#Migrate React to Next.js
Explore tagged Tumblr posts
Visit Tumblr Blog
Explore Tumblr blogs with no restrictions, modern design and the best experience.
Last Seen Tumblr Blogs


Fun Fact
Tumblr was the first site to host the blog for President Barack Obama in 2011.
Text

7 Steps for Migrating an Existing React Project to Next.js – A Comprehensive Guide
Thinking about upgrading your React project? Learn the 7 essential steps for Migrate React to Next.js project to enhance performance, SEO, and scalability. This guide covers key strategies, potential challenges, and best practices for a smooth transition to Next.js.
0 notes
Text
Top eCommerce Development Company in California | Kushel Digi Solutions USA
In the rapidly evolving digital marketplace, having a robust, scalable, and user-friendly eCommerce platform is essential for business growth. California, as a global tech hub, is home to many eCommerce development companies, but Kushel Digi Solutions USA stands out as a leading choice for brands seeking innovation, reliability, and measurable results.
Why Kushel Digi Solutions is California’s Top eCommerce Development Company
Proven Track Record and Industry Experience
With over eight years of expertise and more than 300 successful projects, Kushel Digi Solutions has established itself as a premier eCommerce development partner for businesses of all sizes—from ambitious startups to global enterprises. The company’s commitment to excellence is reflected in its long-standing client relationships and a portfolio that spans diverse industries, including retail, B2B, healthcare, automotive, real estate, education, and hospitality.
Comprehensive eCommerce Services
Kushel Digi Solutions offers a full suite of eCommerce development services tailored to meet unique business needs:
Custom eCommerce Development: Bespoke solutions built on leading platforms like Shopify, BigCommerce, WooCommerce, and custom frameworks for unmatched flexibility and performance.
BigCommerce Certified Partner: As an official BigCommerce partner, Kushel Digi Solutions delivers advanced BigCommerce development, seamless integrations, and scalable solutions that drive growth.
UI/UX Design: The company prioritizes user experience, creating visually appealing, intuitive, and conversion-focused online stores that enhance customer engagement.
Platform Migration: Smooth transitions from legacy systems or other eCommerce platforms (Shopify, Magento, WooCommerce) with minimal downtime and zero data loss.
B2B & Wholesale Solutions: Specialized features for bulk ordering, custom catalogs, and advanced pricing structures to optimize B2B sales channels.
System Integration: Seamless connectivity with ERP, CRM, payment gateways, and inventory management for streamlined operations.
Ongoing Support & Maintenance: Proactive monitoring, regular updates, and technical support ensure your store runs at peak performance.
Client-Centric Approach
Kushel Digi Solutions takes the time to understand each client’s business model, target audience, and growth objectives. This personalized strategy ensures that every eCommerce solution is aligned with the client’s vision and market demands, resulting in high-performing online stores that deliver measurable ROI.
Cutting-Edge Technology Stack
The team leverages the latest technologies—Node.js, Angular, React, Laravel, MongoDB, HTML5, PHP, ASP.NET, Magento, and more—to create future-ready eCommerce stores. Their headless commerce capabilities using React, Next.js, and Vue.js enable highly flexible and fast online experiences.
Success Stories and Client Testimonials
Kushel Digi Solutions’ impact is best illustrated through its client success stories. Brands like Mithal Industries, Slides365, and MyCrazy SimpleCMS have praised the company for its technical expertise, strategic approach, and ability to deliver seamless digital upgrades that enhance user experience and drive business growth.
“Kushel Digi Solutions delivered exceptional ecommerce development services and helped us build a highly functional online platform. The team's technical skills and experience are really commendable.” — Shikhar Mithal, Mithal Industries
For More Visit :-
1 note
·
View note
Text
Shopify Headless Commerce Development Services: The Future of E-Commerce
Introduction
The e-commerce landscape is evolving rapidly, and businesses need more flexibility than ever to stay ahead. Traditional Shopify stores work well for many merchants, but for brands looking for unmatched customization, speed, and scalability, headless commerce is the way forward.

In this guide, we’ll explore the benefits, features, and reasons why investing in Shopify Headless Commerce Development Services is a game-changer for modern e-commerce brands.
What is Shopify Headless Commerce?
Shopify Headless Commerce refers to a decoupled architecture, where the backend (Shopify) manages products, orders, and payments, while the frontend (your storefront) is built using modern frameworks like React, Vue.js, or Next.js. This approach gives merchants complete control over design, speed, and user experience.
With Shopify Headless Commerce Development Services, businesses can create unique and highly customized online experiences that aren’t limited by Shopify’s traditional themes or Liquid templates.
Key Benefits of Shopify Headless Commerce Development Services
1. Unparalleled Performance & Speed
Headless commerce eliminates the restrictions of traditional Shopify themes, resulting in faster load times, improved SEO, and a better user experience. With a custom frontend, businesses can optimize every aspect of performance, leading to higher engagement and conversion rates.
2. Complete Design Freedom
Unlike standard Shopify stores that rely on Liquid themes, headless commerce allows you to create a fully customized storefront using cutting-edge technologies. Brands can build unique shopping experiences that align with their vision without being restricted by Shopify’s native design limitations.
3. Omnichannel Selling
With Shopify Headless Commerce Development Services, you can integrate your e-commerce platform with multiple digital touchpoints. Sell across websites, mobile apps, social media, IoT devices, and even in-store kiosks — all while maintaining a seamless experience for customers.
4. Scalability & Flexibility
As businesses grow, they need an e-commerce solution that can adapt. Headless commerce supports enterprise-level scalability, allowing merchants to handle high traffic volumes, integrate with custom APIs, and expand their online presence without limitations.
5. Advanced Technology Stack & API-First Approach
Headless Shopify integrates with modern frontend technologies like React, Vue.js, and Next.js. Plus, with Shopify’s GraphQL API, merchants can connect various third-party tools, CRMs, and ERPs to create a powerful, data-driven ecosystem.
Who Should Consider Shopify Headless Commerce?
Fast-growing brands looking for greater control over their store’s UX/UI
Enterprise businesses handling high-volume traffic and complex operations
DTC (Direct-to-Consumer) brands aiming for a seamless omnichannel experience
Companies with custom app requirements that need deep API integrations
If your business fits any of these categories, investing in Shopify Headless Commerce Development Services can be a strategic move toward scaling and optimizing your online store.
How Oyecommerz Can Help You with Shopify Headless Commerce Development
At Oyecommerz, we specialize in building future-ready Shopify stores with our expert Shopify Headless Commerce Development Services. Our team of experienced developers helps businesses migrate, design, and optimize headless Shopify stores for maximum performance and growth.
Our Services Include:
✅ Headless Shopify Store Development with modern frontend technologies ✅ Custom API Integration to connect with third-party apps and systems ✅ Performance Optimization to ensure fast loading and smooth navigation ✅ Seamless Shopify Migration for businesses looking to upgrade to headless commerce ✅ Ongoing Support & Maintenance for long-term success
Ready to future-proof your Shopify store? Contact us today and explore how Shopify Headless Commerce Development Services can transform your e-commerce business!
0 notes
Text
Why Choose a MERN Stack Development Company for Your Web Solutions?
Introduction
In the fast-paced digital world, businesses need robust, scalable, and high-performance web applications to stay ahead of the competition. MERN Stack—comprising MongoDB, Express.js, React.js, and Node.js—is one of the most powerful full-stack development frameworks available today. Partnering with a MERN Stack Development Company can help businesses build feature-rich applications that offer seamless user experiences.

What Makes MERN Stack the Best Choice?
MERN Stack is an end-to-end JavaScript-based technology that enables full-stack development. Here’s why it’s an excellent choice:
Full-Stack Capabilities – From front-end to back-end, MERN offers a seamless development experience.
Scalability – Easily handles high traffic and growing data requirements.
Faster Development – React’s reusable components speed up the process.
Real-Time Performance – Node.js ensures quick execution and a smooth user experience.
Flexibility – Works well with cloud-based solutions and third-party APIs.
MERN Stack Development Services for Businesses
A leading MERN Stack Development Company provides comprehensive services, including:
Custom Web Application Development
Enterprise-Grade Software Solutions
E-Commerce Development
API Development & Integration
Migration & Maintenance Services
Why Hire Dedicated MERN Stack Developers?
When you hire dedicated MERN Stack developers, you get professionals who specialize in full-stack JavaScript development. They ensure:
✅ High-quality code for better performance ✅ Faster development cycles with reusable components ✅ Scalable solutions for growing business needs ✅ Secure applications with robust backend support
How Brain Inventory Can Help?
Brain Inventory is a top MERN Stack Development Company offering high-quality, scalable web solutions. Our expertise extends to MERN Stack Development Services, and we also help businesses hire Next.js developers for high-performance web applications.
0 notes
Text
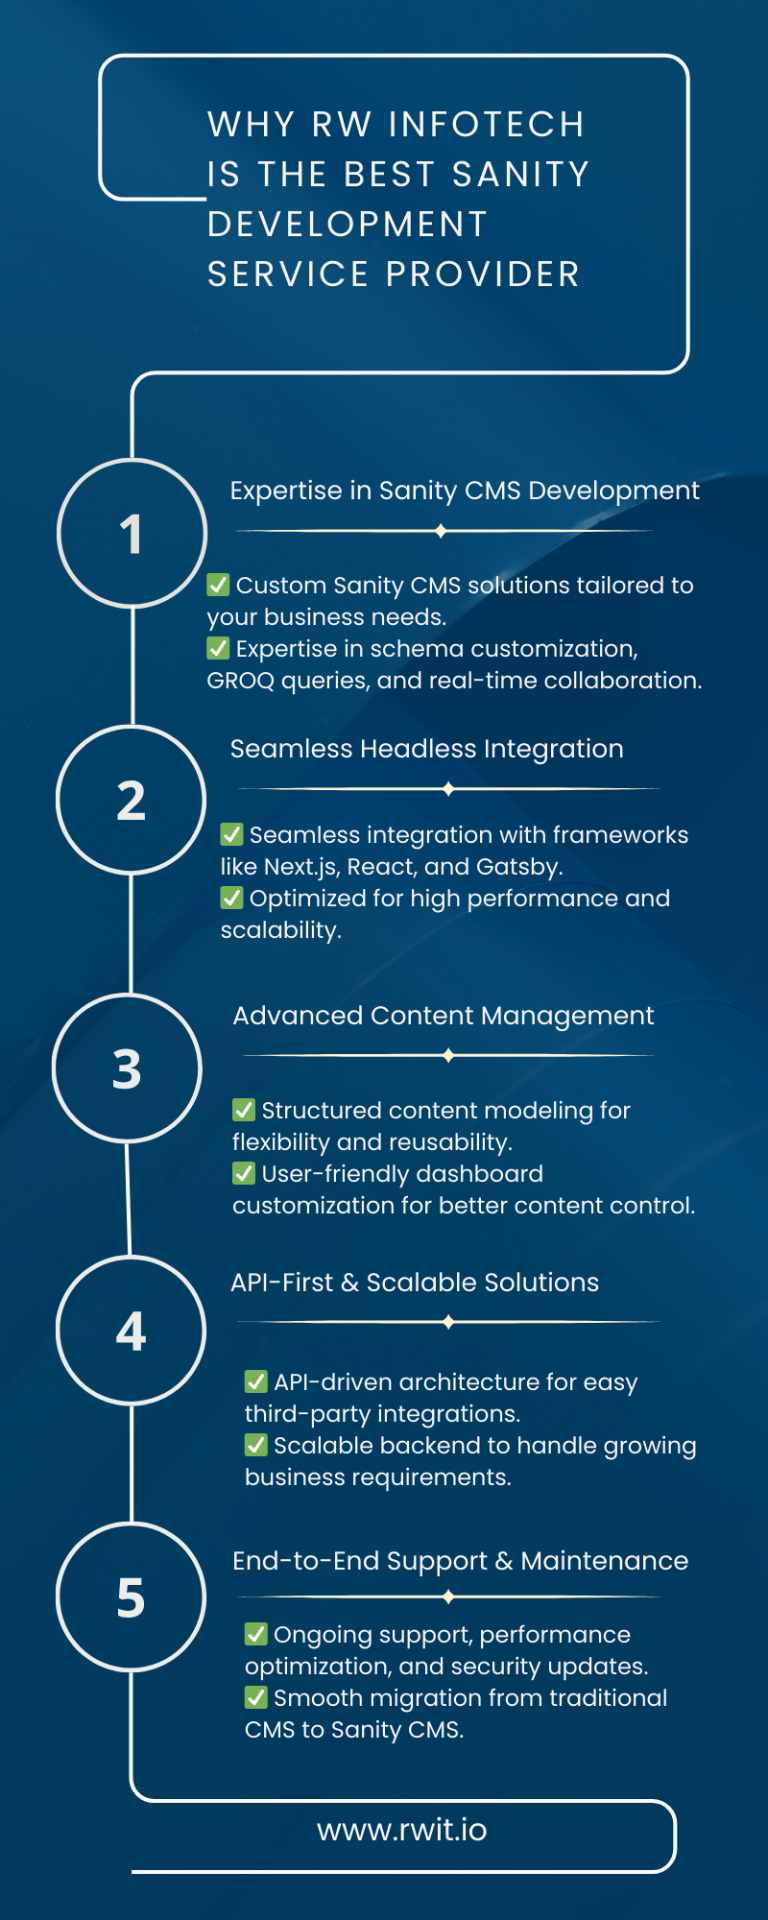
Why RW Infotech is the Best Sanity Development Service Provider
RW Infotech is a leading Sanity CMS development service provider, offering scalable, API-first, and high-performance content management solutions. With expertise in headless CMS integration, we ensure seamless workflow, advanced content structuring, and effortless third-party integrations.
Our expert developers specialize in Sanity CMS customization, GROQ queries, structured content modeling, and real-time collaboration. Whether you need a custom dashboard, a smooth migration from traditional CMS, or a powerful Next.js, React, or Gatsby integration, RW Infotech delivers cutting-edge, scalable, and SEO-friendly solutions.
#SanityCMS#HeadlessCMS#SanityDevelopment#CMSExperts#WebDevelopment#NextJS#ReactJS#HeadlessCommerce#ContentManagement#APIFirst#ScalableSolutions#RWInfotech
0 notes
Text
youtube
7 - Prisma Models migration and Data seed - Next.Js eCommerce Project (Next js 15, React 19, PostgreSQL , Prisma, ShadCN , Paypal , Stripe integration)
0 notes
Text
You don't need Next.js – Why we migrated from Next to React
https://www.comfydeploy.com/blog/you-dont-need-nextjs
0 notes
Photo
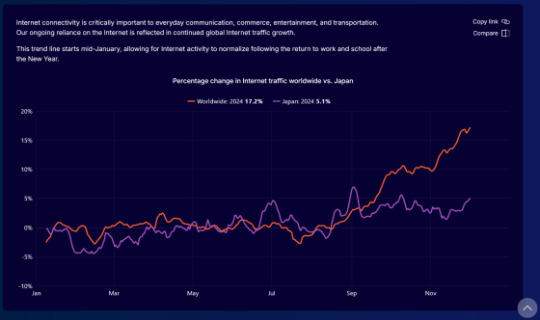


2024年12月10日 20時00分 Cloudflareのレポートで「日本ではTwitterが人気」「世界のインターネットトラフィックは2024年に17.2%増加」などさまざまな情報が明らかに
Cloudflareがまとめたレポート「Cloudflare 2024 Year in Review」が公開され、1年を通して観察されたインターネットのトレンドが明らかになりました。世界で最も人気のあるサービスは何なのか、iOSとAndroidはどっちが優勢なのかといった情報が公開されています。
Cloudflare Radar 2024 Year in Review for Japan https://radar.cloudflare.com/year-in-review/2024
Cloudflare 2024 Year in Review https://blog.cloudflare.com/radar-2024-year-in-review/
Cloudflareによると、同社のネットワークは120以上の国または地域で330以上の都市に広がっており、1秒当たり平均4200万件を超えるDNSリクエストや平均6300万件を超えるHTTP(S)リクエストを処理しているとのこと。こうした膨大なデータを元に、セキュリティやトラフィック、使用状況に関するパターンを割り出し、2024年1月1日から12月1日までの情報をまとめたのが「Cloudflare 2024 Year in Review」です。Cloudflareは「トラフィックの傾向」などいくつかの項目に分けてデータを公開しています。
◆トラフィックの傾向 以下のグラフにおいて、橙線が世界、紫線が日本のトラフィックを示しています。年初の休日明け、1月8日~15日の週をベースラインとして増減を計測したところ、世界中の年間トラフィックは2024年に17.2%増加したとのこと。8月中旬まではベースラインから1~2%の増減にとどまっていましたが、それ以降は11月末まで上昇し続けたそうです。このように、下半期にトラフィックが増加するという傾向は2022年と2023年にも見られていたとのことです。一方で、日本では9月2日頃にピークに達してからはほぼ横ばい。なお、最も多くのトラフィックを占めたのは、検索インデックスを作成するGoogleのウェブクローラー「Googlebot」だったそうです。
◆最も人気のあるサービス 2024年、最も人気のあったサービスはGoogleで、2位がFacebook、3位がAppleでした。
日本では2位がApple、3位がX/Twitterになっています。
「生成AI」に限定すると、世界で最も人気だったのはOpenAIの「ChatGPT」、ユーザーがキャラクターを独自に作成できるチャットサービス「character.ai」が2位、AIコードアシスタントプラットフォーム「Codeium」が3位でした。その他のサービスについて、1位から3位までを以下にまとめています。
1位 2位 3位 ソーシャルメディア Facebook TikTok Instagram ビデオストリーミング YouTube Netflix Twitch ニュース Globo BBC NY Times 電子商取引 Amazon Taobao AliExpress メッセージング WhatsApp QQ Telegram メタバースとゲーム Roblox Xbox/Xbox Live Epic Games/Fortnite 金融サービス Stripe TradingView Alipay 仮想通貨サービス Binance Coinbase OKX
◆Starlinkのトラフィック 2万基以上の人工衛星で郊外にもネットワークを提供するサービス「Starlink」のトラフィックは、年間を通じてベースラインから3.3倍に増加しました。特にStarlinkが進出し始めた地域では上がり幅が大きく、東アフリカのマラウイ共和国では38倍、ジョージアでは100倍以上、パラグアイでは900倍以上になったとのこと。
◆AIボットとクローラーのトラフィック 進化し続けるAIモデルをトレーニングするため、AI企業はインターネット上から情報を集め続けています。こうした「クロール」の傾向は以下の通りで、ByteDanceのAIクローラー「Bytespider」からのトラフィックが年末に向けて徐々に減少したこと、AnthropicのAIクローラー「ClaudeBot」が4月に継続的なクロール活動の兆候を示し始め、5月と6月に最初のピークを迎えた後に減少していることなどがわかります。
◆iOS対Android 世界全体では、トラフィックの67.4%がAndroid、32.6%がiOSという結果が示されました。日本では対照的にiOSの方が多く、iOSが57.3%、Androidが42.7%という結果になっています。なお、モバイル端末用OSはAndroidとiOS以外も存在しますが、Cloudflareいわく「こうしたOSからのトラフィックはごくわずかであったため、このグラフには含まれていない」とのことです。
◆上位のウェブサイトで最も人気のあるテクノロジー 広告や分析ツールなどの分野で人気のあるテクノロジーは何なのか、トラフィック上位5000のドメインから集計した結果が示されています。1位から3位までをピックアップして以下にまとめました。
1位 2位 3位 広告 Microsoft Advertising Twitter Ads Linkedin Ads 分析 Google Analytics Facebook Pixel Linkedin Insight Tag A/Bテスト VWO Optimizely Google Optimize CMS WordPress Adobe Experience Manager Contentful Cookieのコンプライアンス OneTrust TrustArc Cookiebot JavaScriptフレームワーク React Vue.js Next.js JavaScriptライブラリ jQuery jQuery Migrate Slick マーケティングオートメーション HubSpot Marketo MailChimp PaaS Amazon Web Services WP Engine Vercel プログラミング技術 PHP Node.js Java タグマネージャー Google Tag Manager Tealium Commanders Act TagCommander ウェブフレームワーク Next.js Express Nuxt.js
◆ブラウザシェア ブラウザのシェアでは、Chromeが全体の65.8%と圧倒的。
Windowsに限定すると「Microsoft Edge」のシェアが6.9%から17.3%に増加しますが、やはりChromeがトップを独走。
iOSだとSafariが81.7%で圧倒的多数を占めます。
◆インターネット遮断 災害や政府の意図によって、インターネットが遮断される地域は少なくありません。大規模な遮断が確認された地域と��数が国別にまとめられた結果、以下のようになりました。特筆すべきは、シリアで32回、イラクで49回も遮断されているという事実です。
原因として最も多かったのは政府の指令、次点がケーブルの断線でした。シリアでは32回中25回、イラクでは49回中48回が政府の指令による遮断だったとのことです。
◆ネットワーク品質 ダウンロード速度とアップロード速度の平均値などがまとめられています。ダウンロード速度が最も高速だったのはスペインで、平均値は292.6Mbpsでした。
アップロード速度もスペインが最も速く、192.6Mbpsでした。アップロード速度に限っては日本が120.9Mbpsでトップ10に食い込んでいます。
◆モバイル対デスクトップ 世界におけるトラフィックの58.7%がデスクトップ、41.3%がモバイルデバイスという結果になりました。日本ではモバイルデバイスが47.8%となり、デスクトップに肉薄しています。
◆トラフィック軽減 全世界のトラフィックの6.5%が「悪意がある可能性あり」または「顧客の定義」を理由として、Cloudflareのシステムによって軽減されたそうです。DDoS緩和ツールとWAF管理ツールにより軽減されたのは全体の3.2%でした。
◆ボットの活動地域 ボットのトラフィックが最も多かったのはアメリカで、全体の34.6を占めていました。日本は2.6%でした。
◆最も攻撃されている業界 業界別にトラフィックが軽減された割合を示し、「最も攻撃されている業界」を算出したグラフが以下。ギャンブル/ゲーム、金融がそれぞれ6.6%で1位タイでしたが、その他の業界もほとんど差があるとは言えません。Cloudflareは「どの業界が最も標的となりやすいのかを予測することはできませんが、すべての業界が攻撃を受けることはわかっています。業界に関係なく、最善の策は気を引き締めることです」と述べました。
この記事のタイトルとURLをコピーする
・関連記事 Cloudflareがバグによって3時間半にわたりユーザーに送信するはずだったログの約55%を喪�� - GIGAZINE
CloudflareがAI用にウェブサイトのスクレイピングを許可する権利を取引できるプラットフォームを立ち上げへ - GIGAZINE
Cloudflareが自動SSL/TLSモードを導入、オリジンサーバーへの接続モードを自動で選定可能に - GIGAZINE
NATO加盟後にスウェーデンへのDDoS攻撃が466%急増していたことがCloudflareによるDDoS攻撃レポートで発覚 - GIGAZINE
Cloudflareの2023年第2四半期の収益は前年同期比32%増の440億円、営業利益は4四半期連続で過去最高を記録 - GIGAZINE
Cloudflareが史上最大規模となる毎秒7100万リクエストの攻撃を受けたことを報告 - GIGAZINE
・関連コンテンツ
「データ通信は爆増中で音声通信は横水平」や「世界各国のスマホやネットの平均速度」などがわかる「Akamai’s State of the Internet」
全世界の携帯電話網事情2016年8月最新版レポート、日本は普及率2位で速度は9位
「ワールドカップ開幕でポルノ動画の視聴が激減していること」が大手ポルノサイトの調査で明らかに
Google Cloudが史上最大となる1秒あたり4600万リクエストのDDoS攻撃をブロック、Cloudflareが以前に阻止した攻撃よりも76%以上強大
NATO加盟後にスウェーデンへのDDoS攻撃が466%急増していたことがCloudflareによるDDoS攻撃レポートで発覚
スマホゲームのダウンロード数はコロナ以前から30%増加し課金額は40%増えた
Googleがテスト中のCDN「Google Cloud CDN」は、ベータ版で既に世界最速
人気ポルノサイトが「新型コロナウイルス」による影響を公表、パンデミック後にアクセスが最も増えた国は? << 次の記事
(Cloudflareのレポートで「日本ではTwitterが人気」「世界のインターネットトラフィックは2024年に17.2%増加」などさまざまな情報が明らかに - GIGAZINEから)
0 notes
Text
Struggling with a Slow Website? Here’s How Island Wizards’ Headless WordPress Can Turn It Around!
Businesses need more than just a website—they need a fast, flexible, and future-proof web solution. This is where a headless WordPress approach comes into play. At Island Wizards, we specialize in providing cutting-edge headless WordPress services to help businesses unleash their full potential online.
What is a Headless WordPress Agency?
A headless wordpress website development, like Island Wizards, takes the traditional WordPress content management system (CMS) and decouples the frontend (the visible part of the website) from the backend (where the content is managed). In simpler terms, we allow your content to live in WordPress, while the frontend can be built using modern frameworks like React, Vue.js, or Next.js.
By separating the frontend and backend, this headless approach provides a range of benefits including:
Faster Page Load Times: Websites built with a headless architecture are optimized for performance, resulting in quicker loading speeds, which improves user experience and SEO rankings.
Flexibility in Design and Development: Frontend developers are not restricted by WordPress themes, allowing for more creative and custom design options, giving you full control over the look and feel of your website.
Future-Proof Technology: A headless WordPress setup allows easy integration with new and emerging technologies, so your website remains adaptable and scalable as trends and tools evolve.
Why Island Wizards?
At Island Wizards, we pride ourselves on our ability to turn complex technological requirements into user-friendly, beautiful websites. As a specialized headless WordPress agency, we offer:
Custom Headless Development: Whether you're building a new website from scratch or migrating your current WordPress site to a headless architecture, our team has the technical expertise to guide you every step of the way.
Seamless Content Management: We ensure that you can continue using WordPress as your CMS, with an easy-to-manage backend, while enjoying the freedom of a custom-built frontend.
Lightning-Fast Performance: Our headless solutions are engineered to be blazing fast, leveraging static site generators and advanced caching techniques to deliver near-instant load times for your audience.
Future-Ready Solutions: We build websites that are designed to grow with your business. From integrations with third-party apps to scalability across devices, our solutions are as dynamic as your needs.
The Island Wizards Difference
Our agency is committed to creating digital experiences that resonate with your target audience while also meeting your business goals. We combine the best of both worlds—the power and flexibility of headless WordPress with our team’s deep expertise in web development.
Full Customization: Every website we build is tailored to your unique brand identity, offering an experience that stands out from competitors.
Agile and Scalable: We use agile development practices to deliver your project on time and ensure that your website can scale as your business grows.
Comprehensive Support: Beyond just development, Island Wizards offers ongoing support, ensuring your website remains functional, secure, and up-to-date with the latest technologies.
Is Headless WordPress Right for Your Business?
If you’re looking for a web solution that offers speed, flexibility, and scalability, then a headless WordPress architecture may be perfect for you. At Island Wizards company, we specialize in helping businesses of all sizes make the transition to headless, ensuring a seamless experience from start to finish.
Let Island Wizards help you create a website that not only meets today’s digital demands but is also ready for the future.
Get in Touch
Ready to explore the power of headless WordPress for your business? Contact Island Wizards today to learn more about how we can transform your digital presence.
Explore more…https://islandwizards.com/services/headless-wordpress/https://islandwizards.com/services/
#headless wordpress development services#island wizards#wordpress#shopify#custom theme shopify#wordpress theme#headless wordpress#islnad wizards#wizards island
1 note
·
View note
Text
Angular vs React 2021: Which JS Framework To Select For Your Project?

Selecting the right JavasScript framework is very confusing especially when your team has the right suite of tools and architecture to facilitate the project requirements. Selecting the right framework that works best for your requirements demands strong knowledge and understanding of the frameworks. Choosing between Angular and React for your project requirements is completely debatable. According to our research, we have tried our best to showcase which framework is the best. Which one should you go for? Angular or React? In this blog, we have compared these front-end frameworks to help you out in selecting the framework that would better streamline your project requirements.
We know how difficult it is to select a particular framework for your project. To overcome this difficulty, we have segmented this blog into 5 main aspects that highlight the strong points of each framework. Let’s dive into these aspects.
1)Working With The Front-End Framework
Maturity of Frameworks
Understanding the maturity of these frameworks is important before adopting any of them. Your agile team would want to incorporate state-of-the-art technology to streamline project requirements. But, maintaining a balance between the new technology and proven methodologies is extremely crucial.
Selecting unmatured tools and frameworks can bring new challenges. The framework might not be completely developed and might be full of bugs. Apart from that, the community base might not be large. If you run into any problem, you will have to deal with it on your own.
Learning Curve
Angular houses a huge dynamic library which makes it difficult for the developers to learn. There are several concepts and languages associated with it. Learning every concept and language takes time and makes a learning curve a bit rough with several ups and downs. Apart from that, Angular consists of a lot more components that complicate things up. Being a developing framework, Angular is constantly updating so the developer has to keep updated with the frequent changes in the Angular ecosystem.
React is more minimalistic and simple to learn. It has no complicated templates or dependency injections and other irrelevant features. The developers might take some time to get used to the structure as there is no predefined project structure. The developers need to learn only the Redux library which is used for state management. The most basic thing React offers in the learning curve is the management of the internal states, components, and prop configuration.
Components & Architecture
The Angular framework is based on the MVC architecture which is a complex and fixed structure. The Angular framework allows the developers to break down the codes into separate files. This makes it easier to use and reuse the templates and codes in other projects as well.
On the other hand, React architecture does not have a fixed format to write the codes. The code that is written using the React library is readable and well-structured. The use of component trees allows the developers to dynamically structure the code accordingly.
Development, Productivity & Speed
The Command-Line Interface of the Angular framework allows a great development experience. It creates a brilliant workspace and allows the developers to design the components with just a few lines of code. Apart from that, there are a lot of built-in processes that can solve complex issues easily.
On the other hand, the use of third-party libraries affects the speed in the case of React development. There are several tools in this framework. The importance of these tools varies from project to project. This framework demands more time if the project is given to a new developer for an update or feature up-gradation.
Backward Compatibility
Angular 4 is backward compatible with Angular 2 and above. The versions below Angular 2 are not backward compatible and this is one of the disadvantages of the AngularJS framework. Apart from that, Angular 2 is not compatible with AngularJS.
React is a completely different framework. The latest version React 16 is 100% backward compatible with the previous versions and also supports asynchronous rendering. Apart from that, it is open-source and is licensed under MIT with GraphQL and Jest.
2)Technical Aspects Of The Frameworks
Performance
Angular uses DOM that greatly affects its performance which makes the process slow and inefficient. Not only the DOM but the two-way data binding also affects the overall performance of the Angular-powered applications. However, the recent update has come with improved performance.
React uses virtual DOM that enables access and change of document layout and structure. The virtual DOM updates the document without rewriting the entire document. This saves time and renders the updates quickly. The data-binding process in React is unidirectional and thus there is no unnecessary workload.
Ease Of Update
Angular comes with an improved Command Line Interface (CLI) that comprises different commands that make it easy to upgrade the latest Angular applications. This reduces the development time to a minimum. On top of that, the up-gradation is automated, which makes this framework more preferable.
React allows the developers to make smoother transitions from one version to the other. The front-end development libraries depend on the external libraries to migrate and update the third-party components. Apart from that, the developers have to check whether the third-party libraries they have used are compatible with the newer versions of the JS framework.
Data Binding
The Angular library uses a two-way data binding approach that changes the model state automatically when any change takes place in the UI element and/or vice versa. The two-way data binding approach is extremely easy to incorporate.
On the other hand, the React library uses a one-way approach. This one-way approach allows the change in the UI elements only after a change is made in the model state. The one-way approach is far more effective for giant projects with tons of development and coding hours.
Document Object Modeling: Regular VS Virtual
Document Object Model (DOM) is an important KPI in the performance evaluation of each of the frameworks. The Document Object Model organizes HTML, XML, and XHTML document format in the form of a tree.
In Angular-powered applications, a real DOM is used. The entire tree structure is refreshed when a small change is made. This makes the process slower in the case of the Angular framework.
The React framework uses a virtual DOM. This allows the developers to make changes to the tree without refreshing it. This does not slow down the development process.
Flexibility
There is quite a huge difference between Angular and React frameworks. These both offer different levels of flexibility.
Angular does not provide the flexibility that React provides. The components of the Angular framework can be used only within the other frameworks. The codes should be embedded within an HTML application. This framework does not help the apps that require real-time updates. On top of that, every component in the framework has a lifecycle.
On the contrary, the React framework offers the developers several tools, libraries, and huge architecture. A professional and skilled team of React developers can easily get the tools and architecture they need in the beginning to deliver a customized application. React architecture helps the developers reduce the time-to-market.
Developers’ Perspective
Angular is easy to incorporate but it takes time to deliver the projects since it has a very steep learning curve and there are tons of unnecessary elements, syntax, and things that are compulsory to learn. These elements delay the project deliveries and increase the coding time.
React takes longer to incorporate and set up but assists the developers with projects and software development quickly. Although it lacks the Model and Controller components, it allows the development team to add new features through the React library.
Languages
Angular uses Javascript or Typescript that happens to be a superset of JS This script is used in the development of bigger projects. Additionally, the code refactoring process is simpler and faster. This makes Typescript more compact than Javascript.
On the other hand, React is based on JavaScript ES6+ which is combined with JSX script. The JSX is an extension for JavaScript code syntax that is written in HTML. This makes the code easy to understand. Furthermore, the typos are easy to spot.
Suite Of Tools
The Angular framework is supported by several code editing tools such as Visual Studio, Sublime Text, and Aptana. The Command-Line Interface can be used to set up any project. The Angular Universal can be used for server-side rendering. Different platforms can be used for end-to-end testing in Angular.
Just like Angular, React is also supported by some code editors like Atom, Sublime Text, and Visual Studio. The developers can also use the Create React App to bootstrap a project. Developers can use the ‘Create React APP’ (CLI) tool to bootstrap a project. The React ecosystem consists of Next.js to complete the server-side rendering. The Enzyme code editor is used for component testing.
App structure
There are three main layers in the structure of the Angular framework namely Model, View, and Controller. An object that is responsible for the Model layer is initialized by the second layer and displayed in the third layer. TypeScript is used to implement the component, an HTML file is used for defining the view and the CSS file is used to define the features.
The structure of React provides the developers with the freedom to have their customizations. React offers only the View layer and the other two layers are added with the usage of other libraries. The entire architecture of React is component-based. The code is also made of React components that are rendered with the help of the React DOM library.
3)Popularity
Stack Overflow
Angular has been extremely popular till 2016 and Stack Overflow shows that both Angular and React frameworks were equally popular among several developers in the year 2018. Since then, Angular has become one of the most popular open-source JavaScrip libraries.
Since 2016, React framework has been gaining a lot of popularity, unlike Angular. Its popularity acquired the market in 2018 and it has been gaining more users ever since.
If we compare Angular and React, the former is ranked third in popularity for the year 2020, and React is the clear winner. According to a survey by Stack Overflow, React is popular over Angular.
Google Trends
Google Trends neither shows the popularity nor the usage, but it shows which of these frameworks are the most talked about the created hype in the developer community. Analytics and data show which frameworks, people are more curious to talk about.

According to Google Trends, React is extremely popular and the most talked-about framework at the moment. On the other hand, Angular has seen a steep fall.
NPM Downloads
NPM is the package manager of the NodeJS platform. It streamlines the modules in place so that the node can find them easily. Apart from that, this package manager also handles the dependency conflicts smartly.
React is the clear winner in the NPM downloads too as being the most downloaded framework. This framework has seen popularity since 2018.
Community
Image for reference:
Angular
Developers are quite skeptical when it comes to Angular as compared to React. It’s mainly because of Angular’s unpopularity due to Angular 1.0Although, Angular is developed by Google which provides constant improvements and long-term support for the framework. Angular is used by business giants including Nike, HBO, Forbes, Apple, AT&T, Microsoft, and many more.
React
In comparison to Angular, React has a wider community on both Github and Gitlab. Developers working with React need to learn continuously as the framework gets frequent updates. Because of the frequent updates, there is always an issue of lack of documentation. This framework is used by Facebook, Twitter, Airbnb, PayPal, Netflix, etc.
Advantages Of Angular JS
Two-way Data Binding
AngularJS has the MVC architecture and the framework synchronizes with the Model and View. As the model changes, the View also changes and so does the data in it. The two-way binding structure reduces the development time so the developers can effectively utilize the time in other development activities. This approach eliminates the need to write any additional code to continuously synchronize the View and Model synchronization.
Directives
This feature enables the use and proper implementation of HTML extensions. Proper implementation of HTML extensions help the developers to assign special behavior to the DOM. This helps them to create feature-rich and dynamic content with HTML.
Dependency Injection
AngularJS allows the developers to use the injectors that define dependencies as external elements. These external elements decouple the components from their dependencies. Dependency injections make the components more reusable and easier to manage.

Advantages Of React
React Guarantees Stable Code
ReactJS uses the downward data flow only. When an object is changed, particular components are updated. This structure of data binding offers code stability and improves the performance of the application.
Virtual DOM Offers Better UX
Web browsers use layout engines to parse the HTML syntax into a document object model which is either in the form of HTML, XML, or XHTML. ReactJS uses virtual DOM that offers a better user experience.
Fast Time-To-Market
Reusing the components saves tons of development hours. In programming and development, developers face several changes and this affects the work of other components in the system. The React framework offers a code-reuse feature that saves significant development hours.

Why & When: The Important Question
Your agile development team needs to know the requirements, resources, and toolchain of these frameworks. Different projects have different requirements and deliveries. It is better to select the framework that resonates with your development environment and streamlines your application development activities.
Why & When To Choose The Angular Framework?
You should select the Angular framework when:
Your agile team has sound knowledge of C#, Java, and has hands-on expertise on the previous versions of the framework
Your project requirement falls under the difficulty level of low to medium
Your tech team requires higher productivity and quality and you are open to adapt to the done-for-you solutions and templates
If you want to regulate the application size
You require a wide-scale feature-rich application
Why & When To Choose The React Framework?
You should select the React framework when:
Your team has hands-on experience in HTML, CSS, and JavaScript
When you need to develop a highly customized application
The development process involves a huge number of components with variable states
You have time to spare on the pre-development processes
Down The Road
Selecting a framework depends on the learning curve for the companies and the agile development teams. React can go a long way in getting the job done by organizing the HTML and also offers the easiest ways to reuse the components and elements. On the other hand, Angular is capable of handling multiple elements without any additional help so it seems a bit tricky and complex at first.
Both React and Angular provide varied methodologies and approaches to develop customized web applications and software. Many startups, SMEs, small and medium-sized businesses, prefer either of these two frameworks due to the vast talent pool across the world. Both these technologies are adaptable and neither of them is good or bad.
0 notes
Text
Why Choose a MERN Stack Development Company for Your Web Solutions?
Introduction
In the fast-paced digital world, businesses need robust, scalable, and high-performance web applications to stay ahead of the competition. MERN Stack—comprising MongoDB, Express.js, React.js, and Node.js—is one of the most powerful full-stack development frameworks available today. Partnering with a MERN Stack Development Company can help businesses build feature-rich applications that offer seamless user experiences.

What Makes MERN Stack the Best Choice?
MERN Stack is an end-to-end JavaScript-based technology that enables full-stack development. Here’s why it’s an excellent choice:
Full-Stack Capabilities – From front-end to back-end, MERN offers a seamless development experience.
Scalability – Easily handles high traffic and growing data requirements.
Faster Development – React’s reusable components speed up the process.
Real-Time Performance – Node.js ensures quick execution and a smooth user experience.
Flexibility – Works well with cloud-based solutions and third-party APIs.
MERN Stack Development Services for Businesses
A leading MERN Stack Development Company provides comprehensive services, including:
Custom Web Application Development
Enterprise-Grade Software Solutions
E-Commerce Development
API Development & Integration
Migration & Maintenance Services
Why Hire Dedicated MERN Stack Developers?
When you hire dedicated MERN Stack developers, you get professionals who specialize in full-stack JavaScript development. They ensure:
✅ High-quality code for better performance ✅ Faster development cycles with reusable components ✅ Scalable solutions for growing business needs ✅ Secure applications with robust backend support
How Brain Inventory Can Help?
Brain Inventory is a top MERN Stack Development Company offering high-quality, scalable web solutions. Our expertise extends to MERN Stack Development Services, and we also help businesses hire Next.js developers for high-performance web applications.
Conclusion
Whether you're a startup or an enterprise, a MERN Stack Development Company can help you build scalable, high-performing, and secure applications. Contact Brain Inventory today to get started!
0 notes
Text
Why RW Infotech is the Best Sanity Development Service Provider
RW Infotech is a leading Sanity CMS development service provider, offering scalable, API-first, and high-performance content management solutions. With expertise in headless CMS integration, we ensure seamless workflow, advanced content structuring, and effortless third-party integrations.
Our expert developers specialize in Sanity CMS customization, GROQ queries, structured content modeling, and real-time collaboration. Whether you need a custom dashboard, a smooth migration from traditional CMS, or a powerful Next.js, React, or Gatsby integration, RW Infotech delivers cutting-edge, scalable, and SEO-friendly solutions.
0 notes
Photo

Issue 243 hot off the press! 📰 - React Query v3 - Electron React Boilerplate v2 - Webpack’s 2021 Roadmap - How Lyft is Migrating 100+ Frontend Microservices to Next.js - A handwritten version of Twitter (?) + lots more ❤ https://t.co/pYVIF6Zjll
0 notes
Text
Building a Blog with Next.js
In this article, we will use Next.js to build a static blog framework with the design and structure inspired by Jekyll. I’ve always been a big fan of how Jekyll makes it easier for beginners to setup a blog and at the same time also provides a great degree of control over every aspect of the blog for the advanced users.
With the introduction of Next.js in recent years, combined with the popularity of React, there is a new avenue to explore for static blogs. Next.js makes it super easy to build static websites based on the file system itself with little to no configuration required.
The directory structure of a typical bare-bones Jekyll blog looks like this:
. ├─── _posts/ ...blog posts in markdown ├─── _layouts/ ...layouts for different pages ├─── _includes/ ...re-usable components ├─── index.md ...homepage └─── config.yml ...blog config
The idea is to design our framework around this directory structure as much as possible so that it becomes easier to migrate a blog from Jekyll by simply reusing the posts and configs defined in the blog.
For those unfamiliar with Jekyll, it is a static site generator that can transform your plain text into static websites and blogs. Refer the quick start guide to get up and running with Jekyll. This article also assumes that you have a basic knowledge of React. If not, React’s getting started page is a good place to start.
Installation
Next.js is powered by React and written in Node.js. So we need to install npm first, before adding next, react and react-dom to the project.
mkdir nextjs-blog && cd $_ npm init -y npm install next react react-dom --save
To run Next.js scripts on the command line, we have to add the next command to the scripts section of our package.json.
"scripts": { "dev": "next" }
We can now run npm run dev on the command line for the first time. Let’s see what happens.
$ npm run dev > [email protected] dev /~user/nextjs-blog > next ready - started server on http://localhost:3000 Error: > Couldn't find a `pages` directory. Please create one under the project root
The compiler is complaining about a missing pages directory in the root of the project. We’ll learn about the concept of pages in the next section.
Concept of pages
Next.js is built around the concept of pages. Each page is a React component that can be of type .js or .jsx which is mapped to a route based on the filename. For example:
File Route ---- ----- /pages/about.js /about /pages/projects/work1.js /projects/work1 /pages/index.js /
Let’s create the pages directory in the root of the project and populate our first page, index.js, with a basic React component.
// pages/index.js export default function Blog() { return <div>Welcome to the Next.js blog</div> }
Run npm run dev once again to start the server and navigate to http://localhost:3000 in the browser to view your blog for the first time.
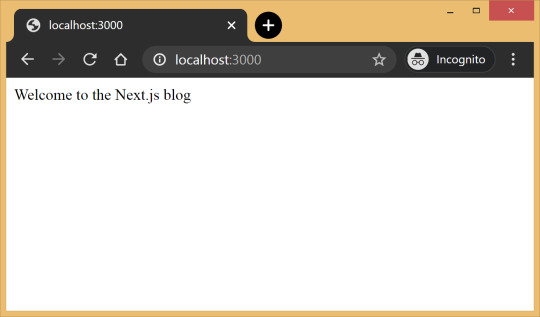
Out of the box, we get:
Hot reloading so we don’t have to refresh the browser for every code change.
Static generation of all pages inside the /pages/** directory.
Static file serving for assets living in the/public/** directory.
404 error page.
Navigate to a random path on localhost to see the 404 page in action. If you need a custom 404 page, the Next.js docs have great information.

Dynamic pages
Pages with static routes are useful to build the homepage, about page, etc. However, to dynamically build all our posts, we will use the dynamic route capability of Next.js. For example:
File Route ---- ----- /pages/posts/[slug].js /posts/1 /posts/abc /posts/hello-world
Any route, like /posts/1, /posts/abc, etc., will be matched by /posts/[slug].js and the slug parameter will be sent as a query parameter to the page. This is especially useful for our blog posts because we don’t want to create one file per post; instead we could dynamically pass the slug to render the corresponding post.
Anatomy of a blog
Now, since we understand the basic building blocks of Next.js, let’s define the anatomy of our blog.
. ├─ api │ └─ index.js # fetch posts, load configs, parse .md files etc ├─ _includes │ ├─ footer.js # footer component │ └─ header.js # header component ├─ _layouts │ ├─ default.js # default layout for static pages like index, about │ └─ post.js # post layout inherts from the default layout ├─ pages │ ├─ index.js # homepage | └─ posts # posts will be available on the route /posts/ | └─ [slug].js # dynamic page to build posts └─ _posts ├─ welcome-to-nextjs.md └─ style-guide-101.md
Blog API
A basic blog framework needs two API functions:
A function to fetch the metadata of all the posts in _posts directory
A function to fetch a single post for a given slug with the complete HTML and metadata
Optionally, we would also like all the site’s configuration defined in config.yml to be available across all the components. So we need a function that will parse the YAML config into a native object.
Since, we would be dealing with a lot of non-JavaScript files, like Markdown (.md), YAML (.yml), etc, we’ll use the raw-loader library to load such files as strings to make it easier to process them.
npm install raw-loader --save-dev
Next we need to tell Next.js to use raw-loader when we import .md and .yml file formats by creating a next.config.js file in the root of the project (more info on that).
module.exports = { target: 'serverless', webpack: function (config) { config.module.rules.push({test: /\.md$/, use: 'raw-loader'}) config.module.rules.push({test: /\.yml$/, use: 'raw-loader'}) return config } }
Next.js 9.4 introduced aliases for relative imports which helps clean up the import statement spaghetti caused by relative paths. To use aliases, create a jsconfig.json file in the project’s root directory specifying the base path and all the module aliases needed for the project.
{ "compilerOptions": { "baseUrl": "./", "paths": { "@includes/*": ["_includes/*"], "@layouts/*": ["_layouts/*"], "@posts/*": ["_posts/*"], "@api": ["api/index"], } } }
For example, this allows us to import our layouts by just using:
import DefaultLayout from '@layouts/default'
Fetch all the posts
This function will read all the Markdown files in the _posts directory, parse the front matter defined at the beginning of the post using gray-matter and return the array of metadata for all the posts.
// api/index.js import matter from 'gray-matter'
export async function getAllPosts() { const context = require.context('../_posts', false, /\.md$/) const posts = [] for(const key of context.keys()){ const post = key.slice(2); const content = await import(`../_posts/${post}`); const meta = matter(content.default) posts.push({ slug: post.replace('.md',''), title: meta.data.title }) } return posts; }
A typical Markdown post looks like this:
--- title: "Welcome to Next.js blog!" --- **Hello world**, this is my first Next.js blog post and it is written in Markdown. I hope you like it!
The section outlined by --- is called the front matter which holds the metadata of the post like, title, permalink, tags, etc. Here’s the output:
[ { slug: 'style-guide-101', title: 'Style Guide 101' }, { slug: 'welcome-to-nextjs', title: 'Welcome to Next.js blog!' } ]
Make sure you install the gray-matter library from npm first using the command npm install gray-matter --save-dev.
Fetch a single post
For a given slug, this function will locate the file in the _posts directory, parse the Markdown with the marked library and return the output HTML with metadata.
// api/index.js import matter from 'gray-matter' import marked from 'marked'
export async function getPostBySlug(slug) { const fileContent = await import(`../_posts/${slug}.md`) const meta = matter(fileContent.default) const content = marked(meta.content) return { title: meta.data.title, content: content } }
Sample output:
{ title: 'Style Guide 101', content: '<p>Incididunt cupidatat eiusmod ...</p>' }
Make sure you install the marked library from npm first using the command npm install marked --save-dev.
Config
In order to re-use the Jekyll config for our Next.js blog, we’ll parse the YAML file using the js-yaml library and export this config so that it can be used across components.
// config.yml title: "Next.js blog" description: "This blog is powered by Next.js"
// api/index.js import yaml from 'js-yaml' export async function getConfig() { const config = await import(`../config.yml`) return yaml.safeLoad(config.default) }
Make sure you install js-yaml from npm first using the command npm install js-yaml --save-dev.
Includes
Our _includes directory contains two basic React components, <Header> and <Footer>, which will be used in the different layout components defined in the _layouts directory.
// _includes/header.js export default function Header() { return <header><p>Blog | Powered by Next.js</p></header> }
// _includes/footer.js export default function Footer() { return <footer><p>©2020 | Footer</p></footer> }
Layouts
We have two layout components in the _layouts directory. One is the <DefaultLayout> which is the base layout on top of which every other layout component will be built.
// _layouts/default.js import Head from 'next/head' import Header from '@includes/header' import Footer from '@includes/footer'
export default function DefaultLayout(props) { return ( <main> <Head> <title>{props.title}</title> <meta name='description' content={props.description}/> </Head> <Header/> {props.children} <Footer/> </main> ) }
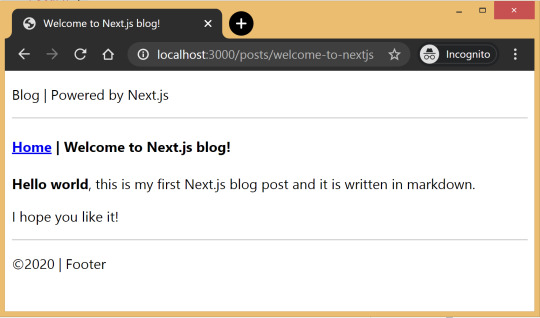
The second layout is the <PostLayout> component that will override the title defined in the <DefaultLayout> with the post title and render the HTML of the post. It also includes a link back to the homepage.
// _layouts/post.js import DefaultLayout from '@layouts/default' import Head from 'next/head' import Link from 'next/link'
export default function PostLayout(props) { return ( <DefaultLayout> <Head> <title>{props.title}</title> </Head> <article> <h1>{props.title}</h1> <div dangerouslySetInnerHTML=/> <div><Link href='/'><a>Home</a></Link></div> </article> </DefaultLayout> ) }
next/head is a built-in component to append elements to the <head> of the page. next/link is a built-in component that handles client-side transitions between the routes defined in the pages directory.
Homepage
As part of the index page, aka homepage, we will list all the posts inside the _posts directory. The list will contain the post title and the permalink to the individual post page. The index page will use the <DefaultLayout> and we’ll import the config in the homepage to pass the title and description to the layout.
// pages/index.js import DefaultLayout from '@layouts/default' import Link from 'next/link' import { getConfig, getAllPosts } from '@api'
export default function Blog(props) { return ( <DefaultLayout title={props.title} description={props.description}> <p>List of posts:</p> <ul> {props.posts.map(function(post, idx) { return ( <li key={idx}> <Link href={'/posts/'+post.slug}> <a>{post.title}</a> </Link> </li> ) })} </ul> </DefaultLayout> ) }
export async function getStaticProps() { const config = await getConfig() const allPosts = await getAllPosts() return { props: { posts: allPosts, title: config.title, description: config.description } } }
getStaticProps is called at the build time to pre-render pages by passing props to the default component of the page. We use this function to fetch the list of all posts at build time and render the posts archive on the homepage.

Post page
This page will render the title and contents of the post for the slug supplied as part of the context. The post page will use the <PostLayout> component.
// pages/posts/[slug].js import PostLayout from '@layouts/post' import { getPostBySlug, getAllPosts } from "@api"
export default function Post(props) { return <PostLayout title={props.title} content={props.content}/> }
export async function getStaticProps(context) { return { props: await getPostBySlug(context.params.slug) } }
export async function getStaticPaths() { let paths = await getAllPosts() paths = paths.map(post => ({ params: { slug:post.slug } })); return { paths: paths, fallback: false } }
If a page has dynamic routes, Next.js needs to know all the possible paths at build time. getStaticPaths supplies the list of paths that has to be rendered to HTML at build time. The fallback property ensures that if you visit a route that does not exist in the list of paths, it will return a 404 page.
Production ready
Add the following commands for build and start in package.json, under the scripts section and then run npm run build followed by npm run start to build the static blog and start the production server.
// package.json "scripts": { "dev": "next", "build": "next build", "start": "next start" }
The entire source code in this article is available on this GitHub repository. Feel free to clone it locally and play around with it. The repository also includes some basic placeholders to apply CSS to your blog.
Improvements
The blog, although functional, is perhaps too basic for most average cases. It would be nice to extend the framework or submit a patch to include some more features like:
Pagination
Syntax highlighting
Categories and Tags for posts
Styling
Overall, Next.js seems really very promising to build static websites, like a blog. Combined with its ability to export static HTML, we can built a truly standalone app without the need of a server!
The post Building a Blog with Next.js appeared first on CSS-Tricks.
You can support CSS-Tricks by being an MVP Supporter.
Building a Blog with Next.js published first on https://deskbysnafu.tumblr.com/
0 notes
Text
Building a Blog with Next.js
In this article, we will use Next.js to build a static blog framework with the design and structure inspired by Jekyll. I’ve always been a big fan of how Jekyll makes it easier for beginners to setup a blog and at the same time also provides a great degree of control over every aspect of the blog for the advanced users.
With the introduction of Next.js in recent years, combined with the popularity of React, there is a new avenue to explore for static blogs. Next.js makes it super easy to build static websites based on the file system itself with little to no configuration required.
The directory structure of a typical bare-bones Jekyll blog looks like this:
. ├─── _posts/ ...blog posts in markdown ├─── _layouts/ ...layouts for different pages ├─── _includes/ ...re-usable components ├─── index.md ...homepage └─── config.yml ...blog config
The idea is to design our framework around this directory structure as much as possible so that it becomes easier to migrate a blog from Jekyll by simply reusing the posts and configs defined in the blog.
For those unfamiliar with Jekyll, it is a static site generator that can transform your plain text into static websites and blogs. Refer the quick start guide to get up and running with Jekyll. This article also assumes that you have a basic knowledge of React. If not, React’s getting started page is a good place to start.
Installation
Next.js is powered by React and written in Node.js. So we need to install npm first, before adding next, react and react-dom to the project.
mkdir nextjs-blog && cd $_ npm init -y npm install next react react-dom --save
To run Next.js scripts on the command line, we have to add the next command to the scripts section of our package.json.
"scripts": { "dev": "next" }
We can now run npm run dev on the command line for the first time. Let’s see what happens.
$ npm run dev > [email protected] dev /~user/nextjs-blog > next ready - started server on http://localhost:3000 Error: > Couldn't find a `pages` directory. Please create one under the project root
The compiler is complaining about a missing pages directory in the root of the project. We’ll learn about the concept of pages in the next section.
Concept of pages
Next.js is built around the concept of pages. Each page is a React component that can be of type .js or .jsx which is mapped to a route based on the filename. For example:
File Route ---- ----- /pages/about.js /about /pages/projects/work1.js /projects/work1 /pages/index.js /
Let’s create the pages directory in the root of the project and populate our first page, index.js, with a basic React component.
// pages/index.js export default function Blog() { return <div>Welcome to the Next.js blog</div> }
Run npm run dev once again to start the server and navigate to http://localhost:3000 in the browser to view your blog for the first time.

Out of the box, we get:
Hot reloading so we don’t have to refresh the browser for every code change.
Static generation of all pages inside the /pages/** directory.
Static file serving for assets living in the/public/** directory.
404 error page.
Navigate to a random path on localhost to see the 404 page in action. If you need a custom 404 page, the Next.js docs have great information.

Dynamic pages
Pages with static routes are useful to build the homepage, about page, etc. However, to dynamically build all our posts, we will use the dynamic route capability of Next.js. For example:
File Route ---- ----- /pages/posts/[slug].js /posts/1 /posts/abc /posts/hello-world
Any route, like /posts/1, /posts/abc, etc., will be matched by /posts/[slug].js and the slug parameter will be sent as a query parameter to the page. This is especially useful for our blog posts because we don’t want to create one file per post; instead we could dynamically pass the slug to render the corresponding post.
Anatomy of a blog
Now, since we understand the basic building blocks of Next.js, let’s define the anatomy of our blog.
. ├─ api │ └─ index.js # fetch posts, load configs, parse .md files etc ├─ _includes │ ├─ footer.js # footer component │ └─ header.js # header component ├─ _layouts │ ├─ default.js # default layout for static pages like index, about │ └─ post.js # post layout inherts from the default layout ├─ pages │ ├─ index.js # homepage | └─ posts # posts will be available on the route /posts/ | └─ [slug].js # dynamic page to build posts └─ _posts ├─ welcome-to-nextjs.md └─ style-guide-101.md
Blog API
A basic blog framework needs two API functions:
A function to fetch the metadata of all the posts in _posts directory
A function to fetch a single post for a given slug with the complete HTML and metadata
Optionally, we would also like all the site’s configuration defined in config.yml to be available across all the components. So we need a function that will parse the YAML config into a native object.
Since, we would be dealing with a lot of non-JavaScript files, like Markdown (.md), YAML (.yml), etc, we’ll use the raw-loader library to load such files as strings to make it easier to process them.
npm install raw-loader --save-dev
Next we need to tell Next.js to use raw-loader when we import .md and .yml file formats by creating a next.config.js file in the root of the project (more info on that).
module.exports = { target: 'serverless', webpack: function (config) { config.module.rules.push({test: /\.md$/, use: 'raw-loader'}) config.module.rules.push({test: /\.yml$/, use: 'raw-loader'}) return config } }
Next.js 9.4 introduced aliases for relative imports which helps clean up the import statement spaghetti caused by relative paths. To use aliases, create a jsconfig.json file in the project’s root directory specifying the base path and all the module aliases needed for the project.
{ "compilerOptions": { "baseUrl": "./", "paths": { "@includes/*": ["_includes/*"], "@layouts/*": ["_layouts/*"], "@posts/*": ["_posts/*"], "@api": ["api/index"], } } }
For example, this allows us to import our layouts by just using:
import DefaultLayout from '@layouts/default'
Fetch all the posts
This function will read all the Markdown files in the _posts directory, parse the front matter defined at the beginning of the post using gray-matter and return the array of metadata for all the posts.
// api/index.js import matter from 'gray-matter'
export async function getAllPosts() { const context = require.context('../_posts', false, /\.md$/) const posts = [] for(const key of context.keys()){ const post = key.slice(2); const content = await import(`../_posts/${post}`); const meta = matter(content.default) posts.push({ slug: post.replace('.md',''), title: meta.data.title }) } return posts; }
A typical Markdown post looks like this:
--- title: "Welcome to Next.js blog!" --- **Hello world**, this is my first Next.js blog post and it is written in Markdown. I hope you like it!
The section outlined by --- is called the front matter which holds the metadata of the post like, title, permalink, tags, etc. Here’s the output:
[ { slug: 'style-guide-101', title: 'Style Guide 101' }, { slug: 'welcome-to-nextjs', title: 'Welcome to Next.js blog!' } ]
Make sure you install the gray-matter library from npm first using the command npm install gray-matter --save-dev.
Fetch a single post
For a given slug, this function will locate the file in the _posts directory, parse the Markdown with the marked library and return the output HTML with metadata.
// api/index.js import matter from 'gray-matter' import marked from 'marked'
export async function getPostBySlug(slug) { const fileContent = await import(`../_posts/${slug}.md`) const meta = matter(fileContent.default) const content = marked(meta.content) return { title: meta.data.title, content: content } }
Sample output:
{ title: 'Style Guide 101', content: '<p>Incididunt cupidatat eiusmod ...</p>' }
Make sure you install the marked library from npm first using the command npm install marked --save-dev.
Config
In order to re-use the Jekyll config for our Next.js blog, we’ll parse the YAML file using the js-yaml library and export this config so that it can be used across components.
// config.yml title: "Next.js blog" description: "This blog is powered by Next.js"
// api/index.js import yaml from 'js-yaml' export async function getConfig() { const config = await import(`../config.yml`) return yaml.safeLoad(config.default) }
Make sure you install js-yaml from npm first using the command npm install js-yaml --save-dev.
Includes
Our _includes directory contains two basic React components, <Header> and <Footer>, which will be used in the different layout components defined in the _layouts directory.
// _includes/header.js export default function Header() { return <header><p>Blog | Powered by Next.js</p></header> }
// _includes/footer.js export default function Footer() { return <footer><p>©2020 | Footer</p></footer> }
Layouts
We have two layout components in the _layouts directory. One is the <DefaultLayout> which is the base layout on top of which every other layout component will be built.
// _layouts/default.js import Head from 'next/head' import Header from '@includes/header' import Footer from '@includes/footer'
export default function DefaultLayout(props) { return ( <main> <Head> <title>{props.title}</title> <meta name='description' content={props.description}/> </Head> <Header/> {props.children} <Footer/> </main> ) }
The second layout is the <PostLayout> component that will override the title defined in the <DefaultLayout> with the post title and render the HTML of the post. It also includes a link back to the homepage.
// _layouts/post.js import DefaultLayout from '@layouts/default' import Head from 'next/head' import Link from 'next/link'
export default function PostLayout(props) { return ( <DefaultLayout> <Head> <title>{props.title}</title> </Head> <article> <h1>{props.title}</h1> <div dangerouslySetInnerHTML=/> <div><Link href='/'><a>Home</a></Link></div> </article> </DefaultLayout> ) }
next/head is a built-in component to append elements to the <head> of the page. next/link is a built-in component that handles client-side transitions between the routes defined in the pages directory.
Homepage
As part of the index page, aka homepage, we will list all the posts inside the _posts directory. The list will contain the post title and the permalink to the individual post page. The index page will use the <DefaultLayout> and we’ll import the config in the homepage to pass the title and description to the layout.
// pages/index.js import DefaultLayout from '@layouts/default' import Link from 'next/link' import { getConfig, getAllPosts } from '@api'
export default function Blog(props) { return ( <DefaultLayout title={props.title} description={props.description}> <p>List of posts:</p> <ul> {props.posts.map(function(post, idx) { return ( <li key={idx}> <Link href={'/posts/'+post.slug}> <a>{post.title}</a> </Link> </li> ) })} </ul> </DefaultLayout> ) }
export async function getStaticProps() { const config = await getConfig() const allPosts = await getAllPosts() return { props: { posts: allPosts, title: config.title, description: config.description } } }
getStaticProps is called at the build time to pre-render pages by passing props to the default component of the page. We use this function to fetch the list of all posts at build time and render the posts archive on the homepage.

Post page
This page will render the title and contents of the post for the slug supplied as part of the context. The post page will use the <PostLayout> component.
// pages/posts/[slug].js import PostLayout from '@layouts/post' import { getPostBySlug, getAllPosts } from "@api"
export default function Post(props) { return <PostLayout title={props.title} content={props.content}/> }
export async function getStaticProps(context) { return { props: await getPostBySlug(context.params.slug) } }
export async function getStaticPaths() { let paths = await getAllPosts() paths = paths.map(post => ({ params: { slug:post.slug } })); return { paths: paths, fallback: false } }
If a page has dynamic routes, Next.js needs to know all the possible paths at build time. getStaticPaths supplies the list of paths that has to be rendered to HTML at build time. The fallback property ensures that if you visit a route that does not exist in the list of paths, it will return a 404 page.

Production ready
Add the following commands for build and start in package.json, under the scripts section and then run npm run build followed by npm run start to build the static blog and start the production server.
// package.json "scripts": { "dev": "next", "build": "next build", "start": "next start" }
The entire source code in this article is available on this GitHub repository. Feel free to clone it locally and play around with it. The repository also includes some basic placeholders to apply CSS to your blog.
Improvements
The blog, although functional, is perhaps too basic for most average cases. It would be nice to extend the framework or submit a patch to include some more features like:
Pagination
Syntax highlighting
Categories and Tags for posts
Styling
Overall, Next.js seems really very promising to build static websites, like a blog. Combined with its ability to export static HTML, we can built a truly standalone app without the need of a server!
The post Building a Blog with Next.js appeared first on CSS-Tricks.
via CSS-Tricks https://ift.tt/38RTO6t
0 notes
Link
The best part of any idea is when it's fresh and new, and you don't yet know the limitations and restrictions. It can be almost magical! Oh, the customers you'll help and the money you'll make! All you have to do first is... write a lot of code.
How much code? Well, obviously that depends on your idea and what business you're planning on setting up. But there's a huge amount of code you'll need and want for any SaaS business, and a lot of it you'll have to write before you can write even line one of your business logic.
Where did I come by this list? Well, I've spent quite a few years working on SaaS businesses at a variety of stages of maturity, and I keep my ear to the ground by listening to good SaaS podcasts. I noticed that there are a lot of common tasks necessary to launch a new SaaS product, and I decided to help fix that problem by taking it all and packing it into a SaaS starter kit to help cut down on the code you need to write (and the time you need to spend) to launch your business.
Let's explore that huge list of code.
Stuff You're Gonna Need
The basics
Okay, first you're gonna need something to start from. Unless you plan on writing everything from scratch, you'll need to set up some common frameworks to enable a modern web app to run. On the front-end, that's something like:
A bundler/build system. Examples: Webpack, Parcel, Gulp, Grunt.
Babel, if you want to use modern JavaScript features on older browsers.
A UI library. Examples: React, Vue, Angular, Elm.
A CSS framework. Examples: Bootstrap, TailwindCSS, Semantic, Bulma.
An HTTP requests library, if your framework doesn't come with one. Examples: Superagent, Axios, got.
A testing library. Examples: Jest, Mocha, Jasmine, Ava.
Getting all these various tools set up to work together will take some time as well. Just searching "configuring webpack for X" reveals a minefield of blog posts written for various versions of webpack and X. Some will help, some won't, and sometimes only experimentation will reveal which is which.
Thankfully, there are tools that make a lot of this easier. Next.js for React and Nuxt.js for Vue are just two examples, but there are many flavours of UI frameworks that can significantly reduce the setup time for the above. Of course, now you have to learn how your UI framework works as well as your UI library, but generally that trade-off is worthwhile.
Moving on to the back-end, you're going to want a web framework. This will largely depend on the language you're working with, but you have plenty to choose from:
Node.js: Fastify, Koa, and Express.
PHP: Laravel, Symfony, and CakePHP.
Python: Django, Pylons, and Zope.
Go: Gin, Beego, Martini.
Ruby: Sinatra, Hanami, and of course Rails.
This list is by no means extensive - just tracking down all the available frameworks for a single language would be an article in it's own. But it does display the variety of choices available. Each language and framework has its own capabilities and trade-offs, and that's something you'll have to take into account before you make your choice. (Or after! It's just harder to change your mind at that point.)
Development build system
Actually, let's take a step back for a second. Sure, those are the basics, but you still need someplace to run all that code, and in a way that speeds up your evaluation of code changes.
You could run everything on your local machine, but that's rarely ideal. For starters, your local environment is highly unlikely to resemble your production environment, and you don't want seemingly-minor differences causing problems when you deploy. Plus, it's very hard (comparatively) to automate local environment setup, so adding anyone else to the project is bound to cause conflict, especially if they want to use an entirely different OS from you.
You have a lot of options for this, but the two easiest/most-common are:
1) Use a Virtual Machine
Virtual Machines have the advantage of being very simple to understand and work with. If you know how to navigate your own system, you'll know how to navigate a virtual one just fine. They're easily automated with something like Ansible, and easy to use for development with something like Vagrant. Plus, you'll likely only need to modify a bit of your Ansible scripts or variables to turn your development deploy script into a production deploy script.
But they can be a bit heavy, as they are emulating an entire other machine. There are good solutions to this (enabling CPU optimizations, using AMIs or other machine images to reduce deploy time, etc), but there's also an alternative.
2) Use docker
Docker containers are crazy lightweight. Essentially, they just run the bits of the system required to run your code, as dictated by you. Plus, a great many CI systems accept dockerfiles as input to automatically run tests and deploys of your code. A well-built docker setup is a thing of beauty.
However, docker can be a bit confusing. It requires learning a different mindset and tooling from working directly on a machine or virtual machine, and can lead you naturally towards more-complex solutions where a simpler one would otherwise work better for your use case. (Hello, microservices!)
Reducing your development cycle time with watchers
A small thing that can save you a lot of time is setting watchers on your code. These are programs that keep an eye out for changes in your code, then re-compile and restart servers so that the latest version of your code is always running when you refresh your browser. Many of the tools you'll use will come with built-in watchers (webpack, for example), but for others, you'll need to install your own (nodemon to watch your Node.js server).
And like with anything else, there's configuration you have to do to make sure that each watcher is only watching the correct directories, that files are shared between your host system and VM/docker container in a fast method that won't trip up your watchers, etc.
Application template & UI architecture
With any luck, you'll have a design already to work with, but you still need to translate that design into an application template and common UI components and architecture. A good CSS framework can really help here, allowing you to set up common colours and sizes that you can use across the entire project, and using component-based development can allow you to, say, create a TextInput element once, then use it across your project multiple times. You'll also need to set up some form of menu infrastructure that allows you to enable/disable or hide/show certain menus based on user access or page location.
Logging
Proper logging can give you more and more-useful information than a slapdash setup can. You'll want to log requests and request data, useful checkpoint information, and the usual stuff - errors, stack traces, etc. But you also want to make sure not to log too much. For example, you'll obviously want to omit passwords, but you should also in general omit headers, especially headers containing authentication tokens, for obvious security reasons.
Database migrations
Database schemas are part of your app as well, and that means they need to be represented as code somewhere and checked into version control. Manually updating your production database to match your development database is amateur-hour.
So in addition to your back-end frameworks and your front-end frameworks, you'll need a database migration framework, and you'll need to write migrations for it.
Users
Users are the fundamental primitive of a SaaS application, and there's a common set of interactions you'll require: sign-up, login, logout, edit profile, etc. But sitting underneath all that is a bit of a contentious topic: user authentication.
There are a bunch of ways to do user authentication, but most of them are wrong and will end up leaving you with security vulnerabilities. JWTs are popular and can be secured, but you need to follow some best practices:
Don't store JWTs in localStorage, since any JS that runs on your page can access them, and if you get hit with a cross-site scripting attack, they can export your tokens en masse.
Store JWTs in secure, HTTPS-only cookies.
Include a global version code in your JWTs so that you can instantly invalidate all JWTs every issued.
Include a user version code in your JWTs so that a user can instantly invalidate all JWTs ever issued for them specifically. This is useful to include a "log out all devices" option for users who may have lost a device or had their account compromised.
Send a Cross-Site Request Forgery token with every request as a javascript-injected header, and make sure that token matches one you've stored for the user on login.
You'll notice a lot of these practices are "in case of a security breach", and you'd hope that if you did everything correctly, they'd be unnecessary. However, that's a fantasy and should be treated as such. No site is 100% secure and bug-free, and yours won't be either. Instead, you need to work in layers, so that if any one layer of security fails, there are still other layers and countermeasures in place.
Form validation
When users sign up, log in, and really all throughout your app, they'll be filling out and submitting forms. These forms will need to be validated for the appropriate data, preferably on both the front-end (before the data is sent to the server, to provide the best experience to the user) and the back-end (to ensure no junk data is saved to the database). If your back-end isn't in JavaScript, you'll need validation libraries for both languages that have the same semantics.
Transactional email
Transactional email is the email you send when certain events happen for your users. These can be lifecycle events, like welcome emails, "trial about to expire" emails, etc, or service-related emails like email address confirmation emails, password reset emails, notifications about your service, etc.
You'll need to find and configure a decent mailer module, and usually perform some DNS configuration at your mail service host's instruction. Some mailer modules will come with template capabilities built-in, while others will leave you to install your own.
Subscriptions/Payments
Getting paid is why most people are going to start a SaaS in the first place, so processing payments and subscriptions is mightily important. Choosing and setting up an account with a payments provider is up to individual preference, but Stripe offers probably the best API and developer experience out there, while PayPal is usually the most-requested provider of choice from users. It's likely that you'll want to offer multiple ways to pay through multiple providers, just to ensure that no potential customer is left behind.
If you offer subscriptions, you'll want to allow users to choose between a monthly billing cycle and an annual one. Annual billing is a great way for dedicated users to save money, while also offering you the benefits of higher LTV and getting you the money up-front, increasing your liquidity.
If you have multiple levels of plans, you'll need to implement the ability for users to change between those levels, usually offering a prorated fee for the month of transition.
Though it's definitely not the "happy path", you'll need to offer users the ability to cancel subscriptions. You shouldn't add extra friction to this, since some users will just be cancelling temporarily, and you want to leave a good impression on them, but it's important to try to capture the reason they're leaving, so you can improve your service.
Production deploy system
Once you've fully-developed your fancy new SaaS, you're going to need to put it up on the web for people to interact with, and for that, you're going to need a deploy system. Even if that system is largely manual, you're going to want defined, repeatable, documented steps that ensure that deploys go off without incident.
You're going to want to cover the following bases, at a minimum:
Ensure server is reachable
Ensure server is set up correctly (correct runtime libraries installed, etc.)
Update code
Run DB migrations
Ensure front-end UI code is not cached in user's browser (update ETags, etc)
There are a whole lot more things you can do to ensure a safe and clean deploy, but this list is at least a good starting place.
Production backups
Much like how we discussed security in layers above, backups of production data are another layer of defence in case something goes wrong. If you're still using manual processes to alter user data, it can be very easy for a slip of the keys to accidentally alter or delete the wrong user's data. And if you're using automated processes, it's usually a lot harder to make those simple mistakes, but more complex mistakes can make it very easy to edit or delete huge swathes of user data. Proper backups will one day save your bacon, bet on it.
What makes a proper backup, then? That's a whole topic on its own, but you should start with:
Complete: Don't just backup the database - if the user uploads files, those should be backed up as well.
Regular: Backups should happen on a schedule, ideally daily or more, for more-volatile data.
Retained: You'll want to keep your backups around for a while, though you might want to set up a schedule for longer-retained backups. (i.e. Daily backups retained for 30 days, weekly backups retained for 3 months, monthly backups retained for 1 year.)
Secure: Your backups should be kept with the same level of security as your data. If your data is encrypted at rest, your backups should be as well. Make sure to keep your encryption keys secure. If you lose those keys, you lose the backup.
Tested: A backup that hasn't been tested is not a backup. You don't want to find out that your backup process doesn't work (or stopped working) when you need to restore critical data. There should be an automated test process that runs after backups are created.
If you're lucky, your hosting platform will offer some level of database backup as a service, which will save you a lot of time and effort setting up. It likely won't cover 100% of your needs, but it will get you a lot closer than starting from scratch.
Stuff You're Gonna Want
Okay! That'll get you off the ground, but once you start seeing any success at all, you're going to start wanting something a little more... robust. Eventually, manually editing the database is going to get tedious (not to mention dangerous), and users will start asking the same questions over and over. You're going to have to slow down on development related to your core business and implement a bunch more supporting features.
Admin console
You can edit and delete users directly from the database, sure, but all it takes is one time forgetting to add a WHERE or LIMIT clause to a statement to make you long for a proper administration console. (And backups. You set up backups, right?)
An admin console is also a great place for dashboards, user statistics, summaries, metrics, etc. Your admin console can become your one-stop-shop for running your SaaS.
Documentation
Documentation can serve multiple purposes. Primarily, it's for user education, but conveniently, this is user education you don't have to do manually. Think about it like automated customer support - a user that answer their question from your documentation is a user that doesn't email you.
If your documentation is publicly available, it can also help users make purchasing decisions. By answering questions about your service openly and up-front, you can let users more-easily determine if your service will work for them, as well as reassure them about your transparency.
Public documentation also helps with SEO, since your keywords will likely naturally come up frequently on your documentation pages.
Billing history
Once you have a sufficient number or sufficiently large customers, you'll likely start getting requests around tax time for their billing history. Your payment system will keep track of payments for you, and many of them will be able to generate invoices from their web interface that you can send to customers who request it.
That might hold you for a while, but eventually, you'll want this functionality built into your system, so clients can self-serve, and your customer support team can focus on more-important issues.
Stuff That's Gonna Make Your Life A Lot Easier
Making the right decisions early on and as your service grows can have compounding benefits, but frequently, it's difficult to find time to devote to tasks that aren't seen as critical. Still, if you can make the time to invest in them, it can pay off for you and your users as well.
Pause subscriptions & credit
Especially now, when people are trying to cut costs in both their lives and businesses, the ability to pause a subscription instead of cancel it outright can mean the difference between saving a customer and losing them. Similarly, the ability to credit customers some free time or usage on your service can aid in retention, especially if something goes wrong and you want to make it up to them.
User ID obfuscation
When displaying publicly-visible auto-incrementing IDs (such as user IDs), it can be a good idea to obfuscate what that number actually is. This prevents competitors and skittish customers from identifying how much usage your service has seen so far. A great library for this is Hashids, which has many compatible implementations across many languages.
Limited number of development languages
The fewer languages your app uses, the less common code that you'll have to duplicate between the various services and projects you require. Some are going to be unavoidable, such as JavaScript if you have a web app with any serious browser interactions, Swift for iOS, and Java/Kotlin for Android. Web apps, however, offer a truly terrifying number of languages you can choose for server code: PHP, Ruby, JavaScript, Typescript, Go, Rust, Java, Python, Perl, Scala, Erlang, and even C# and C++. In a microservices environment, it can be tempting to use a variety of languages for your different services, but that means redeveloping and maintaining common libraries for every new language you want to include.
In extreme situations, you can limit yourself to just one language, even across multiple disparate platforms. JavaScript can do front-end and back-end web development, desktop development through Electron, and mobile development through Cordova. There are definite trade-offs for going this route, but for a smaller studio, this opens up a multi-platform strategy on a limited budget.
Linters
Linters like ESLint, RuboCop, and Flake8 can make a marked improvement in your code. They can catch stylistic errors long before they make it into production, and many stylistic errors are really just shortcomings of your chosen language, where hard-to-find bugs breed and propagate.
Monorepo
Monorepos are great! They're especially great if you're just starting your SaaS, as they're far simpler than trying to work with multiple repositories when managing dependencies, figuring out code re-use, and ensuring that all the correct code is committed before deploys go out.
Everyone's situation is different, of course, and it may make sense in your case to go with multiple repositories, or even one day switch to such a strategy, but when you're starting out, you want to limit the complexity of your project as much as you can, and the monorepo strategy will definitely pay off in this regard.
User impersonation
Being able to log in as your users from your Admin Console can help immensely when trying to sort out customer service issues. Instead of having several back-and-forth "what do you see now?" emails, you can just log in as them and find out. There are a lot of things to consider when writing a user impersonation feature, however: Do you require special access to impersonate users? Do you require the user's permission to impersonate them? Are actions taken while impersonated logged? Can you even take actions when impersonating, or view only? How do you indicate that you are impersonating a user (vs. logged in under your own account)?
These aren't the only considerations, but ideally it's enough to make the point that there's a lot more to user impersonation than simply changing a token ID.
Improved production deployments
Once you start getting enough customers with sufficient expectations, you'll have to make modifications to your deploy process for increased reliability and flexibility:
Updating in-place won't work forever. Eventually, switching to blue/green deploys or even something as simple as displaying a maintenance mode page while you update will be necessary to keep people from interacting with the system while performing significant changes.
If you have a complex SPA, you'll want to be able to inform users when you've made an update that requires reloading that code. Tracking version numbers both in your UI code and on the server will allow you to pop up a notification, allowing the user to save their work and then reload.
Ideally, you should be using a bug tracking service. If you also send your source maps to them when performing a deploy, they can provide even better error messages when UI errors occur.
Serving your UI JavaScript from your server is simple and easy, but users appreciate fast, and your job is to do the hard work so that users have a good time. A relatively easy way to speed up your user's experience is to upload your UI JavaScript on release to a CDN. This is a one-time change you need to make that pays dividends for your users going forwards.
You'll likely be manually checking that releases go as expected, but automated smoke tests that run on every deploy are a better way to catch issues that might otherwise slip by you when you're tired, distracted, or in a hurry.
What's the alternative?
If you don't want to start from an empty folder and write all this code yourself, you should consider using a SaaS starter kit, and it just so happens that you're reading the blog for one right now! With Nodewood, you can get started writing business logic today, saving weeks or even months of development time.
Nodewood starts you off with a full working web app, with a Vue front-end and Express back-end, built entirely from JavaScript. Form validation, testing, user authentication and management, subscription/billing are all built-in, alongside a sleek and customizable application theme with an easy-to-extend admin console.
0 notes