#Netgear Extender setup
Explore tagged Tumblr posts
Visit Tumblr Blog
Explore Tumblr blogs with no restrictions, modern design and the best experience.
Last Seen Tumblr Blogs


Fun Fact
Tumblr’s website traffic is steadily declining.
Text
How do I reset my Netgear Extender Login?
Use these procedures to reset your Netgear extender login:
First, find your Netgear extender's "Reset" button.
Usually located on the device's back or side, this is a tiny, inset button.
Press and hold the button with a paperclip or other pointed item until the power LED begins to blink.
This restores the extender to its factory default settings, erasing any previously saved login credentials.
Await the extender's reboot after the reset.
Then, connect to the extender's default Wi-Fi network.
The network name will typically be something like “NETGEAR_EXT,” and you won’t need a password initially.
Open a web browser and go to either www.mywifiext.net or 192.168.1.250. This will take you to the Netgear extender login page.
You will be asked to create a new admin username and password on the login page.
To configure the extender for your network, according to the setup wizard's instructions. For future reference, be sure you write down your updated login information.
Make sure your browser's cache is empty and that the device you are using is linked to the extender network if you are having trouble seeing the login page.
Your Netgear extender login should be successfully reset after completing this method. Go to our website to know more about it.
0 notes
Text
0 notes
Text
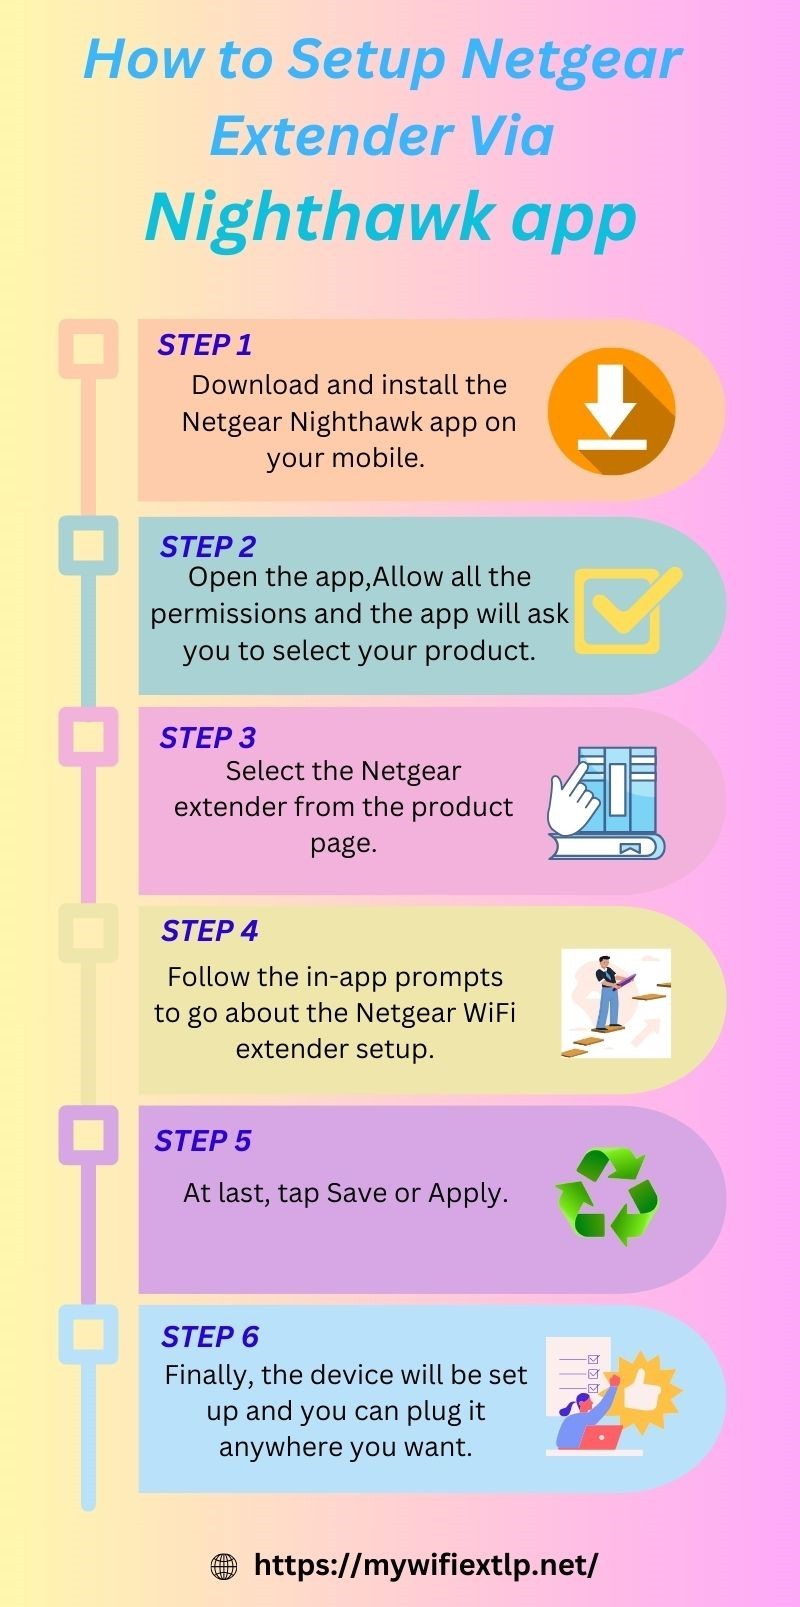
Step-by-Step Guide to Setting Up Your Netgear Extender!
For easy Netgear extender setup, open the web browser and type the mywifiext.net web address in the browser bar. Now, enter the login details and you reach the smart setup dashboard of the repeater. Here, visit the basic and advanced settings to configure the further settings accordingly. To know more information regarding the same, get in touch with us!

0 notes
Text
Netgear WiFi Extender: Maximizing Connectivity for Smart Homes
Plugging your Netgear extender into a power outlet close to your Wi-Fi network will enable you to set it up. Use WPS configuration or join the extender's Wi-Fi network. For configuration, use a web browser or the Netgear installation aid to follow the on-screen instructions. By visiting our website, you can simplify the configuration of your Netgear wifi extender. Should you require more assistance with the process execution, don't hesitate to reach out to our experts.
1 note
·
View note
Text
Netgear wireless extender login
The Netgear wireless extender login is a crucial step in enhancing and optimizing your home or office network. Designed to boost the existing Wi-Fi signal range, Netgear extenders require a seamless setup process, and the login interface serves as the gateway to configuration. To initiate this process, connect your extender to a power source and access its default network using a device like a computer or smartphone. Once connected, open a web browser and enter the default login web address or the extender's IP address. This prompts the Netgear extender login page, where users input their credentials, typically a username and password. After successful authentication, users gain access to the extender's settings, enabling them to customize network parameters, update firmware, and optimize performance. A user-friendly interface ensures a smooth Netgear wireless extender login experience, empowering individuals to tailor their network extension according to specific needs and preferences.
#Netgear wireless extender login#Netgear extender setup#netgear wifi extender setup#netgear extender set up#netgear extender setup wizard#netgear extender not working#wifi extender login netgear#netgear wireless extender login
1 note
·
View note
Text
How do I setup Netgear Ex6110?

The Netgear EX6110 setup is a fast procedure. First, connect it to a power source. Open a web browser and navigate to http://www.mywifiext.net/ after connecting your device to the extender’s WiFi network. To choose and establish a connection to your current WiFi network, adhere to the on-screen directions. After adjusting the extender’s parameters or leaving them as they are, click “Finish” to finish the configuration. Move the extender to a location with a strong WiFi signal for best coverage.
How to setup Netgear EX6110 setup manually?
When the Power LED on the Netgear EX6110 illuminates, it is ready to be used.
Make that your device is connected to the “NETGEAR_EXT” default WiFi network.
Type http://www.mywifiext.net/ or http://192.168.1.250/ into the address bar of an open web browser.
Select the WiFi network you already have and input its password by following the on-screen directions.
You may choose to use the default values or modify the extension settings.
In order to maximize WiFi coverage, move the extender and click “Finish” to finish the manual setup.
Read More:-
1 note
·
View note
Text
Fix 192.168.1.250 Not Working
Is your Wi-Fi extender throwing a tantrum, refusing to budge at the seemingly magic address 192.168.1.250? Fear not, intrepid adventurer of the internet! This guide equips you with the arsenal to vanquish connection woes and reignite your digital domain.
First, Identify the Foe:
Before charging into battle, understanding the enemy is key. Here are some common reasons why 192.168.1.250 might not be playing nice:
Wrong Address: Did you double-check the address? It's a sneaky little devil. Consult your extender's manual or manufacturer's website for the definitive answer.
Typos, Typos Everywhere: A single misplaced finger can derail your entire campaign. Retype the address meticulously, paying close attention to capitalization and special characters.
Connection Woes: Ensure your device is connected to the Wi-Fi network properly. Sometimes, a simple restart can work wonders.
IP Conflict: Another device on the network might be claiming the throne. Check your router's DHCP settings to see if any IP addresses are assigned to 192.168.1.250.
Firmware Frenzy: Outdated firmware can throw wrenches into the works. Update your extender's firmware to the latest version.
0 notes
Text
Struggling with your Wi-Fi signal? 📶 Upgrade your connection with Netgear Extender Setup! Say goodbye to dead zones and hello to seamless browsing. Click the link in bio to boost your internet speed now! Don't miss out! 🔥 #NetgearExtender #WiFiBoost #StrongConnection #TechSavvy #GamingLife #ViralTech #SmoothStreaming
0 notes
Text
https://erobideonetto.com/how-to-perform-factory-default-reset-of-netgear-extender/
0 notes
Text

To understand How To Setup Netgear Extender, plug it into a power outlet and connect your device to the extender's temporary WiFi network. Open a web browser and go to mywifiext.net. Follow the on-screen wizard to connect it to your existing WiFi network. For teh full details, come to us!
0 notes
Video
youtube
Netgear Range Extender Setup & Unboxing | AC750 | AC1200 |EX3700|
0 notes
Text
How To Setup WiFi Range Extender Netgear, plug it in, connect to the default WiFi network, and launch a web browser. Visit mywifiext.net, connect to your existing WiFi network using the setup wizard, and then configure the extender's SSID and password. Once set up, insert the extender halfway between your router and the desired coverage area.
#How To Setup WiFi Range Extender Netgear#How To Setup#WiFi Range Extender Netgear#Netgear WiFi range extender
0 notes
Text
A Guide 2024 on How to Reset Netgear WiFi Extender

Method 1: Soft Reset via Web Interface

Connect to the Extender:
Ensure your device is connected to the Netgear WiFi extender network.
Open a web browser and enter the default web address “http://mywifiext.net" in the address bar.
Log In:
Enter your admin credentials (username and password) to access the extender’s web interface.
Navigate to Reset:
Locate and click on the “Settings” or “Maintenance” option.
Find the “Reset” or “Restore Factory Settings” option.
Confirm Reset:
Follow the on-screen instructions to confirm the reset.
Allow the extender to reboot, and it will be reset to its default settings.
Method 2: Hard Reset Using the Reset Button
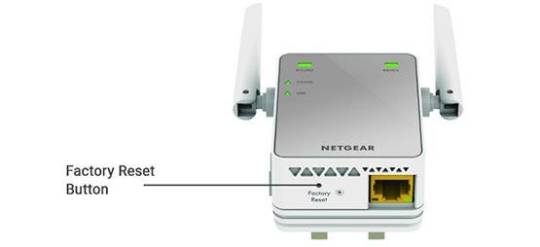
Locate the Reset Button:
On your Netgear WiFi extender, find the reset button. It is usually a small hole labeled “Reset.”
Use a Paperclip or Pin:
With the extender powered on, use a paperclip or pin to press and hold the reset button for about 10 seconds.
Release the Button:
Release the button when the LED lights on the extender start flashing.
The extender will reset to its factory settings.
Method 3: Factory Reset Using Netgear Genie App
Install Netgear Genie:
Download and install the Netgear Genie app on your smartphone or computer.
Launch the App:
Open the Netgear Genie app and log in with your extender’s credentials.
Navigate to Reset:
Find the “WiFi Settings” or “Wireless” option in the app.
Look for the “Reset” or “Restore Factory Settings” option.
Confirm Reset:
Follow the prompts to confirm the reset.
Allow the extender to reboot, completing the factory reset process.
Conclusion:
By following these three methods, you can easily reset Netgear WiFi extender and address various connectivity issues. Remember to reconfigure your extender with the appropriate settings after the reset to ensure optimal performance. Whether you prefer a soft reset through the web interface, a hard reset using the reset button, or a factory reset using the Netgear Genie app, these methods offer flexibility based on your preferences and the extender model you are using.
1 note
·
View note
Text
Eliminate Dead Zones with Netgear WiFi Extender Setup
Netgear WiFi extender setup
Are you thinking of carrying out the Netgear WiFi Extender Setup at your home? Well, it will help you boost the wireless internet signal and expand your WiFi network coverage. In addition, the Netgear extender setup will also ensure that you receive a seamless WiFi experience throughout your home.
Unlock the full potential of your home network with the step-by-step process on the Netgear WiFi extender setup in this blog post. It will, further, enhance your WiFi coverage and performance effortlessly.
Netgear WiFi Extender Setup
Now the time has come for you to start learning about the complete Netgear extender setup process. So, go through the steps in this section right away.
First & foremost, plug your Netgear WiFi extender into an electrical outlet.
After that, launch a browser on your device and enter "http://192.168.1.250" in the URL bar.
Next, access your device's Wi-Fi settings and connect to the Netgear Extender's network.
Then press the "Enter" button and you'll be prompted to choose your existing Wi-Fi network and enter the password.
Once you access the setup page, you can customize your extender settings, including network names & passwords.
Finally, you can connect your smart devices to your extender's WiFi network and start using the benefits of an extended network.
With the Netgear Wi-Fi extender, you will enjoy stronger signals, uninterrupted connectivity, and outstretched coverage. It is the key to a seamless online experience in all corners of your office or home.
Bottom Line
This blog post includes the complete Netgear WiFi extender setup process. Thus, follow the steps carefully and make no mistake. But if you are unable to carry out these processes by any chance, feel free to get in touch with our technical team. They will guide you through the complete Netgear WiFi extender setup.
0 notes
Text
Optimizing Your Network: A Guide to Netgear Extender Setup?
Inputting your Netgear WiFi extender into a power outlet that is adjacent to your current wireless internet connection is how you set it up. First, press the WPS button on your router, then on your extender. Await the LED lights turning on to show that the connection was successful. Visiting our website will be a terrific first step towards finding the answers to any additional questions you may have regarding the Netgear extender setup. If you need further help, you may connect with our specialists using the live chat option on our website.
1 note
·
View note
Text
Netgear EX6400 setup
The Netgear EX6400 setup is the process of configuring and installing the Netgear EX6400 WiFi extender, a device designed to enhance and extend the coverage of an existing WiFi network. It is especially helpful in large houses or workplaces where the Wi-Fi signal could not fully cover every area.
Netgear EX6400 setup Using Web browser
Follow these steps for Netgear EX6400 setup through Web browser:
Plug in your Netgear EX6400 extender and wait for the green power LED to shine brightly.
Establish a connection between your device and the extender by utilizing an Ethernet cable.
Launch a web browser on your device.
Enter "mywifiext.net" into the address bar and hit Enter.
Access the system by employing your default login credentials.
Choose the WiFi network you wish to amplify.
Proceed by following the prompts displayed on the screen to finalize the setup.
We hope that by following the steps outlined above, you will be able to configure your Netgear EX6400 WiFi range extender. If you get stuck at any point, please contact our experts.
Netgear EX6400 setup Using WPS Method
Utilizing WPS represents the simplest method for setting up the Netgear EX6400 Extender. You can set up your Netgear EX6400 wifi range extender in just two minutes.
Follow these steps for Netgear EX6400 setup through WPS:
The power source should be connected to the Netgear EX6400 wifi extender.
Wait until the power LED transitions to a solid green light.
Note that the WPS setup for the Netgear EX6400 Wi-Fi extender works best when it's in close proximity to your router.
Begin by pressing the WPS button on the Netgear EX6400, followed by the corresponding button on your router.
This process will create a connection between the extender and your standard Wi-Fi network.
This is the procedure for establishing a connection to your existing internet using the WPS method.
Netgear EX6400 Extender Firmware Update
Firmware is a type of software that controls the internal operations of a device. In the case of a wifi range extender, the firmware controls the way the extender communicates with the router, the way it amplifies the wireless signal, and many other functionalities.
Steps to Update Firmware Of Netgear EX6400 extender :
Power up your Netgear EX6400 extender.
Connect a device to the extender.
Open a web browser and enter "192.168.1.250" in the address bar.
Log in with your username and password.
Navigate to the menu and choose "Firmware Update."
Select "Check Online" to determine if a newer firmware version is available.
If an update is available, click to update.
Your Netgear EX6400 extender's firmware is now up to date.
Common Issues during Netgear EX6400 setup
Mywifiext.com and mywfiext.net are no longer operational.
The WiFi extender is connected to the router, but there is no internet access.
I am unable to access mywifiext.local.
Mywifiext password is incorrect.
The WiFi extender is constantly disconnecting.
The WiFi extender is unable to connect to the network.
I forgot the default Netgear extender password.
Netgear EX6400 cannot be accessed.
The Netgear EX6400 is not operational.
EX6400 cannot be reset.
Troubleshooting Tips for Netgear EX6400 extender configuration
If you're experiencing issues with your extender and it's affecting your Wi-Fi device's performance, follow the troubleshooting steps provided below to quickly resolve the problems and have your EX6400 functioning optimally within minutes.
Verify whether your Netgear EX6400 extender is securely connected and receiving sufficient power.
A high-speed internet connection is required for your device.
Check that all of the wired connections are secure.
Keep your extender away from cordless phones, Bluetooth devices, metal objects, room corners, microwave ovens, and other devices that could interfere with your WiFi signal.
If mywifiext.net is not functioning, ensure that you have accurately entered the correct web address in your browser's address bar.
Check that your Netgear EX6400 is running the most recent firmware version. If not, update your device to the most recent version right away.
If the preceding troubleshooting suggestions prove ineffective, reset your extender to its factory default settings and then proceed with the reconfiguration process.
#Netgear EX6400 setup#Netgear EX6400 setup Using Web browser#Netgear EX6400 setup Using WPS Method#Netgear EX6400 Extender Firmware Update#Common Issues during Netgear EX6400 setup#Troubleshooting Tips for Netgear EX6400 extender configuration
1 note
·
View note