#Netgear ex3920 extender setup
Explore tagged Tumblr posts
Visit Tumblr Blog
Explore Tumblr blogs with no restrictions, modern design and the best experience.
Last Seen Tumblr Blogs


Fun Fact
Tumblr was the first site to host the blog for President Barack Obama in 2011.
Photo

Netgear-ex3920-extender-setup is most widely used method to setup NETGEAR extender in existing network. That means this method is most preferred over other because of the reason that this method does not want user to ensure any pre requisite before going with this method.
#Netgear ex3920 extender setup#Netgear ex6100 extender setup#Netgear ex2700 extender setup#Netgear ex7000 extender setup
0 notes
Link
There are two basic way to configure any netgear wireless range extender to your existing or preferred wireless network. It is always said that range extender is a simple plug and play device. That is because all you need to do is plug in the range booster within the range of your regular router and wait for the power light to be steady green.
0 notes
Text
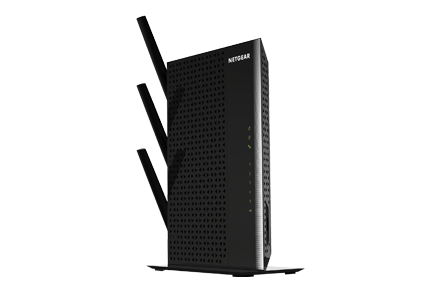
Netgear EX3920 Setup
You can increase the range and speed of your current network by adding dual-band WiFi with the Netgear EX3920 Setup. It functions as both a range extender and an access point. With its dual-band range, Netgear AC750 EX3920 can reach up to 100–120 feet away.
How do I configure my Netgear EX3920?
For the Netgear EX3920 setup, the following procedures must be followed:
For your home WiFi, position the EX3920 AC750 Extender next to the router.
Connect the extender to the power outlet.
Wait for the power light on your Netgear EX3920 to first turn amber and then solid green.
If the power LED is not glowing, press the power on/off button.
You must connect your wireless device to the Netgear_ext network after turning on your extender.
Once you've established a network connection with the Extender, go to www.mywifiext.net.
To install your Netgear EX3920, follow the directions on the screen.
Netgear EX3920 Setup Using a WPS Button
Steps for Setting up a Netgear EX3920 extender with WPS:
The Netgear AC750 EX3920 extender must be turned on.
Install the WiFi extension and router in the same location.
Connect your extension to a power outlet once you're done.
Watch for the EX3920's Power LED to become green.
The extender's WPS button should be pressed.
If the Netgear EX3920 Link Status LED is lit in white, your extender and router are connected properly.
Your extender should be relocated.
Bring a laptop or other mobile Internet-capable device if you're travelling somewhere with patchy WiFi router service.
With a computer or mobile device that supports WiFi, join the enlarged network.
If you still have any issue regarding Netgear EX3920 Setup, then don’t feel ashamed to contact our experts via live chat or toll free helpline number.
Problems with the Netgear AC750 EX3920 setup
Not working is Mywifiext.net
WiFi extender connects but no internet due to incorrect mywifiext password
WiFi extender cannot access mywifiext.local because it is not connected to the network.
The Netgear Genie app won't launch.
Accessing 192.168.1.250 IP address has problems
CD WiFi connectivity difficulties have been resolved
The LED lights on the extender are unstable.
Mywifiext.com won't launch
Netgear EX3920 extender loses internet access and won't let you log in
updating Netgear firmware is not possible
After a fix for the EX3920 MAC address filtering problems, mywifiext.net is no longer accessible.
WiFi extender EX3920 not working after failed update and not connecting to the internet
No network name for Netgear range extenders
Extender from Netgear not working
No internet on Netgear EX3920
Inability to restart the Netgear extender's Internet connection due to issues with the red light on the device
Troubleshooting tips for Netgear EX3920 Setup Problems
Use the troubleshooting instructions listed below to resolve setup issues with the Netgear WiFi extender EX3920:
Check to see that the Netgear AC750 EX3920 extender is getting the right amount of power from the wall outlet.
When plugging in the extender, make sure the wall plug is not damaged or shorted.
Get your device a high-speed internet connection.
Verify each and every electrical connection. Use only undamaged cables.
Place your extension away from things like cordless phones, microwaves, fish tanks, room corners, metal objects, walls, and aluminium studs. Also, keep your extension away from metal objects, walls, and walls.
Check to see if you have the right URL entered in the address area if you are experiencing problems with mywifiext.net.
After doing a power cycle, try configuring your Netgear extender once more.
Only the most recent version of your web browser should be used to access mywifiext.net.
Update the firmware on your extender to the latest Netgear version.
Reset the extender's settings to their original factory defaults.
How can I reset my NETGEAR Ex3920 to factory settings?
You can reset the default settings on your EX3920 using one of two methods. both via the online user interface and by initially choosing the Factory Reset option (GUI).
The hard reset:
Locate anything, such as a pen or a paper clip.
On the extender bottom find the factory reset button.
Hold down the reset button with a paperclip or pen for at least five seconds, or until the Device to Extender LED starts to flicker amber, before releasing the button.
After the extender has restarted, release the Factory Reset button.
After rebooting your factory settings have been restored.
Reset Using Web GUI:
Use a Computer that is either wirelessly or wired connected to the extender.
Open a web browser like Google Chrome, Mozilla Firefox, or Internet Explorer.
In the address bar of your web browser enter www.mywifiext.net.
To log in, go to the login page, input your email address, and then click Log In.
On the NETGEAR genie page, choose Settings, followed by Extra Settings.
Press Reset. Tap Yes to proceed.
Wait for the web interface to finish restoring the device to its factory default settings.
If you still have any issue regarding Netgear EX3920 Setup, then don’t feel ashamed to contact our experts via live chat or toll free helpline number.
1 note
·
View note
Text
We Provides help all Type of Model in your Router/ Extender Setup
We Provides help all Type of Model in your Router/ Extender Setup
EX6150,EX6100,EX6200,EX3920,EX3700,WN3500RP,WN2500RP, WN3000RP,WN2000RPT,EX2700,WN1000RP,Netgear EX7000,EX8000.
mywifiext.net is just a local web address and it mainly uses a Net gear range extender setup. When anyone enters mywifiext.net in the search bar of the web browser where they asked about the username & password to Log-in.
0 notes
Link
Netgear range extenders are installed to increase the area of a range of your network. Sometimes there are more than one extenders are installed in various houses to cover the range. At that time i…
0 notes
Link
Netgear range extenders are installed to increase the area of a range of your network. Sometimes there are more than one extenders are installed in various houses to cover the range. At that time it becomes difficult to connect with the actual extender with which you want to connect the device.
0 notes
Text
Find the Best Location for new Netgear EX3920 extender
If you are using advance Netgear EX3920 extender device for your wifi access then you will need to make sure that you can find the best and proper location for your extender device. You can easily get location for your wifi extender device link LED for your device. Set up the Netgear wifi extender using the WPS button from the blog here.
When you do not get best location for your Netgear EX3920 extender, you will start getting slow wifi Netgear extender login connections from wireless devices. When you use this status LED you will instructions for placing your wifi extender device.
Here are Tricks to Find Best Location for Netgear EX3920 extender
· When you find that Netgear EX3920 extender link status LED is solid red in color that means you will need to place your wifi extender and router device near to each other.
· When you find that link status LED is solid Amber in color that means you have to change location of your wireless device. When you sit too far from your Netgear EX3920 extender device, you will start getting slow wifi connections.

· When you place your Netgear EX3920 extender device near to any other electronic device then you must change the location as soon as possible. That is because other electronic devices can disturb the wifi signals of your wifi extender devices.
· You must not place your Netgear EX3920 extender device in direct sun light because direct sun light can easily damage the inner circuits of your device.
These are some tips for choosing best location for your Netgear EX3920 extender devices. When you can’t get all these tricks that you can contact Netgear team for help. You can also get remote access control and get setup for your devices
0 notes
Text
How to Perform Netgear AC750 Setup Without WPS
Don't find a WPS button on your home WiFi router to set up your Netgear AC750 extender? Well, you need not to worry! You can even perform the Netgear AC750 setup without WPS. Yeah, you read that right! In this post, you will find the process on how to set up Netgear AC750 WiFi range extender without WPS. Let's get started.
Netgear AC750 Setup
Netgear AC750 WiFi range extender has various different models such as EX3110, EX6100, EX3700, EX2800, and EX3920. No matter which model you own, you can set it up with the method given in this post.
Here are the steps to set up Netgear AC750 wireless range extender without WPS.
Step-1: Place Your Extender
First and foremost, you need to place your Netgear AC750 WiFi extender in a manner so that you get no issues while setting it up. Follow the below-given guidelines to place your Netgear extender:
Keep your Netgear extender to a central location in your home or office.
Also, try to place your extender and the router in the same room.
Don't hide your extender under a table, inside an almirah, behind a box, nearby walls, and in corners.
Place your Netgear device away from electronic appliances such as microwave ovens, refrigerators, cordless phones, electronic garage openers, etc.
Also, keep your extender at a certain distance away from metal objects like aluminum studs.
Position your range extender a few feet away from reflexive surfaces like glasses, mirrors, etc.
Step-2: Turn on Your WiFi Extender
Once done with the extender placement, the next step is to turn it on. For this, connect the power adapter of your Netgear AC750 WiFi range extender to a wall outlet and switch it on.
Make sure that the LED on your extender turns solid green.
Step-3: Connect Your Extender
For a hassle-free Netgear WiFi extender setup, you have to connect your extender with the router. To get the job done, you can either make a wired connection or connect wirelessly.
In order to make a wired connection, you need an Ethernet cable. Connect its one end to the extender and another end to the router.
Quick Tip: Be sure that the cable connection you made is perfect and finger-tight. Also, keep in mind to use only non-damaged and cuts-free Ethernet cable for making the connection.
Step-4: Log in to Your Netgear AC750 Extender
As soon as you have made a connection between your extender and home WiFi router, turn on a PC or laptop. Afterward, launch your preferred web browser, be it Google Chrome, Mozilla Firefox, or Internet Explorer.
In the address bar, type mywifiext web address and press the Enter key. The login window will appear. Type in the username and password. Re-check the entered details carefully and hit the Log In button.
Step-5: Access the Setup Wizard
Next, you will be directly redirected to the Netgear genie setup wizard for the AC750 extender. This wizard provides on-screen instructions to make the extender setup an easy task for you.
Simply follow the on-screen steps in the exact given order.
Step-6: You Are Done!
That's it! As soon as the setup asks you to click on the Finish button, it means your Netgear AC750 extender has been successfully set up.
All LED lights on your extender must be solid green. Now, unplug your Netgear range extender by disconnecting its power connector from the wall socket. Place it to your favorite location in your home. However, make sure that it is in the range of your connected devices.
At this point, you can connect as many wireless devices to your new extender's network as you wish and enjoy uninterrupted internet connectivity all over the house or workplace.
So, this was all you need to know about the Netgear AC750 setup without WPS. How did you find this method; easy or hard? Let us know in the comments below.
0 notes
Text
Unable To Follow The Manual Setup To Setup The Netgear Extender!
While setting up the Netgear wireless rang extender using the Web Browser Setup many users often see the error message saying you are not connected to your Extender’s Wi-Fi network. This means that there is no connection between your Netgear wireless rang extender and existing Wi-Fi network, that’s why many users are not able to access mywifiext.net. To avoid this, make sure to connect your Netgear wireless rang extender with your existing Wi-Fi network.
Some of them are : EX8000, EX7000,EX6400, EX6200,EX6120, EX6100, EX3920,EX3700,EX3110, WN3500RP,WN2500RP,WN3000RP,WN2000RPT,EX2700.

0 notes
Text
New NETGEAR Extender Setup
Had you bought new extender and now is wondering the way to install extender in your already existing network? If it is the case, then you had landed on right website. In this article we will try to give you holistic view of how to go for new NETGEAR range extender setup.

As you all do know that NETGEAR range extender comes in wide range of varieties, among which user can choose as per their requirement. In the coming sections we will try to elaborate on new extender setup for most of these extenders. Hope this will be helpful for the reader.
New extender setup for Nighthawk EX7000 AC1900 WiFi range extender Nighthawk EX7000 AC1900 WiFi range extender is specially designed to provide dual band WiFi signal up to 1900 Mbps. This NETGEAR range extender belongs to one of the most advanced range extenders. Thus they are compatible with 802.11 a/b/g/n/ac WiFi devices. For new extender setup of Nighthawk EX7000 AC1900 WiFi range extender you can follow any one method from following listed methods as per your desire.
1. Wi-Fi Protected Setup(WPS) method: - In this method you will be able to install your new EX7000 range extender with just pressing WPS button on both router and EX7000 AC1900 WiFi range extender. But the only requirement for using this method is that your network router should have to be WPS enabled. All you have to do is • Put your range extender on power • Press WPS button on EX7000 Ac1900 range extender • Within time period of 2 minutes, press WPS button on router And that’s it. Your new extender setup is completed. You can place it wherever you want and can access extender network by using any WiFi device available in your network. For this do select network named same as your home network but having _EXT at the end of its name. Password for getting connected to extender network will be same as that of your home network router. If in case you want to change credentials for your extender network then you have to first log into www.mywifiext.net setup page by using default username and password which are admin and password respectively. Here firstly go into settings option and then wireless setting. Then enter desired credentials and hit apply button. Thus your password and username will stand to be changed. Now you have to re-establish connection between WiFi device and extender using new credentials.
2. Manual method: - In case your network router does not support WPS mode of installation then best option available to you is manual method. In this method you have to manually establish connection between your device such as computer and NETGEAR range extender with the help of Ethernet cable. Once connection between your device and extender is establish launch web browser on your device. In case you are going for new extender setup for the first time then while launching web browser you will be automatically landed on http://www.mywifiext.net setup page. But if due to any reason http://www.mywifiext.net web page do not open up by default then you are requested to enter http://www.mywifiext.net or IP address assigned to that page that is 192.168.1.250 in the address bar of your web browser. Pop up window will appear, asking you to enter username and password for http://www.mywifiext.net login. BY default, Username is admin and Password is password, but in case you had assigned any particular username and password to your NETGEAR range extender then you have to enter same here. By this you will be prompted to NETGEAR Wi-Fi range extender Setup wizard. Here you can do all changes as you desire. To explore more on this topic, you can check our article on the same by clicking on this link.
New Extender Setup n300, New Extender Setup ac1200, New Extender Setup ex7000 AC1900 wifi range extender, new extender setup ex7500, ex7300, ex7000, new extender setup ex6400 , new extender setup ex8000, new extender setup ex6200, ex6920, ex6400,ex6100, ex6150, ex6120, ex6000, new extender setup ex3800, ex3700, ex3920 ,new extender setup ex2700, New extender setup WN3500RP, WN3000RP, WN2500RP, WN 2000RPtv1, WN1000RP Procedure for all of these extenders are same as discussed in New extender setup EX7000 AC1900 WiFi range extender. All steps will be same as given above. SO you are requested to follow above given steps holistically for all range of NETGEAR range extender.

We had tried our level best to explain New extender setup in depth as possible. But in case any doubt remains unexplained, we apologise for the same. You can explore other articles on our website for the same. In case even then your doubt does not get clarified then you are requested to kindly visit NETGEAR’s official website for more information.
#Netgear#MyWifi#mywifiext setup#www.mywifiext.net#mywifiext.net new extender setup#www.mywifiext.net setup#netgear router login#technology#mywifiext.net login#netgear extender setup#Extender#Netgear Router Setup#router#wifi
0 notes
Link
Mywifiext login is a local web address to install Netgear wifi range extenders with your present wireless framework. The fast and most easy way to deal with setting up the Netgear wifi extender is through WPS.
0 notes
Link
The problem of dead zones is highly evident when you are living in a bigger house. These zones are basically the areas that are created in your house where the wi-fi signal never reaches. When you have installed a single router, it will never be able to cover the whole house.
0 notes
Link
Once you get advance Netgear EX3920 extender device for your home, you can easily setup and configure these advance wifi extender devices from a computer device. When you access www mywifiext net s…
0 notes
Link
Once you get advance Netgear EX3920 extender device for your home, you can easily setup and configure these advance wifi extender devices from a computer device. When you access www mywifiext net s…
0 notes