#PSD to HTML in Photoshop
Explore tagged Tumblr posts
Visit Tumblr Blog
Explore Tumblr blogs with no restrictions, modern design and the best experience.
Last Seen Tumblr Blogs


Fun Fact
28.6 is the average number of monthly visits per US mobile user.
Text

— COMO JOGAR NO TUMBLR?
Parte I: o tumblr. Criando seu blog, customizando e como usar a plataforma para jogar rpg.

Aviso: eu escrevo muito. Esse tutorial vai ser gigantesco.
Ultimamente tenho visto algumas pessoas comentarem que só não jogam no tumblr por não saberem como. Acham que é complicado demais, assustador demais. Existem diversos guias de como jogar por aqui, mas a plataforma evoluiu com o tempo, por isso vim trazer um guia atualizado pra quem tem interesse em explorar os rps do tumblr.
Nesta primeira parte vamos falar sobre a plataforma e tudo o que você precisa saber para começar a usar.
Primeiro, algumas questões comuns:
Preciso entender de html?
Não. Hoje existe o modo de leitura, o que faz com que os blogs sejam vistos apenas pela dashboard e você não precisa ter um theme customizado. E mesmo que você prefira ter um theme, existem blogs como o theme-hunter com themes que você consegue customizar sem entrar no html. Posso fazer um guia sobre isso, se vocês quiserem.
Posso jogar pelo celular?
Uma das desvantagens do jogo pelo tumblr é que, pra muita coisa, é necessário usar o computador. Isso porque nós precisamos cortar os posts conforme jogamos, e por conta das atualizações da plataforma, só é possível fazer isso com extensões de navegador (mais sobre isso neste mesmo post). Você pode pedir para o seu partner cortar os posts na vez dele, por exemplo, o que te permite jogar apenas pelo celular. Além disso, muitos players utilizam gifs nos turnos, o que também (até onde sei) só é possível pelo computador, já que demanda o uso de gif hunts (mais sobre isso em outro post). Claro, o uso de gifs não é obrigatório.
Preciso usar templates, customizar meu blog de uma forma específica, etc.?
Não. Como disse ali em cima, você pode só criar um blog em modo leitura. Não precisa baixar nenhum template, se não quiser, e nem usar nada muito elaborado. O objetivo é jogar, então o foco não é a est��tica do seu blog. Não há necessidade de aprender a usar photoshop e nem nada disso, ninguém cobra que você tenha psds diferentes, um fixado diferente, coisas assim. Muita gente usa essa questão como impedimento mas muitos users do bsky/twitter usam templates, por exemplo. Não há diferença nenhuma. Assim como não é obrigatório lá, por aqui também não é. O seu blog você personaliza como quiser e puder.
Agora, para o tutorial.
Se você está aqui, provavelmente já tem um blog. Sabe o básico de como criar um tumblr e suas funcionalidades como criar posts, reblogar, curtir, etc. Agora, então, vamos focar nas funcionalidades do tumblr que usamos especificamente para jogar rpg.
Primeiro, a customização.
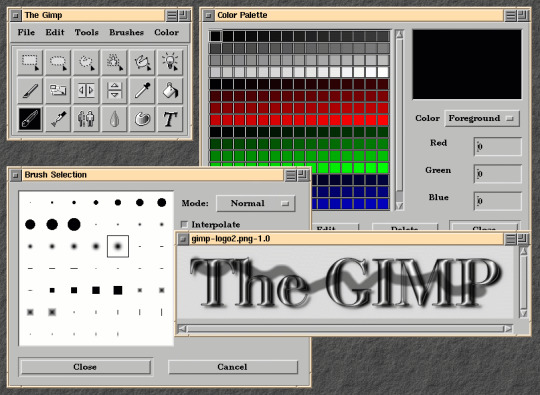
Neste tutorial vamos focar na criação de um tumblr em modo leitura, sem a utilização de um theme customizado e sem criação de páginas. Assim que você cria seu blog, pode ir até a página de configuração e vai ver algo assim:

Aqui você altera sua header, seu icon, título do blog, descrição e cor de realce. E descendo um pouquinho mais você encontra esta opção:

Para manter seu blog em modo de leitura, você mantém ela desativada. Caso queira adicionar um theme customizado, ative ela e uma nova opção de customização vai aparecer. Como não é o nosso foco, vamos prosseguir.
Não existe um padrão de como customizar o tumblr de um personagem. O básico é: se o seu blog for para um personagem só, use a foto do FC dele. Se o seu blog for multimuse (ou seja, para mais de um personagem), pode utilizar algum outro icon que desejar. A header é um complemento, você pode optar por desativar o uso dela, ou utilizar uma imagem que transmita algo sobre o seu personagem. O título e descrição também ficam a critério do player. Você pode optar por colocar informações básicas do seu personagem, por exemplo, ou algum quote da sua escolha.
Vamos ao meu exemplo, primeiro na página de edição e depois com ele pronto:

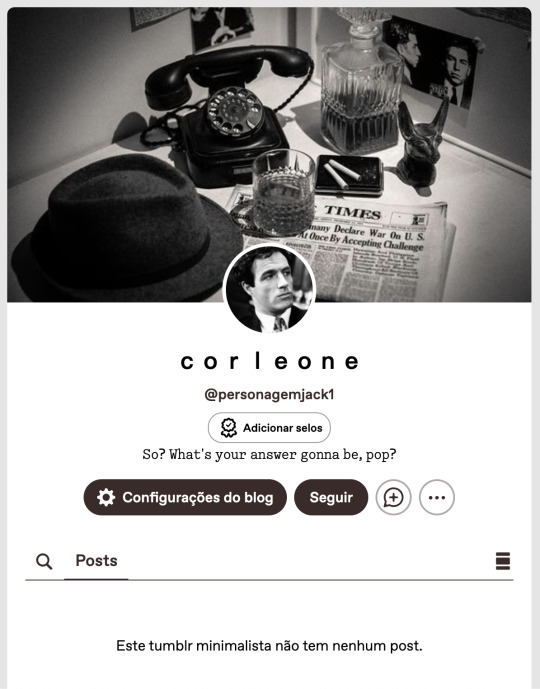
Está pronto! Pretendo fazer um guia mais detalhado para blogs multimuse e outro para sideblogs, para aqueles que jogam com mais de um personagem na mesma comunidade.
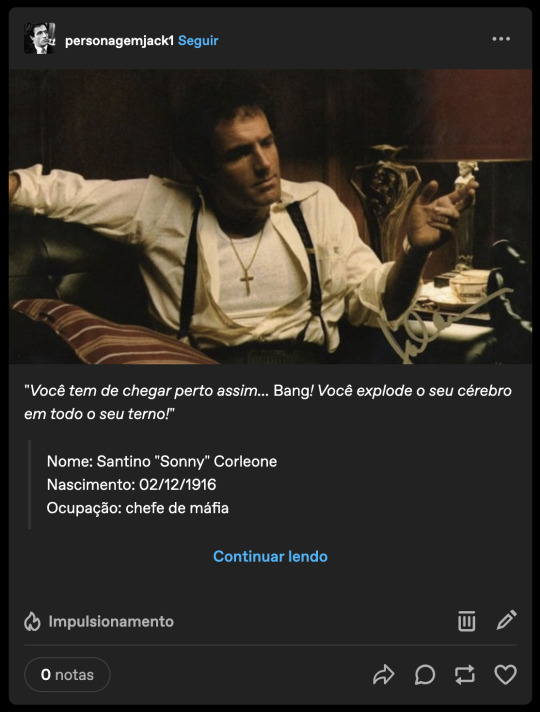
Agora, o próximo passo para a customização do seu blog é totalmente opcional, mas você vai ver na maioria das comunidades. Se trata do fixado. O mais comum é que você utilize no fixado as informações que colocou na ficha, e pode colocar uma imagem para ilustrar. Como o objetivo é ser simples, o que você pode fazer é utilizar uma foto do seu fc.
Você vai criar um novo post com foto, adicionar a sua foto, e depois sua descrição.
Existe uma regra de etiqueta na comunidade de não ter posts muito longos na dashboard, exceto turnos. Sendo assim, opte por uma descrição curta inicialmente, e adicione uma divisão de read more para então colocar a biografia completa do seu personagem.
Para adicionar a barra de read more, você inicia um novo parágrafo e usa esta opção:

Seu post pode parecer com algo assim:

E depois de postado:
Para fixar você vai clicar nos três pontos no canto superior direito e selecionar fixar. Pronto, este post será a primeira coisa que verão quando abrirem o seu tumblr.
Algumas pessoas também incluem neste post inicial as conexões desejadas e ativas, além da biografia. Também pode incluir trivia, headcanons, etc. Você pode optar por criar um post fixado com links que direcionam para a bio e outras páginas, mas vou falar sobre isso no guia para blog multimuse.
Seu blog está pronto para jogar! Vamos ver como aplicar e como começar a jogar na próxima parte, mas aqui vou te mostrar como jogar.
O jogo no tumblr consiste em: criar posts de texto e reblogar posts. Simples assim. A única forma de jogar é por meio de turnos, sejam estes curtos ou longos.
Você pode criar um starter, ou até mesmo reblogar um starter aberto para começar um turno (mais detalhes no próximo post), mas basicamente tudo gira em torno dos posts de texto.
Para criar um starter, você vai criar um novo post de texto e escrevê-lo:

Questões mais específicas sobre starters serão discutidas no próximo post. Mas, basicamente, você vai postar o seu starter e esperar que outras pessoas respondam.
Ok, mas como responder? Reblogando!
Para isso, vamos dar uma pausa no tumblr. Mencionei lá em cima sobre a necessidade de cortar posts, certo? O que isso significa?
Basicamente, quando você rebloga um post e adiciona algo, vai criar uma corrente de respostas. Esse post fica gigantesco, e vai atrapalhar a visualização da dashboard. Por isso, a regra é cortar as respostas. Para fazer isso, você precisa baixar uma extensão chamada XKit Rewritten.

Depois de baixar, você vai atualizar a página do tumblr, ir até a extensão pela barra do navegador, selecionar o XKit e ativar a opção de cortar posts:
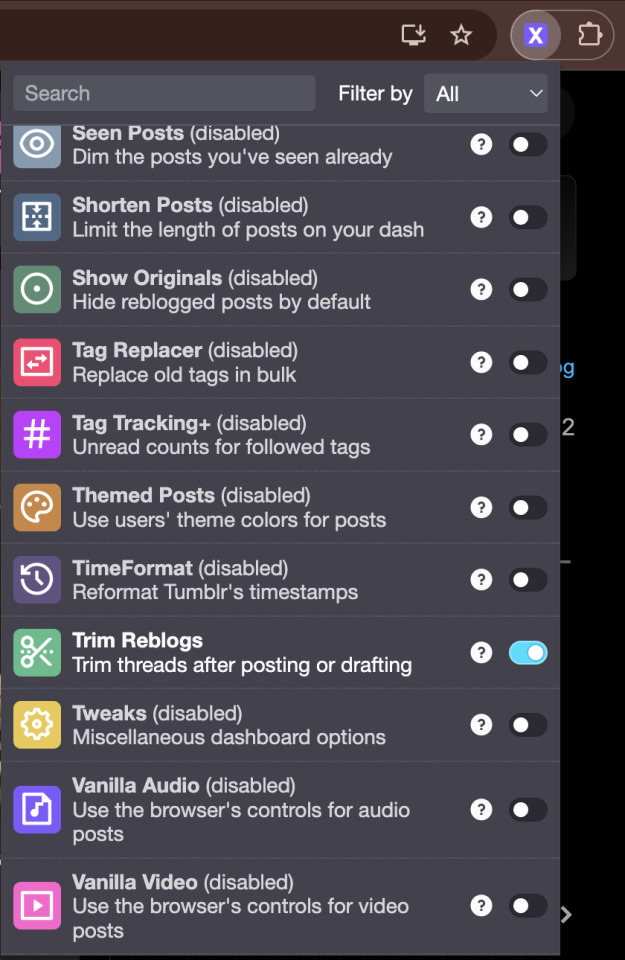
Pronto. Guarde esta informação.
Agora, continuamos nossa explicação de como jogar.
Digamos que você viu um starter aberto que quer responder, como fazer? Você vai selecionar reblogar, abrir a janela de texto, e digitar a sua resposta.

Feito. Você escreveu a resposta do turno da forma que achar melhor, e tudo o que precisa fazer é postar. E depois a outra pessoa vai te responder da mesma forma. Simples assim.
O detalhe importante aqui é o corte de posts, lembra? O ideal é sempre manter apenas duas respostas nos posts: a do outro player + a sua. Portanto, depois dessas duas interações iniciais, vai acontecer o seguinte:
O post vai aparecer desta forma para você:

Escreva sua resposta, mas desta vez, você não vai reblogar o post imediatamente, você vai salvar nos rascunhos. Ao lado de reblogar, você clica na seta, e seleciona a opção, depois só salvar.
Vá até a página de rascunhos, seu post com a resposta estará lá, e agora entre as opções você vai encontrar a de cortar o post.
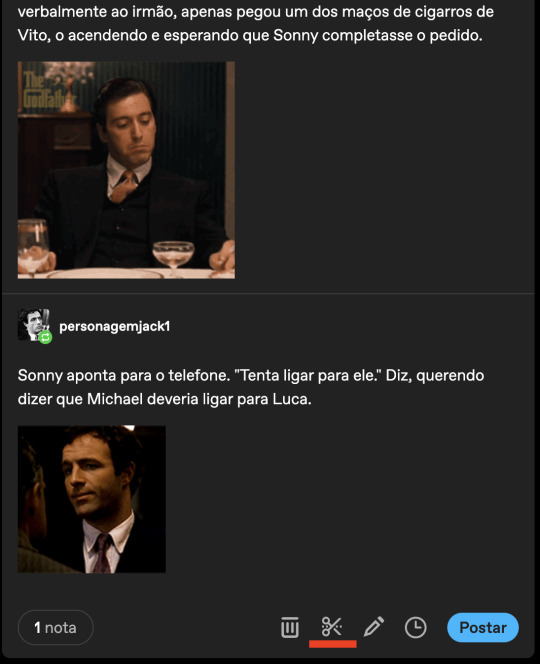
Eu aconselho que você só selecione esta opção quando estiver com a sua resposta pronta para postar, pois ela vai apagar a sua resposta anterior e caso você ainda precise responder, não vai ter como ver o que já havia respondido. Quando estiver pronto para cortar, esta tela surgirá:
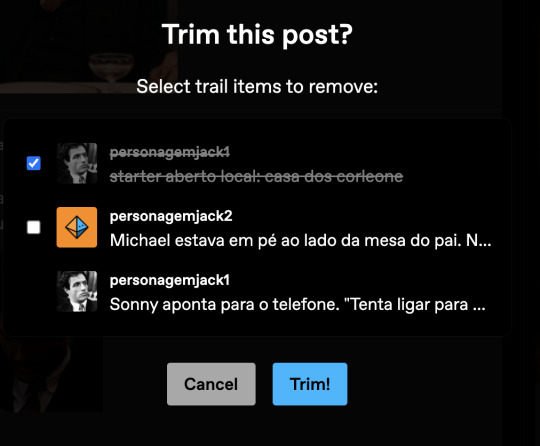
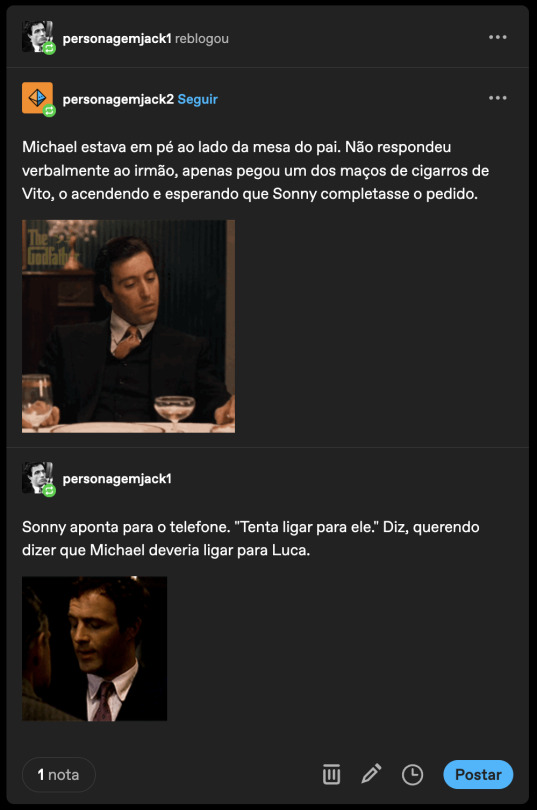
Perceba o seguinte: todas as vezes que você selecionar esta opção, a sua resposta anterior será apagada. Esse é o padrão que você sempre vai seguir: apagar a sua resposta anterior, manter a resposta do outro personagem. Essa extensão já te dá essa opção, então você não precisa selecionar nada, apenas clicar em trim! e o post será salvo nos seus rascunhos assim:
Depois disso é só postar normalmente.
E é desta forma que se joga no tumblr, sem segredos. Apenas escrever, postar e reblogar. As únicas coisas mais específicas e que demandam mais tempo são o corte dos posts e a adição de gifs, o que pode tornar difícil para algumas pessoas.
Fora isso, talvez seja importante saber que o jogo todo acontece na dashboard por meio dos turnos. O tumblr tem a funcionalidade de chat, mas ele é utilizado para conversas em OC.
Sobre os gifs, também existe uma forma correta de adicionar eles. Você precisa encontrar uma gif pack ou uma gif hunt do seu FC, salvar o gif que deseja usar, e então adicionar no post clicando em enter para começar uma nova linha, clicar na foto vermelha e selecionar o seu gif.

Não é recomendado pesquisar o gif pela opção do tumblr, pois ele pode ser grande demais. Não existe um padrão obrigatório para os gifs, mas o ideal é que ele não tome a página toda como esse, por exemplo:

E assim você aprendeu o básico de como é jogar no tumblr!
Por último, tenho uma dica importante que pode ajudar na sua jogabilidade. O tumblr mudou muito e agora você precisa mudar as suas configurações para ver os posts da dashboard em ordem cronológica.
Para isso, você vai ir em configurações > painel > preferências e desativa essa opção:
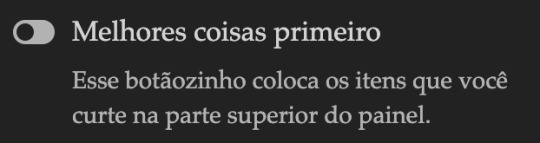
Pronto, agora você vai ver os posts em ordem cronológica!
Pode parecer assustador de início, mas é muito simples.
Como este é um guia básico, podem surgir algumas outras dúvidas. Caso você queira saber algo que eu não citei aqui, fique à vontade para me mandar uma ask.
Na parte 2 nós falaremos sobre as dinâmicas de um rpg no tumblr, como entrar em um, termos mais usados, entre outras coisas relacionadas à como jogar em si.
Nos vemos lá!
32 notes
·
View notes
Note
sorry if you’ve answered something similar before but how do you format things for your website? in the collections you have for poems
i love how it looks. the book kind of format it has
and i want to do similar/the same formatting for my own works but im really struggling…
i've been asked stuff like this a lot and i don't mind explaining it often because i want people to make websites more. i made a tutorial video at some point but it's kind of hard to make a curriculum or tutorial or whatever around this kind of thing because it's really just a self expression thing. i'll try to break down as much of my thought process as makes sense.
i design my pages in photoshop with either double/single page display in mind and then i use html to set them next to each other. most of the choice here comes down to how overwhelming i want my designs to feel. in the case of the lonely leaver page, the entire book was designed to be something that could be a physical book, and so from the getgo i made the pages in that kind of format. i previewed things in acrobat which has a booklet view mode (which singles out the front and back cover around the contents of the file) & allows you to process double page view as well. as for the actual process in photoshop before that point, i typically will open a canvas that is the size of the full 2 page spread (i.e. 8 inches wide for 2 pages which are both 4 inches wide) and i set grid lines for bleed margins and to mark the center of the page so that i can make the composition something that im comfortable with having a gap in the middle from the book folding. with lonely leaver i had to reformat about half the book at some point because i wanted to make it a larger resolution which was annoying but i just keep my guidelines for a print size in mind while im working. often if im a certain amount of time into a project that i feel like i will be spending a lot more time with i'll create a dummy psd file at this point which is devoid of content but which has all of the margins/resolution stuff set up already so i can just open that up and save a different version of it when i'm done.
my actual writing process and my design process is generally extremely intertwined, that's why things tend to be varying degrees stream of conscious in my work i think. i'll for instance, have a thought im stuck on for several days, and then open photoshop without having a poem or comic in mind, but i'll fill the canvas with some kind of color like red or yellow or a photo or whatever, and then open a text box or start drawing. telling a story through composition (i.e. page layout itself) is generally my favorite aspect of art and design because i enjoy how violent and dramatic framing angles can make the content of a piece feel so i'll try to move stuff around as much as possible in order to get my desired effect, often times using place holder shapes in lieu of finished design elements in order to get a rough blocking. as i do this i tend to react to what i'm writing/making as i'm doing it, and i do a lot of selective self editing during this part. for instance, i'll start manipulating rasterized text or cutting around images or whatever. i'll reread and look at whatever im doing for a couple of hours and then when i'm done with a spread or whatever i will save the document as a psd with a combined full spread and then each page separately as pngs or whatever (split at the middle grid line, back to the example, i'll save 2 different 4 inch wide images by changing the canvas size).
when it's time for me to put stuff on my website i then batch convert whatever pngs i exported into webp's because they load faster and take up less space on the server/my computer. you can look at my direct html/css files in your internet browser's explorer mode to see exactly what i do but essentially i just have either 1 or 2 images in a block and then a series of repeating vertical blocks containing images. i don't have an extremely efficient way of uploading pages and i'll typically just copy the same
"<p><img src="01.png"> <p><img src="02.png">"
like, 30 or 40 times or whatever into a html document. i use visual studio code for this stuff because it lets me do a bunch of stuff like having several files open at once & the navigation pane is nice & there's a live server extension that automatically refereshes the html file in my web browser on file save which is really awesome. i have a css page that i made like, 5 years ago, and i usually just link new projects to that because it has a bunch of different settings in it which i'll toggle on or off depending on the needs of whatever page or i'll add new div id's to it. it's kind of messy at this point, but it gets the job done. i use filezilla and something like bluehost or something for webhosting/file management.
i arrange and organize all of my art extremely methodically so usually in my like "<root catch all poetry folder>" inside of my "<root catch all art folder>" there will be a "<name of specific poem book>" folder which just contains the poems named by their actual name e.g. "dedication to saint eulalia 4.png" and then another folder inside of that is called "paginated" where i, using the acrobat document i arrange stuff in as reference, rename copies of my pages which i have placed in that folder to be named things like "01.png" so that i can then manually flip through it sequentially in the windows photo viewer and also just so that i don't have to go through the arduous process of renaming and tracking stuff inside of the root folder i'm containing that project's files in.
i'm 26 now and i made my first website when i was like 18, and my first zine project and i'm tired of feeling feeling around that same time, so i've got like, coming up on a decade of trial and error behind this and this is generally what has worked for me. my website isn't super complicated and mostly just gets the job done but because i try to think about style and presentation up front with whatever projects i'm doing i tend to just make plans based around that as early as it makes sense. to me having a website for art presentation has always been the Primary Method and intended landing zone for my art so it's genuinely always been a consideration in my process to try to plan around how i will put it on my website. i do this because i believe having my own curated space for containing my art allows it to exist in a context which best heightens whatever message i'm trying to convey. if there's an issues with my website right now they are that i'm very bad at mobile browser formatting & i havent updated the main look of the website in something like 4 years barely at all.
anyway, at the end of the day i think really as long as you can identify whatever your intentions are and do some planning/problem solving around that you should probably be able to find your own method which works for you better than mine might but if you do just want to copy my website the tools to do so are within your brain and internet searches and i believe in you. i think the biggest strength of my website is that it shows how easy it is to just put art big as fuck on a webpage and how effective that kind of minimalism can be. i just want my website to be like a museum's walls. and it's not super complicated to get to that level of html knowledge.
11 notes
·
View notes
Text


On the 19th of March 2025, I downloaded the latest version of the GNU Image Manipulation Program (GIMP). I downloaded it through the Microsoft Store.
https://www.gimp.org/news/2025/03/16/gimp-3-0-released/
GIMP is an open source image editing application for Linux, Unix, Mac and Windows. The latest version is 3.0, which was released for stable use on the 16th of March.
https://en.wikipedia.org/wiki/GIMP
GIMP 3.0 has been in development for 7 years since the previous release version which was 2.10. GIMP 3.0 celebrates a major milestone for the software, here are just a few of the notable changes:
A completed GTK3 port of the application and all of the tool sets
Non destructive editing capability
Better painting and drawing tools
Major HiDPI display scaling improvements
Faster performance boost with muti-threading
Better support for PSD (Photoshop) files
A new revamped light and dark theme set
Native 'Wayland' display server protocol support on Linux systems.
Native Microsoft Store app with auto updates
Lots and lots of bug fixes
See more here:
https://www.omgubuntu.co.uk/2025/03/gimp-3-0
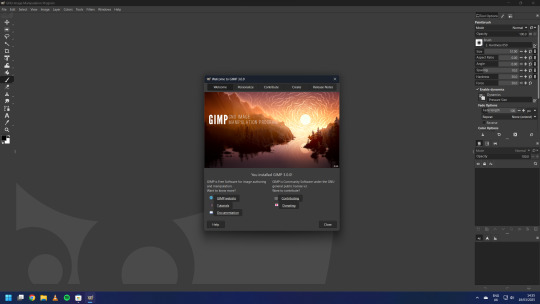
The update also features the option to merge the title bar and menu bar, which provides a minimalistic header bar style to the user interface on Windows and Linux. (see screenshot below)
The theme and icon set can be easily changed in the settings and feature a brand new set of icons that echo the older style of icons used in older versions of GIMP up to 2.8 (2012).
Read the release notes below:
https://www.gimp.org/release-notes/gimp-3.0.html
3.0 also celebrates 30 years since the original version of GIMP was released back in 1995! Its first public release was 1998.
The application features a refreshed logo as part of its release.
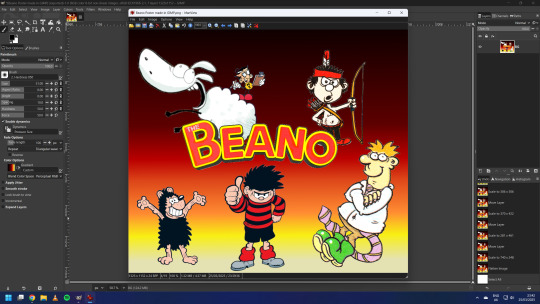
I created a quick mock-up of Roger the Ragdoll using the layers panel for each of the graphics.
-
GIMP got its first point release for 3.0.2, after a week of being available. This version got auto updated on the 25th March.
Underneath is a small project I did involving layers in GIMP. The Beano comic characters included are:
Derek the Sheep by Gary Northfield.
The Numskulls Brainy by Barry Glennard.
Dennis the Menace & Gnasher by Nigel Parkinson.
Colin the Vet by Duncan Scott.
Little Plum by Hunt Emerson.
A gradient effect was added behind the characters.
Each image is shown in the tabs above. I exported the image as a portable network graphic (PNG) afterwards.
This release makes GIMP feel more like a great Photoshop open source alternative. For many users there is still a steep learning curve, however the overall experience feels worth it after 7 years!
4 notes
·
View notes
Text

#PhotoshopByCHAOTICMVSE; tutorials no one asked for. todays headache: helpful links to look for inspiration & help.
Da es oftmals einfacher ist vorgefertigte Templates zu bearbeiten oder sich auch die Inspiration daher zu holen, kommt hier eine Auflistung aller Seiten, die mir noch heute oftmals helfen bei der Benutzung von Photoshop:
Deviantart ; Registrierung: notwendig. Suchbegriffe: rpg templates, character templates, coloring psd
Storming Gates ; Registrierung: notwendig. Mobile Ansicht ist für‘n Arsch! Es handelt sich hierbei um eine Art Forum, bei denen euch HTML Templates zur Verfügung gestellt werden, eine Liste an Avataren geführt wird, man bekommt Hilfestellung beim Bearbeiten mit Photoshop gestellt und auch beim Codieren; außerdem gibt es Tutorials mit Vorschau wie man Bilder in bestimmten Arten und Weisen bearbeiten kann (inklusive aller genutzten Colorings, Overlays, Schriftarten etc.)
Tumblr ; Registrierung; nicht zwingend notwendig. Suchbegriff: Character PSD, character template, coloring psd, photoshop tutorial
YouTube ; Registrierung: nicht notwendig. Suchbegriff: Was auch immer ihr nachgucken wollt bei Photoshop (die Videos sind eher auf englisch als deutsch).
Pinterest ; Registrierung: nicht zwingend notwendig, aber empfehlenswert. Hier bekommt ihr nicht nur gute Overlays, Texturen und Background Material her, sondern auch sehr viel Inspiration wie etwas aussehen kann. Ich habe einen privaten Ordner nur mit Photoshop Zeug wie Texturen, Hintergünden, Overlays, Lichteffekte etc. ; wenn jemand Interesse daran hat, lemme know.
Wenn ihr euch Dateien runterladen solltet von diesen Seiten kann ich bisher nur davon sprechen keinerlei Probleme damit gehabt zu haben. Dennoch müsst ihr immer darauf achten, dass es sich auch um eine .psd file handelt, ansonsten könnte es schwierig sein, damit zu arbeiten. Und denkt daran credits zu geben, if they want so! 🫶🏼
6 notes
·
View notes
Text
7 Benefits of PSD to Responsive HTML Conversion
Designing a stunning website layout in Photoshop is just the first step. To make that design functional, interactive, and user-friendly, it must be converted into responsive HTML. This transformation ensures that your design looks great and works smoothly across all devices, from mobile phones to large desktop screens. Here are seven strong reasons to consider PSD to responsive HTML conversion services for your next project.
1. Mobile-Friendly Experience
Most users today browse websites on mobile devices. A PSD to responsive HTML conversion ensures your site adjusts beautifully across all screen sizes. Visitors will enjoy a hassle-free experience without having to zoom or scroll sideways, which helps keep them engaged.
2. Boost in User Engagement
The user-friendly design keeps visitors on your site for a longer duration. By converting your design into clean, responsive HTML, everything from navigation to reading content becomes easier. A trusted PSD to HTML conversion company can ensure that your website is intuitive and user-focused, increasing the chances of clicks and conversions.
3. Better SEO Ranking
Search engines give preference to mobile-responsive websites. When your HTML is clean, and your site is responsive, search engines find it easier to crawl and rank your pages. With mobile-first indexing now standard, this conversion supports your SEO efforts from day one.
4. Faster Website Loading
Responsive HTML layouts load faster due to optimised coding and lighter design elements. Faster websites improve the user experience and lower bounce rates. A few seconds of delay can cost you visitors, so speed optimisation is a must.
5. Consistent Brand Identity
Maintaining a consistent look and feel across all platforms is crucial for your brand. A PSD design often includes brand-specific fonts, colours, and layout elements. Responsive HTML conversion preserves these visual aspects, ensuring your audience instantly connects with your brand on any device.
6. Cross-Browser Compatibility
Users access websites through various browsers. A responsive HTML site works seamlessly across various browsers, including Chrome, Safari, Firefox, and others. Responsive HTML conversion services ensure that your design and features remain consistent, no matter which browser your audience prefers.
7. Easy to Maintain and Scale
Managing one responsive website is far simpler than handling separate desktop and mobile versions. Updates become easier and cost less time. Plus, your site is future-ready. Scaling or adding features down the line becomes smooth with a clean HTML foundation.
Final Thoughts
Choosing the right PSD to HTML conversion company means turning your creative designs into responsive, high-performing websites. From enhancing user experience to improving your SEO, this single step plays a crucial role in your digital presence. Explore trusted services today and unlock the full potential of your website across every screen, every browser, and every click
#psd to responsive html conversion services#PSD to HTML Conversion company#MagentoDevelopment#MagentoExperts#EcommerceDevelopment#MagentoAgency#MagentoStore#MagentoIndia#MagentoDevelopersIndia#EcommerceIndia#WebDevelopmentIndia#MagentoCompanyIndia#EcommerceSolutions#WebDevelopmentServices#OnlineStoreDevelopment#DigitalCommerce#CustomMagentoDevelopment#SocialMediaMarketing#DigitalMarketing#MarketingAgency#SocialMediaStrategy#ContentMarketing#OnlineMarketing#MarketingTips#BrandPromotion#SEO#PPC#Noida#NoidaBusinesses#NoidaStartups
0 notes
Text
Softhunters: Best PSD to HTML, XML, xHTML Conversion Experts
Why Choose PSD to HTML/XML/xHTML Conversion?
Photoshop (PSD) designs are ideal for creating static layouts. However, for these layouts to function on the web, they need to be converted into responsive and browser-compatible code. Converting PSD to HTML, XML, or xHTML ensures your website is not just visually attractive but also fast, mobile-friendly, and SEO-ready.
Whether you are a business owner with a stunning website design or an agency looking to deliver projects with pixel accuracy, our team of expert developers and web designers in Jaipur can transform your PSD files into dynamic, interactive web pages with clean, structured code.
Visit Now ;- https://softhunters.in/psd-to-html-xhtml-conversion-services/
Benefits of Our PSD to HTML & XML Conversion Services
1. Pixel-Perfect Conversion
We maintain 100% design integrity while converting your PSD to HTML or XML. Every visual element — colors, fonts, layout spacing, and responsiveness — is handled with precision, ensuring your web interface looks just like your original design.
2. W3C-Compliant Code
As a leading website designing company in Jaipur, Softhunters adheres strictly to W3C standards. Our clean, well-commented, and validated code helps improve SEO performance and cross-browser compatibility.
3. Responsive Design
With the increasing use of mobile devices, it’s vital for websites to be responsive. Our developers use the latest HTML5 and CSS3 techniques to make sure your site adjusts beautifully across screens and devices.
4. SEO-Friendly Markup
The conversion process incorporates SEO-friendly practices right from the start. We use semantic HTML tags and optimized images, which helps search engines index your site faster and better.
5. Fast Loading Speed
We optimize the code, compress images, and minimize the use of unnecessary scripts. This ensures quick load times — an essential factor for user experience and search engine ranking.
Why Softhunters Technologies?
With over a decade of experience in web development, Softhunters Technologies has established itself as a reputable website designing company in Jaipur. We combine technical skill with creative vision to bring your PSD designs to life. Our team of certified developers and creative web designers in Jaipur are known for their dedication to quality, innovation, and client satisfaction.
Our Core Strengths:
Dedicated Developers: Skilled in HTML5, CSS3, JavaScript, and frameworks like Bootstrap.
Cross-Browser Compatibility: Websites are tested on Chrome, Firefox, Safari, Edge, and others.
Quick Turnaround Time: We deliver projects on time without compromising on quality.
Affordable Pricing: High-quality conversion services at competitive rates.
Our PSD Conversion Process
We follow a structured, transparent approach that ensures you get the best results:
Requirement Analysis: We understand your PSD file and desired output (HTML, XML, or xHTML).
Slicing: The PSD is carefully sliced into multiple layers to manage each element efficiently.
HTML Markup: Clean, SEO-friendly HTML code is written using the latest standards.
Styling with CSS: CSS3 is used for styling, including animations, transitions, and layout formatting.
Integration and Testing: We integrate your HTML/XML code with CMS if needed and test it across all platforms and devices.
Delivery: The final product is delivered with full documentation and support.
Industries We Serve
Our PSD to HTML and XML services cater to a wide range of industries:
E-commerce
Healthcare
Real Estate
Education
Travel and Hospitality
Fashion & Lifestyle
Whether you’re a startup or an enterprise, we customize every project according to your specific needs.
Hire the Best Web Designers in Jaipur
If you’re searching for a reliable web designer in Jaipur, Softhunters is home to some of the most creative minds in the industry. Our design team doesn’t just convert files — they understand UI/UX principles, accessibility, and the latest design trends. This means your website won’t just look good, it will feel right for users.
We take pride in being among the top choices for PSD to HTML and XML conversion in Jaipur. Our client testimonials and successful project deliveries speak for our commitment and excellence.
Let’s Build Something Great
At Softhunters Technologies, we believe that your website should be a reflection of your brand. From PSD design to flawless HTML or XML implementation, we offer end-to-end solutions that help businesses grow online. Whether you need a static website, an eCommerce platform, or CMS integration, we’re here to make it happen.
0 notes
Text
0 notes
Text
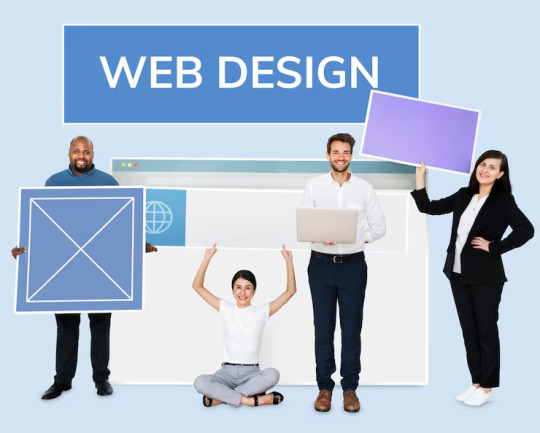
Master Web Design and Digital Marketing: Your Path to Success!

Want to build a strong career in web designing and digital marketing? Look no further! WindowIT Technologies, a leading digital marketing institute in Mohali and Chandigarh, offers top-notch training programs to help you excel in the industry. Our Web Designing Training includes hands-on experience in HTML, CSS, Bootstrap, Media Query, PSD Design, Website Design, Live Projects, and Photoshop.
But that's not all! We also provide advanced digital marketing courses in Mohali and Chandigarh, covering essential skills like SEO training, PPC training, and social media marketing. Whether you are a beginner or looking to upgrade your expertise, our expert trainers will guide you at every step.
Why Choose WindowIT?
✅ Industry-relevant training with live projects
✅ Learn from expert developers and digital marketers
✅ 100% practical and job-oriented courses
✅ Affordable fees with placement assistance
Join our digital marketing course in Mohali or Chandigarh today and gain expertise in SEO training, PPC training, and more! Build a lucrative career with real-world skills.
📞 Contact us now! +91-9876997280
🌐 Visit us at: www.windowittechnologies.com
#WebDesignTraining #DigitalMarketingCourse #SEOTips #PPCTutorial #MarketingExperts #LearnAndEarn #Chandigarh #Mohali
0 notes
Text
Short Guidance on How to Use PSD in HTMLIt’s highly important to maintain consistency throughout your design. This helps to make your website look complete and professional. However, it takes time to make the process of coding easier. All the consistent designs such as footers, buttons, margins or headers help online users to make the PSD to XHTML or HTML5 conversion process a breeze and keep them away from all sorts of bugs. Stay Away from the Blending ModesWhen it comes to Photoshop, using the so-called blending modes is an amazing option. But the reality is that these are too difficult to recreate in CSS. They provide the best and most attractive effects, but the experts of the most reputed PSD to HTML service insist that they bring undesirable results when you try to transform them into HTML. Thus, you can use those to check your design, but the expert web developers of the most famous PSD to HTML conversion services recommend staying away from them when trying to convert PSD into HTML. Cross-Browser Compatibility & General Screen Resolution Are a Must There are many browsers available all over the web and your number one task is to access your personal or company website on as many browsers as you can. That is why it is highly important to make sure that the converter and the coding process is based on these differences. To get the most responsive design possible, ensure to design a special page layout screen resolution – 1366x768px in the process of incorporating the most responsive design techniques. Since you’re the one, who works on the website design step by step, the most experienced authors of the ‘How to complete PSD to HTML Conversion’ tutorials recommend to provide the users with the most pleasing experience ever and thus, cut the need to scroll your page from user’s viewpoint. Have Properly Organized PSD files & Convert Manually If you take a look at any online tutorial to learn more about how to slice, export or cut images, you’ll ensure that a properly organized PSD file gives the visitors an opportunity to comprehend every issue related to the website. Besides, it’ll also shorten the time and effort needed to cope with the process for the reason that all the elements of the site are completely clean and well-ordered. It’s not that hard to choose the right software or online tool available on the web to get the slicing done or convert files from PSD to HTML. But the best idea here is to keep away from them. The point is that a lack of a human hand can lead to multiple bugs that will turn your website into an unusable and poor one. Once you have efficient knowledge and skills in PSD to HTML conversion, it’s getting easier to facilitate the process. The results of the professional conversion are typically stunning when developed by the proficient web experts in no time.
0 notes
Text
PSD to HTML Conversion Services: The Key to a Seamless Web Development Experience

PSD to HTML Conversion Services provide a smooth transition from design to development, ensuring pixel-perfect, responsive websites. By converting Photoshop designs into clean, well-structured HTML code, these services streamline the web development process. This approach ensures cross-browser compatibility, fast loading times, and enhanced user experience, making it a crucial step in professional web development.
1 note
·
View note

Text
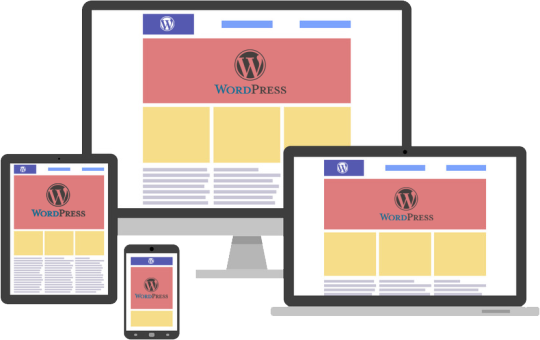
How to Handle Complex PSD Designs During WordPress Conversion
Converting complex PSD designs to WordPress can be a challenging task, but with the right approach, you can achieve a seamless transition. Here’s a step-by-step guide to help you navigate the PSD to WordPress conversion process efficiently.
1. Understand the Design Thoroughly
Before starting the PSD to WordPress conversion, ensure you fully understand the PSD design:
Analyze Layout: Break down the design into sections like header, footer, content, and sidebar.
Identify Features: Note any special features such as sliders, forms, or interactive elements.
Check Responsiveness: Ensure you understand how the design should adapt to different screen sizes.
2. Prepare Your Tools
Equip yourself with the necessary tools for a successful PSD to WordPress conversion:
Design Software: Use Adobe Photoshop or a similar tool to inspect and slice the PSD.
Development Environment: Set up a local WordPress environment for testing.
Plugins and Themes: Install necessary plugins and choose a base theme if needed.
3. Slice the PSD
Slice the PSD into manageable pieces for the PSD to WordPress conversion:
Header and Footer: Extract these elements as separate images.
Content Areas: Slice images used in the content area, such as backgrounds and icons.
Buttons and Icons: Save these as individual images for easy integration.
4. Convert to HTML/CSS
Create a static HTML/CSS version of the design as a precursor to the PSD to WordPress conversion:
HTML Structure: Write clean, semantic HTML to match the design structure.
CSS Styling: Apply CSS to achieve the visual appearance. Use responsive design techniques like media queries for mobile optimization.
5. Integrate with WordPress
Convert your static HTML/CSS into a WordPress theme in the PSD to WordPress process:
Create a Theme: Set up a new WordPress theme directory and create necessary files (style.css, index.php, etc.).
Template Files: Break down the HTML into WordPress template files (header.php, footer.php, sidebar.php).
Theme Functions: Add theme support features in functions.php and enqueue styles/scripts properly.
6. Implement Functionality
Add dynamic functionality during the PSD to WordPress conversion:
Custom Post Types: Create custom post types if the design requires special content types.
Widgets and Menus: Set up widgets and custom menus as needed.
Plugins: Integrate plugins to add features like sliders, contact forms, or SEO enhancements.
7. Test Thoroughly
Ensure everything works as intended:
Cross-Browser Testing: Check compatibility across different browsers.
Mobile Responsiveness: Verify that the site looks good on various devices.
Performance: Test site speed and optimize images and scripts for better performance.
8. Debug and Optimize
Fix any issues that arise:
Debugging: Use debugging tools to identify and resolve errors.
Optimization: Optimize CSS and JavaScript files, and implement caching to enhance site speed.
9. Deploy and Monitor
Deploy the site to the live server:
Migration: Use migration tools or plugins to move from the local environment to the live server.
Monitor: Keep an eye on the site’s performance and user feedback to make necessary adjustments.
10. Documentation and Maintenance
Document the conversion process and plan for ongoing maintenance:
Documentation: Write detailed documentation for future reference.
Updates: Regularly update WordPress, themes, and plugins to ensure security and functionality.
By following these steps, you can effectively handle complex PSD designs during the PSD to WordPress conversion, ensuring a smooth transition from design to a fully functional website.
0 notes
Text
The Ultimate Guide to PSD to WordPress Conversion: Tips, Tools, and Best Practices
Are you looking to transform your stunning PSD designs into a fully functional WordPress website? You’re not alone. Many designers and developers face the challenge of converting their Photoshop files into a dynamic online presence. With the right approach, tools, and knowledge, this process can be smooth and efficient. WordPress powers over 40% of websites on the internet today. This popularity stems from its flexibility, ease of use, and extensive range of themes and plugins. By converting your PSD files to WordPress, you're not just creating a website; you're crafting an engaging user experience that reflects your unique vision. In this ultimate guide to PSD to WordPress conversion, we’ll explore everything you need—insightful tips, essential tools, best practices for success—and even highlight common pitfalls to avoid along the way. Whether you’re a seasoned developer or just starting out in web design, you'll find valuable information here that will elevate your project from concept to reality. Let’s dive in!
What is PSD to WordPress Conversion?
PSD to WordPress conversion is the process of transforming a Photoshop design file (PSD) into a fully functional WordPress website. Designers often create stunning layouts and visuals in Photoshop, but those designs need to be translated into code for web use. This conversion involves several steps, including slicing the PSD file, coding it with HTML and CSS, and integrating it with WordPress themes and functionalities. The goal is to maintain the original design's aesthetics while ensuring that it performs well on various devices. By converting your PSD files into WordPress format, you harness the power of this popular content management system. This allows users to easily update content without diving back into complex coding or graphic design tools. It’s about making your creative vision accessible online while leveraging WordPress's robust features for optimal user engagement.
The Benefits of Converting from PSD to WordPress
Converting from PSD to WordPress opens up a world of possibilities for website design and functionality. One major benefit is the flexibility that WordPress offers. This platform allows you to easily customize your site without needing extensive coding knowledge. Speed is another significant advantage. Once your PSD file is transformed into a fully functional WordPress theme, your website can load faster. This not only enhances user experience but also positively impacts SEO rankings. Moreover, utilizing WordPress means access to countless plugins and tools. These can add features like contact forms, galleries, or e-commerce capabilities with just a few clicks. Security updates and support are readily available through the WordPress community. Regular updates help protect your site from vulnerabilities, giving you peace of mind as you focus on content creation and growth.
Step-by-Step Guide to Convert PSD to WordPress
Converting a PSD file to WordPress can seem daunting, but breaking it down makes it manageable. Start by slicing your PSD design into individual images. Tools like Adobe Photoshop allow you to export these assets easily. Next, set up a local development environment using software like XAMPP or MAMP. This helps create a sandbox for testing your site without affecting the live version. Install WordPress on this local server and choose an appropriate theme that aligns with your design structure. Now comes the coding part. Create custom templates using PHP files in your theme folder. File formats such as header.php, footer.php, and sidebar.php will be essential here. Use CSS to style each component according to your original design while ensuring responsiveness across different devices is crucial at this stage. Integrate necessary plugins for added functionality before launching everything on the web host of your choice!
Top Tools for PSD to WordPress Conversion
When tackling PSD to WordPress conversion, the right tools can make all the difference. One standout tool is Adobe XD. It streamlines design collaboration and allows for easy export of assets. Next up is Avada, a versatile theme that simplifies the conversion process while offering extensive customization options. Users appreciate its drag-and-drop interface, making it accessible even for beginners. Another powerful option is Elementor. This page builder integrates seamlessly with WordPress and provides real-time editing capabilities. Its library of templates helps speed up development time significantly. Don’t overlook plugins like WP All Import either. They enable smooth data migration from your PSD files into WordPress without losing any vital information. There’s Figma—a favorite among designers for its collaborative features and seamless integration with various coding tools. Each of these tools enhances efficiency in converting designs into functional websites.
Best Practices for Successful PSD to WordPress Conversion
To achieve a seamless PSD to WordPress conversion, start with well-structured designs. Keep your layers organized in Photoshop. Label them clearly for easier identification. Next, focus on responsive design. Ensure that the final website looks great on all devices, including tablets and smartphones. A mobile-friendly site is crucial for user experience and SEO. Optimize images before uploading them to WordPress. Compress files without sacrificing quality to improve loading speeds. Use a child theme during development if you're customizing an existing theme. This approach preserves original code while allowing you to make changes safely. Consistently test your site throughout the process. Check functionality, browser compatibility, and responsiveness regularly to catch issues early. Adhere closely to WordPress coding standards when converting HTML/CSS from your PSD files into PHP templates. Clean code enhances performance and maintainability over time.
Common Mistakes to Avoid in the Conversion Process
One common mistake during PSD to WordPress conversion is neglecting responsive design. Failing to ensure your site looks great on all devices can alienate users. Another pitfall is not optimizing images before uploading them. Large files slow down page loading, negatively affecting user experience and SEO rankings. Many forget about proper coding standards as well. Messy code can lead to maintenance headaches later on. Ignoring browser compatibility also poses issues. Always test the website across different browsers to maintain uniformity in appearance and functionality. Skipping testing phases is a critical error. Thoroughly check links, forms, and overall performance before launching the site to avoid frustrating your audience with broken elements or glitches.
Conclusion
When it comes to converting PSD files into functional WordPress websites, understanding the process is crucial. With the right tools and practices in place, you can create a stunning website that meets your needs and appeals to your audience. The benefits of transitioning from PSD to WordPress are numerous. You gain flexibility, ease of use, and access to countless plugins that enhance functionality. By following a step-by-step guide and utilizing top-notch tools specifically designed for this conversion, you can streamline the entire experience. It's essential not only to focus on technical aspects but also on best practices throughout the process. Avoiding common pitfalls will save time and ensure a smoother transition. With careful planning and execution, mastering PSD to WordPress conversion opens doors to endless possibilities for creating beautiful websites tailored perfectly for users' experiences. Embrace these guidelines as you embark on your journey into web development using WordPress!
0 notes
Text
How to Convert PSD into WordPress: A Step-by-Step Guide
Learn how to seamlessly convert your PSD (Photoshop Document) designs into functional WordPress websites. Discover the process of slicing PSD files, converting them into HTML/CSS, integrating with WordPress, and ensuring responsive design for all devices. Mastering how to convert PSD into WordPress involves understanding PSD slicing techniques, proficient HTML/CSS coding, and effective WordPress theme integration practices.
#Convert PSD to WordPress#PSD to HTML#Web Development#WordPress Development#Responsive Design#Front-end Development
0 notes
Text
I will guide you on how to transform designs from PSD to HTML, WordPress, and Shopify.
Are you someone with a cool design that is saved in a Photoshop file? Or maybe you're a business owner with creative ideas for a website and you want to turn your design into a real website. So don't worry about that. I am here for your help in changing your Photoshop file into something websites can use, like HTML, WordPress, or Shopify themes. Let's break down this process and see how it works.
Understanding the PSD to HTML, WordPress, and Shopify Conversion:
PSD to HTML Conversion: This process turns your Photoshop design into HTML, which is the language used to make web pages. Every part of your Photoshop file, like pictures and text, gets carefully turned into HTML code. This makes sure your website looks perfect on different browsers and devices. After that, CSS is added to make your design look even better and work well on all screens.
2. PSD to WordPress Conversion: WordPress is a widely-used tool for managing website content. It's famous for being flexible and easy to use. Converting a PSD design into a WordPress theme means taking the design from Photoshop and fitting it into WordPress. This is how you can manage your website's content dynamically, making it easy for you to update and change things on your site.
3. PSD to Shopify Conversion: For e-commerce ventures, Shopify offers a robust platform to build online stores with seamless user experiences. Converting a PSD design into a Shopify theme requires slicing the PSD file and coding it into Liquid, Shopify's templating language. This transformation ensures that your online store not only reflects your design vision but also provides intuitive navigation and secure transaction capabilities.
Benefits of Converting PSD to HTML, WordPress, and Shopify
Customization: Turning PSD designs into HTML, WordPress, or Shopify themes lets you customize your website a lot. Whether you're a designer who wants every pixel to be perfect or a business owner who wants your website to match your brand perfectly, this process helps you make your online presence exactly how you want it to be.
Scalability: HTML, WordPress, and Shopify provide scalable solutions suitable for projects of all sizes. Whether you're launching a personal portfolio, a corporate website, or an e-commerce store, the versatility of these platforms ensures that your website can grow alongside your business.
SEO-Friendliness: By converting PSD designs into HTML, WordPress, or Shopify themes, you can optimize your website for search engines. From semantic HTML markup to SEO plugins and built-in features, these platforms offer robust tools to enhance your site's visibility and rankings in search engine results.
Converting PSD designs into HTML, WordPress, or Shopify themes is a valuable skill that bridges the gap between design and development. with this experience I am able to bring your creative visions to life and deliver engaging, user-friendly websites to your clients or audience.
#PSDtoHTML#PSDtoWordPress#PSDtoShopify#WebDesign#WebsiteDevelopment#HTML#WordPress#Shopify#DesignTransformation
0 notes
Text
From Pixel to Perfection: Mastering the Art of PSD to WordPress | Xchop
Introduction to PSD to WordPress Conversion
In today's digital age, having a strong online presence is essential for businesses and individuals alike. One of the most popular and powerful platforms for creating and managing websites is WordPress. With its user-friendly interface and extensive customization options, WordPress has become the go-to choice for website development. However, if you have a unique design for your website created in Photoshop (PSD) format, you need to convert it into a WordPress theme. This process is known as PSD to WordPress conversion, and it allows you to bring your design to life on the web. In this article, we will guide you through the steps involved in mastering the art of PSD to WordPress conversion.
Understanding the Benefits of Converting PSD to WordPress
Before diving into the technicalities of PSD to WordPress conversion, it's important to understand why it is a beneficial approach. Converting your PSD design to WordPress offers several advantages. Firstly, it provides you with a responsive and mobile-friendly website. With the increasing use of smartphones and tablets, having a website that adapts to different screen sizes is crucial. WordPress themes are designed to be responsive, ensuring that your website looks great on any device.
Secondly, converting PSD to WordPress allows for easy content management. With the intuitive WordPress dashboard, you can easily update and modify your website's content without any coding knowledge. This flexibility empowers you to keep your website up-to-date with fresh content, resulting in better user engagement and search engine rankings.
Step-by-Step Guide to Converting PSD to WordPress
Now that we understand the benefits, let's dive into the step-by-step process of converting PSD to WordPress. The first step is to slice your PSD design into individual image assets. This involves separating different elements like the header, footer, menus, and content sections. Once you have the images ready, you need to convert them into HTML and CSS code. This step involves coding the structure, layout, and styling of your website using web technologies like HTML, CSS, and JavaScript.
Next, you need to integrate the HTML and CSS code into a WordPress theme. This is done by converting the static HTML and CSS files into a dynamic WordPress theme structure. You will need to create PHP template files and add WordPress-specific tags and functions to make your theme compatible with WordPress.
Choosing the Right Tools and Resources for PSD to WordPress Conversion
To ensure a smooth and efficient PSD to WordPress conversion process, it is important to choose the right tools and resources. There are several tools available that can simplify the conversion process. For slicing the PSD design, you can use tools like Adobe Photoshop or Sketch. These tools allow you to export individual image assets from your design.
For coding the HTML and CSS, you can use popular text editors like Sublime Text or Visual Studio Code. These editors provide syntax highlighting, auto-completion, and other features to streamline your coding workflow. Additionally, there are online resources and tutorials available that can help you learn and understand the intricacies of PSD to WordPress conversion.
Customizing the WordPress Theme with Elementor
Once you have converted your PSD design into a WordPress theme, you can further enhance the customization options using popular page builders like Elementor. Elementor is a powerful drag-and-drop page builder that allows you to visually design your website without any coding knowledge. With its extensive library of pre-designed templates and elements, you can easily create stunning and unique layouts for your website. Elementor also offers advanced features like animation effects, responsive editing, and WooCommerce integration, making it a versatile tool for customizing your WordPress theme.
Enhancing Your WordPress Website with Divi Theme
Another popular option for customizing your WordPress theme is the Divi theme. Divi is a multipurpose WordPress theme that comes with a built-in visual page builder. With its intuitive interface and extensive customization options, Divi allows you to create stunning and professional websites. It offers a wide range of pre-designed templates, layout options, and modules that can be easily customized to match your design requirements. Divi also provides advanced features like split testing, global elements, and responsive editing, making it a powerful tool for enhancing your WordPress website.
Creating a Custom WordPress Theme from Scratch
While using pre-designed themes and page builders can be convenient, sometimes you may need a completely custom WordPress theme to meet your unique design requirements. In such cases, you can create a custom WordPress theme from scratch. This involves creating the necessary PHP files, adding the required WordPress tags and functions, and styling the theme using CSS. Although creating a custom WordPress theme requires advanced coding skills, it offers complete control over your website's design and functionality.
Utilizing WordPress with Advanced Custom Fields (ACF)
Another way to enhance your WordPress website is by using the Advanced Custom Fields (ACF) plugin. ACF allows you to add custom fields to your WordPress posts, pages, and custom post types. This gives you the flexibility to create custom content types and add additional data to your website. For example, you can add fields for testimonials, portfolios, or product specifications. ACF also provides an intuitive interface for managing and displaying the custom fields, making it a powerful tool for extending the functionality of your WordPress website.
Converting a Custom Design into a WordPress Website
In addition to converting PSD designs, you can also convert custom designs created in other design tools like Adobe XD or Sketch into a WordPress website. The process is similar to PSD to WordPress conversion, where you need to slice the design into individual assets and convert them into HTML and CSS code. Once you have the code ready, you can integrate it into a WordPress theme following the same steps mentioned earlier. This allows you to bring your custom design to life on the WordPress platform and take advantage of its powerful features and functionality.
Converting a Figma Design to WordPress
Figma is another popular design tool that allows you to create stunning web and mobile designs. If you have a design created in Figma and want to convert it into a WordPress website, the process is similar to converting PSD or custom designs. You need to export the design assets from Figma and convert them into HTML and CSS code. Once you have the code ready, you can integrate it into a WordPress theme and customize it further using WordPress plugins and page builders.
Best Practices for Successful PSD to WordPress Conversion
To ensure a successful PSD to WordPress conversion, it is important to follow best practices. Firstly, optimize your images for web by compressing them without compromising quality. This will ensure faster loading times for your website. Secondly, make your theme lightweight by removing unnecessary code and scripts. This will improve the performance and speed of your website. Thirdly, test your website on different devices and browsers to ensure compatibility and responsiveness. Finally, regularly update your WordPress theme, plugins, and core files to keep your website secure and up-to-date.
Conclusion
Mastering the art of PSD to WordPress conversion opens up a world of possibilities for creating stunning and functional websites. Whether you are a beginner or an experienced developer, the step-by-step guide provided in this article will help you navigate the complex process with ease. By understanding the benefits, choosing the right tools, and following best practices, you can convert your unique designs into fully functional WordPress websites. And if you need professional assistance, Xchop is a leading PSD to WordPress conversion service provider that can deliver high-quality custom WordPress themes tailored to your specifications. Don't miss out on the opportunities that PSD to WordPress conversion offers. Start converting your designs from pixel to perfection today!
More Info: https://www.xhtmlchop.com/
#wordpress#wordpressdesign#psd to wordpress#webdesign#figma to html#divitheme#ACF#wordpress elementor#webdevelopment#bootstrap#wordpress acf#web#website#xchop
0 notes