#PTEQ Equalizer
Text
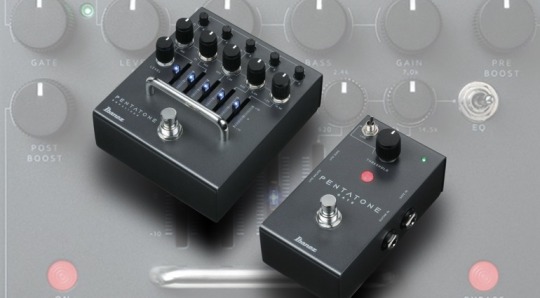
NAMM 2024: Ibanez PTEQ Equalizer and PTGate Noise Gate
Discover the newest additions to the Ibanez Pentatone series – the innovative PTEQ Equalizer and the versatile PTGate Noise Gate pedals. Building on the success of the 2023 PTPRE Pentatone Preamp, these pedals offer advanced features for guitarists and musicians.
PTEQ Equalizer
The Ibanez PTEQ Equalizer, also known as the Pentatone Equalizer, is a standalone pedal derived from the five-band EQ…
View On WordPress
#Ibanez#Ibanez Pentatone#Ibanez PTEQ PTGate#NAMM#NAMM 2024#pedal#Pentatone#PTEQ Equalizer#PTGate Noise Gate#PTPRE Pentatone Preamp#stompbox#Variable Q
0 notes
Text
Best Vst Plugin For Chopping Samples

EQ plugins are one of the most used plugins in music production. The reason for that is because EQing is the most invasive action that you can apply to your audio signal, whether you need to boost or cut the frequencies or just add some warmth to your audio.='font-size:>
For this reason, we picked 17 Best Free EQ VST Plugins, so you can choose your most favorite one and use it for mixing as well as for mastering. ='font-size:>
You may face several scenarios while mixing and mastering which may include the use of an equalizer, having a transparent display to analyze what you are adding or subtracting with the EQ, multiple EQ bands, and proper CPU usage is what to look for in an EQ.
But with that said every piece of software and hardware alike creates and outputs a slightly different sound meaning they all have unique timbres and uses. Alongside that, there are some rather expensive plugins we may see online, which aren’t out of our reaches but we don’t know what we need until we need it right? Well, this is why its best to try some free EQ’s first to see what it is you like within an EQ and what it maybe you are looking for.
Sample is a surprisingly powerful plug-in that delivers a host of sample management and editing features. It enables users to easily chop, transpose, and even find samples amidst immense libraries. It also comes with a very capable time-stretch algorithm that longtime DAW users will immediately recognize. Specs and useful features. Beat Chopper is a free VST plugin that allows you to load an audio sample, split it, and trigger it from various positions by MIDI. You can split the sample evenly to 4, 8, 16 or 32 parts or use automatic split. A plugin effect is a signal processing device such as a reverb, delay, compressor or EQ, while plugin instruments take in, amongst other things, synthesizers, samplers, drum machines and sample-based recreations of real-world guitars, drum kits, pianos, etc. They recorded their samples at one of the best studios in Germany, using instruments from the 18th and 19th century played by some of the top musicians from the best orchestras in Europe. With this plugin, there’s no need to spend hours upon hours tweaking little parts of your arrangements. The obvious answer is the Antares Autotune. While it’s the best vocal VST plugin out there, not everyone can spend $400+ on just 1 tool. That’s why I present you MAutoPitch, one of the best Auto-tune. Download Plugin. Zampler by Plugin Boutique is an excellent add-on for electronic musicians as you can download drum & bass, hip hop, even dubstep expansion packs. The sampler has 3 LFOs and a large effects library including chorus, phaser, tube saturation, and many more. There are 2 sample banks and 3 ADSR envelopes for full modulation control. DSK Overture is a full orchestral sample VST plugin. It gives you the ability to choose between 40 different instruments and play 4 of those instruments in the same instance, through MIDI.
We become ever so comfortable with our stock plugins, they do the simple tasks for us (sometimes), they don’t run our computer into the ground, and they for sure are pretty basic. Well, this is the issue most people come to, they want a better EQ, or they want a change of visuals.
EQ History – ‘The first EQ was first used by John Volkman working at RCA in the 1920s”
Related Topics:='color:>
The 15 Best Delay Plugins For Mixing (VST, AU, AAX)
10 Best Noise Gate Plugins (VST, AU, AAX)
What Are The Best Tools To Develop VST Plugins & How Are They Made?
37 Best Free Vst Compressor Plugins For Mixing & Mastering
17 Best Free EQ VST Plugins In 2020 For Mixing And Mastering='color:>
DDMF Colour EQ | info & download
SPL Free Ranger | info & download
Analog Obsession STEQ v2 | info & download
TDR Nova Parallel Dynamic Equalizer | info & download
Cockos ReaEQ | info & download
Blue Cat’s Triple EQ | info & download
Analog Obsession Merica | info & download
TinyQ lkjb | info & download
Sonimus SonEQ | info & download
Ignite Amps PTEq-X | info & download
Leftover Lasagne Pushtec 5+1A EQ | info & download
lkjb QRange | info & download
TDR Slick EQ | info & download
Manda Audio 7Q | info & download
Mellowmuse EQ1A | info & download
Voxengo Marvel GEQ | info & download
Kuassa BASIQ | info & download
1. DDMF Colour EQ Review='color:>
More Info & Download
Specifications:
64-bit processing
Low-CPU Usage
Customizable GUI
Great warm sound
5 Bands
Resizable Window
Features & When To Use:
Colour EQ is a 64-bit EQ plugin that offers 5 ”super parametric” bands to manipulate the frequency range. This is exceedingly handy when wanting to use more than one band in one instance; the intuitive gain knobs on the five bands allow for perfect mixing of these bands when mixing and mastering.
Using the two different types of curves, Colour EQ offers a warm sound that you just wouldn’t get from your stock EQ.
Having a bright visual display helps you to craft and mould your bands to preference.
A great way to use this plugin is when you are not getting enough warmth in your low, mid/mids, Colour EQ will add a great sense of warmth throughout the selected bands. Another cool way to use this plugin is to use two different setups with two different curve types; you can use modified versions of the EQ for selected times in your mixdowns to add the feeling of a change in energy in a breakdown or drop.
Colour EQ is a great tool to have in your arsenal for mixing and mastering, plus you may find many uses in your day-to-day production.
Compatibility:
Windows VST (32/64 bit), Windows/Mac RTAS, and Mac VST/AU format (Intel, OSX 10.5 and higher)
2. SPL Free Ranger Review='color:>
More Info & Download
Specifications:
Four useful bands
Volume knob
Great sound
Four buttons to switch between EQ settings
Features & When To Use:
With a sleek, minimalistic design Free Ranger is a powerful EQ.
With a mid-band (150Hz – 7kHz), fixed high (10kHz), low shelf (80Hz) SPL have kept things very simple so anyone can EQ with ease.
Free Ranger gives the feel of the world-renowned API 560 EQ but offers this all for free!
Free Ranger is a bodybuilder for your sounds while mixing and a gentle touch when mastering, this plugin makes EQing fun, quick and easy.
You may find yourself using the four different EQ settings and incorporate them into your mixdowns. Using them to create different feels and vibes can give your masters that final touch you’ve been looking for.
This is a must-have!
Compatibility:
macOS 10.9 through 10.15, Windows 7-10
3. Analog Obsession STEQ v2 Review='color:>
More Info & Download
Specifications:
mid-band (150Hz – 7kHz)
fixed high (10kHz)
low shelf (80Hz)
Optical compressor knob
Added preamp
Features & When To Use:
Simplicity is key with EQ work in the mix or master, and this plugin keeps that in mind through and through.
With a very easy to use GUI STEQ 2 has a powerful but simple way of delivering a small form factor EQ to your DAW.
This EQ gives off old school retro vibe, precise, clean, and adds a lot of detail to the mid-range.
STEQ 2 is excellent for tonal rebalancing due to the broadness of the three bands creating a pure blend between the frequency ranges.
Using this to add punch to claps and snares is also a good use. But be careful when adding to full bus groups.
This EQ from Analog Obsession is an excellent tool to keep at your disposal when thinking about doing some tasks during your mix, or why not change up those stock plugins for free.
Compatibility
WiN, OSX AU VST, VST3
4. TDR Nova Parallel Dynamic Equalizer Review='color:>
More Info & Download
Specifications:
Great for:
Parametric equalization
Dynamic equalization
Frequency selective compression
Multi-band compression
Wideband compression
Features & When To Use:
Nova is a parallel dynamic EQ; each band has a dedicated, dynamic section giving the user full flexibility.
Giving the option to drag and move bands in the visual GUI individually or group, this provides a natural form factor way to get results.
Using the multiband compression built into Nova your be able to manipulate your EQ even further, this will be displayed in the visual GUI with real-time feedback of the compression process. (subtly decrease the threshold to hear the difference)
In mix and mastering, you can use Nova to visually see where you may have audio issues to fix and makes it very easy to apply these changes with the drag and change feature.
The dynamic EQ is a handy tool to have in practice when mixing down full compositions – use it to bring down or up frequencies only when they reach a specific volume.
Nova is a heavyweight EQ with a lot under the hood all for free!
Compatibility:
Win XP SP2 or above, Mac OS X 10.7 or above.
5. Cockos ReaEQ Review='color:>
More Info & Download
Specifications:
Low CPU & RAM
Fast and highly configurable
Portable – copy & run
Resizeable GUI
Features & When To Use:
ReaEQ may look basic, but under the hood, there is a lot to offer.
Being able to have as many bands as you wish is a massive bonus, you also have the ability to change all of these bands to one of the following (shelves, bands, LPF, HPF, notch, bandpass, allpass).
With a stripped-back GUI, it keeps you focused on the task at hand, not over complicating things but giving you the power of an audio god at your fingertips.
With a tremendous real-time visual display, this gives you the eyes and ear focus that you need when EQ in the mix.
Phasing is a big issue when mixing, ReaEQ gives you a ‘Show Phase’ button which will show you in your display what frequencies are being affected by the band.
When mastering you may wish to keep all bands in one EQ patch, with ReaEQ you can do this.
Stripped back and powerful ReaEQ is a favorite among many producers across a wide range of genres.
Compatibility:
WIN 32, WIN 64
6. Blue Cat’s Triple EQ Review='color:>
More Info & Download
Specifications:
Semi-parametric EQ
+/- 40dB Range per band
MIDI control and automation support
Real-time display
All sample rates supported
Features & When To Use:
The Triple EQ is a three-band semi-parametric equaliser.
With a simple and easy to read visual display of the frequencies in real-time, you will have a clear display of the EQ in front of your eyes.
Alongside the huge +/- 40 dB range, Triple EQ has a bandwidth of .01 to 5 Octaves!
An exciting feature with Triple EQ is that you can link two bands together using the ‘Link Channels’ feature. This will allow you to use them in unison; combine this with the automaton support to create quick and easy modulation. This is a great way to change an EQ while in the mix with complex automation.
Using the linking feature to create movement and progression within your mixdowns makes Triple EQ a threat.
Fully customisable shapes make this a different tool when deep in the mix or master, you will find many uses for the dynamic bands you can create—having dynamic bands that you are able to manipulate helps when visually your EQ and how it may affect the whole frequency range.
Check this one out for a small form factor powerful EQ!
Compatibility:
Windows 7 to 10, Mac OS 10.7 or newer.
Related Readings:='color:>
29 Best Sound Design VST Plugins In 2020
10 Best Opto Compressor Plugins (VST,AU,AAX) For Transparent Sound
11 Best Granulizer Plugins 2020 For a Future Sound Design
33 Best Waves Plugins of 2020 (Mixing & Mastering)
Difference Between Active EQ, Passive EQ and Dynamic EQ
7. Analog Obsession Merica Review='color:>
More Info & Download
Specifications:
Low & High Band – Shelf
Mid Band – Proportional Q Peak
HP & LP Filter – Constant
Low CPU usage
Features & When To Use:
We have another FREE plugin from Analog Obsession!
This time is bringing you Merica an emulation of the API 550A console equaliser.
A simple three-band EQ delivers a lot of power to your mixes and masters. Selectively choose which frequency your band boosts or cuts with the option to the right of the knobs.
All bands kept simple and easy to get to grips with.
Meica also has a nifty and very much needed output knob, there will be no issues with clipping in the digital domain when mastering with this plugin.
A larger than appearing sound Merica is an excellent EQ plugin to use when in the mixdowns and masters.
Given that the EQ it emulates is an industry-standard plugin this small form, powerful, easy to use, and was coded by one man! Merica is a must grab for all audio creatives looking to upgrade their stock EQ plugins.
Compatibility:
VST Win, VST3 Win, VST Mac, VST3 Mac, AU Mac
8. TinyQ lkjb Review='color:>
More Info & Download
Specifications:
Four bands (20 Hz to 20 kHz)
Small form factor (ability to make larger if wanted)
High & Low cuts range is 6 and 48 dB/octave
Included frequency analyser
Features & When To Use:
TinyQ is a small form factor EQ.
Giving the user a stripped-back interface TinyQ offers a solution to a simple job.
Having too many settings can become overwhelming; TinyQ does what it says on the tin and doesn’t make your job any harder.
Keeping things simple when mixing down whole groups is essential – finding yourself using CPU heavy EQ, or a stock plugin just might not cut it for you. TinyEQ is excellent for doing those necessary but straightforward EQ tasks!
With the recent addition of built-in frequency analyzer, it makes EQ even easier when getting stuck into your mixes or masters.
Create awesome sounding band curves.
Great emphasis on keeping things simple goes a long way with TinyQ; the team has made a great EQ that does everything it needs to in one small package. With four bands plus high pass/low pass filters, you won’t be looking any further for your day to day EQ needs.
Compatibility:
Windows 7 or later, macOS 10.7 or later (both 64 bit)
9. Sonimus SonEQ Review='color:>
More Info & Download
Specifications:='font-size:>
Three-band Equalizer, Low, Mid, High.
2 Musical Filters, High-Pass Low-Pass.
Preamp stage with a bass booster.
64-bit floating-point precision.
Up to 192kHz sample rates supported.
Features & When To Use:
SonEQ has 3 bands, low (20 Hz – 100 Hz), mid (150 Hz – 4 kHz), high (6 kHz – 15 kHz). Combined with a high pass and low pass filter, plus a ‘Mid-high Q’ this means when it’s on your band its narrow and when deactivated will cause it to be wider. This indicated by the red light.
Giving the user a lot of ways to EQ but keeping things user-friendly is what SonEQ does best.
Having the volume meter is very hand when mixing with any EQ, it gives the visual display of when things are getting a bit heated for your output.
SonEQ also gives you the full control of your input and output levels. This comes in handy when you are mixing your tracks with heavy effects, causing the overall levels to become louder than 0.0dB; this is where adjusting both the input and output parameters will solve the issue.
With this plugin being free for all to use we don’t see any reason why this shouldn’t be ready to deploy at the click of a finger, whether it’s beefing up the mix with the built-in bass boost preamp staging or adding a touch of colour to the highs this plugin has you covered.
Compatibility:
Mac OSX 10.6 or newer – Windows XP or newer
10. Ignite Amps PTEq-X Review='color:>
More Info & Download
Specifications:
Best Free Vst Plugins 2020
Three equalisation modules
Stereo/Mono switching
Four different tube types
Global input/output level control
Features & When To Use:
PTEq-X is a digital emulation of three famous vintage EQ.
Equipped with three EQ modules comprised of mid-range (2kHZ – 7 kHz), low-frequency (20Hz – 150Hz), high-frequency (3kHz – 16kHz).
Using the mid-range module, you can use the low, mid parameter (top left) to effect the lower mid frequencies. Alternatively use the high mid setting (top right) to cause-effect to these frequencies.
Moving down the EQ, we have our second module, which is PEQ1A EQ (Low & High). This comes with a bunch of parameters to mould your EQ patches perfectly to your source.
Finally, this is all topped off with the HL3C module; this is a low-cut accompanied by a high-cut.
You can also use the ‘Oversampling’ feature to reduce aliasing.
Use the “Tube” switch to apply or deactivate the tube amp.
Using the input and output levels will give you the ability to control any nasty peaks brought in or out of the EQ.
PTEq-X is a combination of some of the best analogue EQ’s to exist, plus its FREE!! We recommend this one for a great addition to your EQ arsenal.
Compatibility:
Windows 7 – 10 32 and 64 bit. OS X 10.7 64 bit
11. Leftover Lasagne Pushtec 5+1A EQ Review='color:>
More Info & Download
Specifications:
6 Band mid-range EQ
Presets built-in
Algorithms based on famous analogue gear
Designed for mixing and mastering
Features & When To Use:
Best Plugin For Chopping Samples
Pushtec 5+1A is a versatile mid-range program EQ that has mixing and mastering at its heart.
This plugin offers six bands, all offering a fantastic sounding boost through all parameters.
A vast selection of plugins makes it easy for users to start with something super effective and tweak to their liking.
“B/W” stands for bandwidth, this allows you to tweak the selected band and adjust to your preference.
A friendly and straightforward GUI keeps this EQ a smaller form factor but with a lot of power. Being designed for mixing and mastering be assured that this plugin delivers best when applied to a whole group or a master channel.
Giving instant sparkle to a mix or a very much needed bass boost this FREE plugin has you covered!
Compatibility:
Win 7 or higher only
12. lkjb QRange Review='color:>
More Info & Download
Specifications:
12 bands
peak, shelf and cut filter
Cut filters (12, 24 and 48 dB/oct steepness)
Stereo/Left/Right/Mid/Side routing for each band
A global gain for loudness adjustments
Resizable GUI
Features & When To Use:
QRange is a very straight forward, user friendly, and effective EQ for mixing and mastering.
Giving the user an intuitive click and drag feature makes EQ work easy and more controllable.
With a choice of twelve bands, there is excellent room for doing additive plus subtractive EQ all in one plugin patch. Each band has. Selection of up to five different types (peak, low-shelf, high-shelf, low cut, and high cut).
Built into the frequency spectrum, you have the power to change it to pre or post. ‘Pre’ will let you see what the frequency range looks likes before the EQ is applied, whereas ‘Post’ will allow you to see it after the EQ has taken effect.
Offering the ability to users to save and load their own presets makes it easy to bring back some of your favourite patches while working on a mix or master.
It has to be said lkjb QRange is a must-have FREE EQ plugin.
Compatibility:
Win 7 or higher, macOS 10.7 or higher
Related Reading:='color:>
The 6 Best Ring Modulator VST Plugins in 2020 | KiloHearts, Melda
13. TDR Slick EQ Review='color:>
More Info & Download
Specifications:
Semiparametric EQ layout
Three bands combined with 18dB/Oct high-pass filter
Four EQ models: “American”, “British”, “German” and “Soviet” with optional non-linearity
Five output stages: “Linear”, “Silky”, “Mellow”, “Deep” and “Toasted”
Saturation algorithms by VoS (“Stateful saturation”)
Features & When To Use:
TDR’s Slick EQ provides a recognizable analogue sound.
Using three bands that bring together four different EQ models.
Both low and high bands are coupled with a cut and bell feature allowing for comfortable band changing.
Auto gain estimates the gain change caused by the current EQ settings; this makes it great to compare your EQ setting during the mix. There is also an ‘EQ Sat’ button; this will activate the saturator which is very intelligently paired to your EQ bands. This will add harmonics when boosting and remain passive when cutting.
Being able to save your favourite EQ settings for a later mix or master can be done within the plugin. Coupled with a undo/redo button you never miss that sweet spot for your bands, alternatively set up two different EQs with the A/B switch.
Slick EQ gives a very stripped back interface meaning you don’t get caught up with the visuals when doing equalising, providing a focus on what your hearing. This EQ shouldn’t be overlooked, with great coding, algorithms, settings, and excellent sounding types SlickEQ delivers more than you would expect from a FREE plugin.
Compatibility:
Win 32 bit VST2, VST3, Win 64bit VST2, VST3, AAX
Mac VST2, VST3, AU, AAX 64 bit
14. Manda Audio 7Q Review='color:>
More Info & Download
Specifications:
Seven band EQ
Highpass/lowpass
Stereo/mono options
Left/right options
Output level
Features & When To Use:
Manda Audio brings us 7Q.
7Q is an emulation of the beloved ‘Classic EQ’ which became discontinued, the team came together and brought the community back a redesigned version.
7Q takes off all the fancy parts and gives you the bare basics; this is what gives this a place on our list. With 7Q giving you the ability to apply your EQ to the left or right or both channels, you can independently EQ both sides of the stereo field.
Each band can be additive or subtractive. Keeping easy to use format is what this plugin does best; it doesn’t over-complicate the task at hand but assists your needs along the way wether mix or master.
Low memory and CPU usage make it easy to have multiple instances in your projects without having your computer meltdown.
7Q is a nifty EQ that is awesome for giving your sounds a little crisp boost before running into your other plugins within the chain.
Compatibility:
Win VST 32/64 bit, AAX 32/64 bit
Mac VST, AU, AAX
15. Mellowmuse EQ1A Review='color:>
More Info & Download
Specifications:
HP: 10hz – 1khz / sweepable Q
Low Shelf: 30hz – 500hz
Low Mid: 70hz – 2khz / sweepable Q
High Mid: 500hz – 6k / sweepable Q
High Shelf: 1.5k – 18k
Phase switch
Output level
64-bit internal processing
Formats: 64bit VST, VST3, AU and AAX
Version: 3.2
Legacy 32bit installers
Features & When To Use:
EQ1A is a FREE analog-style EQ with a clever algorithm giving you minimal phase coloration.
This plugin has initially been paid to use the plugin, but the developers have decided to give it to us all for FREE!
EQ1A allows you to use broad bands to shape your sounds or outputs in a clean, crisp and phase-corrected way.
Being able to save you presets within the plugin makes it very easy to pull back that EQ you made on the last mix. 4-band parametric equalizer with an additional HP filter with variable resonance gives a wide range of settings to play with while keeping everything simple and user friendly.
EQ1A does what it says on the tin for FREE!
Using this within mixing or mastering may help you when wanting to add a hefty highpass or when looking to give some warmth to your mid ranges.
It has to be said with a great look, and low CPU usage EQ1A is an excellent addition to your plugins.
Compatibility:
Win, Mac
16. Voxengo Marvel GEQ Review='color:>
More Info & Download
Specifications:
16-band graphic equalizing
+/- 12 dB gain range per band
Channel grouping
Preset manager
Contextual hint messages
Freehand drawing mode
Stereo and multi-channel processing
Mid/side processing
Undo/redo history
All sample rates support
Linear-phase equalizing
Internal channel routing
64-bit floating-point processing
Features & When To Use:
Voxengo is notorious for doing some excellent free plugins.
This addition is the Marvel GEQ, which is a fifteen band linear phase EQ.
There is a routing tab that allows you to affect the signals mid/sides independently. (orange slides)
Also giving full independence to the mid/side output level, becoming very useful when mixing and mastering.
Bypass feature makes it simple to hear what your EQ is doing to your sound source. Alternatively, decide between two EQ setups with the A/B mode.
For quick EQ drawing, you can hold ‘Ctrl or Cmd’ and click across the EQ drawing in your fader settings with the click of a mouse.
Having a stripped back form factor with enough controls to complement your mixing tasks this plugin has to be our list today.
Compatibility:
VST Win, VST3 Win, VST Mac, VST3 Mac, AU Mac
17. Kuassa BASIQ Review='color:>
More Info & Download
Specifications:
Three-band EQ
High, mid, low
Presets tab
Output level
Very simple to use
Features & When To Use:
BASIQ is a three-band EQ.
It keeps in mind that EQ work for mixing and mastering doesn’t have to be a headache or over complicated.
BASIQ is a design similar to the classic ‘Baxandall Equalizer’ which is knowns for its natural-sounding shelves and HiFi quality responses.
Adding a smooth, gradual shimmer or warmth instead of a surgical sharpness is what BASIQ does best. Use on groups or a master chain to subtly but significantly add character with the turn of a knob.
With some added presets you be able to get a quick change in tone with the click of a button.
The small form factor makes this BASIQ a powerful tool to be used within the mix or master.
Compatibility:
Win, Mac, VST, AU, 64 bit
Our Picks For Top 3 Free EQ VST Plugins='color:>
With all of that said, grabbing all 17 plugins wouldn’t do you any harm, but we want to break down our top 3 picks!
1. DDMF Colour EQ Review='color:>
In our top spot, we have Colour EQ by DDMF.
This plugin brings so many features that you would expect from pay to use plugins but all for FREE! Another fresh point is that the curves you can create with this cannot be done on other EQ plugins, giving Colour EQ a versatile approach.
Low-CPU – Usage Customisable GUI – Great warm sound – 5 Bands
2. TDR Nova Parallel Dynamic Equalizer='color:>
Coming in second is Nova by TDR.
Parametric, dynamic EQ, and multiband compression are all built into an excellent looking FREE plugin.
Nova has a built-in dynamic EQ parameter when mixing, and mastering using a dynamic EQ is crucial sometimes. Having this all in one plugin for free is hugely commendable to the team who developed this plugin!
Parametric equalization – Dynamic equalization – Frequency selective compression – Multi-band compression – Wideband compression
3. Blue Cat’s Triple='color:>
And finally, our last top pick is ‘Triple’ by Blue Cat.
This awesome plugin has so many features you just wouldn’t expect a FREE plugin to have.
With a fresh interface and drag and click feature to make EQing even more natural Triple is a powerful EQ.
Semi-parametric EQ – +/- 40dB Range per band – MIDI control and automation support – Real-time display
Conclusion ='font-size:>
Today we have covered a lot of great FREE EQs for mixing and mastering. Amazingly, we have developers putting out all of these plugins for producers/sound engineers to level out the playing field. As we have all seen these ‘not to name’ brands releasing rather expensive EQs that we just can’t fork out for, but with the way, music has progressed today in the digital domain it has become much more accessible for creatives to share their ideas and effects for free.
With that said, they all have their benefits and downsides, but with them all being free, there is no reason you can’t pick them up and use these in your mixes or masters today!
0 notes
Text
Mixing Progression Series #5: Clean-Up EQ
Most of what I've described for you guys in the past 4 blog post have been about basic setup procedures I do for every mix. Although basic, this is 30% of your mix. If you get this workflow to happen in 30 minutes then mixing will naturally happen. A mix isn't purely creative as some might want to believe. You make the song what it is because the song can be nothing but what it is. It sounds very anti-philosophical, but mixing implores a lot of common sense strategies cause we prefer certain qualities and traits over others. For example, why would we ever care to listen to 20 kHz on any instrument? This is why we roll-off the very low and high frequencies to help emphasize what we do want to listen to. They're technical implications that need to be addressed.
Now I can began this blog post with the best practices of using an equalizer, but that's no different from listening to a random person on youtube making choices only he will make with his tracks. That won't help you in the long run and specific case scenarios dedicated to your music. Take Dave Pensado's advice. He doesn't mind showing you tricks and tips in his mixing because they worked for that song. I repeat.
He doesn't mind showing you tricks and tips in his mixing because they worked for that song. Repeat this into memory.
Now, does this mean its a bad idea to ignore these tips and tricks people give you? No because they might come in handy or save you if your mix has a similar issue. But if you think every kick drum or brass instrument will use the same boost/cut frequencies and values you are sadly mistaken. Even in the same room with the same microphone the wind changes. What I'm trying to say is be very acute on your decisions when EQ'ing. Don't make decisions because that's what 'everyone' says you should do or because 'generally' this is how things are done. There are many engineers that will 'generally' tell you different. Focus on your specific issue. If you hear a kick drum that sounds way to woofy, don't just boost the mid and high frequencies just cause somebody says that'll bring out the smack in your kick drums. Tailor your EQ process specifically in this stage.
Let me show y'all what I do in these scenarios. I'm an adamant user of Kuassa's EQ plugins. I own a set in both Reason and as AU/VST plugins. They're based off the Neve 1081, 1084 and Pultec MEQ-5, EQP-1A modules respectively.
I use these for two reasons. One, they use discrete values tailored for the specific frequencies. I don't need to judge what my Q-Value should be. I take away as much as I need to add the correct frequency to do the job. This also keeps me from making unnecessary decisions since I don't have a graphical display so the only thing that can help me is my ears. There's many plugins emulating these suite of EQ's. Waves has the Pultecs and the VEQ series. UAD has versions of these as well. There is a free version of the Pultec called PTEq-X made by Ignite Amps. It's solid and well worth it especially if you do mastering work.
This doesn't mean you have to use what I use, but have a go to EQ where you can dial in a frequency immediately to cut frequencies without having to scroll out the spectrum and find it. This is not surveillance. We need to get things cleaned up so we can make creative decisions. Let the technical be the technical. Let the interns have some work so you can make sure the track sounds the best it can be without over working yourself.
The next thing these EQ's will do is help your ear training. When I'm going through trying to hear what needs to be taken out, I'm listening for unnecessary room tone and unwanted frequency content in the highs & lows. If a vocal is too boomy, go ahead and cut it at 65 Hz or whatever. Females 80. This is how I work; there is no extra processing. Overtime I decide to boost the high frequencies with my EVE EQ's, I generally always low pass at 18 kHz. This is to keep harmonics generated by the boost in the 16 kHz from over saturating. The Pultec has a Bandwith knob (Q-Value). I typically do not change it unless I really need to. 85% of the time it stays right where it is. If I need to add 2 or 3 instances of EQ's, so be it. It's better in my ears to add the right amount of EQ's at the right frequencies in stages rather than attempting to force an EQ to make a sound perfect by processing it at extreme levels.
If your track doesn't have enough body or weight too it, it's probably sitting on the wrong fundamental frequency. What I've learned is sounds, especially vocal still need frequencies below 100 Hz. They need that foundation because the chest resonates there and those frequencies still propagate through the air when a person speaks. If we just remove those frequencies, we will thin out the vocal. If I'm missing that in my recording I would take the Pultec and crank up the low end Boost at either 20 or 30 Hz to a number where I can hear the bass build up. Then knock it back one dot. Then I'll carve out some of the unwanted frequencies with the Attenuation knob at the value half of what I boosted. The vocals should then have some density and not feel like paper because it's resting on warm low end frequencies even if there isn't much.
Habits like these is what's going to make EQ'ing much easier. I have more but I will explain those as we move forward. If you would like to understand how the Pultec works, watch this video of the Pultec using Izotope's modeling in the Ozone processing suite.
youtube
1 note
·
View note
Text
The LANDR Guide to Mixing Music
The LANDR Guide to Mixing Music: via LANDR Blog
Audio mixing is the process of taking recorded tracks and blending them together. Tracks are blended using various processes such as EQ, Compression and Reverb. Essentially, mixing is making all your different tracks sit well with each other. If you’re new to mixing, this is what to start with. The bare-bones essentials.
Balance Your Levels
Use your channel faders to get a basic balance of all your tracks before you start processing them.
It’s never too early to start thinking about headroom. You’ve probably noticed the level at the master fader increase as you add tracks to your session.
If things get too loud and you’ll start to have issues. Keep an eye on your meters—and never let your individual tracks or master bus exceed -6 dBFS.
Headroom is an important subject for audio engineers. Learn how to get it right and make your mix better with our headroom guide.
Use Buses
A bus or Aux return track is a tool for routing audio inside your DAW’s mixer.
Send the output of multiple tracks to a bus to apply the same processing to them. Or use a track’s Aux send to create a parallel signal path.
Buses are incredibly useful. Organizing your sessions with a bus for each element will help you keep track of your mix and make top-level adjustments on the fly.
Learn more about sends, returns and buses.
Processing
Now for the fun part. Most of your mix process can be broken down into three tasks: EQ, Compression and Ambience. Mixing can get complicated, but these three things make up 90% of your process. Practice them and everything else will follow.
EQ
Equalizing is the art of boosting, cutting and balancing the frequencies of your tracks so that everything works in the mix.
Our ears can detect a huge range of frequencies—roughly 20 Hz to 20 kHz. Each element of your mix has energy in different parts of that range. Keep this in mind while you’re mixing.
For example, if two instruments in your mix have a lot of energy at the same frequencies, it’s going to be hard to hear each one distinctly on your recording. That’s the effect of masking.
You need to carve out space in your mix so that your sounds don’t overlap. That’s where filters come in.
You might be surprised how much of the sound in your raw tracks doesn’t contribute meaningfully to your mix—especially in the tricky low bass and midrange areas.
Use low-pass (high-cut) filters to make sure nothing is competing with your foundation sounds (like kick and bass) for control of the low end.
Learn more about how to dial in low-pass filters to mix kick and bass.
Compression
Compression is the other main tool you’ll be using in your mix. But unlike EQ, compression deals with dynamics. It’s the glue that holds your mix together.
Compression is the process of reducing a signal’s dynamic range. Dynamic range is the difference between the loudest and quietest parts of an audio signal.
Compressors work by attenuating the loudest parts of your signal and boosting the result so the quieter parts are more apparent.
Compression is essential, but it’s important to use it properly. Bad compression leads to a lifeless, punchless and fatiguing mix.
Learn how to use compression the right way for a better mix.
Reverb
Reverb is how you add a sense of space to your recordings.
Reverb works best as a send effect. Remember those buses we talked about? Create an aux return channel for your reverb and use your track sends to decide how much signal to send it.
Tasteful reverb can give your mixes an immersive three-dimensional quality. It also helps to provide context and subtle blending between instruments.
Learn more about how to set your reverb plugins during your mix.
Plugins
Plugins come in many shapes and sizes. Depending on which DAW you’re using, you might be working with VSTs, AUs or even AAXs.
Plugins are one of the most exciting things about mixing, and lots of them are free. Here’s a few of our favourites from our comprehensive guide to the best free vst plugins.
Here’s a few to get you started on your mix.
Klanghelm - DC1A Compressor
Klanghelm DC1A is an easy-to-use free character compressor that brings the warmth of analog hardware to your tracks.
With just two knobs the DC1A can cover everything from “smooth levelling to heavy pumping.”
Ignite Amps PTeq-X
Ignite Amps PTeq-X is a free software emulation of one of the best hardware EQs of all time—the Pultec EQP-1A.
Mixing with Pultec-style EQs is sublime. Try it out on your tracks with the PTeq-X.
Valhalla DSP FreqEcho
Valhalla DSP FreqEcho is a deceptively versatile free delay plugin. With just high/low cut filters and a pitch-shifter on the repeats, the FreqEcho can conjure a inspiring amount of delay weirdness.
TAL Chorus-LX
TAL-Chorus-LX is an accurate reproduction of the unique chorus found on the classic Roland Juno 60 synth.
Smartelectronix Ambience
Smartelectronix Ambience was one of the first quality free reverb plugins on the scene. And it’s still a great option for dreamy, ambient reverbs.
Specific Techniques
Mix referencing
Mix referencing is the process of comparing your nearly finished mix to previous mixes you’ve made, other versions of your mix in the same project or commercial recordings to determine the quality of your mix.
Using reference tracks is the best way to make sure that your mix translates and holds its own against commercial recordings.
Your LANDR mastered tracks make this step easy.
A rough version of your track mastered with LANDR will be much closer to the level of a commercial recording right off the bat.
Panning
Panning is the placement of your tracks in the stereo field. The pan dial in your DAW’s mixer changes the position of the sound by varying the amount of signal sent to the left and right speakers.
Panning is what makes your mix wide and immersive. It’s a big part of how you give each element of your mix it’s own space. But that doesn’t mean you can neglect the middle. A good mix has a solid core with foundational instruments like kick and bass panned dead center.
A good rule of thumb is to keep an equal amount of elements on each side. Try to see your mix in pairs and balance one element with another.
Layering
Layering is exactly what it sounds like—laying multiple tracks on top of each other to compliment their different qualities.
To get starting with layering, try stacking some kick samples together to highlight different parts of your kick sound.
For example, the “click” from one sample might be particularly effective paired with the fat low end of another. You’ll have to be pay attention to each sample’s EQ and make sure you’re carving out enough space in the mix.
De-Mudding
Fixing a muddy mix comes down to EQing. Remember the masking effect we talked about?
Muddiness happens when there are too many sounds overlapping in the low-midrange. This area is especially difficult to EQ because so many instruments have harmonic content here.
You’ll have to experiment with carving different pieces out of different mix elements. Use your ears and experiment, it’s the best way to get better at mixing.
Start your mix!
Now you have the basic know-how to start mixing
As with any skill, the best thing you can do to develop it is Practice, Practice, Practice. Make sure to LANDR your mix early and often to see where you’re at.
The post The LANDR Guide to Mixing Music appeared first on LANDR Blog.
from LANDR Blog https://blog.landr.com/landr-guide-mixing-music/
via https://www.youtube.com/user/corporatethief/playlists
from Steve Hart https://stevehartcom.tumblr.com/post/181084841739
0 notes
Text
As you dive into music production, you soon realise that EQ is the most meaningful and vital effect you can use! Some say that 90% of mixing is EQing.
While the concept of what an EQ is is fairly simple, maybe you’ve read about different types of Equalizers. ‘M/S’, ‘linear-phase’, ‘minimum-phase’, ‘dynamic’, ‘parametric’, ‘graphic’, etc… Does it matter which EQ I use? If so, How much? What are the differences?

Puigtec by Waves
Does it matter which EQ I use?
Yes, but not that much, specially if you’re getting started in the world of production. In the beggining you can’t even tell if different EQs sound any different, but as you mix and mix some more, you start noticing that some EQs are just slightly better for some things. For example an API560 is better for boosts in high frequencies. You’ll feel that some EQ sounds better for vocals, and others sound awesome for drums. Some sound analog and colorful, and others sound cleaner.
It’s all OK though! It just sounds different, and different isn’t always better! So experiment and find what you like more, and unlike what many will say, it doesn’t even have to be expensive. Many mixing engineers out there are used to working with analog equipment in studios, and they pay big bucks so that they can get the digital version of what they are used to. Although there are EQs that are good for some specialized stuff, you can get by without it. Nowadays you can do great mixing using only the plugins that come together with your DAW. Here are some super cool free EQs I use all the time in my mixes:
My Top 5 Free EQs
MEqualizer
Cleansweep
BootEQ
TDR Nova
PTEq-X
Graphic EQ vs. Parametric EQ vs Semi Parametric EQ
Differences: A picture is worth more than a thousand words! Check these out:
Graphic EQ – GEQ by Waves
Parametric EQ – REQ by Waves
On the left, you have a graphic EQ and on the right a parametric one. In graphic EQs you have bands with a fixed frequency, and hence, they are less flexibile. You can find them in your car stereo or in other simpler stereos having only 2 or 3 fixed bands (bass, treble, etc….). More complex ones have 5 or 8 bands, and in the beast shown in the picture above on the left, 30 bands! This great number bands will actually offer you quite a bit of flexibility, but as a rule, this is not the strong point for graphic EQing.
Graphic EQs were very much used in studios before, and because of this, many engineers who’ve worked with older equipment will want to use graphic EQing once in a while since they are used to it, and they do have their analog charm. However, keep in mind that most modern music goes through parametric EQs. Unlike their graphic counterparts, you can move the band around the whole frequency spectrum, increase or reduce the bandwidth of the band, and thus, it offers much more flexibility.
Why should I care? Graphic EQs look simpler to operate since it will usually offers less knobs (not this beast of GEQ by Waves), and many of the analog equipment with all their tricks and quirks are graphic in the end. But parametric EQs will offer you much more flexibility in finding the sweet spots for cutting and boosting. I guess another great difference between one and the other is that it helps you visualize sound in different ways.
When should I use each? Use graphic EQs when you want to make wide but less precise boosts or cuts. Since Analog EQs and their simulators carry their warmth and their own sound, use them for coloring too. Use parametric EQs to do some more precise carving around your track.
In summary:
Very simple;
Fixed frequency adjustment;
Lower precision;
Many renowned EQs are graphic;
Used in cars and simpler stereos, etc…
Parametric EQ
More tweakable parameters and hence more complex;
Adjustable band frequency, bandwidth;
More precise;
Most used kind of EQ currently.
Graphic EQ
Same thing as Parametric EQ but you can’t change the bandwidth (Q) of the band.
Linear-Phase EQ vs. Minimum-Phase EQ
Differences: If you EQ something you alter its phase, and consequentely affect the signal. Linear-Phase EQ keeps it much closer to the original signal using digital algorithms, in the Minimum Phase EQ, modelled after analog EQs, the phase is slightly affected. In practical terms this means that every time you EQ something, as a side effect, the EQ will change the volume of the track! Minimum-phase EQ make the volume slip much more than a linear-phase EQ will.

Linear-Phase EQ by Waves
Why should I care?: Equalization using a linear-phase eq alters the volume much less than using a minimum phase one.
When should I use each?: Since linear-phase eq is much more transparente and alters the perceived volume much less, it is favored by mastering engineers, and if you’re interested in having a more transparent EQ. On the other hand, since analog EQs are always minimum phase EQs, you might prefer to use those for its analog color.
In summary:
Linear Phase EQ:
No phase shift;
EQing’s side effects on the volume of the signal are greatly reduced;
Precise and transparent;
Favored by Mastering Engineers.
Minimum Phase EQ:
Slight phase shift;
Greater EQing’s side effects on the volume;
All analog EQs are minimum phase EQs;
HINT – Always check if your EQ is adjusting the perceived volume by bypassing the FX, and adjust the volume accordingly. Make it different, not just louder.
Mono EQ vs. Stereo EQ vs. M/S EQ
Differences: As a rule, you’ll use mono EQs for mono tracks unless you want to get a stereo track and make it into mono. On the other hand stereo EQs are generally used for stereo tracks, allowing you for different EQing settings on each side channel. This offers you the chance for some cool effects, or for enhacement of your stereo imaging. You can also slap stereo EQ in a mono track and EQ it slightly differently on each end, tweaking it into something more interesting or different.
Now what about M/S EQ? In this acronym, the ‘M’ stands for ‘mid’ and the ‘S’ for side. In m/s you visualize the stereo field as having sides, the edges, hard right and hard left, and then in between them a perceived middle. M/S EQs will let you work on this perceived ‘sides’ and ‘mid’. For example, when mastering, you might be mixing a song with hard panned guitars, and then on the middle, the snare, the kick and the bass. With m/s EQing you can focus on the hard left and right, and make the guitars brighter while leaving the middle alone.
Why should I care? If you slap a mono EQ into a stereo track, you’re making it mono! It makes a difference which you use. and using different varieties of EQing will help you to achieve different effects.
When should I use each? Use mono and stereo EQs for mixing stage and leave the m/s for mastering.
In summary:
Mono EQ:
Hint – Be careful not to turn your stereo track into mono with a misplaced mono EQ;
Stereo EQ:
Hint – try slightly different settings on each side in order to achieve different effects
M/S EQ:
Favored by mastering engineers;
It’s not necessarily better than a Stereo EQ. It just helps you achieve different results;
Try to use it on instruments hard panned like guitars and keys.
Static EQs vs. Dynamic EQs
Differences; Imagine you have a kick drum in your session. You get an EQ and you slap it on your track, and after some masterful engineering on your part, you get that sweet thick spot to get the sound you were looking for. Awesome! The kick plays through the whole song and it sounds amazing.
Why should I care? Static EQs might not do the job for you if there is a huge range of frequencies in your track, unless you automate it. A good dynamic EQ will save you loads of time.
When should I use each? Fetch the dynamic EQs for instruments that go up and down the frequency spectrum such as some vocals or the bass. Static EQ will work just fine for drums and other instruments that tend to focus around the same frequencies.

Surfer EQ is a Dynamic ‘smart’ EQ
In summary:
Smart EQ that can save you a lot of time.
Transparent EQ vs. Coloring EQ
Differences: The name is pretty much self-explanatory. You can’t even tell that more transparent EQs have been used, where as coloring EQs add warmth and a change to the sound you’re mixing. As a general rule, digital EQs tend to be more transparent, and simulations of analog EQs tend to have a bit more character.
Why should I care: It’s true that you can’t even tell the difference in the beggining, but if you want to take it a step further look for your own sound! Get that EQ that is perfect for boosting your drums! Or get that EQ that really gets your vocals rock! With this step, you just have to experiment a lot on your own.
When to use each: Use more transparent EQing for cuts, and use coloring EQ for changing the character of the sound. Out of the free EQs I added, I’ll use BootEQ when boosting my drums, or when boosting high frequencies. I’ll use the PTEq-X for the bass. Look for your own sound!
Conclusion
EQing is a planet of its own, but in the end is always boosting and cutting frequencies and it isn’t as complicated as many make it sound. It’s true that having some analog EQs in your arsenal is cool and takes your sound to the next level, but you don’t have to spend hundreds on it in order to get great sounding mixes. It’s all about training your ears and knowing what to cut or boost.
Any kind of EQs that I missed? What do you think? Please leave your thoughts on the comments below.
Different Types of EQ Explained As you dive into music production, you soon realise that EQ is the most meaningful and vital effect you can use!
#audio#coloring#dynamic#engineering#eq#Eqs#equalization#equalizers#free#graphic#hints#m/s#mixing#mono#parametric#producer#semi#static#stereo#tips#transparent
0 notes
Text
The 15 Best EQ Plugins to Shape Your Mix
The 15 Best EQ Plugins to Shape Your Mix: via LANDR Blog
EQ is one of the most basic—and important—tools you have as an audio engineer.
But there are so many different EQs out there, how do you know which ones are for you?
You might be thinking your DAW’s channel EQ is perfectly fine. But not all EQs are the same. There’s more types than you might think.
This article will teach you about the common styles of EQ and how to use them to shape the perfect sound.
Analog EQ
Early EQs were all analog. Some of the earliest equalizer designs are still around today.
Engineers covet these analog beauties for the musically pleasing way they shape sounds. The musical qualities are the result of the unique circuit design of each unit.
Certain EQs became so sought after that plugin designers developed software to emulate them as closely as possible in the digital domain—leading to a mind-boggling ocean of plugin choices.
So what are the different styles of analog EQ? How do they work? What are they used for and where do they work best?
There’s no hard and fast rules when it comes to choosing an EQ. But there are some helpful guidelines that will help you get started with the classic designs.
Pultec-style EQ
The Pultec EQP-1A is the most sought after EQ ever. Well-preserved original units can sell for over $10,000.
The Pultec EQP-1A is the most sought after EQ ever.
Fortunately for us, the EQP-1A has a long history of software emulation. Today’s Pultec-style plugins can sound good—if you know how to use them.
Pultec-style EQ can work wonders to subtly boost top end or extend lows. It can even make broad EQ enhancements without sacrificing any of the original vibe of the sound.
Since the EQP-1A hails from the earliest era of equalizers, it’s control scheme is a little less intuitive than modern designs.
The bandwidth control affects both the high and low band, but low band works differently from the high band.
For the low band, the boost and attenuate knobs are both linked to one of four frequency options. This quirk allows you to both boost and cut at the selected frequency.
The overlapping filters create a steep bump that’s fantastic for boosting the fundamental frequencies of low end instruments.
The high band has separate frequency options for boosting and cutting with overlaps at 5 and 10 kHz.
These controls are interactive and can result in some unique equalization curves.
Best Pultec EQ VSTs
if (!window.AdButler) { (function () { var s = document.createElement(“script”); s.async = true; s.type = “text/javascript”; s.src = ‘https://servedbyadbutler.com/app.js’; var n = document.getElementsByTagName(“script”)[0]; n.parentNode.insertBefore(s, n); }()); } var AdButler = AdButler || {}; AdButler.ads = AdButler.ads || []; var abkw = window.abkw || “; var plc291816 = window.plc291816 || 0; document.write(” + 'div>’); AdButler.ads.push({ handler: function (opt) { AdButler.register(171487,291816, [300,250], 'placement_291816_’ + opt.place, opt); }, opt: { place: plc291816++, keywords: abkw , domain: 'servedbyadbutler.com’ } });
Free Plugin: Ignite Amps PTeq-X
Ignite Amps PTeq-X is a fantastic (and free) way to get started with Pultec-style EQ. It works just like the original so you can get a sense for creating those quirky overlapping curves.
Cheap Plugin: Waves PuigTec EQP-1A
The Waves PuigTec EQP-1A is a well-emulated, workhorse Pultec EQ. It’s very affordable if you can catch it on sale.
Pro Plugin: UAD Pultec EQP-1A
The UAD Pultec EQP-1A is the industry standard software Pultec. UAD spared no expense in creating the perfect Pultec for your DAW.
SSL Channel EQ
SSL console strips did a lot to inform our idea of what a modern EQ is.
SSL console strips did a lot to inform our idea of what a modern EQ is.
Classic features we’re familiar with today like integrated high/low-pass filters and variable Q were popularized by these consoles.
The SSL consoles are famous for their incredibly powerful filters.
The sharp high/low-pass filters, precise frequency ranges and extremely narrow Q options make this a EQ a first choice for surgical suturing and dramatic tonal changes. Their character is precise but aggressive.
Best SSL EQ VSTs
Free Plugin: Smacklabs Logic Channel
Smacklabs Logic Channel is a good entry-level SSL EQ. This free plugin models the entire SSL channel strip, so you can try out the classic SSL-style compressor and gate/expander while you’re at it.
Cheap Plugin: Slate FG-S
The Slate FG-S comes bundled with their very affordable VMR channel strip collection. The FG-S packs all the features and sound of the aggressive, surgical SSL channel EQ.
Pro Plugin: SSL Native Channel Strip
SSL recently jumped into the software game with their own line of plugins—including an in-house version of their classic console channel strip. Why not go straight to the source?
API-style EQ
if (!window.AdButler) { (function () { var s = document.createElement(“script”); s.async = true; s.type = “text/javascript”; s.src = 'https://servedbyadbutler.com/app.js’; var n = document.getElementsByTagName(“script”)[0]; n.parentNode.insertBefore(s, n); }()); } var AdButler = AdButler || {}; AdButler.ads = AdButler.ads || []; var abkw = window.abkw || “; var plc291816 = window.plc291816 || 0; document.write(” + 'div>’); AdButler.ads.push({ handler: function (opt) { AdButler.register(171487,291816, [300,250], 'placement_291816_’ + opt.place, opt); }, opt: { place: plc291816++, keywords: abkw , domain: 'servedbyadbutler.com’ } });
Experienced engineers often refer to API as the “American” sound in contrast to the “British” Neve tone.
They’re two sides of the same classic console coin.
If you’re a fan of music from the 60’s and 70’s, there’s a good chance some of your favourite records were recorded one of these desks.
The classic API EQ comes in a three band (550a) or four-band (550b) flavour.
The bands don’t have individual Q controls, but the EQ is designed so that the Q becomes progressively sharper as you apply more extreme cuts or boosts.
It’s intuitive and keeps you from worrying too much about the Q setting.
API-style EQ splits the difference between surgical and sculpting. Mild settings can be very transparent, while extreme cuts or boosts can be dramatic and vibey.
Best API EQ VSTs
Free Plugin: Bee-Happy 550
Bee-Happy 500 is a free API-style plugin for those looking to start with classic 70’s console EQ.
Cheap Plugin: Sly-Fi Axis
Sly-Fi Axis is part of the UBK family of products that includes the innovative Kush Audio hardware and software. This EQ is an API on steroids that’s meant to exaggerate the analog colouration of the original.
Pro Plugin: Waves 550a & 550b
Waves 550a and 550b are fantastic native emulations of the API EQ. These are great-sounding and versatile plugins to get the API sound on your tracks.
Neve-style EQ
Neve consoles are the world’s most prized vintage recording equipment.
From the early sixties until the mid-eighties, Neve Electronics produced consoles legendary for their warm, musical sound.
The preamp section of the Neve console strip often gets the most attention, but the EQ is a big part of the Neve sound.
Neve EQs are another great option for broad, smooth cuts and boosts with lots of character.
Neve EQs are another great option for broad, smooth cuts and boosts with lots of character.
There are several different flavours of Neve EQ from the various revisions of the console, but they mostly share the same architecture with a high-pass filter, two or three parametric mid bands and one fixed high band.
The fixed 12 kHz high band found on the Neve 1073 EQ is famous for its ability to add air to vocals, drum rooms and overheads.
Best Neve EQ VSTs
Free Plugin: Smacklabs SL84 Console EQ
Smacklabs SL84 Console EQ will give you a taste of the Neve EQ sound for free. It’s accurately modelled using IR technology.
Cheap Plugin: Sonimus Burnley 73
Sonimus Burnley 73 is super economical way to get the sound of a 1073 on to your tracks.
Pro Plugin: UAD Neve 1073
The UAD Neve 1073 is a tremendously accurate emulation of the classic 1073 preamp and EQ. It’s incredibly smooth and musical with tone that screams Neve.
Digital EQ
We all drool over the analog EQ beauties. But that doesn’t mean there aren’t extremely useful and creative tools that don’t have anything in common with the classics.
Digital EQ is essential for any DAW. It’s the most precise tool in your EQ tool box.
Reach for digital EQ when you want to make changes without colouring your sound at all. In the right hands, digital EQ can be powerful, flexible and utterly undetectable.
Reach for digital EQ when you want to make changes without colouring your sound at all.
It’s a first choice for “problem solving” duties like notching out room resonances.
Best Digital EQ VSTs
Free Plugin: Your built-in DAW EQ
Most DAWs come bundled with a capable digital EQ. We’re talking about stock DAW plugins like Ableton EQ Eight, Logic Channel EQ, and Avid EQIII. These are all effective entry points into digital EQ.
Cheap Plugin: Voxengo PrimeEQ
Voxengo PrimeEQ is a robust, well-designed digital EQ from a respected company. Look no further if you’re after a nice workhorse digital EQ.
Pro Plugin: Fabfilter ProQ 2
Fabfilter ProQ 2 is the most technologically advanced EQ on this list. The raw power of this EQ is staggering—it’s a singular feat of DSP engineering. Listing all its incredibly powerful features would take far too long, let’s just say this a top-tier professional EQ!
Great Equalizer
There’s a whole world of EQ out there.
It’s such a fundamental tool that engineers will always have strong opinions about it. And that means that designers will always be creating new and better versions.
Wading through that water is daunting and exciting at the same time.
But now that you know a little bit about the types of EQ, go head try some of the plugins on this list. You’ll find out which EQ works best for you!
The post The 15 Best EQ Plugins to Shape Your Mix appeared first on LANDR Blog.
from LANDR Blog https://blog.landr.com/best-eq-plugins/
via https://www.youtube.com/user/corporatethief/playlists
from Steve Hart https://stevehartcom.tumblr.com/post/177459261554
0 notes
Last Seen Blogs

fullwritinggamingauthor
Untitled

cherryheartsx
kim

alphafemalebullies
Alpha Female Bullies

ptagceo
PTAG

damnnourry-blog
was damnnourry