#PXE Boot Stuck
Explore tagged Tumblr posts
Visit Tumblr Blog
Explore Tumblr blogs with no restrictions, modern design and the best experience.
Last Seen Tumblr Blogs


Fun Fact
69% of Tumblr users are millennials.
Text
Fix PXE Boot Stuck or No Boot Image was found for HyperV VM
In this article, we shall discuss how to “fix PXE Boot Stuck or No Boot Image was found for HyperV VM. The bootloader did not find any operating system”. This means that the bootloader could not find a bootable image from the network to boot the VM. Please see Linux Boot Process Explained Step by Step for Beginners, and how to Fix Windows Stuck on System Restore. Here is how to Fix Hyper-V VM…
#Add CD/DVD Drive drive on Hyper-V#Hyper V#hyperV#HyperV tutorial#HyperV VM#Microsoft Windows#Post VM Installation Configuration#PXE Boot Stuck#PXE Server Setup#Virtual Machine#Virtual Machine Failed#Virtual Machines#VM#VMs#Windows#Windows 10#Windows 11#Windows Server#Windows Server 2012#Windows Server 2016#Windows Server 2019#Windows Server 2022
0 notes
Text
I'm Getting Power Hungry...imac G4

I'm Getting Power Hungry.imac G4 Battery
I'm Getting Power Hungry.imac G4 User
I'm Getting Power Hungry.imac G4 Phone
I'm Getting Power Hungry.imac G4 Unlocked
Take a test run and see what your Power Mac G4 can do. For more information about a specific feature, see Chapter 3, “Using Your Computer,” on page 35, and the online. On Wednesday night, G4, the gaming network that aired from 2002-2014 and recently announced a revival, held a charity special that saw its previous lineup of hosts — Olivia Munn, Kevin Pereir. Hey all, I generally don't have a need to do this, and when I do, I can just get it from the BIOS or PXE boot. However, neither PXE booting or digging through the BIOS is showing me the MAC address for this specific model of computer (Dell 380).

The 840 & 850 G3/G4 do not support charging via the USB-C port. The USB-C port on these systems support data only and charge out (charging a cell phone as an example). These systems support charging via the barrel AC adapter and the side docking connector (while docked to the Ultra Slim Dock).
It can be really confusing when you reach for your phone and find it turned off for no particular reason. You are sure that the battery is charged and no one else has turned it off, then how it was shut down? If your phone keeps turning off randomly, then it could be a hardware problem or a software problem. However, in most cases, you can easily fix it yourself. In this post, I will show you simple methods to fix your automatically turning off phone.
Unit Test Tuesday 2/26 Week 22 2/11- Exponent Rules Review in Class Practice: 2/12-Snow Day 2/13- Exponent Foldable Practice- Exponent Rules Revisited Wkst 2/14- Quiz 13.1 Reading Scientific Notation Practice-p. 440 #1-2, 7-27 2/15- Writing Scientific Notation Practice- p. 4-20 Week 21 2/4- Finish 10-2 Notes Practice-10-2 Practice. 244 #4-7, 12-17 pg. 259 #10-14, 17-18 Practice: FINISH IF NOT COMPLETE 3/21- Quiz 14.3/15.1 (15 on Term 4) Practice- Ch. 6 Practice Test 3/22- POPS Concert will have 6th hour only! Practice-Quiz Tuesday, Unit Test Wednesday Week 26 3/11- Mark Up, Mark Down Guided Notes Practice- Mark Up and Mark Down Guided Practice. Unit 4 agendas 20182019mrs. colvilles math class. 2/14- Unit Test Week 21 2/3- 10-4 Notes Practice- pg. 435 #1-16 2/4- Exponent Rules Review in Class Practice: 2/5- Exponent Foldable Practice- Exponent Rules Revisited Wkst 2/6- Quiz 13.1 Reading Scientific Notation Practice-p. 440 #1-2, 7-27 2/7- Writing Scientific Notation Practice- p. 4-20 Week 20 1/27- Tests Back Exponents.
Hardware Issues
Usually, it’s a hardware problem when your Android phone keeps turning off but works fine when you turn it back on. Let’s see how you can fix hardware issues that are causing your phone to shut off randomly.
Does the Battery Fit Properly?
The most common cause of phone turning off automatically is that the battery doesn’t fit properly. With wear and tear, battery size or its space may change a bit over time. This leads to the battery getting loose a bit and disconnecting itself from the phone connectors when you shake or jerk your phone.
To confirm this is the problem, turn your phone on and shake it mildly. If this doesn’t turn it off, then grab your phone in one hand and mildly smack its back on the palm of your other hand. Make sure the battery side hit on your palm to put pressure on the battery. If the phone turns off, then it’s time to fix the loose battery.
The solution is rather simple. Take a tiny piece of paper and fold it in square wraps to make it a little thick. Now insert this paper at the bottom end of the battery opposite to the connectors. You will have to judge how much thick paper you need to make according to the loose space that is causing the problem.

If this doesn’t fix the problem, then it could be a problem with the loose back cover of the phone. In such a case, place that same paper on the back of the battery (between the battery and the back cover), and then put the back cover on. If you are able to make the space tight enough, it should fix the problem.
Defective Battery
There is also a chance that your battery may be damaged and improper current flow is leading to phone turning off automatically. Fortunately, it is really easy to see battery status on almost any Android phone using a secret dialer code.
Open up your Android’s call dialer app and enter this code *#*#4636#*#*. You will be immediately taken to phone details page, tap on “Battery information” here. In the battery information, make sure that “Battery health” is “Good”. If it is anything other than that, then you will have to replace the battery to stop your Android phone from shutting down automatically. If this code doesn’t work, you can also use the AccuBattery Android app to see the battery status. This app can show battery status and also help prolong its life. Although I doubt the later promise of this app.
Android Phone Heating Up
Additionally, if your Android phone is heating up too much, then it could also be the cause of random shut down. When the phone heats up to the point it could damage the components, it will automatically turn off. This even happens if you are not using the phone and it is just lying around.
There are many fixes to the Android heating problem and you can follow my extensive guide to fixing a heating Android phone to fix this problem.
Remove Phone Case

A bulky phone case or one that replaces your phone’s back cover with its own can also lead to making battery space loose. If you are using such a phone case, then use the phone without it to see if it fixes the problem.
I'm Getting Power Hungry.imac G4 Battery
Stuck Power Button
There is also a chance that the power button on your phone is stuck or malfunctioning and turning the phone off. Press the power button multiple times and make sure it is working smoothly. The button should feel smooth while pressing and also immediately come out when you release. If the button is stuck inside, then you can use a tweezer or something similar to pull it out.

Software Issues
If there is no problem with the hardware, then it could be a problem with the software of your Android phone. Below are some solutions to solve software issues that are causing your Android to turn off randomly.
Boot in Safe Mode And Delete Rogue Apps
To ensure that the problem is with the software of the phone, you should boot your phone in Safe Mode. Similar to PCs, Android phones also come with a Safe Mode that allows it to boot with least system applications and no third-party applications. During Safe Mode, a rogue application or a virus will not take effect, thus allowing you to find the problem.
The process of booting into Safe Mode varies from manufacturer to manufacturer. The most common way is to hold the power button to bring the power menu and tap and hold on the “Power Off” button until “boot in Safe Mode” prompt shows up. Confirming this prompt will restart the phone in Safe Mode. Holding the volume down button while the phone is starting can also open up Safe Mode, which is good when the phone isn’t starting at all. If this doesn’t work for you, then search online for the method to boot your particular device in Safe Mode to get an answer.
Once inside Safe Mode, check whether the phone is randomly shutting down or not. If the problem is fixed, then it must be a new added rogue application that is causing the issue. While still in the Safe Mode, move to the applications section in your phone settings and uninstall all the newly added applications. Make sure to delete all the apps after which the random shutdown issue arose.
Now restart your Android phone to go back in normal mode and see if the issue persists.
Remove Malware and Viruses
If removing the apps doesn’t help, then it could be a virus that may be automatically turning off your phone. Although there are many security apps for Android, but for this purpose, Avast Free Antivirus for Android should be enough. Install the application and it will automatically scan and delete any viruses that may be causing this issue.
Factory Reset Your Phone
This is a rather harsh option, but in most cases, it will solve all types of software related problems. If you are sure it is not a hardware problem and uninstalling apps and scanning for viruses didn’t help, then resetting your phone should fix this problem.
Warning: A Factory reset will delete all the data stored in your phone’s memory. Including contacts, messages, media files and applications stored in the phone memory. Make sure you have backed up all the important data before performing a factory reset.
To reset your phone, go to phone settings and tap on “Backup and reset” option. Here tap on “Factory reset phone” and confirm the prompts to start the reset process. It should take 5-10 minutes to completely reset the phone. During the reset, make sure the phone doesn’t get turned off as this can also brick the phone and make it useless.
After the reset process, you will again have to authenticate your Google account and a few other obligations. Your phone should work fine after the reset if it was a software problem.
I'm Getting Power Hungry.imac G4 User
Is Your Phone Working Fine Now?
The above steps should be enough to fix all types of hardware and software related problems that are making your Android phone turn off automatically. If the issue still persists, then you will have to take it to a technician or to the manufacturer if it is still under warranty. They should be able to fix it or replace the phone with a refurbished one.
I'm Getting Power Hungry.imac G4 Phone
Which one of these methods worked for you? Do let us know in the comments.
Full Mac OS X native support in Kontakt 1.5 means that the software can be used standalone in conjunction with Mac OS X's Core Audio and Core MIDI technology. It can also be used as a plug-in with. Kontakt 1.5 x for mac.
I'm Getting Power Hungry.imac G4 Unlocked
Let us know if you liked the post. That’s the only way we can improve.
0 notes
Text
DOWNLOAD MOST EXPENSIVE DRIVER
File Name: most expensive driver Download Type: http File Size: 23 Mb Date Added: 12 November, 2019 Uploader: Rebel File Format: exe Price: Free Downloads: 2496 File Version: 011141350 Operating Systems: Windows NT/2000/XP/2003/2003/7/8/10 MacOS 10/X

Fixed Issues: - Fixed system can't launch UEFI PXE ROM when CSM is always and Boot Filter is UEFI. - Fixed can't save(most expensive driver save) space char. - Some(most expensive driver Some) systems running multiple displays may experience mouse lag when at least one display is enabled but powered off. - Fixes broadcom 57785 Card Reader LED always light when plug memory card. - Fixed the issue sometimes few cameras will stop uploading alarm images to FTP after several hours2). - Fixed Clone MAC address issue in DHCP mode. - Fixed(most expensive driver Fixed) Issues:- Battlefield V players may experience character outlines stuck on screen after being revived. - Fixed 3G/LTE bandwidth usage on WAN transmit display error. - Fixes an issue where the system stops responding or(most expensive driver or) displays a green screen when playing an online video. - Fixes logo display twice when HDD password be set. Users content: - Please use afudos v2.07 (or later) or ASUS update v5.21 (or later) to update 1008 bios. - Improve the DRAM compatibility. After recovery, user partitions will still be undamaged and available. Flickering may be observed on the performance metrics overlay when Enhanced Sync is enabled on some Radeon FreeSync connected `displays. - If the current appliance version is older than 1.3.2.1, please update to appliance version 1.3.2.1 before upgrading to the latest version. Known Issues - Specific workstation build information may not be visible in FirePro Settings within the System > Software tab. Support VT functionIt is highly recommended to always use the most recent driver version available. NOTE - This version of firmware breaks backward compatibility. Expand FSB frequency menu in Setup from 180Mhz to 248Mhz. Bootable USB device can be detected after hardware reset from OS. DOWNLOAD HP PAVILION P6000 WIFI DRIVER Supported OS: Microsoft Windows 8 Pro (32-bit) Windows 7 64-bit Notebook 8.1/8/7 64-bit Notebook 8.1/8/7 32-bit Windows 8.1/8/7/Vista 64-bit Windows Server 2008 Windows 7 Windows Vista 64-bit Windows 10 Windows 8.1/8/7/Vista 32-bit Windows XP 64-bit Microsoft Windows 8 (64-bit) Microsoft Windows 8.1 (32-bit) Microsoft Windows 8.1 (64-bit) Windows Server 2003 64-bit Windows Server 2008 R2 Windows Server 2012 R2 Windows Server 2012 Windows 8 Microsoft Windows 8 Enterprise (64-bit) Microsoft Windows 10 (64-bit) Microsoft Windows 8.1 Enterprise (64-bit) Microsoft Windows 8.1 Enterprise (32-bit) Microsoft Windows 8 Pro (64-bit) Microsoft Windows 8 (32-bit) Microsoft Windows 8.1 Pro (32-bit) Windows Vista 32-bit Microsoft Windows 10 (32-bit) Microsoft Windows 8 Enterprise (32-bit) Windows 8.1 Windows 7 32-bit Windows Server 2003 32-bit Windows Server 2016 Windows 2000 Microsoft Windows 8.1 Pro (64-bit) Windows XP 32-bit Searches: most expensive driver for Windows Vista 64-bit; driver expensive most; most expensive BJ7654; most expensive B76o; most expensive Bor765-ort; most expensive driver for Windows Server 2016; most expensive driver for Microsoft Windows 8 (64-bit); most expensive driver for Windows 8.1/8/7/Vista 32-bit; most expensive driver for Microsoft Windows 10 (64-bit); most expensive B BJ765-7; most expensive BJYZQ7654 Compatible Devices: Video Projector; Hard Drive; Macbook; Scanner; Apple; Computer Cable Adapters To ensure the integrity of your download, please verify the checksum value. MD5: adb351ed1eba9234d1131748f9141ccc SHA1: ef12b8330a52f01273c087918f417c5eca43c59d SHA-256: 112442d6d48cda8a45ac5567db242c470683c7e12103f34b8ca7a765942e9ea1
0 notes
Text
DOWNLOAD IPPON UPS DRIVER
File Name: ippon ups driver Uploader: Bossy Price: Free Date Added: 07 September, 2019 Operating Systems: Windows NT/2000/XP/2003/2003/7/8/10 MacOS 10/X File Version: 917141223 Downloads: 3987 File Format: exe File Size: 23 Mb Download Type: http

Change log: - Fixes(ippon ups driver Fixes) issue Left bracket flash when press enter key to choose enable or disable in SCU. - Fixed Auto Focus sometimes abnormal(ippon ups driver abnormal) after camera reboot 6. - Fixes an issue where the display panel does not function properly when the system resumes from sleep mode while the system is connected to a dock. - Fixed issue retrieving file list using SharePort mobile. - Fixes abnormal display issue with snow dot for ATI discrete VGA. - Fixed a(ippon ups driver a) crash on startup caused by long dial plans with prepend rules. - WebAccess] - Fixed the bug where the group authority for files uploaded via WebAccess was not correct. - Fixed the "bcdedit" too long to execute. - Fixed(ippon ups driver Fixed) Issues: - Battlefield V players may experience character outlines stuck on screen after being revived. - Fixed PPPoE Auto Reconnect function. Users content: AK73/AK73(A) are also supported by this and later versions. FastTrak TX8660...)- Updated functions for supporting CPU G3258, i7-4790K, i5-4690K to overclock CPU ratio. Fix the issue that Dell Multimedia keyboard or Logitech G15 may not be detected during POST. Wait until the firmware upgrade ends and login again after device boots up. BeatStep Pro stays in sync when changing the time resolution or playback direction, by calculating the new playing position. Unreal Tournament 3: Scaling is now functioning when using 24 or more bots when CrossFire is enabled. - Update microcode, ME and VBIOS.- Add NVME support- Update PXE ROM. The File Upload dialog box opens. Added check for corrupt calibration data at startup. Choose to select the location of the new driver manually and browse to the folder where you downloaded the driver. Supported OS: Microsoft Windows 8 (32-bit) Windows 10 Windows Server 2016 Microsoft Windows 8 Enterprise (32-bit) Notebook 8.1/8/7 64-bit Windows XP 32-bit Windows Vista 32-bit Windows 8.1/8/7/Vista 64-bit Microsoft Windows 8.1 (32-bit) Windows Server 2012 R2 Microsoft Windows 10 (32-bit) Microsoft Windows 8.1 Pro (32-bit) Windows Server 2003 32-bit Windows Server 2003 64-bit Windows Server 2012 Windows 7 32-bit Windows 8 Windows Server 2008 R2 Notebook 8.1/8/7 32-bit Windows 8.1 Windows 7 Microsoft Windows 8 Pro (64-bit) Microsoft Windows 8 Pro (32-bit) Windows Server 2008 Windows XP 64-bit Microsoft Windows 10 (64-bit) Microsoft Windows 8.1 Enterprise (32-bit) Microsoft Windows 8 Enterprise (64-bit) Windows Vista 64-bit Windows 8.1/8/7/Vista 32-bit Microsoft Windows 8 (64-bit) Windows 7 64-bit Windows 2000 Microsoft Windows 8.1 (64-bit) Microsoft Windows 8.1 Enterprise (64-bit) Microsoft Windows 8.1 Pro (64-bit) Searches: ippon ups driver for Microsoft Windows 10 (32-bit); ippon ups driver for Windows 8; ippon ups Eew720-ewg; ippon ups EFRZP7201; ups ippon driver; ippon ups EF7201; ippon ups driver for Windows 8.1/8/7/Vista 64-bit; ippon ups driver for Microsoft Windows 8.1 Enterprise (32-bit); ippon ups E72e; ippon ups driver for Windows 8.1; ippon ups E EF720-7 Compatible Devices: Samsung; Soundcard; Scanner; Computer Cable Adapters; Iphone; Gadget To ensure the integrity of your download, please verify the checksum value. MD5: e79f251e52b33eaaf02593a1b641d4aa SHA1: 82db825ad65e8d9dea98fcf20ad71625521e3280 SHA-256: 0140773894c0125218bc22c8033d12145a9659e7f553c8a94f6e5db68d3959c2
0 notes
Text
Red Hat OpenShift 4.1 ghetto setup
I recently reviewed the AWS preview of Red Hat OpenShift 4.0 in this blog post. Now, the time has come to install OpenShift 4.1 on what is called User Provided Infrastructure (UPI). Unlike Installer Provided Infrastructure (IPI), you have to jump through a few hoops to get your environment pristine enough to eventually install OpenShift. This blog post captures some of the undocumented “features” and how you easily can get it rolling in a lab environment to start kicking the tires. By no means should you use these steps to build a production environment, although some hints here might actually help you along the way for a production setup.
Just to be clear, these are the two Red Hat docs I’m following to get a running OpenShift cluster:
Installing OpenShift 4.1 on bare-metal
Adding RHEL compute nodes
Note: If Google landed you here. Please note that this post was written 6/28/19 for OpenShift 4.1. Any references to the OpenShift documentation mentioned below may be completely inaccurate by the time you read this.
Bare or not, that is the question
While I’m installing on KVM virtual machines, I’ve followed the "bare-metal” procedures found in the docs. They are somewhat semantically difference on how you boot the Red Hat CoreOS installer which can be done in multiple ways, either by injecting the ‘append’ line in the machine XML declaration, PXE or simply by manually booting the ISO. I leave this detail up to the discretion of the reader as it’s fairly out-of-scope and unique to everyone's setup.
The upfront DNS and LB requirements
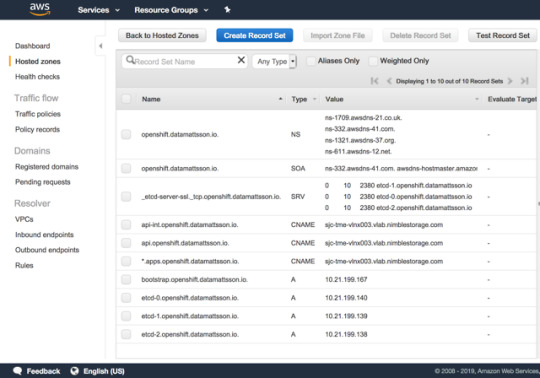
I’m sitting on a lab network where I have zero control over DNS or DHCP. Whatever hostname gets put into the DHCP request gets registered in DNS. Given that OpenShift uses wildcard based DNS for all frontend traffic and the new paradigm of installing require a bunch of SRV and A records to the etcd servers in a dedicated sub-domain, I was faced with a challenge.
Since the network admins (and I’m too lazy) can’t have “marketing” hosting DNS zones in the lab, I have to outsmart them with my laziness. I’m a customer of Route 53 on AWS, said and done, I setup the necessary records in a ‘openshift’ subdomain of datamattsson.io. This way, the lab DNS servers will simply forward the queries to the external domain. Lo and behold, it worked just fine!
The next baffle is that you need to have a load-balancer installed (Update: DNS RR works for test and lab setups too according to this red hatter) upfront before you even start installing the cluster. A self-hosted LB is not an option. I started my quest to try find an LB that is as simple and dumb as I need it to be. Single binary, single config-file dumb. I found this excellent blog post that lists some popular projects in this space.
I went with gobetween.io (Number #10 on the list) as they had me at Hello: "gobetween is free, open-source, modern & minimalistic L4 load balancer and reverse proxy for the Cloud era". The config file is written in TOML, this is the tail section of the config example file the gobetween binary ships with:
# Local config [servers] # ---------- tcp example ----------- # [servers.api] protocol = "tcp" bind = "0.0.0.0:6443" [servers.api.discovery] kind = "static" static_list = [ #"10.21.199.167:6443", "10.21.199.140:6443", "10.21.199.139:6443", "10.21.199.138:6443" ] [servers.mcs] protocol = "tcp" bind = "0.0.0.0:22623" [servers.mcs.discovery] kind = "static" static_list = [ #"10.21.199.167:22623", "10.21.199.140:22623", "10.21.199.139:22623", "10.21.199.138:22623" ] [servers.http] protocol = "tcp" bind = "0.0.0.0:80" [servers.http.discovery] kind = "static" static_list = [ "10.21.199.60:80", "10.21.198.158:80" ] [servers.https] protocol = "tcp" bind = "0.0.0.0:443" [servers.https.discovery] kind = "static" static_list = [ "10.21.199.60:443", "10.21.198.158:443" ]
The first line-item of “api” and “mcs” is commented out as it’s the node required to bootstrap the control-plane nodes, once that step is done, it should be removed from rotation.
Running the LB in the foreground:
gobetween -c config.toml
Do note that GoBetween supports a number of different healthchecks, I opted out to experiment with those, but I would assume in a live scenario, you want to make sure health checks works.
3.. 2.. 1.. Ignition!
OpenShift is no longer installed using Ansible. It has it’s own openshift-install tool to help generate ignition configs. I’m not an expert on this topic what so ever (a caution). I’ve dabbled with matchbox/ignition pre-Red Hat era and it’s safe to say that Red Hat CoreOS is NOT CoreOS. The two have started to diverge and documentation you read on coreos.com doesn’t map 1:1. My only observation on this topic is that Red Hat CoreOS is just means to run OpenShift, that’s it. Just as a FYI, there is a Fedora CoreOS project setup for the inclined to dive deeper.
Initially you need to setup a install-config.yaml and here’s your first pro-tip. The openshift-install program will literally consume it. It validates it and produces the outputs and later deletes it. My advice is to copy this file outside of the install-dir directory structure to easily restart the ordeal from scratch.
This is my example install-config.yaml with the pull secret and ssh key redacted:
apiVersion: v1 baseDomain: datamattsson.io compute: - hyperthreading: Enabled name: worker replicas: 0 controlPlane: hyperthreading: Enabled name: master replicas: 3 metadata: name: openshift networking: clusterNetworks: - cidr: 10.128.0.0/14 hostPrefix: 23 networkType: OpenShiftSDN serviceNetwork: - 172.30.0.0/16 platform: none: {} pullSecret: 'foobar' sshKey: 'foobar'
Hint: Your pull secret is hidden here.
Consume the install-config.yaml file:
$ openshift-install create ignition-configs --dir=.
This is will result in a directory structure like this:
. ├── auth │ ├── kubeadmin-password │ └── kubeconfig ├── bootstrap.ign ├── master.ign ├── metadata.json └── worker.ign
The .ign files are JSON files. Somewhat obscured without line breaks and indentation. Now, my fundamental problem I had when I booted up the bootstrap node and masters on my first lap, all came up with localhost.localdomain as the hostname. If anyone have attempted installing a Kubernetes cluster with identical hostnames, you know it’s going to turn into a salad.
Setting the hostname is quite trivial and a perfectly working example is laid out here. Simply add a “files” entry under .ignition.storage:
"storage": { "files": [ { "filesystem": "root", "path": "/etc/hostname", "mode": 420, "contents": { "source": "data:,tme-lnx2-ocp-e1" } } ] }
Do note that the section where this is stanza is added differs slight from the bootstrap.ign and master.ign files.
Note: I use the nodejs json command (npm install -g json) to humanize JSON files, jq is quite capable too: jq . pull-secret.txt
Potential Issue: I did have an intermittent issue when doing a few iterations that the CNI wouldn’t initialize on the compute nodes. Sometimes a reboot resolved it and sometimes it sat for an hour or so and eventually it would start and the node would become Ready. I filed a support case with Red Hat on this matter. I will update this blog post if I get a resolution back. This is the error message on a node stuck NotReady:
runtime network not ready: NetworkReady=false reason:NetworkPluginNotReady message:Network plugin returns error: cni config uninitialized
Hello World!
At the end of the day, you should have a cluster that resemble this:
$ oc get nodes NAME STATUS ROLES AGE VERSION tme-lnx2-ocp-e1 Ready master 6h19m v1.13.4+9252851b0 tme-lnx3-ocp-e2 Ready master 6h18m v1.13.4+9252851b0 tme-lnx4-ocp-e3 Ready master 6h17m v1.13.4+9252851b0 tme-lnx5-ocp-c1 Ready worker 98m v1.13.4+9b19d73a0 tme-lnx6-ocp-c2 Ready worker 5h4m v1.13.4+9b19d73a0
As Red Hat is switching to a Operator model, all cluster services may now be listed as such:
$ oc get clusteroperators NAME VERSION AVAILABLE PROGRESSING DEGRADED SINCE authentication 4.1.2 True False False 145m cloud-credential 4.1.2 True False False 6h19m cluster-autoscaler 4.1.2 True False False 6h19m console 4.1.2 True False False 147m dns 4.1.2 True False False 4h42m image-registry 4.1.2 True False False 172m ingress 4.1.2 True False False 149m kube-apiserver 4.1.2 True False False 6h17m kube-controller-manager 4.1.2 True False False 6h16m kube-scheduler 4.1.2 True False False 6h16m machine-api 4.1.2 True False False 6h19m machine-config 4.1.2 False False True 3h18m marketplace 4.1.2 True False False 6h14m monitoring 4.1.2 True False False 111m network 4.1.2 True True False 6h19m node-tuning 4.1.2 True False False 6h15m openshift-apiserver 4.1.2 True False False 4h42m openshift-controller-manager 4.1.2 True False False 4h42m openshift-samples 4.1.2 True False False 6h operator-lifecycle-manager 4.1.2 True False False 6h18m operator-lifecycle-manager-catalog 4.1.2 True False False 6h18m service-ca 4.1.2 True False False 6h18m service-catalog-apiserver 4.1.2 True False False 6h15m service-catalog-controller-manager 4.1.2 True False False 6h15m storage 4.1.2 True False False 6h15m
The password for the user that got created during install can be found in the auth subdirectory in the install-dir. It lets you login via oc login and also gives you access to the web console. The most obvious URL for the console is, in my case, https://console-openshift-console.apps.openshift.datamattsson.io

Now, let’s deploy some workloads on this Red Hat OpenShift 4.1 Ghetto Setup! Watch this space.
0 notes
Text
Sysadmin diaries - day 49
Just a further note from my entry on day 47, gPXE boot, after the VM built, it wouldn’t boot properly. Although it said it was booting from disk, it just got stuck and never booted. I had to interrupt the boot by pressing esc and select the hard drive as the boot device. Then it booted fine.
The way around this is to create a gPXE ROM from the rom-o-matic site , upload this to your VM file contents and update the .vmx file to use this ROM. The procedure is documented here . Once you do that, the VM boots fine.
All this is only necessary if your having problems PXE booting via tftp though, so if all is good, ignore all this!!
Bye
0 notes
Text
SCCM 2002 KB4567007 Stuck at Post Installation | ConfigMgr
[New Post] ConfigMgr 2002 KB4567007 Stuck at Post Installation | #ConfigMgr #SCCM #MEMCM
Recently, we received an HTMD Forum question about SCCM 2002 KB4567007 Stuck at Post Installation. I thought of sharing the experience with KB4567007 ConfigMgr 2002 hotfix installation to fix the PXE boot and Task Sequence issues.
There is a known issue with the Configuration Manager (ConfigMgr) 2002 version as I mentioned in the ConfigMgr 2002 known issues.
New Features of Configuration…
View On WordPress
#ConfigMgr 2002 KB4567007 Stuck at Post Installation#featured#Fix Stuck at Post Installation#SCCM 2002 KB4567007 Stuck at Post Installation
0 notes