#Pickering's Triangle
Explore tagged Tumblr posts
Visit Tumblr Blog
Explore Tumblr blogs with no restrictions, modern design and the best experience.
Last Seen Tumblr Blogs


Fun Fact
Tumblr has a low social media market share in South America.
Text

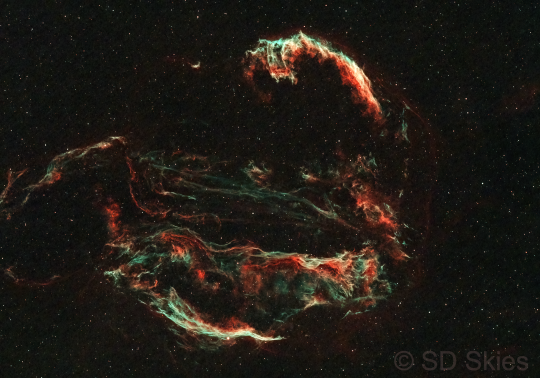
The Veil Nebula // Julien Defferrard
#astronomy#astrophotography#nebula#emission nebula#supernova remnant#veil nebula#western veil nebula#eastern veil nebula#pickering's triangle#NGC 6960#NGC 6992#NGC 6995#IC 1340#cygnus
24 notes
·
View notes
Text

Pickering's Triangle
2K notes
·
View notes
Text


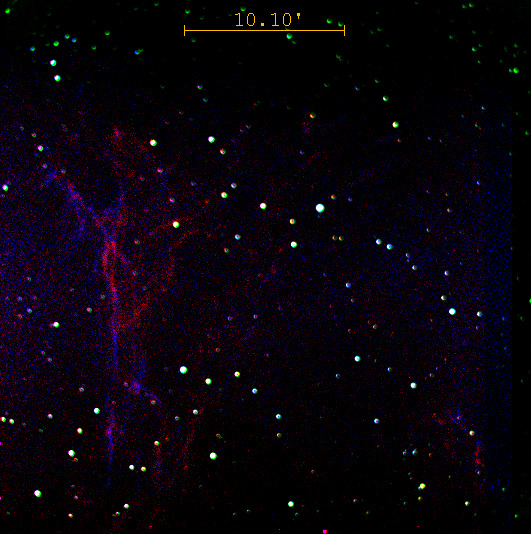
Photo of Pickering's triangle (also known as Fleming's triangle) and NGC 6979 / NGC 6974 (the more diffused clouds at the top center/left). This is the third part of the Cygnus loop / veil nebula, this part of the supernova remnant is fainter than the previous two parts of the loop I photographed. This explains in part why it was only discovered by in 1904 by Williamina Fleming (whereas the two writer part were discovered in 1784 by William Herschel). Williamina Fleming was a pioneer in stellar classification, she worked with other women at the Harvard college observatory. Their work in star classification resulted in the Henry Draper Catalogue, an extensive (225 300 stars in the first edition) classification of stars with their position and their spectra. Williamina is also credited with the discovery of 59 nebula (including the famous hors head nebula) more than 300 variable stars as well as (with Henry Norris Russell and Edward Charles Pickering) the discovery of white dwarfs (the remnants of dead sun-like stars).
#astronomy#astrophotography#space#photos taken from my backyard#supernova remnant#nebula#pickering's triangle#Williamina Fleming
93 notes
·
View notes
Photo
Pickering's Triangle image taken with the Mayall 4-meter Telescope
A wide-field image of Pickering's Triangle taken with the U.S. National Science Foundation's Mayall 4-meter Telescope at Kitt Peak National Observatory. Pickering's Triangle is part of the Cygnus Loop supernova remnant.
Credit: T.A. Rector/University of Alaska Anchorage, H. Schweiker/WIYN and NOIRLab/NSF/AURA (Available under Creative Commons Attribution 4.0 International)
#t a rector#university of alaska anchorage#h schweider#wiyn#noirlab#national science foundation-ocean observatory initiative#aura#pickering's triangle#astronomy#space#mayall 4-meter telescope#cygnus loop supernova#nature
31 notes
·
View notes
Photo
Picture with Annotations:

2025 June 2
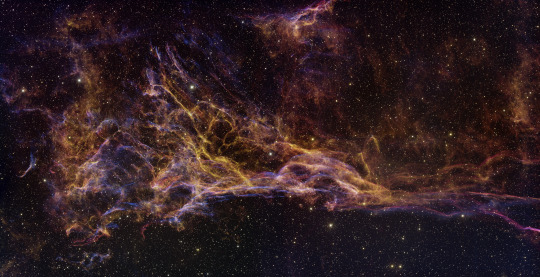
Veil Nebula: Wisps of an Ancient Supernova Image Credit & Copyright: Abdullah Alharbi
Explanation: Wisps like this are all that remain visible of a Milky Way star. About 7,000 years ago that star exploded in a supernova, leaving the Veil Nebula. At the time, the expanding cloud was likely as bright as a crescent Moon, remaining visible for weeks to people living at the dawn of recorded history. Today, the resulting supernova remnant, also known as the Cygnus Loop, has faded and is now visible only through a small telescope directed toward the constellation of the Swan (Cygnus). The remaining Veil Nebula is physically huge, however, and even though it lies about 1,400 light-years distant, it covers over five times the size of the full Moon. The featured picture was taken in Kuwait in mid-2024 and features light emitted by hydrogen in red and oxygen in blue. In deep images of the complete Veil Nebula like this, even studious readers might not be able to identify the iconic filaments.
∞ Source: apod.nasa.gov/apod/ap250602.html
#astronomy#astronomy picture of the day#supernova remnant#Veil Nebula#Cygnus Loop#Western Veil#Witch's Broom Nebula#Caldwell 34#NGC 6960#Eastern Veil#Caldwell 33#NGC 6992#NGC 6995#Bat Nebula#IC 1340#Pickering's Triangle#Fleming's Triangular Wisp#NGC 6974#NGC 6979#Southwestern Knot
78 notes
·
View notes
Text

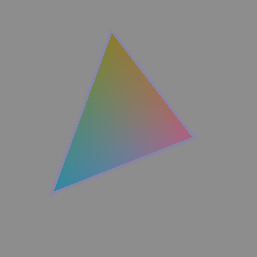
first computer drawing!!! valentine type beat in,,, august
#i only draw with mouse please be kind#ive also never used the triangle colour picker thing before?#the apps ive used always use the cube one#so some of the colours maybe be wacky cause i was making things way too unsaturated by accient#boone my beloved#the thermometer in the middle is the same one in dinky dino is wearing#i thought itd be cute if i made it like#love thermometer?#and its overfiled cause yk they love each other#craig boone#boone#fallout#fallout new vegas#boone x courier#ship: boone x six#cain maryann
37 notes
·
View notes
Text
feel free to mention what program(s) you use as well. of course not every program gives you a choice on what shape it is, but i find it interesting what people are more used to/prefer when given the choice
#personal#square sweeeeeep. only because its what im used to though#honestly also enjoy HSV sliders. particularly in heavypaint
4K notes
·
View notes
Photo

Pickering's Triangle from Kitt Peak
Credits: T. Rector, U. Alaska Anchorage, H. Schweiker, WIYN, NOAO, AURA, NSF
89 notes
·
View notes
Text
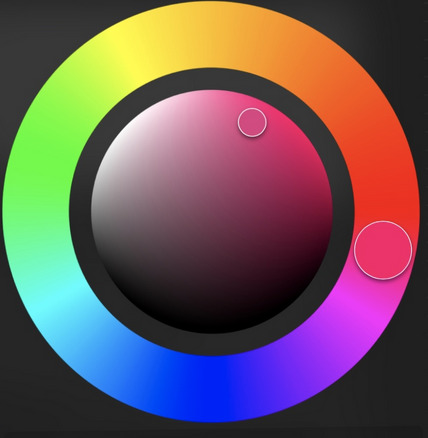
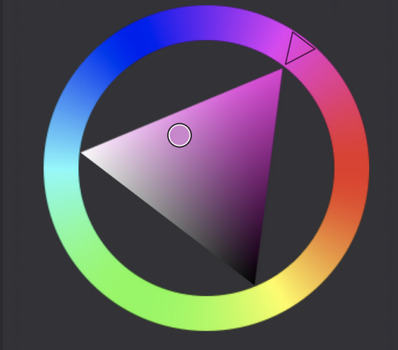
Making a Gamut Mask in CSP
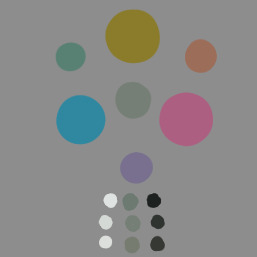
Strap in folks! I'm going to show you how to make a "gamut mask" and palette using nothing but a color wheel and Clip Studio Paint!
*I made this tutorial using CSP Pro 1, but the same principles should apply for any version.
Introduction
First, what's a gamut mask? The term comes from physical painting and printing, where artists only have so many pigments to work with. A 'gamut' is the set of all colors that can be mixed from a certain set of pigments. Painters and printers have been looking for 'wide' gamuts for a long time -- so they can make the widest variety of colors from the fewest number of base pigments or dyes. Some base-color sets you may have heard of are CMYK, RGB, or RYB.
One of the easiest ways of making a painting harmonious is to use color theory to limit the number of colors of your palette. The technique of covering up, or 'masking' your reference color wheel also lets the artist see what intermediate colors can be mixed and still remain part of the cohesive palette. And in the physical world, where more pigments means more tubes of paint you have to spend money on, it's important to know exactly how few pigments you can get away with.
In digital art, painters have access to every possible RGB color right out of the gate, which can sometimes feel overwhelming or make it harder to see relationships between colors. So let's try gamut masking! Using this tutorial, you'll make a general-purpose file you can change and adapt to your liking for future projects!
Part I: The Setup
In this tutorial, I'm using a color wheel image obtained from Björn Ottosson's blog, showcasing the OKHSL color space. I like it because the OKHSL space has perceptually constant lightness and saturation per hue. Try out his comparative color picker here. (I also like this image bc it has a transparent background)
You can use whatever color wheel you like! Just one thing is important-- it should gradually become more unsaturated toward the center of the wheel. This saves you some manual color mixing down the road.
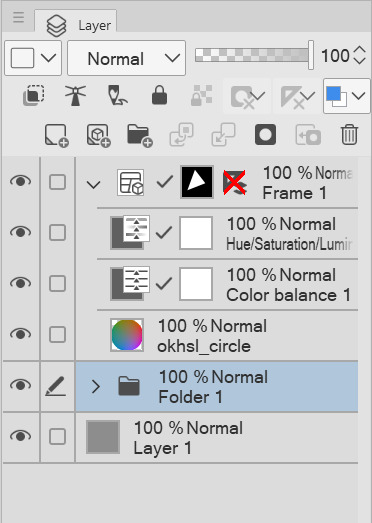
Here's our basic layer template. To get started, follow this:
Open your color wheel in Clip Studio Paint. It will be the only layer.
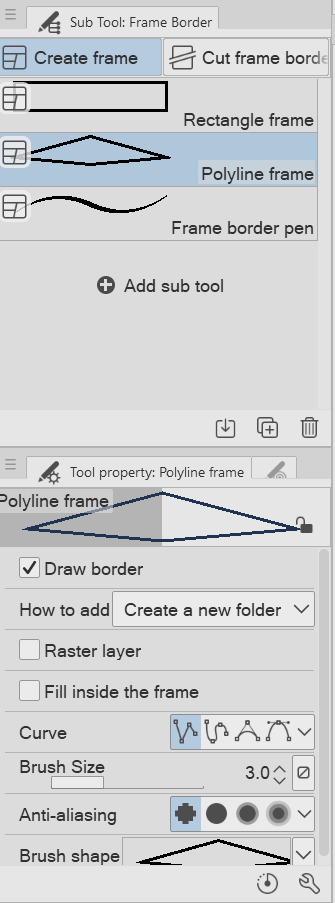
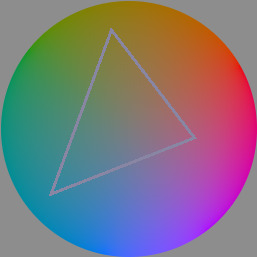
Select the "Frame Border" tool (U), pick the shape or subtool you think is best. I've picked 'polyline' since I'm making a triangle. (HINT: if you want an elliptical/circle shape, click the wrench in the tool properties window, then the "Figure" submenu, then you should see the option to choose an ellipse shape.)
Create the frame shape on the canvas over any section of the wheel. If it's not quite right, choose the "Operation" tool (O) and adjust the rotation, corners, or size of the frame!
You'll now see your frame border shape over the color wheel. Drag the color wheel layer into the Frame folder and it'll be masked!
That's the very basics! Here's some extra steps I took to make it extra helpful:
*In the Frame folder, I added two correction layers: a Hue/Luminosity/Saturation and a Color Balance. The first is in case I want to work with darker/lighter tones. The second is if I want to apply a tint to my gamut while preserving the color relationships of the mask! eg: if I want to make a painting that's overall blue, but still want colors that 'feel' red, yellow, etc compared to the strongest blue.
*I've created a uniform neutral grey layer at the very bottom, so I can judge tones and colors without bias.
*("Folder 1" was unused, just some layers not relevant to this tutorial)
With that mask, you technically have everything you need! For each new painting you want to make a palette for, just edit the shape of the Frame Border layer and change the adjustment layers to your liking. Then you can save it as your favorite image type to use for reference!
But let's talk about how you can further use the mask...to be continued!
105 notes
·
View notes
Note
Okay, I’m an American? And I have a question for British life, but I generally believe most British people are messing with us, but you’ve gain my trust,
Two things, one the guys with the wierd hats that stand out side of the places, are they actually real? Like the ones that don’t move.
And second, do y’all actually call grilled cheese toasties.
do you mean these guys? the kings guards?

if so, then yes !!! real !! very big tourist attraction - some of them Do Move but they can't move out of their route so you can find so many videos of them marching into crowds outside the palace yelling "KING'S GUARD! MOVE!" "KING'S GUARD! OUT OF THE WAY!"
i'm sure they do,,, something. guard the palace i reckon (palace does NOT feel like a real word to be using in 2025 #downwiththemonarchy) but really they just march about and tourists try to interact with them. but yk, they aren't allowed to
and then yes!!! cheese toastie. cheese and ham toastie. cheese and tomato toastie. i'm running out of toasties but,,, i don't think most of us grill them? i might be lying and YES. a toastie maker is a kind of grill i guess but my house had a lil maker that you just put it in and closed and it toasted it, closed the edges, and cut it into four triangles for you :D very handy :D
i'm honoured to be the brit picker here 🫡🫡 however essex is known to be a stain on britain so i apologise for being from the worst part of it
20 notes
·
View notes
Note
Yes please do the coloring😭😭 I'm really bad at it even with my own style and your advice is really helping❤ Never Met someone give so specific and incredible advice That actually helps!! <3
here you go!
1. flat colours
my colouring process is the regular old outline > fill bucket method


one trick i can recommend to make your flats more interesting is adding a texture using a textured brush with some colour variation:


just choose any brush you like from your drawing app
colour choice REALLY depends on personal taste. i usually gravitate towards more saturated & warmer colours (i use the square shaped colour picker, but i’ve heard someone say triangle is better. honestly not sure if it makes a difference). some advice:
1. limit your colour palette to a maximum of 4-5 main colours and their shades + neutrals. (white, black, grey and sometimes brown) this can make your art more cohesive!
2. colour palette generating websites are handy if you’re really not confident in your ability to choose colours.
3. stay consistent with what type of colours you’re working with: if your colours are saturated, they all should more or less be so. if they’re desaturated or pastel, same thing. don’t make the bi flag mistake! of course, this isn’t set in stone, as clashing shades can work sometimes, but for a beginner it’s a good principle to stick to.
2. colouring the line-art
this is a completely optional step. you can leave your line-art black or make it any one colour you want. but, at least for fully rendered drawings, i prefer to colour my lines.
to do that, i make a new layer above and make it into a clipping mask. (look up how to do that in your drawing programme of choice) now everything you draw on this layer will only appear on top of the layer below. basically, you can only draw on your line-art.
i use a darker and in some cases (like skin) more saturated version of the flat colour. play around with it and go with whatever you think looks good.
3. basic shading
i set the shading layer’s blending mode to multiply, 48% opacity. (the exact percentage isn’t really important) then i put down all the main shadows. before you do that, it is important to choose the direction the light is coming from and keep that consistent during your shading process.
btw: i know at first it might be really tempting to blend all your shadows because you’re not confident in placing them, but this’ll make your art look blurry and messy in a bad way. ideally (at least if you’re going for my kind of style) you should mix hard and blended edges with your shadows, but as i myself struggle with that, just hard edges are fine.

as to how to do shades exactly, i do it intuitively. i assume there are some fundamental principles, but for me it was a lot of staring at things and analysing how light hits them.
when it comes to choosing the colour for shading, in 8/10 cases i use the line-art colour of the object. on darker shades, like black, i may use the original flat colour. for skin, i actually go for a significantly more saturated shade, to avoid making it it look grey and dead.
extremely basic bitch advice but DO NOT USE BLACK OR GREY FOR SHADING OBJECTS THAT ARE NOT BLACK, WHITE OR GREY THEMSELVES. especially on skin.
4. more shading
after i’ve put down all my shadows, i like to go for a second layer to add more depth. select your shading layer and create another identical multiply layer above. the first thing i do is outline the shadows. (the selection comes in handy) i can’t tell you exactly what this does, but it makes it look better.

however, i don’t do this for skin and hair. hair is just left as is for now, and for skin, i actually create a new clipping mask above the skin layer (so below the shading) and outline the shadows in a more saturated version of the skintone. (applied to both darker and lighter skintones)
you can also darken some spots inside, if the shadows there are really strong.
5. highlights
this actually depends on the material of the object.
for skin and clothes i lighten the main colour a little and highlight the spots further away from the shadows or where light hits the most. darker skin usually needs lighter highlights (use references)


for hair: on non-textured hair i do more defined non-blended highlights, while on textured hair (braids, dreadlocks, really strong curls) i blend them


for everything else (metal, specific types of cloth, etc) please look up tutorials, this post is already super long
hope this helps! if you have any specific questions left, you can dm me
8 notes
·
View notes
Text
The Veil Nebula // Dale R.
#astronomy#astrophotography#nebula#emission nebula#supernova remnant#veil nebula#eastern veil nebula#western veil nebula#pickering's triangle#NGC 6960#NGC 6992#NGC 6995#IC 1340#NGC 6974#NGC 6979#cygnus
80 notes
·
View notes
Text

An area in the center of the Cygnus Loop supernova remnant called "Pickering's Triangle" 1,500 ly away.
135 notes
·
View notes
Text
Pickering's Triangle (part of the Veil Nebula) in H-alpha (red), OIII (blue), and V (green) taken with the 16" telescope on campus.
Just the V-band image below, because you can't see it unless I really mess with the color scaling:

#not in love with this one unfortunately but it's still cool to see#V was also sooo out of focus which I’m sure didn’t help 🫠#I also imaged the Orion Nebula which turned out gorgeous so I’ll post that later too :3c#astroposting
4 notes
·
View notes
Photo
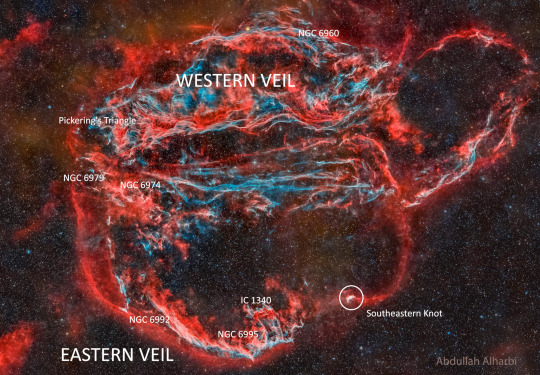
The entire Veil Supernova Remnant has an intricate filamentary structure, as seen here. This small triangle is often ignored in favor of the larger Eastern and Western arcs, which between them span about 3 degrees. But the structure is beautiful and complex, whichever part you choose to view.
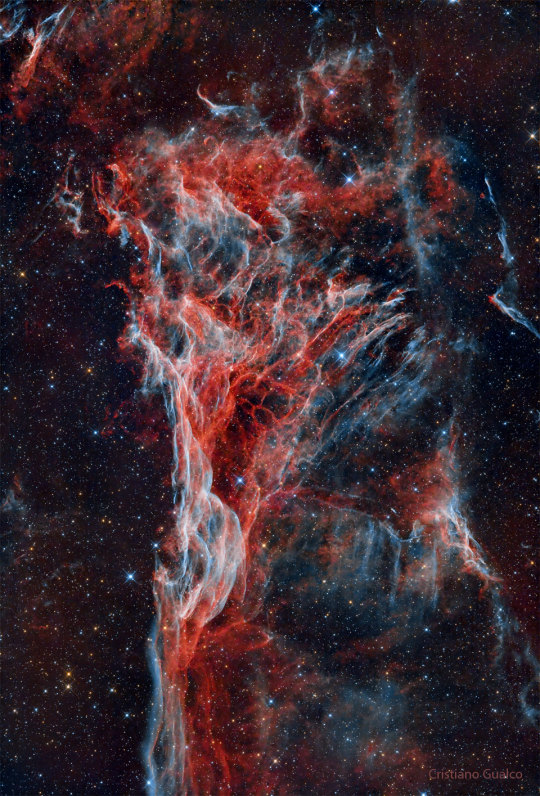
2023 November 21
Fleming’s Triangular Wisp Image Credit & Copyright: Cristiano Gualco
Explanation: These chaotic and tangled filaments of shocked, glowing gas are spread across planet Earth’s sky toward the constellation of Cygnus as part of the Veil Nebula. The Veil Nebula itself is a large supernova remnant, an expanding cloud born of the death explosion of a massive star. Light from the original supernova explosion likely reached Earth over 5,000 years ago. The glowing filaments are really more like long ripples in a sheet seen almost edge on, remarkably well separated into the glow of ionized hydrogen atoms shown in red and oxygen in blue hues. Also known as the Cygnus Loop and cataloged as NGC 6979, the Veil Nebula now spans about 6 times the diameter of the full Moon. The length of the wisp corresponds to about 30 light years, given its estimated distance of 2,400 light years. Often identified as Pickering’s Triangle for a director of Harvard College Observatory, it is perhaps better named for its discoverer, astronomer Williamina Fleming, as Fleming’s Triangular Wisp.
∞ Source: apod.nasa.gov/apod/ap231121.html
171 notes
·
View notes
Note
Apparently Michael did come close to playing Professor Higgins on stage. They should make a modern adaptation with David as Pickering but the story is less about Eliza and phonetics and more about her conspiring with Mrs Hudson to get the two men to admit their feelings for each other
wait for real on professor higgins? we need to manifest gay pygmalion where there's a little bit of a love triangle but it's also "singin in the rain" throuple vibes but in the end eliza ends up with modern day jeremy brett and the two guys end up together. *looking up at the sky* theatre gods you listened to me with david tennant macbeth and ncuti gatwa oscar wilde three years ahead of schedule. please listen to this also.
16 notes
·
View notes