#PowerShell Gallery
Explore tagged Tumblr posts
Visit Tumblr Blog
Explore Tumblr blogs with no restrictions, modern design and the best experience.
Last Seen Tumblr Blogs


Fun Fact
Tumblr was acquired by Yahoo for $1.1B in 2013.
Text
Minor update to Get-MacInfo, added iBridge data from system_profiler. Install from https://www.powershellgallery.com/packages/Get-MacInfo, source at https://github.com/johncwelch/Get-MacInfo #powershell #powershellMac #powershellmacOS
0 notes
Text
My Dev VM

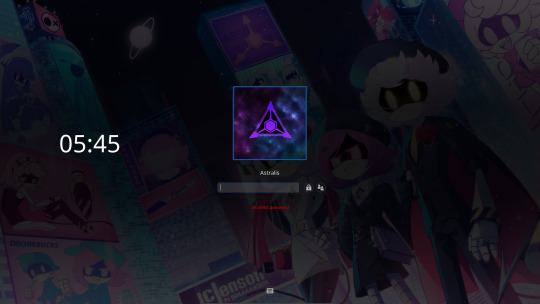

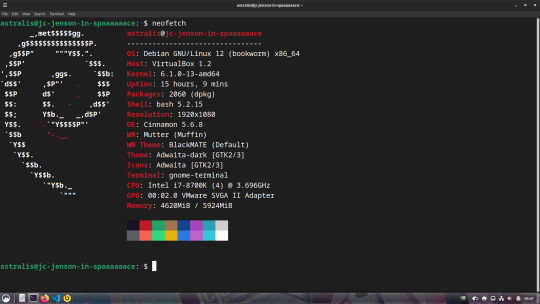
For those interested, this is what my dev machine looks like. Debian 12 + Cinnamon Desktop running inside of Virtual Box
The wallpaper is one I found on DA, but from what I can tell I don't think that the uploader was the original artist, especially after looking through the uploader's gallery. I have tried to find the original to no avail (TinEye, Lens, etc), so if someone finds the original artist I'd be more than grateful (and willing to shoot a few pounds their way cuz this piece is amazing)
Outside of that, I use VSCode most of the time on Linux, Komodo Edit (RIP T^T) on Windows, Beekeeper for SQL (database stuff) on Linux and Heidi on Windows, and Bash on Linux and Powershell on Windows for terminal/scripting.
For languages, it changes between three, Node/JS for web apps, C# for the majority of game and Windows stuff, and Elixir/Erlang (Oh look my MD OC's last name) for more random stuff cuz I'm trying to learn it.
So yea, thats my nerdy infodump for the moment, I do still create random website designs in my downtime after work but more often than not, I just play copious amounts of Trackmania and FFXIV.
4 notes
·
View notes
Text
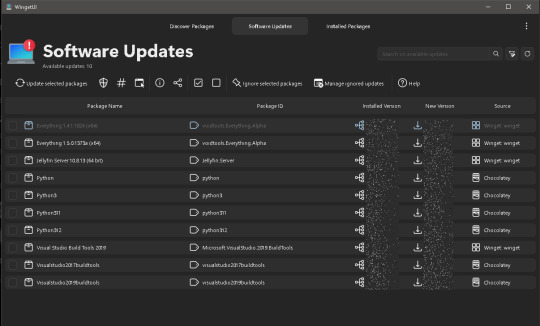
Software of the Week: WingetUI / UniGetUI
Keeping all of the programs on your computer up to date is important for security reasons; just ask LastPass, the disgraced password manager that got hacked because an employee's personal computer was running an old version of Plex Media Server. The particular vulnerability that the hackers exploited had been patched almost 3 years earlier, but because the employee never bothered to update Plex, he never got the fix.
Every month that you leave software on your computer un-patched is time in which hackers may discover the vulnerability and start using it to attack computers. But how on earth can you even figure out which of your programs need updates? Doing that one by one takes forever, and THEN you still have to actually install those updates.
This is where software updaters are essential. On Windows, SUMO used to be among the best programs for the job, but it was discontinued in early 2024. I've been searching for a replacement for a while now, and I finally settled on WinGetUI (soon to be known as UniGetUI). A LOT more detail and some tips are under the readmore!
Details:
Purpose: Provide a unified frontend for multiple package managers on Microsoft Windows to simplify installing and updating software
OS Supported: Windows 10, 11
Installer Size: 76 MB
Country of Origin: Catalonia/Spain
Languages Supported: 16 languages fully, 24 partially
License: Freeware
Download Link: https://www.marticliment.com/wingetui/
A LOT more detail and some tips are under the readmore!
Winget ("WIN-get") is the name of Microsoft Window's new-ish package manager, a program that itself takes care of installing and updating other software for you. Linux and Unix have had built-in package managers for decades, but Windows has been sorely lacking on that front until just recently. Winget provides the ability to install and update software, but it's a command line utility, meaning you have to type text into a command prompt in order to get winget to do anything for you.
WinGetUI is essentially just a nice interface using winget in the background; it shows you which programs you have installed, which ones have updates available, and it will even install the updates for you. That last part was a game changer for me personally as it saves me a lot of time (I have a LOT of programs and libraries installed on my computer).
The best part is the developer has added support for other package managers too. Computer language SDKs often come with their own package managers for downloading the little libraries that you can bundle with code that you write, and WinGetUI now supports most of them: npm, pip, .NET Tool, Chocolatey, scoop, Powershell Gallery, and it can even list software installed from the Steam shop or the Microsoft Store (though it can't update those ones for you). Incidentally, this is why the name is changing from WinGetUI to UniGetUI; it now supports a lot more package managers than just winget.
WinGetUI can even help you migrate software to a new computer. Simply install WinGetUI on your old computer, export a list of all of the software you have installed, then install WinGetUI on your new computer and import that list and then click install. You'll probably have to babysit it for a while because Windows will prompt you to give admin access to the installers that need it, but hey. At least you don't have to write down all the software you have and download and install each one by hand.
I do want to highlight that Microsoft is still working out the kinks in winget. Windows has existed for a long time and provided a lot of freedom in how you could install software. Multiple companies have made their fortunes just by providing custom installer software for Windows (InstallShield and NSIS being prime examples), so Microsoft has their work cut out for them trying to get all the different software manufacturers to list their software in the winget directory AND standardize their installers.
As such, you may run into issues like these:
WinGetUI lists a program you installed manually and tries to update it via winget; the installer succeeds, but because those installation methods are different, you end up with 2 copies of the software installed in different locations
WinGetUI fails to update a program because the hash of the downloaded installer doesn't match the hash that winget says it should have. This is usually a developer error
WinGetUI fails to determine whether some programs have updates available or not
WinGetUI downloads an installer/updater but it fails to run because it detects that the installation methods for that program are different (manual install vs. winget install)
Almost all of these can be resolved by uninstalling the manually installed version and reinstalling it using winget, either from the command line or just from WinGetUI. Once you do that one-time operation, the winget package manager (and by extension WinGetUI) should be able to handle everything from there on out. It will only get better too as winget usage becomes more common among software developers.
#software of the week#windows software#mine#wingetui#winget#package managers#microsoft windows#cybersecurity
1 note
·
View note
Text
Critical Flaws in PowerShell Gallery Enable Malicious Exploits
http://i.securitythinkingcap.com/StnLLX
0 notes
Text
Experts Uncover Weaknesses in PowerShell Gallery Enabling Supply Chain Attacks
The Hacker News : Active flaws in the PowerShell Gallery could be weaponized by threat actors to pull off supply chain attacks against the registry's users. "These flaws make typosquatting attacks inevitable in this registry, while also making it extremely difficult for users to identify the true owner of a package," Aqua security researchers Mor Weinberger, Yakir Kadkoda, and Ilay Goldman said in a report shared http://dlvr.it/StkScl Posted by : Mohit Kumar ( Hacker )
0 notes
Text
Terraform Visual Studio Code

Terraform is an open-source tool created by HashiCorp for developing, changing and versioning infrastructure safely and efficiently. It provides a service known as 'Infrastructure as Code' which enables users to define and provision infrastructure using a high-level configuration language. About the Terraform extension.
Terraform Editor
Setup Terraform Visual Studio Code
Vs Code Jquery
Visual Studio Code Terraform 12
Install and configure Terraform Get Started Configure Terraform using Azure Cloud Shell; Configure Terraform using Azure PowerShell; How-To Guide Install the Terraform Visual Studio Code extension; Create a Terraform base template using Yeoman.
Terraform This is a Visual Studio Code extension. Adds syntax support for the Terraform and Terragrunt configuration language.
I’ve been doing more work with Terraform and Azure recently, particularly around deployments that need to deploy both Azure and non-Azure resources at the same time. In particular, this has focussed on creating AKS clusters and then using Terraform to set these up and deploy all the standard services on top of the cluster. I’ve also been live streaming some of this work on Twitch so if your interested in watching how this is done, or want to ask a question, please do join me.

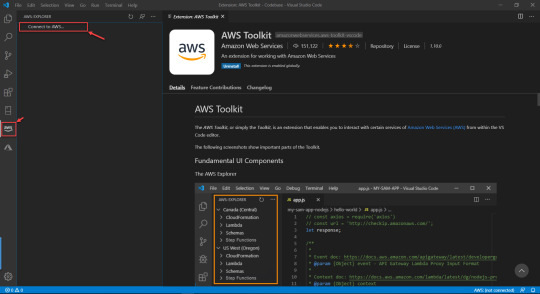
When I started this work, I stumbled across the Azure Terraform extension for VS Code. This is a Microsoft extension, but I hadn’t seen it before, and I’ve found it very useful during the development process. What this extension does is provide integration between VS Code and Terraform running in Azure Cloud Shell. It provides commands for all the standard Terraform functions, but where it is different is it runs all these commands in Cloud shell, not on my local machine. My Terraform files are on my machine (in this case checked out from Git), but when I run “Azure Terraform Plan”, the extension takes care of syncing the latest copy of the file up to cloud shell, and then running the “Plan” command directly in Cloud Shell.
By utilising Cloud Shell, I get several benefits:
I don’t have to care about authenticating to Azure in my Terraform files; this is taken care of for me by Cloud Shell. No need to create service principals or set up a provider with credentials. I can get up and running with Terraform very quickly
My commands execute in Cloud Shell, so if I have any connectivity issues from my local machine, they should not impact things
Cloud Shell is kept up to date with the latest version of Terraform and any dependencies
All my Terraform files are synced with my storage in Cloud Shell
One thing to bear in mind, however, is that this is very much designed as a development tool, to help you create your Terraform scripts in the first place. This is not generally the approach you would use to run deployments in production, particularly if you need governance around your process. Moving to production would usually involve checking the files you created using VS Code and this extension into version control and building a proper pipeline. Given all that, let’s take a look at how to get set up.
Pre-Requisites
There are a few things you need to have installed to use this extension:
Visual Studio Code (obviously)
Node.js 6.0 or higher - this is needed to run Cloud Shell in VS Code
Optionally, you might want to add some optional components that make life better:
Terraform - yes I did say all commands run in Cloud Shell, so you don’t need this, but if you want the option to run some commands (like validate) locally then it can be useful to have it installed, but it is optional
Terraform VS Code Plugin - The standard VS Code plugin that gives you auto-completion, syntax highlighting, linting etc.
GraphViz - This is entirely optional, but if you want to use the visualisation feature you will need it
Extension
Once all the pre-requisites are installed, we can install the extension by searching for “Azure Terraform” in the VS Code plugin gallery, or going to this page.
Once the plugin is installed, open up an existing Terraform project, or create a new one. Make sure you open the containing folder in VS Code, as it is this folder that gets created on your Cloud Drive.
When you are ready to start running your project, press the VS Code command keys (ctrl shift P on Windows) and look for “Azure Terraform Init”. Run this, and VS Code will ask you if you want to open Cloud Shell, click OK.
If your account is connected to more than one Azure AD tenant, then VS Code will ask you which tenant to connect to, pick the appropriate one.
You will see in the Shell that it tries to CD into your project directory in Cloud Shell but fails as it does not exist. It will then create the directory, and you will see a message indicating “Terraform initialized in an empty directory!”.
At this point, the plugin has created your directory in Cloud Shell, but to initialise Terraform we need to rerun Init. So again press the VS code command keys, and go to “Azure Terraform Init”. This time you will see it CD into your directory and then run init, which installs all the required Terraform Modules. You now have Terraform initialised and all your files in Cloud Shell.
The Cloud Shell console will remain open, so you can run manual commands to check your files if you wish.
That was all the setup there is. Now, whenever you run one of the Azure Terraform commands VS Code will sync the latest version of your files to Cloud Shell and then run the requested Terraform Command. The extension supports the following standard Terraform commands:

Terraform Editor

Init
Plan
Apply
Validate
Refresh
Destroy
Additional Commands
As well as the 6 commands listed above, this plugin also provides some extra commands:
Azure Terraform Visualize
Setup Terraform Visual Studio Code

If you installed the GraphViz pre-requisite, you can use this command to generate a visual representation of your templates. This command runs locally, not in Cloud Shell. Once you run it, it will seem to not do anything for a while, but eventually, it will create a png with a graph of your deployment.
I’m not yet sure how useful this feature is, but it is a helpful tool to have
Vs Code Jquery
Azure Terraform Push
Visual Studio Code Terraform 12
This command triggers a push of the latest versions of your files up to Cloud Shell if you wish to trigger this outside of the other commands
Azure Terraform Execute Test
This command allows you to run any tests you have set up against your Terraform code. It has two values:
lint - this will run tests to check the formatting of the code
e2e - this will take your Terraform code, and the settings in your variables file and actually run a deployment, test everything works, and then destroy the resources, so a full end to end test
1 note
·
View note
Text
Just some ionic notes
Starting notes on ionic
Never used Angular in earnest before. Also an introduction to a full fledged framework (other than Ruby on Rails) which is oldskool at this point I feel like. in addition to the camera component, we can use this helloworld app to learn theming and use the other two tabs to test some of the other components and build / structure what a ‘page/activity’ can look like. The camera bit shows you how to use the native capabilities of a mobile device and outside ‘stuff’.
When we are done we can port the whole thing to an .apk to test on-device. This will serve as a dry run for building a prod type app.
https://ionicframework.com/docs reference documentation
//general init code// ionic start myApp tabs <name> <prototype>dsafsd
We had this error====== ionic : File C:\\ionic.ps1 cannot be loaded. The file C:\\ionic.ps1 is not digitally signed. You cannot run this script on the current system. For more information about running scripts and setting execution policy, see about_Execution_Policies at https:/go.microsoft.com/fwlink/?LinkID=135170. At line:1 char:1 + ionic start myApp tabs + ~~~~~ + CategoryInfo : SecurityError: (:) [], PSSecurityException + FullyQualifiedErrorId : UnauthorizedAccess
> this error needs to be resolved by setting some power shell environment variables like..
Set-ExecutionPolicy -ExecutionPolicy AllSigned -Scope CurrentUser - for signed stuff
and
Set-ExecutionPolicy -ExecutionPolicy RemoteSigned -Scope CurrentUser - works for ionic
or
You can use the ExecutionPolicy parameter of pwsh.exe to set an execution policy for a new PowerShell session. The policy affects only the current session and child sessions.
To set the execution policy for a new session, start PowerShell at the command line, such as cmd.exe or from PowerShell, and then use the ExecutionPolicy parameter of pwsh.exe to set the execution policy.
For example: PowerShell
pwsh.exe -ExecutionPolicy AllSigned ==========
IONIC HUB
- I set up an ionic account. The details are saved to LastPass. ------
FIRST APP - setup and served. This is interesting, literally just boilerplate though: https://ionicframework.com/docs/components ^^ more component documentation
>> 10/5/20 See written sheet for a design sketch of our app. basically RH type ( do design )/ code that ronatracker app as a primary test run.
Currently following this tut:
https://ionicframework.com/docs/angular/your-first-app
----- I'm confused where to put the class: Next, define a new class method, addNewToGallery, that will contain the core logic to take a device photo and save it to the filesystem. Let’s start by opening the device camera: Also. https://www.loom.com/my-videos Lobe.ai for a sweet website design.
From what I learned today, interface is like a metadata location or an accessible data object. Also learned the way they build this tutorial, that copy paste is a crutch and a pain. Read carefully, they specify where to put things
Holy crap we did it.
>> 11/1/20 Okay finished the last two pages, where there was some storage stuff. A bit over my head but here is what I take away from it. - we learned how to leverage 'outside stuff' like a phone camera. I assume otuer datatypes/sources will function similarly like a GPS service etc. At least I think so. Basically stuff outside of the app?

Lessons
- We learned how to push an collection of pictures to an array, and then how to display that array using built in gallery - a surface level intro to the GRID system. - how to start an app - configuring a dev environment - how to put in a Fab - what .ts is (typescript, a typed-javascript); new js syntax types (for me) like blob; a refresh on actually making classes and methods and such - interface holds metadata - you can make a functional app very quickly honestly - 'await' is a cool thing await this.photoService.loadSaved();
>> NEXT: finish the Tut to the T, Then branch and playground with leftover tabs. Then deep dive for docs, also learn rest of dev cycle, watch videos, then app project.
questions: More about the constructors What are all of these other files that come in the src folder? wtf is this base64 stuff and do I need it? how do I install new components and use them? How can I build something for production?
3 notes
·
View notes
Text
finally forced meself to install python an figure out some more basic commands thru powershell. think this'll help me a lot lot lot more when installin github shit in the future
needed it primarily today to get gallery-dl workin on my system, which is how i was able to automate downloadin an archive of old twibber images i posted in like 2015-2016 ;03
0 notes
Text
Check pester version

#CHECK PESTER VERSION INSTALL#
#CHECK PESTER VERSION CODE#
However, running Pester tests in Linux proved to be a little more tricky. Plus I could add the results to the test results tab in Azure DevOps, if only I can find a way to consolidate the results that are across 6 or 7 disparate build agents. Here I could ensure that the scripts do not throw, and eventually, I could add more asserts much more easily. And again thanks to “Eventual Improvement” I decided to alter the tests to run in the Pester framework. Initially the tests were merely PowerShell scripts, and that if the scripts did not fail in the build then everything was golden. Still, one test is an infinite improvement over zero tests, and this is because I have a framework to create tests against. GPOZaurr is a free PowerShell module that contains a lot of different small and. Use Get-PackageSource to get the source name.
#CHECK PESTER VERSION INSTALL#
The first step is to install Pester, using Install-Module Pester -Force in a PowerShell console (with administrator rights). Currently there is not 100% test coverage. I use YAML based multi-stage pipeline in azure-pipelines.yml. As all the tests run successfully on these build agents, I’m confident to say that the task works onĪnd whilst there’s more agent types than that, I did only ever set it up to run on the hosted 2017 build agent and a locally running build agent.Īnd so recently I have decided to improve the testing around the code. For example I have added the tests to run over more than one type of build agent.
#CHECK PESTER VERSION CODE#
What this basically means is that you have a pipeline that works to deliver an MVP in an MVP-style, and then once development has settled down and you don’t anticipate to make many more changes to the code for the time being, you can improve the pipeline. But in addition to CD, I’m going for something I have come up myself: “Eventual Improvement”. I use a single pipeline because once I’ve run the tests there’s no need to fret about whether or not I hold off from pushing a later version. The build and release pipeline are publicly available to view here. Windows PowerShell is a common tool used in IT for desktop and server management, so we decided to stick with that as a framework to build upon. You can see the status of the pipeline here! Assuming you are on PowerShell version 5.x, you can find out what version of Pester is currently available by using the Find-Package cmdlet. The past few months I’ve been improving the pipeline I use to build and publish a Visual Studio Extension that basically updates the module version number and publishes it to the PowerShell gallery.
0 notes
Text
In this tutorial, we will look at how you can configure your Windows server 2019 to run Docker containers. Docker has been a game changer in Applications containerization and the whole microservices design and deployment patterns. Docker makes it easy to build, ship and run images containing applications with their dependencies and avoid crazy dependency issues common with the use of Virtual Machines. Docker engine is what powers docker containers. It was originally written for Linux but a lot of work has been done to enable Windows and macOS users to run Docker containers. One pre-requisite is the installation of a Windows server. This can be on a Virtual Machine running on-premise, a Physical server deployment or a Cloud instance running in Azure. You can refer to our installation guide below. How to Install Windows Server 2019 Step by Step How to run Docker Containers on Windows Server 2019 Before you can use the Windows Containers to run multiple isolated applications your system, you’ll need to enable the containers feature and install Docker on Windows Server 2019. Step 1: Enable the containers feature in Windows Server 2019 The first step is to enable the Windows Server 2019 containers feature. Open PowerShell as Administrator. Run the following commands. Install-Module -Name DockerMsftProvider -Repository PSGallery -Force This will install the Docker-Microsoft PackageManagement Provider from the PowerShell Gallery. Sample output is as shown below: Step 2: Install Docker on Windows Server 2019 once the Containers feature is enabled on Windows Server 2019, install the latest Docker Engine and Client by running the command below in your PowerShell session. Install-Package -Name docker -ProviderName DockerMsftProvider Agree to the installation using “Yes” or “Y” or “A” to Agree to all. When the installation is complete, reboot the computer. Restart-Computer -Force Installed Docker version can be checked with: Administrator> Get-Package -Name Docker -ProviderName DockerMsftProvider Name Version Source ProviderName ---- ------- ------ ------------ docker 18.09.2 DockerDefault DockerMsftProvider The same can be achieved with the docker --version command. PS C:\Users\Administrator> docker version Client: Version: 18.09.2 API version: 1.39 Go version: go1.10.6 Git commit: 1ac774dfdd Built: unknown-buildtime OS/Arch: windows/amd64 Experimental: false error during connect: Get http://%2F%2F.%2Fpipe%2Fdocker_engine/v1.39/version: open //./pipe/docker_engine: The system cannot find the file specified. In the default daemon configuration on Windows, the docker client must be run elevated to connect. This error may also indicate that the docker daemon is not running. Upgrade can be done anytime by running the following commands on PowerShell. Install-Package -Name Docker -ProviderName DockerMsftProvider -Update -Force Start-Service Docker Step 3: Run Docker Container Start Docker Daemon Start-Service Docker After starting Docker Engine service, Download the pre-created .NET sample image from the Docker Hub registry: docker pull mcr.microsoft.com/dotnet/samples:dotnetapp-nanoserver-2009 You can retrieve a list of all available tags for dotnet/samples at https://mcr.microsoft.com/v2/dotnet/samples/tags/list Then deploy a simple container running a .Net Hello World application. docker run mcr.microsoft.com/dotnet/samples:dotnetapp-nanoserver-2009 The container will start, print the hello world message, and then exits. Running Linux Containers on Windows Server 2019 Out of the box, Docker on Windows only run Windows container. To use Linux containers on Windows Server, you need to use the Docker Enterprise Edition Preview which includes a full LinuxKit system for running Docker Linux containers.
Uninstall your current Docker CE. Uninstall-Package -Name docker -ProviderName DockerMSFTProvider Enable Nested Virtualization if you’re running Docker Containers using Linux Virtual Machine running on Hyper-V. Get-VM WinContainerHost | Set-VMProcessor -ExposeVirtualizationExtensions $true Then install the current preview build of Docker EE. Install-Module DockerProvider Install-Package Docker -ProviderName DockerProvider -RequiredVersion preview Enable LinuxKit system for running Linux containers [Environment]::SetEnvironmentVariable("LCOW_SUPPORTED", "1", "Machine") Restart Docker Service after the change. Restart-Service docker Pull a test docker image. > docker run -it --rm ubuntu /bin/bash root@1440a7fef7e0:/# cat /etc/os-release NAME="Ubuntu" VERSION="18.04.1 LTS (Bionic Beaver)" ID=ubuntu ID_LIKE=debian PRETTY_NAME="Ubuntu 18.04.1 LTS" VERSION_ID="18.04" HOME_URL="https://www.ubuntu.com/" SUPPORT_URL="https://help.ubuntu.com/" BUG_REPORT_URL="https://bugs.launchpad.net/ubuntu/" PRIVACY_POLICY_URL="https://www.ubuntu.com/legal/terms-and-policies/privacy-policy" VERSION_CODENAME=bionic UBUNTU_CODENAME=bionic root@1440a7fef7e0:/# exit exit To Switch back to running Windows containers, run: [Environment]::SetEnvironmentVariable("LCOW_SUPPORTED", "$null", "Machine") Enjoy running Linux and Windows containers on Windows Server 2019. Drop us a comment in case of any issues.
0 notes
Text
[Media] PersistenceSniper
PersistenceSniper Powershell script that can be used by Blue Teams, Incident Responders and System Administrators to hunt persistences implanted in Windows machines. The script is also available on Powershell Gallery. https://github.com/last-byte/PersistenceSniper #blueteam

0 notes
Text
Get-ChooseFileName in PowerShell Gallery
My new PowerShell module, GetChooseFileName is now up on the PowerShell Gallery: https://www.powershellgallery.com/packages/Get-ChooseFileName #powershell #powershellmac #powershellmacos
Pretty much what it says, GetChooseFileName is now up on the PowerShell Gallery: https://www.powershellgallery.com/packages/Get-ChooseFileName W00t!!
0 notes
Text
PowerShell? More like PowerHell: Microsoft won't fix flaws in package gallery ripe for supply chain attacks
http://i.securitythinkingcap.com/StlFTL
0 notes
Text
Microsoft visual studio 2015 xaml designer 無料ダウンロード.XAML デザイナーを使用して UI を作成する
Microsoft visual studio 2015 xaml designer 無料ダウンロード.XAML Studio

This device is not currently supported for these products..Visual Studio XAML Designer で UI を作成する - Visual Studio (Windows) | Microsoft Docs
Sep 09, · 無料のExpressはありましたが、言語は別になっているしやはり製品版は欲しかったです。Visual Studio からはMSDN会員として入手できるようになりましだか。 さて、そんな中Visual Studio は無料でProfessional相当の機能を持つVisual Studio Communityがあります。 Aug 18, · Microsoft Edge をダウンロードする 詳細情報 内容 Visual Studio の XAML デザイナーと Blend for Visual Studio には、XAML ベースのアプリのデザインに役立つビジュアル インターフェイスが用意されています (WPF、UWP など)。 Jan 16, · XAML Studio also includes a suite of tools to help you develop. Provide Data Context to your UI to fill it with static test data or live data from a JSON REST API. Then use our revolutionary binding debugging to not only see how a back-end data source connects to the front-end UI, but spot where errors are occurring and what the most recent
Microsoft visual studio 2015 xaml designer 無料ダウンロード.Aphalina Designer を入手 - Microsoft Store ja-JP
Nov 11, · 8/10 (59 点) - 無料でVisual Studio をダウンロード Visual Studio を使えば様々な数のデバイスに対応しているあなたのアプリケーションを非常に簡単に開発してデバッグできます. Visual Studio で行われたすべての改善を試す機会を見逃さないでください。/5 Aug 18, · Microsoft Edge をダウンロードする 詳細情報 内容 Visual Studio の XAML デザイナーと Blend for Visual Studio には、XAML ベースのアプリのデザインに役立つビジュアル インターフェイスが用意されています (WPF、UWP など)。 Visual Studio Community 、Visual Studio Professional 、Visual Studio Enterprise 、 Microsoft Visual C++ 再頒布可能パッケージには、ランタイム DLL のバグ修正と最新バージョンの KB 無料ダウンロード
Would you like help? XAML Studio, a Microsoft Garage project will help you rapidly prototype UWP XAML that can be easily copied into your app in Visual Studio. XAML Studio lets you preview your XAML code in real-time and interact with the result just like it was running in your own app!
This instant response lets you quickly iterate on ideas visually, copy in examples from docs to explore, and test the final behavior all at the same time in one app easily downloaded from the store. You can even download it and get started prototyping while installing Visual Studio! XAML Studio also includes a suite of tools to help you develop. Provide Data Context to your UI to fill it with static test data or live data from a JSON REST API.
Then use our revolutionary binding debugging to not only see how a back-end data source connects to the front-end UI, but spot where errors are occurring and what the most recent values were. Microsoft Store での特別サービス、最新の製品、イベントなどについての情報をお届けします。日本 に在住の方がご利用いただけます。. XAML Studio. 対応プラットフォーム PC. WinUI 3 Controls Gallery 無料. RoslynPad 無料. GWSL 無料. Windows Community Toolkit Sample App 無料. PowerShell Preview 無料. GitFiend 無料. openSUSE Leap このバージョンの最新情報 v1. 機能 Rapidly Prototype UWP XAML UIs with Live Edit and Interaction Binding Debugger Data Context Editor Auto-save and restore Documents IntelliSense Documentation Toolbox Alignment Guides Namespace Helpers.
追加情報 公開元 Microsoft Corporation. 公開元 Microsoft Corporation. 著作権 Microsoft 開発元 Michael A. おおよそのサイズ 年齢区分 3 才以上対象. このアプリは次のことができます インターネット接続にアクセスする. インストール Microsoft アカウントにサインインしているときにこのアプリを入手し、最大 10 台 の Windows 10 デバイスにインストールできます。.
アクセシビリティ 製品開発者は、この製品がアクセシビリティの要件を満たしていて、だれにとっても使いやすい製品であると自信を持っています。. サポートされる言語 English United States. 公開元情報 XAML Studio の Web サイト XAML Studio のサポート. その他の規約 XAML Studio プライバシー ポリシー お取引の条件. この製品を報告する このアプリをマイクロソフトに報告する 問題を報告していただき、ありがとうございます。弊社のチームで検討し、必要な場合は対策を講じます。 サインイン してこのアプリをマイクロソフトに報告する.
このアプリをマイクロソフトに報告する 違反の可能性 不快な内容 児童労働 マルウェアやウイルス プライバシーの侵害 誤解を招くアプリ パフォーマンスの低下. 確認 キャンセル. システム必要条件 最小 この製品を実行するには、デバイスが最小要件をすべて満たしている必要があります OS Xbox, Windows 10 バージョン おすすめ 最適なエクスペリエンスを実現するには、デバイスがこれらの要件を満たしている必要があります OS Xbox, Windows 10 バージョン サインアップする Microsoft Store での特別サービス、最新の製品、イベントなどについての情報をお届けします。日本 に在住の方がご利用いただけます。. Microsoft Store からのメールを受け取るようにサイン アップしていただき、ありがとうございます。 閉じる.
0 notes
Text
Windows server 2012 windows identity foundation 無料ダウンロード.Id Foundation を Windows コアにWindowsできない
Windows server 2012 windows identity foundation 無料ダウンロード.Windows Server 2012 R2 で WAP またはアプリケーションの HttpOnly 機能を有効または無効にする更新プログラム

Introduction.How to install Windows Identity Foundation | Dell Suomi
無料ダウンロード & セキュリティ Windows Server R2 Datacenter Windows Server R2 Essentials Windows Server R2 Foundation Windows Server R2 Standard その他 減らす. この資料では、Windows Server R2 の証明書の認証方法を使用する場合に発生する問題について 無料ダウンロード & セキュリティ Windows Server R2 Datacenter Windows Server R2 Standard Windows Server R2 Essentials Windows Server R2 Foundation その他 減らす. この資料を有効にするか、Windows Server R2 ベースのサーバー上の Web アプリケーション プロキシ (WAP Sep 19, · Hello! I'm trying to install Windows Identity foundation runtime (WindowsKBxmsu) on a Server Standard and keep getting this error: This package installs properly on my Windows 7 prof workstation.??? Thank you in advance, Michael · Hello, Any reason not to use the following? (Powershell) Add-WindowsFeaturewindows-identity-foundation��
Windows server 2012 windows identity foundation 無料ダウンロード.Windows Server R2 で WAP またはアプリケーションの HttpOnly 機能を有効または無効にする更新プログラム
無料ダウンロード & セキュリティ Windows Server R2 Datacenter Windows Server R2 Essentials Windows Server R2 Foundation Windows Server R2 Standard その他 減らす. この資料では、Windows Server R2 の証明書の認証方法を使用する場合に発生する問題について Sep 19, · Hello! I'm trying to install Windows Identity foundation runtime (WindowsKBxmsu) on a Server Standard and keep getting this error: This package installs properly on my Windows 7 prof workstation.??? Thank you in advance, Michael · Hello, Any reason not to use the following? (Powershell) Add-WindowsFeaturewindows-identity-foundation 無料ダウンロード & セキュリティ Windows Server R2 Datacenter Windows Server R2 Standard Windows Server R2 Essentials Windows Server R2 Foundation その他 減らす. この資料を有効にするか、Windows Server R2 ベースのサーバー上の Web アプリケーション プロキシ (WAP
I'm trying to install Windows Identity foundation runtime Windows6. msu on a Server Standard and keep getting this error:. Add-WindowsFeature windows-identity-foundation. This error is due to the missing of the software prerequisite such as.
NET 3. NET 4. Install the prerequisite and check whether this is working or not. Let me know if it is not working. Joju Jose. You need to install the. This includes Windows Identity Foundation WIF. If this "You need to install the. This includes Windows Identity Foundation WIF " is correct then why I don't have WIF runtime on my Server ? Cheers Prakash Nandwana Bangalore , India.
TechNet Products IT Resources Downloads Training Support Products Windows Windows Server System Center Microsoft Edge. Office Office Exchange Server. SQL Server SharePoint Products Skype for Business See all products ». Resources Channel 9 Video Evaluation Center Learning Resources Microsoft Tech Companion App Microsoft Technical Communities Microsoft Virtual Academy Script Center Server and Tools Blogs TechNet Blogs. TechNet Flash Newsletter TechNet Gallery TechNet Library TechNet Magazine TechNet Wiki Windows Sysinternals Virtual Labs.
Solutions Networking Cloud and Datacenter Security Virtualization. Updates Service Packs Security Bulletins Windows Update. Trials Windows Server System Center Windows 10 Enterprise SQL Server See all trials ». Related Sites Microsoft Download Center Microsoft Evaluation Center Drivers Windows Sysinternals TechNet Gallery. Training Expert-led, virtual classes Training Catalog Class Locator Microsoft Virtual Academy Free Windows Server courses Free Windows 8 courses SQL Server training Microsoft Official Courses On-Demand.
Certifications Certification overview Special offers MCSE Cloud Platform and Infrastructure MCSE: Mobility MCSE: Data Management and Analytics MCSE Productivity. Other resources Microsoft Events Exam Replay Born To Learn blog Find technical communities in your area Azure training Official Practice Tests.
Support options For business For developers For IT professionals For technical support Support offerings. Not an IT pro? Microsoft Customer Support Microsoft Community Forums. Windows Client. Sign in. United States English. Home Windows 10 Windows 10 Mobile Previous versions MDOP Surface Surface Hub Library Forums.
Ask a question. Quick access. Search related threads. Remove From My Forums. Answered by:. Archived Forums. Windows Server General. Sign in to vote. msu on a Server Standard and keep getting this error: This package installs properly on my Windows 7 prof workstation.
Thank you in advance, Michael. Edited by MF47 Friday, June 14, AM. Friday, June 14, AM. Hello, Any reason not to use the following? Powershell Add-WindowsFeature windows-identity-foundation Regards MCITP: Enterprise Messaging Administrator MCTS: Lync Server , Configuring MCSE.
Proposed as answer by Timil Tuesday, June 18, AM Marked as answer by 朱鸿文 Wednesday, June 19, AM. Monday, June 17, AM. HI, This error is due to the missing of the software prerequisite such as. Let me know if it is not working Regards, Joju Jose. Marked as answer by 朱鸿文 Wednesday, June 19, AM.
Friday, June 14, PM. This includes Windows Identity Foundation WIF Regards, Mylo. Proposed as answer by Mylo Tuesday, June 18, AM Marked as answer by 朱鸿文 Wednesday, June 19, AM. Thank you all for your replies! Edited by MF47 Monday, June 17, AM. You can add it via the Server Manager UI as a feature.. Regards, Mylo. Monday, June 17, PM. Thank you all for your help - it works! Best regards, Michael.
Tuesday, June 18, AM. Because Windows Identity Foundation 3. It is a separate feature. Install it with Add Roles and Features - Skip Roles then scroll down Features until you find it. Proposed as answer by Rutters Friday, September 20, PM.
Friday, September 20, PM. Just open Powershell and type below command and rest it will do for you. Friday, October 31, PM. Missing a space there.. Wednesday, May 25, PM.
For Windows R2 and above use this. Install-WindowsFeature windows-identity-foundation Rahul Parimal Sharepoint , Project server. Thursday, July 14, PM. Newsletter Contact Us Privacy Statement Terms of Use Trademarks.
0 notes