#Print to pdf for mac
Explore tagged Tumblr posts
Visit Tumblr Blog
Explore Tumblr blogs with no restrictions, modern design and the best experience.
Last Seen Tumblr Blogs


Fun Fact
In 2020, 27% of US Tumblr users had an annual household income of over $100,000.
Note
since we’re on the topic of bookbinding, i’ve been wanting to get into it but i haven’t actually done any research (yet) other than vibes, so do u have any tips for complete beginners?? :)
@geminibookbinding is who inspired me to finally look up the whole process and figure out where to start! this is the super helpful tutorial i got from them
i had dabbled with binding before though, using Sea Lemon's tutorials to make blank sketchbooks yearsss ago. i still use her text block and diy hardcover videos as a refresher/reminder while i bind!
the biggest thing that stopped me from learning to bind printed fiction was not understanding how to print the text from home, specifically how to get the pages in the right order for signatures. it's actually so easy with some very simple to use programs: QuantumElephant for PC users (free), and I use BookletCreator on Mac ($20)
i want to go into more detail about my process and supplies from a beginner perspective, i hope this helps:
format the text in a word processor
export your document as a single page PDF
enter that PDF file into Quantum Elephant or BookletCreator, to rearrange the pages for your signatures. your program will give you a new PDF file that you can then print.
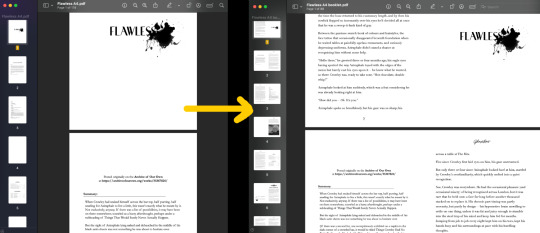
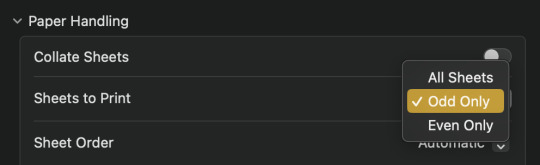
4. double sided printing: i was so so scared of this at first, but it's incredibly simple. no matter what printer you have, somewhere in your print settings will be an option to print even or odd pages.
print all the even pages first, then when the stack is finished printing, flip them over, insert them back into the paper feed, and print the odd pages.
5. fold the signatures together so you have a stack of little booklets, then mark on the spine where your sewing holes need to be. manually punch the holes using an awl, or diy an awl by stuffing a cork on the end of a straight needle.
6. sewing: take regular sewing thread and run it over a block of beeswax. this makes the thread easier to manage and holds it in place better while you sew. a curved needle is also much easier to use than a straight one, especially for a kettle stitch (using Sea Lemon's tutorial)
7. gluing: glue decorative pages (or plain, but thicker paper) to the front and back to create your end pages, then press the book flat to apply PVA glue to the spine. press it overnight so the glue dries flat. (optional: glue a ribbon to the top of the spine, then sew on headbands) finally glue an additional piece of paper (or mull) around the spine to strengthen it.
8. optional: trim the edges of your book down to create a smooth edge. this one's given me the most trouble because it's very hard to get right with a knife, and the proper supplies are expensive. check your local stationery shop (i.e. Officeworks, Staples) for an industrial guillotine service
9. cover: once you have the final measurements of your text block you can start making the cover. this is essentially gluing cardboard, binders board, or plywood etc to a sheet of fabric. the fabric either needs to be bookcloth, or have some kind of non-porous back so the glue doesn't seep through. you can diy bookcloth from any fabric with tissue paper. then glue the decorate end pages to your cover to attach the textblock!
129 notes
·
View notes
Text
Blackcrowing's Master Reading List

I have created a dropbox with pdfs I have gathered over the years, I have done my best to only allow access to documents which I found openly available through sites like JSTOR, Archive.org, or other educational resources with papers available for download.
That being said I ALSO recommend (I obviously have not read all of these but they are either in my library or I intend to add them)
📚 Celtic/Irish Pagan Books
The Morrighan: Meeting the Great Queens, Morgan Daimler
Raven Goddess: Going Deeper with the Morríghan, Morgan Daimler
Irish Paganism: Reconstructing Irish Polytheism, Morgan Daimler
Ogam: Weaving Word Wisdom, Erynn Rowan Laurie
Celtic Cosmology and the Otherworld: Myths, Orgins, Sovereignty and Liminality, Sharon Paice MacLeod
Celtic Myth and Religion, Sharon Paice MacLeod
A Guide to Ogam Divination, Marissa Hegarty (I'm leaving this on my list because I want to support independent authors. However, if you have already read Weaving Word Wisdom this book is unlikely to further enhance your understanding of ogam in a divination capacity)
The Book of the Great Queen, Morpheus Ravenna
Litany of The Morrígna, Morpheus Ravenna
Celtic Visions, Caitlín Matthews
Harp, Club & Calderon, Edited by Lora O'Brien and Morpheus Ravenna
Celtic Cosmology: Perspectives from Ireland and Scotland, Edited by Jacqueline Borsje and others
Polytheistic Monasticism: Voices from Pagan Cloisters, Edited by Janet Munin
📚 Celtic/Irish Academic Books
Early Medieval Ireland 400-1200, Dáibhí Ó Cróinín
The Sacred Isle, Dáithi Ó hÓgáin
The Ancient Celts, Berry Cunliffe
The Celtic World, Berry Cunliffe
Irish Kingship and Seccession, Bart Jaski
Early Irish Farming, Fergus Kelly
Studies in Irish Mythology, Grigory Bondarnko
Prehistoric Archaeology of Ireland, John Waddell
Archeology and Celtic Myth, John Waddell
Understanding the Celtic Religion: Revisiting the Past, Edited by Katja Ritari and Alexandria Bergholm
A Guide to Ogam, Damian McManus
Cesar's Druids: an Ancient Priesthood, Miranda Aldhouse Green
Animals in Celtic Life and Myth, Miranda Aldhouse Green
The Gods of the Celts, Miranda Green
The Celtic World, Edited by Miranda J Green
Myth and History in Celtic and Scandinavian Tradition, Edited by Emily Lyle
Ancient Irish Tales, Edited by Tom P Cross and Clark Haris Slover
Cattle Lords and Clansmen, Nerys Patterson
Celtic Heritage, Alwyn and Brinley Rees
Ireland's Immortals, Mark Williams
The Origins of the Irish, J. P. Mallory
In Search of the Irish Dreamtime, J. P. Mallory
The Táin, Thomas Kinsella translation
The Sutton Hoo Sceptre and the Roots of Celtic Kingship Theory, Michael J. Enright
Celtic Warfare, Giola Canestrelli
Irish Customs and Beliefs, Kevin Danaher
Pagan Celtic Ireland, Barry Raftery
Cult of the Sacred Center, Proinsais Mac Cana
Mythical Ireland: New Light on the Ancient Past, Anthony Murphy
Early Medieval Ireland AD 400-1100, Aidan O'Sullivan and others
The Festival of Lughnasa, Máire MacNeill
Curse of Ireland, Cecily Gillgan
📚 Indo-European Books (Mostly Academic and linguistic)
Dictionary of Indo-European Concepts and Society, Emily Benveniste
A Dictionary of Selected Synonyms in the Principle Indo-European Languages, Carl Darling Buck
The Horse, the Wheel and Language, David W. Anthony
Comparative Indo-European Linguistics, Robert S.P. Beekes
In Search of the Indo-Europeans, J.P. Mallory
Indo-European Mythology and Religion, Alexander Jacob
Some of these books had low print runs and therefore can be difficult to find and very expensive... SOME of those books can be found online with the help of friends... 🏴☠️
library genesis might be a great place to start... hint hint...
My kofi
#books#book#resource#blackcrowing#pagan#paganism#irish mythology#celtic#irish paganism#irish polytheism#celtic paganism#celtic polytheism#celtic mythology#indo european#indo european mythology#historical linguistics#paganblr#masterlist#irish reconstructionism#irish reconstructionist#celtic reconstructionist#celtic reconstructionism#masterpost
136 notes
·
View notes
Text
Affinity DesignerでTayda向けのフルカラーUV印刷原稿を作成する
続・エフェクター用のアルミダイキャストケースを発注した話です。今回はフルカラーの印刷を発注してみました。

タイに拠点を持つ電子部品のネット通販サイト「Tayda Electronics」では、ペダル型エフェクターでよく使われているアルミダイキャストケースの塗装や穴あけ加工、UV印刷といったサービスも提供しています。1個単位で発注でき、価格もかなりリーズナブルなので、世界中に利用者がいるようです。
自分も以前P-EQのケースを発注しているのですが(下記がそのときの記事)、そのときは青の本体に白で文字やマークを印刷する、というシンプルなものでした。ただ、単色ではどうしてもシンプルなデザインしか作れないので、今回はフルカラーでのUV印刷を発注してみることにしました。
今回のゴール:Illustoratorを使わずに発注する
TaydaのUV印刷は、印刷するデータをオンラインで(Web上で)アップロードして発注する仕組みになっています。入稿データはPDF形式が指定されているのですが、TaydaではAdobe Illsutorator以外で入稿データを作成することは推奨していないらしく、入稿データ作成用の説明などもすべてIllustratorを前提としています。ただ、Illustratorは利用料金が通常価格で1年あたり約3万4,000円と、個人が趣味で利用するにはハードルが高いお値段です。ということで、今回は同じような印刷用データの作成機能を持つAffinity Designerというソフトウェアを使って入稿データを作成します。
Affinity DesignerはIllustratorを使ったことがあれば比較的すぐに習得できるかと思います。もちろん細かい点で違いはありますが、ドキュメントも充実しているため、不明点などがあったら検索すれば大体の問題はすぐ解決できるかと思います。
ちなみにAffinity DesignerはMac/Windowsで動作し、価格(2025年6月時点)は6,590円ですが、年1、2回の頻度でセールをやっており、そのタイミングだとかなりお安く購入が可能です。もし急ぎで必要でないのであれば、セール時の購入をおすすめします。
なお、先に述べたとおり基本TaydaではIllustratorの利用を推奨しているため、下記で説明している手順は単なる「こうやったらできた」というレポートです。当方では成功を保証できませんのでご了承ください。
���ンプレートとサンプルファイルのダウンロード
TaydaのUV印刷サービスページではアルミダイキャストケースのUV印刷用のテンプレートが公開されているので、こちらをベースにデータ作成を始めます。
今回は1590Bサイズ(MXRのエフェクターとほぼ同サイズ)のケースに印刷してもらうので、「1590B type enclosure AI format template CLICK HERE (artboard size 56 x 108.50mm)」をダウンロードします。ちなみにAffinity DesignerはAI形式のファイルをそのままインポート可能です。また、同じページ内の「Here is example UV printing file we made for 125B enclosure size with Adobe Illustrator,」という部分の下、「EXAMPLE FILE AI FORMAT CLICK HERE」というリンクからサンプルファイルをダウンロードできるので、こちらもダウンロードしておきます。
テンプレートファイルを開いて編集する
ダウンロードしたテンプレートファイルをAffinity Designerで開きます。この際、「PDF Options」という画面が表示されますが、デフォルト設定のまま「OK」を選択します。

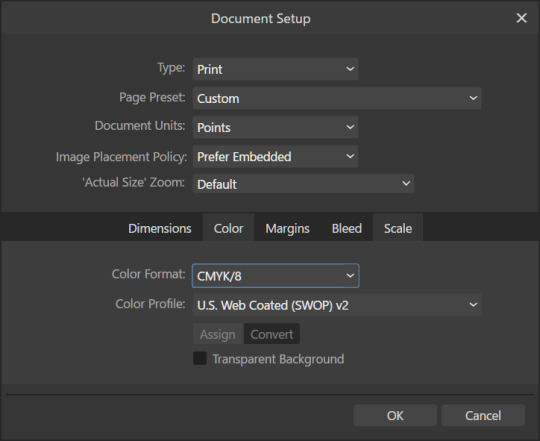
また、ファイルを開いた直後はカラーモードがRGBになっているので、「Document Setup」の「Color」タブで「Color Format」を「CMYK/8」に変更しておきます。
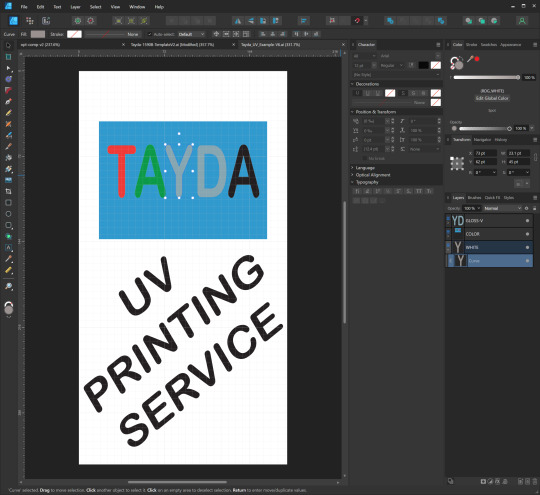
「COLOR」レイヤーにフルカラー印刷したい文字や図形を配置する
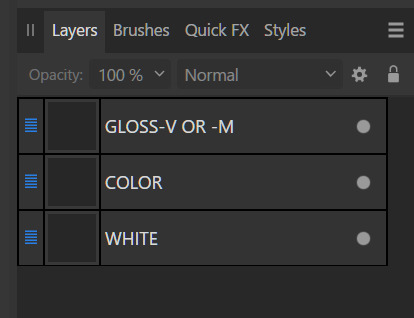
このテンプレートファイルには「GLOSS-V OR -M」「COLOR」「WHITE」という3つのレイヤーが用意されていますが、まずは「COLOR」レイヤーに印刷したい文字や図形を配置していきます。
このレイヤーに配置した文字や図形(オブジェクト)は、フルカラーで印刷されます。なお、ラスター画像(写真などの画像)は推奨しないとのことで、Affinity Designer上で図形ツールや各種ペン・ブラシツールを使ってデザインを作成していくことになります。
「WHITE」レイヤーに白で印刷したい文字や図形を配置する
「COLOR」レイヤーはフルカラー(CMYK)での印刷が可能ですが、白の印刷はできません。そのため、白い文字や図形は「WHITE」レイヤーに配置する必要があります。さらに、「COLOR」レイヤーの印刷は下地が白であることを想定しているため、(特に意図しない限りは)「COLOR」レイヤーに配置したオブジェクトの下が白く塗りつぶされるよう、「WHITE」レイヤーにも同じオブジェクトを配置することが推奨されています(イメージとしては、UVプリンタメーカーによる解説「透明な印刷対象物に印刷する (下地にホワイトインクを印刷)」や「印刷対象物の色に影響を受けずに印刷する(下地に白印刷)」が分かりやすいです)。
具体的な作業としては、「COLOR」レイヤーにオブジェクトを配置したら、それをそのままコピー&ペーストして「WHITE」レイヤーに配置して、同じオブジェクトが白でも印刷されるようにしておけばOKです。印刷時には最初に「WHITE」レイヤーが印刷され、続けて「COLOR」レイヤーが印刷されるため、このように設定することで白いインクで印刷された文字や図形の上にカラーで文字や図形が印刷されるようになります。
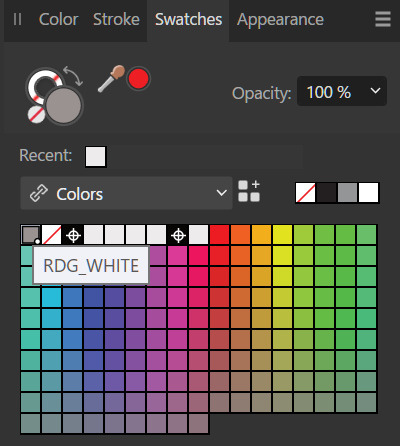
なお、「WHITE」レイヤーにオブジェクトを配置する際の注意点として、このレイヤー内に配置するオブジェクトの色はすべて「RDG_WHITE」というspot color(特色)を指定する必要があります。spot colorを指定する方法はいくつかあるのですが、サンプルファイルのスタイルをコピペするのが簡単で確実です。
まず、ダウンロードしておいたサンプルファイルをAffinity Designerで開きます。「WHITE」レイヤー内に「Curve」(Yの文字)があるので、これを右クリックしてコピーします(同じ「Y」の文字が「GLOSS-V」レイヤーにもあるのでそちらをコピーしないように注意)。
続いて、「RDG_WHITE」を設定したいオブジェクトを選択し、「Edit」メニュー内の「Paste Style」を実行します。
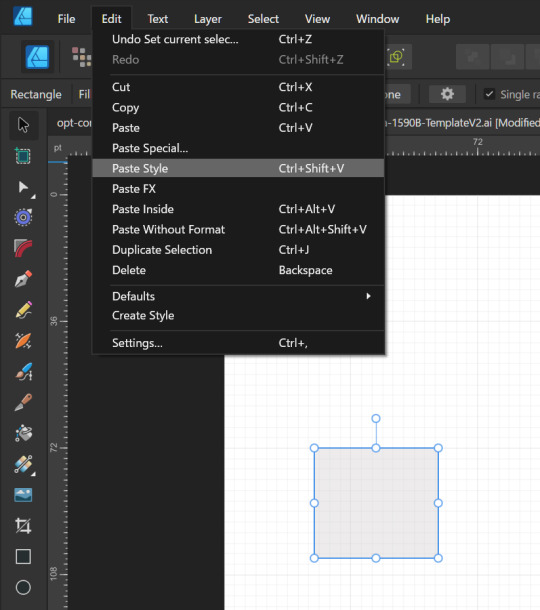
すると、そのオブジェクトの塗りつぶしカラーが「RDG_WHITE」に設定されます。

また、塗りつぶし色として「RDG_WHITE」が設定されたオブジェクトを選択した状態で「Swatchs」タブの「Colors」横にある「■+■■」ボタンをクリックするとSwatches内に「RDG_WHITE」が追加され、ここから「RDG_WHITE」を指定できるようになります。
「GLOSS-V OR -M」レイヤーについて
「GLOSS-V OR -M」はTaydaの有料オプションで用意されているグロス(光沢)/マット(艶消し)仕上げサービス用のレイヤーで、ここにオブジェクトを配置するとその位置に光沢/艶消しインクを乗せてくれるとのことですが、自分は使ったことがないので割愛します。なお、このレイヤーに配置するオブジェクトはすべて色としては「RDG_GLOSS」を指定しておく必要があります(参考:「表面を仕上げる(グロス印刷)」)
そのほかのレイヤーについて
Affinity Designerでは、出力用データの作成時(エクスポート時)に選択したレイヤーだけを出力する機能���あるので、印刷しないガイド用の図形などは別レイヤーに分けて置きましょう。たとえば自分の場合、穴開けする場所に穴(円)を描いたレイヤーを用意したりしています。
出力するレイヤーの指定
デザインデータの作成が完了したら、PDFへの出力を行います。実はここが一番ハードルが高く面倒くさいところだったりします。
まず、ウィンドウ左上の「Export Persona」をクリックします。この状態では、エクスポートするレイヤーなどの設定を行うことができるので、「Layers」タブで出力したいレイヤー(「GLOSS-V OR -M」、「COLOR」、「WHITE」の3つ)をクリックしてエクスポート対象に指定します(ウィンドウから矢印が飛び出たアイコンがハイライトされた状態にする)。

この設定が終わったら、「Design Persona」をクリックするとデザイン画面に戻れます。

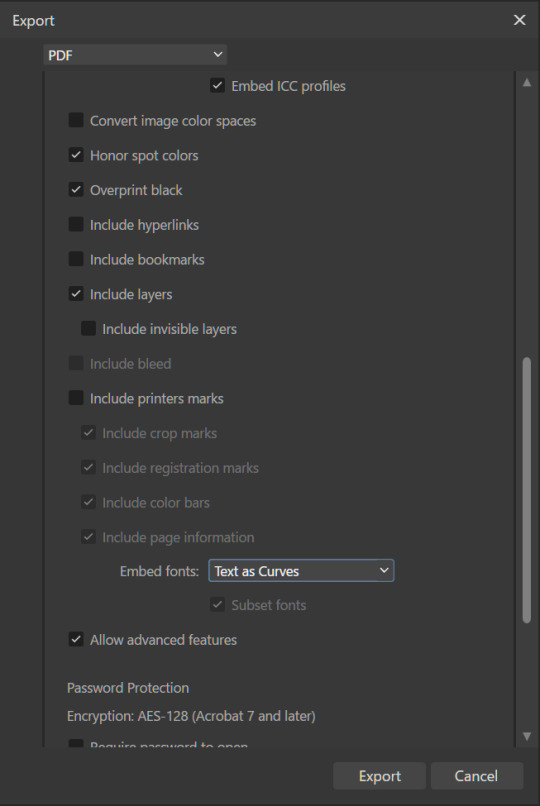
エクスポート設定
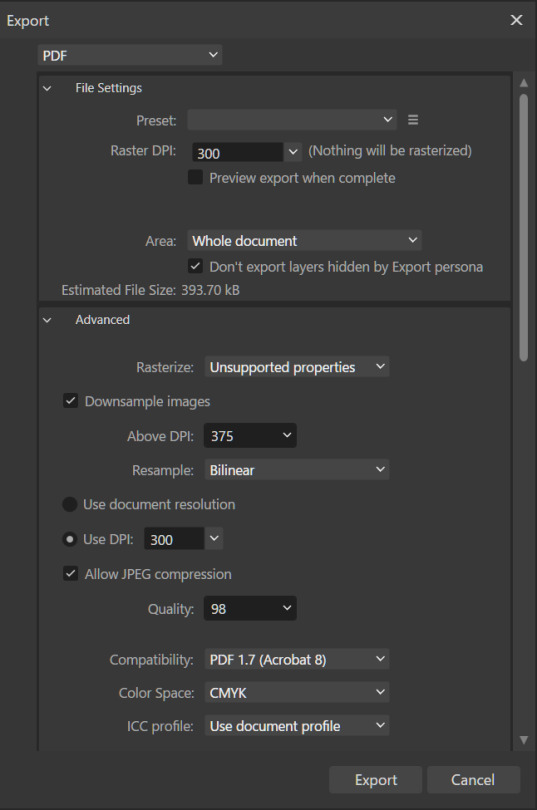
続いて「File」-「Export」メニューを選択し、エクスポート画面を開きます。ここではフォーマットとして「PDF」を選択し、続いてオプションを次の画像のように選択します。
(注:「Raster DPI」の部分に「Nothing will be rasterized」と表示されているかも確認してください。Affinity DesignerはPDFで表現できない機能を使ったオブジェクトを自動的にラスター画像化する機能があり、ラスター化された画像が含まれていない場合のみここに「Nothing will be rasterized」が表示されます。)
最後に「Export」ボタンをクリックし、出力するファイル名や保存先を指定します。
Acrobat(無料版)でデータを確認する
最後に、データが正しくエクスポートされているかをAdobe Acrobatで確認します。Acrobatは有料版(Pro)と無料版がありますが、最低限の確認は無料版のみで可能です。
まず、画面左のレイヤーアイコンをタップして、PDF内に含まれるレイヤーを確認します。
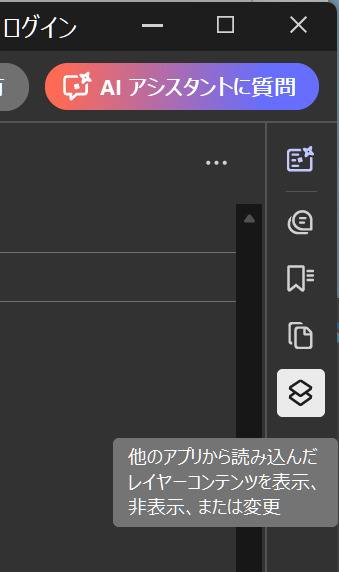
「WHITE」「COLOR」が(もし使用していれば「GLOSS-V OR -M」も)含まれていればOKです。また、レイヤーを右クリックして「レイヤーを表示」を選択することでレイヤーの表示/非表示を切り替えることができます。ここで「WHITE」レイヤーに本来「COLOR」レイヤーに含まれるはずのカラーの文字や図形が入っていないかなどをチェックしておきます。

(ちなみに、自分は事故を避けるために「WHITE」「COLOR」レイヤーの中にはレイヤーを作らないようにしているためこの2つのレイヤーしか表示されませんが、レイヤー内にレイヤーを作っている場合はそれもここに表示されるはずです)。
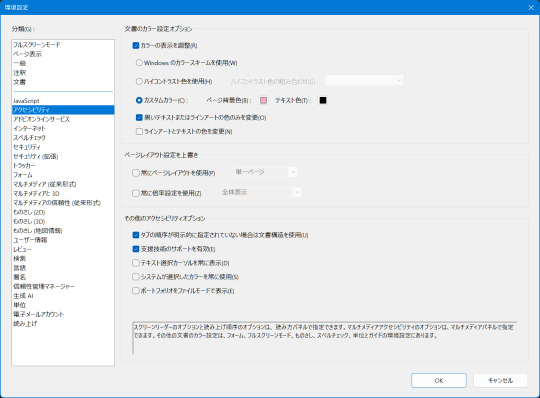
なお、Acrobatの標準設定では背景が白で表示されるのですが、この設定では「WHITE」レイヤーが確認しずらいです。そのため、自分はAcrobatの「メニュー」-「環境設定」で表示できる環境設定画面の「アクセシビリティ」で、「ページ背景色」を別の色に変更しています。この設定だと、「WHITE」レイヤーを非表示にした際にどうなるかが分かりやすくなります。
また、PDFを拡大表示して、輪郭がスムーズになっていない(ギザ��ザになっている=ラスター画像化されている)部分がないかもチェックします。
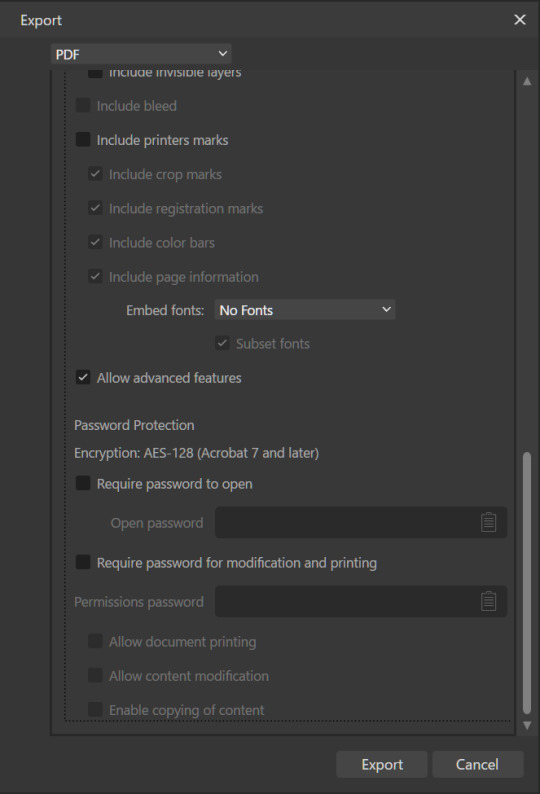
最後に、PDFコンテンツ表示エリアを右クリックして「文書のプロパティ」を選択します。すると「文書のプロパティ」画面が表示されるので、下記をチェックします。
「概要」タブの「PDFのバージョン」。Affinity Designerでエクスポート時に選択したもの(1.7)と一致しているか
「概要」タブの「ページサイズ」が適正かを確認。1590Bサイズなら「56.0×108.5mm」。
「セキュリティ」タブの「文章のセキュリティ」および「文書に関する制限の概要」。「セキュリティなし」、「Acrobatの全バージョン」、「印刷」が許可になっているかを確認。
「フォント」タブでフォントが埋め込まれていないかを確認。何も表示されていなければOK。
これで問題が無ければ、あとはTaydaに注文&入稿を行えばOKのはずです。
ちなみに、この筐体は最終的にはこんな感じになっています。このデザインでは、筐体がシルバー塗装なのを利用し、カラー印刷したい図形(「COLOR」レイヤーに配置した図形)の下にあえて白インクを重ねないことでメタリック感を残しつつ文字はくっきりさせています。

2 notes
·
View notes
Text
Automate Simple Tasks Using Python: A Beginner’s Guide
In today's fast paced digital world, time is money. Whether you're a student, a professional, or a small business owner, repetitive tasks can eat up a large portion of your day. The good news? Many of these routine jobs can be automated, saving you time, effort, and even reducing the chance of human error.
Enter Python a powerful, beginner-friendly programming language that's perfect for task automation. With its clean syntax and massive ecosystem of libraries, Python empowers users to automate just about anything from renaming files and sending emails to scraping websites and organizing data.
If you're new to programming or looking for ways to boost your productivity, this guide will walk you through how to automate simple tasks using Python.
🌟 Why Choose Python for Automation?
Before we dive into practical applications, let’s understand why Python is such a popular choice for automation:
Easy to learn: Python has simple, readable syntax, making it ideal for beginners.
Wide range of libraries: Python has a rich ecosystem of libraries tailored for different tasks like file handling, web scraping, emailing, and more.
Platform-independent: Python works across Windows, Mac, and Linux.
Strong community support: From Stack Overflow to GitHub, you’ll never be short on help.
Now, let’s explore real-world examples of how you can use Python to automate everyday tasks.
🗂 1. Automating File and Folder Management
Organizing files manually can be tiresome, especially when dealing with large amounts of data. Python’s built-in os and shutil modules allow you to automate file operations like:
Renaming files in bulk
Moving files based on type or date
Deleting unwanted files
Example: Rename multiple files in a folder
import os folder_path = 'C:/Users/YourName/Documents/Reports' for count, filename in enumerate(os.listdir(folder_path)): dst = f"report_{str(count)}.pdf" src = os.path.join(folder_path, filename) dst = os.path.join(folder_path, dst) os.rename(src, dst)
This script renames every file in the folder with a sequential number.
📧 2. Sending Emails Automatically
Python can be used to send emails with the smtplib and email libraries. Whether it’s sending reminders, reports, or newsletters, automating this process can save you significant time.
Example: Sending a basic email
import smtplib from email.message import EmailMessage msg = EmailMessage() msg.set_content("Hello, this is an automated email from Python!") msg['Subject'] = 'Automation Test' msg['From'] = '[email protected]' msg['To'] = '[email protected]' with smtplib.SMTP_SSL('smtp.gmail.com', 465) as smtp: smtp.login('[email protected]', 'yourpassword') smtp.send_message(msg)
⚠️ Note: Always secure your credentials when writing scripts consider using environment variables or secret managers.
🌐 3. Web Scraping for Data Collection
Want to extract information from websites without copying and pasting manually? Python’s requests and BeautifulSoup libraries let you scrape content from web pages with ease.
Example: Scraping news headlines
import requests from bs4 import BeautifulSoup url = 'https://www.bbc.com/news' response = requests.get(url) soup = BeautifulSoup(response.text, 'html.parser') for headline in soup.find_all('h3'): print(headline.text)
This basic script extracts and prints the headlines from BBC News.
📅 4. Automating Excel Tasks
If you work with Excel sheets, you’ll love openpyxl and pandas two powerful libraries that allow you to automate:
Creating spreadsheets
Sorting data
Applying formulas
Generating reports
Example: Reading and filtering Excel data
import pandas as pd df = pd.read_excel('sales_data.xlsx') high_sales = df[df['Revenue'] > 10000] print(high_sales)
This script filters sales records with revenue above 10,000.
💻 5. Scheduling Tasks
You can schedule scripts to run at specific times using Python’s schedule or APScheduler libraries. This is great for automating daily reports, reminders, or file backups.
Example: Run a function every day at 9 AM
import schedule import time def job(): print("Running scheduled task...") schedule.every().day.at("09:00").do(job) while True: schedule.run_pending() time.sleep(1)
This loop checks every second if it’s time to run the task.
🧹 6. Cleaning and Formatting Data
Cleaning data manually in Excel or Google Sheets is time-consuming. Python’s pandas makes it easy to:
Remove duplicates
Fix formatting
Convert data types
Handle missing values
Example: Clean a dataset
df = pd.read_csv('data.csv') df.drop_duplicates(inplace=True) df['Name'] = df['Name'].str.title() df.fillna(0, inplace=True) df.to_csv('cleaned_data.csv', index=False)
💬 7. Automating WhatsApp Messages (for fun or alerts)
Yes, you can even send WhatsApp messages using Python! Libraries like pywhatkit make this possible.
Example: Send a WhatsApp message
import pywhatkit pywhatkit.sendwhatmsg("+911234567890", "Hello from Python!", 15, 0)
This sends a message at 3:00 PM. It’s great for sending alerts or reminders.
🛒 8. Automating E-Commerce Price Tracking
You can use web scraping and conditionals to track price changes of products on sites like Amazon or Flipkart.
Example: Track a product’s price
url = "https://www.amazon.in/dp/B09XYZ123" headers = {"User-Agent": "Mozilla/5.0"} page = requests.get(url, headers=headers) soup = BeautifulSoup(page.content, 'html.parser') price = soup.find('span', {'class': 'a-price-whole'}).text print(f"The current price is ₹{price}")
With a few tweaks, you can send yourself alerts when prices drop.
📚 Final Thoughts
Automation is no longer a luxury it’s a necessity. With Python, you don’t need to be a coding expert to start simplifying your life. From managing files and scraping websites to sending e-mails and scheduling tasks, the possibilities are vast.
As a beginner, start small. Pick one repetitive task and try automating it. With every script you write, your confidence and productivity will grow.
Conclusion
If you're serious about mastering automation with Python, Zoople Technologies offers comprehensive, beginner-friendly Python course in Kerala. Our hands-on training approach ensures you learn by doing with real-world projects that prepare you for today’s tech-driven careers.
2 notes
·
View notes
Text


MacWorld UK Magazine PDFs from 1999, 2000, and 2001
"Macworld is a web site dedicated to products and software of Apple Inc. It is published by Mac Publishing, which is headquartered in San Francisco, California. Published since 1984, the magazine has the largest audited circulation (both total and newsstand) of Macintosh-focused magazines in North America, more than double its nearest competitor, MacLife (formerly MacAddict). Macworld was founded by David Bunnell (publisher) and Andrew Fluegelman (editor). It was the oldest Macintosh magazine still in publication, until September 10, 2014, when IDG, its parent company, announced it was discontinuing the print edition and laid off most of the staff, while continuing an online version."
2 notes
·
View notes
Text
Okay but what if I just formatted my poetry book in Microsoft Word
Because I don’t have a Mac so I can’t try Vellum, and Atticus isn’t gonna let me format it with cool indents and other fun poetry stuff the way I want to (and I’m two seconds from asking for my money back), and while Kindle Create DOES let me format it the way I want, it isn’t gonna let me export a PDF with page numbers, and I need a PDF with page numbers to send to IngramSpark, because bookstores and libraries aren’t gonna buy from Amazon…
What if I just made the print version of my poetry book with Microsoft Word
I’ve been fiddling with Word and Googling “how to do this, how to do that” all evening and y’all I think this is actually going to work
2 notes
·
View notes
Text
That was certainly one workaround that I just resorted to.
Go to print off a single page from my laptop, where I have indeed successfully used that printer before. The job stays stuck on "processing" in the queue.
Cancel that job, which has now sat there for 6-7 minutes. Repeat a couple of times.
Check that the printer is actually turned on. Which involves getting Mr. C to physically poke at it, since he currently has it physically blocked off from my gimpy ass with some boxes. (Probably not on purpose. Probably.) At least he is sitting less than 6 feet away in the same room at the time.
Make sure the laptop and printer are currently sitting on the same wifi network. Because yeah they need to be, and we have two in here. Repeat previous steps a time or two, but with less physical poking at buttons.
Mr. C volunteers that he has also had trouble printing from his Linux box recently. The Mac and Windows systems are still working fine. Start suspecting some CUPS/Brother tomfoolery.
He offers to print from one of the systems that's been working, if I send the thing to him.
In a fit of stubbornness, I save the fucker as a PDF, mail it to myself, and try printing through my older phone. After the current main one doesn't even see the printer, though it is definitely set up on there too.
This half-baked solution actually works.
Was this something urgent? Not particularly. I just got persistent.
So yeah, I have never pretended to be particularly smart--but I really am not good at letting much of anything go. More to my benefit in this case than too many others. 🥴
2 notes
·
View notes
Text

How to Print a Digital Download from Etsy
The whole downloaded-file-to-framed-print-on-your-wall process breaks down like this:
- Save the file you purchased to your computer or thumbdrive.
- Take the file to a job printer and get it printed to the size you want.
- Take the printed file to a framer, and have it framed so it fits your décor.
Digital files are often much, much cheaper on Etsy than buying their physical item counterparts. Plus, when you buy a digital file, you can finetune it to the exact size you want for your own wall. And once it’s printed, you can also choose the exact framing and matting combination you want.
Now, the details:
You were on Etsy or an artist’s website, and you fell in love with an image. Perfect for your wall, but you’re not sure how the whole printing thing works.
Not to worry! Lots of people use printable downloads every day for party decorations, invites, or coloring pages for kids (using their own home printer, if they have one), or for higher quality prestige printing for smashing wall art. The following is a list of steps for accessing your digital downloads, and how to turn them into art you’ll be proud to see on your wall.
So, what’s a digital download, or ‘printable’? It’s not a physical object; it’s an image file, in the form of 1s and 0s, saved on your computer or a thumbdrive. You bought it, you keep it, and you can always print it, as many times as you like. You can copy the file to two or three locations, so you don’t lose it.
Digital downloads come in various formats, including PDF, JPG, PNG, SVG, EPS, and more. Each type of file depends on what you need to use it for and how you are going to print it. Printing services will specify which formats they need.
Etsy places the file to your account in the orders section and you can download it on a desktop. They’ll also send you an email with a link to it.
Or, log into your account and click on “Purchases and Reviews.” Find the button that says “Download Files”. If you run into troubles, there’s a Help page. (Remember, you can’t access your digital download file through the mobile Etsy app.)
Now that it’s downloaded, you can open your file, just to check whether you have the right image at the right size. You’ll need to use the right software.
.bmp (Microsoft Windows Photos, Apple Preview or Apple Photos, Adobe Photoshop, Adobe Illustrator, CorelDRAW)
.doc (Microsoft Word)
.gif (Microsoft Windows Photos, Apple Preview or Apple Photos, Adobe Photoshop, Adobe Illustrator, CorelDRAW)
.jpeg (Microsoft Windows Photos, Apple Preview or Apple Photos, Adobe Photoshop, Adobe Illustrator, CorelDRAW)
.jpg (Microsoft Windows Photos, Apple Preview or Apple Photos, Adobe Photoshop, Adobe Illustrator, CorelDRAW)
.mobi (Calibre, Stanza, Sumatra PDF, Mobi File Reader, popular eReaders)
.mov (QuickTime, iTunes)
.mp3 (Windows Media Player or iTunes)
.mpeg (Windows Media Player, QuickTime)
.pdf (Adobe Acrobat Reader, Most Internet Browsers)
.png (Microsoft Windows Photos, Apple Preview or Apple Photos, Adobe Photoshop, Adobe Illustrator, CorelDRAW)
.psp (Corel PaintShop Pro, Adobe Photoshop, ACD Systems Canvas)
.rtf (Microsoft Word, WordPad)
.stl (AutoDesk Viewer, Microsoft 3D Viewer, Microsoft Print 3D, ShareCAD)
.txt (Windows NotePad, TextEdit on Mac)
.zip (Usually, you can unzip a .zip file with any computer.)
.ePUB (Various eReaders)
.iBook (Internet browser or Apple iBooks)
You can print image files on home printers. This is great for low-resolution art up to 8.5” x 11”, like recipes, or sewing instructions. The downside here is that the print will only be as good as the printer itself. For larger wall art, the best move is to take your file to a professional printshop.
This can be done online, or it can be done in person. Local Walgreens and Costcos are often quite good. You can upload your saved image file to them using their official website, and just pick up your image, printed the size you specify, on the paper you choose, the next time you’re in the neighborhood. There are also online choices like Shutterfly or Vistaprint, who will ship you your prints in the mail.
You’ve got your print, and you love it. But it’s just a big piece of paper right now; what about framing? One easy option is to select a standard sized frame, mat and glass available at the local stores or mall shops, and insert your new print yourself. Or maybe your print deserves first-cabin treatment, and you’ll want to check out the local frame shop for the right frame, matting and glass. Either way, totally legit. Then just hang it on the wall, and enjoy.
And that’s the whole process. Before you buy a digital download, you should check a couple of things:
- Be sure you have the software you’ll need to open the download at home, or be sure you know where online to find a site that will open the image (such as Photopea.com, for opening a layered .psd file, if you don’t happen to have Photoshop on your own machine).
- Be sure you understand the optimum print size of the download and its aspect ratio. Artists generally will inform you that their image will look best at a certain size, say, 24” x 18”. Printing it larger will seem overblown, with visible pixellation; printing it smaller will cause it to lose detail.
In other words, make sure the digital download fits your needs before you buy.
+++++++++++++
#collage#abstract#art#modernart#digital download#etsy#midcentury#kolaj#homedecor#interiordesign#design
4 notes
·
View notes
Text
Scrivener is quite good for writing, but it's not as powerful as MS Word or even Google Docs for editing, formatting, or print page design, and you'll have to export the file to Word or PDF to share it with anyone who doesn't have Scrivener.
Scrivener runs on both Windows and Mac. It currently costs about US$60, and this is a one-time purchase, not an annual subscription. (I don't remember whether there's a fee for updates or not, but I think not.)
Scrivener also has a fuckton of really cool writing features that Word doesn't have, like the ability to import web pages and PDFs directly into your research folder, along with templates for screenplays and character descriptions/backstories. This allows you to keep everything for your project all in one place. You can also convert text files into .epub and .mobi formats directly from Scrivener, if you want to self-publish an e-book.
Libre Office/Open Office is the closest thing I've seen to Word, but I haven't used it in almost twenty years so I don't know what it looks like now.
Microsoft Office, like many companies in recent months, has slyly turned on an “opt-out” feature that scrapes your Word and Excel documents to train its internal AI systems. This setting is turned on by default, and you have to manually uncheck a box in order to opt out.
If you are a writer who uses MS Word to write any proprietary content (blog posts, novels, or any work you intend to protect with copyright and/or sell), you’re going to want to turn this feature off immediately.How to Turn off Word’s AI Access To Your Content
I won’t beat around the bush. Microsoft Office doesn’t make it easy to opt out of this new AI privacy agreement, as the feature is hidden through a series of popup menus in your settings:On a Windows computer, follow these steps to turn off “Connected Experiences”:
File > Options > Trust Center > Trust Center Settings > Privacy Options > Privacy Settings > Optional Connected Experiences > Uncheck box: “Turn on optional connected experiences”
40K notes
·
View notes
Text
Microsoft Mac Office and Microsoft Publisher: Tools for Every Creative and Productive User
When it comes to professional productivity, Microsoft continues to set the standard. Two essential tools that stand out in the Microsoft ecosystem are Microsoft Mac Office and Microsoft Publisher. These applications cater to two very different but important needs—cross-platform compatibility and desktop publishing.
Whether you’re a student, business user, or creative professional, these tools offer features that simplify tasks, enhance output, and deliver quality. In this article, we’ll explore how these software packages can elevate your work.
Microsoft Mac Office: A Perfect Fit for Apple Users
Apple users no longer need to rely on workarounds or third-party tools to access the power of Office apps. Microsoft Mac Office provides native compatibility with macOS, offering an optimized experience for Mac users.
You get access to essential apps such as Word, Excel, PowerPoint, and OneNote. These apps are fully tailored for macOS with a user interface that feels native and intuitive.
Why Choose Office for Mac Over Alternatives?
There are several reasons to select Office for Mac over other options:
Full compatibility with Office files on Windows
Real-time collaboration through OneDrive and SharePoint
Offline access so you can work without an internet connection
Regular updates for features and security enhancements
Office for Mac is ideal for students, professionals, and anyone who needs high-quality editing tools without leaving the Apple ecosystem.
Microsoft Publisher: A Power Tool for Desktop Publishing
While many users are familiar with Word or PowerPoint, Microsoft Publisher often goes unnoticed. However, it’s one of the best tools for creating professional-looking publications with ease.
Publisher is a desktop publishing application that focuses on layout and design. It’s perfect for creating brochures, flyers, newsletters, and greeting cards.
Microsoft Publisher Microsoft: A Tool for Creative Projects
The latest version, Microsoft Publisher Microsoft, takes things a step further. It introduces modern templates, drag-and-drop design tools, and better image support.
You don’t need advanced design skills to create stunning visuals. Publisher’s interface is user-friendly, and you can produce professional content quickly.
Some features include:
Advanced text formatting
Photo editing and alignment tools
Mail merge functionality for marketing materials
Export to high-resolution PDFs
This tool simplifies the creative process for users who need polished results.
Microsoft Mac Office vs Office for Mac: Is There a Difference?
Many people wonder if Microsoft Mac Office and Office for Mac are the same. In essence, they refer to the same suite of apps. However, the difference often lies in licensing or packaging.
"Microsoft Mac Office" often refers to the product as sold or bundled. "Office for Mac" refers to the software functionality optimized for macOS.
In either case, the user experience is seamless. Both deliver consistent features, regular updates, and strong integration with Apple devices.
Who Should Use Microsoft Publisher?
While Microsoft Publisher isn't as well-known as Word or Excel, it fills a specific niche that these apps can’t. If you work in marketing, event planning, or education, Publisher is a fantastic choice.
Small businesses especially benefit from using Publisher for their print materials. It eliminates the need for hiring a designer for every promotional piece.
Students can also use it for school newsletters, posters, and project presentations. The templates make designing easy and stress-free.
Subheading: Microsoft Publisher Microsoft in Modern Workflows
In today’s digital world, we often think only of online content. But print media still plays a role in branding and communication.
Microsoft Publisher Microsoft bridges this gap. It helps professionals create visually engaging print documents without investing in expensive software or design training.
Many users now combine Publisher with other Office tools. For example, a Word document might include basic content, while Publisher presents it with enhanced visuals.
This kind of synergy saves time and boosts quality.
Why Microsoft Mac Office Is a Smart Investment
The world is shifting to hybrid work and learning. Having access to robust productivity tools is no longer optional.
Microsoft Mac Office gives users the power to edit, present, and collaborate. It supports the modern demands of school, remote work, and business communication.
Unlike online-only platforms, Mac Office works offline too. This means you’re always in control of your work—no matter the internet connection.
Compatibility and Support Across Devices
One of Microsoft’s strengths is cross-device compatibility. You can start a project on your Mac and continue it on a Windows PC. This is especially useful in organizations with mixed systems.
You can also save documents to OneDrive and access them from any device. Office for Mac includes these features, allowing real-time updates and automatic file syncing.
This type of flexibility keeps your workflow uninterrupted and efficient.
Final Thoughts: Which Tool Is Right for You?
If you use macOS and need top-quality apps for writing, calculating, and presenting, choose Microsoft Mac Office.
If you design brochures, cards, or business materials, go for Microsoft Publisher or the newer Microsoft Publisher Microsoft version.
Both tools offer strong functionality, user-friendly interfaces, and compatibility with other Microsoft services. By investing in these tools, you enhance your productivity, creativity, and professionalism.
Start today and experience the power of Microsoft’s trusted software suite.
0 notes
Text
Everything You Need to Know About Adobe Acrobat and Adobe Acrobat Price
Adobe Acrobat is a powerhouse in the world of PDF solutions. Whether you're a student, professional, or business owner, Adobe Acrobat provides versatile tools to create, edit, sign, and share PDF documents effortlessly. However, before making a purchase decision, understanding adobe acrobat price options, features, and benefits is essential to choose the plan that fits your needs and budget.
In this guide, we'll explore Adobe Acrobat’s features, editions, pricing plans, and why purchasing through QuickSoftSell.com can be your best option.
What is Adobe Acrobat?
Adobe Acrobat is a software suite developed by Adobe Systems designed to create, view, manipulate, and manage PDF (Portable Document Format) files. Unlike simple PDF viewers, Acrobat offers comprehensive features such as:
Creating PDFs from virtually any file format
Editing text and images in PDFs
Converting PDFs to Word, Excel, or PowerPoint
Adding electronic signatures
Protecting PDFs with passwords and permissions
Collaborating on documents with review and commenting tools
This versatility makes Adobe Acrobat an indispensable tool across industries — from education and legal to marketing and engineering.
Different Editions of Adobe Acrobat
Adobe Acrobat comes in several editions tailored for different user needs:
1. Adobe Acrobat Standard DC
Best suited for individuals and small businesses who need to create, edit, and sign PDFs on Windows. It offers essential PDF tools with a simple interface.
2. Adobe Acrobat Pro DC
The professional edition, available for both Windows and Mac, offers all Standard features plus advanced capabilities like OCR (Optical Character Recognition), redaction, PDF comparison, and enhanced scanning.
3. Adobe Acrobat Reader DC
This free version allows you to view, print, and annotate PDFs but does not include editing or creation features.
Understanding Adobe Acrobat Price Plans
Pricing is often a decisive factor for many users. Here’s a breakdown of the typical Adobe Acrobat price structures:
Subscription Plans (Most Common)
Acrobat Standard DC: Usually around $12.99/month, ideal for users who need reliable PDF creation and editing tools on Windows.
Acrobat Pro DC: Around $14.99/month, including all advanced features for power users.
Annual or Monthly Billing: Adobe offers both, with savings if you opt for annual plans.
Perpetual License (One-Time Purchase)
In some regions, Adobe offers perpetual licenses for Acrobat Standard or Pro versions with one-time payments, but this is becoming rare as Adobe shifts towards subscription models.
Why Check Adobe Acrobat Price on QuickSoftSell.com?
When considering purchasing Adobe Acrobat, price and authenticity are paramount. At QuickSoftSell.com, you’ll find competitive and transparent pricing for all Acrobat editions. Here’s why buying through us is advantageous:
Genuine Software: We guarantee official Adobe licenses, ensuring your software is legitimate and secure.
Affordable Pricing: Our prices are competitive, often better than buying directly from Adobe, especially with bundle deals and discounts.
Instant Delivery: After purchase, you get your license keys immediately via email, so you can start using Adobe Acrobat without delay.
Excellent Support: QuickSoftSell.com offers dedicated customer service for installation, activation, and troubleshooting — going beyond just selling software.
Explore the detailed adobe acrobat price options on our website to find the best deal for your needs.
Key Features to Consider When Choosing Adobe Acrobat Edition
Understanding your workflow will help you choose the right Adobe Acrobat version and plan, considering the price and feature balance.
PDF Editing and Creation
Most users require the ability to create PDFs from any file and edit text or images within PDFs. Acrobat Standard and Pro support this.
OCR and Scanning
If you work with scanned documents, OCR (Optical Character Recognition) converts scanned images into editable text. This is available in Acrobat Pro.
Advanced Security
For sensitive documents, features like redaction, password protection, and certificate signing matter. Acrobat Pro provides these advanced security options.
Collaboration Tools
Team projects benefit from commenting, annotations, and sharing features. Acrobat DC plans integrate well with cloud services for smooth collaboration.
How Does Adobe Acrobat Pricing Compare to Competitors?
While there are free PDF tools available, none match the comprehensive feature set and reliability of Adobe Acrobat. Some alternatives include:
Foxit PDF Editor: Cheaper, but lacks some advanced Acrobat features.
Nitro Pro: Strong in editing but no mobile app integration like Acrobat.
PDF-XChange Editor: Great for annotation but limited cloud collaboration.
Considering the investment, Adobe Acrobat’s price reflects its industry-standard status and continuous innovation.
Tips for Getting the Best Adobe Acrobat Price
1. Look for Authorized Sellers
Purchase from trusted vendors like QuickSoftSell.com to avoid counterfeit software and get authentic licenses.
2. Check for Student or Volume Discounts
If you’re a student or buying for an organization, check for special pricing plans.
3. Compare Subscription vs. Perpetual Licenses
Subscriptions offer updates and cloud features but consider your budget and long-term needs.
4. Use Bundles When Available
Sometimes, Acrobat licenses come bundled with other Adobe Creative Cloud apps, offering more value.
How to Purchase Adobe Acrobat at QuickSoftSell.com
Buying Adobe Acrobat from QuickSoftSell.com is simple and secure:
Visit our adobe acrobat price page.
Browse editions and select the plan fitting your needs.
Add to cart and proceed with easy checkout.
Receive your official license key via email instantly.
Follow our step-by-step activation guide or contact support for help.
Our goal is to make your software purchase smooth and reliable.
Frequently Asked Questions About Adobe Acrobat Pricing
What is the difference between Adobe Acrobat Standard and Pro in price?
Pro is typically $2–3 more expensive per month but offers advanced features like OCR, redaction, and PDF comparison.
Is there a free trial available?
Yes, Adobe offers a free 7-day trial for Acrobat Pro DC, which you can try before buying.
Can I switch plans later?
Absolutely. Adobe subscriptions are flexible — you can upgrade or downgrade plans as your needs change.
Are there discounts for students or educators?
Yes, Adobe and trusted resellers like QuickSoftSell.com provide educational discounts — check our site for current offers.
Conclusion
Choosing the right Adobe Acrobat edition at the right adobe acrobat price is critical for maximizing productivity while managing costs. Whether you’re a student, professional, or business, QuickSoftSell.com offers authentic licenses, excellent prices, and dependable support.
Visit our adobe acrobat price page now to explore your options and get started with the best PDF software on the market!
0 notes
Text
@chernozemm: Drop the knowledge I want to bind in signatures toooooo omg. So happy for u
THERE ARE!!! PROGRAMS!!!!
i'm on mac so i had to fork out $20usd for an app called BookletCreator but omg so worth it.
PC users can use Quantum Elephant for freeee dude.
you just put in your single spread PDF and tell it how many pages you want per signature, and it'll turn out a PDF for each signature with the pages laid out ready to print.
i also don't have a double sided printer, so i learned you can print "even pages only", then flip the paper back in, then print "odd pages only" with the order reversed, and it lines up ez breezy.
(Youtube tut for BookletCreator on Mac, double sided printing guide)
and now i got one of my fave fics ready to bind!!!! 😭 i did a test kettle stitch with some spare embroidery thread, and now i'm vibrating in my seat to start on the full thing

141 notes
·
View notes
Text
How to Delete Pages from PDF on Mac: A Professional Guide to PDF Page Management
Managing digital documents is a daily necessity in today’s fast-paced professional world. Whether you're dealing with contracts, reports, proposals, or presentations, chances are you frequently work with PDF files. While PDFs are great for preserving formatting and ensuring document integrity, editing them—especially when you need to delete or remove specific pages—can be tricky if you don’t have the right tools or know-how.
If you're a Mac user looking to delete pages from PDF Mac or wondering how to remove page from PDF Mac efficiently and securely, you’re in the right place. This guide offers step-by-step instructions, tool comparisons, best practices, and workflow tips tailored specifically for professionals.
Why Delete Pages from a PDF on Mac?
There are many reasons professionals may need to delete pages from a PDF document:
Trim unnecessary content before sending a report
Remove sensitive or confidential pages before sharing
Reformat a presentation or pitch deck
Update documents without starting from scratch
Reduce file size for email or online upload
Instead of recreating the entire file, knowing how to delete pages from PDF Mac gives you full control and helps streamline your workflow.
Native macOS Tools to Delete Pages from a PDF
One of the major advantages of using a Mac is the powerful built-in features. macOS offers simple yet effective methods for removing PDF pages without third-party software.
1. Use Preview App (Built-in macOS App)
Preview is the default PDF viewer on Mac and comes pre-installed on all macOS devices. It offers a surprisingly robust set of editing tools, including the ability to remove PDF pages.
Steps to Remove Page from PDF Mac Using Preview:
Open your PDF in Preview (double-click the file or right-click → Open With → Preview).
Click View > Thumbnails (or press ⌘ + Option + 2) to show all pages.
In the thumbnail sidebar, select the page(s) you want to delete. Use Command + click for multiple selections.
Press the Delete key or right-click and choose Delete.
Save the document (File > Save) or File > Export as PDF to create a new version.
✅ Pro Tip: Always save a copy before editing, especially with contracts or legal documents.
2. Use the Print Dialog Hack
For quick page removal without editing the original file:
Open your PDF in Preview.
Go to File > Print (⌘ + P).
In the print dialog, click PDF > Save as PDF (bottom left).
In the Pages section, specify only the pages you want to keep (e.g., 1–3, 5–8).
Save the new PDF.
This method doesn’t overwrite your original file and is useful for quick, temporary edits.
Professional Tools to Delete Pages from PDF on Mac
If your workflow requires more complex PDF handling—batch editing, redaction, encryption, or form filling—you may want to invest in third-party professional PDF editors.
1. Adobe Acrobat Pro DC
Adobe's suite is the industry standard for PDF editing, with robust features for professionals.
How to Remove Pages:
Open the PDF in Adobe Acrobat.
Go to Organize Pages.
Select the page(s) to delete and click the trash icon.
Save the document.
✅ Features:
Batch editing
OCR (text recognition)
Digital signature integration
Cloud sync with Adobe Document Cloud
🧾 Suitable for: Legal professionals, administrative staff, enterprise users.
2. PDF Expert by Readdle
A powerful and elegant PDF editor optimized for macOS.
How to Delete Pages:
Open PDF in PDF Expert.
Click on Thumbnails.
Select and delete desired pages.
Save or export.
✅ Features:
Smooth Apple Pencil support (iPad version)
Split view and tabbed browsing
Annotations, editing, and secure sharing
🧾 Suitable for: Consultants, creative professionals, educators.
3. PDFpen / Nitro PDF Pro (Mac Version)
This tool offers robust page manipulation and redaction features.
Steps:
Open the document.
Click Edit > Delete Page or use the page organizer panel.
Save the changes.
✅ Highlights:
Redaction tools for sensitive data
Cross-platform integration
Affordable licensing for businesses
🧾 Suitable for: Healthcare, finance, and compliance-heavy industries.
Online Tools to Delete PDF Pages on Mac
If you don’t want to install software, cloud-based tools offer convenience—but with some caveats regarding data security.
Recommended Tools:
Smallpdf
ILovePDF
PDFescape
Common Workflow:
Visit the tool’s website.
Upload your PDF.
Use the visual interface to select and delete pages.
Download the modified PDF.
⚠️ Caution: Avoid uploading sensitive or confidential documents to unverified online tools unless they offer encryption and comply with data privacy regulations (like GDPR or HIPAA).
Batch Deletion or Automated Page Removal
For professionals managing hundreds of PDFs (e.g., in publishing or legal review), automation is essential.
Use Automator (macOS Tool):
Automator lets you create custom workflows to batch delete specific pages.
Launch Automator > New Workflow.
Use PDF > Split PDF actions.
Combine desired pages after removal.
This method is technical but powerful for IT departments or professionals comfortable with scripting.
Best Practices for Managing PDF Pages on Mac
To maintain document integrity and save time, follow these best practices:
✅ Always Work on a Copy
Editing PDFs is not always reversible. Preserve the original version for legal or archival purposes.
✅ Use Consistent Naming Conventions
When exporting a new file (after deleting pages), use meaningful names like Proposal_v2_trimmed.pdf.
✅ Secure Sensitive Documents
If your PDF contains financial or client data, use password protection or digital signatures before sharing.
✅ Automate Frequent Tasks
If you frequently need to delete the same pages (e.g., cover sheets or disclaimers), automate with Automator or Apple Shortcuts.
Use Cases for Page Deletion in Professional Settings
Deleting or removing pages from PDFs is a common task across many industries:
Legal: Removing redundant clauses or client information.
Finance: Trimming down reports before presentations.
Marketing: Sending customized decks to clients.
Education: Sharing relevant chapters or removing answer keys.
Healthcare: Removing patient information for anonymized case studies.
Conclusion
Knowing how to delete pages from PDF Mac gives professionals an edge in document management. Whether you're using native apps like Preview or industry-grade tools like Adobe Acrobat, the ability to remove page from PDF Mac quickly and securely is essential in any modern workflow.
With macOS’s built-in features and a rich ecosystem of PDF editors, you have multiple ways to accomplish the task—whether you’re handling simple annotations or editing complex legal documents. By integrating these methods into your day-to-day routine, you’ll save time, ensure accuracy, and boost overall productivity.
0 notes
Video
youtube
Browser Games Cartoon Network Universe FusionFall Bloo en Papercraft
Browser Games - Cartoon Network Universe FusionFall - Bloo en Papercraft ¡Una nueva incorporación al blog que encantará a los nostálgicos de los videojuegos en línea y los fans de Cartoon Network! Hoy presentamos el modelo papercraft de Bloo, uno de los personajes más queridos de la serie Foster's Home for Imaginary Friends, en su versión del videojuego FusionFall. Este papercraft mide aproximadamente 20 cm de alto y está compuesto por 59 partes, numeradas para facilitar el montaje. Se incluyen tanto los archivos PDO como un PDF numerado, lo que lo hace accesible tanto para quienes usan Pepakura como para quienes prefieren trabajar con guías impresas. ¿Quién es Bloo? Bloo (cuyo nombre completo es Blooregard Q. Kazoo) es un personaje travieso, creativo y entrañable, el mejor amigo imaginario de Mac en la serie de animación. Su personalidad descarada y su diseño sencillo pero carismático lo convirtieron en uno de los favoritos del público. ¿Qué es FusionFall? FusionFall fue un MMORPG lanzado por Cartoon Network en 2009. En él, los jugadores podían explorar un mundo abierto repleto de personajes icónicos del canal, como Ben 10, Dexter, Samurai Jack y, por supuesto, Bloo. Con una estética de aventura y ciencia ficción, el juego unía todos estos universos para luchar contra una amenaza común: el malvado Lord Fuse. Aunque el juego cerró oficialmente en 2013, dejó un legado de nostalgia y una comunidad activa de fans. Este modelo papercraft es un homenaje tanto al personaje como al juego, ideal para dioramas, decoración o simplemente para los que quieren revivir una parte especial de su infancia. 📄 Incluye: Archivos PDO y PDF con partes numeradas ✂️ Piezas: 59 📏 Altura final: 20 cm aprox. 🧠 Dificultad: Media 🎮 Juego de origen: Cartoon Network Universe: FusionFall ¡Perfecto para imprimir, montar y añadir a tu colección de figuras recortables! Here’s a brand-new addition to the blog that will delight fans of online browser games and Cartoon Network classics! Today we’re featuring a papercraft model of Bloo, the beloved character from Foster’s Home for Imaginary Friends, as he appears in the game FusionFall. This model stands approximately 20 cm tall and consists of 59 numbered parts, making it easy to assemble. Both PDO and numbered PDF files are included, so it’s great whether you prefer working with Pepakura Designer or printed instructions. Enlace: https://tiendajossorio.blogspot.com/2025/04/browser-games-cartoon-network-universe.html Video: https://youtu.be/c8U4-LvAdCs
0 notes
Photo

Konica Minolta Bizhub 4750 Multifunction Printer In today’s networked workflow, getting the job done demands speed, simplicity, and strategies to contain costs. The bizhub 4750 and 4050 are ideal solutions – fast, compact, and ready for multi-function productivity in general business as well as specialized legal, educational, government and healthcare environments. The advanced Emperon® print system is built in, with PCL and PostScript emulation – even direct printing of OOXML files in Word, Excel, and PowerPoint. PageScope® functions let you track accounts and manage costs. And touch-screen control is as easy as operating a familiar tablet. Want more power in less space? Count on the bizhub 4750/4050. Specifications: Scan File Format TIFF, PDF, JPEG, XPS Discontinued No Product Type Multifunction Printer Printer Type Laser Multifunction Printer Condition New Paper Size A4 Colour Black & White Interface Connection USB Interface Connection LAN Print Resolution 1 200 x 1 200 dpi Scan Speed Up to 45 ipm Print Speed (CPM) Up to 47 ppm Functions Print/Copy/Scan/Fax - Optional Control Panel 7" Colour Touch Screen Mobile Printing No Standard Memory 2GB RAM Hard Disk 320GB Duplex Printing Yes Paper Capacity - Standard 650 Sheets Paper Capacity - Maximum 2 300 Sheets Bypass Tray Capacity of 100 Sheets Paper Sources - Standard 1x 550 Sheet Paper Cassette Additional Paper Trays Optional Document Feeder 50 Sheets Copy Speed Up to 47 ppm Scan Resolution Up to 600 dpi Scan Destinations E-mail, SMB, FTP, USB, Box, USB, WebDAV, DPWS, TWAIN Fax Optional Operating Systems Supported Windows, MAC, Linux Printer Languages PCL5e/c, PCL XL, PostScript 3 (3016), XPS, OpenXPS, PDF 1.7 Paper Weight Supported Cassettes - 60 to 120 gsm. Bypass - 60 to 163 gsm. Dimensions 561 mm (h) x 489 mm (w) x 482 mm (d) Weight Approximately 24kg Environmental Compliance ENERGY STAR Certified
0 notes
Text
Adobe Acrobat Reader DC 2025 Crack With Key Download [Win/MAC]
Adobe Acrobat Reader (often referred to as Adobe Reader) is a free, widely-used software application for viewing, printing, and annotating Portable Document Format (PDF) files. It is one of the most popular PDF readers and is available for both Windows and macOS, as well as mobile platforms like iOS and Android. Adobe Acrobat Reader is developed by Adobe Systems and is part of the Adobe Acrobat family of products, which also includes Adobe Acrobat Pro and Adobe Acrobat Standard.
Download Now
0 notes