#QuickRig
Explore tagged Tumblr posts
Visit Tumblr Blog
Explore Tumblr blogs with no restrictions, modern design and the best experience.
Last Seen Tumblr Blogs


Fun Fact
Premium Tumblr themes are available from anywhere between $9 to $49.
Text
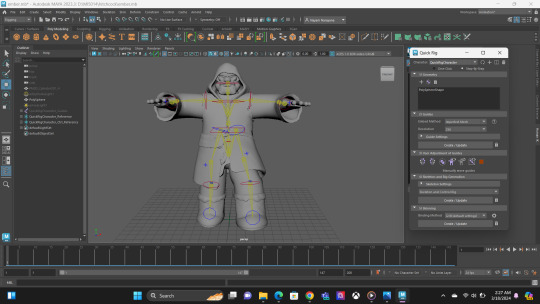
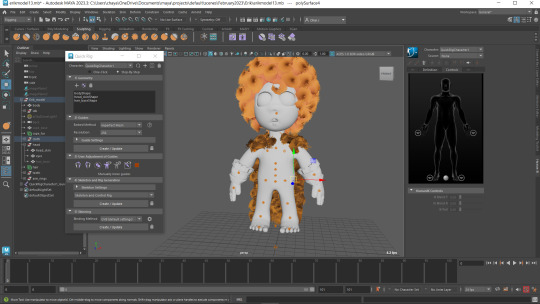
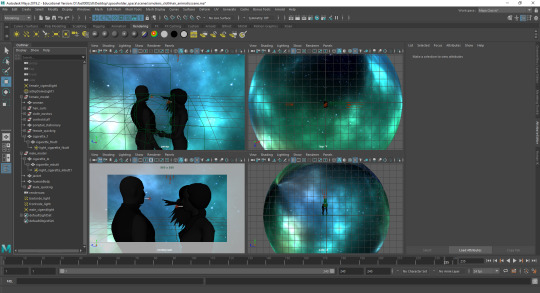
Run Animation 2: Rig problem
As I tried to animate the character, I realized since the character is imported from unreal engine market along with the animation, it only came with the skeleton mesh. No control rig was present.
I exported the skeleton mesh in MAYA but, I was unable to create a quick control rig as it could not find the bones maya required for the control rig and wanted to create its own bones.
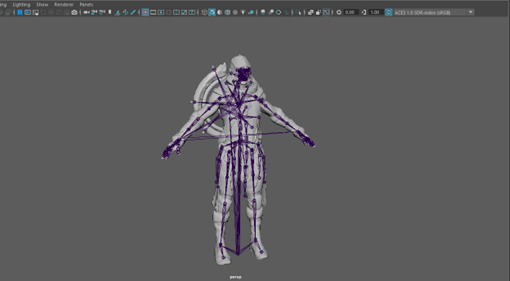
This is the original skeleton mesh that came with the model. After using Maya's Quick Rig tool, I got a new skeleton that Maya created but its only limited to maya.
As you can see, the circled part is the discarded skeleton of the character. I also used Advanced skeleton to generate the control rig. However, it also discards and creates a new rig before applying control rig on the character.
I tried importing it in Unreal Engine, but the control rig is not there as well.
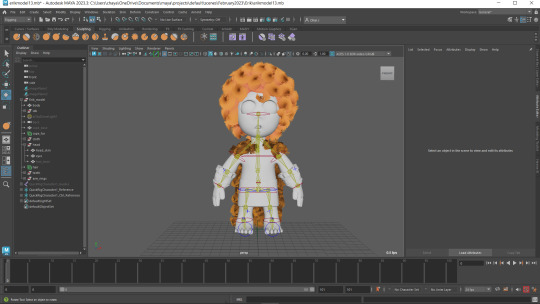
I have been in contact with Malcom, our rigging teacher, for the past few days to fix the issue. While waiting for his reply, I tried to create a control rig on the character myself. The video was super helpful, and I was able to create a complete control rig of the character. However, the only issue was there were no IKs or FKs which will make my future work very difficult.
youtube

References:
Advancedskeleton. (2024). - General overview of AdvancedSkeleton. [online] Available at: https://youtu.be/mTB9Yh_sWKc
JC (2022). Unreal Engine 5 (&4): Build a Control Rig from scratch. #UE5 #UnrealEngine #ControlRig. YouTube. Available at: https://www.youtube.com/watch?v=VXlBqRqFwc4
0 notes
Text
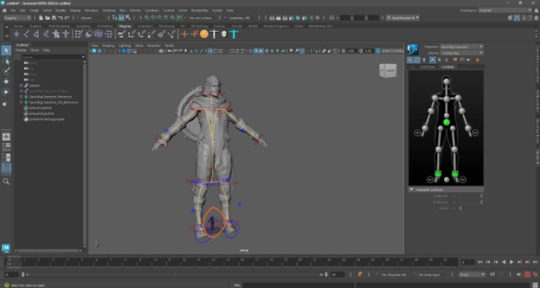
Attempting to Rig the Characters - Using Quick Rig
To rig the characters I used the auto rig option in Maya called QuickRig. It did not turn out well, as it distorted the character when I try to move the controls.
For example, with the Homeowner 's character, when I tried to move the arm down from the shoulder joint, it drags part of the head down with it. When I checked the with weight painting to see if there's an influence on the head from the shoulder joint, it did not show an influence.

After using QuickRig on the lodger, I realized the joints had been placed incorrectly creating an odd looking skeleton. I tried moving the arms and legs and it warped and distorted the character, which could probably be fixed with weight painting. But I decided to leave these as it is for now and try other methods of rigging like using Human IK handle or manually rigging as I felt like those methods would help me to achieve a more accurate rigged character.
3 notes
·
View notes
Text
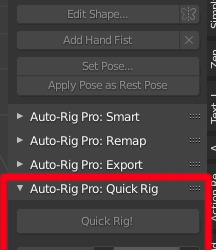
VroidモデルをBlenderでAutoRig仕様にするQuickRigの話
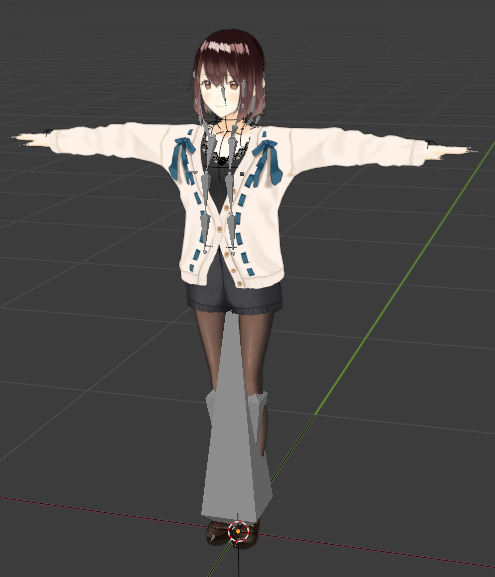
上記Vroidモデルをボタン2つでAutoRig仕様にしちゃうQuickRigの紹介です。
*AutoRigProがインストールされていないと使えません。
DLはこちらから(10ドルです)
https://blendermarket.com/products/auto-rig-pro-quick-rig
アドオンをインストールしたら↑のようにAutoRigProの中にQuickRigタブが作成されます。
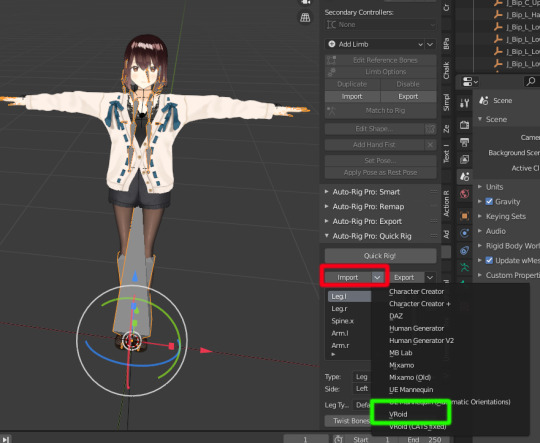
Importの隣の↓を押して(赤)Vroidプリセット(緑)を選択します。

そのままOKを押します。

QuickRig!ボタンを押します。
もしBlenderでレンダリングするのであればPreserve VolumeをOnにします。
最終的にUnityやUE4にエクスポートするのであればOffにしておきます。
それ以外ケースバイケースでチェックを入れたらOKボタンを押します。

出来上がり!
他MixamoやUEのマネキンも対応しているようです!
3 notes
·
View notes
Photo

Sequins. Everywhere. #elsa #icedress #transformationdress #quickchange #costumerigging #quickrig #sequins #letitgo #orlandodesigner #orlandocostumedesigner (at Orlando, Florida) https://www.instagram.com/p/BoANke5ArSf/?utm_source=ig_tumblr_share&igshid=1ruzawklc2o90
#elsa#icedress#transformationdress#quickchange#costumerigging#quickrig#sequins#letitgo#orlandodesigner#orlandocostumedesigner
1 note
·
View note
Video
instagram
It's a dance or he in danger? Lol just a silly bad animation made with Maya's quickrig to test the body retopology! Lol #maya #animation #test #wip #quickrig #fun #3d #3dcharacter #3danimation #silly #bad #lol #sushi https://www.instagram.com/p/B04aKPPjCYd/?igshid=1swo4z3qcu1xx
0 notes
Photo

😈✡🔥🔥🔥🔥🔥🔥✡😈 #kiorgioti #kyorgyoti #philly #philadelphia #producer #engineer #cookcook #beats #sound #sonic #vibes #quickRIG #PHILLYvsEXISTANCE https://www.instagram.com/p/BnmTnJEgsFz/?utm_source=ig_tumblr_share&igshid=1qhgt3zhrsber
#kiorgioti#kyorgyoti#philly#philadelphia#producer#engineer#cookcook#beats#sound#sonic#vibes#quickrig#phillyvsexistance
0 notes
Photo

#Finished #SynthiaAI #DR0N3L0RD #3PhoneRig #MakeShift #MakeShiftRig #QuickRig
0 notes
Text
Rigging | Erik
Using QuickRig on Maya, I rigged the character
Then I manually rigged the cape on his back as it will probably be moving in the animation.
0 notes
Photo


Fig 113 - Autorig Mickey. Fig 114 - Autorig Mickey
16/03/2021
RP4222 - Post 39
Today focused on rigging a Mickey Mouse, (Disney,1928), model previously created in Maya. The initial rig created was a quickrig, autorig, following the processes documented for the robot model following a series of Udemy tutorials also previously mentioned and referenced. The rig was fully functional, allowing the model to move for animation purposes. However, some draw backs did appear. Joints were slightly misplaced around the model and also orientation of the joints were not facing in the correct direction, meaning the models limbs would not be moving naturally as expected.
0 notes
Photo


I thought that I could use a cloth effect like how this tutorial makes a flag, https://youtu.be/4hUjXXTgsF8 to achieve the rough flowing hair from another one of Veronika’s panels without using XGen since that way it could definitely be cached and would turn up in Arnold. This was really just meant to be a cloth test but then became another 3D Animatic scene.
I also found a 15-page paper (pdf) AutoDesk wrote about the Nucleus tool/option so I read through that and learnt more about how the constraints and nucleus manipulations work. There was additionally a 56 page paper by them about nCloth advanced techniques, so I read through that as well. I will come back to both of these and reread them to really make sure I understand the content. They were super helpful in providing tips about how to go about this though. It was quite finicky getting the right combination of wind simulation to get the desired effect but I’m happy with what I ended up with.
https://knowledge.autodesk.com/support/maya/learn-explore/caas/CloudHelp/cloudhelp/2018/ENU/Maya-SimulationEffects/files/GUID-FDE27519-2902-4914-9AA0-A5197F1E2EFE-htm.html
https://knowledge.autodesk.com/support/maya/learn-explore/caas/CloudHelp/cloudhelp/2020/ENU/Maya-SimulationEffects/files/GUID-F8756882-15F5-45E1-BDD4-FD9436324E0B-htm.html
https://knowledge.autodesk.com/support/maya/learn-explore/caas/CloudHelp/cloudhelp/2018/ENU/Maya-SimulationEffects/files/GUID-0E2587C8-A442-4774-9992-BABBA841708A-htm.html
https://knowledge.autodesk.com/support/maya/learn-explore/caas/CloudHelp/cloudhelp/2018/ENU/Maya-CharEffEnvBuild/files/GUID-C890A6D6-1E65-4A80-A4F6-73E1C1D02169-htm.html#GUID-C890A6D6-1E65-4A80-A4F6-73E1C1D02169
Both the models came from the Maya Content Browser, I simply dragged them into the scene and positioned them. I made shapes and then drastically manipulated them to make the hair shape and tails to flow. Once the hair was flowing with the double layers I then Quick Rigged both the female and male model. https://youtu.be/c538zkwxgTQ. I tried to add fingers as in https://youtu.be/DkeTifkDHiQ & https://youtu.be/1OGOOhVbaNs so that I could have their hands in the same smoking position/orientation as the original panel but the finger joints wouldn’t connect to the hand. Rachel tried to help me with the Quick Rig as it’s not quite right, (leading to deforming elbows and wrists) and this included doing a proper rig setup but after a lot of frustration and getting nowhere I simply reverted the QuickRig and started again.
Once I was happy with their arm movements I was able to cache everything and take it into the new scene. I made my own camera to fake the side view while maintaining camera movement freedom and as to not expose the missing chunks of hair you’re not supposed to see. I also had to reanimate where the cigarettes were sitting as constraining them to the hands was more of a pain by the time I’d gone through making corrections.
I used the clothing tutorial Rachel provided to make the jacket on him but didn’t turn it into a cloth as it starts blowing away even with the geo turned into a collider so it’s just placed over him. The arms clipped through the sleeves as well so I didn’t include them in the model. It was mostly just to give him a collar though and that was what I focused on getting right.
https://youtu.be/P173n_9U8cU

I once again used my background to be the proxy for the scene as we don’t have the official one. The characters in the final are supposed to have the beautiful edge lighting and be made out of smoke. This will likely require 2D paint/drawovers (especially to make the hair wisps look nice) as with the flares for the cigarette lights that I couldn’t get working in 3D. Doing this included very primitive 3D animation which I haven’t done since the end of First Year. It was still very clear to me that I don’t really want to be doing the inbetweens for the project and it’s not my strong suit. It was only a short scene though so I didn’t mind trying to figure it out and it gave us another Animatic scene which was a bonus. It needs fixing for the end of Term 1 3D Animatic so I’ll be coming back to it to make the needed adjustments and then in the holidays I’ll try and get the overlaid VFX really looking like that original panel.
vimeo
0 notes
Text
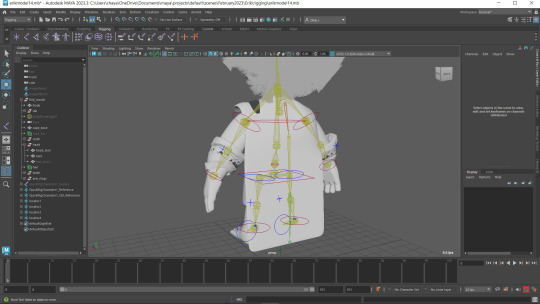
Re-attempting rigging the Homeowner - Manual Rigging
As I was not quite satisfied with the outcome of the QuickRig option in Maya, I decided to go ahead and attempt manual rigging with the help of a 4-part series of a youtube tutorial. This felt like a tedious process at first, but I followed through each video and got the final rigged result of my character.
After rigging was completed I tried moving the controls to see how the rig works. When I moved certain controls of the rig, some body parts of the character got warped or distorted. So I will be weight painting the character next to see if I can solve this issue.
1 note
·
View note
Text
How Your Costume Shop Works, Edition 4.
From @heartseeswhateyescannot:
Have you ever worked as a Wardrobe Supervisor? If so could you explain how quick changes are managed? I am a SM and is very interested in the process at any size.
I HAVE worked as a Wardrobe Sup- at the school I work at, each of us in the shop takes turns supervising the student crews that run the shows we put up.
Usually, we start out early on in the process in the costume shop by trying to figure out where quickchanges are likely to be in any given show. Often, this is working with the director and/or the designer, and there are usually at least a few weeks where we bring up needing to know about them in the production meeting. Ideally, we’d know what/where a quickchange was and about how long we should have to do it before we even start building garments, so if we have to do a special breakaway rig of some sort, we can figure out how to hide it. (This is also true for any clothing that changes onstage-we got sort of blindsided on Curtains last year because one of the leads had to take her own dress off, and we suddenly had to swap the closures from the front to the back to accommodate her)
By the time we get to tech, usually the SMs have given us an entrances/exits chart, or at least a good idea of where the Really Fast Turnarounds are, and we can start setting up the actual changes.
Usually, I start out by just seeing if we can do the change normally with the wardrober helping, and if that takes too long, I’ll move on to choreographing and throwing extra bodies at the problem. I generally tell the actors that the more they can have OFF by the time they get to us, the more helpful it’s going to be, so if they can have their shirt off or at least open, or their shirt off and their pants undone, we can be ready to swap stuff as soon as we see them. If we get to needing choreography, it’s usually as simple as “pants first, then shirt from behind, step into your shoes, do your snaps/buttons/velcro, take the hat off the head of the person tying your shoes, go onstage.” Really the choreography is to make sure that everyone knows exactly what order stuff happens in, and what’s coming next, so there’s not a whole mess of fumbling (which adds time)
There are also a whole lot of tricks in rigging clothes for quickchanges- depending on if a shirt has to go off or on quickly, we might replace the buttons with velcro(on) or snaps(off) and put elastic in the cuffs. There are a lot of times where you sew a top and a bottom together and put a Gianty Big Zipper down the back to get things off of people quickly, or when you sew a vest to a shirt so that you can put it on all as one unit. Sometimes we also have people underdress things- if you have to go from a big poofy dress into a pencil skirt, we’ll have the pencil skirt on under the big poofy dress, so we can just yank the big poofy dress off and you’ll be ready to go. (there are literally a million different rigging tricks for stuff, so if anyone needs like, Specific Quickrig Ideas, feel free to hit me up)
#Teka Answers Questions#costumer support department#dowager costumer of techblr#dowager costumer of tumblr
69 notes
·
View notes
Video
youtube
If you’ve already exported your character from MakeHuman to Maya & you don’t have the MakeHuman file (*.mhm file type), to pose your character you’ll need to add a rig in Maya 2018.
Import your character *.OBJ file into Maya 2018 and follow the tutorial above to get a QuickRig onto your character.
You’ll need to Export from Maya 2018 to Maya 2017, since the default Maya file types won’t work (*.mb or *.ma). So in Maya 2018, go to File->Export and export an FBX file.
Then open Maya 2017 and File->Import that file you just created, it should have a working rig that you can use to pose your character.
0 notes
Text
April 20th
There were a lot of weird issues I started to experience with HumanIK and character definition. I also had issues with the extra joints I added onto the QuickRig skeleton. Errors kept showing up and the automatic rig wasn’t properly generating. I tried to fix some problem areas on the skin too, but I honestly shouldn’t have messed with the Geodesic Voxel skin because it honestly did the best that it could with the model I’m working with. After awhile I was finally able to get the control rig to generate properly with HumanIK, but overall I wasn’t satisfied enough with the results. I had to go, but tomorrow I will definitely be working on a manual rig for the model.
0 notes
Photo

#Finished #SynthiaAI #DR0N3L0RD #3PhoneRig #MakeShift #MakeShiftRig #QuickRig
0 notes
Video
instagram
#SynthiaAI #DR0N3L0RD #3PhoneRig #MakeShift #MakeShiftRig #QuickRig
0 notes