#R programming free tutorials
Explore tagged Tumblr posts
Visit Tumblr Blog
Explore Tumblr blogs with no restrictions, modern design and the best experience.
Last Seen Tumblr Blogs


Fun Fact
Tumblr has 16.74 million mobile monthly users in the US.
Text
A quick-ish guide to the culture of The Sims 2 modding community.
Are you new to The Sims 2 community? Are you coming from more modern games, either in The Sims franchise itself or other contemporary games? Are you excited to start your #brand and become a #simfluencer and post your #earlyaccesscontent to support your #sidehustle?
Have a seat, then! Let's chat.
Hello, friend! My name's Pooklet. I've been playing since 2004 and creating since 2007. I'm by no means an expert in most forms of content creation itself, but I've been around since the heyday of The Sims 2, I've watched how community opinions have shifted (or not) since practically the beginning, and I'm hoping to give you a basic outline of the community culture that you can expect to encounter as a newcomer.
A very brief history of Sims 2 content monetization:
People have been trying to monetize content since there has been content to monetize, all the way back in the days of The Sims 1. We tend to call them "pay creators" and their websites "paysites." Some big names in this arena include The Sims Resource (their free-with-ads model is a relatively recent development, which is why you will find people to this day calling them T$R), PeggySims, Newsea, and many others that you can find on this handy website:
Paysites Must Be Destroyed
Now, if you have a glance at that website, you might be saying to yourself:
"But, that's illegal! I own the copyright to my custom content!"
Alas, no! Due to the wording of the End User License Agreement for The Sims 2, no custom content creator owns their creations for this game (or The Sims 1, or 3, or 4, for that matter, but we're talking about 2 right now). It all belongs to EA at the end of the day, and by installing and playing the game, you have agreed to these terms. Which means you have no individual, protected copyright, and it is perfectly legal for someone to download your paywalled content and then reupload it for free for others to enjoy. And they will!
Furthermore,
You are not making anything alone.
Everything from modding resources, to tutorials, to the mods required to fix disastrous glitches in the game code and make it playable at all, to the third party programs used to make any and all custom content, such as SimPE—all of these have been provided to you for free by other creators, many of whom have a usage policy that asks that people not use their freely-provided tools to make a profit. Although no one can be forced to follow a creator's policy, it is generally considered good manners to not try to make a profit off of someone else's free work. And if you are using these tools to make paywalled content, that's exactly what you're doing.
Pay creators have been ignoring these policies since the beginning of time, and so free creators likewise ignore their policies against sharing their paywalled content. Pay creators have also tried lots of different ways to keep their content exclusive, everything from trying to track leaks with slightly altered files to actively filling their content with malicious code. It has never worked.
Free creators have always found a way around these barriers. In fact, it's taken as something of a challenge to undermine monetization efforts. As you can see from Paysites Must Be Destroyed, there are entire teams of players devoted to reuploading paywalled content for free.
A culture of sharing.
The Sims 2 is something of a time capsule. At 20 years old, it predates a lot of the hyper-capitalist hustle culture that has infested every creative hobby. It is from a time when monetization was an outlier rather than the norm, and a much maligned outlier at that. This attitude has persisted for 20 years. Believe me when I say, you won't be the combo breaker. Especially now, given that The Sims 2 is not the most contemporary in the series and the community has shrunk considerably, down to the people who have either been here for a very long time, or newcomers that understand the community culture.
Also, it's just kind of not a great idea in general to try to make money off of a 20-year-old game with a pretty small community?
Like, I get that The Sims 4 is really saturated with pay creators and it's hard to get a foot in the door. I get that you might look at The Sims 2 and think that the small pond will give you room to be a big fish. It won't. You might get a handful of people willing to pay for your content, but at least one of those people will be resharing it for free.
Paywalls vs. optional donations.
Okay, so hopefully you now understand why people don't like it when you put content behind a paywall. But what about those Ko-fi and Paypal donation links you sometimes see at the bottom of people's downloads? Why is that okay, but a locked Patreon tier isn't? Well, because they're voluntary. No one is obligated to pay for that content to be able to download and use it. It's just a way for someone who does have a little extra cash to basically "tip" a creator whose content they like. You have no way of knowing whether the person who posts those links is actually receiving any donations. And that's kind of the point. Whether or not they receive any donations, they are still sharing their content, because they enjoy the hobby of making and sharing content.
"I can't make a living off of that!"
No, you can't. Because that's not what we do here. That is not part of our community culture for all the above reasons. If you want to make a reliable income off of your hobby, you're going to need to get a different hobby. Try Second Life! That is a community that actively encourages monetization. The Sims 4 allows for "early access" monetization. There's options out there for you, if what you want is to make a profit off of your creations for a game.
"Fine, what about monetized link forwarding services?"
Link forwarding services historically have malicious trackers or viruses embedded. People will also strip those and provide direct links to each other. Or they just won't download your content.
"What if I want to make YouTube videos of someone else's written tutorials and I enable ad revenue on them?"
Personally, I still think that's a dick move. I love video tutorials, I'm a very visual learner myself, and although you might feel entitled to compensation for reciting the steps of someone else's tutorial into a microphone and then editing and uploading the video, you're still monetizing someone else's freely-provided content. I would consider this an 'ask permission' scenario, one in which you tell the person, explicitly, that you will be making ad revenue off their work. If they're fine with that, then you're good! (For the record, I'm not fine with that.)
edit: more of of my thoughts on monetized youtube videos over here.
"What if—"
Look, no one can stop you from trying to monetize your content, or worse, someone else's content. But you will have the exact same arc as every pay creator who came before you: your efforts will be undermined at every turn, your reception in the greater community will be chilly at best, and it will become a battle between you and the folks resharing free reuploads of your content until any fun you initially had making content is gone.
"The steady erosion of every known social safety net beneath the crippling weight of end-stage, line-goes-up capitalism and the yawning abyss of poverty over which I am dangling has imbued me with such anxiety that I cannot engage with a hobby that precludes monetization. I am exhausted. I know no other way."
I get it, friend! I have lived in poverty all my life. I do not begrudge the impulse to find a way to make passive income off of your every waking moment. Increasingly, it seems like that is the only way to survive! Unfortunately, you will not be able to do that with this specific community. We know that we have something special here, having resisted monetization's encroach for so long, which makes us fight all the more viciously to maintain it. You are entitled to try to find ways to supplement your income, just not here. Personally, I consider that a feature, not a bug.
Bonus Round: Remember, That's Not Just Yours!
I said it earlier, but I want to reiterate: you are not making any TS2 CC alone. You are making it with tools, resources, knowledge and code that people have provided on the condition that they not be used for pay content.
To use myself as an example, "my" hair textures are a blend of resources provided by other creators. Namely, Nouk's original hair texture was edited by Vintage D, which I then further edited over the years, using parts by the creators Ephemera and Helga. It would be extremely shit of me to say "well, I think that the time that I put into my edit is worth money, so I'm charging for it" when the edits that I made would not exist without the work of those people. And it continues on down the line with edits that other people have made of my texture blends and color actions, and the content they make with them.
(If you see someone charging for these, btw, lemme know. I'd love to have a talk with them.)
In closing,
The knowledge base, the resources, the coding required to make any and all working content for The Sims 2 has been compiled for 20 years. Please understand, I'm not trying to denigrate anyone's creativity when I say: you cannot bring anything wholly "new" to TS2 CC-making, something that uses no one else's resources or programs, something you can point to and say "no one helped me with that. I did it all on my own. It is my property." Nor should you aspire to! The fun of The Sims 2 community is to share and share alike, to credit each other for our contributions, to hype each other up and iterate on shared works and resources. We've been doing it for 20 years, and hopefully we'll be doing it for many more! Wanting to be a #simfluencer is utterly antithetical to the community culture. No one is influencing anyone else. You need to leave that shit at the door if you want to be invited in.
TL;DR:
Don't show up to the commie circle-jerk trying to charge for handjobs. We're already giving them to each other for free, and nothing about your wrist technique is special enough to justify the cost.
#sims 2#the sims 2#ts2#long post#like yes this post did come from a place of frustration but i do hope it is genuinely helpful to folks who are new to ts2#and maybe don't quite understand how we operate as a community.
447 notes
·
View notes
Text
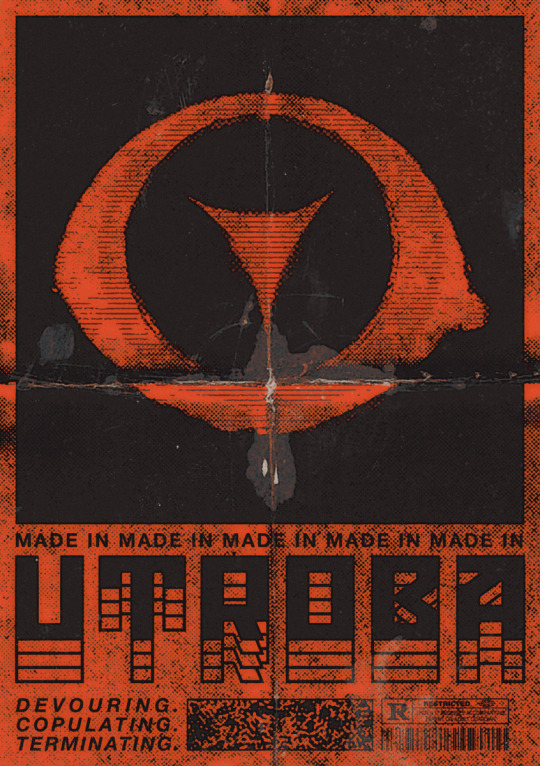
[BOOTING SYSTEM…] [INCOMING TRANSMISSION DETECTED] [SOURCEː MÆTERS 🔻 / STATUSː ENCRYPTED] >>> IDENTIFIEDː Illustrators and co-creators of UTROBA — a dark world of entropy, monstrous beauty, and human fragility. >>> INITIALIZING COREː ART / CHARACTERS / DESIGN >>> TRANSMITTING CONCEPTSː Biopunk / Horror-body resonance / Decay aesthetics. [SIGNAL WARNING — DATA CORRUPTION] >>> Fragments scatteredː "Mon.sters-LoV>R?ed..dreams_r-f.e.a.r." >>> Decrypting lost essenceː Love... Monsters. Horror. Red. Untold stories. [SYSTEM STABILIZING] >>> Awaiting connection... >>> END OF TRANSMISSION. /// morE oF uSː linktr.ee/maeters
?.. ?.. ?..
F.A.Q
— You both run this account? How do you split the work? How do you draw together? Exactly. Just imagine a small art studio of two people drawing in the same style and working on the same work. Share tasks, collaborate on steps like sketching for example, but also create individual pieces. Sometimes it feels like we share one brain... One big elder brain.
— What brushes you use? Where can I find more about your work process? What program do you use for drawing? Brushes, materials about our drawing process, tutorials and other similar content are available on our [Patreon]. We also regularly upload step by step materials and PSD-files. We’re drawing in both SAI and Photoshop.
— Do you do commissions? Can I get one? Yes, we draw commissions, but currently they are closed. We'll drop a post about the slots as soon as we free up time for new work. You can find all the details about working with us in the links.
[ERROR]: ████ ██ █████

295 notes
·
View notes
Note
Heyyy. . :3
Idk if you are fine with questions but I'd like to ask where you get these gifs from.. And how u color them..

Your post with these banners
haiii!!!!!!!! these r the overlays below :3 i get most of these from pinterest,, i recommend searching up keywords like "gif overlays for editing" but im pretty sure u can find these also on tenor
and the coloring tutorial is under the cut !!!!!!!! (it is again, long)


how do i color my overlays?
... is what ill be teaching u today! follow my steps
step zero : make the color first !!!
this will be used to color the overlays, your free to make it look like anything, throw in some gradients or some dots!!!


first, ill show you how to color the heart tunnel! ill be doing this on capcut, but this can probably work on most programs! follow my steps!
step one : add the images
make sure to first add the background and then add the overlay!!!


step two : color it
to do this first click on the overlay, scroll till you find "blend" and then click "dodge"

then save! this will be the end result, tada!

wasnt that hard, was it? now lets do the other overlay! ill be doing this again on capcut but this can work on most programs!
lets keep going!
step one : add the images
this time, add the overlay first and then the color! scroll til you find "overlay" -> "add overlay"
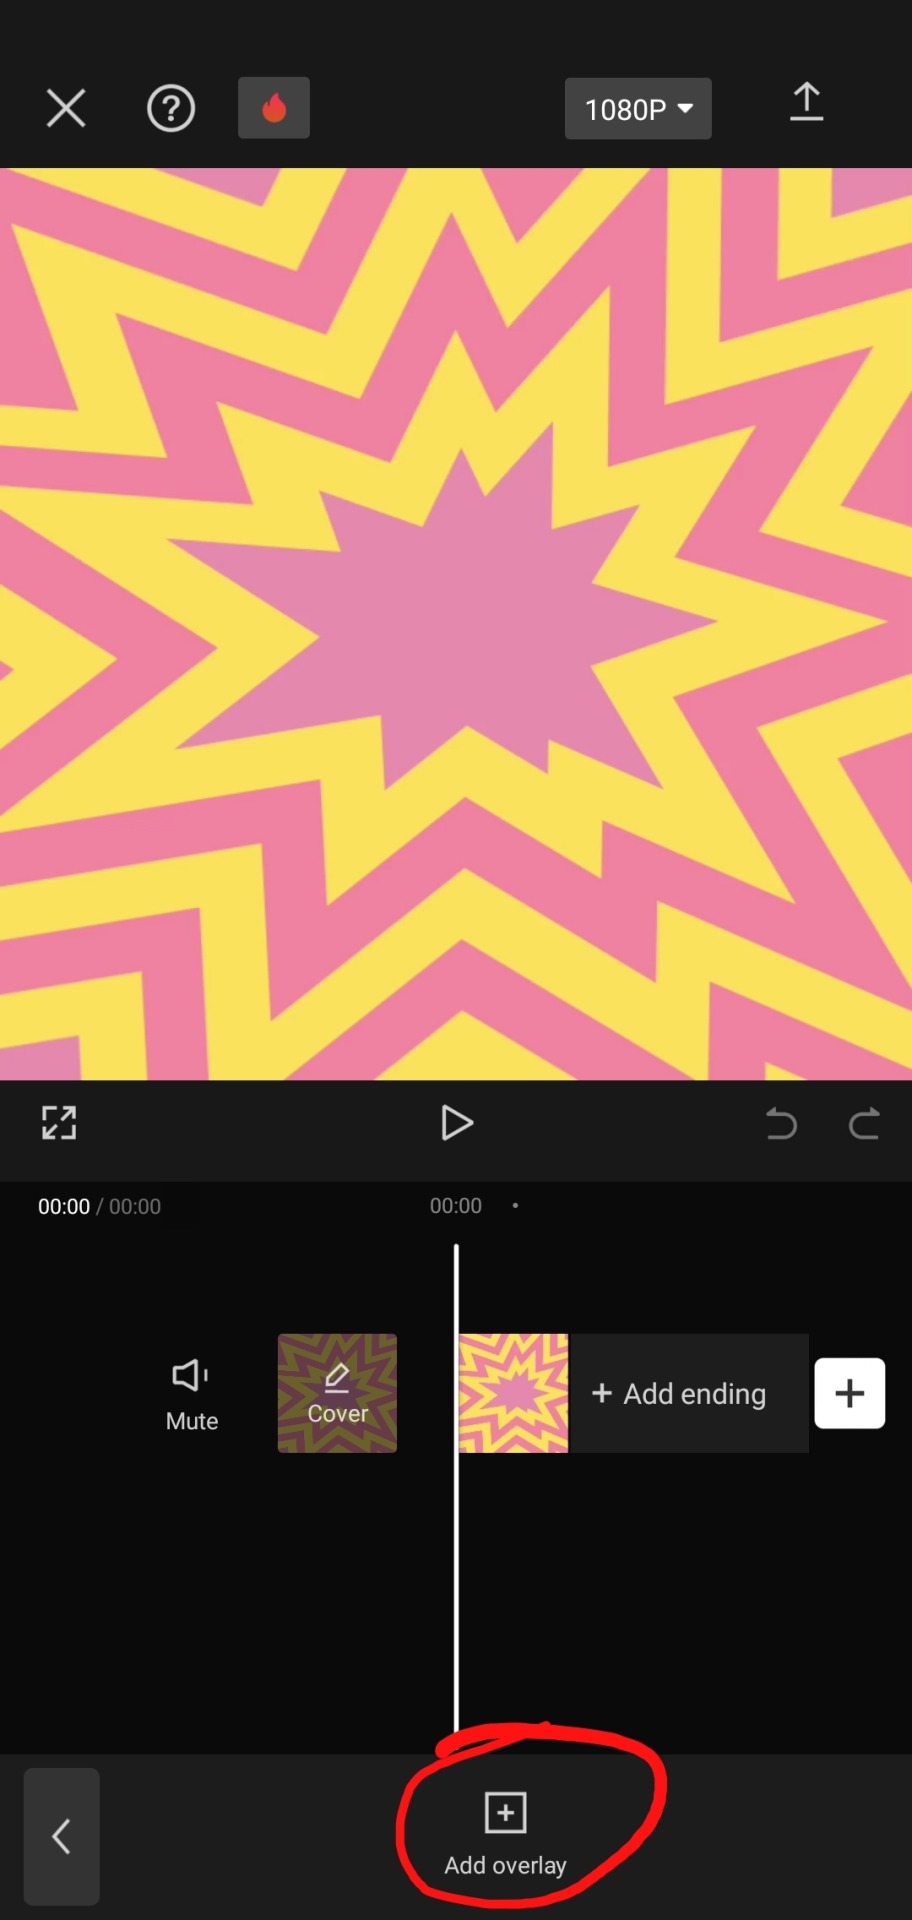
step two : color it
scroll til you find "blend" -> "filter"


and now save! and you are finished!

tada! now this is the end result!
additional steps: if u need to make it a gif, convert it on ezgif
hope this tutorial is easy to understand and helpful!
178 notes
·
View notes
Text
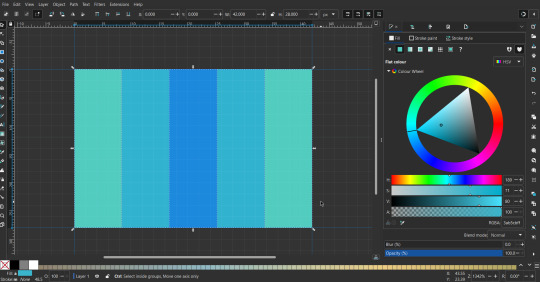
Flag Making Tutorial
This will be a more technical step-by-step tutorial on how I make my flags (also a long post because I wanted to be thorough, plus I love flags lol).
The program I use is Inkscape, a free vector (.svg) editor program for pc.
I have templates set up, so the actual flag making process is pretty easy/quick.

Hotkeys/Locations/Other Reference
I'll be mentioning these options, so I thought to put them here all in one list. (They list the keyboard shortcuts first)
Snapping: magnet symbol (top right of screen), or under the adjacent arrow ◀️ symbol.
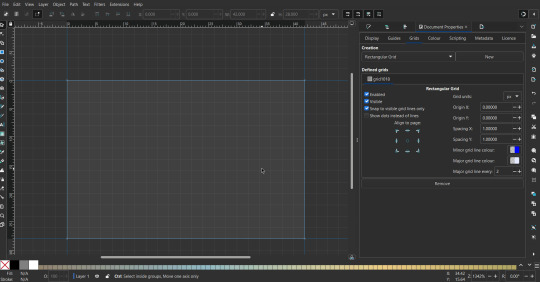
Document properties: shift+ctrl+D, or under the file menu (top left corner of screen). Display (1st tab) Guides (2nd tab) Grids (3rd tab)
Fill and Stroke: shift+ctrl+F, or under object (top of screen).
Layers and Objects: ctrl+shift+L, or under object (top of screen).
Align and Distribute: ctrl+shift+A, or under object (top of screen).
Import (Images): ctrl+i, under the file menu, or by dragging into the Inkscape window.
Save As: ctrl+shift+S, or under the file menu.
Export: shift+ctrl+E, or under the file menu.
Selector Tool: S, or cursor symbol (left side of screen). Click, or click and drag around the objects, to select them.
Locking a selection: lock symbol between the width and height boxes at the top of the screen.
Transform Selections: the width/height and x y position can be changed by typing in the X,Y,W,H boxes (near top middle of screen), or by dragging the corners/edges (resize) and inside the object (move).
Duplicate: ctrl+D.
Delete: delete key, or right click on the object.
Node Tool: N, or below the selector tool (left side of screen).
Rectangle Tool: R, or square symbol (left side of screen).
Pen Tool: B, or pen symbol (left side of screen).
Gradient Tool: G, gradient square symbol (left side of screen).
Mesh Tool: swirly square symbol (left side of screen).
Dropper Tool: D, or dropper symbol (left side of screen).
Undo: ctrl+Z.
Redo: ctrl+Y.
Creating the Template
Download Inkscape and open it, under the Time to Draw tab, click New Document.
First, snapping needs to be enabled, and under advanced mode enable grids and guide lines snapping. (This is crucial for making the stripes equally sized, spaced, and the overall flag in the right ratio.)
I'll be making a template with a 2:3 flag ratio.
Open document properties. (I like to move these types of windows to the right side.)
Under display, set the width to 42px and height to 28px.
Under guides, just click create guides around the current page.
Under grids, make sure rectangular grid is selected, and click new. (Grid units should be in px.) For the major grid line every option, change it to 2. (I also prefer to change the minor grid line color to be transparent.)
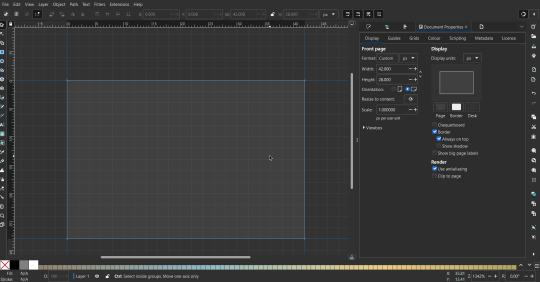
That's pretty much it, your template is done :D ! Just save it wherever you want. I like putting it in an easy-to-access flag folder, as it is needed to open it every time to make new flags.

You can use a different width / height / grid size / flag ratio if you want, these are just the numbers I'm comfortable with / used to.
Also, since this is a vector, the image can be infinitely big or small without any quality loss, so the small dimensions above don't actually translate to a low res image.
Creating the Flag
(I'll be using the rainbow flag to demonstrate.)
Start by having the template open.
You can import images (like .png/.jpg files) to color pick / reference if you want. Said images can be transformed (resized/moved) by selecting and transforming them using the options mentioned in reference. (This is optional, they should just be off to the side so they don't get in the way.)
To create the stripes, use the rectangle tool. Click and drag from one grid corner, to a lower grid corner.

While the rectangle is selected, use the dropper tool to pick a color from a imported image. You can also use the fill and stroke (shown on right) tab to create your own colors / edit colors / etc.
You can make these stripes however you want, they just need to all be equally sized. (They don't have to all have the same height, if you intentionally want that (like the demisexual flag for example).)
Then select all the stripes and transform them so that they fit the page.
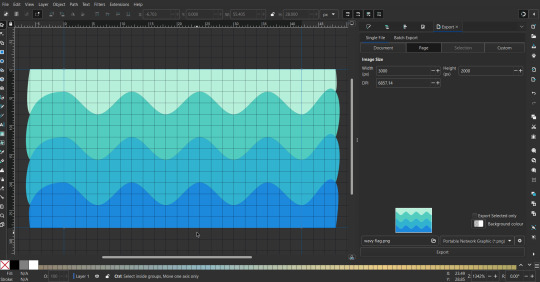
All that's left is to save/export it.
To export it, use the export tab, under single file, page, adjust the width and height (in px) to however high res you want your image to be. (I usually do 3000 by 2000.)
Type in the desired file name in the box next to the folder symbol, use the folder symbol to choose its export location (which can also be used to determine the file name and save/export it), the adjacent drop-down-menu to select what to save it as (,png, .jpg, .svg, etc.), and the gear symbol to adjust other settings (I leave it as default, with antialias turned off (set to 0)).
And done, you've made a flag :D 🏳️🌈
Extra Notes
Layers and Objects: a menu that can be used to manage objects. Like their layering position (whether they are above or below another object), and other options can also be done here instead of with keyboard shortcuts.
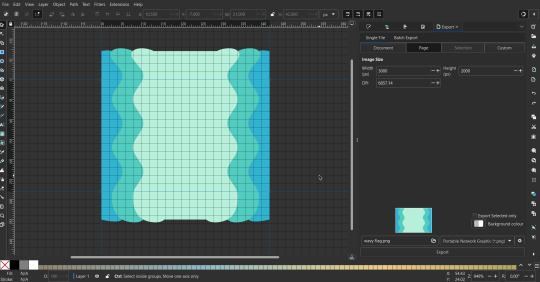
Vertically striped flags: it's very similar to above. You would just make the rectangles taller rather than wider.
Wavy stripes: first use the pen tool to create zigzags. (The pen tool works like a outline, so just click along the grid corners, and join the line at the end. The fill and stroke menu can be used to make it a solid colored shape, and remove/add outlines). The steepness/frequency of the zigzags is up to personal preference, they just need to extend off the page a bit. To create equally sized wavy stripes, have the all side lengths (highlighted in red) be equal except (depending on how you draw your zigzags) the first or last wave, which should have half the side length of the others.

Select everything, and with the node tool, select all the zigzag nodes (the corners don't need to be selected), and click make selected nodes smooth (half circle with point in middle symbol, at top of screen). (It'll likely look like it has weird lines in-between the waves, see glitch section at the end for how to fix that.)
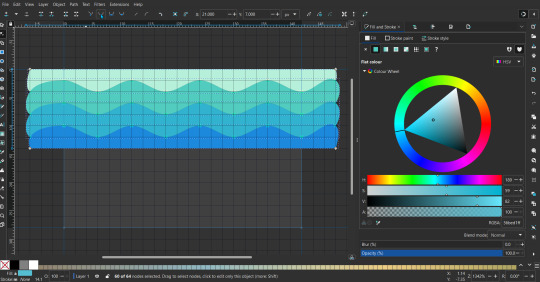
Then resize it all to the height of the canvas. And done :)
This can of course be vertical too.
Gradients: You can use the fill and stroke dialogue, gradient tool, or mesh tool to do this.
To create the gradient, select the object, click the linear gradient symbol (gradient box) under fill and stroke. Or dragging / double clicking with the gradient/mesh tools. (The mesh tool is what I used to create the square gradient.)
To change the colors, click on the arrows or circles under fill and stroke, or by clicking the points on the shape, to select the nodes. Then use fill and stroke to change the colors.
To create new colors/stops, click on the plus+ symbol under stops (under fill and stroke), or double click on the gradient. Edit the new colors in fill and stroke again.
To change the location of stops, use stop offset under fill and stroke, or drag the nodes on the gradient. You can also move the end points on the object to make the gradient slanted or vertical.

Symbols: I make my own when I can (like the demi- triangle can be drawn with the pen tool, and resized to the correct proportions). When the symbol is too complicated, I import a .svg of it. Wikimedia commons is a great resource, and the popular twemoji comes in .svg format too. You could also edit it on over the .png in a rastor program if need be.
The align and distribute tab can be used to center symbols (or any other selected object). Select page for the relative to option, and use the symbols underneath to center/align it however you want. (You can also use different relative to options, like last selected, if you want to align it to an object instead.)
Deleting imported reference images: you can do this before saving it as a .svg, if you don't want to keep them / want to clean up the .svg file.
Antialiasing: an option that blurs things basically. A image with antialiasing off will be sharp pixels, while a image with antialiasing on will have transition colors between the main colors.
Below is an example. The left side is without antialiasing, and the right side is with antialiasing.

I can see why it might be preferable to have it on (like for diagonal shapes), but antialiasing can make recoloring .png (not .svg) files hard. The extra different colors messes with fill tools. I also think it looks cleaner without, so I prefer it off.
Exporting glitch: sometimes an exported image will have a thin line between the stripes, despite the fact the stripes are perfectly next to each other. (This seems to not just be a problem with Inkscape, but with vectors in general.)
Below is a zoomed in example of what it'd look like. The left side shows the stripes are all next to each other, but the right image has a transparent line in-between the stripes.
This can be fixed a number of ways.
You could select all the objects, and duplicate them twice.

Or overlap them. The stripes will still be the same size when overlapped, but they will technically be behind each other, so there will be no gap.
With all the different stuff mentioned, you can basically think of them as building blocks with the grid as reference. They can all be mixed and matched together.
I didn't mention all the options, just because there's that many different things you can do in Inkscape. I'd encourage you to play around with all the different options/tools yourself.
There's also some great Inkscape guides on YouTube, it's where I learned how to do a lot of this from (even if they're not for flags specifically, the concepts in those videos can be applied to flags).
Here's an overly elaborate flag I made, just to demonstrate some (but not all) of the things that can be done.

Anyways what a long post haha. But maybe this will be helpful for anyone interested in making (pride) flags.
218 notes
·
View notes
Note
Hiiii! Im trying to create cc for fun and was wondering how you did it cause yours is just perfect TT. For example what softwares, any tutorials you recommend, or just advice. Thank you so so so so so much if you do <3
ofc!!
CAS backgrounds
I learned how to use blender and make CAS background from [this] tutorial, took me a long time to get used to it and had to do a lot of independent research tho, so keep that in mind. But other than that, I didnt watch any tutorials for anything else.
Recolors
I'm mostly making recolors currently, and for that I use FireAlpaca digital drawing software. It's free and easy to use! I export the textures of cc on Sims 4 Studio, open it in FireAlpaca, and edit the texture. I never watched any, but I'm sure u can find tutorials on how to use that program too! Or any other free drawing software really. U can also use Adobe Photoshop if u r not broke like me lol.
Mesh making
And for mesh making. Just watch a lot of beginner-friendly blender tutorials on YouTube. I don't have any specific recommendations, unfortunately since I'm new to this as well.
Definitely use Pinterest to find textures or just for inspo!
That's all I can say for now.
If u have more specific questions, feel free to ask again! Hope it was helpful and wishing u the best in ur cc making journey!! <33
7 notes
·
View notes
Text
edit tutorial for @fe3lthethunder !! all images found on tumblr under "transparent png" aside from the John wick icon which I got off of Pinterest which is a screenshot from i believe. the second or third movie. but i wanna say the third. ANYWAY
STEP 1: upload your frame if you're using one and put the image behind it, erase what u don't need.
how it looks on ibis paint. i use an airbrush eraser which is why the bottom is Like That
STEP 2: color the frame. there's a ton of ways you can do this, usually i just use multiply+ clipping layer and color over it but here's something else you could do

pin light is what made the bg of the frame brown, and lighter color makes the darker parts blue and stuff. i just color picked from the og icon But if you want your own colors go off too.
STEPS 3 AND 4: RECOLORING PNGS

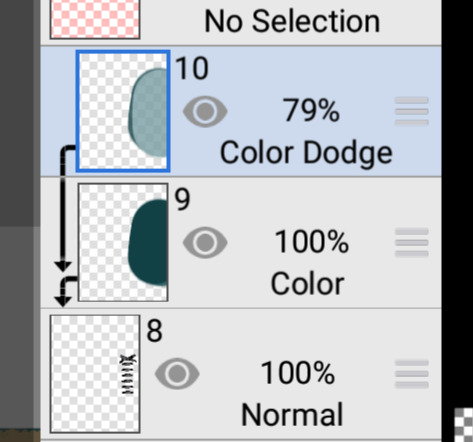
both the ribbon and the flowers found on tumblr! the color layer on the ribbon is made it match and the color dodge upped the contrast so it stands out. luminosity makes the flowers lighter and hue changes the color

so here's what it looks like right now. p simple but still looks nice. i don't like using lighter/darker color layers for actual pngs (frames r fine though), hue and color layers + multiply and color dodge or add layers are gonna be your best friend. luminosity helps make it lighter without losing too much depth, which is also a good option on stuff where you need it to blend in.
STEP 4 AND 5: Random Shit Go

Boom. Slap some pngs on that icon. The butterflies I found on tumblr again and just put in the corner because I felt it needed something there, the error window I made with a windows error generator and duplicated a few times, moving them over to make a pile up thingy. Neither of them were edited or recolored— in fact a lot of the pngs I use I don't recolor a lot or at all.
STEP 7: effects
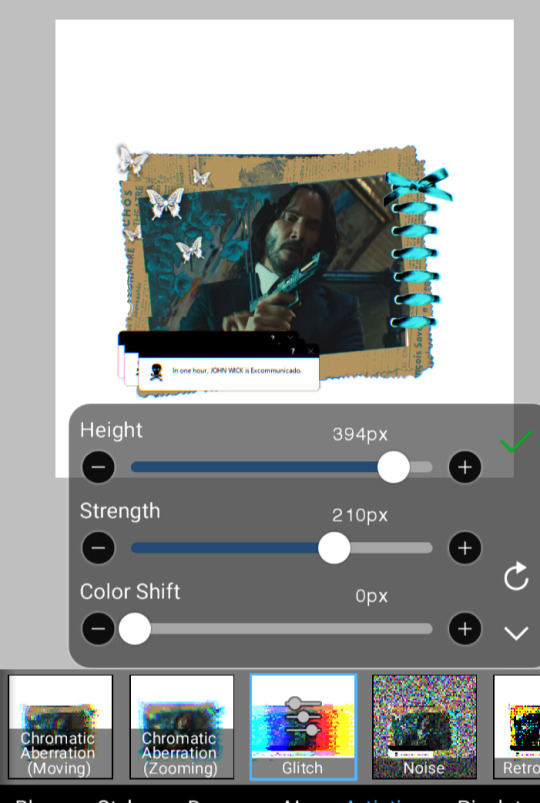

Usually I don't do these but I thought it would look nice. Chromatic aberration is fun (i always center it moving away from the face) and I usually keep the distance to a 10px maximum otherwise it gets wonky and your icon might look awkward. Glitch I also keep away from the face for the same reason, but hands are free game.

Whatever program you use should also have save as transparent png . Ibis paint does not make it clear that not having transparent checked will give it a white background. Always Check Transparent or else it will have a white bg, ask me how I know (horrid experience)

And boom! Icon!
Whatever program you use will probably have similar names. I usually have about 15 pngs over the icon, this one has 4 because I didn't want to go too crazy 😭 the biggest parts of it are recoloring and that's pretty simple once you get the hang of it— like I said hue layers are your best friend. Color balance and overlay are also great if you want some texture and variation!
7 notes
·
View notes
Text

So, what have I been up to...? Since I was in Tumblr's spam-bot prison for more than 5 months, I thought I would create a little ICYMI post. (That's "In-Case-You-Missed-It" for the old folks like myself that have to look up all these new acronyms.) Basically, I'm gonna highlight/link to some of the posts I made this year, and you can check them out if you like. :) I didn't want to necessarily do a bunch of reblogs of my own content and clog up the system or something...

I finished posting up my 100's of edited screenshots from Advent Children Complete! You can view the archive of 53 different posts, separated by character, here. It also includes a fun side post about the Mysterious Case of Sephiroth's Missing Straps. :3

I confess, I haven't made too many wallpapers this year. But it's September now, and I have a thought rolling around in my head. We'll see. The archive of wallpapers is here.

Speaking of, so many cool wallpapers came out for Ever Crisis, and I've posted them all! Find them here, at the bottom of this archive post. I swear I'll eventually beat TFS season 1, but...they sure made it difficult for people who don't purchase their packs.
Did you know that Tumblr is feeding your posts(including reblogs) to theird party AI? Well, they are, and you can set it to be prevented in your settings. I talked about it here.

Rebirth coming out was the biggest thing this year, and I made my first manipulation for it back in March! You can see the post here, as well as a simple tutorial for it using GIMP(GNU Image Manipulation Program, free at gimp.org) here.

I also made a second manipulation for Rebirth! If you want to see the additional dialogue that goes with it, that's here.
When I played the demo for Rebirth, I noticed that they had changed Sephiroth's eyes, and it reminded me of something...
Did you know that in Advent Children, Sephiroth's gloves are not as tight as in Remake and you can see his wrists? 😏Check it out! What? Of course this is important!
I took a look at Sephiroth and all his forms over the years. Then I did the same for Cloud.
My AO3 sefikura work In Death was finished on April 26th, and came with a special manipulation. That was also the first story where I was accused of writing non-con, when it obviously wasn't, so that was fun. If you need to hydrate, you can go drink that tea in the comments of, I think, chapter 16 and after. Several people have asked about a sequel, and I do have eventual plans. Hang in there.
I made my first(of many) Rebirth memes, which also came with a blank template.
A peek under Sephiroth's jacket, courtesy of Rebirth. 😏Yes, this is important, obviously.
Another Rebirth meme, featuring Sephiroth being badass.
I put my design for Lucrecia's locket onto my edited EC Sephiroth artwork! This one actually got a lot of notes thanks to reblogging. 💕I also put the locket on Sephiroth's EC in-game model.
I wrote a long one-shot as a thank you for 400+ followers! It's based on my most popular sefikura manipulation of all time—a very indulgent work, and my first time writing for Rebirth. Thanks, guys!
Another meme, haha...oops, and another one. Damn, another one? AND a Sephiroth/Cloud arms-crossed companion meme set?
I did another Rebirth manipulation, this time of the famous sefikura hug scene. I added a second part to it here. AND a third part to it here! This set has quickly become one of my favorites. I also gave it some Japanese dialogue+translation here.
I did a little PSA because I've seen a lot of awfully suspicious digital paintings lately...
I made an account on Twitter/X, just in case they never fixed my blog, so if you're over there, follow me @ perfectlysane77 and say hi. :)
The FF7 crew have super hearing, confirmed??
Do you play Ever Crisis and want to join a sefikura guild? Check here. All skill levels are welcome, and you don't have to talk to anyone if you don't want to.
My first ever edited Rebirth video: "Fill your hollow heart...with me-ow."
And now I've been released from Tumblr spam-bot prison, so I'm sure you've seen even more silly memes from me. So what now? I hope to release the rewrite of Stranger Inside very soon, maybe by the end of the month if possible? The sequel will follow, for real this time. At that point, we'll be back to voting, so you guys will be able to choose what comes after that. I'm really focused on writing now, which is probably why I'm mostly making memes and silly things. Still, if it makes you laugh, I'm happy. 🥰
If you read this to the end, you're amazing.💕
22 notes
·
View notes
Note
i’m envy your art style, the line work is perfect 🥺 aaaaa
i bought an ipad pro (M4) 13 inch just to get into the habit of being happy and art-pilled again 🥹 do you recommend keeping clip studio?? or should i experience with Procreate etc
Kya thank you!!
oo i'd say that really depends on what you end up finding most comfortable!
CSP by f a r has way more features and brushes you can buy- there are easily thousands of short cuts and tools people have made as well. Its a really great program if you're willing to learn the, not-very-steep learning curve. (there are sooooo many tutorials on csp stuff as well)
However! I am in fact a procreate girlie... honestly I just love how easy it was to learn- and it being like...built for the ipad with the ipad in mind has made it really streamlined while the ui of csp can get a bit overwhelming.
One big thing I will say...CSP is definitely better for comic artists while Procreate is better for painters. But the two are not mutually exclusive. (I do my comic jobs all on Procreate!) So take that as you will.
Procreate also is...kinda bare bones lmao. There's not a crazy amount of features (also you can't clip a layer to a group...what the heck man) and I would dare say it even lacks some important ones. But dam if it doesn't feel good to draw in lol.
(oh also if drawing on the glass screen feels weird, I 100% recommend getting one of those textured screen protectors and some extra nibs)
I would say....if you can, give em both a shot! I think csp has a free trial of a few months and procreate is a $13 one time purchase! Regardless, both are real nice, Im sure you'll find something good in each!
(other side note: on the ipad, csp is subscription only, not sure why this is the case. but yeah)
(oh also. Procreate files save to the app itself. Your art doesn't automatically save to the cloud. So if your ipad dies at any point and you didn't have ypur files saved in a second location...bye bye art😔 I learned this the hard way😭)
wow. this guy has a lot of opinions on art programs.
Hope this helps lol!
7 notes
·
View notes
Note
Hi!!! I'm new here and I was wondering what apps you use to convert clothes,items,😂 literally anything from The Sims 4 to The Sims 2. You have inspired me to start making conversions for CC.
Your CC conversions always look breathtaking and it inspires me to do the same. Thank you so much for this.You really are helping out.
Have the most joyful day ever! 😌
hi nonny, thank you for your lovely kind words! i use so many programs to convert stuff that i'm honestly not sure where to start...? do you want the programs or do you want actual tutorials on how to use them to convert stuff from ts4 to ts2 🥴
for anything involving ts2 cc, simpe is a must-have. it's also used to edit your sims 2 towns and other stuff involving the game.
for modelling software, i use blender 4.1, blender 2.79b, and milkshape. plus also the sims 2 plugins for milkshape.
for extracting the models and textures from sims 4, i use sims4studio (you must have the game installed alongside the appropriate version of blender).
for editing the textures to match sims 2, i use an older version of photoshop (photopea or GIMP could probably also work).
for editing the bones of CAS and other items to match the sims 2 models, i use the meshtoolkit and WSO plugins from t$r workshop
for binning my hairs, adding basic tooltips, making collection files, and compressorizing my file sizes, i use the hair binner, tooltipper, collections creator, and compressorizer edited by @lazyduchess, respectively.
for organising my outfit categories, adding repo'd ages to my outfits, changing the categories of my objects, and other stuff, i use a variety of tools by @picknmixsims.
and of course, for outfits and scalp textures that need to be painted directly onto a sim's skin, i use @paluding's iconic sim tattooer.
i think it's important to stress at this point that at the moment, as far as i'm aware, there is no one program to directly port sims 4 assets to the sims 2. it seems to be a common misconception but 4t2 creators are making new packages, adding new bones, resizing textures, and a bunch of other stuff that is necessary to import these assets to the game. at some point the only similarities are the meshes and their textures (and even those are subject to change!)
if you want tutorials on how to use these programs and how 4t2 creations actually work, feel free to check out the cc creation section of the simscord - i also occasionally will livestream my process there 😄
#ask#answered#sims 2 ask#sims 2 cc creation#anonymous#ky's cc rambles#fr the amount of times i've been approached by people who assume it's easy because 'everyone seems to do it' is lowkey crazy#like imagine a program where u put a sims 4 package file in and it spits out a sims 2 package#my dream fr fr
25 notes
·
View notes
Text
"From Passion to Profession: Steps to Enter the Tech Industry"
How to Break into the Tech World: Your Comprehensive Guide
In today’s fast-paced digital landscape, the tech industry is thriving and full of opportunities. Whether you’re a student, a career changer, or someone passionate about technology, you may be wondering, “How do I get into the tech world?” This guide will provide you with actionable steps, resources, and insights to help you successfully navigate your journey.
Understanding the Tech Landscape
Before you start, it's essential to understand the various sectors within the tech industry. Key areas include:
Software Development: Designing and building applications and systems.
Data Science: Analyzing data to support decision-making.
Cybersecurity: Safeguarding systems and networks from digital threats.
Product Management: Overseeing the development and delivery of tech products.
User Experience (UX) Design: Focusing on the usability and overall experience of tech products.
Identifying your interests will help you choose the right path.
Step 1: Assess Your Interests and Skills
Begin your journey by evaluating your interests and existing skills. Consider the following questions:
What areas of technology excite me the most?
Do I prefer coding, data analysis, design, or project management?
What transferable skills do I already possess?
This self-assessment will help clarify your direction in the tech field.
Step 2: Gain Relevant Education and Skills
Formal Education
While a degree isn’t always necessary, it can be beneficial, especially for roles in software engineering or data science. Options include:
Computer Science Degree: Provides a strong foundation in programming and system design.
Coding Bootcamps: Intensive programs that teach practical skills quickly.
Online Courses: Platforms like Coursera, edX, and Udacity offer courses in various tech fields.
Self-Learning and Online Resources
The tech industry evolves rapidly, making self-learning crucial. Explore resources like:
FreeCodeCamp: Offers free coding tutorials and projects.
Kaggle: A platform for data science practice and competitions.
YouTube: Channels dedicated to tutorials on coding, design, and more.
Certifications
Certifications can enhance your credentials. Consider options like:
AWS Certified Solutions Architect: Valuable for cloud computing roles.
Certified Information Systems Security Professional (CISSP): Great for cybersecurity.
Google Analytics Certification: Useful for data-driven positions.
Step 3: Build a Portfolio
A strong portfolio showcases your skills and projects. Here’s how to create one:
For Developers
GitHub: Share your code and contributions to open-source projects.
Personal Website: Create a site to display your projects, skills, and resume.
For Designers
Design Portfolio: Use platforms like Behance or Dribbble to showcase your work.
Case Studies: Document your design process and outcomes.
For Data Professionals
Data Projects: Analyze public datasets and share your findings.
Blogging: Write about your data analysis and insights on a personal blog.
Step 4: Network in the Tech Community
Networking is vital for success in tech. Here are some strategies:
Attend Meetups and Conferences
Search for local tech meetups or conferences. Websites like Meetup.com and Eventbrite can help you find relevant events, providing opportunities to meet professionals and learn from experts.
Join Online Communities
Engage in online forums and communities. Use platforms like:
LinkedIn: Connect with industry professionals and share insights.
Twitter: Follow tech influencers and participate in discussions.
Reddit: Subreddits like r/learnprogramming and r/datascience offer valuable advice and support.
Seek Mentorship
Finding a mentor can greatly benefit your journey. Reach out to experienced professionals in your field and ask for guidance.
Step 5: Gain Practical Experience
Hands-on experience is often more valuable than formal education. Here’s how to gain it:
Internships
Apply for internships, even if they are unpaid. They offer exposure to real-world projects and networking opportunities.
Freelancing
Consider freelancing to build your portfolio and gain experience. Platforms like Upwork and Fiverr can connect you with clients.
Contribute to Open Source
Engaging in open-source projects can enhance your skills and visibility. Many projects on GitHub are looking for contributors.
Step 6: Prepare for Job Applications
Crafting Your Resume
Tailor your resume to highlight relevant skills and experiences. Align it with the job description for each application.
Writing a Cover Letter
A compelling cover letter can set you apart. Highlight your passion for technology and what you can contribute.
Practice Interviewing
Prepare for technical interviews by practicing coding challenges on platforms like LeetCode or HackerRank. For non-technical roles, rehearse common behavioral questions.
Step 7: Stay Updated and Keep Learning
The tech world is ever-evolving, making it crucial to stay current. Subscribe to industry newsletters, follow tech blogs, and continue learning through online courses.
Follow Industry Trends
Stay informed about emerging technologies and trends in your field. Resources like TechCrunch, Wired, and industry-specific blogs can provide valuable insights.
Continuous Learning
Dedicate time each week for learning. Whether through new courses, reading, or personal projects, ongoing education is essential for long-term success.
Conclusion
Breaking into the tech world may seem daunting, but with the right approach and commitment, it’s entirely possible. By assessing your interests, acquiring relevant skills, building a portfolio, networking, gaining practical experience, preparing for job applications, and committing to lifelong learning, you’ll be well on your way to a rewarding career in technology.
Embrace the journey, stay curious, and connect with the tech community. The tech world is vast and filled with possibilities, and your adventure is just beginning. Take that first step today and unlock the doors to your future in technology!
contact Infoemation wensite: https://agileseen.com/how-to-get-to-tech-world/ Phone: 01722-326809 Email: [email protected]
#tech career#how to get into tech#technology jobs#software development#data science#cybersecurity#product management#UX design#tech education#networking in tech#internships#freelancing#open source contribution#tech skills#continuous learning#job application tips
9 notes
·
View notes
Note
Hi, I just got into tech (actually 1 year in but I still feel like I don't know anything).
I learnt python, R, SQL, Tableau and concepts in Data Structures, Algorithms.
[Just the Basic level of the listed.]
But I can't write my own programs on python or create anything.
I was hella impressed by your microprocessor project, and when I took up tech (ai and data science) I assumed I would do something like that or at least code.
Now, I am just venting but where do I start, how do I make projects what are some interesting projects, what should I learn? A lot of my seniors tell me to have a wide range of knowledge like focus on one thing by depth but add other things. For example: you can study data analytics in depth but have some knowledge in ethical hacking and web development etc. Like an all rounder.
Wow ok a lot to unpack here, I'll get started
Lots of places recommend that you start with Arduino, as there are a lot of good tutorials out there. I somewhat disagree
I think that raspberry pi is better because it's usually a lot cheaper to buy the stuff you want to play around with
But an even cooler way to do it, go to wokwi.com and start a project on a Raspberry Pi Pico (make sure it's the micropython version) and then you can get started there
Google something like "Blink led with Pi Pico micropython" and there will be a tutorial or two
Then, once you've played around for a while you can buy a Pi Pico for very little money and see your stuff work irl!
If you need any more help or have any questions, feel free to DM me and I'll see what I can do
#micropython#coding#python#raspberry pi#raspberry pi pico#programming#microprocessors#microcontroller#microcontrollers
6 notes
·
View notes
Text


EEE thank you @l3o-lion !! To answer your question, most of the animations I post on here are tweening, specifically with Live2D.
I like using it for gentle looping animations & backdrops. (Character animations are a whole different beast? I usually only keep them to a couple functions like 'HandMove' or 'HairGoWoosh'" but this is the VTuber-making software so it's totally possible to make more complex characters. )
I made a tutorial for how I animate with L2D below the cut, if you'd like to see the details! :D
This is the file for that Artfight attack. (quick disclaimer for anyone reading out of context: THIS IS NOT MY CHARACTER DESIGN, they belong to Finchstick over on Artfight!)
I drew the image itself in Krita - for this one I tried to go for more of a fuzzy, painterly style because I wanted to make it look like a muppet. L2D can handle fuzzy textures and gradients without too much trouble most of the time which is something I really like about animating with it.
______________
So! Each different moving piece has to be its own layer. Naming and organizing them into folders helps a lot once I export it into L2D. The finished image needs to be saved as a .PSD file.
After it's done, I'll open the .PSD file in L2D and it'll look something like this:

Once the file is open I find the moving pieces of my character and select them. (I also lock the static layers before doing anything )

_______ M E S H E S ________
Once I have my piece selected, I open the automatic mesh generator ( located above the image, to the left ) and automatic mesh it.

(Keep the mesh generator window open and select / apply mesh to each moving object.)

______ D E F O R M E R S _______
Once the pieces have a mesh on them I apply warp deformers for each part. (I try to apply the deformer for each body part to the largest piece making up that part. For example, the part being used for the head deformer here is the upper part of the head.)
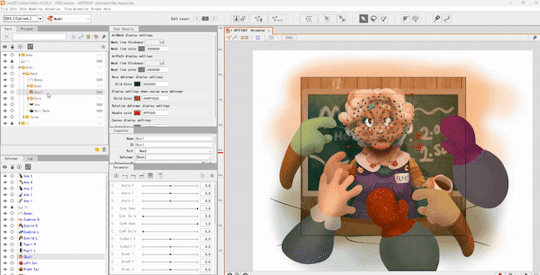
Each part of the face also gets a deformer - each eye, the mouth, etc - and those get shoved into the parent "head" warp deformer.
The deformers allow for parts of the face to move with the head, but they also allow for you to set more parameters per part and make your model look more dynamic. (There's a 3 parameter limit in the free version but if I need to make another parameter work I'll just brute force it and make a 'head deformer deformer' etc)
_____ P A R A M E T E R S ______
Once the deformers are set up, I start setting the parameters.
The program opens with these default parameters which are all intended for rigging a face, you can make your own custom parameters at the bottom of the window.
As for the green dots here, they represent points of extremes on the parameter! You can change what these are by moving the slider over the green dot, and moving the mesh on the selected object.
This can be a bit tedious, but it's fun to watch the model look more alive the more parameters you finish.
______ A N I M A T I N G _______
After I save my model as a .CMO3 file I open a new animation file in L2D, and drag and drop the .CMO3 into the window.

The model shows up much larger than the window. You can resize the window in the bottom left, (third and fourth fields from the top,) and shrink the model to fit inside.
(The free version has a limitation on how big your image can be in order to be exported. It usually takes me a bit of trial and error to get the right size for the image.)
The window below your image shows your tracks. You can have multiple models per animation, I usually just use one. The purple track represents the model while the orange represents the duration of the animation.

With that out of the way, it's time to set the keyframes! Under the purple model track there's a green drop-down window called 'Live2D Parameters'. Here, you can adjust your parameters in order to move your model to the right position.
(In order to make a looping animation, you can copy all parameter values in the first keyframe by left RIGHT clicking the dot on the green Parameters track, and then paste them to the last rendered keyframe.)
I adjust the parameters and keyframes until I feel satisfied with the result. Once I'm done, I just go to File > Export Image/Video > GIF animation or Video.
I make sure my image is sized correctly, and save! And that's about it. ( For this specific animation I also put some effects over it in Clipchamp. )
21 notes
·
View notes
Text
How to Switch From a Non-Tech Background to Data Science: A Step-by-Step Guide
Data science is one of the most exciting and rapidly evolving fields today. With businesses relying heavily on data to drive decisions, professionals who can extract insights from complex datasets are in high demand. If you come from a non-tech background, the thought of transitioning into this realm might feel daunting, but it’s achievable!
Imagine being able to tell compelling stories with numbers, help organizations make informed choices, or even predict future trends. The world of data science opens doors not just for tech enthusiasts but for anyone willing to learn and adapt. This guide will walk you through how to switch gears and embark on an exhilarating career in data science—a journey that starts with understanding foundational skills and takes you through job opportunities tailored for beginners like yourself. Let’s dive in!

Understand What Data Science Is
Before diving in, it's essential to understand what data science entails and how it fits into today’s business and technology landscape. At its core, data science is about using data to derive insights and solve problems. It combines skills from statistics, computer science, and domain expertise to analyze data, build models, and support decision-making.
This doesn’t mean you need to be a math wizard or a coding prodigy. What matters most is your ability to learn and apply concepts to real-world problems.
Identify Your Transferable Skills
You might be surprised to learn that many skills from non-tech backgrounds—like communication, problem-solving, and domain knowledge—are highly valued in data science.
For example:
Marketing professionals bring customer insight and analytical thinking.
Finance experts understand data-driven decision-making.
Educators often excel in structured thinking and clear communication.
Project managers know how to coordinate, report, and evaluate performance.
Recognizing these transferable skills can boost your confidence and help you position yourself effectively when job hunting.
Learn the Core Concepts and Tools
To succeed in data science, you need to build a foundation in key areas like statistics, programming, and data visualization. Here’s what to focus on:
Statistics and Probability Basics
Understanding the fundamentals of statistics is crucial for interpreting data and making sound decisions. Topics like distributions, correlation, regression, and hypothesis testing are essential.
Python or R Programming
Learning a programming language like Python or R will empower you to manipulate data, run analyses, and build predictive models. Python is generally recommended for beginners due to its simplicity and widespread use.
Data Manipulation and Visualization Tools
Tools like Pandas (Python library), SQL (for querying databases), and Tableau or Power BI (for data visualization) are industry standards. These tools help you clean, explore, and present data in a meaningful way.
Take Advantage of Online Courses and Resources
Numerous free and paid resources are available specifically for beginners from non-tech fields. Here are a few reputable platforms to consider:
Coursera – Great for structured courses from top universities.
edX – Offers both free and certificate programs.
DataCamp – Interactive coding tutorials tailored to data science.
Kaggle Learn – Free micro-courses and datasets for hands-on practice.
Start small. Begin with introductory courses and gradually move to more complex topics.
5. Build Real Projects to Apply What You Learn
Hands-on projects are the fastest way to cement your learning and showcase your abilities to future employers. Try these ideas:
Analyze a dataset from Kaggle or a public data repository.
Build a dashboard showing business metrics.
Predict outcomes (e.g., sales, customer churn) using regression models.
Choose projects related to your background to highlight your domain knowledge and show how it translates into data insights.
Network and Connect With the Data Science Community
Engaging with the data science community through meetups, forums, and social media can accelerate your growth and open doors. Join:
LinkedIn groups related to data science
Reddit communities like r/datascience
Local data science meetups or online events
Hackathons and datathons to practice collaboratively
Connecting with others can lead to mentorship, feedback, and job opportunities.
8. Prepare for the Job Market
With your skills and portfolio in place, it's time to start tailoring your resume, practicing interviews, and applying for roles. Focus on:
Entry-level positions like data analyst, junior data scientist, or business intelligence analyst
Keywords in job descriptions (use them in your resume)
Storytelling during interviews—explain your career change, projects, and learning journey confidently
Practice with mock interviews and behavioral questions to build your comfort level.
9. Consider Further Education or Certifications
While not always required, a structured program or certification can provide credibility and fill in knowledge gaps. Look into:
Google Data Analytics Certificate (Coursera)
IBM Data Science Professional Certificate (Coursera)
Harvard’s Data Science MicroMasters (edX)
Certifications can help bridge the gap, especially if you lack a technical degree.
10. Stay Consistent and Keep Learning
The field of data science evolves rapidly, so continuous learning and curiosity are key to long-term success. Subscribe to newsletters, follow industry blogs, and experiment with new tools and techniques.
Treat learning like a habit, not a phase.
Final Thoughts
Breaking into data science from a non-tech background is challenging, but with perseverance, strategic learning, and confidence, it's a realistic and rewarding career move. Leverage your unique strengths, stay consistent, and remember—everyone starts somewhere.
Your past doesn’t define your potential in data science. You do.
#CareerSwitch#DataScienceJourney#NonTechToTech#CareerChange#DataScienceForBeginners#Upskill#LearnDataScience#Reskill#BreakingIntoTech#TransitionToDataScience#DataScienceGuide#TechCareerChange#DataScienceLearningPath#DataScienceTips#SwitchToTech
0 notes
Text
Master Data Like a Pro: Enroll in the 2025 R Programming Bootcamp for Absolute Beginners!!

Are you curious about how companies turn numbers into real-world decisions? Have you ever looked at graphs or reports and wondered how people make sense of so much data?
If that sounds like you, then you’re about to discover something that could completely change the way you think about numbers — and your career. Introducing the 2025 R Programming Bootcamp for Absolute Beginners: your all-in-one launchpad into the exciting world of data science and analytics.
This isn’t just another course. It’s a bootcamp built from the ground up to help beginners like you master R programming — the language trusted by data scientists, statisticians, and analysts across the world.
Let’s break it down and see what makes this course the go-to starting point for your R journey in 2025.
Why Learn R Programming in 2025?
Before we dive into the bootcamp itself, let’s answer the big question: Why R?
Here’s what makes R worth learning in 2025:
Data is the new oil — and R is your refinery.
It’s free and open-source, meaning no costly software licenses.
R is purpose-built for data analysis, unlike general-purpose languages.
It’s widely used in academia, government, and corporate settings.
With the rise of AI, data literacy is no longer optional — it’s essential.
In short: R is not going anywhere. In fact, it’s only growing in demand.
Whether you want to become a data scientist, automate your reports, analyze customer trends, or even enter into machine learning, R is one of the best tools you can have under your belt.
What Makes This R Bootcamp a Perfect Fit for Beginners?
There are plenty of R programming tutorials out there. So why should you choose the 2025 R Programming Bootcamp for Absolute Beginners?
Because this bootcamp is built with you in mind — the total beginner.
✅ No coding experience? No problem. This course assumes zero background in programming. It starts from the very basics and gradually builds your skills.
✅ Hands-on learning. You won’t just be watching videos. You’ll be coding along with real exercises and practical projects.
✅ Step-by-step explanations. Every topic is broken down into easy-to-understand segments so you’re never lost or overwhelmed.
✅ Real-world applications. From day one, you’ll work with real data and solve meaningful problems — just like a real data analyst would.
✅ Lifetime access & updates. Once you enroll, you get lifetime access to the course, including any future updates or new content added in 2025 and beyond.
Here's What You'll Learn in This R Bootcamp
Let’s take a sneak peek at what you’ll walk away with:
1. The Foundations of R
Installing R and RStudio
Understanding variables, data types, and basic operators
Writing your first R script
2. Data Structures in R
Vectors, matrices, lists, and data frames
Indexing and subsetting data
Data importing and exporting (CSV, Excel, JSON, etc.)
3. Data Manipulation Made Easy
Using dplyr to filter, select, arrange, and group data
Transforming messy datasets into clean, analysis-ready formats
4. Data Visualization with ggplot2
Creating stunning bar plots, line charts, histograms, and more
Customizing themes, labels, and layouts
Communicating insights visually
5. Exploratory Data Analysis (EDA)
Finding patterns and trends
Generating summary statistics
Building intuition from data
6. Basic Statistics & Data Modeling
Mean, median, standard deviation, correlation
Simple linear regression
Introduction to classification models
7. Bonus Projects
Build dashboards
Analyze customer behavior
Create a mini machine-learning pipeline
And don’t worry — everything is taught in plain English with real-world examples and analogies. This is not just learning to code; it’s learning to think like a data professional.
Who Should Take This Course?
If you’re still wondering whether this bootcamp is right for you, let’s settle that.
You should definitely sign up if you are:
✅ A student looking to boost your resume with data skills ✅ A career switcher wanting to break into analytics or data science ✅ A marketer or business professional aiming to make data-driven decisions ✅ A freelancer wanting to add analytics to your skill set ✅ Or just someone who loves to learn and try something new
In short: if you’re a curious beginner who wants to learn R the right way — this course was made for you.
Real Success Stories from Learners Like You
Don’t just take our word for it. Thousands of beginners just like you have taken this course and found incredible value.
"I had zero background in programming or data analysis, but this course made everything click. The instructor was clear, patient, and made even the complicated stuff feel simple. Highly recommend!" — ★★★★★ "I used this bootcamp to prepare for my first data internship, and guess what? I landed the role! The hands-on projects made all the difference." — ★★★★★
How R Programming Can Transform Your Career in 2025
Here’s where things get really exciting.
With R under your belt, here are just a few of the opportunities that open up for you:
Data Analyst (average salary: $65K–$85K)
Business Intelligence Analyst
Market Researcher
Healthcare Data Specialist
Machine Learning Assistant or Intern
And here’s the kicker: even if you don’t want a full-time data job, just knowing how to work with data makes you more valuable in almost any field.
In 2025 and beyond, data skills are the new power skills.
Why Choose This Bootcamp Over Others?
It’s easy to get lost in a sea of online courses. But the 2025 R Programming Bootcamp for Absolute Beginners stands out for a few key reasons:
Updated content for 2025 standards and tools
Beginner-first mindset — no jargon, no skipping steps
Interactive practice with feedback
Community support and Q&A access
Certificate of completion to boost your resume or LinkedIn profile
This isn’t just a video series — it’s a true bootcamp experience, minus the high cost.
Common Myths About Learning R (and Why They’re Wrong)
Let’s bust some myths, shall we?
Myth #1: R is too hard for beginners. Truth: This bootcamp breaks everything down step by step. If you can use Excel, you can learn R.
Myth #2: You need a math background. Truth: While math helps, the course teaches everything you need to know without expecting you to be a math whiz.
Myth #3: It takes months to learn R. Truth: With the right structure (like this bootcamp), you can go from beginner to confident in just a few weeks of part-time study.
Myth #4: Python is better than R. Truth: R excels in statistics, visualization, and reporting — especially in academia and research.
Learning on Your Own Terms
Another great thing about this course?
You can learn at your own pace.
Pause, rewind, or skip ahead — it’s your journey.
No deadlines, no pressure.
Plus, you’ll gain access to downloadable resources, cheat sheets, and quizzes to reinforce your learning.
Whether you have 20 minutes a day or 2 hours, the course fits into your schedule — not the other way around.
Final Thoughts: The Best Time to Start Is Now
If you’ve been waiting for a sign to start learning data skills — this is it.
The 2025 R Programming Bootcamp for Absolute Beginners is not just a course. It’s a launchpad for your data journey, your career, and your confidence.
You don’t need a background in coding. You don’t need to be a math genius. You just need curiosity, commitment, and a little bit of time.
So go ahead — take that first step. Because in a world where data rules everything, learning R might just be the smartest move you make this year.
0 notes
Text
Get Started Coding for non-programmers

How to Get Started with Coding: A Guide for Non-Techies
If you ever considered learning how to Get Started Coding for non-programmers but were intimidated by technical terms or daunted by the prospect, you're in good company. The good news is that coding isn't for "techies" alone. Anyone can learn to code, no matter their background or experience. In this guide, we'll take you through the fundamentals of how to get started coding, whether you're looking to create a website, work with data, or simply learn how the technology that surrounds you operates. Why Learn to Code? Before diving into the "how," it's worth knowing the "why." Coding can unlock new doors, both personally and professionally. Some of the reasons why learning to code is worth it include: Problem-solving abilities: Programming allows you to dissect difficult problems and identify solutions. Career adaptability: More and more careers, from marketing to medicine, are turning to coding as a requirement. Empowerment: Code knowledge enables you to have a better understanding of the technology you're using daily and enables you to own your own project development. Creativity: Coding isn't purely logical—it's also about making new things and creating your own ideas. Step 1: Choose Your Learning Path Before you start, consider what you are most interested in. The route you take will depend on what you want to do. These are some of the most popular routes: Web Development: Creating websites and web apps (learn HTML, CSS, JavaScript). Data Science: Examining data, visualizing patterns, and making informed decisions based on data (learn Python, R, or SQL). App Development: Creating mobile apps for iOS or Android (learn Swift or Kotlin). Game Development: Building video games (learn Unity or Unreal Engine using C# or C++). Take a moment to determine which area speaks to you. Don't stress about choosing the "perfect" path—coding skills are interchangeable, and you can always make a change later. Step 2: Begin with the Basics After you've decided on your route, it's time to begin learning. As a novice, you'll want to begin with the fundamentals of coding. Here are some fundamental concepts to familiarize yourself with: Variables: A means of storing data (such as numbers or text). Data Types: Familiarity with various types of data, including integers, strings (text), and booleans (true/false). Loops: Doing things over and over again without writing the same code over and over. Conditionals: Deciding things in code using if-else statements. Functions: These are the Building blocks of code that can be reused to accomplish particular tasks. For instance, when you're learning Python, you could begin with a basic program such as: Step 3: Select the Proper Learning Material There's plenty of learning material out there for beginners, and the correct resource can mean a big difference in how rapidly you learn to code. Some of the most popular methods include: Online Courses: Websites such as Coursera, Udemy, edX, and freeCodeCamp provide sequential courses, and some of these are available free of charge. Interactive Platforms: Sites such as Codecademy, Khan Academy, or LeetCode offer in-the-code lessons that walk you through problems sequentially. Books: There are a lot of code books for beginners, such as "Python Crash Course" or "Automate the Boring Stuff with Python." YouTube Tutorials: YouTube contains a plethora of coding tutorials for beginners where you can work through actual projects. For complete beginners, sites such as freeCodeCamp and Codecademy are excellent as they enable you to code in the browser itself, so you don't have to install anything. Step 4: Practice, Practice, Practice The secret to mastering coding is regular practice. Similar to learning a musical instrument or a foreign language, you'll have to develop muscle memory and confidence. Practice Coding Challenges: Sites such as HackerRank or Codewars offer exercises that allow you to practice what you've learned. Build Small Projects: Begin with small projects, like a to-do list, a basic calculator, or a personal blog. This reinforces your learning and makes coding more rewarding. Join Coding Communities: Sites like GitHub, Stack Overflow, or Reddit's /r/learnprogramming are excellent for asking questions, sharing your work, and receiving feedback. Step 5: Don't Be Afraid to Make Mistakes Keep in mind that errors are all part of learning. While you're coding, you'll get errors, and that's completely fine. Debugging is a skill that takes time to master. The more you code, the more accustomed you'll get to spotting and resolving errors in your code. Here's a useful approach when faced with errors: Read the error message: It usually indicates precisely what's wrong. Search online: Chances are, someone else has faced the same issue. Platforms like Stack Overflow are full of solutions. Break the problem down: If something’s not working, try to isolate the issue and test each part of your code step by step. Step 6: Stay Motivated Get Started Coding for Non-Programmers. Learning to code can be challenging, especially in the beginning. Here are a few tips to stay motivated: Break goals into bite-sized pieces: Don't try to learn it all at once; set mini goals such as "Complete this course" or "Finish this project." Pat yourself on the back: Celebrate every time you complete a project or figure out a problem. Get a learning buddy: It's always more fun and engaging with someone learning alongside you. Don't do it in one sitting: It takes time to learn to code. Relax, be good to yourself, and enjoy the process. Conclusion Learning to Get Started Coding for non-programmers might seem daunting, but it’s possible with the right mindset and resources. Start small, be consistent, and remember that every coder, no matter how experienced, was once a beginner. By following these steps—choosing the right learning path, mastering the basics, practicing regularly, and staying motivated—you’ll soon gain the skills and confidence you need to code like a pro. Read the full article
0 notes
Text
Machine Learning Course for Beginners: A Comprehensive Guide to Getting Started
What is Machine Learning?
At its core, machine learning (ML) is a subset of artificial intelligence (AI) that enables computers to learn from data and make decisions or predictions without being explicitly programmed for each task. Instead of coding every rule, ML algorithms identify patterns and relationships within data to generate outcomes.
Why Enroll in an Online Machine Learning Course for Beginners?
Online courses offer flexibility, affordability, and access to expert instructors. A machine learning course online typically covers foundational topics such as supervised and unsupervised learning, data preprocessing, model evaluation, and common algorithms like linear regression, decision trees, and neural networks. These courses often include hands-on projects that reinforce learning and build your portfolio.
Key Topics Covered in a Beginner’s Machine Learning Course
Understanding Data and Features: Learning how to clean, preprocess, and select relevant features.
Supervised Learning: Techniques where models are trained on labeled data, such as classification and regression.
Unsupervised Learning: Methods like clustering and dimensionality reduction applied to unlabeled data.
Model Evaluation: Metrics like accuracy, precision, recall, and F1-score.
Overfitting and Underfitting: Strategies to improve model generalization.
Recommended Resources for Beginners
Several platforms offer beginner-friendly courses, including Coursera, edX, Udacity, and DataCamp. Many of these platforms provide free trials and introductory courses suitable for newcomers.
Practical Machine Learning Projects
To solidify your understanding, engaging in real-world projects is essential. Some popular machine learning projects for beginners include:
Iris Flower Classification: Using the classic Iris dataset to classify flower species.
Titanic Survival Prediction: Predicting passenger survival based on features like age, sex, and class.
Handwritten Digit Recognition: Using the MNIST dataset to recognize handwritten numbers.
Customer Churn Prediction: Analyzing customer data to predict churn rates.
These projects help you apply theoretical knowledge, learn to handle data, and fine-tune models.
AI Tutorial for Beginners: Understanding the Basics
Artificial Intelligence (AI) is a broader field that encompasses machine learning, natural language processing, computer vision, and more. For beginners, an AI tutorial for beginners provides a gentle introduction to these concepts, demystifying how machines can be taught to perform intelligent tasks.
What is AI?
AI involves creating systems that can perform tasks that typically require human intelligence, such as understanding language, recognizing images, making decisions, or solving problems.
Types of AI
Narrow AI: Systems designed for specific tasks (e.g., virtual assistants like Siri or Alexa).
General AI: Hypothetical systems with human-like intelligence (not yet realized).
How AI Relates to Machine Learning
While AI is the overarching field, machine learning is a subset focused on algorithms that learn from data. Many modern AI applications rely heavily on ML techniques, making understanding both essential.
Basic Concepts in AI
Natural Language Processing (NLP): Teaching machines to understand and generate human language.
Computer Vision: Enabling machines to interpret visual information.
Robotics: Designing intelligent robots capable of perception and action.
Getting Started with AI
Beginners can start with free tutorials, videos, and introductory courses that cover fundamental concepts, popular algorithms, and basic programming skills in Python or R.
Combining Learning: Online Machine Learning Course and Projects
Enrolling in a machine learning course for beginners is an excellent way to systematically learn the concepts, gain practical experience, and work on machine learning projects that enhance your skills. These projects often involve datasets from Kaggle or UCI Machine Learning Repository, providing real-world scenarios to apply your knowledge.
Why Practical Projects Matter
Projects help you understand data handling, feature engineering, model selection, and evaluation. They also build your portfolio, which is valuable when seeking internships or jobs in AI and ML.
Resources to Find Projects
Many online courses include project modules, and platforms like Kaggle host competitions suitable for beginners. Additionally, GitHub repositories often showcase beginner-friendly ML projects.
0 notes