#REPO/SOFTWARE/WEB
Explore tagged Tumblr posts
Visit Tumblr Blog
Explore Tumblr blogs with no restrictions, modern design and the best experience.
Last Seen Tumblr Blogs


Fun Fact
US Tumblr user growth rate is estimated to slow down to 4.1%.
Note
Our DE broke recently (no idea why that keeps happening for seemingly no reason REH) so we used links to download Manjaro owo 🩶 have TUI webbrowser suggestions?
i've only briefly ventured into TUI web browsers (one of the few GUI components i've resigned myself to), but i have some thoughts on the following:
Lynx (old af but still maintained) - i had a harder time w/ this than when i started learning vim. minimal support outside of raw html
Links (also old but a nicer experience) - works fine but again minimal support outside of raw html
ELinks (Links fork) - use this instead of normal links. it supports some basic CSS and ECMA (JS standard) scripting
browsh (text renderer for headless firefox) - idk if it's still maintained, but you get cell-style approximations of graphics. it essentially renders what firefox sees to a terminal.
w3m (a more modern experience) - proper image rendering, tabs, context menus, etc. idk if it supports any kind of JS though
there's also the Emacs web browser, though ik a lotta people use w3m inside their Emacs instead.
i'd say try ELinks and w3m and see which you prefer ?
3 notes
·
View notes
Note
Hey! I haven't read your story (yet!! I'm not really into transmigration stories but I wanna give it a shot) but I wanted to say you're really inspirational! I'm an artist who's interested in posting a webnovel with some bonus art, but I was unsure where to post and if there's an audience for it. So just, seeing you doing this makes me happy and motivates me to write.
hey thank you! i hope the inspiration continues to flow. :)
most people publishing webnovels or original fiction in the eng-speaking circles of the internet will do so on royalroad, scribblehub, ao3, wattpad, or some other platform. i'm a bit unusual in that i've only published on a personal website so far -- i haven't crossposted on other popular platforms.
RR has a lot of webnovel / litrpg / isekai enthusiasts; the others, i'm not too sure how they usually fare for original works. i've seen people talk about gaining audiences by doing review swaps, joining web rings, engaging with the forums on their host site of choice, and so on.
at some point, to grow my audience, i will probably have to do the same thing too... but right now i'd prefer a small & regular community of readers over having a widely known story on another platform. i have this problem where i loooove going back and making minor edits, so having too many places to cross-post is sort of a headache for me.
right now, i only have to worry about two places -- my writing software, and my github repo. the github repo has been set up to automatically roll out my updates to both neocities and github books, which is super useful for not having to manually edit both places at once.
i don't anticipate that "proof of existence" will be everyone's cup of tea, but if you give it a shot, i hope you enjoy! and if not, i will probably be putting up other original works in different genres as well.
good luck with your projects and hope to hear back from you soon!
5 notes
·
View notes
Text
In late November, a deepfake porn maker claiming to be based in the US uploaded a sexually explicit video to the world’s largest site for pornographic deepfakes, featuring TikTok influencer Charli D’Amelio’s face superimposed onto a porn performer’s body. Despite the influencer presumably playing no role in the video’s production, it was viewed more than 8,200 times and captured the attention of other deepfake fans.
“So nice! What program did you use for creating the deepfake??” one user going by the name balascool commented. “I love charli.” D’Amelio’s agent did not reply to a request for comment.
The video’s creator, “DeepWorld23,” has claimed in the comments that the program was a deepfake model hosted on developer platform GitHub. This program was “starred” by 46,300 other users before being disabled in August 2024 after the platform introduced rules banning projects for synthetically creating nonconsensual sexual images, aka deepfake porn. It became available again in November 2024 in an archived format, where users can still access the code.
GitHub’s crackdown is incomplete, as the code—along with others taken down by the developer site—also persists in other repositories on the platform. A WIRED investigation has found more than a dozen GitHub projects linked to deepfake “porn” videos evading detection, extending access to code used for intimate image abuse and highlighting blind spots in the platform’s moderation efforts. WIRED is not naming the projects or websites to avoid amplifying the abuse.
“It’s not easy to always remove something the moment it comes online,” says Henry Ajder, an AI adviser to tech companies like Meta and Adobe on the challenge of moderating open source material online. “At the same time, there were red flags that were pretty clear.”
Implemented in June 2024, GitHub’s policy bans projects that are “designed for, encourage, promote, support, or suggest in any way the use of synthetic or manipulated media for the creation of nonconsensual intimate imagery or any content that would constitute misinformation or disinformation.”
GitHub has disabled at least three repositories identified by WIRED in December 2024 and is clearly taking action on abusive code. But others have popped up elsewhere on the platform, including some with near-identical branding or clear descriptors as “NSFW,” “unlocked” versions, or “bypasses.”
GitHub did not respond to a request for comment.
One project identified by WIRED in December 2024 had branding almost identical to a major project—self-described as the “leading software for creating deepfakes”—which GitHub disabled for several months last year for violating its terms of service. GitHub has also since disabled this additional version.
“It wasn’t hiding,” says Ajder. “It wasn’t particularly subtle.”
However, an archived version of the major repository is still available, and at least six other repositories based on the model were present on GitHub as of January 10, including another branded almost identically.
All of the GitHub projects found by WIRED were at least partially built on code linked to videos on the deepfake porn streaming site. The repositories exist as part of a web of open source software across the web that can be used to make deepfake porn but by its open nature cannot be gate-kept. GitHub repos can be copied, known as a “fork,” and from there tailored freely by developers.
“When we look at intimate image abuse, the vast majority of tools and weaponized use have come from the open source space,” says Ajder. But they often start with well-meaning developers, he says. “Someone creates something they think is interesting or cool and someone with bad intentions recognizes its malicious potential and weaponizes it.”
Some, like the repository disabled in August, have purpose-built communities around them for explicit uses. The model positioned itself as a tool for deepfake porn, claims Ajder, becoming a “funnel” for abuse, which predominantly targets women.
Other videos uploaded to the porn-streaming site by an account crediting AI models downloaded from GitHub featured the faces of popular deepfake targets, celebrities Emma Watson, Taylor Swift, and Anya Taylor-Joy, as well as other less famous but very much real women, superimposed into sexual situations.
The creators freely described the tools they used, including two scrubbed by GitHub but whose code survives in other existing repositories.
Perpetrators on the prowl for deepfakes congregate in many places online, including in covert community forums on Discord and in plain sight on Reddit, compounding deepfake prevention attempts. One Redditor offered their services using the archived repository’s software on September 29. “Could someone do my cousin,” another asked.
Torrents of the main repository banned by GitHub in August are also available in other corners of the web, showing how difficult it is to police open-source deepfake software across the board. Other deepfake porn tools, such as the app DeepNude, have been similarly taken down before new versions popped up.
“There’s so many models, so many different forks in the models, so many different versions, it can be difficult to track down all of them,” says Elizabeth Seger, director of digital policy at cross-party UK think tank Demos. “Once a model is made open source publicly available for download, there’s no way to do a public rollback of that,” she adds.
One deepfake porn creator with 13 manipulated explicit videos of female celebrities credited one prominent GitHub repository marketed as a “NSFW” version of another project encouraging responsible use and explicitly asking users not to use it for nudity. “Learning all available Face Swap AI from GitHUB, not using online services,” their profile on the tube site says, brazenly.
GitHub had already disabled this NSFW version when WIRED identified the deepfake videos. But other repositories branded as “unlocked” versions of the model were available on the platform on January 10, including one with 2,500 “stars.”
“It is technically true that once [a model is] out there it can’t be reversed. But we can still make it harder for people to access,” says Seger.
If left unchecked, she adds, the potential for harm of deepfake “porn” is not just psychological. Its knock-on effects include intimidation and manipulation of women, minorities, and politicians, as has been seen with political deepfakes affecting female politicians globally.
But it’s not too late to get the problem under control, and platforms like GitHub have options, says Seger, including intervening at the point of upload. “If you put a model on GitHub and GitHub said no, and all hosting platforms said no, for a normal person it becomes harder to get that model.”
Reining in deepfake porn made with open source models also relies on policymakers, tech companies, developers and, of course, creators of abusive content themselves.
At least 30 US states also have some legislation addressing deepfake porn, including bans, according to nonprofit Public Citizen’s legislation tracker, though definitions and policies are disparate, and some laws cover only minors. Deepfake creators in the UK will also soon feel the force of the law after the government announced criminalizing the creation of sexually explicit deepfakes, as well as the sharing of them, on January 7.
2 notes
·
View notes
Text
So not long ago I completed my diploma in software dev, but ngl the course was a bit...crap? While it gave me a solid grasp of intermediate programming with a high level language, I feel like it didn't really leave me competent enough at all with a lot of crucial technologies and concepts to land any kind of job anytime soon.
Took a few months to learn game maker and did some cool shit with that, which was great practice and made me feel a lot more confident in my problem-solving skills.
And I've spent the last couple months working through the learning materials on something called The Odin Project, which is a very project-heavy self-learning curriculum meant to basically teach you everything you ought to know to land a job as a jr web developer. 1 and a half months into it, and 2 of the 9 courses are done, and I've already learned so much and its reinforced some of the shit I didn't quite get while studying my diploma.
The best thing about it though is that because it involves building lot of projects that gradually increase in complexity, by the end of it, I'll have a pretty sexy collection of git repos that I can make into a portfolio. In fact I think one of the last projects is making a portfolio website you can show to employers.
Gimme another 6-8 months and I reckon I'll have it all done. And after that, I still think it's gonna be an uphill battle just cuz of how shit the job market is and how competitive the field I've chosen is, but I think I'll actually be qualified and confident for the first time. I'll keep learning new shit, keep making shit, and sooner or later I'll get something.
I think within the next couple years I'll finally be able to turn my agonizingly stagnant life around.
2 notes
·
View notes
Text
mr reporting
Medical Representative Reporting – Used in pharmaceutical sales for tracking activities, visits, and sales performance.
Management Reporting – General business reporting for internal use by management to track KPIs, finances, and operations.

0 notes
Text
Learning Full Stack Development: A Journey from Frontend to Backend
In the ever evolving world of technology, full stack development has emerged as one of the most in demand and versatile skill sets in the software industry. Whether you're a beginner stepping into the coding universe or an experienced developer looking to broaden your horizon, learning Full Stack Development Online can be a game changer. This blog post will guide you through what it means to be a full stack developer, why it's valuable, and how to start your journey effectively.

What is Full Stack Development?
Full stack development refers to the ability to work on both the frontend (client-side) and backend (server-side) of a web application. A full stack developer is someone who can manage the entire development process from designing user interfaces to handling databases and server logic.
Frontend: Everything the user interacts with HTML, CSS, JavaScript, frameworks like React or Angular.
Backend: Everything behind the scenes server logic, databases, APIs, and authentication using languages like Node.js, Python, Java, or PHP.
Why Learn Full Stack Development?
High Demand: Companies value developers who can handle multiple aspects of development.
Better Problem Solving: Understanding both sides helps you debug and improve applications more efficiently.
More Opportunities: Freelancing, startups, or product building all benefit from full stack skills.
Autonomy: Build complete apps by yourself without relying on multiple specialists.
Higher Earning Potential: Multi-skilled developers often command higher salaries.
Skills You Need to Master
Here’s a breakdown of core skills needed for a full stack developer to study in a well reputed Software Training Institutes:
Frontend:
HTML, CSS, JavaScript: The building blocks of any website.
Frameworks: React.js, Vue.js, or Angular.
Responsive Design: Making websites mobile-friendly using CSS frameworks like Bootstrap or Tailwind CSS.
Backend:
Languages: Node.js, Python (Django/Flask), Ruby, Java, or PHP.
Databases: MySQL, PostgreSQL, MongoDB.
APIs: RESTful and GraphQL.
Authentication & Security: JWT, OAuth, HTTPS.
Tools & Platforms:
Version Control: Git and GitHub.
Deployment: Heroku, Vercel, Netlify, AWS, or Digital Ocean.
CI/CD & Testing: Basic knowledge of pipelines and automated testing.
How to Start Learning Full Stack Development

Pick a Language Stack: For beginners, the MERN stack (MongoDB, Express, React, Node.js) is a popular and well-supported option.
Follow a Roadmap: Stick to a structured learning plan. Many websites like roadmap.sh offer visual guides.
Build Projects: Start simple (to-do list, portfolio website) and gradually work on more complex applications like blogs, chat apps, or e-commerce platforms.
Use Online Resources: Leverage free and paid courses on platforms like free Code Camp, Udemy, Coursera, and YouTube.
Join Communities: Participate in developer communities on GitHub, Reddit, or Discord to get feedback and stay motivated.
Tips for Staying on Track
Be patient: Full stack development takes time. Don’t rush.
Practice consistently: Code every day, even for a short time.
Document your journey: Start a blog or GitHub repo to share your progress and projects.
Stay updated: Web development technologies evolve. Follow tech blogs, newsletters, and changelogs.
Final Thoughts
Learning full stack development is an investment in your future as a developer. It empowers you to understand the bigger picture of software development and opens doors to a wide range of career opportunities. Start small, be consistent, and enjoy the process before you know it, you'll be building fully functional web apps from scratch.
0 notes
Text
Why GitHub Matters More Than Ever
Think of GitHub as your online portfolio. It’s a place where you don’t just tell recruiters what you know—you show them. In fact, many companies now check GitHub profiles during the hiring process, especially for software development roles.
A 2022 HackerRank Developer Skills Report revealed that almost 60% of hiring managers look at GitHub projects to assess candidates’ coding abilities. For fresh graduates, that’s huge! A well-organized, active GitHub profile can prove that you have real-world coding experience—even if you haven’t had a full-time job yet.
Step 1: Set Up Your GitHub Profile Like a Pro
Before you dive into uploading code, make sure your profile is neat, informative, and professional:
Use a clear photo (a headshot works best)
Add a short bio describing your skills and interests
Link your personal website or portfolio if you have one
Pin your best repositories to highlight them at the top of your profile
Remember, this is your professional identity. Keep it clean, focused, and relevant to your goals.
Step 2: Upload Meaningful Projects
Recruiters don’t want to see dozens of empty or poorly maintained repositories. They want a few quality projects that showcase your skills.
Here’s what you can add:
A web app you built using HTML, CSS, JavaScript, or a framework like React
Backend APIs written in Node.js, PHP, or Python
Data analysis projects using Python and Jupyter Notebooks
Mobile apps built with Flutter or Android Studio
If you’re a student from one of the best private engineering colleges in Odisha, chances are you’ve already done mini-projects, internships, or hackathons. Don’t let them gather dust on your hard drive. Push them to GitHub with proper documentation.
Step 3: Document Everything
A project without a README is like a book without a title. Every project should include a clear README.md file explaining:
What the project is about
What technologies were used
How to run it
Screenshots or live demo links (if any)
Even at NMIET, I’ve noticed students with well-documented GitHub projects get better traction during placement interviews. It shows you care about clarity and collaboration—two traits companies love.
Step 4: Stay Active, Stay Relevant
It's not enough to create a GitHub account and forget it. Regular contributions matter. Here’s how you can stay active:
Push code regularly, even small updates count
Contribute to open-source projects
Fix bugs or improve documentation in someone else’s repo
Follow developers and engage with the community
You don’t have to be a genius to contribute to open source. Even correcting typos in documentation is a valid contribution. It shows initiative.
Step 5: Keep Learning, Keep Showcasing
As you grow your skills, reflect that growth in your GitHub activity. If you're exploring machine learning, create a beginner-level project and upload it. Learning a new framework? Document your learning journey through a public repo.
Students from the best private engineering colleges in Odisha often have access to mentors, labs, and industry collaborations. Use those resources to build something real—and then share it with the world through GitHub.
A Few Final Tips to Stand Out
Add your GitHub link to your resume, LinkedIn, and email signature.
Star and fork repositories that genuinely interest you.
Join GitHub Student Developer Pack to get access to free tools and training.
Remember, your GitHub doesn’t need to be perfect. It just needs to show growth, curiosity, and commitment to coding. Start with one project and build from there.
Wrapping Up
Building a great GitHub profile takes time, but it’s one of the smartest moves you can make for your tech career. Whether you're applying for internships, jobs, or even further studies, your GitHub tells your story better than words ever could.If you're doing engineering or planning to join B.Tech courses, there are a few engineering colleges in Odisha that focus on real-world projects and practical learning instead of just sticking to textbooks. In such environments, you're not just guided through theory—you’re encouraged to build, experiment, and apply what you learn. That’s where tools like GitHub come in. It becomes the perfect platform to document your journey, showcase your skills, and prove your potential to future employers. Whether it’s a project built in your second year or a collaborative effort during your internship, GitHub allows you to put your best work out there for the world—and recruiters—to see.
#college of engineering bhubaneswar#best engineering colleges in orissa#best engineering colleges in bhubaneswar#best private engineering colleges in odisha#best engineering colleges in odisha
0 notes
Text
Rambox Lifetime Deal Review: Save Big on Workspace Tools
Do you waste hours switching between Gmail, Slack, WhatsApp, and Trello? The Rambox Lifetime Deal promises a one‑time investment to centralize 700+ apps into a single, unified workspace no more switching windows, losing track of notifications, or wrestling with messy layouts. In this post, we’ll explore why this deal makes sense, how Rambox truly works, and whether it’s the right move for your productivity toolkit.

You Can Visit Our Official Website
What Is the Rambox Lifetime Deal?
A single investment in the Rambox Lifetime Deal delivers lifelong Pro Plan access, bypassing the standard $210 one‑time fee. through a limited‑time code on AppSumo, currently available for just $5 (saving over $200) AppSumo. Once redeemed within 60 days, you unlock:
All Pro Plan features
Unlimited app integrations
Cross‑device settings sync
Future Pro Plan updates
No subscriptions. No renewal fees. Just lifetime access.
Why Rambox Is Useful for Your Daily Work
In my own freelance projects, I spent almost an hour daily toggling between Gmail, Slack, Trello, and GitHub. Rambox solves that common pain point by bringing every service under one roof. According to user reviews on SoftwareAdvice, Rambox “centralizes all your apps, making it easy to organize and access frequently used applications in one place,” improving focus and reducing context‑switching fatigue Software Advice.
Key benefits:
Time savings: Fewer clicks between windows
Improved focus: Mute non‑critical notifications
Consistent setup: Same workspace on every device
Rambox Features You Should Know
Rambox blends essential tools into a clean dashboard. Here’s how it delivers on its promise:
App Integration (700+ Pre‑configured)
Instantly add popular services Gmail, WhatsApp, Facebook, Microsoft Teams, and more without manual URLs or extensions. If you need a niche tool, you can also add any custom web app. Rambox
Centralized Dashboard
A single sidebar lists your workspaces and apps side by side. Quickly jump to what matters, or search across all services with the quick‑search bar.
Notification Management
Use the Notification Center to mute sounds, pause alerts, or set work hours per workspace, so you only get notified when it counts.
Workspace Layouts
Choose from fullscreen or tile modes. Pre‑defined layouts let you arrange apps horizontally or vertically, tailoring your digital desk to tasks at hand.
Auto‑Hibernation & Performance
When apps aren’t in use, Rambox puts them to sleep to reclaim memory and keep everything running smoothly, even with many services open. With Rambox’s custom CSS and JavaScript injection, experienced users can personalize both the look and functionality of their apps.
Cross‑Device Sync
Your workspaces, app order, and settings follow you between Windows, macOS, and Linux installations, no manual reconfiguration required. Rambox
Who Can Benefit from Rambox Lifetime Deal
Freelancers juggling multiple client accounts
Developers managing code repos, chats, and documentation
Remote teams concert via Slack, Teams, Zoom, and Trello
Power users who want a clean, consolidated digital workspace
If you spend more time toggling apps than actually working, this lifetime deal pays for itself in hours saved.
Use Case: A Week Using Rambox to Boost Focus
Day 1: I set up two workspaces “Client A” and “Personal.” Each had Gmail, Slack, and Trello. Notification profiles were tailored: “Client A” blared only critical pings, while “Personal” stayed silent until evenings.
Day 3: I added a grammar‑checker extension to my marketing workspace, catching errors in real‑time without switching to a browser.
Day 5: During a heavy coding sprint, I hibernated non‑essential apps, freeing over 500 MB of RAM and keeping Rambox responsive.
Result: I reclaimed roughly 45 minutes per day by avoiding app‑switch fatigue. Tasks flowed more smoothly, and I hit deadlines earlier.
You Can Visit Our Official Website
Common Questions About the Rambox Lifetime Deal
Is the deal stackable? No. Each code is a single‑user license, non‑stackable.
How do I redeem my code? After purchase, follow the link in your AppSumo dashboard. Enter your code within 60 days.
Can I use it on multiple devices? The Pro Plan lets you run Rambox on up to three devices at once.
Are future updates included? All Pro Plan updates are covered—no hidden fees.
Why This Is the Best Time to Grab the Deal
Limited availability: Codes expire 60 days after purchase.
Huge savings: Save over 97% compared to standard lifetime price.
Future‑proof: Get every Pro enhancement, CSS/JS flexibility, and cross‑device sync without extra cost.
If you’ve been on the fence, now’s the moment to claim your code before the offer disappears.
Final Thoughts
If daily app‑switching is hurting your productivity, Rambox is more than a convenience, it's a game‑changer. The Rambox Lifetime Deal turns what could be hundreds of subscription dollars into a simple one‑time fee, backed by robust features, performance optimizations, and flexible layouts. For developers, freelancers, or any knowledge worker, this deal is a low‑risk, high‑reward investment in your workflow.
You Can Visit Our Official Website
0 notes
Text
Slimjaro Reviews Australia (Honest Customer Reviews 2025) Must Check Once Before Buying!
Introduction
Linux enthusiasts are always on the lookout for lightweight, fast, and efficient operating systems that can breathe new life into older hardware or provide a streamlined experience on modern machines. Slimjaro Reviews is one such distribution that has gained attention for its minimalistic approach while retaining the power of Arch Linux.
In this detailed Slimjaro review, we’ll explore its features, performance, installation process, software availability, and overall usability to help you decide if it’s the right choice for your needs.
What is Slimjaro?
Slimjaro is a lightweight Linux distribution based on Arch Linux and Manjaro. It is designed to be fast, minimal, and highly customizable while maintaining the stability and rolling-release model of Arch. Unlike standard Manjaro, which comes with a full suite of pre-installed applications, Slimjaro strips away unnecessary packages, offering a leaner experience ideal for:
Older or low-spec computers
Users who prefer a minimal setup
Developers and advanced users who want control over their system
Key Features of Slimjaro
Lightweight & Fast – Uses fewer system resources than standard Manjaro.
Arch-Based – Benefits from the Arch User Repository (AUR) and rolling updates.
Multiple Desktop Environments – Offers Xfce, Openbox, and LXQt for flexibility.
Minimal Pre-Installed Software – Only essential apps are included, allowing users to customize their setup.
Manjaro Tools – Retains useful utilities like Manjaro Hardware Detection (MHWD) and Pamac package manager.
Slimjaro Performance Review
One of the biggest selling points of Slimjaro is its performance. Let’s break down how it performs in different scenarios.
1. System Resource Usage
Compared to standard Manjaro or Ubuntu, Slimjaro consumes significantly less RAM and CPU at idle:
OS
Idle RAM Usage
Idle CPU Usage
Boot Time
Slimjaro (Xfce)
~250-350 MB
1-3%
~15-20 sec
Manjaro (Xfce)
~500-600 MB
2-5%
~20-25 sec
Ubuntu (GNOME)
~800-1000 MB
5-10%
~30-40 sec
This makes Slimjaro an excellent choice for older PCs, netbooks, or lightweight workstations.
2. Gaming & Multimedia Performance
Thanks to its minimal background processes, Slimjaro can improve gaming performance on weaker hardware. However, since it doesn’t come with proprietary drivers pre-installed, users must manually install:
Graphics Drivers (NVIDIA/AMD via MHWD)
Multimedia Codecs (Optional but recommended)
Once configured, Slimjaro performs well for emulation, indie games, and even some AAA titles via Steam (Proton).
3. Responsiveness & Stability
Unlike some ultra-lightweight distros that sacrifice stability, Slimjaro maintains a good balance. It rarely crashes, and the rolling-release model ensures up-to-date software without major system-breaking updates.
Installation Process
Slimjaro provides a user-friendly Calamares installer, similar to Manjaro. Here’s a quick overview:
Download the ISO from the official Slimjaro website.
Create a bootable USB using tools like Slimjaro Reviews Australia
or Rufus.
Boot into Live Environment to test before installing.
Run Calamares Installer – Configure partitions, user accounts, and timezone.
Reboot & Enjoy – The system boots into a clean, minimal desktop.
Note: Unlike Manjaro, Slimjaro doesn’t include many pre-installed apps, so users must manually install additional software post-installation.
Software & Package Management
Since Slimjaro is Arch-based, it supports:
Pamac (GUI Package Manager) – Easy access to AUR and official repos.
Pacman (CLI) – For advanced users who prefer terminal commands.
AUR Support – Install virtually any Linux software.
Default Apps in Slimjaro
Slimjaro keeps things minimal:
File Manager: Thunar (Xfce), PCManFM (LXQt)
Web Browser: Firefox (minimal setup)
Text Editor: Mousepad (Xfce), FeatherPad (LXQt)
Terminal: Xfce Terminal, QTerminal (LXQt)
Users can easily install additional software like:
Office: LibreOffice, OnlyOffice
Multimedia: VLC, MPV
Development: VS Code, Neovim
Desktop Environment Options
Slimjaro offers multiple lightweight desktop environments:
1. Xfce Edition
Best for: Balanced performance and customization.
Pros: Stable, highly configurable, good for beginners.
Cons: Slightly heavier than Openbox/LXQt.
2. Openbox Edition
Best for: Ultra-minimalist users who love keyboard-driven workflows.
Pros: Extremely lightweight Slimjaro Chemist Warehouse.
Cons: Requires manual configuration (tint2 panel, menu editors).
3. LXQt Edition
Best for: Users who want a modern but lightweight experience.
Pros: Qt-based, clean interface, good for mid-range systems.
Cons: Fewer customization options than Xfce.
Pros & Cons of Slimjaro
✅ Pros
✔ Lightweight & Fast – Great for old hardware. ✔ Arch + AUR Support – Access to the latest software. ✔ Customizable – Start with a minimal base and build up. ✔ Stable Rolling Release – No need for major upgrades.
❌ Cons
✖ Not for Beginners – Requires some Linux knowledge. ✖ Limited Default Apps – Needs manual software installation. ✖ Less Polished Than Manjaro – Fewer pre-configured settings.
LIMITED TIME OFFER: -
Visite Here: -https://slimjarocanada.ca/
1 note
·
View note
Text
CI/CD Pipeline Automation Using Ansible and Jenkins
Introduction
In today’s fast-paced DevOps environment, automation is essential for streamlining software development and deployment. Jenkins, a widely used CI/CD tool, helps automate building, testing, and deployment, while Ansible simplifies infrastructure automation and configuration management. By integrating Ansible with Jenkins, teams can create a fully automated CI/CD pipeline that ensures smooth software delivery with minimal manual intervention.
In this article, we will explore how to automate a CI/CD pipeline using Jenkins and Ansible, from setup to execution.
Why Use Jenkins and Ansible Together?
✅ Jenkins for CI/CD:
Automates code integration, testing, and deployment
Supports plugins for various DevOps tools
Manages complex pipelines with Jenkinsfile
✅ Ansible for Automation:
Agentless configuration management
Simplifies deployment across multiple environments
Uses YAML-based playbooks for easy automation
By integrating Jenkins with Ansible, we can achieve automated deployments, infrastructure provisioning, and configuration management in one streamlined workflow.
Step-by-Step Guide: Integrating Ansible with Jenkins
Step 1: Install Jenkins and Ansible
📌 Install Jenkins on a Linux Server
wget -O /usr/share/keyrings/jenkins-keyring.asc \
echo "deb [signed-by=/usr/share/keyrings/jenkins-keyring.asc] \
https://pkg.jenkins.io/debian binary/" | sudo tee /etc/apt/sources.list.d/jenkins.list > /dev/null
sudo apt update
sudo apt install jenkins -y
sudo systemctl start jenkins
sudo systemctl enable jenkins
Access Jenkins UI at http://<your-server-ip>:8080
📌 Install Ansible
sudo apt update
sudo apt install ansible -y
ansible --version
Ensure that Ansible is installed and accessible from Jenkins.
Step 2: Configure Jenkins for Ansible
📌 Install Required Jenkins Plugins
Navigate to Jenkins Dashboard → Manage Jenkins → Manage Plugins
Install:
Ansible Plugin
Pipeline Plugin
Git Plugin
📌 Add Ansible to Jenkins Global Tool Configuration
Go to Manage Jenkins → Global Tool Configuration
Under Ansible, define the installation path (/usr/bin/ansible)
Step 3: Create an Ansible Playbook for Deployment
Example Playbook: Deploying a Web Application
📄 deploy.yml
---
- name: Deploy Web Application
hosts: web_servers
become: yes
tasks:
- name: Install Apache
apt:
name: apache2
state: present
- name: Start Apache
service:
name: apache2
state: started
enabled: yes
- name: Deploy Application Code
copy:
src: /var/lib/jenkins/workspace/app/
dest: /var/www/html/
This playbook: ✅ Installs Apache ✅ Starts the web server ✅ Deploys the application code
Step 4: Create a Jenkins Pipeline for CI/CD
📄 Jenkinsfile (Declarative Pipeline)
pipeline {
agent any
stages {
stage('Clone Repository') {
steps {
git 'https://github.com/your-repo/app.git'
}
}
stage('Build') {
steps {
sh 'echo "Building Application..."'
}
}
stage('Deploy with Ansible') {
steps {
ansiblePlaybook credentialsId: 'ansible-ssh-key',
inventory: 'inventory.ini',
playbook: 'deploy.yml'
}
}
}
}
This Jenkins pipeline: ✅ Clones the repository ✅ Builds the application ✅ Deploys using Ansible
Step 5: Trigger the CI/CD Pipeline
Go to Jenkins Dashboard → New Item → Pipeline
Add your Jenkinsfile
Click Build Now
Jenkins will execute the CI/CD pipeline, deploying the application using Ansible! 🚀
Benefits of Automating CI/CD with Ansible & Jenkins
🔹��Faster deployments with minimal manual intervention 🔹 Consistent and repeatable infrastructure automation 🔹 Improved security by managing configurations with Ansible 🔹 Scalability for handling multi-server deployments
Conclusion
By integrating Ansible with Jenkins, DevOps teams can fully automate CI/CD pipelines, ensuring faster, reliable, and consistent deployments. Whether deploying a simple web app or a complex microservices architecture, this approach enhances efficiency and reduces deployment risks.
Ready to implement Ansible and Jenkins for your DevOps automation? Start today and streamline your CI/CD workflow!
💡 Need help setting up your automation? Contact HawkStack Technologies for expert DevOps solutions!
For more details click www.hawkstack.com
0 notes
Text
What Is Github Account?
Buy Old GitHub Account. GitHub is a web-based platform and service designed for interpretation control and collaborative software development. It is widely used by developers, organizations, and teams to store, manage, and track changes in code, making collaboration easier and more efficient.
Key Features of GitHub:
Version Control: GitHub uses Git, a distributed version control method, to track changes in files and code. It allows developers to manage versions of their projects, review code history, and revert to previous versions when necessary.
Repositories: A repository (or “repo”) is a project folder on Old GitHub where all related files, code, and documentation are stored. Repositories can be public (accessible to everyone) or private (restricted access).
Collaboration: GitHub Account provides tools for collaborative development, including:
Pull Requests: Developers can propose changes, review, and discuss them before merging into the main codebase.
Branching: Developers can work on separate “branches” of a project without affecting the main codebase.
Integrated Tools: Old GitHub Account integrates with different tools and services for continuous integration/continuous deployment (CI/CD), testing, project management, and more.
GitHub Pages: A feature to host static websites directly from a repository.
Social Coding: Developers can follow other users, star repositories, and contribute to open-source projects by forking and submitting pull requests.
Documentation and Wikis: Repositories can include markdown files for documentation, as well as wikis for detailed project information.
Security Features: Old GitHub offers tools for code scanning, dependency vulnerability alerts, and secure development practices.
Old GitHub is accessible via a web interface, desktop application, or command-line tools, making it flexible for developers of all skill levels.
2 notes
·
View notes
Text
Top Cloud Computing Certification Courses To Boost Your Skills In 2025
Cloud computing plays a critical role in today’s digital world. The industries and cloud technologies go hand-in-hand. These technologies help in streaming processes, fastening the software delivery systems, etc. Regardless of your job position i.e. cloud engineer, devOps professional, IT administrator, the cloud computing certification courses give opportunity to every individual. It provides a quality learning experience with in-depth theoretical exposure. This article lists the best courses that are often regarded as the most reputable in 2025.

AWS Certified: Solutions Architect Associate- Amazon Web Services is among the most prestigious certifications in the cloud computing industry. This certification validates your mastery in conceiving scalable and cost-efficient cloud resolutions on AWS. It covers topics such as AWS architectural best practices, security & compliance, AWS storage, networking, and computing services. This also helps in cost optimization. It is ideal for IT experts transitioning to cloud computing, cloud engineers, and architects.
Microsoft Certified: Azure Solutions Architect Expert- when it comes to the cloud service provider then it tops regarding the efficacy. This credential is indispensable for specialists operating in Microsoft-based cloud environments. It validates expertise in devising and executing solutions on Microsoft Azure. The key topics include executing security and identity solutions. It encourages data storage and networking solutions, business continuity strategies, monitoring, and optimizing Azure solutions. This certification is well-suited for cloud solution architects and IT professionals with Azure experience.
Google Cloud: Professional Cloud Architect- This certification is ideal for professionals who want to design, develop, and manage Google Cloud solutions. This certification involves designing & planning cloud architecture, managing & provisioning cloud solutions, etc. It ensures security, compliance, analysis, and optimization of business processes. This certification is the best fit for IT professionals and cloud engineers working with Google Cloud.
Certified Kubernetes Administrator- Kubernetes is a pivotal technology for container orchestration in cloud atmospheres. The CKA certification showcases your potential to deploy, govern, and troubleshoot Kubernetes groupings. It includes Kubernetes architecture, cluster installation, configuration, networking, security, troubleshooting, and managing workloads and scheduling. The devOps engineer and cloud-native application developers can pursue this program.
CompTIA Cloud+ - It is a vendor-neutral certification that offers a foundational understanding of cloud technologies. It is ideal for IT experts seeking a broad cloud computing knowledge base. This certification covers cloud deployment, cloud management, security, compliance, cloud infrastructure, and troubleshooting cloud environments. It is a great option for IT professionals, new to cloud computing, Python programming for DevOps, etc.
AWS Certified: DevOps Engineer Professional - For those emphasizing Python programming for DevOps within AWS, this certification is highly regarded. It validates skills in continuous integration, monitoring, and deployment strategies. The key topics include continuous integration/ continuous deployment, infrastructure as a code, monitoring & logging, and security & compliance automation. The devOps engineers and cloud automation professionals.
Microsoft Certified: Azure DevOps Engineer Expert- This certification is crafted for professionals who implement devOps strategies in Azure. It covers agile development, CI/CD, and infrastructure automation. The certification covers Azure pipelines & Repos, infrastructure as code using ARM templates, continuous monitoring & feedback, etc. in devOps. The devOps engineers using Azure and IT professionals focusing on automation can join this program.
Google Cloud Professional DevOps Engineer- This certification is suitable for individuals who specialize in deploying and maintaining applications on Google Cloud using DevOps methodologies. It covers site reliability engineering principles, CI/CD pipeline execution, service monitoring & incident response, and security. This credential is immaculate for cloud operation professionals and DevOps engineers.
Certified Cloud Security Professionals- Cloud security is a potent crisis for businesses. The CCSP certification from (ISC)2 validates expertise in securing cloud environments. The certification covers cloud security architecture & design, risk management & compliance, identity and access management (IAM), and cloud application security. It is ideal for security analysts, and IT experts emphasizing cloud security.
IBM Certified: Solutions Architect Cloud Pak For Data- It is gaining traction in artificial intelligence-driven cloud solutions. This certification is best fitted for professionals working with IBM cloud technologies. It covers data governance & security, AI & machine learning blend, cloud-native application maturation, and hybrid cloud strategies. This certification is best suited for data architects and AI/Cloud professionals.
With rapid progress in cloud technologies, abiding competition mandates continuous wisdom and skill enhancement. Certifications offer a structured pathway to mastering cloud platforms, tools, and best practices. As businesses move towards digitalization, cloud computing remains an important element in the IT strategy. By obtaining an industry-recognized certification, you can future-proof your career and secure high-paying job opportunities.
Conclusion
The cloud computing certification courses are capable of significantly impacting your career in 2025. If you want to specialize in cloud computing or only in devOps methodologies, the above-listed courses offer it all. These certifications are suited to your employment objectives. Join the 2025 cloud computing best certifications and carve your profile for higher compensation. The only way to select one is the one that suits your career goals better.
0 notes
Text
Here's a comprehensive outline for an Azure and DevOps online internship course, designed to equip learners with the essential skills to excel in modern software development and deployment practices:
Course Overview
This internship course provides a hands-on introduction to Azure and DevOps principles. Participants will learn to leverage Azure's powerful cloud services and DevOps methodologies to automate, streamline, and improve the entire software development lifecycle.
Module 1: Introduction to Cloud Computing and Azure
Cloud Computing Fundamentals: Definition, benefits, and types of cloud computing (public, private, hybrid) Key cloud computing service models (IaaS, PaaS, SaaS) Introduction to Microsoft Azure: Overview of Azure services and their applications Creating an Azure account and navigating the portal Understanding Azure resource groups and subscriptions Module 2: Version Control with Git
Version Control Concepts: The importance of version control in software development Basic Git commands (init, add, commit, push, pull, branch, merge) Using Git for collaborative development and conflict resolution Module 3: Azure DevOps
Azure DevOps Overview: Introduction to Azure DevOps and its key features Creating Azure DevOps organizations and projects Azure Repos: Using Git repositories within Azure DevOps Branching strategies and workflows Azure Pipelines: Creating and configuring CI/CD pipelines Automating build, test, and deployment processes Integrating with Azure services for deployment (App Service, Azure Functions, etc.) Azure Boards: Agile project management with Azure Boards Using work items (tasks, bugs, user stories) to track progress Configuring Kanban and Scrum boards Azure Test Plans: Test planning, test case management, and test execution Integrating with Azure Pipelines for automated testing Module 4: Infrastructure as Code (IaC) with Azure
Introduction to IaC: Benefits of using IaC for infrastructure provisioning Azure Resource Manager (ARM) Templates: Creating and deploying ARM templates Using parameters and variables to customize deployments Azure DevOps and IaC: Integrating ARM templates into CI/CD pipelines for automated infrastructure provisioning Module 5: Monitoring and Logging
Azure Monitor: Monitoring Azure resources and applications Creating alerts and notifications Azure Application Insights: Monitoring application performance and identifying issues Analyzing logs and metrics Internship Project
Participants will work on a real-world project to apply the learned concepts. This could involve: Building a web application and deploying it to Azure App Service Implementing a CI/CD pipeline for automated builds and deployments Configuring monitoring and logging for the application Additional Considerations
Hands-on Labs: Incorporate hands-on labs to reinforce learning and provide practical experience. Mentorship: Assign experienced mentors to guide interns and provide feedback. Collaboration: Encourage collaboration among interns through group projects and discussions. Continuous Learning: Provide resources for further learning and skill development. Certification Preparation: Offer guidance and resources for preparing for Azure certifications (e.g., AZ-104, AZ-400). By following this comprehensive course outline and providing a supportive learning environment, you can equip interns with the necessary skills to excel in the field of Azure and DevOps.
For More Details Contact HR Recruiter on WhatsApp No: 9065410298
0 notes
Text
Tutorial de Git
Git: Control de Versiones y Colaboración Efectiva
Git es una herramienta de control de versiones distribuida que permite gestionar y rastrear los cambios en un proyecto de software. Su principal ventaja es que facilita el trabajo en equipo, permitiendo que varios desarrolladores trabajen simultáneamente sin interferir con el trabajo de los demás. Además, ofrece la posibilidad de crear diferentes versiones del proyecto (ramas o branches), revertir cambios, y combinar el trabajo de varios colaboradores en un solo flujo ordenado.
En esta guía, te explicaré cómo utilizar Git para crear un repositorio, trabajar con ramas, y conectarlo con un repositorio remoto como GitHub. También aprenderás cómo manejar estos conceptos de manera argumentada y contextualizada.
1. Inicialización del Repositorio Local: El Primer Paso para Gestionar tu Proyecto
Cuando comienzas un nuevo proyecto, lo primero que debes hacer es inicializar un repositorio local con Git. Un repositorio es el lugar donde se almacenan todos los archivos y su historial de versiones. Esto es fundamental para garantizar que los cambios en el código sean rastreados y revertibles si es necesario.
Repositorios Git
Si queremos empezar a usar Git, necesitamos saber dónde alojar nuestros repositorios.
Un repositorio (o "Repo" para abreviar) es un proyecto que contiene múltiples archivos. En nuestro caso un repositorio contendrá archivos basados en código.
Hay dos maneras en que puedes alojar tus repositorios. Uno es en línea (en la nube) y la segunda es fuera de línea (auto-instalado en tu servidor).
Hay tres servicios de alojamiento popular de Git: GitHub (propiedad de Microsoft), GitLab (propiedad de GitLab) y BitBucket. Usaremos GitHub como nuestro servicio de alojamiento.
Creación de cuenta de GitHub
Para crear tu cuenta, necesitas ir al sitio web de GitHub y llenar la forma de registro.

Instalación de Git
Ahora necesitamos instalar las herramientas de Git en nuestra computadora. Utilizaremos CLI (interfaz de línea de comandos) para comunicarnos con GitHub.
Para Ubuntu:
Primero, actualiza tus paquetes
sudo apt update
2. A continuación, instala Git y GitHub con apt-getsudo apt-get install git
3. Finalmente, verifica que Git se instaló correctamentegit --version
4. Ejecuta los siguientes comandos con tu información para establecer un nombre de usuario y un correo electrónico predeterminados para cuando vayas a salvar tu trabajo.git config --global user.name "MV Thanoshan" git config --global user.email "[email protected]"
2. Creación de Ramas: Desarrollo Paralelo y Colaboración Sin Conflictos
Uno de los mayores beneficios de Git es la capacidad de crear y trabajar en diferentes ramas (branches). Una rama es una versión separada del proyecto en la que puedes hacer modificaciones sin afectar el trabajo principal. Este concepto es vital cuando varios desarrolladores están colaborando en un proyecto, o cuando quieres experimentar con nuevas funcionalidades sin riesgo de romper el código existente.
Comando: git branch y git checkout
Crear una nueva rama: git branch <nombre_rama>
Cambiarte a esa rama: git checkout <nombre_rama>
Argumentación:
Las ramas son fundamentales para cualquier flujo de trabajo colaborativo. Imagina que estás desarrollando una nueva funcionalidad o realizando una corrección de un error mientras tus compañeros siguen trabajando en la versión estable del proyecto. Crear una nueva rama te permite desarrollar esa funcionalidad de manera independiente y sin el riesgo de comprometer el código principal.
Trabajar en una rama separada permite una mayor flexibilidad, ya que puedes realizar pruebas y modificaciones sin afectar a los demás desarrolladores. Además, si los cambios en la nueva rama funcionan como se espera, puedes integrarlos de manera sencilla al proyecto principal usando el comando merge (fusión).
Ejemplo:
bash
Copiar código
# Crear una nueva rama llamada "nueva-funcionalidad" git branch nueva-funcionalidad # Cambiar a esa rama git checkout nueva-funcionalidad
Ahora estás trabajando en la rama nueva-funcionalidad. Los cambios que realices aquí no afectarán a la rama principal hasta que los fusiones.
Fusión de Ramas (Merge)
Cuando has terminado de trabajar en tu rama y deseas integrar esos cambios a la rama principal, el comando git merge te permite fusionar las dos ramas.
Argumentación:
El proceso de fusión es clave para mantener la integridad del proyecto. Una vez que has desarrollado y probado tu funcionalidad, necesitas combinar ese trabajo con la rama principal. Esta integración asegura que el trabajo de todos los desarrolladores se mantenga coherente y que las nuevas funcionalidades estén alineadas con la base del código.
Ejemplo:
bash
Copiar código
# Cambiar a la rama principal git checkout main # Fusionar la rama "nueva-funcionalidad" con "main" git merge nueva-funcionalidad
Este proceso asegura que los cambios realizados en la rama nueva-funcionalidad se integren en la rama main sin perder el historial de cambios ni el contexto de las modificaciones.
3. Agregar un Repositorio Remoto: Conectar el Trabajo Local con GitHub
Un repositorio remoto es una copia de tu proyecto almacenada en un servidor externo, como GitHub. Conectar tu repositorio local a uno remoto te permite hacer copias de seguridad de tu trabajo, colaborar con otros desarrolladores, y tener acceso a tu código desde cualquier lugar.
Comando: git remote add
El comando git remote add es el que te permite vincular tu repositorio local con un servidor remoto, en este caso GitHub.
Argumentación:
¿Por qué es tan importante? Mantener una copia del proyecto en un servidor remoto es crucial para la colaboración y la protección de tu trabajo. Imagina que tu computadora se daña o pierdes acceso a ella. Tener tu proyecto en un repositorio remoto te garantiza que puedes recuperarlo y continuar trabajando desde cualquier lugar.
Además, GitHub y otras plataformas permiten a múltiples desarrolladores colaborar de manera sencilla, revisando y fusionando cambios sin complicaciones.
Pasos:
Crea un repositorio en GitHub. Ve a GitHub y crea un nuevo repositorio.
Conecta el repositorio local al remoto:bashCopiar códigogit remote add origin https://github.com/tu_usuario/mi_proyecto.git
Subir los cambios al repositorio remoto:bashCopiar códigogit push -u origin main
Ejemplo:
bash
Copiar código
# Añadir el repositorio remoto git remote add origin https://github.com/tu_usuario/mi_proyecto.git # Subir los cambios al repositorio remoto git push -u origin main
Consideraciones sobre la Colaboración
Con Git, una vez que tu repositorio está en GitHub, cualquier persona con los permisos adecuados puede clonar el repositorio, realizar cambios, y enviarlos para revisión. Esto fomenta un flujo de trabajo colaborativo, donde todos los desarrolladores pueden trabajar en diferentes partes del proyecto sin interferir entre sí.
Git es una herramienta poderosa que permite gestionar versiones de código de manera eficiente y colaborativa. Inicializar un repositorio local, crear ramas para trabajar en paralelo, y conectar tu proyecto con un repositorio remoto son los tres pilares fundamentales que permiten a cualquier equipo de desarrollo trabajar de manera ordenada y sin problemas.
El uso de ramas garantiza que el desarrollo y la experimentación no interfieran con la estabilidad del proyecto, mientras que la conexión con un repositorio remoto asegura que todo el equipo puede colaborar de forma fluida, sin importar la ubicación física de los desarrolladores.
1 note
·
View note
Text
Cross-border VAT audits: Preparing for increased scrutiny
The face of VAT compliance has changed in the recent past. Globalisation and increasing complexity in the supply chain make cross-border VAT audits formal. This would mean businesses having to find their way through a web of regulations and ensuring that their VAT practices measure up to the mark. This blog shows how businesses can prepare for such heightened scrutiny involved with cross-border VAT audits.
What are cross-border VAT audits?
VAT cross-border audits aim at scrutiny of the records of value-added tax and compliance of transactions spanning across many countries. The audits are carried out by tax authorities to ensure that businesses apply the rules and regulations of VAT correctly across various jurisdictions. With the increased wave of international trade, tax authorities are increasingly putting their focus on cross-border transactions in order to avoid fraud and also ensure the correct collection of VAT.
UK VAT Registration
IOSS VAT Registration
Why are cross-border VAT audits becoming more common?
The following are some of the major drivers of the increase in cross-border VAT audits:
Globalization and Trade Expansion: The more businesses run across borders, the more complicated VAT compliance becomes. It gives authorities a keen eye to make sure VAT obligations are met in each jurisdiction.
Technological Advancements: Sophisticated data analytics and electronic invoicing systems will facilitate the tracing and analysis of transactions by tax authorities.
Need for More Revenues: Governments face budgetary pressures and therefore attach considerable importance to VAT compliance as a source of revenue generation. This has made auditing practices more proactive.
According to the European Commission, in 2022, the estimated VAT revenues lost due to fraud and non-compliance reached EUR 93 billion only for the EU; this shows its growing importance.
How can businesses prepare for Cross-Border VAT audits?
It’s not possible to sail through cross-border VAT audits without proper preparation. Some of the steps that a business must take are as follows:
Understand the VAT regulations in each jurisdiction
Countries have varying rules and regulations with respect to Value-Added Tax. It is important that businesses are aware of such value-added tax requirements in any country a business entity is involved in. This would include:
VAT Rates: Many countries apply different rates of VAT on different types of goods and services.
Exemption Rules: The rules governing VAT exemption and zero-rated supplies may be different in every jurisdiction.
Documentation Requirements: Proper documentation is essential for compliance and supporting VAT claims.
Staying up-to-date on changes to the VAT regime is very relevant. For instance, as a result of the OECD’s BEPS project, new guidance has been issued which may impact cross-border VAT practices.
Maintain accurate and comprehensive records
Proper record keeping is the most crucial factor for ensuring VAT compliance. Check that your record-keeping is full and up-to-date, including:
Invoices: Keep all invoices issued and received, ensuring that they are in line with the VAT requirements placed on you in all jurisdictions.
Contract: Document all the terms of the cross-border deals, including payment methods and value-added tax treatment.
Customs Declarations: Retain records of any information which serves as proof for the customs declaration of goods that cross the border.
The International VAT Association reported that the risk of penalties arising from an audit can be significantly reduced if a robust record-keeping system has been maintained.
Implement robust internal controls
Internal controls also aid compliance with the VAT regime and minimise errors to the best extent possible. The following controls may be considered:
Automated Systems: Make use of VAT compliance software for the automation of calculations and generating accurate reports.
Regular Audits: Conduct internal audits for reviewing the VAT process and to point out the problems, if any, before external auditors do.
Training: Undertake regular staff training in respect of the VAT regime and compliance procedures.
A study by the VAT Forum indicates that the use of automated VAT compliance tools can reduce errors and enhance efficiency.
Conduct a Self-Assessment
In case of self-assessment, you would have to relook at the VAT practices for improvement opportunities. Top such attitude and approach can assist proactively:
Identify Risks: Spot potential compliance issues before they become problems.
Procedures Updating: This will involve reviewing the VAT procedures in line with the new regulations and best practices.
Prepare for external audits: Many of the concerns raised during the self-assessment phase shall have to be worked on to make the process of external audit more streamlined.
Engage with VAT experts
VAT experts can bring on board valuable insight into ensuring compliance. VAT consultants can:
Interpretation of Complex Rules: The firm will assist you in understanding the complex rules of VAT and their application in different countries.
Assistance with Documentation: Ensure that your document meets up to the requirements of each country.
Provide Audit Support: Offer guidance and support in case of VAT audits to handle all issues related to the same.
According to Deloitte, businesses that used VAT consulting services surveyed reported, at worst, as low as 20% in audit findings and penalties.
What are the consequences of non-compliance?
Failure to comply with cross-border VAT regulations runs the risk of incurring very serious penalties, including:
Fines and penalties: Non-compliance can result in several fines and penalties, which could have financial implications for your business.
Reputation damage: Bad VAT practices can ruin your image and lose the trust of your customers and/or partners.
Enhanced Scrutiny: Non-compliance may mean that your business is subject to higher frequency and depth of the audit, thus burdening the business more.
According to the European Commission, failure to comply with VAT obligations may lead to financial losses and operational problems for companies in the VAT Gap Report.
Any business requiring cross-border VAT compliance support can avail expertise from Cross-Border VAT on audit support. You can also seek help when expanding your operations to the EU and UK.
In summary, successful preparation for cross-border VAT audits requires familiarity with the rules on value-added tax, keeping of records, internal controls, and support. Businesses with such measures in place can be sure to stay on top of the intricacies of cross-border VAT compliance, reducing thereby the potential risks related to close scrutiny.
Disclaimer:
This blog is for information purposes only and should not be relied or acted upon when making financial decisions. Always seek professional advise prior to taking any action.
0 notes
Text
Software of the Week: Stirling PDF
Details:
Purpose: Locally hosted web application that allows you to perform various operations on PDF files (manipulation, conversion, etc.)
OS Supported: Windows, Mac, Linux (anything that can run Docker containers)
Installer Size: ~245 MB-~953 MB depending on the version
Country of Origin: United Kingdom
Languages Supported: 38 languages supported
License: Free and open source
Download Link: https://github.com/Stirling-Tools/Stirling-PDF
Over the last year or so I've been trying to replace online services in my life with offline alternatives for a two reasons.
Privacy. I don't have to worry what a bunch of strangers are doing with the files/information I give them. I try to give people as little data as possible; even if I trust the company providing the service in its current state, there is always the chance it will be sold to others I do NOT trust, and by then it's too late; my data is already out there and I don't have a say over what the new owners do with it
Availability: I don't want to depend on third-party service to always be up and running. The service could be having issues, or worse, the entire service could disappear from the internet (looking at all the YouTube to MP3 websites that Google keeps taking offline).I don't want to have to keep hunting down and vetting new services if my preferred one is down for some reason
The privacy aspect especially comes into play when I need to manipulate PDFs; rotating or removing pages, signing documents, converting from PDFs to Word or vice versa, etc.. Often the PDF is sensitive, and even if it isn't, someone could probably infer a bunch of information about you (or someone at your IP) over time based on what you upload.
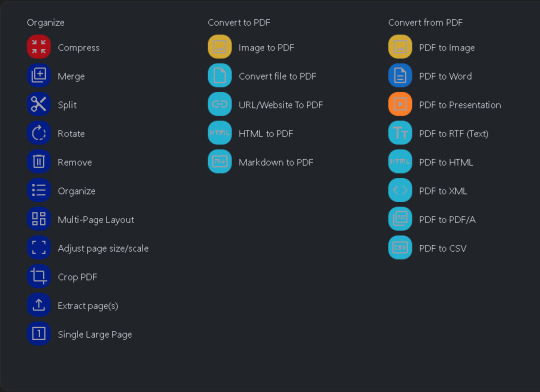
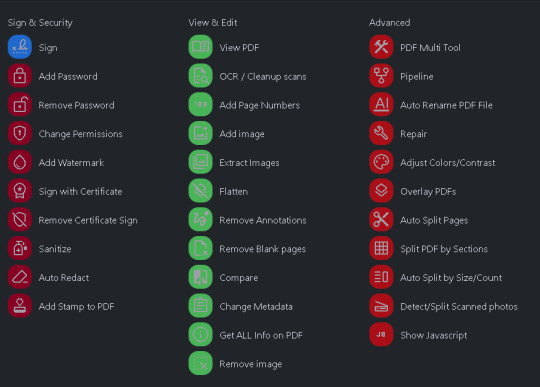
Enter Stirling PDF, a self-hosted app that has functionality for just about every PDF manipulation you can imagine.
I'm serious. There are 46 different functions listed in the documentation, ranging from common (merging PDFs) to esoteric (redacting/blacking out specific words or phrases within PDFs). If you need to manipulate a PDF, Stirling PDF probably has you covered.
If this intrigues you, I encourage you to spin up an instance of Stirling PDF on your own system. I've linked their GitHub repo above, but if you happen to own a Synology or UGREEN NAS, Marius Bogdan Lixandru (AKA MariusHosting) has written a fantastic guide to getting started here (and also his website is just a nerdy delight all around).
0 notes