#React router dom docs
Explore tagged Tumblr posts
Visit Tumblr Blog
Explore Tumblr blogs with no restrictions, modern design and the best experience.
Last Seen Tumblr Blogs


Fun Fact
Average visit duration of Tumblr.com is 10 mins and 25 secs.
Text
Flexpeak - Front e Back - Opções
Módulo 1 - Revisão de JavaScript e Fundamentos do Backend: • Revisão de JavaScript: Fundamentos • Variáveis e Tipos de Dados (let, const, var) • Estruturas de Controle (if, switch, for, while) • Funções (function, arrow functions, callbacks) • Manipulação de Arrays e Objetos (map, filter, reduce) • Introdução a Promises e Async/Await • Revisão de JavaScript: Programação Assíncrona e Módulos • Promises e Async/Await na prática Módulo 2 – Controle de Versão com Git / GitHub • O que é controle de versão e por que usá-lo? • Diferença entre Git (local) e GitHub (remoto) • Instalação e configuração inicial (git config) • Repositório e inicialização (git init) • Staging e commits (git add, git commit) • Histórico de commits (git log) • Atualização do repositório (git pull, git push) • Clonagem de repositório (git clone) • Criando um repositório no GitHub e conectando ao repositório local • Adicionando e confirmando mudanças (git commit -m "mensagem") • Enviando código para o repositório remoto (git push origin main) • O que são commits semânticos e por que usá-los? • Estrutura de um commit semântico: • Tipos comuns de commits semânticos(feat, fix, docs, style, refactor, test, chore) • Criando e alternando entre branches (git branch, git checkout -b) • Trabalhando com múltiplos branches • Fazendo merges entre branches (git merge) • Resolução de conflitos • Criando um Pull Request no GitHub Módulo 3 – Desenvolvimento Backend com NodeJS • O que é o Node.js e por que usá-lo? • Módulos do Node.js (require, import/export) • Uso do npm e package.json • Ambiente e Configuração com dotenv • Criando um servidor com Express.js • Uso de Middleware e Rotas • Testando endpoints com Insomnia • O que é um ORM e por que usar Sequelize? • Configuração do Sequelize (sequelize-cli) • Criando conexões com MySQL • Criando Models, Migrations e Seeds • Operações CRUD (findAll, findByPk, create, update, destroy) • Validações no Sequelize • Estruturando Controllers e Services • Introdução à autenticação com JWT • Implementação de Login e Registro • Middleware de autenticação • Proteção de rotas • Upload de arquivos com multer • Validação de arquivos enviados • Tratamento de erros com express-async-errors Módulo 4 - Desenvolvimento Frontend com React.js • O que é React.js e como funciona? • Criando um projeto com Vite ou Create React App • Estruturação do Projeto: Organização de pastas e arquivos, convenções e padrões • Criando Componentes: Componentes reutilizáveis, estruturação de layouts e boas práticas • JSX e Componentes Funcionais • Props e Estado (useState) • Comunicação pai → filho e filho → pai • Uso de useEffect para chamadas de API • Manipulação de formulários com useState • Context API para Gerenciamento de Estado • Configuração do react-router-dom • Rotas Dinâmicas e Parâmetros • Consumo de API com fetch e axios • Exibindo dados da API Node.js no frontend • Autenticação no frontend com JWT • Armazenamento de tokens (localStorage, sessionStorage) • Hooks avançados: useContext, useReducer, useMemo • Implementação de logout e proteção de rotas
Módulo 5 - Implantação na AWS • O que é AWS e como ela pode ser usada? • Criando uma instância EC2 e configurando ambiente • Instalando Node.js, MySQL na AWS • Configuração de ambiente e variáveis no servidor • Deploy da API Node.js na AWS • Deploy do Frontend React na AWS • Configuração de permissões e CORS • Conectando o frontend ao backend na AWS • Otimização e dicas de performance
Matricular-se
0 notes
Text
React router dom docs

#React router dom docs how to#
#React router dom docs update#
#React router dom docs software#
#React router dom docs code#
#React router dom docs software#
React Router is developed and maintained by Remix Software and many amazing contributors. You may provide financial support for this project by donating via Open Collective. Details: 1:27 AM Link, npm, npm-package-react-router-dom, React, React BrowserRouter, React Router, react-router. This repository is a monorepo containing the following packages:ĭetailed release notes for a given version can be found on our releases page. If you're migrating to v6 from v5 (or v4, which is the same as v5), check out the migration guide. If you're new to React Router, we recommend you start with the getting started guide. React Router runs everywhere that React runs on the web, on the server (using node.js), and on React Native. If you're interested, check out our contributing guidelines to learn how you can get involved. React Router is a lightweight, fully-featured routing library for the React JavaScript library. There are many different ways to contribute to React Router's development. When v6 is stable we will publish the docs on our website. The last package in the list, react-router-native has bindings to be used in developing React Native applications. The react-router-dom is the package that is used in React apps for routing.
#React router dom docs code#
If you need to find the code for v5, it is on the v5 branch. react-router-dom react-router-native The package react-router is the core library that is used as a peer dependency for the other two packages listed above. Learn all about them in this quick overview of the features that make v6 special. Familiar with React Router We introduced several new features and exciting changes in version 6. Its got everything you need to know to get up and running in React Router quickly. If you're migrating from Reach Router, check out the migration guide for Reach Router. Welcome to React Router New to React Router We suggest you start with the tutorial. MemoryRouter works when you don't need access to the history object itself in the test, but just need the components to be able to render and navigate. React Router v3 support is maintained for React Router >= 3.2.0 and
#React router dom docs update#
Use the withSentryRouting higher order component to create a SentryRoute component that will update the match path on. teams/:teamid/user/:userid instead of /teams/123/user/345), you must give the SDK access to the match path of the route render. You can pass an array of route config objects as per react-router-config. To get parameterized transaction names (ex. Make sure you use a Router component combined with createBrowserHistory (or equivalent). The React router instrumentation uses the React router library to create pageload/navigation transactions and paramaterize transaction names. We support integrations for React Router 3, 4 and 5.
#React router dom docs how to#
The React Router integration is designed to work with our Tracing SDK, Please see Getting Started with React Performance for more details on how to set up and install the SDK.
0 notes
Text
Why to upgrade to Angular 2
Introduction of Angular 2
Angular 2 is one of the most popular platforms which are a successor to Google Angular 1 framework. With its help, Angular JS developers can build complex applications in browsers and beyond. Angular 2 is not only the next or advanced version of Angular 1, it is fully redesigned and rewritten. Thus, the architecture of Angular 2 is completely different from Angular 1. This tutorial looks at the various aspects of Angular 2 framework which includes the basics of the framework, the setup of Angular and how to work with the various aspects of the framework. Unlike its predecessor, Angular 2 is a TypeScript-based, web application development platform that makes the switch from MVC (model-view-controller) to a components-based approach to web development.
Benefits of Angular 2
Mobile Support: Though the Ionic framework has always worked well with Angular, the platform offers better mobile support with the version 2. The 1.x version compromised heavily on user experience and application performance in general. With its built-in mobile-orientation, Angular 2.0 is more geared for cross-platform mobile application development.
Faster and Modern Browsers: Faster and modern browsers are demanded by developers today. Developers want Angular 2 stress more on browsers like IE10/11, Chrome, Firefox, Opera & Safari on the desktop and Chrome on Android, Windows Phone 8+, iOS6 & Firefox mobile. Developers believe that this would allow AngularJS codebase to be short and compact and AngularJS would support the latest and greatest features without worrying about backward compatibility and polyfills. This would simplify the AngularJS app development process.
High Performance: Angular2 uses superset of JavaScript which is highly optimized which makes the app and web to load faster. Angular2 loads quickly with component router. It helps in automatic code splitting so user only load code required to vendor the view. Many modules are removed from angular’s core, resulting in better performance means you will be able to pick and choose the part you need.
Changing World of Web: The web has changed noticeably and no doubt it will continue changing in the future as well. The current version of AngularJS cannot work with the new web components like custom elements, HTML imports; shadow DOM etc. which allow developers to create fully encapsulated custom elements. Developers anticipate with all hopes that Angular 2 must fully support all web components.
Component Based Development: A component is an independent software unit that can be composed with the other components to create a software system. Component based web development is pretty much future of web development. Angular2 is focused on component base development. Angularjs require entire stack to be written using angular but angular2 emphasis separation of components /allow segmentation within the app to be written independently. Developers can concentrate on business logic only. These things are not just features but the requirement of any thick-client web framework.
Why to upgrade to Angular 2 ?
Angular 2 is entirely component-based and even the final application is a component of the platform. Components and directives have replaced controllers and scopes. Even the specification for directives has been simplified and will probably further improve. They are the communication channels for components and run in the browser with elements and events. Angular 2 components have their own injector so you no longer have to work with a single injector for the entire application. With an improved dependency injection model, there are more opportunities for component or object-based work.
Optimized for Mobile- Angular 2 has been carefully optimized for boasting improved memory efficiency, enhanced mobile performance, and fewer CPU cycles. It’s as clear of an indication as any that Angular 2 is going to serve as a mobile-first framework in order to encourage the mobile app development process. This version also supports sophisticated touch and gesture events across modern tablet and mobile devices.
Typescript Support- Angular 2 uses Typescript and variety of concepts common in back-end. That is why it is more back-end developer-friendly. It's worth noting that dependency injection container makes use of metadata generated by Typescript. Another important facet is IDE integration is that it makes easier to scale large projects through refactoring your whole code base at the same time. If you are interested in Typescript, the docs are a great place to begin with. Moreover, Typescript usage improves developer experience thanks to good support from text editors and IDE's. With libraries like React already using Typescript, web/mobile app developers can implement the library in their Angular 2 project seamlessly.
Modular Development- Angular 1 created a fair share of headaches when it came to loading modules or deciding between Require.js and Web Pack. Fortunately, these decisions are removed entirely from Angular 2 as the new release shies away from ineffective modules to make room for performance improvements. Angular 2 also integrates System.js, a universal dynamic modular loader, which provides an environment for loading ES6, Common, and AMD modules.
$scope Out, Components in- Angular 2 gets rid of controllers and $scope. You may wonder how you’re going to stitch your homepage together! Well, don’t worry too much − Angular 2 introduces Components as an easier way to build complex web apps and pages. Angular 2 utilizes directives (DOMs) and components (templates). In simple terms, you can build individual component classes that act as isolated parts of your pages. Components then are highly functional and customizable directives that can be configured to build and specify classes, selectors, and views for companion templates. Angular 2 components make it possible to write code that won’t interfere with other pieces of code within the component itself.
Native Mobile Development- The best part about Angular 2 is “it’s more framework-oriented”. This means the code you write for mobile/tablet devices will need to be converted using a framework like Ionic or Native Script. One single skillset and code base can be used to scale and build large architectures of code and with the integration of a framework (like, you guessed it, NativeScript or Ionic); you get a plethora of room to be flexible with the way your native applications function.
Code Syntax Changes- One more notable feature of Angular 2 is that it adds more than a few bells and whistles to the syntax usage. This comprises (but is not limited to) improving data-binding with properties inputs, changing the way routing works, changing an appearance of directives syntax, and, finally, improving the way local variables that are being used widely. One more notable feature of Angular 2 is that it adds more than a few bells and whistles to the syntax usage. This comprises improving data-binding with properties inputs, changing the way routing works, changing an appearance of directives syntax, and, finally, improving the way local variables that are being used widely.
Comparison between Angular 1 and Angular 2
Angular 1
In order to create service use provider, factory, service, constant and value
In order to automatically detection changed use $scope, $watch, $scope, $apply, $timeout.
Syntax event for example ng-click
Syntax properties for example ng-hid, ng-checked
It use Filter
Angular 2
In order to create service use only class
In order to automatically detection changed use Zone.js.
Syntax event for example (click) or (dbl-click)
Syntax properties for example [class: hidden] [checked]
It use pipe
How to migrate Angular 1 to Angular 2
It is a very simple and easy task to upgrade Angular 1 to Angular 2, but this has to be done only if the applications demand it. In this article, I will suggest a number of ways which could be taken into consideration in order to migrate existing applications from Angular 1.x to 2. Therefore, depending on the organizational need, the appropriate migration approach should be used.
Upgrading to Angular 2 is quite an easy step to take, but one that should be made carefully. There are two major ways to feel the taste of Angular 2 in your project. Which you use depends on whatever requirements your project has. The angular team have provided two paths to this:
ngForward
ngForward is not a real upgrade framework for Angular 2 but instead we can use it to create Angular 1 apps that look like Angular 2.
If you still feel uncomfortable upgrading your existing application to Angular 2, you can fall to ngForward to feel the taste and sweetness of the good tidings Angular 2 brings but still remain in your comfort zone.
You can either re-write your angular app gradually to look as if it was written in Angular 2 or add features in an Angular 2 manner leaving the existing project untouched. Another benefit that comes with this is that it prepares you and your team for the future even when you choose to hold onto the past for a little bit longer. I will guide you through a basic setup to use ngForward but in order to be on track, have a look at the Quick Start for Angular 2.
If you took time to review the Quick Start as I suggested, you won't be lost with the configuration. SystemJS is used to load the Angular application after it has been bootstrapped as we will soon see. Finally in our app.ts, we can code like its Angular 2.
ngUpgrade
Writing an Angular 1.x app that looks like Angular 2 is not good enough. We need the real stuff. The challenge then becomes that with a large existing Angular 1.x project, it becomes really difficult to re-write our entire app to Angular 2, and even using ngForward would not be ideal. This is where ngUpgrade comes to our aid. ngUpgrade is the real stuff.
Unlike ngForward, ngUpgrade was covered clearly in the Angular 2 docs. If you fall in the category of developers that will take this path, then spare few minutes and digest this.
We'll also be writing more articles on upgrading to Angular 2 and we'll focus more on ngUpgrade in a future article.
6 notes
·
View notes
Text
How To Test Your React Apps With The React Testing Library
In this article we will discuss about the automatic testing of written software projects with some types of common testing process. First of all we will build to- do list app by Test-Driven Development (TDD) approach. Here I will use combination of RTL and Jest which were pre- installed in any new project created by Create-React-App (CRA).
At first you need to know the working process of new React project and how to set up and explore it and how to work with yarn package manager (or npm). One should know about Axios and React- Router.
Testing of Code
To hand over a software to the customer you should confirm that whether it satisfy all the specification or not as customer expectance.
Not only at the time of shipping, testing our code is essential for lifetime. There are many reason behind it:
We may update some parts of our application by changing the code.
A third party may interfere in this.
The browser which run the application may undergo breaking changes.
Some function may stop due to unexpected reason.
For this reason testing is important throughout lifetime of a project. Types of Automated Testing
Unit test
This test verify the unit of our application which works isolately. For example it test particular function for known input and expected output.
Smoke test
It check the system whether up and running or not. For example in a React app we just need to render our main app components which would fairly render the browser.
Integration test
It check two or more module works together or not. For example server and database work together or not.
Functional test
The test is done to verify functional specifications of the system.
Acceptance test
This test is done by business owner whether for the system verification.
Performance test
It verify how the system work under load which specify how fast app load in a browser.
Importance of React Testing Library?
The most common React Testing options are Enzyme and React Testing Library (RTL).
RTL
It is very simple that the user need not to care whether you use redux or context for state management. They just fix your app in certain way you want. It just need to usual testing of app.
Advantages
It is very easy to use.
New React project comes with RTL and Jest configured.
Testing is done of your choice
Project Setup
To open a terminal follow the command:
# start new react project and start the server npx create-react-app start-rtl && cd start-rtl && yarn start
While a project running open separate terminal to run yarn test and then press a. Run all the project in watch mode which indicates that when detect changes it automatically run the file. In terminal picture is looked like
Green line means in the test we are passing with flying colours.
CRA sets up RTL and Jest are for sample test.
Jest is javascript testing network to running the test. It is not listed in package.json but can be find from yarn.lock.
Jest provide huge range of functionality like assertions, mocking, spying, etc.
There are some packages for testing specifications like:
testing-library/jest-dom: provides custom DOM element matchers for Jest.
testing-library/react: provides the APIs for testing React apps.
testing-library/user-event: provides advanced simulation of browser interactions
Testing And Building The To-Do List Index Page
The components specifications for the system are:
A loading indicator
Display the title of 15 to do list while returns to the APIs call.
To creat a file src/TodoList.js enter the content.
import React from "react"; import "./App.css"; export const TodoList = () => { return ( <div> </div> ); };
Isolation testing is done before incorporating into the app
Testing is also done to check any accidental fight fire.
To create a new file in src/TodoList.test.js enter the code.
import React from "react"; import axios from "axios"; import { render, screen, waitForElementToBeRemoved } from "./custom-render"; import { TodoList } from "./TodoList"; import { todos } from "./makeTodos"; describe("<App />", () => { it("Renders <TodoList /> component", async () => { render(<TodoList />); await waitForElementToBeRemoved(() => screen.getByText(/Fetching todos/i)); expect(axios.get).toHaveBeenCalledTimes(1); todos.slice(0, 15).forEach((td) => { expect(screen.getByText(td.title)).toBeInTheDocument(); }); }); });
The source of to do which can be used in list
const makeTodos = (n) => { // returns n number of todo items // default is 15 const num = n || 15; const todos = []; for (let i = 0; i < num; i++) { todos.push({ id: i, userId: i, title: `Todo item ${i}`, completed: [true, false][Math.floor(Math.random() * 2)], }); } return todos; }; export const todos = makeTodos(200);
This function generated complete list, from where it is choosen by true and false.
Unit test should be done under few seconds where APIs calls are impractical.
To avoid APIs calls mocking should be done where original version is replaced by fake version.
Jest automatically provide mocking functions in the box.
To mock the Axios create a file src/_mocks_/axios.js and enter the below content:
Jest originally find the mock folder instead of find the original one.
Here we carried out a passing and a failings test.
Testing And Building The Single To-Do Page
To creating the list one should make it simplier
To add components create a file by src/TodoItem.js and content should added like
import React from "react"; import { useParams } from "react-router-dom"; import "./App.css"; export const TodoItem = () => { const { id } = useParams() return ( <div className="single-todo-item"> </div> ); };
The file is the const { id } = useParams() line which is attached from react-router-dom that lets us read URL parameters.
Here the situation is little different from the other because the user when click on the link
After satisfying we want to hold first item in the to-do list. To prevent collision with other URL, we use the global mock with Jest’s mockImplementationOnce.
The test is finished by adding position where it is expected.Here we expected to see our name and who created this, but it is not sure about to-do status. Here we can create a switch block, if it is not work we can throw it like an error.
Conclusion
To understand this you need to write tests for React app, no matter how small it is. For better implementation you can use CRA’s testing docs and RTL’s documentation. For small tests make sure that all the components should render. You can continuously add more tests over that time.
We will be happy to answer your questions on designing, developing, and deploying comprehensive enterprise web, mobile apps and customized software solutions that best fit your organization needs. As a reputed Software Solutions Developer we have expertise in providing dedicated remote and outsourced technical resources for software services at very nominal cost. Besides experts in full stacks We also build web solutions, mobile apps and work on system integration, performance enhancement, cloud migrations and big data analytics. Don’t hesitate to
get in touch with us!
0 notes
Text
Production Ready with React Training

Hello there, and Happy 2020!
At RisingStack, besides working on consulting and outsourced development projects, we're actively training engineering teams as well, ranging in size from 5 to 25 ppl at a time.
You might already know that we have 2-days-long training agendas for
Node.js
React
Kubernetes
Microservices
These training opportunities are regularly popping up in major European cities, and are also available for companies who'd like to train their engineers on-site, wherever that may be.
In December we prepared a new, 5-days-long training agenda for engineering teams who'd like to dive deep into React and Node, but have little to none experience with these technologies.
Below you can read the full training agenda for the React training, and you can also check out the 5-days-long Node.js Training Agenda in another blogpost.
In case you have any questions about our training agendas, or if you'd like to invite us, reach out to me at [email protected], or use the contact form on our training page.
I'll get back to you within 24 hrs.
This React Training is for developers who:
want to improve their front-end skills,
want to build application prototypes rapidly,
want to create complex and maintainable websites with React
The goal of the training sessions is to
teach JavaScript and React fundamentals.
teach how to create complex and maintainable websites with React.
teach how to write performant front-end code with React, with the latest UX best-practices in mind.
Prerequisites
Basic JavaScript and HTML knowledge needed.
No prior React knowledge is required.
Other info
This training agenda is delivered throughout 5 days.
The training relies heavily on hands-on exercises. During the training, we're building a social networking site.
Full Training Agenda
React primer
Setting up a React project
JSX and rendering
Creating React components
Handling state
Project design and structuring
Performance optimization
The new way of writing React: Hooks
Revising and covering more exotic use cases
Complex state management with third-party libraries
Networking on the client-side
Routing with User Experience in mind
Creating a real-world React app
1. React primer
We will discuss the basics of front-end applications, then learn what React is and when to use it. After that, you will learn the core principles behind React - like components and the vDOM.
Vanilla JS vs. jQuery vs. Modern Frontend Frameworks
When to use React
Components and their benefits
Introducing the virtual DOM
React vs. other frameworks: the difference between a view layer and full frameworks
The current state and the future of React: async rendering and hooks vs. lifecycle
2. Setting up a React project
You will learn how to bootstrap a React application in seconds with create-react-app and jump straight into development. We will cover the basics of writing components and the development flow.
1-minute setup with create-react-app
Writing our first dummy app
Introducing the basic programming and dev tools
Creating our first production build
What happens behind the scenes of create-react-app?
3. JSX and rendering
You will learn what JSX is and its relation to HTML and JavaScript. After that, we will discuss when do React components render and what exactly happens during a render.
The relation of JSX to JS and HTML
Common JS syntax patterns that you will use inside JSX: like conditional rendering and spreading
Inspecting how renders affect the DOM
The syntactical differences between JSX and HTML
What are JSX fragments
What happens with JSX during the build
4. Creating React components
We will take a deeper dive into React components - explaining the different ways of writing them. After that, we will learn how to handle user-triggered and lifecycle events.
Class-based and function components
Event handling
Synthetic React events vs. DOM events
Lifecycle events
5. Handling state
We will learn how to handle local state inside components, how to split complex apps into multiple components, and how to share state with child components.
Handling local state
Controlled components and uncontrolled components
Passing props to child components
Lifting the state up: when and how to do it
The problems with props and handling state in big apps with React context
6. Project design and structuring
We will discuss best practices for project structuring and component design. We will learn the difference between stateful and stateless components and the difference between container & presentational components.
Project structuring
Stateful and stateless components
Containers and presentational components
7. Performance optimization
React has a few key concepts which boost performance significantly. Knowing these and applying them during development can save you from a lot of post-project optimization headache.
Avoiding redundant renders with PureComponent, shouldComponentUpdate and memo
Using keys to render lists: why are keys required and what do they do
Common design mistakes that slow down websites
8. The new way of writing React: Hooks
Hooks are the new way of writing React logic. They are co-existing with lifecycle events, but they fundamentally differ from them. We will discuss the benefits and drawbacks of both and your opinion about them.
From mixins to lifecycles to hooks: the benefit of hooks and why were they added
Writing an app with the most commonly used React hooks
The rules of hooks and what happens if you violate them
Writing a simple useWindowSize hook
How hooks work behind the scenes
Your opinion about hooks vs. old-school lifecycles
9. Revising and covering more exotic use cases
React has an amazingly well written and terse documentation. We will go through the docs, discuss what we already know, and learn what we did not cover so far.
Avoiding redundant renders with PureComponent, shouldComponentUpdate, and memo
Using keys to render lists: why are keys required and what do they do
Common design mistakes that slow down websites
10. Complex state management with third-party libraries
We will discuss when to use React’s own setState and when to use more third-party state management solutions, then learn how to manage complex state and handle async state changes.
Why is React’s own setState not enough: handling large scale global state
Learning the basics of Redux
Writing an app with redux and react-redux
Handling async actions
The idea behind and redux and it’s benefits
Covering other - fundamentally different - state management alternatives: like MobX and Apollo Link State
11. Networking on the client-side
You will learn how to fetch data from an API server and how to handle async events.
Handling async networking
Updating the state
A quick glance at GraphQL and when to use it
12.Routing with User Experience in mind
You will learn how to implement user-friendly routing with pages and links, then we’ll move on to programmatic routing. We will also cover protected routes with redirects and handling query parameters.
Introducing React Router
Creating a simple multi-page app with links
Handling redirects and private pages
Nested routing
Keeping the minimal state in query parameters
13. Creating a real-world React app
You will learn how to rapidly develop and deploy front-end apps while keeping them maintainable.
Rapid app bootstrapping and development
UX considerations, project management, and structuring
Graceful error handling
Refactoring apps as they grow
Deploying apps on Netlify
Production Ready with React Training published first on https://koresolpage.tumblr.com/
0 notes
Text
React: The Basics
React JS is today's most popular JavaScript library for building User Interfaces, which has created by Facebook. We can build modern, fast Single Page Applications or websites with React. React is so popular in the market and beneficial to know for a Web/Frontend Developer.
Is React JS a Library or a Framework?
This is one of the most unclear subjects of React. Let’s make this clear from the beginning. React is a Library, not a Framework.
What is a Library?
A library in programming can be explained as a collection of codes. We use a library to write code in a much simpler way or to import a feature from it into our project. JQuery is a library for example. We can write JavaScript much simpler by using JQuery, or we can import written JQuery features to our project. The project itself is not dependent on a library.
What is a Framework?
A Framework, on the other hand, is a complete package of code with its own functionalities & libraries. A Framework has its own rules, you don’t have much flexibility and the project is dependent on the Framework you use. Angular is an example of a framework. So React is for building User Interfaces, and how you program the rest of the project is up to you. Like JQuery, you can include React in your project partially, or completely. So React JS a library.
React Virtual DOM
To understand the importance of React Virtual DOM, first, you need to know what DOM (Document Object Model) is. DOM is basically a representation of the HTML code on a webpage. The document is the web page itself, the objects are the HTML tags. And finally, the model of DOM is a tree structure:
The Document Object Model (DOM) is a programming interface for HTML and XML documents. It represents the page so that programs can change the document structure, style, and content. The DOM represents the document as nodes and objects. That way, programming languages can connect to the page.
A Web page is a document. This document can be either displayed in the browser window or as the HTML source. But it is the same document in both cases. The Document Object Model (DOM) represents that same document so it can be manipulated. The DOM is an object-oriented representation of the web page, which can be modified with a scripting language such as JavaScript.
What is the benefit of Virtual DOM?
Each time you make a change in the code, DOM will be completely updated and rewritten. This is an expensive operation and consumes lots of time. In this point, React provides a solution: The Virtual DOM.
So when something changes:
React first creates an exact copy of the DOM
Then React figures out which part is new and only updates that specific part in the Virtual DOM
Finally, React copies only the new parts of the Virtual DOM to the actual DOM, rather than completely rewriting it.
This approach makes a webpage much faster than a standard webpage. That’s also one of the reasons why React is so popular.
So what is this JSX?
JSX (JavaScript XML) is a syntax extension to JavaScript used by React. JSX is basically used to write HTML tags inside JavaScript. Later, the JSX code will be translated into normal JavaScript, by Babel.
In summary, React doesn’t have HTML files, HTML tags are rendered directly inside JavaScript. This approach makes React faster.
What is a React Component?
A component is an independent, reusable code block, which divides the UI into smaller pieces. In other words, we can think of components as LEGO blocks. Likewise, we create a LEGO structure from many little LEGO blocks, we create a webpage or UI from many little code blocks (components).
We don’t really want to have thousands of lines of code together in one single file. Maintenance of the code gets more and more complex as the project gets bigger. In this point, dividing the source code into components helps us a lot. Each component has its own JS and CSS code, they are reusable, easier to read, write and test. In web development, as the reasons I explained above, it’s beneficial to use component-based technologies, and React JS is one of them.
React has 2 types of components: Functional (Stateless) and Class (Stateful).
Functional (Stateless) Components
A functional component is basically a JavaScript (or ES6) function which returns a React element. According to React official docs, the function below is a valid React component:
function Welcome(props) {
return <h1>Hello, {props.name}</h1>;
}
IMPORTANT: Functional components are also known as stateless components
So a React Functional Component:
Is a JavaScript / ES6 function
Must return a React element
Take props as a parameter if necessary
Class (Stateful) Components
Class components are ES6 classes. They are more complex than functional components including constructors, life-cycle methods, render( ) function and state (data) management. In the example below, we can see how a simple class component looks like:
import React, { Component } from 'react';
class ParentComponent extends Component {
render() {
return <h1>I'm the parent component.</h1>;
}
}
export default ParentComponent;
So, a React class component:
It is an ES6 class, will be a component once it ‘extends’ React component.
Can accept props (in the constructor) if needed
Can maintain its own data with state
Must have a render( ) method which returns a React element (JSX) or null
Props
Let’s start by defining Component’s props (obviously short for properties) in React. Props are used to customize Component when it’s being created and give it different parameters.
import React, {Component} from 'react'
class Topic extends Component {
render{
return(
<div>
{this.props.name}
</div>
)
}
}
One of the most important features of props is that they can be passed by a parent component to its child components. This allows us to create a component that can be customized with a new set of props every time we use it.
import React, {Component} from 'react'
class Welcome extends Component {
render{
return(
<div>
<p> Welcome to React, today you will learn: </p>
<Topic name="Props"/>
<Topic name="State"/>
</div>
)
}}
Props are passed to the component and are fixed throughout its lifecycle. But there are cases when we want to use data that we know is going to change over time. In this case, we use something called state.
State
Unlike props, the state is a private feature and it strictly belongs to a single Component. The state allows React components to dynamically change output over time in response to certain events.
Component’s state is initialized inside a constructor:
class Counter extends Component{
constructor(props){
super(props);
this.state = {counter: 0}
}
render(){
return(
<p>{this.state.counter}</p>
)
}
And can be changed later using inbuilt setState() function
class Counter extends Component{
constructor(props){
super(props);
this.state = {counter: 0}
this.increment = this.increment.bind(this);
}
increment(){
this.setState({counter: this.state.counter + 1})
}
render(){
return(
<button onClick={this.increment}>Like</button>
<p>{this.state.counter}</p>
)
}
Lifecycle of Components
Each component in React has a lifecycle that you can monitor and manipulate during its three main phases.
The three phases are Mounting, Updating, and Unmounting.
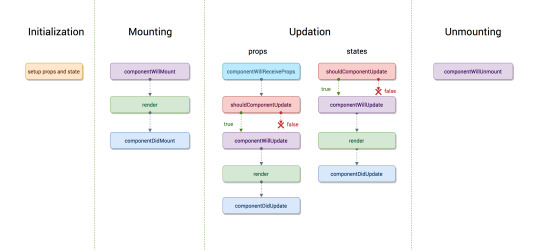
Common React Lifecycle Methods
render()
componentDidMount()
componentDidUpdate()
componentWillUnmount()
render()
The render() method is the most used lifecycle method. You will see it in all React classes. This is because render() is the only required method within a class component in React. As the name suggests it handles the rendering of your component to the UI. It happens during the mounting and updating of your component.
componentDidMount()
Now your component has been mounted and ready, that’s when the next React lifecycle method componentDidMount() comes in play. componentDidMount() is called as soon as the component is mounted and ready. This is a good place to initiate API calls if you need to load data from a remote endpoint.
componentDidUpdate()
This lifecycle method is invoked as soon as the updating happens. The most common use case for the componentDidUpdate() method is updating the DOM in response to prop or state changes. You can call setState() in this lifecycle, but keep in mind that you will need to wrap it in a condition to check for state or prop changes from the previous state. Incorrect usage of setState() can lead to an infinite loop.
componentWillUnmount()
As the name suggests this lifecycle method is called just before the component is unmounted and destroyed. If there are any cleanup actions that you would need to do, this would be the right spot.
Routing
Routing is a key aspect of web applications (and even other platforms) that could not be left out in React. We can make full-fleshed single-page applications with React if we harness the powers of routing. This does not have to be a manual process, we can make use of React-Router.
Switch
Switch component helps us to render the components only when path matches otherwise it fallbacks to the not found component.
<Switch>
<Route exact path="/" component={App} />
<Route path="/users" component={Users} />
<Route path="/contact" component={Contact} />
<Route component={Notfound} />
</Switch>
Browser Router
A <Router> that uses the HTML5 history API (pushState, replaceState, and the popstate event) to keep your UI in sync with the URL.
<BrowserRouter
basename={optionalString}
forceRefresh={optionalBool}
getUserConfirmation={optionalFunc}
keyLength={optionalNumber}>
<App />
</BrowserRouter>
Go through this link for better understanding of Routes: Getting started with React Router
Handling Events
Handling events with React elements is very similar to handling events on DOM elements. There are some syntactic differences:
React events are named using camelCase, rather than lowercase.
With JSX you pass a function as the event handler, rather than a string
<button onClick={activateLasers}></button>
Named Export vs Default Export in ES6
Named Export: (export)
With named exports, one can have multiple named exports per file. Then import the specific exports they want to be surrounded in braces. The name of the imported module has to be the same as the name of the exported module.
// imports
// ex. importing a single named export
import { MyComponent } from "./MyComponent";
// ex. importing multiple named exports
import { MyComponent, MyComponent2 } from "./MyComponent";
// ex. giving a named import a different name by using "as":
import { MyComponent2 as MyNewComponent } from "./MyComponent";
// exports from ./MyComponent.js file
export const MyComponent = () => {}
export const MyComponent2 = () => {}
Default Export: (export default)
One can have only one default export per file. When we import we have to specify a name and import like:
// import
import MyDefaultComponent from "./MyDefaultExport";
// export
const MyComponent = () => {}
export default MyComponent;
Getting Started:
You can just run the create-react-app on the command line, followed by the name of the app you want to create. This creates the react app, with all the necessary functionality you need, already built into the app. Then you can just cd into the react app and start it with npm start.
Command: create-react-app my-app
Basic Structure
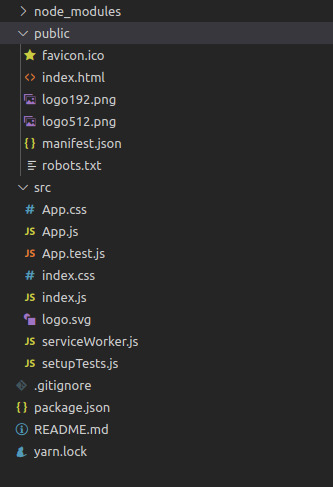
node_modules is where packages installed by NPM or Yarn will reside.
src is where your dynamic files reside. If the file is imported by your JavaScript application or changes contents, put it here.
public is where your static files reside.
0 notes
Text
Testing React components
If you're writing your front-ends in React, are you writing tests?
Testing is hard. We all know it. It's practically a separate skill that needs to be constantly trained and improved in addition to your usual programming abilities. That's why people find it scary, especially when they're coming from back-end environment. In this blog post I want to prove to you that testing your React frontend may actually be easy to set up and quite pleasant to do.
What this blog post does not touch is all the rules and best practices when testing. I'm afraid there are entire books dedicated to this topic and it takes years of practice to start noticing certain patterns on your own. I will, however, try to help you with beginning your journey.
Before we begin, let's discuss our tooling. We are going to use Jest as a platform. The biggest advantage of this one over other tools is that it's (almost) zero configuration - we can drop it into our project without extra complications and it will take care of configuring and compiling our tests with Babel for us. If you're using create-react-app, it's already added to the project so there's one less thing for you to worry about ;)
Other than Jest, I recommend amazing Sinon.js for all your stubbing, mocking and XHR faking needs and Enzyme for rendering your React components and poking them, checking how they work and why. The last ingredient of our secret testing sauce is enzyme-to-json - it facilitates seamless integration between Jest snapshot testing (more about that in a moment) and Enzyme.
Add all of these to your project and keep on reading:
yarn add --dev jest sinon enzyme enzyme-to-json
Different kinds of rendering
Before we start our test writing adventure, there's something you need to understand first. When we are testing our React components, we are not actually rendering them in the browser (OK, we do, but only in very specific kinds of tests). Often we don't even want to touch the DOM and generate HTML as it doesn't make sense and only makes our tests slower.
There are three ways we can render our components using Enzyme:
Shallow rendering
Shallow rendering is the kind of rendering that you want to use as often as possible. It takes your component and renders only the first layer, the native components (like <div></div>) and placeholders for other components with passed props but without actually rendering them (or running any lifecycle methods). It also doesn't touch DOM and opts for returning simple objects instead.
This is the best kind of rendering you want in your tests - it's fastest and it keeps your tests decoupled from their children components so if any of those children components break, rest of the tests are not making it harder to pinpoint the problem.
Since this kind of rendering does not generate DOM, it does not run all lifecycle methods so you don't have to worry about your componentDidMount crashing. This also means that if for some reason you're doing something other than additional manipulation of rendered output (for ex. fetching data in componentDidMount instead of componentWillMount), it will never get executed in your tests.
The entire API is available in documentation and you will probably want to keep this tab open until you're confident enough that you remember what you need from it.
Full rendering (mount)
If for some reason (for example: because you're testing a component that is wrapping external library, when you're testing browser events or when you want componentDidMount to run) you need to access to full DOM API, Enzyme has your back. Full rendering using mount() renders your component and all of its children while using JSDOM (browserless Javascript implementation of DOM) to make sure all those extra manual addEventListener work properly.
You might be inclined to use this as often as possible but unless you have a very good cause you should avoid doing full mount. It's much slower than shallow rendering and it introduces coupling between your parent component test and it's children. Imagine the situation where you always do a full mount and then introduce a bug in an <Icon/> component. Suddenly all your tests have crashed and it's much much harder to figure out where, when and why it happened.
The API is similar to shallow and it's also available in the documentation of Enzyme.
Static HTML rendering
This is the last kind of rendering. It uses ReactDOM static rendering underneath so it works like server-side rendering but the result is then wrapped in Cheerio.js library to make it easier to traverse and analyze the HTML result.
In this case only the example usage is in docs and you should consult cheerio documentation instead. I didn't feel the need yet to use this kind of testing but it might be useful in your particular case so it's good to know that you have this option.
Unwrapping components
One of the things that most people starting with testing components is tripping on are components that are wrapped in HOC (Higher-Order Component). If you're using something like Redux or MobX, you're probably used to exporting your component wrapped in either connect() or @inject. Those functions work by creating an extra component above yours that passes extra data with React contexts.
Unfortunately, this will cause a problem when using shallow rendering because it will only render an empty container and not the thing we want to test.
How can we avoid this problem? There are three ways:
Dive!
The solution most people try at first is to use .dive() to render one component deeper. Regrettably, this solution may be very confusing and throw hard to debug errors as it does not respect context being passed from the wrapping component. I would avoid this if possible.
Use escape hatches
I think almost every library I've seen so far has implemented some kind of escape hatch to give you access to the original component. The problem with this solution is that you always need to remember what the escape hatch was and in which order it should be applied. For example, if you use withRouter and inject on one component, you would have to unwrap it like this:
const TestedButton = Button.wrappedComponent.WrappedComponent
As you may imagine, this is not a perfect solution and it does not scale very well.
Export unwrapped component
My favorite method of dealing with this extra complexity is to export the component without any extra wrappers in addition to the one treated with inject, connect, withRouter etc.
The only real drawback is that we cannot use @decorators on entire class and we need to do the wrapping ourselves on export:
export MyComponent as UnwrappedMyComponent export default inject('store')(withRouter(MyComponent))
I do not believe this to be a huge hassle (the export is only a bit more verbose) and it allows us to test actual components, not coupling with the rest of the system.
All right, we have the theory, we have the links to documentation, we're ready to start writing tests.
But what exactly do we want to test? How do we want to do this? What kinds of tests are there?
Types of component tests
There are multiple naming conventions regarding tests so don't treat the following list as the one and only possible way of categorization.
Snapshot tests
These are the simplest to write tests that can be used for a quick (and brittle) way of having as much test coverage as possible. They work by serializing the result of rendering to a JSON file called snapshot and then, during future runs of the test, using it to compare with future render results to make sure they are unchanged.
import React from 'react' import { shallow } from 'enzyme' import toJson from 'enzyme-to-json' import { UnwrappedButton } from 'components/button' describe('Button', () => { it('matches the snapshot', () => { const component = shallow(<UnwrappedButton store={{ label: 'foo' }}/>) // this line is important expect(toJson(component)).toMatchSnapshot() }) })
I've mentioned that these tests are brittle. Because of the way they work, they are going to fail the moment anything in your component changes visually which means even fixing a typo or changing the className is going to break them. They are still very useful as a sanity check, especially when doing larger refactoring.
The other thing you need to be very careful about is that all props passed to your components will also be serialized. This means if you pass a huge object (like entire, non-mocked Store) during your tests, the resulting JSON might be huge which will make the test run (seemingly) forever - we had this problem where someone in a test passed a non-mocked store which kept an instance of HLS.js. The resulting JSON was 5 MB (!)
Rendering tests
Rendering tests are (in this case) tests that test... rendering. More specifically they're the more precise version of snapshot tests that render a component and then poke it around to check if props were passed correctly and all UI elements necessary were rendered and are available.
import React from 'react' import { shallow } from 'enzyme' import toJson from 'enzyme-to-json' import { UnwrappedButton } from 'components/button' describe('Button', () => { it('renders label', () => { const component = shallow(<UnwrappedButton store={{ label: 'foo' }}/>) expect(component.find('button').text()).toEqual('foo') }) })
They provide a better insight into what is happening inside the component which means they're more useful when working in teams - if someone needs to know how a component works they can just look at these and behaviour (more in a moment) tests and do an educated guess which is much harder in case of snapshots.
Behaviour tests
The most important of all tests and the ones that you absolutely have to write, even if you slack off and ignore all the other categories are behavior tests. They're the bread and butter of your application test suite - they test how your application behaves when user interactions happen.
const sandbox = sinon.createSandbox() describe('EmptyForm', () => { afterAll(() => sandbox.restore()) it('triggers form object onSuccess on submit', () => { const component = shallow(<EmptyForm/>) const instance = component.instance() const stub = sandbox.stub(instance.form, 'onSuccess') .returns(true) component.find('form').simulate('submit') expect(stub.calledOnce).toBe(true) }) })
Behaviour tests mostly simulate browser events and focus on checking if event handlers are attached properly. Side effects, like network requests, timers etc. should be mocked/stubbed to avoid test coupling.
There is an important caveat when writing behavior tests with Enzyme - you may think that .simulate() is simulating actual browser events but that is not entirely true. What it does is it finds the event handler and calls it, passing any extra data we provide to it. It does not support things like event bubbling or calling onChange when simulating keypresses. If you need any of those advanced features you need to code them yourself.
If it makes it easier to wrap your head around it, remember that those two are more or less equivalent:
component.simulate('change', { target: { value: 'abc' } }) component.prop('onChange')({ target: { value: 'abc' } })
Integration tests
Integration tests are testing communication between components. They are the ones that benefit most from the full mount as they need to actually run more than component in a nested tree and see how all parts fit in together. They are basically behavior tests but for groups of components.
describe('Article', () => { it('displays comments after clicking a show comments button', () => { const article = mount(<Article store={mockedStore}/>) article.find('ShowComments').simulate('click') expect(article.find('Comment').length).toBe(5) }) })
Most of the time every part of the integration test can also be written as a series of smaller behavior tests with behavior between them mocked. These tests should check if that mocked behavior is actually connected properly.
System tests
The last on our list are system tests. They are very similar to integration tests but instead of running in a simulated environment, they're are running in an actual browser. They are also, unfortunately, the slowest of the bunch so it's a good idea to separate them from your main test suite and launch for example only on CI server (instead of every time you change something).
import Nightmare from 'nightmare' describe('App', () => { it('renders the initial app', async () => { const nightmare = Nightmare() return nightmare .goto('http://localhost:4000') .type('#search_form_input_homepage', 'github nightmare') .click('#search_button_homepage') .wait('#r1-0 a.result__a') .evaluate(() => document.querySelector('#r1-0 a.result__a').href) .end() .then((link) => { expect(link).toBe('https://github.com/segmentio/nightmare') }) }) }); });
The system tests require an extra library that takes care of opening your application and passing your commands to the browser. The two that I found most interesting are Nightwatch.js that uses Selenium and Nightmare that runs on Electron. Historically Selenium was usually a bit tricky to properly configure but a lot has changed since PhantomJS got abandoned and Chrome headless became the new standard so your mileage may vary.
Configuring and running system tests can be complicated depending on the environment so I've released jest-str, a simple system test runner that contains preconfigured presets for popular boilerplates (at the moment of writing this blog post there are two - for create-react-app and razzle). If you want your favorite boilerplate to also get an official preset, feel free to send a PR :)
Great, we now know the different ways of testing components. If you've been careful with reading code examples, you probably get a general idea already of how we're doing it but let's get more specific.
Using Jest and Jest matchers
As you might've noticed already, Jest uses a spec-like syntax to define tests. They can be grouped using describe blocks for easier navigation, marking boundaries and behaviors being tested and for better error messages. The tests themselves are in it blocks and wrap tested values in expect().
There are 26 matchers which may seem overwhelming at first so when beginning your journey, focus on these 4:
toBe - checks for strict equality (===), useful for comparing numbers, true/false values, exact strings etc.
toEqual - performs deep value comparison, useful when checking for objects that have the same fields but are not necessarily the same object (ex. expect(myObj).toEqual({ foo: 1 }))
toThrow - checks if the function passed to expect() have thrown an exception (ex. expect(() => something()).toThrow(/fail/)), keep in mind to always create an anonymous function in expect() to avoid problems with scoping
toMatchSnapshot - used for snapshot testing
After your tests get more complex and you get the general gist of it, you will notice that you need more than what's above. It might be then very helpful to keep this documentation page around.
Using spies and stubs and sandboxes
Sinon.js gives us tools to observe the inner workings of our application and change it when necessary. Those tools are spies and stubs.
Spies
Spies are functions that keep track of how many times and with what arguments they were called. They can also be used as a wrapper around the original function and return its value. Spies are most useful for testing behaviors, for example, to check if the component has triggered an action in store.
I didn't want to artificially make this blog post longer so you should just check out the documentation to see exactly everything that's possible with them.
Stubs
Stubs are spies with controlled behavior. They include the same API as spies but they can also be used to return specific values, run their own fake function, call original function (or wrap it), throw errors, reject promises etc.
They are most useful when disabling parts of the application we do not want to test at the moment (XHR, complex operations, side effects etc) or when we want to make sure a certain path in code is being run (like making sure an if()somewhere gets true/false or when testing error handling).
Sandbox
Mocking functions inside stores is nice but what about test isolation? If we replace a method inside a pre-existing object with a stub, it may leak to the other tests, making them dependent on the order they were run. This is not an ideal scenario but fortunately, Sinon implements sandboxes.
A Sandbox is basically an orchestrating object that keeps track of all the spies and stubs and allows us to reset them after every call. It's usually set up like this:
const sandbox = sinon.createSandbox() describe('something', () => { afterEach(() => sandbox.restore()) // ... })
When using sandbox, remember to create spies and stubs using sandbox.spy() / sandbox.stub() instead of sinon.spy() and sinon.stub().
Stubbing network requests
There are multiple techniques to achieve that, depending on the library you're using for network requests.
If you're using something like $.ajax then check out Sinon's fake XHR server.
For axios you might be inclined to use moxios, the official testing library from the same author. I wouldn't recommend it as moxios is rarely updated and lacks some features that can be necessary for more complex flows. Personally, I use axios-mock-adapter as it has much better and more powerful API.
Finally, if you're using Fetch API, consider fetch-mock. It has a feature set similar to axios-mock-adapter. Keep in mind that fetch() is a browser API and you will a polyfill like isomorphic-fetch to make it work!
General guidelines on testing
There are a couple of things that you should remember during the tests. If you don't, you will trip and hurt yourself and drop testing front-ends again.
Avoid testing wrapped components. I mean it, always sure your components are unwrapped, otherwise, you will encounter a world of pain and arcane errors. This is where most of the people I've talked with bounced off testing altogether.
The only good moment to test wrapped components is during integration tests with full mount.
Mock your stores whenever possible. It's tempting to just instantiate your entire Store class in tests but it introduces tight coupling to the current state of your store and makes your tests both tightly coupled to it and, in case of complex apps, significantly slower.
Keep tests simple. You may be tempted to test for 10 different things in one test case (it will be faster!) but it will once again make your tests more brittle and prone to failing. It's better to have laser focus so every time your test suite fails, you have a clear message of what went wrong, where and why.
Group your tests. There's nothing worse than a huge file full of ungrouped, unordered tests. Be careful not to overdo it though, one or two levels of nesting are usually more than enough.
Keep your tests in one describe() block. It will make your life easier with before / after blocks, especially when it comes to sandboxing or stubbing requests.
And that's it! As you can see, testing your application components is not that hard and hopefully, you should have a better idea on where to begin now :)
Keep your code bugs free!
2 notes
·
View notes
Text
Deploying a Client-Side Rendered create-react-app to Microsoft Azure
New Post has been published on https://headacheshelp.com/awesome/deploying-a-client-side-rendered-create-react-app-to-microsoft-azure/
Deploying a Client-Side Rendered create-react-app to Microsoft Azure

Deploying a React app to Microsoft Azure is simple. Except that … it isn’t. The demon is in the details. If you’re looking to deploy a create-react-app — or a similar style front-end JavaScript framework who are in need of pushState-based routing — to Microsoft Azure, I believe this article will serve you well. We’re going to try to avoid the headaches of client and server side routing reconciliation.
First, a quick story.
Back in 2016, when Donovan Brown, a Senior DevOps Program Manager at Microsoft, had given a “but it works on my machine speech” at Microsoft Connect that year, I was still in my preliminary stages as a web developer. His talk was about micro-services and containers.
[…] Gone are the days when your manager comes running into your office and she is frantic and she has found a glitch. And no matter how hard I try, I can’t reproduce it and it runs perfectly on my machine. She says: fine Donovan, then we are going to ship your machine because that is the only place where it runs. But I like my machine, so I’m not going to let her ship it…
I had a similar sort of challenge, but it had to do with routing. I was working on a website with a React front end and ASP.NET Core back end, hosted as two separate projects that were deployed to Microsoft Azure. This meant we could deploy both apps separately and enjoy the benefits that comes with separation of concern. We also know who to git blame if and when something goes wrong. But it had downsides as well, as front-end vs. back-end routing reconciliation was one of those downsides.
One day I pushed some new code to our staging servers. I received a message shortly after telling me the website was failing on page refresh. It was hurling a 404 error. At first, I didn’t think it was my responsibility to fix the error. It had to be some server configuration issue. Turns out I was both right and wrong.
I was right to know it was a server configuration issue( though at the time, I didn’t know it had to do with routing ). I was wrong to deny it my responsibility. It was only after I went on a web searching rampage that I discovered a utilize case for deploying a create-react-app to Azure under the Deployment tab on the official documentation page.
Building React for production
When building a React app for production( assuming we’re are using create-react-app ), it’s worth noting the folders that get produced. Running npm running construct will generate a build folder where an optimized static version of its implementation lives. To get the application on a live server, all we need do is feed the server the content of the construct folder. If we were working on localhost, there is no live server involved, so it is not always equivalent to having the application on a live server.
Generally, the construct folder will have this structure :P TAGEND- constructed
– static
– css
– css files
– js
– js files
– media
– media files
– index.html
– other files … Client-side routing with React Router
React Router uses the HTML5 pushState history API internally. What pushState does is quite interesting. For example, navigating( or using Link in react router) from the page https :// css-tricks.com to the page https :// css-tricks.com/ archives/ will cause the URL bar to display https :// css-tricks.com/ archives/ but won’t cause the browser to load the page/ archives or even check that it exists. Couple this with the component-based model of React, it becomes a thing to change routes while displaying different pages based on those routes — without the all-seeing eye of the server trying to serve a page in its own directory. What happens, then, when we introduce servers by pushing the code to a live server? The docs tell it better :P TAGEND
If you use routers that use the HTML5 pushState history API under the hood( for example, React Router with browserHistory ), many static file servers will fail. For example, if you used React Router with a road for/ todos/ 42, the development server will respond to localhost: 3000/ todos/ 42 properly, but an Express serving a production build as above will not. This is because when there is a fresh page loading for a/ todos/ 42, the server looks for the file construct/ todos/ 42 and does not find it. The server needs to be configured to respond to a request to/ todos/ 42 by serving index.html.
Different servers involve different configuration. Express, for example, involves this :P TAGEND app.get(‘*’,( req, res) =>
res.sendFile( path.resolve( __dirname, ‘client’, ‘build’, ‘index.html’ )); );
…as documented in the create-react-app docs. Keep in intellect though, this assumes that we’re hosting create-react-app at the server root, which is making employ of a wildcard road (*) that catches all road and respond to all route request by serving the index.html file in the build folder which sits at the root of the server application. Also, this is tightly coupled with the back-end. If that’s the case, we would most likely have this kind of folder structure( assuming the back-end is in NodeJS ):
– Server
– Client( this is where your react code runs)
– construct( this is the build folder, after you npm running build)
– src
– node_modules
– package.json
– other front-end files and folders
– Other back-end files and folders
Since my front-end( create-react-app) and back-end( ASP.NET) were two different projects, serving static files by navigating the directory was sort of an impossibility.
In fact, since we are deploying a static app, we do not need the back-end. As Burke Holland set it: “Static” means that we aren’t deploying any server code; simply the front-end files.
I keep mentioning ASP.NET here because during the course of my research, I figured configuring Azure required a configuration file in a wwwroot folder and ASP.NET’s folder structure typically has a wwwroot folder. Remember the application’s back-end was in ASP.NET? But that’s just about it. The wwwroot folder seemed to be hidden somewhere on Azure. And I can’t show you without deploying a create-react-app. So let’s go do that.
Getting started with App Services on Microsoft Azure
To get started, if you do not already have a Azure account, get a free trial then head over to the Azure portal.
Navigate to All services- Web- App Services Navigating on the Azure portal from All services, to Web, to App services
We want to add a new app, give it a name, subscription( should be free if you’re on a free trial, or if you already have one ), resource group( create one or utilize existing ), then click on the Create button down at the bottom of the panel.
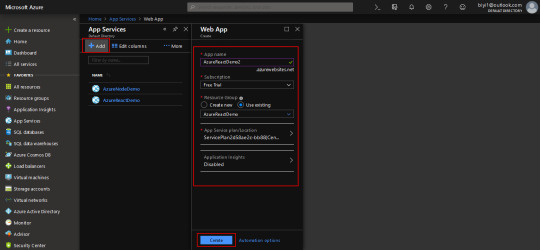
Creating a new App service on the Azure portal.
We should get a notification that the resource has been created. But it won’t immediately show up, so hit “Refresh” — I have other resources, but the AzureReactDemo2 is what I’m employing here. You’ll click on the name of your newly created app, which is AzureReactDemo2 in my occurrence.

Displaying all App Services on the Azure portal.
The blade shows you information about your app, the navigation to the left has everything you need to manage your application( overview, activity log, deployment center …).
For example, the Deployment Center is where the app deployment is managed, Slots is where things like staging, production, test are managed. Configuration is where things like environmental variables , node versions and — an important one — Kudu are managed.
The overview screen shows a general position of the application Status, URL … Click on the URL to see the live site.

Showing the various parts of an App Service on the Azure CLI.
The app is up and running!

Showing the default live page of an App Service.
What we’ve done is create a new App Service, but we have none of our code on Azure yet. As said earlier, all we need to do is to feed Azure the content of the build folder generated by building React for production, but we don’t have one yet. So let’s go local and get some React app.
Going local
We need to create a new React app, and install react-router as a dependency.
npx create-react-app azure-react-demo cd azure-react-demo
We also want to install react-router( react-router-dom, actually)
npm i react-router-dom
All things being equal, starting the app with npm start, we should get the default page.

Showing the default page generated by React.
Because this will be about testing routes, I needed to induce some pages. I’ve modified my local version and uploaded it to GitHub. I’m banking on the fact that you can find your route around react and react-router. Download a demo .
My folder looks like this :P TAGEND

Showing the folders and files in the modified create-react-app app.
The altered files have the following code :P TAGEND // App.js import React, Component from “react”; import ” ./ App.css”; import Home from ” ./ pages/ Home”; import Page1 from ” ./ pages/ Page1″; import Page2 from ” ./ pages/ Page2″; import BrowserRouter as Router, Switch, Route from “react-router-dom”;
class App extends Component
render()
return(
);
exportation default App; // Page1. js import React from “react”; import Link from “react-router-dom”;
const Page1=() =>
return(
Argentina( PAGE 1)
Nigeria
Home
); ; exportation default Page1; // Page2. js import React from “react”; import Link from “react-router-dom”;
const Page2=() =>
return(
Nigeria( PAGE 2)
Argentina
Home
); ; exportation default Page2; /* App.css */ html
box-sizing: border-box; body
margin: 0;. page
display: grid;
grid-template-rows: repeat( 3, 1fr );
height: 100 vh;. page1. flagTop, .page1. flagBottom
background-color: blue;. page2. flagTop, .page2. flagBottom
background-color: green;. flagCenter
display: flex;
align-items: centre;
flex-direction: column;
justify-content: center;
text-align: centre;. page a
perimeter: 2px solid currentColor;
font-weight: bold;
margin: 0 30 px;
padding: 5px;
text-decoration: none;
text-transform: uppercase;. flags
display: flex;
thicknes: 100%;. flags>. page
flex: 1;
Running the app runs locally, so the roads deliver when links are clicked and even when the page is refreshed.
Deploy the app to Azure
Now, let’s get it up on Azure! There are a few steps to make this happen.
Step 1: Head to the Deployment Center
On Azure, we need to go to the Deployment Center. There are quite a few options each with its pros and cons. We’ll be using Local Git( which means your local git app straight immediately to Azure) for source control, Kudu for Build Provider.
Remember to click continue or finish when you select an option, or else, the portal will just keep staring at you.

Showing Deployment Center on the Azure portal and choosing a source control as the first step in deploying a new App Service.
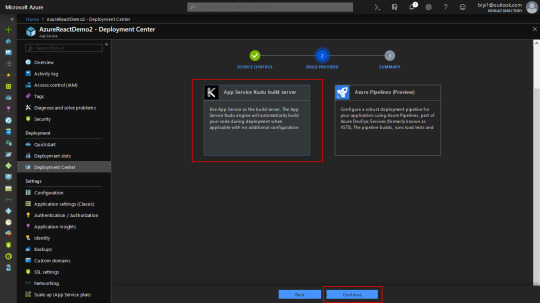
Showing the Build Provider section in the Deployment Center on Azure portal.
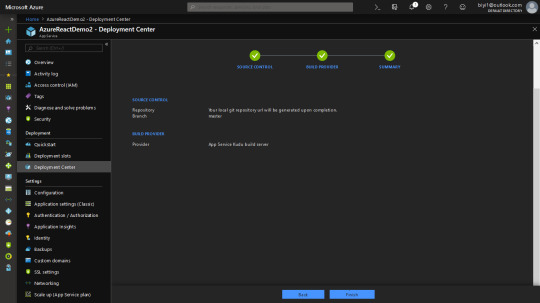
After the third step, Azure produces a local git repo for you. And it gives you a remote link to point your react app to.
One thing to note at this phase. When you push, Azure will ask for your GitHub credentials. It is under the deployment tab. There are two: App and User. App credential will be specific to an app. User will be general to all the apps you as a user has Read/ Write access to. You can do without User Credentials and use App credentials, but I find that after a while, Azure stops asking for credentials and just tells me authentication failed automatically. I defined a custom User Credentials. Either way, you are able to get past that.

Showing the Deployment Credentials for the App Service on Azure portal.
In the React app, after modification, we need to build for production. This is important because what we want to upload is the content of the build folder.
We need to tell Kudu what node engine we’ll be using, or else, the construct will most likely fail, due to the reported fact that react-scripts requires a node version higher than the default set on Azure. There are other ways to do that, but the simplest is to add a nodes engine in package.json. I’m utilizing version 10.0 here. Regrettably, we can’t only add what we like, since Azure has Node versions it supports and the rest are unsupported. Check that with the CLI with the command: az webapp list-runtimes
Add the preferred node version to the package.json file, as in :P TAGEND “engines”:
“node”: “1 0.0 ”

Displaying a list of Azure runtimes in the Azure CLI. Step 2: Build the App
To build the React app, let’s run npm build in the Terminal.
Step 3: Initialize the Git repo
Navigate into the build folder and initialize a Git repo in there. The URL to clone the repo is in the overview page. Depending on what credentials you’re employing( App or User ), it will be slightly different.

Showing the overview of the App Service on Azure and the Git clone URL. git init git add. git commit -m “Initial Commit” git remote add azure git push azure master
Now, visit the live app by using the URL on the overview page. As you can see, the app fails on/ page2 freshen. Looking at the network tab, a 404 is thrown because the page tried to be fetched from the server — with client-side routing, as we have already set up, the page shouldn’t even be server fetched at all.

Showing the failed page request and the network tab to verify. Configuring Azure to reconcile client and server side routing
In the public folder, let’s add a web.config XML file with the following content :P TAGEND
I’ve intentionally decided to not format the code snippet because XML is strict about that. If you miss the formatting, the file has no effect. You can download an XML formatter for your text editor. For VSCode, that would be the XML Tools plugin.

Showing an XML formatter and an XML formatted file in VSCode.
The app can be built again at this point, although we’ll lose the Git info in the construct folder since the new construct overrules the old build. That means it would have to be added again, then pushed.
Now the app runs as shown below! Whew.
We don’t want to have to npm run build every time — that’s where continuous deployment comes in. Check out the link below for appropriate references.
Conclusion
There is a lot to Azure, as it can do a lot for you. That’s nice because there are times when you need it to do something that seems super specific — as we’ve seen here with client and server side routing reconciliation — and it already has your back.
That said, I’ll leave you with a couple of related resources you can turn to as you look to deploying a React app to Azure.
Custom NodeJs Deployment on Azure Web App by Hao Luo: Learn more about Kudu and NodeJS deployment. Deploying a React App As a Static Site On Azure by Burke Holland: Even more options for deploying create-react-app to Microsoft Azure.
The post Deploying a Client-Side Rendered create-react-app to Microsoft Azure seemed first on CSS-Tricks.
Read more: css-tricks.com
0 notes
Text
How To Test Your React Apps With The React Testing Library
In this article we will discuss about the automatic testing of written software projects with some types of common testing process. First of all we will build to- do list app by Test-Driven Development (TDD) approach. Here I will use combination of RTL and Jest which were pre- installed in any new project created by Create-React-App (CRA).
At first you need to know the working process of new React project and how to set up and explore it and how to work with yarn package manager (or npm). One should know about Axios and React- Router.
Testing of Code
To hand over a software to the customer you should confirm that whether it satisfy all the specification or not as customer expectance.
Not only at the time of shipping, testing our code is essential for lifetime. There are many reason behind it:
We may update some parts of our application by changing the code.
A third party may interfere in this.
The browser which run the application may undergo breaking changes.
Some function may stop due to unexpected reason.
For this reason testing is important throughout lifetime of a project. Types of Automated Testing
Unit test
This test verify the unit of our application which works isolately. For example it test particular function for known input and expected output.
Smoke test
It check the system whether up and running or not. For example in a React app we just need to render our main app components which would fairly render the browser.
Integration test
It check two or more module works together or not. For example server and database work together or not.
Functional test
The test is done to verify functional specifications of the system.
Acceptance test
This test is done by business owner whether for the system verification.
Performance test
It verify how the system work under load which specify how fast app load in a browser.
Importance of React Testing Library?
The most common React Testing options are Enzyme and React Testing Library (RTL).
RTL
It is very simple that the user need not to care whether you use redux or context for state management. They just fix your app in certain way you want. It just need to usual testing of app.
Advantages
It is very easy to use.
New React project comes with RTL and Jest configured.
Testing is done of your choice
Project Setup
To open a terminal follow the command:
# start new react project and start the server npx create-react-app start-rtl && cd start-rtl && yarn start
While a project running open separate terminal to run yarn test and then press a. Run all the project in watch mode which indicates that when detect changes it automatically run the file. In terminal picture is looked like
Green line means in the test we are passing with flying colours.
CRA sets up RTL and Jest are for sample test.
Jest is javascript testing network to running the test. It is not listed in package.json but can be find from yarn.lock.
Jest provide huge range of functionality like assertions, mocking, spying, etc.
There are some packages for testing specifications like:
testing-library/jest-dom: provides custom DOM element matchers for Jest.
testing-library/react: provides the APIs for testing React apps.
testing-library/user-event: provides advanced simulation of browser interactions
Testing And Building The To-Do List Index Page
The components specifications for the system are:
A loading indicator
Display the title of 15 to do list while returns to the APIs call.
To creat a file src/TodoList.js enter the content.
import React from "react"; import "./App.css"; export const TodoList = () => { return ( <div> </div> ); };
Isolation testing is done before incorporating into the app
Testing is also done to check any accidental fight fire.
To create a new file in src/TodoList.test.js enter the code.
import React from "react"; import axios from "axios"; import { render, screen, waitForElementToBeRemoved } from "./custom-render"; import { TodoList } from "./TodoList"; import { todos } from "./makeTodos"; describe("<App />", () => { it("Renders <TodoList /> component", async () => { render(<TodoList />); await waitForElementToBeRemoved(() => screen.getByText(/Fetching todos/i)); expect(axios.get).toHaveBeenCalledTimes(1); todos.slice(0, 15).forEach((td) => { expect(screen.getByText(td.title)).toBeInTheDocument(); }); }); });
The source of to do which can be used in list
const makeTodos = (n) => { // returns n number of todo items // default is 15 const num = n || 15; const todos = []; for (let i = 0; i < num; i++) { todos.push({ id: i, userId: i, title: `Todo item ${i}`, completed: [true, false][Math.floor(Math.random() * 2)], }); } return todos; }; export const todos = makeTodos(200);
This function generated complete list, from where it is choosen by true and false.
Unit test should be done under few seconds where APIs calls are impractical.
To avoid APIs calls mocking should be done where original version is replaced by fake version.
Jest automatically provide mocking functions in the box.
To mock the Axios create a file src/_mocks_/axios.js and enter the below content:
Jest originally find the mock folder instead of find the original one.
Here we carried out a passing and a failings test.
Testing And Building The Single To-Do Page
To creating the list one should make it simplier
To add components create a file by src/TodoItem.js and content should added like
import React from "react"; import { useParams } from "react-router-dom"; import "./App.css"; export const TodoItem = () => { const { id } = useParams() return ( <div className="single-todo-item"> </div> ); };
The file is the const { id } = useParams() line which is attached from react-router-dom that lets us read URL parameters.
Here the situation is little different from the other because the user when click on the link
After satisfying we want to hold first item in the to-do list. To prevent collision with other URL, we use the global mock with Jest’s mockImplementationOnce.
The test is finished by adding position where it is expected.Here we expected to see our name and who created this, but it is not sure about to-do status. Here we can create a switch block, if it is not work we can throw it like an error.
Conclusion
To understand this you need to write tests for React app, no matter how small it is. For better implementation you can use CRA’s testing docs and RTL’s documentation. For small tests make sure that all the components should render. You can continuously add more tests over that time.
We will be happy to answer your questions on designing, developing, and deploying comprehensive enterprise web, mobile apps and customized software solutions that best fit your organization needs. As a reputed Software Solutions Developer we have expertise in providing dedicated remote and outsourced technical resources for software services at very nominal cost. Besides experts in full stacks We also build web solutions, mobile apps and work on system integration, performance enhancement, cloud migrations and big data analytics. Don’t hesitate to
get in touch with us!
0 notes
Text
22+ React Developer Tools to Increase Your Programming Productivity [Updated 2021]
New Post has been published on https://flatlogic.com/blog/22-react-developer-tools-to-increase-your-programming-productivity-updated-2021/
22+ React Developer Tools to Increase Your Programming Productivity [Updated 2021]
React Developer Tools Reactide Belle react-styleguidist React Material template React Semantic UI Profiler React Component Benchmark React Developer Toolbox React Bootstrap Admin template Sing App Periscope React wastage Monitor React Studio Atom React Plugin React Extension pack React Style generator Flatlogic One React React Testing Library React Monocle React + Redux kit React Boilerplate Storybook React-Sight
Conclusion
As you can understand from the title of this article, the goal is to be more productive developing React applications. That is why a long intro is unnecessary.
There are only two points that I want to highlight at the very beginning of the article:
This list is opinionated. That means first of all that you can make your additions. I am sure that it can be extended to 30 or even 40 React developer tools. That is why your comments on Facebook or Twitter are highly appreciated. This article can be useful first of all to beginners. That is why I provide some additional historical or background information about React.js in some paragraphs.
React Developer Tools
Reactide
Github stars: 9662 Web-site: http://reactide.io/
Image source: http://reactide.io/
Reactide is an integrated development environment (IDE) for web developers using React.js. If you use this tool, you don’t need server configuration as well as build-tool. Reactide is a React developer tool, it is simply a desktop application that offers great opportunities for visualization thought live code editing.
In Flatlogic we create web & mobile application templates built with Laravel, React, Vue, Angular and Bootstrap to help you develop web & mobile apps faster. Go and check out yourself! See our themes!
Belle
Web-site: http://nikgraf.github.io/belle
Image source: http://nikgraf.github.io/belle/#/?_k=744r8m
This open-source library was built by the members of React community. Belle is a UI framework that was built because of the difficulties with creating a decent UI with React in a short period. Too much freedom with React can lead to a giant waste of time. And that is where the opinionated component library Belle comes in handy. You can easily customize these components, and think only about the features you need to have. Mobile support and consistent API complying with React are also two big pluses of this React dev tool.
react-styleguidist
Web-site: https://react-styleguidist.js.org/docs/getting-started
React development environment. You need to install webpack in order to use this tool. You can see some examples here and here.
React Material Admin
Web-site: https://flatlogic.com/templates/react-material-admin
Image source: https://flatlogic.com/templates/react-material-admin
Admin template is a great React development tool that simplifies the process of coding. The benefits of using admin templates are well known. This particular admin dashboard follows Google material design guidelines. It is completely jQuery and Bootstrap free and can be used for fast development of almost any kind of web application.
Basic Tables; React Router;
Charts; Authentication; Basic Dashboard; Notifications bar.
Do you like this article?
You might want to read “19 Online Tools for Creating Charts”
React Semantic UI
Web-site: https://react.semantic-ui.com/
Image source: https://react.semantic-ui.com/
There is an original Semantic UI library. And to use it in React you need to use a React integration of this library and Semantic UI CSS package. It will help to speed up the development process because of the prebuilt UI components. React Semantic UI is jQuery-free. As you probably know jQuery is a library for DOM manipulation. That is why it is unnecessary to keep real DOM in sync with virtual DOM (React uses JS representation of the real DOM).
Among other features semantic UI React has:
Declarative API Shorthand Props Sub Components Augmentation Auto Controlled State
Profiler
Web-site: https://github.com/reactjs/rfcs/pull/51
Image source: https://reactjs.org/blog/2018/09/10/introducing-the-react-profiler.html
Two years ago the React team introduced Profiler. It gives you a summary of re-rendering of your app. You can increase your debugging performance using this “recording” your set of interactions with the help of this profiling feature. You will be able to see a visualization of re-render as well as screenshots of DOM update.
React Component Benchmark
Web-site: https://github.com/paularmstrong/react-component-benchmark
Image source: https://github.com/paularmstrong/react-component-benchmark
Do you remember react-addons-perf? This tool provided developers with insights about app performance. As the new version of React has been released you can no longer use react-addons-perf. React Component Benchmark is an open-source project that aims to solve the problem of getting an accurate benchmark metric. But it is important to understand that only large enough sample will give you a confident metric. The reason it’s happening like this is that this project does not hook into React directly. And because of this values are not accurate enough. That is why it is reasonable to run large samples using this React development tool.
React Developer Toolbox
Web-site: http://react-toolbox.io/#/
Image source: http://react-toolbox.io/#/
This is the best tool for developing Material Design UI. It has tons of responsive components that comply with Google Material Design guidelines. The exhaustive list you can find right here. React Toolbox is created on top CSS Modules, ES6, and Webpack. Documentation page contains all the live examples of each component so it’s very illustrative.
React Bootstrap
Web-site: https://react-bootstrap.github.io
You can make a case that bootstrap is the largest UI ecosystem in the world. So React-Bootstrap was built for compatibility with Bootstrap. This is one of the oldest libraries for React. It has Bootstrap core, rely on Bootstrap stylesheet and fully evolved side by side with React.js itself. If you want a set of accessible-by-default components React-Bootstrap is giving you much more possibilities than plain Bootstrap.
Admin Templates: Sing App React
Web-site: https://flatlogic.com/templates/sing-app-react
This fully responsive admin template was downloaded more than 1000 times. This template is versatile and was built by professional UI/UX experts. It has more than 60 ready-to-use components and provides you with intuitive framework. It can be useful for building such CRM, CMS, SAAS, etc.
Tens of Pages Fully Responsive 8 Charts Library 2 Dashboards Theme Support E-Commerce Section Static & Hover Sidebar Fully Documented Codebase
Periscope
Web-site: https://github.com/shea-hawkins/periscope
Image source: https://github.com/shea-hawkins/periscope
There isn’t much to say about this open-source project. This is monitoring for Redux applications. You can view your app at all times and adjust the timeline range.
React Wastage Monitor
Web-site: https://github.com/MalucoMarinero/react-wastage-monitor
Image source: https://github.com/MalucoMarinero/react-wastage-monitor#react-wastage-monitor
This project helps you to manage performance issues by detecting wasted rendering time. To understand the importance of this tool you need to dive deep into the concept of <PureComponent>. Implementing PureComponent stops the process called React reconciliation (you can read more here). And PureComponent only re-render when it’s necessary. If you rely on Redux managing to access possible performance mistakes you risk making a critical mistake. React Wastage Monitor ensures you never waste computation on unnecessary renders.
React Studio
Web-site: https://reactstudio.com/
Image source: https://reactstudio.com
React Studio is a useful tool for web developers and web designers. Web developers can enjoy clean JS code, good visual design representation that respects React.js concepts. You can design separate UI components using the code generator. A designer can enjoy responsive layouts that can be easily turned into React code, mobile preview and use it as a prototyping tool. You can have your clean code promptly with nothing extra.
Atom React Plugin
Web-site: https://orktes.github.io/atom-react/
Image source: https://orktes.github.io/atom-react/
This is support for the Atom Editor that helps highlight JSX code. JavaScript Syntax eXtensin without the plugin is very difficult to work with. With the addition of highlighter and code folding, you can make fewer mistakes. It will help you be more productive and makes your job easier.
React Developer Tool. Extension Pack
Web-site: https://marketplace.visualstudio.com/items?itemName=jawandarajbir.react-vscode-extension-pack
Image source: https://marketplace.visualstudio.com/items?itemName=jawandarajbir.react-vscode-extension-pack
As well as the previous tool this one is used to adjust your code editor. You can speed up the development process in Visual Studio using these seven extensions:
Code snippets; An integrated npm; ES6 snippets; ESLint; File paths; IntelliSense for npm modules; A search feature for node_modules.
React Style Guide Generator
Web-site: http://pocotan001.github.io/react-styleguide-generator/#!.
Image source: http://pocotan001.github.io/react-styleguide-generator/#!.
You need to maintain a consistent style across all the pages. When a big team is working on the same project all colors, typography, paddings should be consistent. To make a convenient style guide you can use React Style Guide Generator. And even if in a couple of years you will need to make adjustments or addons to your project you can simply give a developer or agency your style guide.
Flatlogic One React
Web-site: https://flatlogic.com/templates/one-react-template
Image source: https://flatlogic.com/templates/one-react-template
This is an admin template made with React 16 and Redux. The template has a responsive layout with tens of pages and hundreds of customizable components. The designers did a good job on this product. Flatlogic One React is a good basis for creating CMS systems, SAAS, Blog/Data management solutions, E-Commerce.
Tens of Pages; Beautiful charts made with Amcharts, Echarts, and Apexcharts; Fully responsive; React 16; Redux; Login and Logout screens; Notifications & Icons; Flatlogic Typography & Icons; 2 Dashboards;
Google Maps Integrated, etc.
If you’re interested in more examples of a react template, Flatlogic team can offer them for you.
React Testing Library
Web-site: https://testing-library.com/docs/react-testing-library/example-intro
If you use create-react-app you have support of Testing Library. If you don’t, you can use npm
npm install –save-dev @testing-library/react
React Monocle
Web-site: https://github.com/team-gryff/react-monocle
Image source: https://github.com/team-gryff/react-monocle
When you work on some complex projects with tons of classes of components it is always hard to manage such a project and debug it. In this case, only a transparent structure of a project is a condition for the successful delivery of a project. React-monocle can visualize all the relationships of all the components and show you the hierarchies very fast.
React + Redux starter kit
Web-site: https://github.com/coryhouse/react-slingshot
Image source: https://github.com/coryhouse/react-slingshot
This starter kit implements React best practices. This includes:
Bundling; Minification; Testing; Lintinting; Hot reloading, etc.
The most valuable part of this project is the amount of developers expertise that was put is this boilerplate. You no longer need to make tons of difficult decisions starting from the structure of the project until the testing.
React Boilerplate
Web-site: https://www.reactboilerplate.com/
Image source: https://www.reactboilerplate.com/
When you start a new app very often create-react-app crosses your mind. But you can also use a boilerplate with all dependencies prebuilt. This ready-to-use was created by the community to maximize the development speed and therefore your effectiveness. React Boilerplate can easily work with well known Chrome Redux DevTools.
Storybook
Web-site: https://storybook.js.org
Image source: https://storybook.js.org/
Storybook helps you develop nice separate UI components. In case when you need to make some isolated from business logic this tool provides so-called sandbox. And that in this sandbox or playground (you can call it as you want) you can create components. So why it is called a storybook? Because it documents components as stories. Each story contains states. Each state can be may be compared with the visual test case. In the end, a story is simply a function. This function returns a value that is rendered to the screen.
React-Sight
Web-site: https://github.com/React-Sight/React-Sight
Image source: https://github.com/React-Sight/React-Sight
This tool fully supports Router, Redux, and Fiber, and shows your app’s hierarchy. As well as previous visualization tool it requires to React Dev Tools that can be installed as an extension in Chrome.
Finally…
JavaScript is famous for the number of tools that you can use. As time goes by you get overwhelmed and tired. You need to have a set of proven tools for your coding process. We offer you a series of articles about React.js development tools.
The post 22+ React Developer Tools to Increase Your Programming Productivity [Updated 2021] appeared first on Flatlogic Blog.
0 notes
Text
How To Test Your React Apps With The React Testing Library
About The Author
Awesome frontend developer who loves everything coding. I’m a lover of choral music and I’m working to make it more accessible to the world, one upload at a … More about Chidi …
Testing gives confidence in written code. In the context of this article, ‘testing’ means ‘automated testing’. Without automated testing, it is significantly harder to ensure the quality of a web application of significant complexity. Fails caused by automated testing may lead to more bugs in production. In this article, we’re going to show how React developers can quickly start testing their app with the React Testing Library (RTL).
Today, we’ll briefly discuss why it’s important to write automated tests for any software project, and shed light on some of the common types of automated testing. We’ll build a to-do list app by following the Test-Driven Development (TDD) approach. I’ll show you how to write both unit and functional tests, and in the process, explain what code mocks are by mocking a few libraries. I’ll be using a combination of RTL and Jest — both of which come pre-installed in any new project created with Create-React-App (CRA).
To follow along, you need to know how to set up and navigate a new React project and how to work with the yarn package manager (or npm). Familiarities with Axios and React-Router are also required.
Best Practices With React
React is a fantastic JavaScript library for building rich user interfaces. It provides a great component abstraction for organizing your interfaces into well-functioning code, and there’s just about anything you can use it for. Read more articles on React →
Why You Should Test Your Code
Before shipping your software to end-users, you first have to confirm that it is working as expected. In other words, the app should satisfy its project specifications.
Just as it is important to test our project as a whole before shipping it to end-users, it’s also essential to keep testing our code during the lifetime of a project. This is necessary for a number of reasons. We may make updates to our application or refactor some parts of our code. A third-party library may undergo a breaking change. Even the browser that is running our web application may undergo breaking changes. In some cases, something stops working for no apparent reason — things could go wrong unexpectedly. Thus, it is necessary to test our code regularly for the lifetime of a project.
Broadly speaking, there are manual and automated software tests. In a manual test, a real user performs some action on our application to verify that they work correctly. This kind of test is less reliable when repeated several times because it’s easy for the tester to miss some details between test runs.
In an automated test, however, a test script is executed by a machine. With a test script, we can be sure that whatever details we set in the script will remain unchanged on every test run.
This kind of test gives us the benefits of being predictable and fast, such that we can quickly find and fix bugs in our code.
Having seen the necessity of testing our code, the next logical question is, what sort of automated tests should we write for our code? Let’s quickly go over a few of them.
Types Of Automated Testing
There are many different types of automated software testing. Some of the most common ones are unit tests, integration tests, functional tests, end-to-end tests, acceptance tests, performance tests, and smoke tests.
Unit test In this kind of test, the goal is to verify that each unit of our application, considered in isolation, is working correctly. An example would be testing that a particular function returns an expected value, give some known inputs. We’ll see several examples in this article.
Smoke test This kind of test is done to check that the system is up and running. For example, in a React app, we could just render our main app component and call it a day. If it renders correctly we can be fairly certain that our app would render on the browser.
Integration test This sort of test is carried out to verify that two or more modules can work well together. For example, you might run a test to verify that your server and database are actually communicating correctly.
Functional test A functional test exists to verify that the system meets its functional specification. We’ll see an example later.
End-to-end test This kind of test involves testing the application the same way it would be used in the real world. You can use a tool like cypress for E2E tests.
Acceptance test This is usually done by the business owner to verify that the system meets specifications.
Performance test This sort of testing is carried out to see how the system performs under significant load. In frontend development, this is usually about how fast the app loads on the browser.
There’s more here if you’re interested.
Why Use React Testing Library?
When it comes to testing React applications, there are a few testing options available, of which the most common ones I know of are Enzyme and React Testing Library (RTL).
RTL is a subset of the @testing-library family of packages. Its philosophy is very simple. Your users don’t care whether you use redUX or context for state management. They care less about the simplicity of hooks nor the distinction between class and functional components. They just want your app to work in a certain way. It is, therefore, no surprise that the testing library’s primary guiding principle is
“The more your tests resemble the way your software is used, the more confidence they can give you.”
So, whatever you do, have the end-user in mind and test your app just as they would use it.
Choosing RTL gives you a number of advantages. First, it’s much easier to get started with it. Every new React project bootstrapped with CRA comes with RTL and Jest configured. The React docs also recommend it as the testing library of choice. Lastly, the guiding principle makes a lot of sense — functionality over implementation details.
With that out of the way, let’s get started with building a to-do list app, following the TDD approach.
Project Setup
Open a terminal and copy and run the below command.
# start new react project and start the server npx create-react-app start-rtl && cd start-rtl && yarn start
This should create a new React project and start the server on http://localhost:3000. With the project running, open a separate terminal, run yarn test and then press a. This runs all tests in the project in watch mode. Running the test in watch mode means that the test will automatically re-run when it detects a change in either the test file or the file that is being tested. On the test terminal, you should see something like the picture below:
Initial test passing. (Large preview)
You should see a lot of greens, which indicates that the test we’re running passed in flying colors.
As I mentioned earlier, CRA sets up RTL and Jest for every new React project. It also includes a sample test. This sample test is what we just executed.
When you run the yarn test command, react-scripts calls upon Jest to execute the test. Jest is a JavaScript testing framework that’s used in running tests. You won’t find it listed in package.json but you can do a search inside yarn.lock to find it. You can also see it in node_modules/.
Jest is incredible in the range of functionality that it provides. It provides tools for assertions, mocking, spying, etc. I strongly encourage you to take at least a quick tour of the documentation. There’s a lot to learn there that I cannot scratch in this short piece. We’ll be using Jest a lot in the coming sections.
Open package.json let’s see what we have there. The section of interest is dependencies.
"dependencies": { "@testing-library/jest-dom": "^4.2.4", "@testing-library/react": "^9.3.2", "@testing-library/user-event": "^7.1.2", ... },
We have the following packages installed specifically for testing purpose:
@testing-library/jest-dom: provides custom DOM element matchers for Jest.
@testing-library/react: provides the APIs for testing React apps.
@testing-library/user-event: provides advanced simulation of browser interactions.
Open up App.test.js let’s take a look at its content.
import React from 'react'; import { render } from '@testing-library/react'; import App from './App'; test('renders learn react link', () => { const { getByText } = render(); const linkElement = getByText(/learn react/i); expect(linkElement).toBeInTheDocument(); });
The render method of RTL renders the <App /> component and returns an object which is de-structured for the getByText query. This query finds elements in the DOM by their display text. Queries are the tools for finding elements in the DOM. The complete list of queries can be found here. All of the queries from the testing library are exported by RTL, in addition to the render, cleanup, and act methods. You can read more about these in the API section.
The text is matched with the regular expression /learn react/i. The i flag makes the regular expression case-insensitive. We expect to find the text Learn React in the document.
All of this mimics the behavior a user would experience in the browser when interacting with our app.
Let’s start making the changes required by our app. Open App.js and replace the content with the below code.
import React from "react"; import "./App.css"; function App() { return ( <div className="App"> <header className="App-header"> <h2>Getting started with React testing library</h2> </header> </div> ); } export default App;
If you still have the test running, you should see the test fail. Perhaps you can guess why that is the case, but we’ll return to it a bit later. Right now I want to refactor the test block.
Replace the test block in src/App.test.js with the code below:
# use describe, it pattern describe("<App />", () => { it("Renders <App /> component correctly", () => { const { getByText } = render(<App />); expect(getByText(/Getting started with React testing library/i)).toBeInTheDocument(); }); });
This refactor makes no material difference to how our test will run. I prefer the describe and it pattern as it allows me structure my test file into logical blocks of related tests. The test should re-run and this time it will pass. In case you haven’t guessed it, the fix for the failing test was to replace the learn react text with Getting started with React testing library.
In case you don’t have time to write your own styles you can just copy the one below into App.css.
.App { min-height: 100vh; text-align: center; } .App-header { height: 10vh; display: flex; background-color: #282c34; flex-direction: column; align-items: center; justify-content: center; font-size: calc(10px + 2vmin); color: white; } .App-body { width: 60%; margin: 20px auto; } ul { padding: 0; display: flex; list-style-type: decimal; flex-direction: column; } li { font-size: large; text-align: left; padding: 0.5rem 0; } li a { text-transform: capitalize; text-decoration: none; } .todo-title { text-transform: capitalize; } .completed { color: green; } .not-completed { color: red; }
You should already see the page title move up after adding this CSS.
I consider this a good point for me to commit my changes and push to Github. The corresponding branch is 01-setup.
Let’s continue with our project setup. We know we’re going to need some navigation in our app so we need React-Router. We’ll also be making API calls with Axios. Let’s install both.
# install react-router-dom and axios yarn add react-router-dom axios
Most React apps you’ll build will have to maintain state. There’s a lot of libraries available for managing state. But for this tutorial, I’ll be using React’s context API and the useContext hook. So let’s set up our app’s context.
Create a new file src/AppContext.js and enter the below content.
import React from "react"; export const AppContext = React.createContext({}); export const AppProvider = ({ children }) => { const reducer = (state, action) => { switch (action.type) { case "LOAD_TODOLIST": return { ...state, todoList: action.todoList }; case "LOAD_SINGLE_TODO": return { ...state, activeToDoItem: action.todo }; default: return state; } }; const [appData, appDispatch] = React.useReducer(reducer, { todoList: [], activeToDoItem: { id: 0 }, }); return ( <AppContext.Provider value=> {children} </AppContext.Provider> ); };
Here we create a new context with React.createContext({}), for which the initial value is an empty object. We then define an AppProvider component that accepts children component. It then wraps those children in AppContext.Provider, thus making the { appData, appDispatch } object available to all children anywhere in the render tree.
Our reducer function defines two action types.
LOAD_TODOLIST which is used to update the todoList array.
LOAD_SINGLE_TODO which is used to update activeToDoItem.
appData and appDispatch are both returned from the useReducer hook. appData gives us access to the values in the state while appDispatch gives us a function which we can use to update the app’s state.
Now open index.js, import the AppProvider component and wrap the <App /> component with <AppProvider />. Your final code should look like what I have below.
import { AppProvider } from "./AppContext"; ReactDOM.render( <React.StrictMode> <AppProvider> <App /> </AppProvider> </React.StrictMode>, document.getElementById("root") );
Wrapping <App /> inside <AppProvider /> makes AppContext available to every child component in our app.
Remember that with RTL, the aim is to test our app the same way a real user would interact with it. This implies that we also want our tests to interact with our app state. For that reason, we also need to make our <AppProvider /> available to our components during tests. Let’s see how to make that happen.
The render method provided by RTL is sufficient for simple components that don’t need to maintain state or use navigation. But most apps require at least one of both. For this reason, it provides a wrapper option. With this wrapper, we can wrap the UI rendered by the test renderer with any component we like, thus creating a custom render. Let’s create one for our tests.
Create a new file src/custom-render.js and paste the following code.
import React from "react"; import { render } from "@testing-library/react"; import { MemoryRouter } from "react-router-dom"; import { AppProvider } from "./AppContext"; const Wrapper = ({ children }) => { return ( <AppProvider> <MemoryRouter>{children}</MemoryRouter> </AppProvider> ); }; const customRender = (ui, options) => render(ui, { wrapper: Wrapper, ...options }); // re-export everything export * from "@testing-library/react"; // override render method export { customRender as render };
Here we define a <Wrapper /> component that accepts some children component. It then wraps those children inside <AppProvider /> and <MemoryRouter />. MemoryRouter is
A <Router> that keeps the history of your “URL” in memory (does not read or write to the address bar). Useful in tests and non-browser environments like React Native.
We then create our render function, providing it the Wrapper we just defined through its wrapper option. The effect of this is that any component we pass to the render function is rendered inside <Wrapper />, thus having access to navigation and our app’s state.
The next step is to export everything from @testing-library/react. Lastly, we export our custom render function as render, thus overriding the default render.
Note that even if you were using RedUX for state management the same pattern still applies.
Let’s now make sure our new render function works. Import it into src/App.test.js and use it to render the <App /> component.
Open App.test.js and replace the import line. This
import { render } from '@testing-library/react';
should become
import { render } from './custom-render';
Does the test still pass? Good job.
There’s one small change I want to make before wrapping up this section. It gets tiring very quickly to have to write const { getByText } and other queries every time. So, I’m going to be using the screen object from the DOM testing library henceforth.
Import the screen object from our custom render file and replace the describe block with the code below.
import { render, screen } from "./custom-render"; describe("<App />", () => { it("Renders <App /> component correctly", () => { render(<App />); expect( screen.getByText(/Getting started with React testing library/i) ).toBeInTheDocument(); }); });
We’re now accessing the getByText query from the screen object. Does your test still pass? I’m sure it does. Let’s continue.
If your tests don’t pass you may want to compare your code with mine. The corresponding branch at this point is 02-setup-store-and-render.
Testing And Building The To-Do List Index Page
In this section, we’ll pull to-do items from http://jsonplaceholder.typicode.com/. Our component specification is very simple. When a user visits our app homepage,
show a loading indicator that says Fetching todos while waiting for the response from the API;
display the title of 15 to-do items on the screen once the API call returns (the API call returns 200). Also, each item title should be a link that will lead to the to-do details page.
Following a test-driven approach, we’ll write our test before implementing the component logic. Before doing that we’ll need to have the component in question. So go ahead and create a file src/TodoList.js and enter the following content:
import React from "react"; import "./App.css"; export const TodoList = () => { return ( <div> </div> ); };
Since we know the component specification we can test it in isolation before incorporating it into our main app. I believe it’s up to the developer at this point to decide how they want to handle this. One reason you might want to test a component in isolation is so that you don’t accidentally break any existing test and then having to fight fires in two locations. With that out of the way let’s now write the test.
Create a new file src/TodoList.test.js and enter the below code:
import React from "react"; import axios from "axios"; import { render, screen, waitForElementToBeRemoved } from "./custom-render"; import { TodoList } from "./TodoList"; import { todos } from "./makeTodos"; describe("<App />", () => { it("Renders <TodoList /> component", async () => { render(<TodoList />); await waitForElementToBeRemoved(() => screen.getByText(/Fetching todos/i)); expect(axios.get).toHaveBeenCalledTimes(1); todos.slice(0, 15).forEach((td) => { expect(screen.getByText(td.title)).toBeInTheDocument(); }); }); });
Inside our test block, we render the <TodoList /> component and use the waitForElementToBeRemoved function to wait for the Fetching todos text to disappear from the screen. Once this happens we know that our API call has returned. We also check that an Axios get call was fired once. Finally, we check that each to-do title is displayed on the screen. Note that the it block receives an async function. This is necessary for us to be able to use await inside the function.
Each to-do item returned by the API has the following structure.
{ id: 0, userId: 0, title: 'Some title', completed: true, }
We want to return an array of these when we
import { todos } from "./makeTodos"
The only condition is that each id should be unique.
Create a new file src/makeTodos.js and enter the below content. This is the source of todos we’ll use in our tests.
const makeTodos = (n) => { // returns n number of todo items // default is 15 const num = n || 15; const todos = []; for (let i = 0; i < num; i++) { todos.push({ id: i, userId: i, title: `Todo item ${i}`, completed: [true, false][Math.floor(Math.random() * 2)], }); } return todos; }; export const todos = makeTodos(200);
This function simply generates a list of n to-do items. The completed line is set by randomly choosing between true and false.
Unit tests are supposed to be fast. They should run within a few seconds. Fail fast! This is one of the reasons why letting our tests make actual API calls is impractical. To avoid this we mock such unpredictable API calls. Mocking simply means replacing a function with a fake version, thus allowing us to customize the behavior. In our case, we want to mock the get method of Axios to return whatever we want it to. Jest already provides mocking functionality out of the box.
Let’s now mock Axios so it returns this list of to-dos when we make the API call in our test. Create a file src/__mocks__/axios.js and enter the below content:
import { todos } from "../makeTodos"; export default { get: jest.fn().mockImplementation((url) => { switch (url) { case "https://jsonplaceholder.typicode.com/todos": return Promise.resolve({ data: todos }); default: throw new Error(`UNMATCHED URL: ${url}`); } }), };
When the test starts, Jest automatically finds this mocks folder and instead of using the actual Axios from node_modules/ in our tests, it uses this one. At this point, we’re only mocking the get method using Jest’s mockImplementation method. Similarly, we can mock other Axios methods like post, patch, interceptors, defaults etc. Right now they’re all undefined and any attempt to access, axios.post for example, would result in an error.
Note that we can customize what to return based on the URL the Axios call receives. Also, Axios calls return a promise which resolves to the actual data we want, so we return a promise with the data we want.
At this point, we have one passing test and one failing test. Let’s implement the component logic.
Open src/TodoList.js let’s build out the implementation piece by piece. Start by replacing the code inside with this one below.
import React from "react"; import axios from "axios"; import { Link } from "react-router-dom"; import "./App.css"; import { AppContext } from "./AppContext"; export const TodoList = () => { const [loading, setLoading] = React.useState(true); const { appData, appDispatch } = React.useContext(AppContext); React.useEffect(() => { axios.get("https://jsonplaceholder.typicode.com/todos").then((resp) => { const { data } = resp; appDispatch({ type: "LOAD_TODOLIST", todoList: data }); setLoading(false); }); }, [appDispatch, setLoading]); return ( <div> // next code block goes here </div> ); };
We import AppContext and de-structure appData and appDispatch from the return value of React.useContext. We then make the API call inside a useEffect block. Once the API call returns, we set the to-do list in state by firing the LOAD_TODOLIST action. Finally, we set the loading state to false to reveal our to-dos.
Now enter the final piece of code.
{loading ? ( <p>Fetching todos</p> ) : ( <ul> {appData.todoList.slice(0, 15).map((item) => { const { id, title } = item; return ( <li key={id}> <Link to={`/item/${id}`} data-testid={id}> {title} </Link> </li> ); })} </ul> )}
We slice appData.todoList to get the first 15 items. We then map over those and render each one in a <Link /> tag so we can click on it and see the details. Note the data-testid attribute on each Link. This should be a unique ID that will aid us in finding individual DOM elements. In a case where we have similar text on the screen, we should never have the same ID for any two elements. We’ll see how to use this a bit later.
My tests now pass. Does yours pass? Great.
Let’s now incorporate this component into our render tree. Open up App.js let’s do that.
First things. Add some imports.
import { BrowserRouter, Route } from "react-router-dom"; import { TodoList } from "./TodoList";
We need BrowserRouter for navigation and Route for rendering each component in each navigation location.
Now add the below code after the <header /> element.
<div className="App-body"> <BrowserRouter> <Route exact path="/" component={TodoList} /> </BrowserRouter> </div>
This is simply telling the browser to render the <TodoList /> component when we’re on the root location, /. Once this is done, our tests still pass but you should see some error messages on your console telling you about some act something. You should also see that the <TodoList /> component seems to be the culprit here.
Terminal showing act warnings. (Large preview)
Since we’re sure that our TodoList component by itself is okay, we have to look at the App component, inside of which is rendered the <TodoList /> component.
This warning may seem complex at first but it is telling us that something is happening in our component that we’re not accounting for in our test. The fix is to wait for the loading indicator to be removed from the screen before we proceed.
Open up App.test.js and update the code to look like so:
import React from "react"; import { render, screen, waitForElementToBeRemoved } from "./custom-render"; import App from "./App"; describe("<App />", () => { it("Renders <App /> component correctly", async () => { render(<App />); expect( screen.getByText(/Getting started with React testing library/i) ).toBeInTheDocument(); await waitForElementToBeRemoved(() => screen.getByText(/Fetching todos/i)); }); });
We’ve made two changes. First, we changed the function in the it block to an async function. This is a necessary step to allow us to use await in the function body. Secondly, we wait for the Fetching todos text to be removed from the screen. And voila!. The warning is gone. Phew! I strongly advise that you bookmark this post by Kent Dodds for more on this act warning. You’re gonna need it.
Now open the page in your browser and you should see the list of to-dos. You can click on an item if you like, but it won’t show you anything because our router doesn’t yet recognize that URL.
For comparison, the branch of my repo at this point is 03-todolist.
Let’s now add the to-do details page.
Testing And Building The Single To-Do Page
To display a single to-do item we’ll follow a similar approach. The component specification is simple. When a user navigates to a to-do page:
display a loading indicator that says Fetching todo item id where id represents the to-do’s id, while the API call to https://jsonplaceholder.typicode.com/todos/item_id runs.
When the API call returns, show the following information:
Todo item title
Added by: userId
This item has been completed if the to-do has been completed or
This item is yet to be completed if the to-do has not been completed.
Let’s start with the component. Create a file src/TodoItem.js and add the following content.
import React from "react"; import { useParams } from "react-router-dom"; import "./App.css"; export const TodoItem = () => { const { id } = useParams() return ( <div className="single-todo-item"> </div> ); };
The only thing new to us in this file is the const { id } = useParams() line. This is a hook from react-router-dom that lets us read URL parameters. This id is going to be used in fetching a to-do item from the API.
This situation is a bit different because we’re going to be reading the id from the location URL. We know that when a user clicks a to-do link, the id will show up in the URL which we can then grab using the useParams() hook. But here we’re testing the component in isolation which means that there’s nothing to click, even if we wanted to. To get around this we’ll have to mock react-router-dom, but only some parts of it. Yes. It’s possible to mock only what we need to. Let’s see how it’s done.
Create a new mock file src/__mocks__ /react-router-dom.js. Now paste in the following code:
module.exports = { ...jest.requireActual("react-router-dom"), useParams: jest.fn(), };
By now you should have noticed that when mocking a module we have to use the exact module name as the mock file name.
Here, we use the module.exports syntax because react-router-dom has mostly named exports. (I haven’t come across any default export since I’ve been working with it. If there are any, kindly share with me in the comments). This is unlike Axios where everything is bundled as methods in one default export.
We first spread the actual react-router-dom, then replace the useParams hook with a Jest function. Since this function is a Jest function, we can modify it anytime we want. Keep in mind that we’re only mocking the part we need to because if we mock everything, we’ll lose the implementation of MemoryHistory which is used in our render function.
Let’s start testing!
Now create src/TodoItem.test.js and enter the below content:
import React from "react"; import axios from "axios"; import { render, screen, waitForElementToBeRemoved } from "./custom-render"; import { useParams, MemoryRouter } from "react-router-dom"; import { TodoItem } from "./TodoItem"; describe("<TodoItem />", () => { it("can tell mocked from unmocked functions", () => { expect(jest.isMockFunction(useParams)).toBe(true); expect(jest.isMockFunction(MemoryRouter)).toBe(false); }); });
Just like before, we have all our imports. The describe block then follows. Our first case is only there as a demonstration that we’re only mocking what we need to. Jest’s isMockFunction can tell whether a function is mocked or not. Both expectations pass, confirming the fact that we have a mock where we want it.
Add the below test case for when a to-do item has been completed.
it("Renders <TodoItem /> correctly for a completed item", async () => { useParams.mockReturnValue({ id: 1 }); render(<TodoItem />); await waitForElementToBeRemoved(() => screen.getByText(/Fetching todo item 1/i) ); expect(axios.get).toHaveBeenCalledTimes(1); expect(screen.getByText(/todo item 1/)).toBeInTheDocument(); expect(screen.getByText(/Added by: 1/)).toBeInTheDocument(); expect( screen.getByText(/This item has been completed/) ).toBeInTheDocument(); });
The very first thing we do is to mock the return value of useParams. We want it to return an object with an id property, having a value of 1. When this is parsed in the component, we end up with the following URL https://jsonplaceholder.typicode.com/todos/1. Keep in mind that we have to add a case for this URL in our Axios mock or it will throw an error. We will do that in just a moment.
We now know for sure that calling useParams() will return the object { id: 1 } which makes this test case predictable.
As with previous tests, we wait for the loading indicator, Fetching todo item 1 to be removed from the screen before making our expectations. We expect to see the to-do title, the id of the user who added it, and a message indicating the status.
Open src/__mocks__/axios.js and add the following case to the switch block.
case "https://jsonplaceholder.typicode.com/todos/1": return Promise.resolve({ data: { id: 1, title: "todo item 1", userId: 1, completed: true }, });
When this URL is matched, a promise with a completed to-do is returned. Of course, this test case fails since we’re yet to implement the component logic. Go ahead and add a test case for when the to-do item has not been completed.
it("Renders <TodoItem /> correctly for an uncompleted item", async () => { useParams.mockReturnValue({ id: 2 }); render(<TodoItem />); await waitForElementToBeRemoved(() => screen.getByText(/Fetching todo item 2/i) ); expect(axios.get).toHaveBeenCalledTimes(2); expect(screen.getByText(/todo item 2/)).toBeInTheDocument(); expect(screen.getByText(/Added by: 2/)).toBeInTheDocument(); expect( screen.getByText(/This item is yet to be completed/) ).toBeInTheDocument(); });
This is the same as the previous case. The only difference is the ID of the to-do, the userId, and the completion status. When we enter the component, we’ll need to make an API call to the URL https://jsonplaceholder.typicode.com/todos/2. Go ahead and add a matching case statement to the switch block of our Axios mock.
case "https://jsonplaceholder.typicode.com/todos/2": return Promise.resolve({ data: { id: 2, title: "todo item 2", userId: 2, completed: false }, });
When the URL is matched, a promise with an uncompleted to-do is returned.
Both test cases are failing. Now let’s add the component implementation to make them pass.
Open src/TodoItem.js and update the code to the following:
import React from "react"; import axios from "axios"; import { useParams } from "react-router-dom"; import "./App.css"; import { AppContext } from "./AppContext"; export const TodoItem = () => { const { id } = useParams(); const [loading, setLoading] = React.useState(true); const { appData: { activeToDoItem }, appDispatch, } = React.useContext(AppContext); const { title, completed, userId } = activeToDoItem; React.useEffect(() => { axios .get(`https://jsonplaceholder.typicode.com/todos/${id}`) .then((resp) => { const { data } = resp; appDispatch({ type: "LOAD_SINGLE_TODO", todo: data }); setLoading(false); }); }, [id, appDispatch]); return ( <div className="single-todo-item"> // next code block goes here. </div> ); };
As with the <TodoList /> component, we import AppContext. We read activeTodoItem from it, then we read the to-do title, userId, and completion status. After that we make the API call inside a useEffect block. When the API call returns we set the to-do in state by firing the LOAD_SINGLE_TODO action. Finally, we set our loading state to false to reveal the to-do details.
Let’s add the final piece of code inside the return div:
{loading ? ( <p>Fetching todo item {id}</p> ) : ( <div> <h2 className="todo-title">{title}</h2> <h4>Added by: {userId}</h4> {completed ? ( <p className="completed">This item has been completed</p> ) : ( <p className="not-completed">This item is yet to be completed</p> )} </div> )}
Once this is done all tests should now pass. Yay! We have another winner.
Our component tests now pass. But we still haven’t added it to our main app. Let’s do that.
Open src/App.js and add the import line:
import { TodoItem } from './TodoItem'
Add the TodoItem route above the TodoList route. Be sure to preserve the order shown below.
# preserve this order <Route path="/item/:id" component={TodoItem} /> <Route exact path="/" component={TodoList} />
Open your project in your browser and click on a to-do. Does it take you to the to-do page? Of course, it does. Good job.
In case you’re having any problem, you can check out my code at this point from the 04-test-todo branch.
Phew! This has been a marathon. But bear with me. There’s one last point I’d like us to touch. Let’s quickly have a test case for when a user visits our app, and then proceed to click on a to-do link. This is a functional test to mimic how our app should work. In practice, this is all the testing we need to be done for this app. It ticks every box in our app specification.
Open App.test.js and add a new test case. The code is a bit long so we’ll add it in two steps.
import userEvent from "@testing-library/user-event"; import { todos } from "./makeTodos"; jest.mock("react-router-dom", () => ({ ...jest.requireActual("react-router-dom"), })); describe("<App />" ... // previous test case ... it("Renders todos, and I can click to view a todo item", async () => { render(<App />); await waitForElementToBeRemoved(() => screen.getByText(/Fetching todos/i)); todos.slice(0, 15).forEach((td) => { expect(screen.getByText(td.title)).toBeInTheDocument(); }); // click on a todo item and test the result const { id, title, completed, userId } = todos[0]; axios.get.mockImplementationOnce(() => Promise.resolve({ data: { id, title, userId, completed }, }) ); userEvent.click(screen.getByTestId(String(id))); await waitForElementToBeRemoved(() => screen.getByText(`Fetching todo item ${String(id)}`) ); // next code block goes here }); });
We have two imports of which userEvent is new. According to the docs,
“user-event is a companion library for the React Testing Library that provides a more advanced simulation of browser interactions than the built-in fireEvent method.”
Yes. There is a fireEvent method for simulating user events. But userEvent is what you want to be using henceforth.
Before we start the testing process, we need to restore the original useParams hooks. This is necessary since we want to test actual behavior, so we should mock as little as possible. Jest provides us with requireActual method which returns the original react-router-dom module.
Note that we must do this before we enter the describe block, otherwise, Jest would ignore it. It states in the documentation that requireActual:
“…returns the actual module instead of a mock, bypassing all checks on whether the module should receive a mock implementation or not.”
Once this is done, Jest bypasses every other check and ignores the mocked version of the react-router-dom.
As usual, we render the <App /> component and wait for the Fetching todos loading indicator to disappear from the screen. We then check for the presence of the first 15 to-do items on the page.
Once we’re satisfied with that, we grab the first item in our to-do list. To prevent any chance of a URL collision with our global Axios mock, we override the global mock with Jest’s mockImplementationOnce. This mocked value is valid for one call to the Axios get method. We then grab a link by its data-testid attribute and fire a user click event on that link. Then we wait for the loading indicator for the single to-do page to disappear from the screen.
Now finish the test by adding the below expectations in the position indicated.
expect(screen.getByText(title)).toBeInTheDocument(); expect(screen.getByText(`Added by: ${userId}`)).toBeInTheDocument(); switch (completed) { case true: expect( screen.getByText(/This item has been completed/) ).toBeInTheDocument(); break; case false: expect( screen.getByText(/This item is yet to be completed/) ).toBeInTheDocument(); break; default: throw new Error("No match"); }
We expect to see the to-do title and the user who added it. Finally, since we can’t be sure about the to-do status, we create a switch block to handle both cases. If a match is not found we throw an error.
You should have 6 passing tests and a functional app at this point. In case you’re having trouble, the corresponding branch in my repo is 05-test-user-action.
Conclusion
Phew! That was some marathon. If you made it to this point, congratulations. You now have almost all you need to write tests for your React apps. I strongly advise that you read CRA’s testing docs and RTL’s documentation. Overall both are relatively short and direct.
I strongly encourage you to start writing tests for your React apps, no matter how small. Even if it’s just smoke tests to make sure your components render. You can incrementally add more test cases over time.
Related Resources
“Testing Overview,” React official website
“Expect,” Jest API Reference
“Custom Render,” React Testing Library
“jest-dom,” Testing Library, GitHub
“Guiding Principles,” Getting Started, Testing Library
“React Testing Library,” Testing Library
“Recommended Tools,” Testing Overview, React official website
“Fix the “not wrapped in act(…)” warning,” Kent C. Dodds
“<MemoryRouter>,” React Training
“screen,” DOM Testing Library
“user-event,” Ecosystem, Testing Library Docs
“The Different Types Of Software Testing,” Sten Pittet, Atlassian
(ks, ra, yk, il)
Website Design & SEO Delray Beach by DBL07.co
Delray Beach SEO
source http://www.scpie.org/how-to-test-your-react-apps-with-the-react-testing-library/ source https://scpie1.blogspot.com/2020/07/how-to-test-your-react-apps-with-react.html
0 notes
Text
How To Test Your React Apps With The React Testing Library
About The Author
Awesome frontend developer who loves everything coding. I’m a lover of choral music and I’m working to make it more accessible to the world, one upload at a … More about Chidi …
Testing gives confidence in written code. In the context of this article, ‘testing’ means ‘automated testing’. Without automated testing, it is significantly harder to ensure the quality of a web application of significant complexity. Fails caused by automated testing may lead to more bugs in production. In this article, we’re going to show how React developers can quickly start testing their app with the React Testing Library (RTL).
Today, we’ll briefly discuss why it’s important to write automated tests for any software project, and shed light on some of the common types of automated testing. We’ll build a to-do list app by following the Test-Driven Development (TDD) approach. I’ll show you how to write both unit and functional tests, and in the process, explain what code mocks are by mocking a few libraries. I’ll be using a combination of RTL and Jest — both of which come pre-installed in any new project created with Create-React-App (CRA).
To follow along, you need to know how to set up and navigate a new React project and how to work with the yarn package manager (or npm). Familiarities with Axios and React-Router are also required.
Best Practices With React
React is a fantastic JavaScript library for building rich user interfaces. It provides a great component abstraction for organizing your interfaces into well-functioning code, and there’s just about anything you can use it for. Read more articles on React →
Why You Should Test Your Code
Before shipping your software to end-users, you first have to confirm that it is working as expected. In other words, the app should satisfy its project specifications.
Just as it is important to test our project as a whole before shipping it to end-users, it’s also essential to keep testing our code during the lifetime of a project. This is necessary for a number of reasons. We may make updates to our application or refactor some parts of our code. A third-party library may undergo a breaking change. Even the browser that is running our web application may undergo breaking changes. In some cases, something stops working for no apparent reason — things could go wrong unexpectedly. Thus, it is necessary to test our code regularly for the lifetime of a project.
Broadly speaking, there are manual and automated software tests. In a manual test, a real user performs some action on our application to verify that they work correctly. This kind of test is less reliable when repeated several times because it’s easy for the tester to miss some details between test runs.
In an automated test, however, a test script is executed by a machine. With a test script, we can be sure that whatever details we set in the script will remain unchanged on every test run.
This kind of test gives us the benefits of being predictable and fast, such that we can quickly find and fix bugs in our code.
Having seen the necessity of testing our code, the next logical question is, what sort of automated tests should we write for our code? Let’s quickly go over a few of them.
Types Of Automated Testing
There are many different types of automated software testing. Some of the most common ones are unit tests, integration tests, functional tests, end-to-end tests, acceptance tests, performance tests, and smoke tests.
Unit test In this kind of test, the goal is to verify that each unit of our application, considered in isolation, is working correctly. An example would be testing that a particular function returns an expected value, give some known inputs. We’ll see several examples in this article.
Smoke test This kind of test is done to check that the system is up and running. For example, in a React app, we could just render our main app component and call it a day. If it renders correctly we can be fairly certain that our app would render on the browser.
Integration test This sort of test is carried out to verify that two or more modules can work well together. For example, you might run a test to verify that your server and database are actually communicating correctly.
Functional test A functional test exists to verify that the system meets its functional specification. We’ll see an example later.
End-to-end test This kind of test involves testing the application the same way it would be used in the real world. You can use a tool like cypress for E2E tests.
Acceptance test This is usually done by the business owner to verify that the system meets specifications.
Performance test This sort of testing is carried out to see how the system performs under significant load. In frontend development, this is usually about how fast the app loads on the browser.
There’s more here if you’re interested.
Why Use React Testing Library?
When it comes to testing React applications, there are a few testing options available, of which the most common ones I know of are Enzyme and React Testing Library (RTL).
RTL is a subset of the @testing-library family of packages. Its philosophy is very simple. Your users don’t care whether you use redUX or context for state management. They care less about the simplicity of hooks nor the distinction between class and functional components. They just want your app to work in a certain way. It is, therefore, no surprise that the testing library’s primary guiding principle is
“The more your tests resemble the way your software is used, the more confidence they can give you.”
So, whatever you do, have the end-user in mind and test your app just as they would use it.
Choosing RTL gives you a number of advantages. First, it’s much easier to get started with it. Every new React project bootstrapped with CRA comes with RTL and Jest configured. The React docs also recommend it as the testing library of choice. Lastly, the guiding principle makes a lot of sense — functionality over implementation details.
With that out of the way, let’s get started with building a to-do list app, following the TDD approach.
Project Setup
Open a terminal and copy and run the below command.
# start new react project and start the server npx create-react-app start-rtl && cd start-rtl && yarn start
This should create a new React project and start the server on http://localhost:3000. With the project running, open a separate terminal, run yarn test and then press a. This runs all tests in the project in watch mode. Running the test in watch mode means that the test will automatically re-run when it detects a change in either the test file or the file that is being tested. On the test terminal, you should see something like the picture below:
Initial test passing. (Large preview)
You should see a lot of greens, which indicates that the test we’re running passed in flying colors.
As I mentioned earlier, CRA sets up RTL and Jest for every new React project. It also includes a sample test. This sample test is what we just executed.
When you run the yarn test command, react-scripts calls upon Jest to execute the test. Jest is a JavaScript testing framework that’s used in running tests. You won’t find it listed in package.json but you can do a search inside yarn.lock to find it. You can also see it in node_modules/.
Jest is incredible in the range of functionality that it provides. It provides tools for assertions, mocking, spying, etc. I strongly encourage you to take at least a quick tour of the documentation. There’s a lot to learn there that I cannot scratch in this short piece. We’ll be using Jest a lot in the coming sections.
Open package.json let’s see what we have there. The section of interest is dependencies.
"dependencies": { "@testing-library/jest-dom": "^4.2.4", "@testing-library/react": "^9.3.2", "@testing-library/user-event": "^7.1.2", ... },
We have the following packages installed specifically for testing purpose:
@testing-library/jest-dom: provides custom DOM element matchers for Jest.
@testing-library/react: provides the APIs for testing React apps.
@testing-library/user-event: provides advanced simulation of browser interactions.
Open up App.test.js let’s take a look at its content.
import React from 'react'; import { render } from '@testing-library/react'; import App from './App'; test('renders learn react link', () => { const { getByText } = render(); const linkElement = getByText(/learn react/i); expect(linkElement).toBeInTheDocument(); });
The render method of RTL renders the <App /> component and returns an object which is de-structured for the getByText query. This query finds elements in the DOM by their display text. Queries are the tools for finding elements in the DOM. The complete list of queries can be found here. All of the queries from the testing library are exported by RTL, in addition to the render, cleanup, and act methods. You can read more about these in the API section.
The text is matched with the regular expression /learn react/i. The i flag makes the regular expression case-insensitive. We expect to find the text Learn React in the document.
All of this mimics the behavior a user would experience in the browser when interacting with our app.
Let’s start making the changes required by our app. Open App.js and replace the content with the below code.
import React from "react"; import "./App.css"; function App() { return ( <div className="App"> <header className="App-header"> <h2>Getting started with React testing library</h2> </header> </div> ); } export default App;
If you still have the test running, you should see the test fail. Perhaps you can guess why that is the case, but we’ll return to it a bit later. Right now I want to refactor the test block.
Replace the test block in src/App.test.js with the code below:
# use describe, it pattern describe("<App />", () => { it("Renders <App /> component correctly", () => { const { getByText } = render(<App />); expect(getByText(/Getting started with React testing library/i)).toBeInTheDocument(); }); });
This refactor makes no material difference to how our test will run. I prefer the describe and it pattern as it allows me structure my test file into logical blocks of related tests. The test should re-run and this time it will pass. In case you haven’t guessed it, the fix for the failing test was to replace the learn react text with Getting started with React testing library.
In case you don’t have time to write your own styles you can just copy the one below into App.css.
.App { min-height: 100vh; text-align: center; } .App-header { height: 10vh; display: flex; background-color: #282c34; flex-direction: column; align-items: center; justify-content: center; font-size: calc(10px + 2vmin); color: white; } .App-body { width: 60%; margin: 20px auto; } ul { padding: 0; display: flex; list-style-type: decimal; flex-direction: column; } li { font-size: large; text-align: left; padding: 0.5rem 0; } li a { text-transform: capitalize; text-decoration: none; } .todo-title { text-transform: capitalize; } .completed { color: green; } .not-completed { color: red; }
You should already see the page title move up after adding this CSS.
I consider this a good point for me to commit my changes and push to Github. The corresponding branch is 01-setup.
Let’s continue with our project setup. We know we’re going to need some navigation in our app so we need React-Router. We’ll also be making API calls with Axios. Let’s install both.
# install react-router-dom and axios yarn add react-router-dom axios
Most React apps you’ll build will have to maintain state. There’s a lot of libraries available for managing state. But for this tutorial, I’ll be using React’s context API and the useContext hook. So let’s set up our app’s context.
Create a new file src/AppContext.js and enter the below content.
import React from "react"; export const AppContext = React.createContext({}); export const AppProvider = ({ children }) => { const reducer = (state, action) => { switch (action.type) { case "LOAD_TODOLIST": return { ...state, todoList: action.todoList }; case "LOAD_SINGLE_TODO": return { ...state, activeToDoItem: action.todo }; default: return state; } }; const [appData, appDispatch] = React.useReducer(reducer, { todoList: [], activeToDoItem: { id: 0 }, }); return ( <AppContext.Provider value=> {children} </AppContext.Provider> ); };
Here we create a new context with React.createContext({}), for which the initial value is an empty object. We then define an AppProvider component that accepts children component. It then wraps those children in AppContext.Provider, thus making the { appData, appDispatch } object available to all children anywhere in the render tree.
Our reducer function defines two action types.
LOAD_TODOLIST which is used to update the todoList array.
LOAD_SINGLE_TODO which is used to update activeToDoItem.
appData and appDispatch are both returned from the useReducer hook. appData gives us access to the values in the state while appDispatch gives us a function which we can use to update the app’s state.
Now open index.js, import the AppProvider component and wrap the <App /> component with <AppProvider />. Your final code should look like what I have below.
import { AppProvider } from "./AppContext"; ReactDOM.render( <React.StrictMode> <AppProvider> <App /> </AppProvider> </React.StrictMode>, document.getElementById("root") );
Wrapping <App /> inside <AppProvider /> makes AppContext available to every child component in our app.
Remember that with RTL, the aim is to test our app the same way a real user would interact with it. This implies that we also want our tests to interact with our app state. For that reason, we also need to make our <AppProvider /> available to our components during tests. Let’s see how to make that happen.
The render method provided by RTL is sufficient for simple components that don’t need to maintain state or use navigation. But most apps require at least one of both. For this reason, it provides a wrapper option. With this wrapper, we can wrap the UI rendered by the test renderer with any component we like, thus creating a custom render. Let’s create one for our tests.
Create a new file src/custom-render.js and paste the following code.
import React from "react"; import { render } from "@testing-library/react"; import { MemoryRouter } from "react-router-dom"; import { AppProvider } from "./AppContext"; const Wrapper = ({ children }) => { return ( <AppProvider> <MemoryRouter>{children}</MemoryRouter> </AppProvider> ); }; const customRender = (ui, options) => render(ui, { wrapper: Wrapper, ...options }); // re-export everything export * from "@testing-library/react"; // override render method export { customRender as render };
Here we define a <Wrapper /> component that accepts some children component. It then wraps those children inside <AppProvider /> and <MemoryRouter />. MemoryRouter is
A <Router> that keeps the history of your “URL” in memory (does not read or write to the address bar). Useful in tests and non-browser environments like React Native.
We then create our render function, providing it the Wrapper we just defined through its wrapper option. The effect of this is that any component we pass to the render function is rendered inside <Wrapper />, thus having access to navigation and our app’s state.
The next step is to export everything from @testing-library/react. Lastly, we export our custom render function as render, thus overriding the default render.
Note that even if you were using RedUX for state management the same pattern still applies.
Let’s now make sure our new render function works. Import it into src/App.test.js and use it to render the <App /> component.
Open App.test.js and replace the import line. This
import { render } from '@testing-library/react';
should become
import { render } from './custom-render';
Does the test still pass? Good job.
There’s one small change I want to make before wrapping up this section. It gets tiring very quickly to have to write const { getByText } and other queries every time. So, I’m going to be using the screen object from the DOM testing library henceforth.
Import the screen object from our custom render file and replace the describe block with the code below.
import { render, screen } from "./custom-render"; describe("<App />", () => { it("Renders <App /> component correctly", () => { render(<App />); expect( screen.getByText(/Getting started with React testing library/i) ).toBeInTheDocument(); }); });
We’re now accessing the getByText query from the screen object. Does your test still pass? I’m sure it does. Let’s continue.
If your tests don’t pass you may want to compare your code with mine. The corresponding branch at this point is 02-setup-store-and-render.
Testing And Building The To-Do List Index Page
In this section, we’ll pull to-do items from http://jsonplaceholder.typicode.com/. Our component specification is very simple. When a user visits our app homepage,
show a loading indicator that says Fetching todos while waiting for the response from the API;
display the title of 15 to-do items on the screen once the API call returns (the API call returns 200). Also, each item title should be a link that will lead to the to-do details page.
Following a test-driven approach, we’ll write our test before implementing the component logic. Before doing that we’ll need to have the component in question. So go ahead and create a file src/TodoList.js and enter the following content:
import React from "react"; import "./App.css"; export const TodoList = () => { return ( <div> </div> ); };
Since we know the component specification we can test it in isolation before incorporating it into our main app. I believe it’s up to the developer at this point to decide how they want to handle this. One reason you might want to test a component in isolation is so that you don’t accidentally break any existing test and then having to fight fires in two locations. With that out of the way let’s now write the test.
Create a new file src/TodoList.test.js and enter the below code:
import React from "react"; import axios from "axios"; import { render, screen, waitForElementToBeRemoved } from "./custom-render"; import { TodoList } from "./TodoList"; import { todos } from "./makeTodos"; describe("<App />", () => { it("Renders <TodoList /> component", async () => { render(<TodoList />); await waitForElementToBeRemoved(() => screen.getByText(/Fetching todos/i)); expect(axios.get).toHaveBeenCalledTimes(1); todos.slice(0, 15).forEach((td) => { expect(screen.getByText(td.title)).toBeInTheDocument(); }); }); });
Inside our test block, we render the <TodoList /> component and use the waitForElementToBeRemoved function to wait for the Fetching todos text to disappear from the screen. Once this happens we know that our API call has returned. We also check that an Axios get call was fired once. Finally, we check that each to-do title is displayed on the screen. Note that the it block receives an async function. This is necessary for us to be able to use await inside the function.
Each to-do item returned by the API has the following structure.
{ id: 0, userId: 0, title: 'Some title', completed: true, }
We want to return an array of these when we
import { todos } from "./makeTodos"
The only condition is that each id should be unique.
Create a new file src/makeTodos.js and enter the below content. This is the source of todos we’ll use in our tests.
const makeTodos = (n) => { // returns n number of todo items // default is 15 const num = n || 15; const todos = []; for (let i = 0; i < num; i++) { todos.push({ id: i, userId: i, title: `Todo item ${i}`, completed: [true, false][Math.floor(Math.random() * 2)], }); } return todos; }; export const todos = makeTodos(200);
This function simply generates a list of n to-do items. The completed line is set by randomly choosing between true and false.
Unit tests are supposed to be fast. They should run within a few seconds. Fail fast! This is one of the reasons why letting our tests make actual API calls is impractical. To avoid this we mock such unpredictable API calls. Mocking simply means replacing a function with a fake version, thus allowing us to customize the behavior. In our case, we want to mock the get method of Axios to return whatever we want it to. Jest already provides mocking functionality out of the box.
Let’s now mock Axios so it returns this list of to-dos when we make the API call in our test. Create a file src/__mocks__/axios.js and enter the below content:
import { todos } from "../makeTodos"; export default { get: jest.fn().mockImplementation((url) => { switch (url) { case "https://jsonplaceholder.typicode.com/todos": return Promise.resolve({ data: todos }); default: throw new Error(`UNMATCHED URL: ${url}`); } }), };
When the test starts, Jest automatically finds this mocks folder and instead of using the actual Axios from node_modules/ in our tests, it uses this one. At this point, we’re only mocking the get method using Jest’s mockImplementation method. Similarly, we can mock other Axios methods like post, patch, interceptors, defaults etc. Right now they’re all undefined and any attempt to access, axios.post for example, would result in an error.
Note that we can customize what to return based on the URL the Axios call receives. Also, Axios calls return a promise which resolves to the actual data we want, so we return a promise with the data we want.
At this point, we have one passing test and one failing test. Let’s implement the component logic.
Open src/TodoList.js let’s build out the implementation piece by piece. Start by replacing the code inside with this one below.
import React from "react"; import axios from "axios"; import { Link } from "react-router-dom"; import "./App.css"; import { AppContext } from "./AppContext"; export const TodoList = () => { const [loading, setLoading] = React.useState(true); const { appData, appDispatch } = React.useContext(AppContext); React.useEffect(() => { axios.get("https://jsonplaceholder.typicode.com/todos").then((resp) => { const { data } = resp; appDispatch({ type: "LOAD_TODOLIST", todoList: data }); setLoading(false); }); }, [appDispatch, setLoading]); return ( <div> // next code block goes here </div> ); };
We import AppContext and de-structure appData and appDispatch from the return value of React.useContext. We then make the API call inside a useEffect block. Once the API call returns, we set the to-do list in state by firing the LOAD_TODOLIST action. Finally, we set the loading state to false to reveal our to-dos.
Now enter the final piece of code.
{loading ? ( <p>Fetching todos</p> ) : ( <ul> {appData.todoList.slice(0, 15).map((item) => { const { id, title } = item; return ( <li key={id}> <Link to={`/item/${id}`} data-testid={id}> {title} </Link> </li> ); })} </ul> )}
We slice appData.todoList to get the first 15 items. We then map over those and render each one in a <Link /> tag so we can click on it and see the details. Note the data-testid attribute on each Link. This should be a unique ID that will aid us in finding individual DOM elements. In a case where we have similar text on the screen, we should never have the same ID for any two elements. We’ll see how to use this a bit later.
My tests now pass. Does yours pass? Great.
Let’s now incorporate this component into our render tree. Open up App.js let’s do that.
First things. Add some imports.
import { BrowserRouter, Route } from "react-router-dom"; import { TodoList } from "./TodoList";
We need BrowserRouter for navigation and Route for rendering each component in each navigation location.
Now add the below code after the <header /> element.
<div className="App-body"> <BrowserRouter> <Route exact path="/" component={TodoList} /> </BrowserRouter> </div>
This is simply telling the browser to render the <TodoList /> component when we’re on the root location, /. Once this is done, our tests still pass but you should see some error messages on your console telling you about some act something. You should also see that the <TodoList /> component seems to be the culprit here.
Terminal showing act warnings. (Large preview)
Since we’re sure that our TodoList component by itself is okay, we have to look at the App component, inside of which is rendered the <TodoList /> component.
This warning may seem complex at first but it is telling us that something is happening in our component that we’re not accounting for in our test. The fix is to wait for the loading indicator to be removed from the screen before we proceed.
Open up App.test.js and update the code to look like so:
import React from "react"; import { render, screen, waitForElementToBeRemoved } from "./custom-render"; import App from "./App"; describe("<App />", () => { it("Renders <App /> component correctly", async () => { render(<App />); expect( screen.getByText(/Getting started with React testing library/i) ).toBeInTheDocument(); await waitForElementToBeRemoved(() => screen.getByText(/Fetching todos/i)); }); });
We’ve made two changes. First, we changed the function in the it block to an async function. This is a necessary step to allow us to use await in the function body. Secondly, we wait for the Fetching todos text to be removed from the screen. And voila!. The warning is gone. Phew! I strongly advise that you bookmark this post by Kent Dodds for more on this act warning. You’re gonna need it.
Now open the page in your browser and you should see the list of to-dos. You can click on an item if you like, but it won’t show you anything because our router doesn’t yet recognize that URL.
For comparison, the branch of my repo at this point is 03-todolist.
Let’s now add the to-do details page.
Testing And Building The Single To-Do Page
To display a single to-do item we’ll follow a similar approach. The component specification is simple. When a user navigates to a to-do page:
display a loading indicator that says Fetching todo item id where id represents the to-do’s id, while the API call to https://jsonplaceholder.typicode.com/todos/item_id runs.
When the API call returns, show the following information:
Todo item title
Added by: userId
This item has been completed if the to-do has been completed or
This item is yet to be completed if the to-do has not been completed.
Let’s start with the component. Create a file src/TodoItem.js and add the following content.
import React from "react"; import { useParams } from "react-router-dom"; import "./App.css"; export const TodoItem = () => { const { id } = useParams() return ( <div className="single-todo-item"> </div> ); };
The only thing new to us in this file is the const { id } = useParams() line. This is a hook from react-router-dom that lets us read URL parameters. This id is going to be used in fetching a to-do item from the API.
This situation is a bit different because we’re going to be reading the id from the location URL. We know that when a user clicks a to-do link, the id will show up in the URL which we can then grab using the useParams() hook. But here we’re testing the component in isolation which means that there’s nothing to click, even if we wanted to. To get around this we’ll have to mock react-router-dom, but only some parts of it. Yes. It’s possible to mock only what we need to. Let’s see how it’s done.
Create a new mock file src/__mocks__ /react-router-dom.js. Now paste in the following code:
module.exports = { ...jest.requireActual("react-router-dom"), useParams: jest.fn(), };
By now you should have noticed that when mocking a module we have to use the exact module name as the mock file name.
Here, we use the module.exports syntax because react-router-dom has mostly named exports. (I haven’t come across any default export since I’ve been working with it. If there are any, kindly share with me in the comments). This is unlike Axios where everything is bundled as methods in one default export.
We first spread the actual react-router-dom, then replace the useParams hook with a Jest function. Since this function is a Jest function, we can modify it anytime we want. Keep in mind that we’re only mocking the part we need to because if we mock everything, we’ll lose the implementation of MemoryHistory which is used in our render function.
Let’s start testing!
Now create src/TodoItem.test.js and enter the below content:
import React from "react"; import axios from "axios"; import { render, screen, waitForElementToBeRemoved } from "./custom-render"; import { useParams, MemoryRouter } from "react-router-dom"; import { TodoItem } from "./TodoItem"; describe("<TodoItem />", () => { it("can tell mocked from unmocked functions", () => { expect(jest.isMockFunction(useParams)).toBe(true); expect(jest.isMockFunction(MemoryRouter)).toBe(false); }); });
Just like before, we have all our imports. The describe block then follows. Our first case is only there as a demonstration that we’re only mocking what we need to. Jest’s isMockFunction can tell whether a function is mocked or not. Both expectations pass, confirming the fact that we have a mock where we want it.
Add the below test case for when a to-do item has been completed.
it("Renders <TodoItem /> correctly for a completed item", async () => { useParams.mockReturnValue({ id: 1 }); render(<TodoItem />); await waitForElementToBeRemoved(() => screen.getByText(/Fetching todo item 1/i) ); expect(axios.get).toHaveBeenCalledTimes(1); expect(screen.getByText(/todo item 1/)).toBeInTheDocument(); expect(screen.getByText(/Added by: 1/)).toBeInTheDocument(); expect( screen.getByText(/This item has been completed/) ).toBeInTheDocument(); });
The very first thing we do is to mock the return value of useParams. We want it to return an object with an id property, having a value of 1. When this is parsed in the component, we end up with the following URL https://jsonplaceholder.typicode.com/todos/1. Keep in mind that we have to add a case for this URL in our Axios mock or it will throw an error. We will do that in just a moment.
We now know for sure that calling useParams() will return the object { id: 1 } which makes this test case predictable.
As with previous tests, we wait for the loading indicator, Fetching todo item 1 to be removed from the screen before making our expectations. We expect to see the to-do title, the id of the user who added it, and a message indicating the status.
Open src/__mocks__/axios.js and add the following case to the switch block.
case "https://jsonplaceholder.typicode.com/todos/1": return Promise.resolve({ data: { id: 1, title: "todo item 1", userId: 1, completed: true }, });
When this URL is matched, a promise with a completed to-do is returned. Of course, this test case fails since we’re yet to implement the component logic. Go ahead and add a test case for when the to-do item has not been completed.
it("Renders <TodoItem /> correctly for an uncompleted item", async () => { useParams.mockReturnValue({ id: 2 }); render(<TodoItem />); await waitForElementToBeRemoved(() => screen.getByText(/Fetching todo item 2/i) ); expect(axios.get).toHaveBeenCalledTimes(2); expect(screen.getByText(/todo item 2/)).toBeInTheDocument(); expect(screen.getByText(/Added by: 2/)).toBeInTheDocument(); expect( screen.getByText(/This item is yet to be completed/) ).toBeInTheDocument(); });
This is the same as the previous case. The only difference is the ID of the to-do, the userId, and the completion status. When we enter the component, we’ll need to make an API call to the URL https://jsonplaceholder.typicode.com/todos/2. Go ahead and add a matching case statement to the switch block of our Axios mock.
case "https://jsonplaceholder.typicode.com/todos/2": return Promise.resolve({ data: { id: 2, title: "todo item 2", userId: 2, completed: false }, });
When the URL is matched, a promise with an uncompleted to-do is returned.
Both test cases are failing. Now let’s add the component implementation to make them pass.
Open src/TodoItem.js and update the code to the following:
import React from "react"; import axios from "axios"; import { useParams } from "react-router-dom"; import "./App.css"; import { AppContext } from "./AppContext"; export const TodoItem = () => { const { id } = useParams(); const [loading, setLoading] = React.useState(true); const { appData: { activeToDoItem }, appDispatch, } = React.useContext(AppContext); const { title, completed, userId } = activeToDoItem; React.useEffect(() => { axios .get(`https://jsonplaceholder.typicode.com/todos/${id}`) .then((resp) => { const { data } = resp; appDispatch({ type: "LOAD_SINGLE_TODO", todo: data }); setLoading(false); }); }, [id, appDispatch]); return ( <div className="single-todo-item"> // next code block goes here. </div> ); };
As with the <TodoList /> component, we import AppContext. We read activeTodoItem from it, then we read the to-do title, userId, and completion status. After that we make the API call inside a useEffect block. When the API call returns we set the to-do in state by firing the LOAD_SINGLE_TODO action. Finally, we set our loading state to false to reveal the to-do details.
Let’s add the final piece of code inside the return div:
{loading ? ( <p>Fetching todo item {id}</p> ) : ( <div> <h2 className="todo-title">{title}</h2> <h4>Added by: {userId}</h4> {completed ? ( <p className="completed">This item has been completed</p> ) : ( <p className="not-completed">This item is yet to be completed</p> )} </div> )}
Once this is done all tests should now pass. Yay! We have another winner.
Our component tests now pass. But we still haven’t added it to our main app. Let’s do that.
Open src/App.js and add the import line:
import { TodoItem } from './TodoItem'
Add the TodoItem route above the TodoList route. Be sure to preserve the order shown below.
# preserve this order <Route path="/item/:id" component={TodoItem} /> <Route exact path="/" component={TodoList} />
Open your project in your browser and click on a to-do. Does it take you to the to-do page? Of course, it does. Good job.
In case you’re having any problem, you can check out my code at this point from the 04-test-todo branch.
Phew! This has been a marathon. But bear with me. There’s one last point I’d like us to touch. Let’s quickly have a test case for when a user visits our app, and then proceed to click on a to-do link. This is a functional test to mimic how our app should work. In practice, this is all the testing we need to be done for this app. It ticks every box in our app specification.
Open App.test.js and add a new test case. The code is a bit long so we’ll add it in two steps.
import userEvent from "@testing-library/user-event"; import { todos } from "./makeTodos"; jest.mock("react-router-dom", () => ({ ...jest.requireActual("react-router-dom"), })); describe("<App />" ... // previous test case ... it("Renders todos, and I can click to view a todo item", async () => { render(<App />); await waitForElementToBeRemoved(() => screen.getByText(/Fetching todos/i)); todos.slice(0, 15).forEach((td) => { expect(screen.getByText(td.title)).toBeInTheDocument(); }); // click on a todo item and test the result const { id, title, completed, userId } = todos[0]; axios.get.mockImplementationOnce(() => Promise.resolve({ data: { id, title, userId, completed }, }) ); userEvent.click(screen.getByTestId(String(id))); await waitForElementToBeRemoved(() => screen.getByText(`Fetching todo item ${String(id)}`) ); // next code block goes here }); });
We have two imports of which userEvent is new. According to the docs,
“user-event is a companion library for the React Testing Library that provides a more advanced simulation of browser interactions than the built-in fireEvent method.”
Yes. There is a fireEvent method for simulating user events. But userEvent is what you want to be using henceforth.
Before we start the testing process, we need to restore the original useParams hooks. This is necessary since we want to test actual behavior, so we should mock as little as possible. Jest provides us with requireActual method which returns the original react-router-dom module.
Note that we must do this before we enter the describe block, otherwise, Jest would ignore it. It states in the documentation that requireActual:
“…returns the actual module instead of a mock, bypassing all checks on whether the module should receive a mock implementation or not.”
Once this is done, Jest bypasses every other check and ignores the mocked version of the react-router-dom.
As usual, we render the <App /> component and wait for the Fetching todos loading indicator to disappear from the screen. We then check for the presence of the first 15 to-do items on the page.
Once we’re satisfied with that, we grab the first item in our to-do list. To prevent any chance of a URL collision with our global Axios mock, we override the global mock with Jest’s mockImplementationOnce. This mocked value is valid for one call to the Axios get method. We then grab a link by its data-testid attribute and fire a user click event on that link. Then we wait for the loading indicator for the single to-do page to disappear from the screen.
Now finish the test by adding the below expectations in the position indicated.
expect(screen.getByText(title)).toBeInTheDocument(); expect(screen.getByText(`Added by: ${userId}`)).toBeInTheDocument(); switch (completed) { case true: expect( screen.getByText(/This item has been completed/) ).toBeInTheDocument(); break; case false: expect( screen.getByText(/This item is yet to be completed/) ).toBeInTheDocument(); break; default: throw new Error("No match"); }
We expect to see the to-do title and the user who added it. Finally, since we can’t be sure about the to-do status, we create a switch block to handle both cases. If a match is not found we throw an error.
You should have 6 passing tests and a functional app at this point. In case you’re having trouble, the corresponding branch in my repo is 05-test-user-action.
Conclusion
Phew! That was some marathon. If you made it to this point, congratulations. You now have almost all you need to write tests for your React apps. I strongly advise that you read CRA’s testing docs and RTL’s documentation. Overall both are relatively short and direct.
I strongly encourage you to start writing tests for your React apps, no matter how small. Even if it’s just smoke tests to make sure your components render. You can incrementally add more test cases over time.
Related Resources
“Testing Overview,” React official website
“Expect,” Jest API Reference
“Custom Render,” React Testing Library
“jest-dom,” Testing Library, GitHub
“Guiding Principles,” Getting Started, Testing Library
“React Testing Library,” Testing Library
“Recommended Tools,” Testing Overview, React official website
“Fix the “not wrapped in act(…)” warning,” Kent C. Dodds
“<MemoryRouter>,” React Training
“screen,” DOM Testing Library
“user-event,” Ecosystem, Testing Library Docs
“The Different Types Of Software Testing,” Sten Pittet, Atlassian
(ks, ra, yk, il)
Website Design & SEO Delray Beach by DBL07.co
Delray Beach SEO
source http://www.scpie.org/how-to-test-your-react-apps-with-the-react-testing-library/ source https://scpie.tumblr.com/post/622686213824970752
0 notes
Text
How To Test Your React Apps With The React Testing Library
About The Author
Awesome frontend developer who loves everything coding. I’m a lover of choral music and I’m working to make it more accessible to the world, one upload at a … More about Chidi …
Testing gives confidence in written code. In the context of this article, ‘testing’ means ‘automated testing’. Without automated testing, it is significantly harder to ensure the quality of a web application of significant complexity. Fails caused by automated testing may lead to more bugs in production. In this article, we’re going to show how React developers can quickly start testing their app with the React Testing Library (RTL).
Today, we’ll briefly discuss why it’s important to write automated tests for any software project, and shed light on some of the common types of automated testing. We’ll build a to-do list app by following the Test-Driven Development (TDD) approach. I’ll show you how to write both unit and functional tests, and in the process, explain what code mocks are by mocking a few libraries. I’ll be using a combination of RTL and Jest — both of which come pre-installed in any new project created with Create-React-App (CRA).
To follow along, you need to know how to set up and navigate a new React project and how to work with the yarn package manager (or npm). Familiarities with Axios and React-Router are also required.
Best Practices With React
React is a fantastic JavaScript library for building rich user interfaces. It provides a great component abstraction for organizing your interfaces into well-functioning code, and there’s just about anything you can use it for. Read more articles on React →
Why You Should Test Your Code
Before shipping your software to end-users, you first have to confirm that it is working as expected. In other words, the app should satisfy its project specifications.
Just as it is important to test our project as a whole before shipping it to end-users, it’s also essential to keep testing our code during the lifetime of a project. This is necessary for a number of reasons. We may make updates to our application or refactor some parts of our code. A third-party library may undergo a breaking change. Even the browser that is running our web application may undergo breaking changes. In some cases, something stops working for no apparent reason — things could go wrong unexpectedly. Thus, it is necessary to test our code regularly for the lifetime of a project.
Broadly speaking, there are manual and automated software tests. In a manual test, a real user performs some action on our application to verify that they work correctly. This kind of test is less reliable when repeated several times because it’s easy for the tester to miss some details between test runs.
In an automated test, however, a test script is executed by a machine. With a test script, we can be sure that whatever details we set in the script will remain unchanged on every test run.
This kind of test gives us the benefits of being predictable and fast, such that we can quickly find and fix bugs in our code.
Having seen the necessity of testing our code, the next logical question is, what sort of automated tests should we write for our code? Let’s quickly go over a few of them.
Types Of Automated Testing
There are many different types of automated software testing. Some of the most common ones are unit tests, integration tests, functional tests, end-to-end tests, acceptance tests, performance tests, and smoke tests.
Unit test In this kind of test, the goal is to verify that each unit of our application, considered in isolation, is working correctly. An example would be testing that a particular function returns an expected value, give some known inputs. We’ll see several examples in this article.
Smoke test This kind of test is done to check that the system is up and running. For example, in a React app, we could just render our main app component and call it a day. If it renders correctly we can be fairly certain that our app would render on the browser.
Integration test This sort of test is carried out to verify that two or more modules can work well together. For example, you might run a test to verify that your server and database are actually communicating correctly.
Functional test A functional test exists to verify that the system meets its functional specification. We’ll see an example later.
End-to-end test This kind of test involves testing the application the same way it would be used in the real world. You can use a tool like cypress for E2E tests.
Acceptance test This is usually done by the business owner to verify that the system meets specifications.
Performance test This sort of testing is carried out to see how the system performs under significant load. In frontend development, this is usually about how fast the app loads on the browser.
There’s more here if you’re interested.
Why Use React Testing Library?
When it comes to testing React applications, there are a few testing options available, of which the most common ones I know of are Enzyme and React Testing Library (RTL).
RTL is a subset of the @testing-library family of packages. Its philosophy is very simple. Your users don’t care whether you use redUX or context for state management. They care less about the simplicity of hooks nor the distinction between class and functional components. They just want your app to work in a certain way. It is, therefore, no surprise that the testing library’s primary guiding principle is
“The more your tests resemble the way your software is used, the more confidence they can give you.”
So, whatever you do, have the end-user in mind and test your app just as they would use it.
Choosing RTL gives you a number of advantages. First, it’s much easier to get started with it. Every new React project bootstrapped with CRA comes with RTL and Jest configured. The React docs also recommend it as the testing library of choice. Lastly, the guiding principle makes a lot of sense — functionality over implementation details.
With that out of the way, let’s get started with building a to-do list app, following the TDD approach.
Project Setup
Open a terminal and copy and run the below command.
# start new react project and start the server npx create-react-app start-rtl && cd start-rtl && yarn start
This should create a new React project and start the server on http://localhost:3000. With the project running, open a separate terminal, run yarn test and then press a. This runs all tests in the project in watch mode. Running the test in watch mode means that the test will automatically re-run when it detects a change in either the test file or the file that is being tested. On the test terminal, you should see something like the picture below:
Initial test passing. (Large preview)
You should see a lot of greens, which indicates that the test we’re running passed in flying colors.
As I mentioned earlier, CRA sets up RTL and Jest for every new React project. It also includes a sample test. This sample test is what we just executed.
When you run the yarn test command, react-scripts calls upon Jest to execute the test. Jest is a JavaScript testing framework that’s used in running tests. You won’t find it listed in package.json but you can do a search inside yarn.lock to find it. You can also see it in node_modules/.
Jest is incredible in the range of functionality that it provides. It provides tools for assertions, mocking, spying, etc. I strongly encourage you to take at least a quick tour of the documentation. There’s a lot to learn there that I cannot scratch in this short piece. We’ll be using Jest a lot in the coming sections.
Open package.json let’s see what we have there. The section of interest is dependencies.
"dependencies": { "@testing-library/jest-dom": "^4.2.4", "@testing-library/react": "^9.3.2", "@testing-library/user-event": "^7.1.2", ... },
We have the following packages installed specifically for testing purpose:
@testing-library/jest-dom: provides custom DOM element matchers for Jest.
@testing-library/react: provides the APIs for testing React apps.
@testing-library/user-event: provides advanced simulation of browser interactions.
Open up App.test.js let’s take a look at its content.
import React from 'react'; import { render } from '@testing-library/react'; import App from './App'; test('renders learn react link', () => { const { getByText } = render(); const linkElement = getByText(/learn react/i); expect(linkElement).toBeInTheDocument(); });
The render method of RTL renders the <App /> component and returns an object which is de-structured for the getByText query. This query finds elements in the DOM by their display text. Queries are the tools for finding elements in the DOM. The complete list of queries can be found here. All of the queries from the testing library are exported by RTL, in addition to the render, cleanup, and act methods. You can read more about these in the API section.
The text is matched with the regular expression /learn react/i. The i flag makes the regular expression case-insensitive. We expect to find the text Learn React in the document.
All of this mimics the behavior a user would experience in the browser when interacting with our app.
Let’s start making the changes required by our app. Open App.js and replace the content with the below code.
import React from "react"; import "./App.css"; function App() { return ( <div className="App"> <header className="App-header"> <h2>Getting started with React testing library</h2> </header> </div> ); } export default App;
If you still have the test running, you should see the test fail. Perhaps you can guess why that is the case, but we’ll return to it a bit later. Right now I want to refactor the test block.
Replace the test block in src/App.test.js with the code below:
# use describe, it pattern describe("<App />", () => { it("Renders <App /> component correctly", () => { const { getByText } = render(<App />); expect(getByText(/Getting started with React testing library/i)).toBeInTheDocument(); }); });
This refactor makes no material difference to how our test will run. I prefer the describe and it pattern as it allows me structure my test file into logical blocks of related tests. The test should re-run and this time it will pass. In case you haven’t guessed it, the fix for the failing test was to replace the learn react text with Getting started with React testing library.
In case you don’t have time to write your own styles you can just copy the one below into App.css.
.App { min-height: 100vh; text-align: center; } .App-header { height: 10vh; display: flex; background-color: #282c34; flex-direction: column; align-items: center; justify-content: center; font-size: calc(10px + 2vmin); color: white; } .App-body { width: 60%; margin: 20px auto; } ul { padding: 0; display: flex; list-style-type: decimal; flex-direction: column; } li { font-size: large; text-align: left; padding: 0.5rem 0; } li a { text-transform: capitalize; text-decoration: none; } .todo-title { text-transform: capitalize; } .completed { color: green; } .not-completed { color: red; }
You should already see the page title move up after adding this CSS.
I consider this a good point for me to commit my changes and push to Github. The corresponding branch is 01-setup.
Let’s continue with our project setup. We know we’re going to need some navigation in our app so we need React-Router. We’ll also be making API calls with Axios. Let’s install both.
# install react-router-dom and axios yarn add react-router-dom axios
Most React apps you’ll build will have to maintain state. There’s a lot of libraries available for managing state. But for this tutorial, I’ll be using React’s context API and the useContext hook. So let’s set up our app’s context.
Create a new file src/AppContext.js and enter the below content.
import React from "react"; export const AppContext = React.createContext({}); export const AppProvider = ({ children }) => { const reducer = (state, action) => { switch (action.type) { case "LOAD_TODOLIST": return { ...state, todoList: action.todoList }; case "LOAD_SINGLE_TODO": return { ...state, activeToDoItem: action.todo }; default: return state; } }; const [appData, appDispatch] = React.useReducer(reducer, { todoList: [], activeToDoItem: { id: 0 }, }); return ( <AppContext.Provider value=> {children} </AppContext.Provider> ); };
Here we create a new context with React.createContext({}), for which the initial value is an empty object. We then define an AppProvider component that accepts children component. It then wraps those children in AppContext.Provider, thus making the { appData, appDispatch } object available to all children anywhere in the render tree.
Our reducer function defines two action types.
LOAD_TODOLIST which is used to update the todoList array.
LOAD_SINGLE_TODO which is used to update activeToDoItem.
appData and appDispatch are both returned from the useReducer hook. appData gives us access to the values in the state while appDispatch gives us a function which we can use to update the app’s state.
Now open index.js, import the AppProvider component and wrap the <App /> component with <AppProvider />. Your final code should look like what I have below.
import { AppProvider } from "./AppContext"; ReactDOM.render( <React.StrictMode> <AppProvider> <App /> </AppProvider> </React.StrictMode>, document.getElementById("root") );
Wrapping <App /> inside <AppProvider /> makes AppContext available to every child component in our app.
Remember that with RTL, the aim is to test our app the same way a real user would interact with it. This implies that we also want our tests to interact with our app state. For that reason, we also need to make our <AppProvider /> available to our components during tests. Let’s see how to make that happen.
The render method provided by RTL is sufficient for simple components that don’t need to maintain state or use navigation. But most apps require at least one of both. For this reason, it provides a wrapper option. With this wrapper, we can wrap the UI rendered by the test renderer with any component we like, thus creating a custom render. Let’s create one for our tests.
Create a new file src/custom-render.js and paste the following code.
import React from "react"; import { render } from "@testing-library/react"; import { MemoryRouter } from "react-router-dom"; import { AppProvider } from "./AppContext"; const Wrapper = ({ children }) => { return ( <AppProvider> <MemoryRouter>{children}</MemoryRouter> </AppProvider> ); }; const customRender = (ui, options) => render(ui, { wrapper: Wrapper, ...options }); // re-export everything export * from "@testing-library/react"; // override render method export { customRender as render };
Here we define a <Wrapper /> component that accepts some children component. It then wraps those children inside <AppProvider /> and <MemoryRouter />. MemoryRouter is
A <Router> that keeps the history of your “URL” in memory (does not read or write to the address bar). Useful in tests and non-browser environments like React Native.
We then create our render function, providing it the Wrapper we just defined through its wrapper option. The effect of this is that any component we pass to the render function is rendered inside <Wrapper />, thus having access to navigation and our app’s state.
The next step is to export everything from @testing-library/react. Lastly, we export our custom render function as render, thus overriding the default render.
Note that even if you were using RedUX for state management the same pattern still applies.
Let’s now make sure our new render function works. Import it into src/App.test.js and use it to render the <App /> component.
Open App.test.js and replace the import line. This
import { render } from '@testing-library/react';
should become
import { render } from './custom-render';
Does the test still pass? Good job.
There’s one small change I want to make before wrapping up this section. It gets tiring very quickly to have to write const { getByText } and other queries every time. So, I’m going to be using the screen object from the DOM testing library henceforth.
Import the screen object from our custom render file and replace the describe block with the code below.
import { render, screen } from "./custom-render"; describe("<App />", () => { it("Renders <App /> component correctly", () => { render(<App />); expect( screen.getByText(/Getting started with React testing library/i) ).toBeInTheDocument(); }); });
We’re now accessing the getByText query from the screen object. Does your test still pass? I’m sure it does. Let’s continue.
If your tests don’t pass you may want to compare your code with mine. The corresponding branch at this point is 02-setup-store-and-render.
Testing And Building The To-Do List Index Page
In this section, we’ll pull to-do items from http://jsonplaceholder.typicode.com/. Our component specification is very simple. When a user visits our app homepage,
show a loading indicator that says Fetching todos while waiting for the response from the API;
display the title of 15 to-do items on the screen once the API call returns (the API call returns 200). Also, each item title should be a link that will lead to the to-do details page.
Following a test-driven approach, we’ll write our test before implementing the component logic. Before doing that we’ll need to have the component in question. So go ahead and create a file src/TodoList.js and enter the following content:
import React from "react"; import "./App.css"; export const TodoList = () => { return ( <div> </div> ); };
Since we know the component specification we can test it in isolation before incorporating it into our main app. I believe it’s up to the developer at this point to decide how they want to handle this. One reason you might want to test a component in isolation is so that you don’t accidentally break any existing test and then having to fight fires in two locations. With that out of the way let’s now write the test.
Create a new file src/TodoList.test.js and enter the below code:
import React from "react"; import axios from "axios"; import { render, screen, waitForElementToBeRemoved } from "./custom-render"; import { TodoList } from "./TodoList"; import { todos } from "./makeTodos"; describe("<App />", () => { it("Renders <TodoList /> component", async () => { render(<TodoList />); await waitForElementToBeRemoved(() => screen.getByText(/Fetching todos/i)); expect(axios.get).toHaveBeenCalledTimes(1); todos.slice(0, 15).forEach((td) => { expect(screen.getByText(td.title)).toBeInTheDocument(); }); }); });
Inside our test block, we render the <TodoList /> component and use the waitForElementToBeRemoved function to wait for the Fetching todos text to disappear from the screen. Once this happens we know that our API call has returned. We also check that an Axios get call was fired once. Finally, we check that each to-do title is displayed on the screen. Note that the it block receives an async function. This is necessary for us to be able to use await inside the function.
Each to-do item returned by the API has the following structure.
{ id: 0, userId: 0, title: 'Some title', completed: true, }
We want to return an array of these when we
import { todos } from "./makeTodos"
The only condition is that each id should be unique.
Create a new file src/makeTodos.js and enter the below content. This is the source of todos we’ll use in our tests.
const makeTodos = (n) => { // returns n number of todo items // default is 15 const num = n || 15; const todos = []; for (let i = 0; i < num; i++) { todos.push({ id: i, userId: i, title: `Todo item ${i}`, completed: [true, false][Math.floor(Math.random() * 2)], }); } return todos; }; export const todos = makeTodos(200);
This function simply generates a list of n to-do items. The completed line is set by randomly choosing between true and false.
Unit tests are supposed to be fast. They should run within a few seconds. Fail fast! This is one of the reasons why letting our tests make actual API calls is impractical. To avoid this we mock such unpredictable API calls. Mocking simply means replacing a function with a fake version, thus allowing us to customize the behavior. In our case, we want to mock the get method of Axios to return whatever we want it to. Jest already provides mocking functionality out of the box.
Let’s now mock Axios so it returns this list of to-dos when we make the API call in our test. Create a file src/__mocks__/axios.js and enter the below content:
import { todos } from "../makeTodos"; export default { get: jest.fn().mockImplementation((url) => { switch (url) { case "https://jsonplaceholder.typicode.com/todos": return Promise.resolve({ data: todos }); default: throw new Error(`UNMATCHED URL: ${url}`); } }), };
When the test starts, Jest automatically finds this mocks folder and instead of using the actual Axios from node_modules/ in our tests, it uses this one. At this point, we’re only mocking the get method using Jest’s mockImplementation method. Similarly, we can mock other Axios methods like post, patch, interceptors, defaults etc. Right now they’re all undefined and any attempt to access, axios.post for example, would result in an error.
Note that we can customize what to return based on the URL the Axios call receives. Also, Axios calls return a promise which resolves to the actual data we want, so we return a promise with the data we want.
At this point, we have one passing test and one failing test. Let’s implement the component logic.
Open src/TodoList.js let’s build out the implementation piece by piece. Start by replacing the code inside with this one below.
import React from "react"; import axios from "axios"; import { Link } from "react-router-dom"; import "./App.css"; import { AppContext } from "./AppContext"; export const TodoList = () => { const [loading, setLoading] = React.useState(true); const { appData, appDispatch } = React.useContext(AppContext); React.useEffect(() => { axios.get("https://jsonplaceholder.typicode.com/todos").then((resp) => { const { data } = resp; appDispatch({ type: "LOAD_TODOLIST", todoList: data }); setLoading(false); }); }, [appDispatch, setLoading]); return ( <div> // next code block goes here </div> ); };
We import AppContext and de-structure appData and appDispatch from the return value of React.useContext. We then make the API call inside a useEffect block. Once the API call returns, we set the to-do list in state by firing the LOAD_TODOLIST action. Finally, we set the loading state to false to reveal our to-dos.
Now enter the final piece of code.
{loading ? ( <p>Fetching todos</p> ) : ( <ul> {appData.todoList.slice(0, 15).map((item) => { const { id, title } = item; return ( <li key={id}> <Link to={`/item/${id}`} data-testid={id}> {title} </Link> </li> ); })} </ul> )}
We slice appData.todoList to get the first 15 items. We then map over those and render each one in a <Link /> tag so we can click on it and see the details. Note the data-testid attribute on each Link. This should be a unique ID that will aid us in finding individual DOM elements. In a case where we have similar text on the screen, we should never have the same ID for any two elements. We’ll see how to use this a bit later.
My tests now pass. Does yours pass? Great.
Let’s now incorporate this component into our render tree. Open up App.js let’s do that.
First things. Add some imports.
import { BrowserRouter, Route } from "react-router-dom"; import { TodoList } from "./TodoList";
We need BrowserRouter for navigation and Route for rendering each component in each navigation location.
Now add the below code after the <header /> element.
<div className="App-body"> <BrowserRouter> <Route exact path="/" component={TodoList} /> </BrowserRouter> </div>
This is simply telling the browser to render the <TodoList /> component when we’re on the root location, /. Once this is done, our tests still pass but you should see some error messages on your console telling you about some act something. You should also see that the <TodoList /> component seems to be the culprit here.
Terminal showing act warnings. (Large preview)
Since we’re sure that our TodoList component by itself is okay, we have to look at the App component, inside of which is rendered the <TodoList /> component.
This warning may seem complex at first but it is telling us that something is happening in our component that we’re not accounting for in our test. The fix is to wait for the loading indicator to be removed from the screen before we proceed.
Open up App.test.js and update the code to look like so:
import React from "react"; import { render, screen, waitForElementToBeRemoved } from "./custom-render"; import App from "./App"; describe("<App />", () => { it("Renders <App /> component correctly", async () => { render(<App />); expect( screen.getByText(/Getting started with React testing library/i) ).toBeInTheDocument(); await waitForElementToBeRemoved(() => screen.getByText(/Fetching todos/i)); }); });
We’ve made two changes. First, we changed the function in the it block to an async function. This is a necessary step to allow us to use await in the function body. Secondly, we wait for the Fetching todos text to be removed from the screen. And voila!. The warning is gone. Phew! I strongly advise that you bookmark this post by Kent Dodds for more on this act warning. You’re gonna need it.
Now open the page in your browser and you should see the list of to-dos. You can click on an item if you like, but it won’t show you anything because our router doesn’t yet recognize that URL.
For comparison, the branch of my repo at this point is 03-todolist.
Let’s now add the to-do details page.
Testing And Building The Single To-Do Page
To display a single to-do item we’ll follow a similar approach. The component specification is simple. When a user navigates to a to-do page:
display a loading indicator that says Fetching todo item id where id represents the to-do’s id, while the API call to https://jsonplaceholder.typicode.com/todos/item_id runs.
When the API call returns, show the following information:
Todo item title
Added by: userId
This item has been completed if the to-do has been completed or
This item is yet to be completed if the to-do has not been completed.
Let’s start with the component. Create a file src/TodoItem.js and add the following content.
import React from "react"; import { useParams } from "react-router-dom"; import "./App.css"; export const TodoItem = () => { const { id } = useParams() return ( <div className="single-todo-item"> </div> ); };
The only thing new to us in this file is the const { id } = useParams() line. This is a hook from react-router-dom that lets us read URL parameters. This id is going to be used in fetching a to-do item from the API.
This situation is a bit different because we’re going to be reading the id from the location URL. We know that when a user clicks a to-do link, the id will show up in the URL which we can then grab using the useParams() hook. But here we’re testing the component in isolation which means that there’s nothing to click, even if we wanted to. To get around this we’ll have to mock react-router-dom, but only some parts of it. Yes. It’s possible to mock only what we need to. Let’s see how it’s done.
Create a new mock file src/__mocks__ /react-router-dom.js. Now paste in the following code:
module.exports = { ...jest.requireActual("react-router-dom"), useParams: jest.fn(), };
By now you should have noticed that when mocking a module we have to use the exact module name as the mock file name.
Here, we use the module.exports syntax because react-router-dom has mostly named exports. (I haven’t come across any default export since I’ve been working with it. If there are any, kindly share with me in the comments). This is unlike Axios where everything is bundled as methods in one default export.
We first spread the actual react-router-dom, then replace the useParams hook with a Jest function. Since this function is a Jest function, we can modify it anytime we want. Keep in mind that we’re only mocking the part we need to because if we mock everything, we’ll lose the implementation of MemoryHistory which is used in our render function.
Let’s start testing!
Now create src/TodoItem.test.js and enter the below content:
import React from "react"; import axios from "axios"; import { render, screen, waitForElementToBeRemoved } from "./custom-render"; import { useParams, MemoryRouter } from "react-router-dom"; import { TodoItem } from "./TodoItem"; describe("<TodoItem />", () => { it("can tell mocked from unmocked functions", () => { expect(jest.isMockFunction(useParams)).toBe(true); expect(jest.isMockFunction(MemoryRouter)).toBe(false); }); });
Just like before, we have all our imports. The describe block then follows. Our first case is only there as a demonstration that we’re only mocking what we need to. Jest’s isMockFunction can tell whether a function is mocked or not. Both expectations pass, confirming the fact that we have a mock where we want it.
Add the below test case for when a to-do item has been completed.
it("Renders <TodoItem /> correctly for a completed item", async () => { useParams.mockReturnValue({ id: 1 }); render(<TodoItem />); await waitForElementToBeRemoved(() => screen.getByText(/Fetching todo item 1/i) ); expect(axios.get).toHaveBeenCalledTimes(1); expect(screen.getByText(/todo item 1/)).toBeInTheDocument(); expect(screen.getByText(/Added by: 1/)).toBeInTheDocument(); expect( screen.getByText(/This item has been completed/) ).toBeInTheDocument(); });
The very first thing we do is to mock the return value of useParams. We want it to return an object with an id property, having a value of 1. When this is parsed in the component, we end up with the following URL https://jsonplaceholder.typicode.com/todos/1. Keep in mind that we have to add a case for this URL in our Axios mock or it will throw an error. We will do that in just a moment.
We now know for sure that calling useParams() will return the object { id: 1 } which makes this test case predictable.
As with previous tests, we wait for the loading indicator, Fetching todo item 1 to be removed from the screen before making our expectations. We expect to see the to-do title, the id of the user who added it, and a message indicating the status.
Open src/__mocks__/axios.js and add the following case to the switch block.
case "https://jsonplaceholder.typicode.com/todos/1": return Promise.resolve({ data: { id: 1, title: "todo item 1", userId: 1, completed: true }, });
When this URL is matched, a promise with a completed to-do is returned. Of course, this test case fails since we’re yet to implement the component logic. Go ahead and add a test case for when the to-do item has not been completed.
it("Renders <TodoItem /> correctly for an uncompleted item", async () => { useParams.mockReturnValue({ id: 2 }); render(<TodoItem />); await waitForElementToBeRemoved(() => screen.getByText(/Fetching todo item 2/i) ); expect(axios.get).toHaveBeenCalledTimes(2); expect(screen.getByText(/todo item 2/)).toBeInTheDocument(); expect(screen.getByText(/Added by: 2/)).toBeInTheDocument(); expect( screen.getByText(/This item is yet to be completed/) ).toBeInTheDocument(); });
This is the same as the previous case. The only difference is the ID of the to-do, the userId, and the completion status. When we enter the component, we’ll need to make an API call to the URL https://jsonplaceholder.typicode.com/todos/2. Go ahead and add a matching case statement to the switch block of our Axios mock.
case "https://jsonplaceholder.typicode.com/todos/2": return Promise.resolve({ data: { id: 2, title: "todo item 2", userId: 2, completed: false }, });
When the URL is matched, a promise with an uncompleted to-do is returned.
Both test cases are failing. Now let’s add the component implementation to make them pass.
Open src/TodoItem.js and update the code to the following:
import React from "react"; import axios from "axios"; import { useParams } from "react-router-dom"; import "./App.css"; import { AppContext } from "./AppContext"; export const TodoItem = () => { const { id } = useParams(); const [loading, setLoading] = React.useState(true); const { appData: { activeToDoItem }, appDispatch, } = React.useContext(AppContext); const { title, completed, userId } = activeToDoItem; React.useEffect(() => { axios .get(`https://jsonplaceholder.typicode.com/todos/${id}`) .then((resp) => { const { data } = resp; appDispatch({ type: "LOAD_SINGLE_TODO", todo: data }); setLoading(false); }); }, [id, appDispatch]); return ( <div className="single-todo-item"> // next code block goes here. </div> ); };
As with the <TodoList /> component, we import AppContext. We read activeTodoItem from it, then we read the to-do title, userId, and completion status. After that we make the API call inside a useEffect block. When the API call returns we set the to-do in state by firing the LOAD_SINGLE_TODO action. Finally, we set our loading state to false to reveal the to-do details.
Let’s add the final piece of code inside the return div:
{loading ? ( <p>Fetching todo item {id}</p> ) : ( <div> <h2 className="todo-title">{title}</h2> <h4>Added by: {userId}</h4> {completed ? ( <p className="completed">This item has been completed</p> ) : ( <p className="not-completed">This item is yet to be completed</p> )} </div> )}
Once this is done all tests should now pass. Yay! We have another winner.
Our component tests now pass. But we still haven’t added it to our main app. Let’s do that.
Open src/App.js and add the import line:
import { TodoItem } from './TodoItem'
Add the TodoItem route above the TodoList route. Be sure to preserve the order shown below.
# preserve this order <Route path="/item/:id" component={TodoItem} /> <Route exact path="/" component={TodoList} />
Open your project in your browser and click on a to-do. Does it take you to the to-do page? Of course, it does. Good job.
In case you’re having any problem, you can check out my code at this point from the 04-test-todo branch.
Phew! This has been a marathon. But bear with me. There’s one last point I’d like us to touch. Let’s quickly have a test case for when a user visits our app, and then proceed to click on a to-do link. This is a functional test to mimic how our app should work. In practice, this is all the testing we need to be done for this app. It ticks every box in our app specification.
Open App.test.js and add a new test case. The code is a bit long so we’ll add it in two steps.
import userEvent from "@testing-library/user-event"; import { todos } from "./makeTodos"; jest.mock("react-router-dom", () => ({ ...jest.requireActual("react-router-dom"), })); describe("<App />" ... // previous test case ... it("Renders todos, and I can click to view a todo item", async () => { render(<App />); await waitForElementToBeRemoved(() => screen.getByText(/Fetching todos/i)); todos.slice(0, 15).forEach((td) => { expect(screen.getByText(td.title)).toBeInTheDocument(); }); // click on a todo item and test the result const { id, title, completed, userId } = todos[0]; axios.get.mockImplementationOnce(() => Promise.resolve({ data: { id, title, userId, completed }, }) ); userEvent.click(screen.getByTestId(String(id))); await waitForElementToBeRemoved(() => screen.getByText(`Fetching todo item ${String(id)}`) ); // next code block goes here }); });
We have two imports of which userEvent is new. According to the docs,
“user-event is a companion library for the React Testing Library that provides a more advanced simulation of browser interactions than the built-in fireEvent method.”
Yes. There is a fireEvent method for simulating user events. But userEvent is what you want to be using henceforth.
Before we start the testing process, we need to restore the original useParams hooks. This is necessary since we want to test actual behavior, so we should mock as little as possible. Jest provides us with requireActual method which returns the original react-router-dom module.
Note that we must do this before we enter the describe block, otherwise, Jest would ignore it. It states in the documentation that requireActual:
“…returns the actual module instead of a mock, bypassing all checks on whether the module should receive a mock implementation or not.”
Once this is done, Jest bypasses every other check and ignores the mocked version of the react-router-dom.
As usual, we render the <App /> component and wait for the Fetching todos loading indicator to disappear from the screen. We then check for the presence of the first 15 to-do items on the page.
Once we’re satisfied with that, we grab the first item in our to-do list. To prevent any chance of a URL collision with our global Axios mock, we override the global mock with Jest’s mockImplementationOnce. This mocked value is valid for one call to the Axios get method. We then grab a link by its data-testid attribute and fire a user click event on that link. Then we wait for the loading indicator for the single to-do page to disappear from the screen.
Now finish the test by adding the below expectations in the position indicated.
expect(screen.getByText(title)).toBeInTheDocument(); expect(screen.getByText(`Added by: ${userId}`)).toBeInTheDocument(); switch (completed) { case true: expect( screen.getByText(/This item has been completed/) ).toBeInTheDocument(); break; case false: expect( screen.getByText(/This item is yet to be completed/) ).toBeInTheDocument(); break; default: throw new Error("No match"); }
We expect to see the to-do title and the user who added it. Finally, since we can’t be sure about the to-do status, we create a switch block to handle both cases. If a match is not found we throw an error.
You should have 6 passing tests and a functional app at this point. In case you’re having trouble, the corresponding branch in my repo is 05-test-user-action.
Conclusion
Phew! That was some marathon. If you made it to this point, congratulations. You now have almost all you need to write tests for your React apps. I strongly advise that you read CRA’s testing docs and RTL’s documentation. Overall both are relatively short and direct.
I strongly encourage you to start writing tests for your React apps, no matter how small. Even if it’s just smoke tests to make sure your components render. You can incrementally add more test cases over time.
Related Resources
“Testing Overview,” React official website
“Expect,” Jest API Reference
“Custom Render,” React Testing Library
“jest-dom,” Testing Library, GitHub
“Guiding Principles,” Getting Started, Testing Library
“React Testing Library,” Testing Library
“Recommended Tools,” Testing Overview, React official website
“Fix the “not wrapped in act(…)” warning,” Kent C. Dodds
“<MemoryRouter>,” React Training
“screen,” DOM Testing Library
“user-event,” Ecosystem, Testing Library Docs
“The Different Types Of Software Testing,” Sten Pittet, Atlassian
(ks, ra, yk, il)
Website Design & SEO Delray Beach by DBL07.co
Delray Beach SEO
source http://www.scpie.org/how-to-test-your-react-apps-with-the-react-testing-library/
0 notes
Link
If you have started working on ReactJS recently then you might be wondering how to manage state in React so that your application can scale. To solve this state management issue, many companies and people have developed various solutions. Facebook, who developed ReactJS, came up with a solution called Flux. You may have heard about Redux if you have worked on front end technology such as AngularJS or EmberJS. ReactJS also has a library for implementing Redux. But before learning Redux I would advise you to go through Flux and understand it. After that give Redux a try. I say this because Redux is a more advanced version of Flux. If the concepts of Flux are clear then you can learn redux and integrate it into your application.
What is flux?
Flux uses a unidirectional data flow pattern to solve state management complexity. Remember it is not a framework – rather it's more of a pattern that targets to solve the state management issue. Are you wondering what's wrong with the existing MVC framework? Imagine your client's application scales up. You have interaction between many models and views. How would it look?
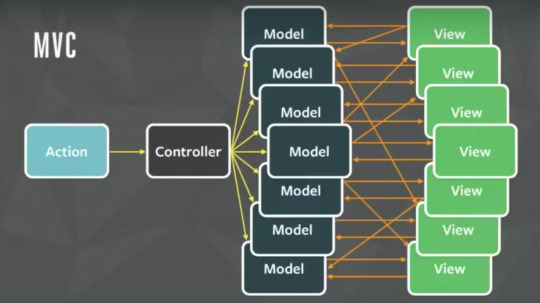
Credit: Image from Facebook F8 Flux Event
The relationship between components gets complicated. It becomes hard to scale the application. Facebook faced the same issue. To solve this issue they architected a Single directional data flow.

Credit: Image from Facebook's Flux Doc
As you can see from the image above, there are a lot of components used in Flux. Let's go through all the components one by one. View: this component renders the UI. Whenever any user interaction occurs on it (like an event) then it fires off the action. Also when the Store informs the View that some change has occurred, it re-renders itself. For example, if a user clicks the Add button. Action: this handles all the events. These events are passed by the view component. This layer is generally used to make API calls. Once the action is done it is dispatched using the Dispatcher. The action can be something like add a post, delete a post, or any other user interaction. The common structure of the payload for dispatching an event is as follows:
{ actionType: "", data: { title: "Understanding Flux step by step", author: "Sharvin" } }
The actionType key is compulsory and it is used by the dispatcher to pass updates to the related store. It is also a known practice to use constants to hold the value name for actionType key so no typos occur. Data holds the event information that we want to dispatch from Action to Store. The name for this key can be anything. Dispatcher: this is the central hub and singleton registry. It dispatches the payload from Actions to Store. Also makes sure that there are no cascading effects when an action is dispatched to the store. It ensures that no other action happens before the data layer has completed processing and storing operations. Consider this component has a traffic controller in the system. It is a centralized list of callbacks. It invokes the callback and broadcasts the payload it received from the action. Due to this component, the data flow is predictable. Every action updates the specific store with the callback that is registered with the dispatcher. Store: this holds the app state and is a data layer of this pattern. Do not consider it as a model from MVC. An application can have one or many app stores. Stores get updated because they have a callback that is registered using the dispatcher. Node's event emitter is used to update the store and broadcast the update to view. The view never directly updates the application state. It is updated because of the changes to the store. This is only part of Flux that can update the data. Interfaces implemented in the store are as follows:
The EventEmitter is extended to inform the view that store data has been updated.
Listeners like addChangeListener and removeChangeListener are added.
emitChange is used to emit the change.
Consider the above diagram with more stores and views. Still, the pattern and the flow of data will be the same. This is because this is a single direction and predictable data flow, unlike MVC or Two-way binding. This improves the data consistency and it's easier to find the bug.
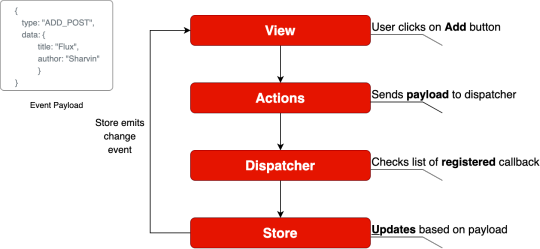
Flux Data Flow
Well, Flux brings the following key benefits to the table with the help of unidirectional data flow:
The code becomes quite clear and easy to understand.
Easily testable using Unit Test.
Scalable apps can be built.
Predictable data flow.
Note: The only drawback with the Flux is that there is some boilerplate that we need to write. Besides the boilerplate, there is little code we need to write when adding components to the existing application.
Application Template
To learn how to implement flux in ReactJS, we will build a Posts page. Here we will display all the posts. The application template is available at this commit. We will use this as the template for integrating Flux on top of it. To clone the code from this commit, use the following command:
git clone https://github.com/Sharvin26/DummyBlog.git
git checkout 0d56987b2d461b794e7841302c9337eda1ad0725
We will require a react-router-dom and bootstrap module. To install these packages, use the following command:
npm install [email protected] [email protected]
Once done you'll see the following application:

DummyBlog
To understand Flux in detail we will only implement the GET posts page. Once that is done you'll realize the process is the same for POST, EDIT and DELETE. Here you'll see the following directory structure:
+-- README.md +-- package-lock.json +-- package.json +-- node_modules +-- .gitignore +-- public | +-- index.html +-- src | +-- +-- components | +-- +-- +-- common | +-- +-- +-- +-- NavBar.js | +-- +-- +-- PostLists.js | +-- +-- pages | +-- +-- +-- Home.js | +-- +-- +-- NotFound.js | +-- +-- +-- Posts.js | +-- index.js | +-- App.js | +-- db.json
Note: We have added here a db.json file. This is a dummy data file. Since we don't want to build APIs and instead focus on Flux, we will retrieve the data from this file.
Our Application's base component is index.js. Here we have rendered the App.js inside the index.html under public directory using the render and getElementById methods. The App.js is used for configuring the routes. We are also adding NavBar component at the top of the other so it will be available for all the components. Inside the pages directory we have 3 files => Home.js, Posts.js, and NotFound.js. Home.js is simply used to display the Home component. When a user routes to a URL which doesn't exist, then NotFound.js renders. The Posts.js is the parent component and it is used to get the data from the db.json file. It passes this data to the PostLists.js under the components directory. This component is a dumb component and it only handles the UI. It gets the data as props from its parent component (Posts.js) and displays it in the form of cards. Now that we are clear about how our blog app is working we will start with integrating Flux on top of it.
Integrating Flux
Install Flux using the following command:
npm install [email protected]
To integrate Flux in our application we will divide this section into 4 subsections:
Dispatcher
Actions
Stores
View
Note: The complete code is available at this repository.
Dispatcher
First, create two new folders named actions and stores under the src directory. After that create a file named appDispatcher.js under the same src directory. Note: From now all the files which are related to Flux will have Camel casing as they are not ReactJS components. Go to the appDispatcher.js and copy-paste the following code:
import { Dispatcher } from "flux"; const dispatcher = new Dispatcher(); export default dispatcher;
Here we are importing the Dispatcher from the flux library that we installed, creating a new object and exporting it so that our actions module can use it.
Actions
Now go to the actions directory and create two files named actionTypes.js and postActions.js. In the actionTypes.js we will define the constants that we require in postActions.js and store module. The reason behind defining constants is that we don't want to make typos. You don't have to define constants but it is generally considered a good practice.
// actionTypes.js export default { GET_POSTS: "GET_POSTS", };
Now inside the postActions.js, we will retrieve the data from db.json and use the dispatcher object to dispatch it.
//postActions.js import dispatcher from "../appDispatcher"; import actionTypes from "./actionTypes"; import data from "../db.json"; export function getPosts() { dispatcher.dispatch({ actionTypes: actionTypes.GET_POSTS, posts: data["posts"], }); }
Here in the above code, we have imported the dispatcher object, actionTypes constant, and data. We are using a dispatcher object's dispatch method to send the data to the store. The data in our case will be sent in the following format:
{ actionTypes: "GET_POSTS", posts: [ { "id": 1, "title": "Hello World", "author": "Sharvin Shah", "body": "Example of blog application" }, { "id": 2, "title": "Hello Again", "author": "John Doe", "body": "Testing another component" } ] }
Stores
Now we need to build the store which will act as a data layer for storing the posts. It will have an event listener to inform the view that something has changed, and will register using dispatcher with the actions to get the data. Go to the store directory and create a new file called postStore.js. Now first, we will import EventEmitter from the Events package. It is available in the NodeJS by default. We will also import the dispatcher object and actionTypes constant file here.
import { EventEmitter } from "events"; import dispatcher from "../appDispatcher"; import actionTypes from "../actions/actionTypes";
We will declare the constant of the change event and a variable to hold the posts whenever the dispatcher passes it.
const CHANGE_EVENT = "change"; let _posts = [];
Now we will write a class that extends the EventEmitter as its base class. We will declare the following methods in this class: addChangeListener: It uses the NodeJS EventEmitter.on. It adds a change listener that accepts the callback function. removeChangeListener: It uses the NodeJS EventEmitter.removeListener. Whenever we don't want to listen for a specific event we use the following method. emitChange: It uses the NodeJS EventEmitter.emit. Whenever any change occurs, it emits that change. This class will also have a method called getPosts which returns the variable _posts that we have declared above the class. Below the variable declaration add the following code:
class PostStore extends EventEmitter { addChangeListener(callback) { this.on(CHANGE_EVENT, callback); } removeChangeListener(callback) { this.removeListener(CHANGE_EVENT, callback); } emitChange() { this.emit(CHANGE_EVENT); } getPosts() { return _posts; } }
Now create the store object of our PostStore class. We will export this object so that we can use it in the view.
const store = new PostStore();
After that, we will use the dispatcher's register method to receive the payload from our Actions component. To register for the specific event, we need to use the actionTypes value and determine which action has occurred and process the data accordingly. Add the following code below the object declaration:
dispatcher.register((action) => { switch (action.actionTypes) { case actionTypes.GET_POSTS: _posts = action.posts; store.emitChange(); break; default: } });
We will export the object from this module so others can use it.
export default store;
View
Now we will update our view to send the event to postActions whenever our Posts page is loaded and receive the payload from the postStore. Go to Posts.js under the pages directory. You'll find the following code inside the useEffect method:
useEffect(() => { setposts(data["posts"]); }, []);
We will change how our useEffect reads and updates the data. First, we will use the addChangeListener method from the postStore class and we will pass an onChange callback to it. We will set the posts state value to have a return value of the getPosts method from the postStore.js file. At the start, the store will return an empty array as there is no data available. So we will call a getPosts method from the postActions.js. This method will read the data and pass it to the store. Then the store will emit the change and addChangeListener will listen to the change and update the value of the posts in its onChange callback. If this seems confusing don't worry – check out the flow chart below which makes it easier to understand.
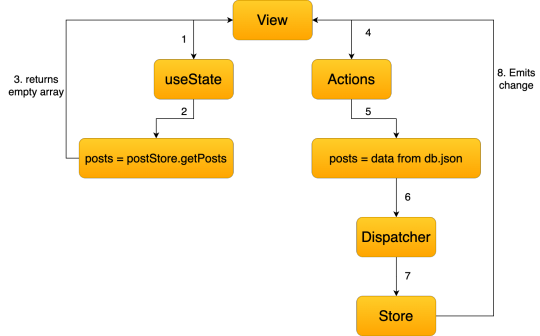
Remove the old code and update the following code inside Posts.js:
import React, { useState, useEffect } from "react"; import PostLists from "../components/PostLists"; import postStore from "../stores/postStore"; import { getPosts } from "../actions/postActions"; function PostPage() { const [posts, setPosts] = useState(postStore.getPosts()); useEffect(() => { postStore.addChangeListener(onChange); if (postStore.getPosts().length === 0) getPosts(); return () => postStore.removeChangeListener(onChange); }, []); function onChange() { setPosts(postStore.getPosts()); } return ( <div> <PostLists posts={posts} /> </div> ); } export default PostPage;
Here you'll find that we have also removed the import and also we are using setPosts inside our callback instead of useEffect method. The return () => postStore.removeChangeListener(onChange); is used to remove the listener once the user leaves that page. With this go to the Blog Page and you'll find that our blog app is working. The only difference is that now instead of reading the data in the useEffect method we are reading it in actions, storing it in the store, and sending it to the components that require it. When using the actual API you'll find that the application loads the data from the API one time and stores it in the store. When we revisit the same page you'll observe that no API call is required again. You can monitor it under the source tab in Chrome Developer console. And we're done!! I hope this tutorial has made the idea of Flux clearer and you'll be able to use it in your projects.
0 notes
Link
SitePoint http://j.mp/2fGWFbg
React Router is the de facto standard routing library for React. When you need to navigate through a React application with multiple views, you'll need a router to manage the URLs. React Router takes care of that, keeping your application UI and the URL in sync.
This tutorial introduces you to React Router v4 and a whole lot of things you can do with it.
Introduction
React is a popular library for creating single-page applications (SPAs) that are rendered on the client side. An SPA might have multiple views (aka pages), and unlike the conventional multi-page apps, navigating through these views shouldn't result in the entire page being reloaded. Instead, we want the views to be rendered inline within the current page. The end user, who's accustomed to multi-page apps, expects the following features to be present in an SPA:
Each view in an application should have a URL that uniquely specifies that view. This is so that the user can bookmark the URL for reference at a later time --- e.g. http://j.mp/2fIjgnL.
The browser's back and forward button should work as expected.
The dynamically generated nested views should preferably have a URL of their own too --- e.g. http://j.mp/2xONM5m, where 101 is the product id.
Routing is the process of keeping the browser URL in sync with what's being rendered on the page. React Router lets you handle routing declaratively. The declarative routing approach allows you to control the data flow in your application, by saying "the route should look like this":
<Route path="/about" component={About}/>
You can place your <Route> component anywhere that you want your route to be rendered. Since <Route>, <Link> and all the other React Router API that we'll be dealing with are just components, you can easily get used to routing in React.
A note before getting started. There's a common misconception that React Router is an official routing solution developed by Facebook. In reality, it's a third-party library that's widely popular for its design and simplicity. If your requirements are limited to routers for navigation, you could implement a custom router from scratch without much hassle. However, understanding how the basics of React Router will give you better insights into how a router should work.
Overview
This tutorial is divided into different sections. First, we'll be setting up React and React Router using npm. Then we'll jump right into React Router basics. You'll find different code demonstrations of React Router in action. The examples covered in this tutorial include:
basic navigational routing
nested routing
nested routing with path parameters
protected routing
All the concepts connected with building these routes will be discussed along the way. The entire code for the project is available on this GitHub repo. Once you're inside a particular demo directory, run npm install to install the dependencies. To serve the application on a development server, run npm start and head over to http://localhost:3000/ to see the demo in action.
Let's get started!
Setting up React Router
I assume you already have a development environment up and running. If not, head over to “Getting Started with React and JSX”. Alternatively, you can use Create React App to generate the files required for creating a basic React project. This is the default directory structure generated by Create React App:
react-routing-demo-v4 ├── .gitignore ├── package.json ├── public │ ├── favicon.ico │ ├── index.html │ └── manifest.json ├── README.md ├── src │ ├── App.css │ ├── App.js │ ├── App.test.js │ ├── index.css │ ├── index.js │ ├── logo.svg │ └── registerServiceWorker.js └── yarn.lock
The React Router library comprises three packages: react-router, react-router-dom, and react-router-native. react-router is the core package for the router, whereas the other two are environment specific. You should use react-router-dom if you're building a website, and react-router-native if you're on a mobile app development environment using React Native.
Use npm to install react-router-dom:
npm install --save react-router-dom
React Router Basics
Here's an example of how our routes will look:
<Router> <Route exact path="/" component={Home}/> <Route path="/category" component={Category}/> <Route path="/login" component={Login}/> <Route path="/products" component={Products}/> </Router>
Router
You need a router component and several route components to set up a basic route as exemplified above. Since we're building a browser-based application, we can use two types of routers from the React Router API:
<BrowserRouter>
<HashRouter>
The primary difference between them is evident in the URLs that they create:
// <BrowserRouter> http://j.mp/2fI6k1c // <HashRouter> http://j.mp/2xOAjum
The <BrowserRouter> is more popular amongst the two because it uses the HTML5 History API to keep track of your router history. The <HashRouter>, on the other hand, uses the hash portion of the URL (window.location.hash) to remember things. If you intend to support legacy browsers, you should stick with <HashRouter>.
Wrap the <BrowserRouter> component around the App component.
index.js
/* Import statements */ import React from 'react'; import ReactDOM from 'react-dom'; /* App is the entry point to the React code.*/ import App from './App'; /* import BrowserRouter from 'react-router-dom' */ import { BrowserRouter } from 'react-router-dom'; ReactDOM.render( <BrowserRouter> <App /> </BrowserRouter> , document.getElementById('root'));
Note: A router component can only have a single child element. The child element can be an HTML element --- such as div --- or a react component.
For the React Router to work, you need to import the relevant API from the react-router-dom library. Here I've imported the BrowserRouter into index.js. I've also imported the App component from App.js. App.js, as you might have guessed, is the entry point to React components.
The above code creates an instance of history for our entire App component. Let me formally introduce you to history.
history
history is a JavaScript library that lets you easily manage session history anywhere JavaScript runs. history provides a minimal API that lets you manage the history stack, navigate, confirm navigation, and persist state between sessions. --- React Training docs
Each router component creates a history object that keeps track of the current location (history.location) and also the previous locations in a stack. When the current location changes, the view is re-rendered and you get a sense of navigation. How does the current location change? The history object has methods such as history.push() and history.replace() to take care of that. history.push() is invoked when you click on a <Link> component, and history.replace() is called when you use <Redirect>. Other methods --- such as history.goBack() and history.goForward() --- are used to navigate through the history stack by going back or forward a page.
Moving on, we have Links and Routes.
Links and Routes
The <Route> component is the most important component in React router. It renders some UI if the current location matches the route's path. Ideally, a <Route> component should have a prop named path, and if the pathname is matched with the current location, it gets rendered.
The <Link> component, on the other hand, is used to navigate between pages. It's comparable to the HTML anchor element. However, using anchor links would result in a browser refresh, which we don't want. So instead, we can use <Link> to navigate to a particular URL and have the view re-rendered without a browser refresh.
We've covered everything you need to know to create a basic router. Let's build one.
Demo 1: Basic Routing
src/App.js
/* Import statements */ import React, { Component } from 'react'; import { Link, Route, Switch } from 'react-router-dom'; /* Home component */ const Home = () => ( <div> <h2>Home</h2> </div> ) /* Category component */ const Category = () => ( <div> <h2>Category</h2> </div> ) /* Products component */ const Products = () => ( <div> <h2>Products</h2> </div> ) /* App component */ class App extends React.Component { render() { return ( <div> <nav className="navbar navbar-light"> <ul className="nav navbar-nav"> /* Link components are used for linking to other views */ <li><Link to="/">Homes</Link></li> <li><Link to="/category">Category</Link></li> <li><Link to="/products">Products</Link></li> </ul> </nav> /* Route components are rendered if the path prop matches the current URL */ <Route path="/" component={Home}/> <Route path="/category" component={Category}/> <Route path="/products" component={Products}/> </div> ) } }
We've declared the components for Home, Category and Products inside App.js. Although this is okay for now, when the component starts to grow bigger, it's better to have a separate file for each component. As a rule of thumb, I usually create a new file for a component if it occupies more than 10 lines of code. Starting from the second demo, I'll be creating a separate file for components that have grown too big to fit inside the App.js file.
Inside the App component, we've written the logic for routing. The <Route>'s path is matched with the current location and a component gets rendered. The component that should be rendered is passed in as a second prop.
Here / matches both / and /category. Therefore, both the routes are matched and rendered. How do we avoid that? You should pass the exact= {true} props to the router with path='/':
<Route exact={true} path="/" component={Home}/>
If you want a route to be rendered only if the paths are exactly the same, you should use the exact props.
Nested Routing
To create nested routes, we need to have a better understanding of how <Route> works. Let's do that.
<Route> has three props that you can you use to define what gets rendered:
component. We've already seen this in action. When the URL is matched, the router creates a React element from the given component using React.createElement.
render. This is handy for inline rendering. The render prop expects a function that returns an element when the location matches the route's path.
children. The children prop is similar to render in that it expects a function that returns a React element. However, children gets rendered regardless of whether the path is matched with the location or not.
Path and match
The path is used to identify the portion of the URL that the router should match. It uses the Path-to-RegExp library to turn a path string into a regular expression. It will then be matched against the current location.
If the router's path and the location are successfully matched, an object is created and we call it the match object. The match object carries more information about the URL and the path. This information is accessible through its properties, listed below:
match.url. A string that returns the matched portion of the URL. This is particularly useful for building nested <Link>s
match.path. A string that returns the route's path string --- that is, <Route path="">. We'll be using this to build nested <Route>s.
match.isExact. A boolean that returns true if the match was exact (without any trailing characters).
match.params. An object containing key/value pairs from the URL parsed by the Path-to-RegExp package.
Now that we know all about <Route>s, let's build a router with nested routes.
Switch Component
Before we head for the demo code, I want to introduce you to the <Switch> component. When multiple <Route>s are used together, all the routes that match are rendered inclusively. Consider this code from demo 1. I've added a new route to demonstrate why <Switch> is useful.
<Route exact path="/" component={Home}/> <Route path="/products" component={Products}/> <Route path="/category" component={Category}/> <Route path="/:id" render = {()=> (<p> I want this text to show up for all routes other than '/', '/products' and '/category' </p>)}/>
If the URL is /products, all the routes that match the location /products are rendered. So, the <Route> with path :id gets rendered along with the Products component. This is by design. However, if this is not the behavior you're expecting, you should add the <Switch> component to your routes. With <Switch>, only the first child <Route> that matches the location gets rendered.
Continue reading %React Router v4: The Complete Guide%
http://j.mp/2xPiYBx via SitePoint URL : http://j.mp/2c7PqoM
0 notes