#React router dom history push
Explore tagged Tumblr posts
Visit Tumblr Blog
Explore Tumblr blogs with no restrictions, modern design and the best experience.
Last Seen Tumblr Blogs


Fun Fact
Mobile Tumblr US users spend an average of 4.04 minutes per session on the app.
Text
React router dom history push

#React router dom history push how to#
#React router dom history push install#
Note: You can only use () function inside the component page that already listed on your project route, or simply use the withRouter() HOC if the component is not available in the route list. You can navigate to another path by using a. This is also the only way to access history in Class Components, which aren’t compatible with hooks. React Router (react-router-dom) is one of the most popular React libraries with over 46k stars on GitHub and nearly 7 million downloads per week on npmjs. Let’s say we want to move to the dashboard page, all we need to do is: class M圜omponent extends React.Component ) Version 4 of React Router doesn’t include a useHistory hook, so you’ll have to pass down the history object via props. history.push(path, state) Depending on your requirements, you may want to pass update as part of the location state, or the query string.
Consider we have a component, on click of a button we want to get redirected to a '/product' route and pass a product details along with the route, later display the product details on the.
It takes the first argument as a destination path and a second argument as the state. The second parameter in the history.push() method is actually known as the location state. We can pass data in route using browser's History API, which is possible in React through a custom hook useHistory () available in react-router-dom. The history.push() function belongs to react-router-dom and used to move from the current page to another one.
#React router dom history push install#
If you find yourself using both, it’s OK to get rid of React Router since you already have it installed as a dependency within React Router DOM. Use the following command from a terminal window to generate the project directory, then navigate inside the project directory and install required dependencies to add React Router v6 library: npx create-react-app react-router-v6-example cd react-router-v6-example yarn add history react-router-domnext. In other words, you don’t need to use React Router and React Router DOM together.
#React router dom history push how to#
In this article, you will learn how to use in your react project. React Router DOM contains DOM bindings and gives you access to React Router by default.
1 note
·
View note
Text
How to do routing in React

In this post we are going to learn how to do routing in React. Routing is the main concept that most of the web applications have independent of there language.
What is Routing
Routing is nothing but going from one url/page to another url/page within your web app. React doesn’t provide routing functionality out of the box. To handle routing you need to install react-router package.
How to install react-router
Installation of react router is same as any other normal package. You can install it using npm or yarn.
npm install react-router-dom
How to use React-router
You can use react-router in just 3 simple steps
Adding your router
Generating your routes
Navigate using link component or push function.
Adding your Router
You can choose one of these two routers
BrowserRouter
HashRouter
BrowserRouter
You can choose BrowserRouter if you have a backend server which is going to respond to every request from the browser.
import { BrowserRouter } from 'react-router-dom';
HashRouter
It should be only used for static web apps. In this case server is only gonna respond for files that it knows about.
import { HashRouter } from 'react-router-dom';
Generating your Routes
Routes are nothing but a way to specify path are there respective component. The Routers accepts only single child for that reason you need to wrap your routes with a parent div or you can also use Switch. Switch is nothing but a Component provided by the react router which basically render first child whichever match the path/url.
import { Switch, Route } from 'react-router-dom';
<Switch> <Route exact path='/' component={Home}/> <Route path='/roster' component={Roster}/> <Route path='/schedule' component={Schedule}/> </Switch>
Navigate using Link component or push function.
The last step is redirecting the user to another router on click of a link or a button.
Using Link
You can think Link Component as a tag which is similar to a tag of html.
import { Link } from 'react-router-dom';
<Link to='/'>Home</Link>
Using Push
You can also use push function to redirect to the new route. You can access push function from history which will be get from top most component of a route and it can also be get using HOC withRouter component from react-router-dom.
history.push("/")
0 notes
Text
Deploying a Client-Side Rendered create-react-app to Microsoft Azure
New Post has been published on https://headacheshelp.com/awesome/deploying-a-client-side-rendered-create-react-app-to-microsoft-azure/
Deploying a Client-Side Rendered create-react-app to Microsoft Azure

Deploying a React app to Microsoft Azure is simple. Except that … it isn’t. The demon is in the details. If you’re looking to deploy a create-react-app — or a similar style front-end JavaScript framework who are in need of pushState-based routing — to Microsoft Azure, I believe this article will serve you well. We’re going to try to avoid the headaches of client and server side routing reconciliation.
First, a quick story.
Back in 2016, when Donovan Brown, a Senior DevOps Program Manager at Microsoft, had given a “but it works on my machine speech” at Microsoft Connect that year, I was still in my preliminary stages as a web developer. His talk was about micro-services and containers.
[…] Gone are the days when your manager comes running into your office and she is frantic and she has found a glitch. And no matter how hard I try, I can’t reproduce it and it runs perfectly on my machine. She says: fine Donovan, then we are going to ship your machine because that is the only place where it runs. But I like my machine, so I’m not going to let her ship it…
I had a similar sort of challenge, but it had to do with routing. I was working on a website with a React front end and ASP.NET Core back end, hosted as two separate projects that were deployed to Microsoft Azure. This meant we could deploy both apps separately and enjoy the benefits that comes with separation of concern. We also know who to git blame if and when something goes wrong. But it had downsides as well, as front-end vs. back-end routing reconciliation was one of those downsides.
One day I pushed some new code to our staging servers. I received a message shortly after telling me the website was failing on page refresh. It was hurling a 404 error. At first, I didn’t think it was my responsibility to fix the error. It had to be some server configuration issue. Turns out I was both right and wrong.
I was right to know it was a server configuration issue( though at the time, I didn’t know it had to do with routing ). I was wrong to deny it my responsibility. It was only after I went on a web searching rampage that I discovered a utilize case for deploying a create-react-app to Azure under the Deployment tab on the official documentation page.
Building React for production
When building a React app for production( assuming we’re are using create-react-app ), it’s worth noting the folders that get produced. Running npm running construct will generate a build folder where an optimized static version of its implementation lives. To get the application on a live server, all we need do is feed the server the content of the construct folder. If we were working on localhost, there is no live server involved, so it is not always equivalent to having the application on a live server.
Generally, the construct folder will have this structure :P TAGEND- constructed
– static
– css
– css files
– js
– js files
– media
– media files
– index.html
– other files … Client-side routing with React Router
React Router uses the HTML5 pushState history API internally. What pushState does is quite interesting. For example, navigating( or using Link in react router) from the page https :// css-tricks.com to the page https :// css-tricks.com/ archives/ will cause the URL bar to display https :// css-tricks.com/ archives/ but won’t cause the browser to load the page/ archives or even check that it exists. Couple this with the component-based model of React, it becomes a thing to change routes while displaying different pages based on those routes — without the all-seeing eye of the server trying to serve a page in its own directory. What happens, then, when we introduce servers by pushing the code to a live server? The docs tell it better :P TAGEND
If you use routers that use the HTML5 pushState history API under the hood( for example, React Router with browserHistory ), many static file servers will fail. For example, if you used React Router with a road for/ todos/ 42, the development server will respond to localhost: 3000/ todos/ 42 properly, but an Express serving a production build as above will not. This is because when there is a fresh page loading for a/ todos/ 42, the server looks for the file construct/ todos/ 42 and does not find it. The server needs to be configured to respond to a request to/ todos/ 42 by serving index.html.
Different servers involve different configuration. Express, for example, involves this :P TAGEND app.get(‘*’,( req, res) =>
res.sendFile( path.resolve( __dirname, ‘client’, ‘build’, ‘index.html’ )); );
…as documented in the create-react-app docs. Keep in intellect though, this assumes that we’re hosting create-react-app at the server root, which is making employ of a wildcard road (*) that catches all road and respond to all route request by serving the index.html file in the build folder which sits at the root of the server application. Also, this is tightly coupled with the back-end. If that’s the case, we would most likely have this kind of folder structure( assuming the back-end is in NodeJS ):
– Server
– Client( this is where your react code runs)
– construct( this is the build folder, after you npm running build)
– src
– node_modules
– package.json
– other front-end files and folders
– Other back-end files and folders
Since my front-end( create-react-app) and back-end( ASP.NET) were two different projects, serving static files by navigating the directory was sort of an impossibility.
In fact, since we are deploying a static app, we do not need the back-end. As Burke Holland set it: “Static” means that we aren’t deploying any server code; simply the front-end files.
I keep mentioning ASP.NET here because during the course of my research, I figured configuring Azure required a configuration file in a wwwroot folder and ASP.NET’s folder structure typically has a wwwroot folder. Remember the application’s back-end was in ASP.NET? But that’s just about it. The wwwroot folder seemed to be hidden somewhere on Azure. And I can’t show you without deploying a create-react-app. So let’s go do that.
Getting started with App Services on Microsoft Azure
To get started, if you do not already have a Azure account, get a free trial then head over to the Azure portal.
Navigate to All services- Web- App Services Navigating on the Azure portal from All services, to Web, to App services
We want to add a new app, give it a name, subscription( should be free if you’re on a free trial, or if you already have one ), resource group( create one or utilize existing ), then click on the Create button down at the bottom of the panel.
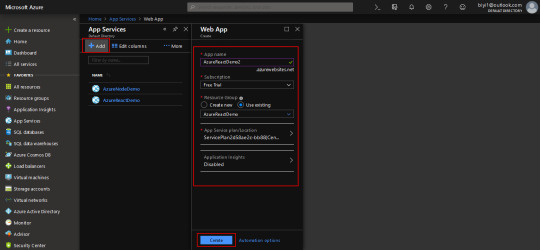
Creating a new App service on the Azure portal.
We should get a notification that the resource has been created. But it won’t immediately show up, so hit “Refresh” — I have other resources, but the AzureReactDemo2 is what I’m employing here. You’ll click on the name of your newly created app, which is AzureReactDemo2 in my occurrence.

Displaying all App Services on the Azure portal.
The blade shows you information about your app, the navigation to the left has everything you need to manage your application( overview, activity log, deployment center …).
For example, the Deployment Center is where the app deployment is managed, Slots is where things like staging, production, test are managed. Configuration is where things like environmental variables , node versions and — an important one — Kudu are managed.
The overview screen shows a general position of the application Status, URL … Click on the URL to see the live site.

Showing the various parts of an App Service on the Azure CLI.
The app is up and running!

Showing the default live page of an App Service.
What we’ve done is create a new App Service, but we have none of our code on Azure yet. As said earlier, all we need to do is to feed Azure the content of the build folder generated by building React for production, but we don’t have one yet. So let’s go local and get some React app.
Going local
We need to create a new React app, and install react-router as a dependency.
npx create-react-app azure-react-demo cd azure-react-demo
We also want to install react-router( react-router-dom, actually)
npm i react-router-dom
All things being equal, starting the app with npm start, we should get the default page.

Showing the default page generated by React.
Because this will be about testing routes, I needed to induce some pages. I’ve modified my local version and uploaded it to GitHub. I’m banking on the fact that you can find your route around react and react-router. Download a demo .
My folder looks like this :P TAGEND

Showing the folders and files in the modified create-react-app app.
The altered files have the following code :P TAGEND // App.js import React, Component from “react”; import ” ./ App.css”; import Home from ” ./ pages/ Home”; import Page1 from ” ./ pages/ Page1″; import Page2 from ” ./ pages/ Page2″; import BrowserRouter as Router, Switch, Route from “react-router-dom”;
class App extends Component
render()
return(
);
exportation default App; // Page1. js import React from “react”; import Link from “react-router-dom”;
const Page1=() =>
return(
Argentina( PAGE 1)
Nigeria
Home
); ; exportation default Page1; // Page2. js import React from “react”; import Link from “react-router-dom”;
const Page2=() =>
return(
Nigeria( PAGE 2)
Argentina
Home
); ; exportation default Page2; /* App.css */ html
box-sizing: border-box; body
margin: 0;. page
display: grid;
grid-template-rows: repeat( 3, 1fr );
height: 100 vh;. page1. flagTop, .page1. flagBottom
background-color: blue;. page2. flagTop, .page2. flagBottom
background-color: green;. flagCenter
display: flex;
align-items: centre;
flex-direction: column;
justify-content: center;
text-align: centre;. page a
perimeter: 2px solid currentColor;
font-weight: bold;
margin: 0 30 px;
padding: 5px;
text-decoration: none;
text-transform: uppercase;. flags
display: flex;
thicknes: 100%;. flags>. page
flex: 1;
Running the app runs locally, so the roads deliver when links are clicked and even when the page is refreshed.
Deploy the app to Azure
Now, let’s get it up on Azure! There are a few steps to make this happen.
Step 1: Head to the Deployment Center
On Azure, we need to go to the Deployment Center. There are quite a few options each with its pros and cons. We’ll be using Local Git( which means your local git app straight immediately to Azure) for source control, Kudu for Build Provider.
Remember to click continue or finish when you select an option, or else, the portal will just keep staring at you.

Showing Deployment Center on the Azure portal and choosing a source control as the first step in deploying a new App Service.
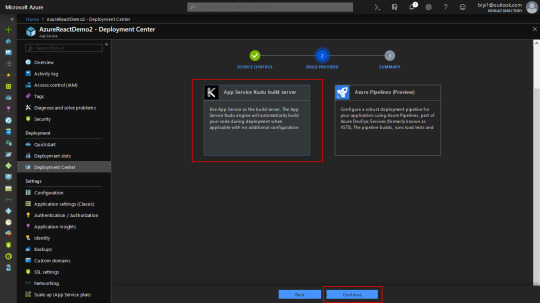
Showing the Build Provider section in the Deployment Center on Azure portal.
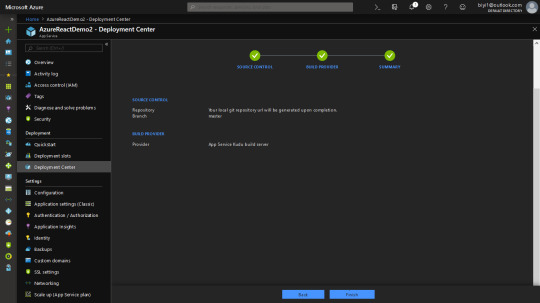
After the third step, Azure produces a local git repo for you. And it gives you a remote link to point your react app to.
One thing to note at this phase. When you push, Azure will ask for your GitHub credentials. It is under the deployment tab. There are two: App and User. App credential will be specific to an app. User will be general to all the apps you as a user has Read/ Write access to. You can do without User Credentials and use App credentials, but I find that after a while, Azure stops asking for credentials and just tells me authentication failed automatically. I defined a custom User Credentials. Either way, you are able to get past that.

Showing the Deployment Credentials for the App Service on Azure portal.
In the React app, after modification, we need to build for production. This is important because what we want to upload is the content of the build folder.
We need to tell Kudu what node engine we’ll be using, or else, the construct will most likely fail, due to the reported fact that react-scripts requires a node version higher than the default set on Azure. There are other ways to do that, but the simplest is to add a nodes engine in package.json. I’m utilizing version 10.0 here. Regrettably, we can’t only add what we like, since Azure has Node versions it supports and the rest are unsupported. Check that with the CLI with the command: az webapp list-runtimes
Add the preferred node version to the package.json file, as in :P TAGEND “engines”:
“node”: “1 0.0 ”

Displaying a list of Azure runtimes in the Azure CLI. Step 2: Build the App
To build the React app, let’s run npm build in the Terminal.
Step 3: Initialize the Git repo
Navigate into the build folder and initialize a Git repo in there. The URL to clone the repo is in the overview page. Depending on what credentials you’re employing( App or User ), it will be slightly different.

Showing the overview of the App Service on Azure and the Git clone URL. git init git add. git commit -m “Initial Commit” git remote add azure git push azure master
Now, visit the live app by using the URL on the overview page. As you can see, the app fails on/ page2 freshen. Looking at the network tab, a 404 is thrown because the page tried to be fetched from the server — with client-side routing, as we have already set up, the page shouldn’t even be server fetched at all.

Showing the failed page request and the network tab to verify. Configuring Azure to reconcile client and server side routing
In the public folder, let’s add a web.config XML file with the following content :P TAGEND
I’ve intentionally decided to not format the code snippet because XML is strict about that. If you miss the formatting, the file has no effect. You can download an XML formatter for your text editor. For VSCode, that would be the XML Tools plugin.

Showing an XML formatter and an XML formatted file in VSCode.
The app can be built again at this point, although we’ll lose the Git info in the construct folder since the new construct overrules the old build. That means it would have to be added again, then pushed.
Now the app runs as shown below! Whew.
We don’t want to have to npm run build every time — that’s where continuous deployment comes in. Check out the link below for appropriate references.
Conclusion
There is a lot to Azure, as it can do a lot for you. That’s nice because there are times when you need it to do something that seems super specific — as we’ve seen here with client and server side routing reconciliation — and it already has your back.
That said, I’ll leave you with a couple of related resources you can turn to as you look to deploying a React app to Azure.
Custom NodeJs Deployment on Azure Web App by Hao Luo: Learn more about Kudu and NodeJS deployment. Deploying a React App As a Static Site On Azure by Burke Holland: Even more options for deploying create-react-app to Microsoft Azure.
The post Deploying a Client-Side Rendered create-react-app to Microsoft Azure seemed first on CSS-Tricks.
Read more: css-tricks.com
0 notes
Text
Ionic 4.1 and React: Navigation
Navigating between pages is a core feature of any mobile application. Let’s look at how we can achieve this with React, React Router and Ionic 4.
For this article, I’m going to assume that you have a React and Ionic 4 application already up and running. If you haven’t done this yet - visit my article on Alligator.io that covers this already.
The core dependencies we’ll need for this project are the following:
$ npm i @ionic/core @ionic/react react-router react-router-dom
🐊 Alligator.io recommends �
Fullstack Advanced React & GraphQL by Wes Bos
ⓘ About this affiliate link
Creating Our Pages
For routing to work, we’ll need some pages to route between. Let’s create two new files at src/pages/HomePage.js and src/pages/BlogPage.js
This allows us to define a HomePage:
import React from 'react'; import { IonToolbar, IonTitle, IonContent, IonCard, IonHeader, IonCardHeader, IonCardTitle, IonCardSubtitle, IonCardContent, IonButton } from '@ionic/react' const HomePage = () => ( <> <IonHeader> <IonToolbar color="primary"> <IonTitle>Home Page</IonTitle> </IonToolbar> </IonHeader> <IonContent> <IonCard> <IonCardHeader> <IonCardSubtitle>Home Page</IonCardSubtitle> <IonCardTitle>Let's take a look at the blog</IonCardTitle> </IonCardHeader> <IonCardContent> <p>Sounds like a great idea. Click the button below!</p> <IonButton>Blog</IonButton> </IonCardContent> </IonCard> </IonContent> </> ) export default HomePage
And a BlogPage:
import React from 'react'; import { IonToolbar, IonTitle, IonContent, IonCard, IonHeader, IonCardHeader, IonCardTitle, IonCardSubtitle, } from '@ionic/react' const BlogPage = () => ( <> <IonHeader> <IonToolbar color="primary"> <IonTitle>Blog Page</IonTitle> </IonToolbar> </IonHeader> <IonContent> <IonCard> <IonCardHeader> <IonCardSubtitle>Vue.js</IonCardSubtitle> <IonCardTitle>Ionic 4 and Vue.js</IonCardTitle> </IonCardHeader> </IonCard> <IonCard> <IonCardHeader> <IonCardSubtitle>REACT</IonCardSubtitle> <IonCardTitle>Ionic 4 and React</IonCardTitle> </IonCardHeader> </IonCard> <IonCard> <IonCardHeader> <IonCardSubtitle>ANGULAR</IonCardSubtitle> <IonCardTitle>Ionic 4 and Angular</IonCardTitle> </IonCardHeader> </IonCard> </IonContent> </> ) export default BlogPage
Defining Routes
We can then define the routes for our application inside of App.js:
import React, { Component } from 'react'; import { BrowserRouter as Router, Route } from 'react-router-dom'; import { IonApp, IonPage, IonRouterOutlet } from '@ionic/react'; import HomePage from './pages/HomePage'; import BlogPage from './pages/BlogPage'; import './App.css'; class App extends Component { render() { return ( <Router> <div className="App"> <IonApp> <IonPage id="main"> <IonRouterOutlet> <Route exact path="/" component={HomePage} /> <Route path="/blog" component={BlogPage} /> </IonRouterOutlet> </IonPage> </IonApp> </div> </Router> ); } } export default App;
While we could just define our Route with react-router-dom only, placing the Route inside of an IonRouterOutlet will enable animations within route changes.
Navigating Between Two Pages
Navigating between two pages is therefore as easy as taking history from props and pushing a new Page onto the stack.
Let’s update the HomePage to accommodate this:
const HomePage = ({history}) => ( <> <IonHeader> <IonToolbar color="primary"> <IonTitle>Home Page</IonTitle> </IonToolbar> </IonHeader> <IonContent> <IonCard> <IonCardHeader> <IonCardSubtitle>Home Page</IonCardSubtitle> <IonCardTitle>Let's take a look at the blog</IonCardTitle> </IonCardHeader> <IonCardContent> <p>Sounds like a great idea. Click the button below!</p> <IonButton onclick={(e) => { e.preventDefault(); history.push('/blog')}}>Blog</IonButton> </IonCardContent> </IonCard> </IonContent> </> )
Pretty simple to achieve as you can see! Here’s the results of our work:
via Alligator.io https://ift.tt/2Yz1AfB
0 notes
Text
The Hooks of React Router
React Router 5 embraces the power of hooks and has introduced four different hooks to help with routing. You will find this article useful if you are looking for a quick primer on the new patterns of React Router. But before we look at hooks, we will start off with a new route rendering pattern.
Before React Router 5
// When you wanted to render the route and get router props for component <Route path="/" component={Home} />
// Or when you wanted to pass extra props <Route path="/" render={({ match }) => <Profile match={match} mine={true} />}>
When using the component syntax, route props (match, location and history) are implicitly being passed on to the component. But it has to be changed to render once you have extra props to pass to the component. Note that adding an inline function to the component syntax would lead to the component re-mounting on every render.
After React Router 5
<Route path="/"> <Home /> </Route>
Note that there is no implicit passing of any props to the Home component. But without changing anything with the Route itself, you can add any extra props to the Home component. You can no longer make the mistake of re-mounting the component on every render and that's the best kind of API.
But now route props are not being passed implicitly, so how do we access match, history or location? Do we have to wrap all components with withRouter? That is where the hooks steps in.
Note that hooks were introduced in 16.8 version of React, so you need to be above that version to use them.
useHistory
Provides access to the history prop in React Router
Refers to the history package dependency that the router uses
A primary use case would be for programmatic routing with functions, like push, replace, etc.
import { useHistory } from 'react-router-dom'; function Home() { const history = useHistory(); return <button onClick={() => history.push('/profile')}>Profile</button>; }
useLocation
Provides access to the location prop in React Router
It is similar to window.location in the browser itself, but this is accessible everywhere as it represents the Router state and location.
A primary use case for this would be to access the query params or the complete route string.
import { useLocation } from 'react-router-dom'; function Profile() { const location = useLocation(); useEffect(() => { const currentPath = location.pathname; const searchParams = new URLSearchParams(location.search); }, [location]); return <p>Profile</p>; }
Since the location property is immutable, useEffect will call the function every time the route changes, making it perfect to operate on search parameters or current path.
useParams
Provides access to search parameters in the URL
This was possible earlier only using match.params.
import { useParams, Route } from 'react-router-dom'; function Profile() { const { name } = useParams(); return <p>{name}'s Profile</p>; } function Dashboard() { return ( <> <nav> <Link to={`/profile/ann`}>Ann's Profile</Link> </nav> <main> <Route path="/profile/:name"> <Profile /> </Route> </main> </> ); }
useRouteMatch
Provides access to the match object
If it is provided with no arguments, it returns the closest match in the component or its parents.
A primary use case would be to construct nested paths.
import { useRouteMatch, Route } from 'react-router-dom'; function Auth() { const match = useRouteMatch(); return ( <> <Route path={`${match.url}/login`}> <Login /> </Route> <Route path={`${match.url}/register`}> <Register /> </Route> </> ); }
You can also use useRouteMatch to access a match without rendering a Route. This is done by passing it the location argument.
For example, consider that you need your own profile to be rendered at /profile and somebody else's profile if the URL contains the name of the person /profile/dan or /profile/ann. Without using the hook, you would either write a Switch, list both routes and customize them with props. But now, using the hook we can do this:
import { Route, BrowserRouter as Router, Link, useRouteMatch, } from 'react-router-dom'; function Profile() { const match = useRouteMatch('/profile/:name'); return match ? <p>{match.params.name}'s Profile</p> : <p>My own profile</p>; } export default function App() { return ( <Router> <nav> <Link to="/profile">My Profile</Link> <br /> <Link to={`/profile/ann`}>Ann's Profile</Link> </nav> <Route path="/profile"> <Profile /> </Route> </Router> ); }
You can also use all the props on Route like exact or sensitive as an object with useRouteMatch.
Wrapping up
The hooks and explicit Route comes with a hidden advantage in itself. After teaching these techniques at multiple workshops, I have come to the realization that these help avoid a lot of confusion and intricacies that came with the earlier patterns. There are suddenly far fewer unforced errors. They will surely help make your router code more maintainable and you will find it way easier to upgrade to new React Router versions.
The post The Hooks of React Router appeared first on CSS-Tricks.
The Hooks of React Router published first on https://deskbysnafu.tumblr.com/
0 notes