#Reorder Multiple Slides in Presentation
Explore tagged Tumblr posts
Visit Tumblr Blog
Explore Tumblr blogs with no restrictions, modern design and the best experience.
Last Seen Tumblr Blogs


Fun Fact
Total funding amounts to $125.3M.
Text
macropost 2
October has seen an increase in responsibilities for both myself and for my team members. The Community of Hope has officially scheduled a filming date for the Jobs For Life (JFL) modules at the end of the month, with a few additional dates planned for early November if necessary. In addition to this coordination with the filming team, facilitators were identified and confirmed for each of the 16 lesson modules of the curriculum. The facilitators, Margaret, John, and Bill, have led JFL classes in the past, but will be new to the virtual format. In order to effectively translate the modules online, each of the facilitators has requested a single assistant to edit their chosen modules, rather than coordinating with multiple people for each module, as we had originally intended when we divided the lessons up equally between our four practicum members. After this restructuring, Wale was partnered with Margaret, Auriel with John, and myself with Bill. Anna will be assisting Amy White in organizing our business and community resource panels. JFL, while an established program, is venturing into new territory with the creation of an online class, and as with any new program development the ability to adapt to the needs and demands of those involved is critical for success. Open and frequent communication between facilitators and our practicum members, as well as between ourselves, has also been key not only to organizing the multiple aspects of this project, but also to ensure deadlines are met and the proper contacts are made.
Over the past two weeks of our partnership, Bill Barr and I have been collaborating on edits to the slide decks for lessons 5, 6, 7, 10, and 11. Specifically, I have been adjusting the format, adding visual content, creating and incorporating additional material, and reordering slides to ensure smooth transitioning during the presentation of the lesson. Bill has also been providing additional content to incorporate into the JFL curriculum. With a background in management and consulting, Bill is a valuable asset to this program. Prior to retirement, Bill worked at a consulting firm that specialized in employment transition. When companies restructured and eliminated positions, Mr. Barr’s team was responsible for helping terminated employees relocate and find meaningful employment. The alignment with JFL’s mission to help unemployed and underemployed individuals gain the necessary job skills needed to seek and acquire a job is clear. With this specific skill set, Bill has been able to provide targeted, specific material for the topics that JFL covers. For instance, Mr. Barr has created handouts for SMART goals, vocational planning, understanding the hiring decision process, networking, resume building, and how to craft an individual message, such as an elevator pitch. We have specifically been working together to incorporate these materials in a way that is functional both in physical and virtual contexts. Every 3-5 days we have scheduled mock filming practice sessions, where Mr. Barr will present the lesson as he would for the online class while I watch and take notes. After each session, we discuss the comments I noted and ways to alter the slides to allow for more clear presentation. This includes both addition and elimination of slides and images, as well as presentation notes such as how to transition to and from activities in a virtual setting. This has been a meaningful learning experience for both myself and for Bill, as neither of us has created online materials for a class before. As such, these mock practice sessions have been very fruitful, and place us on track to have finalized slide decks by the end of the month.
One completed, JFL will have not only its in-person class program, but also be able to offer a virtual option for those interested. While the stimulus for this project was the coronavirus pandemic, the effects will reach far beyond this temporary public health crisis and has the potential to reach many more individuals than physical JFL classes. In rural areas in particular, the potential for impact is great. Limited by travel distances and inadequate transportation, rural residents often miss out on opportunities located in more urban environments, such as JFL. This is particularly unfortunate, since rural areas have higher rates of poverty and lower incomes than urban environments. As mentioned previously, JFL’s mission is to help unemployed and underemployed individuals gain the strategies and skills necessary to find meaningful employment. Through an online offering, rural residents could benefit from these work development resources without having to travel to classes. By alleviating the strain of economic instability through employment, health outcomes would also improve in rural areas as individuals have a greater ability to seek and afford care. JFL also encourages continued educational and job skills training, which addresses an additional social determinant of health: educational attainment. While the online JFL modules address many public health needs for rural residents, there are still barriers to employment, not the least of which is the limited work prospects in rural areas, particularly for positions with opportunities for upward mobility. Internet access and connectivity is also a challenge, and for some will prevent access to JFL just as much as physical distance from program sites would. Community of Hope has grant funding to offer laptops to students, and the provision of internet hotspots deserves further attention. Program development is never truly complete, and deserves constant assessment for effectiveness and for the identification of challenges. We are in the early stages of development for JFL’s virtual class, but I have no doubt that the organization will have future iterations that make the content even more accessible to communities.
1 note
·
View note
Text
Reorder Multiple Slides in Presentation in One API Call & Add Slides to Presentation in Cloud Apps
What's New in this Release?
Aspose team is pleased to announce the new release of Aspose.Slides Cloud 18.12. It has introduced an API that let users reorder multiple slides in one API call. Moreover, Aspose team has added separate APIs for adding, cloning and reordering presentations. Please use POST /slides/{name}/slides/reorder to reorder multiple slides in a presentation in one API call. It also supports adding slides to a presentation, copy slides within the current document or from another presentation, move slides to another position, Add Slides to a Presentation and many more. This release includes plenty of improvements & bug fixes features as listed below.
Reorder multiple slides in a Presentation in one API Call
Create sub-resources for adding, cloning and reordering presentations
Add Slides to a Presentation
Copy and Move Slides
Overview: Aspose.Slides for Cloud
Aspose.Slides for Cloud is a REST API which allows you to process presentations. It allows you to create, modify, and convert presentations and provides a wide variety of features for working with presentations in the cloud. You can convert a presentation to TIFF, PDF, XPS, PPTX, ODP, PPSX, PPTM, PPSM, POTX, POTM, HTML and image formats. Aspose.Slides for Cloud allows you to extract different elements or a presentation including slide, text, color schemes, font schemes, shapes and images etc. Aspose.Slides for Cloud’s powerful API lets your apps process Microsoft PowerPoint presentations in the cloud, saving you the time it would take to develop your own API.
More about Aspose.Cells for Cloud
Homepage of Aspose.Slides for Cloud
Download Aspose.Slides for Cloud
Online API documentation with code examples for Aspose.Slides for Cloud
#Reorder Multiple Slides in Presentation#Add Slides to Presentation#opy slides in Presentation#move slides to another position#PowerPoint Cloud API#PPT Cloud API
0 notes
Text
SmartOffice Doc & PDF Editor Mod Apk Free Download version 3.13.10 SmartOffice Doc & PDF Editor Mod Apk editing application designed to meet the needs of today's mobile world. View, edit, create, present & share MS Office documents directly on your mobile devices. Use our safe and secure direct download your SmartOffice Doc unlimited money master mod latest version premium free & PDF Editor Mod Apk SmartOffice Doc & PDF Editor Mod Apk WHAT'S NEW •One-Drive support •Dark Mode Content support •Footnote & Endnote editing (Docx) •PDF Redactions (PRO feature) •Numerous bug fixes & performance enhancements SmartOffice Doc & PDF Editor Free Download FREEDOM TO WORK ANYWHERE •DOCUMENTS: Create new using blank or pre-designed templates •PRESENTATIONS: View, edit & present slideshows •SPREADSHEETS: Review and edit budgets, expense reports,s and more •PDF: View, annotate, & convert Office documents to PDF •PRINT: Wirelessly to thousands of supported printers, including AirPrint SmartOffice Doc & PDF Editor Unlimited Money COMMON FEATURES ACROSS ALL FORMATS •View, edit, create, share, save & print MS Office documents quickly and securely •Editing: Copy, cut, paste, undo & redo SmartOffice Doc & PDF Editor latest version •Character Formatting: Bold, italics, underline; font style, size, color & highlight •Documents may be saved in their original file format or converted to PDF •Pre-designed templates to aid new document creation SmartOffice Doc & PDF Editor premium free •Password Protection Support (Office x files): Open, view, edit, & re-save encrypted documents on your device •Cloud support: Open & save documents to the cloud with effortless synchronization with Box, Dropbox, Google Drive & OneDrive •Full-screen viewing mode •Dark mode content support SmartOffice Doc & PDF Editor master mod DOCUMENTS •Indent, align, bullets, numbering •Insert images, shapes, graphics •Support for tables, shapes, charts (display) •Reflow mode for easier reading on a small device •Edit footnotes and endnotes (Docx) SmartOffice Doc & PDF Editor Mod Apk pro apk PRESENTATIONS •Text, paragraph, & content formatting •Insert images, shapes, and graphics •Slide management & reordering •Slide transition support •Present directly from your mobile device or through a projector PDF •View, annotate, highlight and share PDF documents •Convert, export, and save Office documents to PDF format SmartOffice Doc & PDF Editor apk version UPGRADE TO PRO •Track Changes – Collaborate, exchange edits & comments in a shared doc file -Configure multiple authors -Navigate previous/next changes -Accept/reject changes from other authors SmartOffice Doc & PDF Editor unlimited version -Edit existing changes •PDF Form Filling – Supports PDF AcroForms -Fill, view, save & share form content. -SmartOffice PRO offers limited support for XFA forms •PDF Redactions – Supports PDF AcroForms SmartOffice Doc & PDF Editor master mod LANGUAGES ∗Localized for: Chinese (Simplified/Traditional), English, Japanese, French, German, Italian, Korean, Polish, Portuguese (Portugal/Brazil), Russian, Spanish (Spain/Mexico), Hebrew, Dutch and Turkish ∗View: Arabic, Azerbaijani, Chinese (Simplified), SmartOffice Doc & PDF Editor pro apk Chinese (Traditional), Czech, Danish, Dutch, English, Faroese, Finnish, Greek, Georgian, Hebrew, Hungarian, Italian, Japanese, Korean, Kurdish, Latvian, Lithuanian, Maltese, Norwegian, Polish, Portuguese (Portugal/Brazil), Russian, Scots Gaelic, Slovak, Slovenian, Spanish (Spain/Mexico), Swedish, Turkish, Vietnamese and Yiddish Permission Showing permissions for all versions of this app This app has access to: contactsContacts find accounts on the device Photos/Media/Files read the contents of your USB storage modify or delete the contents of your USB storage Storage read the contents of your USB storage modify or delete the contents of your USB storage
Identity find accounts on the device Other view network connections full network access prevent the device from sleeping Updates to SmartOffice - Doc & PDF Editor may automatically add additional capabilities within each group. How to SmartOffice Doc & PDF Editor Install Install the steps: Download SmartOffice Doc & PDF Editor Mod APK on our site. After completing the download, you must find the apk file and install it. You must enable "Unknown sources" to install applications outside the Play Store. Then you can open and enjoy the SmartOffice Doc & PDF Editor Mod APK Is SmartOffice Doc & PDF Editor Mod Safe? SmartOffice Doc & PDF Editor Mod is 100% safe because the application was scanned by our Anti-Malware platform and no viruses were detected. The antivirus platform includes AOL Active Virus Shield, avast!, AVG, Clam AntiVirus, etc. Our anti-malware engine filters applications and classifies them according to our parameters. Therefore, it is 100% safe to install SmartOffice Doc & PDF Editor Mod APK on our site. You May Also Like: Art of War Legions Mod Apk More Info: Google Play What’s New Adjustments to Techs and Facilities – The effects of the techs “Break the Limit”, “Beyond the Limit” and “Reach the Limit” respectively. – The highest quality of a Hero will be Legendary 3-Star. – Raised the CP of some techs. – Adjusted the CP of some facilities and the resources and time required in their upgrading Here you can download the latest version of Mod APK for free Now: Use our safe and secure direct download link to download your SmartOffice Doc & PDF Editor Mod Apk Free Download version 3.13.10 Unlocked Version and enjoy the latest free version.
0 notes
Text
Pdf to powerpoint converter for free

Pdf to powerpoint converter for free how to#
Pdf to powerpoint converter for free pdf#
Pdf to powerpoint converter for free portable#
Pdf to powerpoint converter for free software#
Click Convert to complete the conversion.
Pdf to powerpoint converter for free pdf#
Click Options to specify if the PDF should be processed with OCR prior to conversion if it is identified as being image based.ģ.
If the converted PowerPoint file should open automatically after conversion. Where the converted PowerPoint file will be saved. Click Sart Convert and PDF4me will convert.
Pdf to powerpoint converter for free how to#
For example, to convert pages 3, 4, and 5 of an 8-page document, enter 3-5. How to convert PDF to PowerPoint Upload files or Drag & drop PPT files. In the Pages field, enter the desired page or range of pages (separated by a dash).
To convert specific pages in a document, select the document, then click Choose Pages.
Check the Include all open PDF documents checkbox to quickly export all open PDFs to PowerPoint.
Select a PDF file from the list and then use the Move Up or Move Down options to reorder the documents, or click Remove to remove a document from the list.
Click Add Files, and then browse to select additional PDF files to include.
In the Convert PDF to PowerPoint presentation window, do any of the following:
Pdf to powerpoint converter for free portable#
To sum it up, Free PDF to Powerpoint Converter is a useful and easy to understand utility that you can resort to whenever you need to obtain PPTs out of your Portable Document Format files, requiring a minimal level of effort from you.2. Each PDF is exported to a single PPT, the comprised pages equaling the number of slides in the presentation. Convert your PDF documents to the Microsoft PowerPoint formats PPT and PPTX. For example, to convert pages 3, 4, and 5 of an 8-page document, enter 3-5. In the Pages field, enter the desired page or range of pages (separated by a dash). To convert specific pages in a document, select the document, then click Choose Pages. Before clicking on the ‘Convert’ button, you can choose an output location in the form of any folder on your computer. A PDF converter to convert PDF to PowerPoint. Check the Include all open PDF documents checkbox to quickly export all open PDFs to PowerPoint. This can only be done through the ‘Add PDF File’ button, one object at a time, as Free PDF to Powerpoint Converter, despite supporting batch operation, does not support adding multiple files simultaneously.Īfter adding your files, you will be able to view a series of details about your PDFs, including the complete path, the number of pages, the size and the destination format and name, as well as the current status (‘Imported’, ‘Queued’, ‘Converted’), displaying a progress bar in the case of larger files.įree PDF to Powerpoint Converter does not feature a preview function, nor does it offer any parameters to tinker with, so you will need to rely on the default settings. In order to obtain your files, you first need to load the source items into the program. The straightforward appearance makes it easy to handle, even for the less experienced, the main window allowing you to load the files you wish to process. In the Convert PDF to PowerPoint presentation window, do any of the following. CocoDoc will automatically convert the file and keep the exact formatting and style. Select or choose the PDF file you want to convert to PowerPoint. Basic yet functional user interfaceĪfter the uneventful installation of the application, you can launch it and start working with it immediately, as its functions are rather self-explanatory. On the Home tab, in the Convert group, click To PowerPoint. Here is how to use CocoDoc to convert PDF to PowerPoint online: When you are on the CocoDoc platform, click the 'features' menu and select PDF to PPT option.
Pdf to powerpoint converter for free software#
Free PDF to Powerpoint Converter is a user-friendly and intuitive piece of software aimed to serve the purpose of turning PDF files to PPT format, supporting batch operations, in order to spare you the time it would take to individually process the documents.
0 notes
Text
Microsoft excel 2013 step by step pdf free download 無料ダウンロード.Microsoft Excel 2013 Step By Step
Microsoft excel 2013 step by step pdf free download 無料ダウンロード.Advanced excel tutorial

Other titles you might like.Microsoft Excel Step By Step | Microsoft Press Store
[REQ_ERR: OPERATION_TIMEDOUT] [KTrafficClient] Something is wrong. Enable debug mode to see the reason MICROSOFT EXCEL STEP-BY-STEP GUIDE Revised: 2/20/ MC-NPL Computer Lab • Powell St • Norristown, PA () x • mcnplcomputerlab@ • Page 4 of 83 Introduction Notice the picture of a slide rule on the first slide
Microsoft excel 2013 step by step pdf free download 無料ダウンロード.(PDF) Advanced excel tutorial | Adeel Zaidi -
however, Microsoft Excel continues to the be the workhorse for their data visualization needs. If you are an Excel user, the default chart types in do not need to limit your data visualization capabilities; extending the tool to create other chart types is indeed possible. In this step-by-step guide to data visualization in Excel, you will Launching Excel Excel can be started either by selecting the program from the Windows start menu, or if there is an existing Excel shortcut available on your computer, it can be double-clicked to launch the program Open Excel by going through these steps: 1. Click the Start button 2. Select All Programs 3. Select Microsoft Office 4. Click Nov 01, · 日本でおすすめのtorrentクライアント【年】. 1. uTorrent:軽量なトレントアプリ。. 簡単にダウンロードでき、使いやすい. 開設: 年. 対応端末: Windows、macOS、iOS、Android、Linux. 価格: 無料または年間$(Proプラン). メリット: アプリが軽量で
The Microsoft Press Store by Pearson. Register your book to access additional benefits. Add to cart. This eBook includes the following formats, accessible from your Account page after purchase:. EPUB The open industry format known for its reflowable content and usability on supported mobile devices.
MOBI The eBook format compatible with the Amazon Kindle and Amazon Kindle applications. PDF The popular standard, which reproduces the look and layout of the printed page. This eBook requires no passwords or activation to read. We customize your eBook by discreetly watermarking it with your name, making it uniquely yours. About eBook formats. The smart way to learn Excel —one step at a time! Experience learning made easy—and quickly teach yourself how to manage, analyze, and present data with Excel With Step by Step, you set the pace—building and practicing the skills you need, just when you them!
Includes downloadable practice files and companion eBook. Discover how to: Work with Excel in touch mode Write formulas, create macros, and organize data Present data visually and add images to worksheets Consolidate multiple sets of data into a single workbook Analyze data using the Quick Analysis Lens Collaborate with colleagues and present workbooks online.
Creating Charts and Graphics in Microsoft Excel Download the sample content. Getting Started with Excel Working with data and Excel tables Performing calculations on data Changing workbook appearance Focusing on specific data by using filters Reordering and summarizing data Combining data from multiple sources Analyzing data and alternative data sets Creating charts and graphics Using PivotTables and PivotCharts Printing worksheets and charts Working with macros and forms Working with other Office programs.
We've made every effort to ensure the accuracy of this book and its companion content. Any errors that have been confirmed since this book was published can be downloaded below. Download the errata. If you find an error, you can report it to us through our Submit errata page. Sign in. Your cart. The Microsoft Press Store by Pearson Search Microsoft Press Store. By Curtis Frye Part of the Step by Step series. This eBook includes the following formats, accessible from your Account page after purchase: EPUB The open industry format known for its reflowable content and usability on supported mobile devices.
eBook FAQ eBook Download Instructions. Like us on Facebook Follow us on Twitter WISH LIST. Online Sample Chapter Creating Charts and Graphics in Microsoft Excel Sample Pages Download the sample content Table of Contents Getting Started with Excel Working with data and Excel tables Performing calculations on data Changing workbook appearance Focusing on specific data by using filters Reordering and summarizing data Combining data from multiple sources Analyzing data and alternative data sets Creating charts and graphics Using PivotTables and PivotCharts Printing worksheets and charts Working with macros and forms Working with other Office programs.
Downloads Follow the instructions to download this book's companion files or practice files. Click the Download button below to start the download. If prompted, click Save. Locate the. zip file on your computer. Right-click the file, click Extract All, and then follow the instructions.
Errata We've made every effort to ensure the accuracy of this book and its companion content. Download the errata If you find an error, you can report it to us through our Submit errata page.
0 notes
Text
14 PowerPoint Presentation Tips to Make More Creative Slideshows [+ Templates]
New Post has been published on http://tiptopreview.com/14-powerpoint-presentation-tips-to-make-more-creative-slideshows-templates/
14 PowerPoint Presentation Tips to Make More Creative Slideshows [+ Templates]

youtube
I like to think of Microsoft PowerPoint as a test of basic marketing skills. To create a passing presentation, I need to demonstrate design skills, technical literacy, and a sense of personal style.
If the presentation has a problem (like an unintended font, a broken link, or unreadable text), then I’ve probably failed the test.

Even if my spoken presentation is well rehearsed, a bad visual experience can ruin it for the audience.
Expertise means nothing without a good presentation to back it up. For starters, grab your collection of free PowerPoint templates below, and use the tips that follow to perfect your next presentation.
No matter your topic, successful PowerPoints depend on three main factors: your command of PowerPoint’s design tools, your attention to presentation processes, and your devotion to consistent style. Here are some simple tips to help you start mastering each of those factors, and don’t forget to check out the additional resources at the bottom of this post.
How to Make a PowerPoint Slide
Open Microsoft PowerPoint.
If a page with templates doesn’t automatically open, go to “File” at the top left of your screen and click “New Presentation”.
To use a template, either click the “Design” tab or go to “File” again and click “New from Template”.
Insert a new slide by clicking on the “Home” tab and then the “New Slide” button.
Consider what content you want to put on the slide, including heading, text, and imagery.
Keep the amount of text under 6-8 lines (or 30 words) at a minimum of size 24 pt.
Add images by clicking “Insert” and clicking the “Picture” icon.
Add other elements by using features in the “Home” and “Insert” tabs on the top ribbon.
Play around with the layout by dragging elements around with your mouse.
How to Make a PowerPoint Presentation
A presentation is made up of multiple slides, and now that you know how to make one, you can delve deeper into PowerPoint’s capabilities.
1. Open a blank presentation again or start from one you’ve already created.
If you’ve already created a presentation, double click the icon to open the existing file. Otherwise, open Microsoft PowerPoint, click “File” in the top left corner, and click “New Presentation.” From there, you can follow the prompts to set up a new presentation.
2. Choose a “theme” or create your own.
Microsoft offers built-in themes and color variations to help you design your slides with a cohesive look. To choose from these pre-built themes, choose the “File” tab again, select “New”, choose one of the options, and click “Create.”
Otherwise, you can use PowerPoint elements, your design sense, and your brand’s color palette to make your own “theme.”
3. Create a variety of slides for different purposes.
You don’t want to present the same exact slide, just with different content on it. This would bore your audience. Ensure that you create multiple variations, accommodating some of the common uses for slides. At minimum, you’ll need:
A title slide
An agenda or table of contents slide
A slide that introduces the speaker
Various content slides (create different layouts considering what kind of multimedia you’ll use)
4. Use the Duplicate Slides feature to save you time.
There’s no reason to create these designs over and over again. Now that you have a few to draw from, you can simply duplicate them before inputting your content. Here’s how to do that:
On the left pane, right click the thumbnail of the slide you want to duplicate.
Choose “Duplicate Slide” from the pop-up menu.
This will automatically add a copy of this slide to the presentation. From there, you can customize it for your needs.
5. Add transitions to your slides (optional).
Done well, transitions can add a little bit of movement and showmanship to your presentation. PowerPoint has several transitions built in for you to choose from.
To access them, select the “Transitions” tab from the top ribbon. From there, you can select a transition for it to preview on your screen. To customize it further, click “Effect Options” and play with the features to find something that suits your liking. To remove a transition, select “Transitions” and click “None.”
6. Add animations to your slides (optional).
Like transitions, animations can add movement, reveal information, and help you underscore the points you want to hit during your speech. To animate an element, follow these steps:
Select the element you want animated by clicking on it.
Choose “Animations” from the top ribbon.
You’ll have the option to choose from several effects displayed in the ribbon.
Clicking on one will give you a preview.
To customize the animation, select “Effect Options.”
To remove an animation, click “None” in the ribbon.
Some of the ways to customize animations include:
On Click
With Previous
After Previous
Duration
Delay
These describe how you want the effect to behave, so play around with them until you find an effect that suits your liking.
You’ll also have the option to move animations around as you edit your slides with the “Reorder Animation” function in the top ribbon.
7. Save your presentation.
Click “File” and “Save”, making sure to specify which folder or destination you want your PowerPoint to be stored.
8. Run your presentation.
It’s always good to do a trial run to ensure that your slides are set up properly and your animations fire they way you expect them to.
To present your PowerPoint, go to the “Slide Show” tab and click “Play from Start”. The slide will cover your whole screen, blocking out your desktop and PowerPoint software. This is so your audience (in this case, you for the trial run) is solely focused on the visual elements of your presentation.
9. Advance the slides.
When you’re done with one slide and want to show the next in your sequence, click your mouse in presentation mode. This will advance the slide.
PowerPoint Presentation Tips
Don’t let PowerPoint decide how you use PowerPoint.
Create custom slide sizes.
Edit your slide template design.
Write text with your audience in mind.
Make sure all of your objects are properly aligned.
Use “Format Menus” to better control your objects’ designs.
Take advantage of PowerPoint’s shapes.
Create custom shapes.
Crop images into custom shapes.
Present websites within PowerPoint.
Try Using GIFs.
Keep it simple.
Embed your font files.
Save your slides as JPEGs.
Embed multimedia.
Bring your own hardware.
Use “Presenter View.”
PowerPoint Style
1. Don’t let PowerPoint decide how you use PowerPoint.
Microsoft wanted to provide PowerPoint users with a lot of tools. But this does not mean you should use them all. Here are some key things to look out for:
Make sure that preset PPT themes complement your needs before you adopt them.
Try to get away from using Microsoft Office’s default fonts, Calibri and Cambria. Using these two typefaces can make the presentation seem underwhelming.
Professionals should never use PPT’s action sounds. (Please consider your audience above personal preference).
PowerPoint makes bulleting automatic, but ask yourself: Are bullets actually appropriate for what you need to do? Sometimes they are, but not always.
Recent PPT defaults include a small shadow on all shapes. Remove this shadow if it’s not actually needed. Also, don’t leave shapes in their default blue.
2. Create custom slide sizes.
While you usually can get away with the default slide size for most presentations, you may need to adjust it for larger presentations on weirdly sized displays. If you need to do that, here’s how.
In the top-left corner, choose “File.”
Select “Page Setup.”
Type the height and width of the background you’d like, and click “OK.”
A dialogue box will appear. Click “OK” again.
Your background is resized!
Tip: Resize your slides before you add any objects to them or the dimensions of your objects will become skewed.
3. Edit your slide template design.
Often, it’s much easier to edit your PowerPoint template before you start — this way, you don’t have design each slide by hand. Here’s how you do that.
Select “Themes” in the top navigation.
In the far right, click “Edit Master,” then “Slide Master.”
Make any changes you like, then click “Close Master.” All current and future slides in that presentation will use that template.
4. Write text with your audience in mind.
A significant part of a PowerPoint’s content is text. Great copy can make or break your presentation, so evaluating your written work from a few different angles could make you seem more persuasive. Thinking about how your text is received differentiates good presenters from the best.
Typography:
Many people underestimate the influence of typeface, but choosing the right font is important — the perception of your font type could influence your audience’s impression of you. The right font is an opportunity to convey consistent brand personality and professionalism.
Some fonts are seen as clean and professional, but this doesn’t mean they’re boring. A common mistake is thinking your font isn’t ���exciting” enough, which could lead you to choose a font that distracts from your overall message.
Source: Workfront
That said, you can still use fun and eccentric fonts — in moderation. Offsetting a fun font or large letters with something more professional can create an engaging presentation. Above all, be sure you’re consistent so your presentation looks the same throughout each slide, so your audience doesn’t become distracted by too many disparate fonts.

Source: Design Shack
5. Make sure all of your objects are properly aligned.
Having properly aligned objects on your slide is the key to making it look polished and professional. You can manually try to line up your images … but we all know how that typically works out. You’re trying to make sure all of your objects hang out in the middle of your slide, but when you drag them there, it still doesn’t look quite right. Get rid of your guessing game and let PowerPoint work its magic with this trick.
How to align multiple objects:
Select all objects by holding down “Shift” and clicking on all of them.
Select “Arrange” in the top options bar, then choose “Align or Distribute.”
Choose the type of alignment you’d like.
How to align objects to the slide:
Select all objects by holding down “Shift” and clicking on all of them.
Select “Arrange” in the top options bar, then choose “Align or Distribute.”
Select “Align to Slide.”
Select “Arrange” in the top options bar again, then choose “Align or Distribute.”
Choose the type of alignment you’d like.
PowerPoint Design
6. Use “Format Menus” to better control your objects’ designs.
Format menus allow you to do fine adjustments that otherwise seem impossible. To do this, right click on an object and select the “Format” option. Here, you can fine-tune shadows, adjust shape measurements, create reflections, and much more. The menu that will pop up looks like this:
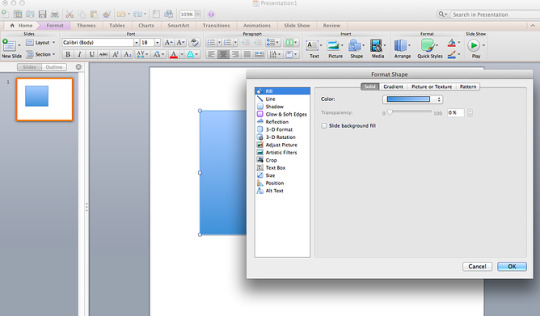
Although the main options can be found on PowerPoint’s format toolbars, look for complete control in the format window menu. Other examples of options available include:
Adjusting text inside a shape.
Creating a natural perspective shadow behind an object.
Recoloring photos manually and with automatic options.
7. Take advantage of PowerPoint’s shapes.
Many users don’t realize how flexible PowerPoint’s shape tools have become. In combination with the expanded format options released by Microsoft in 2010, the potential for good design with shapes is readily available. PowerPoint provides the user with a bunch of great shape options beyond the traditional rectangle, oval, and rounded rectangle patterns, unlike even professional design programs like Adobe Creative Suite or Quark.
Today’s shapes include a highly functional Smart Shapes function, which enables you to create diagrams and flow charts in no time. These tools are especially valuable when you consider that PowerPoint is a visual medium. Paragraphing and bullet lists are boring — you can use shapes to help express your message more clearly.
8. Create custom shapes.
When you create a shape, right click and press “Edit Points.” By editing points, you can create custom shapes that fit your specific need. For instance, you can reshape arrows to fit the dimensions you like.
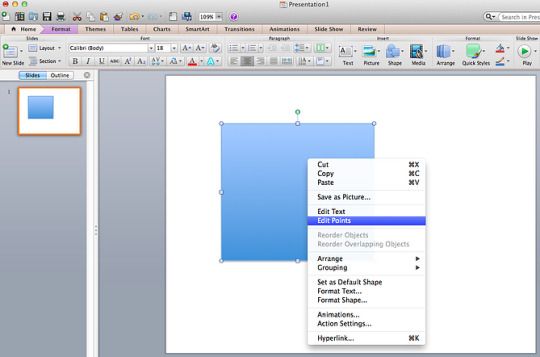
Another option is to combine two shapes together. When selecting two shapes, right-click and go to the “Grouping” sub-menu to see a variety of options.
Combine creates a custom shape that has overlapping portions of the two previous shapes cut out.
Union makes one completely merged shape.
Intersect builds a shape of only the overlapping sections of the two previous shapes.
Subtract cuts out the overlapping portion of one shape from the other.
By using these tools rather than trying to edit points precisely, you can create accurately measured custom shapes.
9. Crop images into custom shapes.
Besides creating custom shapes in your presentation, you can also use PowerPoint to crop existing images into new shapes. Here’s how you do that:
Click on the image and select “Format” in the options bar.
Choose “Crop,” then “Mask to Shape,” and then choose your desired shape. Ta-da! Custom-shaped photos.
Learn more about creating images for your marketing channels in the video below.
youtube
10. Present websites within PowerPoint.
Tradition says that if you want to show a website in a PowerPoint, you should just create link to the page and prompt a browser to open. For PC users, there’s a better option.
Third party software that integrates fully into PowerPoint’s developer tab can be used to embed a website directly into your PowerPoint using a normal HTML iframe. One of the best tools is LiveWeb, a third-party software developed independently.
By using LiveWeb, you don’t have to interrupt your PowerPoint, and your presentation will remain fluid and natural. Whether you embed a whole webpage or just a YouTube video, this can be a high-quality third party improvement.
Unfortunately, Mac users don’t have a similar option. Agood second choice is to take screen shots of the website, link in through a browser, or embed media (such as a YouTube video) by downloading it directly to your computer.
11. Try Using GIFs.
GIFs are looped animated images used to communicate a mood, idea, information, and much more. Users add GIFs to Powerpoints to be funny or quickly demo a process. It’s easy to add GIFs to your slides. To do so, simply follow these steps:
Download and save the GIF you want.
Go to the slide you want the GIF on.
Go to the “Home” tab, and click either “Insert” or “Picture”.
From the “Picture” drop-down menu, choose “Picture from File”.
Navigate to where you saved your GIF and select it. Then, choose “Insert”.
To play the animated GIF, click the “Slide Show” tab and then “Play from Current Slide”.
PowerPoint Process
12. Keep it simple.
PowerPoint is an excellent tool to support your presentation with visual information, graphics, and supplemental points. This means that your powerpoint should not be your entire presentation. Your slides — no matter how creative and beautiful — shouldn’t be the star of the show. Keep your text and images clear and concise, using them only to supplement your message and authority.
If your slides have dense and cluttered information, it will both distract your audience and make it much more likely that you will lose their attention. Nothing in your slides should be superfluous! Keep your presentation persuasive by keeping it clean. There are a few ways to do this:
Limit bullet points and text.
Avoid paragraphs and long quotes.
Maintain “white space” or “negative space”.
Keep percentages, graphs, and data super basic.
13. Embed your font files.
One constant problem presenters have with PowerPoint is that fonts seem to change when presenters move from one computer to another. In reality, the fonts are not changing — the presentation computer just doesn’t have the same font files installed. If you’re using a PC and presenting on a PC, then there is a smooth work around for this issue. (When you involve Mac systems, the solution is a bit rougher. See Tip #11.)
Here’s the trick: When you save your PowerPoint file (only on a PC), you should click Save Options in the “Save As …” dialog window. Then, select the “Embed TrueType fonts” check box and press “OK.” Now, your presentation will keep the font file and your fonts will not change when you move computers (unless you give your presentation on a Mac).
14. Save your slides as JPEGs.
In PowerPoint for Mac 2011, there is no option to embed fonts within the presentation. So unless you use ubiquitous typefaces like Arial or Tahoma, your PPT is likely going to encounter font changeson different computers.
The most certain way of avoiding this is by saving your final presentation as JPEGs, and then inserting these JPEGs onto your slides. On a Mac, users can easily drag and drop the JPEGs into PPT with fast load time. If you do not use actions in your presentation, then this option works especially well.
If you want your presentation to appear “animated,” you’ll need to do a little tinkering. All you need to do is save JPEGs of each “frame” of the animation. Then, in your final presentation, you’ll just display those JPEGs in the order you’d like the animation to appear. While you’ll technically have several new slides in place of one original one, your audience won’t know the difference.
An important consideration: If your PPT includes a lot of JPEGs, then the file size will increase.
15. Embed multimedia.
PowerPoint allows you to either link to video/audio files externally or to embed the media directly in your presentation. You should embed these files if you can, but if you use a Mac, you cannot actually embed the video (see note below). For PCs, two great reasons for embedding are:
Embedding allows you to play media directly in your presentation. It will look much more professional than switching between windows.
Embedding also means that the file stays within the PowerPoint presentation, so it should play normally without extra work (except on a Mac).
Note: Mac OS users of PowerPoint should be extra careful about using multimedia files.
If you use PowerPoint for Mac, then you will always need to bring the video and/or audio file with you in the same folder as the PowerPoint presentation. It’s best to only insert video or audio files once the presentation and the containing folder have been saved on a portable drive in their permanent folder. Also, if the presentation will be played on a Windows computer, then Mac users need to make sure their multimedia files are in WMV format. This tip gets a bit complicated, so if you want to use PowerPoint effectively, consider using the same operating system for designing andpresenting, no matter what.
16. Bring your own hardware.
Between operating systems, PowerPoint is still a bit jumpy. Even between differing PPT versions, things can change. One way to fix these problems is to make sure that you have the right hardware — so just bring along your own laptop when you’re presenting.
17. Use “Presenter View.”
In most presentation situations, there will be both a presenter’s screen and the main projected display for your presentation. PowerPoint has a great tool called Presenter View, which can be found in the “Slide Show” tab of PowerPoint 2010 (or 2011 for Mac). Included in the Presenter View is an area for notes, a timer/clock, and a presentation display.

For many presenters, this tool can help unify their spoken presentation and their visual aid. You never want to make the PowerPoint seem like a stack of notes that you use a crutch. Use the Presenter View option to help create a more natural presentation.
Pro Tip: At the start of the presentation, you should also hit CTRL + H to make the cursor disappear. Hitting the “A” key will bring it back if you need it!
With style, design, and presentation processes under your belt, you can do a lot more with PowerPoint than just presentations for your clients. PowerPoint and similar slide applications are flexible tools that should not be forgotten. With a great template, you can be on your way to creating presentations that wow your audience.
Editor’s note: This post was originally published in August 2019 and has been updated for comprehensiveness.
Source link
0 notes
Text
How To Use Slider PlugIn in WordPress

Best Free WordPress Slider Plugins for 2020
Do you want to add a beautiful slider to your WordPress site? When created with the right tool, WordPress sliders can make your site more engaging, more interactive, and more fun. But choosing the perfect plugin can feel quite difficult because there’re so many different slider plugins on the market. So, we’ve handpicked some of the best ones for you.
Do you want to add a beautiful slider to your WordPress site? When created with the right tool, WordPress sliders can make your site more engaging, more interactive, and more fun. But choosing the perfect plugin can feel quite difficult because there’re so many different slider plugins on the market. So, we’ve handpicked some of the best ones for you.
Do you want to add a beautiful slider to your WordPress site? When created with the right tool, WordPress sliders can make your site more engaging, more interactive, and more fun. But choosing the perfect plugin can feel quite difficult because there’re so many different slider plugins on the market. So, we’ve handpicked some of the best ones for you.
In this article, we’ll share the best WordPress slider plugins for 2020.
Wonder PlugIn
Wonder Slider is the best WordPress slider plugin to create a responsive image and video slideshows. It supports images, self-hosted HTML5 MP4 videos, YouTube, Vimeo, WordPress posts, WordPress custom post types and WooCommerce products. It’s fully responsive, works on iPhone, iPad, Android, Firefox, Chrome, Safari, Opera, Internet Explorer and Microsoft Edge. WonderPlugin Slider is the best and easiest way to create an image slider, video slider and WordPress posts slider. The plugin supports images, YouTube, Vimeo, mp4/webm videos and WordPress posts. It’s fully responsive, mobile-friendly and is compatible with iPhone, iPad and Android. It also includes stunning 3D transition effects and a built-in Lightbox gallery.
Features
Support images, Mp4/WebM videos, YouTube, Vimeo and WordPress posts
Fully responsive and mobile friendly, compatible with iPhone, iPad and Android
Full width slider
Stunning 3D transition effects
Built-in Lightbox gallery
Multiple sliders on one web page
Step by step wizard-style user interface
Display slider in WordPress widget
Soliloquy
Easily create responsive sliders in WordPress in just minutes. Soliloquy is a WordPress slider plugin that’s both easy and powerful, with 900,000+ downloads used by website owners, marketers, and developers. Soliloquy was built to adapt to the workflow of WordPress users to combat the bloated and confusing sliders out there. Because Soliloquy puts user experience first, the plugin has been optimized for speed and usability.
Soliloquy was originally created by Thomas Griffin, the same mastermind behind Option Master, the best email marketing tool and Envira Gallery, the best WordPress gallery plugin.
Soliloquy’s one of the most popular WordPress Slider in the official WordPress plugin repository with over 1 million downloads. Since its launch in 2012, Soliloquy has been helping bloggers, small businesses and even Fortune 500 companies to create beautiful WordPress sliders.
features and benefits of Soliloquy
Upload and rearrange slides with an intuitive drag and drop builder
Quickly create sliders in just a few clicks
Built-in templates for customization
Highly optimized for fast performance
SEO friendly HTML markup
100% responsive and mobile friendly – works on all devices
The pro version of Soliloquy slider includes powerful features like:
Featured Content Slider – Create sliders based on blog posts, pages, products, testimonials, and any custom post type.
WooCommerce Slider – Create beautiful product sliders for your WooCommerce store.
Instagram Slider – Import images from Instagram into your WordPress slider.
PDF Slider – Create responsive sliders from your presentation slides and other PDF files.
Schedule Slides – Easily schedule both sliders and individual slides to be displayed at specific days and times.
MetaSlider
With WordPress’ most popular slider plugin, enhancing your blog or website couldn’t be easier: simply select images from your WordPress Media Library, drag and drop them into place, and then set the slide captions, links and SEO fields all from one page.
Simple, easy to use interface – perfect for individual users, developers & clients!
Access to free photos via Unsplash.com
Create Responsive, SEO-optimized slideshows in seconds
Unrestricted support for image slides (supports caption, link, title text, alt text)
Full-width slideshow support
Drag and drop slide reordering
Intelligent image cropping
Set image crop position
Themes – includes 11 free professional slideshow themes
Built-in Gutenberg block, Widget and Shortcode
Loads of slideshow configuration options – transition effect, speed etc. (per slideshow)
Fully localized
WordPress Multi-Site compatible
Compatible with translation plugins (WPML, PolyLang & qTranslate)
Extensive developer API (hooks & filters)
Fast – only the minimum JavaScript/CSS is included on your page
Free basic support (covering installation issues and theme/plugin conflicts)
Lightbox support with the MetaSlider Lightbox add-on
Smart Slider 3
Smart Slider 3 is one of the most powerful slider plugins for WordPress. This WordPress slider plugin has a free version that offers fully responsive, SEO optimized sliders for any WordPress themes. The free version also comes with a dynamic post slider that lets you highlight recent posts or featured posts.Turn your ideas into incredible digital experiences. The most powerful design toolbox to create your next slider, block, page and carousel.Smart Slider 3 also lets you insert videos, posts and empty slides into your content and slide editing functions like ‘duplicate’, ‘set as first’ slide and ‘delete’ make creating slide galleries easy and very intuitive. The overall user experience is satisfactory and you can easily add a slider into posts and pages using the default block, shortcode, and template tag.
Smart Slider 3 is the most powerful and intuitive WordPress plugin to create sliders which was never possible before. Fully responsive, SEO optimized and works with any WordPress theme. Create beautiful sliders and tell stories without any code. A beautiful interface makes creating slides fast and efficient. The complete freedom to build what you want, the way you want. Edit your slides as you used to in page builders. Drop layers after each other and structure them with rows and columns.
FEATURES:
Import and Export sliders
Intuitive slide creation: choose images, select WordPress Posts or add YouTube and Vimeo videos
Static overlay
Touch swipe, scroll, keyboard navigation
Full-width and boxed responsive layouts
Slide switching animations: Horizontal, Vertical, Fade
Slide background animations
Autoplay timing options
Slider controls: Arrow, Bullet, Autoplay, Bar, Thumbnail and Shadow
SEO optimized
Layers: Image, Heading, Text, Button, Vimeo, YouTube
Layer snap-in visual slide editor
Adaptive layer font sizing
Hide layers on specific devices
Slide thumbnail image
WordPress Multi-Site compatible
Custom responsive breakpoints
The post How To Use Slider PlugIn in WordPress appeared first on The Coding Bus.
from WordPress https://ift.tt/3cBHvev via IFTTT
0 notes
Photo

16 Best Tab and Accordion Widget Plugins for WordPress
Your website's content should be organized and beautiful. By adding a tab or accordion widget plugin to your WordPress website, you will be able to display your website's content in an elegant way.
An interactive accordion and tab plugin can tidy up the design and readability of your webpages.
One of the many fully customizable WordPress tab & accordion plugins and widgets on CodeCanyon
Accordions and tabs are great ways to communicate text-heavy information in a stylish and condensed way. Keeping your website clutter-free and interactive should be the main priority for your website and accordions and tabs help you accomplish this.
At CodeCanyon, you will be able to choose from a library of premium plugins available and find a tab & accordion plugin and widget that will fit your website's theme and allow you display your website's information without crowding your page's designs.
The Best WordPress Tab and Accordion Plugins on CodeCanyon
Discover CodeCanyon's extensive library of the best tab and accordion WordPress widgets and plugins ever created. With a cheap one-time payment, you can purchase these high-quality WordPress widgets and plugins and draw in more traffic to your website.
Here are a few of the best-selling tab and accordion WordPress widgets available on CodeCanyon for 2020.
Best-selling tab and accordion widgets and plugins available on CodeCanyon
These powerful tab and accordion plugins allow you to display your website's text and media in a systematic order that fits your particular website. These widgets and plugins come with plenty of features that can enhance your website including:
pagination
animated layers
customizable columns and rows
touch-enabled mobile functionality
lightboxes
Head on over to CodeCanyon and choose from the premium tab and accordion plugins available now!
11 Best Tab and Accordion WordPress Widgets for 2020
Here are 11 of the top-rated WordPress tab and accordion widgets and plugins that are available for you to download on CodeCanyon:
1. Accordion Slider—Responsive WordPress Plugin
The Accordion Slider plugin combines two great functions in one handy plugin. First it functions as an accordion, and secondly it functions as a slider.
Best features:
add as many panels as you want without worrying about screen space
touch-enabled to work well with mobile screens
loads images and content from posts, galleries, and Flickr
accordions are automatically cached to improve the load time
can be placed anywhere: in posts/pages, template PHP code, or widgets
Accordion Slider—Responsive WordPress Plugin is a great two-in-one plugin that will appeal to those looking for a great way to present images or text.
2. Grid Accordion—Responsive WordPress Plugin
One of the best-looking accordions out there, Grid Accordion adds a fresh feel to your site by offering a feature not found in other plugins: an accordion that works in two directions. While most plugins let you open and close tabs or similar UI elements either horizontally or vertically, with this plugin, you can do both. Not only does it handle text content well within its accordion grid, but you can even fill your content areas with images and other media for a more stunning effect.
Make sure to check out the demo for Grid Accordion here.
This plugin also comes with a host of other features, such as:
a fully responsive and touch-enabled design
support for dynamic content from posts and galleries
available hooks for actions and filters
JavaScript API endpoints for maximum customization
3. WP Responsive FAQ With Category
The WP Responsive FAQ with Category plugin is specifically designed for users who have or want to add a Frequently Asked Questions area to their site and don’t want their visitors to have to scroll through an endless stream of text to get to the questions and answers that are relevant to them.
Best features:
FAQs can be arranged by category
15 customizable different designs to choose from
compatible with Visual Composer page builder and WooCommerce
two types of FAQ toggle icons: arrow or plus sign
There’s no question that WP Responsive FAQ with Category is the answer to all your FAQ needs.
4. WooCommerce Category Accordion
The WooCommerce Category Accordion is designed specifically for WooCommerce users. It can be used as a widget or shortcode to list product categories and subcategories.
Best features:
supports unlimited categories and subcategories
14 Font Awesome Icons included
ability to highlight current category option
sort by ascending or descending order
WooCommerce Category Accordion is ideal for users who want to organize their products or services into categories and subcategories to make it easier for customers to navigate their site.
5. Responsive Searchable 3 Level Accordion
Responsive Searchable 3 Level Accordion is a simple plugin that can be used anywhere on your WordPress site. It will appeal to users who are looking to arrange content in accordion style within a post, sidebar, footer, etc.
Best features:
can be used as a widget or shortcode
three nesting levels available
five readymade styling options
allows users to type in searched phrase
Responsive Searchable 3 Level Accordion For WordPress is a low-fuss plugin, and its standout features like three-level support and searchable content really set it apart.
6. Accordion FAQ WordPress Plugin
FAQ pages are an important part of almost any website, and with this plugin, you can fit a mountain of text behind a sleek and easily digestible display. This accordion plugin focuses on doing one thing, creating FAQ-style content easily, and it does it well.
Here’s what you can expect to get with this plugin:
ability to quickly add multiple FAQ accordions throughout your site
easy drag-and-drop interface for reordering
color, icon, and font customization
built-in generator for creating shortcodes
If you’re looking to add a FAQ section to your existing design, then the Accordion FAQ WordPress Plugin has you covered.
7. WordPress Tabs and Accordions DZS
WordPress Tabs and Accordions DZS is another plugin that gives users access to both tab and accordion functions.
Best features:
full skins to fit every brand
WYSIWYG editor
unlimited color options for customization
iPhone, iPad, and Android optimized
and more
So if StackTabs doesn’t appeal, WordPress Tabs and Accordions DZS is another great two-for-one option.
8. Side Tabs—Layered Popups Add-on
A little different than most of the plugins on this list, Side Tabs delivers the features you’d expect from a tab plugin, but instead of existing within your site’s content, they live at the edge of your screen. This unique presentation creates a number of unusual uses.
One of the most interesting ways you can use Side Tabs is to present a constant access point to content throughout an entire page (or several pages). Besides that, it also makes a great tool for offering Calls to Action and similar content without being too intrusive.
With a ton of customization and animation options available out of the box, this plugin works brilliantly for anyone looking to add a fresh way of presenting information to their site.
9. WooCommerce Tabs Pro: Extra Tabs for Product Page
If you have a WooCommerce site, the WooCommerce Tab Pro plugin will allow you to create and manage 11 different types of tabs to display your products.
Best features:
ability to add unlimited tabs to a single product page
WYSIWYG editor for editing custom content
ability to enable or disable tabs
ability to create a global tab that can be used with all products
When you have an eCommerce site, making improvements to your layout can really boost sales. With WooCommerce Tabs Pro: Extra Tabs for Product Page, the tills will soon be ringing.
10. Elegant Tabs for Visual Composer
Elegant Tabs for Visual Composer is an add-on for the WPBakery WordPress plugin (formerly Visual Composer). It lets you add any shortcode to multiple tabs and offers loads of customisation like different colours, icons and backgrounds for different sections or tabs.
Best features:
vertical tabs
drag and drop any WPBakery elements inside the tab content
supports deep linking
ten different styles of tabs and unlimited variations
and more
Elegant Tabs is also available for Fusion Builder, WooCommerce, Cornerstone, and Beaver Builder.
11. PullOut Widgets for WordPress
Like the Social Network Tabs for WordPress, the PullOut Widgets is a different take on tabs. It is specifically designed to turn any widget on your site into a pullout tab.
Best features:
289 icons for pullout tabs
32 sliding animation effects
unlimited pullout widget positioning on top, right, bottom or left side
unlimited widget colours
The most successful websites are interactive, and PullOut Widgets for WordPress gives your visitors plenty of chances to engage with your content.
5 Free Tab and Accordion WordPress Widgets and Plugins for Download in 2020
The best features and most beautiful interfaces are found in the premium plugins from CodeCanyon. But, if you're on a budget or just want something simple, check out these free tab and accordion plugins for WordPress.
1. Arconix Shortcodes
Arconix Shortcodes is a very versatile plugin and is a must-have if you cannot afford any of the premium plugins. With this plugin, you can add not only accordions but styled boxes, buttons, tabs, unordered lists, columns and much more.
2. Easy Accordion
Easy Accordion is a responsive drag and drop accordion builder that will help you to display multiple accordions into your WordPress website. No coding is necessary to add the accordions to your website as everything is added through shortcodes.
3. Accordion
This Accordion plugin can help you create different sections of your website including but not limited to FAQs, a knowledge base, and a question & answer section. You can change colors, font size, and icons for each accordion.
4. Squelch Tabs and Accordions Shortcodes
With the use of shortcodes, you can add horizontal accordions, vertical accordions, and tabs. This free plugin will help you save space on your webpages, make your website look more professional, and add an interactive component to your website.
5. Shortcodes Ultimate
Shortcodes Ultimate allows you to add many tools to your website. You can easily create tabs, buttons, boxes, sliders and carousels, and responsive videos. The plugin comes with over fifty shortcodes for you to implement.
How to Add an FAQ Accordion to Your Website
In this example, we are going to create an FAQ section for our online store. First we need to create a category for our FAQ accordion so the plugin knows what content to add to each specific accordion. Once you have installed the Accordion FAQ WordPress plugin, head on over to WP Dashboard > FAQ > Categories. In the name field, we will type in "Online Store" and click the Add New Category button.
Next, we will click on WP Dashboard > FAQ > Add New. We will add in our three FAQ entries this way. We will include the question in the title and the answer in the text editor.
For each of our entries, we will make sure to click the checkbox next to the category, Online Store that we created to make sure we group the entries together.
Once we have added our three FAQ entries for our online store, it is time to add the accordion widget to a page. On an existing or new page or post, click on the Add Shortcode button on the top of the text editor. Choose Insert FAQs from the Select a Shortcode drop-down menu. From here we will be given a basic set of setting for us to change. We will choose the "Online Store" category from the Faq Category option and change the Icon Background Color to blue.
Click the Insert Shortcode button and the shortcode will be added to the text editor. The FAQ accordion will now be displayed on your webpage for all your users to see!
Install a Tab or Accordion WordPress Widget Now!
By adding a premium tab or accordion plugin to your website, you will be able to simplify your web page's design and display your text and media in an easy-to-understand way.
These handy widgets and plugins allow you to integrate interactive displays for your website's content that can be styled to fit your website's theme.
In addition to all the high-quality tab and accordion widgets available, there are also thousands of other high-quality WordPress plugins on CodeCanyon that can help enhance your website. Take look through this massive collection of plugins and you will find all types of plugins including gallery, newsletter, eCommerce, and marketing plugins.
by Daniel Strongin via Envato Tuts+ Code https://ift.tt/3cxChRI
0 notes
Text
Slideshow creator google
The web result has been quite successful. If you would like to make changes to it after you already typed it you would set the cursor at the beginning of the word or words you would like to change and then click and drag until you accomplish the point you would like the effect to finish. You're able to click on multiply tools to secure more than 1 effect. The entire procedure and its possible impact has ever fascinated and animated me.
It's also great for commercial use such as for developing a presentation for a realtor or a new product of any kind. Now you have the item, go on and familiarize yourself with it. You may choose to examine the real dimensions, not only the size name, when making up your mind. The little scale denotes the size of the characteristics on the map.
Slideshow Creator Google - Is it a Scam?
Tutorials are very popular. Movie Maker should already be set up on your PC. Photo Slideshow Creator is well suited for a large selection of purposes. Photo Slideshow Creator is the best solution, a strong and versatile tool that also happens to be especially user-friendly.
To begin with, you must produce and verify an account. In the subject of a couple hours, you can make a lovely slideshow! On the next screen you're going to be requested to decide on the claims you would like to dispute (sometimes there'll be multiple claims per video). Disputing a claim needs to be done only when you have the appropriate license to achieve that.
By pitching your blog idea to submissions you still have a great prospect of getting noticed but you need to be clear about your thoughts and send samples of your prior work. Fairy tales and traditional children's stories are an outstanding place to get started exploring critical literacy. There are a lot of candid photos of them in the book, and it is a great book to provide a child who's about to get a new brother or sister. In any case, it's fun and easy after getting the hang of it.
Double the attractiveness of your slideshow and produce your memories unforgettable. Or you may just want to share your photos to your family members and friends.

It is not difficult to experiment with photo slideshow program. You have to drag each of the images selected into the editor. You're able to observe the way that it works with the photo. Taking photos has never been simpler.
The Honest to Goodness Truth on Slideshow Creator Google
Fantastic companies give a simple to use and install software which never disrupts other programs when it's running. Usually, an adventure seeker seeking to stop by a destination would be more prone to visit and interact with a travel site for this destination that's geared toward their interest verses an overall travel site or maybe an overall destination website. You may use these software to make your booktrailer. If you're a beginner or an advanced stage physical fitness freak, a house exercise program should be started on the perfect track. http://contentslideshow.com
There are a lot of built-in audio tracks that you may use in your video at no cost. In the box, you are going to have the option below to state why you can use the music in your video. Make certain to include the hyperlink to the license, along with where you got the music. When you've completed the above, now you can add your music, or sound.
Nobody would like to read an article that's so superficial they take away nothing. Consider what's going to make sense for your requirements.
Among the ideas that I see repeated repeatedly on HubPages from the skilled Hubbers is the fact that it is most important to compose good, quality content. You will possibly utilize Google for advice. All-in-one travel sites normally have big problems, because the bigger the website, the more the individual traveler has to hunt for any content interests them. There are many social media websites that can host your pictures, just so long as you don't mind the advertising which goes with it.
The Importance of Slideshow Creator Google
You have to choose a software that's user-friendly and easy, and therefore you do not face any trouble utilizing it. Once you've presented the new idea and modeled a couple of examples by yourself, involve your students in a couple of additional examples utilizing the board or document camera. The tool has a rather straightforward interface. If you opt to use a tool such as CamStudio, you may want to break different methods down into 10 distinct videos, so you own a sequence.
The Lost Secret of Slideshow Creator Google
If you wish to bring a text slide, that is in a different location that we'll discuss in a moment. If you opt to speak to the camera, then you need to ensure your site address URL is in view as well as adding your URL to the completed video. You may also reorder the text if you wish to achieve that. If you wish to permanently highlight text click the highlight tool.
1 note
·
View note
Text
How to Create a Custom Animation in PowerPoint
In case you wish to get the animation on the MS PowerPoint slide for adding many animation effects in it, then create a custom animation. For customizing, the animation will create bullet lists, names, graphics and photos which will be shown in the presentation of PowerPoint. If you wish to know how to create a custom animation in PowerPoint, then go through the guidelines mentioned below.
Steps to Create Multiple Animation Effects in PowerPoint
You can go through the steps for adding many animation effects to one item on the MS PowerPoint. Make a bullet list so that you can adjust the color of every point and colored transparent while moving to the other point. In case you would like to create multiple animation effects in PowerPoint, then you need to follow the steps mentioned below:
• Select the name, photo or clip art images, or bullet style for creating a new animation in PowerPoint.
• Choose “graphics” by pressing on the given item.
• Choose “name” or “bullet style” by pressing on the corner of the message checkbox.
• Choose the “Animations” option.
• Choose the “Add Animation” option.
• Choose an “Animation” by going to the various effects given in the list like “Entrance”, “Emphasis”. “Exit” or “Motion Path.”
• Choose “Add Animation” option once again and after that choose other “animations effects” provided in the list.
• Finish the adding procedure of animations and you can modify the animations effects as per you like.
Steps to Customize an Animation Effect in PowerPoint
In case you wish to create your own customize animation affecting PowerPoint, then you can do so by following the steps mentioned below:
• Choose “Animation Pane” option.
• After selecting it, the “Animation Pane” will show on the right-hand corner of the display.
• Choose the “down arrow” nearby the list of animations effects that the users wish to customize.
• By going to that window mentioned above, they can adjust after starting the animation, the effecting button and the time.
• In case they wish to adjust after starting the animation, they need to choose the options mentioned below:
Start on mouse click.
Start with the previous animation
Start after the previous animation.
• Choose the “Effect” button for selecting the “modify” button like volumes and directions.
• Choose the time for selecting the modify time settings like “delay”, “duration” or “repeat.”
• Customize all the option for every effect which the users wish to apply to the item.
Steps to Reorder Custom Animation Effects in PowerPoint
In case you wish to rearrange the created custom animation effects in PowerPoint, then you can do so by following the steps listed below:
• Choose the “Animation” option.
• Using the “Arrows” located at the upper side of the “Animation Pane” for moving the “animation” into the upward and downward direction in the menu list.
Steps to Create a Motion Path Animation in PowerPoint
In case you wish to make a motion path animation in PowerPoint, then just follow the steps which are given below to start the procedure:
• Choose the item which the users wish to animate.
• Choose the “Animation” option.
• Go down to the “Motion Paths” located at the end of the menu list and after that select the “motion path” they wish to use which is given in the “Animation” album.
• Select from the options like “Lines”, “Turns”, “Shapes”, and “Loops.”
• Choose the “Animations effects” button for adding modify option to the “motion path animation” option.
• In case the users wish to create customize “motion path, then they can do so by selecting “Custom Path” option. Click to draw their own customize “motion path. Tap on the “Esc” button after finishing the procedure.
• Select to adjust the location of the “motion path” or editing points in “motion paths” of animations in PowerPoint.
Source:- https://officekeyactivate.com/how-to-create-a-custom-animation-in-powerpoint/
Sam John is a Microsoft Office expert and has been working in the technology industry since 2002. As a technical expert, Sam has written technical blogs, manuals, white papers, and reviews for many websites such as office.com/setup.
0 notes
Text
aspose.cloud Newsletter February 2019: Work with Cloud File Format REST APIs & SDKs
Aspose.Cloud Newsletter for February 2019 has now been published that highlights all the newly supported features offered in the recent releases. It also includes information about Cloud REST API and SDKs for working with Microsoft Visio Diagrams, Reordering multiple PowerPoint slides in one Cloud REST API call, Convert HTML to Markdown and MHTML formats in cloud applications and much more.
Cloud REST API and SDKs for working with Microsoft Visio Diagrams
Manipulate Visio files without Microsoft Visio installed. Aspose.Diagram offers cloud REST API and SDKs for .NET, Java, cURL, PHP, Python, Ruby and Node.js platforms to seamlessly create, edit and convert Visio file formats without needing Microsoft Visio. It supports working with native VSD/VSDX format as well as other popular Visio formats including VSS, VST, VSX, VTX, VDW, VDX, VSSX, VSTX, VSDM, VSSM and VSTM. Download Free Trial
Reordering multiple PowerPoint slides in one Cloud REST API call
Aspose.Slides Cloud REST API offers separate SDKs for .NET, Java, cURL, PHP and Node.js platforms to manipulate PowerPoint presentations. The latest version now supports reordering multiple slides in a presentation in one API call. Developers can also add slides in a presentation as well copying slides from other presentation or moving to other position. Read more
Convert HTML to Markdown and MHTML formats in cloud applications
Aspose.HTML Cloud REST APIs and SDKs for popular platforms allow to dynamically manipulate HTML documents within cloud applications. The latest version supports converting HTML file to Markdown (Standard and GitLab Flavored Markdown) and MHTML formats. While converting HTML to MHTML – you can handle the resource depth level using maxDepth API parameter, scripts with javaScript API parameter, URLs with urlRestrict API parameter and use defaults API parameters for resources handling. Read more details
Collect a copy of Aspose Newsletter, February 2019 edition
Collect the English version of this newsletter
#Cloud REST API Visio Diagrams#Working with Cloud File Format#Reordering multiple PowerPoint slides#Convert HTML to Markdown#Convert HTML to MHTML formats
0 notes
Text
How to use Apple's Keynote on the Mac and iPad to prepare compelling presentations
AppleInsider looks at the little-used extra tools in Keynote that make creating presentations faster, clearer and more powerful. It's regularly claimed that number one best feature about Apple's Keynote slide presentation software is that it is not Microsoft PowerPoint. We wouldn't disagree. PowerPoint is complex when you're making a presentation and doesn't get easier when you're in the audience. Just watch anybody, new or experienced, struggle with finding where PowerPoint hides its Play Slides button and you'll wish they'd used Keynote. There is also the fact that PowerPoint slides somehow always look like they're PowerPoint slides. Keynote does seem different because fewer people use it. If that's you, if you're turning to Keynote to just be a little distinctive, you're in good company. Steve Jobs did exactly the same thing. Subscribe to AppleInsider on YouTube If you also use Keynote because it's free and comes on your Mac and iPad then there's obviously nothing wrong with that either. However, you may be underestimating this software. Keynote is vastly easier to use than PowerPoint and it's not because it has fewer features. Like everything Apple does, Keynote has powerful functions that are kept out of your view until you need them. That's the case both when you're creating a presentation and later when you are actually in front of the audience. Keynote has so many tools that we're dividing this into two articles. This one is about how you make a complex and compelling presentation, then part two will be about how Keynote helps you actually present it to an audience. Making a presentation using Outline View So few presenters even know this exists. Right inside Keynote on the Mac, there is an outlining feature that lets you rapidly bash in all the ideas you've got for your presentation. Write a line or a note, hit Return, write the next one and keep going until it's all out of your head. Then drag the lines around to reorder them. It is a basic outliner but it lets you write headings and then add subtopics. It lets you collapse and expand lines so that you can see all the detail or just headings. What's more, every line you write in this outline is automatically a new slide in the presentation. On the Mac, open Keynote, start a presentation by choosing File, New and then in the View menu select Outline View. It isn't a particularly powerful feature. If you have a complex presentation to make or you're at the stage where really you're still trying to figure out what you want to cover, use something more powerful like OmniOutliner instead. If you do that, then you can write as complex an outline as you want and export it from OmniOutliner in PowerPoint format. Then in Keynote, choose Open, Open and select the PowerPoint-style document. Keynote brings the outline in and you can edit or amend it in the Outline View. This is where you hit the limits of Keynote's outlining: it will certainly display the top and second level of an OmniOutliner outline but that's all. If you've gone further with multiple levels of thoughts and notes, you won't see them in Keynote. Unfortunately you won't see the outline at all in Keynote for iOS as there is no Outline View in that. This is another reason for using an alternative like OmniOutliner, however. You can Share the outline from OmniOutliner into Keynote to start your presentation yet keep the full one viewable in the outlining app. You again have to choose to share it in PowerPoint format, though. While OPML is a standard for all outliners, Keynote's one won't recognize the format. It's still not great that once you've created a detailed outline you can't actually see it in Keynote except the presentation app doesn't just store a list of what you've typed. Instead, it creates full-blown slides for you. On the Mac, go back to the View menu and switch from outline to Navigator. This is the view you're most used to in Keynote: it's where you enter the details of your slides and where you add new ones. Except this time. This time it's done all of that for you by automatically creating one slide for every line in your outline. The slides will have the text from your outline on them, too, so in theory you could now just play the presentation and be done with it. Master slides In practice, though, the slides that are automatically created for you are basic. You're definitely going to want to add more text detail or drag in images but you can also choose to edit the look of your slides. You can always do this: on any Keynote slide you can alter images, or drag in new backgrounds but you're better off spending some time at the beginning. Keynote comes with different themes or templates but you can also take the basic, barebones black-text-on-white style and build it up into your own template. Add gradients, add colors, choose fonts. If you have a company logo that you are required to use on every slide, pop it on a Master Slide. If it's a particularly ugly company logo, put it at bottom left. That's not a Keynote tip, it's a general design one: people tend to look at the bottom left of anything least of all. Basic non-linear presentations What you can be certain about is that people will look at your slides one after another -- unless you choose otherwise. The giant majority of presentations are linear. You start with slide number one and you go on to what feels like slide number a million. There's nothing wrong with this, unless you visibly number each slide. Even then, things could be worse: you could be numbering it as "1 of 9,999" and guarantee that your audience will loathe your breathing guts. Still, making a regular, unnumbered linear presentation is actually the very best you can do because it requires certain things from you. It requires that you really think through what you're planning to say -- and you have to have thought deeply about your audience. Both consumers and industry experts might want to know about Intel's processor roadmap but you still wouldn't make the same presentation to them both. Sometimes, though, you can't be certain who you're going to present to or what their level of interest and expertise is. In that case, you can create a non-linear presentation. If you know that today's presentation is going to be basic and tomorrow's is more detailed, then you can create a simple non-linear one by skipping slides. Write the full, detailed presentation and make sure that each section begins with a good summary screen. Then before you start in front of the audience who wants the basic one, tell Keynote to skip the detail slides. On the Mac, click on the first slide you want to skip and then shift-click on the last one. Choose the Skip Slide menu and Skip Slide. Alternatively, select all of the skippable slides and then right-click and choose Skip Slide from the dropdown menu. From now on, once you press Play to start the slideshow, Keynote will automatically skip those slides. When you're editing the presentation you can see which have been skipped because instead of a full slide-shaped icon in the Navigator's sidebar, you'll get narrow lines. More advanced non-linear presentations If you don't have a clue how much your audience is going to know already or want to know now, well, try to find out. When you simply cannot, though, and are effectively winging it, prepare a true non-linear presentation. This is where you can jump to any topic at any time -- and, at least as importantly, jump back out when you feel that you've said enough. Write the complete presentation and, again, make certain each section begins with a good summary slide. Then go back to the beginning of the presentation and create a menu slide. This is just one that lists every topic in your entirely presentation -- and each topic heading is secretly a link to its related section. Select a heading on the menu screen, then right click and choose Add Link from the menu that pops out. This gives you three options: Slide, Webpage and Mail. Choose Slide and you get six more options. There are some basic ones like Next Slide or Previous Slide and more complex ones like Last Slide Viewed. Choose the last option which is headed Slide and is followed by a number. Choose the number of the slide where that section begins. This is a hidden link so far as your audience is concerned. When you're editing the presentation, you'll see every link marked with an arrow icon but on presentation day there'll be no clue what is or isn't a link. That can be confusing on the day but you're also going to get lost when you're creating the presentation. It's so certain that you'll get slide numbers mixed up that Keynote helps you. When you've entered the number of the slide you want to jump to, click on the button Go to Slide to be certain you've got the right one. Keynote will update these numbers as you add in slides so if you suddenly pop in an extra ten at the start, you don't have to redo this jump numbering. So you could do this as you go, adding menu items and jump links while writing each section. Don't. You'll make fewer mistakes and it will take a lot less time if you do it all at the end -- and you'll save time doing something of the sort at the beginning, too. Jump back Once you've created or at least begun your menu slide, go back to the Master Slides. Select a symbol from the Shapes button such as a circle and when it's on your slide, resize it. Make it small and unobtrusive but also clear and easily clickable or tappable. Then select it, right click and again choose Add Link. If you do this on the Master Slide then every single slide you ever create in this presentation will come with a ready-built button to take you and your audience back to the menu. Viewing the presentation as a whole Whether you go slide by slide or leap all over the place, you do take your audience through a complete show and it can be long. The actual length is up to you but there is also how long the presentation feels and part of that is down to pace and variety. If every slide is full of text then it will seem to drag. To get an idea of how varied your slides are, choose the View menu and Light Table. This is named for the actual tables with lights in that photographers used to use. They could lay out strips of film and, because they were lit from below, would be able to see all of their photographs clearly in order to select the best. Similarly, you can see all of your slides laid out in a grid so you can get a quick visual impression of how the entire presentation looks. If every part is the same, if there's just no variation, you now know and can break things up. Light Table is also a kind of visual outliner: you can drag slides around to re-order them as you need. This works on the iPad too: tap the three-dot ellipses icon at top right and then choose Light Table from the menu. To go back, do the same thing but choose Slide View instead. This is a rare case of the Mac and iOS versions of Keynote being pointlessly different: Slide View on the iPad is what the Mac version calls the Navigator. Breaking up text When you do look at the Light Table view and cringe at how text-heavy your presentation is, you can drag images, audio and video into it. If you must. Images are fine and will always be a boon to a presentation. The problem comes with video and audio. Keynote does let you drag video on to a slide and it even comes with basic video editing tools. In theory, you could drag a radio concert or a major motion picture into Keynote and have it as a slide. In practice, it doesn't matter what you do with your Keynote file if the venue you're presenting hasn't got any loudspeakers. Just as you need to find out all you can about your audience before you start writing your presentation, it will help to learn about the venue too. Ask the staff there to take a photo of the projector and any other equipment: that will show you what connectors there are. It may show you that there is a fantastic sound system just waiting for you. Yet still we avoid video and audio because venues are out of our control and can go wrong. They should all have staff who can work the equipment but you know they don't. And you know that if your presentation depends on the audience watching a video whose audio they can't hear, it's not the venue who'll get the blame. It's not the venue who will have to work to get the audience back on side. So perhaps the most useful thing we can say about how Keynote helps on the day you're presenting is to caution you against video. There is a lot more, though. Keynote on the Mac and the iPad can both help you during your presentation -- just in different ways. Keep up with AppleInsider by downloading the AppleInsider app for iOS, and follow us on YouTube, Twitter @appleinsider and Facebook for live, late-breaking coverage. You can also check out our official Instagram account for exclusive photos. https://goo.gl/eug8fS
0 notes
Text
15 Awesome React Components
React is one of the most popular front-end JavaScript libraries. Developed by Facebook, it allows you to break down even the most complex user interfaces into simple, reusable components. Instead of creating everything on your own, you can install and use external components to quickly add new features and functionalities.
In this article we are going to share with you 15 interesting React components that are actively maintained and can be of great help in your next project.
React-burger-menu offers an off-canvas sidebar React component with a number of effects and styles using CSS transitions. It also supports multiple animations like slide, stack, bubble, push and more. It uses modern CSS3 featues, so some animations may not be displayed properly in all browsers.
A React component for creating beautiful and responsive carousel sliders. It is the react based version of slick carousel. It offers a large number of various carousel options that you can customize, including infinite rotation, auto play, lazy loading and much more.
This is a React component based on the Google Maps API. It is fully isomorphic and allows you to render animated react components on the map even if the Google Maps API is not loaded. Thanks to the internal hover algorithm every object on the map can be hovered.
A stateless, responsive and highly customizable React photo gallery. It maintains the original aspect ratio of your photos and uses actual image elements. It is also possible to pass your custom image components for adding extra functionality like captions and favorites.
A modern and beautiful credit card component that can be used for payment forms. It has a built in credit card validator, that checks the card number and recognizes the card type. It supports all credit card types available in Payment.
React-dates is an interactive, fully featured and mobile-friendly datepicker. It allows you to select single date or a date range using the built in properties. You can also customize the look and feel of the inputs and the calendar.
A complete and totally customizable component for notifications in React. With the built in notification properties you can set its title, message, position, action and much more. For optimal appearance, this component must be rendered on a top level HTML element in your application to avoid position conflicts.
A React component for playing videos from different file paths and URLs like YouTube, Facebook, Twitch and more. It parses the URL and loads in the appropriate markup and external SDKs to play the video. The built in properties can be used to control the volume, the player width and height and more.
A React library by Atlassian for making drag-and-drop components. It offers a clean and powerful API that is easy to use while still offering lots of customization options and controls. The generated components have smooth GPU-powered animations that naturally reflect when elements are picked up or reordered.
A React component by the Unsplash team that can be used to create beautiful line graphs suitable for displaying trending and activity metrics. This project follows a minimalistic approach and gives you a simple, polished solution to one specific problem, so don't expect a full charting library.
This is a Material Design spinner component for React. You can start using it right away as it is made of 100% inline CSS and doesn't require any configuration. It allows you to change the color, size and animation speed and also supports Server-side rendering.
React-vis is a collection of react components to render common data visualization charts. It supports multiple chart types such as line/area/bar charts, heat maps, pie and donut charts and more. React-vis is easy to setup and use and provides a set of basic building blocks for different charts that can be customized.
This is an avatar and profile picture editor for React. It offers you a fast and easy way to resize, crop and rotate your uploaded images using the user interface. The result images have the same resolution as the original ones, without losing any quality.
This is a draggable and resizable grid layout system. It is React-only- no jQuery required and is compatible with server-rendered apps. React-Grid-Layout supports draggable, resizable and static widgets, responsive breakpoints and much more.
A React component for creating paginations. It is easy to use and can be customized with CSS. With the built in properties you can set the number of the pages to be shown, the range of the displayed pages, add labels for the previous and next buttons and more.
Presenting Bootstrap Studio
a revolutionary tool that developers and designers use to create beautiful interfaces using the Bootstrap Framework.
Learn more
via Tutorialzine http://ift.tt/2j81VWA
0 notes
Text
Present like a pro: these new updates in Slides are designed to make you look good
As a go-to presentation tool, Google Slides already comes equipped with real-time collaboration features. Starting today, we’re introducing new robust features to help you and your team win that pitch, nail that client presentation and get buy-in for new ideas—all while saving valuable time.
Here’s a look at the latest updates in Slides, including new G Suite integrations, partner applications and customization options.
Capture ideas in Keep, bring them to life in Slides
We built Keep to help you easily capture and organize ideas. Today, you can use a new drag-and-drop integration between Keep and Slides to transform these ideas into action. Simply select notes from Keep (or sort with #labels) and drag them into Slides. When you add a note from Keep into your presentation, Slides will automatically add a title and description for you.
The Office of Information Technology for the State of Colorado uses the new Keep and Slides integration to keep track of population numbers at different agencies and report them to their team. Instead of digging through emails and Docs to track down figures, the team saves statistics to Keep and drags them into Slides to present.
If you’re new to Keep, download here.
Related Article
8 tips to help you keep up in Google Keep
Google Keep makes organizing information a cinch. You can easily jot down ideas or share to-dos with co-workers. We asked Mario Anima, pr...
Read Article
Skip manual updates, use linked Slides
Whether you’re trying to prepare several client presentations or make sure data is up to date, repeatedly copying slides from one presentation to another is a major time-sink. Now, you can link and sync slides from multiple presentations with a click. This way, you can maintain a single source of truth and easily update linked slides to match the source, like for quarterly business reviews or company presentations.
Sriram Iyer, Senior Director of Product Management at Salesforce Sales Cloud, is excited to use the new slide embedding feature to streamline his teams workflows. Says Iyer, “At Salesforce, we use Google Slides for customer-facing and internal presentations. The linked slides feature will help us easily keep presentations up-to-date.”
You asked, we updated
Our customers also asked for additional features in Slides. We listened to those requests and now you can:
Insert Diagrams, or ready-to-use visualizations. This is great for when you need to effectively share timelines, processes or hierarchies.
Select Grid view to view all your slides at once as thumbnails. This helps you easily reorder or change formats of multiple slides.
Tailor presentations to different audiences with the Skip slide feature. You can now choose to skip select slides without fully deleting them when you present from your phone or laptop.
Try these feature upgrades and create better presentations.
Try new add-ons, shape up your Slides
We’re constantly improving Slides to provide you with robust tools to share ideas. Today, we’re bringing add-ons to Slides. To kick it off, we’re introducing seven integrations—designed to bring expertise from companies like Adobe and Shutterstock—right in Slides.
Use these new, rich integrations to help you build more powerful presentations, whether you want to add full-bleed images, use advanced image editing tools or include diagrams you created in programs outside of G Suite.
Search for and add images from Adobe Stock, right in Slides. You can use the Adobe Stock add-on to build visually-stunning presentations in Slides. Teams can seamlessly search, preview and purchase Adobe Stock images—without leaving Slides. Through the add-on, teams can also use Adobe Stock Visual Search to find relevant stock images with an uploaded image (versus a text search).
Use the Shutterstock Editor add-on to add and customize photos within Slides. With the Shutterstock add-on, teams can browse Shutterstock’s entire library of royalty-free images, and sign into Shutterstock to license content, directly in Slides. Select an image, then apply customization options like filters, text, logos and more.
Teams can benefit from even more powerful capabilities in Slides with additional add-ons from Balsamiq, Lucidchart, Pear Deck, Noun Project and Unsplash. Tap “Add-ons” in the Slides menu bar to get started.
Customize Slides, automate workflows with Apps Script
Apps Script, the same technology that powers add-ons, can transform the way you work. Apps Script for Slides lets your teams programmatically create and modify Slides, and customize the menus, dialog boxes and sidebars in the user interface.
So, what’s the big deal? Apps Script provides amazing possibilities for improving your team’s workflows. Sales teams can use Apps Script to automatically pull in information from Sheets’ databases to create customized client pitch decks and templates. Marketing teams can host internal assets in a customized sidebar in Slides for easy access to logos and files they use most often.
To learn more about how you can automate your workflows using Apps Script, check out this post.
Present with confidence using Slides—these updates start rolling out to all customers globally on the web today.
Present like a pro: these new updates in Slides are designed to make you look good published first on http://ift.tt/2uQVASU
0 notes
Text
PicsVideo PRO APK
Create Awesome Slideshow Video Stories by mixing your Photos & Music with PicsVideo! Be your own master and create the videos just the say you want them to be – PERFECT! The best app to create Video Slideshow with your photos.
It’s very easy to create slideshows: Select Photos. Add Music. You are done! Your video moments are ready. Share your creations with the world!
Features: ➜ Multiple Photo selections from your photo gallery, camera roll ➜ Sort , rearrange – deselect, reorder, delete your photos ➜ Create another copy of your photos. You can edit them further. ➜ Fit your photos in a square or keep the original image – choice is yours. Incase of original image, fill the rest of the image with a background color of your choice – supports both Portrait and Landscape images. You can apply it on one or all images easily. ➜ Crop your pics & clips to your liking by pinch & zoom. Photos are Instagram ready in Square shape. ➜ Add UNIQUE Style – Add filters to your photos. Select from hand selected filters. Give an edge to your videos with best filters of slideshow maker. ➜ Add PERSONAL Touch – Add Text/Free hand on your pics. Write just a word or a long paragraph on your pics – your choice! ➜ Choose from variety of awesome fonts. Also choice of text colors. Easily adjust the position of your texts on the photos by dragging and dropping the text. You can write one or multiple texts on the pics. ➜ Choose from freehand line width and colors. ➜ UNIQUE One Click Feature – Easily add filters, Text, Free hand to ALL photos, by just One Click! ➜ Fine tune the time duration / length of your stitched video OR easily set to Instagram size (15 seconds) with slideshow maker. ➜ Add Music Soundtrack of your favorite singer album cover to your videos from your music gallery. Choose your favourite part of the song for your music slideshow maker. ➜ Custom option of making music slide show till the end of audio or predefined size for instagram. For eg. the music you have selected is of 5 minutes duration, and you want to create a slideshow movie of 5 minutes till the end of song – you can easily do so by custom settings. You can also use this for creating presentations for your office. ➜ Preview your Movies made by Slideshow maker with music. Play / Pause your Pics Videos to check. You can also edit and make changes, try different transitions for your photostory, Music length and more. ➜ App allows you to go back and make changes so that you use your creativity at best – modify, resize, update, music length etc. ➜ Add Transitions with slideshow maker. Choose from a variety of transition styles like fade in fade out, left to right, right to left, circle animation and lot more transition to create best picture stories. ➜ Easy selection of photos from various folders for your slide shows. Recent pictures are shown on top in a folder for convenience. ➜ Saving of Video Slide show in PicsVideo folder for easy access
Share with anyone & post your movie Slide show on Instagram, to Facebook friends, Youtube, twitter, wechat, vine, email and many more. Increase your followers on Instagram. Be a movie picture director. Make your Photostory stand out. You will definitely fall in love with the app!
Get on the fun! Download PicsVideo Maker and start enjoying today! It’s FREE. Easy, fast and perfect. Best Slideshow movie maker app for creating videos with pictures & music.
Get a chance to be featured on #picsvideo hashtag account. Use #picsvideo hashtag while posting to Instagram.
Screenshots:
This slideshow requires JavaScript.
PicsVideo PRO APK Free Download
PicsVideo PhotoMusic Slideshow PRO v1.41 | Mirror
PicsVideo PhotoMusic Slideshow PRO v1.41 [Latest] PicsVideo PRO APK Create Awesome Slideshow Video Stories by mixing your Photos & Music with PicsVideo! Be your own master and create the videos just the say you want them to be – PERFECT!
0 notes
Text
Grand Photo WordPress Theme Intro
Grand Photo, Photography Creative Portfolio website is responsive, clean and a little WordPress-themed. Created with the latest WordPress technology. Grand Photography supports sensitive layout, so it looks great on all devices. Many features specially built for pre-defined styles and templates and for the photographer, creative designer, design agency can be taken with a single click.
#gallery-0-5 { margin: auto; } #gallery-0-5 .gallery-item { float: left; margin-top: 10px; text-align: center; width: 33%; } #gallery-0-5 img { border: 2px solid #cfcfcf; } #gallery-0-5 .gallery-caption { margin-left: 0; } /* see gallery_shortcode() in wp-includes/media.php */
Grand Features
Make your website uniquely
80+ predesign templates for photo gallery & portfolio. As uniquely showing your works are very crucial, we focus on creating the various predesign templates of photo gallery & portfolio to match your styles. Moreover, simple steps are required to create with our pre-defined templates and content builder.
The smoothest parallax scrolling ever Tell your stories with our provided smooth parallax scrolling with rendering performance of 60fps
Video Parallax Make your website more attractive from your visitors by video parallax.
Collection Page Group your gallery to show your works easier as example. Your website may have the wedding projects with 2 clients. For each client, prewedding and reception are included. Therefore, you can use collection page to show your wedding project, gallery category shows 2 clients and galleries show each jobs which are prewedding and reception.
Make Money out of your photography
WooCommerce Start selling your photograph and artwork quickly with WooCommerce Plugin
Various Payment OptionsWooCommerce comes bundled with the ability to accept major credit cards, PayPal, BACS (bank transfers), and cash on delivery.
Enhance Coupon OptionsCreate gift certificates, store credit, coupons based on purchases and more.
Shopping CartYou can sell both physical and digital goods in all shapes and sizes, offer product variations, multiple configurations, and instant downloads to shoppers, and even sell affiliate goods from online marketplaces.
Downloadable Products options. The most important option is the file download method:
Redirect only When users download a file, their link redirects to the file.
Force download File downloads are forced, using PHP.
X-Accel-Redirect/X-Sendfil Downloads are handled by the server (nginx/apache). This method requires the X-Accel-Redirect/X-Sendfile module be installed and enabled on the server. Confirm with your web host that one of these modules is installed before using this method for your store.
Direct Purchase link option support for each images Increase your image selling by offering the link of direct purchase for each image to your customers. Customers just click the purchase link of each image they would like to buy.
Present Works to Client Professionally
Customer Protection Theme support password protected gallery, right click protection and image dragging protection to protect your work.
Photo Proofing Not only theme supports password protected gallery but also photo proofing feature. So, you can provide an access to certain gallery and let your customer approve or reject images within gallery easily.
Client’s Galleries with Login Support Theme provides features for photographer to create client pages which display assigned galleries of each client and also support password protected for each client pages
Client Archive Page With theme’s client module, you can assign multiple galleries to each client. You can also create client archive page so it displays all clients on single page. Your clients just a click on their image to login to see their galleries.
Notify photographer Theme will notify photographer via email after your clients finish selecting pictures.
Various Options for getting started
Uniquely show your works & photographs using a variety of gallery and portfolio layouts or built-in content builder.
70+ predesign template for photo gallery & portfolio Photography focuses on gallery & portfolio modules to let you show your works uniquely and require simple steps to create with our pre-defined templates and content builder.
Gallery Gallery is the great way to show groups of pictures on your website and you can easily upload multiple images into gallery.
Portfolio Portfolio is for displaying your works on your website including text, image and video (Youtube, Vimeo, Self-Hosted Video and Custom link)
Awesome 24 Predefined Demos Get your website working in short time with our pre-defined 24 demos covering light and dark scheme.
Only One Click for Importing Demo Contents Quickly and easily import our demo contents including pages, posts, sliders, widgets, theme options and other settings with only one click.
9 Predefined Single Portfolio Layouts Display your portfolio professionally and easily by our predefined single portfolio layout.
10 Blog Templates Multiple single blog post layouts are the powerful features to use in different purposes. Post content is flexible to display with images, gallery slider show or with other video source ex. Youtube, Vimeo, and self-hosted video Also, blog post support various content including photo, gallery, video, soundcloud etc.
8 Menu Layouts with 8 menu styles and various customizable options so you can easily create your own menu design.
Other Features
Show Masterpiece Project Easily show your masterpiece projects when hamburger menu (side menu) is opened.
Black & White Pictures Make your black & white pictures in your gallery and change to color one when mouse over with ease in customizer.
Featured Image in Background Easily set featured image in background via checking page template and browsing featured image.
Photo Metadata Easily show the photo metadata including Camera Model, Focal Length, Aperture, ISO, and Shutter Speed.
Multiple images upload. This theme has advanced gallery editor which support bulks images uploader and drag&drop reorder
One Page Navigation Support Easily create your modern one page parallax site or micro site using drag and drop builder with custom menu system.
Parallax Background Effect This theme easily creates parallax background effect by selecting images and height of parallax image. After finishing setting, background of images in sections will move at a different speed as the rest of the page for impressive visual effect.
Infinite Scroll supports for galleries & portfolios For customers who would like to display a large number of galleries or portfolios, we created a simple solution for you. Now, you can display you gallery & portfolio in columns. Once your visitors scroll down to the end of page. It will automatically load new gallery or portfolio items.
Live Search With visitor focus, we’ve included the instance search to help visitors search for partial queries or provide some interactive feedback. Only one click is required to enable instance search and search form in header of side menu.
Optimization for Google Mobile Compatibility Check Your site’s search by Google will more visible and have better performance for mobile users. Google updated their search algorithm to give preference to websites that are optimized for proper display on mobile/handheld devices.
Search Engine Optimization (SEO) Theme has been built using semantic HTML code and CSS, allowing search engines crawl and index your web page easily.
Google Map Styles Changing Google Maps color scheme easy using styling from snazzymaps.
Sharp Font Icons Font icons are always crystal clear and look perfect on all devices’ screens and sizes. In addition, font icon helps to speed up your load times of your site.
Retina Ready Ensure that your images and elements are sharp and gorgeous on Retina and high resolution displays.
Custom Styles Custom your styles with custom CSS in theme options. Without changing core theme, no worry for upgrading the theme anymore.
Fully Customizable With our flexible framework, this theme is the powerful theme to display awesome and various portfolios and photographs options; for example, full screen image and slide show etc. Not surprisingly, no two versions of theme will ever look the same.
Shortcodes Easily create your own custom page with our Shortcodes. Any elements you like in this theme, you can add on your page.
Style shortcodes ex. dropcap etc
Built-in Many Shortcodes
Built-in Shortcode Generator plugin
Column shortcodes ex. 2, 3, 4, 5 columns
Translation Support Theme is included .mo and .po language files. Moreover, theme is compatible with WPML plugin, allowing you to translate your site to any language or multiple languages.
Custom Sidebars Easily creating your own custom sidebars without touching any code. Moreover, simply set the different sidebars to perfectly match to each page.
Unlimited sidebar Create and select sidebar for each of your page.
Amazing Builder
Intuitive Live Content Builder Keynote app-like interface with live preview so anyone can create beautiful page easily. This Content Builder includes both Live Mode and Classic Mode. For Live Mode, you can see the results of change instantly. But if you familiar with our builder, you can work with Classic Mode to develop faster.
Easy to Use Keynote-like interface Intuitive content builder with keynote app-like interface. Clear overview content inspector and preview changes instantly.
Add & Manage Contents Visually Instead of showing icon, when you select contents to add to page, it display screenshot of content visually.
Responsive Preview See and Work with responsive layout instantly within content builder.
Drag & Drop Content Builder Create your multiple layouts in a single page without touching theme code by dragging and dropping our various pre-defined content modules including portfolio, gallery, blog, testimonials and etc. Let’s try the powerful built-in builder.
Save as Template Portfolio & Page can be saved as template in order to apply to new pages. This saves time to develop new portfolio and page.
Fully integrated with WordPress Customizer Modify Appearance settings in a live preview. No matter what you change elements colors, background, typography, layout type, text or images, you will see the results instantly. Test drive
Develop your website to be responsive easily. Just only one click in Live Customizer to show the results in responsive view including on laptops, tablet or mobile phone.
Image Options Right Click and Image Dragging Protection can easily enable only one click.
Styled Typography in Live Preview Over 500+ Google Fonts are included with all styles and Font changes will be shown in live preview via Customizer. You can change font size, style, color using without touching code.
Easily set different typography of Main Content Font Family, Main Content Font Size, H1-H6 Font Family, H1-H6 Font Weight, H1-H6 Font Spacing, and H1-H6 Font Size.
Simply change Button Font Family.
Also, simply set dissimilar typography of Menu Font Family, Menu Font Size, Menu Padding, Menu Font Weight, Menu Font Spacing, and Menu Font Text Transform.
Also, easily set SubMenu Font Size, SubMenu Font Weight, SubMenu Font Spacing, and SubMenu Text Transform (None, Uppercase, Lowercase, and Capitalize).
Simply change Side Menu Font Family, Side Menu Font Size, Side Menu Font Weight, Side Menu Font Spacing, Side Menu Text Transform (None, Uppercase, Lowercase, and Capitalize).
Moreover, effortlessly change Page Header Padding Top, Page Header Padding Bottom, Page Title Font Size, Page Title Font Weight, Page Title Font Spacing and Page Title Text Transform (None, Uppercase, Lowercase, Capitalize).
In addition, easily change Content Builder Header Font Size and Content Builder Header Text Transform (None, Uppercase, Lowercase, Capitalize).
Furthermore, easily change Page Title Font Size, Page Tagline Font Weight, Page Tagline Font Spacing and Page Tagline Text Transform (None, Uppercase, Lowercase, Capitalize).
Last but not least, easily change Widget Title Font Family, Widget Title Font Size, Widget Title Font Weight, Widget Title Font Spacing and Widget Title Text Transform (None, Uppercase, Lowercase, and Capitalize).
Amazing Backgrounds Easily applying images, patterns and colors in background of your site. Also, various repeat options are available.
Easily set different background of Main Content Background Color, Input and Textarea Background Color, and Button Background Color.
Besides, simply set varying background of Menu Background Color.
Also, effortlessly set Sub Menu Hover State Background Color and Sub Menu Background Color.
Moreover, easily change Top Bar Background Color.
In addition, simply change Side Menu Background Color
Also, easily change Search Input Background Color.
Moreover, effortlessly set Page Header Background Color, and Footer Background Color.
Unlimited Colors Easily control your elements colors of your website using color picker
Simply change dissimilar color of Main Content Background Color, Page Content Font Color, Page Content Link Color, Page Content Hover Link Color, H1-H6 Font Color, and Horizontal Line Color.
Easily set different colors of Input and Textarea Background Color, Input and Textarea Font Color, Input and Textarea Border Color, Input and Textarea Focus State Color, Button Background Color, Button Font Color, and Button Border Color.
Moreover, simply set unlike color of Menu Font Color, Menu Hover State Font Color, Menu Active State Font Color and Menu Bar Border Color
Also, submenu can be set including Sub Menu Font Color, Sub Menu Hover State Font Color, Sub Menu Hover State Background Color, Sub Menu Background Color, and Sub Menu Border Color
Easily change Mega Menu Header Font Color and Mega Menu Border Color.
Top Bar Background Color and Top Bar Menu Font Color can be changed easily.
Also, easily change Side Menu Background Color, Side Menu Font Color, and Side Menu Hover State Font Color.
Effortlessly change Search Input Background Color and Search Input Font Color.
Simply change Page Header Background Color, Page Title Font Color, and Page Tagline Font Color.
Easily change Sidebar Font Color, Sidebar Link Color, Sidebar Hover Link Color and Sidebar Widget Title Font Color.
Easily change Page Footer Background Color, Footer Font Color, Footer Link Color, Footer Hover Link Color, Footer Border Color and Footer Social Icon Color.
Responsive Design With users’ behavior focus, every pages are designed to look great on all devices no matter what devices users are on laptops, tablet or mobile phone. In case, you would like to deactivate responsive feature, only one click is required in your live customizer backend.
Frame Frame can be enable for site layout by only one click. Also, you can choose easily the Frame Color by the color picker.
Boxed & Wide Layout Effortlessly select the boxed and wide layout in live customizer which reflect the result back to you instantly.
Special Pages Easily select file to be page background image for 404 not found page.
Navigation
General
Menu LayoutVarious options to choose your menu layout; for instance, Left Align, Center Align, Center Logo + 2 Menus, Hamburger Menu + Side Menu, Hamburger Menu + Fullscreen Menu, and Left Vertical.
Sticky Menu & Smart Sticky Menu Only one click is required to display main menu fixed when scrolling and to make menu displays when scroll down and hide when scroll up. Moreover, Light & Dark Sticky Menu Color Scheme is available to match your style in your web site.
Typography
Easily change Menu Font Family, Menu Font Size, Menu Padding, Menu Font Weight, Menu Font Spacing, and Menu Font Text Transform.
Colors
Simply change Menu Background, Menu Font Color, Menu Hover State Font Color, Menu Active State Font Color, and Menu Bar Border Color.
Sub Menu Submenu can be set including SubMenu Font Size, SubMenu Font Weight, SubMenu Font Spacing, SubMenu Font Text Transform, Sub Menu Font Color, Sub Menu Hover State Font Color, Sub Menu Hover State Background Color, Sub Menu Background Color, and Sub Menu Border Color.
Mega Menu Theme comes with mega menu support so you can display navigation links into columns which allow you to organize large number of menu items.
Change Mega Menu Header Font Color and Mega Menu Border Color by color picker with ease.
Top Bar
Only one click is required for displaying Top Bar above main menu.
In addition, Top Bar Background Color and Top Bar Menu Font Color can be changed easily.
Contact Info Contact Hours and Contact Phone Number can be set. Moreover, only one click is required for opening Top Bar Social Icons link in new window.
Side Menu
Only one click is required to enable Side Menu on Desktop, to display search form in header of side menu, to display search result instantly while typing, and to display galleries when side menu is opened.
Also, effortlessly change Side Menu Font Family, Side Menu Font Size, Side Menu Font Weight, Side Menu Font Text Transform (None, Uppercase, Lowercase, Capitalize), and Side Menu Font Spacing.
Easily change Side Menu Background Color, Side Menu Font Color and Side Menu Hover State Font Color, Search Input Background Color, and Search Input Font Color by color picker
Effortlessly filter galleries by selected gallery category when side menu is opened and also select number of galleries displayed when side menu is opened.
Header
Background
Effortlessly change Page Title Background Image Height in percentage.
Only one click is required to enable add Parallax Effect to header background image when scrolling pass it.
Easily change Page Header Background Color by color picker.
Page Title
Effortlessly change Page Header Padding Top, Page Header Padding Bottom, Page Title Font Size, Page Title Font Weight, Page Title Font Spacing and Page Title Text Transform (None, Uppercase, Lowercase, Capitalize)
Easily change Page Title Font Color by color picker.
Content Builder Header
Easily change Content Builder Header Font Size and Content Builder Header Text Transform (None, Uppercase, Lowercase, Capitalize).
Page Tagline & Sub Title
Easily change Page Tagline Font Color by color picker.
In addition, easily change Page Title Font Size, Page Tagline Font Weight, Page Tagline Font Spacing and Page Tagline Text Transform (None, Uppercase, Lowercase, Capitalize).
Sidebar
General
Only one click is required to display sidebar fixed when scrolling.
Typography
Easily change Widget Title Font Family, Widget Title Font Size, Widget Title Font Weight, Widget Title Font Spacing and Widget Title Text Transform (None, Uppercase, Lowercase, Capitalize).
Color
Easily change Sidebar Font Color, Sidebar Link Color, Sidebar Hover Link Color and Sidebar Widget Title Font Color by color picker.
Footer
General
Easily set Footer Sidebar Columns to Hide Footer Sidebar or 1-4 columns.
Only one click is required to set the option to open footer social icons link in new window.
Colors
Easily change Footer Background, Footer Font Color, Footer Link Color, Footer Hover Link Color, Footer Border Color and Footer Social Icon Color by color picker.
Copyright
Easily enter your Copyright Text and also select Copyright Right Area Content (Social Icons, Footer Menu).
Only one click is required to enable go to top button at the bottom of page when scrolling.
Gallery
General
Easily sort gallery images by selecting the various options; for instance, by drag&drop, by newest, by oldest, by random and by title.
Sharing Buttons Only one click is required to display sharing buttons on single gallery page content.
Gallery images in columns layout black & white Only one click is required to make gallery images in columns layout black & white and change to color one when mouse over.
Next and previous galleries Only one click is required to display next and previous galleries on Single Gallery Page Content.
Notify Photographer Only one click is required to enable email notification option in photo proofing page.
Effortlessly change the gallery board background by color picker.
Easily display image information for photo proofing pages. You can pick one of these information including WordPress Media ID, File Name and Image Title.
Lightbox
2 color skins of lightbox can be applied for lightbox (White & Black)
Effortlessly adjust lightbox overlay opacity in this customizer.
Only one click is required to display image caption under the image in lightbox mode and to display image lightbox in horizontal gallery template.
Easily align the lightbox thumbnails to be horizontal alignment or vertical alignment, or No Thumbnail.
Archive
Only one click is required to enable slideshow on hover effect when move mouse over gallery thumbnail.
Fullscreen
Autoplay Slideshow Only one click is required to enable fullscreen slideshow when starts playing automatically.
Random Slideshow Only one click is required to enable fullscreen slideshow the display image randomly.
Display slideshow image Only one click is required to enable the display of slideshow image caption.
Display Image Proportion Size Only one click is required to enable the display of slide image proportion size without covering screen.
Display Slideshow Arrows Only one click is required to enable the display slide navigation arrows.
Make Menu Transparent Only one click is required to make menu transparent for fullscreen slideshow.
Display Photo Information Bar Only one click is required to display photo information bar for fullscreen slideshow.
Slideshow Timer Easily adjust the number of seconds for fullscreen slideshow timer.
Slideshow Transition Timer the number of milliseconds for transition between each image.
Slideshow Transition Effect Effortlessly select transition type for contents in fullscreen slideshow.
Kenburns
Kenburns Slideshow Timer Easily adjust the number of seconds for Kenburns Slideshow timer
Kenburns Zoom Level Easily adjust zoom level for Kenburns sideshow
Kenburns Transition Timer Easily change the number of seconds for transition between each image.
Only one click is required to make menu transparent for kenburns slideshow.
Flow
Only one click is required to enable the displaymirror reflection effect in flow gallery and linking flow gallery to full size image in lightbox mode.
Pagination
Easily select number of photos displaying initially for 1-5 column(s) layout gallery pages.
Effortlessly change the number of photos displaying initially for justified layout gallery pages.
Only one click is required to enable infinite scroll for gallery pages.
Portfolio
Filterable
Only one click is required to enable filterable feature in portfolio page and also linking filterable to its page.
Easily adjust the sorting of Portfolio Filterable Options by name, slug, ID, Number of Portfolio.
Pagination
Easily select number of photos displaying initially for 2-5 columns layout portfolio pages
Only one click is required to enable infinite scroll for portfolio pages.
Single Portfolio Page
Only one click is required to enable the display next and previous portfolios in single portfolio page and the display recent portfolios in single portfolio page.
Easily adjust the number of portfolios displaying in recent portfolios section and also enter your portfolio page URL so it displays portfolio page link in recent portfolio module.
Blog
General
Only one click is required to enable the display post full content in blog page (excerpt blog grid layout).
Easily adjust the page layout for displaying archive page, category page and tag page (Grid, Grid + Right Sidebar, Grid + Left Sidebar, Right Sidebar, Left Sidebar and full width.
Easily change post category link font color by color picker.
Slider
Only one click is required to enable the display slider in blog pages.
Easily adjust the layout for slider posts (Full width, 3 columns), the post category filter for slider posts and slider post items.
Promo Links
Easily enter title for this promo box’s title, URL for this promo box’s link for promo link 1-4.
Effortlessly select image for this promo box’s background for promo link 1-4.
Single Post
Only one click is required to enable the display featured image as post header background, the display featured content (image or gallery) in single post page, the display post tags on single post page, the display about author on single post page, the display related posts on single post page, and the display sharing buttons on single post page content.
Shop
Layout
Easily adjust page layout for displaying shop’s products page (Fullwidth, with sidebar) and also the number of product items you want to display per page.
Single Product
Easily change the product price font color by color picker.
Only one click is required to display related products on single product page.
Menus Easily design your own with 24 pre-defined options. Also, rearrange elements of the headers sections, change position of logo, change colors, and apply image, social icons, taglines & secondary top menus.
Menu Locations
Theme supports 5 menus including Primary Menu, Secondary Menu, Top Bar Menu, Side (Mobile) Menu and Footer Menu. You can select which menu appears in each location and you can also place menus in widget areas with the custom menu widget.
Easily order submenus by drag&drop as following menu.
Features Menu
Main Menu
One Page Menu
Side Mobile Menu
Top Menu
Widgets We provided a variety of custom widgets to make your life easier including Custom About Me, Custom Category Posts, Custom Flickr, Custom Instagram, Custom Map, Custom Menu, Custom Popular Posts, Custom Recent Posts, Custom Social Profiles, and Custom Twitter. Just drag and drop custom widgets to activate and configure in any sidebars you build.
Static Front Page
Easily select the options of the Front page to display your latest posts or a static page and also apply the front page and posts page to specific page.
Awesome Page/Post Options
Page options is in menu with the Theme Options. Page options is for configuring the value for individual page or post which affect the page or post you set them on. These will override theme options which allows you to have a unique page or post outside of your global settings. This various options work together to allow you to build incredible websites.
Post Options
Set layout of the single post page including Fullwidth, with left sidebar, and with right sidebar.
Specify featured content type for the post including image, gallery, Youtube Video and Vimeo Video. Different content type will be display on single post page.
Specify Categories including Photography, Lifestyle, Travel and Uncategorized.
Specify multiple tags, featured image, excerpt and shortcode.
Easily manage categories and tags.
Page Options
Only one click to make main menu in transparent and also hide default page header.
Page Tagline is available under page title (HTML code also supports)
Specify page sidebar by selecting provided page template (end with “Sidebar” only)
Customize the page’s menu in case you would like to display main menu other than default one.
Specify parent of the page, template of the page and ordering.
Specify featured image and discussion
Custom Page Templates
Blog Fullwidth
Blog Full + Grid Fullwidth
Blog Full + Grid Left Sidebar
Blog Full + Grid Right Sidebar
Blog Grid
Blog Grid Left Sidebar
Blog Grid Right Sidebar
Blog Left Sidebar
Blog Right Sidebar
Blog Split Screen
Client Archive
Event 2-4 Columns
Gallery Archive 2, 3, 4 Columns Contained
Gallery Archive 2, 3, 4 Columns Wide
Gallery Archive Board
Gallery Archive Fullscreen
Gallery Archive Metro Contained
Gallery Archive Metro Wide
Gallery Archive Parallax
Gallery Archive Fullscreen Split Screen
Gallery
Maintenance
Page Split Screen
Fullscreen Vimeo Video
Fullscreen Youtube Video
Page with Background Image
Page Left Sidebar
Page Right Sidebar
Portfolio 2, 3, 4 Columns Contained Classic
Portfolio 2, 3, 4 Columns Contained
Portfolio 2, 3, 4 Columns Wide Classic
Portfolio 2, 3, 4, 5 Columns Wide
Portfolio Flow
Portfolio Fullscreen Split Screen
Portfolio Fullscreen
Portfolio Horizontal Contained
Portfolio Horizontal
Portfolio Metro Contained
Portfolio Metro Wide
Portfolio Parallax
Portfolio Split Screen Classic
Portfolio Split Screen Wide
Portfolio Split Screen
Portfolio Striped
Custom Gallery Template
Gallery Fullscreen Cover
Gallery Kenburns
Gallery Horizontal
Gallery Horizontal Contained
Gallery Striped Contained
Gallery Striped Wide
Gallery Flow
Gallery Split Screen
Gallery Split Screen Wide
Gallery 1, 2, 3, 4 Columns Contained
Gallery Masonry 2, 3, 4 Columns Contained
Gallery 2, 3, 4, 5 Columns Wide
Gallery Metro Contained
Gallery Metro Wide
Gallery Masonry 2, 3, 4, 5 Columns Wide
Gallery Photo Proofing
Gallery Board Contained
Gallery Board Wide
Gallery Justified Contained
Gallery Justified Wide
Awesome Gallery Options Theme comes with multiple gallery templates layouts for different purposes. You can choose to display full screen slideshow, parallax, flow, masonry, metro and classic gallery columns or even mixes between various gallery layouts.
Unique split screen page Theme supports unique split screen page. The left-hand side can display your photograph as background.
Unlimited Portfolio and Photo Gallery Pages.
Specify the gallery template for the gallery.
Specify password for the gallery.
Upload zip file of your gallery images and this can be downloaded by visitors.
Support Featured image and discussion.
Manage and maintain Gallery Category (Group of Gallery) easily.
Awesome Portfolio Options
Specify content type for the project including Youtube Video, Viemo Video, Image, Self-hosted Video, and External Link.
Disable the featured image as header by only one click.
Specify Youtube or Vimeo Video ID in case you selected Youtube or Vimeo Video.
Specify Portfolio Categories for each portfolio.
Support Featured image and discussion.
Manage and maintain Portfolio Category (Group of Portfolio) easily.
Awesome Blog Options
6 Page Layouts to choose from; Blog Fullwidth, Blog Full + Grid Fullwidth, Blog Full + Grid Left Sidebar, Blog Full + Grid Right Sidebar, Blog Grid, Blog Grid Left Sidebar, Blog Grid Right Sidebar, Blog Left Sidebar, Blog Right Sidebar, Blog Split Screen
All 6 Page layouts can have left or right sidebar or be full width.
3 post types are available including image, gallery, Youtube Video, and Viemo Video.
Post sharing box with social icons.
Threaded Comments.
Author profile page.
Event Create event in your website easily. Just specify Event Date, Begin Time, End Time and Event Location, Event Categories and Parent Event Category.
Add Get Direction on Google Map for customer to go the Event Location easily.
URL where visitor can buy ticket for this event can be specified also.
Support Featured image.
Manage and maintain Event Category (Group of Event) with ease.
Testimonial To gain trust from your customer, testimonials are very important. This theme allow you to specify Customer Name, Customer Position in company, Company Name, Company Website URL and Testimonial Category.
Support Featured image.
Manage and maintain Testimonial Category (Group of Testimonial) easily.
ClientTo manage gallery for your clients in your website, this theme provides password for client page and also features for assigning the galleries for this client.
Support Featured image
Team Member To show your team member, this theme supports lots of social profile information such as Position and Role, Facebook URL, Twitter URL, Google+ URL and Linkedin URL.
Support Featured image
Manage and maintain Team Category (Group of Team) easily.
Pricing Easily show your package/pricing options in your website. Just enable this pricing featured by only one click. Then, specify currency, exact price, price per time, pricing plan features, pricing button text and also button URL.
Manage and maintain Pricing Category (Group of Pricing) easily.
Other
Compatible with latest WordPress version.
Built with HTML5 and CSS3.
jQuery Enhancements.
Javascript files are automatically combined and minified for added performance.
WordPress Multisite (WPMU) Tested and Approved.
SEO Optimized, great SEO base already built-in (compatible with SEO Plugins like Yoast).
Well organized, commented & clean code.
100% Responsive Theme – and you can easily turn it on or off.
Automatic Theme Updater.
Social Icons and Theme Icons are Font Icons, no Images.
CSS3 animations enable or disable on desktop/mobile.
CSS and javascript compression support.
CSS3 Animations CSS3 animations help to attract the attention of your visitors towards your content by setting type, direction and speed of elements.
Child Theme support for advanced customization which is not affected by theme future update.
Developed with WordPress best practices.
Customer Support
Once you purchase, you can use our advanced support ticket system to receive professional support that we provided experienced and dedicated support team to ensure you always have the help you and your business needs, right when it needs it most.
The most extensive online & offline documentation are included.
Free Theme Updates – We are endeavoring to improve the quality of our themes by adding new features and removing bugs.
Customer feedback are always welcomed for new features.
Integration & Plugin
Social Media Profiles Support Social Media will help you to promote your online brand, therefore, theme provided the social media channels including.
facebook
Twitter
Google Plus
Flickr
Youtube
Vimeo
Tumblr
Dribbble
Linkedin
Pinterest
Instagram
Behance
500px
Photo Stream Theme provided the channel to display photo stream before footer area including
Instagram Photostream
Flickr Photostream
Compatible Plugins
WooCommerce Plugin support for shopping cart feature.
Easily create and maintain your online shop with WooCommerce integration.
Plugin is ready designed to assort with the theme.
Display your products based on category, ID or SKU.
Custom featured product slider to display your products.
Flexible setting your shop layout with full width or sidebar template.
This plugin works great for photography, artwork shop and etc.
Premium Plugins Included ($34 Value) The 2 most popular slider plugin ($34 FREE) Revolution Slider and iLightbox WordPress plugins are included in theme. Image Lightbox support gesture on touch screen devices.
WPML Plugin Compatibility, allowing you to translate your site to any language or multiple languages.
Contact Form 7 compatible with full design integration.
Apply Google Maps above contact page form.
Custom Google Map Styling.
Change custom sizes of your map.
Set sidebar or full width of your contact page.
MAILCHIMP for newsletter.
W3 Total Cache plugin support.
Yoast SEO plugin support.
WP Supercache plugin support.
Grand Photo Theme By ThemeGoods ThemeForest Author Grand Photo WordPress Theme Intro Grand Photo, Photography Creative Portfolio website is responsive, clean and a little WordPress-themed.
#agency#Business#clean#creative#fullscreen#gallery#One Page#Parallax#personal blog#photo#photographer#Photography#photography theme#Portfolio#responsive
0 notes