#SSHKeys
Explore tagged Tumblr posts
Visit Tumblr Blog
Explore Tumblr blogs with no restrictions, modern design and the best experience.
Last Seen Tumblr Blogs


Fun Fact
Tumblr has been banned in Indonesia for providing people with access to pornographic content.
Text
2 notes
·
View notes
Link
0 notes
Link
Foxpass in providing enterprise-level security to all type of organization to get rid of security breaches & unauthorized access by third parties. We provide various protocols, tools & software for the removal of all kind of unwanted access your business is facing. Foxpass provide services of SSH Keys, LDAP, 802.1x Wi-fi Authentication, Radius Server, Role Based Access Control, and Radius Authentication.
0 notes
Text
Create ssh key
ssh-keygen -t rsa
0 notes
Photo

Install and secure SSH server in Linux
0 notes
Quote
ssh経由でrsyncを利用する際に、ssh鍵認証かつsshポート22以外に接続する方法。 コマンド rsync -avz -e "ssh -p SSHポート番号 -i SSH秘密鍵ファイルパス" 送信元 username@hostname:~/dest/ 例) rsync -avz -e "ssh -p 2345 -i /c/sshkey/id_rsa" /c/develop/src/ [email protected]:~/dest/
rsyncで公開鍵を指定してデータ転送する方法 - yoshiyoshi-1413’s blog
5 notes
·
View notes
Text
Bandit
Level 13 → Level 14
The password for the next level is stored in /etc/bandit_pass/bandit14 and can only be read by user bandit14. For this level, you don’t get the next password, but you get a private SSH key that can be used to log into the next level. Note:localhost is a hostname that refers to the machine you are working on

connect the ssh server using sshkey will lead me to next level
Level 14 → Level 15
The password for the next level can be retrieved by submitting the password of the current level to port 30000 on localhost.

Telnet can help you to establish TCP/IP connection between you and the server
Level 15 → Level 16
The password for the next level can be retrieved by submitting the password of the current level to port 30001 on localhost using SSL encryption.
Helpful note: Getting “HEARTBEATING” and “Read R BLOCK”? Use -ign_eof and read the “CONNECTED COMMANDS” section in the manpage. Next to ‘R’ and ‘Q’, the ‘B’ command also works in this version of that command…
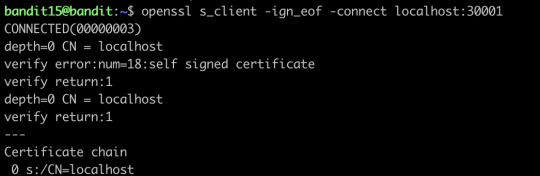
openssl will help you connect the server using SSL protocol
Level 16 → Level 17
The credentials for the next level can be retrieved by submitting the password of the current level to a port on localhost in the range 31000 to 32000. First find out which of these ports have a server listening on them. Then find out which of those speak SSL and which don’t. There is only 1 server that will give the next credentials, the others will simply send back to you whatever you send to it.
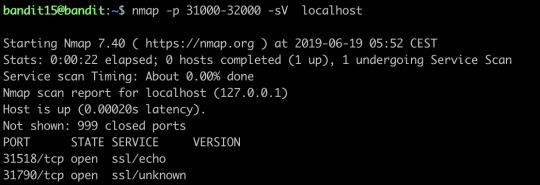
nmap can help you find out the open ports and their services on the internet, we can see we have found two open ports, and let’s try to connect the first one:


It only offers echo service, let’s try the second port:

This time it gives out the ssh key, we save it and then go to the next level
Level 17 → Level 18
There are 2 files in the homedirectory: passwords.old and passwords.new. The password for the next level is in passwords.new and is the only line that has been changed between passwords.old and passwords.newNOTE: if you have solved this level and see ‘Byebye!’ when trying to log into bandit18, this is related to the next level, bandit19

diff can show the differences between the textfiles
Level 18→ Level 19
The password for the next level is stored in a file readme in the homedirectory. Unfortunately, someone has modified .bashrc to log you out when you log in with SSH.

Though I can’t log in properly, I still can visit the file directly and get the password for the next level
Level 19 → Level 20
To gain access to the next level, you should use the setuid binary in the homedirectory. Execute it without arguments to find out how to use it. The password for this level can be found in the usual place (/etc/bandit_pass), after you have used the setuid binary.
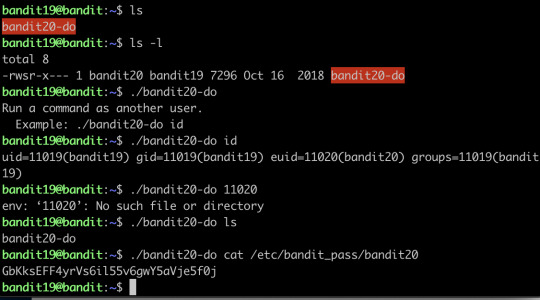
This program basically fakes you like another user, and you just use it to cat the password to the terminal directly
Level 20 → Level 21
There is a setuid binary in the homedirectory that does the following: it makes a connection to localhost on the port you specify as a commandline argument. It then reads a line of text from the connection and compares it to the password in the previous level (bandit20). If the password is correct, it will transmit the password for the next level (bandit21).
NOTE: Try connecting to your own network daemon to see if it works as you think

What you need to do is basically setting up a client and server, where nc here is actually a client sending the message, and the binary setuid here act as a server to listen to a specific code and return the password.
Level 21 → Level 22
A program is running automatically at regular intervals from cron, the time-based job scheduler. Look in /etc/cron.d/ for the configuration and see what command is being executed.

What you need to do is actually investigating what do the shells do, then you find that the shells are exporting the password to a file somewhere.
Level 22 → Level 23
A program is running automatically at regular intervals from cron, the time-based job scheduler. Look in /etc/cron.d/ for the configuration and see what command is being executed.
NOTE: Looking at shell scripts written by other people is a very useful skill. The script for this level is intentionally made easy to read. If you are having problems understanding what it does, try executing it to see the debug information it prints.
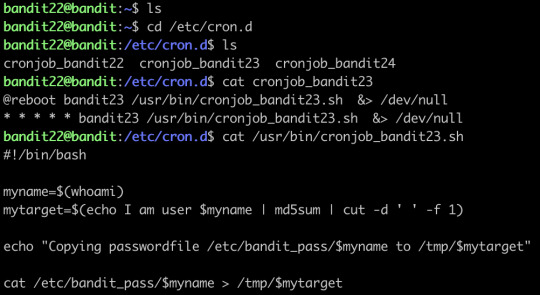
Find the shell first, an then just run it:

After running it, the password is generated.
Level 23 → Level 24
A program is running automatically at regular intervals from cron, the time-based job scheduler. Look in /etc/cron.d/ for the configuration and see what command is being executed.
NOTE: This level requires you to create your own first shell-script. This is a very big step and you should be proud of yourself when you beat this level!
NOTE 2: Keep in mind that your shell script is removed once executed, so you may want to keep a copy around…
The cron does not seem to run the sh automatically... I’ve waited for a long time and nothing happened, so I skipped this level
Level 24 → Level 25
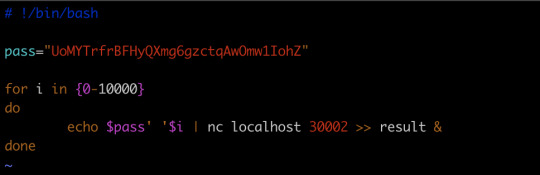
A daemon is listening on port 30002 and will give you the password for bandit25 if given the password for bandit24 and a secret numeric 4-digit pincode. There is no way to retrieve the pincode except by going through all of the 10000 combinations, called brute-forcing.

Let’s make a new directory, and create a shell script
and run the script, we will get the key
Level 25 → Level 26→Level 27(actually)
Logging in to bandit26 from bandit25 should be fairly easy… The shell for user bandit26 is not /bin/bash, but something else. Find out what it is, how it works and how to break out of it.
Honestly, this one I did not find out the solution myself, I stuck at this level for a long time, and finally, I went to google for the solution, the solution is AMAZING! The solution is so creative that I actually shocked, I will go through the solution for you:

When you tried to login, you find the connection is closed immediately. Then I tried to find some information about the shell it this level uses, then I found this:

So basically, the shell will close immediately after it showed all the text...how the hell can you connect to the level 26 and get the password of level 27???
And this is also where I stuck...
And the solution is....
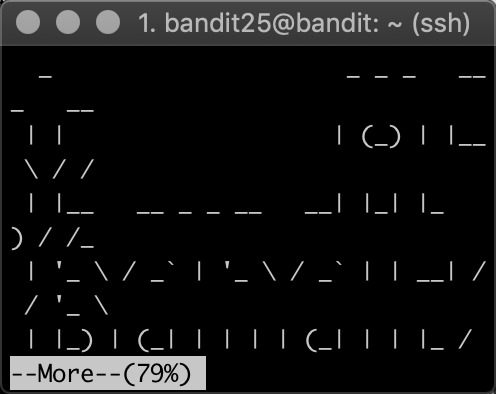
The shell does close immediately after showing all the text, but... what if you can find a way to slow down the procedure of showing all the text?? And yeah!
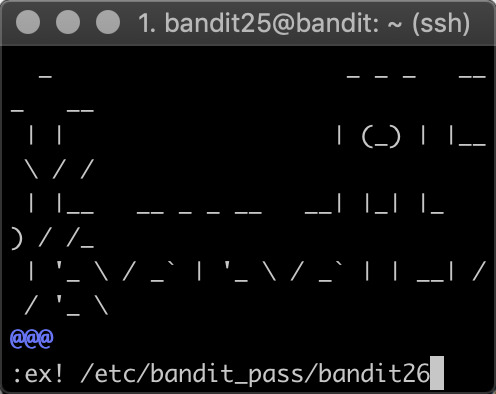
with “more”, you can actually realize this by simply resizing your terminal to a very small size, and now you can let the text show page by page...and as long as your text has not been fully shown on the screen, you still have the connection, and you could enter the edit mode, which is vim, and in the vim, you know you can open other files, and boom, you have the password!
2 notes
·
View notes
Text
[Media] H Y D R A
H Y D R A Hydra is a parallelized login cracker which supports numerous protocols to attack. It is very fast and flexible, and new modules are easy to add. This tool makes it possible for researchers and security consultants to show how easy it would be to gain unauthorized access to a system remotely. It supports: Cisco AAA, Cisco auth, Cisco enable, CVS, FTP, HTTP(S)-FORM-GET, HTTP(S)-FORM-POST, HTTP(S)-GET, HTTP(S)-HEAD, HTTP-Proxy, ICQ, IMAP, IRC, LDAP, MS-SQL, MySQL, NNTP, Oracle Listener, Oracle SID, PC-Anywhere, PC-NFS, POP3, PostgreSQL, RDP, Rexec, Rlogin, Rsh, SIP, SMB(NT), SMTP, SMTP Enum, SNMP v1+v2+v3, SOCKS5, SSH (v1 and v2), SSHKEY, Subversion, Teamspeak (TS2), Telnet, VMware-Auth, VNC and XMPP. https://github.com/vanhauser-thc/thc-hydra A Detailed Guide on Hydra: https://www.hackingarticles.in/a-detailed-guide-on-hydra/ #brute #best

0 notes
Text
New Post has been published on 나만의 세상~!
New Post has been published on https://blog.seabow.pe.kr/?p=8406
kdump with ssh (remote)
vmcore 를 ssh 를 통하여 원격지 서버에 전송하기 ( RHEL, CentOS)
file : /etc/kdump.conf
ssh root@$(remote ip)
sshkey /root/.ssh/id_rsa
# ssh-keygen -t rsa
# ssh-copy-id root@$(remote ip)
아래와 같은 메시지가 발생됨.
/etc/kdump.conf
Rebuilding /boot/initramfs-3.10.0-229.11.1.el7.x86_64kdump.img
The specified dump target needs makedumpfile “-F” option.
mkdumprd: failed to make kdump initrd
core_collector makedumpfile -F -l –message-level 1 -d 31
위와 같이 “-F” 옵션을 추가하면됨.
Link : https://access.redhat.com/solutions/2106681
0 notes
Text
OverTheWire Bandit level 20-end
Level21 told me that cron is the essential command to solve the problem, so I look it up on google, first I use cd /etc/cron.d check what it contains, then I know that is is a script that write the answer of level 21 in time, so I access the temp file and get the code. Level 22, as I learnt from 21, the first thing is to check what does the script say, then, I know that it would get the username and calculate I am user $username mod 5, then I use echo I am user bandit23| md5sum, done. Level 23 is similar with 22, we also should see what did the script does, /var/spool/cron/ store that every user include root and the mission of crontab, so that we should write my own script, I type vim ans.sh and write cat /etc/bandit_pass/bandit24 > /tmp/bandit24pass which can store the code to the temp file, then simply run it and get the code. Level 24 said that I need to use brute-forcing to test all cases, but I do not know how do it, and it seems that I can not write program under this directory, however, I found that I can do it under the tmp, so I write a python program to test all cases :#! /usr/bin/python
from pwn import *
conn = remote('localhost', '30002')
badline = conn.recvline()
for i in range(1000):
tmp = str(i).zfill(4)
print '[+] Trying pincode: ' + str(tmp)
conn.sendline('UoMYTrfrBFHyQXmg6gzctqAwOmw1IohZ ' + tmp)
response = conn.recvline()
print response
if "Wrong" not in response;
print "Got Pincode: " + str(tmp)
response = conn.recvline()
print response
exit(0)
Run it and get the answer. Level 25 I can see a bandit26.sshkey under home directory, it can use the private key to link the remote sever base on previous experience. So I google how to use ssh, and then I type ssh -i bandit26.sshkey bandit26@localhost, it should work but I got a error that the link is shut down by sever, I google again and try ssh -T but also failed. It is wired, then I looked at the shell, I realized that the reason of system shut down the link is because the sell has exit0 at the end, so what should I do is just run it before exit0, that is. before more. So I use e /etc/bandit_pass/bandit26 get the code.Level 26 is pretty similar with previous one, once I try to link it, the system would shut down immediately, base on previous experience, I get in to the more and use vim to run the command, but I can not use e like what did I do in level 25, I do not have enough permission, I try !command and !sh but all failed. Then I google how the vim work, I found that vim has a kind of directory that we need set up the shell first. So I use set shell=/bin/sh set it up and cat /etc/bandit_pass/bandit27. Done. Level 27 the aim is clone, I can not create new file in current directory , so I create the new directory in temp directory, and found that the code is just in the README. Level 28 the clone step is pretty same as level 27, and the instruction already told us that the code is in one of file. So I access the git log check the submit history, recognize by ID get the code. Level 29 I use git show git log and git diff check the git submit history and use git branch -a check the branch, I found there are 4 branches I can use git checkout change the branch, when I change to dev and look the git-log, I found a “data needed for development”, I open the README file get the code. Level 30 I do not really know how git-show works so I check google then I know that got show -ref can print all ID in local repo, done. Level 31 I just need to submit to remote repo, I check git-show git-commit git-add,,then I succeeded. Last level is pretty easy, just use $0 access the terminal and cat the file get code. I lean many commands in unix and many operation in git this stage is. pretty fun.
0 notes
Text
“Enter passphrase for key” - when git asks to login all the time
When you setup a new computer, will get into the situation, that you will proably clone a repo.
But if you want to interact with that repo like git pull origin develop it asks you for your passphrase all the time.
So how to approach this and prevent this? (on MacOS)
Add ssh key to keychain
ssh-add -K ~/.ssh/your-private-key-file
Create config
touch .ssh/config
Add following config file to .ssh/config
Host * UseKeychain yes AddKeysToAgent yes IdentityFile ~/.ssh/id_rsa
0 notes
Text
Bandit Level 26: Complete!
This question involved thinking out of the literal terminal box to get our solution.

It began with an sshkey which I (like one of the previous challenges) attempted to ssh into. Upon doing so I was immediately kicked out. Huh.
I had no idea what to do so I started going through the manual pages for the suggested commands and more was one of them. Here I found that I can type vim in more and from there edit the current file I was on. From vim, I know I can :edit and open files.
So I just needed to trigger more. To do this ( yeah, I had to google help lol) I just shrunk the size of my terminal.

From here I typed this:

Since the bandit passwords have all been stored here and boom.

Note, to get to the next level, while you are editing the bandit26, you have to set your :set shell=/bin/bash then call shell to get into the next level. If you try log in the normal ssh way you get kicked out
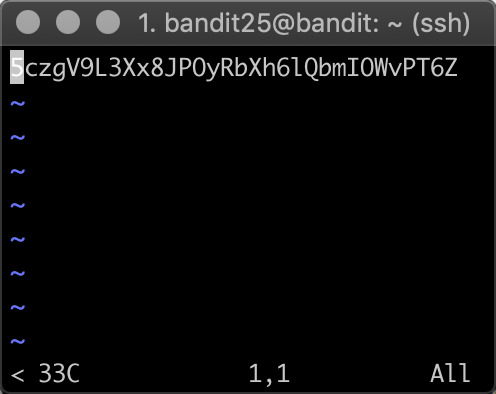
Password: 5czgV9L3Xx8JPOyRbXh6lQbmIOWvPT6Z
0 notes
Text
Red Hat OpenShift 4.1 ghetto setup
I recently reviewed the AWS preview of Red Hat OpenShift 4.0 in this blog post. Now, the time has come to install OpenShift 4.1 on what is called User Provided Infrastructure (UPI). Unlike Installer Provided Infrastructure (IPI), you have to jump through a few hoops to get your environment pristine enough to eventually install OpenShift. This blog post captures some of the undocumented “features” and how you easily can get it rolling in a lab environment to start kicking the tires. By no means should you use these steps to build a production environment, although some hints here might actually help you along the way for a production setup.
Just to be clear, these are the two Red Hat docs I’m following to get a running OpenShift cluster:
Installing OpenShift 4.1 on bare-metal
Adding RHEL compute nodes
Note: If Google landed you here. Please note that this post was written 6/28/19 for OpenShift 4.1. Any references to the OpenShift documentation mentioned below may be completely inaccurate by the time you read this.
Bare or not, that is the question
While I’m installing on KVM virtual machines, I’ve followed the "bare-metal” procedures found in the docs. They are somewhat semantically difference on how you boot the Red Hat CoreOS installer which can be done in multiple ways, either by injecting the ‘append’ line in the machine XML declaration, PXE or simply by manually booting the ISO. I leave this detail up to the discretion of the reader as it’s fairly out-of-scope and unique to everyone's setup.
The upfront DNS and LB requirements
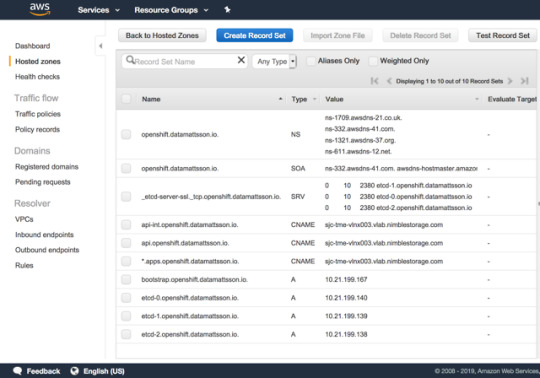
I’m sitting on a lab network where I have zero control over DNS or DHCP. Whatever hostname gets put into the DHCP request gets registered in DNS. Given that OpenShift uses wildcard based DNS for all frontend traffic and the new paradigm of installing require a bunch of SRV and A records to the etcd servers in a dedicated sub-domain, I was faced with a challenge.
Since the network admins (and I’m too lazy) can’t have “marketing” hosting DNS zones in the lab, I have to outsmart them with my laziness. I’m a customer of Route 53 on AWS, said and done, I setup the necessary records in a ‘openshift’ subdomain of datamattsson.io. This way, the lab DNS servers will simply forward the queries to the external domain. Lo and behold, it worked just fine!
The next baffle is that you need to have a load-balancer installed (Update: DNS RR works for test and lab setups too according to this red hatter) upfront before you even start installing the cluster. A self-hosted LB is not an option. I started my quest to try find an LB that is as simple and dumb as I need it to be. Single binary, single config-file dumb. I found this excellent blog post that lists some popular projects in this space.
I went with gobetween.io (Number #10 on the list) as they had me at Hello: "gobetween is free, open-source, modern & minimalistic L4 load balancer and reverse proxy for the Cloud era". The config file is written in TOML, this is the tail section of the config example file the gobetween binary ships with:
# Local config [servers] # ---------- tcp example ----------- # [servers.api] protocol = "tcp" bind = "0.0.0.0:6443" [servers.api.discovery] kind = "static" static_list = [ #"10.21.199.167:6443", "10.21.199.140:6443", "10.21.199.139:6443", "10.21.199.138:6443" ] [servers.mcs] protocol = "tcp" bind = "0.0.0.0:22623" [servers.mcs.discovery] kind = "static" static_list = [ #"10.21.199.167:22623", "10.21.199.140:22623", "10.21.199.139:22623", "10.21.199.138:22623" ] [servers.http] protocol = "tcp" bind = "0.0.0.0:80" [servers.http.discovery] kind = "static" static_list = [ "10.21.199.60:80", "10.21.198.158:80" ] [servers.https] protocol = "tcp" bind = "0.0.0.0:443" [servers.https.discovery] kind = "static" static_list = [ "10.21.199.60:443", "10.21.198.158:443" ]
The first line-item of “api” and “mcs” is commented out as it’s the node required to bootstrap the control-plane nodes, once that step is done, it should be removed from rotation.
Running the LB in the foreground:
gobetween -c config.toml
Do note that GoBetween supports a number of different healthchecks, I opted out to experiment with those, but I would assume in a live scenario, you want to make sure health checks works.
3.. 2.. 1.. Ignition!
OpenShift is no longer installed using Ansible. It has it’s own openshift-install tool to help generate ignition configs. I’m not an expert on this topic what so ever (a caution). I’ve dabbled with matchbox/ignition pre-Red Hat era and it’s safe to say that Red Hat CoreOS is NOT CoreOS. The two have started to diverge and documentation you read on coreos.com doesn’t map 1:1. My only observation on this topic is that Red Hat CoreOS is just means to run OpenShift, that’s it. Just as a FYI, there is a Fedora CoreOS project setup for the inclined to dive deeper.
Initially you need to setup a install-config.yaml and here’s your first pro-tip. The openshift-install program will literally consume it. It validates it and produces the outputs and later deletes it. My advice is to copy this file outside of the install-dir directory structure to easily restart the ordeal from scratch.
This is my example install-config.yaml with the pull secret and ssh key redacted:
apiVersion: v1 baseDomain: datamattsson.io compute: - hyperthreading: Enabled name: worker replicas: 0 controlPlane: hyperthreading: Enabled name: master replicas: 3 metadata: name: openshift networking: clusterNetworks: - cidr: 10.128.0.0/14 hostPrefix: 23 networkType: OpenShiftSDN serviceNetwork: - 172.30.0.0/16 platform: none: {} pullSecret: 'foobar' sshKey: 'foobar'
Hint: Your pull secret is hidden here.
Consume the install-config.yaml file:
$ openshift-install create ignition-configs --dir=.
This is will result in a directory structure like this:
. ├── auth │ ├── kubeadmin-password │ └── kubeconfig ├── bootstrap.ign ├── master.ign ├── metadata.json └── worker.ign
The .ign files are JSON files. Somewhat obscured without line breaks and indentation. Now, my fundamental problem I had when I booted up the bootstrap node and masters on my first lap, all came up with localhost.localdomain as the hostname. If anyone have attempted installing a Kubernetes cluster with identical hostnames, you know it’s going to turn into a salad.
Setting the hostname is quite trivial and a perfectly working example is laid out here. Simply add a “files” entry under .ignition.storage:
"storage": { "files": [ { "filesystem": "root", "path": "/etc/hostname", "mode": 420, "contents": { "source": "data:,tme-lnx2-ocp-e1" } } ] }
Do note that the section where this is stanza is added differs slight from the bootstrap.ign and master.ign files.
Note: I use the nodejs json command (npm install -g json) to humanize JSON files, jq is quite capable too: jq . pull-secret.txt
Potential Issue: I did have an intermittent issue when doing a few iterations that the CNI wouldn’t initialize on the compute nodes. Sometimes a reboot resolved it and sometimes it sat for an hour or so and eventually it would start and the node would become Ready. I filed a support case with Red Hat on this matter. I will update this blog post if I get a resolution back. This is the error message on a node stuck NotReady:
runtime network not ready: NetworkReady=false reason:NetworkPluginNotReady message:Network plugin returns error: cni config uninitialized
Hello World!
At the end of the day, you should have a cluster that resemble this:
$ oc get nodes NAME STATUS ROLES AGE VERSION tme-lnx2-ocp-e1 Ready master 6h19m v1.13.4+9252851b0 tme-lnx3-ocp-e2 Ready master 6h18m v1.13.4+9252851b0 tme-lnx4-ocp-e3 Ready master 6h17m v1.13.4+9252851b0 tme-lnx5-ocp-c1 Ready worker 98m v1.13.4+9b19d73a0 tme-lnx6-ocp-c2 Ready worker 5h4m v1.13.4+9b19d73a0
As Red Hat is switching to a Operator model, all cluster services may now be listed as such:
$ oc get clusteroperators NAME VERSION AVAILABLE PROGRESSING DEGRADED SINCE authentication 4.1.2 True False False 145m cloud-credential 4.1.2 True False False 6h19m cluster-autoscaler 4.1.2 True False False 6h19m console 4.1.2 True False False 147m dns 4.1.2 True False False 4h42m image-registry 4.1.2 True False False 172m ingress 4.1.2 True False False 149m kube-apiserver 4.1.2 True False False 6h17m kube-controller-manager 4.1.2 True False False 6h16m kube-scheduler 4.1.2 True False False 6h16m machine-api 4.1.2 True False False 6h19m machine-config 4.1.2 False False True 3h18m marketplace 4.1.2 True False False 6h14m monitoring 4.1.2 True False False 111m network 4.1.2 True True False 6h19m node-tuning 4.1.2 True False False 6h15m openshift-apiserver 4.1.2 True False False 4h42m openshift-controller-manager 4.1.2 True False False 4h42m openshift-samples 4.1.2 True False False 6h operator-lifecycle-manager 4.1.2 True False False 6h18m operator-lifecycle-manager-catalog 4.1.2 True False False 6h18m service-ca 4.1.2 True False False 6h18m service-catalog-apiserver 4.1.2 True False False 6h15m service-catalog-controller-manager 4.1.2 True False False 6h15m storage 4.1.2 True False False 6h15m
The password for the user that got created during install can be found in the auth subdirectory in the install-dir. It lets you login via oc login and also gives you access to the web console. The most obvious URL for the console is, in my case, https://console-openshift-console.apps.openshift.datamattsson.io

Now, let’s deploy some workloads on this Red Hat OpenShift 4.1 Ghetto Setup! Watch this space.
0 notes
Text
Something Awesome - wargame challenges bandit12-26
The challenges are definitely getting harder. The ‘man’ pages are my friends, and so is going through a bit of trial and error. Overall a lot of fun though! My solutions to the problems have been posted below 📽as well as the things I learnt in the challenge
Note: screenshots used as timestamps for each completed level
Note: INDIVIDUAL CHALLENGES NOW HAVE THEIR OWN BLOG but I’ll keep this here for the timestamps
Note: Realised that blogs have their own timestamps so I probably won’t keep screenshotting completed challenges but I’ll leave this up for posterity anyway
Solution to bandit12 (this one was a loooong one):
xxd -r data.txt > datadump file datadump mv datadump datadump.gz && gzip -d datadump.gz file datadump mv datadump datadump.bz2 && bzip2 -d datadump.bz2 file datadump mv datadump datadump.gz && gzip -d datadump.gz file datadump mv datadump datadump.tar && tar -xf datadump.tar ls mv data5.bin data5.tar && tar -xf data5.tar ls file data6.bin mv data6.bin data6.bz2 && bzip2 -d data6.bz2 file data6 mv data6 data6.tar && tar -xf data6.tar ls file data8.bin mv data8.bin data8.gz && gzip -d data8.gz ls file data8 cat data8 file data5.bin
things I learnt: how to use gzip, bzip2 and tar; using the man page to go through flags for these; the fact that ‘tar’ creates a new file (obvious but never really thought about it before) while bzip2 and gzip change the file you give as input.

Solution to bandit13:
ssh -i ./sshkey.private bandit14@localhost
things I learnt: the private key must be saved in a file with specific permissions, private keys are very powerful and can bypass passwords.

Solution to bandit14:
nc localhost 30000 < /etc/bandit_pass/bandit14
things I learnt: how to use nc (netcat), and that nc is used to read from and write to internet connections

Solution to bandit15:
cat /etc/bandit_pass/bandit15 | openssl s_client -ign_eof -connect localhost:30001
things I learnt: uses and meaning of openssl, and how it is used to implement basic cryptography

Solution to bandit16:
nc -zv localhost 31000-32000
cat /etc/bandit_pass/bandit16 | openssl s_client -ign_eof -connect localhost:31790
exit
// save the private rsa key to sshkey_bandit17
chmod 400 sshkey_bandit17
ssh -i sshkey_bandit17 [email protected] -p 2220
things I learnt: using the flags in nc to listen to which ports might be open, and printing those out instead of attempting to connect to them using said flags. Remembering to change the permissions of the key to be able to use it to ssh to level 17

Solution to bandit17:
diff passwords.old passwords.new
things I learnt: related to access to the next level - that you can be force logged off with ssh

Solution to bandit18:
ssh [email protected] -p 2220 cat readme
things I learnt: how to use cat over an ssh connection, and knowing that it is possible to cat a file without ever actually accessing the server (but still needing the password to cat the file)

Solution to bandit19:
ls
./bandit20-do
./bandit20-do cat /etc/bandit_pass/bandit20
things I learnt: It is possible to run a command using permissions different to your own. This challenge also made it obvious that a system with incorrect permissions can be made vulnerable.

Solution to bandit20:
(terminal 1)$ nc -lvp 12345 < /etc/bandit_pass/bandit20
(terminal 2)$ ./suconnect 12345
things I learnt: In this challenge I learnt how to get connections to listen and communicate with each other using nc, and again using the man page to get to know the different nc flags.

Solution to bandit21
cd /etc/cron.d/
ls
cat cronjob_bandit22
cat /usr/bin/cronjob_bandit22.sh
cat /tmp/t7O6lds9S0RqQh9aMcz6ShpAoZKF7fgv
things I learnt: The existence of a time-based job scheduler (cron)

Solution to bandit22:
cd /etc/cron.d/
cat cronjob_bandit23
cat /usr/bin/cronjob_bandit23.sh
echo I am user bandit23 | md5sum | cut -d ' ' -f 1
copy output
cat /tmp/output
things I learnt: Reading shell-scripts is useful even if you don’t have permission to execute the shell or if the script only works for the user it is designed for (ie in this case the script would have sent the password for bandit22 to the file when run from the pov of user bandit22)

Solution to bandit23:
cd /etc/cron.d/
cat cronjob_bandit24
cat /usr/bin/cronjob_bandit24.sh
Here, we see a shell-script which executes and removes every file in its folder (depending on which user is on, each user will have its own folder - including bandit24). Therefore, write shell-script myscript.sh:
#!/bin/bash cat /etc/bandit_pass/bandit24 > /tmp/sectemp/pass
save myscript.sh
chmod 777 myscript.sh
chmod 777 .
cp myscript.sh /var/spool/bandit24
cat pass
things I learnt: This one took me a bit of time to complete because it took me a while to realise that in order for bandit24 to be able to create a file in my /tmp/sectemp directory I had to change the permissions on my directory to be writeable (ie chmod 777 .)

Solution to bandit24:
mkdir /tmp/sectemp
for i in {0000..9999}; do echo $pass $i >> codes; done
sort -k2r codes | nc localhost 30002 | grep -v W
things I learnt: At first I tried to solve the problem by making a shell-script that looked through every solution, however I quickly realised that this solution would take much too long, so I decided to make a file which stored all possible solutions and feed it as input to nc. When the codes were sorted in ascending order the program timed out before it had a chance to find the correct code because the code must have been closer to the end than the start.

Solution to bandit25:
make terminal window as short as possible
ssh -i bandit26.sshkey bandit26@localhost
type yes
type ‘v’ followed by ‘:’
:e /etc/bandit_pass/bandit26
voila! password is in the file
to get the shell (while in vim):
:set shell=/bin/bash
:shell
things I learnt: From the man page - typing the ‘:e [filename]’ in vim will let you examine a new file. While in ‘more’ you are able to open the content on screen in vim and from this can access new files. I also learnt that it is possible to go straight to the shell from vim, and that you can change the shell from within vim. Pretty much I learnt that vim can do a whole bunch of stuff and is actually pretty cool.

Solution to bandit26:
./bandit27-do cat /etc/bandit_pass/bandit27
things I learnt: Finally an easy one!

0 notes
Text
SSH 的 SSHFP record
SSH 的 SSHFP record
很久前看過 SSHFPT record,當時支援度不高就忘記了… 剛剛在 Cloudflare 的這篇「Additional Record Types Available with Cloudflare DNS」看到發現 OpenSSH 很久前就有支援了…
用法是 VerifyHostKeyDNS 這個 option,像是 ssh -o "VerifyHostKeyDNS=yes" -o "StrictHostKeyChecking=yes" hostname 這樣的指令,對於 ~/.ssh/known_hosts 裡沒有的機器,在第一次連線的時候會去查 DNS record,如果沒有查到的話就會中斷。
產生 SSHFP record 的���式則是可以參考「How do I generate SSHFP records?」這篇,也就是直接用 sshkey-gen -r [hostname]
View On WordPress
0 notes