#STL files rendering support
Explore tagged Tumblr posts
Visit Tumblr Blog
Explore Tumblr blogs with no restrictions, modern design and the best experience.
Last Seen Tumblr Blogs


Fun Fact
Tumblr was the first site to host the blog for President Barack Obama in 2011.
Text
Blender for Dental Download: A Comprehensive Guide
What is Blender?
Blender for Dental download Blender is a free and open-source 3D creation suite that supports the entirety of the 3D pipeline, including modeling, rigging, animation, simulation, rendering, compositing, and motion tracking. It is widely used by artists, designers, and engineers across multiple industries.
In the context of dentistry, Blender is being adopted by dental technicians, orthodontists, prosthodontists, and dental laboratories for tasks such as:
Designing crowns, bridges, and dentures
Creating orthodontic appliances
Performing digital wax-ups
Surgical guide planning
Model editing and preparation for 3D printing
Why Use Blender for Dental Applications?
1. Cost-Effective
Traditional dental CAD software can be prohibitively expensive. Blender, being free and open-source, eliminates the financial barrier for small practices and individual technicians.
2. Customizable
Blender’s open-source nature means it can be tailored to specific needs. Plugins and add-ons like "Blender for Dental" streamline and adapt Blender for dental workflows, adding custom tools, workflows, and interface layouts specifically designed for dental modeling and applications.
3. High-Quality Output
With Blender, users can produce detailed, high-resolution 3D models that are ready for 3D printing or digital storage. The software supports STL, OBJ, and other common 3D file formats used in dentistry.
4. Versatile Integration
Blender can be integrated with other digital tools and workflows. For example, it can work in conjunction with intraoral scanners, 3D printers, and slicer software such as CHITUBOX download, offering a complete ecosystem for digital dentistry.
Blender for Dental: Specialized Add-Ons
The standard Blender software is incredibly powerful, but when tailored for dentistry, its capabilities grow exponentially. Several add-ons and plugins have been developed to convert Blender into a specialized dental tool.
Notable Add-ons Include:
Blender for Dental: A commercial add-on that transforms Blender into a full-fledged dental CAD system. It includes features for crown and bridge design, aligners, splints, and model editing.
OrthoFlow: Focuses on orthodontic applications. Offers tools for bracket placement, arch wire simulation, and more.
Dental Shaper: Helps with morphing and sculpting tools for precise anatomical shaping.
Tips for Success with Blender for Dental
Start with Tutorials: Blender has a steeper learning curve, but there are plenty of dental-specific tutorials available.
Practice Regularly: The more time you spend, the more intuitive it becomes.
Join Communities: Facebook groups, Reddit forums, and Discord servers focused on digital dentistry can be very helpful.
Back-Up Work Regularly: Ensure your work is saved frequently, especially when handling complex cases.
Use Cases and Real-World Applications
Dental Labs: Design restorations digitally and reduce turnaround times.
Orthodontic Clinics: Create aligners and retainer designs in-house.
Academic Institutions: Teach dental students digital workflows without expensive software.
Research and Innovation: Use for bio-modelling, simulations, and custom appliance prototyping.
Final Thoughts
Blender for Dental represents a democratization of dental CAD tools. By using open-source software and cost-effective add-ons, dental professionals can now access powerful digital tools that were once restricted to large practices with significant budgets.
Whether you are a dental technician, clinician, or educator, exploring the Blender for Dental download could be a transformative step for your digital dentistry capabilities. Coupled with slicer software like CHITUBOX download, it opens the door to a complete digital workflow from scan to print.
0 notes
Text
How Rhino Has Been Revolutionizing Jewelry 3D Printing

How Rhino is Changing Jewelry 3D Printing
Jewelry 3D printing has undergone a massive transformation in the past decade, and Rhino is at the forefront of this revolution. This powerful software is enabling jewelers to push the boundaries of creativity, efficiency, and precision. Whether you’re a small business or a large jewelry manufacturer, Rhino offers unparalleled features that make designing and printing jewelry easier and more advanced than ever before.
Understanding Rhino 3D Printing
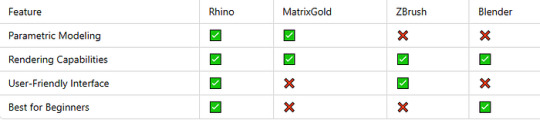
Key Features of Rhino for Jewelry Design
Rhino 3D, also known as Rhinoceros, is a computer-aided design (CAD) software that allows jewelers to create highly detailed 3D models for printing. Some of its standout features include:
Parametric modeling for precise adjustments
Boolean operations for intricate detailing
Advanced rendering for realistic previews
Seamless integration with other jewelry design tools
Why Rhino is Preferred by Jewelry Designers
Many jewelry designers choose Rhino due to its:
User-friendly interface
Wide compatibility with different 3D printers
Cost-effective solutions for both beginners and professionals
Advantages of Using Rhino for Jewelry Design
Precision and Accuracy
Rhino provides jewelers with unmatched precision, ensuring that every detail is captured before the design is sent for 3D printing.
Enhanced Customization Capabilities
With Rhino, jewelers can offer customers fully customized designs, from unique engravings to intricate settings that fit any gemstone shape.
Time and Cost Efficiency
Compared to traditional jewelry-making methods, Rhino significantly reduces production time and costs by eliminating multiple trial-and-error processes.
Comparing Rhino with Other 3D Jewelry Printing Software
Rhino’s Role in Custom Jewelry Manufacturing
Personalized Jewelry Design Trends
The demand for unique, custom-made jewelry is growing, and Rhino provides the perfect platform to cater to this market trend.
Integrating Rhino with Other Tools
Jewelry designers can integrate Rhino with tools like Grasshopper, T-Splines, and KeyShot for a seamless workflow.
Step-by-Step Guide to Creating Jewelry Designs in Rhino
Sketch the initial design
Use Rhino’s modeling tools to create the base shape
Apply intricate details using Boolean operations
Render the model for a realistic preview
Convert the model into a 3D-printable format
Send to a 3D printer for final production
Case Studies of Jewelers Using Rhino Successfully
Small Businesses Leveraging Rhino
Independent jewelers have been using Rhino to create affordable, custom pieces with great precision.
Large-Scale Jewelry Manufacturers
Big brands integrate Rhino into their production lines to enhance efficiency and reduce material waste.
Common Challenges and Solutions in Rhino Jewelry Printing

Future of Rhino in Jewelry 3D Printing
Innovations and AI Integration
AI-powered tools are being integrated with Rhino, making jewelry design even more precise and automated.
Sustainability and Eco-Friendly Printing
New eco-friendly resins and recyclable materials are being introduced for a greener jewelry industry.
FAQs
1. Is Rhino difficult to learn for beginners?
While it has a learning curve, Rhino offers tutorials and community support to help beginners master it.
2. Can I use Rhino for fine jewelry designs?
Yes! Rhino’s advanced modeling tools are perfect for intricate fine jewelry pieces.
3. What file formats does Rhino support for 3D printing?
Rhino supports formats like STL, OBJ, and 3DM, which are compatible with most 3D printers.
4. Does Rhino work on Mac?
Yes, Rhino is available for both Windows and Mac users.
5. Can I use Rhino with a resin 3D printer?
Absolutely! Rhino works well with resin printers, making it ideal for high-detail jewelry designs.
6. How does Rhino compare to other jewelry CAD software?
Rhino offers a balance of affordability, functionality, and ease of use, making it a top choice among jewelry designers.
Final Thoughts on Rhino’s Impact
Rhino has transformed jewelry 3D printing, offering designers an efficient, cost-effective, and precise tool for crafting stunning pieces. Whether you’re a novice jeweler or an experienced designer, Rhino provides the flexibility and features needed to bring your creative visions to life.
0 notes
Text
Production-Ready 3D Files: The Key to Efficient Manufacturing and Design
In today’s fast-paced industries, production-ready 3D files play a crucial role in manufacturing, 3D printing, and digital fabrication. Whether you’re in architecture, product design, jewelry making, or industrial engineering, having precisely designed and optimized 3D files ensures smooth production processes. Platforms like BeeGraphy Market provide high-quality, parametric 3D models that are ready for immediate use in manufacturing and digital workflows.
What Are Production-Ready 3D Files?
A production-ready 3D file is a fully optimized digital model that meets all the necessary requirements for manufacturing, 3D printing, or digital rendering. Unlike standard 3D models, production-ready files are precisely scaled, structurally accurate, and compatible with fabrication methods such as CNC machining, injection molding, and additive manufacturing.
Key Characteristics of Production-Ready 3D Files
✔ Optimized for Manufacturing – Designed with correct tolerances, wall thickness, and structural integrity. ✔ High-Quality Mesh – Free of errors like non-manifold edges, overlapping faces, or holes. ✔ Scalable & Editable – Can be modified to fit different production requirements. ✔ Compatible with Industry Standards – Supports file formats like STL, OBJ, STEP, IGES, and more. ✔ Simulation-Ready – Usable in engineering analysis, stress testing, and prototyping.
Why Use Production-Ready 3D Files?
1. Faster Time to Market
Production-ready files eliminate the need for extensive modifications, allowing businesses to speed up prototyping and manufacturing.
2. Cost Savings
Errors in 3D files can lead to costly rework or failed prints. Using optimized models reduces waste and ensures efficient material usage.
3. Higher Product Accuracy
Precision is essential for machining, injection molding, and 3D printing. Well-prepared parametric models ensure dimensional accuracy and perfect fit.
4. Seamless Integration with Manufacturing Processes
From CNC machining to metal casting, production-ready files work seamlessly across different fabrication methods.
Where to Find High-Quality Production-Ready 3D Files?
BeeGraphy Market is a leading platform offering parametric 3D models optimized for manufacturing, architecture, product design, and more.
Why Choose BeeGraphy Market for Production-Ready 3D Models?
Parametric Customization – Modify dimensions and design elements before downloading.
Diverse Industry Applications – Models for architecture, furniture, engineering, and medical design.
High-Quality Standards – Professionally created files ready for 3D printing and CNC machining.
Multiple File Formats – Compatible with CAD software, slicing tools, and industrial machines.
Instant Download & Secure Transactions – Buy and sell ready-made 3D models with ease.
Industries That Benefit from Production-Ready 3D Files
✔ Manufacturing & Engineering – CNC machining, injection molding, and mechanical part production. ✔ 3D Printing & Prototyping – Rapid iteration of functional prototypes and final products. ✔ Architecture & Construction – Scalable 3D models for buildings, interiors, and urban planning. ✔ Jewelry & Fashion – High-detail designs ready for casting and 3D printing. ✔ Gaming & Animation – Production-ready assets for game development and digital art.
Conclusion
Using production-ready 3D files saves time, cost, and effort, ensuring a smooth transition from digital design to physical production. BeeGraphy Market provides high-quality, customizable parametric models, making it easy for professionals across industries to access ready-to-use 3D files for manufacturing, prototyping, and product development.
0 notes
Text
10 Best Free CAD Software Options for Designers and Engineers
Remains a leader in CAD software, but its premium pricing and complexity often deter individual designers and smaller teams. Free alternatives cater to diverse needs, providing features like 2D drafting, 3D modeling, and collaborative tools without a hefty price tag. Whether you’re a budding engineer or an experienced architect, exploring these options can save costs while maintaining design quality. The growing demand for affordable tools has fueled the development of feature-rich,free CAD software,making high-level design accessible to everyone. These alternatives ensure creative freedom and practical functionality for professionals seeking cost-effective yet powerful solutions.
What Is CAD Software and Why Is It Essential for Designers and Engineers?
Computer-Aided Design free CAD software is a critical tool for designers and engineers, enabling the creation of precise 2D and 3D models for various industries like architecture, manufacturing, and product design. Free CAD options allow professionals and students to access powerful tools without financial barriers, fostering innovation and skill-building. From creating intricate mechanical parts to drafting architectural blueprints, CAD software provides a streamlined, efficient way to bring ideas to life. Understanding the capabilities and benefits of CAD tools can help users make informed decisions when choosing software that aligns with their project needs and skill levels.
Key Features to Look for in Free CAD Software
Choosing the right CAD software involves evaluating essential features that align with your project requirements. Look for tools that support both 2D drafting and 3D modeling, offering flexibility for diverse tasks. Compatibility with file formats like STL, DXF, and DWG ensures seamless collaboration and printing. User-friendly interfaces, tutorials, and community support are crucial for beginners, while advanced features like parametric modeling, rendering, and simulation cater to professionals. Additionally, assess the software's performance on your hardware and its scalability as your skills grow, ensuring long-term usability without compromising productivity.
Top Free CAD Software for Beginners Easy-to-Learn Options
For beginners venturing into CAD, intuitive and accessible software can make all the difference. Programs like TinkerCAD and FreeCAD offer user-friendly interfaces with simplified tools ideal for learning the basics of 3D design and drafting. TinkerCAD’s web-based platform focuses on drag-and-drop simplicity, while FreeCAD introduces more robust parametric modeling capabilities. These options often include tutorials and active communities, helping users overcome the initial learning curve. By starting with beginner-friendly CAD tools, aspiring designers and engineers can gain foundational skills and confidence before transitioning to more advanced software.
Advanced Free CAD Software Tools for Professional Designers and Engineers
Professional designers and engineers require advanced tools capable of handling complex projects with precision. Free software like Blender and Onshape delivers powerful features for 3D modeling, animation, and collaborative design. Blender excels in rendering and simulation, making it ideal for product visualization, while Onshape’s cloud-based platform supports real-time collaboration among team members. These tools often include functionalities such as parametric modeling, finite element analysis, and custom scripting. With robust capabilities comparable to premium CAD programs, these free options empower professionals to tackle demanding projects without incurring software costs.
Best Free CAD Software for 3D Printing Enthusiasts
Free CAD software tailored for 3D printing simplifies the creation of printable designs, making it accessible to hobbyists and professionals alike. Programs like Ultimaker Cura and TinkerCAD offer tools for designing and preparing models for 3D printers. Cura specializes in slicing and optimizing designs for various printer types, while TinkerCAD’s easy-to-use interface is perfect for creating simple, print-ready objects. These programs often include features for adjusting scale, infill, and support structures, ensuring efficient and successful prints. By using these CAD tools, 3D printing enthusiasts can bring their ideas to life with minimal effort and cost.
Free CAD Software for Architectural and Engineering Drafting
Architects and engineers need CAD tools that excel in precision and technical drafting. Free options like LibreCAD and SketchUp Free cater to these needs, offering powerful 2D and 3D drafting capabilities. LibreCAD focuses on creating detailed 2D blueprints, ideal for structural designs and schematics. SketchUp Free, on the other hand, provides a web-based platform with robust 3D modeling tools, perfect for visualizing architectural projects. These programs support essential drafting features like dimensioning, layering, and annotation, enabling professionals to produce high-quality technical drawings without the expense of premium software.
How to Choose the Right Free CAD Software for Your Needs?
Selecting the best free CAD software involves assessing your specific needs, project requirements, and skill level. Beginners may prioritize user-friendly interfaces and learning resources, while professionals seek advanced features like simulation, rendering, and file compatibility. Consider your hardware capabilities, as some programs require powerful systems for optimal performance. Collaboration tools and cloud-based access are valuable for team projects. By understanding the unique strengths and limitations of different CAD options, users can make informed decisions, ensuring their chosen software aligns with their goals and fosters creativity in their design and engineering pursuits.
Conclusion
Choosing the right CAD software can greatly enhance creativity and productivity for designers and engineers. The 10 free CAD software options highlighted here cater to a variety of needs, from beginners exploring 2D drafting to professionals working on intricate 3D models. Whether you're designing for architecture, engineering, or product development, these tools provide robust features without breaking the bank. They not only make complex design tasks accessible but also foster innovation. Explore these options, experiment with their capabilities, and find the one that aligns with your workflow to bring your ideas to life with efficiency and precision.
0 notes
Text
Top Free AutoCAD Alternatives for Budget-Friendly Design and Drafting
Looking for powerful design and drafting tools without breaking the bank? AutoCAD, while a leader in CAD software, can be expensive for individuals and small businesses. Fortunately, several free AutoCAD offer excellent features for budget-conscious designers, architects, and engineers. These tools provide robust functionality for 2D drafting, 3D modeling, and other design needs, making them ideal for students, startups, and hobbyists. Whether you're working on architectural blueprints or mechanical prototypes, these cost-effective solutions help unleash your creativity without the hefty price tag. Explore our top picks for free AutoCAD alternatives and find the perfect fit for your projects.
Blender A Versatile Free Autocad Alternative Tool for 3D Modeling and Rendering
Blender stands out as a powerful, open-source alternative to free autocad alternative, offering a suite of 3D modeling, rendering, and animation tools. While primarily used in artistic fields like animation and game development, Blender’s precision and customizable features make it suitable for architectural visualization and product design. Its active community ensures regular updates and plenty of learning resources. Though its interface may seem daunting at first, users can unlock immense potential with practice. Blender supports cross-platform use and boasts robust performance, making it ideal for those seeking a budget-friendly yet professional-grade tool for creative and technical drafting projects.
LibreCAD A Free Autocad Alternative and Lightweight 2D CAD Solution
LibreCAD is an excellent choice for users focusing on 2D drafting. This open-source software is compatible with Windows, macOS, and Linux, making it highly accessible. It supports DXF file formats, ensuring seamless compatibility with other free autocad alternative tools, including AutoCAD. LibreCAD’s interface is clean and user-friendly, catering to beginners and professionals alike. With features for dimensioning, layer management, and custom snapping tools, it handles basic to moderately complex drafting tasks effectively. Frequent updates by a dedicated developer community ensure stability and ongoing improvements, making LibreCAD a reliable and cost-effective option for engineers, architects, and hobbyists.
SketchUp Free Autocad Alternative Intuitive 3D Modeling in Your Browser
SketchUp Free offers a user-friendly introduction to 3D modeling for hobbyists, students, and professionals. Accessible via a web browser, it eliminates installation hassles, while its intuitive interface makes it easy to create detailed models quickly. SketchUp Free supports exporting projects in popular file formats, ensuring compatibility with other free autocad alternative tools. Ideal for architectural and interior design projects, this free version focuses on core modeling features without overwhelming users with advanced tools. Its robust 3D Warehouse library offers thousands of pre-designed components to streamline workflows, making it a valuable tool for budget-conscious designers.
Free Autocad Alternative Parametric Modeling for Versatile Applications
FreeCAD is a parametric 3D free autocad alternative software perfect for designing real-world objects of any size. Its parametric modeling system allows users to modify designs easily by revisiting the object history and altering parameters. FreeCAD is particularly popular among mechanical engineers, architects, and product designers for its precision and adaptability. It supports various file formats, including STEP, IGES, STL, and more, ensuring compatibility with professional workflows. Despite being open-source, FreeCAD offers advanced features like simulation tools and module extensions, proving its capability as a cost-effective AutoCAD alternative for complex design and drafting projects.
TinkerCAD Simplifying 3D Design for Beginners Free Autocad Alternative
TinkerCAD is a cloud-based tool ideal for beginners exploring 3D design and free autocad alternative drafting. Developed by Autodesk, it provides an accessible platform for creating simple designs, prototypes, and educational models. Its drag-and-drop interface simplifies the design process, making it popular among students and hobbyists. TinkerCAD integrates seamlessly with 3D printers and offers STL file exports for manufacturing purposes. Though limited in advanced features, it serves as an excellent stepping stone for those new to CAD software. With a focus on accessibility, TinkerCAD enables users to master fundamental design skills without any financial investment.
NanoCAD Free Professional-Level CAD Features at Zero Cost Free Autocad Alternative
NanoCAD Free offers a professional-grade drafting experience comparable to free autocad alternative.This Windows-based software includes essential CAD features such as layer management, DWG compatibility, and advanced plotting tools. Its user interface closely resembles AutoCAD, allowing seasoned users to transition effortlessly. nanoCAD Free also supports scripting and automation through LISP, enhancing productivity for repetitive tasks. While the free version omits some premium features, it still provides ample functionality for technical drawing and drafting needs. Perfect for budget-conscious professionals, nanoCAD Free combines robust capabilities with zero cost, making it an excellent choice for individual designers and small teams.
BRL-CAD A Military-Grade Open-Source Modeling System Free Autocad Alternative
BRL-CAD is a sophisticated open-source free autocad alternative tool with a rich history in military applications. Renowned for its solid modeling capabilities, it excels in complex simulations, engineering, and analysis tasks. While its interface is less intuitive than modern CAD software, BRL-CAD compensates with powerful performance and precise modeling tools. It supports various geometric representations, making it suitable for high-precision projects. BRL-CAD's robust documentation and active community help users navigate its features effectively. For those seeking a free alternative with advanced functionalities, BRL-CAD is a compelling choice that demonstrates reliability and efficiency in professional-grade design environments.
Conclusion
Exploring free AutoCAD alternatives opens up a world of possibilities for designers and drafters on a budget. These tools provide robust features for 2D drafting, 3D modeling, and collaboration without the hefty price tag. Whether you're a student, freelancer, or professional, options like FreeCAD, LibreCAD, and TinkerCAD empower you to create precise and innovative designs. Each alternative offers unique capabilities, ensuring you find a solution tailored to your needs. Embracing these budget-friendly tools not only enhances accessibility but also fosters creativity, making high-quality design and drafting achievable for everyone. Start your design journey without breaking the bank today.
0 notes
Text
What to Expect From Affordable CAD Software Solutions?

As you explore the world of affordable CAD software solutions, you’ll likely find yourself wondering what features and functionalities you can expect to get for your budget. You’ll be pleased to know that many of these solutions offer a robust set of tools and capabilities that can help you bring your designs to life. From accurate 2D and 3D modeling to efficient drafting and simulation, and robust collaboration features, you’ll have the essentials covered. But that’s just the beginning - what about the user interface, file compatibility, and performance capabilities? Can these affordable solutions really deliver on their promises, or are there trade-offs to be made?
Core Features and Functionality
When searching for affordable CAD software, you likely prioritize a set of core features and functionalities that meet your design needs. You want a cheap CAD software that can deliver accurate 2D and 3D modeling, efficient drafting, and robust simulation capabilities. You’ll also expect robust collaboration tools, data management, and compatibility with popular file formats like DWG and STL. In addition, you may require advanced features like parametric modeling, surface modeling, and assembly modeling. A good affordable CAD software should also provide real-time rendering, animation, and dynamic simulation to help you visualize and test your designs. By prioritizing these core features, you can confirm that your chosen cheap CAD software meets your design requirements and stays within your budget.
User Interface and Experience
Intuitive control lies at the heart of a seamless design experience, and an affordable CAD software’s user interface plays a critical role in boosting your productivity. You’ll want a user interface that’s easy to navigate, with clear and concise menus, toolbars, and dialog boxes. A well-designed user interface should minimize clutter, allowing you to focus on your design tasks. Look for software that offers customizable workflows, as this will enable you to tailor the interface to your specific needs. Additionally, consider a user interface that provides real-time feedback, such as tooltips and hover-over help, to help you quickly learn the software’s features and functions.
File Compatibility and Sharing

Most CAD projects involve collaboration with others, and that’s where file compatibility and sharing become crucial. You’ll want to guarantee the affordable CAD software you choose can seamlessly share files with stakeholders, regardless of the device or platform they’re using. Look for CAD software that supports popular file formats like DWG, STL, and IGES, as well as cloud-based collaboration tools that enable real-time feedback and commenting. This will save you time and frustration when working with clients, contractors, or team members. Additionally, consider CAD software with built-in file management systems, which can help you track revisions, manage access permissions, and maintain a version history. By prioritizing file compatibility and sharing, you can streamline your workflow and focus on bringing your design vision to life.
Performance and Processing Power
As you streamline your workflow through efficient file compatibility and sharing, you’ll need a CAD software that can keep up with your design demands. You’ll want to guarantee the software can handle complex designs, simulations, and analyses without slowing you down. Look for CAD software that utilizes multi-core processing, taking advantage of your computer’s capabilities to accelerate tasks. A 64-bit architecture will also help process large files and datasets. Additionally, consider the software’s rendering engine, as it directly impacts performance. A well-optimized engine will reduce lag and improve overall responsiveness. By choosing a CAD software that prioritizes performance and processing power, you’ll be able to work efficiently and effectively, meeting project deadlines and staying competitive.
Support and Resources Availability
Several CAD software options boast impressive feature sets, but without reliable support and resources, you may find yourself struggling to overcome hurdles or maximize the software’s potential. When you can buy CAD software, you expect it to come with adequate support and resources. Look for vendors that offer multi-channel support, including phone, email, and live chat. Additionally, check if they provide extensive online resources, such as tutorials, user manuals, and knowledge bases. A thorough support system can substantially reduce downtime and help you get the most out of your CAD software. Verify the vendor’s support team is responsive, knowledgeable, and willing to help you resolve issues promptly.
Conclusion
You’ll get a reliable design experience with affordable CAD software solutions. They’ll provide accurate modeling, efficient drafting, and robust collaboration tools, making it easy to bring your ideas to life. Expect seamless file sharing, intuitive interfaces, and robust performance capabilities. With extensive support resources and multi-channel support options, you’ll have the help you need to overcome any design challenge.
0 notes
Text
SketchUp Software Subscriptions Plans in India - PI Software
If you're new to SketchUp and want to understand how to subscribe to this powerful 3D modeling software in India, you've come to the right place. This guide will take you through the process step-by-step, ensuring you have all the information you need to get started.
Step 1: Understand SketchUp's Subscription Plans
SketchUp offers various subscription plans tailored to different needs. The main plans available are:
SketchUp Free: A web-based version with limited features, suitable for hobbyists.
SketchUp Shop: For personal projects and makers, offering more tools than the free version.
SketchUp Pro: For professional use, with a full suite of tools and features.
SketchUp Studio: Includes advanced tools like Sefaira for energy analysis and other premium features.
When choosing a SketchUp subscription plan, it's important to understand the features and benefits of each option to select the one that best suits your needs. Here’s a detailed breakdown of the available subscription plans:
1. SketchUp Free
Best For: Hobbyists and beginners exploring 3D modeling.
Features:
Web-based application, no installation required.
Basic 3D modeling tools.
Limited cloud storage (Trimble Connect).
Access to the 3D Warehouse for free models.
No commercial use allowed.
Limitations:
No access to advanced tools and features.
Limited file export options (only .SKP files).
Cannot use extensions or plugins.
2. SketchUp Shop
Best For: DIY enthusiasts, woodworkers, and makers who need more functionality than the free version.
Price: Approximately ₹7,000/year (check PI Software for current pricing).
Features:
Web-based application with enhanced capabilities.
Advanced 3D modeling tools compared to SketchUp Free.
Increased cloud storage (Trimble Connect).
Access to the 3D Warehouse.
Export options to various file formats (including .STL and .DWG).
Use for personal projects and small-scale commercial use.
Limitations:
Still web-based, so requires an internet connection.
Limited in comparison to SketchUp Pro and Studio in terms of professional features and tools.
3. SketchUp Pro
Best For: Professionals in architecture, engineering, construction, and other design industries.
Price: Approximately ₹22,000/year (check PI Software for current pricing).
Features:
Desktop application for both Windows and Mac.
Full suite of professional 3D modeling tools.
Advanced drawing and documentation tools (LayOut).
Style Builder for custom edge styles.
High-quality, customizable materials and textures.
Extensive import/export options (including .DWG, .DXF, .STL, .OBJ, and more).
Full access to the Extension Warehouse for plugins.
Use for commercial projects.
Higher cloud storage (Trimble Connect).
Limitations:
Requires installation on your device.
Higher cost compared to Free and Shop versions.
4. SketchUp Studio
Best For: Professionals and studios needing advanced features, particularly for performance analysis and large projects.
Price: Approximately ₹70,000/year (check PI Software for current pricing).
Features:
All features included in SketchUp Pro.
Includes Sefaira for energy analysis and building performance.
Real-time collaboration and model sharing.
Access to advanced rendering tools.
Higher level of technical support and customer service.
Enhanced cloud storage capacity (Trimble Connect).
Ideal for large-scale projects and comprehensive analysis.
Limitations:
Higher cost, suitable for users who need the advanced features.
Requires installation and higher system specifications.
Conclusion
Choosing the right SketchUp subscription plan depends on your specific needs and how you intend to use the software. Here's a quick summary to help you decide:
SketchUp Free: Ideal for casual users and beginners who want to explore 3D modeling without any cost.
SketchUp Shop: Great for hobbyists and makers who need more features than the free version offers.
SketchUp Pro: Perfect for professionals who require a comprehensive set of tools for detailed and complex projects.
SketchUp Studio: Best for advanced users and studios needing performance analysis and premium features.
By understanding the features and limitations of each plan, you can make an informed decision that aligns with your 3D modeling needs.
0 notes
Text
Unveiling The Power Of 3D Printing Design Software

Source – AnkerMake
In the realm of modern manufacturing and creativity, 3D printing has emerged as a transformative technology, enabling the fabrication of intricate objects with unprecedented precision and efficiency. At the heart of this revolution lies 3D printing design software, the digital toolkit that empowers designers, engineers, and enthusiasts to bring their visions to life in three-dimensional form. In this article, we explore the landscape of 3D printing design software, uncovering its capabilities, features, and the creative possibilities it unlocks.
Introduction to 3D Printing Software
Before diving into the intricacies of 3D printing software, it’s essential to understand its fundamental role in the 3D printing process. At its core, 3D printing design software serves as the bridge between the digital realm and the physical world, allowing users to create, modify, and optimize digital models that can be translated into physical objects through additive manufacturing.
From simple geometric shapes to complex assemblies, 3D printing design software accommodates a wide range of design requirements and skill levels, making it accessible to novices and experts alike. Whether you’re a hobbyist experimenting with DIY projects or a professional engineer developing prototypes for a new product, there’s a 3D printing design suite tailored to your needs.
Key Features and Functionality

Intuitive User Interface: A user-friendly interface with intuitive navigation tools and easy-to-understand commands is essential for beginners and experienced users alike.
Modeling Tools: Robust modeling tools for creating and manipulating 3D geometry, including tools for extrusion, lofting, sweeping, and sculpting.
Parametric Design: Parametric modeling capabilities that allow users to define geometric relationships and constraints, enabling rapid iteration and design optimization.
Support for Multiple File Formats: Compatibility with a wide range of file formats, including STL, OBJ, STEP, and IGES, to facilitate seamless collaboration and interoperability with other software applications.
Advanced Rendering and Visualization: High-quality rendering and visualization tools that allow users to create realistic renderings of their designs, helping to communicate ideas and concepts effectively.
Mesh Repair and Analysis: Built-in tools for repairing and analyzing mesh geometry to ensure watertight models suitable for 3D printing without errors or defects.
Integration with 3D Printing Hardware: Integration with 3D printing hardware and slicer software, allowing users to prepare models for printing directly within the design environment.
Popular 3D Printing Software
There is a plethora of 3D printing softwares available in the market, catering to different needs, preferences, and budgets. Some of the most popular 3D printing design software packages include:
Autodesk Fusion 360: A cloud-based CAD/CAM platform that offers a comprehensive set of design tools for mechanical engineering, industrial design, and product development.
Blender: A powerful open-source 3D modeling and animation software suite that is widely used by artists, designers, and animators for creating complex 3D models and visualizations.
SolidWorks: A professional-grade CAD software package known for its robust parametric modeling capabilities and extensive library of design features and tools.
Tinkercad: A beginner-friendly web-based 3D modeling software platform that is ideal for educators, students, and hobbyists looking to learn the basics of 3D design and printing.
Rhino: A versatile 3D modeling software package popular among architects, industrial designers, and jewelry designers for its flexible modeling tools and support for organic shapes.
SketchUp: An intuitive 3D modeling software package that is widely used by architects, interior designers, and hobbyists for creating detailed 3D models of buildings, furniture, and other objects.
Creative Applications and Use Cases

Art and Sculpture: Artists and sculptors are using 3D printing software to create intricate sculptures, installations, and mixed-media artworks that push the boundaries of creativity and expression.
Fashion and Wearable Technology: Designers are leveraging 3D printing software to create bespoke fashion accessories, jewelry, and wearable technology that blend cutting-edge design with functional innovation.
Healthcare and Biomedical Engineering: Researchers and medical professionals are harnessing the power of 3D printing design software to develop customized prosthetics, implants, and surgical guides that improve patient outcomes and quality of life.
Education and STEM Learning: Educators are integrating 3D printing software into STEM curricula to engage students in hands-on learning experiences and foster creativity, problem-solving, and critical thinking skills.
Future Trends and Developments
As technology continues to evolve and new advancements emerge, the landscape of 3D printing design is poised for further innovation and growth. Some of the key trends and developments shaping the future of 3D printing design include:

Cloud-Based Collaboration and Workflow Automation: Cloud-based collaboration tools and workflow automation solutions are streamlining the design process and facilitating real-time collaboration between remote teams, enabling faster iteration and design iteration.
Integration with Augmented Reality and Virtual Reality: Integration with augmented reality (AR) and virtual reality (VR) technologies is enabling designers to visualize and interact with 3D models in immersive virtual environments, enhancing the design review process and enabling more intuitive design exploration.
Moreover, 3D printing design software enables on-demand manufacturing, eliminating the need for costly inventory management and reducing the risk of overproduction and waste. By leveraging digital manufacturing technologies, companies can respond quickly to changing market demands and offer consumers a wider range of options for personalized products.
Conclusion
In conclusion, 3D printing design software is a powerful tool that is driving innovation and creativity across a wide range of industries and disciplines. From mechanical engineering to art and fashion, the capabilities of 3D printing software are virtually limitless, empowering individuals and organizations to bring their ideas to life in ways that were once unimaginable.
As technology continues to advance and new developments emerge, the future of 3D printing design promises to be even more exciting and transformative. Whether you’re a seasoned professional or a novice enthusiast, there has never been a better time to explore the world of 3D printing design and unleash your creativity on the digital frontier.
0 notes
Text
Revolutionizing Product Design with 3DX Designs
Product design and development have undergone a significant transformation with the introduction of 3DX designs. In this blog, we'll discuss how 3D visualization agencies are leveraging this technology to streamline the product development process and bring innovative ideas to life.
The Impact of 3DX Designs on Product Development Traditionally, product designers relied on physical prototypes and 2D drawings to visualize their ideas and communicate with stakeholders. While these methods were effective to some extent, they were often time-consuming, expensive, and limited in scope. With 3DX designs, product designers can now create virtual prototypes that are more accurate, versatile, and cost-effective.
Advantages of 3DX Designs in Product Design
Rapid Prototyping: 3DX designs enable designers to create virtual prototypes quickly and easily, allowing for faster iteration and refinement of design concepts.
Cost Savings: By reducing the need for physical prototypes and minimizing design errors, 3DX designs can help companies save time and money throughout the product development process.
Enhanced Collaboration: 3DX designs facilitate better collaboration between designers, engineers, and other stakeholders by providing a common platform for visualizing and discussing design ideas.
Market Differentiation: High-quality 3DX designs can help companies stand out in the marketplace by showcasing their products in a more compelling and engaging way. This can lead to increased sales and market share.
FAQs About 3DX Designs in Product Design:
How accurate are 3DX designs compared to physical prototypes?
3DX designs can be highly accurate representations of physical objects, especially when created using advanced modeling and rendering techniques. However, it's essential to validate the design through testing and simulation to ensure its real-world viability.
Can 3DX designs be used for prototyping functional components?
Yes, 3DX designs can be used to prototype both aesthetic and functional aspects of a product, including form, fit, and function. Virtual testing and simulation tools can help validate the performance of these components before they are manufactured.
What file formats are used for sharing 3DX designs with manufacturers?
Common file formats for sharing 3DX designs include .obj, .fbx, .stl, and .step. These formats are widely supported by CAD/CAM software used in manufacturing.
How can 3DX designs help companies reduce time-to-market for new products?
By enabling faster iteration, validation, and collaboration, 3DX designs can help companies streamline the product development process and bring new products to market more quickly.
In our next blog, we'll explore how 3DX designs are being used in the gaming and entertainment industry.
0 notes
Link
0 notes
Text
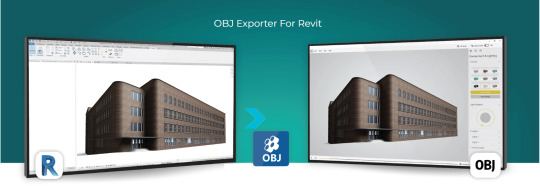
Unlocking Cross-Platform Creativity: The Essential Role of an OBJ Exporter for Revit
Introduction
In the world of architectural design and 3D modeling, Autodesk Revit stands as a powerful software tool that aids architects, engineers, and designers in creating intricate building designs and structures. However, despite its many capabilities, Revit does not natively support the OBJ file format, which is widely used in various industries for 3D visualization, animation, and interoperability. This blog aims to delve into the reasons behind the need for an OBJ exporter for Revit, shedding light on the benefits it brings to the table.
The OBJ File Format: A Brief Overview
The Wavefront OBJ (Object) file format is a widely recognized open standard for storing 3D geometric data, including vertices, normals, textures, and material properties. It was developed by Wavefront Technologies and has since become a staple in industries such as gaming, animation, virtual reality, and 3D printing. OBJ files are easily readable by various software applications, making them an ideal choice for cross-platform collaboration and 3D content exchange.
Revit’s Limitation: Export Formats
While Revit offers a variety of export formats, such as DWG, FBX, and STL, it lacks native support for the OBJ format. This omission poses challenges when professionals need to collaborate with artists, animators, or other software that rely on OBJ files. This is where the importance of an OBJ exporter becomes evident.
Reasons for Needing an OBJ Exporter for Revit
1. Interoperability: OBJ files are widely supported by various 3D modeling, rendering, and animation software. When architects and designers create models in Revit, they often need to collaborate with professionals using different tools. An OBJ exporter bridges the gap by allowing seamless data exchange, preserving the model’s geometry, textures, and material properties.
2. Visualization and Rendering: OBJ files are commonly used for high-quality 3D visualization and photorealistic rendering. By exporting Revit models to OBJ format, architects can leverage specialized rendering software to achieve stunning visuals, realistic lighting, and intricate details that might not be achievable within Revit itself.
3. Animation and Virtual Reality: OBJ files are a preferred choice for creating animations and virtual reality experiences. Architects and designers who want to showcase their designs in interactive environments or walkthroughs can benefit from an OBJ exporter, as it enables the integration of Revit models into animation software or VR platforms.
4. 3D Printing and Rapid Prototyping: OBJ files are also used in the realm of 3D printing and rapid prototyping. Architects and engineers may need to produce physical models of their designs for presentations or client meetings. An OBJ exporter enables the seamless transfer of models from Revit to 3D printing software, ensuring accurate representation during the printing process.
5. Artistic Enhancement: OBJ files offer more flexibility for artistic modifications. Artists and designers can manipulate OBJ files in sculpting or artistic software, adding intricate details, textures, or creative modifications that can enhance the overall design beyond what Revit alone can offer.
6. Preserving Geometry and Textures: OBJ exporters are designed to maintain the integrity of the original model’s geometry, textures, and material assignments during the conversion process. This ensures that the visual fidelity of the model remains intact when imported into other software.
Conclusion
In the rapidly evolving landscape of 3D modeling, architectural design, and digital visualization, the ability to seamlessly exchange data between different software applications is paramount. The absence of native OBJ support in Revit underscores the significance of an OBJ exporter. By enabling architects, engineers, and designers to convert their Revit models into the widely accepted OBJ format, the exporter facilitates collaboration, realistic rendering, animation, virtual reality experiences, 3D printing, and artistic enhancements. This bridging of gaps ultimately empowers professionals to bring their creative visions to life and communicate their ideas effectively across a diverse range of industries.
1 note
·
View note
Text
What 3D Model Formats Does Unity Support?
At our company, we have conducted extensive research and analysis to provide you with a comprehensive guide to the 3D model formats supported by Unity. Unity is a powerful platform widely used for game development and interactive experiences. Understanding the supported file formats is crucial for maximizing Unity’s capabilities and ensuring seamless integration of 3D models into your projects.
Introduction to Unity’s 3D Model Format Support
Unity boasts robust support for a diverse range of 3D model formats. This section will explore these formats, their features, benefits, and common use cases. By familiarizing yourself with these formats, you can make informed decisions when working with Unity.
Supported 3D Model Formats in Unity:
GLTF (GL Transmission Format): GLTF is an efficient format for delivering 3D scenes and models. Unity supports GLTF files, allowing you to import and work with them effortlessly. GLTF offers compact file sizes, making it ideal for web-based applications and real-time rendering.
DWG (AutoCAD Drawing): Unity does not directly support DWG files. However, you can convert DWG files to compatible formats like FBX or OBJ using third-party tools or AutoCAD itself. Once converted, these formats can be easily imported into Unity.
STL (Standard Triangle Language): STL files represent the surface geometry of 3D objects through a collection of triangles. Unity supports STL files, making it convenient for 3D printing applications and working with models that require precise geometric representations.
FBX (Filmbox): FBX is a widely used interchange format for 3D models, animations, and textures. Unity has excellent support for FBX files, preserving animations and materials during the import process. It is the recommended format for seamless integration into Unity.
GLB (GL Transmission Format Binary): GLB files are binary versions of GLTF files, including both the 3D model and its associated textures. Unity supports GLB files, allowing for efficient loading and rendering of 3D scenes. GLB is commonly used for web-based applications and virtual reality experiences.
STEP (Standard for the Exchange of Product Data): STEP files are used primarily in engineering and manufacturing workflows. While Unity does not directly support STEP files, you can convert them to FBX or OBJ formats using specialized software. This enables their import into Unity for visualization or simulation purposes.
OBJ (Wavefront OBJ): OBJ is a widely adopted format for storing 3D geometry, materials, and textures. Unity provides native support for importing OBJ files, making it easy to work with models created in various 3D software applications.
BLEND (Blender): Blender is a popular open-source 3D modeling software that uses its own proprietary format, BLEND. Unity supports importing BLEND files, allowing seamless integration of Blender projects into Unity. This feature facilitates collaborative workflows between artists and developers.
Converting Between 3D Model Formats in Unity
Unity’s flexibility extends beyond supporting various 3D model formats; it also enables easy conversion between formats. Understanding the conversion process is essential for optimizing your workflow and ensuring compatibility across different projects.
Here’s a step-by-step guide on converting between some commonly used 3D model formats:
Converting GLTF to DWG:
To convert GLTF files to DWG format, you can follow these steps:
Export the GLTF file from Unity using the appropriate export functionality or third-party plugins.
Convert the GLTF file to DWG using third-party software or Autodesk’s FBX Converter.
Import the resulting DWG file into your desired CAD software for further editing or use.
Converting STL to GLTF:
To convert STL files to GLTF format within Unity, you can follow these steps:
Import the STL file into Unity using the appropriate import functionality.
Convert the imported STL file to GLTF using third-party plugins or scripts available in the Unity Asset Store.
Once converted, the GLTF file can be used directly within Unity for rendering or exporting to other compatible formats.
Exporting FBX to DAE:
To export FBX files to DAE format for Unity, you can follow these steps:
Open the FBX file in Unity by importing it into your project.
Select the imported FBX file in Unity’s Project window.
From the Inspector window, choose the option to export as DAE.
Save the DAE file to your desired location, and it’s now ready for use in Unity.
Transforming GLB Files to FBX:
To transform GLB files to FBX format in Unity, you can follow these steps:
Import the GLB file into Unity using the import functionality.
Select the imported GLB file in Unity’s Project window.
From the Inspector window, choose the option to export as FBX.
Save the FBX file to the desired location, and it can be used in Unity or other compatible software.
Adapting STEP Files to FBX and OBJ:
To adapt STEP files to FBX and OBJ formats for Unity, you can follow these steps:
Convert the STEP file to FBX using third-party software like Autodesk’s FBX Converter.
Import the FBX file into Unity for further editing or use.
Alternatively, convert the STEP file to OBJ using specialized software or online conversion tools.
Import the resulting OBJ file into Unity, enabling compatibility with the Unity engine.
Importing Blender Files (BLEND) into STL Format for Unity:
To import Blender files (BLEND) into STL format for Unity, you can follow these steps:
Open your Blender file (.blend) in the Blender software.
Export the desired 3D model or scene from Blender as an STL file.
Import the generated STL file into Unity using the import functionality.
The imported STL file can now be utilized within Unity for further development or visualization purposes.
Conclusion
In conclusion, understanding the 3D model formats supported by Unity is vital for optimizing your workflow and ensuring seamless integration of assets into your projects. This article has provided a comprehensive overview of the supported formats, including GLTF, DWG, STL, FBX, GLB, STEP, OBJ, and BLEND. By following the conversion processes outlined above, you can transform and adapt your 3D product visualization to meet the requirements of Unity and create captivating experiences.
Remember, Unity’s flexibility, combined with your creativity and expertise, opens endless possibilities for game development, interactive applications, and immersive simulations. Stay up to date with the latest advancements in 3D model formats and harness the power of Unity to bring your visions to life
Frequently Asked Questions (FAQs):
Q1. Can Unity import other file formats apart from the ones mentioned in this article? A1. Yes, Unity supports additional file formats beyond those covered in this article. However, the formats discussed here represent the most commonly used and recommended options for seamless integration with Unity.
Q2. Are there any limitations when converting 3D models to Unity-supported formats? A2. While the conversion process is generally straightforward, it’s essential to consider factors such as file size, complexity, and compatibility. Large or highly detailed models may require additional optimization or may not be fully compatible with Unity.
Q3. Can I export Unity projects back to the original 3D model formats? A3. Unity primarily focuses on importing 3D model files rather than exporting them. However, you can export Unity scenes to certain file formats for interoperability with other software or game engines.
Q4. Are there any recommended software tools for 3D model conversions? A4. Various software tools are available for converting between different 3D model formats. Some popular options include Autodesk FBX Converter, Blender, and Unity’s built-in import capabilities. Choose the tool that best suits your specific requirements and preferences.
Q5. Does Unity support animations and textures in the converted 3D model files? A5. Yes, Unity supports animations and textures in most of the supported 3D model formats. However, it’s crucial to ensure that the file formats and conversion processes preserve these elements correctly for seamless integration into Unity.
With this comprehensive guide to the 3D model formats supported by Unity, you now have the knowledge and tools to import, convert, and optimize your 3D models effectively. By leveraging Unity’s capabilities and understanding the intricacies of each format, you can unlock new possibilities and create immersive experiences that captivate your audience. So, start exploring and pushing the boundaries of 3D modeling and game development with Unity today!
0 notes
Text
Week 10


During this term, I achieved the key concepts of Sketch design in drawing, technical design and practical renderings. These objectives were completed through the interactive activities presented by the Lecturer and Tutors. Drawing concepts were learned in the early parts of the term with the creation of Accurate Drawings in the first week, then in the second week the designing of a paper presentation case for a calculator using pencil drawing, followed by an AS1100 Drawing of tutorial shape, and finally the drawing of with loose hand of objects with the production of Sketch drawing. The completion of these activities heavily prepared my Drawing within Sketch design with experience of these hand-drawn conceptual activities. The Key concepts of the Technical part of Sketch design, Week 6’s use of photoshop app in designing of 2D Concepts, then in Week eight using 3D max designing of loose objects, culminating in Week 9 with the use of Rhino in part with 3D max and Ultimaker Cura. The relevant use of the technical software in the tutorial activities thoroughly helped me in forming the key concepts of this part of Sketch design with the mastery of techniques of using them. My solidification of the objective of the Practical side of Sketch design, was earnt through Week 7 with the forming of foam designs and later in week 10 in the 3D printing of a finalized design. The formation of Practical designs was important in Sketch design with the proving of ideas in the real space.
The development of drawn Sketches was very easy to complete. They seemed to be simple and helped me further understand a very important part of the design in the Technical development of certain views. The only hard part of the drawings was going over them in pen which seemed harder but solidified the correct performance of the Sketched design. The 3D foam modelling and printing was easy to develop as they shared ideas of Sketch design with IDES1212 (Design studio 1B). What I found difficult was the technical development of Photoshop as the Lectures and Tutors didn’t give enough education on the production of the concepts. Another of these technical difficulties was the creation of 3D altered concepts of 3D Scan on 3ds Max, where I only got a small understanding of the app from a short Microsoft teams video. This Difficulty was further instilled by the problem that my own Scan had a large amount of composite of Scans making it hard to alter.
I enjoyed learning Photoshop tools in Week 6, even though I didn’t have any opportunities to ask any questions. The tools explored in it were very fun to access and produced something beautiful. The Beauty also further supported my understanding of technical drawing on software of explorative concepts. What I didn’t enjoy was the activity in week 2. This task was very hard and didn’t have little to any effect on Sketch design, as I had to draw the calculator in pencil, then in pen in AS1100 form and then use it to draw a box to be built. The box also didn’t have anything to do with Sketch design as you couldn’t see the views properly through the holes. The steep step in difficulty and unimportant value of this task made me not enjoy it.
If I could done the term again, I would’ve put a bit more into the 3D design of the Concepts from the scans. This part was a bit rushed as every time I tried to import my Stl file from my USB, onto my Citrix apps 3D max It started to not respond. This problem also followed to Rhino and even though I downloaded both applications, on MyUNSW my access I couldn’t use them. I finally used the Computers at the Maker-space in the Square House, completing the design. If I had the chance again, I would've gone straight to the computers rather than wasting time. Another part of the 3D design which needed work was the over-scanning of the foam bottle which happened to make concept designs hard edit in 3D max software. In another opportunity, I would’ve done less scans and filled in those parts.
The Key experience related to the concepts I learnt in this term were the development where constant taking of photos, Remembering main parts about the task and to relating development. Taking photos proved that I did the steps in formation of ideas important to Sketching of designs. Remembering the main parts about a task ensured a steady understanding of what was to be Designed through the Sketches. Relating activities to the main term, was something I did poorer than the main task but now know what to do next time.
The Reminding of taking photos by the tutors gave me that insight. Having the ability to access Tumblr allowed me to understand the main parts of the activities. Learning from the Experience of designing different bottles earnt me insights into how I should localize ideas to the Main Sketch inspiration.
2 notes
·
View notes
Text
STL, IFC Files Processing Support & Rendering to Images or PDF Formats using Java
What’s new in this release?
Aspose team is pleased to announce the new release of Aspose.CAD for Java 17.9.0. This is primarily a maintaannce release whereby we have resovled certain issues incurring in API along with support for STL and IFC file formats. This release has improved the API rendering by introducing the support for STL and IFC file formats processing. Now, you can render these formats to images or PDF as per your requirements. For more about supported features, please visit documentation articles, Exporting STL To PNG Format and Exporting IFC Format To PNG. This release also includes important improvements and bug fixes, such as Missing text and blank area rendering issues when DWG is exported to PDF, Missing layers when saving DWG as JPEG, Resolution of DXF to PDF rendering issues, Incorrect image size for DWF, Difference between rendered PDF and Image, ImageException on exporting DWG to PDF, DXF to PDF conversion is producing very small shapes in resultant PDF, Converting DXF to PDF is generating incorrect PDF file (text missing and multiple pages), Support export option which automatically excludes empty layouts, Fix bug with shift of drawing on layouts, Converting DXF to PDF is not producing correct results: Incorrect color and orientation of text. The main new features added in this release are listed below
Support for IFC format
Implement support for STL format
When DXF is converted to PDF, output files has 3 pages instead of 1.
Converting DXF to PDF is splitting image on multiple pages in PDF
Incorrect image size for DWF
Difference between rendered PDF and Image
ImageException on exporting DWG to PDF
Text missing when DWG is exported to PDF
Layer not visible when saving dwg as jpg
DXF to PDF conversion is producing very small shapes in resultant PDF
Blank area when saving dwg as image and pdf
Converting DXF to PDF is generating incorrect PDF file (text missing and multiple pages)
Converting DWG to PDF format is producing incorrect PDF file of empty pages
Support export option which automatically excludes empty layouts
Fix bug with shift of drawing on layouts
Converting DXF to PDF is not producing correct results: Incorrect color and orientation of text
Newly added documentation pages and articles
Some new tips and articles have now been added into Aspose.CAD for Java documentation that may guide users briefly how to use Aspose.CAD for performing different tasks like the followings.
Exporting IFC Format To PNG
Exporting STL To PNG Format
Overview:Aspose.CAD for Java
Aspose.CAD for Java enables developers to convert AutoCAD DWG and DXF files to PDF, JPG, PNG, BMP, TIFF and GIF image formats. It is a native API and does not require AutoCAD or any other software to be installed. Developers can also convert the selected layers and layouts from the AutoCAD files. The conversion to PDF and Raster images is of very high quality. Developers can also remove entities from DWG and DXF documents. It also adds support for leader’s entity for DWG format.
More about Aspose.CAD for Java
Homepage of Aspose.CAD for Java
Download Aspose.CAD for Java
Online documentation Aspose.CAD for Java
#STL files rendering support#Export STL To PNG Format#IFC To PNG Export#saving DWG as JPEG#exporting DWG to PDF#DXF to PDF rendering#Java AutoCAD API#AutoCAD to raster image
0 notes
Photo


I adore @boboeun‘s wonderful Mei sketches (tiny junkrat snail here!) and had to translate it to 3d for my next donation project. Thank you so much!
Make a Mer-Mei of your very own and donate to Hispanic Federation to support ongoing work in Puerto Rico, Guatemala Disaster Relief, the LIFT fund (Latino Immigrant Families Together), or their general fund for their mission to support Hispanic families and strengthen Latino institutions.
Please consider donating! Below the cut is the information from the image. Please don’t hesitate to ask if you have any questions!
Also, if you aren’t interested in a Mer-Mei and want something a bit more Roadhog shaped, I have a similar donation fund with my Hog Demon sculpt.
HOW TO RECEIVE A PERSONALIZED MER-MEI: 1. Fill out a menu (below) and send me an email @ [email protected] 2. Once your request is confirmed, donate $30 at hispanicfederation.org 3. Email your dated receipt for proof of donation
YOU WILL RECEIVE: 1. A colored, fully rendered beauty shot image (.png) of your Mer-Mei 2. 3D file (.STL) of your Mer-Mei, prepared in parts for 3D printing (upon request) 3. 3D file (.ZTL) of your Mer-Mei without cuts/keys (upon request)
TO RECEIVE A PHYSICAL FIGURE: Utilize shapeways.com or 3dhubs.com to print your own figure, OR request a 3D-printed figure in your email. Reimbursement for materials and shipping will be required - cost will vary
*one mer-mei per donation - do not re-distribute or sell. available with donation to hispanic federation only.
MENU:
Ears (Choose One): round / fins Hair (Choose One): bun / ponytail Glasses (Choose One): square / cat-eye Top (Choose One): fluffy / shells Tail Fin (Choose One): fan / split Pelvic Fins (Choose One): small / feathered Color Palette (OPTIONAL, up to 4 colors): color 1 / color 2 / color 3 / color 4
139 notes
·
View notes
Text
Seven Factors To Give Consideration To When Pruchasing Cad Software

Computer-Aided Design software has revolutionized the field of engineering as well as design. If you're an architect mechanical engineer or designer, using the correct software for CAD is essential to making accurate and precise digital designs. There are many options in the marketplace, selecting the right CAD software could be quite a challenge. In this post we'll look at seven important factors to think about when buying CAD software.
1. Compatible File Formats
One of the most important aspects to think about before deciding on cheap software is compatibility with existing systems and file formats. Check that the software is compatible with those file formats you commonly work with, such as DWG, DXF, or STL. Additionally, check if the CAD software can integrate seamlessly with the other design tools or other software that you employ to facilitate collaboration and workflow integration.
2. Functionalities and features
Different software packages for CAD have distinct functions and capabilities. Consider your requirements for the project and what attributes you require. A few of the most crucial features to think about include 3D modeling capabilities, parametric design tools, Simulation and analysis tools as well as rendering capabilities, as well as compatibility with plugins or extensions. Software that offers the tools that you require to meet your design goals must be considered prioritizing.
3. Simple to use and a user-friendly interface
An intuitive and user-friendly interface is crucial to maximize productivity and minimizing any learning. You can evaluate the CAD program's interface by using a trial period or watching videos of tutorials. Look for software that has a clean layout, an easily customizable workspace, and instruments that are easy to work with. This will allow you to be more productive and not have unnecessary hurdles.
4. Customization Options
Software for CAD that permits customization could greatly enhance the workflow. Consider software that permits customization of toolbars, shortcuts, and menus, enabling you to personalize the layout to suit your needs and working style. Scripts and macros automate routine chores to cut down on time during the design phase.
youtube
5. Integrate with other software tools
In today's digitally interconnected world, seamless integration with other tools and programs is essential. Tools for CAD that are able to communicate with other design software, engineering analysis tools, or project management software will streamline workflows and increase collaboration. Examine the compatibility and integration possibilities of the CAD program you're considering.
6. Licensing costs and fees
The cost of cheap software is a significant aspect to take into account, especially for those who are individuals or small businesses with limited budgets. Consider the different pricing options offered by software companies for cad, including perpetual licenses or subscription plans. Consider the cost of initial purchase, as well as all ongoing charges, as well as any other fees like technical support or updates. It's important to find the right balance between capabilities you want as well as the price of the application.
7. Support and Updates
Technical support and regular updates will ensure a pleasant CAD software experience. Find out the degree of customer service that the service provider provides, whether it's via live chat, email or by phone. Additionally, check if they provide documentation, tutorials, and user forums to help you troubleshoot issues and stay updated with the latest capabilities. Reliable software providers often release regular updates to resolve bugs, release new features, or improve performance.
When choosing the best CAD program, it's essential to look at a number of aspects. Examine compatibility, features, usability, customization options, the integration features, price and customer support provided by the various companies. Additionally, assess the reputation of the company, reviews from customers, technical support, as well as the development plans of the software company that offers CAD. Improve your efficiency and enhance your design process by doing extensive research and aligning software capabilities to your specific needs, and then comparing the results.
0 notes