#Stacklayout
Explore tagged Tumblr posts
Visit Tumblr Blog
Explore Tumblr blogs with no restrictions, modern design and the best experience.
Last Seen Tumblr Blogs


Fun Fact
Users from the US are the majority of Tumblr visitors.
Link
Stack Layout Shadow Background In Flutter
#stack layout shadow background in flutter#flutter#flutter ui#google flutter#stack#Layout#stacklayout#uidesign#flutterapp#androidapp#background#flutter tutorial#fluttertutorial#fluttergoogle#google#flutterdev#flutter dart#dart#dart tutorial
0 notes
Video
youtube
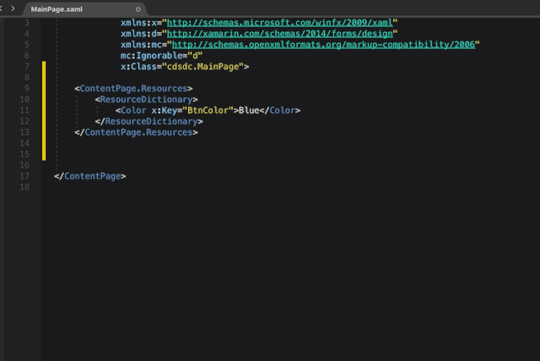
Como criar Tabbed Pages e Carousel Pages no Xamarin Formsde maneira fácil e rápida O post Como criar Tabbed Pages e Carousel Pages no Xamarin Forms de maneira fácil e rápida…
#aprenda os principais componentes#carousel page#Curso Completo#Image#Label#navegação hierárquica#Programação orientada a objetos#programação para celular#programação para celular multiplataforma#Stacklayout#tabbed page#TapGestureRecognizer#xamarin#xamarin forms
0 notes
Link
0 notes
Text
300+ TOP XAMARIN Interview Questions and Answers
XAMARIN Interview Questions for Freshers and experienced :-
1. What is Xamarin? Xamarin is a developing technology which is used to build UI for Android, iOS, and Windows operating systems using only CQ. 2. What are the extensions of Xamarin applications? For Android applications, the extension is .apk and for iOS, it is .app. 3. On what platforms you can work? Android and iOS are the two most popular operating systems on which I can work. 4. What are the languages that Xamarin support for developing any application? Xamarin is a cross-platform technology which supports FQ and CQ for application development. 5. In an application where you need to require the calculation of shortest distance, then which algorithm will be used? In that case, the best algorithm to use is the depth first search algorithm. 6. What are the different ways to make Xamarin apps? Mainly, there are two ways to get the job done. The first is the Xamarin.forms, and the other one is the traditional Xamarin approach. 7. How to decide which way to use to Xamarin apps? For all those applications where you either code sharing is the priority rather than unique UI or that need very less custom functionality, then Xamarin.froms can be used. On the other hand, you can use Xamarin native for all those apps where custom UI is the priority or you have to make custom interactions. 8. Do you know about application package modes? There are two modes to choose from. The first one is the release mode and the other one is debug. Both of them have their own requirements and are used when necessary. 9. Mention the different Xamarin.forms techniques to share codes. Shared projects and PCL are ways to share codes. 10. Elaborate on the use of page in Xamarin.forms. The page is an element which covers almost the entire screen and only has one child. For Android, Windows, and iOS, it is an activity, page, and view controller respectively.

XAMARIN Interview Questions 11. Tell us about Xamarin.forms pages. There are several pages in Xamarin.forms and they are used as per their requirements. Some of them are tabbedpage, contentpage, and carouselpage. 12. Explain views. Views are just another word for widgets. Some of the views are an image, list view, button and label. 13. Can you differentiate between TableView and ListView? The major difference between the both is that TableView shows data in a horizontal manner whereas ListView shows data in a vertical manner. 14. Why cells are used in Xamarin.forms? Cells are parts that are specifically created to be attached to TableView or ListView. 15. How editor is different from entry? The primary motive of both of these features is to assist the user in entering text. However, the major difference is that the editor has several lines and entry has only a single line. 16. Explain data binding. It is a method where a user interface synchronizes automatically with the data source. It shows all the updates automatically to the user interface. Mainly, it focuses on target as well as the sources. 17. Are you aware of the techniques used in data binding. Yes, there are four different techniques for data binding. Twoway, oneway, default, and onewaytosource. 18. What do you know about TestFlight? TeshFlight is a method by which you can best test your applications designed for iOS. 19. Why Hockeyapp is used? Hockeyapp is a service which is used to test iOS, windows and android apps. 20. Do you know about NuGet? Yes, NuGet is a package manager of .NET development. It is not just any other manager, but the most widely used one. 21. What are Activities? Activities offer a platform for the user interface which is graphical and only has one screen. 22. What are Native Apps? Native apps are those which require specific language for their development. This language can be Java, CQ, or swift. 23. What are Cross-Platform apps? Cross-platform apps are those which are developed for all the three mobile platforms with a single code base. However, they need personalization in the user interface as per the operating system. 24. What are the reasons to use XAML? XAML is a language used by developers which helps them in specifying the UI with the help of markup instead of any code. 25. What are the reasons to avoid XAML? Even though XAML is a great technique, but still it has some disadvantages. The reason why it should be avoided is that it does not has any code. Moreover, you cannot define loops of conditional processing. 26. Define Grid Grid is a layout control in Xamarin.forms which displays information in columns and rows. 27. What is ContentPresenter? ContentPresenter is used to view templates. It helps in managing how the content appears. 28. What is padding property? Padding is always added from the internal part of the element and directly affects the content away from the edges. 29. What is margin property? Margin is the opposite of padding which is executed from the outside of the element and affects how distant the content is from other contents. 30. Mention situations where you can use data binding. Data mining has different scenarios where it can be used. Model binding, collection binding, and backward binding are some of the scenarios. 31. Xamarin history? Xamarin is a Microsoft-owned San Francisco, California based software company founded in May 2011 by the engineers that created Mono, Mono for Android and MonoTouch . Novell had granted a perpetual license for Mono on july 2011 for MONO On May 16, 2011: Miguel de Icaza announced on his blog that Mono would be developed and supported by Xamarin, December 2012, Xamarin released Xamarin.Mac which allows developers to build C#-based applications for the Apple OS X operating system and package them for publishing via the Apple App Store. Xamarin 2.0 was released in February 2013 Xamarin.Android and Xamarin.iOS that make it possible to do native Android, iOS and Windows development in C#, with either Visual Studio or Xamarin Studio. Xamarin.forms: Introduced in Xamarin 3 on May 28, 2014 and allows one to use portable controls subsets that are mapped to native controls of Android, iOS and Windows Phone. On February 24, 2016: Microsoft announced it signed a definitive agreement to acquire Xamarin On March 30, 2016: Microsoft acquired the xamarin. And made it for all with free of cost. 32. What are disadvantage of Xaml in Xamarin.Forms? XAML cannot contain code. All event handlers must be defined in a code file. XAML cannot contain loops for repetitive processing. (However,ListView —can generate multiple children based on the objects in its ItemsSource collection.) XAML cannot contain conditional processing (However, a data-binding can reference a code-based binding converter that effectively allows some conditional processing.) XAML generally cannot instantiate classes that do not define a parameterless constructor. (However there is sometimes a way around this restriction.) XAML generally cannot call methods. (Again, this restriction can sometimes be overcome.) 33. When to use Xamarin.Forms vs Xamarin Native? Xamarin.Forms: Apps that require little platform-specific functionality. Apps where code sharing is more important than custom UI. Xamarin.IOS,Xamarin.Android: Apps that require specialized interactions. Apps with highly polished design. Apps that use many platform-specific APIs. Apps where custom UI is more important than code sharing. 34. What is is the difference between ListView & TableView? The ListView and TableView controls are so similar, you can think of them as a single control. The major difference between the two is the manner in which they lay out their items, and it’s easy to change the layout so each control emulates the other. The ListView control displays its data stacked vertically, much like a standard listbox. Use this control to display an ordered list of data, especially long lists that require scrolling like a list of email messages, a list of contacts, or search results. The TableView control displays its data stacked horizontally in rows (although you can alter this behavior and have it displayed in columns first, as well). You use this control when you need more space for rich visualization of each item to be displayed. One of the big differences is ListView provides you a ItemsSource and a Itemtemplate and TableView does not. So items must be added as children manually. 35. What are the layout controls available in Xamarin.Forms? Layout is the process of sizing and positioning child elements in UI. ContentPresenter: A layout manager for templated views. Used within a ControlTemplate to mark where the content to be presented appears. ContentView: An element with a single content. ContentView has very little use of its own. Its purpose is to serve as a base class for user-defined compound views. Frame: An element containing a single child, with some framing options. Frame have a default Xamarin.Forms.Layout.Padding of 20. ScrollView: An element capable of scrolling if it's Content requires. TemplatedView: An element that displays content with a control template, and the base class for ContentView. AbsoluteLayout: Positions child elements at absolute requested positions. User assigned anchors and bounds defines the position and size of the control. Grid: A layout containing views arranged in rows and columns. RelativeLayout: A Layout that uses Constraints to layout its children. StackLayout: A Layout that positions child elements in a single line which can be oriented vertically or horizontally. This layout will set the child bounds automatically during a layout cycle. User assigned bounds will be overwritten and thus should not be set on a child element by the user. XAMARIN Questions and Answers Pdf Download Read the full article
0 notes
Text
Visual Studio 2019 for Mac 8.2 和 8.3 preview 1 發布
訪問:
微軟中國官方商城 – Visual Studio
C# Editor
在 Visual Studio 2019 for Mac 的 8.1 版中,引入了新的 C# 編輯器,並繼續添加特性��進一步改進 Visual Studio for Mac 中的代碼編輯體驗。在最新的版本中,引入 IntelliSense 類型篩選更好地組織完成列表,使其只包含查找的類型。例如,如果只想看到類,單擊類圖標或點擊熱鍵類(⌥ + C)將結果限制為該類,還可以包括多個過濾器。
XAML Editor
此更新包括以下領域的一些顯著的 XAML 改進:IntelliSense、性能、可靠性和 linting。在下面的動畫中,可以看到 XAML 文件的新體驗。
通過添加新的 XAML 編輯器,還包括了一個新的 XAML 語言服務,這種新語言服務的一個好處是改進了匹配功能。例如,它支持模糊、子字符串和CamelCase 匹配。
模糊匹配:輸入字符串的任何部分將提供匹配和喜歡匹配的列表。如果鍵入“STCK”,StackLayout ���將顯示為選項
子字符串匹配:當鍵入字符串的一部分時,將列出匹配項,即使它位於字符串的中間。鍵入“Lay”將匹配“StackLayout”以及包含“lay”的任何其他字符串
不區分大小寫的匹配:如果無法記住要查找的字符串的大小寫,則不區分大小寫的匹配將確保找到所要查找的內容。由於支持這種匹配,輸入“stack”將與“StackLayout”匹配。
AXML Editor
在這個版本中,更新了 .axml 文件的編輯器。這些增強與 XAML 編輯器中的增強類似。一些具體的改進包括:IntelliSense、.axml 文件的語義編輯以及對轉到定義的支持。下面是這個新編輯的截圖:
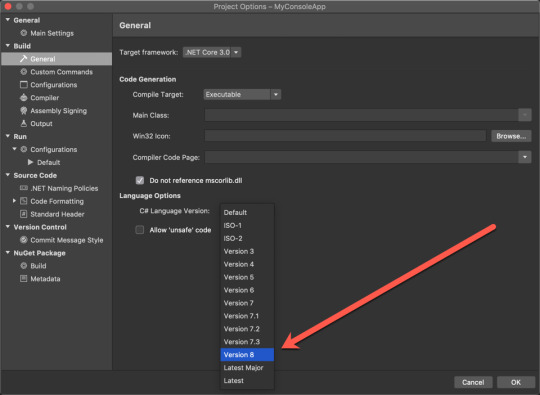
支持 .NET Core 3.0 和 C# 8.0 preview
使用此版本,支持 .NET Core 3.0 預覽版和 C#8。首先,在安裝 Visual Studio for Mac 之後,需要安裝 .NET Core 3.0 SDK 的預覽版。請注意,目前 .NET Core3.0 SDK 並不與 IDE 捆綁在一起,但是將在以後的版本中包含它。安裝 SDK 並重新啟動 Visual Studio for Mac 之後,就可以創建、構建、運行、調試和發布 .NET Core 3.0 應用程序。
此外,為了在 .NET Core 3.0 SDK 中啟用 C#8,則需要使用 Visual Studio for Mac 中的 Project 選項。在 Project 選項中,轉到 Build>General>Language 選項,並將 C# 語言版本設置為 Version 8,如下圖所示:
Visual Studio 2019 for Mac 8.3 Preview 1
在 8.3 的第一個預覽版本中,重點是 .NET Core 改進。
發布對 .NET Core 控制台和 .NET 標準庫項目的支持
在此預覽中,添加了對發布 .NET Core 控制台和 .NET 標準庫項目的支持。下面是在控制台應用程序上工作時這個新選項的屏幕截圖:
ASP.NET Core: 支持 launchSettings.json
在開發 ASP.NET Core 應用程序時,可以使用 lauchSettings.json 文件配置如何為開發目的啟動應用程序。在 LaunchSettings.json 中,您可以配置應用程序的 URL 來偵聽,以及在運行或調試時應用的環境變量。使用此更新,更容易與其他可能不使用 Visual Studio for Mac 的項目協作。 Visual Studio、Visual Studio Code 和 DotNet CLI(命令行接口)已經支持此文件。
ASP.NET Core: 文件嵌套支持
在此預覽中,為 ASP.NET Core 項目添加自動文件嵌套。應用的自動文件嵌套規則與在 Visual Studio 中找到的規則相同。啟用文件嵌套後,就可以更好地集中精力編輯最頻繁的文件。生成的文件和較少編輯的文件將嵌套在其他相關文件下。
詳細內容見發布說明
下載地址:
Visual Studio 2019 for Mac 8.2
Visual Studio 2019 for Mac 8.3 Preview 1
.(tagsToTranslate)Microsoft Visual Studio(t)Visual Studio 2019 for Mac 8.2 和 8.3 preview 1 發布(t)kknews.xyz from Visual Studio 2019 for Mac 8.2 和 8.3 preview 1 發布 via KKNEWS
0 notes
Text
First steps with Xamarin
Through this article, we are going to take a look at Xamarin to try to understand how it works. To achieve this, we are going to make a very simple application. Let's get into it!
Introduction
Nowadays, we have several tools to build simple or complex applications. Nevertheless, most of the time, there is one problem that we have to solve: our application has to run on different platforms and devices. One solution is to program the application as many times that we have platforms.
Another way is to use a solution that lets us build-cross platform applications. Xamarin lets us go this way.
What is Xamarin?
Xamarin is a cross-platform development tool. We can use C# to create iOS and Android apps. Xamarin applications use native UIs on every platform. It is a cross-platform implementation of the Microsoft .NET Framework. It is part of this last one and available through Visual Studio.
Here we are going to use Xamarin.Forms. Xamarin.Forms is a framework that allows us to create cross-platform user interfaces that can be shared across Android, iOS, Windows and Windows Phone. The user interfaces are rendered using the native controls of the target platform, allowing Xamarin.Forms applications to retain the appropriate look and feel for each platform.
Applications written using Xamarin.Forms are able to use any of the API's of the underlying platform. It is also possible to create applications that will have parts of their user interface created with Xamarin.Forms while other parts use the native UI toolkit.
Getting our tools
The first thing we need to do is to download Visual Studio and to install it.
Starting our project
First, we need to create a new project. We are going to choose "Multiplatform", "App". Then, we are going to select "Xamarin.Forms" and then "Blank Forms App". Let's call this application "SampleApp".
In the next step, we are going to select "iOS" and "Android" as targets and we are going to use "Portable Class Library".
Looking at the App file
Xamarin.Forms applications have a single class named "App" that is responsible for instantiating the first Page that will be displayed.
using Xamarin.Forms; namespace SampleApp { public partial class App : Application { public App() { InitializeComponent(); MainPage = new SampleAppPage(); } protected override void OnStart() { // Handle when your app starts } protected override void OnSleep() { // Handle when your app sleeps } protected override void OnResume() { // Handle when your app resumes } } }
App.xaml.cs file
Creating our main Content Page
A Page represents an Activity in Android, a View Controller in iOS or a Page in the Windows Universal Platform (UWP). Xamarin.Forms Pages represent cross-platform mobile application screens.
Let's define our XAML by opening the file named SampleAppPage.xaml and editing it:
<?xml version="1.0" encoding="utf-8"?> <ContentPage xmlns="http://xamarin.com/schemas/2014/forms" xmlns:x="http://schemas.microsoft.com/winfx/2009/xaml" xmlns:local="clr-namespace:SampleApp" x:Class="SampleApp.SampleAppPage"> <ContentPage.Content> <ScrollView Padding="15"> <StackLayout VerticalOptions="Center" HorizontalOptions="Center"> <Label Text="This is a cross platform app!" VerticalOptions="Center" HorizontalOptions="Center"/> </StackLayout> </ScrollView> </ContentPage.Content> </ContentPage>
SampleAppPage.xaml file
There are two techniques to create user interfaces in Xamarin.Forms. The first one is to create UIs with C#. The second one is to use Extensible Application Markup Language (XAML).
XAML is a declarative markup language that is used to describe user interfaces. XAML will play well with MVVM (Model-View-ViewModel). XAML defines the View that is linked to View Model code through XAML-based data bindings.
In our previous XAML code we are using several elements, like a StackLayout to arrange or unique Label on the screen.
Now, let's assure that our C# code looks like this:
using System; using System.Collections.Generic; using Xamarin.Forms; namespace SampleApp { public partial class SampleAppPage : ContentPage { public SampleAppPage() { InitializeComponent(); } } }
SampleAppPage.xaml.cs file
Our first build
Now, if we click and the little "play button" in Visual Studio and wait for a couple of seconds, our application will be displayed in an iOS or in an Android simulator, depending on what we chose in the options list next to the run button.
A closer look at XAML
As we said, XAML is a declarative markup language created by Microsoft extensively used in .NET Framework _and it is part of _Xamarin.Forms. XAML is basically XML, but has some unique syntax features like property elements, attached properties and markup extensions.
In a Xamarin.Forms application, a XAML file is always associated with a C# code file that provides code support for the markup.
In the first lines of our XAML file, we set some namespaces. Then, the "x:Class" attribute specifies a fully qualified .NET class name meaning this XAML file defines a new class named SampleAppPage in the SampleApp namespace that derives from ContentPage.
Within the XAML file, classes and properties are referenced with XML elements and attributes.
We also have a ContentPage.Content tag. It is called property element tag.
XAML also has markup extensions such as StaticResource, that returns an object from a resource dictionary, or "x:Static" that access a public static field, a public static property, a public constant field or an enumeration member.
Data binding
Basically, data bindings allow properties of two objects to be linked so that a change in one causes a change in the other.
Data binding is used to simplify how a Xamarin.Forms application displays and interacts with its data. It establishes a connection between the user interface and the underlying application. It defines a relationship between two objects: a source object that will provide data and a target object that will use the data from the source object.
The benefit of data binding is that we no longer have to worry about synchronizing data between our views and data source.
The "Binding Context" property of the target object must be set to the source object and the "SetBinding" must be called on the target object method to bind a property of that object to a property of the source object.
Most of the time, bindings are used connect the visuals of an application with an underlying data model, usually in a realization of the MVVM (Model-View-ViewModel).
We can define data bindings in XAML also. Sometimes it is set from the code-behind file, sometimes using a "StaticResource" or "x:Static" markup extension, and sometimes as the content of "BindingContext" property-element tags. For example, we can do something like this:
<Slider x:Name="slider" Maximum="360" VerticalOptions="CenterAndExpand" /> <Label BindingContext="{x:Reference slider}" Text="{Binding Value, StringFormat='The angle is {0:F0} degrees'}" />
Data bings example
A single view can have data bindings on several of its properties. However, each view can have only one "Binding Context", so multiple data bindings on that view must all reference properties of the same object.
The solution to this problem involves the "Mode" property that can have the following values:
Default
OneWay — values are transferred from the source to the target
OneWayToSource — values are transferred from the target to the source
TwoWay — values are transferred both ways between source and target
It is also easy to achieve data bindings with a ListView:
<ListView ItemSource="{Binding ListOfItems}" ...> <ListView.ItemTemplate> <DataTemplate> <ViewCell> <ViewCell.View> <Label Text="{Binding Name}" /> </ViewCell.View> </ViewCell> </DataTemplate> </ListView.ItemTemplate> </ListView>
ListView example
A word about MVVM
We previously talked about the MVVM Pattern. Let's refresh our mind!
The MVVM Pattern was developed by Microsoft. It is similar to MVC Pattern (Model-View-Controller) and it is a way to separate our user interface from our logic. In a few words, this pattern is composed of the following elements:
View
The View holds the user interface code. It defines the structure, layout, and appearance of what the user will see on the screen.
Model
The Model contains the logic to perform business functions. It includes a data model along with business and validation logic.
View Model_
The View Model is used to communicate between the View and the Model. It exposes public properties and commands. It is responsible for handling the View logic. It will interact with the Model by invoking methods of this last one. It provides data from the Model that the View can easily use. It will retrieve data from the Model and then makes the data available to the View.
Binder
Binding mechanism is not a part of the pattern itself. It is an underlying technology but it is required for applying the MVVM pattern. Basically, the Binder interprets bindings defined in the UI, observes the View Model for changes and updates the View and it observes the View for changes updates the View Model. Here, the Binder is XAML.
The pattern
The MVVM pattern was invented with XAML in mind. The View and the View Model are often connected through data bindings defined in the XAML file. The "Binding Context" for the View is usually an instance of the "ViewModel".
View Models generally implement the "INotifyPropertyChanged" interface. It means that the class fires an event called "PropertyChanged" whenever one of its properties changes. The data binding mechanism in Xamarin.Forms attaches a handler to this "PropertyChanged" event so it can be notified when a property changes and keep the target updated with the new value.
Sometimes the View needs to contain buttons that trigger various actions in the View Model but that last one must not contain "clicked handlers" for the buttons because that would tie the View Model to a particular user-interface paradigm.
To allow View Models to be more independent of particular user interface objects but still allow methods to be called within the View Model, a "Command Interface" exists. This "Command Interface" is supported by the following elements:
Button
MenuItem
ToolbarItem
SearchBar
TextCell
ImageCell
ListView
TapGestureRecognizer
The "ICommand" interface defines two methods and one event:
void Execute(object arg)
bool CanExecute(object arg)
event EventHandler CanExecuteChanged
Adding more pages
Knowing what we know, let's continue to build our application. First, let's add more pages.
To achieve this, we now have to edit our "App file" like so:
using Xamarin.Forms; using Xamarin.Forms.Xaml; [assembly: XamlCompilation(XamlCompilationOptions.Compile)] namespace SampleApp { public partial class App : Application { public App() { InitializeComponent(); MainPage = new NavigationPage(new SampleAppPage()); } protected override void OnStart() { // Handle when your app starts } protected override void OnSleep() { // Handle when your app sleeps } protected override void OnResume() { // Handle when your app resumes } } }
App.xaml.cs file
First, let's take a closer look at that little guy at the top of the file:
[assembly: XamlCompilation(XamlCompilationOptions.Compile)]
Here, we are making a little bit of optimization, choosing XAML to be compiled, rather than to be interpreted.
Now, let's add another "Forms ContentPage Xaml" to our solution and call it "SecondPage". We are not going to touch the code-behind but only edit the XAML file like so:
<?xml version="1.0" encoding="UTF-8"?> <ContentPage xmlns="http://xamarin.com/schemas/2014/forms" xmlns:x="http://schemas.microsoft.com/winfx/2009/xaml" x:Class="SampleApp.SecondPage"> <ContentPage.Content> <ScrollView Padding="15"> <StackLayout VerticalOptions="Center" HorizontalOptions="Center"> <Label Text="I am another page" VerticalOptions="Center" HorizontalOptions="Center"/> </StackLayout> </ScrollView> </ContentPage.Content> </ContentPage>
SecondPage.xaml file
We now have to edit our SampleAppPage.xaml like so:
<?xml version="1.0" encoding="utf-8"?> <ContentPage xmlns="http://xamarin.com/schemas/2014/forms" xmlns:x="http://schemas.microsoft.com/winfx/2009/xaml" xmlns:local="clr-namespace:SampleApp" x:Class="SampleApp.SampleAppPage"> <ContentPage.Content> <ScrollView Padding="15"> <StackLayout VerticalOptions="Center" HorizontalOptions="Center"> <Label Text="This is a cross platform app!" VerticalOptions="Center" HorizontalOptions="Center"/> <Button Text="Second page" HorizontalOptions="Center" VerticalOptions="Center" Clicked="OnCallSecondPage" /> </StackLayout> </ScrollView> </ContentPage.Content> </ContentPage>
SampleAppPage.xaml file edited
And in our code-behind, we are going to add the following things:
... async void OnCallSecondPage(object sender, EventArgs e) { await Navigation.PushAsync(new SecondPage()); } ...
SampleAppPage.xaml.cs file edited
We can now run our application and check if we have a second page.
Interactions and data
We are now going to improve a little more our application. We are going to add a simple functionality that loads an image from a REST API and display it on the screen.
First of all, we need to install two packages: "System.Net.Http" and "Newtonsoft.Json". When it is done, we create a simple class called "WebImage" with the following code:
using System; namespace SampleApp { public class WebImage { public string File { get; set; } } }
WebImage.cs file
Then, we can edit our SampleAppPage.xaml like so:
<?xml version="1.0" encoding="utf-8"?> <ContentPage xmlns="http://xamarin.com/schemas/2014/forms" xmlns:x="http://schemas.microsoft.com/winfx/2009/xaml" xmlns:local="clr-namespace:SampleApp" x:Class="SampleApp.SampleAppPage" Title="Sample App"> <ContentPage.BindingContext> <local:ViewModel/> </ContentPage.BindingContext> <ContentPage.Content> <ScrollView Padding="15"> <StackLayout VerticalOptions="Center" HorizontalOptions="Center"> <Label Text="This is a cross platform app!" VerticalOptions="Center" HorizontalOptions="Center"/> <Image x:Name="mainImage" Source="{Binding ImgUrl}" /> <Button Text="Refresh" HorizontalOptions="Center" VerticalOptions="Center" Command="{Binding RefreshCommand}" /> <ActivityIndicator IsRunning="{Binding IsBusy}" /> <Button Text="Second page" HorizontalOptions="Center" VerticalOptions="Center" Clicked="OnCallSecondPage" /> </StackLayout> </ScrollView> </ContentPage.Content> </ContentPage>
SampleAppPage.xaml file edited
Our code-behind will be like so:
using System; using Xamarin.Forms; namespace SampleApp { public partial class SampleAppPage : ContentPage { public SampleAppPage() { InitializeComponent(); } async void OnCallSecondPage(object sender, EventArgs e) { await Navigation.PushAsync(new SecondPage()); } } }
SampleAppPage.xaml.cs file edited
Finally, we create a file called ModelView and fill it with the following code:
using System; using System.ComponentModel; using System.Net.Http; using System.Threading.Tasks; using System.Windows.Input; using Xamarin.Forms; using Newtonsoft.Json; namespace SampleApp { public class ViewModel:INotifyPropertyChanged { public event PropertyChangedEventHandler PropertyChanged; string imgUrl; bool busy = false; // Constructor public ViewModel() { // Defining Refresh Command RefreshCommand = new Command(async () => await DownloadAsync()); // Loading data when page is loaded Task.Run(async () => await DownloadAsync()); } // Public properties public bool IsBusy { get { return busy; } set { if (busy == value) { return; } busy = value; OnPropertyChanged("IsBusy"); } } public string ImgUrl { get { return imgUrl; } set { if (imgUrl == value) { return; } imgUrl = value; OnPropertyChanged("ImgUrl"); } } // ICommand implementations public ICommand RefreshCommand { protected set; get; } protected virtual void OnPropertyChanged(string propertyName) { var changed = PropertyChanged; if (changed != null) { PropertyChanged(this, new PropertyChangedEventArgs(propertyName)); } } async Task DownloadAsync() { IsBusy = true; var data = await Task.Run(() => Download()); ImgUrl = data.File; IsBusy = false; } async Task<WebImage> Download() { HttpClient client = new HttpClient(); var response = await client.GetStringAsync("http://random.cat/meow"); var data = JsonConvert.DeserializeObject<WebImage>(response); return data; } } }
ModelView.cs file
Now, if we run our application, we can see an image appear on the screen when the first page is loaded. With the "Refresh" button, we can get another image.
Xamarin VS React Native VS Ionic
Comparing those technologies would take a whole article. But let's have a brief overview:
React Native and Ionic are two other famous solutions that help us build cross platform applications. The first difference is they both use JavaScript while, obviously, Xamarin uses C#.
React Native supports Android and iOS, whereas Xamarin also does Windows Mobile, Android Wear, iOS Watch, Android TV, macOS and Windows Universal App as well.
Some common controls in React Native may need to be coded separately for each platform.
React Native is a little low in performance when it comes to the development on iOS platform.
React Native works more like Xamarin while Ionic doesn’t use native widgets at all.
A complete comparison can be found here.
Conclusion
Through this article, we got a little more familiar with Xamarin by building a really simple application. Of course, we haven't covered everything and there are many things to explore. But we are now able to go deeper and to use this tool. By the way, the following repository is full of great examples!
One last word
If you like this article, you can consider supporting and helping me on Patreon! It would be awesome! Otherwise, you can find my other posts on Medium and Tumblr. You will also know more about myself on my personal website. Until next time, happy headache!
0 notes
Text
Xamarin.Forms 4.0を試してみた
この記事は、mediba Advent Calendar 2018の10日目です。
コミュニケーションデザイン本部 創造部 アプリ開発グループの松島です。Xamarinが大好きです。
今回は、Xamarin.Forms 4.0のプレビュー版がリリースされたので、早速試してみました。
試したバージョンは4.0.0.8055-pre1です。
新機能
以下の3つの機能が追加されました。
Shell
Visual
CollectionView
現状では、これらの機能を使うためには、AppDelegateやMainActivityで以下のように設定する必要があります。
global::Xamarin.Forms.Forms.SetFlags("Shell_Experimental", "Visual_Experimental", "CollectionView_Experimental");
Shell
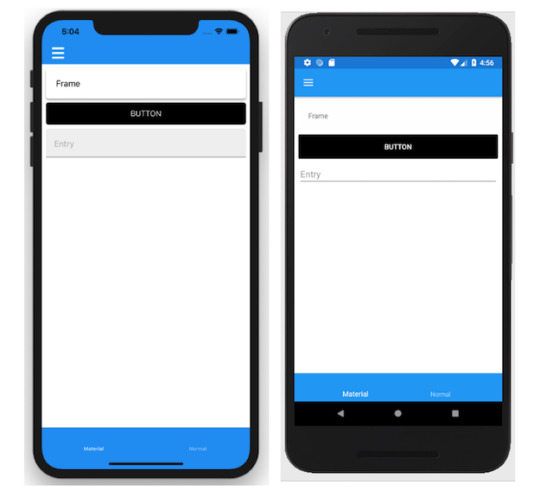
Shellは、MasterDetailPageのような所謂ハンバーガーメニューを作成する機能です。MasterDetailPageとどこが違うのかというと、MasterDetailPageでページを切り替えるには、前のページを破棄して、切り替えるたびに新しくページを作成することになるのですが、Shellは、最初にページを作ってしまい、あとは表示を切り替えるだけになっています。その点は、TabbedPageに似ています。
Shellは、以下のように使います。
<Shell xmlns="http://xamarin.com/schemas/2014/forms" xmlns:x="http://schemas.microsoft.com/winfx/2009/xaml" xmlns:local="clr-namespace:XamarinForms4App" x:Class="XamarinForms4App.MainPage"> <Shell.Resources> ... </Shell.Resources> <ShellItem Title="Visual"> <ShellSection Title="Material"> <ShellContent> <local:MaterialPage/> </ShellContent> </ShellSection> <ShellSection Title="Normal"> <ShellContent> <local:NormalPage/> </ShellContent> </ShellSection> </ShellItem> <ShellItem Title="CollectionView"> <ShellContent> <local:CollectionViewPage/> </ShellContent> </ShellItem> </Shell>
ShellItemで、メニューを追加して、ShellContentに表示するページを含めます。ShellSectionを使えば、タブで切り替えることができるページにすることができます。
あと、iOSでメニューアイコンを表示するには、3bar.pngという名前で画像を含めないといけないようです。

Visual
今までは、共通に書いていても、iOSとAndroidで見た目が結構異なり、デザインに苦労することがありました。4.0からは、マテリアルデザインで見た目も同じようにすることが可能になりました。
VisualプロパティをMaterialにすることで、マテリアルデザインにすることができます。
<ContentPage ... Visual="Material"> ... </ContentPage>
CollectionView
グリッド表示をするには、AiForms.CollectionViewというライブラリを使っていたのですが、ようやく公式にも登場しました。
カラム数が3つのグリッドを作るには以下のようにします。
<CollectionView ItemsSource="{Binding Items}" > <CollectionView.ItemsLayout> <GridItemsLayout Orientation="Vertical" Span="3" /> </CollectionView.ItemsLayout> <CollectionView.ItemTemplate> <DataTemplate> <StackLayout HeightRequest="100"> <Label Text="{Binding Title}"/> <Label Text="{Binding Detail}" FontSize="Small" /> </StackLayout> </DataTemplate> </CollectionView.ItemTemplate> </CollectionView>
現状では、クリックイベントもスペースの設定もできないようなので、まだまだこれからといった感じです。

GitHub
作ったものはここに置いておきます。
おわりに
最近、Xamarin.Formsの進化が目覚ましいです。まだまだのところもありますが、大分使いやすいものになってきました。今後も要チェックですね。
0 notes
Video
youtube
xamarin > Xamarin Trabalhando com StackLayout #51 | 2018-12-05T18:56:22.000Z
0 notes
Text
XAMARIN.FORMS ILE LISTVIEW
Konumuzun dördüncü bölümü olarak daha önceki uygulamamıza bir ekran daha ekleyerek bu ekran üzerinde bir liste göstereceğiz. Daha sonrada bu listeye tıklama eventi ekleyeceğiz.
LIST VIEW
1. Öncelikle yeni bir sayfa yaratarak uygulamamıza başlayalım:

Yeni sayfamızın adı MyListViewPage olsun.
2. Bu sırada artık detaylanmaya başlamış olan uygulamamıza klasörler ekleyerek düzenleyelim. Ben bir adet “Views” klasörü oluşturarak tüm sayfaları oraya ekledim. Ayrıca yaratacağımız sınıflar içinde bir “Models” klasörü ekledim.
3. MyListViewPage.cs sayfasına gidip içerisine bir ListView ve listede gösterilmek üzere bir dizi ekleyelim. Ardından da listemizi ekrana ekleyelim. using System;using Xamarin.Forms; using System.Collections.ObjectModel;namespace XamarinForms { public class MyListViewPage : ContentPage { public MyListViewPage () { //Dizi oluştur string[] dizi = new string[] { “Ufuk ARSLAN“, “Ekin MİRAL“, “Burak Güner“, “Gökçe Sarsılmaz“, “Oğuzhan Gedik“, “Ömer Köksür“ }; 4. Yeni oluşturduğumuz MyListViewPage sayfasını ekranımıza ekleyelim. Bunun için bir önceki yazımızdaki MyTabbedPage.cs içerisine bir Tab daha ekliyoruz. using System;using Xamarin.Forms;namespace XamarinForms { public class MyTabbedPage : TabbedPage { public MyTabbedPage () { var firstPage = new NavigationPage(new MyFirstPage()); firstPage.Title = “İlk Sayfa“; firstPage.Icon = “visitPlan.png“; 5. Kodumuzu çalıştırdığımız zaman yeni ekranlarımız şu şekilde görünmekte. ListView list = new ListView (); list.ItemsSource = dizi; Content = list; } } } secondPage.Title = “İkinci Sayfa“; secondPage.Icon = “visitCalendar.png“; var listPage = new NavigationPage(new MyListViewPage ()); listPage.Title = “Liste“; Children.Add (secondPage); Children.Add (listPage); //Tab ekle } } }
// Liste oluştur.
//Listeyi sayfaya ekle.
var secondPage = new MySecondPage ();
//Liste sayfası
Children.Add (firstPage);

LISTE ÖĞELERINE TIKLAMAK
MyListViewPage.cs içerisine list için bir ItemTapped eventi ekleyelim. Bu event her tıklamada seçilen isimi yeni bir sayfada göstersin.
using System;
using Xamarin.Forms; using System.Collections.ObjectModel;
namespace XamarinForms { public class MyListViewPage : ContentPage { public MyListViewPage () { //Dizi oluştur string[] dizi = new string[] { “Ufuk ARSLAN“, “Ekin MİRAL“, “Burak Güner“, “Gökçe Sarsılmaz“, “Oğuzhan Gedik“, “Ömer Köksür“ };
// Liste oluştur. ListView list = new ListView (); list.ItemsSource = dizi;
list.ItemTapped += (object sender, ItemTappedEventArgs e) => {
string item = (string)e.Item; //Seçili öğeyi al
//Yeni ekran push et. Navigation.PushAsync (new ContentPage() { Content = new StackLayout { Children = { new Label { Text = item, VerticalOptions = LayoutOptions.CenterAndExpand, HorizontalOptions = LayoutOptions.CenterAndExpand } } } });
list.SelectedItem = null; //Listenin seçili kalmasını engelle };
//Listeyi sayfaya ekle. Content = list; } } }
BU UYGULAMANIN KODLARINA
HTTPS://GITHUB.COM/UFUF/XAMARIN.FORMS
ADRESINDE “PART 4” COMMITI ILE ERIŞEBILIRSINIZ.
0 notes
Text
StackLayout for UICollectionView
I played around with UICollectionView for a new app these days and thought this little FlowLayout subclass might help others too.
It's a UICollectionViewFlowLayout subclass which can switch from a stacked state to the default grid, like the iPad photo app does.
You might have to adjust it for your own purposes, but it should give you a good idea about how to build some cool stuff with the existing flow layout.
Here is the content of the header file:
#import <UIKit/UIKit.h> @interface StackLayout : UICollectionViewFlowLayout // the point to which the stack collapses @property (nonatomic) CGPoint stackCenter; // 0.0 means completely stacked, 1.0 results in the default FlowLayout // Values bigger than 1.0 will spread the layout even more @property (nonatomic) CGFloat stackFactor; @end
And the implementation:
#import "StackLayout.h" @implementation StackLayout // Custom setter for redrawing the layout - (void)setStackFactor:(CGFloat)stackFactor { _stackFactor = stackFactor; [self invalidateLayout]; }
- (void)setStackCenter:(CGPoint)stackCenter { _stackCenter = stackCenter; [self invalidateLayout];
}
// Animation of cells only works WITHIN the bounds of the contentView. // Enlarge the contentView to the size of the collectionView if needed -(CGSize)collectionViewContentSize { CGSize contentSize = [super collectionViewContentSize]; if (self.collectionView.bounds.size.width > contentSize.width) contentSize.width = self.collectionView.bounds.size.width; if (self.collectionView.bounds.size.height > contentSize.height) contentSize.height = self.collectionView.bounds.size.height; return contentSize; } -(NSArray*)layoutAttributesForElementsInRect:(CGRect)rect { NSArray* attributesArray = [super layoutAttributesForElementsInRect:rect]; // Calculate the new position of each cell based on stackFactor and stackCenter for (UICollectionViewLayoutAttributes *attributes in attributesArray) { CGFloat xPosition = self.stackCenter.x + (attributes.center.x - self.stackCenter.x) * self.stackFactor; CGFloat yPosition = self.stackCenter.y + (attributes.center.y - self.stackCenter.y) * self.stackFactor; attributes.center = CGPointMake(xPosition, yPosition); if (attributes.indexPath.row == 0) { attributes.alpha = 1.0; attributes.zIndex = 1.0; // Put the first cell on top of the stack
} else { attributes.alpha = self.stackFactor; // fade the other cells out attributes.zIndex = 0.0; //Other cells below the first one } } return attributesArray; } @end
If you create an UICollectionView with stackFactor = 0.0 you will get a stack with only the top cell visible. Call something like that later to get a nice animation to the full grid layout:
[myCollectionView performBatchUpdates:^{ myCollectionView.collectionViewLayout.stackFactor = 1.0; } completion:nil];
You could also use an UIPinchGestureRecognizer to adjust the stackFactor property.
Here is a little preview showing different states of the animation:

If you want to archive something like the iPad photo app, you will need another UICollectionView to display the single albums. Once the user selects an album, show the stacked Photos at the position of the album and animate the photos in.
Feel free to leave me a comment below.
0 notes
Text
Xamarin Forms: Do básico ao SQLite
Xamarin Forms: Do básico ao SQLite
O curso Xamarin Forms: Do básico ao SQLite é voltado para todas as pessoas que desejam criar os seus próprios aplicativos (apps) multiplataforma.
Xamarin Forms: Do básico ao SQLite
Ao final do curso você estará apto a criar aplicativos que armazenam dados localmente por meio do SQLite utilizando uma infinidade de…
View On WordPress
#Button#Como implementar eventos#ContentPage#Curso Completo#GestureRecognizers#GridView#Image#Label#ListView#MasterDetailPage#MasterPage#Métodos#Meu primeiro aplicativo#Page#properties tapGestureRecognizer#SQLite#Stacklayout#xamarin#xamarin forms
0 notes
Text
Introducing .NET Multi-platform App UI
You can build anything with .NET. It’s one of the main reasons millions of developers choose .NET as the platform for their careers, and companies invest for their businesses. With .NET 5 we begin our journey of unifying the .NET platform, bringing .NET Core and Mono/Xamarin together in one base class library (BCL) and toolchain (SDK).
As we consider what building device applications will look like in a unified .NET, we see many devices across multiple platforms used, from Android and iOS to Windows and macOS. To address this need we are excited to announce a new first-class UI framework for doing just that: .NET Multi-platform App UI, affectionately call .NET MAUI.
Let us introduce you to what .NET MAUI is, the single project developer experience, modern development patterns, and a look at the journey ahead.
What is .NET MAUI
.NET MAUI is an evolution of the increasingly popular Xamarin.Forms toolkit that turns 6 years old this month. For years companies such as UPS, Ernst & Young, and Delta have been leveraging the mobile expertise of Xamarin atop .NET to power their businesses; some since the very beginning. It has also been very successful in helping small businesses maximize their development investment sharing upwards of 95% of their code, and beating their competitors to market. .NET MAUI extends this success on mobile to embrace the desktop making it the best way to build multi-platform applications across both, especially our new devices such as the new Surface Duo.
.NET MAUI simplifies the choices for .NET developers, providing a single stack that supports all modern workloads: Android, iOS, macOS, and Windows. The native features of each platform and UI control are within reach in a simple, cross-platform API for you to deliver no-compromise user experiences while sharing even more code than before.
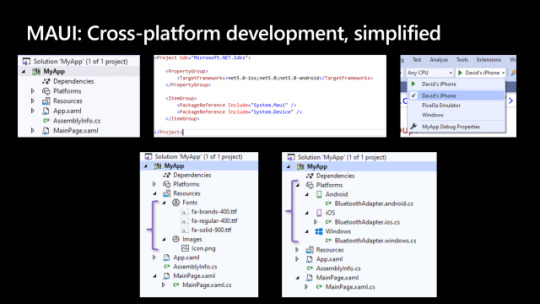
Single Project Developer Experience
.NET MAUI is built with developer productivity in mind, including the project system and cross-platform tooling that developers need. .NET MAUI simplifies the project structure into a single project to target multiple platforms.
This means you can easily deploy to any target that you wish including your desktop, emulators, simulators, or physical devices with a single click. With built-in cross-platform resources you will be able to add any images, fonts, or translation files into the single project, and .NET MAUI will automatically setup native hooks so you can just code.
Finally, you will always have access the native underlying operating system APIs and it will be easier than ever with new platform specific integrations. Under platforms you can add source code files for a specific operating system and access the native APIs. With .NET MAUI everything is in one place where you need it to keep you productive.
MAUI: cross-platform development, simplified
This delivers:
One project targeting multiple platforms and devices
One location to manage resources such as fonts and images
Multi-targeting to organize your platform-specific code
You master one way to build client apps, the MAUI way, and all platforms are within your reach. Today, Scott Hanselman and I will demo it in action at Build, The Journey to One .NET.
Modern App Patterns
Part of the vision for one .NET is providing developer choice in the areas of personal preferences so you can be most productive using .NET. This manifests in which IDE you use whether Visual Studio 2019, Visual Studio for Mac, or even Visual Studio Code. .NET MAUI will be available in all of those, and support both the existing MVVM and XAML patterns as well as future capabilities like Model-View-Update (MVU) with C#, or even Blazor.
MVVM
Model-View-ViewModel (MVVM) and XAML, the predominant pattern and practice among .NET developers for decades now, are first-class features in .NET MAUI. This will continue to grow and evolve to help make you productive building and maintaining production apps.
<StackLayout> <Label Text="Welcome to .NET MAUI!" /> <Button Text="{Binding Text}" Command="{Binding ClickCommand}" /> </StackLayout>
public Command ClickCommand { get; } public string Text { get; set; } = "Click me"; int count = 0; void ExecuteClickCommand () { count++; Text = $"You clicked {count} times."; }
MVU
In addition, we are enabling developers to write fluent C# UI and implement the increasingly popular Model-View-Update (MVU) pattern. MVU promotes a one-way flow of data and state management, as well as a code-first development experience that rapidly updates the UI by applying only the changes necessary. For more information about MVU as a pattern, check out this Elm Programming guide and this blog from Thomas Bandt.
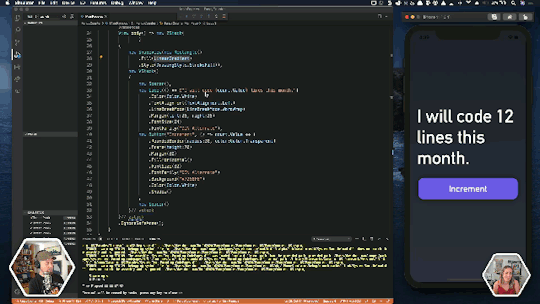
Below is a basic counter example in the MVU style written in .NET MAUI.
readonly State<int> count = 0; [Body] View body() => new StackLayout { new Label("Welcome to .NET MAUI!"), new Button( () => $"You clicked {count} times.", () => count.Value ++) ) };
This pattern is ideally suited for hot reload as you can see below with added styling, gradients, and fonts with instant hot reload from C#.
MAUI: cross-platform development
Both MVVM and MVU deliver the same native applications, performance, and platform fidelity. Developers will be able to choose which style best suits their preference and use case.
The post Introducing .NET Multi-platform App UI appeared first on PureSourceCode.
from WordPress https://www.puresourcecode.com/news/introducing-net-multi-platform-app-ui/
0 notes
Text
Xamarin Forms: Aprenda a criar o app inglês para crianças
Xamarin Forms: Aprenda a criar o app inglês para crianças
O post Xamarin Forms: Aprenda a criar o app inglês para crianças ensina como criar um app que ensina as principais palavras em inglês para crianças.
Ao criar este incrível app você aprenderá a trabalhar com o objeto ListView, editar itens e definir fontes externas para o mesmo.
Xamarin Forms: Aprenda a criar o app inglês para crianças Parte 1
View On WordPress
#aprenda os principais componentes#carousel page#Curso Completo#Editar itens no ListView#Image#Label#ListView#navegação hierárquica#Programação orientada a objetos#programação para celular#programação para celular multiplataforma#Stacklayout#tabbed page#TapGestureRecognizer#xamarin#xamarin forms
0 notes
Text
Xamarin Forms - Aprenda a criar o app Tabuada
Xamarin Forms – Aprenda a criar o app Tabuada
Que tal criar os seus próprios apps para Android, Windows Phone e IOS. O post Xamarin Forms – Aprenda a criar o app Tabuada ensina de maneira fácil, rápida e dinâmica como criar o app Tabuada utilizando o Xamarin Forms.
Ao construir o app Tabuada você aprenderá como utilizar o Stacklayout, ListView, Image e Label. Também aprenderá a criar eventos to tipo click.
Xamarin Forms – Aprenda a criar o…
View On WordPress
#aprenda os principais componentes#Curso Completo#Image#Label#Programação orientada a objetos#programação para celular#programação para celular multiplataforma#Stacklayout#xamarin#xamarin forms
0 notes
Video
youtube
Xamarin Forms – Aprenda a criar o app Comprar Café Que tal criar os seus próprios apps para Android, Windows Phone e IOS. O post Xamarin Forms - Aprenda a criar o app Comprar Café
0 notes
Text
Working with CarouselView in Xamarin Forms
Xamarin.Forms code runs on multiple platforms – each of which has its own filesystem. This means that reading and writing files is most easily done using the native file APIs on each platform. Alternatively, embedded resources are a simpler solution to distribute data files with an app.
Run application on Windows10
CarouselView
CarouselView is available in Xamarin.Forms 4.3. However, it is currently experimental and can only be used by adding the following line of code to your AppDelegate class on iOS, or to your MainActivity class on Android, before calling Forms.Init:
Forms.SetFlags("CollectionView_Experimental");
Prerequisites
Visual Studio 2017 or later (Windows or Mac)
Xamarin.Forms 4.3 Updated
Setting up a Xamarin.Forms Project
Start by creating a new Xamarin.Forms project. You wíll learn more by going through the steps yourself.
Visual Studio 2019 has more options in the opening window. Clone or check out the code from any repository or, open a project or solution for your computer.
Now, you need to click “Create a new project”.
Now, filter by Project Type: Mobile
Choose the Mobile App (Xamarin. forms) project under C# and Mobile.
Name your app. You probably want your project and solution to use the same name as your app. Put it on your preferred location for projects and click “Create”.
Now, select the blank app and target platforms – Android, iOS and Windows (UWP).
Subsequently, go to the solution. In there, you get all the files and sources of your project (.NET Standard). Now, select the XAML page and double-click to open the MainPage.Xaml page.
You now have a basic Xamarin.Forms app. Click the Play button to try it out.
Android implementation
MainActivity.cs
protected override void OnCreate(Bundle savedInstanceState) { TabLayoutResource = Resource.Layout.Tabbar; ToolbarResource = Resource.Layout.Toolbar; base.OnCreate(savedInstanceState); global::Xamarin.Forms.Forms.SetFlags("CollectionView_Experimental"); Xamarin.Essentials.Platform.Init(this, savedInstanceState); global::Xamarin.Forms.Forms.Init(this, savedInstanceState); LoadApplication(new App()); }
iOS implementation
AppDelegate.cs
public override bool FinishedLaunching(UIApplication app, NSDictionary options) { global::Xamarin.Forms.Forms.SetFlags("CollectionView_Experimental"); global::Xamarin.Forms.Forms.Init(); LoadApplication(new App()); return base.FinishedLaunching(app, options); }
UWP
App.xaml.cs
protected override void OnLaunched(LaunchActivatedEventArgs e) { Frame rootFrame = Window.Current.Content as Frame; // Do not repeat app initialization when the Window already has content, // just ensure that the window is active if (rootFrame == null) { // Create a Frame to act as the navigation context and navigate to the first page rootFrame = new Frame(); rootFrame.NavigationFailed += OnNavigationFailed; Xamarin.Forms.Forms.SetFlags("Shell_UWP_Experimental", "CollectionView_Experimental"); Xamarin.Forms.Forms.Init(e); if (e.PreviousExecutionState == ApplicationExecutionState.Terminated) { //TODO: Load state from previously suspended application } // Place the frame in the current Window Window.Current.Content = rootFrame; } if (rootFrame.Content == null) { // When the navigation stack isn't restored navigate to the first page, // configuring the new page by passing required information as a navigation // parameter rootFrame.Navigate(typeof(MainPage), e.Arguments); } // Ensure the current window is active Window.Current.Activate(); }
Common project
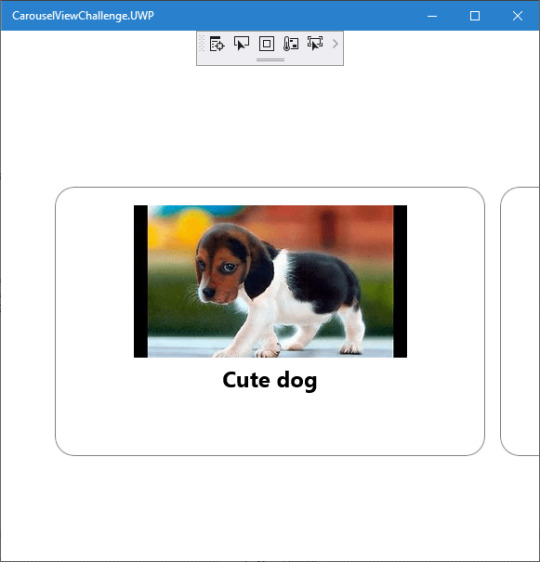
Create a Model to Bind the Collections.
/// <summary> /// Class AnimalModel. /// </summary> public class AnimalModel { /// <summary> /// Gets or sets the title. /// </summary> /// <value>The title.</value> public string Title { get; set; } /// <summary> /// Gets or sets the image path. /// </summary> /// <value>The image path.</value> public ImageSource ImagePath { get; set; } /// <summary> /// Gets or sets the description. /// </summary> /// <value>The description.</value> public string Description { get; set; } }
Now, Bind the Collection to CarouselView. Similar CollectionView and ListView.
using CarouselViewChallenge.Models; using System; using System.Collections.Generic; using System.Collections.ObjectModel; using System.ComponentModel; using System.Text; namespace CarouselViewChallenge.ViewModels { /// <summary> /// Class CarouselPageViewModel. /// Implements the <see cref="System.ComponentModel.INotifyPropertyChanged" /> /// </summary> /// <seealso cref="System.ComponentModel.INotifyPropertyChanged" /> public class CarouselPageViewModel : INotifyPropertyChanged { /// <summary> /// Occurs when a property value changes. /// </summary> /// <returns></returns> public event PropertyChangedEventHandler PropertyChanged; /// <summary> /// The animal /// </summary> private ObservableCollection<AnimalModel> _animal; /// <summary> /// The page title /// </summary> private string _pageTitle; /// <summary> /// Initializes a new instance of the <see cref="CarouselPageViewModel"/> class. /// </summary> public CarouselPageViewModel() { _pageTitle = "CarouselViewChallege"; _animal = new ObservableCollection<AnimalModel>(); _animal.Add(new AnimalModel { Title = "Cute dog", ImagePath = "https://th.bing.com/th/id/OIP.iRjeVJfvve4N0MfUky12HgHaEK?w=294&h=164&c=7&o=5&pid=1.7" }); _animal.Add(new AnimalModel { Title = "Cute cat", ImagePath = "https://th.bing.com/th/id/OIP.__BpwPGRP9yjsUa8MaS5UQHaFj?w=217&h=163&c=7&o=5&pid=1.7" }); _animal.Add(new AnimalModel { Title = "Whahaha", ImagePath = "https://th.bing.com/th/id/OIP.rKSQ8lmDeHwH29L73NFsUAHaFj?w=242&h=178&c=7&o=5&pid=1.7" }); } /// <summary> /// Gets or sets the animals. /// </summary> /// <value>The animals.</value> public ObservableCollection<AnimalModel> Animals { get { return _animal; } set { if (_animal != value) { _animal = value; OnPropertyChanged(new PropertyChangedEventArgs("Birds")); } } } /// <summary> /// Gets or sets the title. /// </summary> /// <value>The title.</value> public string Title { get { return _pageTitle; } set { if (_pageTitle != value) { _pageTitle = value; OnPropertyChanged(new PropertyChangedEventArgs("Title")); } } } /// <summary> /// Handles the <see cref="E:PropertyChanged" /> event. /// </summary> /// <param name="eventArgs">The <see cref="PropertyChangedEventArgs"/> instance containing the event data.</param> private void OnPropertyChanged(PropertyChangedEventArgs eventArgs) { PropertyChanged?.Invoke(this, eventArgs); } } }
Create a new MainPage.xaml under View.
<?xml version="1.0" encoding="utf-8" ?> <ContentPage xmlns="http://xamarin.com/schemas/2014/forms" xmlns:x="http://schemas.microsoft.com/winfx/2009/xaml" xmlns:d="http://xamarin.com/schemas/2014/forms/design" xmlns:mc="http://schemas.openxmlformats.org/markup-compatibility/2006" mc:Ignorable="d" x:Class="CarouselViewChallenge.Views.MainPage"> <ContentPage.Content> <StackLayout> <CarouselView ItemsSource="{Binding Animals}" PeekAreaInsets="50"> <CarouselView.ItemTemplate> <DataTemplate> <StackLayout> <Frame BorderColor="Gray" Margin="8" HasShadow="True" HeightRequest="250" CornerRadius="20" VerticalOptions="CenterAndExpand"> <StackLayout> <Image Source="{Binding ImagePath}"/> <Label Text="{Binding Title}" FontSize="24" FontAttributes="Bold" HorizontalTextAlignment="Center"/> </StackLayout> </Frame> </StackLayout> </DataTemplate> </CarouselView.ItemTemplate> </CarouselView> </StackLayout> </ContentPage.Content> </ContentPage>
In the code behind bind the viewmodel with the page:
using CarouselViewChallenge.ViewModels; using System; using System.Collections.Generic; using System.Linq; using System.Text; using System.Threading.Tasks; using Xamarin.Forms; using Xamarin.Forms.Xaml; namespace CarouselViewChallenge.Views { [XamlCompilation(XamlCompilationOptions.Compile)] public partial class MainPage : ContentPage { CarouselPageViewModel vm; public MainPage() { InitializeComponent(); vm = new CarouselPageViewModel(); BindingContext = vm; } } }
The project is working for Android, iOS and UWP. The source code is available on Github.
The post Working with CarouselView in Xamarin Forms appeared first on PureSourceCode.
from WordPress https://www.puresourcecode.com/dotnet/xamarin/working-with-carouselview-in-xamarin-forms/
0 notes