#Terser JS Minifier
Explore tagged Tumblr posts
Visit Tumblr Blog
Explore Tumblr blogs with no restrictions, modern design and the best experience.
Last Seen Tumblr Blogs


Fun Fact
The KCSC sent more than 20K requests to delete posts related to prostitution and porn to Tumblr from January to June 2017.
Text
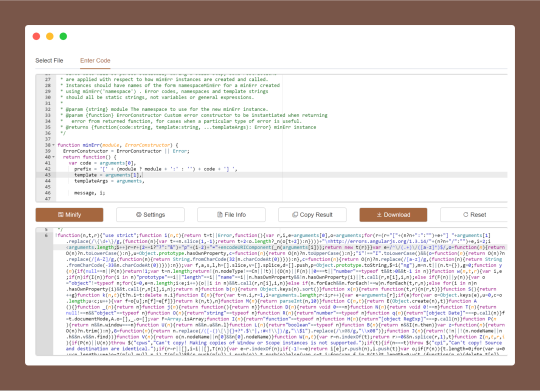
JS Minifier is a web-based code optimize tool that reduces the size of JavaScript (JS) files by removing unnecessary characters like whitespace, comments, and line breaks, improves website performance by decreasing load times and bandwidth usage.
#JS Minifier#JavaScript Minifier#JavaScript Compressor#Minify JavaScript Online#JavaScript Code Minifier#Reduce JavaScript File Size#Free JavaScript Minifier Tool#JS Optimizer#Terser JS Minifier#free online tools#online tools#web tools#online web tools#free web tools#online tool#a.tools
0 notes
Text
q: how much bigger does the minifier option to keep function names unmangled make react code?
a: I tried it on one of my codebases and it looks like it's around 4-5% on the main gzipped js bundle.
(it added 93kb (esbuild keepNames) / 135kb (terser keep_fnames) to my 28mb build output folder, but that includes assets and isn't gzipped, so that's meaningless, and I can't be bothered to run vite-bundle-analyzer for this post.)
one thing that was interesting to observe is that terser kept the function names inline; vite minified them and then ran clientside js to set the name property on the function object. post gzip I have to imagine there's basically no difference between these.
anyway, it's definitely not free, but if necessary a site like tumblr could probably afford it? js bundles have to be an irrelevant percentage of site bandwidth right?
0 notes
Text
Speed Up Your Site: How to Fix Render-Blocking Resources
Ever clicked on a website and stared at a blank screen for a few seconds? That delay is often caused by render-blocking resources—files that hold up your page from loading quickly. These are usually CSS and JavaScript files that the browser must load completely before it can show anything on the screen.
In today’s fast-paced online world, even a short delay can drive visitors away. A slow-loading site not only frustrates users but also affects your SEO. Thankfully, there are smart ways to reduce these render-blocking issues and make your website faster.
What Are Render-Blocking Resources?
When a browser loads your website, it starts by reading the HTML. But as soon as it comes across CSS or JavaScript files marked as important, it pauses the loading process to fetch and process those files. This delay can cause your site to load slower, even if your main content is ready.
These critical CSS and JS files are known as render-blocking resources. Until they finish loading, users may just see a blank page—and that’s not good for user experience or search engine rankings.
Why It’s a Big Deal
Speed matters. A slow website leads to high bounce rates, poor engagement, and lower conversion. Plus, Google considers page speed as a key ranking factor, especially for mobile searches. Fixing render-blocking issues helps your site load faster, improve SEO, and keep visitors around longer.
What Commonly Causes Render-Blocking?
External CSS stylesheets
JavaScript files
Web fonts (especially if not optimized)
These files are important, but if not handled correctly, they can slow down how quickly your page is visible to users.
How to Reduce Render-Blocking Resources
Here are simple ways to fix the issue:
Minify CSS and JavaScript Remove extra spaces, comments, and line breaks in your code. Tools like CSSNano, Terser, and CleanCSS can do this. Most CMS platforms also offer plugins to automate the process.
Use Async or Defer for JavaScript Add async or defer to your script tags. This allows your page to continue loading without waiting for the JavaScript to finish.
async: Loads the script while the page continues loading.
defer: Waits to run the script until the page has fully loaded.
Inline Critical CSS Place the CSS needed for above-the-fold content directly in the HTML. This helps the page show up faster while the rest of the styles load in the background. Tools like Critical or PurifyCSS can help with this.
Optimize Font Loading Use font-display: swap in your CSS to avoid blank spaces where fonts should be. It shows a fallback font first and replaces it when the custom font finishes loading.
Combine CSS and JS Files Reduce the number of files your site loads by combining similar ones. Fewer files mean fewer requests, which speeds up loading. Just make sure you're not adding extra code where it’s not needed.
Use a CDN (Content Delivery Network) A CDN stores your site files on servers across the globe. When someone visits your site, the files are delivered from the nearest location, which loads the page faster—even if render-blocking resources are still there.
When to Call in the Pros
Trying to fix render-blocking issues without the right knowledge can sometimes break your site. That’s why working with a professional website designing company in India can be a smart move. Experts like Dzinepixel Webstudios understand how to optimize your site without affecting the design or user experience.
Whether you're running a personal blog, an eCommerce store, or a business website, faster performance leads to better results—and more happy users.
Final Thoughts
Improving site speed by reducing render-blocking resources is one of the best ways to create a better user experience. From minifying code to optimizing fonts and using a CDN, each step brings you closer to a fast, responsive site.And if you want a worry-free way to get it done right, consider teaming up with a skilled website designing company in India. With the right approach, you’ll not only improve load times but also boost engagement, SEO rankings, and overall success.
#best web development agencies india#website design and development company in india#website development company in india#web design company india#website designing company in india#digital marketing agency india
0 notes
Text
How to Reduce Render-Blocking Resources for Faster Pages

We’ve all faced slow websites. One common reason is render-blocking resources—files like CSS and JavaScript that delay how quickly your page loads. These resources prevent the browser from showing your content until they’re fully loaded. That delay can cost you visitors and affect your SEO. When someone visits your website, their browser starts loading the page by downloading HTML, CSS, JavaScript, fonts, and images.
Some files, especially CSS and JavaScript, are marked as critical and must be fully loaded before the page content can appear. These files are called render-blocking resources. Until they’re done loading, users may only see a blank screen. This can cause visitors to leave your site before it even loads.
Why Do Render-Blocking Resources Matter?
Speed matters. If your page takes too long to load, users may leave. A slow site increases bounce rates and lowers engagement. It also affects search engine rankings. Google includes page speed as one of the factors in its algorithm, especially for mobile devices. Reducing render-blocking files can lead to better SEO performance, happier users, and improved conversion rates.
Common Examples of Render-Blocking Resources
Most often, render-blocking comes from external CSS stylesheets and JavaScript files. Fonts can also delay rendering, especially if they are hosted externally or not optimized. These files must be fully processed before your page is displayed, even if the actual content is ready. That’s why solving this issue is one of the first steps in improving site performance.
How to Reduce Render-Blocking Resources
1. Minify CSS and JavaScript
Minifying your code means removing unnecessary spaces, line breaks, and comments that browsers don’t need. This makes the files smaller and faster to load. You can use tools like CSSNano, CleanCSS, UglifyJS, or Terser. Many website platforms and builders also offer plugins that handle minification automatically.
2. Use Async or Defer for JavaScript
By default, browsers pause content rendering when they encounter a JavaScript file. To avoid this, add async or defer attributes to your script tags. Async loads the script while the rest of the page loads. Defer waits until the page is fully loaded before running the script. Both help reduce delays caused by JavaScript.
3. Inline Critical CSS
Critical CSS is the minimal styling required to render the above-the-fold content of your page. Instead of linking to an external stylesheet, you can place this CSS directly in your HTML. This allows the page to appear more quickly, even if the full CSS file hasn’t finished loading yet. Tools like Critical or PurifyCSS can help generate this code.
4. Optimize Font Delivery
Web fonts are another common source of delays. You can reduce this impact by using font-display: swap in your CSS. This allows a fallback font to show immediately while the custom font loads in the background. It prevents invisible text and improves the user experience.
5. Combine CSS and JavaScript Files
Fewer requests usually mean faster load times. If your website uses multiple CSS or JS files, consider combining them where possible. This reduces the number of HTTP requests made when a page loads. But be careful—only combine files used across multiple pages to avoid unnecessary loading.
6. Use a Content Delivery Network (CDN)
A CDN stores your files on servers around the world. When someone accesses your site, files are delivered from the nearest location. This doesn’t eliminate render-blocking resources, but it does reduce how long they take to load. Faster delivery means quicker page rendering.
Why You Should Work with Experts
Fixing render-blocking issues requires technical knowledge. It’s easy to break a site if changes are made incorrectly. A trusted Website Development Company in India as Dzinepixel Webstudios can help you optimize your site without affecting its design or functionality. Whether you’re running a business site, eCommerce store, or blog, performance is key.
Final Thoughts
Reducing render-blocking resources is one of the most effective ways to boost your website’s speed. Whether it’s minimizing CSS, delaying JavaScript, or optimizing font loading, these steps can have a real impact. A faster website not only helps users stay longer but also ranks better on search engines. If you want to improve user experience and drive more engagement, these small changes can lead to big results.
#website development company in india#web design company india#website designing company in india#best web development agencies india#digital marketing agency india#online reputation management companies in india
0 notes
Text
How to Optimize Website Loading Speed for Better User Engagement

How to Optimize Website Loading Speed for Better User Engagement
Introduction
Why website speed matters for user experience and engagement.
Impact on bounce rates, SEO rankings, and conversions.
Brief mention of tools to measure speed (Google PageSpeed Insights, Lighthouse, GTmetrix).
1. Measuring Website Performance
How to use Google PageSpeed Insights and interpret the results.
Importance of Core Web Vitals (Largest Contentful Paint, First Input Delay, Cumulative Layout Shift).
Using GTmetrix, Lighthouse, and WebPageTest for deeper insights.
2. Optimizing Images and Media
Use next-gen formats (WebP, AVIF) instead of PNG/JPEG.
Implement lazy loading (loading="lazy").
Compress images using tools like TinyPNG, ImageOptim.
Serve responsive images with srcset for different screen sizes.
3. Minimizing HTTP Requests
Reduce the number of external scripts, fonts, and stylesheets.
Combine CSS and JavaScript files where possible.
Use icon fonts or SVGs instead of multiple image icons.
4. Implementing Efficient Caching
Enable browser caching using .htaccess or response headers.
Use a Content Delivery Network (CDN) to serve assets globally (Cloudflare, Amazon CloudFront).
Optimize caching rules for static content (CSS, JS, images).
5. Reducing JavaScript and CSS Blocking
Minify JavaScript and CSS using Terser, UglifyJS, or CSSNano.
Defer or asynchronously load JavaScript (async and defer attributes).
Remove unused CSS with tools like PurifyCSS or UnCSS.
6. Optimizing Server Performance
Upgrade to faster hosting (VPS, Cloud Hosting, or Managed WordPress hosting).
Enable Gzip or Brotli compression to reduce file sizes.
Implement HTTP/2 or HTTP/3 for faster multiplexed connections.
7. Database Optimization
Optimize database queries and indexes for better efficiency.
Use caching mechanisms like Redis or Memcached.
Regularly clean up unused data, revisions, and logs in CMS platforms like WordPress.
8. Mobile Performance Optimization
Ensure responsive design and mobile-friendly assets.
Minimize heavy animations and background videos on mobile.
Optimize touch interactions and reduce excessive scripts.
9. Using a Content Delivery Network (CDN)
Distribute assets through a CDN to load content from the nearest server.
Popular CDN providers: Cloudflare, AWS CloudFront, Fastly, Akamai.
Reducing Time to First Byte (TTFB) by leveraging edge servers.
10. Continuous Monitoring & Testing
Set up performance monitoring with Google Lighthouse, WebPageTest.
A/B test different optimizations and measure impact.
Use New Relic, Datadog, or Pingdom for real-time monitoring.
Conclusion
Recap the most effective strategies.
How website speed directly influences user engagement, conversions, and SEO.
Encourage regular testing and updates to maintain fast performance.
WEBSITE: https://www.ficusoft.in/web-designing-training-in-chennai/
0 notes
Text
Compilator: Week in Review #1

Web development
New way to create modals using HTML only
Which open-source monospaced font is best for coding?
Drawing a star with DOMMatrix
The State of HTML 2023 survey is now open!
What are JWTs/Jots/JSON Web Tokens?
From WebGL to WebGPU
Ultimate solution for generating placeholder images
Productivity
What Causes Bad CLS and How to Fix it?
Get All That Network Activity Under Control with Priority Hints
Css
The Path To Awesome CSS Easing With The linear() Function
A (more) Modern CSS Reset
CSS Findings From The Threads App: Part 2
Responsive type scales with composable CSS utilities
JavaScript
Speeding up the JavaScript ecosystem - Polyfills gone rogue
How to Code Dark Mode for Google Sheets with Apps Script and JavaScript
Understanding the JavaScript Modulo Operator
The Origins of TypeScript: A Documentary
React
Optimizing Provider Context Usage in React
Build Your Own ChatGPT Clone with React and the OpenAI API
How to Build an Accordion Component with React.js
v0: “AI tool from Vercel that works like Midjourney for React, that is, it issues code snippets based on your requests (prompts)
Bootstrap a React app with smol developer
Understanding Props in React — A Comprehensive Guide
Vue
Clean Layout Architecture for Vue Applications
Optimizing Vue.js apps with web workers
7 Quick Tips about Vue Styles You (Might) Didn’t Know
Svelte
Introducing runes
Exploring Astro and Svelte vs. SvelteKit: A comparative guide
How to Build an Etch-A-Sketch App with Svelte
Libs & Plugins
Benchmarks for JS minifiers: babel-minify, esbuild, terser, uglify-js, swc, google closure compiler, tdewolff/minify
MouseMove - JavaScript mouse cursor behavior automation for web presentation
Browser
Nue JS is an extremely small (2.3kb) JavaScript library for creating web interfaces. This is the core of the future Nue ecosystem. It is similar to Vue.js, React.js or Svelte, but without hooks, effects, props, portals, watchers, providers, injects, suspension and other unusual abstractions in your way!
swup 4 - a universal library for creating transitions between pages. It manages the full page load life cycle and seamlessly adds animation between the current and next pages.
What's new in DevTools (Chrome 118)
WebKit features in Safari 17.0
---------
Image by vectorpocket on Freepik
0 notes
Text
Svelte + Tailwind + Storybook Starter Template
First of all, here's the link to the Github repo, go ahead and start working on your project than fiddle with the configurations. Trust me that takes a hell lot of time.
Visit this website to see the outcome: Svelte + TailwindCSS + Storybook
// Quickstart npx degit jerriclynsjohn/svelte-storybook-tailwind my-svelte-project cd my-svelte-project yarn yarn dev yarn stories
Svelte and TailwindCSS is an awesome combination for Frontend development, but sometimes the setup seems a bit non intuitive, especially when trying to try out this awesome combination. When integrating Storybook, which is another awesome tool for UI Component development and documentation, there is no obvious place to get how it's done. This repo was made to address just that!
You can easily start your project with this template, instead of wasting time figuring out configurations for each integration.
What do you get in this repo
A fully functional Svelte + TailwindCSS integration with side-by-side implementation of independent Storybook
Storybook with 5 essential Addons
Storybook populated with basic examples of Svelte + TailwindCSS
Addons
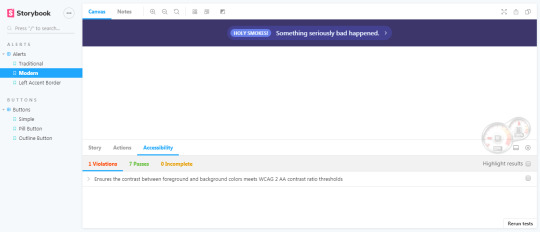
Accessibility Addon

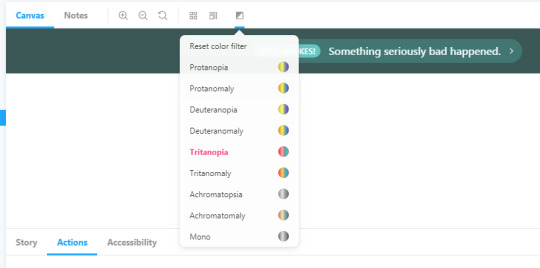
Accessibility Addon - Colorblindness Emulation
Actions Addon

Notes Addon

Source Addon

Viewport Addon

Svelte + TailwindCSS + Storybook
Storybook is an open source tool for developing JavaScript UI components in isolation
Svelte is a component framework that allows you to write highly-efficient, imperative code, that surgically updates the DOM to maintain performance.
TailwindCSS is a highly customizable, low-level CSS framework that gives you all of the building blocks you need to build bespoke designs without any annoying opinionated styles you have to fight to override.
Steps to build
Clone this repo git clone https://github.com/jerriclynsjohn/svelte-storybook-tailwind.git
Go to the directory cd svelte-storybook-tailwind
Install dependencies yarn
To develop your Svelte App: yarn dev
To develop UI components independent of your app: yarn stories
Documentations
Svelte - API and Tutorial
TailwindCSS - Docs and Tutorial
Storybook - Docs and Tutorial (No Svelte Yet!)
Steps to build it all by yourself and some tips [Warning: It's lengthy]
Instantiate Svelte App
Start the template file using npx degit sveltejs/template svelte-storybook-tailwind
Go to the directory cd svelte-storybook-tailwind
Install dependencies yarn
Try run the svelte app yarn dev
Add Tailwind into the project
Install dependencies: yarn add -D tailwindcss @fullhuman/postcss-purgecss autoprefixer postcss postcss-import svelte-preprocess
Change the rollup config as shown:
import svelte from 'rollup-plugin-svelte'; import resolve from 'rollup-plugin-node-resolve'; import commonjs from 'rollup-plugin-commonjs'; import livereload from 'rollup-plugin-livereload'; import { terser } from 'rollup-plugin-terser'; import postcss from 'rollup-plugin-postcss'; import autoPreprocess from 'svelte-preprocess'; const production = !process.env.ROLLUP_WATCH; export default { input: 'src/main.js', output: { sourcemap: true, format: 'iife', name: 'app', file: 'public/bundle.js', }, plugins: [ svelte({ preprocess: autoPreprocess({ postcss: true, }), // enable run-time checks when not in production dev: !production, // we'll extract any component CSS out into // a separate file — better for performance css: css => { css.write('public/bundle.css'); }, }), postcss({ extract: 'public/utils.css', }), // If you have external dependencies installed from // npm, you'll most likely need these plugins. In // some cases you'll need additional configuration — // consult the documentation for details: // https://github.com/rollup/rollup-plugin-commonjs resolve({ browser: true, dedupe: importee => importee === 'svelte' || importee.startsWith('svelte/'), }), commonjs(), // Watch the `public` directory and refresh the // browser on changes when not in production !production && livereload('public'), // If we're building for production (npm run build // instead of npm run dev), minify production && terser(), ], watch: { clearScreen: false, }, };
Add tailwind config using the command npx tailwind init
Add PostCSS config ./postcss.config.js as follows:
const production = !process.env.ROLLUP_WATCH; const purgecss = require('@fullhuman/postcss-purgecss'); module.exports = { plugins: [ require('postcss-import')(), require('tailwindcss'), require('autoprefixer'), production && purgecss({ content: ['./**/*.html', './**/*.svelte'], defaultExtractor: content => { const regExp = new RegExp(/[A-Za-z0-9-_:/]+/g); const matchedTokens = []; let match = regExp.exec(content); // To make sure that you do not lose any tailwind classes used in class directive. // https://github.com/tailwindcss/discuss/issues/254#issuecomment-517918397 while (match) { if (match[0].startsWith('class:')) { matchedTokens.push(match[0].substring(6)); } else { matchedTokens.push(match[0]); } match = regExp.exec(content); } return matchedTokens; }, }), ], };
Build the project with some TailwindCSS utilities yarn dev
Add Storybook into the Svelte Project
Add Storybook dependencies yarn add -D @storybook/svelte
Add 5 commonly used Storybook Addons:
Source: yarn add -D @storybook/addon-storysource
Actions: yarn add -D @storybook/addon-actions
Notes: yarn add -D @storybook/addon-notes
Viewport: yarn add -D @storybook/addon-viewport
Accessibility: yarn add @storybook/addon-a11y --dev
Create an addon file at the root .storybook/addons.js with the following content and keep adding additional addons in this file.
import '@storybook/addon-storysource/register'; import '@storybook/addon-actions/register'; import '@storybook/addon-notes/register'; import '@storybook/addon-viewport/register'; import '@storybook/addon-a11y/register';
Create a config file at the root .storybook/config.js with the following content:
import { configure, addParameters, addDecorator } from '@storybook/svelte'; import { withA11y } from '@storybook/addon-a11y'; // automatically import all files ending in *.stories.js const req = require.context('../storybook/stories', true, /\.stories\.js$/); function loadStories() { req.keys().forEach(filename => req(filename)); } configure(loadStories, module); addDecorator(withA11y); addParameters({ viewport: { viewports: newViewports } });
Add tailwind configs in the webpack.config.js under .storybook and also accommodate for Source addon:
const path = require('path'); module.exports = ({ config, mode }) => { config.module.rules.push( { test: /\.css$/, loaders: [ { loader: 'postcss-loader', options: { sourceMap: true, config: { path: './.storybook/', }, }, }, ], include: path.resolve(__dirname, '../storybook/'), }, //This is the new block for the addon { test: /\.stories\.js?$/, loaders: [require.resolve('@storybook/addon-storysource/loader')], include: [path.resolve(__dirname, '../storybook')], enforce: 'pre', }, ); return config; };
Create the postcss.config.js under .storybook:
var tailwindcss = require('tailwindcss'); module.exports = { plugins: [ require('postcss-import')(), tailwindcss('./tailwind.config.js'), require('autoprefixer'), ], };
Make sure you have babel and svelte-loader dependencies yarn add -D babel-loader @babel/core svelte-loader
Add npm script in your package.json
{ "scripts": { // Rest of the scripts "stories": "start-storybook", "build-stories": "build-storybook" } }
Add a utils.css file under storybook/css/ and make sure you import 'utils.css' in your stories.js files:
/* Import Tailwind as Global Utils */ @import 'tailwindcss/base'; @import 'tailwindcss/components'; @import 'tailwindcss/utilities';
Write your Svelte component in storybook\components and yes you can use your regular .svelte file. The only thing is that you cant use templates in a story yet, not supported, but yes you can compose other components together. For the starter pack lets just create a clickable button.
<script> import { createEventDispatcher } from 'svelte'; export let text = ''; const dispatch = createEventDispatcher(); function onClick(event) { dispatch('click', event); } </script> <button class="bg-blue-500 hover:bg-blue-700 text-white font-bold py-2 px-4 rounded" on:click={onClick}> {text} </button>
Write your stories in storybook/stories and you can name any number of story file with <anything>.stories.js, for the starter package we can create stories of Button with the readme notes at <anything>.stories.md. Note: reference the css here to make sure that tailwind is called by postcss:
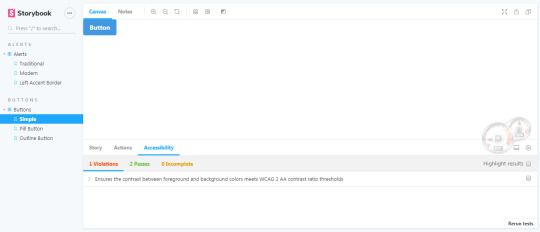
import '../../css/utils.css'; import { storiesOf } from '@storybook/svelte'; import ButtonSimple from '../../components/buttons/button-simple.svelte'; import markdownNotes from './buttons.stories.md'; storiesOf('Buttons | Buttons', module) //Simple Button .add( 'Simple', () => ({ Component: ButtonSimple, props: { text: 'Button' }, on: { click: action('I am logging in the actions tab too'), }, }), { notes: { markdown: markdownNotes } }, )
Write your own Documentation for the Component which will <anything>.stories.md :
# Buttons _Examples of building buttons with Tailwind CSS._ --- Tailwind doesn't include pre-designed button styles out of the box, but they're easy to build using existing utilities. Here are a few examples to help you get an idea of how to build components like this using Tailwind.
Run your storyboard yarn stories and you'll see this:
You can add more addons and play around with them.
That's a wrap!
#template#storybook#svelte#tailwindcss#ui#component#frontend#webdevelopment#postcss#purgecss#autoprefixer#node#javascript#css#html5
2 notes
·
View notes
Text
Npm minify

NPM MINIFY HOW TO
NPM MINIFY INSTALL
NPM MINIFY CODE
Webpack 5.5.0 compiled successfully in 6388 ms If you build the project now ( npm run build), you should notice that CSS has become smaller as it's missing comments and has been concatenated: ⬡ webpack: Build FinishedĪsset vendor.js 126 KiB (name: vendor ) (id hint: commons ) 2 related assetsĪsset main.js 3.32 KiB (name: main ) 2 related assetsĪsset 34.js 247 bytes 2 related assetsĪsset main.css 730 bytes (name: main ). const TerserPlugin = require ( "terser-webpack-plugin" ) To attach it to the configuration, define a part for it first: To get started, include the plugin to the project: npm add terser-webpack-plugin -develop To tune the defaults, we'll attach terser-webpack-plugin to the project so that it's possible to adjust it. In webpack, minification process is controlled through two configuration fields: optimization.minimize flag to toggle it and optimization.minimizer array to configure the process. Modifying JavaScript minification process #
NPM MINIFY CODE
Rewriting the parameters breaks code unless you take precautions against it in this case. For example, Angular 1 expects specific function parameter naming when using modules. Unsafe transformations can break code as they can lose something implicit the underlying code relies upon. Good examples of this include renaming variables or even removing entire blocks of code based on the fact that they are unreachable ( if (false)). Safe transformations do this without losing any meaning by rewriting code. The point of minification is to convert the code into a smaller form.
NPM MINIFY HOW TO
Compared to UglifyJS, the earlier standard for many projects, it's a future-oriented option.Īlthough webpack minifies the output by default, it's good to understand how to customize the behavior should you want to adjust it further or replace the minifier. Terser is an ES2015+ compatible JavaScript-minifier.
In package.Since webpack 4, the production output gets minified using terser by default.
NPM MINIFY INSTALL
It is possible to install two copies - global and local - like this: npm install uglify-js -global -save-dev The advantage of using -save-dev is that the dependency is listed in package.json so that when your code is placed on a different machine, running npm install installs all dependencies (except global ones). If you install globally with npm install -global uglifyjs, you don’t have to do this. node_modules/.bin/uglifyjs instead of just uglifyjs. node_modules/bin and if you want to run it directly from the command-line you need to write. Note: npm tools installed with -save-dev are located in.
Install in a terminal with npm install -save-dev uglify-js.
Major web browsers will run the minified code but show you the original code when you use their debugger).Ĭonfusingly there are two packages, uglify-js and uglify-es. Uglify can also produce a source map to your original TypeScript or ES6 code (source maps allow you to debug the minified code as if it was the original. Uglify-js is 100 times larger than jsmin ( 1.5MB vs 15KB) but has many more features, is more popular, and is still small compared to WebPack or the TypeScript compiler. "build" : "tsc -declaration & npm run minify" ,
In package.json in the "scripts" section, add a minify script that uses jsmin (replace name with the name of your JavaScript file, not your TypeScript file multiple filenames are allowed):.
Install in a terminal with npm install -save-dev jsmin.
It just removes spaces it does not shorten variable names so it does not provide the smallest possible size. This is a tiny (15KB), simple and old minifier, appropriate for simple programs/modules. Parcel’s production mode, parcel build, also uses a minifier. If you’re using webpack to build your code, webpack -p reportedly minifies the application using “UglifyJSPlugin”. tsc -declaration & tsc -removeComments) 1. As of 2018 there is no compiler option to avoid this (at least you can remove comments with "removeComments":true, but if you are producing a d.ts file this will also remove comments from the d.ts file unless you perform a separate comment-removing build that does not produce a d.ts file, e.g. Even if your TypeScript code uses two spaces for indentation and has compact expressions like x+1, the TypeScript compiler produces output with four spaces and adds spaces between things like x + 1. Unfortunately, the TypeScript compiler not only cannot produce minified output, it proactively wastes space. Obfuscators are closely related - their goal is to make code harder to understand. For this reason, we have minifiers to remove spaces, remove newlines and shorten variable names to a single character. Since web apps are sent over the internet, it’s good to keep them small so that the app loads quickly. Leave a comment Four ways to minify your code
0 notes
Text
JavaScript 的壓縮器 esbuild
esbuild 是個 JavaScript bundler & minifier,在 GitHub 上的副標提到了重點在於速度:
An extremely fast JavaScript bundler and minifier
從壓縮時間可以看出來優勢:

另外從最終的檔案大小也可以看出來,與最小的 rollup + terser 組合沒有差太多:

實際拿個 jQuery 跑看看,可以看出來壓縮的效果還行:
-rw-r--r-- 1 gslin staff 89228 Feb 19 06:03 jquery-3.4.1-esbuild.min.js -rw-r--r-- 1 gslin staff 280364 May 2 2019 jquery-3.4.1.js -rw-r--r-- 1 gslin staff 88145 May 2 2019 jquery-3.4.1.min.js
View On WordPress
0 notes
Text
RT @adamvarga_: #Magento #Performance I finally achieved something with the Magento 2 performance. I load the JS files defer and bundled this with RequireJS Optimizer. The JS data is minified extra with Terser. @willemwigman Thank you for the detailed presentation at the @MageUnConf. https://t.co/PN2OPOM1ai
#Magento #Performance I finally achieved something with the Magento 2 performance. I load the JS files defer and bundled this with RequireJS Optimizer. The JS data is minified extra with Terser. @willemwigman Thank you for the detailed presentation at the @MageUnConf. pic.twitter.com/PN2OPOM1ai
— adamvarga (@adamvarga_) February 9, 2020
from Twitter https://twitter.com/fbeardev
0 notes