#TiallusTutorials
Explore tagged Tumblr posts
Visit Tumblr Blog
Explore Tumblr blogs with no restrictions, modern design and the best experience.
Last Seen Tumblr Blogs


Fun Fact
China blocked Tumblr because of pornography and censorship problems in 2013.
Text
What's this? Only me dropping by because I wrote another tutorial. It wouldn't be me if I didn't share it with everyone who might be interested or uninterested. I want you to know that cool thing (tm), too.
44 notes
·
View notes
Text
Tutorial: Camera Position Hotkeys in TAB Mode
Does this sound familiar? You want to take several screenshots from the exact same angle be it for a story, a lookbook, or a CC preview. You tab into free camera mode, take your screenshot, tab out, change poses, tab into free camera mode, and struggle to remember/find the exact camera angle again. Lather, rinse, rage-quit repeat. I did struggle with that. I looked and asked around for a solution, even if it was yet another mod that did what EA failed to do. One day someone dropped a hint, there was a way to set the camera postion, but they didn’t tell how. I used all my google-fu skills and finally found out how to do it. It’s a lifesaver. A fair warning: If you’re anything like me, you’ll use it whenever you take screenhots from now on, just because you can.
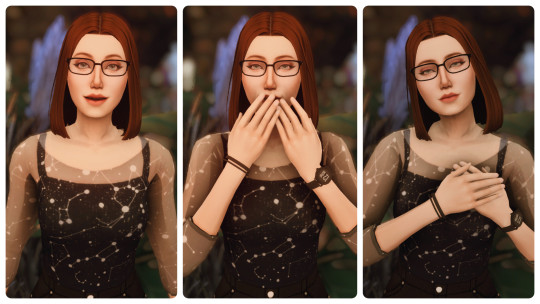
Here’s how you can take a picture series like this.
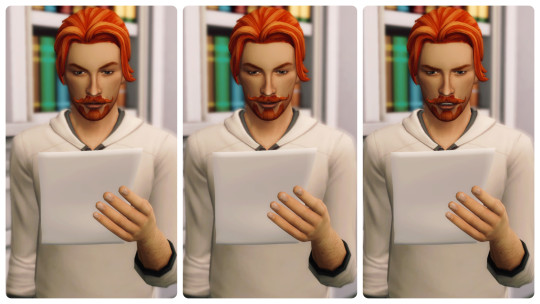
Or this.
1. How to set hotkeys
Press TAB to switch into free camera mode.
Set-up your shot. If you’re happy with it,...
Press CTRL+ 5-8 (top row, not numpad) to save the camera angle.
You can save 4 different camera positions. They’ll be assigned to that hotkey until you overwrite them. Although key 4 is said to be usable as camera hotkey, too it doesn’t work for me.
2. How to use the hotkeys
Press TAB to switch back into free camera mode.
Press key 5-8 and the camera will move back to the saved position. Voila!
Tip: As long as you’re in game mode zoom out as far as you can before re-entering TAB mode. This way all faded-out objects will be visible in TAB mode again. Hit TAB, then your hotkey and enjoy a little tracking shot.
Have fun taking your screenshots! Maybe @thefoxburyinstitute finds this worth sharing? I have a feeling this feature is so unknown, it’s almost like an easter egg. It took me almost three years until I found out.
#TialluRambles#TiallusTutorials#SimsTutorial#sims camera modes#ts4#the sims 4#ts4 screenshots#the sims 4 screenshots#sims tab camera#sims hotkeys
2K notes
·
View notes
Text
Tutorial: Adding Occult Tags to Body Presets using Morph Maker
Imagine this: You find a huge set of body presets, download it, put into your mod folder, and load the presets into your game. Only to realize they don’t show up for all occult sims in CAS. Unfortunately, a batchfix to add those tags, or an updated version of the presets doesn’t seem to exist. It’s DIY then. There are tutorials on how to add these tags with S4S, but there is an even more convenient tool for Windows computers to add the tags: CymarNYC’s MorphMaker.
Step one: Download and unzip the latest version of MorphMaker No need to run an installer.
Caution! If you’re from a country that uses a comma as decimal marker download version 4.3.1.0 from forum post #404 instead. You may have to scroll up a little. Although the top bar still says Morph Maker 4.3.0.0., this version will work with commas. Morph Maker 4.3.1.0
Step two: Make a backup of the file you want to edit. Better safe than sorry. Open MorphMaker by running TS4MorphMaker(.exe) from its folder. Windows will ask you if you really want to run the program at that point. Agree.
Step three: MorphMaker automatically detects your Sims folder and your mod folder. Check if the paths are correct by clicking on Setup.

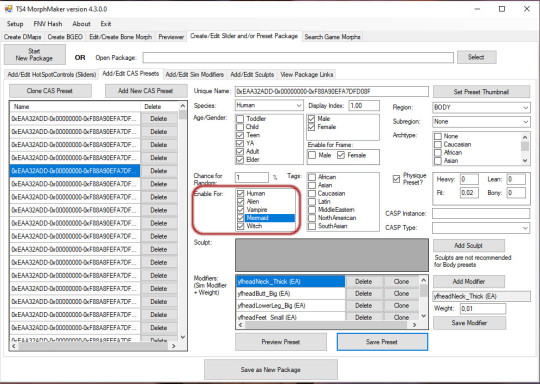
Step four: At first glance MorphMaker looks quite intimidating. To edit tags click on the Create/Edit Slider and/or Preset Package tab. Open the file you want to edit by clicking on Select. Depending on how much data the file contains, MorphMaker might need a while to process it and may even become unresponsive. Just wait.

Step five: As soon as MorphMaker is ready, go to the Add/Edit CAS Presets tab. On the left hand you’ll see all presets included in your file. You now need to edit every single one to enable them for your occults in CAS. Select a preset on the left and then check the missing occult types in the Enable for: box. Done. That’s it.


You can save after every single edit by clicking on Save Preset, or save the entire package from time to time.
If you have any questions feel free to send me an ask. Anon asks are turned off, if you want me to respond privately include a 🤐 (zippered mouth emoji) in your message. Happy simming!
Tag: @thefoxburyinstitute
#TiallusTutorials#tutorial#CymarNYC MorphMaker#MorphMaker#CymarNYC#TialluRambles#SimsTutorial#Sims Tutorial#ts4#the sims 4
96 notes
·
View notes
Text
Did you know?
The light which vampire eyes -- no matter if Vanilla or CC -- are emitting shines through facepaint eyes. This gives you very interesting or creepy effects if you layer facepaint eyes on top. Now imagine the possibilities.
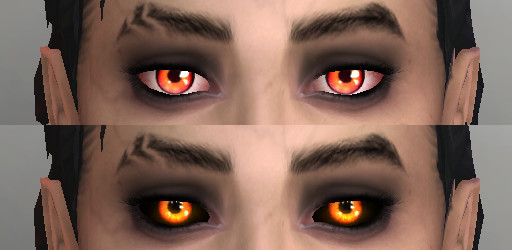
Pic 1: Pyxis’s Aloha vampire eye replacements Pic 2: Pyxis’s Rainbow Demon Facepaint Eyes layered over those.
25 notes
·
View notes
Text
I feel like I just got blessed by the lord himself when reading this.
Tutorial: Camera Position Hotkeys in TAB Mode
Does this sound familiar? You want to take several screenshots from the exact same angle be it for a story, a lookbook, or a CC preview. You tab into free camera mode, take your screenshot, tab out, change poses, tab into free camera mode, and struggle to remember/find the exact camera angle again. Lather, rinse, rage-quit repeat. I did struggle with that. I looked and asked around for a solution, even if it was yet another mod that did what EA failed to do. One day someone dropped a hint, there was a way to set the camera postion, but they didn’t tell how. I used all my google-fu skills and finally found out how to do it. It’s a lifesaver. A fair warning: If you’re anything like me, you’ll use it whenever you take screenhots from now on, just because you can.
Here’s how you can take a picture series like this.
Or this.
1. How to set hotkeys
Press TAB to switch into free camera mode.
Set-up your shot. If you’re happy with it,…
Press CTRL+ 5-9 (top row, not numpad) to save the camera angle.
You can save 5 different camera positions. They’ll be assigned to that hotkey until you overwrite them. Although key 4 is said to be usable as camera hotkey, too it doesn’t work for me.
2. How to use the hotkeys
Press TAB to switch back into free camera mode.
Press key 5-9 and the camera will move back to the saved position. Voila!
Tip: As long as you’re in game mode zoom out as far as you can before re-entering TAB mode. This way all faded-out objects will be visible in TAB mode again. Hit TAB, then your hotkey and enjoy a little tracking shot.
Have fun taking your screenshots! Maybe @thefoxburyinstitute finds this worth sharing? I have a feeling this feature is so unknown, it’s almost like an easter egg. It took me almost three years until I found out.
2K notes
·
View notes