#the sims 4 tutorial
Explore tagged Tumblr posts
Visit Tumblr Blog
Explore Tumblr blogs with no restrictions, modern design and the best experience.
Last Seen Tumblr Blogs


Fun Fact
US Tumblr user growth rate is estimated to slow down to 4.1%.
Text
How to unlock the event rewards from that daily login desaster:
Click in the filters on -> Special and tick 'Event Rewards' Then click on -> Colors and tick all the color boxes!
In case they patch it out, make sure to save all the objects in a room in your gallery :3


126 notes
·
View notes
Text
How to make a UI Emotion Pose Override
I figured I'd explain how I made the UI Emotions pose overrides for Sims 4. This guide assumes you know how to make a pose and know Blender basics, it just explains how you find the relevant files to override and other little bits. I did search and couldn't find a tutorial for this, but maybe I didn't look hard enough. These aren't too tricky to make, and also for me make a pretty big difference in not having to look at EA animations / poses as much, haha.
You will need Blender, Sims 4 Studio and MCCC for easily achieving the relevant moods for testing.

Go to Animation > Override on Sims 4. Click the Animation button.

Type in ui_mood_ into the search bar and it will bring up all of the mood UI poses, the ones that appear in the bottom left of the screen. a_ui is the Adult poses, c_ui is Child poses. There's also i_ui which I assume is Infant, and p_ui which is Toddler. We'll edit an adult UI pose for this.
Some of them have different names to in-game: Depression - Very Sad, Elated - Very Happy, Fearless - Very Confident, In the Zone - Very Focused, Miserable - Very Uncomfortable, Pumped - Very Energised, Frustrated - Very Tense, Passionate - Very Flirty, Imaginative - Very Inspired.

This is an example from the Sims Wiki, even though this doesn't look too exaggerated on this particular example, I always thought this expression seemed a bit too cheery for some of the small things Sims get +1 happy about. (Hey, if we can't be happy then neither can any of our pixel dolls.) So let's find the one labelled 'happy' a_ui_mood_happy_x and open it. Leave the dropdown as Adult Female, then click Export and save the .blend file.
Open it in Blender, and then press 5 on the NumPad to set it to Ortho view. Now you have to try and move the view around to get the 3d viewpoint as close as possible to the rough viewpoint of the appearance of the emotion in-game. Use a screenshot of the Emotion as reference.

Once you have a similar enough viewpoint (this is more or less at the same angle as the UI pose), then make sure you Save and I recommend naming this file 'BASE' or something. This way, if you want to make more than one emotion override for the different emotions. Saves having to find the correct 'view' for every exported pose. Now it's time to make your pose!
Limitations to bear in mind: - You can't have anything that is too far forwards, like a hand reaching forward or something or it will cut off those parts (I tried a pose with the hands facing right the way forward for the 'possessed' emotion for a kind of 'grabbing at the viewer' effect, and they just are invisible if you do that) and you have to keep the arms relatively close to the body or they will also be cut off in-game if they are out to the sides too much.

This is the one I made, which is much more subtle and more suitably 'normal happy'. This tutorial assumes you know how to make a pose, so LocRot and lock in the pose on the 0th frame. Save, then go back to Sims 4 Studio, Import on the same screen you Exported the .blend on, import the new pose .blend file, then Save. Then put the .package in your Mods folder.
After that, you need to go to My Documents / Electronic Arts / The Sims 4 (or your equivalent on your computer). In this folder you'll see a file called localthumbcache.package. Delete it, otherwise you won't see your new pose in-game since it stores the emotion thumbnails.
Once you've done that, boot the game. With MCCC, if you shift-click a Sim it should give you an option to Cheat Emotions if you need to (you can use these multiple times to get the level of emotion you need depending on what Emotions you've made overrides for) to test how it looks in-game.


The top left is the new, more subtle Happy pose which I greatly prefer. The rest are examples of other poses that are part of my (free) UI Pose Overrides. The 'Very Happy' gives you an idea of the space you have and where the 'cut-off' points are.
You can easily take the overrides out without issues as well if you change your mind or want to try out new ones, you just need to delete the 'localthumbcache' package each time you add or delete a pose override so it can 'reset' the portrait images and show the right poses.
#freezerbnuuy#the sims 4 tutorial#sims 4 pose tutorial#sims 4 tutorial#sims 4 cc tutorial#ts4 tutorial
13 notes
·
View notes
Text
youtube
How To Create A Realistic Sims 4 Save File (Step-by-Step Tutorial + Tips) | The Sims 4
In this video, I demonstrate how I create my realistic and detailed save files, starting with the charming town of Henford on Bagley.
#bougiechloe#bougie chloe#bougiechloe cc#bougie chloe builds#sims 4 gameplay#the sims community#sims 4 save file#sims 4 saves#the sims 4#ts4#ts4 simblr#my sims#Youtube#sims 4 screenshots#sims 4 cc#sims 4 custom content#simblr#the sims 4 tutorial#ts4 tutorial#sims 4 tutorial#sims 4#the sims#the sims 4 cc#henford on bagley#cottagecore#cottage aesthetic#simblog#ts4 simbrl#show your sims#ts4 save file
116 notes
·
View notes
Text
Gallery downloader by Anadius
You can view The Sims 4 Gallery by creating free EA account. To download from it you need to install the UserScript created by Anadius. To do so you need a browser add-on:
If you have Chrome, install Tampermonkey or Violentmonkey
If you have Firefox, install Greasemonkey, Tampermonkey or Violentmonkey.
Here some easy tutorials to do so:
tutorial for Chrome + Tampermonkey
tutorial for Firefox + Greasemonkey
And here an easy guide to install tray files:
tutorial for "installing" downloaded files
#vavuskapakage#the sims 4 gallery#The sims 4 anadius#the sims 4 download#ts4 gallery#ts4 download#Ts4 anadius#sims 4 download#sims 4 gallery#anadius#fuck ea#sims 4 tray files#sims 4 tutorial#Ts4 tray files#ts4 tutorial#The sims 4 tray files#the sims 4 tutorial#UserScript#github#boycott ea
14 notes
·
View notes
Text
youtube
Scared of TOOL? Don't worry, I got you! 💖
This is a super gentle, very friendly beginner's guide to using the TOOL mod. I will almost literally hold you hands through it. I always get questions about how to use the amazing mod by TwistedMexi, so I hope this helps!
Download the mod from twistedmexi.com!
#the sims 4#sims 4#ts4#chermibear#sims#ts4 simblr#tool mod#the sims 4 tool mod#twistedmexi tool#twistedmexi#the sims 4 tutorial#ts4 tutorial#sims 4 build#ts4 build tutorial#Youtube
5 notes
·
View notes
Text
5th try at writing the guide on custom pet paint mode brushes, if tumblr manages to mess this one up i will have a fit
16/10/2023 Edited: Updated to add better hash ID generating practices.
Things you'll need:
Sims 4 Studio
GIMP
Notepad
Guide:
Tools that we will be using:

We'll begin by creating a new, empty package.
Save it somewhere convenient and easy to access.
Once you've saved the package, you'll be met with this screen:

From here, we'll go to Tools > Game File Cruiser
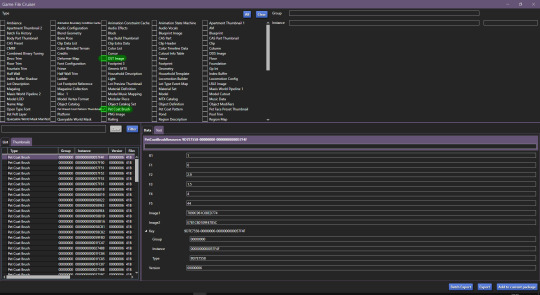
We'll be working with Pet Coat Brush files and DST Image, but for now we'll only select Pet Coat Brush file, so that it's easier for us.
I've selected the first brush file and I've highlighted the piece of data we'll need to use.
We'll have to use the Game File Cruiser search function, but first, press "Add to current package". When you've gotten the hang of this, you can explore the pre-existing brush files and decide which one you'd prefer to use as your base, all are different and correspond to different brushes/stamps in-game.
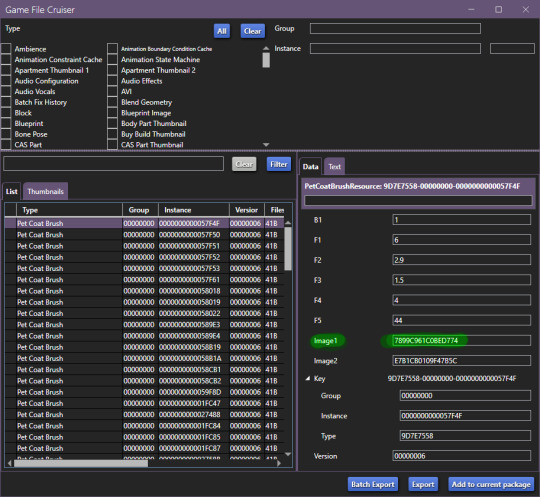
Once you've clicked on "add to current package" your package editor should look like this:

Now we'll copy the Image1 ID and go back to Game File Cruiser, select DST Image from the file type list and enter the ID into the search bar:

Now, click "Add to current package" and now the package file you're working on will look like this:

Before we move further, we need to generate new instance ID's, we'll need 3 of them.
Go to Tools > Hash Generator

Edited 16/10/2023: When generating your hash ID's, please use your creator name ie.: "[YourCreatorName/Blogname]TutorialCustomFurCoat1", this will give you a more unique hash code than hoping to be as descriptive as possible when generating the hashes (in this case instance ID's).
Thanks to Mizore Yukii for this advice, from Creator's Musings.
In the "text" field, enter whatever text you want, I just go with the item name/description + a number, to indicate which ID it is.
We'll need 3 of FNV64 hash codes.
These are the 3 ID's that I've generated:
514EF7FCFA080185
514EF7FCFA080186
514EF7FCFA080187
We'll use the first code for the Pet Coat Brush file, the second code for Image1 (Brush file) and the third for Image2 (Brush icon file).
Your Pet Coat Brush file should look like this now, with the updated ID's.
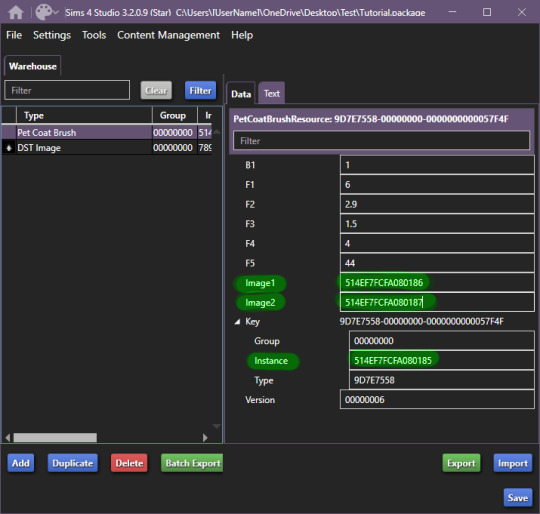
Moving forward, we'll be changing the ID for the DST Image1 (Brush in-game) -

Now that you've done this, you need to right click on DST Images > Duplicate, you'll be prompted with this window:
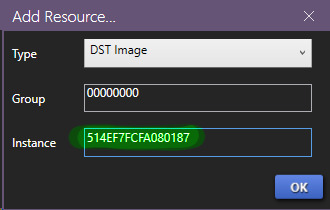
In this window, you'll use the last hash code you generated for the Image2 new ID (in-game icon).
Now! It'll all look like this:

To edit the brush we'll be seeing in-game, we'll now have to edit the image, begin by exporting the image available in DST Image.
Once that's done, open it up in whatever editing software you want to use, I'll be using GIMP, because it has built in DDS exporter, I recommend you do the same, however if not interested in doing so, make sure your program can export DDS images in L8 format, if not, edit in preferred software and use GIMP to export as DDS.
Once you've made your brush, you'll want to do as follows:

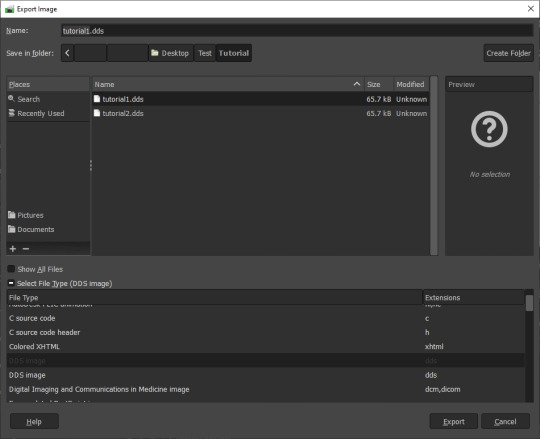

IMPORTANT
It MUST be exported in the format L8, it will appear broken in-game otherwise.
Then, import your custom made brush into S4S package editor:
Do the same for the icon:

You've got the easiest part down, now, comes the part with testing how well the brush works and behaves in-game.
The responsibility of this falls onto the values you may have seen in Pet Coat Brush file -
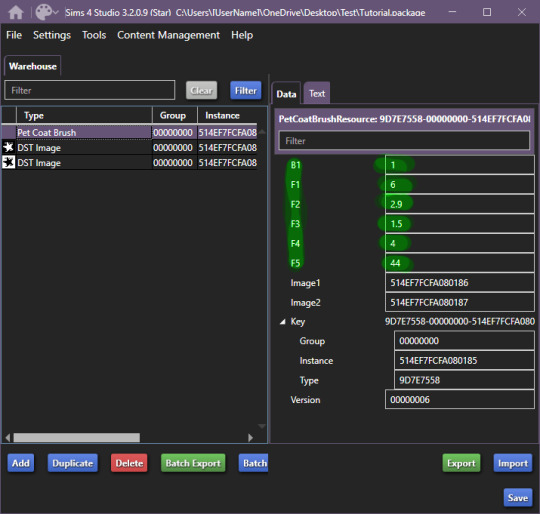
These are the values responsible for how the brush works in-game.
I'll be upfront right now, I can't get the rotation value to work, I'm not sure if I'm doing something incorrectly, but if I figure it out, I'll add to the guide eventually. I haven't had time to test this further, but as far as I've been able to test it, it works like a charm.
These are the value meanings -
Sorry for how lazy this is presented, as once I figured out the basic meaning, I moved forward.
B1 is responsible for sorting on whether your brush is considered a Brush or a Stamp. 0 & 2 - Brush, 1 & 3 Stamp EDITED 24/10/2023: 0 is non-rotating brush, 2 is a rotating brush!
For F1, I do NOT recommend using 0 or 5, when I tested these values in-game, they were extremely laggy when attempting to paint. 1 - Smooth Painting, 2 - Spaced Apart Slightly, Overlap, 3 - Spaced One After Another, Some Overlap, 4 - Spaced One After Another, No Overlap
F2 changes the size of the brush in-game, meaning how small it can be, I believe. 0 - 1px smallest size brush, scaling up changes how small the brush can get.
F3 I suspect is brush rotation, but I could not make it work on any of the brushes I tried making, so I'm not 100 sure. This is one of the brushes you'll have to look at values for in the existing in-game brush files, as I could not get this to work for myself.
F4 is the maximum the size of the brush will become. Maximum size the brush can get, I've tested it from 0 to 5, 5 is quite large, so I recommend that, but go for smaller as well.
F5 I'm not entirely sure, however during my testing, I found that this changes where exactly the brush appears in both stamps and brush tabs in-game. There may be more to it, however, I could not figure it out. The values I tested for this were 0, 1 and 2, this affected where the item appeared - 0 - First Row, First Item, 1, First Row, 2nd Item, 2 - 2nd Row, First Item, I've seen that these can go quite high, ie the base file I used being 44, so keep that in mind while changing this setting. For my personal brushes I use 0.
I recommend comparing existing brush files to the one you're looking to edit.
I believe this is it. If there are any questions, I'll try to answer as best as I can. If anyone wants to add anything to this, please do so, I'll be elated to update and credit you for the information shared.
This all came to be because I could not find a guide, but fortunately for me, I'm too good at figuring things out and even though I didn't quite understand how the Game File Cruiser worked a few days ago, I've consumed so much information it hurts my brain.
Forgot to add: Finished product
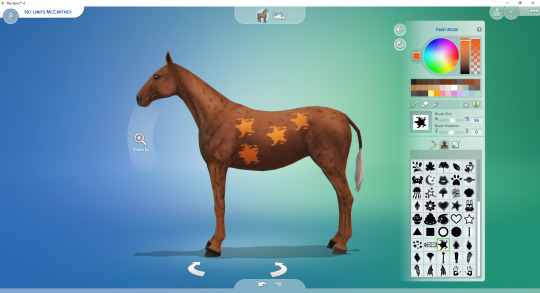
Because I didn't edit the Pet Coat Brush file I was working on, I've made a stamp, I recommend messing around for a while though and finding what you prefer. The values themselves are pretty easy and forgiving to edit.
So account for that, you'll definitely want to edit the values responsible for the brush working correctly. If you have any questions, please let me know, I tried to make this as clear as possible, and I know this is probably over the top for a guide, but I'm the kind of person who needs every small direction, to even know what I'm doing, when I'm following a guide.
UPDATED AGAIN, I FORGOT TO ADD THE ACTUAL VALUES I FOUND.
#The Sims 4 Guide#The Sims 4 Horse Ranch#The Sims 4 Custom Brushes#The Sims 4 CC guide#TS4 CC Guide#TS4 Horse Ranch#TS4 Horses#The Sims 4 Horses#Sims 4 Horses#Sims 4#Sims 4 Horse Ranch#The Sims 4 Tutorial#Sorry if this isn't a great guide#i tried really had and nearly had an aneurysm because tumblr deleted my previous attempts like 4 times
90 notes
·
View notes
Text
What's this? Only me dropping by because I wrote another tutorial. It wouldn't be me if I didn't share it with everyone who might be interested or uninterested. I want you to know that cool thing (tm), too.
44 notes
·
View notes
Text
🎓 DIY Tutorial - Disinfecting "CAS Unlock" sims with modded Sim Presets!
👹 Learn more about "CAS Unlock" sims here: https://../collection/1206184?view=condensed
💬 I loathe "CAS Unlock" sims. Many of them are outdated, buggy, and broken, and if you're not careful, they will "infect" your Saved Game and your Library / Tray households. There are two ways to "disinfect" a "CAS Unlock" sim that I know of - Live Mode and modded Sim Presets.
🌸 Special thanks to @simplyanjuta for their "Custom Starting Sims for CAS" tutorial that I repurposed for my war against "CAS Unlock" sims. I've got another tutorial based off their "Starting Sims" tutorial to do as well.
#sejianismodding#sejianisdisinfecting#sejian ts4 cas unlock destroyed#cas unlock sims are a plague that needs to be destroyed#the sims 4#ts4#sims 4#the sims 4 tutorial#ts4 tutorial#sims 4 tutorial
4 notes
·
View notes
Text

sneak peak at my video releasing Friday!
( ๑‾̀◡‾́)σ"
Since I've gotten a lot of setup questions I decided to make a video to direct anyone confused about where to start and or upgrade their specs for pc gaming :) I give a tour of my recording setup, provide a complete guide to buying laptops, diy desktops, or prebuilts for the sims 4 and more!
link to channel I specs masterlist

also 1k?!! I'm so happy that people enjoy my content so far. Your support means everything and gives me the motivation to keep going.
#simblr#the sims 4#the sims community#ts4#sims#the sims#ts4 screenshots#my sims#the sims 4 edit#the sims screenshots#gaming setup#pc games#gaming#the sims 4 tutorial#sims 4#ts4 simblr#ts4 build#the sims build#wip#the sims interior#the sims exterior#ts4 save file#ts4 gameplay#show us your sims#sims 4 edit#showusyoursims#ts4 edit#Youtube
13 notes
·
View notes
Text

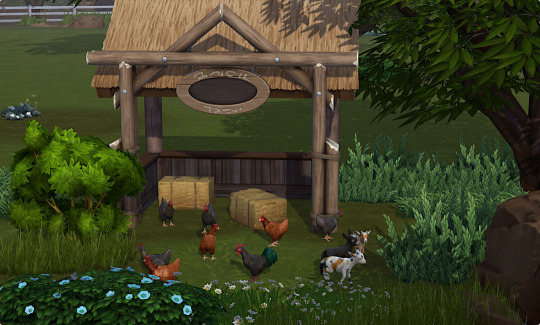
Tutorial
'Fenceless' goat/sheep enclosure Use the 'Hazard Tape', the goats/sheep won't cross it. Then decorate to your liking to cover up the tape :3
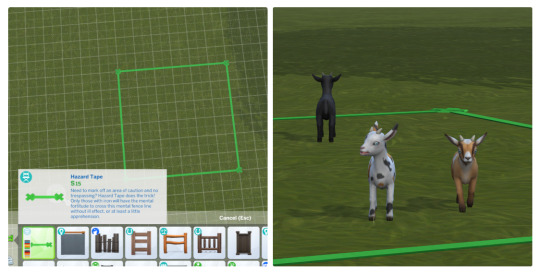
EDIT: Chicken stay inside too!
#ts4 tutorial#the sims 4 tutorial#simblr#sims 4 horse ranch#sims 4#ts4#goats#chestnut ridge#rider's glen
495 notes
·
View notes
Text
youtube
Hate everything default in The Sims like I do? Well, now here's a super easy way to replace default underwear and/or eyes that are originally face paint!
ALWAYS respect the creator's TOU's
Sims 4 Studio / https://sims4studio.com/
Slephora's Muddy Eyes Used / https://www.patreon.com/posts/muddy-eyes-105325507?utm_medium=clipboard_copy&utm_source=copyLink&utm_campaign=postshare_fan&utm_content=web_share
TSR's Sims House / https://www.thesimsresource.com/members/Sims_House
PROTYPE ID code / 00001D8E
NOTE THAT IF FOR SOME REASON THE BRA IS SHOWN ON MALE FRAME SIMPLY GO INTO THE PACKAGE FILE IN S4S, CLICK ON CATEGORIES AND SCROLL DOWN TO WHERE IT SAYS RESTRICT OPPOSITE GENDER THEN CLICK SAVE
My CAS background can be found here I use #2 / https://www.patreon.com/posts/creamd-mirrored-95618469?utm_medium=clipboard_copy&utm_source=copyLink&utm_campaign=postshare_creator&utm_content=join_link
Stand still in CAS mod found here / https://modthesims.info/d/630172/stand-still-in-cas-shimrod101-amp-shooksims.html
⭐ Plumbaleena is an avid supporter of the NON gatekeeping community. Too many of The Sims community members gatekeep like their life depends on it. Around here, we believe that the more you know together, the better this community becomes.
⭐ Stop gatekeeping and letting egos get in the way. Practice humility.
"By sharing the things we love we can support creators and enrich our cultural landscape. The next time we're tempted to hide away our favorite finds, let's remember that true appreciation includes showing off the things we love".
#the sims 4#the sims 4 cas#the sims 4 tutorial#ts4 cas#ts4 cc#the sims 4 cc#the sims 4 custom content#thesims4#ts4#thesims#maxis match#maxis match cc#maxismatch#showusyoursims#sims4cc#Youtube
10 notes
·
View notes
Text
TheStarTome A Sims 4 Lightmaptex tutorial. ✨💖✨

Credits for tutorials that made this tutorial possible:
•orangemittens •@sp-creates •@alistu •sim_man123
This would not be possible without the help of
•@brainstrip •@aj-nebula •@itsonlythee-sims
I thank you all, I am ever grateful for your help!
#TheStarTome#thestartome#thestartome-tutorials#sims 4#sims 4 simblr#sims 4 custom content tutorial#the sims 4 tutorial#sims 4 cc tutorial#ts4 tutorial#sims 4 tutorial#tutorial#cc tutorial#the sims 4 custom content#content creator
12 notes
·
View notes
Text
Tutorial - Como ter duas pastas de jogo The Sims 4 para temáticas diferentes.
Sim, você pode ter duas pastas de jogo ou mais sem precisar instalar o jogo mais de uma vez e isso é ensinado pelo próprio fórum da EA Games. O texto é grande, mas é rico em informações muito importantes, então não tenha preguiça de ler até o fim.
Perguntas:
Mas quais os benefícios disso? R.: Ao ter mais de uma pasta do jogo, você pode ter em uma pasta diversos conteúdos Overrides históricos, enquanto nas outras pastas você pode ter seus baunilhas e ou até mesmo ter uma pasta sem conteúdos nenhum se acaso você ocasionalmente quiser jogar o jogo cru (às vezes isso é bom).
Meu jogo é original, eu consigo fazer isso nele? R.: Sim, pois esse método é válido para ambos já que ambos funcionam da mesma forma.
É complicado fazer? R.: Não, mas isso requer muita atenção. Esse método se feito corretamente, também serve como meio de BackUp e como já mencionado, é ensinado no próprio fórum da EA Games e é muito utilizado por muitos jogadores. Nós mesmos usamos esse método há anos e anos sem nenhum problema, mas como mencionado, isso requer muita atenção.
É seguro? R.: Como é enfatizado no próprio fórum da EA Games, se feito corretamente e com muita atenção, não há problema algum, então sim, é um método seguro, no entanto, assim como é enfatizado no fórum, eu também enfatizarei aqui: Todo e qualquer erro, não é culpa do método e nem nosso, mas seu, pois o método não é falho e muitos usuários utilizam há anos sem problema algum. Então leia tudo primeiramente antes para que você entenda como que essa mecânica funciona para que você fique e faça tranquilamente após a compreensão desse método.
Todo mundo precisa ter isso? R.: Não, esse método é mais indicado para quem joga assiduamente (constantemente e ou permanente) temas históricos e também outros temas ocasionais o quais ambos utilizem arquivos overrides de temas distintos para um mesmo propósito. Então se você só quer jogar em modo histórico uma única vez ou ocasionalmente com novas famílias e poucos conteúdos temáticos, você não precisa fazer isso a menos que você queira.
E os Mods não CC como por exemplo o UI Cheats e o MCCC, dentre outros em alusão, eu precisarei baixá-los duas vezes? R.: Não, mas se você precisar usá-los em ambas as pastas, você precisará tê-los em ambas as pastas (irei explicar isso mais abaixo após as perguntas), mas de resumo, para tê-los em ambas as pastas, basta baixá-los uma vez e após extrai-los em uma de suas pastas, basta copiá-los para as demais pastas do jogo de seu interesse e o mesmo serve para atualização, ou seja, baixe-os apenas uma vez e os copie-os para as demais pastas.
Duas coisas que você precisa entender:
A primeira é que o jogo possui dois diretórios de pastas distintas, sendo uma a pasta do jogo em si localizada em um diretório (onde o jogo foi instalado) e serve para o funcionamento do jogo (pasta principal - não iremos mexer nela) e outra pasta que contém os dados (históricos e registros) de sua jogabilidade/gameplay, e é nessa segunda que iremos trabalhar e não se preocupe que essa pasta não compromete a pasta principal de seu jogo, pois como já explicado, essa pasta é somente uma pasta de leitura de dados de sua gameplay. A segunda é que o sistema do Windows não permite que você tenha duas pastas com o mesmo nome, ou seja, sempre que você tiver duas pastas com o mesmo nome, ele sempre irá fundi-las e é aí que você deve ter cuidado.
Passo-a-passo:
1- Primeiro passo: Vá até sua pasta The Sims 4 (não é a pasta principal do jogo, mas sim aquela que contém sua pasta Mods). Geralmente essa pasta fica em "Meus Documentos/Eletronic Arts", e é dentro dessa pasta Eletronic Arts, terá todas suas demais pastas The Sims 4, a diferença é o pulo do gato, ou seja, não importa quantas pastas você terá dentro da pasta Eletronic Arts, o jogo apenas irá ler a pasta que estiver somente com o nome The Sims 4, ou seja, se você tiver qualquer outra pasta com outro nome (por exemplo: The Sims 4 Histórico), o jogo não irá lê-la, pois qualquer outra palavra como no caso "Histórico" faz parte do nome da pasta, e como já dito, o jogo só irá ler a pasta com o nome The Sims 4. Agora que você entendeu isso, vamos criar uma segunda pasta: Clique sobre o nome da pasta The Sims 4, e renomeia para qualquer outro nome (por exemplo: The Sims 4 Histórico). ATENÇÃO: Tenha MUITO CUIDADO PARA NÃO CLICAR ACIDENTALMENTE EM EXCLUIR, pois como já dissemos, se você fizer isso a culpa não é nossa, é da sua falta de atenção.

2- Segundo passo: Após renomear a pasta, inicie seu jogo normalmente. Como o jogo não encontrará uma pasta somente com o nome The Sims 4, isso fará com que o jogo crie automaticamente uma nova pasta somente com o nome The Sims 4, mas não se preocupe, a outra pasta renomeada não será apagada. Agora basta você ir para o Menu do jogo e habilitar as duas funções de conteúdos personalizados e scripts, clique em aplicar e em seguida feche o jogo. Agora você tem duas pastas dentro da pasta Eletronic Arts, uma zerada/novinha e outra renomeada. Tecnicamente, o tutorial é somente isso e você pode fazer quantas vezes você quiser e ou precisar e por assim tendo pastas diferentes para temas diferentes, mas agora iremos explicar como migrar de uma pasta para outra quando você quiser jogar o que tiver na outra pasta. Você se lembra que falamos amiúde aqui nesta publicação que o jogo apenas lê a pasta com o nome The Sims 4 e não irá ler nenhuma outra que contiver qualquer outro nome? Pois então, para você poder jogar com os dados e conteúdos da outra pasta, você terá que fazer a troca dos nomes das pastas The Sims 4 e The Sims 4 Renomeada, entretanto, não se esqueça do que explicamos sobre o sistema do Windows sobre pastas com o mesmo nome, ou seja, pastas com o mesmo nome é fundida, então para evitar que isso aconteça, na hora de trocar os nomes das pastas, renomeie sempre primeiro a pasta The Sims 4 ADICIONANDO um nome de referência, para só depois você renomear a pasta que você quiser jogar para apenas The Sims 4 (a qual será a que você quer que o jogo leia). Abaixo, deixo um print de minhas pastas para que você entenda melhor como eu usufruo disso. Na pasta The Sims 4 é minha pasta atualmente ativa (a que estou usando/jogando no momento), dentro dessa pasta eu tenho conteúdos futurísticos (CC, Mods e Overrides) e ficaria muito estranho e ou até conflituoso ter tais conteúdos dentro da pasta com CC, Mods e Overrides de temas Medievais, então por isso que eu criei outra pasta somente para conteúdos Medievais. Quando eu quiser jogar com conteúdos Medievais, primeiramente eu renomeio a pasta The Sims 4 para The Sims 4 - Futurístico, para depois renomear a pasta The Sims 4 - Medieval para somente The Sims 4.

Só tomem cuidado para não clicar acidentalmente em excluir e ou para não fundirem as pastas na hora de renomeá-las.
Outras perguntas:
E se eu quiser ter um Mod em ambas as pastas? R.: Como já explicado, para tê-los em ambas as pastas, basta baixá-los uma única vez em uma de suas pastas, extrai-los, e copiá-los para as demais pastas Mods de seu interesse organizando-os em suas respectivas subpastas e o mesmo serve para atualizações.
Quanto isso irá pesar? R.: O peso será o mesmo de todos os seus arquivos (conteúdos) somado com o pequeno adicional da pasta de dados do jogo. Logo então, não é muito, pois o que pesa mesmo são os conteúdos que você baixa.
Isso deixará o jogo mais lento? R.: Não, pois a lentidão do jogo está associado mais para o processamento e para a organização de suas pastas. Daremos algumas dicas mais abaixo sobre isso.
Como você organiza suas pastas Mods? R.: A organização da pasta Mods é algo pessoal, mas irei deixar aqui um exemplo breve de como eu organizo tudo.
Básico:
📂Mods --📁MOD_NomeDoMod (esta é uma subpasta nível 01) --📁MOD_NomeDoMod (esta é uma subpasta nível 01) --📁MOD_NomeDoMod (esta é uma subpasta nível 01) --📁Overrides (esta é uma subpasta nível 01) -----📂Subpasta_Nível02 -----📂Subpasta_Nível02 --📁CC_Criadores (esta é uma subpasta nível 01) -----📂Subpasta_Nível02 --------📂Subpasta_Nível03 -----📂Subpasta_Nível02 --------📂Subpasta_Nível03 --📜Rsource.cfg Como fica:
📂Mods --📁MOD_llazyneiph_Royalty (pode renomear) -----📂Subpasta (não pode renomear) -----📂Subpasta (não pode renomear) -----📜Arquivo_Solto.package -----📑Arvivo_Solto.ts4script --📁MOD_MCCC (pode renomear) -----📜Arquivo_Solto.package -----📑Arvivo_Solto.ts4script --📁MOD_UI_Cheats (pode renomear) -----📜Arquivo_Solto.package -----📑Arvivo_Solto.ts4script --📁MOD_Zero (pode renomear) -----📜Arquivo.package -----📑Arvivo.script --📁Overrides -----📂Medieval_Interface -----📂Vll -----📜ArquivoOverrideSolto.package -----📜ArquivoOverrideSolto.package --📁CC_Criadores -----📂Ingeli -----📂KyriaT -----📂Vll --📜Rsource.cfg --📑XmlInjector.ts4script
Dicas extras: 1ª Dica: Observe que no exemplo acima todos os conteúdos dentro da pasta Mods não possui espaço no nome das pastas, isso porque como já explicado por um dos Gurus no fórum da EA Games, cada caractere possui um valor de leitura e consequentemente um tempo e assim como espaços tanto como caracteres especiais (com exceção do underline _ ) possuem um tempo maior de leitura, então é por isso que sempre é indicado não usar caracteres especiais (incluindo acentuações ´ `~^ç#" dentre outros) nos nomes das pastas e substituir os espaços por underline ( _ ) ou simplesmente apague os espaços deixando os nomes todos juntos (como exemplificado acima com os arquivos.package). Mas atenção: Jamais renomeie arquivos e "subpastas nível 02" de Mods, apenas arquivos.package unitários e independentes de CC (como roupas, móveis, cabelos, etc) que baixamos aleatoriamente, isso porque quando se trata de Mods, os nomes de suas subpastas e arquivos dependentes dentro dessas pastas próprias deles, já estão endereçadas. 2ª Dica: Por mais que o jogo leia até cinco níveis de "subpastas", o mesmo Guru mencionado aqui, sugere utilizar até três níveis de subpasta, pois quanto mais níveis de subpastas, mas tempo o jogo (e o processador) levará para ler tais pastas, pois no sistema ele trabalha com nível de hierarquia e por assim podemos dizer por dizer que ele entende que quanto mais profundo uma pasta esteja, menos importante ela será, logo então, se você colocar um arquivo importante, ou seja, um arquivo que o jogo precisará ler constantemente, provavelmente você terá uma lentidão a mais para que esses arquivos sejam lidos. Por isso que arquivos .ts4cripts não podem ficar em mais de um nível de subpasta, pois como são arquivos .ts4scripts, há um tempo para tais serem lidos pela pasta principal do jogo. Já seus arquivos.package dependentes, esses podem ficar em mais de um nível de subpastas (não ultrapassando cinco níveis, por isso que muitos criadores já as deixam pré organizadas prontas para serem extraídas em uma subpasta de nível 01). Já para arquivos Overrides, não é indicado usar outra pasta fora da pasta Mods, mas você pode criar uma pasta só para eles dentro da pasta Mods (como exemplificado acima) e para esses arquivos overrides.package, você pode tê-los em subpastas como exemplificado acima (em caso de arquivos mais complexos que necessitam de organização), mas para os mais simples é indicado deixá-los soltos dentro da subpasta de nível 01. Para os demais arquivos.package, você pode organizá-los em outros níveis de subpastas (indicado até o terceiro nível). 3ª Dica: Não adianta você ter um jogo atualizado se quem irá lê-lo/processá-lo (o seu PC), estiver desatualizado. Então mantenha sempre seu PC e drivers atualizados e tenha em mente que o jogo sempre é atualizado para acompanhar as atualizações do sistema mundo afora e por isso que você deve acompanhar isso também. 4ª Dica: Nós super indicamos que você fixe a pasta Eletronic Arts no Acesso Rápido do Explorador de Arquivos, para fazer isso, basta clicar com o botão direito do mouse sobre o nome e escolher a opção Fixar no Acesso Rápido.

A princípio por ser muitas informações e por falta de costume estar adentro de tudo isso, pode parecer complicado, mas acredite não é complicado. Compartilhar informações com vocês é uma forma de demonstra um carinho imenso para que vocês além de poderem usufruir melhor o jogo e até mesmo compreender como seus arquivos são lidos queremos enriquecer o conhecimento de vocês. 💕 Esperamos que essas dicas tornem o jogo de vocês mais imersivo quando se trata de Overrides temáticos. 🥰
#TheSims4#TS4#Sims4#Tutorial#The Sims 4#TheSims4Tutorial#Sims4Tutorial#TS4Tutorial#The Sims 4 Tutorial#Sims 4 Tutorial#TS4 Tutorial
4 notes
·
View notes
Photo
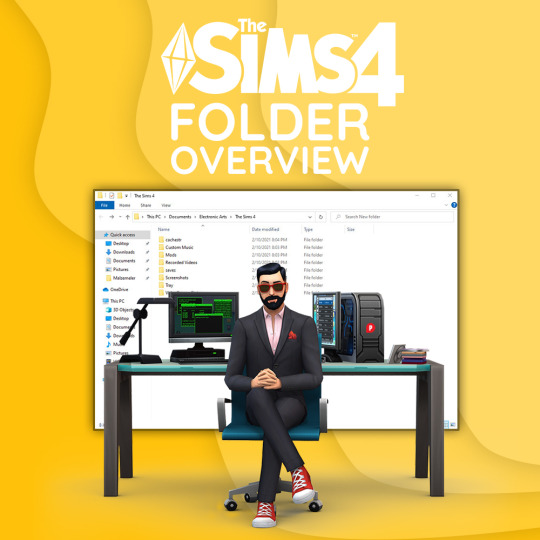
The Sims 4 Folder Overview When adding special content to your The sims 4 game, or if you downloaded a sim or house someone created, or if you want to play someone else’s save file, you need to add the files to the appropriate folders here.
To feel comfortable organizing your The Sims 4 folder, you should understand what all these different files do and which ones are needed to successfully add content created by the community sims 4 community.
Check out this article for detail: The Sims 4 Folder Overview
33 notes
·
View notes
Text
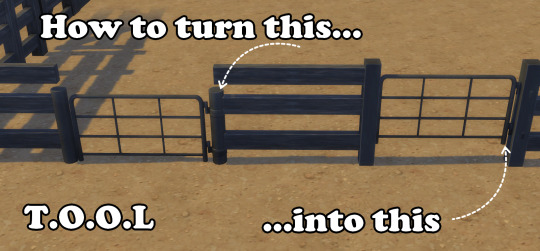
I'm sure I'm not the only one who wishes this gate was compatible with this fence, and while there is cc out there to make the gate bigger, I personally wanted to keep it 2 tile wide, so here's a quick and easy tutorial to force this gate into looking how you want, accessible to people who know exactly One (1) TOOL command (dont worry me too)
What you need:
Horse ranch (obviously)
Twisted Mexi's TOOL mod [here]
The pillar I used* comes from growing together (below), but you can use whatever you have available, as long as you're fine with the gate posts being bigger than the fence posts. Note that from close up the original posts may poke through a little, but it's easy to ignore.
*Can't confirm if the colours match decently to any other fence swatch, as I only used the black fence.

To start off with, you obviously have to place down the gate where you want it. You can add in your pillars now, or after you've raised the gate. Now toggle TOOL with Shift + T.
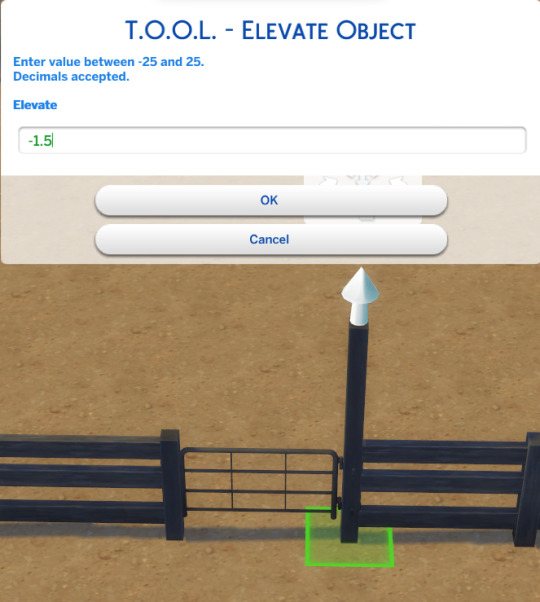
To lift the gate, select it and use the elevate command. (If, like me, you've never touched TOOL before deciding you want to fix this gate, you'll know it's selected when it's green and seethrough.) Type in ".3" to raise the gate in line with the top of the fence. Unless you wanna mess with smaller decimals anything higher is too high, and if you wanna go lower that's personal preference.
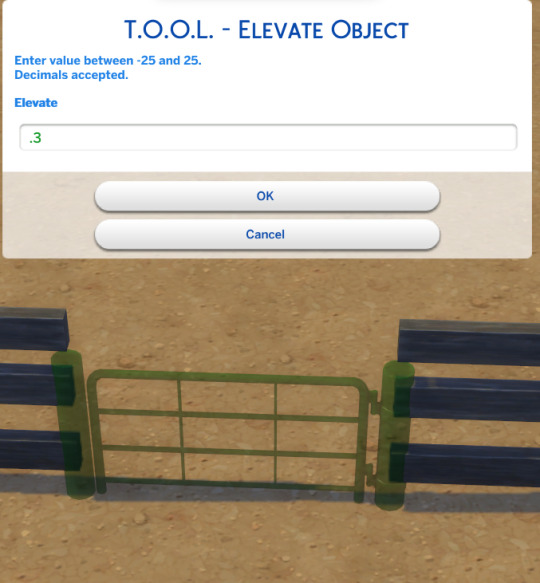
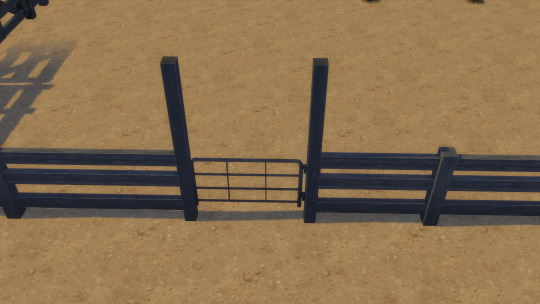
Now, onto the pillars. If you haven't whacked em down already, place your pillars onto either side of the gate, and select with tool. From my (limited) personal experience selecting and deselecting pillars with tool is a little finicky and its easy to accidentally move them, and if that happens just undo.
Again, we're using the elevate command, but in reverse to lower the pillars. In order to get them flush with the height of other fence posts, type in "-1.5". Making the command negative will lower the object. Make sure you do this on both pillars, obviously.
Now, with all of that done, you should be able to exit tool mode and have a beautiful gate that spites EA's gate sizing.

Cheers!
21 notes
·
View notes
Text
Have you ever thought that the black hair colour just wasn't black enough?
If so, I've got an easy solution for you!
DISCLAIMER! I don't mean to be hateful or rude towards anyone. Everyone is free to do as they please with their own content (as long as it complies with EA:s TOS). The original black colour just doesn't fit my taste, that's all. I made this tutorial because I thought that there might be others who share my opinion but who might not know how to change the colour. With that said, I'd like to apologise in advance if this hurts or offends anyone.
Art by Alex Espino.
The hair shown above was made by Kiara Zurk.

Let's begin!
You'll need:
- Sims 4 Studio
- A photo editing program (e.g. Photoshop, Photopea, Gimp)
1) Open the hair you want to edit in Sims 4 Studio (double click on the package file).
2) Export the blue-black texture as a PNG and save it somewhere that's easy to access.
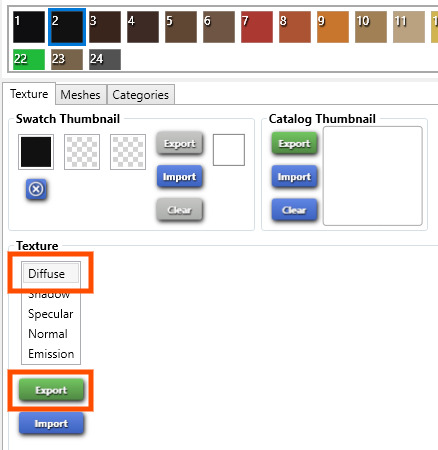
3) Open the PNG you just saved in your editing program of choice. I'll be using Photopea for this tutorial.
4) Add a 'Black & White' adjustment layer.
5) Add a 'Brightness/Contrast' adjustment layer and bring it all the way down to -150 or whatever you prefer.

6) Optional! You can flatten the image into one layer by right-clicking on any of the layers and then click on 'Flatten Image'. I personally don't bother though.
7) Save as a PNG and import it back into Sims 4 Studio. Save the package file.
That's it! Now you've got yourself a true black hair colour.
Important! If you use a Reshade preset, you need to take into account the way that preset changes colours, lighting etc. in the game. If you use a preset that darkens the colours, the hair colour might look odd if you adjusted the brightness exactly the way I did in this tutorial.
Now I'll leave you to it. Happy Simming!
#s4 cc tutorial#s4 tutorial#ts4 cc tutorial#ts4 tutorial#sims 4 tutorial#sims 4 cc tutorial#the sims 4 cc tutorial#the sims 4 tutorial#s4cc tutorial#ts4cc tutorial
23 notes
·
View notes