#Turn Bar System with Web Guiding System
Explore tagged Tumblr posts
Visit Tumblr Blog
Explore Tumblr blogs with no restrictions, modern design and the best experience.
Last Seen Tumblr Blogs


Fun Fact
Kazakhstan’s Minister of Communications and Informatics has blocked the Tumblr site because it contained 60 sites of terrorism, extremism, and pornography in 2015.
Text
Empowering Businesses with Ionic App Development Services
In the dynamic landscape of mobile app improvement, corporations are constantly in search of revolutionary solutions to interact with their target market efficaciously. With the proliferation of smartphones and tablets, having a sturdy mobile presence has come to be imperative for staying competitive in the present-day market. This is wherein Ionic app development businesses step in, imparting flexible and green solutions to build cross-platform cellular packages that captivate customers and power business increase.
Unveiling the Power of Ionic App Development
Ionic is an open-source framework that lets builders build fantastic, function-wealthy cellular packages using internet technology which includes HTML, CSS, and JavaScript. Leveraging web technology permits Ionic app development companies to create go-platform programs that run seamlessly on diverse devices and working structures, consisting of iOS, Android, and the web.
1. Cross-Platform Compatibility:
One of the key advantages of Ionic app development is its potential to create cross-platform programs with a single codebase. This drastically reduces development time and costs, as developers can write as soon as possible and deploy throughout multiple systems, making sure of consistency in personal enjoyment throughout gadgets.
2. Native-Like Performance:
Despite being constructed with net technologies, Ionic packages offer native-like overall performance and responsiveness. Through technology like Capacitor or Cordova, Ionic apps can get the right of entry to device capabilities and APIs, turning in a continuing consumer experience with smooth animations, rapid loading instances, and fluid navigation.
3. Rapid Development Cycle:
Ionic's development environment is characterized by its simplicity and simplicity of use, facilitating a fast improvement cycle. With features like Ionic CLI (Command Line Interface) and Ionic DevApp, developers can streamline the development technique, iterate speedy, and take a look at their applications in actual time throughout multiple devices.
4. Extensive UI Component Library:
Ionic comes with a rich set of pre-designed UI additives and layouts, allowing builders to create visually attractive and intuitive personal interface results easily. From buttons and paperwork to navigation bars and modals, Ionic's UI thing library empowers builders to construct polished and expert-looking applications with minimal attempts.
5. Community Support and Ecosystem:
The Ionic framework boasts a colorful community of builders, designers, and lovers who actively contribute to its surroundings. From open-supply plugins and extensions to comprehensive documentation and tutorials, the Ionic network affords helpful resources and support, fostering collaboration and innovation in app development.
Industries Leveraging Ionic App Development Services
1. E-Commerce:
Ionic app improvement agencies cater to the growing desires of e-trade organizations through building characteristic-wealthy buying apps, inventory control structures, and customer engagement structures. These applications allow e-commerce manufacturers to supply seamless shopping reports, customized tips, and stable payment gateways to their clients.
2. Healthcare:
In the healthcare enterprise, Ionic apps are utilized to create telemedicine systems, patient portals, appointment scheduling structures, and health tracking programs. These apps enhance accessibility to healthcare services, facilitate remote consultations, and empower sufferers to manipulate their health correctly from their cell devices.
3. Education:
Educational establishments and e-gaining knowledge of structures leverage Ionic app improvement offerings to create interactive knowledge of apps, online course platforms, and educational video games. These applications guide far-off mastering, personalized education, and knowledge dissemination, catering to the numerous needs of college students and educators globally.
4. Finance:
Ionic apps are revolutionizing the finance zone by imparting answers together with cell banking apps, virtual wallets, and funding systems. With sturdy security features and seamless personal reports, Ionic-powered finance apps allow people to manage their budgets comfortably and securely on the go.
5. Travel and Hospitality:
Ionic app improvement businesses play an important position in growing travel reserving systems, inn reservation systems, and tour courses for the travel and hospitality industry. These programs provide intuitive interfaces, actual-time updates, and seamless booking reviews, enhancing the overall journey experience for users internationally.
Conclusion
Ionic app improvement organizations are at the leading edge of innovation within the cellular app improvement landscape, empowering organizations across diverse industries to construct compelling and function-rich packages that resonate with their target audience. With its cross-platform compatibility, native-like performance, and giant surroundings, Ionic offers a versatile and efficient framework for growing mobile applications that drive engagement, enhance the personal experience, and propel enterprise boom in the state-of-the-art virtual era.
2 notes
·
View notes
Note
I’ve seen my reblog of this get likes recently so I feel a bit compelled to maybe try and help the team behind this novel out!!
They recently announced on Twitter that the official publishing house behind it, Hualing Publishing House, would cease sales of this novel by April 22, 2027…so if anyone is interested in having a physical copy of an intense and amazing baihe story, this is your time!!
I assume based on the name that Hualing Publishing House is referring specifically to the Chinese version of the novel rather than the official English translation by Monogatari Novels, which has—from my memory—had mixed results in getting things published.
So while I know it may not make a lot of sense to have a Chinese copy of a novel if you can’t read Chinese, if you’re passionate about supporting stories featuring f/f relationships and want to get into baihe, you could get a copy for the aesthetic of it—as long as you want to! 🥺
You can buy all four volumes of the novel on Taobao here, and it’s about 139 RMB ($27.59 CAD) for all of them.
If you don’t have a Chinese address to ship to or struggle to navigate Taobao, you can also get a shipping agent like Superbuy to help you! As long as you provide them with the link, they can buy and store and ship it for you. 🫡
But I also understand that it’s very hard and even makes little sense to buy a novel in Chinese if you don’t know Chinese and do not live in China, so here’s the main thing I wanted to suggest people check out today if they’d like to support Jing Wei Qing Shang!:
According to the official Twitter account, they are halting production of season 2 of the audio drama due to external issues and the audio drama will be taken down from MissEvan aka MaoEr FM on November 30, 2027.
This means after November 30, 2027, there will be no way to buy the Jing Wei Qing Shang audio drama because it will be off the shelves, but listeners who already bought the audio drama will still have their own personal copy that they bought and can still listen to it (this has happened to other audio dramas whose licenses expire and aren’t popular enough to renew).
Thankfully, MissEvan aka MaoEr FM is very easy to use as a foreigner (beyond the issue of the language barrier), so I really recommend checking it out! Best part is, every audio drama has Chinese subtitles that can be machine-translated!
First, I’ll leave a guide on how to use MaoEr FM: here’s a video version and a text version from Tumblr and a Twitter version.
Here’s also a doc guide on how to top up on MaoEr FM, although this version may mention requiring AliPay to do so…but right now, you can actually use foreign payment systems as well (for example, I use Apple Pay).
Essentially, MaoER FM—known as MissEvan in English—can be found in the app store and is not very restrictive in how you make an account. You can then use it as you would any other app where you make digital payments, without requiring a Chinese phone number or payment system.
Then after you’ve set up your account according to the tutorials I linked above and you’ve topped up for diamonds in your account, you can search up “泾渭情殇” in the search bar. The first result will be the entire first season of the Jing Wei Qing Shang audio drama.
It will have a yellow button saying how many diamonds it costs (I believe it’s around 239 diamonds, which should be 23.90 RMB if my dyscalculic ass isn’t mistaken, or $4.45 CAD. Yes, the audio dramas are quite cheap, especially if your country has a strong currency!).
And after you’ve purchased it, here’s a convenient aspect of how you can understand the audio drama even if you don’t speak Chinese!:
Every MaoEr FM audio drama comes with subtitles (there are two kinds, but either way they all come with subtitles, as do all Chinese media), and if you open the audio drama on a browser, you can use your browser’s machine translation feature to turn the subtitles into English.
So for example:
Search up “MissEvan” on your web browser on your laptop or PC, and then log in. Then you can search up the audio drama 泾渭情殇 or open it using this link, and when you click to listen to an episode, enable your browser’s machine translation (so for Google, it would be Google Translate), and all the Chinese subtitles will get machine-translated into English.
Then you can listen to the audio drama and understand it, thus making the most of your purchase! ^^
I hope this helps someone who wants to get into and support Jing Wei Qing Shang! 🫡
what is jwqs 👀👀
'Jing Wei Qing Shang' or 'Clear and Muddy Loss of Love' a baihe (f/f) Chinese novel!! A million words of an enemies to/and lovers sapphic romance :3
Not only the main character is the sexiest character in all of fiction but it also has a wide range of diverse (and sapphic!!) female characters who are all insane, sexy, scheming people. The political drama is exquisite and it's a literal CRIME as to how underrated this novel and the author is.
Here is a link to the carrd!!
And if you're thinking, waaaaaaaaaaa a million words is too muchhhhhhhh allow me to link you to this fan animatic trailer that has convinced many of my intimidated friends to pick up this novel.
Here are the character designs for the main pairing:

ALT
do it for them, do it for 307 chapters of non-stop angst (with happy ending! (allegedly))
521 notes
·
View notes
Text
How to Activate Disney plus on Roku device?
In today’s digital world, streaming services have become a go-to for entertainment. One of the most popular platforms among users is Disney Plus, known for its extensive library of Disney, Pixar, Marvel, Star Wars, and National Geographic content. If you are a Roku user and wondering how to activate Disney Plus on Roku device, you’ve landed on the right page.
In this comprehensive blog post, we’ll walk you through the step-by-step process to activate Disney Plus on Roku, common troubleshooting tips, device compatibility, and how to use disneyplus.com/begin effectively.
Why Choose Disney Plus on Roku?
Before diving into the activation process, let's understand why Disney Plus and Roku make an excellent combination.
Wide content variety – Enjoy movies, series, and originals from Disney, Marvel, Star Wars, and more.
Affordable subscription plans – Multiple packages tailored to your needs.
Seamless interface – Roku offers a smooth and user-friendly experience.
HD and 4K Streaming – Enjoy top-quality content with your Roku streaming player.
Step-by-Step Guide: How to Activate Disney Plus on Roku
Activating Disney Plus on your Roku device is a quick and easy process. Just follow the steps below to start streaming your favorite content.
Step 1: Connect Your Roku to the Internet
Ensure your Roku device is connected to a stable internet connection. Use either Wi-Fi or an Ethernet cable for a reliable connection.
Step 2: Sign in to Your Roku Account
Turn on your Roku device and TV.
Log in using your Roku credentials.
Make sure your Roku software is up-to-date for best performance.
Step 3: Add Disney Plus Channel on Roku
From the Roku Home Screen, navigate to the “Streaming Channels” section.
Go to “Search Channels”.
Type “Disney Plus” in the search bar.
Select the Disney+ app from the results.
Click “Add Channel”.
Once added, select “Go to Channel” to open it.
Step 4: Launch Disney Plus on Roku
After installation:
Open the Disney Plus channel from the Roku home screen.
A welcome screen will appear with two options: Login or Sign Up.
Step 5: Get Activation Code
If you already have a Disney+ account:
Select Log In.
An activation code will appear on your Roku screen.
Note this code down or keep the screen open.
Step 6: Visit disneyplus.com/begin
Now, grab your phone, tablet, or computer and follow these steps:
Open a web browser.
Visit disneyplus.com/begin.
Enter the 8-digit activation code shown on your Roku screen.
Log in with your Disney Plus credentials (email and password).
Once verified, your Roku screen will refresh automatically, and your Disney Plus account will be activated.
Step 7: Start Streaming
Congratulations! You can now explore thousands of hours of content on your Roku device via Disney Plus.
Device Compatibility: Is Your Roku Supported?
Not all Roku devices are compatible with Disney Plus. Before trying to activate, ensure your device supports the app.
Disney Plus is Compatible with:
Roku Streaming Stick (3500X or later)
Roku Express (3900X or later)
Roku Premiere and Premiere+
Roku Ultra
Roku Smart Soundbar
Roku TV models from TCL, Hisense, Sharp, etc.
If you're unsure of your model:
Go to Settings > System > About to view your Roku device’s model and software version.
Subscription Plans for Disney Plus
To enjoy Disney Plus on Roku, you must have an active subscription. Here are the latest options available:
1. Disney Plus Basic (With Ads)
Price: $7.99/month
Access: Full content with ads
2. Disney Plus Premium (No Ads)
Price: $13.99/month
Access: Full content with no interruptions
3. Disney Bundle (Disney+ + Hulu + ESPN+)
Price: Starts at $14.99/month
Value: Great combo for families and sports lovers
How to Sign Up for Disney Plus Before Activation?
If you haven’t created an account yet, follow these steps:
Visit disneyplus.com/begin.
Click Sign Up Now.
Enter your email address and create a password.
Choose a subscription plan.
Enter payment details and confirm.
Once subscribed, return to your Roku to complete the activation.
Common Activation Issues and Troubleshooting Tips
Sometimes things may not go smoothly. Here are some common problems and how to fix them.
1. Activation Code Not Working?
Double-check the code you entered at disneyplus.com/begin.
Make sure there are no typos.
Codes expire after a few minutes; restart the app on Roku to generate a new code.
2. Disney Plus App Crashes or Freezes on Roku
Restart your Roku device.
Uninstall and reinstall the Disney+ app.
Check for Roku system updates.
3. Error Message: "Disney Plus is not available on your device"
Your Roku device might not be compatible.
Consider upgrading to a newer Roku model that supports Disney Plus.
4. Can’t Log in to Disney Plus?
Ensure your email and password are correct.
Reset your password from the disneyplus.com login screen if needed.
How to Update Disney Plus on Roku
To ensure the app functions properly, keep it up to date:
Go to Home > Disney Plus.
Press the ‘*’ button on your Roku remote.
Select “Check for updates”.
Roku will install the latest version if available.
How to Log Out or Switch Disney Plus Account on Roku
Want to change accounts?
Open the Disney Plus app.
Navigate to your profile icon.
Scroll down to “Log Out”.
Relaunch the app and log in with a different account.
Tips for a Better Disney Plus Streaming Experience on Roku
Use a high-speed internet connection (min. 5 Mbps for HD, 25 Mbps for 4K).
Avoid peak usage hours to prevent buffering.
Close background apps on your network.
Use Roku’s Ethernet port (on supported models) for a more stable connection.
Benefits of Using disneyplus.com/begin for Roku Activation
The website disneyplus.com/begin is an essential part of the activation process. It offers:
Fast setup: Enter the code and you’re done.
Secure login: Avoids typing passwords on the TV.
Cross-device compatibility: Use any browser-enabled device.
Always make sure you're entering the correct code and using an up-to-date browser for best results.
Final Thoughts
Activating Disney Plus on your Roku device is simple, quick, and takes just a few minutes. By using the official activation link disneyplus.com/begin, you can pair your account securely and begin streaming top-rated shows and movies from one of the world’s leading platforms.
Whether you're a Marvel fanatic, a Star Wars lover, or a fan of Disney classics, Roku combined with Disney Plus offers a fantastic viewing experience right from your living room.
1 note
·
View note
Video
youtube
How To Enable Or Disable Autostart On The Waterfox Web Browser | Step-by...
In this video tutorial, you'll learn how to enable or disable autostart for the Waterfox web browser using a PC. Autostart determines whether Waterfox opens automatically when you turn on your computer. If you're looking to speed up your boot time or have Waterfox ready right away, this guide is for you.
💡 Tip: Disabling unnecessary startup programs can help speed up your system boot time.
👍 If this helped, don’t forget to Like, Comment, and Subscribe for more browser and PC tips!
Simple Steps 1. Click On The 3 3-bar hamburger Menu In The Upper right-hand corner. 2. Choose "Settings" from the dropdown. 3. In the left side pane, click on the "General" tab. 4. In the "Startup" section, check or uncheck "Open Waterfox Automatically When Your Computer Starts Up".
0 notes
Text
A Beginner’s Guide to Using TotalAV Antivirus
So, your computer’s been acting weird lately.
Slower than usual. Ads popping up outta nowhere. Files taking forever to open. Maybe it’s just being moody. Or maybe... it’s something else.
That’s when the thought hits. Could be a virus. Or malware. Or some other sneaky thing crawling around behind the scenes.
You Google around. Read a few reviews. Then, one name keeps coming up: TotalAV.
Now you're here. Curious. Wondering what TotalAV really is, and more importantly, how the heck you actually use it.
Let’s break it down. No tech talk. No confusing jargon. Just a real guide—for real people—trying to keep their stuff safe.
What is TotalAV, Anyway?
Okay, first things first.
TotalAV is an antivirus software. But it's more than just that. It’s like a bodyguard for your computer, your phone, your whole digital life. It’s built to find threats, block them, and keep your stuff locked down.
Viruses. Malware. Ransomware. Spyware. You name it—TotalAV’s got it covered.
But it’s not just for stopping the bad stuff. It also helps speed up your system. Cleans junk files. Even protects you online with a built-in VPN. Handy, right?
Installing It Is the Easy Part
So let’s say you’ve bought it. Or you’re on a free trial. Either way, installing TotalAV is actually kinda simple.
You head over to their site. Download the software. Double-click. Follow the steps.
Boom. It’s in.
Once it's installed, TotalAV launches itself. You don’t even have to go hunting for the app. It just pops up like, “Hey, I’m ready. Let’s get started.”
It’ll ask if you want to run a quick scan. You should. It’s the easiest way to see what’s lurking on your system.
The First Scan – A Little Nerve-Wracking
Now, here’s where it gets real.
That first scan? It can be a little scary. You sit there watching the progress bar move across your screen, wondering if it’s gonna dig up anything nasty.
Spoiler: It probably will.
Old tracking cookies. Junk files. Maybe even a trojan or two hiding deep in your downloads folder.
But that’s the beauty of it. TotalAV doesn’t just point out the bad stuff—it actually gets rid of it. Click “Resolve,” and you’re done. Clean.
Feels good, right?
The Dashboard Isn’t Just Pretty—It’s Smart
Open TotalAV and you’ll see what they call the "dashboard."
It’s clean. Not cluttered. Everything you need is right there—virus scan, system boost, disk cleaner, web shield. All laid out in a way that doesn’t make you squint or feel dumb.
You want a quick scan? Click. Done.
Need a deeper, full system scan? It’s just another click.
Wanna check your system's performance? Yup. Click again.
There’s even a Safe Browsing feature that uses a VPN to hide your activity. Total privacy. No one watching.
It’s one of those things you didn’t know you needed until you try it.
TotalAV on Your Phone? Yes, Please
Here’s something a lot of people don’t think about: your phone needs antivirus too.
We carry our lives in these things. Photos, messages, banking info. And yep—phones get malware too.
TotalAV has mobile apps for both Android and iOS. You can scan your phone, clean up space, and even use the VPN to stay safe while browsing on public Wi-Fi.
It’s all synced up. Simple. One account, multiple devices. That's it.
Real Life Happens. And TotalAV Helps
Let me tell you a quick story.
My aunt—not exactly a tech wizard—called me one night freaking out. Her laptop was frozen. Weird ads popping up. Files missing.
She thought she broke it. She didn’t.
Turns out she clicked a shady link in an email. Classic mistake.
I told her to try TotalAV. She didn’t even know what antivirus was. I walked her through the setup over the phone. Ten minutes later? It found four threats. Cleaned everything. Laptop running smooth again.
Now she swears by it. Even uses the VPN on her iPad. TotalAV kinda saved her digital life.
But What If Something Goes Wrong?
Look, nothing’s perfect. Even the best software might hit a snag.
That’s where total av customer support comes in. Whether it’s a billing issue or something’s not working right, they’ve got a team ready to help. Real people. Not some robot copy-pasting answers.
They walk you through it. Step by step. It’s actually kind of refreshing to talk to a support team that wants to help.
It’s Not Just About Viruses Anymore
Here’s the thing. Antivirus today isn’t just about fighting viruses.
It’s about protecting your identity. Your data. Your digital footprint.
TotalAV gets that. Which is why it includes more than just basic protection. You’ve got phishing protection. Email breach monitoring. Tools to stop sneaky ad trackers from following you around.
It’s a full security suite. Like a digital guardian angel for all your screens.
Final Thoughts: It’s Worth It
If you're someone who’s not super tech-savvy—or even if you are—TotalAV just makes life easier.
It doesn’t nag you with annoying popups. It runs quietly in the background, doing its thing. And when you need it, it’s there. Ready.
Setup is a breeze. Scans are quick. Protection is solid. And best of all? You don’t have to think too hard to use it.
At the end of the day, you want to feel safe when you’re online. Whether you're working, shopping, streaming, or just wasting time on Reddit—TotalAV helps you do that without stress.
So if you’ve been thinking about getting antivirus but weren’t sure where to start, this is it. Start here. Start simple.
Start with TotalAV.
0 notes
Text
Beginner's Guide to Responsive Web Design
Websites are the storefronts of the digital world. Everyone wants a sleek, stylish, and easy-to-use web design in Sydney. However, not everyone knows how to make one that works on all devices. That is where responsive web design comes in. It is not just a trend—it is the new normal. If your web design in Sydney is not responsive, you are already behind. But don’t worry, this guide will help you catch up.
What is Responsive Web Design?
Responsive web design means a website adjusts to any screen size. You don’t need to zoom in. You don’t need to scroll side to side. Everything lines up. Everything flows. It feels natural.
So, the goal is simple: Make your web design in Sydney readable and usable, no matter the device. No matter the screen resolution.
Why Should You Care?
People use all kinds of gadgets today. Laptops, tablets, smartphones, smart TVs, and so on. Some websites look perfect on a laptop, but try the same site on your phone. It’s a mess. The text is tiny. Buttons are hard to click. Images get cut off. All this chaos makes your visitors leave in frustration.
Google loves responsive websites and gives them better rankings. This leads to more visitors and better visibility. Thus, a responsive site is not a luxury but a necessity.
The Key Ingredients of Responsive Design
1. Fluid Grids
A fluid grid uses percentages instead of fixed pixels. That way, elements grow or shrink depending on the screen size. For example, imagine a picture might be 50% wide. It stretches on a big screen, while on a small screen, it shrinks. The layout stays balanced. The structure remains intact.
2. Flexible Images
Images are tricky. If not sized properly, they break layouts. So, responsive design always uses flexible images that are easy to scale and adjust. No overflow. No broken sections. Just smooth visuals. You can use CSS to control this. A common trick is to set the image width to 100%. That way, it always fills the space.
3. Media Queries
This is the secret sauce. Media queries are CSS rules. They tell the browser how to style the page based on screen size.
When the screen is 600 pixels wide or smaller, the background turns light blue. You can:
Change fonts
Rearrange sections
Hide or show content
In short, media queries give you control and make your design smart.
Mobile-First Design: Start Small
Design for the smallest screen first. That is mobile-first design. It makes you focus. It helps you prioritise. You start with what really matters. To put it in order:
Build a layout for phones.
Then scale it up for tablets.
Then expand it for desktops.
This approach saves time while reducing clutter. It also ensures a clean and clear user experience.
Tools to Help You Get Started
Bootstrap
This is a popular framework with pre-made grid systems. It includes responsive components, from buttons to forms to navigation bars. You can build fast. You can customise easily.
CSS Flexbox
Flexbox helps you align items in rows or columns. It adapts quickly and is ideal for one-dimensional layouts. Want a row of cards that wraps on small screens? Flexbox does that.
CSS Grid
Grid is perfect for complex layouts. You can place items wherever you want—rows, columns, or overlapping elements. It gives you full control.
Chrome DevTools
Test your design right in your browser.
Open Chrome.
Press F12.
You’ll see the Developer Tools.
Switch to mobile view.
Resize the window.
See how your site responds.
Adjust and fix issues on the spot.
Tips for Better Responsive Web Design in Sydney
Keep Navigation Simple
Big menus do not work well on phones. Use icons or collapsible menus, and keep it clean. More importantly, keep it user-friendly.
Avoid Fixed Widths
Fixed widths can break your layout. Stick to percentages. Embrace fluidity.
Use Viewport Meta Tag
Add this to your HTML:
```html
<meta name="viewport" content="width=device-width, initial-scale=1.0">
```
This tells the browser how to scale the page. Without it, your design might look weird on mobile.
Test on Real Devices
Simulators help, but nothing beats the real thing. Open your site on different phones. Try it on tablets. Check how it looks. Check how it feels.
Optimise Loading Time
Mobile users want speed. Compress your images. Minify your CSS and JavaScript. Use lazy loading. Keep things light.
Real World Example
Let’s take a basic layout. A homepage with a header, a main section, a sidebar, and a footer.
On desktop:
– The header stretches across the top.
– The main section sits on the left.
– The sidebar is on the right.
– The footer is at the bottom.
On mobile:
– The header still sits on top.
– The sidebar moves below the main section.
– Everything stacks vertically.
Same content. Different layout. That’s the beauty of responsive design.
Common Mistakes to Avoid
Even the best designers mess up. Let’s make sure you don’t.
– Don’t forget the viewport meta tag.
– Don’t use large fixed images.
– Don’t hide important content on mobile.
– Don’t ignore load speed.
– Don’t test only on one screen size.
Each screen is a new experience. Each visitor deserves a smooth journey.
Final Thoughts: The Future is Flexible
The internet will keep changing. New devices will appear and new screen sizes will emerge. So, your fully responsive website must be ready. It keeps your site future-proof. To get started with your responsive web design in Sydney - https://www.makemywebsite.com.au/web-design/sydney/ , connect with Make My Website.
Web design is not just about looking pretty. It’s about function. It’s about flow. It’s about flexibility. Responsive design gives your website a fighting chance.
0 notes
Text
Access and Optimize Your orbi wifi system Using 192.168.1.1
Using 192.168.1.1 orbi login page you can conveniently access and optimize your orbi wifi system network. An optimized network allows you to perform several tasks like working from home, streaming high-definition content, or gaming online without any disturbance. You can enjoy a more stable & reliable network. Don’t know how to access the login page using the IP and optimize your network? Grab the details from this article. Walk through this guide and know everything you need in detail including your orbi wifi system access.
How to Access the Orbi Login Page
Accessing the orbi login page is not a difficult task using the 192.168.1.1 IP address. Go though the steps you have to follow:
Connect To Orbi
Take your client device (computer/ laptop/ tablet/ smartphone).
Go to its settings and search for WiFi settings.
Begin the scan process and let the device find the SSID of the orbi wifi system.
Choose the SSID and then enter the password of the network.
Afterwards hit the connect button to let the connection complete between the client device & orbi so that you can initiate 192.168.1.1 orbi login page access.
Launch Web Browser
Launch the web browser you have in your client device.
Make sure the browser is the updated version.
Also there should be no cache files to restrict the access.
Enter 192.168.1.1 IP
In the home window of the browser go to the URL bar.
Here you need to enter the IP to get the access of 192.168.1.1 orbi login page.
Initiate the search and login page will display on the computer screen.
Enter Login Credentials
Now you have to enter the details of your admin account.
Firstly enter the admin username of your orbi admin access.
Afterwards you need to enter the password as well.
In case you haven’t changed the details then you need to enter the default details.
Get Access
Choose the login option to submit the login credentials.
As you submit, you will get access to your device settings.
In case you entered any information wrong then the access is denied. So, be sure while entering the information. Even typing errors leads to denial.
Optimizing Your orbi wifi system
By following the below specified guide you can easily optimize your orbi wifi system. Check out what changes do you need to make in the router settings:
Quality Of Service
Make changes in Wi-Fi Multimedia Quality of Service by access of the 192.168.1.1 orbi login page. Once you get the access follow the steps mentioned here:
Go to the settings and choose the advanced option.
Afterwards you have to select the advanced setup option.
Hit on the wireless settings option from there and go to 2.4GHz b/g/n or 5GHz 802.11a/n/ac section.
Hit on the check box given in front of Enable WMM (Wi-Fi multimedia) settings and then Apply option.
Universal Plug And Play
Enabling Universal Plug and Play by accessing the 192.168.1.1 orbi login page is very simple. This feature allows you to use applications such as multiplayer gaming, peer-to-peer connections, orreal-time
Communications such as instant messaging or remote assistance. Once you get the access follow the steps mentioned here:
Go to the settings and choose the advanced option.
Afterwards you have to select the advanced setup option.
Hit on the UPnP settings option from there and select the Turn UPnP On check box.
Then type the advertisement period in minutes and time to live in hops.
Lastly hit on the Apply option and then refresh button.
Daisy Chain Topology
Daisy Chain Topology feature allows your orbi satellite to connect with other satellites. In case you disable this feature then your orbi satellite will only connect to orbi router not the other orbi satellites. To use this feature you need to follow the given steps:
Go to the settings and choose the advanced option.
Afterwards you have to select the advanced setup option.
Hit on the wireless settings option from there
Tick on the check box given in front of Enable Daisy-Chain Topology
Lastly hit on the Apply option.
Implicit Beamforming
Beamforming feature improves the wifi signals. To use this feature you need to follow the given steps:
Go to the settings and choose the advanced option.
Afterwards you have to select the advanced setup option.
Hit on the wireless settings option from there
Tick on the check box given in front of Enable Implicit Beamforming
Lastly hit on the Apply option.
MU-MIMO
The MU-MIMO feature allows you to connect multiple devices with the network. To use this feature you need to follow the given steps:
Go to the settings and choose the advanced option.
Afterwards you have to select the advanced setup option.
Hit on the wireless settings option from there
Tick on the check box given in front of Enable Mu-MIMO
Lastly hit on the Apply option.
0 notes
Text
Web Design: A Simple Approach to Building Beautiful Websites.
Web design is the art of creating and designing the visual layout, structure, and usability of a website. It combines creativity with technology to create an engaging and functional user experience. Every aspect of a website, from its color scheme to its navigation, plays a role in its overall success. A well-designed website can attract visitors, encourage them to explore more, and leave a lasting impression. The process of web design involves several key components that work together to create a seamless online presence.
The Importance of Web Design
Good web design is essential for any business or individual looking to establish a strong online presence. A website often serves as the first point of contact for potential customers, so it must be visually appealing, easy to navigate, and function smoothly. First impressions are crucial, and a poorly designed website can quickly turn visitors away. On the other hand, an attractive and user-friendly site can make visitors feel more comfortable and confident in the brand or service it represents.
Moreover, web design also impacts the functionality of a website. It affects how quickly pages load, how easily users can find information, and how well the website adapts to different devices. As the world becomes more mobile-driven, responsive design, which ensures that a website works well on both computers and mobile devices, has become a critical part of web design. Therefore, web design is not only about aesthetics but also about creating a seamless and effective user experience.
The Elements of Web Design
Web design is a broad field, and several key elements work together to create a functional and appealing website. These include layout, color scheme, typography, images, and navigation. Let’s explore each of these components in detail.
Layout: The layout refers to how the elements on a page are arranged. A good layout should prioritize user experience by organizing content in a logical, easy-to-read manner. This includes choosing the right placement for text, images, and calls to action. The layout should also be responsive, meaning it should adjust according to the device being used to view the website.
Color Scheme: Colors are a powerful tool in web design. They can convey emotions, create a certain atmosphere, and influence how users perceive a website. When choosing a color scheme, designers often consider the brand’s identity and the target audience. For instance, a calm blue might be used for a financial services website, while a vibrant red might be used for a creative portfolio.
Typography: The fonts used on a website contribute to its overall feel. Typography should be easy to read and consistent throughout the site. Web designers usually choose two or three fonts to maintain a clean and professional appearance. The size, style, and spacing of the text are also important for readability.
Images: High-quality images are essential in web design. They help break up text and make the website more visually engaging. Whether it’s a photo, graphic, or illustration, images should be relevant to the content and enhance the user experience.
Navigation: Navigation refers to how users move through the website. A well-designed navigation system makes it easy for visitors to find what they’re looking for. Clear menus, search bars, and buttons are essential for guiding users through the website and ensuring they can quickly access the information they need.
The Role of User Experience (UX) in Web Design
User experience (UX) is a key consideration in web design. UX refers to how users interact with a website and their overall satisfaction with the experience. A good UX design ensures that visitors can easily navigate the site, find relevant information, and complete tasks, such as making a purchase or filling out a contact form, without frustration.
To create a positive UX, web designers need to think from the user's perspective. This means understanding the needs, expectations, and behaviors of the target audience. A well-designed website should be intuitive, meaning users can easily figure out how to use it without needing instructions. Elements such as clear calls to action, fast loading times, and mobile-friendly design all contribute to a positive UX.
Responsive Web Design
In today’s digital age, people access websites from a variety of devices, including desktops, laptops, tablets, and smartphones. Responsive web design ensures that a website looks and functions well on all screen sizes. This is especially important as mobile browsing continues to rise.
Responsive design involves using flexible layouts, images, and CSS media queries to create a site that adjusts to different devices. With a responsive website, users don’t have to zoom in or scroll horizontally to view content properly. This creates a more enjoyable and accessible browsing experience for everyone.
The Future of Web Design
Web design is constantly evolving, and new trends and technologies emerge all the time. In the future, we can expect to see more websites using advanced technologies like artificial intelligence (AI), virtual reality (VR), and augmented reality (AR). These technologies will allow web designers to create more immersive and interactive experiences for users.
Additionally, website accessibility will continue to be a major focus. Making websites accessible to people with disabilities is not only a legal requirement in many places but also a moral obligation. Designers will need to ensure that websites are usable for everyone, including people with visual, auditory, or motor impairments.
Another trend that will likely shape the future of web design is personalization. Websites will become more tailored to individual users, providing them with content and experiences based on their preferences and behaviors. This level of customization will create a more engaging and relevant experience for visitors.
Conclusion
Web design is a critical part of any online presence. It combines creativity with functionality to create websites that are not only visually appealing but also user-friendly and effective. By understanding the key elements of web design, such as layout, color scheme, typography, images, and navigation, designers can create websites that meet the needs of their users. Moreover, with the growing importance of mobile browsing and responsive design, it’s essential that websites adapt to different devices and screen sizes. As technology continues to advance, the future of web design will bring even more exciting possibilities for creating innovative and personalized online experiences.
#webdesign#webdevelopment#website#graphicdesign#digitalmarketing#design#webdesigner#seo#marketing#branding#websitedesign#webdeveloper#socialmedia#socialmediamarketing#business#web#wordpress#uidesign#ui#ecommerce#html#ux#css#uxdesign#logo#websitedevelopment#coding#uiux#designer#onlinemarketing
0 notes
Text
Gamification in Web Design: Engaging Users Through Interactive Elements
In today's digital landscape, user engagement is a critical factor in determining the success of a website. One of the most effective ways to keep users interested and motivated is gamification—the integration of game-like elements into web design. By incorporating challenges, rewards, and interactive features, businesses can significantly enhance user experience, increase retention, and drive conversions.
What is Gamification in Web Design?
Gamification in web design involves applying game mechanics to non-game environments to boost user interaction. It transforms passive browsing into an active experience by making tasks more engaging and rewarding. This approach is widely used in e-commerce, education, social media, and corporate websites to encourage user participation.
Key Gamification Elements for Web Engagement
Progress Bars & Achievements Websites use progress indicators to encourage users to complete tasks, such as filling out a profile, making purchases, or engaging with content. This taps into the psychological need for accomplishment and motivates users to stay longer on the site.
Point Systems & Rewards Many e-commerce and membership sites offer points for specific actions, such as signing up, sharing content, or making purchases. These points can be redeemed for discounts, exclusive content, or other incentives, creating a sense of value.
Leaderboards & Competitions Adding competitive elements like leaderboards can drive engagement by making users feel recognized. This is commonly seen in learning platforms, fitness apps, and community-driven websites.
Interactive Quizzes & Challenges Interactive quizzes or challenges provide users with personalized experiences while keeping them entertained. These elements work well in education, lifestyle, and e-commerce sites to guide users toward relevant content or products.
Badges & Unlockable Content Websites often use badges to reward users for achieving milestones, such as completing a tutorial or reaching a spending threshold. Unlockable content—such as premium features or insider information—further enhances the sense of exclusivity.
Benefits of Gamification in Web Design
✔ Higher Engagement: Interactive elements make users more likely to spend time on the website. ✔ Increased Conversions: Reward-driven actions can encourage sign-ups, purchases, and social sharing. ✔ Better Learning & Retention: Gamification helps users absorb information more effectively, making it valuable for educational websites. ✔ Enhanced Brand Loyalty: A fun, rewarding experience keeps users coming back and builds a deeper connection with the brand.
Implementing Gamification in Modern Web Design
To successfully incorporate gamification, designers must align interactive elements with user goals and motivations. The key is to strike a balance between fun and functionality. A well-executed gamification strategy can help businesses—whether in e-commerce, corporate training, or web design Pakistan—stand out in a competitive digital space.
As user expectations evolve, gamification will continue to be a powerful tool in making web experiences more engaging, memorable, and conversion-friendly. By leveraging these elements effectively, businesses can turn passive visitors into active participants, ultimately driving growth and success.
0 notes
Text
How to Transfer Files from Android to Mac: A Step-by-Step Guide

Transferring files between an Android device and a Mac can be tricky due to compatibility issues. Unlike Windows, macOS does not support native file transfers for Android devices. However, several reliable methods allow seamless transfer of files such as photos, videos, and documents. This guide will walk you through different ways to transfer files from an Android phone or tablet to a Mac.
Method 1: Using Android File Transfer (AFT)
Android File Transfer is an official tool developed by Google that enables file transfers between macOS and Android devices.
Steps to Use Android File Transfer:
Download and Install: Visit https://www.android-file-transfer-mac.com/ and download the application.
Install the App: Open the downloaded .dmg file and move Android File Transfer to the Applications folder.
Connect Your Android Device: Use a USB cable to connect your phone to the Mac.
Enable File Transfer Mode:
Unlock your Android device.
Pull down the notification bar.
Tap on “Charging this device via USB” → Select “File Transfer” or “MTP” mode.
Open Android File Transfer: If the connection is successful, a window will pop up showing your Android’s file system. You can now drag and drop files between the two devices.
⚠️ Note: Android File Transfer may not work with the latest macOS updates or certain Android devices. If you face issues, try the alternative methods below.
Method 2: Using a Third-Party File Transfer App
If Android File Transfer does not work, several alternative apps provide a stable and feature-rich experience. These allow users to transfer files via MTP and ADB mode and even edit files on the phone directly from Mac’s Finder.
How to Use a Third-Party App:
Download and install a file transfer application on your Mac.
Open the app and connect your Android phone via USB.
Select MTP Mode or ADB Mode for faster transfers.
Once connected, your phone’s storage will appear in Finder, allowing easy drag-and-drop file transfers.
Method 3: Transferring Files via Bluetooth
If you don’t have a USB cable, Bluetooth is another way to send small files between Android and Mac.
Steps to Transfer Files Using Bluetooth:
Enable Bluetooth on Mac: Go to System Settings → Bluetooth and turn it on.
Enable Bluetooth on Android: Open Settings → Connected devices → Bluetooth and toggle it on.
Pair Your Devices: On Mac, locate your Android device and click Pair. Accept the pairing request on your phone.
Send Files:
On Android, open the Files app.
Select a file, tap Share → Bluetooth → Select your Mac.
Accept File on Mac: A prompt will appear on Mac asking you to accept the incoming file. Click Accept to save it.
🔹 Tip: Bluetooth is best for transferring small files, as it is slower than USB or Wi-Fi-based methods.
Method 4: Using Cloud Storage for Wireless Transfers
For a wireless transfer method, cloud storage allows you to store and access files from both Android and Mac.
Steps to Transfer Files via Cloud Storage:
Upload Files from Android:
Open a cloud storage app on your phone.
Tap + → Upload → Select the files you want to transfer.
Access Files on Mac:
Open a browser on your Mac and log in to your cloud storage account.
Download the uploaded files.
✅ Pros: Works without cables, accessible from any device. ❌ Cons: Requires an internet connection and may take longer for large files.
Method 5: Transferring Files via Wi-Fi-Based Apps
If you prefer a Wi-Fi-based transfer, some apps allow fast file sharing between Android and Mac without the need for cables.
How to Use a Wi-Fi Transfer App:
Install a Wi-Fi transfer app on your Android phone.
Open a browser on Mac and access the app’s web interface.
Scan the QR code with your phone.
Drag and drop files between devices.
📌 Tip: These methods work without cables and provide fast transfer speeds.
Final Thoughts
Depending on your needs, you can choose between USB, Bluetooth, cloud storage, or Wi-Fi to transfer files from Android to Mac. Android File Transfer is the most common method, but alternatives like third-party apps, cloud storage, and Wi-Fi-based transfers provide more flexibility and better performance.
🔹 Best for Large Files: USB-based apps 🔹 Best for Small Files: Bluetooth or Wi-Fi 🔹 Best for Wireless Transfers: Cloud storage
1 note
·
View note
Video
youtube
How To Enable or Disable Hardware Acceleration In The Zen Browser | PC |...
In this tutorial, we’ll show you how to enable or disable hardware acceleration in the Zen Browser using a PC. Hardware acceleration can improve browser performance, but disabling it may help fix display or rendering issues. Follow this step-by-step guide to adjust the hardware acceleration settings for a smoother browsing experience. Don’t forget to like, subscribe, and hit the notification bell for more Zen Browser tips and tricks!
1. Graphics Issues: Some users may experience graphical glitches or rendering issues when hardware acceleration is enabled. Disabling it can help resolve these problems.
2. Performance: In some cases, hardware acceleration can actually degrade performance, especially on older hardware or systems with incompatible graphics drivers. Turning it off might result in smoother performance, particularly if you're experiencing lag or stuttering.
3. Compatibility: Certain websites or web applications may not work properly with hardware acceleration enabled. Disabling it can sometimes improve compatibility with such sites.
4. Driver Issues: Outdated or incompatible graphics drivers can cause issues when hardware acceleration is enabled. Disabling it can help mitigate these problems until updated drivers are available.
5. Battery Life: On laptops and other portable devices, hardware acceleration can consume more power, potentially reducing battery life. Disabling it may help conserve battery power.
However, it's important to note that hardware acceleration is designed to improve performance and efficiency in most cases. Before disabling it, consider testing your browser's performance with and without hardware acceleration enabled to see if there's a noticeable difference. Additionally, keep in mind that disabling hardware acceleration might not always solve your issues, and it's just one of many troubleshooting steps you can take.
Simple Steps 1. Open the Zen Web Browser. 2. Click on the 3 bar hamburger menu in the upper right corner and choose "Settings". 3. Select "General" from the left side pane. 4. In the center pane, scroll down to the "Performance" section and uncheck "Use Recommended Performance Setup" and "another checkbox will appear 5. Check or uncheck hardware acceleration.
0 notes
Text
What Are The Best UX Design Tools?
You have many multi-platform UX and UI design tools. That especially works both on Mac and PC. These tools prove to be more helpful for web designers who want to create a good digital design. This article has an explanatory note on various UX tools listed under different purpose categories. There are 6 categories in all, namely,
Concept and Inception
Collaboration and Version Control
Wireframes and Early Design
Prototyping
High Fidelity Design
Presentation and Documentation
Concept and Inception
Whimsical Whimsical is a flow-chart design tool. It is easy to use. You have smart designs and shortcut keys. Dribbble Dribbble can be used for your quick discovery of ideas. You can discover simple visual inspiration rather than system or product ideas. You have a well-curated community in Dribbble. Muzli The Muzli chrome app is a valuable tool. Muzli gives you Weekly Inspiration articles and UX interaction roundups. You can get interesting and diverse range of designs from these articles. Therefore, it will help you to discover something new always.
Collaboration and Version Control
Zeplin Zeplin aids you in sharing your work. It is great collaboration tool. You can add collaborators who will be able to,
view screens
download individual assets
give comments and
feedback on your designs.
Zeplin works good for your team effort. It can generate style-guides. Therefore, collaborators can grab hex values for colors or type styles. With Zeplin you can export designs as code. On the other hand, if you are working with other designers you will require version control. Version control is a concept of maintaining a history of changes to an asset. And for this Trunk would be very useful for you. Trunk Trunk is like Github for you. You can tell trunk which files you would like it to look after and it will monitor those files for any changes. When any changes are made, Trunk maintains a record of what kind of change was made and who made it. In turn, those who make the changes can comment on the update. This will help you to easily collaborate with other designers. The fun part is you can roll back changes. You can also handle conflicting changes in a non-destructive way and view the entire history of the file.
Wireframes & Early Design
Whimsical We are again with Whimsical. But this time we are diving deep into its usages as a new wireframing tool. Whimsical has a built-in library of low-fidelity components, like,
Buttons
Toggles
Checking boxes
Text entry fields
Sliders
Tab bars etc.
By just grabbing a few basic components and piecing them together you will get a rough layout in no time. With Whimsical you can also share your work with others, comment and get quick feed backs. Sketch Sketch is a great prototyping tool. It is specifically made for Mac OS X users. Many compare it with Adobe Illustrator. Sketch is 100% vector-based. Therefore it will never lose quality. Its pixel-snapping and alignment guides makes sure that everything is in the right place. With Sketch you can share with your team members or clients. Sketch can compress your file. This will make sharing with your co-workers or clients easy. Figma Figma has 5 main startling uses. They are,
You can arrange scattered ideas with affinity diagrams
Vote on different concepts in real time
Divide and conquer with a design assembly line.
You can make comics and
Play games
InVision InVison offers powerful prototyping tools. Some of the uses of this tool are,
You can upload design files
Add animations
Add gestures and
Place transitions
Doing all the above will transform your static screen to clickable and interactive prototypes. It can support files in PNG, JPG, GIF, AI and PSD format. Clients can provide feedback in the form of comments on your designs. You can easily update project’s progress through actionable to-do lists.
Prototyping
Atomic With Atomic tool, you can program actual logic into your prototypes. This means your prototype doesn’t just look like an app but acts like your app. You can use the tool for prototyping animations or interactions for mobile or desktop applications. Some of the positives with Atomic tool are,
You can easily share and collect feedback on prototypes within the Atomic interface.
Design in the browser and view on any device.
Its interface is easy to learn
It has extensive controls for creating high fidelity animated prototypes.
It contains fine-grain control for adding interactivity to individual elements.
High-Fidelity Design
Adobe XD In Adobe XD, XD stands for experience design. With this design and development tool, you can design websites, mobile apps and prototype and see your product preview in XD. You can easily control and customize your experience. You can get live feedback to iterate faster and preview on mobile devices. You can also work with third party tools. You can also preview XD tools in Dropbox. This tool eventually helps in your creative design process.
Presentation and Documentation
You have some great idea in your mind and an art work to match. And eventually you want to sell your work. So how do you sell? To get gather enough of hype about your work and sell you can rely on the following tools, Apple’s Keynote(Mac) Keynote is more advanced than Power Point and Google Slides. It gives you a good user experience. It has got great animation tools. You can easily explain your story behind your designs. You can record all the necessary details about your design. Confluence Confluence is an internal wiki with advanced permission features. You can drop in screens and user flows. Your business team can add acceptance criteria. It is a great tool. You can use the page as a resource to understand the logic and intentions of your design. The above list of tools can aid UX designers in various ways including your project management. Some tools have drag and drop facility, clickable prototypes, usability testing, rapid prototype and as testing tools. Moreover, these tools help in various designer prototypes. It will be apt to end this article on a happier note. The role of a Web Designer is very sought after in various software industries and MNCs. Hence the right time is, Now, for you to learn more about UX designer skills. You can also learn UX Design Course in Surat if you are put up in or around the city. Learning UX design systematically from reputed institutions will accelerate your learning curve, make you industry ready and quickly fetch you a job.
0 notes
Text
Top 8 Software Development Companies – Verve Systems

“Top 8 Software Development Companies”, You heard it right! Proud to announce that Verve has been ranked as TOP 8 Software Companies by Design Rush!
The Winners keep winning due to their definite characteristics of quality, persistence, and commitment. These characteristics help entrepreneurs cultivate a better vision and stay resilient in a dynamic, chaotic environment. This particular approach has uplifted our bars, and we stand out in 8th place on Design Rush as one of the best software development companies. The title itself says it all!
Design Rush is a podium, a guide, and a baseline that helps you sift the best professional agencies that excel in their services and are categorized according to their areas of expertise. It’s a marketplace that connects brands and professionals. Among thousands of agencies from over 50 countries, we secured the 8th Position for our services as the Best Offshore Software Development company.
Future-Proof Your Business: Choose a Cutting-Edge Software Development Partner
When it comes to software development, business leaders and entrepreneurs always hunt for a cutting-edge Software Development company that can translate their goals and vision in a shorter time frame. But what are some quantified and qualified factors that need to be underpinned while diverging towards your end goals?
Strategic Thinking
A Best Software Development Company, beyond the capacity to hold knowledge, skills, and years of experience in the industry, should have an adaptability to think strategically and a productive mindset that pushes towards powerful products and results. With strategic thinking and a productive mindset, a developer or team can help you out with a sea of possibilities and the best outcome for your products.
Understanding and Futuristic with Product Scalability
A great trait of the Best Development Company is understanding the implications, intricacies, and top-line technology integration to future-proof software. Completing tasks isn’t enough; a team should have unfiltered ideas and proposals that help build feature-rich mobile apps and improve product longevity in the market.
Passionately Striving for Growth
To stand out in tech space, leaders continuously embrace and position themselves in different stages of learning. They learn invaluable skills, connect with the community and are willing to be challenged. Beyond talent, vision and experience, a Best Software Development Company should be able to revolutionize a project and bring something valuable to startups and Fortune 500’s.
Ranked in the Top 8 on DesignRush! Verve Systems: Your trusted partner for exceptional Offshore Software Development
Verve Systems has been renowned for bringing your vision to life and building custom software, web, and mobile solutions. We have created unparalleled value for customers and help them accelerate their digital transformation journey. Verve Systems offers end-to-end mobile and web app development services to companies ranging from startups to large enterprises.
One of the primary reasons we have a strong foothold in the market is to adapt to the latest technology trends and stay afloat with expertise and knowledge. Setbacks were part of our journey, but we turned those stepping stones to their final goals. With a team of XYZ specialists on board, project managers, dedicated developers, and strategists, verve Systems ensures high-quality results and generates visionary goals for clients.
We offer comprehensive solutions from planning to execution and maintenance. We have worked tirelessly to exceed expectations and stay at the forefront of the industry. Our skills have augmented clients in different industries, including supply chain management, healthcare, finance, communication, and other domains.
Verve systems – Innovative Leaders of tomorrow
Each client brings their own set of goals and visions to the table. That’s why we’re always on the lookout for new and valuable learnings every single day! We dig down to the goals, aspects, and intricacies of each item from the list. Following a proper structured planning as per their specific goals and information gathered. Our highly skilled analysts pivot best practices to provide result-oriented solutions.
Being an offshore software development company, we maintain transparency and keep clients in the loop. Whether it’s the designing phase development or so forth, we keep everything clear so all the operations are performed quickly and efficiently.
Don’t Forget to Check it – Verve Systems Is Featured as the Top AngularJS Development Company By DesignRush
Our Software Development Company’s prime focus is to deliver technology, innovative solutions, development, implementation, and maintenance to organizations for their successful business transformation. No matter if it’s custom development or an off-shelf approach, with expertise and competitive pricing, we have positive and happy clientele.
If you are looking for a Software Development Company or team to push your boundaries and deliver the utmost results, we can help you out. Choose Verve Systems as your supporting partner.
To know more about our clients and stories, buzz us at [email protected]! Let Verve Systems be your partner.
0 notes
Video
youtube
How To Turn On Or Off Autostart On The LibreWolf Web Browser | Step-by-S...
In this tutorial, you’ll learn how to turn on or off autostart for the LibreWolf browser using a PC. Autostart controls whether LibreWolf launches automatically when you start your computer. Disabling it can speed up your boot time, while enabling it ensures your browser is ready the moment you log in. This guide walks you through how to manage this setting manually.
💡 Tip: Disabling unnecessary startup programs helps improve your system’s performance.
👍 If this video helped you, be sure to Like, Comment, and Subscribe for more browser tips and PC tutorials!
Simple Steps 1. Open the LibreWolf web browser. 2. Click on the 3 bar hamburger menu in the upper right corner and choose "Settings". 3. Select "General" from the left side pane. 4. Check or uncheck the box next to "Open LibreWolf Automatically When Your Computer Starts Up.
0 notes
Note
your gifs are so good!!!! how do you make them?
thank you so much 🫶 the short version of the story is that i usually use 4k footage, cut the video into a 2-4 second moment, crop it close enough, resize it, turn it into a gif in photoshop, slow it down and post here
full guide under a read more
here i will be going into full detail on how i make gifs. do i need to do this? no. do i want to do this? yes.
i use a macbook and photoshop, so things will be different if you use a computer with some other operating system and/or an alternative to photoshop, but i will still give tips that might be applicable to all. i will first show you how i make a normal gifset with two adjacent gifs and then how i make one that's one clip in two gifs
individual gifs
find a video you want to make a gif out of. i mostly use videos i've filmed myself because i have an easy access to them in great quality. you can also use someone else's videos, but please remember to give credit and source it back to the original video. it doesn't hurt to ask for permission either.
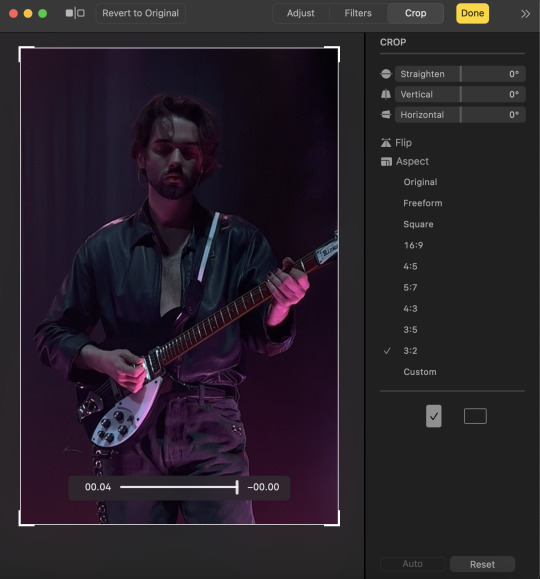
cut the video into a 2-4 second clip, and crop it. some things i recommend taking into consideration when doing this are not cropping at joints, remembering the rule of thirds and preferably not cutting the clip mid-movement. for the ratio i like to use 3:2 vertical or square. i always save the clip as a different clip.
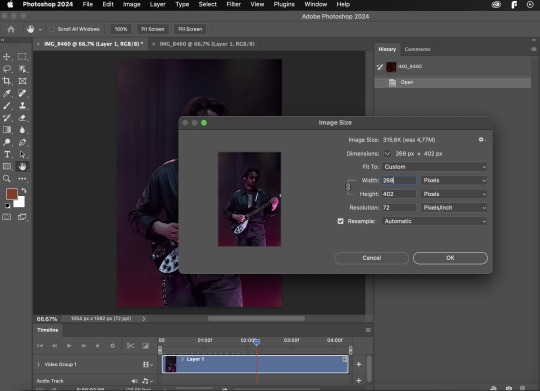
3. open your small video clip in photoshop. first of all go to image > image size. for the individual gifs the image size is not that important, but for the sake of this tutorial i scaled this to the optimal tumblr photoset size, in which the width is 268 pixels for two adjacent gifs/photos. (for three adjacent photos it is 177 | 178 | 177 pixels)
4. then go to file > export > save for web (legacy) to make it into a gif. now save it in this window.

5. close the file and open the gif you just made. now the bottom bar should look a bit different, there's individual frames instead of the video bar. i like to slow down my gifs, so i select all the individual frames, click at the three dots and the downwards pointing arrow, and adjust the delay from other. the delay for this gif on default was at 0,03 seconds, so i set it to double the time, 0,06. if you want to sync the gifs, make sure that the delay and the number of the individual frames match with all of your gifs. if not, just delete some of the frames from the ends.

6. i then went on and exported it again using save for web (legacy). there's no need to change any settings, just save it as is.
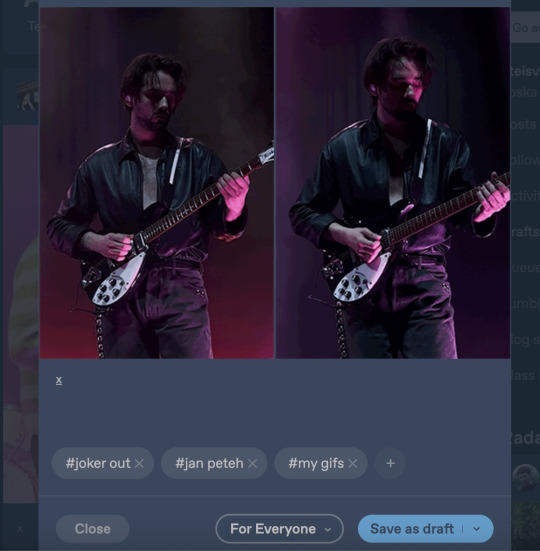
7. post your gifs on tumblr. i like to use an "x" to link the source video. use the tags you feel are necessary and remember to tag triggers like flash warning if needed.
you can find the final look of the gifset right here
gifset out of one clip
now if you want to make a gifset out of one clip, it's mostly the same process. i don't want to make this any longer than necessary, so i won't be explaining the same things again. i'll just tell how it differs.
same as the individual gifs
mostly the same, but for this one i use horizontal 4:5 ratio
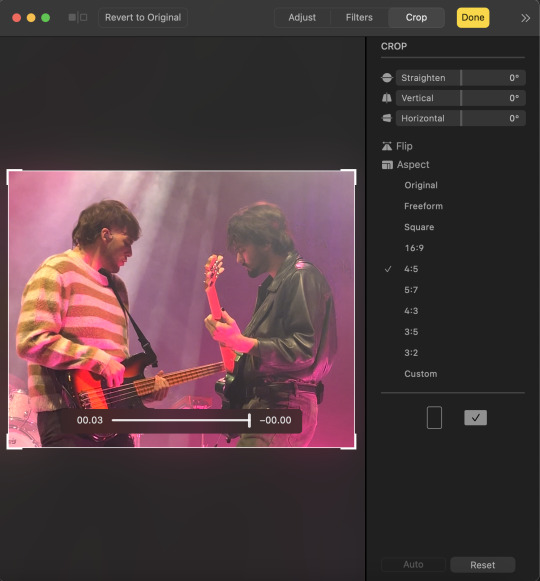
3. now the image size gets more important. for two gifs you need to scale the width to 540 pixels (268 times two + 4 pixels for the space between the gifs, the margin). the gifset will look wonky, if you don't scale it accordingly.

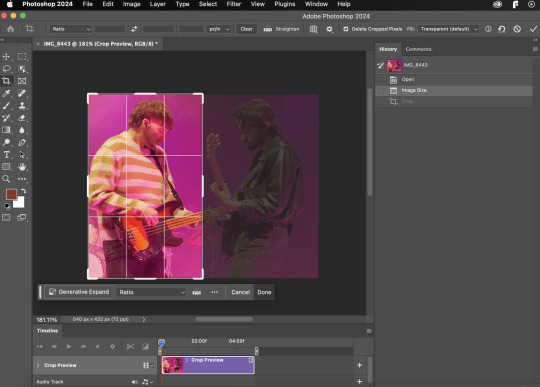
3.5. THIS IS A NEW STEP crop one side of the image to 268 pixels (the picture in half minus two pixels from half of the margin) and press done
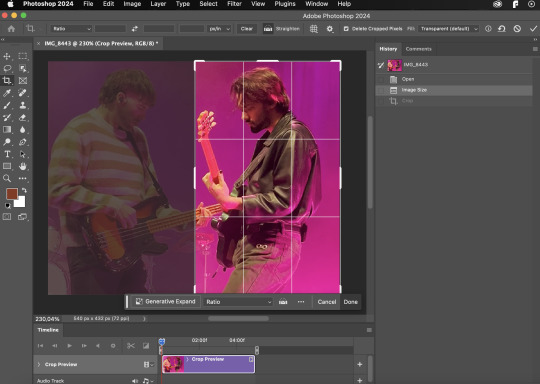
4. save for web the same way you would do in the previous guide. don't close the window under just yet

4.5. THIS IS ALSO A NEW STEP undo the cropping and now crop the other side, also the same 268 pixels and save it again the same way you did the first one.
5. this step is also mostly the same as the first one. open the gifs you just made, not the original video. just remember that if you do delete some frames, delete the same amount of frames from each end so that it's still in sync. and the frame rate for this video was better, so the delay was 0,02 seconds per frame by default and i slowed it down to 0,04 seconds. repeat the process for both of the gifs.

6. same as in the first guide. export them both on save for web (legacy)
7. mostly the same as in the first guide. post it on tumblr. now at least on desktop you can see that the margin (4px) is now nicely in proportion with the pictures. if the gifs do go out of sync when you're posting it, it's no big deal. you can just save it in your drafts and go look at it and it should be in sync when both of the gifs have loaded.

you can find out how this gifset turned out here
i know this turned out long and i probably didn't need to do any of this, but i actually had fun doing it and i hope that at least someone found it useful! please feel free to comment or message me if there are any questions :)
1 note
·
View note
Text
W3 Total Cache WordPress Plugin Review: Really Best Cache Plugin

In the fast-paced digital landscape, where user attention is scarce, the speed at which a website loads is pivotal to its success. Besides the fact that it influences client experience, it also plays an urgent role in web crawler rankings. As the gateway to a seamless online experience, website speed is non-negotiable. To address this imperative, WordPress users turn to caching plugins, W3 Total Cache Plugin Review, with W3 Total Cache emerging as a leading contender in the realm of website optimization.
A. Significance of Website Performance
The performance of a website holds the key to user satisfaction and retention. In an era where instant gratification is the norm, slow-loading websites result in high bounce rates, negatively affecting both user engagement and search engine visibility. The quicker a site, the better the client experience, and thusly, the higher its odds of coming out on top.
B. Role of Caching Plugins
Caching, the process of storing frequently accessed data to reduce load times, is the linchpin of website optimization. WordPress, as the dominant content management system, provides an array of caching plugins. These plugins transform dynamic content into static HTML, minimizing server load and enhancing website speed. Within this landscape, W3 Total Cache distinguishes itself through its comprehensive feature set and robust performance.
C. Purpose of the Article
This article aims to provide an in-depth exploration of the W3 Total Cache WordPress plugin. By scrutinizing its features, installation process, and performance improvements, readers will gain a nuanced understanding of how W3 Total Cache can be a game-changer for their website's speed and overall performance.
Understanding W3 Total Cache
A. Comprehensive Caching W3 Total Cache sets itself apart by offering a comprehensive approach to caching. Beyond basic page caching, it incorporates object caching and database caching. Page caching reduces server load by storing static HTML versions of pages, while object caching optimizes the retrieval of dynamic content. Simultaneously, database caching minimizes database queries, collectively contributing to a faster and more responsive website. B. CDN Integration One of W3 Total Cache's standout features is its seamless integration with Content Delivery Networks (CDNs). These networks distribute website content across multiple servers globally, reducing latency and accelerating page load times. W3 Total Cache facilitates this integration, ensuring optimal performance for users regardless of their geographical location. C. Minification and Browser Caching W3 Total Cache goes beyond the basics by offering minification and browser caching features. Minification reduces the size of CSS, JavaScript, and HTML files, optimizing their delivery to visitors. Browser caching, another integral feature, stores static files locally, preventing unnecessary re-downloads and further expediting page loading. This versatility positions W3 Total Cache as a comprehensive solution for users seeking holistic performance improvements.
Installation and Setup
A. Detailed Installation Guide Installing W3 Total Cache may seem like a daunting task to some, especially for those new to WordPress optimization. However, fear not; our detailed installation guide will walk you through each step, ensuring a smooth and hassle-free process. Begin by navigating to the WordPress dashboard, locating the 'Plugins' section, and clicking 'Add New.' In the search bar, type 'W3 Total Cache,' install the plugin, and activate it. Our step-by-step instructions, accompanied by visual aids, will ensure that you can navigate the installation process with confidence. B. Configuration Walkthrough Once activated, W3 Total Cache presents a plethora of settings to fine-tune its performance. Navigate to the 'Performance' tab on the WordPress dashboard and explore the configuration options. Our walkthrough will guide you through each setting, explaining its impact on performance. Whether you're a beginner or an advanced user, we provide recommendations tailored to various scenarios, ensuring that your website is configured for optimal performance. C. Troubleshooting during Setup Despite its user-friendly interface, some users might encounter challenges during the setup process. Our article addresses common issues users face and provides practical troubleshooting tips. From compatibility concerns to potential conflicts with other plugins, we've got you covered. By the end of this section, you'll have a smoothly configured W3 Total Cache, ready to elevate your website's speed.
Performance Enhancement
A. Comparative Analysis To truly understand W3 Total Cache's prowess, we'll conduct a comparative analysis against other caching plugins. By benchmarking performance metrics and presenting real-world examples, you'll gain insights into how W3 Total Cache outperforms its competitors. We'll explore key parameters such as page load times, server response, and overall user experience, providing a comprehensive overview of its effectiveness. B. Speed Metrics Improvement W3 Total Cache's impact on speed metrics is undeniable. We'll delve into the tangible improvements in Time to First Byte (TTFB), Largest Contentful Paint (LCP), and other critical metrics. Through data-driven analysis, you'll witness the quantifiable enhancements that W3 Total Cache brings to the table, validating its effectiveness in boosting website performance. C. Case Studies For a more nuanced perspective, we'll present real-world case studies highlighting the transformative effects of W3 Total Cache. These before-and-after scenarios will showcase diverse websites, each benefiting uniquely from the plugin's features. Whether you run a dynamic e-commerce site or a content-heavy blog, these case studies will resonate with your specific use case.
User Interface and Experience
A. Dashboard Overview Navigating the W3 Total Cache dashboard is essential for harnessing its power. In this section, we'll provide an in-depth exploration of the user interface, ensuring even beginners can easily grasp its functionalities. The dashboard acts as the control center, allowing users to toggle caching modules, monitor performance statistics, and access various settings. Our visual aids and explanations will empower you to make the most of W3 Total Cache's user-friendly interface. The dashboard is designed with clarity and accessibility in mind, presenting key options at a glance. From enabling or disabling specific caching modules to monitoring real-time performance data, users can swiftly navigate the dashboard thanks to its intuitive layout. Whether you're new to WordPress optimization or an experienced user, understanding the dashboard is crucial for unlocking W3 Total Cache's full potential. B. Customization and Advanced Options W3 Total Cache strikes a delicate balance, catering to both beginners and advanced users. For users seeking simplicity, we'll guide you through basic customization options to get your website optimized swiftly. This includes enabling key features like page caching, minification, and browser caching. Simultaneously, for those seeking a deeper level of customization, advanced users can explore the plugin's depth. Features such as fragment caching, object caching, and database optimization provide a granular level of control over your website's performance. Our guide ensures that regardless of your expertise level, W3 Total Cache accommodates your unique requirements, offering a user-friendly experience without sacrificing advanced functionality.
Compatibility and Integration
A. Hosting Environment Compatibility The seamless operation of W3 Total Cache across different hosting providers is essential for widespread adoption. In this section, we'll explore the plugin's compatibility with various hosting environments, address potential challenges, and provide solutions. W3 Total Cache is designed to work effectively across diverse hosting environments, from shared hosting plans to dedicated servers. We'll delve into considerations for different hosting setups, offering insights into optimizing the plugin's performance based on your specific hosting configuration. This ensures that users, regardless of their hosting provider, can leverage W3 Total Cache to enhance their website's speed. B. CDN and Third-Party Integration W3 Total Cache's integration with Content Delivery Networks (CDNs) is a pivotal feature for global website optimization. In this section, we'll dive into the intricacies of CDN integration, exploring compatibility with popular CDNs. Whether you're using a globally recognized CDN or a regional one, W3 Total Cache aims to facilitate seamless integration. Additionally, we'll assess the plugin's support for other plugins and themes, ensuring a smooth and integrated experience for users with diverse technological stacks. By the end of this section, you'll have a comprehensive understanding of how W3 Total Cache integrates with external services and complements your overall website infrastructure.
Advanced Features
A. Browser Caching Optimization Browser caching is a pivotal feature in W3 Total Cache, enhancing the user experience by storing static files locally. In this section, we'll provide an in-depth exploration of advanced browser caching options, explaining how to fine-tune this feature for optimal results. W3 Total Cache allows users to exert precise control over browser caching settings. From setting expiration times for cached files to managing cache purging, we'll guide you through the intricacies of browser caching optimization. Understanding these advanced options empowers you to tailor your website's caching strategy to suit your specific needs, striking a balance between performance and user experience. B. Object Caching and Database Optimization Going beyond basic page caching, W3 Total Cache offers object caching and database optimization. In this section, we'll dissect the impact of object caching on dynamic content, emphasizing its role in accelerating complex websites. Object caching is particularly beneficial for dynamic websites, such as those with frequently changing content or interactive elements. We'll explore how W3 Total Cache's object caching features contribute to a more responsive user experience. Additionally, our guide on database optimization techniques will equip you with the knowledge to maintain a streamlined and efficient database, ensuring sustained performance gains over the long term.
Pros and Cons
A. Advantages of W3 Total Cache W3 Total Cache brings a multitude of advantages to the table, making it a preferred choice for WordPress users keen on optimizing their websites. Let's delve into the key benefits that set W3 Total Cache apart: - Comprehensive Caching Options: W3 Total Cache's multifaceted approach to caching, encompassing page caching, object caching, and database caching, ensures a thorough optimization of your website. - CDN Integration: The seamless integration with Content Delivery Networks (CDNs) enhances the global reach of your website, reducing latency and improving page load times for users across the world. - Minification and Browser Caching: The plugin's ability to minimize file sizes through minification and optimize browser caching contributes to faster load times, creating a smoother user experience. - User-Friendly Dashboard: The intuitive dashboard provides accessibility for beginners, allowing them to navigate settings easily, while still offering advanced options for seasoned users. - Real-Time Performance Monitoring: W3 Total Cache offers real-time performance monitoring, enabling users to track the impact of optimizations on key metrics, aiding in informed decision-making. B. Limitations and Considerations While W3 Total Cache excels in many areas, it's essential to consider potential limitations and challenges: - Steep Learning Curve for Beginners: The abundance of features may be overwhelming for beginners, requiring some time to familiarize themselves with the plugin's full potential. - Possible Compatibility Issues: In rare cases, users may encounter compatibility issues with specific themes or plugins. It's advisable to test the plugin thoroughly in your specific environment. - Configuration Complexity: While the plugin offers advanced customization options, this complexity may be intimidating for users seeking a quick and simple setup. Understanding both the strengths and limitations allows users to make informed decisions about whether W3 Total Cache aligns with their website optimization goals.
Support and Community
A. Troubleshooting Resources Effective support and troubleshooting resources are crucial for users navigating potential challenges. W3 Total Cache provides a range of resources, including: - Documentation: Detailed documentation offers insights into installation, configuration, and troubleshooting procedures. - Community Forums: Engaging with the community forums allows users to seek advice from experienced users and developers. - Guides and Tutorials: Additional guides and tutorials supplement the documentation, providing step-by-step instructions for common tasks. B. Developer Responsiveness The responsiveness of a plugin's development team is a key indicator of ongoing improvements and support. W3 Total Cache has demonstrated commitment through: - Regular Updates: Frequent updates indicate a commitment to fixing bugs, enhancing features, and adapting to evolving WordPress environments. - Engagement with User Feedback: Developers actively engage with user feedback, addressing reported issues and incorporating valuable insights into updates. By leveraging these support resources, users can troubleshoot effectively and stay informed about the latest developments.
Conclusion: W3 Total Cache WordPress Plugin
In this comprehensive review, we've navigated through the intricacies of W3 Total Cache, exploring its features, installation process, and performance enhancements. Let's recap the key findings: - Comprehensive Caching: W3 Total Cache offers a comprehensive suite of caching options, including page caching, object caching, and database caching. - Global Optimization: Integration with CDNs ensures optimized performance for users worldwide. - User-Friendly Interface: The dashboard provides both simplicity for beginners and depth for advanced users. - Real-World Impact: Through comparative analysis and case studies, we've witnessed tangible improvements in website speed and user experience. Drawing on the insights gathered, the final verdict on W3 Total Cache is positive, with considerations for different user profiles. For those seeking robust website optimization and willing to invest time in configuration, W3 Total Cache proves to be a valuable asset. However, beginners may experience a learning curve, and careful consideration of individual website requirements is advised. Read More: NEVE WordPress Theme Review: A Comprehensive Guide
FAQs: W3 Total Cache WordPress Plugin
Should I use W3 Total Cache? Whether you ought to utilize W3 Total Cache depends upon your particular site needs and specialized aptitude. Which is better: WP Super Cache or W3 Total Cache? Picking either WP Super Cache or W3 Total Cache depends on your needs and the particular necessities of your site. What is the best cache plugin for WordPress? Deciding the best cache plugin for WordPress depends on your particular prerequisites and inclinations. A few famous choices, including W3 Total Cache, WP Super Cache, and others like WP Rocket and LiteSpeed Cache, offer novel elements. Is W3 Total Cache free or paid? W3 Total Cache is fundamentally a free WordPress plugin accessible in the official WordPress storehouse. Read the full article
0 notes