#Ubuntu 24.04 Customization
Explore tagged Tumblr posts
Visit Tumblr Blog
Explore Tumblr blogs with no restrictions, modern design and the best experience.
Last Seen Tumblr Blogs


Fun Fact
The total number of visits Tumblr.com received during January 2021 is 327 million.
Text
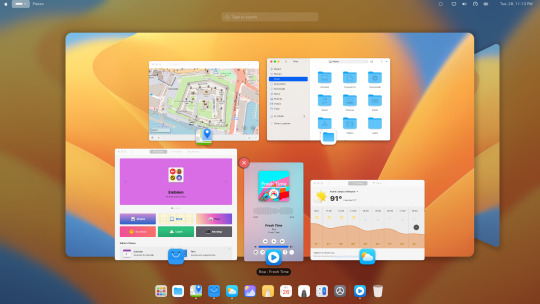
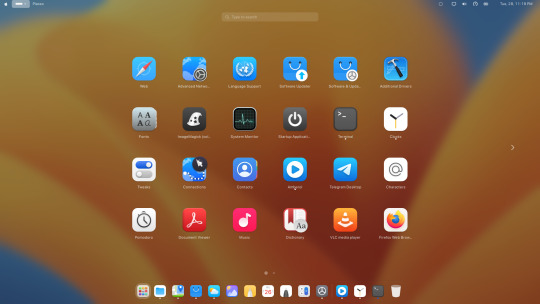
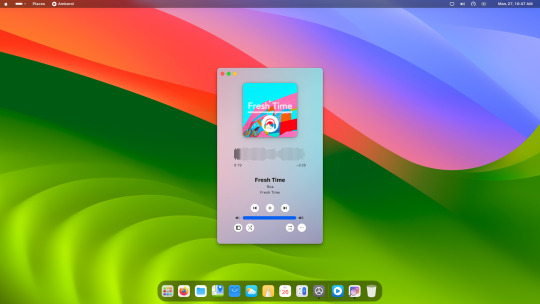
Ubuntu 24.04 Customization | Customize Your Ubuntu 24.04 Look Like macOS
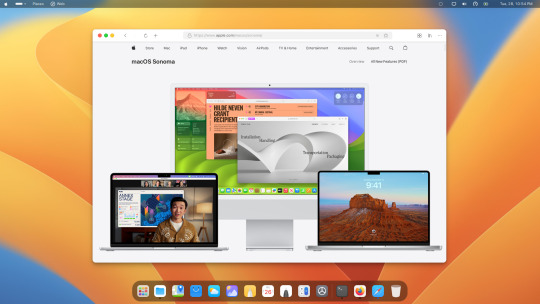
Want to give your Ubuntu 24.04 a sleek macOS makeover? It's easier than you think! With installing a few simple tweaks, you can transform your Ubuntu 24.04 desktop into a macOS-inspired masterpiece.
First, check out this YouTube tutorial for the final result of Ubuntu 24.04 resembling macOS. Then, follow the step-by-step guide in this video to make your Ubuntu 24.04 look like macOS.
To get started, download and install the file resources GNOME macOS lookalike from this resource. These will form the foundation of your macOS-inspired customization.
Enhance the macOS feel further by configuring GNOME extensions such as Dash to Dock and other GNOME extensions. The extensions will help replicate the macOS user interface on your Ubuntu 24.04 system.
For additional resources and documentation, visit this link. You can also download an auto-customization script from here to streamline the customization process.
Give your Ubuntu 24.04 a fresh new look with these macOS-inspired customization tips!
#Ubuntu 24.04#GNOME 46#Ubuntu#Linux#Fedora 40#Ubuntu 24.04 Customization#Customize Ubuntu 24.04#Open Source
29 notes
·
View notes
Text
So the actual reason half my Ubuntu desktop environment no longer worked as I expected is because Ubuntu updated to a new version of GNOME Shell, and that custom functionality was all done by GNOME Shell Extensions, and one quarter of the extensions haven't been updated to work with GNOME Shell 46, and the other quarter were disabled somehow.
Also the version of KDE that is bundled in Ubuntu 24.04 doesn't have support for per-monitor scaling, which is unfortunate.
Maybe I should switch back to something stable, like XFCE.
65 notes
·
View notes
Text
How To Add Users in Ubuntu 24.04 LTS
Adding users is a fundamental responsibility of system administrators, crucial for maintaining secure access and efficient resource allocation. Regular users need accounts for their daily operations, and administrators require robust ways to manage these accounts seamlessly. Effective user addition ensures that each user has the appropriate access and permissions for their role.
How To Add Users in Ubuntu 24.04 LTS
Ubuntu 24.04 LTS offers diverse methods for adding users, accommodating various preferences and needs. Whether you prefer the precision of terminal commands, the convenience of a graphical interface, or the efficiency of automation scripts, this guide covers it all. In this comprehensive guide, we will explore multiple methods for adding users in Ubuntu 24.04 LTS, including:
Using the Command Line: Employing powerful commands like adduser and useradd for detailed and controlled user creation.
Using the Graphical User Interface (GUI): Managing user accounts through Ubuntu’s intuitive settings interface.
Adding Users Temporarily: Creating users with expiration dates for specific tasks.
Automating User Creation with Scripts: Streamlining bulk user creation with custom scripts.
Each method is detailed with step-by-step instructions to ensure you can add users effectively and effortlessly, enhancing your Ubuntu experience.
Method 1: Adding a User Using the Command Line
This method is ideal for administrators who prefer using terminal commands.
Using adduser
An easy-to-use, high-level command for adding users is the adduser. It provides a guided process to set up a new user, including setting a password and additional user information.
Step 1: Open the Terminal
To access the terminal, simultaneously depress the Ctrl, Alt, and T keys. Alternatively, search for "Terminal" in your application menu.
Step 2: Add a New User
Execute the following command:
sudo adduser newuser

Substitute newuser with your desired username.
The password must be entered when prompted.
Take Note:
Make sure the password satisfies the following requirements:
Minimum of 8 characters.
Includes both upper and lower case letters.
Contains at least one number.
Includes special characters (e.g., !, @, #, $, etc.).

Enter the password and press Enter.
Type the password one more time and hit Enter to confirm it.
Some details will be asked while adding a new user like full name, room number, work phone, and home phone.

Any field can be skipped by pressing Enter.
After entering the information, you will see a summary of the details.

Confirm the details by typing Y and pressing Enter.
Step 3: Verify User Creation
Execute the below given command to check the new user's addition:
getent passwd newuser
If the command is successful in creating the user, the user's details will be shown like this:

Using useradd
A low-level utility for creating new users is the useradd command. It requires more specific options but offers greater control over the user creation process.
Step 1: Open the Terminal
The terminal can be opened by simultaneously holding down the Ctrl, Alt, and T keys.
Step 2: Add a New User
Run the following command, and substitute new_username with the username you prefer:
sudo useradd -m new_username
Making sure the user's home directory is created is ensured by the -m option.
Step 3: Set Password for the User
The new user can be assigned a password by using:
sudo passwd new_username

Type the password one more time and hit Enter to confirm it.
Step 4: Verify User Creation
Execute the below given command to check the new user's addition:
getent passwd new_username
If the command is successful in creating the user, the user's details will be shown.

Additional Steps (Optional)
Adding the User to a Specific Group
Use the below given command to add a new user to a certain group:
sudo usermod -aG groupname newuser
Replace groupname with the desired group (e.g., sudo, admin, docker).
Execute the below given command to check the new user's addition:
groups new_username
This command will list all the groups that the user belongs to, including the new group.

Method 2: Adding a User Using GUI (Graphical User Interface)
For those who prefer a graphical interface, Ubuntu provides an easy way to manage users through its settings. Here's a step-by-step guide to adding a new user using the GUI.
Step 1: Open Settings
To access the terminal:
Search for "Settings" in your application menu.

Step 2: Access Users Section
In the Settings window, go to the search bar at the top and type "Users."

As an alternative, move to the sidebar's bottom and select "System."

Click on "Users" from the options available in the System settings.
Step 3: Unlock User Management
Select the "Unlock" button by moving to the upper right corner.

Enter your administrative password and click "Authenticate."
Step 4: Add New User
Click the "Add User" button.
Input the required data, including your username and name.
You can choose to keep the toggle button inactive by default to designate the new user as a "Standard" user.
Then insert password.
Step 5: Confirm and Apply
Click "Add" to create the user.
Now the new user will appear in the user list.
Take Note
User Management:
Once the user is created, click on the username in the Users section to manage its settings.
Method 3: Adding a User Temporarily
For certain tasks, you might need to add a user that expires after a specified period. This method outlines how to create a user with an expiration date using the command line.
Step 1: Open the Terminal
The terminal can be opened by simultaneously holding down the Ctrl, Alt, and T keys.
Step 2: Add a User with an Expiry Date
Execute the following command:
sudo useradd -m -e YYYY-MM-DD temporaryuser
Replace YYYY-MM-DD with the desired expiration date and temporaryuser with your desired username.
Step 3: Set Password for the User
The new user can be assigned a password by using:
sudo passwd temporaryuser
Enter the password, when prompted.
Type the password and press Enter.
Type the password one more time and hit Enter to confirm it.
Step 4: Verify User
To verify that a temporary user has been created successfully, use the below given command:
sudo chage -l temporaryUser
Substitute the temporaryuser with the username you want to verify.
Method 4: Automating User Creation with Scripts
The method outlined here demonstrates automating user creation with scripts, particularly useful for bulk user creation tasks.
Step 1: Open the Terminal
The terminal can be opened by simultaneously holding down the Ctrl, Alt, and T keys.
Step 2: Create a Script
Any text editor will work for writing the script. Using nano, for instance:
nano add_users.sh
Step 3: Add Script Content
Add the following content to the script. Modify the usernames and other details as needed.
#!/bin/bash
sudo adduser user1 --gecos "First Last,RoomNumber,WorkPhone,HomePhone" --disabled-password
echo "user1:password1" | sudo chpasswd
sudo adduser user2 --gecos "First Last,RoomNumber,WorkPhone,HomePhone" --disabled-password
echo "user2:password2" | sudo chpasswd
Replace user1, user2, etc., with the desired usernames.
Modify the --gecos option to provide additional information about the user (optional).
Replace the password with the desired password.
Adjust the script content as needed, adding more users or customizing user details.
Save and close the file.
Step 4: Make the Script Executable
To enable the script to run, use the chmod command.
chmod +x add_users.sh

Step 5: Run the Script
Run the script to create the users.
./add_users.sh

Conclusion:
User management in Ubuntu 24.04 LTS is a critical task for system administrators, providing security, efficient resource allocation, and smooth system operation. With various methods available, from command-line interfaces to graphical user interfaces and automation scripts, Ubuntu 24.04 LTS ensures that adding users can be tailored to different needs and preferences. By following the comprehensive steps outlined in this guide, you can effectively manage regular users.
2 notes
·
View notes
Text
Amazon DCV 2024.0 Supports Ubuntu 24.04 LTS With Security

NICE DCV is a different entity now. Along with improvements and bug fixes, NICE DCV is now known as Amazon DCV with the 2024.0 release.
The DCV protocol that powers Amazon Web Services(AWS) managed services like Amazon AppStream 2.0 and Amazon WorkSpaces is now regularly referred to by its new moniker.
What’s new with version 2024.0?
A number of improvements and updates are included in Amazon DCV 2024.0 for better usability, security, and performance. The most recent Ubuntu 24.04 LTS is now supported by the 2024.0 release, which also offers extended long-term support to ease system maintenance and the most recent security patches. Wayland support is incorporated into the DCV client on Ubuntu 24.04, which improves application isolation and graphical rendering efficiency. Furthermore, DCV 2024.0 now activates the QUIC UDP protocol by default, providing clients with optimal streaming performance. Additionally, when a remote user connects, the update adds the option to wipe the Linux host screen, blocking local access and interaction with the distant session.
What is Amazon DCV?
Customers may securely provide remote desktops and application streaming from any cloud or data center to any device, over a variety of network conditions, with Amazon DCV, a high-performance remote display protocol. Customers can run graphic-intensive programs remotely on EC2 instances and stream their user interface to less complex client PCs, doing away with the requirement for pricey dedicated workstations, thanks to Amazon DCV and Amazon EC2. Customers use Amazon DCV for their remote visualization needs across a wide spectrum of HPC workloads. Moreover, well-known services like Amazon Appstream 2.0, AWS Nimble Studio, and AWS RoboMaker use the Amazon DCV streaming protocol.
Advantages
Elevated Efficiency
You don’t have to pick between responsiveness and visual quality when using Amazon DCV. With no loss of image accuracy, it can respond to your apps almost instantly thanks to the bandwidth-adaptive streaming protocol.
Reduced Costs
Customers may run graphics-intensive apps remotely and avoid spending a lot of money on dedicated workstations or moving big volumes of data from the cloud to client PCs thanks to a very responsive streaming experience. It also allows several sessions to share a single GPU on Linux servers, which further reduces server infrastructure expenses for clients.
Adaptable Implementations
Service providers have access to a reliable and adaptable protocol for streaming apps that supports both on-premises and cloud usage thanks to browser-based access and cross-OS interoperability.
Entire Security
To protect customer data privacy, it sends pixels rather than geometry. To further guarantee the security of client data, it uses TLS protocol to secure end-user inputs as well as pixels.
Features
In addition to native clients for Windows, Linux, and MacOS and an HTML5 client for web browser access, it supports remote environments running both Windows and Linux. Multiple displays, 4K resolution, USB devices, multi-channel audio, smart cards, stylus/touch capabilities, and file redirection are all supported by native clients.
The lifecycle of it session may be easily created and managed programmatically across a fleet of servers with the help of DCV Session Manager. Developers can create personalized Amazon DCV web browser client applications with the help of the Amazon DCV web client SDK.
How to Install DCV on Amazon EC2?
Implement:
Sign up for an AWS account and activate it.
Open the AWS Management Console and log in.
Either download and install the relevant Amazon DCV server on your EC2 instance, or choose the proper Amazon DCV AMI from the Amazon Web Services Marketplace, then create an AMI using your application stack.
After confirming that traffic on port 8443 is permitted by your security group’s inbound rules, deploy EC2 instances with the Amazon DCV server installed.
Link:
On your device, download and install the relevant Amazon DCV native client.
Use the web client or native Amazon DCV client to connect to your distant computer at https://:8443.
Stream:
Use AmazonDCV to stream your graphics apps across several devices.
Use cases
Visualization of 3D Graphics
HPC workloads are becoming more complicated and consuming enormous volumes of data in a variety of industrial verticals, including Oil & Gas, Life Sciences, and Design & Engineering. The streaming protocol offered by Amazon DCV makes it unnecessary to send output files to client devices and offers a seamless, bandwidth-efficient remote streaming experience for HPC 3D graphics.
Application Access via a Browser
The Web Client for Amazon DCV is compatible with all HTML5 browsers and offers a mobile device-portable streaming experience. By removing the need to manage native clients without sacrificing streaming speed, the Web Client significantly lessens the operational pressure on IT departments. With the Amazon DCV Web Client SDK, you can create your own DCV Web Client.
Personalized Remote Apps
The simplicity with which it offers streaming protocol integration might be advantageous for custom remote applications and managed services. With native clients that support up to 4 monitors at 4K resolution each, Amazon DCV uses end-to-end AES-256 encryption to safeguard both pixels and end-user inputs.
Amazon DCV Pricing
Amazon Entire Cloud:
Using Amazon DCV on AWS does not incur any additional fees. Clients only have to pay for the EC2 resources they really utilize.
On-site and third-party cloud computing
Please get in touch with DCV distributors or resellers in your area here for more information about licensing and pricing for Amazon DCV.
Read more on Govindhtech.com
#AmazonDCV#Ubuntu24.04LTS#Ubuntu#DCV#AmazonWebServices#AmazonAppStream#EC2instances#AmazonEC2#News#TechNews#TechnologyNews#Technologytrends#technology#govindhtech
2 notes
·
View notes
Link
#apt#automaticupdates#Automation#cronjobs#Debian#enable#Linux#manualsetup#packagemanagement#patching#Performance#repositories#Security#servermaintenance#softwareupdates#systemadministration#Ubuntu#Ubuntu22.04#Ubuntu24.04#unattendedupgrades
0 notes
Text
How to GitLab on Ubuntu 24.04
This article explains how to install GitLab on Ubuntu 24.04. GitLab is a web-based git repository manager with issues tracking, continuous integration and deployment (CI/CD), and a wiki. The Community Edition of GitLab is not just open-source, it’s free and lets you customize it to fit your needs, giving you the freedom to build your DevOps environment as you see fit. If you’re looking for an…
0 notes
Video
youtube
How to Install and Set Up Ubuntu 24.04 on VMware Workstation Pro 17 in Windows 11
Overview:
Setting up Ubuntu on VMware is a crucial skill for DevOps professionals who want to create isolated environments for testing, development, and automation workflows. VMware allows you to run multiple virtual machines (VMs) on a single system, enabling you to experiment with different Linux distributions without altering your primary operating system. In this hands-on guide, we’ll walk through the steps to install and configure Ubuntu on VMware, covering the key settings and best practices for optimizing performance in DevOps environments.
VMware: Getting Started
Step 1: Install VMware Workstation
To begin, you’ll need VMware Workstation or VMware Player installed on your system. Here’s how:
- Download VMware: Visit the official VMware website and download either VMware Workstation or VMware Player depending on your preference. Workstation is a paid tool with advanced features, while Player is a free option that’s perfect for basic VMs. - Install VMware: Run the installer and follow the setup wizard. Once installed, launch VMware.
Step-by-Step: Installing Ubuntu on VMware
Step 1: Download Ubuntu ISO
- Go to the [official Ubuntu website](https://ubuntu.com/download) and download the LTS (Long Term Support) version of Ubuntu, ensuring you have a stable version for long-term usage in your DevOps workflows.
Step 2: Create a New Virtual Machine in VMware
- Open VMware Workstation or VMware Player and select “Create a New Virtual Machine.” - Choose the ISO image by selecting the downloaded Ubuntu file, then click Next.
Step 3: Allocate Resources
- CPU: Assign at least 2 CPUs for smooth operation. - RAM: Allocate at least 4GB of RAM for optimal performance. You can assign more if your system allows. - Storage: Provide at least 20GB of disk space, especially if you plan to install DevOps tools.
Step 4: Installation of Ubuntu
- Start the VM, and Ubuntu’s installation wizard will appear. - Follow the prompts: choose language, keyboard settings, and select Install Ubuntu. - Choose installation type (erase disk if it’s a fresh VM) and configure time zones, user account, and password. - After installation, update your system by running: ```bash sudo apt update && sudo apt upgrade -y ```
Step 5: VMware Tools Installation
Installing VMware Tools improves VM performance, enabling better integration with the host machine.
- In VMware, go to the VM menu and select Install VMware Tools. ```bash sudo apt install open-vm-tools open-vm-tools-desktop -y sudo reboot vmware-toolbox-cmd -v ``` Verify VMware Tools Installation:
```bash vmware-toolbox-cmd -v ```
Step 6: Post-Installation Setup for DevOps
- Install Basic DevOps Tools: ```bash sudo apt install git curl vim ``` - Enable SSH Access: ```bash sudo apt install openssh-server sudo systemctl enable ssh sudo systemctl start ssh
Best Practices for Installing and Setting Up Ubuntu on VMware
1. Resource Allocation: Ensure you allocate sufficient CPU, RAM, and storage based on the workloads. For most DevOps tasks, assign at least 2 CPUs and 4GB of RAM for optimal performance. More demanding workloads may require additional resources.
2. Snapshots: Regularly take VM snapshots before major changes or installations. This allows you to revert to a stable state if something goes wrong during configuration or software testing.
3. VMware Tools Installation: Always install VMware Tools after setting up the OS. This ensures seamless mouse integration, smoother graphics, and better performance, reducing potential bugs and lag in your virtual environment.
4. Partitioning: For better performance and management, use custom partitioning if needed. This helps in allocating different parts of your virtual disk to `/`, `/home`, and `/var` partitions, improving system performance and flexibility in future updates or installations.
5. Automated Backups: Set up automated backups or export your VMs periodically. This practice is particularly important if your VMs store critical configurations, applications, or databases.
6. Networking Configuration: Ensure that your virtual machines are correctly configured to access the internet and your local network. Consider using NAT or Bridged Network options, depending on your networking needs. NAT works well for internet access, while Bridged is ideal for networked environments.
7. Security Considerations: Configure firewalls and SSH access carefully to secure your VMs from unauthorized access. Set up strong user permissions, enforce password complexity, and enable SSH keys for secure remote access.
8. Regular System Updates: Frequently update Ubuntu systems to ensure they are protected from vulnerabilities. Use the following commands to update packages: - For Ubuntu: ```bash sudo apt update && sudo apt upgrade ```
9. Monitor Resource Usage: VMware allows you to monitor CPU, memory, and storage usage. Use these tools to ensure that your VMs are not consuming excessive resources, especially in shared environments.
10. Test Environments: Use VMs as sandbox environments to test and experiment with new DevOps tools like Docker, Kubernetes, Jenkins, or Ansible before deploying them in production.
Conclusion:
By installing and setting up Ubuntu on VMware, you gain the flexibility to experiment with DevOps tools, test automation workflows, and learn Linux system administration in a safe and isolated environment. This hands-on tutorial provides you with the foundation to run and manage your Linux VMs effectively, setting you up for success in DevOps tasks ranging from development to deployment automation. Follow along in this video as we guide you step-by-step to mastering Linux installations on VMware for your DevOps journey.
how to install ubuntu 24.04,vmware player,windows 11,vmware workstation player,how to install ubuntu 24.04 lts desktop,How to Install and Set Up Ubuntu 24.04 on VMware Workstation Pro 17 in Windows 11,vmware workstation,vmware workstation 17 pro,ubuntu linux,cloudolus,cloudoluspro,linux,free,How to Post-Installation Setup For DevOps,How to Update and VMware Tools Install in Ubuntu 24.04 LTS?,Linux for DevOps,ubuntu installation,ubuntu 24.04,ubuntu,install ubuntu,
Linux Install and Setup Overview,Install and Setup VMware Workstation Pro 17,Installing Ubuntu on VMware Workstation Pro 17,Installing CentOS on VMware Workstation Pro 17,Linux Install and Setup Best Practices vmware,virtual machine,how to download and install vmware workstation pro,Hands On Guide: How to Install and Set Up Ubuntu and CentOS on VMware,centos 7,download and install vmware workstation on windows 11,the reality of using vmware,vmware tutorial,install centos 7 on vmware,installing centos 7 on vmware,ubuntu installation on vmware workstation 17,Linux Install and Setup Best Practices,cloudoluspro vmware,linux for devops,handson ubuntu,open source,linux terminal,distrotube,ubuntu is bad,linux tutorial,linux for beginners,linux commands,Linux installation,Linux beginner guide,Linux setup,how to install Linux,Linux for beginners,Linux distributions,Ubuntu installation,Fedora installation guide,Linux tips,Linux,Linux basics,DevOps basics,cloud computing,DevOps skills,Linux tutorial,Linux scripting,Linux automation,Linux shell scripting,Linux in DevOps,Ubuntu,CentOS,Red Hat Linux,DevOps tools,ClouDolus,DevOps career,Linux commands for beginners,Linux for cloud,Linux training,devops tutorial Linux,Linux commands for beginners ubuntu,cloud computing Linux for DevOps
***************************** *Follow Me* https://www.facebook.com/cloudolus/ | https://www.facebook.com/groups/cloudolus | https://www.linkedin.com/groups/14347089/ | https://www.instagram.com/cloudolus/ | https://twitter.com/cloudolus | https://www.pinterest.com/cloudolus/ | https://www.youtube.com/@cloudolus | https://www.youtube.com/@ClouDolusPro | https://discord.gg/GBMt4PDK | https://www.tumblr.com/cloudolus | https://cloudolus.blogspot.com/ | https://t.me/cloudolus | https://www.whatsapp.com/channel/0029VadSJdv9hXFAu3acAu0r | https://chat.whatsapp.com/D6I4JafCUVhGihV7wpryP2 *****************************
*🔔Subscribe & Stay Updated:* Don't forget to subscribe and hit the bell icon to receive notifications and stay updated on our latest videos, tutorials & playlists! *ClouDolus:* https://www.youtube.com/@cloudolus *ClouDolus AWS DevOps:* https://www.youtube.com/@ClouDolusPro *THANKS FOR BEING A PART OF ClouDolus! 🙌✨*
#youtube#Linux Install and Setup OverviewInstall and Setup VMware Workstation Pro 17Installing Ubuntu on VMware Workstation Pro 17Installing CentOS o#how to install ubuntu 24.04vmware playerwindows 11vmware workstation playerhow to install ubuntu 24.04 lts desktopHow to Install and Set Up#ClouDolus ClouDolusPro#ClouDolusPro
0 notes
Video
youtube
How To Enable Or Disable Lock Screen Notifications In Ubuntu ( 24.04)
Discover how to manage lock screen notifications in Ubuntu with this easy-to-follow tutorial. Whether you prefer to see notifications on your lock screen or want a distraction-free setup, this guide shows you how to customize the settings to fit your needs. Perfect for improving privacy and usability on your Ubuntu system!
Simple Steps 1. In the lower right corner and click on the "Show Apps" button. 2. Open "Settings". 3. In the dialog box that opens, in the left side pane, scroll down and click on "Notifications". 4. Toggle on or off "Lock Screen Notifications".
0 notes
Text
HOW TO MAKE UBUNTU 24.04 LOOK FRESH AND ELEGANT WITH THE ORCHIS THEME
Want to make your Ubuntu 24.04 look fresh and elegant? Check out our latest guide on using the Orchis Theme to transform your desktop! 💻✨
📹 Watch the tutorial here:
youtube
🔗 DOWNLOAD RESOURCES
https://www.pling.com/p/2176652/
https://ko-fi.com/s/9fbf46f04f
📖 DOWNLOAD DOCUMENTATION
https://ko-fi.com/s/f2e544fc5d
https://www.patreon.com/linuxscoop/shop/documentation-make-gnome-46-look-fresh-286268
https://linuxscoop.gumroad.com/l/gnome-46-orchis
🧑💻 DOWNLOAD SCRIPT AUTO CUSTOMIZATION:
https://ko-fi.com/s/d2a3b1878e
https://linuxscoop.gumroad.com/l/auto-custom-gnome46-orchis
https://www.patreon.com/linuxscoop/shop/auto-custom-gnome-46-look-fresh-and-with-287377
Transform your Ubuntu desktop and share your results with us!
#ubuntu#ubuntu 24.04#gnome 46#gnome#linux#open source#linux distribution#fedora 40#manjaro 24#Youtube
9 notes
·
View notes
Text
How to Install Piwigo with Apache on Ubuntu 24.04
This article explains how to install Piwigo with Apache on Ubuntu 24.04. Piwigo is an open-source, web-based photo gallery software designed to help users organize, manage, and share photo collections online. It offers tools for categorizing images, adding metadata, and customizing galleries via themes and plugins. The Ubuntu/Apache stack provides a balanced mix of security, scalability, and…
0 notes
Text
Install Piwigo on Ubuntu 24.04 with Nginx
This article explains how to install Piwigo with Nginx on Ubuntu 24.04. Piwigo is an open-source, web-based photo gallery software designed to help users organize, manage, and share photo collections online. It offers tools for categorizing images, adding metadata, and customizing galleries via themes and plugins. Ubuntu Server is a reliable platform for hosting web apps like Piwigo. Piwigo…
0 notes
Text
How to Install EspoCRM with Nginx on Ubuntu 24.04
This article explains how to install EspoCRM with Nginx on Ubuntu 24.04. EspoCRM is an open-source Customer Relationship Management (CRM) platform designed to help businesses manage customer interactions, sales pipelines, marketing campaigns, and customer support. It offers features like contact management, email integration, workflow automation, reporting, and extensibility through…
0 notes
Text
How to Install EspoCRM with Apache on Ubuntu 24.04
This article explains how to install EspoCRM with Apache on Ubuntu 24.04. EspoCRM is an open-source Customer Relationship Management (CRM) platform designed to help businesses manage customer interactions, sales pipelines, marketing campaigns, and customer support. It offers features like contact management, email integration, workflow automation, reporting, and extensibility through…
0 notes
Text
How to Install Dolibarr with Nginx on Ubuntu 24.04
This article explains how to install Dolibarr with Nginx on Ubuntu 24.04. Dolibarr is an open-source, modular ERP (Enterprise Resource Planning) and CRM (Customer Relationship Management) software designed to help businesses manage contacts, invoices, orders, inventory, projects, and more operations. Nginx excels at handling high concurrent traffic with low memory usage, making it ideal for…
0 notes
Text
How to Install Dolibarr with Apache on Ubuntu 24.04
This article explains how to install Dolibarr with Apache on Ubuntu 24.04. Dolibarr is an open-source, modular ERP (Enterprise Resource Planning) and CRM (Customer Relationship Management) software designed to help businesses manage contacts, invoices, orders, inventory, projects, and more operations. Ubuntu is a widely used Linux distribution known for its reliability and regular security…
0 notes