#Update github desktop
Explore tagged Tumblr posts
Visit Tumblr Blog
Explore Tumblr blogs with no restrictions, modern design and the best experience.
Last Seen Tumblr Blogs


Fun Fact
12.7% of mobile users access Tumblr.
Text
Interesting Update on Firefox
So Firefox has introduced Terms of Use.
Of note:
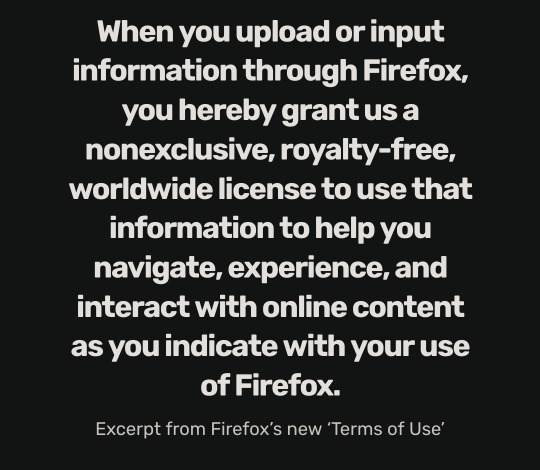
This was pointed out updated in the Privacy Policy:
We use technical data, language preference, and location to serve content and advertising on the Firefox New Tab page in the correct format (i.e. for mobile vs desktop), language, and relevant location. Mozilla collects technical and interaction data, such as the position, size, views and clicks on New Tab content or ads, to understand how people are interacting with our content and to personalize future content, including sponsored content. This data may be shared with our advertising partners on a de-identified or aggregated basis.
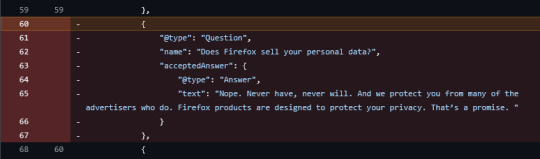
Additionally, you can have a look at their Github changes here, which shows something else interesting:
Mozilla has deleted the lines "Does Firefox sell your personal data? Nope. Never have, never will. And we protect you from many of the advertisers who do. Firefox products are designed to protect your privacy. That’s a promise.
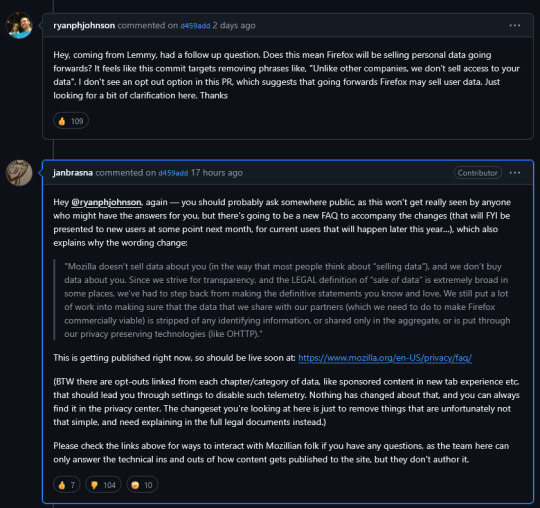
Another commit shows another removal of a line that notes that Firefox doesn't sell personal data
bedrock/firefox/templates/firefox/faq.html Old: Yep! The { -brand-name-firefox-browser } is free. Super free, actually. No hidden costs or anything. You don’t pay anything to use it, and we don’t sell your personal data. New: Yep! The { -brand-name-firefox-browser } is free. Super free, actually. No hidden costs or anything. You don’t pay anything to use it.
Scrolling further down, you can see a response to a comment questioning it
2K notes
·
View notes
Text
The main reason to use Firefox and Linux and other free and open source software is that otherwise the big tech monopolies will fuck you as the customer over in search of profits. They will seek to control how you use their products and sell your data. When a company dominates the market, things can only get worse for ordinary people.
Like take Google Chrome for example, which together with its chromium reskins dominate the web browser market. Google makes a lot of money from ads, and consequently the company hates adblockers. They already are planning to move to manifest V3, which will nerf adblockers significantly. The manifest V3 compatible chrome version of Ublock Orgin is a "Lite" version for a reason. Ublock's Github page has an entire page explaining why the addon works best in Firefox.
And Google as we speak are trying to block adblockers from working on Youtube, If you want to continue blocking Youtube ads, and since Youtube ads make the site unuseable you ought to want that, it makes the most sense to not use a browser controlled by Google.
And there is no reason to think things won't get worse. There is for example nothing stopping Google from kicking adblockers off their add-on stores completely. They do regard it as basically piracy if the youtube pop-ups tell us anything, so updating the Chrome extensions terms of service to ban adblocking is a natural step. And so many people seem to think Chrome is the only browser that exists, so they are not going to switch to alternatives, or if they do, they will switch to another chrominum-based browser.
And again, they are fucking chromium itself for adblockers with Manifest V3, so only Firefox remains as a viable alternative. It's the only alternative to letting Google control the internet.
And Microsoft is the same thing. I posted before about their plans to move Windows increasingly into the cloud. This already exists for corporate customers, as Windows 365. And a version for ordinary users is probably not far off. It might not be the only version of Windows for awhile, the lack of solid internet access for a good part of the Earth's population will prevent it. But you'll probably see cheap very low-spec chromebookesque laptops running Windows for sale soon, that gets around Windows 11's obscene system requirements by their Windows being a cloud-based version.
And more and more of Windows will require Internet access or validation for DRM reasons if nothing else. Subscription fees instead of a one-time license are also likely. It will just be Windows moving in the direction Microsoft Office has already gone.
There is nothing preventing this, because again on the desktop/laptop market Windows is effectively a monopoly, or a duopoly with Apple. So there is no competition preventing Microsoft from exercising control over Windows users in the vein of Apple.
For example, Microsoft making Windows a walled garden by only permitting programs to be installed from the Microsoft Store probably isn't far off. This already exists for Win10 and 11, it's called S-mode. There seem to be more and more laptops being sold with Windows S-mode as the default.
Now it's not the only option, and you can turn it off with some tinkering, but there is really nothing stopping Microsoft from making it the only way of using Windows. And customers will probably accept it, because again the main competition is Apple where the walled garden has been the default for decades.
Customers have already accepted all sorts of bad things from Microsoft, because again Windows is a near-monopoly, and Apple and Google are even worse. That’s why there has been no major negative reaction to how Windows has increasingly spies on its users.
Another thing is how the system requirements for Windows seem to grow almost exponentially with each edition, making still perfectly useable computers unable to run the new edition. And Windows 11 is the worst yet. Like it's hard to get the numbers of how many computers running Win10 can't upgrade to Win11, but it's probably the majority of them, at least 55% or maybe even 75%. This has the effect of Windows users abandoning still perfectly useable hardware and buying new computers, creating more e-waste.
For Windows users, the alternative Windows gives them is to buy a new computer or get another operating system, and inertia pushes them towards buying another computer to keep using Windows. This is good for Windows and the hardware manufacturers selling computers with Windows 11 pre-installed, they get to profit off people buying Windows 11 keys and new computers, while the end-users have to pay, as does the environment. It’s planned obsolescence.
And it doesn’t have to be like that. Linux distros prove that you can have a modern operating system that has far lower hardware requirements. Even the most resource taxing Linux distros, like for example Ubuntu running the Gnome desktop, have far more modest system requirements than modern Windows. And you can always install lightweight Linux Distros that often have very low system requirements. One I have used is Antix. The ballooning Windows system requirements comes across as pure bloat on Microsoft’s part.
Now neither Linux or Firefox are perfect. Free and open source software don’t have a lot of the polish that comes with the proprietary products of major corporations. And being in competition with technology monopolies does have its drawbacks. The lacking website compatibility with Firefox and game compatibility with Linux are two obvious examples.
Yet Firefox and Linux have the capacity to grow, to become better. Being open source helps. Even if Firefox falls, developers can create a fork of it. If a Linux distro is not to your taste, there is usually another one. Whereas Windows and Chrome will only get worse as they will continue to abuse their monopolistic powers over the tech market.
846 notes
·
View notes
Text
SSP PLUGIN RECOMMENDATIONS
Do you want to customize and expand your desktop buddy experience further? here are some handy links to miscellaneous plug-ins I’ve gathered from around the web, or you can even program your own, and they can also be written in any programming language so the possibilities are limitless! plug-ins are essentially extensions or add-on built for SSP. I’m not a plugin developer myself, and have yet to test out each one of them for extended periods of time, so please refer to the readme files/ instructions provided by the developers (github usually has info) on how to use them if you get stuck or encounter issues. these are just some of the more recently updated ones, I'll be (slowly) adding more to the plugin page of my blog if you're interested!
Do you want to customize and expand your desktop buddy experience further? here are some handy links to plug-ins I’ve collected from around the web, or you can even program your own, plug-ins are essentially extensions/add-ons or additional features for the SSP baseware. there are a wide variety of different Ukagaka compatible plug-ins out there that this list hasn’t scratched the surface of yet, some even make it so seperate programs (Discord, music players such as WinAmp or Foobar2000, encoding software) can interact with Ukagaka. a few newer ones require third party (free) software like VOICEVOX or API keys but the majority are designed to work with just the plain baseware (SSP) but refer to the individual readme files and instructions provided by the developers during setup.
forenote:
most of these will only have instructions/documentation in Japanese, I usually reccomend against machine translation but it’s probably no problem to get the gist of basic instructions!
I’m not a plugin developer, and have yet to test if all of these work with current versions of SSP or with all the compatible ghosts
to install a plugin, you can just drag it to your SSP window.
if you have any suggestions for plugins that I haven’t included yet , please submit them here
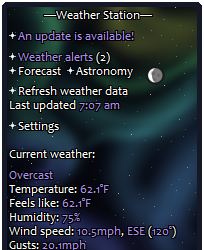
Weather Station by Zicheq (of Ukagaka Dream Team)
A plugin for both users and devs, for getting weather data! As a developer, you can set your ghost up to receive weather data from this plugin, to then do what you will with! Weather based comments? Outfit changes? Something else totally unrelated? It’s up to you! This plugin will handle the messy details of the user inputting their location and gathering the weather data for you. … (read more here)
Discord Rich Presence by Ponapalt (main dev of SSP baseware)
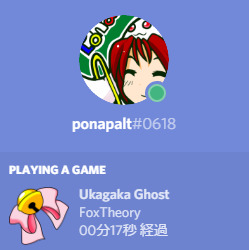
This plugin is designed for displaying the name of the primary ghost you have open on the ‘currently playing’ status on the Discord for Windows application in real-time. also compatible with displaying your currently played song in FLUX (a music player ghost by Zi).
Wallet of Unyu
by Don
⚠️NOT A REAL CRYPTOSCAMCURRENCY⚠️
UNYU is a cryptocurrency widely circulated in the world of Ukagaka.
This wallet plugin allows you to freely deposit and withdraw UNYUcoin
anyone can freely withdraw however much UNYU they want, even if you want 500 trillion UNYU
It isn’t encrypted. Transaction history is stored in plain text format in a save file.
plugin download
CeVIO-Talker V2 Plug-in
by Ambergon
This Plug-in was initially revealed for Day 21 of the Ukagaka Advent Calendar collaborative project in 2022. using this you can have a fully voiced ghost with a realistic sounding voicebank speak to you out loud! (in English too?)
it Requires ceVIO Creative Studio and SSP 2.6.45 (or newer) to work, ceVIO is a vocal synthesizer software commonly compared to Vocaloid and UTAU that works via text-to-speech method. the primary difference between Vocaloid and ceVIO is that ceVIO is built for both TTS/speech and creating vocals for songs in music production. you can download a demo of CeVIO if you would like to try it out here.
GhostSpeaker
by apxxxxxxe like CeVIO-Talker, this Plug-in was initially revealed for Day 17 of the Ukagaka Advent Calendar collaborative project in 2023. it’s a successor to the Bouyomi-chan plug-in and utilizes a free (Japanese) text-to-speech software called VOICEVOX and COEIROINK so that your ghost can verbalize their balloon dialogue and speak to you. you can listen to a demo in this github link.
GhostWardrobe
by apxxxxxxe dress-up is available by default on some ghosts but this also allows you to dress up your ghost (if compatible?) in different outfit coordinates, mix and match pieces and save and load the outfit combinations from the plugin menu.

CharameL plugin by Umeici
This plugin allows you to enjoy watching ghosts directly interact and chat amongst each other freely on a built in instant messenger. like a chatroom for seeing what your ghosts chat together about when you’re out of the room.
Stamp Collection by http://navy.nm.land.to/post/
with this plug-in you can provide links and additional information about events to the user, sort of like your ghost collecting stamps on a card when exploring each booth at a virtual convention dealer alley or an easter egg hunt.
Functions: a YAYA type plugin that notifies the user of information about a stamp. Triggered at ghost startup, plugin loading/unloading, and any set timings for OnStampInfoCall to be sent. has been used for things like providing special links and custom dialogue for Ukagaka events or the Saimoe popularity contests. it worked when I tried but a lot of the images linked in the event dialogues for existing ghosts I tried couldn’t be reached without the assistance of the Internet Archive .
compatible ghosts and the shortcuts to use for them are listed here, and new ones are still being added to that list.
if you want to incorporate it into your own ghost, refer to sample.txt.
BalloonMaker by Coderatte
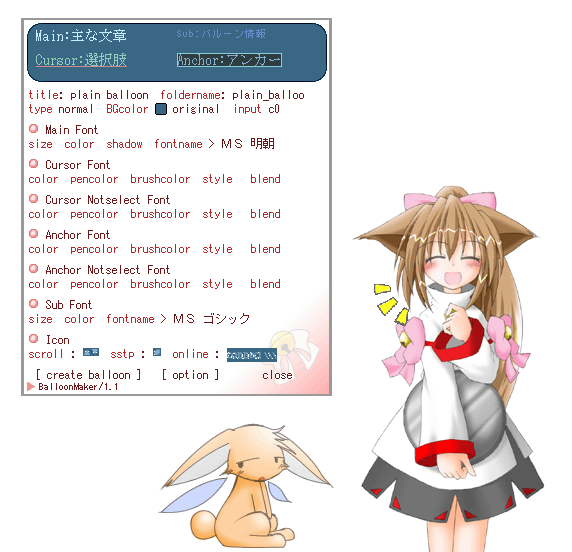
a plugin tool for creating custom balloons. balloons are the speech bubbles/text boxes you’ll see ghosts use to speak.
older plugins (that I haven’t tested succesfully yet, may have compatibility issues with current versions of SSP)
BeerShower
baton/touch plugin by Umeici
?
MicCom plugin by Umeici
?
SSTP Clients
(not plugins but refers to an external application that sends SSTP requests to the SSTP server)
Iria displays the operating process status on the dialogue balloon Kinoko
#ukagaka#ukgk#download#DL#plugin#resources#cevio#cevio ai#vocal synth#webcore#2000s internet#(these are all very modern plugins so not really but shhh i need the algorithm to cooperate#yes they work w/ old ghosts like mayura)
91 notes
·
View notes
Text
hey friends if you're like me and you don't wanna pay for music but you also like the customization and social features of spotify, here's what i use to bypass the limitations!!
spotx on github is a modified version of the desktop client that blocks all ads, and has several optional features like hiding podcasts from the homepage if you just use it for music, and blocking automatic updates to avoid incompatibility. it's currently only available on windows, but all you need is to have the official spotify app already installed!
and here's a modded apk of the mobile app for android! i've been using this for months and i believe it's safe, the only slight annoyance is that you HAVE to manually reinstall the latest version when it updates, but it'll notify you. just make sure you DON'T already have the spotify app installed - it doesn't override any features, it's an entirely seperate app.
i don't know what the alternative would be for ios so if anyone has one, feel free to let me know and i'll add it to the list!
238 notes
·
View notes
Text
A free image hosting solution for AO3 and elsewhere - A Tutorial (mobile-friendly!)
See the demo site made from this template IN ACTION: https://hotlink-archive-template.pages.dev/
This guide is for an easy, mobile-friendly way to host files for hotlinking on AO3 or elsewhere, using github and cloudflare pages.
I've encountered far too many dead links in fanfics and forums simply because a hosting service decided to dump older files, or they decided to change their TOS to no longer allow hotlinking or certain kinds of content (nsfw, fictional graphic content). See Optional Steps for even more options.
This is an easy, barebones way to permanently host images that you don't want deleted unexpectedly or that you can't host elsewhere. (Emphasis on barebones. This will not be a nice portfolio style site. Unless you decide to code that yourself!) You can follow the link above for an example of this type of site.
It is also EASY to upload and use on mobile devices after initial setup!
Tools you will need:
Cloudflare Pages/Workers is a free to use static site hosting service. This will publish your files and make them available online. This will publish your files and make them available online. There is a limit to the amount of data you can upload for free, but you can pay for proper hosting if you want to exceed it.
Github is a code sharing/storage platform. Your files will go here first before being published on Pages. You can edit and upload files through your browser at github.com, or through Github Desktop, a program you install on your computer. There are limits to Github repositories, but they are also generous (suggested 1GB to 5GB per repo).
Basic Setup
1. Create a github account
2. Copy this template repository hotlink-archive-template
Your website will be contained in a repository, a place where all the files and the revision history for your project are stored.
This template repository uses an "Action" (using python) to automatically create a "home" page with an Index of all the files in your repository every time it is updated.
NOTE: I recommend you set your repository to Private. Github's history feature is extensive, so if you have sensitive content or think you might want to delete something later, it will be hard to get rid of it completely once it's been committed and publicly available.
3. Enable Action permissions
In order for the Action script to work, you need to give Actions permission to read and write in your repository.
Within your repository, go to the tab Settings > Actions > General > Workflow Permissions

4. Create a Cloudflare account
5. Create a Pages (or Workers) project and link it to your Github repository
Your Pages project will create the front end of the site where the images will be displayed. You will be able to link those images to other platforms like AO3.
You can create either a Workers or Pages project by going to Add > Pages (or Workers). Name your project WISELY! This name will be your site's URL.
Workers vs. Pages
Workers is subsuming Pages on Cloudflare and now has all the same static hosting capabilities, in addition to its original server-side processing services. If you'd like to, read more about this.
While Workers has similar capabilities, I recommend Pages for this project. Pages has the added bonus of a cleaner URL if you do not have your own domain: “MySite.pages.dev” in Pages vs Workers' “MySite.username.workers.dev”
You will be prompted to import an existing Git repository. You will need to give it access to your Github to do this.

Select the repository on your Github you made for your project, then hit "Begin Setup".
Name your project WISELY! This name will be your site's URL.
You do not need to change any settings on the next page, so hit "Save and Deploy". Your image hosting site will now be live!
The URL will be "https://ProjectName.pages.dev". It may take a few minutes to become accessible.
Now you're done with the basic setup!
How to Add files
You can add any files you want to link to on AO3/elsewhere through mobile, desktop browser, or the Github desktop program!
Here is how to do it on Github.com:
Open up the repository that you made (it can be found at github.com/username/repositoryname). You will see a list of folders and files that are in that repository.
Click into the folder "fan-stuff".
In the top right, go Add file > Upload files and drag in the images you want added. You will need to name the images BEFORE you upload them, as there is not an easy renaming feature within Github's browser interface.
In the Commit changes box, choose a title for what action you are doing. This will help you backtrack uploads if needed.
For example, it could be "Uploaded Batman Art". Make sure it's set to "commit directly to the main branch", then commit those changes. This will upload the files.
Now, if you visit your site, you will see your uploaded image under the "fan-stuff" folder!
To embed/link your image, navigate to your file on your Pages site and copy the URL in the address bar. This URL is what you will use to embed your photo (using HTML or "add image as URL" tools some sites have).
Continue onto More Setup to customize your site and implement more advanced settings. See Tips/Troubleshooting if you're running into problems.
More Setup
Perform site customization/advanced setup with Github Desktop on your PC
Github’s web UI is great, but it has major limitations. I highly recommend that you use Github Desktop during the initial setup, as well as when you want to make major organizational changes to your files/site. Once you have everything set, though, you can use Github in your browser to upload whatever files you want to hotlink at the moment.
Download Github Desktop and “clone” (download a copy of) the repository you made.
This is the best time to rename/rearrange folders + files, etc.
There are other methods in the Troubleshooting section if you need, but Github Desktop is by far the easiest way
see Adding/Renaming Folders for important info on how to properly rename/add folders
see About the Index Page for how to customize your Index pages
Once you’re done editing, “push” (upload) all the changes you made to your online Github repository.
Having some sort of text editor like Notepad++ is useful for editing any code, the automatic color-coding is very helpful. You can edit in plain old Notepad as well, it just won’t look as nice.
About the Index Page
The template repository uses a python Action to automatically create an HTML "home" page with an Index of ALL the files in the folder every time it is updated.
This is particularly convenient for mobile use, as you can upload a file, and the python action automatically updates the Index page.
If you don’t want this, just disable the “create-index” Action and delete the .py files. You can just type in the file locations to get to each file, or you can manually maintain an home/Index page yourself, which isn't hard if you know some basic HTML and can remember to do it consistently.
Also note that if you wish to change any of the content on your Index pages, you must edit the "index.py" file, not the "index.html" file. The "index.html" file gets re-written every time the "create-index" Action is run in order to keep the file index up to date.
Adding/Renaming/Deleting Folders
Disclaimer: This is a bit convoluted because I am extremely unqualified to be working with python OR HTML. There’s probably an easy way to do this, but I don’t have the skill to do it, and most of the stuff here is copied from stuff I found around. If you know a better way to do things, please let me know, it’d make my life easier too!
Adding or renaming folders involves some extra steps.
1. The "index.py" file inside the folder needs to be edited to match the parent folder name.
The place you need to do this is found near the top of the file (highlighted below)

2. Then the outer-most "create-index.py" file needs to be updated to match the new name as well. If you’ve added a new folder, duplicate and adjust the code to match.
The place you need to do this is found at the bottom (highlighted below)

If you don’t need any folders at all, great! Just delete them and their contents! No need to edit any files. (Don’t delete “index.html” or “create-index.py” or “.github/workflows”!)
If you would like to have these folders for later use, leave them as-is and simply edit the index files.
The relevant lines of code at the bottom of "create-index.py" like in the previous step for renaming folders. You may delete this code, or comment it out (using # at the beginning of a line will make it “invisible” to the computer)
Then, add the folder’s name to the “exclusions” list at the top of the "create-index.py" file so that it doesn’t show up on your Index page (highlighted below)

You can also use this same concept to create "invisible" files/folders. Any files/folders included in the "exclusions" list in "(create-)index.py" will not be listed on the Index page, however they can still be found through the direct URL to the file.
On the flipside, this means simply hiding the file/folder from the Index page does not get rid of the file from your site. Anyone who has the URL will be able to find that file unless you remove it, or move its location to change the URL
Tips/Troubleshooting
(Re)name your files before uploading
It’s not possible to rename image/media files on Github’s web UI (it is possible with the local Git program). The "create-index" Action lists out the names of your files exactly, so you will end up with ugly strings of numbers and letters on your Index page if you don't rename them, which is terrible to look at and also plain old CONFUSING to navigate.
So if you're uploading on mobile or through Github on browser, name your files with easy to remember and distinctive filenames before you go ahead and upload them. This makes everything much easier, and it makes your Index page look nice :)
My website isn’t updating when I edit my Github repository!
Check to see if your Pages is retrieving from the correct branch, and if it has automatic deployments enabled.

Can’t see your Github repository when trying to link it on Cloudflare?
Check your Github applications Repository Access settings. Go to your ACCOUNT Settings > Integrations - Applications > Cloudflare > Repository Access

Index action is failing!
Go back to step 3 in Basic Setup and check if you’ve given Actions permission to read and write. If that’s not the issue, check to see if you’ve set up your "index.py" files correctly. The folder names should correspond to the parent folders, and the "create-index.py" file in the outer-most folder should have the correct folder names at the VERY BOTTOM.
How do I rename a folder (or move a file) in Github’s web UI?
It isn’t possible to directly rename a folder in Github’s web UI, doing it using Git on your computer is the most foolproof way to do it. But there is a way (except for media files).
Go into the folder you want to rename and select a file such as “index.html” and enter the “edit” mode.
Go to the file name and backspace until you can edit the parent folder name as well. This will create a new folder with the new name.
You’ll have to do this to every file in the folder until they’re all in the new folder.
Unfortunately, you can’t do this with media files like png/jpg/etc, because entering the “edit” mode on a photo “breaks” it somehow, and bye-bye image :’) (Don’t worry if this happens, just don’t commit the change or roll it back in your history).
Optional Steps
Make deployment (semi-)Manual
You can play with cloudflare and github to make deployment of your site a manual step you have to trigger, instead of automatic with each commit (default setting). This is a safeguard in case you accidentally make a change or delete something from your github, it won't affect your website.
Deploy w/ Branches
You could do a semi-automatic deployment with a "Production" branch on your github that is separate from the branch you edit. This creates an extra step before anything is published on Cloudflare. A safeguard against accidental changes/deletion of sorts :)

Go to Settings > Build tab > Branch Control
Choose your Production Branch (MAIN or CLOUDFLARE) and enable (or disable) automatic deployments
If you choose MAIN, every change you commit to MAIN will be published to Pages
If you choose CLOUDFLARE, any changes you make to MAIN will not show up on your Pages site until you Pull from MAIN to CLOUDFLARE
To Pull changes from MAIN to CLOUDFLARE, go to your github repository
Above your files on the Left, you will see a toggle to choose which branch you are on.
Choose Cloudflare. There will be a message like "This branch is 7 commits ahead of, 2 commits behind main." Click "2 commits behind"
Click "Create a Pull Request". Then click "Merge Pull Request". If everything is correct, this should trigger a build on your Cloudflare
Deploy w/ Github Actions
Or you can create a manual command that you have to enter on github to trigger a deployment on cloudflare. If you're paranoid about anything happening to your site due to a mishap on the Github side, this is a safe choice. Unless you manually trigger the command, your Pages site will be completely untouched no matter if something happens to your repo.
This can be done in many ways, I think the most straightforward is with Deploy Hooks (maybe in conjunction with Actions if you want to make it mobile-friendly), and might be a bit complicated, but not too hard to figure out with some Google-fu.
Here’s some links I think will be useful (note: I don’t use this method, so these haven’t been tested)
Manual trigger action tutorial
How to configure Github webooks
Storing Locally instead of on Github
Although this guide is written with Cloudflare's Github integration in mind, particularly for easy online/mobile access, you can also keep your files locally on your PC and directly upload your assets onto your Pages project. This gives you full control over what happens to your files. (Keeping backups is a good idea. You can still use Github Desktop to do this, just keep your repository on your PC.)
Simply clone/download the repository as it is, customize it as you like, and create a NEW Pages project on Cloudflare, using "Direct Upload" to upload your files
Once you have connected a Pages project with Github, there is no way to change the deployment method to Direct Upload or vice versa. Direct Upload is also not available for Workers.
One thing that will NOT work the same is the "create-index" Action that only works on Github.
I have made a "create-index.exe" that will execute the "create-index.py" files in the exact same way as they would work with the Action. You do not have to install python for this to work (if I did everything right). Simply run "create-index.exe" whenever you make a change and want to update the "index.html" files
Remember, this is EXACTLY THE SAME as the "create-index" Action, meaning you have to edit each "index.py" file when you rename folders, add a folder, want to exclude a file from the Index page, etc. (See Adding/Renaming Folders for how to do this)
Find me on Bluesky. Or if you have a problem, open an Issue on this project :)
I'll try to answer your questions as best I can! But really, I am the most amateur of amateurs and figured this all out using Google, so I might not be of much help ^^;
I also recommend Squidge Images (an offshoot of Squidge.org) as a fairly trustworthy alternative. However, Squidge Images does have some additional rules that Squidge does not, and what crosses the line is at their discretion.
I also posted this over on AO3!
5 notes
·
View notes
Text
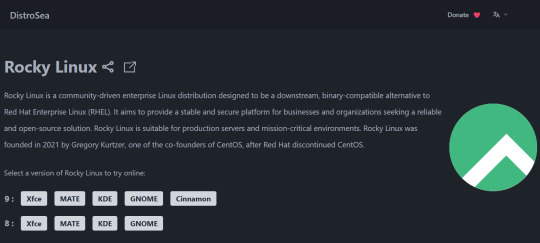


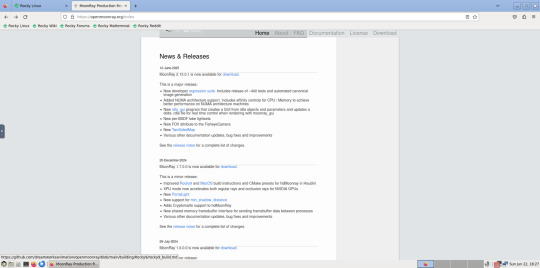
Using Distrosea, I had a look at Rocky Linux 9.
Rocky Linux is a Linux distro designed for the VFX industry. It serves as a drop in replacement for Red Hat Enterprise Linux.
Rocky Linux website:
https://rockylinux.org/
Here is a example of an animation studio that uses the distribution.
DreamWorks' migrated their workstations and servers from Red Hat Enterprise Linux 7 to Rocky Linux 9 in 2023 and completed the rollout the following year.
DreamWorks Animation website:
https://www.dreamworks.com/about
About RHEL:
https://en.wikipedia.org/wiki/Red_Hat_Enterprise_Linux
About Rocky Linux:
https://en.wikipedia.org/wiki/Rocky_Linux
Here are some reasons DreamWorks Animation moved from Red Hat Enterprise Linux:
- Red Hat dropped the CentOS Linux operating system in 2020. They ended support for version 7 in 2024.
CentOS was an downstream version of Red Hats main operating system without its branding and support. Rocky Linux fills this void left by CentOS.
DreamWorks used CentOS alongside Red Hat Enterprise Linux. Both their Workstations and server set-ups were migrated to Rocky.
- Red Hat further restricted access to its source code in their Enterprise focused operating system.
- Rocky Linux has become a very popular open source operating system for the VFX industry and features many modern advancements and desktop environment choices such as GNOME, KDE, XFCE, MATE and Cinnamon.
- Like all Red Hat based builds of Linux, Rocky Linux uses the DNF (Dandified Yellow Dog Updater) extension to manage application installations via the Dnfdragora package manager. However it also uses the universal Flatpak extension to install applications from the GNOME software centre.
- DreamWorks animation pipeline uses their recently opened sourced Moon-Ray renderer, which is built on Rocky Linux. The source code is available on GitHub.
The tool supports Linux and Mac OS. Here is a link to the Open Moon Ray installation and compiling on Rocky:
https://docs.openmoonray.org/getting-started/installation/building-moonray/general_build/
It features a set of commands for installing various graphics libraries (for the render tool and Houdini, a character effects development tool), as well as toolsets which can be applied to programs such as Blender.
There are many YouTube videos about the open sourcing of Moon-Ray itself and some showcases of it working.
Rocky Linux is a downstream, complete binary-compatible release using the Red Hat Enterprise Linux (RHEL) operating system source code.
Unlike RHEL, Rocky is completely free to use. It is released under the BSD 3-Clause license, which allows free use, modification, and distribution.
There are no licensing or subscription fees associated. RHEL is a commercial product from Red Hat and requires a subscription license to use.
Rocky's selection of desktop environments can be installed independently in their own disk image file.
Each one can also be tested on a live USB before installation.
Users can also install their desktop environments of choice using the command line.
When running the system on a server (which is the common way of using Linux systems) it will just have the command line interface when a monitor is plugged in.
Distrosea:
https://distrosea.com/
The latest build is Rocky Linux 10, released in June 2025. The version available to test on Distrosea is 9.
I tried GNOME, MATE, XFCE and KDE.
As this MATE desktop edition didn't come with either Dnfdragora or GNOME Software, I tried installing Blender (an open source animation tool) using the 'sudo dnf install blender' command in the terminal.
However, due to the graphics limitation of the VM, the program couldn't launch.
To install software graphically, you can use GNOME Software Centre that comes on GNOME. This can be used on other desktop environments as well.
A good Linux distribution if you are using graphics heavy applications and need a robust enterprise grade operating system without the cost!
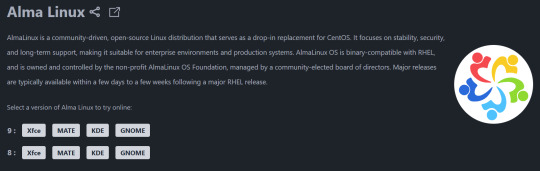
Another Linux distro that is similar is Alma Linux, another enterprise focused operating system that uses the same foundations as CentOS.
4 notes
·
View notes
Text

UPDATE 7/2/23
We've just released the following features and updates:
Proposals to change or add group roles and permissions
Re-designed dark mode theme for both mobile and desktop
Group settings with the ability to set groups to public
For anyone interested in contributing or obtaining an invite link to the website, you can find us on both GitHub and Discord.
Join the Praxis Discord | Follow us on GitHub
#open source#free software#praxis#javascript#typescript#nodejs#ui design#ux desgin#software#technology
75 notes
·
View notes
Text
so... it's a direct clone of the arc browser ui, built on a continually-updated build of firefox, by one guy.
you know what? hell yeah. go off. it's a way better idea than basically every other browser fork.
(I'm not personally going to use it; I don't know how it is on security and I find the arc ui look worse than regular firefox in pretty much every way. also it might be a little buggy at time of writing. but I'm so much happier for web browser hipsters to use this than the catastrophes that are pale moon, waterfox, brave, opera gx, whatever. you have no idea.)
2 notes
·
View notes
Text
📁 Resamplers on MacOS.

For this tutorial, we will be running resamplers on OpenUTAU for MacOS. There are several steps to this process before we can start manipulating the files. These steps include, installing Homebrew, and installing Wine. Do not worry, for this tutorial I will also be showing you how to Homebrew your Mac, and how to install the latest version for Wine. Before we get into this process, I need to clarify that it is only possible on MacOS 13.7.1 (Ventura) or later, as Homebrew has discontinued its service for any older versions of MacOS. So without further ado, let’s begin.
Section 1, "Installing Homebrew."
To install Homebrew you will need to head over to the Homebrew website.
https://brew.sh/
From here, you will want to copy the installation command, and open Terminal. If you are not familiar with Terminal, it is in your Applications > Utilities > Terminal.
In the Terminal control panel, you will want to paste the installation command into the console. It will begin running the installation.
The installation will pause and ask for your computer’s passkey. Input the passkey and the installation will continue.
If you are on Intel, after it installs the, “X code command line tools,” it may run into a fatal error when updating the Homebrew install. Do not worry, head over to, System Preferences > Security and Privacy, and scroll down until you see, "allow install--sh.” Select OK to continue.
Now it will run the rest of the install and you have successfully Homebrewed your Mac.
Section 2, "Installing Wine."
In order to install Wine, head to the WineHQ website.
https://github.com/Gcenx/macOS_Wine_builds/releases
Download Wine Staging from the Github releases page.
Drag the Wine Staging .zip to your desktop and extract.
After extracting the zip, run the Wine Staging application.
The Wine installer will run into an error since it is an external application downloaded from the internet. Head to System Preferences > Security and Privacy, and allow Wine access to run. After this, Wine will be installed to your computer.
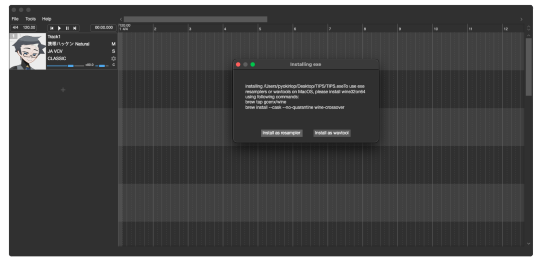
After performing these two steps, we will then prepare the environment for the resamplers. Inside of Terminal we will want to begin a new session and run the installation for Wine Crossover.
If brew command is not found, please refer to this stackoverflow thread.
zsh command not found
brew tap gcenx/wine brew install --cask --no-quarantine wine-crossover
(Update 6/22/25) On Apple Silicon, you may or may not have the --cask or --no-quarantine commands. After testing, I was able to run resamplers without these.
brew install wine-crossover
After running these two commands your environment is set!
Section 3, "How to run resamplers on MacOS."
Now that you have installed both Wine and Homebrew onto your computer, we will now begin the process for installing the resamplers into MacOS. Before we get started, I will like to clarify that for this step we will be converting the executables (.exe) into .sh files. That will be the result we want in order to run resamplers. Here is how.
1. From the OpenUTAU github release page, download the "Mac_Additional.zip." This will be the package we use to convert the resamplers into .sh files.
Mac_Additional.zip
2. Before we get started, let’s find the version of wine that you have installed.
For Intel MacOS . . .
Perform CMND+SHIFT+G, to locate the directory. Now input the following path, /usr/local/bin/. What you will be looking for is either Wine32 or Wine64. Depending on what you have will be important information for a future step. Remember this!
For Silicon MacOS . . .
Open Terminal and run the following command.
which wine
After running this prompt you will receive the location of your Wine installation. *( eg. /opt/homebrew/bin/wine ) Please copy this location as it is very important for the following steps.
3. Download the resampler of your choice, for this tutorial, I will be installing TIPS. Extract the resampler, and run OpenUTAU.
4. Drag the resampler.exe into the OpenUTAU window. It will then ask you if you want to install as a resampler or wavtool, select the resampler option since that is what we are working with today.
5. Extract the Mac_Additional.zip, by extracting it, it will generate a, “moresampler.sh,” file. Rename the file after the resampler you will be working with, *(eg. TIPS.sh ).
6. Open this file with textedit by double-clicking, or right-clicking. Select, “Open with textedit.” Now we will edit the .sh file with resampler's information.

7. Locate the, “moresampler-0.8.4/moresampler.exe” in the relative path and delete it. Replace with only the resampler name, eg. “TIPS.exe.”
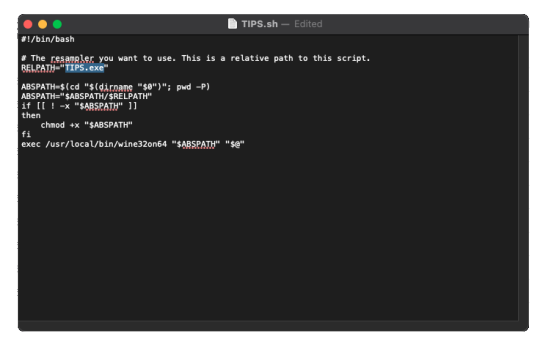
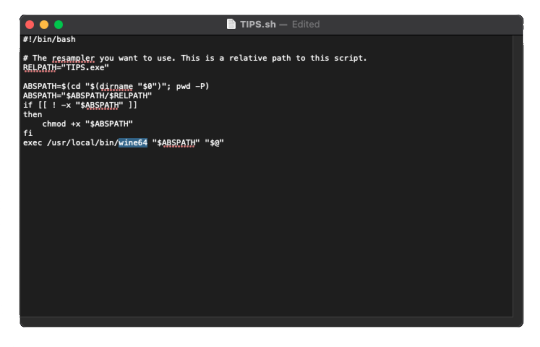
For MacOS Intel . . .
In the field for, “exec /usr/local/bin/wine32on64“ replace the Wine extension with your version of Wine. This will look like, “exec /usr/local/bin/wine64,” since my computer is running Wine64.
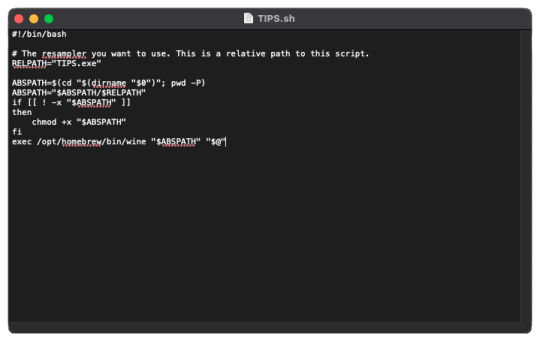
For MacOS Silicon . . .
In the field for, “exec /usr/local/bin/wine32on64“ replace this field with the location of your wine installation. This will may like, “/opt/homebrew/bin/wine." It should look like this!
9. In OpenUTAU, to quickly access the resampler folder, select the, “help,” tag, and, "Open Logs Location." We will not be working with the logs, from here you will open the resampler folder.
10. OpenUTAU will have already generated a .sh file for TIPS.exe in this scenario. With the edited TIPS.sh on your desktop, drag and drop it in the resampler folder, and replace.
11. Return to OpenUTAU, and select, “CLASSIC,” in the resampler field, and to the right there will be a cog icon. From here you will be able to select your downloaded resamplers.
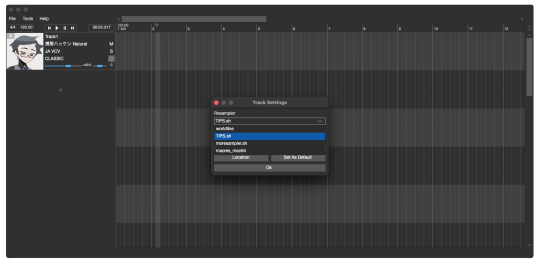
If this is your first time running the instance, Wine will be running the executable in the background for the first render. This will take awhile.
There you have it! You can repeat this process and download as many resamplers as you like.
3 notes
·
View notes
Text
Audacity for Debian-based Linux
So, some time around 2020/2021, Audacity for Linux from the repositories of Debian-based distros (including Ubuntu, Mint, etc.) no longer had access to high quality stretch (change tempo, change pitch, shifting slider). This appears to be due to a combination of Debian no longer updating Audacity at all past 2.4.2 (as Audacity's new owners from 3.0.0 on have had...issues, to put it lightly), but also the fact that 2.4.2 specifically was requiring a version of the SBSMS library past what Debian had. It's still the case that the apt version of Audacity on Linux Mint still lacks the high quality stretch functions.
The workaround for this is to compile from source. HOWEVER. Be apprised that if you specifically go for version 2.4.2, there is still a bug around SBSMS, which causes Audacity to crash when attempting high quality stretching. Apparently, if you go for versions afterwards (3.0+, new Audacity owners), or the version before (2.3.3), you will not run into this issue.
I am stubborn, so I have verified that I can now open Audacity 2.4.2 and do a high quality pitch change without crashing. Here are the solution options. Know that both are still compiling from source.
Option 1: Do it manually command by command on the terminal
You will, however, notice that the important download link for the patch is broken. You must get it from here.
Note that you should preface all of the commands listed in that post with "sudo", or they will likely throw an error. (Or do whatever you need to for terminal to continuously recognize root access.) In addition, note that the "pre-installation test" section is not optional. Audacity will not run if the "Portable Settings" folder is not created, and furthermore, the "Portable Settings" folder and all containing files need to have write permissions enabled to the relevant non-root group/owner.
Whether you installed manually or used the script, you will need to go to "/usr/local/share/audacity/audacity-minsrc-2.4.2/build/bin/Release" to launch Audacity. In the file explorer window, you can click the button to the left of the magnifying glass to switch to text input where you can copy and paste the above path. Or, from /home, go up one level, and then navigate through manually.
Change the launcher's icon and add it to the start menu/desktop, per your specific distro and desktop environment.
Option 2: Modify and run a bash script
I found a helpful Youtube video stepping through the process, before they link to a bash script automating the whole thing. However, the script does not include the 2.4.2 patch. There are also a few modifications that need to be done to the script.
Modifications to make (right click the .sh file, open with, pick some text editor):
Line 35: change the dl_directory to match your own system. (Specifically, you probably need to replace "piuser" with your own account name.)
This change also needs be done on lines 115, 116, and 120 (or replace the hard coded parts with "${DL_DIRECTORY}").
Line 77 (optional): add "patch" as a dependent package to check. Like Python, it's mostly likely already installed, so you could leave this commented out.
Lines 139-142: Not a modification, but a note that I didn't end up using this (left it commented out), so I did have to download the 2.4.2 source code from fosshub manually and put it in the location specified by dl_directory. I also put the patch there. If you do want to try to automate the download, you'll not only have to add another line to also download the patch file, but both the source code for 2.4.2 and the patch have hyphens in their urls, so you need to either add backslashes to escape them, or enclose the entire url in quotation marks. But I also can't guarantee that either of those things will work, since I ended up doing the downloads manually.
Line 150: Per the manual installation above, the patch needs to be applied before the build. Add this code block at line 150 (after the script checks to see if the "Build" folder exists):
#SBSMS patch required for 2.4.2 if [ -f "${DL_DIRECTORY}/changepitch.patch" ]; then sudo cp "${DL_DIRECTORY}/changepitch.patch" "${DIRECTORY}/${VERSION}" fi sudo patch -p 1 < changepitch.patch
That's it for changing the script. Save it, close out of the text editor. (If you decided not to try letting the script do the downloads, then make sure you download the source code and the patch and put them in the dl_directory location at this point.)
Enable the script to be executable. (Right click the .sh file, Properties. On the Permissions tab, check that "Allow executing file as a program" is checked.)
Double click the .sh file. I suggest doing the "Run In Terminal" option so you can see the progress. (And if it's really short, probably something went wrong. The build section takes 20 minutes.)
This script does not include installing the offline manual for Audacity. That is covered in the guide posted in Option 1. Sorry, you'll have to do some terminal typing after all.
Whether you installed manually or used the script, you will need to go to "/usr/local/share/audacity/audacity-minsrc-2.4.2/build/bin/Release" to launch Audacity. In the file explorer window, you can click the button to the left of the magnifying glass to switch to text input where you can copy and paste the above path. Or, from /home, go up one level, and then navigate through manually.
Change the launcher's icon and add it to the start menu/desktop, per your specific distro and desktop environment.
#linux#linux mint#ubuntu#debian#audacity#category: other#vibrating at the mashups now once again at my fingertips
9 notes
·
View notes
Text
A quick guide on diversifying your internet use
Big social media is going to keep being disappointing because their wants and needs don't come anywhere close to aligning with their users wants and needs. EVERY big social media site or app will eventually misalign with its users, because having the entire internet's worth of people in one place is unsustainable for moderation and for financial reasons. It's an unavoidable fate for sites that are supposed to be the hub for everything.
It doesn't have to be that way. Start diversifying the sites you use BEFORE your favorite social media site becomes basically unusable or goes down completely. Take some power away from big tech corporations. Drag your friends into it too, you don't have to explore alone!
Here's a few examples of things you can do:
Join some forums There's forums for basically everything you can think of, from toy collecting, to discussion of specific disabilities, to gardening, to niche roleplay topics, and they've been running for decades so there's immense amounts of knowledge on them. Plus, people tend to be super friendly and welcoming of newbies, so you're likely to make new friends if you post regularly on them. Googling/searching for a topic + "forum"/"discussion board" (like "knitting forum" or "paper mache discussion board") will generally get you what you're looking for. Save your favorites and give them a visit every now and then!
Subscribe to some RSS feeds RSS feeds make it incredibly simple to get updates and news from your favorite websites, including a lot of social media sites! RSS readers + aggregators take the RSS information from your chosen websites (+ tumblrs, twitters, youtube channels, etc) and puts them into an easy to browse format, all in one place. Readers and aggregators are available as browser addons, desktop programs, mobile apps, email subscriptions, embeddable widgets, whatever suits your needs best. Your RSS subscriptions aren't subject to annoying, everchanging, unpredictable algorithms. They'll only show you what you're subscribed to and they'll be in chronological order. Most of them are completely free and have no ads.
Make your own website Having your own website fucking rules and you're fully in charge of everything about it. Make a blog, make an art gallery, use it as a personal image or video host, show your ass, who cares. It's yours to do what you want! Free web hosting: While free hosting is a lot more limited in what you can do, it's also much more accessible if you're not sure you want to fully commit to running a website or if you just want something to throw info on a couple times a year. A few popular examples are NeoCities (also offers a decent paid option,) Cloudflare Pages, and GitHub Pages (SFW only.) Paid web hosting: Paid hosting is generally better for people who are more dedicated to running a site, such as people who need a stable platform for work related stuff (artists, online stores, etc.) You'll generally want your own domain name (like youtube.com or wikipedia.org) which you can get at sites like namecheap, namesilo, or porkbun. Many webhosts offer free subdomain names (like how tumblr blogs are yourblogname.tumblr.com) but having your own domain makes it easy to move to another host if you need to without your url changing. Your choice of web host depends heavily on your price bracket, what you plan to use it for, features you need, if you need to host NSFW content, how much traffic you expect, etc. Contact the support team of any web host you're looking at to make sure they offer what you need before you buy their services. Shared web hosting (where multiple websites are hosted on the same server) is generally the cheapest and most accessible option for the majority of people looking to run a website. Unless you're planning on having several thousands of people on your site all at once on a regular basis, that's probably the option you want. Avoid anything owned by EIG/Newfold Digital. Self-hosting: This is the most complicated option, but also the most versatile. With self-hosting, you're only really limited to the laws of your region and the bandwidth you get from your internet provider, rather than the limits put in place by a hosting company. Take this option only if you're willing to set up a dedicated server and get into all the technical stuff that comes with it. Here's an okay guide for how to get started, though you'll want to do a lot more research beyond this.
29 notes
·
View notes
Text
dreamcatcher devlog: november 2023
(messy concept art sketch for one of the story pages)
it's time for the first proper devlog post on this blog! this is my first time writing something like this, so hopefully i'll do it fine. without further ado, here's what happened in november:
i did some work on music at the start of the month and made some progress on a few tracks; here's the tutorial music:
i also decided to redo the movement mechanics, since i wasn't satisfied with what i had before. i ended up finishing them, and i'm still working on tweaking everything until it feels just right.
on the 12th, i opened up a discord server for dreamcatcher! i'd actually created the server months ago, but was finally ready to share it this month.
if you're interested in joining for more updates, asking questions, or just to hang out, here's the link (also in pinned post): https://discord.gg/umPNp5QTCu
a few days later, i remembered that krita existed and decided to try it out. it's been a good upgrade from the app i used to use (autodesk sketchbook), and i'm still learning as i use it.
to be honest, not much happened for about a week and a half. i was off for thanksgiving break and struggled to find motivation even though i had so much free time.
once i finally felt like making progress again, i finished up the menu animations! once i learned about tweens, they weren't very hard to implement. here's a video showcasing them:
i also downloaded audacity so i could make sound effects, and i've been learning to use that as well.
to finish off the month, i made a github repo for the game and set up github desktop! now i don't have to worry about making backups, and i can also use github's issues and projects features to help with development. also i get so much satisfaction when i commit a new change, so that's been really helping with staying motivated.
that's all for november! i think i've made some good progress this month, and i would like to keep this pace into this month. speaking of which, here's some things i plan on doing in december:
i'll be hosting playtester applications this month! they'll open on the 15th, and close on the 22nd (both are in utc time). you'll be able to find the form in the discord server, but i also might post it here as well.
i want to get as much of the core game mechanics done as possible, such as level transitions, save data, the notebook, etc. i think i'll mainly be focusing on level design for the first few months of next year, and i want to be prepared for that.
i'm buying a stylus and smudgeguard this month, so hopefully that'll improve my drawing process. i've been using my finger to draw for years now, and i'm excited to have those tools to help.
there's plenty more that i'll be doing this month, but this post is getting pretty long, and the rest aren't as significant. if you want to keep up with progress, please consider following this blog, or joining the discord server!
and if you made it this far, thank you so much for reading! it means a lot to me <3
that's all for this month, cya!
7 notes
·
View notes
Text
decided to fully redo my offline music library because last time i did a massive download of my main playlist there was a transcoding step that had a mild impact to quality. for online listening i use a yt music frontend so i can just use yt-dlp to handle the download (skipping transcoding this time) turns out i needed a transcoding step because my DAP doesn't support the opus codec. it supports vorbis, among a bunch of others but initially they were in an ogg container so i had no idea. this is the part where i lose my mind. obviously i'll just use ffmpeg, just a quick for i in *.opus, -c:a vorbis, etc and. wait a minute. how much quality is that gonna lose me. so i go looking for some test results to see what codec i should encode to in the rare case i have to do lossy to lossy audio transcoding. cool aac is probably a safe but so just -c:a aac and wait a minute which one though. so i check the ffmpeg encoding wiki for aac and settle on fraunhofer libfdk_aac. and its not in my build. its not in most builds. there are no build scripts for it. i load up docker in WSL and try to pull an ffmpeg builder container thats supposed to handle non-free builds. the container doesn't exist. eventually i stumble across a github repo that hosts builds through github actions and the resulting binaries are... i think not legal to distribute but i don't really care. i can finally start transcoding it takes some time. but even once its done only ~1200 of ~1700 files have actually been transcoded but i don't even notice that yet because while those were transcoding i was scraping archive.org for .wav and .flac files of some of my most often listened to albums. they take a long time to download but thats fine i have duplicates now though. thats ok thats... manageable. well i can't just compare by filename because a lot of the new ones are prefixed with a track number and other nonsense, whereas the old ones don't have a track title in metadata so i can't use that either. i download a new program that compares them by content. it doesn't take long actually. impressive. i weed out duplicates and finally tell the DAP to update the library. it reports ~1200 tracks. i reconnect it to my desktop. that number is correct. thats how many files there are. fuck. i'm transcoding from the original ~1700 files again now. i suspect there's something my command line shell doesn't like about special characters in about 500 of the filenames. if that is the case i will have to do something to purge special characters from all the filenames and transcode for a third time i have so far been at this since before sunset. it is midnight. further bulletins as events warrant
6 notes
·
View notes
Text
damn guess I've gotta either stick to mobile or suffer through the agony of using using the twitblr update because while dashboard-unfucker does work to a degree, it also just. shoved my feed all to the very left side of the screen on my desktop and I'm too unfamiliar with how github or any of that works to be able to know how to troubleshoot so uh. yeah. i'm fucked I suppose!
#words of meg#i don't have any version of xkit anymore and im on firefox obviously#i may just. try and see if xkit rewritten has their own dash unfucker bc aaaaugh#i'm stupid i am!!!!! i dont know how code works!!!!!!!!!!#i can barely do toyhouse shit lmfao!!!!!!!
4 notes
·
View notes
Text
Freelance Web Development Useful Tricks
In today’s digital age, businesses and individuals are constantly seeking professional help to build and maintain their online presence. This surge in demand has paved the way for a booming market in freelance web development. Whether you're a seasoned Freelance Web Developer or just stepping into the world of freelance work, learning a few practical tricks can significantly improve your productivity, client relationships, and project outcomes.
This guide provides useful tips and insights tailored for those working as a Freelance Web Designer, Web Developer Singapore, or a Freelance Website Developer Singapore.
1. Define Your Niche
As a Freelance Web Designer, the first step to building a successful career is finding your niche. Instead of trying to serve everyone, focus on a specific market. For example, becoming a Freelance Website Designer Singapore who specializes in e-commerce platforms can help you attract targeted clients.
Narrowing your services helps you become an expert in that area, making it easier to deliver higher-quality results and command better rates.
2. Build a Professional Portfolio
Your portfolio is your most powerful marketing tool. As a Freelance Web Developer Singapore, it's important to showcase not just finished websites but also the thought process behind them. Include case studies, user experience improvements, and before/after examples.
Clients in web design Singapore often prefer seeing real-world applications. A well-crafted portfolio tells them you are the right Website Designer Singapore for the job.
3. Use Contracts for Every Project
A common mistake new freelancers make is working without a contract. A good contract outlines the project scope, deadlines, payment terms, and revision limits. Whether you’re a Freelance Website Designer or Freelance Web Developer, having a legal agreement helps protect both parties and sets clear expectations.
Especially in regions like Singapore, where business professionalism is crucial, this step adds to your credibility.
4. Embrace Web Design Tools
Leveraging the right tools can save hours of work. Platforms like Figma, Sketch, and Adobe XD are essential for any Freelance Web Designer Singapore. Similarly, GitHub and GitLab are invaluable for version control if you're a Freelance Website Developer.
These tools not only streamline your workflow but also make collaboration easier with clients and teams.
5. Master Responsive Design
Clients expect websites to look perfect on all devices. Mastering responsive design is critical for any Web Developer Singapore. Use flexible grids, images, and CSS media queries to ensure that your designs look and function well on desktops, tablets, and smartphones.
This is especially important in Singapore, where mobile usage is among the highest in the world.
6. Optimize for SEO
A beautiful website is of little use if it can't be found online. Every Freelance Website Designer and Freelance Web Developer Singapore should have a working knowledge of SEO fundamentals. This includes optimizing page speed, using semantic HTML, and ensuring that websites are mobile-friendly.
Clients looking for web design Singapore services often prefer professionals who can provide both design and SEO support.
7. Keep Up With Trends
The web design and development industry is always evolving. Trends like dark mode, voice search optimization, and minimalistic design are shaping the future. As a Freelance Web Designer, staying updated helps you offer modern and appealing designs to your clients.
Being knowledgeable about trends makes you a more competitive Website Developer Singapore or Freelance Website Designer Singapore.
8. Communicate Clearly and Frequently
Good communication is the backbone of freelance success. Regular updates, clear explanations, and managing client expectations are crucial. If you're a Freelance Website Developer in Singapore, effective communication can help you stand out in a market known for its high standards.
Always confirm client needs and follow up with written summaries after meetings.
9. Time Management is Key
Freelancing gives you flexibility, but it also requires discipline. Use project management tools like Trello, Asana, or Notion to organize tasks and deadlines. A Freelance Website Developer Singapore handling multiple clients will benefit greatly from scheduling tools and time tracking apps.
Meeting deadlines consistently will build your reputation as a reliable Website Designer Singapore.
10. Offer Maintenance Services
Many clients need ongoing support after a website goes live. Offering maintenance packages—such as updates, backups, and minor tweaks—is a smart way for any Freelance Web Developer to earn recurring revenue.
In the competitive web design Singapore industry, providing post-launch support can give you an edge over others.
11. Leverage Social Proof
Gather testimonials from satisfied clients and display them prominently on your website. As a Freelance Web Designer Singapore, social proof builds trust and credibility. Encourage clients to leave reviews on platforms like Google, LinkedIn, or Clutch.
It helps potential clients feel more confident in hiring you as their Website Developer Singapore.
12. Price Your Services Smartly
Pricing can make or break a freelance career. Research market rates and consider the complexity of the project before quoting. Whether you're a Freelance Web Developer Singapore or Freelance Website Designer, avoid underpricing just to get a job—it can hurt your business in the long run.
Offer tiered pricing packages to give clients options that match their budget.
13. Network Within the Local Community
Even in a digital world, word-of-mouth still matters. Attend local meetups, seminars, and webinars related to web design Singapore. Building relationships with other professionals can lead to referrals and collaborations.
Being known in the local scene can greatly benefit a Freelance Web Developer Singapore or Freelance Website Developer Singapore.
14. Invest in Learning
Technology changes fast. Take time to learn new frameworks, design patterns, or CMS platforms like WordPress, Webflow, or Shopify. This is especially useful for a Freelance Website Designer Singapore targeting clients in different industries.
Courses from Udemy, Coursera, or free resources like MDN Web Docs can help you stay ahead.
15. Protect Your Work
Always keep backups and secure your source code. Use version control systems and cloud storage to ensure that no data is lost. As a Freelance Website Developer, protecting your work is as important as creating it.
For those in Singapore, where clients expect high data integrity and privacy, security is a must-have skill.
16. Build a Personal Brand
Branding isn’t just for big businesses. As a Freelance Web Designer Singapore, having a personal brand can help you stand out. Use consistent colors, a unique logo, and a professional tone across your website and social profiles.
Your brand is your identity—make it memorable.
17. Specialize in CMS Platforms
Many small businesses prefer using content management systems for easy updates. Specializing in WordPress, Joomla, or Drupal can be a game changer for a Freelance Website Developer Singapore.
Offering CMS-based solutions can expand your market reach in web design Singapore.
18. Set Client Boundaries
To avoid burnout, it's essential to set clear boundaries regarding your work hours, communication channels, and project scope. Many Freelance Web Designers fall into the trap of being available 24/7.
Define and communicate your availability upfront.
19. Ask for Referrals
Don’t hesitate to ask satisfied clients to refer you to others. Referrals are one of the best ways to grow your freelance business. A Freelance Web Developer Singapore can benefit immensely from personal recommendations.
Referrals reduce your need for marketing and often lead to higher-quality clients.
20. Stay Consistent
Consistency is key in delivering quality results and growing your business. Whether you’re a Freelance Website Designer Singapore or a Website Developer Singapore, being consistent in your communication, design style, and deadlines will build trust.
It’s this consistency that builds long-term success.
Final Thoughts
Freelance web development can be a highly rewarding career, but it requires dedication, continuous learning, and smart business practices. Whether you’re a Freelance Web Designer, Freelance Website Developer, or Freelance Web Developer Singapore, applying these tricks can help you improve your workflow, increase client satisfaction, and scale your freelance business effectively.
The demand for quality web design Singapore professionals continues to grow. By sharpening your skills and following the best practices, you can stand out as a top-tier Website Designer Singapore or Website Developer Singapore in a competitive market.
Remember, success in freelancing doesn’t happen overnight. But with consistent effort, a strong portfolio, and these practical tips, you’ll be well on your way to becoming a sought-after Freelance Web Designer Singapore.
Visit https://www.freelancewebdesigner.sg to learn on Website development in Singapore.
#freelance web designer singapore#website designer singapore#web design singapore#web designer singapore#website developer singapore#web developer singapore
0 notes
Text
The new Link Cleaner

I released my Link Cleaner web app in 2021 as a way to quickly remove tracking parameters, search queries, and other extra fluff from web links. It was mostly intended for phones and tablets, since editing URLs with a touchscreen keyboard is especially awful, but it was also helpful on desktop browsers.
Link Cleaner is now my most popular software project, with over 44K users and 90K links cleaned just in 2025. I've wanted to give it a proper design overhaul, especially for larger screens, and the big update is now complete.
New design
If you have used Link Cleaner, you know the interface was simple but (mostly) functional. The new version is not a massive change: it's just a lot of usability improvements and a more refined design.
The home page still has the same basic layout, but the URL text box is closer to the center of the screen (more like the Google or DuckDuckGo home pages). There's a new header that I can update with different backgrounds and text—right now it has a Pride Month theme.

The navigation bar has also been moved to the top of the screen, and more closely matches the design of the recent PhotoStack update. The navigation bar (and URL field, if you are on the main page) remain pinned to the top of the screen as you scroll down. The home page also has new explanations of Link Cleaner's core features.
The Bulk Mode page has also been slightly updated, with text fields that now use most of your available screen space. There are many other small changes, like the tab icon (favicon) being more readable in dark browser themes, and improved accessibility on all popup panels.
New features
The navigation bar's History button opens the new Clean History panel, showing all the links you have cleaned recently. This is more secure and (hopefully) more useful than the previous History page, since your links are not actually saved in storage. They're gone if you close the window or switch to another page.

The Install button opens the new Install panel, which can guide you through installing Link Cleaner as a web app, adding the Shortcut to your Apple devices, and using Link Cleaner in custom scripts and automations with the custom share URL. It also includes a new bookmarklet, which you can add to your browser's bookmarks toolbar to instantly get a cleaned URL for the current page in a Link Cleaner popup window.
Link Cleaner now uses the same text field for the URL input and cleaned link output, removing the need to click the back button each time. You just paste in the text field again, or press Enter/Return on your keyboard, to clean the link again. There's still a 'Clear' button for touchscreen devices, since selecting and removing all text is more difficult without a physical keyboard.
If you have a device with a physical keyboard, the merged text field means you can now paste a link with Ctrl+V/Cmd+V, then immediately press Ctrl+C/Cmd+V to copy the cleaned link. No reaching for the mouse or tabbing around required. This update removes the experimental option for automatic clipboard copy, since it was not reliable and difficult to test, and the new keyboard accessibility is a close enough replacement.

The share and copy buttons in Link Cleaner are mostly unchanged, but the QR code option now has a 'Save to Downloads' button. If your browser supports sharing files, you can also quickly share the QR code to another installed application. The QR codes are still generated locally in your web browser, for better privacy and offline support.
Importantly, this update does not remove any functionality, except the experimental automatic clipboard copy that didn't reliably work. If you have a script, bookmarklet, Apple Shortcut, or some other automation using Link Cleaner, it should still work exactly as it always did.
Try Link Cleaner
You can use Link Cleaner by visiting linkcleaner.app in your browser. The code is still open-source on GitHub.
0 notes