#V-ray tutorial
Explore tagged Tumblr posts
Visit Tumblr Blog
Explore Tumblr blogs with no restrictions, modern design and the best experience.
Last Seen Tumblr Blogs


Fun Fact
28.6 is the average number of monthly visits per US mobile user.
Text
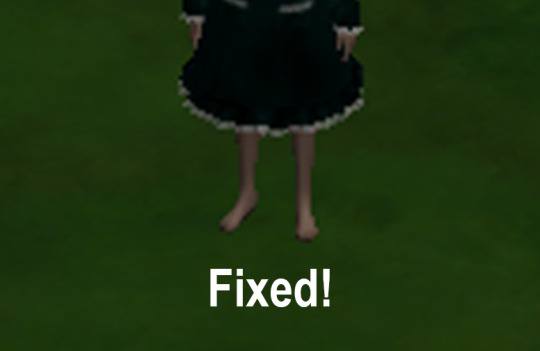
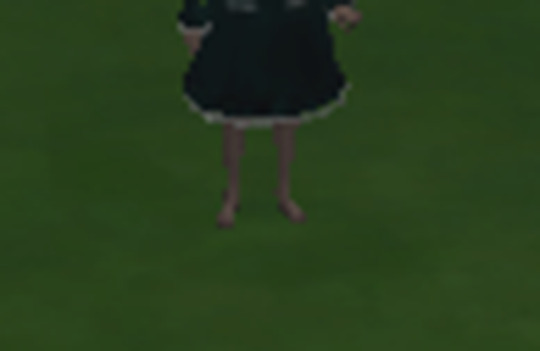
Lower LOD Ankle Distortion Fix (Tutorial)

I've noticed this problem when I was making CC dresses a while back, and noticed it in some other CC clothing packages in game. The problem is about the amount of vertex bones exceeding the amount the game can handle (60) which can cause problems in packages where creators forget to remove excess bones before importing their mesh.
Sometimes this problem can manifest without CC/Mods present (which unfortunately, I don't know how to fix), so this tut is only if you've noticed it with certain pieces of CC or your own.
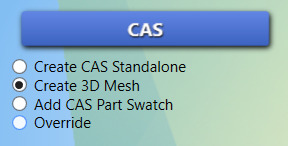
Programs Needed: Blender 2.79/3.X+ and Sims 4 Studio.
This is what worked for me! (Instructions below.)
*****BEFORE YOU START*****
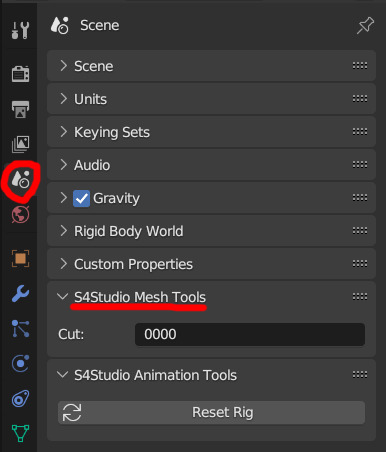
Download the free addon "Remove Unused Vertex Groups" and install it to your Blender version using the instructions. This is essential for the tutorial.
------------------------------------------------------------------------------
Instructions
Start a new package. The old bones are already introduced/ corrupted. I usually use a swimsuit since the texture is just painted onto the body. For this example, I'm using yfBody_EF01SwimsuitOnePiece. Save it on your computer as a package, then export your desired LOD (I recommend 2 and 3.)

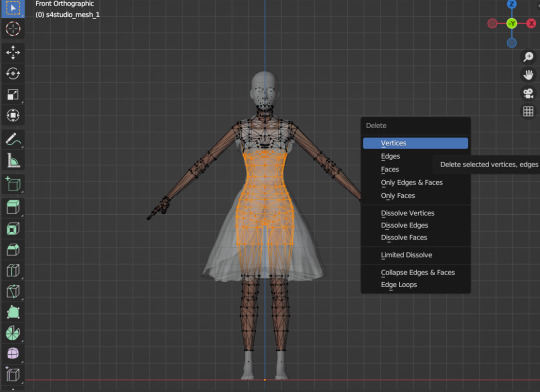
2. Press TAB button to go into Edit Mode. Separate dress and body with P.
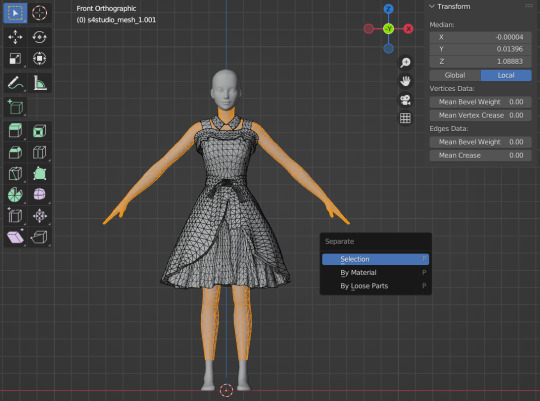
3. Delete body.
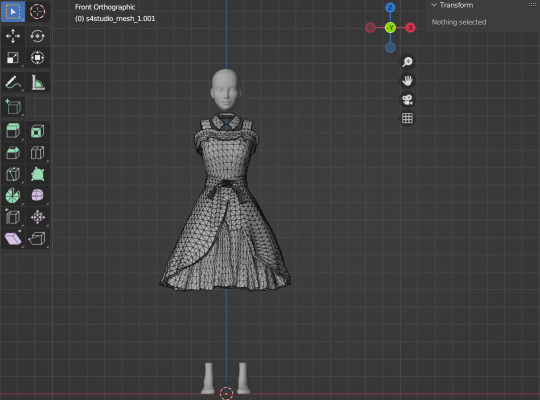
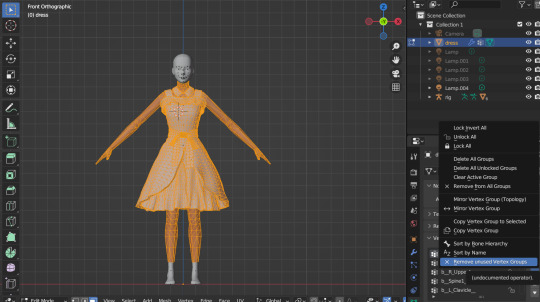
4. Select all of the dress by pressing A and remove unused vertex groups from dress under the "Vertex Data Properties" tab.
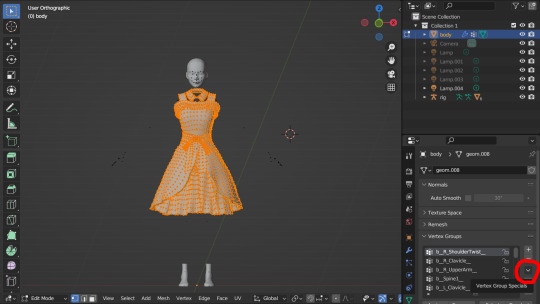

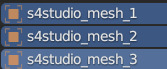
5. Append new LOD x body through File > Append > yourfilename.blend > object > and select all available s4studio_mesh_X. If there is more than one, join them by selecting all of them and pressing CTRL J.
Press CTRL V and remove doubles (ver 2.79) OR press M and merge by distance (ver 3.0+) from it.

6. Delete unused vertex groups from the body.

7. Delete any part of the body that is covered by the mesh (like how the old mesh was before). Toggle x-ray mode to make this 10x easier.

8. Join dress and body with CTRL J.

9. Remove unused vertex groups one more time from the joined mesh.
10. Assign cut numbers (GEOMS) and save. Check in game if the issue is still happening by scrolling out really far.
11. Import back into S4S and save.
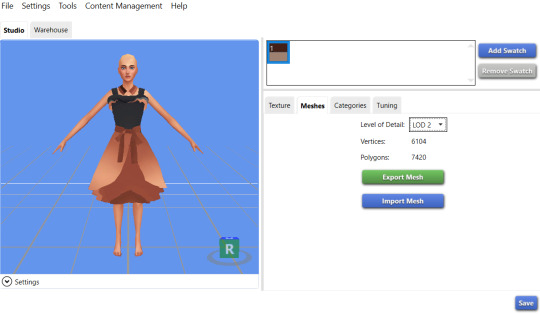
12. Load into your game and see if it still occurs! (LOD2 + LOD3 zoom outs respectively).
#idk whether this problem has been batch fixed already but i hope this helps in the meantime#finally this is out of the drafts </3#resources
16 notes
·
View notes
Text
Gold Tutorial

hiiiii i got asked for how i color gold. tbh most of the time i just blob shapes in but i can try to explain my process too <:v

(i was trying to write more b4 giving up bc my handwriting is a mess)
here is an elf ear to start with! i just paint on top of my sketch for gold but feel free to line art or do whatever is your normal process
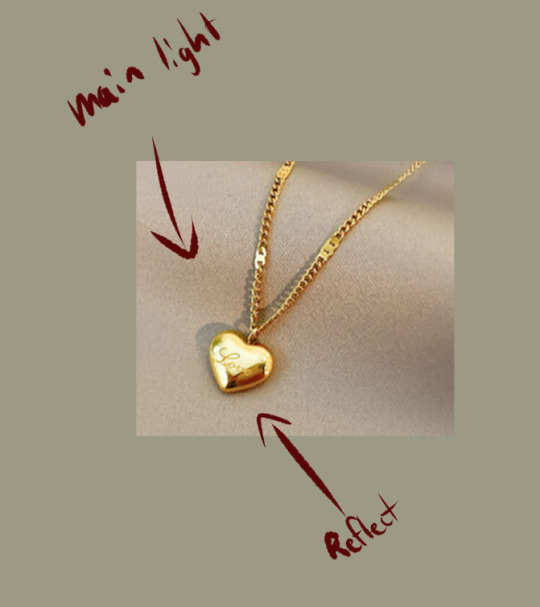
we need to keep in mind gold is reflective! so while picking a light source keep in mind there will be light bouncing back. typically i do this by not coloring the shadows all the way to the edge, but if there are multiple sources be ready for some bounce light action too

heres some colors! the second lightest shade is the base color we'll be working with. feel free to make the gold cool or warm toned, i just usually make my gold warm toned. in theory this also works with rose gold and silver, so feel free to play around with colors!
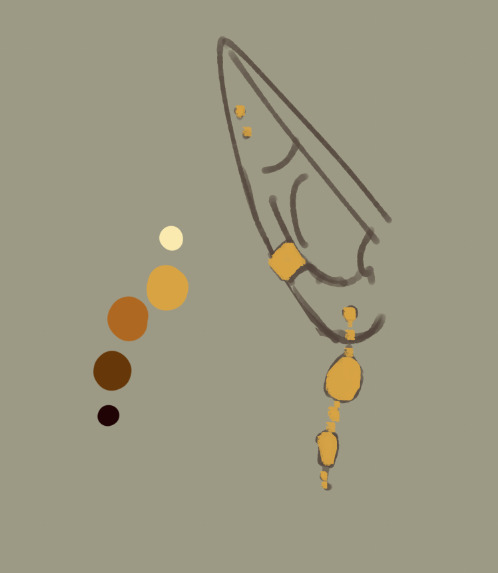
we're gonna keep in mind the light source, which i will be using the same as the example photo roughly. again i'm really messy with gold i just slap it on on top and it usually works okay but refine the shapes if you wanna!
first shadows! i keep these towards the middle to build shape. playing with different shapes of shadows will give different form to the metal but tbh.... i build most of my form in the highlights

second shadows: i focus these usually closer to the light source, but you can also do darker near the rebound light. again, try not to color directly to the edge to keep it looking very shiny

darkest shadows! like before, but smaller. here you can also add in different colors blobbed in the shadows if you want. i find its easiest to see reflections in the 'shadowed' parts of metal. add in your character's hair color, clothing color, or even the bg color if you want!

example with my nerevar picture of the reflections: you can see the blueish-grey of his collar in the gold to give it more dimension! even if you're working with abstract shapes it can help sell the illusion with more detail.
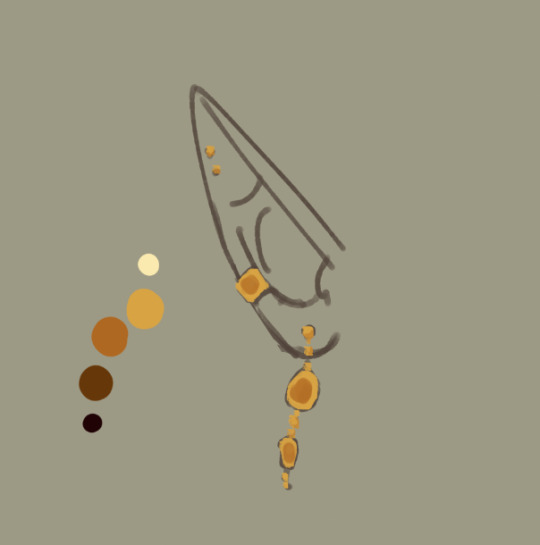
next up is highlights which i use a blending mode for (actually every highlight in anything i draw uses it but i feel for metal it REALLY helps): Add (glow)
or at least, it's called that in CSP. in other programs it might have a different name.

first highlights i like to draw rays of light from the light source and blend the parts furthest from the light. you can curve these according to shape but tbh most of the time i just do this. or you can softly add it in very blended like the nerevar picture above for a brighter look

second highlights: i add them in around the top and bottom. keep it organic really if im being honest.
ANDDDDD UR DONE! it should hopefully look like metal. tbh i have no idea what im doing <:v
i hope this helped a lil!
159 notes
·
View notes
Text
So, I have this writing idea, but I might need some help from you guys.
I have this idea where Crowley and Aziraphale go on abc dates, but I need some ideas. This is the list I have so far:
A: alpha Centauri, amusement park, arcade, aquarium, …
B: baking, boat ride, botanical garden, berry picking, backyard camping, bowling, …
C: cooking, circus, concert, craft night, chocolate fondue, …
D: dinner order, drag show, drive-in movie, …
E: eventing, eating escargo, Everest, estate sales, escape room ( no miracles ), enchilada date, elephant back riding, Easter egg hunt, Eden garden, …
F: fishing, filharmony, fruit picking, firework show, …
G: gaming, getting matching tattoos, goat yoga, …
H: hair tutorial remaking, hiking, horseback riding, historical museum, …
I: ice cream, ice skating, ikea shopping, …
J: jazz club, jogging, jacuzzi, jigsaw puzzle, …
K: kayaking, Karaoke, …
L: live music, Lego building, …
M: movie night, museum, mini golf, magic show, …
N: national park, Nintendo game night, …
O: oven baked cookies, opera, open mic night, origami class, …
P: pancakes, planetarium, pottery, painting, picnic, …
Q: Queen concert, quiz night ( triple date ), …
R: roller skating, Ritz, …
S: swimming, sushi, stargazing, …
T: tour with the Bentley, thrifting, trampoline park, train ride, …
U: ugly sweater party ( triple date ), …
V: vintage car rally, vinyl record shopping, vineyard experience, volunteering, Venice trip, Venus, …
W: wildlife sanctuary, wine tasting, waltz lesson, …
X: Xylophone concert, Xylophone lessons, Xerox, X-Rays, Xbox gaming, xtreme sports, xylophone, …
Y: yacht ride, YouTube marathon, yoga, …
Z: zurich mini break, zero-proof cocktail making class, Zumba class, Z A Rob Zombie concert, zen garden, zoo, …
So let me know if you have another fun idea! I’ll post a poll on my tumblr, so you guys can decide what they are going to do on their date! ( If no one votes, I’ll choose myself, but I hope I’ll get at least some votes )
I’ll be posting this story on my AO3 account, same as my tumblr, GayForAnthonyJCrowley.
#good omens#aziraphale#crowley#david tennant#michael sheen#ineffable husbands#aziracrow#anthony j crowley#crowley x aziraphale#ao3
52 notes
·
View notes
Note
What will you do if you one day wake up as your favourite mysme character
....probably have a panic attack?
LASKDFJAASDF, no, but listen. It would be a terrible day to be Saeran's MC. I don't care if I'm in Ray's or Unknown's shoes. While I do some basic coding for my own projects, I am no programmer, and definitely not a hacker. I don't know shit about half the work he probably does on the daily. And trying to figure it out through tutorials on YouTube won't help me much either. And since I'm Saeran and not MC, I don't even have any protection to depend on. That's not mentioning the fact that I'll probably wake up feeling sore as hell, tired out of my mind, and borderline starving, considering his working conditions.
I'd like to say that I'll be smart and resourceful by trying to find V, or contact Saeyoung depending on the situation, but uh... Realistically, I'd probably mess up my duties, eventually make Rika too disappointed in me, and then get cleansed. And you can't even try and escape out of Magenta by car or on foot. It's literally in the middle of nowhere, and I am not only notoriously bad with directions, but I do not posses half the skills needed to get myself out of there. Saeran had to carefully shut off the cameras and plan a clever escape route for you both to escape in his own route... It is no walk in the park. And even if I do get out, now I have to worry about the prime minister hunting me down as well. I'd probably give Saeran some gray hairs from all this stress 😭
So, uh, my isekai experience is not going to be enjoyable, to say the least.
Oh, but what happens if I wake up as GE Saeran, VAE Ray/Saeran, or SE Saeran? That's an entirely different story. It'll be very weird and awkward for sure. I see Saeyoung as my bestie, so to find myself in a position of his brother all of the sudden... Well, that's an awkward situation to say the least. I would honestly feel a bit bad and guilty. It's as if I took away his brother or something. I would probably just come clean to him, and we'd try to figure out a way to get things back to normal together. Because I want them both to be together now. And happy.
As a bonus, seeing Natasha as his MC would make me extremely happy >:) Even though, uh... Meeting a character you created is surely a bizarre experience to go through. But I would definitely have long conversations with her about this and that. And I would love to try her cooking! Oh, and since in the GE timeline they actually have a doggo, I would have the time of my life playing with her as well.
Overall, this scenario is a bit more lighthearted. But I would try and get things back to normal! Maybe I'd leave Saeran a little note expressing my gratitude to him once we do figure out how to get things back on track. I would love a chance to say how proud of him I am, and how much I want him to enjoy his life to the fullest from now on.
Now I wanna now about you! How would you try and figure yourself out if you suddenly woke up as your fave? 👀
6 notes
·
View notes
Note
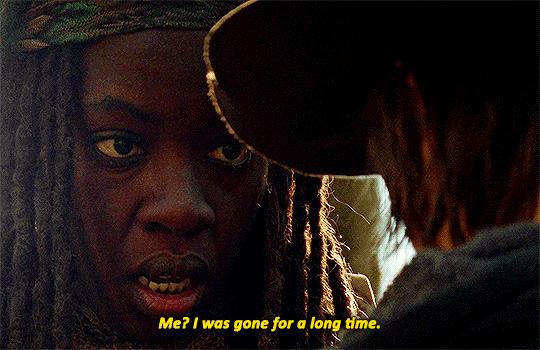
Your richonne gif sets are everythaaaang! As Rick would say. ;) I am currently working on new gifs and they somehow look blurry due to the coloring. You are so talented and I thought I'd take my chance and ask for your advice. You are a true artist! Marlene x
Awww! Thank you so much, Marlene! 🥰 You’re so kind! Also, love the little Rick nod. Please forgive my delay in responding. I try to give people my full attention when they ask me a question, and I was quite busy yesterday and today. So, I am a day behind schedule in answering this.
First things first, if you make gifs, this tutorial by redbelles breaks down the entire gif-making process from software to sharpening to the best time to post. I would recommend it to anyone.
There a few things that can make a gif look "blurry". The file could be grainy, the image could be low contrast, or the gif just hasn't been sharpened enough.
I will address all three scenarios and demonstrate how I would manage them.
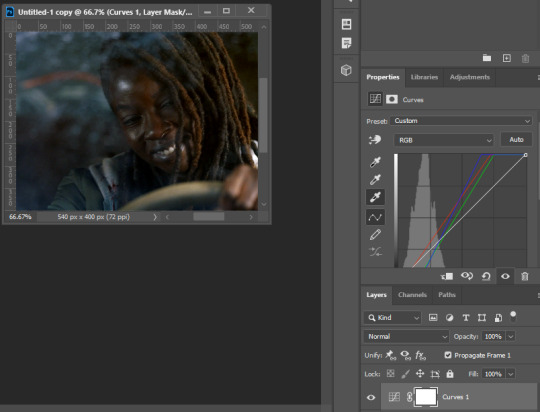
Grainy HD/Pixelated Video
Depending on the size and definition of your source file, the video itself may be pixelated, which will show up even the more once you start brightening, coloring, and sharpening. In general, the higher the GB, the higher the resolution, the more you can manipulate and stretch the gif from its original appearance before it starts to disintegrate.
I have learned not all 1080P files are made equal. Some are pixelated and will just give you grainy gifs (which you then have to compensate for).
Usually, I lean towards very bright, vibrant gifs. However, for videos that start out pixelated, I sometimes brighten it less or manipulate the colors less. For example, check out the gifs below.
The original looked like this. Incredibly dark with a ray of light coming from the left (how can they be outside in the daylight and the scene be this dark??).

Then I start brightening.

The innocuous light coming from the left is now making the pixels stand out even more, washing out the color.
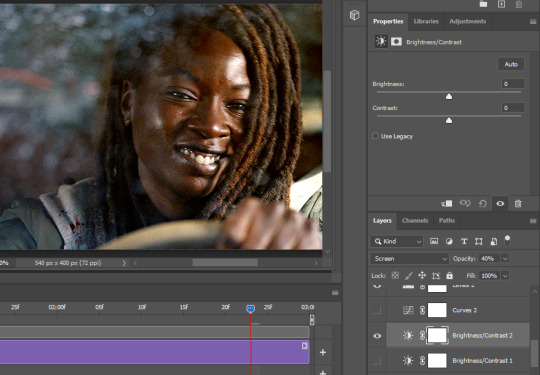
When a gif looks grainy, I will often switch to smaller dimensions such as 540 x 270 or 540 x300 to compress the image and (hopefully) minimize some of the graininess. The graininess remains, but the gif and therefore the most offensively grainy areas are also smaller.
Example: 540 x 400 v 540 x 300 (Brightened to show contrast)


Yet, for this particular gifset, I wanted to do 540 x 350, so I had to find other means for decreasing the graininess.
Tip: If the source material is not the problem, usually, the culprit for grainy/pixelated gifs is overmanipulating. If you make everything too bright, you start to see the individual pixels, especially if the original scene is very dark. Same thing can happen if you oversaturate or over sharpen.
Therefore, I tone down the brightness. Though still there, the pixelation is less noticeable. Nevertheless, when I add Selective Color to make the greens more vibrant, the pixels go haywire. Green and cyan pixels across her face, on her lips, in her hair.

So, I add a mask to the Selective Layer to remove the green/cyan from her hair.

This is the final PSD.
Turning Low Contrast to High Contrast
Take a look at this picture. Beautiful scene, but a gif-makers nightmare. Her entire face is covered in a blue-green wash. The highlights and shadows have also been grayed and tinted, drastically lowering the contrast, making the gif duller. The first action I take is to remove the wash and blacken the shadows.

Now, the blue film that was clouding her face has been stripped away and I can see her features more clearly. However, the base color scheme still isn't neutral. I can still see the yellow-green wash, and the gif is slightly darker now.

So, I now select the brightest area to be the whitest (here I chose the bright spot on her hoodie on the far right). If you look at the screenshot below, you can see her the yellow-green wash has now dissipated. There are still hints of blue at the top and bottom, but it looks more natural (imo), and it's not over her face, which is the most important part of the gif. SHE has been returned to a neutral color scheme. Also, the contrast between the shadows and the highlights have been increased, making the gif look sharper. The overall brightness has been restored too.
To summarize: Using the curves eye dropper works as a color correction. When a scene is covered in a color wash (blue, green, or yellow filter), the shadows and highlights also become tinted. By selecting the darkest shadow to be black, the curves layer strips the gif of the color wash (this works best when there is a wide range of shades). When you do the same with the brightest highlight, it removes the wash even further. Using curves to color correct is usually my first step in the gif-making process. Then, I start brightening.
I use most of the brightness options. I rarely use exposure. The order in which I put them in changes all time, and often, I move the layers around throughout the process. This time, I started with Brightness/Contrast first. I left it on Normal and moved the brightness up by 50. A lot of people use the Contrast on Brightness, but nowadays I prefer to use the Curves eye dropper and Levels Contrast options instead. Again, it's all a matter of preference. There are a thousand ways to get a satisfying end result.

For your first brightness layer, you can do another Curves layer. It's honestly my favorite brightening tool. You can manually adjust your Curves or you can use the Auto feature, and let it self-adjust (I usually still tweak it even if I use Auto as a base).

OR you add a Brightness/Contrast layer set to Screen instead of Normal, and you would get similar results. For this one, I adjusted the opacity to 40% (or whatever the gif can withstand. Sometimes, it's as low as 15%). This brightens the mid tones and shadows as well, so I rarely ever leave it at 100% on screen.

For this gif though, because I'm a brightness lover, I used both lol. Instead of manually adjusting the Curves, this time I pressed the Auto button and let it self-adjust (I think I just find pressing the button fun lol). The gif is already so bright, it only moved the brightness up a smidge.

Technically, at this point, I could call it quits and be done with the gif, but I never finish a gif without some color manipulation. So, I immediately turn to color balance.
There were still hints of the original blue green/yellow green wash, so I adjusted the color balance away from green and away from cyan (cyan also affects green).

Then I added a 2nd Color Balance to adjust the highlights. You can do this on the same color balance but I like to keep them separated (just so I can play with the colors freely without worrying about ruining the previous color balance I liked).

I also decided to lower the Brightness/Contrast layer which I set to Screen to 30% instead of 40% because I was seeing too many pale, grayish pixels (because they had been lightened too much). I also replaced the 2nd Curves layer with a Levels layer (see below), so I could have more control over which area was being brightened. I only adjusted the midtones by .05 in Levels and left the highlights and shadows alone. The result makes her skin glisten just a smidge less.

Sharpening Your Gif
Last step: Smart Sharpen. If done properly, sharpening your gif should completely remove any blurriness. In addition, the Smart Sharpen tool further enhances the contrast and brightens the highlights. I sharpen my gifs twice. I got this method from another gif-maker, and I've been a fan of it ever since. The gifs just come out crisper. If I feel it's too sharp, then, I can just remove the 1st smart sharpen filter (the 10%, 10 pixels), but I rarely do that.
See steps below:

Convert Frame Animation means convert frame animation to timeline. If you do not have timeline, see this tutorial on sharpening without timeline.
The blur has been removed. However, the highlights are too bright now.

As a counter, I turn off the 1st Brightness/Contrast layer and push the 2nd Brightness/Contrast layer which I had set to Screen back to 40%.
Side note: I got rid of the 1st Brightness layer because Brightness/Contrast set to Normal affects highlights more, whereas set to Screen it affects the midtones more. By removing the 1st and increasing the 2nd's opacity, I mitigate the glare of the highlights without sacrificing the overall brightness of the gif.
Final version (sharpened):

Original version (sharpened):

Original version (unsharpened):

As demonstrated, sharpening, contrast and color all play a role in making a gif look sharp and crisp. Hopefully, I addressed your issue somewhere in this tutorial. If not, DM me a gif or a screenshot of one, so I may offer more specific advice.
#ricksmarlene#ask#tutorial#this is based on the assumption you use PS to make gifs#i'm quite longwinded#pls forgive the length#hopefully this helps#if not let me know
3 notes
·
View notes
Text
Best Software for 3d art galleries !
Creating and displaying 3D art galleries requires a combination of software tools to design, model, and present the artwork effectively. Check these software options for different stages of creating a 3D art gallery: 3D Modeling and Sculpting: Blender: A powerful and free open-source software that offers comprehensive 3D modeling, sculpting, and animation capabilities. ZBrush: A popular tool for digital sculpting, ideal for creating intricate and detailed 3D models. Autodesk Maya: Widely used in the entertainment industry for 3D modeling, animation, and rendering. 3D Rendering and Visualization: Unreal Engine: A real-time 3D rendering engine that allows for highly immersive and interactive experiences. Unity: Another real-time 3D rendering engine commonly used for interactive experiences and video games. V-Ray: A high-quality rendering engine often used for creating photorealistic images. 3D Virtual Gallery Creation: Eternal3D.com where you can create your own 3D galleries using photos and videos. Sketchfab: An online platform where you can upload and share 3D models, create galleries, and embed them on websites or social media. Artsteps: A platform that allows artists to design virtual galleries and exhibitions with customizable spaces and layouts. VRChat: A virtual reality platform where you can create 3D galleries and interact with others in a social VR environment. 3D Presentation and Visualization: Substance Painter: A texture painting tool that allows artists to add realistic materials and textures to their 3D models. KeyShot: A user-friendly rendering and animation software that produces high-quality visuals with minimal effort. Adobe Dimension: Designed for creating 3D mockups and product visualizations with a user-friendly interface. Remember that the best software depends on your specific needs and preferences. For example, Blender and Sketchfab are excellent choices for artists on a budget or those looking for free options. On the other hand, professional artists and studios may prefer industry-standard software like Maya or Unreal Engine for their advanced features and capabilities. To find the right software for your 3D art gallery, consider your level of expertise, the complexity of the project, and the desired presentation format. It's also essential to explore tutorials and online resources to familiarize yourself with the chosen software and make the most of its potential for creating stunning 3D art galleries. #virtualartexhibition #ImmerseInArt #eternal3d #virtual #art #exhibition #3dartexhibition Eternal3D.com #california #cerritos #unitedstate #eternal3d #3d #space #virtualexhibition #virtua l #contemporaryart #onlineexhibition #artexhibition #artwork #artist #paintings #fineart #artgallery #stayhome #virtualgallery #modernart #DigitalExhibition #artonline #gallery #interiordesign Read the full article
2 notes
·
View notes
Text
3d product renderings and mockups
It seems like you're looking for information or assistance with 3D product renderings and mockups. Creating 3D product renderings and mockups is a crucial step in the design and marketing process for various industries. Here's some information to help you get started:
1. Software for 3D Rendering:
Blender: A powerful and free open-source 3D creation suite.
Autodesk Maya: Widely used in the film and video game industry.
Cinema 4D: Known for its intuitive interface and powerful capabilities.
KeyShot: A standalone 3D rendering and animation application.
2. Creating 3D Models:
CAD Software (Computer-Aided Design): Use software like AutoCAD, SolidWorks, or Rhino to create accurate 3D models.
Sculpting Software: Tools like ZBrush or Blender's sculpting features are great for organic shapes.
3. Texturing and Materials:
Apply realistic textures and materials to your 3D model using UV mapping techniques.
Software like Substance Painter or Quixel Mixer can help create detailed and realistic materials.
4. Lighting:
Proper lighting is crucial for realistic renders. Experiment with different light setups to achieve the desired look.
Consider using High Dynamic Range Imaging (HDRI) for realistic environmental lighting.
5. Rendering:
Choose the appropriate rendering engine for your needs (Cycles in Blender, Arnold, V-Ray, etc.).
Adjust rendering settings such as resolution, quality, and output format.
6. Mockup Tools:
Adobe Dimension: Allows you to create realistic 3D mockups and product visualizations.
Placeit: An online platform that lets you create mockups with your designs on various products.
Mockup World: Offers a variety of free and premium mockups for different products.
7. Tutorials and Learning Resources:
Online platforms like Udemy, Coursera, and YouTube offer tutorials on 3D modeling, rendering, and mockup creation.
Join forums and communities like Blender Artists or Polycount for support and feedback.
8. Considerations for Product Mockups:
Understand the target audience and purpose of the mockup.
Pay attention to lighting, shadows, and reflections to make the mockup realistic.
Test the mockup on different backgrounds to ensure versatility.
9. Outsourcing:
If creating 3D models and renders is outside your expertise, consider outsourcing to professional 3D artists or agencies.
Remember to practice and experiment with different techniques to refine your skills. The field of 3D rendering is vast, and continuous learning is key to staying updated with the latest trends and technologies.

#shirts#shirt design#artist shirts#tees#tshirts#toby's beans#coffee cat#sundew farms#sunflower fox#sugarbritches#apple orchard#vintage logos#logo design#shop#merch#countrycore#farmcore#cottagecore#fashion#my art#horror#slashers#graphic design#the conjuring#the conjuring 3#the conjuring: the devil made me do it#scream#scream 1996#a nightmare on elm street#anoes
2 notes
·
View notes
Text
How Learning Grasshopper Can Future-Proof Your Architecture Career
In today's fast-evolving architectural landscape, staying ahead requires more than just creative vision—it demands digital fluency. One of the most transformative tools in modern architecture is Grasshopper, the visual scripting plugin for Rhino 3D. Learning Grasshopper enhances your design capabilities and future-proofs your career by aligning you with the industry's shift toward parametric, sustainable, and performance-based design.
At RhinoProf, we help architects, students, and professionals master Grasshopper and key architectural software under one roof.
Why Grasshopper Matters More Than Ever
Our Online Architecture Course is no longer just about drawing and modeling; it's about data-driven, adaptable design. Grasshopper allows architects to build parametric models where every element is interconnected and modifiable. Need to change a façade's pattern based on sun exposure? Do you want to simulate structural performance or environmental impact? Grasshopper makes it possible—with precision and efficiency.
This kind of control isn't just impressive—it's becoming essential in firms using Building Information Modeling (BIM), sustainable strategies, and advanced fabrication methods.
Skills That Set You Apart
While many architects still rely on static modeling tools, those with Grasshopper 3D tutorial skills can:
Optimize building performance with environmental data.
Automate repetitive design tasks, saving time.
Design complex geometries that are not possible with traditional methods.
Integrate with plugins like Ladybug, Karamba, and Kangaroo for deeper performance analysis.
These skills make you more valuable to top-tier architecture firms and open doors to computational design, BIM coordination, digital fabrication, and sustainability consulting careers.
RhinoProf: Your One-Stop Learning Platform
At RhinoProf, we've created a space where architects can learn the Advanced Revit Documentation Course, Rhino, Grasshopper, AutoCAD, SketchUp, V-Ray, and more—all in one place. Our expert-led courses are designed for all levels and offer real project workflows, hands-on practice, and personalized guidance.
Whether you're a student building your portfolio or a professional looking to stay competitive, our training helps you stay relevant, skilled, and future-ready.
Final Thought
The future of architecture belongs to those who can blend creativity with computation. Learning Grasshopper now, especially through a comprehensive platform like RhinoProf, equips you with the tools to lead the next generation of design. Don't wait—invest in your future today
0 notes
Text
VR Project: Week 4 Blog 4;
Normal Map Baking
So I finally followed this super clear tutorial by Monica from Academic Phoenix Plus, where she walks through how to bake a normal map using Substance Painter.
youtube
Vid; Academic Phoenix Plus (2021) How to Bake Normal Maps using Substance Painter. YouTube video, 19 May. Available at: https://www.youtube.com/watch?v=WmDGGKxEL8M (Accessed: 8 March 2025).
The process starts in Maya. Where I first needed two models: a low-poly and a high-poly version of your asset. So I just used the same setup I made during the Maya baking attempt. I made sure both versions were sitting exactly on top of each other in world space, which meant freezing transformations and deleting history before exporting them separately as FBX files.
Once that was sorted, I jumped into Substance. I started a new project and loaded the low poly mesh since that’s the one I’d be texturing. Under the Texture Set Settings, there’s a section called “Bake Mesh Maps.” That’s where the magic happens.

Fig; Baking resolution settings
I set the resolution to 1024, ignored backfaces in the ambient occlusion settings, and bumped up the secondary rays to get better quality. Then, I added the high poly mesh under the High Definition Mesh slot and hit bake.

Fig; First version of the bake
The first bake wasn���t perfect. Some parts like the part where her top meets the skirt looked fine, but the inner holes had some weird artifacts. I played around with smooth settings while exporting as well as the frontal and rear distance values a bit, rebaked, and saw a huge improvement. Honestly, it's a little trial and error, but it works.

Fig; Weird shading artifacts
Finally after the normal bake worked, I just tested a lookdev version with some quick texture materials and then after ensuring that there were no weird stretching and that all the other maps were working properly I forwarded the substance file to Xinlai to do the final texturing.

Fig; Lookdev textures from substance painter
Overall, this tutorial made normal map baking feel way less intimidating than it did before. And after the first one, I gained confidence and finished normal baking for the rest of the charactersbefore forwarding the substance files to Xinlai.
0 notes
Text
Blog Post 55: VR PROJECT: Light Baking
In this brief blog, I’ll share some of the challenges I’ve faced during the Unreal Engine export process—specifically the unexpected issues with lightmap baking.

Trials and Tribulations
From hilarious bugs that randomly turned all of my assets into fabric materials, to headache-inducing technical issues that forced me to ask for help from my seniors—this stage of the project has been nothing short of a rollercoaster.
Light Baking Woes

I followed multiple tutorials on how to enable Lightmass baking in Unreal Engine 5. According to the documentation and video guides, the process involves disabling Lumen and enabling GPU-based ray tracing in the project settings.
youtube
However, here lies the problem: the option to disable Lumen is completely greyed out. No matter how many times I retried or adjusted settings, I couldn't turn it off. Most forum threads and YouTube guides reference earlier versions of Unreal or suggest methods like recreating the entire project—which is completely unfeasible at this stage.

I reached out to Eden Anthony, our teaching assistant, who kindly shared additional resources and tutorials. But even after following those instructions step-by-step, the issue persists.


At this point, I’m planning to reach out to experienced users on Polycount and 3DHit, in the hopes that someone has found a workaround for this version of Unreal.
Next Steps
If I’m still unable to resolve the problem, I’ll move forward with setting up the final scene layout by Thursday and bring the project into class. Hopefully, the professor can offer insight or provide a solution directly.
It’s been an incredibly frustrating day—but fingers crossed that the next one brings a breakthrough.
RESOURCES USED:
Interactive Entertainment Group, Inc. (2023). Interactive Entertainment Group, Inc. [online] Available at: https://interactiveparty.com/product/vr-beat-saber/.
Darktide (2022). Warhammer 40,000: Darktide - Official Website. [online] Available at: https://www.playdarktide.com.
Owlcat.games. (2025). Warhammer 40,000: Rogue Trader. [online] Available at: https://roguetrader.owlcat.games [Accessed 13 Feb. 2025].
Apache.co.uk. (2018). Apache: BARDO Virtual Reality Experience | APACHE. [online] Available at: https://apache.co.uk/work/bardo/ [Accessed 13 Feb. 2025].
Stealthoptional.com. (2023). Darktide error code 3001 - how to fix ‘Failed joining server’ error. [online] Available at: https://stealthoptional.com/article/darktide-error-code-3001-fix-failed-joining-server-error [Accessed 13 Feb. 2025].
DiSalvo, P. (2021). The Best Eldritch Invocations In Dungeons & Dragons. [online] TheGamer. Available at: https://www.thegamer.com/dungeons-dragons-best-eldritch-invocations/ [Accessed 13 Feb. 2025].
to, C. (2024). War in Heaven (Necron). [online] Warhammer 40k Wiki. Available at: https://warhammer40k.fandom.com/wiki/War_in_Heaven_(Necron).
Focus-entmt.com. (2023). Space Marine 2 - Focus Entertainment. [online] Available at: https://www.focus-entmt.com/en/games/warhammer-40000-space-marine-2.
hbitproject (2023). Mastering details in Blender - trim sheets tutorial. [online] YouTube. Available at: https://www.youtube.com/watch?v=1M-GNe_pB9M.
Sketchfab (2022). Sketchfab. [online] Sketchfab. Available at: https://sketchfab.com/3d-models/spartan-helmeta391427a539e40788432e84835e62e3a [Accessed 2 Mar. 2025].
Sketchfab (2017). Sketchfab. [online] Sketchfab. Available at: https://sketchfab.com/3d-models/ak47-weathered9d3315806e524acf8f411a9c22442cf6 [Accessed 2 Mar. 2025].
0 notes
Text
The Best Software for Creating 3D Game Assets in 2025

Creating high-quality 3D game assets is crucial for game developers, whether they're working on indie projects or AAA titles. As the gaming industry evolves, so does the technology used to design immersive 3D game environments and intricate character models. In 2025, various software options cater to different aspects of 3D modeling games, from hard surface modeling to organic sculpting. This blog explores the best software available for creating 3D game assets, including props 3D models, 3D vehicle modeling, and 3D environment modeling.
1. Blender – The Best Free 3D Game Asset Creation Software
Blender remains a top choice for 3D modeling games, offering a powerful and completely free solution for both beginners and professionals. It provides an extensive set of tools for 3D hard surface modeling, sculpting, texturing, and rendering.
Key Features:
Sculpting & Modeling – Excellent for both organic and hard surface modeling.
Geometry Nodes – Great for procedural 3D game environment creation.
Eevee & Cycles Render Engines – Real-time rendering for quick asset visualization.
Large Community Support – Access to thousands of tutorials and plugins.
For developers working on 3D vehicle modeling, Blender offers robust tools to create high-poly and low-poly car 3D models, making it ideal for both indie developers and large studios.
2. Autodesk Maya – Industry-Standard for 3D Game Assets
Maya remains a dominant force in the gaming industry, widely used for AAA 3D game assets. While its steep learning curve might be intimidating, the results are worth it.
Key Features:
Advanced Rigging & Animation Tools – Essential for game-ready character models.
NURBS & Polygonal Modeling – Ideal for complex 3D hard surface modeling.
Powerful UV Mapping & Texturing – Helps in creating realistic textures for 3D game environments.
Many game studios use Maya for high-end 3D game environments and detailed props 3D models due to its precise modeling capabilities and integration with game engines like Unity and Unreal Engine.
3. 3ds Max – A Favorite for Hard Surface & Vehicle Modeling
For those focusing on 3D hard surface modeling and 3D vehicle modeling, 3ds Max remains a powerhouse. Its flexibility and ease of use make it a preferred choice for designing car 3D models and mechanical assets.
Key Features:
Polygonal & Spline-Based Modeling – Perfect for mechanical and hard surface modeling.
Powerful Rendering Tools – Supports Arnold, V-Ray, and other renderers.
Automation with MAXScript – Speeds up workflow for large projects.
Whether you’re working on props 3D models or complex 3D game environments, 3ds Max’s precision and stability make it an excellent choice.
4. ZBrush – The Ultimate Sculpting Tool for 3D Game Assets
When it comes to sculpting highly detailed 3D game assets, ZBrush is unrivaled. It is widely used for creating characters, creatures, and organic 3D environment modeling.
Key Features:
Dynamic Sculpting Tools – Enables high-detail modeling without topology constraints.
ZRemesher – Optimizes high-poly models for game-ready assets.
Immense Detail Control – Perfect for texturing and detailing 3D game environments.
ZBrush is ideal for artists working on highly detailed 3D game environments, statues, and organic props, making it an essential tool for fantasy and sci-fi game development.
5. Houdini – The Best for Procedural 3D Game Environment Modeling
For developers looking to create massive, procedurally generated 3D game environments, Houdini is a top-tier option. It is widely used in AAA games for its powerful procedural tools.
Key Features:
Node-Based Workflow – Speeds up 3D game environment creation.
VFX & Simulations – Ideal for realistic destruction, smoke, and water effects.
Game Engine Integration – Seamless workflow with Unreal Engine and Unity.
If your project requires large-scale 3D environment modeling, such as cities, forests, or landscapes, Houdini is the best choice for procedural generation.
6. Substance Painter & Substance Designer – Best for Texturing 3D Game Assets
Creating realistic 3D game assets isn’t just about modeling; texturing plays a crucial role. Adobe’s Substance Suite offers the best tools for material creation and painting.
Key Features:
PBR Workflow – Supports industry-standard physically based rendering.
Smart Materials & Generators – Speeds up asset texturing for 3D game environments.
Game Engine Support – Direct export to Unreal Engine, Unity, and other engines.
If you need lifelike textures for props 3D models, 3D vehicle modeling, or 3D game environments, Substance Painter and Designer are must-have tools.
7. Unreal Engine & Unity – Best for Integrating 3D Game Assets
After creating 3D game assets, developers need a game engine to bring their creations to life. Unreal Engine and Unity are the top choices.
Unreal Engine Features:
Nanite & Lumen – Supports high-resolution 3D game environments.
Blueprint Visual Scripting – Allows artists to develop gameplay mechanics without coding.
Photorealistic Rendering – Ideal for AAA 3D modeling games.
Unity Features:
URP & HDRP Pipelines – Customizable rendering for different game styles.
Asset Store Integration – Thousands of ready-made props 3D models and tools.
Flexible Scripting with C# – Excellent for indie and mobile game development.
Both engines support seamless import of 3D game assets from Blender, Maya, 3ds Max, and other modeling tools, making them essential for game development in 2025.
Conclusion
Choosing the right software for 3D modeling games depends on your specific needs. Blender is the best free solution, while Maya and 3ds Max dominate the industry with their robust features for 3D hard surface modeling and 3D game environments. ZBrush is unbeatable for sculpting, while Houdini excels in procedural 3D game environment modeling. Lastly, Unreal Engine and Unity ensure seamless game integration.By leveraging these tools, game artists and developers can create stunning 3D game assets, from car 3D models to intricate props 3D models, shaping the future of game design in 2025.
0 notes
Text
Kevin Adanan, Thursday 30th of January
Today I worked on developing more aspects of the environment. I focused on populating the first 10 seconds of the video. I purchased a space ship building asset pack and then started to build the environment out.
I used the Spaceship Kit https://www.fab.com/listings/1b49f6f6-4f68-4d9c-aa15-bdce52d4379a from Volodymyr Stepaniuk to create the small space ships in the scene.
To begin, after some feedback from Saint Walker and Steve Littman, I tested the scene using the Panoramic Render in the Movie Render Queue. The scene appeared to look like the camera would work correctly. I will have to get confirmation on this.
From there, I tested out some rendering methods, I followed this tutorial on how to render out a Panoramic Render https://www.youtube.com/watch?v=hr4_GnQij8c&t=25s (Digital Spaces, 2024).
Once I was confident in my camera, I then moved on to adding in the ships and adding in particle effects. This took a long time. I still couldn't get them to trigger properly. A large issue that I had was lighting the ships in the scene, after testing adding lights to their individual Blueprint Actor files, Emissives etc, I settled on turning up the Skylight in the scene, this appeared to work very well and now all the ships are lit up correctly.
After a number of test videos in Da Vinci Resolve, I then removed the Ray Tracing from the scene as the lighting was flickering on the assets. This game a much more consistent look to the scene.
Fab.com. (n.d.). Spaceship Kit. [online] Available at: https://www.fab.com/listings/1b49f6f6-4f68-4d9c-aa15-bdce52d4379a [Accessed 12 February 2025]
Digital Spaces. (2024). Easily Render 360 Images from Unreal Engine 5 (UE5) [Video]. YouTube. Available at: https://www.youtube.com/watch?v=hr4_GnQij8c&t=25s (Accessed: 30 January 2025)
0 notes
Text
Unreal Engine 5- Lumen and Ray tracing
Blog #7
20th October
I have been following William Faucher for his Unreal Engine lighting tutorials for some time now. Recently I watched his tutorial on lighting in Unreal Engine 5 for beginners. Where he explained the basics of light in Unreal Engine 5. Unreal Engine 5 uses Lumen for Global Illumination.
I learnt about different light actors available in UE5 and how each type of light affects the object and its shadow. Almost all the light sources have settings for intensity, scale, rotation etc. The rectangle light gives softer shadows by default as the size of a light source is related to the sharpness of shadows, the smaller the light source sharper the shadow it casts. When the hardware ray tracing is turned on ray traced shadows give much better output than the virtual shadow maps.
He further explains how the lumen handles indirect lighting in the scene in Unreal Engine 5 and how we can control it. Lumen uses light bounces and calculates indirect lighting depending on the objects hence, with lighter colour objects in the scene we will get more indirect light with a low-intensity light source and vice versa.
he also introduced us to emissive materials which can act as a light source in our scene.
Later in the video the video he takes an environment from the Unreal market and showcases his pipeline to light any environment from the start.
In this tutorial, William explained the basics of lighting and its relationship with objects in the scene very well. I applied what I learned from this tutorial to improve the lighting in my “places of mind” assignment. I better understood the various parameters and settings that can be adjusted to achieve the desired results.

References:
Faucher, W. (2022). Lighting in Unreal Engine 5 for Beginners. [online] www.youtube.com. Available at: https://www.youtube.com/watch?v=fSbBsXbjxPo.
0 notes
Text

This is another excellent tutorial for sketchup vray users from MasterTuts. The tutorial will introduce you with the processes for generating realistic velvet material in vray for sketchup.
Usually, the users can apply reflection and refraction to generate a material for an object. But sometime, some texture maps are utilized to generate these materials. The users can apply texture map for superior rendering.
All these materials are available in Material Editor in V-ray for sketchup. There are three parts in material editor.
A. Material Workplace - It demonstrates all the selected materials. Click right to add, import, export, rename, pack, remove, and choose the objects with existing materials like attributing present materials to the chosen objects, removing materials (which are not applied in the scene), and attaching layers with reflections, refractions to the materials.
B. Material Preview - The Update Preview button facilitates the users to view the adjusted materials.
C. Options for material control - The options are modified with the added scene materials in section A.
Read more
0 notes
Text
Demons Souls Remake (4k 60FPS) PS5 Pro Gameplay
https://ift.tt/IQDmk2p https://www.youtube.com/watch?v=j0ji3KmaOxc Experience Demon’s Souls with high quality graphics in this PS5 PRO gameplay! Don’t forget to give this video a thumbs up, subscribe, and click the bell for more 4K gaming content! This video is about Demon’s Souls Remake (4k 60FPS) PS5 Pro Gameplay. But It also covers the following topics: Demon’s Souls Remake PS5 Pro Gameplay Demon’s Souls Remake No Commentary Demon’s Souls Remake 4K 60FPS Resident Evil 4 Remake (4k 60FPS) PS5 Pro Gameplay Ray Tracing Hit that subscribe button & stay tuned for high-quality, no-commentary walkthroughs, expert strategies, & tutorials for conquering both classic and modern games! https://www.youtube.com/@MainWaveGaming/?sub_confirmation=1 Stay Connected With Us. Twitter (X): https://ift.tt/6KcQlsW For Business Inquiries: [email protected] ============================= Recommended Playlists Black Myth: Wukong Walkthrough Life Is Strange: Before the Storm WATCH OUR OTHER VIDEOS: Black Myth – Wukong: Intense Boss Fights – PS5 Gameplay Full Walkthrough Part 2 (No Commentary) Black Myth – Wukong: PS5 Walkthrough No Commentary: New Epic Bosses & Challenges Part 3 Black Myth – Wukong: PS5 Walkthrough Gameplay: Hardest Boss Battles! Part 4 – No Commentary Black Myth Wukong Gameplay: Battles, Secrets & Mysteries – PS5 Walkthrough (No Commentary) Part 5 Uncharted: Drake’s Fortune Full Gameplay Walkthrough (No Commentary) – Part 1 | Epic Treasure Hunt ============================= About Main Wave Gaming. Welcome to Main Wave Gaming! Experience cinematic gameplay with our no-commentary walkthroughs, designed to guide you through the most captivating gaming adventures. Whether you’re exploring classic titles or the latest releases, our channel provides the highest-quality game footage to immerse you in the action. We focus on timeless classics and fresh hits across all consoles, offering a movie-like journey through each game. If you’re stuck on a puzzle or struggling with a boss, our walkthroughs help you conquer challenges and complete your gaming quest. Enjoy games like never before and get the help you need to beat those tough spots! For Collaboration and Business inquiries, please use the contact information below: Email: [email protected] Are you a fan of epic gameplay adventures? Subscribe now, & don’t miss the latest cinematic no commentary walkthroughs, tips, & strategies from classic and new games! https://www.youtube.com/@MainWaveGaming/?sub_confirmation=1 ================================= #demonssouls #ps5progameplay #nocommentary #walkthrough #ps5pro DISCLAIMER: Our gameplay videos should not be re-uploaded on other channels or streaming services. We do not accept any liability for any loss or damage incurred from you acting or not acting as a result of watching any of our publications. You acknowledge that you use the information we provide at your own risk. Do your research. Copyright Notice: This video and our YouTube channel contain dialogue, music, and images that are the property of Main Wave Gaming. You are authorized to share the video link and channel and embed this video in your website or others as long as a link back to our YouTube channel is provided. © Main Wave Gaming from Main Wave Gaming https://www.youtube.com/channel/UCWeh4QReL1ZB-a7JzeunIqA via Main Wave Gaming https://ift.tt/Y9oQdsK November 18, 2024 at 03:07AM
0 notes
Text
Demons Souls Remake (4k 60FPS) PS5 Pro Gameplay
https://ift.tt/5bwti19 https://www.youtube.com/watch?v=j0ji3KmaOxc Experience Demon’s Souls with high quality graphics in this PS5 PRO gameplay! Don’t forget to give this video a thumbs up, subscribe, and click the bell for more 4K gaming content! This video is about Demon’s Souls Remake (4k 60FPS) PS5 Pro Gameplay. But It also covers the following topics: Demon’s Souls Remake PS5 Pro Gameplay Demon’s Souls Remake No Commentary Demon’s Souls Remake 4K 60FPS Resident Evil 4 Remake (4k 60FPS) PS5 Pro Gameplay Ray Tracing Hit that subscribe button & stay tuned for high-quality, no-commentary walkthroughs, expert strategies, & tutorials for conquering both classic and modern games! https://www.youtube.com/@MainWaveGaming/?sub_confirmation=1 Stay Connected With Us. Twitter (X): https://ift.tt/6KcQlsW For Business Inquiries: [email protected] ============================= Recommended Playlists Black Myth: Wukong Walkthrough Life Is Strange: Before the Storm WATCH OUR OTHER VIDEOS: Black Myth – Wukong: Intense Boss Fights – PS5 Gameplay Full Walkthrough Part 2 (No Commentary) Black Myth – Wukong: PS5 Walkthrough No Commentary: New Epic Bosses & Challenges Part 3 Black Myth – Wukong: PS5 Walkthrough Gameplay: Hardest Boss Battles! Part 4 – No Commentary Black Myth Wukong Gameplay: Battles, Secrets & Mysteries – PS5 Walkthrough (No Commentary) Part 5 Uncharted: Drake’s Fortune Full Gameplay Walkthrough (No Commentary) – Part 1 | Epic Treasure Hunt ============================= About Main Wave Gaming. Welcome to Main Wave Gaming! Experience cinematic gameplay with our no-commentary walkthroughs, designed to guide you through the most captivating gaming adventures. Whether you’re exploring classic titles or the latest releases, our channel provides the highest-quality game footage to immerse you in the action. We focus on timeless classics and fresh hits across all consoles, offering a movie-like journey through each game. If you���re stuck on a puzzle or struggling with a boss, our walkthroughs help you conquer challenges and complete your gaming quest. Enjoy games like never before and get the help you need to beat those tough spots! For Collaboration and Business inquiries, please use the contact information below: Email: [email protected] Are you a fan of epic gameplay adventures? Subscribe now, & don’t miss the latest cinematic no commentary walkthroughs, tips, & strategies from classic and new games! https://www.youtube.com/@MainWaveGaming/?sub_confirmation=1 ================================= #demonssouls #ps5progameplay #nocommentary #walkthrough #ps5pro DISCLAIMER: Our gameplay videos should not be re-uploaded on other channels or streaming services. We do not accept any liability for any loss or damage incurred from you acting or not acting as a result of watching any of our publications. You acknowledge that you use the information we provide at your own risk. Do your research. Copyright Notice: This video and our YouTube channel contain dialogue, music, and images that are the property of Main Wave Gaming. You are authorized to share the video link and channel and embed this video in your website or others as long as a link back to our YouTube channel is provided. © Main Wave Gaming from Main Wave Gaming https://www.youtube.com/channel/UCWeh4QReL1ZB-a7JzeunIqA via Main Wave Gaming https://ift.tt/mpB6Tlu November 18, 2024 at 03:07AM
0 notes