#VCFSW
Explore tagged Tumblr posts
Visit Tumblr Blog
Explore Tumblr blogs with no restrictions, modern design and the best experience.
Last Seen Tumblr Blogs


Fun Fact
In Q3 of 2020, 31% of US users access the Tumblr app daily.
Text
On Recovering From Disaster

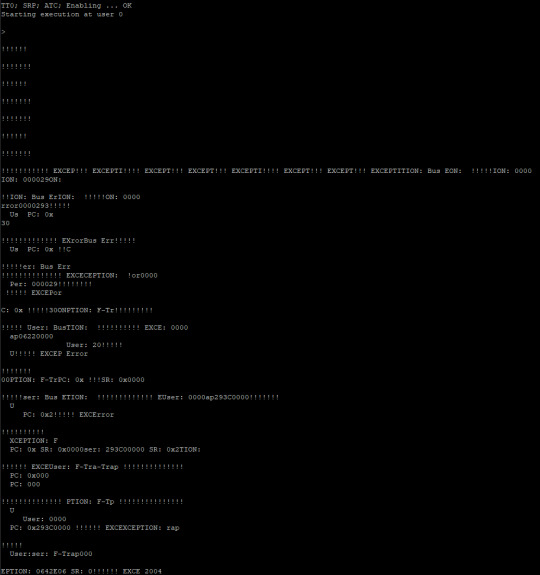
Just before disaster struck with my 68030 homebrew, I had a plan to fork the project and take it in two directions in parallel.
The first would be my minimal Multibasic setup which was running great and was something I would be proud to exhibit at VCFSW '25.
Since that was working well, I didn't want to do anything that might make it not ready for the show. So I had assembled a second main board that I could use with other peripheral cards to continue development. My plan was to rework the memory map to move ROM and I/O addresses to the upper half of the 32-bit address space, which would allow me to use a DRAM card for up to 16MB of contiguous memory starting at address 0 — a perfect setup for running a proper OS
And then I burned up my good mainboard.
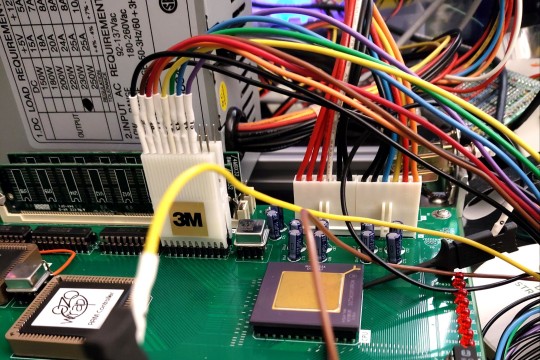
I had a spare CPLD on-hand, and I was able to get another 40MHz 68EC040 for cheap. But the 4Mbit SRAM chips are expensive, and I thought that if I was going to be paying for more SRAM, I should get the 12ns parts that would allow me to run RAM with no wait states at 50MHz. Which would require adapter boards, and more pin headers, and would have just driven the cost up even more.
Paralyzed by indecision and the rising cost, I decided to switch gears. I already have the DRAM board I built years ago, I just needed to get it working. And if I'm doing that, I may as well do the work on reorganizing my memory map.
So that's what I did. I made a new branch on my newly cleaned up repository, and set to work. I updated the mainboard bus controller logic to remove the no-longer-needed SRAM control, adjust the ROM address to start at 0x8000,0000, and move the 6850 UART address to 0x8008,0000. This freed up the entire 2GB space between 0x0000,0000 and 0x7FFF,FFFF for the DRAM card to use for main memory (my bus connector layout only allows for up to 16MB main memory, but that's plenty for my purpose).
Next, I needed to build the control logic for my DRAM board. I've done this once before on my Wrap030-ATX project a couple years ago, so I used that logic as a starting point. It … kind-of worked. Sometimes. Maybe.

I was getting random errors all over the place. Sometimes it was able to copy all of ROM into RAM and verify the copy without error, but it would fail when running code from RAM. Sometimes it wouldn't even pass the first two simple tests of writing a longword to RAM and reading it back.
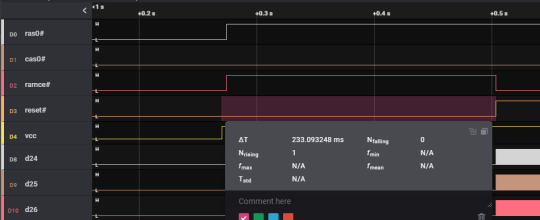
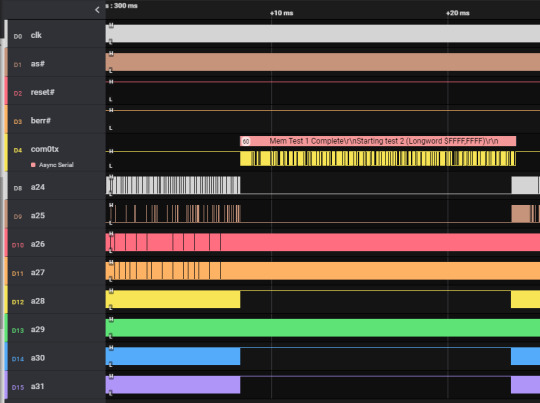
Back to the data sheets to plan out the logic. I drew out a new timing diagram down to 1ns resolution, accounting for the specified propagation time for my CPLDs, and the measured signal delays for my CPU. This gave me the information I needed to build out a new state machine for the DRAM controller. In the process I also caught a few other bugs in my original logic, such as not ensuring the DRAM Write Enable strobe did not get asserted during refresh cycles.

The new state machine worked much better, but I got my timing off a bit. It worked reliably at 16MHz, but not at the intended 25MHz. At least it was working though; I can move forward with 16MHz.
The next thing to do was get my 8-port serial card working with this new setup. Every time the computer tried to access one of the 8 serial ports, it would get a bus error. This was a tough one that had me stuck for a while.
It looked like the serial card was getting addressed and asserting DSACK0# as expected, but I couldn't confirm the signal was making it back to the CPU. Every time I tried to measure the DSACK signals, the probes would increase the line capacitance (I think) too much and cause the whole computer to fail before it even got to the point of trying to address the serial ports.


I have the DSACK signals in a wired-or configuration. The logic on each card connects to the proper DSACK signal via an open-collector buffer, and is able to pull the signal low to signal that card acknowledging the bus cycle. The signal is then pulled back up to +5V by a 1kΩ resistor. This works well enough for small, slow systems, but with long bus wires or lots of chips on the bus, the extra capacitance means it can take a long time for that pull-up resistor to get the signal back up to +5V.
I made a change to my DRAM controller to actively drive the DSACK signals to +5V briefly at the end of a bus cycle before setting the pin to high-impedance. This helps ensure a fast rise time at the end of the cycle so it doesn't disrupt the next bus cycle.
It didn't fix the problem with the serial card, but it did allow me to actual probe the signals live to see what was happening — the Bus Error signal was getting asserted immediately after the CPU addressed the serial card. This didn't make much sense to me. My main board logic will assert Bus Error if no peripherals acknowledge a bus transaction within 64 clock cycles. Nothing should be asserting Bus Error so quickly.
Except … the main board bus controller. My original memory map used the lower half of the address space for the main board, and peripheral cards used the upper half. So my original main board logic was built to assert Bus Error immediately for an unused address in the lower half of the address space. I hadn't properly removed that bit of logic, so it was now asserting Bus Error for any accesses to the upper half of the address space that weren't used by the main board.
The challenges of working on a project after six years. I had forgotten that bit of logic was even there.
With that erroneous Bus Error assertation removed, the machine was finally able to properly load my Multibasic kernel and run BASIC for 8 users again.


At the moment it is running stable at 24MHz on my 25MHz-rated full 68030. It may not be the 50MHz high I was at, but after the frustration and disappointment of the past few weeks, I'm absolutely taking that as a win. 24MHz is incredible.
#mc68030#motorola 68k#motorola 68030#vcfsw#wrap030#retrotech#debugging#troubleshooting#homebrew computing#homebrew computer#retro computing
23 notes
·
View notes
Text


VICs that are not 20
My exhibit at Vintage Computer Festival Southwest 2023 went well. It was a major lift to drive it all out to Texas in summer, but the results were worth it. I got to meet a whole different group of the vintage computer community, and share my esoteric VICs with them. Seems like alot of people enjoyed talking with me, trying out the games, and even programming in BASIC. My exhibit even won the award for Best Microcomputer.
Items on display included:
Rainbow label VIC-20
Early American VIC-20
Japanese VIC-1001
Prototype VIC-20 aka the "Brown Board"
Prototype 16K VIC-20 plus a variety of expansions, peripherals, and software. I filled my trunk to the brim with items for my exhibit.
Special thanks go out to @ms-dos5 for helping with setup and breakdown of my exhibit, as well as demonstrating many of my exhibit machines by playing some of the supplied video games. I was glad to finally meet @techav who had the table next to mine, keeping extra sets of eyes on each others tables throughout the weekend.
#vcfsw2023#vcf southwest 2023#vintage computer festival southwest 2023#commodorez goes to vcfsw 2023#commodore#vic-20#vic 20#commodore vic 20
171 notes
·
View notes
Note
Have fun at VCFSW! Dont forget to take pictures.
I recommend checking out Usagi Electic, techav, Nybbles and Bytes, and Forgotten Machines' exhibits in particular. Tell 'em Z sent ya!
Thanks for the message! I didn't check Tumblr notifications again until now, but I did have a blast at VCF. I didn't get many pictures myself, but my husband got a bunch!


117 notes
·
View notes
Text
On Major Milestones
I left off previously with init immediately crashing when trying to run NetBSD on Wrap030, my 68030 homebrew computer. I was completely lost and didn't know where to start looking. The error code it gave, 11, didn't tell me much.
Until now, most error codes I've gotten have been defined in kernel errno.h, which has 11 defined as:
EDEADLK 11 /* Resource deadlock avoided */
That … also isn't helpful. I'm still not entirely sure what that means, but since this is process 1 we're dealing with, I didn't think it was relevant.
Finally, I was able to find someone who had encountered the same error six years ago. Helpful soul [Martin] explained the exact cause of the error, how to fix it, and why the kernel errno didn't line up:

I'm running a NetBSD live disk on a laptop as a test host, so I mounted my disk on it and spent some time with mknod adding the essential device nodes, referencing the "majors" file for my arch. Sure enough, on next boot it skipped right past the point it had been panicking. It worked for a bit then finally printed on the console:
Enter pathname o
Enter pathname of what? The machine appeared frozen. Nothing further printed, and it responded to no input.
I was afraid this would happen. That string is 16 characters. The 16C55x UART chips I'm using have a 16-byte buffer. The system is hung up waiting for the UART to interrupt to indicate it has finished transmitting everything in its buffer.
There's just one problem — I don't have any serial interrupts wired.
I have a confession to make. Until a few weeks ago when I got my timer working, I hadn't really worked with hardware interrupts before. So between a limited understanding of how to use them effectively and limited board space, I had omitted the interrupt signals from my 8-port serial card. This was now a Problem, and I was going to have to find a solution.
I had a few options:
Force the com driver to 8250 mode so it doesn't try to use the buffers
Use my timer interrupt to check status bits on the UARTs and fake the interrupts
Deadbug an interrupt handler onto my serial card
Respin the serial card
Option 4 would've been expensive and risked passing my deadline. I wasn't sure option 1 would even help. And option 3 would have been difficult and error-prone. I decided option 2 would be the way to go so I set about researching how to accomplish it
I spent a few hours digging through the com driver. In the process I found softintr(9), a native NetBSD software interrupt process that looked like just the thing I needed. Digging in a little deeper, I realized that the com driver was already using softintr. And then I realized all it needed to do polled mode serial ports instead of interrupt-driven was to set a single variable, sc_poll_ticks, before initializing the driver. It's such a simple thing, but it's not really documented anywhere I could find, so the only way to know it was even an option was to spend hours studying the code.
With that in place, I recompiled my kernel and tried again.

It was asking for a shell. This is promising. I accepted the default shell, /bin/sh, and waited a moment. It printed a single #.
I had a shell prompt.

I typed in the first thing that came to mind, echo "hellorld" (thanks, [Usagi]). It responded:
hellorld
and printed another # prompt.
I had a working shell.

This is a major milestone. I have a modern operating system kernel loaded and running on my homebrew computer, and I have a functional root shell. I can navigate disk directories and run commands and programs.
But only as root, and only on this one console. I have seven other serial ports I want terminals on, and I certainly don't want them all running as root.
What it's running here is single-user mode. It is just the kernel and a few core services, somewhat analogous to Safe Mode in Windows. It's a fall-back for setting up or repairing a system. It's not quite the full operating system just yet.
Getting the rest of the operating system up and running is going to be a significant task, on par with getting just the kernel running. Setting up a working Unix system from scratch is not easy. It requires a lot of detailed knowledge of the various programs and libraries and config files scattered across the disk. For a sense of scale, the AT&T Unix System V manual was over 1100 pages, plus an 800 page programmer's guide and a handful of other manuals … and that was 40 years ago. That's a lot of specialized knowledge that I don't really have.
But still, this is something I've wanted to do for years and after countless hours of work, I finally have a glimpse of what it can look like. I have a lot to learn and a lot of work to do yet, but I'm certain I can figure it out.
I'm still hoping I can get this running multi-user on all those terminals in time for VCF Southwest in June. The show is just a few weeks away and I have a lot of work to do.
#mc68030#motorola 68k#motorola 68030#debugging#wrap030#retrotech#troubleshooting#netbsd#at&t unix#unix#unixporn#operating systems#os development#retro computing#retrocomputing#homebrew computer#homebrew computing#usagi electric#vcfsw#vcf southwest
19 notes
·
View notes
Text
On Catastrophic Failures
After working through a silly design mistake and then having to reverse engineer my own project to make up for my own bad habits, my 68030 homebrew computer was running great. Better than ever, in fact — I finally had it running stable at 50MHz. It was absolutely flying.
The only thing keeping the machine from running faster was my 8-port serial card, which really needed another wait state to surpass the 50MHz mark. Luckily, I had designed the board with this need in mind and had included a jumper to select between 0 to 3 wait states. Unfortunately I had missed a single exclamation point in the logic equations for that wait state generator and so the signals were inverted. Not to worry — it's reprogrammable. I just need to add the missing mark, recompile, and re-burn the chip.
And that's when everything went wrong.
All I did was swap out the logic chip for the serial card, why won't the computer boot anymore? I haven't even changed the jumper setting yet. Swapping that chip shouldn't have affected anything else.
... It's not booting even with the serial card disconnected.
Out comes the oscilloscope. Reset is good, but nothing else is moving. All the bus signals are holding steady instead of doing their jobs.
Lower the clock speed; still nothing. Double-, triple-check power supply and bus connections; still nothing. Check the clock pin on the CPU ... nothing.
There's no clock signal on the CPU, so it can't do anything.
A quirk of this design, coming from my limited knowledge when I first started building it, is that the bus control CPLD drives the CPU clock, not the oscillator directly (the original intent was to divide the bus clock for the CPU — something that was more common in the 8-bit era). If there is no CPU clock something must be wrong with the CPLD.
That CPLD seems awfully warm.
I pulled the CPLD and dropped it in my programmer. ATMISP reported that the chip was not blank. That meant it was at least responding to some JTAG queries. I tried erasing the chip and it reported success. I tried reflashing my bus controller configuration. It failed verification every time. Nothing left to do but pull it and try another chip.
That's when I noticed not only was it getting quite hot, but it was drawing enough current that the LED on my programming adapter wasn't even lit. Something in that chip had shorted and was causing excessive current draw. Luckily I have some spares. New chip burns without any problems. Drop in into the main board and success — we have clock and bus signals!
But it's still not booting.
Out comes the oscilloscope again. Address strobes are working as expected. Cycle termination is happening as expected. ROM read & enable strobes are working as expected. RAM and the on-board serial port are never getting selected.
Time for the logic analyzer. After working through bus signals 16 at a time, I finally got to the point where I was watching enough of the address bus to see what it was loading.
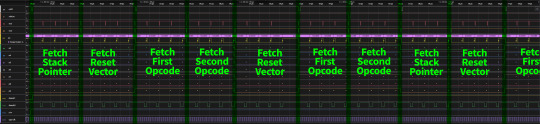
The CPU was stuck in an odd loop. It would load the initial stack pointer & reset vector as normal, then start fetching & executing instructions. But before it had even finished fetching the second instruction, it would go back to loading the reset vector, then start again with fetching & executing instructions. Then it would go back to the beginning with loading the initial stack pointer & reset vector, and just continue on in this fashion endlessly.
There is nothing I'm aware of in the documentation that describes this behavior. It is possible to halt the CPU on startup by trying to use a misaligned stack pointer or reset vector, but it's not indicating a halt.
Thoroughly stumped, I turned to Discord for help. One user, [arminius97] had encountered something similar with the 68020 that ultimately required replacing the CPU. Another user well-versed in the 68030, [transistorfet], helped me walk through possibilities, and ultimately we came to the conclusion that something is very wrong with this CPU.
So something burned up my CPLD and my CPU.
I have one other 68030 CPU — a full-featured ceramic-package chip rated for 25MHz (it was my plastic-package 40MHz 68EC030 that failed). Time to swap chips around and see what happens.
A memory error.
It was running code! But it was also consistently reporting a memory error on startup at address 0x00000084. Always the same location, always the same bad byte. So I swapped around SRAM chips. The error followed. I have a bad memory chip.
So that's a CPLD, a CPU, and an SRAM chip that all failed at the same time.
This is quite a setback, especially because it had been running better than ever before. I don't even have any spare 4mbit SRAM chips I can test with. Repairs will be expensive.
Perhaps this is a good time to spring for some 15ns or faster SRAM and run with no wait states for main memory. Or perhaps I could finally finish building & testing the 72-pin SIMM board I assembled for this machine years ago.
I plan on exhibiting this build running the multi-user BASIC setup this June at VCFSW, so I do have a bit of a ticking clock to get it up and running again. I'm sure I'll figure something out.
#homebrew computing#homebrew computer#homebrew#vintage computing#motorola 68k#mc68030#motorola 68030#wrap030#troubleshooting#vcf#vcfsw#vcfsw2025
20 notes
·
View notes
Text
Sharing a Computer with More Friends
A few months ago I built an I/O expansion board for my homebrew 68030 project with a 4-port serial card to go with it, and got BASIC running for four simultaneous users. It worked, but not as well as I had hoped. I wanted to be able to run two of those serial cards to support 8 total users, but it had proven unstable enough that with just the one card I had to slow down the whole system to 8MHz.
So I designed a new serial card.

I had previously been running this computer without any issues at 32MHz with a mezzanine card with FPU & IDE as well as a video card. The main board by itself can clear 56MHz. Having to go all the way down to 8MHz just didn't sit well with me. I want this machine to run as fast as possible for its 8 users.
I put extra time into reviewing worst-case timing for all components and graphing out how signals would propagate. The 16C554 quad UARTs I'm designing around are modern parts that can handle pretty fast bus speeds themselves — easily up to 50MHz with no wait states on the 68030 bus — assuming all the glue logic can get out of the way fast enough.
Signal propagation delays add up quickly.
My first draft schematic used discrete 74-series logic for chip selection, signal decoding, timing, etc. At slower bus speeds this wouldn't have been a problem. But I want this thing to run as fast as possible. By the time critical signals had made it through all those logic gates, I was looking at already being well into one wait state by the time the UART would see a 50MHz bus cycle begin.
I needed something faster. I was also running low on space on the board for all the components I needed. The obvious answer was programmable logic. I settled on the ATF22V10 as a good compromise of speed, size, availability, and programmability. It's available in DIP with gate delays down to 7ns. Where discrete gates were necessary, I selected the fastest parts I could. The final design I came up with showed a worst case timing that would only need one wait state at 50MHz and none for anything slower.
It ended up being a tight fit, but I was able to make it work on a 4-layer board within the same footprint of my main board, putting some components on the back side. (It may look like a bunch of empty space, but there's actually a lot going on running full RS232 with handshaking for 8 ports).
New problem. I had blown my budget for the project. As much as I love those stacked DE9 connectors, they're expensive. And there's no getting around the $10 pricetag for each of those quad UARTs. Even using parts on-hand where possible, I was looking at a hefty Mouser order.
[jbevren] suggested using ganged RJ45 connectors with the Cisco pinout instead of stacked DE9, to save space & cut costs. [Chartreuse] suggested buffering the TTL serial TX/RX signals to drive the LEDs that are frequently included on PCB-mount RJ45 connectors. Both great ideas. I was able to cut 20% off my parts order and add some nice diagnostic lights to the design.
Two weeks later, I received five new PCBs straight from China. I of course wasted no time setting into starting to assemble one.
I really set myself up for a challenge on this one. I learned to solder some 25 years ago and have done countless projects in that time. But I think this might be the most compact, most heavily populated, most surface mount board I've ever assembled myself. (There are 56 size 0805 (that's 2x1.2mm) capacitors alone!)


After a few hours soldering, I had enough assembled to test the first serial port. If the first port worked then the other three on that chip should work too, and there's a great chance the other chip would work as well.

And it did work! After some poking around with the oscilloscope to make sure nothing was amiss, I started up the computer and it ran just fine at 8MHz.
And at 16MHz.
And at 25MHz.
And at 32MHz.
And at 40MHz.
And almost at 50MHz!
Remember what I said about my timing graphs showing one wait state for 50MHz? The computer actually booted up and ran just fine at 50MHz. The problem was when I tried typing in a BASIC program certain letters were getting switched around, and try as I might, BASIC just refused to 'RQN' my program. It was pretty consistently losing bit 3, likely from that signal having to travel just a tiny bit farther than the others. A problem that will probably be resolved with an extra wait state.
Good enough for a first test! A few hours more and I finished assembling the card.

I did have some problems with cleaning up flux off the board, and I had to touch up a few weak solder joints, but so far everything seems to be working. I've updated my little multi-user kernel to run all 8 users from this new card and it's running stable at 40MHz.
I need to update my logic on the 22V10 to fix a bug in the wait state generator. I would love to see this thing actually running at 50MHz — a 25% overclock for the 40MHz CPU I am currently running. I also want to expand my little kernel program to add some new features like the ability to configure the console serial ports and maybe even load programs from disk.
I hope to bring this machine with a collection of terminals and modems this June to VCF Southwest 2025 for an interactive exhibit that can be dialed into from other exhibits at the show.
#wrap030#multi-user BASIC#EhBASIC#homebrew computer#motorola 68030#68030#mc68030#motorola 68k#vcfsw#vcfsw2025#Retrocomputing#rtc#retrotech crew
31 notes
·
View notes
Text

On Incremental Improvement:
With VCF Southwest almost here, and having run into a dead end on getting NetBSD running on my 68030 homebrew computer, Wrap030, I decided to circle back to my multi-user BASIC kernel. There are some important features the system is needing to get it ready for running as an exhibit for all three days of the show.
Memory Protection
There's a fun couple fairly standard BASIC commands, PEEK and POKE. The former will read a byte of memory from a specified address, and the latter will write a byte. These were commonly used in the 8-bit era to manipulate hardware registers. For instance, POKE 53280,1 on the Commodore 64 would set the screen frame color to white by writing 1 to the address 53280.
While there were ways to cause problems by writing bad values to the wrong address, on a single-user home computer the impact was only to the one user. On a multi-user system however, PEEK could be used maliciously to look at private data from other users. An errant POKE command could overwrite user data, kernel data, even code being run by users.
A good multi-user system needs some way to prevent one user from accessing memory used by another user, and to prevent users from overwriting shared code. The Motorola 68030 has a couple tools to solve this problem: separate supervisor & user states, and a built-in Memory Management Unit (MMU).
The supervisor state has access to all instructions and registers in the CPU. The user state is blocked from running certain instructions that would change system state or CPU configuration. I was already using supervisor state for my kernel and user state for BASIC programs, but it doesn't prevent users from accessing memory that doesn't belong to them.
That's what the the MMU is for.
The MMU takes the memory address the CPU is outputting (the Logical Address) and uses a table to remap it to a new address (the Physical Address). That table can hold additional information about how a particular region of memory can be used, and can be configured by the kernel at any time.
So we can, for instance, set up the table to mark the program code for BASIC as read-only when the CPU is in the user state. Or remap the memory allocated to each user so that it always starts at logical address zero. In fact, there's also nothing that requires the entirety of physical memory to be mapped — so as far as one user program is concerned, the other users' memory doesn't even exist.
Adding MMU support to my Multibasic kernel has been a goal from the beginning. It's a challenge though. The 68k MMU is a very capable, very complex beast. It supports tables that are up to four levels deep, supports page sizes from 256B to 32kB, and can use separate data and code tables for both supervisor and user states. It's something I've struggled to understand, but my work with NetBSD helped show me how to use it.
I decided to use 32kB pages and only map the 16MB of actual RAM I have installed. This allowed me to use a single-level table with 512 entries. During startup, the kernel initializes the supervisor table and a table for each user. When switching users, only the Root Pointer register in the MMU needs to be updated point to that user's table.
I was able to get the table initialization running after a few rewrites. And then realized I had forgotten to update the user initialization routines to point to their new logical addresses. And I was using the wrong table entry marker for the user tables, so the MMU was expecting more table entries instead of reading page descriptors. This got me to the point of the kernel running with the MMU enabled and I could even run a user program or two in BASIC, but if I tried to run three user programs, things got ... weird.
Overlapping exceptions is never a good sign. Or, it usually isn't. In this case I was trying to print out some debugging data for exceptions which takes a relatively long time. Longer than my timer interrupt, in fact … I had forgotten to disable the timer at the start of an exception handler. My timer was doing exactly what it was supposed to, I just needed to stop it when handling exceptions. That fixed the overlapping exceptions, but I still couldn't run more than two programs at a time.
This one had me stuck for a while, but I finally decided to review the NetBSD source to see what I was doing differently. All of my initialization and task switching code looked similar; there was just one thing that stood out to me as being different — NetBSD was clearing CPU cache on task switch and I wasn't. The 68030 doesn't have a large cache, surely that's not the probl…
It was the CPU cache.
Once I added the single instruction to clear cache when switching users, everything ran smoothly no matter how many programs I ran.
Loading from Disk
Having to enter programs by hand each time you want to run one is no fun. It's tedious and error-prone. Sure, it was common four decades ago for books and magazines to publish listings of BASIC programs. But after taking the time to carefully enter in hundreds of lines of code, most people are going to want to save the program to disk so it can be quickly reloaded later.
In my case, I would like to have a few demos, games, and interactive programs available for my exhibit. I do not want to have to type them in by hand every morning. It's time I finally sit down and figure out how to add file loading to EhBASIC.
The EASy68k applications page has a link to an archive of EhBASIC that supports the EASy68k simulator's I/O traps. This was the perfect starting point. All I needed was to add new system calls to my kernel for similar file open, read, and close operations, then update the EhBASIC file handling routines to use them.
I started by copying the Elm-Chan FAT filesystem library I had used for my bootloader into my kernel. It's a great minimal C library for FAT-formatted disks that doesn't take much to get up and running. I was able to write wrapper functions for its f_open(), f_read(), and f_close() functions that worked with my existing system call format.
This went surprisingly well. I found that EhBASIC was trying to re-open the file after each line, so I did have to update my code to keep track of whether it had reached the end of the file yet. That got me to the point where it would read the entire program and echo it to the terminal, but it couldn't run anything. It turns out EhBASIC was using address refused A0 for a line pointer; gcc C convention treats A0 as a scratch register that doesn't normally need to be saved. I just had to be sure to save the register contents to memory before calling the filesystem library functions.

Finally, I can load programs from disk instead of having to type them in manually every time!
Printing Disk Contents
It would be really helpful to be able to see what programs are on the disk. Loading a program requires entering the LOAD command followed by the filename. That's hard to do without knowing what programs are available.
Luckily, the Elm-Chan FatFs library also has functions for reading directory contents. I just needed to add three new system calls for the directory counterparts to the previous file operations.
EhBASIC didn't already have a command for printing directory contents though, I would have to add one. I wrote the function and was able to use the built-in CALL command to run it by the compiled address of the function, but CALL $100178 is not the easiest to remember.
I tried adding a new command, CAT (short for Catalog, a common directory listing command for early BASIC systems), to the command tables. All it would give me was a Syntax Error, however. I eventually stumbled onto the answer for this one — when parsing a line of code, EhBASIC will check if the token for a given keyword is greater or less than the token for the TAB keyword. Keywords less than TAB are treated as commands that can be executed at the beginning of a line; keywords greater than TAB must follow another statement such as PRINT. All I needed to do was move my new CAT command above TAB in the table.
On Incremental Improvement
These three new features go a long way towards making the system something robust enough and usable enough that I feel good about running it as an interactive exhibit for VCFSW this year.
But more than that, these new features bring my little Multibasic kernel just that much closer to a "proper" operating system — it is now a preemptive multiuser kernel with hardware memory protection and the ability to load programs from disk.
It currently does not support saving files to disk (intentionally omitted for now), doesn't support dynamic memory allocation, and can't run any processes other than the eight instances of BASIC. But it is starting to look the part. And I am definitely proud of the work that I have managed to do on this project.
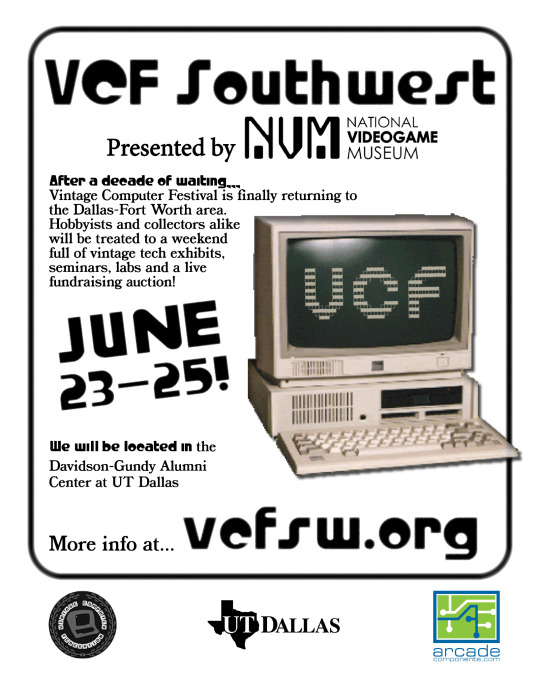
If you would like to see Wrap030 running Multibasic in person, I will be exhibiting it June 20-22, 2025 at VCF Southwest in Richardson, Texas. This will be the third annual VCFSW since it was rebooted after a decade-long hiatus, and the third year in a row that I have had the opportunity to exhibit and volunteer for the show. This year is bigger than ever with over 90 exhibitors & vendors and a full schedule of workshops, talks, & presentations. If you're in the area, I highly recommend attending!
#wrap030#mc68030#motorola 68k#motorola 68030#debugging#vcfsw#vcf southwest#retrotech#homebrew computing#homebrew computer#retro computing#vintage computing#vintage computer festival#vintage computer festival southwest 2025#os development#operating systems#basic programming
15 notes
·
View notes
Text
On Accepting Victories Where They Come
At the end of my last post on getting NetBSD running on my 68030 homebrew computer, I had a (mostly) working root shell prompt in single-user mode.
Well here we are a week or so later and I have ... a (mostly) working root shell prompt in single-user mode.
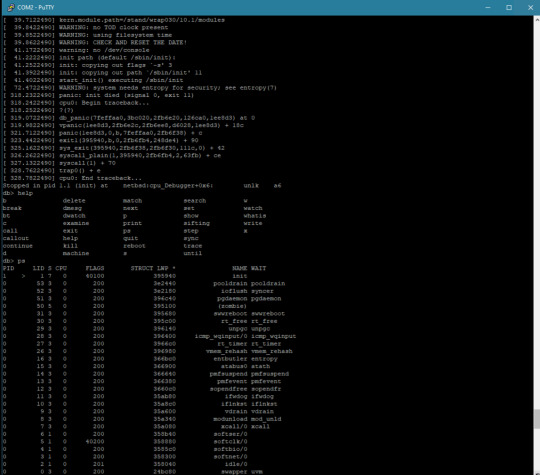
It turns out bringing up a modern operating system is hard.
The first problem was the default collection of init scripts. There are a ton of scripts in /etc/rc.d that are run at startup to finish bringing up the system after the kernel is loaded but before users can log in. These scripts do things like check filesystem integrity, mount disks, initialize networking, etc. Most of the scripts are not relevant to my specific hardware, but I wasn't even getting far enough along for that to matter. I was getting stuck early on in two steps in particular: filesystem checks and initializing /dev/random.
The latter issue there's not really anything I can do about. I can copy a pre-populated entropy file from an existing system, but I don't have the hardware support for random number generation. Frankly I don't need it either, if I'm not doing anything with cryptography like using TLS certificates. So remove that script.
I can check and repair the filesystem much faster on my host machine, so remove that script for now also.
And remove all of those networking-related scripts since I don't have the hardware for networking either.
…
It turns out init scripts have declared dependencies on other scripts. So removing one, especially an early important one like checking filesystem, means editing others to continue without it. It's dependency hell.
So for the sake of just getting things running, I removed everything and wrote my own. There were just a few things I really needed, like mounting the root filesystem as writeable and initializing TTYs.
It took a few tries to get it right, but my init script did eventually run without stalling. This was it, time for it to initialize the terminals and print the login prompt …
init: can't add utmpx record for 'tty01': Bad file descriptor
… That's not a login prompt. That's not a login prompt at all. What does that even mean? What on earth is utmpx?
The error message itself is printed by init. UTMPX keeps record of logged-in users, and it does so using a file, /var/run/utmpx. But is the bad file descriptor error relating to that file or to /dev/tty01?
I was stuck here for a while. I tried everything I could think of to make sure my tty devices were created properly and with the right major/minor numbers and permissions. I finally realized that I didn't get the error if the utmpx file didn't exist. So something was wrong with writing the file, possibly due to never being able to properly shut down and close out the file & filesystem any time it got created. But it's easy enough to just make sure it's deleted by the init script before getting to that point.
It's at this point where I went down a rabbit hole of trying to create a RAM disk for root just to eliminate the possibility of lingering problems with the ATA driver or similar. This proved to be a dead end because the system would only boot single-user from a RAM disk, and I also got stuck in dependency hell trying to get it to compile a RAM disk image that included the actual login binary.
After some more experimentation, I learned that if I had no extra terminals defined in /dev/ttys, then it would at least show the login prompt on the root console, but would never actually log in. Kernel debugger & SIGINFO would show that login was stuck waiting for something. If I did have multiple terminals defined, I would never see a login prompt and it would show that getty, which spawns the terminals, was sleeping, waiting for something.
And that's where I'm stuck. I have no idea what these programs are waiting on, and don't really have any way to check. I suspect it's possible they need those hardware interrupts I don't have, but since I can see activity on the UART chip select lines, I don't think that's the case.
So for now, facing a looming deadline and burnout setting in after a solid month of working on this, I've decided to accept the victory I have and admit defeat where I must. I have a computer that I built myself which can load and run a modern operating system up to the point of a root shell prompt. That is a remarkable accomplishment and I will absolutely accept that victory. There is already so much the machine is capable of just getting to that point. And going from knowing nothing about porting an OS to a new machine to having a running shell in under a month is a victory all on its own.
But, I was not able to get it fully running in multi-user mode on all of my terminals. I will happily accept that defeat in light of the major victory of getting as far as I have.
So, with VCFSW coming up very soon, I've decided to turn my attention back to my multi-user BASIC system. I have a few refinements and new features in mind that I would love to have ready by the show.
#homebrew computing#mc68030#motorola 68k#motorola 68030#debugging#vcfsw#wrap030#vcf#Retrocomputing#NetBSD#homebrew computer
18 notes
·
View notes
Text
On Not Knowing Where to Start
I have made tremendous progress on getting NetBSD to run on Wrap030, my 68030 homebrew computer.
I learned I had completely misunderstood how NetBSD sets up hardware devices (the tag is just a machine-dependent structure to help identify the bus properties the device is attaching to, and the handle is the actual device base address).
I learned how to set up my timer interrupt for use by the kernel for delay() statements & the like, which turned out to be a missing piece in getting serial devices set up (since the driver calls delay() at several points).
I got stuck for days trying to understand why the kernel couldn't mount my disk (endian-swapping strikes again).
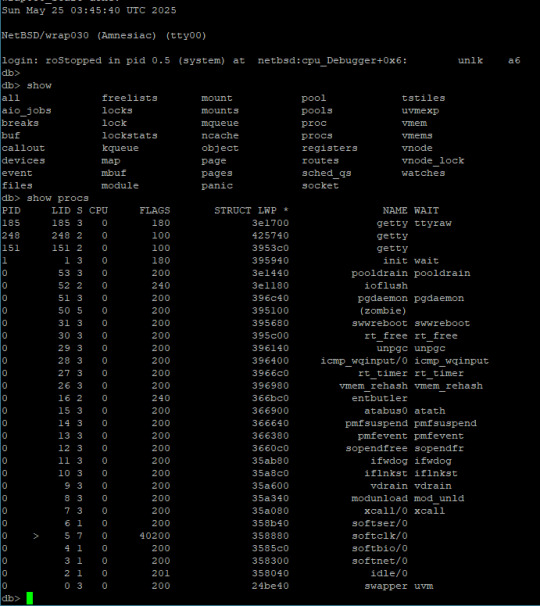
Then finally, the kernel prompted me to enter the path for init, the "mother of all processes" as the code calls it.

... which promptly crashed.
and it crashed again. and again. and again.
I am finally out of the kernel. I have reached process 1. The machine is officially running userland code.
And I am completely lost.
I've spent weeks learning how to customize, build, and troubleshoot the kernel; but I am no longer dealing with the kernel.
I caught some bugs in how I was setting up virtual memory space for user processes (invalid stack address that overlapped I/O space). I swapped out some suspicious RAM. I found that the kernel would die in unexpected ways if it got too large (still don't know the cause, but it seems fine if I just keep it small). Still, init just dies with no insight into what it's doing or how far it's getting into its process.
But I'm in unknown territory here, and I'm finding myself quite lost and unsure where to turn next. I'm sure I'll figure out though. I just have to keep hammering away at it. I've come too far to give up now.
I have a looming deadline I've set for myself. VCFSW 2025 is in just a few weeks and I would love to have this system running in time for the show. It's a long shot — this project is something I've wanted to do for 25 years, and something I've been working towards for 10. I remain cautiously optimistic, knowing full well the scale of what remains.
But look how far I've come.
#mc68030#motorola 68k#motorola 68030#debugging#vcfsw#wrap030#retrotech#vcf#homebrew computer#homebrew computing#retro computing#netbsd#unix#Retrocomputing
17 notes
·
View notes
Text
On Bodging Silly Mistakes
After a few weeks of rest and working on non-homebrew-related projects since getting my 68030 stack running 8-user BASIC, I've circled back around to the project. My goal is to have it ready to exhibit for VCF Southwest 2025 in June.
The first thing to do when picking up an old project is to make sure it still works to begin with.
It did not.
The computer would start up, go through its boot process, and start the user programs. The supervisor terminal would accept and execute commands, but none of the user terminals would accept input.
I could tell the serial data was making it to the machine, because my 8-port serial card has indicator LEDs on the Transmit & Receive signals and they were working as expected. If I held down a key as the system booted, it would print that character a few times before stopping and then no longer accept any more data. So it really looked like the hardware was working. Nothing had changed in software so that wasn't likely to be the issue.
It reminded me of the problems I encountered with reading from disk when CPU cache was preventing the updated disk status bit from being read. The serial card supports asserting the CPU's Cache Inhibit signal, but perhaps that circuit wasn't functioning. There was no change with it connected or not. Time to break out the oscilloscope. The Cache Inhibit signal was always low — always asserted. Cache wasn't the problem because cache was effectively always disabled.
Out of ideas, it was time to break out the logic analyzer. The I/O Read & Write signals on the serial card were working as expected, and it was properly addressing the card & its individual ports. So next thing was to check was the actual data being read from the UARTs.
Letting the logic analyzer run and watching the data fly through, the problem finally made itself known — the UARTs were not setting bit 0 of the status byte to indicate that they had received data. The data was getting to the UART, it just wasn't acknowledged.
But why? And why did it work initially on restart and then stop? And why did it work without issue a few weeks ago? What is different?
What is different, indeed. I have made one change to the hardware since I last ran it — I added a proper watchdog/power-on-reset controller. If the power supply drops below 4.7 volts, it will reset the computer. The power supply I had been using was marginal and was getting caught by the watchdog, so I switched to a proper power PC supply.
So what's different since last time I ran the system is my reset circuit is more effective and the system voltage should be much more stable 5V.
And that's when I realized a mistake I made in the design for my 8-port serial card. The 68k reset signal is active-low and the 16C55x UART reset signal is active-high. I was trying to minimize part count, and didn't have an inverter for the reset signal, so I used what I had on hand — a buffer with an active-low enable signal.

Anyone well-versed in electronics may already see the problem.
When the CPU-RESET# signal is asserted (low), the buffer will set its output, IO-RESET to match its input, VCC (high). That's great, we get a high signal on the output whenever the CPU Reset signal is low.
Except ... what happens when the CPU Reset signal is not asserted? The buffer goes open-collector and doesn't pull the IO-RESET signal one way or the other; it's just left floating.
Floating signals are bad news for digital circuits. Their behavior is unpredictable and subject to environmental noise, power fluctuations, etc. For my IO-RESET signal to function properly, something needs to pull it low whenever the 74'125 buffer is not actively driving it high. A good-sized pull-down resistor should do the job just fine, so I dug through my stock and found a 3.65k surface-mount resistor and bodged it onto the back side of the board.

And sure enough, that fixed the problem!
It is possible that when I was running the system on that marginal power supply previously, the IO-RESET signal was able to stay just low enough to not trigger reset on the UARTs. Or it could have just been different environmental factors.
I'm glad I took the time to test the machine today, and I'm glad this bug came up. It's the kind of bug that could easily have come up when running in a new environment for the first time — such as on the show floor at VCFSW. Far better to run into a bug like this at home with access to all of the tools (and time) to figure it out.
Now that things are up and running again I can continue my testing and setup for VCFSW.
#homebrew computing#homebrew computer#vintage computing#motorola 68030#motorola 68k#mc68030#wrap030#vcfsw
16 notes
·
View notes
Text

VCF Southwest 2025
Starts tomorrow!
Friday, June 20th through Sunday, June 22nd, 2025 at the UT Dallas Davidson-Gundy Alumni Center in Richardson, Texas. This year is bigger than ever with over 90 exhibitors and two dozen talks, presentations, & workshops
I will be there both as staff and exhibiting my Wrap030 homebrew computer project running Multibasic, a minimal multiuser BASIC kernel.
If you're in the area come check it out; it's going to be a great show!
#vcf#vcfsw#vcfsw2025#vcf southwest#vintage computer festival southwest 2025#vintage computer festival#vintage computing#retro computing#retrotech
9 notes
·
View notes
Text
Stepping Backwards a Bit (or 24)
I was looking for a simpler project. My recent 68030 work has been challenging and really pushing the limits of what I can do. I wanted something I could work on, but perhaps where someone else has already worked out the hardest parts.
I find laying out PCBs to be rather relaxing. It's one of those repetitive, almost meditative tasks, like needlepoint or whittling. The kind of hobby where I can turn on some music or a comfortable old TV show, zone out for a few hours, and wake up to this new thing that I created.
Debugging however is very mentally taxing, and the design work required to have a functional schematic to create a PCB for is an active whole-mind prices. So what I really needed was an existing project I could design a board for.
Enter [Grant Searle]. If you're not familiar with [Grant Searle], he has excellent designs for breadboard computers with a very minimal parts count. I studied his minimal Z80 design when I was first starting to build my own computers and learned a lot from it. I highly recommend his work for anyone who is interested in learning how to build their own computer but doesn't know where to start.
I was recently given a Rockwell 6502 CPU pulled from a dead LED marquee. I've never actually worked with 6502, so this seemed like a good time to try building Grant's 8-chip (or 7-chip) 6502 computer.
A few hours later, I had a PCB design completed, gerbers generated, and an order placed. Less than $5 for 5 boards, including shipping. A couple weeks later they arrived in the mail.


I did end up making a few modifications to [Grant]'s design. Instead of a clock circuit made from a discrete crystal and a couple inverter gates, I used a TTL oscillator because I've always found them to be more reliable. I also added support for an FTDI USB Serial adapter chip so that the board can be used with a modern computer as a terminal. And finally, since a PCB is much harder to add new components to relative to a solderless breadboard, I added an expansion header. All of it wrapped up in a compact PCB with lots of helpful silkscreen marking.

I realized after I had ordered the PCBs that the 16kB ROM chips [Grant] used are no longer manufactured or readily available. I have plenty of 8kB EEPROM chips on hand however. Thankfully the OSI BASIC interpreter [Grant] ported to this design fits within 8kB, so I was able to make a few adjustments and re-assemble it to work with the ROM chips I have on hand.
After a small glitch with my EEPROM programmer, it works!

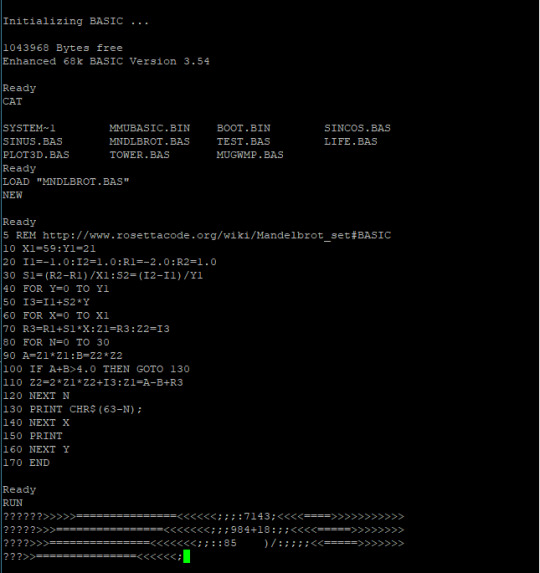
It's quite a change going from my 33MHz+ 68030 to this tiny 6502 running at just under 2MHz. The BASIC text-based Mandelbrot renderer that completes in seconds on my 68030 takes four and a half minutes on the 6502. Not bad at all, considering my bus-impaired 68000 build takes 9 minutes to do the same.
This was a fun little project. It was a nice little break from some of the more difficult projects I've been working on. I have shared the project on GitHub for anyone who might want to take a look.
I hope to have this project with me this weekend, June 14-16, 2024 at Vintage Computer Festival Southwest. I'll be at table 207 in the Tandy Assemble hall, just across the street from the main exhibit hall.
30 notes
·
View notes
Text
VCF Southwest
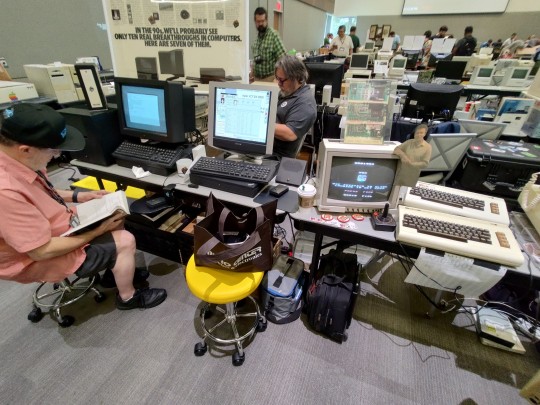
This was the first time I've been able to attend a VCF, and it was the first held in the Dallas area in over a decade. I was lucky enough to participate as both event staff, helping to plan and run the show, and as an exhibitor. It was exhausting, it was overwhelming at times, and I nearly lost my voice by the end of the first day ... But it was also an incredible experience and I really enjoyed it.

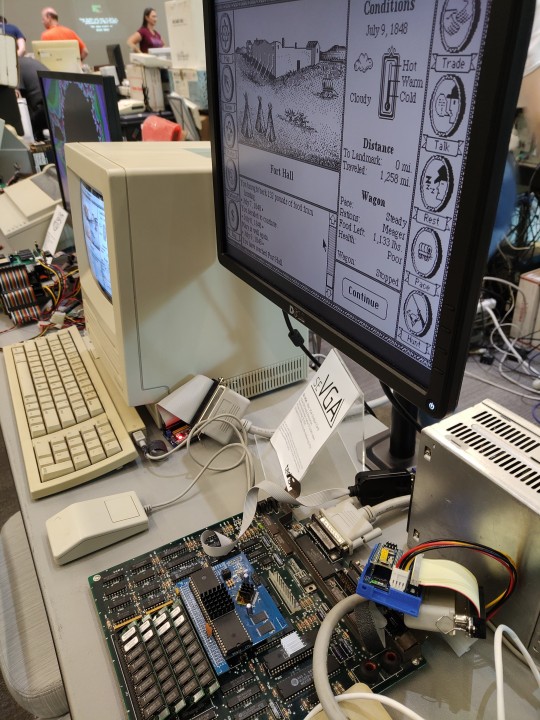
I brought a few of my projects to show off. First and foremost was my Wrap030-ATX project, which I paired with a Wyse WY-30 terminal I rescued from Computer Reset, and had running a demo program for printing names on my recently-repaired Apple ImageWriter II/L. Next to that was my Wrap030 board stack running a Mandelbrot fractal renderer using its 68882 FPU and video generator cards. Then came the Mac SE from Computer Reset I repaired, with my SE-VGA card driving an external monitor, and running Oregon Trail (always a crowd favorite!). Finally I had my Franken-Plus, which sadly suffered a power supply failure early on the first day and sat dark all weekend.
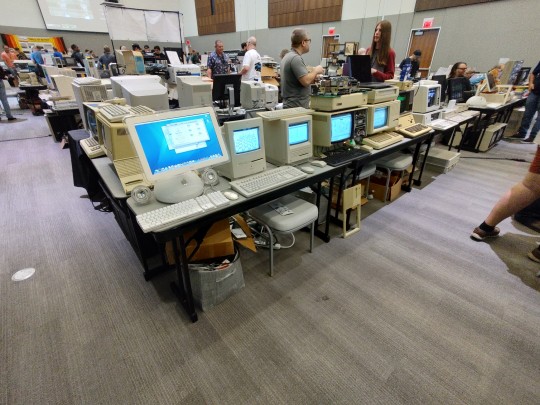
My exhibit was situated just down the row from @commodorez , who won the show's Best Microcomputer award for his "VICs that aren't 20" exhibit of rare and lesser-known Commodore computers. Across from Commodore-Z was Usagi Electric, who won Best in Show for his exhibit of the Centurion, a PDP-11, and his vacuum tube computer.
I had a great time talking to Commodore-Z, @ms-dos5 , Usagi Electric, Nybbles and Bytes, Macintosh Librarian, Retrotech Chris, Kevin & Michael of the Turbo 9 Team, Al Williams, and so many more wonderful people that I couldn't even begin to catch names for.
I also got to go into deep-dive discussions on very specific details about my projects with people who already knew so much more about the components and the tools that I'm using than I do. It's energizing to be around people that understand the work that goes into these projects and appreciate what I've accomplished.
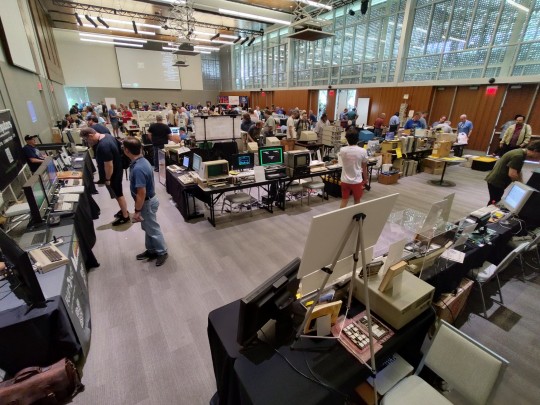

The show was so much bigger than I anticipated. Including staff, volunteers, sponsors, speakers, exhibitors, and attendees, we saw nearly 900 people come through the main hall over the course of the weekend. Seminars were full, with CuriousMarc's presentation on Restoring the Apollo Guidance Computer forming an imposing line for entry well ahead of the scheduled start of the talk. We had incredible community turnout; it was great to see entire families come through with awestruck small children in tow.
There was so much to see and do, so many people to talk to. The entire weekend is just a blur. My brain is still trying to process everything from the show.
One thing does stand out though — an unbelievably generous act from someone I spoke to on Saturday about my homebrew builds and my methods for testing and debugging. This kind soul was so impressed by what I have accomplished without an oscilloscope that he bought one from the VCFSW charity auction and gave it to me on Sunday. I was so surprised I didn't think to even get his name before he disappeared into the crowd. I can't wait to put it to good use, and I hope that what I build with it lives up to his expectations.
Following VCF East earlier this year, Bil Herd said something about riding that high from VCFE, and that prompted him to agree to come out to join us at VCFSW this year. Now that I've experienced it for myself, I understand what he meant. I've been looking though all the pictures and blog posts everyone has been sharing, and catching up on recordings of the presentations I missed. Interest in some of my projects has me thinking about what I can do with them next. It's exciting.
I can't wait until next year.
#vcf southwest#vcf#vcfsw#vcfsw 2023#vintage computer festival#vintage computing#retro computing#wrap030 atx#SE-VGA
115 notes
·
View notes
Text

@techav's exhibit next to my exhibit at VCF Southwest 2023
#vcfsw2023#vcf southwest 2023#vintage computer festival southwest 2023#commodorez goes to vcfsw 2023#commodore vic 20#wirewrap 030
32 notes
·
View notes
Text
Join me at VCF Southwest, the 23rd though the 25th of June, 2023.
50 notes
·
View notes
Text
Wrap030-ATX Remembers
No general-purpose computer will do much without a good amount of Random Access Memory for transient storage of code and data. Now that I have confirmed basic operation of CPU, bus controller, ROM, and serial, it's time to turn my attention to main system memory.
Every homebrew computer I've built to date, including previous iterations of the Wrap030 project, has used Static RAM. Static RAM is nearly as simple as peripherals can be — give it an address, assert a Chip Enable and a Read or Write strobe signal, wait a bit, and release. Done, cycle complete. If you don't need to retrieve some data for a good long while, it's no matter so long as the chip still has power. For a small system, SRAM is reliable and dead simple to use.
The problem with SRAM is it is also very expensive. The 2MB of SRAM I had on the previous iteration of Wrap030 cost over $20 — and it's still far from enough to run an operating system like Unix System V, NetBSD, Linux, etc. This is the reason computers generally use Dynamic RAM for primary system memory.
The difference is SRAM uses several transistors to create a flip-flop for storing each and every bit of memory, whereas DRAM uses a capacitor to store each bit of memory. This reduces manufacturing costs and increases storage density, but does come with some trade-offs. Most notably, the capacitors that store bits in DRAM will lose their charge — and the stored data with it — after a rather brief period of time. This means the DRAM capacitors need to be topped off regularly in a process known as a refresh cycle.
Another complication of using DRAM is the bus interface has been changed to allow much larger storage capacities without the physical chip package growing to absurd sizes. Instead of the chip accepting the entire address at once, it expects to be given a Row address (along with a Row Address Strobe [RAS#]) then a Column address (along with a Column Address Strobe [CAS#]), with myriad specific timing requirements for when each signal should be asserted and deasserted.
In short, DRAM is much more difficult to interface with compared to SRAM, so I've never really gotten around to it.
With one of the long term goals of this project being running a *nix operating system though, I'm going to need the larger memory that DRAM affords. So i made provision for a CPLD to serve as a dedicated DRAM controller on the Wrap030-ATX motherboard and added a couple 72-pin SIMM slots. In theory this setup should be able to support up to 256MB of RAM (if rare 128MB SIMMs should fall into my hands...).
So where do we turn when dealing with complicated timing with multiple modes and a bunch of I/O? Why, Finite State Machines, of course! That bit where the DRAM expects a row address for a little while, that's a state. And the following bit where the DRAM expects a column address is another state. And then another state to make sure the DRAM has enough time to write or fetch the data. The round it out with one last state to tell the CPU data is ready.
What about that weird refresh timing? Well, that's just few more states for the state machine. And then one last "idle" state that waits for a refresh timing counter to hit 0 or for the CPU to start a bus cycle. Laid out like that, the DRAM controller became a state machine with 7 or 8 states, a counter, and an address multiplexer.
The logic actually came together easier than expected. Not completely without bugs of course.
There's this note in the datasheets about startup initialization where the DRAM should not be accessed 200μs after power on, and there should be 8 refresh cycles before the first access. Initially I had built this entire sequence into my logic. It consumed a ton of resources and didn't really work right.
I realized that my reset circuit held the CPU in reset for longer than 200μs on power on, so I was guaranteed that first initialization time. So I removed that startup delay from my DRAM controller logic, and made a few tweaks to the state machine so it could do 8 back-to-back refresh cycles after reset.
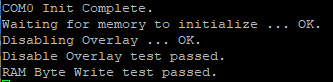
I was able to successfully write to DRAM and read that data back!
That much proved to be the easy part. The next steps were confirming DRAM accesses worked reliably, that I had the order of my byte select signals correct, that I could identify the amount of installed memory, and that all of the installed memory was working. These are programming problems, not logic problems, and I am not a strong programmer. On top of that, not only am I working with unproven DRAM logic, but I'm also using untested SIMMs that I had picked up from Computer Reset.
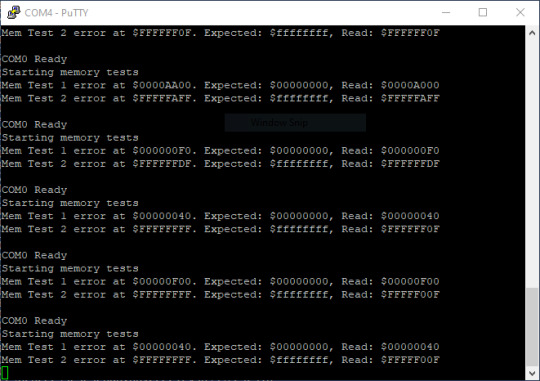
I quickly ran into errors, but was it a problem with my logic? A problem with my timing? A problem with the SIMMs?
I had a large back of 72-pin SIMMs, split fairly evenly between Fast Page Mode (FPM) and Extended Data Output (EDO) types. I tried them all. Some would pass the tests for nearly all addresses but fail at the end. Some seemed to have a stuck bit. Some were just plain bad and gave errors everywhere. It didn't really answer the question about whether my logic was bad, but results were consistent enough for me to think that maybe the logic might be ok.
And then finally I came across a pair of HP-branded 8MB EDO SIMMs that passed a simple write-read test without error ...
... right around the time my serial port stopped working. But the memory test was passing, and I could at least see the serial output on the logic analyzer.
The serial port problem was a bit setback. It had been working but suddenly wasn't. Clearly the UART itself was working, I just wasn't getting anything past the level shifter. Well that at least gave me a starting point of where to look. Sure enough, one of the 12V supply pins was not well soldered. Thankfully a quick fix.
Back to testing memory, I started writing a program to identify the size of the installed SIMM and write a register I added to the DRAM controller to configure the specific geometry of the installed memory. See, DRAM has another lovely quirk — chips of the same size may have a different configuration of Row and Column sizes. For instance one chip may have a 9-bit Column and a 10-bit Row, but the next may have a 10-bit Column and a 9-bit Row, and both are the same size. If the DRAM controller just assumes 12-bit Row and Column (the largest supported by 72-pin SIMMs), then there will be gaps in the memory map that will need to be accounted for in software (using MMU, for example). If the DRAM controller knows the geometry of the installed memory, then it can present the memory to the CPU as one contiguous block of memory.
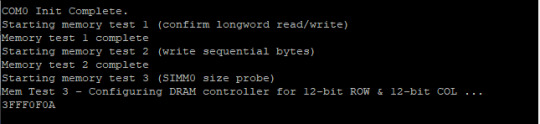
And that's where I found my next bug. The system would just hang when trying to write to that DRAM controller configuration register.
... because I had forgotten to complete that part of the state machine. The result was the state machine would end up in a state for writing to the configuration register, but then it couldn't get out of it. Once I added the missing condition to the state machine logic I was able to correctly identify the geometry and size for my installed memory!
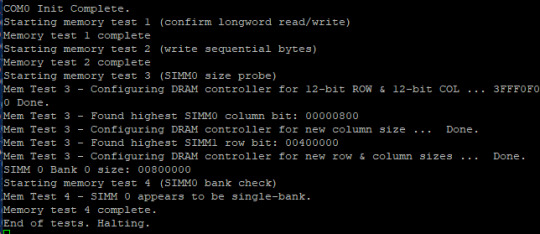
Wow that was long. This has been the biggest, most involved step in the process of bringing up this computer yet. It turns out there are a lot of moving pieces that have to all work together to get the computer running code from ROM and reading/writing DRAM.
Now that I have my main memory working, I should be able to get some software running. I'm hoping to at least have BASIC running in time for VCFSW at the end of June.
#homebrew computing#vintage computing#motorola#mc68030#motorola 68k#assembly programming#motorola 68030#vcf#VCFSW#vcf southwest#verilog#Dynamic RAM#CPLD#troubleshooting#wrap030 atx
33 notes
·
View notes