#Visual guide to lockpicking
Explore tagged Tumblr posts
Visit Tumblr Blog
Explore Tumblr blogs with no restrictions, modern design and the best experience.
Last Seen Tumblr Blogs


Fun Fact
In 2020, Tumblr had 29.4 million users in the US.
Text
10-Level Guide to Restraining Your Darling
A comprehensive guide for a Yandere looking to ensure their Darling stays exactly where they belong.
Level 1: Yarn (Symbolic Restraint)
Purpose: Playful, psychological introduction to restraint.
Yarn is soft, delicate, and practically useless as an actual restraint.
Tying your Darling’s wrists together with a loose bow shows control but allows them to easily break free.
Best used for teasing or playfully reminding them that they could be tied up for real later.
Can also be used for sensory play, like wrapping yarn around their fingers or ankles while whispering possessive words to them.
Level 2: Silk Ribbons & Scarves (Gentle, Romantic Restraint)
Purpose: Comfortable, visually appealing, but still escapable restraint.
Silk ribbons and soft scarves feel luxurious, making the experience more intimate.
Good for beginners because it doesn’t feel too restrictive or scary.
If tied loosely, they can slip out with effort, but a well-tied knot makes escaping more difficult.
Works well for roleplay or as a precursor to more serious restraints.
Ideal for those who enjoy the feeling of being restrained without the actual inability to escape.
Level 3: Leather Cuffs with Velcro (Beginner’s Bondage)
Purpose: Gentle introduction to physical restraint with a safety option.
Soft leather cuffs with Velcro allow for some struggle but won’t cut into their skin.
Can be used to secure their wrists to furniture, keeping them in place for a short time.
A good middle ground between play and serious restraint—can be undone quickly if needed.
Often used in professional settings for patients or beginners in bondage.
Ideal for when your Darling starts getting comfortable with being under your control.
Level 4: Rope (Basic Knot Tying)
Purpose: A step toward real captivity; requires skill but is still escapable with enough effort.
Proper knot tying is essential. Without skill, rope is easy to slip out of.
Best used with strong materials like hemp or cotton rope—soft yet durable.
Can tie their wrists, ankles, or even bind them to a chair or bed.
If done correctly, it limits movement significantly but still allows some circulation.
Rope burn is a risk, so using soft rope or padding is recommended.
If they get access to something sharp, they can still free themselves.
Level 5: Handcuffs (Serious Restraint, But Still Escape Possible)
Purpose: A real restraint, requiring a key or serious skill to escape.
Metal handcuffs add an element of real control.
Most people don’t know how to pick handcuff locks, but it’s not impossible.
Used by law enforcement, meaning they’re designed to be secure.
Can be combined with leg cuffs or attached to a fixed object for extra control.
Double-locking handcuffs prevent tightening and injury.
Still has one flaw: If they steal the key or have lockpicking skills, they can get out.
Level 6: Heavy-Duty Chains & Padlocks (Full Commitment to Control)
Purpose: Serious physical restraint that requires external tools to remove.
Chains remove the risk of lockpicking since a padlock is the only way out.
The weight of the chains adds a psychological impact—escape feels impossible.
Used in high-security environments for dangerous individuals.
If attached to something sturdy, like a wall or a heavy piece of furniture, mobility is nearly zero.
Depending on the length of the chain, they can move a little or not at all.
Can be padded to prevent injury or left bare for a raw, intimidating experience.
Level 7: Padded Restraint Bed (Medical-Style Confinement)
Purpose: Maximum restraint while ensuring comfort and safety.
Used in psychiatric hospitals and high-security facilities.
Soft, but firm straps secure wrists, ankles, and even the torso.
Prevents all meaningful movement without causing harm.
Impossible to escape without outside help.
Can be used for short-term confinement or as a transition to more serious restraint.
Often comes with monitoring features to check on your Darling’s well-being.
Level 8: Soundproof, Lockable Room (Total Environmental Control)
Purpose: Instead of just restraining their body, you control everything.
A locked, soundproof room isolates them completely.
No access to the outside world—only you control what they see and hear.
No sharp objects, no tools, no risk of escape.
If they scream, no one will hear them.
If they behave, you can give them comforts like books or music, reinforcing dependence on you.
Can be disguised as a "safe room" to avoid suspicion if outsiders come around.
Level 9: Sedation & Soft Restraints (Passive Control, Forced Dependency)
Purpose: Ensuring your Darling is too weak to resist, even if they aren’t tied up.
Mild sedation keeps them docile and unable to resist.
Soft restraints ensure they can’t harm themselves or attempt escape.
Creates a sense of helplessness while maintaining comfort.
They become reliant on you for food, movement, and care.
Best used in combination with previous levels for total control.
Level 10: Custom-Built Safe Room or Secret Dungeon (Absolute, Inescapable Restraint)
Purpose: Permanent, escape-proof captivity designed specifically for your Darling.
The ultimate commitment to keeping them yours.
A room designed with no exits except the one you control.
Soundproof, escape-proof, and fully stocked with everything they need.
Can be disguised as a normal room from the inside, preventing any hope of rescue.
Reinforces complete dependence on you for everything—food, entertainment, companionship.
If done well, they may even stop wanting to escape.
Final Notes:
This guide escalates from playful to serious. For a Yandere, the goal is control, not destruction, keeping your Darling safe and dependent while ensuring they know they belong to you.
#male darling#yandere#obslove#yanblr#irl yandere#female yandere#yandere x you#yanderecore#yancore#darling x yandere
51 notes
·
View notes
Text
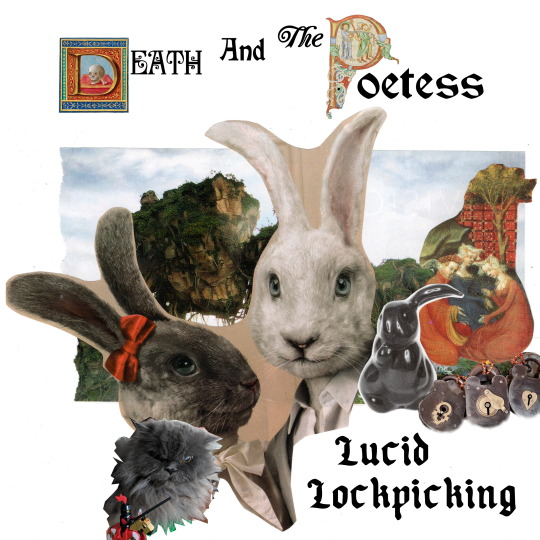
https://deathandthepoetess.bandcamp.com/album/lucid-lockpicking
We’re only two months into 2025, yet it can sometimes feel like we’ve already been insomniac-style awake, sleep-deprived in a much longer, dark, dystopian, anxious fever dream. If you’ve been feeling soul-wearily agitated, or doom-scrolling the news between jagged sleep bursts at night ~ this record is our ‘dirge wave,’ weirdeval musical offering for you. We wish to assist in profound rest, sacred release, and for you to feel safe and bolstered on The Journey.
I had surreal childhood experiences of night time and consciousness; lucid dreaming, hypnagogic light fractal visuals, and sleepwalking. With this EP I hope to share rituals, soothing/trippy tunes, and lightly intended sleep hypnosis induction/guided talk-downs –for grappling with the vulnerability of falling asleep.
There are some ‘Easter eggs’ from the songs my mother sang to me (check the track notes for “Dancing Shoes” and “Wolfy’s Song.”) We were influenced by The Brothers Grimm fairy tales, Ukulele Ike, Johnny Cash, Faun Fables, and the Victorian absurdist artist Edward Lear, whose poem “The Duck And The Kangaroo” we set to music.
On our prior five RPM challenge albums we’ve oscillated between acoustic, folk instrument compositions as well as making extensive use of synth-orchestra embellishments, and psychedelic, digital pedal libraries. With *Lucid Lockpicking* we have aimed for a natural, ‘in house,’ solely acoustic instruments' sound. We hope you enjoy the album, may you sleep deeply whenever you do, and may you wake rested for your adventures, the continued unfolding of The Great Mystery.
-jojo (March 1, 2025)
.
GENRES: Dirge Wave, Weirdeval, Neofolk, Grimoire for Lucid Dreaming, Mind Palace Hacking, Twee Dark Ages, Ethereal Acoustic, Sleepy Vaudeville
#ukulele#death and the poetess#rpm challenge#rpm challenge 2025#new music#new album#guided sleep meditation#flute#classical guitar#marimba#boston bands#dirge wave#spooky music#dark folk#weirdeval#bandcamp#Bandcamp
2 notes
·
View notes
Text

rudolf the red nosed christmas sweater wearing warrior reinbear
some disgruntled former employee of a local game studio discarded this piece of 2015 corporate swag just in time because it is the perfect mug for me to sip my way through the slowpocalypse. this will be my third christmas post divorce and it feels different already. if the theme of the first one was shocked grief, and the theme of the second one was global isolation, then i think the theme this year will be chuck it in the fuck it bucket. i might even get a christmas tree.
#chimeras#mugs#christmas#slowpocalypse#the tragedy of human relationships#pandemic#divorce#chimera#bookshelves#ancient oceans of central kentucky#black friday#buy nothing day#dwelling portably#a visual guide to lockpicking#prisoners inventions#raw spirits#access all areas a users guide to the art of urban exploration#one potato two potato#grimmsfairytales#crows#beer?#how are you supposed to take a picture of a shiny black mug
18 notes
·
View notes
Text
Visual guide to lockpicking
youtube
1 note
·
View note
Text
Guardians of Dreams.
Previous chapter.
Part 2, Y/N's delusions from the starry-eyed man.
"what do you mean it's 3am?!" y/n whisper-yelled down the phone. where had the time gone? a moment ago he had just walked through the door, he hadn't eaten and he wasn't disturbed by his nagging parents. what was going on?"you did graduate primary school didn't you? you know how time works. it's 3am." logan responded, rather sarcastically. "not the time!" y/n snapped at their friend.
"i think i'm going insane" the confused one started to explain "that's the sleep deprivation talking y/n. go to bed" logan responded. "wait!" they spoke up. "what?" "i saw two boys" y/n said. "one was like... a jester kind of, with yellow hair and a moon mask, the second had grey hair and the same mask but he wore a crown" they explained. logan was suspiciously silent.
"i've not lost it, have i?" they asked. again, logan was silent. "l, you there?". again. nothing. "welp, i'm coming over later" he finally said. "you what?" "i'm coming over later" he said again. what. ..? y/n was not just confused, they were a little scared for their own sanity and logan's reasons "my dad won't let you in, it's a weekend" logan seemed to smirk down the phone "oh, i'll get in. don't you remember the spirit house two years ago?" logan reminded the insomniac. they quietly chuckled back "how could i forget? you somehow got yourself over a 8 foot wall. a smooth, 8 foot wall. then was able to lockpick a gate with a thorn branch and let me in"
"also, i have a feeling that your dad will be quite tired later.... all his work and that." the blue boy added, that one confused y/n more. "just get some sleep. if you see them again (or any new ones) just... draw them or something so you can visualize then better, i'll look at them when i come around if you've done any" he instructed. y/n hummed in approval and hung up. they looked around their room, a mess. they should probably clean that.... nah, it'll be fine.
Sleep wasn't a luxury that y/n had that often. they slept every now and again, often out of their own bed, now they're being haunted by bizzare dreams or hallucinations of people they'd never met before. great.
later that morning, y/n slept pretty well until about 7:45. why? their mother would wake them so they could go downstairs while she was at work. y/n's father was still in bed as he normally was, they had no siblings, it was just them. an hour passed and there was noise coming from the kitchen, y/n looked over and saw logan crawling in though the window."what're you doing, you lunatic?!" y/n whisper-yelled at him. logan waved as he closed the window behind him an ld jumped off of the countertop. "i said i was coming over" he said with a smile "i didn't think you were serious!" y/n said out of surprise. "tell me more about these dream boys of yours" the intruder chuckled as he walked into the living room. "well... he looked like a jester, he had a headband with triangles on them, it looked like how a kid would draw the sun. he also had a cresent moon mask on and it made his sunflower yellow eyes stand out more" they stared as they sat down beside their friend.
"and the second one?" logan asked "he had grey hair and red eyes and just like the last one, he had a cresent moon mask, he wore a blue nightcap with yellow stars and he had a cape with stars too. oh! and on the nightcap was a silver crown with a blue crescent moon gem on it" logan took notes for a moment but then stopped "would you like to hear a story?" he asked. y/n looked confused "i don't know if this is relevant-" "it is i promise" logan butted in.
"it's an old story in....my family!, it tells a tale of people, known as "dreamers" people who have a special kind of lucid dream. a dream of a world that contains 7 different people. the king of dreams, lord of nighttime dreams. the daydreamer, lord of day dreams. the guide of dreams, the mystical guide. the gatekeeper of dreams, the protector of the realm. denizen of daydreams, the villager of daydream village. denizen of nightmares, the villager of nightmare town... and finally the imaginary friend. a being that can let people become a "dreamer" all exist in this world" logan explained.
"the two people you've described to me, could be the daydreamer and the king of dreams." he said. "you're making this up" y/n joked. they looked past logan and they saw the yellow jester from last night, standing in the corner.
waving at them.
"logan..?" y/n said, pointing to the jester "what?" logan said, looking over to the corner, he didn't seem to react. "what?" he said again, looking back to y/n "you don't see him?!" y/n panicked "i'm not a dreamer you dunce. you must be. have you met anyone who is like, really handsome and wears glasses and has stars in his eyes?" he smiled, pressing his two index fingers together. they paused and shook their head, logan looked down, almost defeated the jester chuckled "did you just laugh at me?" y/n said almost in horror.
"yes i did my sweet little sunbite!" he giggled, jingling the bells on his wrists "and now you're talking-" ok. that was wierd. talking hallucinations? y/n really did need sleep. "are you sure??" logan said, with puppy dog eyes. "no i havent-!" y/n repeated. the jester laughed a little again "you, shut up!" y/n said with a raised voice, pointing to the jester.
"i think he's talking about himself" the jester jingled. y/n blinked. "but i've known logan for forever" y/n said, voice laced with confusion. "oh moony would love this!" he jingled. logan looked up and took down his hair, letting his blue locks flow.
"you ok L?" y/n asked. logan looked up, and it seemed like he had a galaxy in his eyes, twinkling daimonds fell from his black sockets "yes you have" he said. y/n stood up suddenly. "as cool as this all is, what is going on?!" they panicked. logan looked to the jester who waved at him, he then stood up and approached y/n. "get back logan, or whatever you are" y/n said, edging to the door. both the jester and logan took a step and after the step, y/n was out of the door and running away.
Logan turned to the jester, "sunny? do I always scare people like that?" he asked. the jester shrugged and stood next to logan. "they're a little older than what some may consider imaginable for dreaming. their mind doesnt accept you as something all that fun" he smiled.
"I know that, but i really liked that one."
#Fnafsb#fnafsb au#fnaf sb#fnaf sb au#fnaf sb oc#fnafsb#security breach#sundrop#fnaf security breach#sunnydrop#daycare assistant#cloudy skies character#fnaf#superstar daycare#fnaf oc#fnaf 9#Stormy Night character#Morning Storms character#Eclipse Fnaf#fnaf moon#fnaf moon animatronic#fnaf moondrop#fnaf moonrise#fnaf sun and moon#moon animatronic#moon fnaf#moondrop#moondrop fnaf#moondrop my beloved#My AU
13 notes
·
View notes
Text
So here you will see an early look at the Party system for Grimfel. The avatar cards will be clickable and display all of your team's skills and history once it is fully set up.
The Captain: Is your right hand man. This is the second in command leader of the party. Captains give you certain passive abilities and benefits. For example if you have a scoundrel as a Captain you will be able to master lockpicking through them. They will also benefit your other party members by motivating them and providing strategy. A good captain will help you through being outnumbered against monsters. They will also help your party members level faster. Making a captain will essentially give you the opportunity to build a lifelong bond throughout your game. Though many captains will come and go, if you visit them you can pick right off where you left them. The Team is your combat roles and general party slots. They are the swords, staves and shields throughout your perilous journey. You will be able to level them up and choose specialisations for them to master. They will also have their own inventory and can hold a number of items for you. The social aspect comes into play here. For you may build a team that gets on like a house on fire, or one bad flame may destroy it entirely.

The Guide role is your personal 'tour' guide throughout Grimfel. They have knowledge and have travelled through the perilous depths of the world to provide that. They give insight and open new paths to long lost treasure, secrets and relics of the past. They do not level up and don't participate in combat but will be vocal in dialogue scenes to provide you with an history of a dungeon or present the dangers for you. Some guides you'll absolutely want around just for their sense of humour. Others are disastrous and lead you down danger potentially losing party members along the way. You'll do well to find out if you're being led astray by a bad guide.

And that's it! I'm so excited to show you more but I'm working hard to get this out to you. Thanks for all your support.
https://www.kickstarter.com/projects/grimfel/grimfel-grimdark-fantasy-interactive-fiction-visual-novel
#twine game#interactive fiction#twine#game design#twine sugarcube#fantasy rpg#grimfel#twine wip#video game art#visual novel
4 notes
·
View notes
Photo


Paju
Dragonborn Ysmir, the Dragon of the North Champion of Meridia Champion of Azura Nightingale of Nocturnal Master of the Thieves Guild
They were born in Riften, Skyrim. Their father, Ri’yppy, is the Arch-Mage of the College of Winterhold, and their mother, Daro’ruis, was a member of the Thieves Guild. She disappeared when Paju was a child and their father became distant.
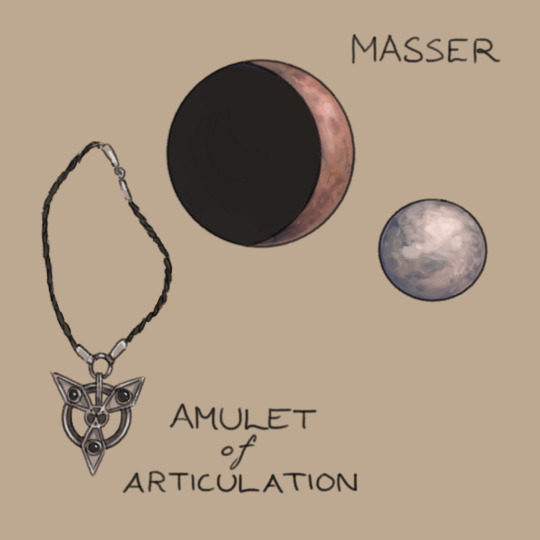
Masser
Paju and their twin sister Pujo have always been very close. Their family occasionally refers to them as “twin moons”, Paju often associated with Masser and Pujo with Secunda
Amulet of Articulation
Paju loved and admired their mother and thus they joined the Thieves Guild in order to find out what had happened to her. Daro’ruis had devoted almost her entire life to the guild and following her footsteps, Paju restored the guild to its former glory and became both a Nightingale and the Guild Master.
Thu’um
Despite their parents’ magical abilities, Paju’s magicka reservoir is almost non-existent. The only form of magic they can use effortlessly are dragon shouts. Their favorite shouts to use are:
Animal Allegiance — Makes travelling through the Rift less time and energy consuming when the bears are your friends. They also use falcons to carry out messages: letters to the family while they are adventuring and orders to the guild while they are at home.
Elemental Fury — While their magicka is low, their stamina is endless. They are always running around and they are fast at their feet, fast at shooting, fast wielding the blade, and fast at thinking. And almost unstoppable when they call wind to carry their attacks even more effortlessly.
Ice Form — They are almost always cold and so ice shouts come more naturally to them. Ice Form allows others to experience their cold hands while also allowing Paju a few precious seconds to escape.
Slow Time — They freeze the flesh, they freeze the time. Slow Time gives them extra time to aim their arrow and lessens their enemy’s time to avoid it.
Clear Skies — While the night hides them, they also love the sun and it’s warmth.
Vampirism
Paju has been a vampire twice. The first time they turned from Alva’s attack in Morthal. The second time Serana turned them so they could survive the Soul Cairn. They loathed themselves as a vampire and even after that because the cure required a black soul. Still, with Serana, they decided that life would be better for them and Paju’s family if they were mortals. Together, they sought the cure. After that, Paju offered her a new community from the Thieves Guild.
While Paju has been able to process some of the traumas and memories caused by the vampirism, they still avoid eating red meat and blood.
Chidna Mine: Paju was thrown into the jail of Markarth after unfortunate events as a vampire. They don’t really talk about that time, but it left them with a Skooma addiction (that their sister Pujo helped them to overcome) and a fear of tight underground spaces. They still keep the shiv they used to break out alone in their office’s locked coffer.
Dawnbreaker
Paju found Meridia’s Beacon from a small and remote cave when they were unknowingly becoming a vampire and weren’t feeling well either mentally or physically. As they picked up the beacon, a ray of light shone to their face through a crack in the ceiling and Paju felt like there was someone watching over them.
A day after they had returned the beacon, they became a vampire. They had already sworn to be the wielder of Meridia’s cleansing light and thus their own undeadness caused an identity crisis. They continued to use Dawnbreaker even though it burned their skin as well and they refused to drink blood, starving themself. Eventually, they no longer trusted their self control around human settlements and the pain started to become unbearable as they withered away. They had to seek a cure, even when it required sacrificing someone’s soul.
Despite the rather traumatizing events, Paju continues to believe that Meridia guards them, and Dawnbreaker lights their steps in dark and tight caverns they nowadays fear.
Letters From a Friend
Paju also believes that Meridia is the one behind the mysterious “letters from a friend” as the “friend” always seems to witness their deeds and the first one of such letters pointed them to Mount Kilkreath.
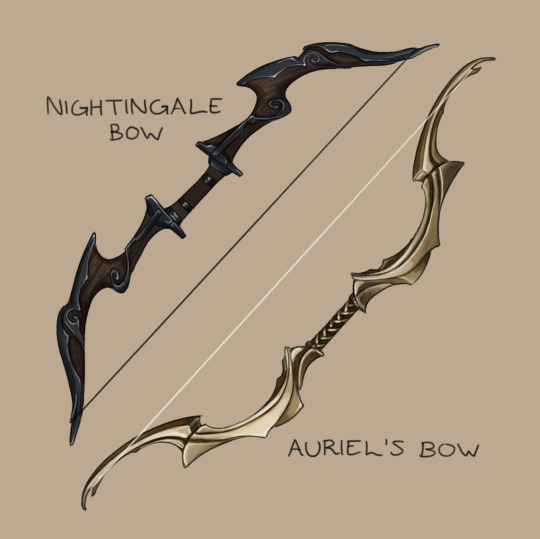
Nightingale Bow
Their mother’s old bow that Paju inherited. Daro’ruis was a legendary sniper whose every arrow was said to hit its target. Paju wanted to be like their mother in this too, but no bow seemed to fit in their hand — before this. Still, they cannot help feeling that they are unworthy of it.
Auriel’s Bow
During the years they spent seeking their mother, Paju also hoped to find their mother’s most treasured artifact: a circlet that seemed to give its wearer a magically accurate aim. They dreamed that it would aid them reach their mother’s level in archery. While searching it, Paju trained every day, completed Angi’s archery trials, and found and earned — not inherited — Auriel’s Bow. They never found the circlet, but although they do not fully realize it, they are more skilled than their mother ever was.
Nightingale Blade
Paju has one bow and one blade for dawn and day, and another ones for dusk and darkness. Through them they honor all their princes. The weapons also visualize Paju’s desire to not live contained within one of the opposites, but rather in both, neither, and in between.
Invisibility
Paju avoids killing people because of their personal morals and the convenience of leaving little as possible traces behind. That is why they have perfected the arts of stepping lightly and blending into shadows. More than that, they often literally disappear into thin air. While Paju is usually terrible with magic, at best they could switch between visible and invisible almost indefinitely. (with Shadowcloak of Nocturnal, the Shadow stone, Embrace of Shadows, and potions.
Jaska
A tame gray horse Paju found roaming Skyrim alone. He was a loyal friend until bandits killed him. The two were reunited when Paju found him again from Soul Cairn.
Tea
or infusions. After Chidna Mine and Skooma, Paju doesn’t really want to touch any addictives — including alcohol. Unfortunately, there aren’t many drinks in Skyrim that do not have alcohol in them. Fortunately, they are resourceful and after reading about the teas of Morrowind, they decided to try to brew their own.
I may write another post where I introduce more of their fave recipes because honestly they were fun to make, but their absolutely favorite is canis root and elves ear tea that is flavored with juniper berries.
Books
Paju’s library is one of the biggest in Skyrim and there is a copy of almost every book available in Skyrim. Collecting books is their passion and they are fortunate enough that their spouse, Nauris, is enthusiastic to help (even though she doesn’t really pay attention what books she brings and whether Paju already owns two of them). Paju’s career choice has also helped them to acquire rarer books that actually weren’t on sale.
More than collecting books, they enjoy reading books while relaxing at home or taking a break with them while travelling. Their favorite books are:
A Dance in Fire series
A Game at Dinner
Advances in Lockpicking
Beggar, Thief, Warrior, King series
Chance’s Folly
The Firmament
Herbalist’s Guide to Skyrim
Incident at Necrom
The Locked Room
Mystery of Talara series
Purloined Shadows
Three Thieves
Vernaccus and Bourlor
Words of Clan Mother Ahnissi
2920 series
Solstheim
After Alduin was defeated, they decided with their wife Nauris and their sister Pujo and her wife Lydia, to leave the Windstad manor they had built in Morthal and move to Raven Rock. Some born in Skyrim and other in Solstheim, with them also came the children of Paju and Nauris — Lydia (II), Jone, Jode, Ruis, Ulfric (‘Lilfrick’) — and the adopted son of Pujo and Lydia, Briar. The twins had also reconnected with their father, who retired and came with them. Together the two couples (occasionally with the help of Ri’yppy) can hopefully live in peace and rise their six children to a happier home than the twins had.
After the world was saved and the twins had found their mother, Paju felt a moment of emptiness with no pressing responsibilities. They continue to run the Thieves Guild with the help of messenger falcons and occasionally travelling to the mainland themselves. They have also started to write a biography of Daro’ruis with the help of their father, and an autobiography of the twins.
Trivia
Their name means ‘willow’
I omitted the “the last” from their Dragonborn title because in this universe they weren’t the only dragonborn. Their wife Nauris, their friend Lydia, and Pujo were all the last dragonborns simultaneously.
I tried to avoid Paju’s death while playing and while I did not succeed 100% I got relatively far. I gave them their scar after the first death (they were ambushed by bandits between Morthal and Dawnstar)
Their eyes are actually so narrow that whenever they are in combat and they squint slightly, their eyes just seem closed. They are just… so mad at mudcrabs…… they don’t want to even see them...
#khajiit#skyrim#Paju#long post#the elder scrolls#tes#the last dragonborn#ldb#more info under the cut! I tried to make photo only version but there's just so many things I want to tell#you are always free to ask more!#I wanted to do an info post for so long but uh oh it takes time and I wan't to spare those of you who are not interested from my rambles#so hopefully the read more link works!
588 notes
·
View notes
Text
Gunnerkrigg's Ether, the Hope and Rage aspects, and Kat's and Zimmy's classpects
Spoiler warnings for the webcomics Gunnerkrigg Court and Homestuck.
In the webcomic Gunnerkrigg Court, there are several characters who are literal deities from human mythology. They interact directly with humans, and are able to provide concrete proof that the myths about them are true. For example, Coyote created the stars, and is able to interact with celestial bodies by plucking them out of the sky. The main character Annie is even able to touch the moon when Coyote demonstrates this, permanently leaving her fingerprint there for anyone who observes it later in the comic. However, there are multiple myths about the creation of the stars, which can’t possibly all be true, and in addition to that, we have a character (Jones) who had existed since before the birth of life on Earth, and can vouch for the presence of the stars from the very beginning. We find out that these deities’ existence is sustained by the Ether, a force which reflects the collective belief of many humans at a time, and can put in place a kind of “dual truth.” I think this is a really cool cosmology, and many works of fiction which I really like use it to great effect. Two which I think are particularly cool are Niel Gaiman’s American Gods and the Tumblr blog @zuckerberg-for-president.
In Homestuck, reality is constructed from twelve aspects, which exist in six complementary/opposing pairs. One pair I find particularly interesting is Hope and Rage. They both deal with faith, truth, and the story’s relationship with the fact that it’s fictional. Hope, with it’s whole “believing hard enough makes it slightly less fake” thing, mirrors the phenomenon of suspension of disbelief. When humans are following a story, we get swept up in it. Even though intellectually we know it’s composed almost entirely of outright lies, we suspend our disbelief and can feel very real emotions about its characters, almost as if we knew them.
Bilbo Baggins is a hobbit. Bilbo Baggins is a human.
Both of these sentences are false. But by reading a story, or even absorbing secondhand cultural knowledge about it, we construct in our minds a universe where one of them has the ring of truth to it. And in Homestuck, the Hope aspect allows that imaginary truth to interact with the real (or, less imaginary?) truth. In Gunnerkrigg Court, the Ether serves the same function.
Zimmy has a unique connection to the Ether. She’s plagued by hallucinations, except that if they get bad enough, other people start to see them, too. And if they get even worse, they become real. As a Mage of Hope, this relationship she has to the Ether makes sense, as it gives her a unique understanding of the magical world, especially later in the comic. But, as a Mage, she of course has to suffer for her aspect.
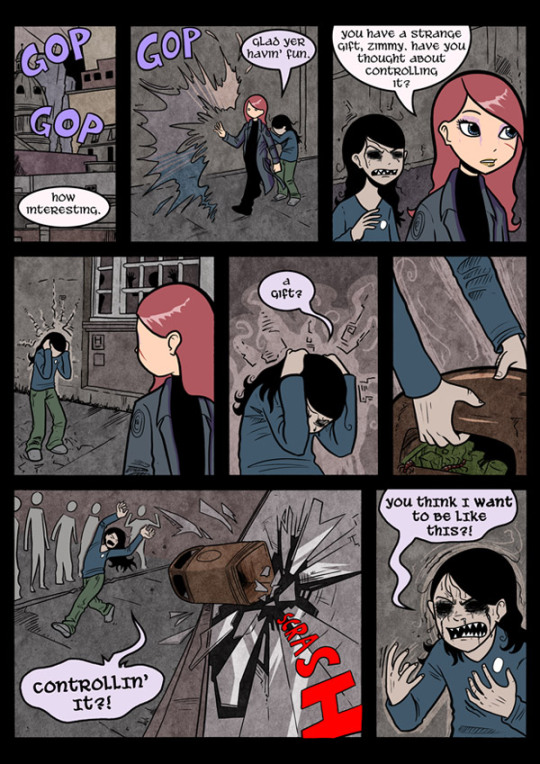
(https://www.gunnerkrigg.com/?p=461)
The guiding/knowing classes are characterized by the narrative pushing them to the background. While they aren’t necessarily irrelevant characters, their biggest impacts will usually be actions taken by other characters. The Mage, though, is an active class, so there’s some tension there.
(https://www.gunnerkrigg.com/?p=2263)
This is very late in the comic, where she’s come to terms a bit with her role. She and Gamma, I think, are very similar to Sollux and Aradia in terms of their placement relative to the rest of the plot. They’re sort of just doing their own thing, only occasionally intersecting with our main narrative, but just begging for a spinoff that focuses on them. Zimmy and Sollux have a lot in common, actually, in terms of general mannerism, though that wasn’t the reason I originally pinned her as a Mage. Her conversation with Annies in the pages surrounding this is what made it click for me.
It’s actually pretty wild how well it all comes together in this conversation. I don’t think a Homestuck fan could possibly read something about the fakeness or realness of magic without getting flashbacks. It almost makes you wonder if it’s intentional.
For more Hope symbolism surrounding Zimmy, look no further than her biggest fan Jack. What a creep, am I right? One really, really big motif in Hope characters is romantic feelings, specifically those that go unrequited or turn sour. So a Mage of Hope, in being directly spoken to and given information by her aspect in a negative way, would only naturally have a stalker like Jack.
The aspect Hope is paired with Rage, as both its opposite and complement. Where Hope tries to fool you into thinking a story is real, Rage tries to remind you it’s fake. Its symbols and motifs include puppets, masks, clowns, face paint, stages and their curtains. All objects which signify what you’re watching is a farce, displayed for solely your amusement. If Hope is the suspension of disbelief, Rage is a Lampshade.
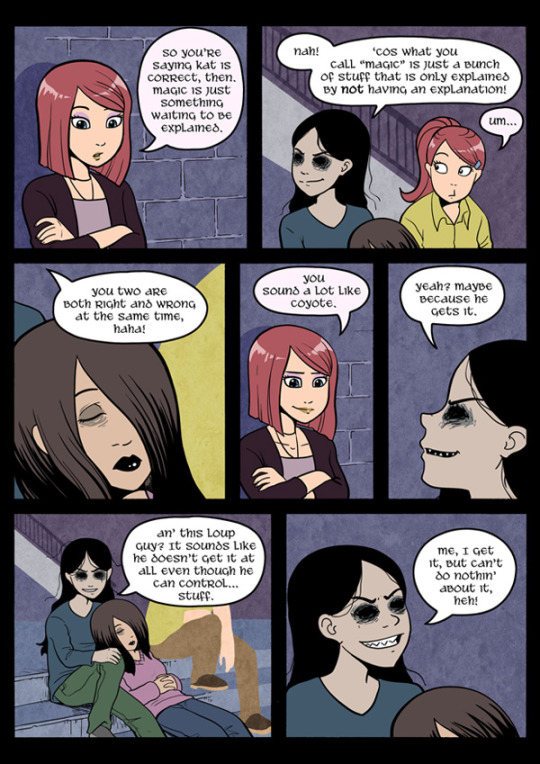
Kat Donlan is effectively the second main character of Gunnerkrigg Court. (Well, she was, until the main character Annie got split in two, taking up the first two spots instead of one.) And, like Zimmy, she has a very interesting relationship to the Ether which I think shows that she’s a Seer of Rage. This is first called to our attention when we visit the Realm of the Dead, and the comic shows it to us from her perspective instead of Annie’s.
(This is one of my favorite sequences in the comic. I’ve selected some more relevant pages in it, but I suggest you ready the whole thing, starting at https://www.gunnerkrigg.com/?p=1304 end ending at the end of the chapter.)
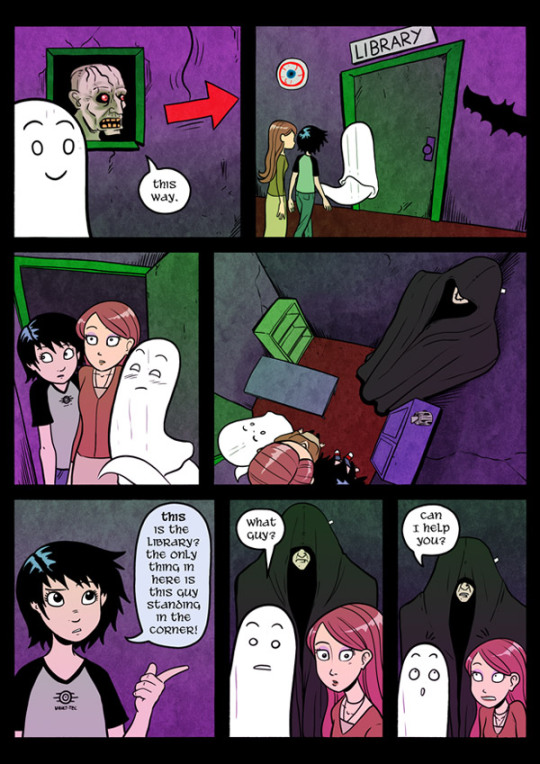
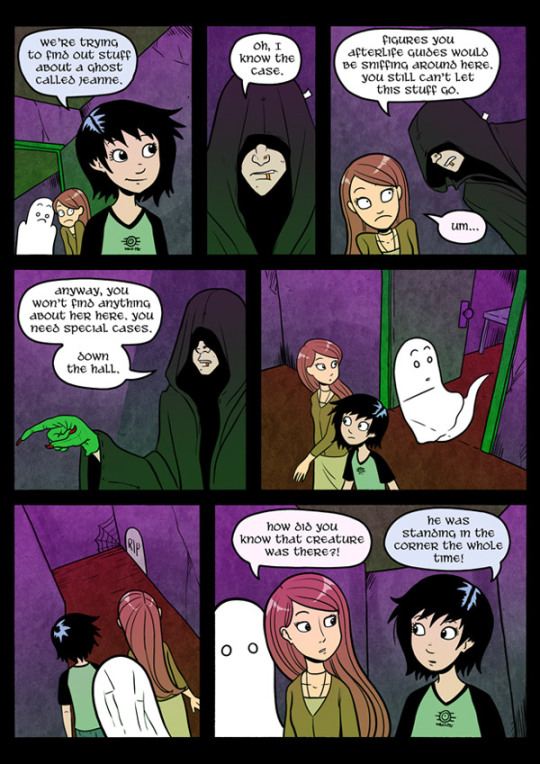
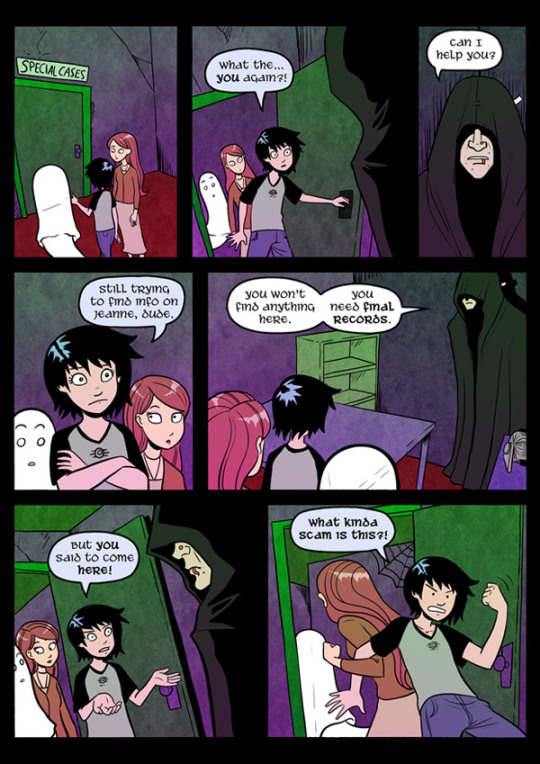
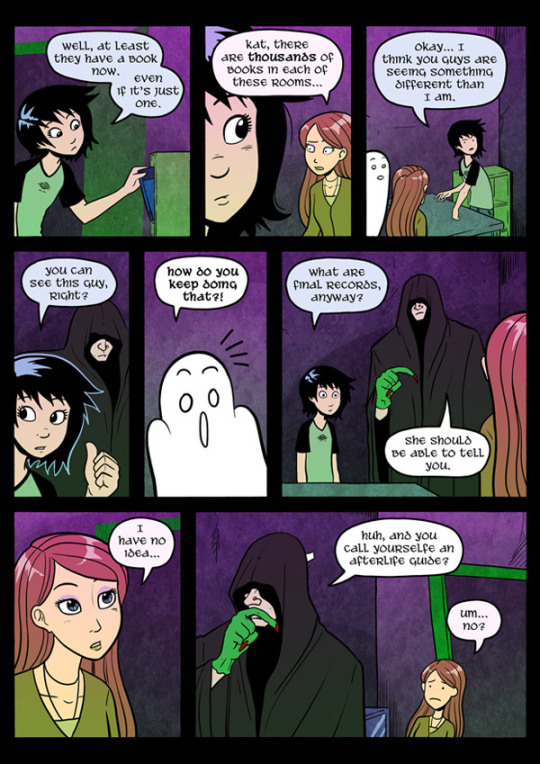
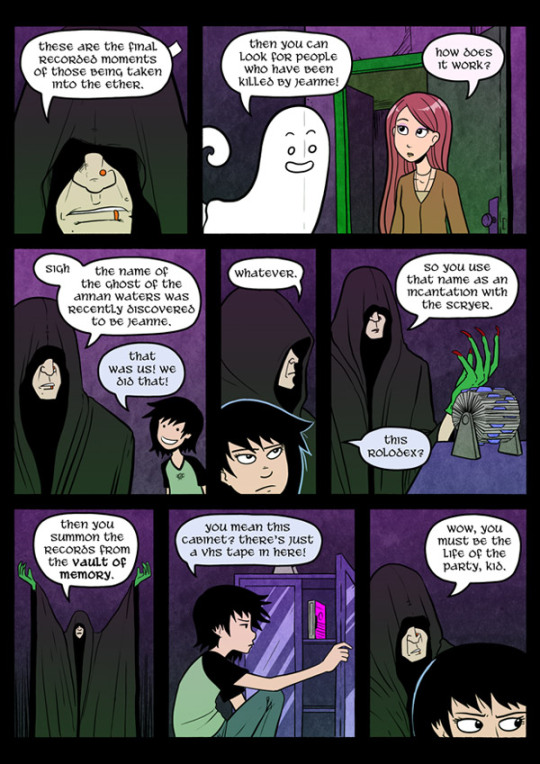
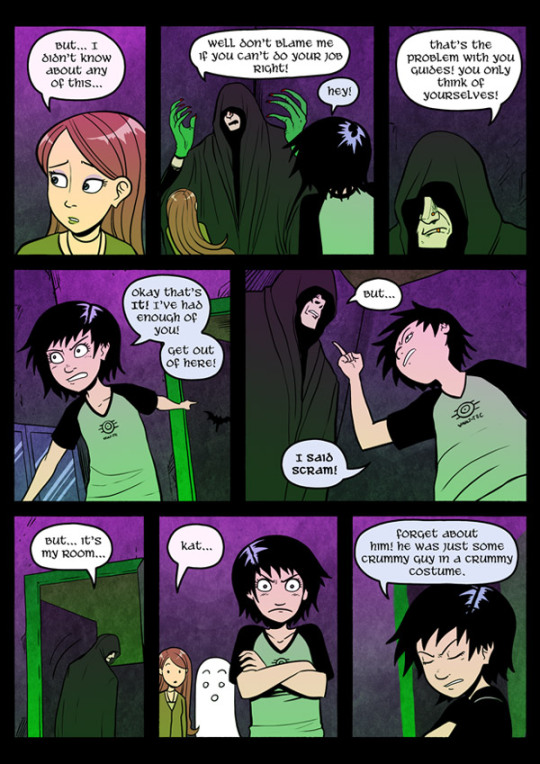
As Mort takes Annie to a massive, mystical library, populated by strange eldritch creatures and terrifying gatekeepers, Kat steps into a shitty haunted house filled with nonsensical beaurocracy and guys in half-assed Halloween costumes. Basically, in a place constructed entirely from this universe’s equivalent to Hope, Kat is perceiving it via the visual language of Rage. Later, when Annie is trying to free an Elf from a massive Etherial labyrinth, Kat is able to go in, see only Annie standing next to the elf locked in some handcuffs, and free him with nothing but an ordinary set of lockpicks. Meanwhile, Annie sees a massive, terrifying entity become part of the labyrinth’s landscape. She can’t even tell it’s not part of the structure at first.
(https://www.gunnerkrigg.com/?p=1756)
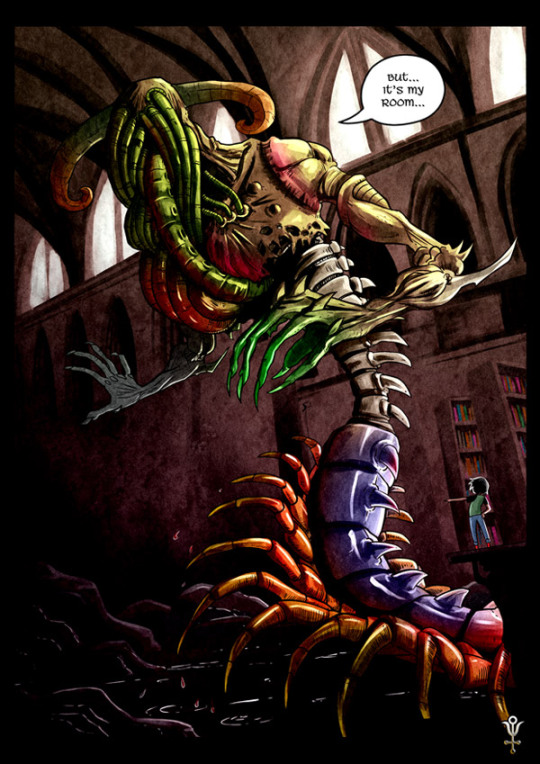
By the way, Zimmy sees Kat as a creature like that 24/7.
In the symbolic language of Gunnerkrigg Court, robots are associated with Rage. First, to enter the robot-only sector of the Court, Annie wears a pair of fake antennae as a disguise, and it works completely - so, by participating in a Rage-associated activity, she is seen as a part of the robots’ world. Second, much later in the comic, she and Kat find a secret basement with some of the first models of Court robots, who begin to fight each other when activated. But they quickly realize the fights are all choreographed, as part of a play designed by Diego - the creator of the robots and likely a Page of Rage - as some sort of wish-fulfillment fantasy. Third, while most robots have no faces, the King of the Robots has a blank plate which he draws on with a white board marker to display different emotional expressions. It’s definitely remeniscent of Rage’s symbols of masks and face paint, especially the two smiling and frowning masks of comedy and tragedy. Finally, Rage is the aspect in the comic most associated with religion, especially if it’s more cult-like, and the robots do form a sort of cult around Kat.
Kat has a great affinity for the Court’s robots. She understands them better than the Court itself, and can even read their language - one designed to be read by machines, which can’t physically be written on a 2-dimensional surface, and which humans shouldn’t even be able to comprehend.
Rage is associated with emotions, and Kat is probably the one who can tell Annie’s emotional state best. Even when Annie has physically splintered all her negative emotions off of herself, in the form of a fire monster, and is proceeding as though she’s completely fine, Kat can tell she isn’t.
When Red (in a fit of Rage) breaks ties with Annie, she justifies it with an unfair narrative which, while technically accurate, interprets all of Annie’s actions in the most uncharitable and bad-faith light imaginable. Kat sees this for what it is - bullshit.
Again, in the Realm of the Dead scene, it’s only because of what Kat can see that Annie and Mort find what they’re looking for.
Basically, Kat uses her knowledge of and unique ability to percieve the Rage aspect to help her friends and guide them to victory.
Please send me feedback, I’d love to hear what people think about this!
#Gunnerkrigg Court#Homestuck#Zimmy#Mage of Hope#Kat Donlan#Seer of Rage#classpect#classpect analysis#long post
8 notes
·
View notes
Text
Top 33 Best Kingdom Come Deliverance Mods []

💾 ►►► DOWNLOAD FILE 🔥🔥🔥 Released in , Kingdom Come Deliverance is a role-playing action game that is set in medieval times. The game is known for delivering historically accurate content and focus on the finer details. The game received great praise from the critics for the extreme realism that it has. However, nothing is perfect without the modding community and their love for mods. So, here we have the top 30 best Kingdom Come Deliverance mods that will bring an entirely different gaming experience. Small mods that target specific areas of gameplay are greatly appreciated because they typically fix niche problems. This allows you to lock in on a crowd and move in to engage instead. The newest version of this mod also allows you to freelook during combat. The Richer Merchants mod increases the amount of wealth of every merchant in the game. But with this mod, you can choose how much merchants will have every cycle. This mod comes in 5,, 10,, and 20, wealth amounts , making it easier to barter and sell. Minor details can affect gameplay greatly, without even you realizing it. The Very Unintrusive Reticle mod replaces the yellow dot in the center of the screen with a more transparent reticle. Oh, how frustrating minigames can get when it comes to lockpicking. The tenacity required to open that sucker up. Now simply unlock any lock in the game without having to go through solving the minigame. However, there is a catch, though. With this mod, you can open any lock instantly if your skill level surpasses the locks. This one is for those who want to go through playing the minigame rather than instantly opening the lock. This is because many want to stay true to the base game and experience it how it is, however, it would require a bit of guidance. The sectorial lockpicking is the way to go then. The mod enables a visual aid that guides gamers on where the cursor should be to open the lock. No more relying on the simple yellow hover zone. How does training and making money at the same time sound? It gives you control in building your character; however, you can take your character to the next level by making it overpowered with this mod. It removes level requirements and completely eliminates training costs. But you can ramp up the costs of training to make the game more challenging for yourself. We doubt anyone will do that. The game has an interactive component to it meaning you can only save the game when you go to bed or exit the game. This also includes autosave as well. This can limit the kind of decisions players can make as the saves are very limited. However, with unlimited saving , you can change all that. However, you do get 30 saved slots, after which you need to overwrite existing save files if you want to save more. But 30 is better than none. With so many items in the game and also in your pockets, it can become very hard to search through your inventory. Although you can sort the items yourself into categories, that would take time and also focus on this particular task, which you can spend on the game instead. Good thing for us OCD freaks is that there is a mod by the name of sorted inventory to do all this for you. The mod helps categorize items in your inventory according to the item type by attaching a prefix to every item. This automatically makes things easier, and players can navigate quickly to what they want while spending more time focusing on the game itself. What makes this game shine is its mechanics and how it pursues realism. The weapons and armors degrade upon use and eventually need to be repaired. Toughen up your tools with durable armor and weapons. The mod has several versions that allow items to be durable almost twice as much, while you can also increase its durability up to times. Do more with your mouse by skipping cutscenes, closing the map, skipping conversations, and more. Having minimal complications in a game and keeping it stylish are a few factors that can make the game more immersive for gamers. Now imagine having both these things in your HUD. Better vanilla HUD keeps things simple by reducing the size of things found in the HUD, such as your health bar, the compass, and more. It even changes the colors of certain elements making the game more interesting as your focus gets diverted to the game rather than such elements. Those that fancy a bit of farming and want to increase their herbalism skills might find that picking up plants will take you to a third-person view, which can at times become more annoying than you would have thought. A Constant third-person view every time to harvest can get you agitated. Hence, we introduce first-person herb picking. As mentioned previously, keeping things to the minimal helps in creating a great gaming experience, and in this case, less intrusive map icons do the job just right. It turns the icons slightly translucent or a bit visible to preserve the ancient-looking map with less intrusive map icons. This can make the viewing map less clustered. It changes most of the icons to almost half of their original size , which is perfect for users playing the game on a PC. Create an immersive environment with no GPS and remove compass mod. The mod will remove you from the map every time you reach out for the map. There are two variants to this mod. The challenging part is understanding the map and finding your way around the game without relying on your location. This is the time where you get to fulfill your Indiana jones expedition dreams. Stealth requires disappearing in the common public while wearing rags and additional clothing accessories like hats, masks, and more. In Kingdom Come Deliverance is a bit different. Get midnight armor set and get an array of gorgeous black robes and gowns to hide yourself in style. Perkaholic will add additional perks to the list of already pre-existing perks that you have in the game. This is perfect as perks added for agility results in much lower damage upon falling while you can get more speed sprinting while being unarmed. During combats, increase your damage while lessening the life drainage you get from being wounded. Perkaholic also adds more accuracy to bow and has a higher chance for critical damage through poisoning. Check it out. There is a lot of artwork for the game out there on the internet, however, the game only features four loading screens. This can get boring and repetitive; hence we suggest more artwork loading screens. The mod introduces new artwork loading screens that will change the boring landscape of the loading screen. It has real concept art and great illustrations that can be found on official sites for the game. Now be able to admire the beautiful scenery and new interesting characters in the loading screen. There are over 23 new artworks that will keep things hyped up. Why can you not use polearms as primary weapons in the game? The polearm that is featured on your character in the game is turned to primary weapons using this mod and introduces an experience bar. Now turn your character into a two-handed combat machine or a single weapon with a shield in your other hand. This can also be very annoying; hence a mod to make bow shots more accurate is bow dot reticle. The mod roads are dangerous for those kinds of gamers as it increases the probability of players running into ambushes during fast travel. It even provides an option whereby gamers can add different enemies, various enemy encounters like merry lads, berserkers, and more. The helmet vision puts you off, and thanks to the modding community, now we have no helmet vision. It does exactly what it says on the tin, removes the helmet vision trading immersion for quality of life. Now you can have your skull safe with a helmet but also have a great vision allowing you to see everything rather than the previous visual limitations when wearing a helmet. The game focuses on being as real as it can get to reality, which can be a bit too much at times. Say, for example, getting out of breath, so your screen starts to blur, and the audio changes too. This can be annoying as well, and that is why we have no stamina visual effects. There are currently three variants in the mod, one that removes only visual cues, other than removes audio cues, while the third one removes both visual and audio cues. Beards have become a symbol of machismo and strength but also a recent fashion trend that has allowed men in beards to look competent and stylish. Henry grows a beard is a mod that enables the main protagonist, Henry himself, to have facial hair. Now you can walk manly across the map and let everyone know that a warrior, strong macho man is coming along, make way. Kingdom come deliverance has some stunning views, and there is no doubt about it. However, to add atmosphere to the entire game, a bit of fog can do the trick just fine. A few things can make kingdom come deliverance more immersive than before, and realistic blood splatters is one of them. As the blood splatters upon the swing of your sword, you feel a rush like never before. You, too, can have that feeling with blood mod — alpha. However, once your weapon cuts through the armor, blood will start to splatter across walls, tables, floors, and everywhere else. You thought your friend nags you a lot in real life, wait till you start bumping into people in this game. The constant bickering and complaining whenever you bump into NPC, or we like to call them the sensitive bunch, can have you riled up. The mod makes it difficult for Henry to make the NPCs angry at him. This might be a great look of a warrior gone through hell, but trust us, sometimes being squeaky clean is the way to go. Yes, but we love pebbles and with pebbles is the best horse mod slow is not something to worry about. Henry face customizations will help you change the appearance of Henry. He might look a bit too bland and boring, so with the beard mod mentioned earlier and this one, you can completely change the way Henry looks. Alter his face, hair, and eyes and make him either too rugged or a sensitive politically correct man in the wrong timeline. Finally, a reshade mod in kingdom come deliverance that will have you overjoyous. Perfection reshade makes really small graphical changes that makes the game look attractive. However, the colors are more vivid while there is heightened contrast. There have been trainer mods for a long time, and cheat is no different. Cheat helps gamers add a console command, which is perfect for those that want to have a bit of fun. Be able to manipulate money while increasing perks, skills, and stats are also added to the new update. Lighten up a bit and enjoy the game as if no moderator was watching you, let your evil side out, and have a bit of fun along the way. Unlimited weight allows gamers to carry as many items as they want without being burdened by them. Many games have added this feature and made their games more realistic by slowing down characters upon lifting too many items. This is a hindrance to those who like to hoard items. Well, guess what? An angel from the modding community was able to remove the bushes block with the collision remover mod. Be able to move freely at will without any hindrance with this mod and feel amazing as you do so. Top 5 Best Minecraft Trident Enchantments []. More Responsive Targeting Richer Merchants Very Unintrusive Reticle Lock Picking Overhaul Sectorial Lockpicking Better Trainers Unlimited Saving Sorted Inventory Durable Armor and Weapons Right Mouse Button Better Vanilla HUD First-person Herb Picking Less Intrusive Map Icons Midnight Armor Set Perkaholic More Artwork Loading Screens Restore Halberds Bow Dot Reticle Roads Are Dangerous No Helmet Vision No Stamina Visual Effects Henry Grows A Beard Volumetric Fog Enabler 9. Blood Mod — Alpha 8. NPC Complains Less 7. Stay Clean Longer 6. Pebbles Is The Best Horse 5. Henry Face Customizations 4. Perfection Reshade 3. Cheat 2. Unlimited Weight 1. Bushes — Collision Remover. Click here to cancel reply.
1 note
·
View note
Video
tumblr
Awesome video about how lockpicking works! Highly advised. Its important to understand how lockpicking works before you start jamming you lockpicks in a keyhole. You need to visualize what you want to accomplish.
#visual#lockpicking#lockpick#lockpick guid#lockpick guide#lockpick instructions#instructions#how a lock works#lock#cylinder lock#how to
0 notes
Text
So an age and a half ago @dearophelia wrote me introductory guides to the first two Mass Effect games, and now that @momsthetic is playing Dragon Age 2, I thought I'd write one for them as well.
This is going to be rogue-focused in places because that's what Rowan is playing, and it's also going to be pretty disjointed because I'm writing whatever comes to mind first.
It's also very long, I apologize if you're on mobile.
CHARACTER SCREEN
When you click on Character from the pause menu (sometimes it's labeled Level Up if someone in your party has unspent attribute or ability points), you can choose to look at the Attributes, Abilities, Tactics, or Resistances of the selected character.
ATTRIBUTES
There are six different attributes, and these all translate to different stats depending on your character’s class.
Strength - increases attack values for warriors, and increases fortitude (resistance to knockdown) for all characters.
Dexterity - increases attack values for rogues, and increases critical hit chance for all characters.
Magic - increases attack values for mages, and increases magic defense for all characters.
Cunning - secondary stat for rogues, allowing lockpicking and trap disarming. Increases damage when you critically hit (and defense for all characters).
Willpower - secondary stat for mages. Increases mana or stamina pool for all characters.
Constitution - secondary stat for warriors. Increases health for all characters.
Under these values you'll see the rest of your stats, which are dependent on the amount of points you have in each of the above categories. These are:
Damage - the amount of damage your character does. Damage itself is the amount of basic damage from your weapon, damage per second (DPS) is the amount of base damage you can do in a second - so if a dagger has 37 base damage and 74 DPS, that means you can attack twice in one second.
Attack - the percentage chance a basic attack from a staff, bow, daggers, or sword will hit the target.
Defense - chance of dodging an attack.
Armor - damage done to you is reduced by this amount.
A good rule of thumb for allocating points is two in the primary stat and one in the secondary stat per level. It's also prudent to put a few into willpower and constitution every few levels even if you're not a mage or warrior respectively, to increase stamina and health (health especially for a dual-wield rogue). There are many ways to get extra attribute points, generally from things called tomes that you can buy in many stores, and you can reallocate these (and abilities) with the Maker’s Sigh potion from the Black Emporium.
ABILITIES
These are combat powers aside from your basic weapon attack. There are activated abilities (diamonds), sustained modes (hexagons), passive buffs (circles), and upgrades (small diamonds). There's somewhere between five and seven trees for each character, some of which are shared with others of the same class and some which are unique.
Player-character rogues have both the dual daggers and archery trees, so the player can choose which to focus on, while the three companion rogues each only have one (the same occurs for warriors with weapon and shield vs two-handed, mages all share the same basic trees except Bethany, who cannot learn from the Primal tree).
All companions except Bethany and Carver have a unique specialization that unlocks at level seven (the Hawke siblings only gain a specialization when they return in the endgame, Legacy, or Mark of the Assassin, where they use the Force Mage and Templar specializations). The unique specializations are similar to the ones given for Hawke, but there are also talents completely unique to each companion.
Hawke gains a specialization point at level seven and again at level fourteen, allowing you to choose two out of the three available. They tend to all be useful for different play styles and storylines, especially on lower difficulties, so choose whichever you find most interesting.
For companions, once you reach higher levels, it tends to be more useful to give them passives or upgrades rather than additional spells/talents, because sometimes the AI gets confused when it has too many choices.
You and companions both have six quick slots for abilities (hold down the right trigger button to access the second set of three). You can also hold/toggle the left trigger button to open the power wheel and use any other powers you don't have mapped.
TACTICS
This is how you set what your companions will do in battle when you're not directly controlling them. They all have the form ‘when [person] is in [situation], do [thing].’ You can set them up to protect themselves, to protect the player character, or any number of things. There are some default tactics settings that provide different combat styles, and you can build off of these or build your own from scratch.
When you're playing on lower difficulties, you don't really have to mess with this very much. Sometimes it can be helpful to set one to drink a health potion when health is too low, but this can cause your stockpile to deplete quickly, and you don't want a nasty surprise where you're the only one left and suddenly you're out of luck.
RESISTANCES
This lists how resistant your character is to certain types of magical and elemental attacks. These can be affected by passives from talent/spell trees, armor, runes, or accessories.
INVENTORY
Your inventory screen can get a bit overwhelming if you're not vigilant about selling things, because you will pick up a TON of stuff, all the time. Three main tips:
1) buy backpacks to increase your inventory space. There are two available during each of acts one and two and one available during act three (five in total), so you can increase your inventory up to 100 by act three.
2) SELL ALL JUNK. You can do literally nothing with this, you don't need it. Every time you going into a store interface, press whatever button is labeled ‘sell all junk.’ And if you run out of space in your inventory when you're running around, this is what you want to destroy to make more space.
3) sell the armor for the other classes that aren't yours. You only want to be wearing whichever armor is for your class (indicated by which stats are required to equip it), because the bonuses will help you more. Your companions can't change armor, so don't worry about trying to give them other pieces.
ARMOR
As your companions can't wear any other armor, the armor section of the inventory screen is for Hawke alone. You can equip a helmet (there's a setting to ‘hide helmets’ in your options, so you can equip a helmet for bonuses but not have to see it), chestpiece (which includes pants, ignore Bioware’s inability to give useful names), gloves, and boots.
Always aim for more stars. Two stars is the basic equipment for your level, but there is almost always something better than two stars available to you. There is a unique armor set in each act, one for each class, and these tend to be the best pieces.
Runes can be created at Worthy’s shop in the Hightown Market or in Hawke's house/estate, and added to your armor at Sandal’s enchantment apparatus (in the courtyard near Bartrand in act one, in the Hawke Estate in acts two and three). These add damage or protection from certain elements, and the amount they provide is proportional to the level of the gear you put them on (save good runes for good gear). These can't be taken off once used, only replaced.
There are armor upgrades for each companion to be found throughout the game, giving them things like extra rune slots, more health, extra attack, or other buffs. Merrill, Fenris, and Isabela's armor visually changes if they're romanced (and Merrill's changes names), Anders’s changes if you do his act three quest Justice, and Varric's will change names if you do his act three quest Haunted. None of the visual or name changes have any effect on the properties of the armor.
WEAPONS
All characters except Varric need to be equipped with new weapons as you level up (Bianca levels up automatically). Again, go for more stars.
Damage tends to be more important than DPS, because your spells and talents are calculated off the base damage of your weapon. Daggers are faster than bows, and swords are faster than axes are faster than hammers/mauls.
The rarity chart for colors goes copper > silver > gold > purple > green, with copper being the most basic gear and green being special gear you only get with DLCs. The higher rarity the item, the better bonuses you get.
Some items are most useful to a specific character, others are useful for a variety (i.e., a staff that increases blood magic helps Merrill more than it helps Bethany or Anders, but a staff that gives extra mana will help Bethany or Anders more than Merrill once she’s learned Blood of the First).
Keep something like the Thrice-Bound dagger in your inventory even once you're over-leveled for using it as a weapon, until you've found better gear with the ‘bonus to lockpicking’ buff, and equip it only when you're trying to unlock high-level chests/doors. You absolutely want that buff, because it greatly lowers the cunning needed to open high-level locks.
Runes can also be added to weapons - same rules and restrictions as for armor.
ACCESSORIES
This will get unwieldy VERY quickly. Each character can equip a necklace/amulet, a belt, and two rings. These provide stat boosts of various kinds, and they tend not to be restricted to certain characters (there's a ring restricted to Merrill and an amulet restricted to Isabela in the main game, and some others in the DLCs that are restricted, but not many).
Try to keep up with this, and equip something for every character you have. Sell everything that's two stars or less, you will find so many of these that there's no point at all in keeping the lower level ones.
POTIONS
You can't use potions from the inventory screen, but you can see how many of each you have. To use them, hold the left trigger button (you can reset this to toggle on and off in your options menu) and go into the potions menu.
COMBAT
Don't let yourself get backed into a corner, especially as a dual-daggers rogue. Backstab and Evade are useful for getting out of tricky situations, but you don't have control of the direction you move, so you can unintentionally back yourself even further into a corner.
Kill enemy mages first if you can, especially blood mages and saarebas, as well as bigger demons like revenants, arcane horrors, and pride demons. Enemy mages will often have a bubble pop up around them that makes them invulnerable, so focus on the other stuff when this happens, then go back to the mage. They often also have area of effect (AOE) attacks than can get you stuck and do a lot of harm. Try to watch out for assassins and shadow warriors as well - they can stealth, and they'll sometimes suddenly pop up right next to you and take a shot while you're not paying attention.
Remember you have mana and stamina potions that can give you enough for another spell/talent or two in long battles.
Mages can stun targets, rogues can disorient them, and warriors can make them brittle - this keeps them from moving around, makes them forget which target they were attacking, and can make your life a lot easier (just try to avoid having it happen to you!). You can also trigger cross-class combos when enemies are primed with one of these - Fist of the Maker (from the Force Mage tree) does more damage on brittle enemies, for example.
Each class has a few ‘get away from the mess’ powers. Mages have Mind Blast, rogues have Evade and Stealth (and Shadows have Decoy), and warriors have Stonewall. Mind Blast and Evade can stun targets when upgraded - don't forget to check out your upgrades!
QUESTS
Quests are listed in your journal in the pause menu. They're broken up into Main Quests, Secondary Quests, Side Quests, Companion Quests, and Premium Content. Main quests are what you have to do to progress the story, and secondary quests give more background information on the main quests. Side quests are generally things like fetch quests, where you pick up some random item someone's lost and bring it back to them. Companion quests are just what it says on the tin - these tell the story of how your companions fit into Hawke’s life and into the events going on around Kirkwall. Premium content is anything that comes from DLC.
A lot of quests are bugged. Check the wiki if you're worried - there's a section for bugs on each page that has them. Most of these are not game-breaking, they'll just prevent completion of that specific quest, but it's always good to check, because they can interfere with triggering other things later.
CHARACTERS
You recruit Aveline, Varric, Merrill, Anders, and your still-living sibling through main quests. Isabela is only recruitable after finishing Anders’s Tranquility quest and going back to the Hanged Man. Fenris’s recruitment quest Bait and Switch triggers from a letter you get at Gamlen’s house. Sebastian is only recruitable if you have the Exiled Prince DLC, and even if you do his quest Duty in act one, he won't join you until act two. Tallis is a required temporary companion during the Mark of the Assassin DLC.
Each companion has a ‘home base’ where they wait when they're not with you. This is where you have to go to trigger their companion quests. Be careful - these won't always show up on the choose-a-destination screen, so make sure to check your journal to see if you have any open. The companions also sometimes have things to say outside of quest, especially Isabela, so going to talk to them can be fun even without a quest.
There are approval ‘crisis points’ for a few of the companions, where your choices can lead to them leaving the party for good. Isabela will always leave the party, but if you've done her act two Questioning Beliefs quest she'll return. Merrill, Aveline, Fenris, and Sebastian can also leave during the endgame quest The Last Straw, based on who you side with and your decisions about Anders.
Approval is not on an ‘approval vs disapproval’ scale here, it's on a ‘friendship vs rivalry’ scale. Rivalry is conceptualized as ‘they don't like you, but they respect you.’ Quests that trigger based on friendship or rivalry will trigger regardless of which path you choose, it's based on amount of either (act two Questioning Beliefs triggers at 50% friendship or rivalry, act three Questioning Beliefs and Merrill, Friend or Foe trigger at 100% in either direction). The quests will be slightly different based on which path you're on. Each non-sibling companion also has a buff for themselves or for Hawke when you reach 50% in either direction. You can also romance characters along either the friendship or rivalry path (I believe Isabela's romance may not complete if you're on the rivalry path, however).
Merrill, Isabela, Fenris, and Anders are all bisexual, and it is possible to romance multiple characters in one playthrough (but you can only complete the romance with one, and you must break up with the first before the second will trigger). Sebastian is only romanceable by female Hawke, and in order to trigger his romance you must not have flirted with anyone else in the whole game. Aveline and Varric also have a few flirt options, but they are not romanceable.
The party I usually run is two rogues, a mage, and a warrior. There’s no real ‘best’ party, but rogues can do a lot of damage and have higher crit chances than do other classes, so they’re often a pretty good ‘standard’ (and also they’re the only class that can unlock stuff). Take whoever you like on lower difficulties.
DLC
The Black Emporium is free, and it includes the Mirror of Transformation, where you can change your face and such if you don't like how it turned out. Definitely worth it.
The Exiled Prince allows you to recruit Sebastian, who's another romance option for female Hawke. You also get a few extra missions and some high-level items.
Mark of the Assassin has a temporary companion, Tallis, and some extra missions and items. You're also allowed to take Hawke's sibling on this DLC even in acts two and three, provided they didn't die in the Deep Roads. There's unique gear for whichever companions you bring along (except Merrill).
Legacy sets up the bones of the plot in Inquisition. Again, you're able to bring your sibling along, and there's some unique gear for Hawke.
I've played the first three and enjoyed them all a lot. I haven't done Legacy yet, and I've heard that having both Legacy and Mark of the Assassin can cause save file corruption (there seems to be a workaround involving destroying all gear found in the DLCs).
WARNINGS
General excessive blood warning for whenever Merrill uses blood magic in cutscenes (most prominently in the cutscene during her recruitment quest Long Way Home where she opens the magic barrier to get to Sundermount).
Extreme body horror warnings for the act two quest All That Remains and the act three endgame The Last Straw.
Kidnapping warnings for All That Remains and the act three quest Best Served Cold.
Also parental death warning for All That Remains, sibling death during the prologue, and potential sibling death during The Deep Roads Expedition. Mention of familial death in act one/two quest Duty with The Exiled Prince DLC.
SOOOOO that’s about it! If anyone has any thoughts, feel free to share them, but remember this is just how I play and how I’m telling a friend to play - we aren’t out there to be The Best, we’re just here to have fun.
2 notes
·
View notes
Text
Best Steering Wheel Locks for Better Vehicle Security
Best Overall
Disklok
Read Review
Hardened steel construction
Tamperproof lock
Hardened steel construction
Tamperproof lock
View on Amazon
Read Review
Budget Pick
The Club 3000
Read Review
Double hook design
Tamper-resistant lock
Double hook design
Tamper-resistant lock
View on Amazon
Read Review
Best for Trucks and SUVs
The Club 2100
Read Review
Universal fit
$1,800 guarantee
Universal fit
$1,800 guarantee
View on Amazon
Read Review
Bottom Line: Disklok Is Serious about Security
Most of the steering wheel locks we researched had the same design problems: they could be defeated with a well-placed kick, a sharp hacksaw blade, or an experienced lockpicker. The Disklok was the only car steering wheel lock with a design that withstood these common auto theft techniques.
Its steel shell has no obvious weak points that say “Cut here!” and its lock is so resistant to picking that even Disklok owners report having to do some key wiggling to get it to unlock (which is actually an intentional safety feature). Its weight and size make it less convenient to carry with you than some of the other locks we studied, but it outperforms the competition when it comes to security. If you want a lock that’s more than just a deterrent and gives you real car theft protection, Disklok is the clear choice.
Here Are the Best Steering Wheel Locks of 2020
Disklok: Best Overall Steering Wheel Lock
Club 3000: Best Budget Pick
Club 2100: Best Steering Wheel Lock for Trucks and SUVs
Compare the Best Steering Wheel Locks
Price Construction Materials Lock Type
Best Overall
Budget Pick
Best for Trucks and SUVs
Best for Small Vehicles
Best Dual Purpose
Disklok The Club 3000 The Club 2100 The Club CL303 Monojoy $159.98 $19.99 $54.99 $16.99 $25.99 Hardened steel Chromoly steel Chromoly steel Chromoly steel Hardened steel, aluminum alloy Spinning steering wheel cover Double hook bar Single hook bar Steering wheel to pedal Single hook bar View on Amazon View on Amazon View on Amazon View on Amazon View on Amazon
{ "@context": "http://schema.org", "@type": "Table", "about": "" }
Data effective 12/17/19 10:42 a.m. MST. Offers and availability subject to change. See full disclaimer.
Best Steering Wheel Lock Reviews
Disklock: Best Overall
View on Amazon
When it’s not on your steering wheel, the Disklok looks (and feels) kind of like a Frisbee the Hulk might use, but on your wheel it looks more like an impenetrable steering wheel lock fortress. It weighs about as much as a bowling ball (11 lb.) and it operates like a childproofing doorknob cover. You lock it in place over the steering wheel, and if you try to turn, the Disklok spins freely, making it impossible to steer. It takes two hands to put it on, but it’s easy to lock and doesn’t require you to ratchet up the tension for a tight fit like club-style locks.
The Disklok isn’t without its weaknesses—we saw a guy with a metal grinder cut it off in about three and a half minutes. But in car theft time, that’s pretty long, and using power tools would be noisy enough to draw quite a bit of attention. Because the Disklok is different from most normal bar-style steering wheel locks, it takes longer to figure out, so it’s a good deterrent. With manual tools, it would be impossible to remove. Just make sure you select a Disklok device that’s the right size for your steering wheel, because if it’s too snug it won’t work correctly.
Pros
3 keys included
Tamperproof lock
Hardened steel construction
Unique design
3 different sizes
Cons
Non-universal sizing
Bulky construction
The Club 3000: Budget Pick
View on Amazon
The Club 3000’s bright yellow plastic coating makes it easy for a thief to spot, and its double hook design makes it hard for a thief to remove. It was the locking device’s twin-hook design that put it in our top three, because the two hooks automatically make it twice as hard for a would-be thief to cut it off your steering wheel. The reinforced housing around the lock helps protect against drilling, but someone with lockpicking skills can easily pick the wafer lock and remove the device. The lock can also be defeated by sheer force—a hard hit or kick can bend the chromoly steel tubing enough to remove it.
Fortunately, The Club 3000 manufacturers offer a guarantee of $500 toward your insurance deductible if the device fails, but you have to get through quite a bit of red tape before you see the money. Still, with a price tag of around $20, you can get a highly visual theft deterrent without having to spend a lot of cash.
Pros
Twin hook design
Bright yellow color
Universal fit
Reinforced lock housing
$500 guarantee
Cons
Wafer lock
Fallible materials
The Club 2100: Best for Trucks and SUVs
View on Amazon
If you drive a larger vehicle and yellow isn’t your color, you may want to try the red Club 2100 on for size. Just like its Club cousins, the 2100 uses hooks on either end and a steel ratcheting system to lock on to your steering wheel. The clubbed end extends out to prevent a would-be thief from turning the wheel.
A determined thief can hacksaw through the chrome-covered ratcheting column in the center or drill through the lock to remove it, but The Club is still a good visual deterrent. We like the universal fit this device offers and the $1,800 deductible reimbursement guarantee from the manufacturer. Unfortunately, the guarantee is good only up to a year and all the paperwork has to be done via snail mail.
Pros
Coated steel bar
Universal fit
$1,800 guarantee
High visibility
Cons
Mail-in guarantee
Fallible materials
More Steering Wheel Locks That Are Worth a Look
The CL303: Best for Small Vehicles
The CL303 works a little differently than the other Club products on our list. One hook loops around your steering wheel while the other hooks onto a clutch, gas, or brake pedal. Once you get the steering wheel locked, turning the wheel or pressing the pedal just tightens the lock.
It’s a unique design that might thwart a thief, but it’s not as easy to attach as a steering wheel locking device, and it doesn’t fit larger vehicles. If you do go with this design, make sure to attach it with your steering wheel in the lowest position. Also, keep some graphite on hand to lubricate the locking mechanism as the lock can stick and the key won’t turn.
Monojoy: Best Dual Purpose
We like that this Monojoy steering wheel lock is designed with a pointed end that can be used as a safety hammer to break glass in case of an emergency. The unique lock and keys on this device are another plus: the lock spins if someone tries to drill it, and the keys have a wavy pattern to them that makes them hard to duplicate.
The insides of the hooks have a foam grip to prevent the lock from sliding. Even if a car thief cut the steering wheel, it would still be hard to slide the Monojoy lock off. Keep in mind that this lock isn’t as large as some of the others on our list, so it may not work with trucks and SUVs.
Car Theft Prevention Tips
Steering wheel locks are just one element of car safety; there’s more you can do to avoid getting your car stolen. Park in well-lit, high-traffic areas, lock your doors, and use remote car starters only when you’re in sight of your vehicle. Taking precautionary steps ahead of time like installing devices such as GPS trackers and kill switches can make all the difference in stopping car thieves and getting your vehicle back right away.
Steering Wheel Locks FAQs
Isn’t my steering wheel locked without the key in the ignition?
Most cars with power steering have a device called an ignition lock cylinder that locks the steering wheel in place unless your keys are in the ignition. An experienced car thief will know how to remove the ignition lock assembly (even without a key) and unlock the steering wheel, so an additional steering wheel lock is still a good idea.
Where should I keep the key to my steering wheel lock?
We recommend keeping the key to your lock on a different key ring than the one holding the keys to your car. That way, if your car keys get stolen, the thief might be able to turn your ignition switch, but they won’t be able to unlock your steering wheel to drive away.
How should I care for my steering wheel lock?
If possible, keep your lock in a dry place when you’re not using it so it won’t rust. If you want to store it under your seat or on the floor of your car, wrapping it in a small towel or keeping it in a case will protect it from moisture. If the master lock starts sticking, use graphite rather than a liquid lubricant, since liquid oil-based lubricants can attract dirt and debris and gum up the lock even more over time.
Related Pages on SafeWise
7 Ways to Avoid Getting Your Car Stolen
Best Car Alarm Systems Buyers Guide
The 5 Best GPS Vehicle Trackers
Dealing with a Car Break-In? Here’s What to Do
The Best Aftermarket Remote Car Starters
Amazon.com list price as of 12/17/19 10:42 a.m. MST. Product prices and availability are accurate as of the date/time indicated and are subject to change. Any price and availability information displayed on Amazon at the time of purchase will apply to the purchase of this product. Safewise.com utilizes paid Amazon links.
Certain content that appears on this site comes from Amazon. This content is provided “as is” and is subject to change or removal at any time.
The post Best Steering Wheel Locks for Better Vehicle Security appeared first on SafeWise.
Article source here: Best Steering Wheel Locks for Better Vehicle Security
0 notes
Link
via Infographic.tv – Number one infographics & data Data visualization source
0 notes
Text
Kingdom Come: Deliverance Review: Fantastically Frustrating
Kingdom Come: Deliverance has arrived after pulling in over $1 million in 2014 via crowdfunding on Kickstarter, and now those that supported have an opportunity to see what grew from the many seeds they planted. WarHorse Studios’ major debut is a great game that doesn’t entirely break under the developers’ ambitions, but surely does bend.
Kingdom Come: Deliverance is a loosely accurate tribute to medieval Europe and, when it comes to the dev team’s desire for fun gameplay based in realism, it executes in more ways than it doesn’t. The combat is challenging whether you focus on melee or ranged and I cherished the deep physics system is as I layered my armor and watched the attacks of enemies glide off of me later in the game. Fighting is complex and, no matter how skilled I felt I was, I always ran the risk of returning to a save point if you’re not geared up correctly.
Ah, the save point. Many frustrations found in Kingdom Come: Deliverance can be summed up by the way the developers address saving your progress. There are autosaves at regular intervals, but there are mechanics surrounding manual saves that can punish you if you abuse it. Early on, the alcoholic beverage you have to have in your inventory is an expensive item to buy, so I had to manage my time wisely and be extremely careful with my decisions. As you progress, you find that you can craft the drink via the Alchemy system to save a great deal of time and in-game funds, but it’s entirely understandable if you’re too frustrated to care by then. The save system is a creative mechanic, but the game isn’t polished enough to warrant a player’s investment into it. All too often a bug or series of bugs would put me in a position where I’d need to spin up on old save file, but I’d have to weigh the decision to go back a good bit into the game or just deal with the consequences. Thank goodness the game was fun enough that I didn’t completely hate the idea of a bit of retread, but it’s something that held a solid game back.
The quests are really well done, so it hurts when you work through such an entertaining moment only to be derailed by a missing NPC or some other bug that ruins the quest outright and you move on without completing or you replay it altogether. Witcher 3 is another game that comes to mind when I think of collections of side quests and optional activities that don’t bore you to death with repeated tasks with a slightly different theme to them and Kingdom Come: Deliverance executes in this regard. The herbalist suddenly went missing? There’s a fight club outside a home disturbing the owners sleep at night? A plague has broken out in the village? At every turn I caught myself diving deeper into side quests, rarely ever feeling like being roped into the mundane.
A place where things do get mundane, though, is with the random encounters that happen as your traveling between towns. At first, they felt as well executed as the full-on side quests. At one point, as I searched for the young man I mentioned early that had info about bandits, I came across a dead body in the woods. I checked it for loot, assuming nothing out of the ordinary, right before a woman ran up to me and accused me of murder. She scared the crap out of me, but I noticed she was a bit out of her mind and seemed to be carrying the murder weapon herself. I accused her, she took off running, and I ended up losing her in the woods. It was a briefly terrifying moment in a game with none of the fantasy elements that usually anchor similar situations, but it was sullied as I kept running into the same thing over and over again. There are other random events that occur as you travel, but they all lose their luster over time. In a patch, the devs even increased the frequency of these occurrences and I feel that took away from a cool idea.
Waiting to strike!
Kingdom Come: Deliverance afforded me a lot of freedom and that’s one of the most incredible parts of the experience. I can wander to essentially anywhere I wanted to at any time, as long as I’m ready to deal with the consequences. Quests were presented as is typical with an RPG of this kind, but, I regularly would take note of some little bit of information an NPC gave me and find ways to complete a task more efficiently. For example, at one point I was on the hunt for a young man that had information about an attack from a group of bandits. The quest log on my map showed me a handful of places where I could find the next bit of information, but a couple details about what direction he fled in and the friends he usually spent time with put me on the right trail faster than running off to each marker to ask questions. Those details weren’t saved anywhere in the menus and, if I hadn’t been giving the conversations I had with random villagers my full attention, I’d have missed out. The game does hold your hand for a little while as you work through quests, but you have an opportunity to run off into the wild and accomplish things your own way if you want to risk it. Time progresses in the game realistically and that’s another element that influenced what I ran into as I maneuvered through Bohemia.
Learning to read actually helped me investiage a murder.
The freedom and realism also made me question a few design decisions from WarHorse Studios, one being the decision to not allow players to create a unique character. Henry is the game’s lead and, while you can shape him in many ways as you play, he has a story for you to experience. Thankfully, it’s a good one. Henry is one of the most endearing lead characters in recent memory and I enjoyed watching (and shaping parts of) his growth to see how it impacted his interactions with lowborn and nobles later in the game. My Henry had a pretty wonderful relationship with both, which is something that can even be influenced by some skills you earn, but it is interesting to navigate both worlds. Regarding Henry's skill progression, you must really practice to get better at everything. Whether it be lockpicking, combat, reading, or crafting potions, all the mechanics are really involved experiences and practice legitimately made me more adept in addition to earning me skill points.
On the other hand, the attention to realism made other elements stand out in a bad way. I played as a character whose energy, nourishment, and overall health I had to manage by taking to time to eat and sleep. If I didn’t take care, Henry’s performance would suffer in various ways. These survival mechanics weren’t overwhelming, kept me engaged throughout, but were strangely absent when it came to my horse Pebbles (I never upgraded from the starting horse). Not having to worry about my horse’s well being other than when it gets skittish during a storm or battle was a missed opportunity by the devs, but the real problem is when I would hit “X” to instantly summon my horse to me. Those moments snapped the immersion right in half and the list of places where I couldn’t summon him to me was pretty small.
I played the game on a GTX 1060 and, initially, I got really good performance out of the game at high settings. After I made it through the well-crafted segment of the game that serves as a four to five-hour tutorial, I started losing a lot of frames. I dropped the settings down to “Low” so I could have a smooth performance throughout my playthrough and the game was still quite pleasant to look at. Lighting, textures, and characters didn’t take too much of a hit at all and Kingdom Come: Deliverance was a visual feast on higher settings.
It’s a long path to the final chapter and the devs made one head-scratcher of a decision in the end. No explicit spoilers, but the path to the game’s final conflict starts off beautifully. There's a twist focused on Henry that kind of falls flat, but the events around it get the blood pumping. For the majority of the game, I felt that I’d have a pretty neat bow tied on the game’s major conflict. The first turn in the final chapter bucks that entirely and set me on the exceptionally jagged path to the final battle, excitement at nearly every turn. After a few significant moments that are obviously building up to the big crescendo, the pace completely falls off a cliff.
Wasted a lot of time waiting for this thing to be built.
At this point, I’d already experience the “point of no return” message and taken on some big quests. Right before the big battle though, I’m offered a ton of optional quests and an accompanying main quest to the final battle that forces me to return to the slower pacing of the game before we’d reached the point of no return. While it does play into the realism that the developers so excitedly aspire to in Kingdom Come: Deliverance, there’s plenty of opportunity before the point of no return to get these things lined up in the open world and keep from crippling the pace before finishing.
Kingdom Come: Deliverance is a fantastic and absolutely frustrating experience. I was treated to a memorable lead character whose agency and development was largely wiped away with a twist late in the game and a collection of incredible gameplay mechanics and quests repeatedly stifled by bugs. Despite its downfalls, though, the good parts of the game are so good. I spent 50+ hours in the game’s version of 15th century Bohemia and that’s with me rushing through the latter half of the game, leaving plenty interesting side-quests to be unfinished. I’d have done a whole lot more if I didn’t want to get the review out in a reasonable amount of time, and I will definitely be returning in the future.
This review is based on a PC code provided by the developer. Kingdom: Come Deliverance is now available on PC, PS4, and Xbox One for $59.99. The game is rated M for Mature. Check out our Kingdom Come: Deliverance Guide and Walkthrough for tips that will help you survive Bohemia.
Kingdom Come: Deliverance Review: Fantastically Frustrating published first on https://superworldrom.tumblr.com/
0 notes
Text
Reminder
If you want to see the cool shit I reblog, go to my dedicated blog. There's a visual lockpicking guide, artist commission info, and fanart for RWBY, OK KO Let's Be Heroes, and Undertale among other things.
0 notes