#WinRM Service Guide
Explore tagged Tumblr posts
Visit Tumblr Blog
Explore Tumblr blogs with no restrictions, modern design and the best experience.
Last Seen Tumblr Blogs


Fun Fact
In 2020, Tumblr had 29.4 million users in the US.
Text
Enter-PSsession: Run PowerShell Remote Commands
Enter-PSsession: Run PowerShell Remote Commands @vexpert #vmwarecommunities #100daysofhomelab #homelab #PowerShellRemotingBasics #EnterPSSessionCommands #PowerShellRemoteServer #RemoteSystemManagement #WindowsServerPowerShell #NewPSSessionUsage
Windows PowerShell has changed how we manage our Windows Server environments. One of the powerful features of PowerShell is PowerShell remoting, which enables the execution of PowerShell commands or scripts on a remote computer. The Enter-PSSession command, a core part of PowerShell remoting, allows us to establish an interactive session with a remote system, fundamentally changing how we…
View On WordPress
#Enter-PSSession Commands#Managing Remote Computers#New-PSSession Usage#PowerShell Remote Commands#PowerShell Remote Server#PowerShell Remoting Basics#PowerShell Session Configuration#Remote System Management#Windows Server PowerShell#WinRM Service Guide
0 notes
Text
Unlocking the Power of Ansible Automation: A Comprehensive Guide
In today’s fast-paced technological landscape, automation has become a cornerstone for achieving efficiency and reliability in IT operations. Among the myriad of automation tools available, Ansible stands out for its simplicity, flexibility, and power. This blog post delves into what Ansible is, how it works, and why it’s an essential tool for IT professionals and organizations looking to streamline their workflows.
What is Ansible?
Ansible is an open-source automation tool used for IT tasks such as configuration management, application deployment, and orchestration. Developed by Michael DeHaan and introduced in 2012, Ansible has quickly gained popularity due to its agentless architecture and straightforward approach to automation.
Key Features of Ansible:
Agentless Architecture: Unlike many automation tools, Ansible does not require any agents or additional software on the client systems. It uses SSH for Unix-like systems and WinRM for Windows systems to execute tasks.
Playbooks: Written in YAML, playbooks are the heart of Ansible's automation. They describe the desired state of the system and the steps needed to achieve that state.
Idempotency: Ansible ensures that repeated executions of a playbook will produce the same result, preventing unintended changes.
Extensible: With a robust set of built-in modules and the ability to create custom modules, Ansible can be tailored to meet a wide range of automation needs.
How Ansible Works
Ansible operates by connecting to your nodes and pushing out small programs, called "Ansible modules," to them. These programs are written to be resource models of the desired state of the system. Ansible then executes these modules over SSH (or WinRM for Windows), and once the desired state is achieved, it removes them.
Basic Components:
Control Node: The machine where Ansible is installed and from which tasks are executed.
Managed Nodes: The networked systems that Ansible manages.
Inventory: A list of managed nodes, which can be defined in a simple text file or dynamically generated.
Playbook: A YAML file containing one or more plays, which define the tasks to be executed on the managed nodes.
Why Use Ansible?
Simplified Management
Ansible's simplicity is one of its strongest points. Its agentless nature means less overhead and fewer points of failure. By using straightforward YAML syntax, playbooks are easy to read, write, and understand, making Ansible accessible even to those with minimal coding experience.
Scalability and Flexibility
Whether managing a few servers or thousands, Ansible scales efficiently. It supports complex deployments with multiple environments, ensuring consistent configuration across development, testing, and production.
Enhanced Collaboration
Ansible's human-readable playbooks serve as documentation, making it easier for teams to collaborate. Everyone from developers to operations teams can understand and contribute to the automation process.
Security and Compliance
With Ansible, maintaining security and compliance is streamlined. Automated tasks reduce the risk of human error, and consistent configurations ensure systems adhere to organizational policies.
Ansible Use Cases
Configuration Management
Ansible can manage configurations across diverse environments, ensuring consistency and compliance. From setting up new servers to maintaining existing ones, it handles tasks such as package installation, system updates, and service management.
Application Deployment
Deploying applications can be complex, but Ansible simplifies the process. Whether you’re deploying web applications, databases, or microservices, Ansible automates the entire workflow, from code checkout to configuration and service restart.
Orchestration
Beyond individual configurations and deployments, Ansible excels in orchestrating entire workflows. It can manage complex, multi-tier deployments involving load balancers, databases, and web servers, ensuring each component is configured correctly and deployed in the right order.
Continuous Delivery
Ansible integrates seamlessly with CI/CD pipelines, automating the deployment of applications and updates. This ensures that software changes are consistently tested and deployed, accelerating the delivery process.
Getting Started with Ansible
Install Ansible: Ansible can be installed on various operating systems using package managers like apt, yum, or pip.
Set Up Inventory: Define your managed nodes in a simple text file.
Create Playbooks: Write YAML playbooks to describe your automation tasks.
Execute Playbooks: Run your playbooks using the ansible-playbook command.
Conclusion
Ansible is a powerful automation tool that simplifies IT management and accelerates workflows. Its agentless architecture, ease of use, and flexibility make it an ideal choice for organizations of all sizes. By adopting Ansible, you can enhance efficiency, ensure consistency, and focus on innovation rather than repetitive tasks.
Ready to take your automation to the next level? Start exploring Ansible today and unlock the full potential of your IT infrastructure. For more details click www.qcsdclabs.com
#redhatcourses#information technology#docker#containerorchestration#container#linux#kubernetes#containersecurity#dockerswarm#aws
0 notes
Text
Rundeck is an open source automation service that lets you easily run automation tasks across a set of nodes. It comes with a web console, command line tools, and a WebAPI. In this guide, I’ll take you through the steps to install and configure Rundeck on Ubuntu 18.04 & Debian 9. The same should also work for Ubuntu 16.04 LTS. Features of Rundeck Distributed command execution Workflow (including option passing, conditionals, error handling, and multiple workflow strategies) Pluggable execution system (SSH and WinRM by default; Powershell available) Pluggable resource model (get details of your infrastructure from external systems) On-demand (Web GUI, API or CLI) or scheduled job execution Secure Key store for passwords and keys Role-based access control policy with support for LDAP/ActiveDirectory/SSO Access control policy editing/management tools History and auditing logs Use any scripting language Step 1: Update your system & Set the hostname Start your installation by making sure your packages are updated. sudo apt update sudo apt upgrade -y After update, set server hostname. sudo hostnamectl set-hostname rundeck.example.com Add the hostname and IP address to /etc/hosts echo "192.168.17.50 rundeck.example.com" | tee -a /etc/hosts Step 2: Install Java 8 ( SE or OpenJDK) Rundeck requires Java 8 installed on the host system. You can install Java 8 on your Ubuntu 18.04 / Debian 9 by: 1. Add Java 8 PPA repository sudo add-apt-repository ppa:webupd8team/java Press [ENTER] when prompted to add the repository to your system. 2. Install Java 8 on Ubuntu 18.04 / Debian 9 sudo apt install oracle-java8-installer Press Ok to Agree to Oracle Binary Code License Agreement for the Java SE Platform Products and JavaFX. Next, Accept Oracle Binary Code license terms by selecting Yes After the installation is done, confirm the Java version installed: $ java -version java version "1.8.0_191" Java(TM) SE Runtime Environment (build 1.8.0_191-b12) Java HotSpot(TM) 64-Bit Server VM (build 25.191-b12, mixed mode) To install OpenJDK 8, just run: sudo apt install openjdk-8-jdk-headless Step 3: Install Rundeck on Ubuntu 18.04 / Debian 9 After installing Java 8, proceed to install Rundeck on Ubuntu 18.04 / Debian 9. Check for the latest release of Rundeck before downloading. wget https://dl.bintray.com/rundeck/rundeck-deb/rundeck_3.0.22.20190512-1.201905130100_all.deb Once downloaded, install the package using dpkg command: $ sudo dpkg -i rundeck*.deb Selecting previously unselected package rundeck. (Reading database ... 105814 files and directories currently installed.) Preparing to unpack rundeck_3.0.22.20190512-1.201905130100_all.deb ... Unpacking rundeck (3.0.22.20190512-1.201905130100) ... Setting up rundeck (3.0.22.20190512-1.201905130100) ... Adding group rundeck....done Adding system user rundeck....done Processing triggers for ureadahead (0.100.0-20) ... Processing triggers for systemd (237-3ubuntu10.3) ... Step 4: Configure Rundeck The main configuration file is /etc/rundeck/framework.properties. Edit the file to customize Rundeck I have modified my Rundeck server connection information to be similar to below: framework.server.name = rundeck.example.com framework.server.hostname = rundeck.example.com framework.server.port = 4440 framework.server.url = http://192.168.17.50:4440 Also set correct hostname on /etc/rundeck/rundeck-config.properties $ sudo vim /etc/rundeck/rundeck-config.properties grails.serverURL=http://192.168.17.50:4440 Don’t forget to replace all occurrences of rundeck.example.com & 192.168.17.50 with your correct values for hostname and IP address. When done with the changes, start rundeckd and set it to start on boot: sudo systemctl start rundeckd sudo systemctl enable rundeckd If you have an active ufw firewall, allow port 4440 sudo ufw allow 4440/tcp To check service status, use: $ sudo systemctl status rundeckd
* rundeckd.service - LSB: rundeck job automation console Loaded: loaded (/etc/init.d/rundeckd; generated) Active: active (running) since Wed 2018-11-14 11:24:45 PST; 19s ago Docs: man:systemd-sysv-generator(8) Main PID: 4751 (java) Tasks: 20 (limit: 2319) CGroup: /system.slice/rundeckd.service `-4751 java -Drundeck.jaaslogin=true -Djava.security.auth.login.config=/etc/rundeck/jaas-loginmodule.conf -Dloginmodule.name=RDpropertyfile Nov 14 11:24:45 rundeck.example.com systemd[1]: Starting LSB: rundeck job automation console... Nov 14 11:24:45 rundeck.example.com rundeckd[4726]: * Starting rundeckd Nov 14 11:24:45 rundeck.example.com rundeckd[4726]: ...done. Nov 14 11:24:45 rundeck.example.com systemd[1]: Started LSB: rundeck job automation console. Step 5: Access Rundeck UI Open http://[IP or hostname]:4440/ on your favorite web browser to Login to Rundeck web console. The default logins are: Username: admin Password: admin Changing admin user password by editing the file /etc/rundeck/realm.properties sudo vim /etc/rundeck/realm.properties Set like below: admin:NEW_ADMIN_PASSWORD,user,admin,architect,deploy,build Restart rundeckd service: sudo systemctl restart rundeckd I hope this tutorial was helpful in your journey to install and configure Rundeck on Ubuntu 18.04 / Debian 9.
0 notes
Text
Windows Admin Center 1910

Windows Admin Center 1910.
User Experience
Add connections: A new entry page for the add connection experience simplifies the process of adding any supported connection type in the Windows Admin Center.
Platform
Connectivity settings: Under Settings, Internet Access lets users in completely disconnected environments specify that they are offline so that Windows Admin Center does not try to perform any actions that require internet access.
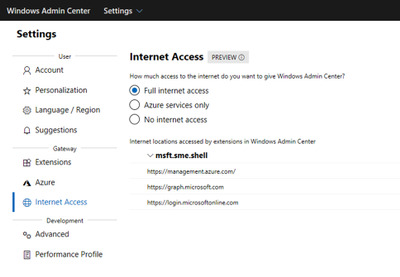
WinRM over HTTPS: A top user request, you now have the option to choose WinRM over HTTPS (port 5986) as the method of connection to your managed nodes. Optionally select this configuration when installing Windows Admin Center 1910, on the Configure Gateway Endpoint page when running the installer.
Core Tools
Virtual machines tool: Import/Export VM – We’ve added Import/Export buttons to the Virtual Machines tool for importing VMs from and exporting VMs to a local volume or remote file share. When importing VMs, you have the option to create a new VM ID, and copy the VM files or use them in-place. You can also rename VMs during the import process if we detect that the VM’s name already exists.VM tagging – Similar to the UI for tagging connections in Windows Admin Center, you can now tag VMs on a Hyper-V server! In the Virtual machines tool’s Inventory tab, an “Edit tags” button has been added to manage tags. These tags are saved on the Hyper-V host server and can be accessed by other admins. VM tags are also supported for Hyper-V clusters.VM live migration – VM live migration is now supported for Hyper-V clusters and standalone servers! You can live migrate a VM from a server or cluster, to a server or cluster in any combination and Windows Admin Center will take care of clustering the role and live migration configuration if necessary.Performance improvements – Significant performance improvements have been made to reduce page load time in the Virtual machines tool. Updates tool: You can now select individual Windows updates to install.Overview tool: Windows Admin Center now includes a banner on the Overview tool that notifies you when a reboot is pending on the server/computer being managed.Performance Monitor tool: PerfMon has been part of Windows for over 25 years, and in all those years, it hasn’t changed much. For the first time ever, Microsoft is re-imagining the experience of working with performance counters from scratch.

Packet Monitor tool: Packet Monitoring is a new feature that allows you to diagnose your server by capturing and displaying network traffic through the networking stack in a log that is filtered, organized, and easy to follow and manipulate. Currently, only recent SAC versions of Windows Server are supported, but support for Windows Server 2019 is coming soon.IIS tool: A preview release of the IIS tool is now available in the Extensions feed. It provides much of the functionality in IIS Manager to administer and manage your web servers.
Hybrid
Azure hybrid services tool: Content now loads from an online feed to ensure the latest available services are always shown.Switch accounts: From the Account menu in Settings, you can now switch between multiple Azure accounts.Cost estimates: Azure hybrid integrations within Windows Admin Center now include a hyperlink to Azure, to discover and understand the estimated cost of that service once onboarded.Add Azure VM: Azure VMs are now a top-level connection type. When a server is added this way, it appears in the connections list as “Server (Azure VM)” so you can easily see which of your servers are Azure VMs.Create Azure VM: Azure VMs can now be provisioned directly from within Windows Admin Center.Azure Arc for servers: Leverage Azure policies and solutions to manage your servers. Inventory, organize, and manage on-premises servers from Azure. You can govern servers using Azure policy, control access using RBAC, and enable additional management services from Azure. Azure Security Center: Get unified security management and advanced threat protection with Azure Security Center. Monitor security across hybrid workloads, apply policy to ensure compliance, find and fix vulnerabilities, block malicious activity, detect attacks, and simplify investigation for rapid threat response.Azure File Sync: Sync your file server with the cloud. Centralize file shares in Azure while caching frequently accessed files on your local file servers. The updated version of the Azure File Sync extension now enables end-to-end provisioning and configuration within Windows Admin Center.S2S VPN / Azure Extended Network: Previewing in the Extensions feed, added ability in Gateway Connections extension to setup Site to Site VPN connection between SDN virtual network and Azure virtual network, enabling seamless migration of on-prem applications to Azure without any IP address changes thanks to private IP carryover (extends your SDN virtual network into Azure vNet).Azure Monitor: Windows Admin Center can now onboard Cluster connections to Azure Monitor: To configure Azure Monitor for your cluster, navigate to Settings -> Monitoring Alerts. The onboarding process will help set up the log analytics workspace in Azure and install the appropriate local agents on each server in your cluster to help you collect events and performance counters for analysis, reporting, and alerting.Storage Migration Service: Storage Migration Service helps migrate on-premises file servers to Azure, and upgrade to newer versions of Windows Server in the process. You can now create Azure Virtual Machines on the fly during migration, automatically size them, provision them with formatted storage, and join them to your domain – while allowing you to migrate from legacy operating systems, Samba on Linux, and standalone servers to the latest versions of Windows Server and failover clusters.Storage Replica: You can now use Azure as your secondary site for Storage Replica. Windows Admin Center now supports creating Azure Virtual Machines on the fly during setup of new asynchronous replication partnerships so that Azure can help protect your business from disasters with minimal data loss.Azure Cloud Shell: Cloud Shell is now accessible from within Windows Admin Center via the Extensions feed. Cloud Shell provides a browser-based, authenticated, interactive shell experience to manage your Azure resources. Cloud Shell comes with common command-line tools by default, and any new tools or files that you save will be persisted and available during your next session.
Hyperconverged infrastructure (HCI)
Deploy Azure Stack HCI: Get the Cluster Creation preview from the Extensions feed to use Windows Admin Center version 1910 to deploy an Azure Stack HCI cluster using two or more suitable Windows Servers. This new feature takes the form of a multi-stage workflow that guides you through installing features, configuring networking, creating the cluster, and deploying Storage Spaces Direct and/or software-defined networking (SDN) – reducing what used to take hours of complex, error-prone PowerShell to something straightforward even for relative newcomers. This feature is in Preview so you can try it early and share your feedback. Clustering:Unified connection type - The two separate connection types for hyper-converged clusters and failover clusters have been merged into a single, unified connection type. Clusters can be added as a “Windows Server cluster” and the appropriate tools will be loaded and available, primarily based on whether Storage Spaces Direct is enabled or not. Hyper-converged cluster connections and failover cluster connections added from previous versions of Windows Admin Center will be automatically migrated to the new cluster connection type.New tools – Azure Monitor and Performance Monitor tools for clustersCluster settings – Rename cluster, node shutdown behavior, cluster traffic encryption, VM load balancing, quorum witness, in-memory cache, and Get-ClusterS2D Hyper-V: All new features described in the Core Tools section above for standalone Hyper-V hosts are also applicable for hyperconverged clusters: Import/Export VMs, VM tagging, VM live migration, and performance improvements.Storage Spaces Direct: Identify noisy VMs - You can now more easily identify which VMs are consuming resources. For example, on the volume page, VMs using that volume are listed under the Related heading, where you can sort by IOPS, IO throughput, and capacity usage. Likewise, on the server page, related VMs and can be sorted by processor, memory, and network usage. There is also bi-directional cross-linking between the pages for servers, volumes, and VMs to streamline navigation.Storage tiers - You can see individual storage tiers (if any) on the volume detail page. Software Defined Networking: FlowLog Audit - Flowlog auditing is a new capability for the SDN firewall in Windows Server 2019. When you enable SDN firewall, any flow processed by SDN firewall rules (ACLs) that have logging enabled gets recorded. These logs can be used for diagnostics or archived for later analysis. With the new “Flowlog Audit” extension in Windows Admin Center, you can easily manage, search and filter the SDN logs for analysis and diagnostics. It can be difficult to gain insights into flow logging data by manually searching the log files. In this extension, you can also upload the log to Azure Blob, then use Power BI to visualize your most recent flow logs and learn about traffic on your network.SDN Load Balancer - Allows users to create LBs that evenly distribute tenant customer network traffic among virtual or physical network resources. The SDN Load balancer enables multiple servers to host the same workload, providing high availability and scalability.SDN Public IP - Public IPs enable inbound and outbound communication between SDN resources and the Internet. Public IP Addresses can be associated with SDN Gateway pools, Internet-facing load balancers, as well as network interfaces.
Ecosystem
The Windows Admin Center ecosystem continues to grow! Dell EMC, HPE, Thomas-Krenn.AG and BiitOps have newly released Windows Admin Center extensions in the past few months. Dell EMC released the Dell EMC OpenManage Integration v1 extension earlier this year in August. The Dell EMC extension provides a dashboard view of hardware component health, component inventory, iDRAC information and update compliance report for servers and Azure Stack HCI solutions.HPE released preview versions of the HPE Proliant Server extension and HPE Azure Stack HCI extension today. The HPE Proliant Server extension displays server health and remediation options, server component info and BIOS settings. The Azure Stack HCI extension additionally highlights firmware and driver version inconsistencies between nodes.Thomas-Krenn.AG released their Azure Stack HCI extension earlier this year in May. This extension provides detailed information on cluster nodes and drives, cluster information and cluster network connectivity.BiitOps extension provides configuration change tracking for on-premises servers and clusters. Easily zoom in and see full details for software and hardware changes made across your servers using the BiitOps extension’s powerful graphical interface. In addition, the Lenovo XClarity Integrator extension became generally available in August, and DataON, QCT, Pure Storage have also released extension updates recently. Read the full article
#MicrosoftAzure#MicrosoftHyper-V#MicrosoftWindowsAdminCenter#MicrosoftWindowsServer#Network#WindowsServer2019
0 notes
Text
vRA Enterprise Level Distributed Installation
by Gregg Robertson
Recently I was fortunate enough to design and build an enterprise level distributed installation of the vRealize Automation suite of products and integrate it into an enterprise environment. I’ve done several vRA/vCAC deployments before but each time I do a new deployment I like to collate information, read all the latest articles and make sure what worked in the past for me hasn’t changed or more likely has been enhanced so I can provide an even better deployment.
For those unsure of what an enterprise distributed deployment comprises of I have added a logical diagram below

For my current deployment it was based on vRealize Automation 6.1 due to it being part of a Hybrid Cloud deployment but the architecture and layout are exactly the same for 6.2. (note this is defined after collecting customer requirements based on amount of workloads, NSX load balancing and the requirement of application services so make sure you have reasons for design decisions)
Resources
For the resources I used, some are ones I used in the past to learn how to do an enterprise deployment and some are ones I re-read prior to this deployment. I have listed them below to save me looking for them again but also to maybe help other people:
The first place anyone should start is the vRA documentation centre which has a large portion of the vRA documentation you will need to have read and at some points follow along with to do your deployment.
One of the most important documents to utilise is the Installation and Configuration document. As I mentioned, I was deploying vRA 6.1 so utilised the following document from page 43 onwards.
One challenge when deploying an enterprise level deployment of vRA is that you should at a minimum use internally signed certificates. For vRA if you are changing one on the components then you need to change all of them or else you will have a plethora of problems (I have spent countless hours in the past helping companies who have tried their own PoC , have only changed a few certificates and then deployed workloads that they now want to keep). For this portion I like to follow Eiad Al-Aqqad’s resources as to me they seem really straight forward and have worked really well in the past
http://www.virtualizationteam.com/cloud/vcloud-automation-center-6-certificates-a-to-z.html
http://www.virtualizationteam.com/cloud/generating-certificates-for-vcac-6-iaas-web-server-manager-service.html
http://www.virtualizationteam.com/cloud/generating-certificates-for-the-identity-appliancevcac-appliance.html
NB: Make sure when importing the certificate into the appliances remember to remove the bag attributes at the beginning of the PEM file and start from —BEGIN CERTIFICATE—– until ——–END CERTIFICATE————-
Once you have the certificates prepared then you can start the deployments. I used the identity appliance rather than the vCenterSSO due to the identity appliance following the same upgrade schedule as all the other vRA components and in the past I have hit a few problems due to people using vCenter SSO. There are positives and negatives of using SSO so make sure you look at both options and select the correct option for your deployment. The official documentation is good but I also used Emad and Grants blogs for the deployment of the identity appliance
Next portion is the configuration of the external vPostgres database and for this I used the vRA appliance and disabled the services that were not required. For this i used the official documentation. If you don’t know how to deploy the vRA appliances then go to the next step , follow that then come back to this step (Although I do worry if you don’t know how to deploy an appliance)
http://emadyounis.com/vrealize-automation/vrealize-automation-6-1-formally-vcloud-automation-center-identity-appliance-deployment-configuration/
http://pubs.vmware.com/vra-62/topic/com.vmware.vra.install.doc/GUID-A57BEE9C-BC0D-42D3-9ACD-E2F003E6B8F2.html
NOTE: VMware no longer recommend using an external postgres database. The 6.2 documentation has been updated to reflect this.
Now you need to deploy the vRA appliances. This is fairly straight forward and really shouldn’t cause you any issues.
Next are the IaaS components. This is SO MUCH easier than the vCAC 4.1 days now that there is the pre-req script. The script can be found here. Before installation of the IaaS components ensure you have ntrights.exe downloaded, a windows iso attached to the virtual machine (2012 requires this but 2008 never did) and java 7u75 downloaded in an easily searchable folder (java version is correct as of this posting). For these steps I was going to break it down into a few blog postings but fellow vBrownbag member, Jonathan Frappier has done such a cracking job I recommend you follow his:
Now that the components are installed it is time to grant permissions, create the required tenant/s for your cloud workloads apart from the default tenant and create all the business groups. Again Jonathan has broken this down brilliantly and this is what I re-read prior to my deployments
Now on to the application services, adding and preparing of vSphere templates and creating entitlements so that services can be requested. Again Jonathan has covered it perfectly ( as does the official documentation that you should be following alongside these)
Now for the vRO deployment as well as including NSX into vRA and installing the NSX plug-in to the vRO server. For vRO I used the windows method rather than the appliance route due to us being unable to do multi-hop WinRM using the PowerShell plugin when we need to run PowerShell scripts locally on multiple servers rather than locally on the vRO server. For this I used Sid Smith’s articles as well as the standard VMware documentation:
http://www.virtxpert.com/deploy-vrealize-automation-appliance-vrealize-automation-series-part-2/
http://www.virtxpert.com/configure-vrealize-automation-appliance-vrealize-automation-series-part-3/
http://www.virtxpert.com/install-vrealize-automation-iaas-components-vrealize-automation-series-part-4/
http://www.virtxpert.com/install-vrealize-automation-iaas-sql-installation-vrealize-automation-series-part-5/
http://www.virtxpert.com/install-vrealize-automation-iaas-installation-vrealize-automation-series-part-6/
http://www.virtxpert.com/configure-vrealize-permissions-vrealize-automation-series-part-7/
http://www.virtxpert.com/add-vcenter-endpoint-vrealize-automation-series-part-8/
http://www.virtxpert.com/configure-fabric-groups-vrealize-automation-series-part-9/
http://www.virtxpert.com/adding-business-groups-vrealize-automation-series-part-10/
http://www.virtxpert.com/creating-reservations-vrealize-automation-series-part-11/
http://www.virtxpert.com/deploying-application-services-vrealize-automation-series-part-12/
http://www.virtxpert.com/preparing-vsphere-templates-vrealize-automation-series-part-13/
http://www.virtxpert.com/adding-blueprints-vsphere-templates-vrealize-automation-series-part-14/
http://www.virtxpert.com/creating-entitlements-vrealize-automation-series-part-15/
http://pubs.vmware.com/vsphere-60/topic/com.vmware.vrealize.orchestrator-install-config.doc/GUID-64F03876-2EAB-4DB3-A95D-89842425FF7A.html
http://dailyhypervisor.com/vrealize-automation-vcac-6-1-adding-a-vco-endpoint/
http://dailyhypervisor.com/vmware-nsx-6-1-vcac-6-1-connecting-nsx-to-vcac/
Troubleshooting
Along the way I hit a few errors and spent a fair bit of time with VMware support also on a few of them. The main ones are listed below:
Received a 401 error in the Infrastructure Tab of vRA
Received a 404 error when opening thevRA portal
Received a “Failed to retrieve form from provider” when requesting an Application Service catalog item in vRA
Received errors about trust relationships failing between the components
Received a “Failed to retrieve form from provider” when requesting a catalog item in vRA (this is using multi-machine rather than application services). This error is one I still have a ticket with engineering open for as what is happening is that when we do a quiesced backup of the vRO database this at times causes one of the vRO nodes to stop due to a timeout in connectivity to the database. Currently the only way fix is to start the stopped node. I will update this if/when VMware engineering give a realistic solution.
http://kb.vmware.com/selfservice/microsites/search.do?language=en_US&cmd=displayKC&externalId=2110207
http://www.virtualizationteam.com/cloud/vcac-6-service-unreachable-reference-error-repo404.html
http://kb.vmware.com/kb/2086649
http://kb.vmware.com/kb/2110207
Gregg Robertson joined the Xtravirt consulting team in December 2011. As well contributing to the Xtravirt blog, Gregg blogs on his own site at www.thesaffageek.co.uk .
If you’d like any assistance with a virtualisation project or simply want to learn more about how Xtravirt can help your organisation, please _contact us, and we’d be more than happy to use our real world experiences to support you._
0 notes