#PowerShell Session Configuration
Explore tagged Tumblr posts
Visit Tumblr Blog
Explore Tumblr blogs with no restrictions, modern design and the best experience.
Last Seen Tumblr Blogs


Fun Fact
Tumblr’s website traffic is steadily declining.
Text
Enter-PSsession: Run PowerShell Remote Commands
Enter-PSsession: Run PowerShell Remote Commands @vexpert #vmwarecommunities #100daysofhomelab #homelab #PowerShellRemotingBasics #EnterPSSessionCommands #PowerShellRemoteServer #RemoteSystemManagement #WindowsServerPowerShell #NewPSSessionUsage
Windows PowerShell has changed how we manage our Windows Server environments. One of the powerful features of PowerShell is PowerShell remoting, which enables the execution of PowerShell commands or scripts on a remote computer. The Enter-PSSession command, a core part of PowerShell remoting, allows us to establish an interactive session with a remote system, fundamentally changing how we…
View On WordPress
#Enter-PSSession Commands#Managing Remote Computers#New-PSSession Usage#PowerShell Remote Commands#PowerShell Remote Server#PowerShell Remoting Basics#PowerShell Session Configuration#Remote System Management#Windows Server PowerShell#WinRM Service Guide
0 notes
Text
Future-Proof Your IT Career with TechshilaMind’s Active Directory Administrator Course
In today’s enterprise environments, managing users, securing data, and controlling access are mission-critical responsibilities. If you're looking to become an essential part of any organization's IT backbone, Active Directory (AD) mastery is non-negotiable.
At TechshilaMind, the Active Directory Administrator course is crafted by experts to ensure you're ready to lead in these areas with confidence and skill.
What is Active Directory? Why Should You Learn It?
Active Directory is Microsoft's identity and access management service used by 90%+ of Fortune 1000 companies. It serves as a centralized system for:
User Authentication
Network Resource Management
Security Policy Enforcement
Learning AD helps you understand the core of enterprise-level infrastructure and positions you as a valuable asset in roles such as:
System Administrator
Network Administrator
IT Support Engineer
Security Analyst
Explore how this technology can elevate your IT skill set in the Active Directory Administrator course.
In-Depth Course Curriculum Highlights
The course is structured to ensure clarity and progression – from basic to expert-level competencies:
Module 1: Introduction to Active Directory
What is AD?
Architecture and Components
AD vs Azure AD
Module 2: Setting Up Domain Controllers
Installing and Configuring ADDS
DNS Integration
Creating Domains and Forests
Module 3: User and Group Management
OU (Organizational Unit) Structure
Managing Users, Groups, and Computers
Scripting with PowerShell
Module 4: Group Policy Objects (GPOs)
What are GPOs?
Creating and Linking GPOs
Group Policy Troubleshooting
Module 5: Security, Backup, and Recovery
AD Security Best Practices
Implementing Role-Based Access Control
AD Backup, Restore, and Disaster Recovery
Module 6: Real-Time Case Studies & Project Work
Industry Use Cases
Hands-On Assignments
Simulated Scenarios
Download the full syllabus by visiting the course page.
Who Should Join This Course?
Whether you're starting from scratch or polishing your skills, this course suits:
Fresh IT graduates seeking a powerful niche
System Admins upgrading their skillset
Cybersecurity professionals needing infrastructure knowledge
Tech leads and managers exploring AD deployment at scale
Key Features That Set This Course Apart
✅ Live Instructor-Led Sessions ✅ 24/7 Dedicated Mentor Support ✅ Interview Prep + Career Mentorship ✅ Flexible Weekday & Weekend Schedules ✅ Access to LMS + Recorded Lectures ✅ Official Certification Preparation
What You Can Expect After Completion
Job-Ready Skills to handle Active Directory infrastructure
Certification-ready preparation for roles such as MCSA, Microsoft Certified: Azure Administrator Associate
Boosted Employability with in-demand tools like PowerShell, GPO, LDAP
Get started now: Join the Active Directory Administrator course today
Still Have Questions?
Contact TechshilaMind directly for a free consultation:
📞 +91-7505974183
What Students Are Saying
⭐⭐⭐⭐⭐ “The instructors are highly knowledgeable, and I loved how real-time projects were part of the learning. Definitely worth the investment!” — Amit Sharma, Network Engineer
⭐⭐⭐⭐ “Perfect for those trying to break into infrastructure roles. Their career support was the cherry on top.” — Nisha R., System Admin Intern
Your Path to Becoming an AD Expert Starts Here
If you've been looking for a well-structured, job-oriented course that delivers not just knowledge but career impact, then the Active Directory Administrator course from TechshilaMind is your launchpad.
0 notes
Text
“How to Restrict Server Access for Teams Using RHosting’s Custom Controls”
When managing a shared server environment, not every team member needs full access. Whether it’s for security, compliance, or operational clarity, restricting access based on roles is essential. That’s why RHosting offers powerful custom control features — so you can manage exactly who can access what, and how.
In this guide, we’ll show you how to use RHosting’s built-in controls to restrict server access for teams — without complex IT configurations or third-party tools.
🔐 Why Access Restrictions Matter
Unrestricted access increases the risk of:
Accidental file deletions or edits
Unauthorized use of sensitive applications
Data breaches or compliance violations
Confusion and clutter for end users
With RHosting’s granular access settings, you can provide the right level of access to every user — and nothing more.
🛠️ Step-by-Step: How to Restrict Access Using RHosting’s Custom Controls
Step 1: Log in to the RHosting Admin Portal
Access the RHosting Admin Dashboard using your credentials. From here, you’ll manage users, permissions, and server settings.
Step 2: Create or Select a User Group
If you're managing a team:
Navigate to User Groups
Create a new group (e.g., “Finance Team”, “Dev Interns”, “HR”)
Or, select an existing group to edit
Grouping users by role or department simplifies future management.
Step 3: Assign Server Access Controls
Within the group settings:
Choose which servers the group can access
Select folders or drives available to the group (e.g., restrict “Finance” from accessing “Dev”)
Set time-based access if needed (e.g., office hours only)
Step 4: Set Application-Level Restrictions (Optional)
RHosting also lets you control which applications are visible and usable by each user or group.
Allow only necessary apps like Tally, Excel, or custom software
Block access to tools unrelated to the user’s role
Prevent command-line or admin-level tools from being launched
Step 5: Enable Session Monitoring & Logs
Activate activity logging for transparency and compliance:
See login times, session durations, and accessed resources
Export logs for audits or internal reviews
Identify unusual behavior or access patterns
🔄 Real-World Example: Restricting Access for Interns
Let’s say your dev team hires interns for a 3-month period. Using RHosting:
Create an “Interns” group
Give them access to a specific development server only
Block access to client databases or financial systems
Restrict usage of PowerShell or admin tools
Auto-disable access after 90 days
This keeps your systems secure while enabling interns to contribute productively.
✅ Benefits of Using RHosting’s Custom Controls
Enhanced security for sensitive data and critical systems
Simplified user management for IT teams
Tailored access that matches your organizational structure
Peace of mind knowing every user has just the access they need
🚀 Take Full Control of Your Remote Environment
RHosting’s custom access controls are designed to give you precision, flexibility, and confidence in how your team interacts with remote servers.
Whether you’re onboarding new employees, managing contractors, or supporting multiple departments — you’re in control.
0 notes
Text
System Administration Online Course: Master Modern IT with Gritty Tech
In today’s digitally driven world, efficient system management is critical for any business. A comprehensive System administration online course equips learners with the skills required to handle system networks, servers, security protocols, and more. Whether you’re aiming for a career upgrade or starting fresh in the tech field, and flexible learning experience For More…

Why Choose Gritty Tech for Your System Administration Online Course?
Top-Quality Education, Affordable Price
Gritty Tech stands out in the education sector for delivering high-quality learning at affordable rates. Our System administration online course is designed to provide exceptional training in core IT administration areas without overburdening your budget.
Global Tutor Network Spanning 110+ Countries
We bring together expert instructors from around the world. With a diverse team of seasoned professionals, Gritty Tech ensures your System administration online course is led by industry veterans with practical experience in managing modern infrastructure.
Flexible Payment and Satisfaction Policies
Learners can benefit from our monthly and session-wise payment models. We also offer an easy refund policy and tutor replacement options, reinforcing our commitment to student satisfaction. Our System administration online course is built around your needs.
What You Will Learn in the System Administration Online Course
Gritty Tech’s curriculum covers every key aspect needed to become a proficient system administrator. With real-world scenarios and hands-on labs, the course includes:
Linux and Windows server installation and configuration
Network architecture, monitoring, and troubleshooting
Security controls, firewalls, and user permissions
Data backup, system recovery, and storage solutions
Cloud platforms introduction and server virtualization
Task automation using scripting (Bash, PowerShell)
Managing Active Directory and DNS configurations
Each module in the System administration online course builds foundational expertise, reinforced by real-time assignments.
Who Should Take This Course
The System administration online course is ideal for:
Beginners entering the IT field
IT professionals aiming to upskill
Computer science students
Freelancers and consultants supporting IT operations
System engineers seeking certification
Career Paths After Completing the System Administration Online Course
With a solid foundation from our System administration online course, students can pursue rewarding roles such as:
System Administrator
IT Support Technician
Network Engineer
Cloud Operations Associate
DevOps Engineer
Server Security Analyst
Companies across industries depend on skilled system administrators to maintain robust and secure IT environments.
What Makes the Gritty Tech System Administration Online Course Stand Out
Experienced Tutors
Gritty Tech tutors are not just educators—they are working professionals with hands-on experience in systems management. Their real-world insights enhance the quality of your System administration online course journey.
Hands-On Projects and Labs
You will work with actual server environments and practice live configurations. These exercises provide a practical layer to your theoretical learning.
Interactive and Self-Paced
The System administration online course can be completed at your convenience. Whether you study full-time or part-time, the flexibility is built-in to support your schedule.
Certification Included
After successful completion of your System administration online course, you’ll receive a digital certificate from Gritty Tech, which you can share with potential employers or on professional platforms.
Real Student Support
From one-on-one mentoring to peer support, our System administration online course ensures you never feel isolated. Our global community provides an excellent platform for collaboration and discussion.
Related Topics Covered in the Course
The course doesn’t stop at systems. To help broaden your technical base, we integrate related training on:
Linux system administration
Windows server roles
Cloud administration fundamentals
Networking essentials
Cybersecurity basics
IT support workflows
Infrastructure monitoring tools
These modules complement the core lessons of the System administration online course, helping you become a versatile IT professional.
10 Most Asked Questions About the System Administration Online Course
What is a system administration online course?
A System administration online course teaches the principles and practices of managing IT systems and networks remotely via an interactive online format.
Who should take the system administration online course?
Anyone seeking a career in IT, especially those interested in maintaining servers, networks, and databases, should consider a System administration online course.
What will I learn in the system administration online course?
You’ll gain expertise in system configuration, network setup, user management, and IT troubleshooting through our System administration online course.
Is prior IT experience required for the system administration online course?
No prior experience is needed. The System administration online course is suitable for both beginners and intermediate learners.
How long is the system administration online course?
Most students complete the System administration online course within 6 to 10 weeks depending on their pace.
Does Gritty Tech provide certification after the course?
Yes, a verified certificate is awarded upon completing the System administration online course.
What tools are used in the system administration online course?
You’ll work with Linux, Windows Server, VMware, PowerShell, and various network monitoring tools during the System administration online course.
Can I change my tutor during the course?
Yes. We offer flexible tutor replacement options during your System administration online course.
What if I’m not satisfied with the course?
Gritty Tech provides an easy refund policy for learners who are unsatisfied with their System administration online course experience.
Can I pay in installments for the system administration online course?
Absolutely. We support monthly and session-wise payment plans to make the System administration online course more accessible.
Conclusion
Gritty Tech’s System administration online course is a comprehensive, flexible, and industry-relevant program that prepares you for success in IT systems management. With world-class tutors, real-time labs, affordable pricing, and a globally recognized certificate, you get everything you need to transform your career.
Whether you’re starting out or advancing in your IT journey, this System administration online course is your launchpad. Take the first step today and join a learning community that spans over 110 countries. Gritty Tech makes tech education not only possible—but powerful.
0 notes
Text
Comment faire tourner Windows dans votre navigateur, sans rien installer
Envie de retrouver l’ambiance d’un ancien bureau Windows ou de tester une version plus récente sans toucher à votre système ? Bonne nouvelle : il est tout à fait possible d’exécuter différentes versions de Windows directement depuis votre navigateur, sans rien installer. Que vous soyez sur macOS, Linux, ou même Windows, ces émulateurs en ligne sont parfaits pour satisfaire une dose de nostalgie, apprendre à utiliser un nouvel environnement, ou tester quelques logiciels sans prise de risque. Certains fonctionnent comme de véritables machines virtuelles, d’autres comme des démonstrations interactives, mais tous ont un point commun : vous pouvez les essayer en quelques clics. Voici donc une sélection des meilleurs émulateurs Windows disponibles sur navigateur. 1. AppOnFly VPS – L’expérience Windows 11 la plus réaliste On commence fort avec AppOnFly VPS, un véritable serveur virtuel qui vous permet d’exécuter Windows 11 dans toute sa splendeur. Ce n’est pas un simple clone : ici, vous utilisez une version réelle du système, avec accès à PowerShell, à l’Éditeur du Registre et même à la fameuse fonction Edge Copilot Suggestions, introduite dans la version 24H2. 💡 À savoir : vous disposez de 50 minutes d’essai gratuit par session. L’astuce ? Vous pouvez relancer plusieurs sessions, mais attention à ne pas dépasser la limite par IP. Pour un usage plus régulier, des forfaits payants débutent à 5 euros pour 100 heures par an. 2. Win11React – Une reproduction fidèle en React Poursuivons avec Win11React, un émulateur développé avec amour en JavaScript, React et CSS. Il ne s'agit pas d'une machine virtuelle complète, mais l’interface utilisateur de Windows 11 y est fidèlement reproduite. Vous pouvez explorer les paramètres, naviguer dans les menus, et même enregistrer des fichiers sur le bureau. Idéal pour se familiariser avec l’apparence de Windows 11, notamment si vous hésitez à migrer depuis Windows 10. Ne vous attendez cependant pas à pouvoir installer des logiciels ou modifier les configurations système. 3. Windows 10 Lite par OnWorks – Simplicité et compatibilité Vous cherchez quelque chose de plus familier ? L’émulateur Windows 10 Lite proposé par OnWorks est une solution accessible qui simule très bien les éléments essentiels de Windows 10 : menu Démarrer, Explorateur de fichiers, Panneau de configuration, tout y est. Basé sur Linux, il reste fonctionnel sur la plupart des navigateurs modernes. L’icône Firefox est là par défaut, mais vous pouvez également installer Chrome ou Edge si besoin. Notez simplement que la réactivité peut varier selon votre connexion et votre appareil. 4. WebJeet – Le Windows 10 des débuts, version légère Vous êtes nostalgique des premières versions de Windows 10 ? Alors WebJeet est fait pour vous. Ce simulateur vous plonge dans l’interface de Windows 10 tel qu’il était à son lancement, avec un accès aux applications classiques comme Microsoft Store ou Office. L’expérience est plutôt superficielle, mais intéressante pour observer l’évolution du système au fil des années. Un bon outil pour les curieux et les amateurs de rétro-design Microsoft. 5. Win7 Simu – Le retour de Windows 7 Ah, Windows 7... Un grand classique ! Avec Win7 Simu, vous pouvez revivre cette époque dorée où le menu Démarrer était encore au centre de toutes les attentions. Vous y trouverez les jeux emblématiques comme Démineur ou Solitaire, et un accès fonctionnel à l’invite de commandes. Certaines applications sont également préinstallées, et vous pourrez même utiliser des jeux comme Flappy Bird ou Minecraft Survival dans un navigateur. 6. WinXP – Le charme intemporel de Windows XP Envie d’un bon vieux Windows XP ? Cet émulateur le reproduit avec soin, incluant ses outils de base comme Paint, Bloc-notes, ou encore Internet Explorer (même si ce dernier ne vous connectera pas vraiment au Web). C’est surtout une expérience éducative et nostalgique, utile pour se rappeler comment Windows fonctionnait à l’époque. Vous pouvez créer, enregistrer et même éditer des fichiers dans les applications intégrées.
7. Windows 98 – Virtual x86 pour les puristes On remonte encore le temps avec une version complète de Windows 98, hébergée sur Virtual x86. Cet émulateur vous permet non seulement d’exécuter des applications, mais aussi d’installer des jeux compatibles, et même de naviguer sur Internet (dans une certaine limite). 💾 Il est possible de sauvegarder vos sessions sous forme de fichiers .BIN et de les recharger plus tard. Pour activer Internet, pensez à exécuter le fichier networking.bat présent sur le bureau. 8. Windows 95 dans DOSBox – Retour dans les années 90 Enfin, pour les plus nostalgiques d’entre nous, Windows 95 dans DOSBox est un vrai petit bijou. Il recrée cette vieille interface si familière avec FreeCell, Dame de Pique, WordPad, et bien sûr, l’indétrônable Démineur. Les fichiers créés sont enregistrés dans le stockage local de votre navigateur, ce qui permet de retrouver facilement vos documents WordPad ou dessins Paint. Vous ne pourrez cependant pas transférer de fichiers ni accéder à Internet.
0 notes
Text
Master IT Infrastructure: Windows Server Administration Course in Australia
In today’s digitally driven world, servers are the foundation of every business’s IT operation. From hosting applications and managing user access to maintaining data security, servers do it all—and the professionals who manage them are critical to every organization's success. If you’re an IT professional in Australia looking to enhance your system administration skills, the Windows Server Administration Course in Australia offered by Xelware is your ideal next step.
This course is specially designed for both aspiring and experienced administrators, giving you practical, real-world skills to configure, manage, and maintain Windows Server environments effectively. Whether you're aiming to boost your resume, prepare for certification, or support your organization's infrastructure more confidently, this training is your gateway.
Why Learn Windows Server Administration?
Windows Server is one of the most widely used operating systems for managing enterprise-level IT infrastructure. It powers file servers, domain controllers, DNS, DHCP, and much more. With the continued growth of hybrid environments—mixing on-premise and cloud technologies—the need for skilled Windows Server administrators is only increasing.
By mastering Windows Server administration, you can:
Improve the performance, stability, and security of IT environments
Manage networks, users, and policies with precision
Ensure business continuity with proper backup and recovery practices
Reduce system downtime and boost productivity across the organization
Become a key resource in IT operations, infrastructure design, and support
What You’ll Learn in the Course
The Windows Server Administration Course in Australia from Xelware is based on Microsoft’s official curriculum and is updated to reflect the latest best practices and technologies in system administration.
Key areas covered include:
Installing and configuring Windows Server roles and features
Managing Active Directory Domain Services (AD DS)
Implementing DNS, DHCP, and IPAM
Maintaining server performance and monitoring systems
Ensuring security with group policies, file permissions, and firewall configurations
Automating tasks with PowerShell and administrative templates
Performing regular backups and disaster recovery
The course also emphasizes practical labs and case studies so you can apply what you’ve learned in realistic scenarios.
Why Choose Xelware in Australia?
Xelware is a trusted name in professional IT training, known for delivering industry-relevant content with expert instruction. Their Windows Server Administration Course is tailored for Australian learners and businesses, offering flexible schedules, local time zones, and trainers with hands-on experience in enterprise IT environments.
Here’s what sets Xelware apart:
Instructor-led sessions delivered live and online across Australia
Microsoft-certified trainers who teach from real-world experience
Interactive labs and assignments that build job-ready skills
Certification preparation and guidance to help you succeed
Post-training support and resources to reinforce your learning
Whether you're in Sydney, Brisbane, Adelaide, Melbourne, or working remotely from any corner of Australia, Xelware makes high-quality IT training accessible to you.
Who Should Take This Course?
This course is ideal for:
IT support professionals seeking to move into system administration
Network administrators wanting to broaden their expertise
System administrators responsible for Windows-based infrastructure
Students and recent graduates looking to specialize in server technology
IT managers who want to better understand their infrastructure
A basic understanding of networking concepts and the Windows operating system is recommended, but the course is structured to guide learners at all levels.
Final Thoughts: Build a Reliable IT Backbone
Every successful business relies on stable, secure, and efficient server infrastructure. As a Windows Server Administrator, you’ll play a vital role in ensuring the smooth operation of IT systems. The Windows Server Administration Course in Australia from Xelware gives you the skills and confidence to take on that responsibility with expertise.
0 notes
Text
Microsoft Copilot Tutorial: Introduction to Copilot for Microsoft 365
youtube
In this YouTube video, Tarik Rukab introduces Microsoft Copilot, an AI tool integrated into Microsoft products. Copilot is available through Bing or via copilot.microsoft.com, offering a free version for everyday tasks like planning or recipe suggestions.
For enterprise use, it’s embedded into Microsoft 365, requiring a subscription to enhance productivity apps such as automating formula calculations in Excel and presentation creation in PowerPoint. Copilot is also integrated into Windows and various Microsoft security and analytics tools. Different versions of Copilot are accessed through specific URLs. Tarik provides a brief overview and hints at a demonstration of its capabilities.
The speaker then delves into Copilot’s functionalities, highlighting its ability to assist with tasks like creating images, planning vacations, and aiding in cooking or fitness routines. The demonstration focuses on deploying a virtual machine scale set on Azure, showcasing auto-scaling features that adjust web servers based on demand. The speaker details configurations such as resource groups, virtual networks, and security settings, emphasizing Copilot’s efficiency in automating script writing rather than manual coding, thus simplifying cloud management.
Next, the speaker demonstrates using Copilot to create a Powershell script for deploying an Azure virtual machine scale set with Windows Server 2022. Copilot generates the script syntax and prompts the user to replace placeholder values, streamlining the script creation process. Despite Copilot’s automation, the speaker stresses the importance of testing and debugging the scripts. Overall, the session highlights Copilot’s potential to simplify complex scripting tasks and improve productivity while allowing user customization.
1 note
·
View note
Text
Discover AWS Systems Manager Cross-Account Management
What is AWS Systems Manager?
AWS Systems Manager is a solution that facilitates the management, viewing, and control of your infrastructure in multicloud, on-premises, and AWS settings.
AWS Systems Manager’s advantages
Boost visibility throughout your whole node infrastructure
A consolidated view of all the nodes across the accounts and regions of your company is offered by AWS Systems Manager. Get node information quickly, including its name, ID, installed agents, operating system information, and tags. You may find problems and act more quickly by using Amazon Q Developer to query node metadata in natural language.
Use automation to increase operational efficiency
Reduce the time and effort needed to maintain your systems by automating routine operational chores. Systems Manager eliminates the need for remote PowerShell, SSH, or bastion hosts by enabling you to safely and securely manage your nodes at scale without logging into your servers. It offers a straightforward method for automating routine operational tasks, like software and patch installations, registry modifications, and user administration, across groups of nodes.
Make node management easier at scale in any setting
Any AWS, on-premises, or multicloud environment can run the Systems Manager Agent (SSM Agent), enabling Systems Manager to offer out-of-the-box visibility and simplifying managed node maintenance. Set up diagnostics to run automatically in order to find problems with the SSM Agent. Issues with pre-defined runbooks can then be fixed. Once under control, nodes can efficiently carry out vital operational functions including remotely executing commands, starting logged sessions, and patching nodes with security updates.
Tools
You can use the entire suite of AWS Systems Manager tools to securely connect to nodes without managing bastion hosts or SSH keys, patch nodes with security updates, automate operational commands at scale, and obtain thorough fleet visibility once your nodes are managed by Systems Manager.
Use cases
Control every node you have
Gain thorough insight into your hybrid and multicloud systems, as well as your node infrastructure across Amazon Web Services accounts and regions. Rapidly detect and resolve agent problems to restore unmanaged nodes and efficiently carry out crucial operational duties, such applying security updates to nodes, starting and recording sessions, or executing operational commands.
Automate your processes
Make your computational resources available, configure them, and deploy them automatically. To address common problems like misconfigured agents, keep infrastructure up to date with SSM Agent diagnosis and remediation. Execute essential operational activities, like automatically applying fixes for applications and operating systems on a regular basis.
Increase the effectiveness of operations
Prioritize increasing operational effectiveness, cutting expenses, and growing your company. Across your hybrid and multicloud setups, AWS Systems Manager is your enterprise-grade solution for managing nodes at scale with cross-account and cross-region visibility.
Presenting a fresh AWS Systems Manager experience
AWS is presenting an enhanced version of AWS Systems Manager today, which offers the much-desired cross-account and cross-region experience for large-scale node management.
All of your managed nodes, including different kinds of infrastructure like Amazon Elastic Compute Cloud (EC2) instances, containers, virtual machines on other cloud providers, on-premise servers, and edge Internet of Things (IoT) devices, can be seen centrally with the new System Manager experience. When they are linked to Systems Manager and have the Systems Manager Agent (SSM Agent) installed, they are called “managed nodes.”
A node is referred to be a “unmanaged node” if an SSM Agent ceases operating on it for any reason, at which point Systems Manager no longer has access to it. The latest version of Systems Manager also makes it easier to find and troubleshoot unmanaged nodes. To resolve any problems and restore connectivity so they can once more be managed nodes, you may run and even schedule an automated diagnosis that gives you suggested runbooks to follow.
Amazon Q Developer, the most powerful generative AI-powered software development helper, has also been integrated with Systems Manager. Using natural language, you may ask Amazon Q Developer questions about the nodes you’ve handled. You’ll receive quick answers and links to the Systems Manager where you can take action or carry out more research.
With the new interface with Systems Manager in this edition, you can also leverage AWS Organizations to enable a delegated administrator to centrally manage nodes throughout the business.
AWS Systems Manager pricing
You can monitor and fix operational problems with all of your AWS applications and resources, including Amazon Elastic Compute Cloud (EC2), Amazon Relational Database Service (RDS), Amazon Elastic Container Service (ECS), and Amazon Elastic Kubernetes Service (EKS) instances, as well as in multicloud and hybrid environments, using the unified user interface that AWS Systems Manager offers. With AWS Systems Manager, you may begin using the benefits of the AWS Free Tier without paying a dime. No upfront obligations or minimum costs apply. There may be restrictions.
AWS Free Tier
The following functionalities of AWS Systems Manager are available to you for free as part of the AWS Free Tier. There may be restrictions.
Explorer
Enabling Explorer does not incur any further fees. There may be restrictions.
The dashboard of Explorer is populated by paid OpsCenter APIs (GetOpsSummary). These API queries will incur fees. The Export to CSV option uses an aws:executeScript action step to run an Automation document. The cost of these actions may be determined by Automation pricing.
For more details please visit the AWS systems manager pricing page.
In conclusion
Gaining visibility and control over your computing infrastructure and carrying out operational tasks at scale need the use of Systems Manager. Through a centralized dashboard, the new experience provides a centralized view of all your nodes across AWS accounts, on-premises, and multicloud environments. It also integrates Amazon Q Developer for natural language queries and allows one-click SSM Agent troubleshooting. By going to the Systems Manager panel and following the simple steps, you may activate the new experience without paying more.
Read more on govindhtech.com
#DiscoverAWSSystems#ManagerCross#Tools#AccountManagement#AmazonQDeveloper#AmazonWebServices#AmazonElasticComputeCloud#virtualmachines#AmazonRelationalDatabaseService#RDS#technology#technews#news#govindhtech
0 notes
Text
5 Tips For Azure Users That Will Change There Life
Here are five tips for Azure users that can significantly enhance their experience and productivity:
Leverage Azure Cost Management and Billing: Take advantage of Azure Cost Management and Billing tools to monitor, optimize, and control your cloud spending. Set up budgets, alerts, and cost analysis reports to gain visibility into your usage and identify opportunities for cost savings. Utilize features like Azure Advisor recommendations to optimize your resource usage and reduce unnecessary expenses.
Implement Azure Resource Groups and Tags: Organize your Azure resources effectively using resource groups and tags. Resource groups allow you to manage and group related resources together, making it easier to manage and maintain your deployments. Tags provide additional metadata that can be used for tracking, cost allocation, and resource management purposes, helping you categorize and identify resources across your Azure environment.
Embrace Infrastructure as Code (IaC): Adopt Infrastructure as Code (IaC) practices using tools like Azure Resource Manager (ARM) templates, Azure CLI, or Azure PowerShell. Define your infrastructure and configurations as code to automate provisioning, deployment, and management of Azure resources. This approach ensures consistency, repeatability, and scalability of your deployments while reducing manual errors and speeding up the development lifecycle.
Implement Azure Backup and Disaster Recovery: Safeguard your data and applications by implementing Azure Backup and Disaster Recovery solutions. Utilize Azure Backup to protect your data and workloads across Azure services, virtual machines, and on-premises environments. Implement Azure Site Recovery to replicate and orchestrate failover of your applications and services to a secondary location, ensuring business continuity and minimizing downtime in the event of a disaster.
Stay Updated with Azure Documentation and Community: Keep yourself informed about the latest Azure updates, best practices, and tips by regularly referring to Azure documentation, blogs, forums, and community resources. Stay connected with the Azure community through social media, user groups, and online forums to learn from others, share experiences, and troubleshoot issues effectively. Participate in Azure events, webinars, and training sessions to deepen your understanding of Azure services and stay ahead of the curve in your Azure journey.
By implementing these tips, Azure users can optimize their cloud deployments, improve operational efficiency, and maximize the value of their investments in Microsoft Azure.
#technology#business#marketing#artificial intelligence#microsoft#machine learning#success#commercial#information technology
0 notes
Text
AWS Lambda and the Power of Serverless Computing in 2025
In a time when speed, scalability, and efficiency are critical to software development, serverless computing has emerged as a transformative approach to building cloud-native applications. At the forefront of this shift is AWS Lambda, Amazon Web Services' flagship serverless compute service that allows developers to run code without managing servers.
By offloading infrastructure concerns to AWS, Lambda enables teams to focus purely on code, reducing operational overhead while improving flexibility and performance. But what exactly makes this service so powerful? Let’s explore how AWS Expert Lambda is shaping modern cloud architecture in 2025.
What is AWS Lambda?
AWS Lambda is a serverless computing service that executes code in response to events. You simply write your code in supported languages, upload it to Lambda, and AWS handles the provisioning, scaling, and maintenance of the underlying servers. Whether it's a file upload to Amazon S3, a change in a DynamoDB table, or an API call, Lambda automatically runs your function in a highly available and fault-tolerant environment.
No Server Management Required
One of Lambda’s biggest advantages is that you don’t need to manage servers at all. AWS handles the entire infrastructure layer—including provisioning, scaling, security patches, and operating system updates. This serverless model reduces operational burden and accelerates your development lifecycle, enabling teams to ship features faster.
Event-Driven by Design
AWS Lambda operates on an event-driven architecture, executing functions in response to specific triggers. These events can originate from multiple AWS services or external applications. For example, uploading an image to S3 can trigger Lambda to generate a thumbnail, or a new record in a database can launch a data processing workflow.
This design pattern is ideal for building reactive and automated systems, particularly for microservices, IoT applications, and real-time data processing.
Automatic and Instant Scaling
Scaling applications can be challenging and expensive in traditional environments. Lambda removes this complexity with built-in auto-scaling. Your code can handle a single request or thousands per second—Lambda dynamically allocates resources based on traffic volume. This responsiveness makes it ideal for unpredictable or spiky workloads without requiring any configuration changes from your end.
Stateless Function Execution
Lambda functions are stateless, which means each invocation runs in isolation without relying on persistent memory or session data from previous runs. This independence boosts scalability and reliability. If your application requires persistent data, it can integrate with services like Amazon RDS, DynamoDB, or S3 for external storage.
Cost-Efficiency with Pay-Per-Use Billing
With AWS Lambda, you only pay for what you actually use. Billing is based on the number of requests and the duration your code runs, measured in milliseconds. There are no charges for idle resources, which is particularly useful for workloads that experience infrequent or inconsistent traffic.
This model provides significant cost savings compared to traditional server-based deployments, especially for startups and small businesses managing limited budgets.
Deep Integration with the AWS Ecosystem
Lambda functions integrate effortlessly with a broad range of AWS services such as:
Amazon API Gateway for creating RESTful APIs
Amazon S3 for object storage
Amazon DynamoDB for NoSQL data storage
Amazon Kinesis for real-time streaming data
Amazon CloudWatch for monitoring and logging
This integration capability enables developers to construct powerful, event-driven applications without building glue code or custom infrastructure.
Multi-Language Support
AWS Lambda supports several mainstream programming languages including:
Python
Node.js
Java
Ruby
C#
PowerShell
In addition, AWS allows developers to create custom runtimes, giving even more freedom to use niche or in-house languages. This makes Lambda suitable for a wide range of development teams and use cases.
Real-World Applications of Lambda
AWS Lambda is already widely used in diverse scenarios:
Web application backends: Handle requests and responses efficiently without provisioning servers.
Image and file processing: Automatically resize or analyze media files as they’re uploaded.
ETL pipelines: Transform and load data in real-time from one service to another.
IoT automation: Trigger events based on sensor input or device behavior.
Chatbots and voice assistants: Manage conversational logic in platforms like Amazon Alexa.
Challenges and Considerations
While Lambda offers many advantages, it’s important to understand potential limitations:
Cold starts: There can be a slight delay when functions are invoked after a period of inactivity.
Execution time limits: Each Lambda function has a maximum execution duration (currently 15 minutes).
Monitoring complexity: Observability across distributed Lambda functions can be more challenging than monolithic apps, but services like AWS CloudWatch and X-Ray help bridge that gap.
Conclusion
AWS Lambda is not just a cost-effective solution; it’s a catalyst for innovation. By abstracting infrastructure management, it empowers developers to focus on delivering business value. From startups building MVPs to enterprises scaling microservices, Lambda has become an essential part of the modern cloud toolkit.
If you're seeking to future-proof your applications while reducing infrastructure overhead, AWS Lambda is a platform worth adopting. Start small, experiment with real-world triggers, and let AWS handle the complexity behind the scenes.
0 notes
Text
Query Dhcp For Mac

Many many moons ago, we had a way to trawl through DHCP scopes utilising the netsh tool to find devices on our networks that match a certain MAC address.
Instead of relying on such an outdated tool that isn’t on Microsoft’s radar to keep alive, I’ve cobbled together a function in Powershell aptly named Get-Mac to perform some duty which added functionality (and no required to log onto DHCP hosts).
The above function will by default, utilise the Get-DhcpServerInDC to return all your DHCP servers, obtain all their scopes with Get-DhcpServerv4Scope, look through each scopes lease with Get-DhcpServerv4Lease and finally match any lease with the MAC address provided. If you have a large enterprise network, comprises of multiple AD sites, then you can narrow the field down with the -DhcpSite together with the DNS name of your DHCP server in that site. Both the -Mac and the -DhcpSite switches work on wildcard matches so you won’t need the full address or full name of the DHCP server. Hopefully your AD sites have a naming convention which should assist narrowing it down.
On your Mac, choose Apple menu System Preferences, then click Network. Open Network preferences for me. Select the network connection you want to use (such as Ethernet) in the list. Click the Configure IPv4 pop-up menu, then choose an option: If your address will be assigned automatically, choose Using DHCP. MAC addresses aren't in networks, not strictly speaking. They are attached to other objects, so you will need to search for those instead. There are (at least) 3 possible places a MAC address could be: - in a fixed address - in a Host - in a MAC filter. You will need to search each of those.
Let me know if you found this one useful in your SysAdmin’ing day or think of improvements11.
There comes a point when you ask yourself, ‘there has to be a better way’ (this should be often). This was certainly the case where after a large campus switch out which required many printers to be reconfigure. Part of that reconfiguring was creating new DHCP reservation.
Unfortunately, if you do not cull the old lease, Windows (rightfully so) informs you there is already a device with that MAC in the reservation database. In someone’s at Microsoft’s infinite wisdom, they neglect to tell you what DHCP scope the device is currently reserved in. So I would begin to trawl each scope I guessed in maybe reserved in based on my knowledge of our current scopes. This would waste many minutes of my time (sometimes without success) which means my customers are getting less of me. No good.
But, I did ask myself, ‘there has to be a better way’…and there is!
Open up a command prompt window on your DHCP server (or a remote powershell session) and input the following:
Powershell Query Dhcp For Mac Address
All you need is the MAC address of the device and input it without ‘-‘ in the MACADDRESS space and you should get something a little like the below:
Query Dhcp For Mac Address
Another time saver for the time poor SysAdmin
1 note
·
View note
Text
Just some ionic notes
Starting notes on ionic
Never used Angular in earnest before. Also an introduction to a full fledged framework (other than Ruby on Rails) which is oldskool at this point I feel like. in addition to the camera component, we can use this helloworld app to learn theming and use the other two tabs to test some of the other components and build / structure what a ‘page/activity’ can look like. The camera bit shows you how to use the native capabilities of a mobile device and outside ‘stuff’.
When we are done we can port the whole thing to an .apk to test on-device. This will serve as a dry run for building a prod type app.
https://ionicframework.com/docs reference documentation
//general init code// ionic start myApp tabs <name> <prototype>dsafsd
We had this error====== ionic : File C:\\ionic.ps1 cannot be loaded. The file C:\\ionic.ps1 is not digitally signed. You cannot run this script on the current system. For more information about running scripts and setting execution policy, see about_Execution_Policies at https:/go.microsoft.com/fwlink/?LinkID=135170. At line:1 char:1 + ionic start myApp tabs + ~~~~~ + CategoryInfo : SecurityError: (:) [], PSSecurityException + FullyQualifiedErrorId : UnauthorizedAccess
> this error needs to be resolved by setting some power shell environment variables like..
Set-ExecutionPolicy -ExecutionPolicy AllSigned -Scope CurrentUser - for signed stuff
and
Set-ExecutionPolicy -ExecutionPolicy RemoteSigned -Scope CurrentUser - works for ionic
or
You can use the ExecutionPolicy parameter of pwsh.exe to set an execution policy for a new PowerShell session. The policy affects only the current session and child sessions.
To set the execution policy for a new session, start PowerShell at the command line, such as cmd.exe or from PowerShell, and then use the ExecutionPolicy parameter of pwsh.exe to set the execution policy.
For example: PowerShell
pwsh.exe -ExecutionPolicy AllSigned ==========
IONIC HUB
- I set up an ionic account. The details are saved to LastPass. ------
FIRST APP - setup and served. This is interesting, literally just boilerplate though: https://ionicframework.com/docs/components ^^ more component documentation
>> 10/5/20 See written sheet for a design sketch of our app. basically RH type ( do design )/ code that ronatracker app as a primary test run.
Currently following this tut:
https://ionicframework.com/docs/angular/your-first-app
----- I'm confused where to put the class: Next, define a new class method, addNewToGallery, that will contain the core logic to take a device photo and save it to the filesystem. Let’s start by opening the device camera: Also. https://www.loom.com/my-videos Lobe.ai for a sweet website design.
From what I learned today, interface is like a metadata location or an accessible data object. Also learned the way they build this tutorial, that copy paste is a crutch and a pain. Read carefully, they specify where to put things
Holy crap we did it.
>> 11/1/20 Okay finished the last two pages, where there was some storage stuff. A bit over my head but here is what I take away from it. - we learned how to leverage 'outside stuff' like a phone camera. I assume otuer datatypes/sources will function similarly like a GPS service etc. At least I think so. Basically stuff outside of the app?

Lessons
- We learned how to push an collection of pictures to an array, and then how to display that array using built in gallery - a surface level intro to the GRID system. - how to start an app - configuring a dev environment - how to put in a Fab - what .ts is (typescript, a typed-javascript); new js syntax types (for me) like blob; a refresh on actually making classes and methods and such - interface holds metadata - you can make a functional app very quickly honestly - 'await' is a cool thing await this.photoService.loadSaved();
>> NEXT: finish the Tut to the T, Then branch and playground with leftover tabs. Then deep dive for docs, also learn rest of dev cycle, watch videos, then app project.
questions: More about the constructors What are all of these other files that come in the src folder? wtf is this base64 stuff and do I need it? how do I install new components and use them? How can I build something for production?
3 notes
·
View notes
Text
Enable Telnet Client
You ought to be about to utilize Telnet via Command Prompt now. Telnet is an old outdated protocol that's used for remote command-line administration on several different devices like Cisco routers. Telnet is a network protocol used on the web or local area networks to offer a bidirectional interactive text-oriented communication facility employing a digital terminal connection. Telnet is also utilized as a verb. In summary, Telnet is a text-based tool which may be used at the command prompt to connect to a different computer online. Telnet isn't a good chose to control a system over the net. Should you do a yum install telnet it is only going to contain client telnet program.
Install Telnet if it's not already installed. Now you've enabled telnet you ought to be able to get started issuing commands with it and using it to troubleshoot TCP connectivity issues. It's wise not to use telnet whenever you are dealing with sensitive data. Telnet is really the most insecure approach to attach with a remote computer. Originally Telnet was developed for the private network and it ought to be used just in private network where outsider computers aren't allowed to contact network.
The Basics of Enable Telnet Client
In the event the service isn't running, an individual would find the next error when making a telnet connection. You should allow the service first. You have to enable and begin the service. Telnet service was created on 1969. Before starting To troubleshoot a connection, you want to understand the address and port you're trying to connect to. A failed connection is going to be accompanied by an error message. An unsuccessful connection is going to be accompanied by an error message.
To prevent telnet service you may run the below command. All the commands accept the mandatory parameters, which you are able to discover using the Get-Help cmdlet. If the above command doesn't return any output then telnet-server isn't installed. The upcoming obvious command to check at is the command to do a scenario-based deployment. The telnet command should currently be available. Even easier, particularly if you don't intend on following up your very first Telnet command with a variety of further ones, you are able to just type telnet followed by any Telnet command, like you'll see in the majority of our examples below.
This set of commands is a fast depiction of how you're able to enable telnet from a PowerShell prompt to guarantee the capability of testing certain ports. You may save sessions so you don't need to type exactly the same information each time you connect to the exact same session. Typically there is just a single session per remote client.
It's possible to allow the customer either by command line or by means of the graphical interface. Firstly you must allow the telnet client, if you don't enable it you'll receive a result very similar to the below message when attempting to utilize it. The Telnet Client is among the absolute most basic tools for such pursuits. It's possible to allow the telnet client either by command line or by means of the graphical interface. In order in order to connect to Telnet servers, you are going to have to have the Telnet Client installed on your PC. Your TS3 server could possibly be lacking permissions.
Whichever server you're using. As mentioned in the introduction, Windows Server 2012 comes with a huge quantity of PowerShell cmdlets. If you want to locate Telnet servers to connect to and work with, there are a lot of fantastic websites available which provide loads of Enable telnet Client resources. Your SMTP Server is currently configured and prepared to go. Once you are finished with the configuration, verify whether the telnet to a server works.
If the system isn't connected with any repository, the above command will not operate. You might have to restore your operating system to a prior state where the problem did not exist. If it is possible to tell which my computer that was not there before and I can't eliminate it. For a successful implementation, it ought not to have the ability to access the server computer.
Telnet Client utility is a crucial and most useful tool that permits you to connect to other devices. Otherwise, you can download the Putty SSH utility as it may also be utilized as a Telnet client for Windows. As with several other facets of the operating system, Windows Server 2012 provides PowerShell support to do the exact same function. Installing and enabling on your device is extremely easy as you have observed in the aforementioned procedure. After installation is finished, close the key Programs and Features Control Panel applet.
youtube
1 note
·
View note
Text
The One Thing to Do to Enable Telnet Client
If the system isn't connected with any repository, the above command will not operate. You might need to restore your operating system to a former state where the problem did not exist. If you are able to tell which my computer that was not there before and I can't do away with it. For a successful implementation, it ought not to have the ability to access the server computer.
Whichever server you're using. Your TS3 server could be lacking permissions. Once you are finished with the configuration, verify whether the telnet to a server works. As mentioned in the introduction, Windows Server 2012 comes with a great quantity of PowerShell cmdlets. In case the server doesn't support Explicit SSL, then you still must use Stunnel that's a little more complicated. Your SMTP Server is currently configured and prepared to go.
You are able to allow the customer either by command line or by means of the graphical interface. Firstly you have to allow the telnet client, if you don't enable it you'll receive a result very similar to the below message when attempting to utilize it. The Telnet Client is among the absolute most basic tools for such pursuits. You may allow the telnet client either by command line or by means of the graphical interface.
You ought to be about to utilize Telnet via Command Prompt now. It's wise not to use telnet whenever you are dealing with sensitive data. Now you have enabled telnet you need to be able to get started issuing commands with it and using it to troubleshoot TCP connectivity troubles. Telnet is an old outdated protocol that's used for remote command-line administration on several devices like Cisco routers. Telnet is also utilized as a verb. Telnet isn't a good chose to control a system over the world wide web. Should you do a yum install telnet it's only going to contain client telnet program.
To prevent telnet service you are able to run the below command. Now you know your way around the Command Prompt, it is a great idea you learn a few of the tricks and suggestions for the Windows 10 Task Manager too. To use any of these commands you have to bring up the Command Prompt itself. If the above command doesn't return any output then telnet-server isn't installed. Despite the fact that the above commands are the most useful while using the Command Prompt, there's more you're able to do. The upcoming obvious command to check at is the command to do a scenario-based deployment.
You don't need to understand all the Enable telnet Client Command Prompt commands to discover some use within it. The telnet command should currently be available. Even easier, particularly if you don't intend on following up your very first Telnet command with a variety of further ones, you may just type telnet followed by any Telnet command, like you'll see in the majority of our examples below.
A reboot is needed for the modifications to come into effect. If you aren't certain whether a rule is working telnet may be an excellent means to help debug. Among the biggest perks of Telnet is with a very simple command it's possible to test whether or not a port is open. Rather than going to the Control Panel, there are a better means.

A failed connection is going to be accompanied by an error message. An unsuccessful connection is going to be accompanied by an error message. If your network is live, make certain that you fully grasp the possible effect of any command. In the event the service isn't running, an individual would find the next error when making a telnet connection. You should allow the service first. You have to enable and initiate the service. Telnet service was created on 1969. Well, the obvious rationale is, to knock out the browser. Though most users decide to work with graphical interfaces, Telnet is among the simplest methods to check connectivity on specific ports. Luckily with PowerShell, it is not hard to allow the telnet functionality. Since there's just one feature to install, it is possible to directly click the Install button. The selected feature will be set up. It is possible to specify more than 1 feature in the very same package. In reality, you have many options.
You've got to click on a tick box facing Telnet client. This set of commands is a fast depiction of how it is possible to enable telnet from a PowerShell prompt to make sure the capacity of testing certain ports. You are able to save sessions so you don't need to type the exact same information each time you connect to the exact same session. In some instances, it may be required to close the telnet session and reconnect.
youtube
1 note
·
View note
Text
Windows Virtual Desktop – Now in Public Preview
As a long-suffering Citrix and RDS administrator, I’ve eagerly awaited the release of Microsoft’s virtual desktop offering that was announced at last year’s Microsoft Ignite – to put it to the test.
With Windows Virtual Desktop finally entering public preview, I took the chance to explore what the service offers and write up a blog post on my deployment experience, the “gotchas” I ran into, and some initial thoughts.
Fair warning, this is a long article, so skip to the end if you want my verdict!
Windows Virtual Desktop – The essentials before you begin
Before you start, you will need to have the following:
· An active Azure Subscription
· A pre-configured Virtual network & AD Domain
· A bit of patience: It’s still in preview, and different people are reporting varying levels of success with the deployment.
Thankfully, the deployment process has been well documented by Microsoft and I already had a lab environment set up.
For those wishing to follow along in a safe environment, I’ve placed some Azure Resource Manager (ARM) templates here for deploying some of the prerequisite infrastructure (you still need to configure AD properly).
Now - onto the fun stuff!
Windows Virtual Desktop – Step # 1: Installation
The first thing you will want to do, is grab some useful information and the new PowerShell module.
Locate and note down your AAD tenant ID and subscription ID – you will need these shortly. To install the PowerShell module, use the following command:
Install-Module -Name Microsoft.RDInfra.RDPowerShell
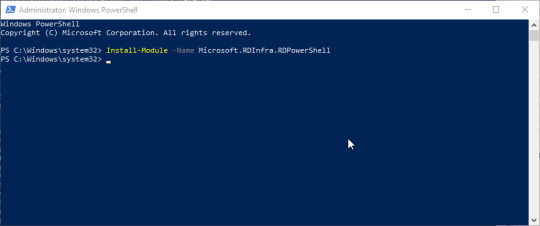
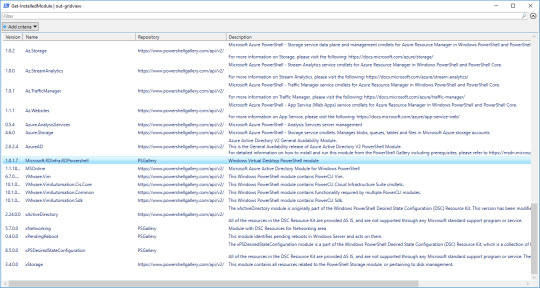
You should be able to verify the install with:
Get-InstalledModule | Out-GridView
(The grid view is not needed; it just makes everything so much easier to find!)
Windows Virtual Desktop – Step # 2: Tenant setup
Now, open the following URL: https://rdweb.wvd.microsoft.com in two SEPARATE tabs – we need to complete the next process twice. Once for the service, and once for the client. In the first window, input your Tenant ID and click submit. You will be asked to sign in and should get back a success message.
In the second window, swap the dropdown to “Client App”, input your tenant ID and submit. Hopefully you will get a second success!

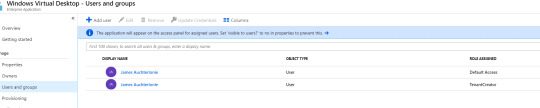
Windows Virtual Desktop – Step # 3: Assigning users, roles and permissions
You should now be able to view the Windows Virtual Desktop within your enterprise applications.

From the Enterprise Apps page, you will need to add an application permission to “Windows Virtual Desktop”; Assign a new user, and the role should be automatically populated as tenant creator.
Windows Virtual Desktop – Step # 4: Powershell
Next, you will create a Virtual Desktop Tenant using PowerShell.
The following two commands should complete this, with a slight pause for a password!
Add-RdsAccount -DeploymentUrl https://rdbroker.wvd.microsoft.com
New-RdsTenant -Name <TenantName> -AadTenantId <DirectoryID> -AzureSubscriptionId <SubscriptionID>
Make sure you keep the Tenant name in mind, as you will need this shortly.

I got a bit side tracked at this point, as it looked as if I could specify extra flags for an OMS workspace.
The possibility of onboarding the service from the first deployment is something I could not pass up.
Sadly, it didn’t appear to function, so I’ve left this as something to investigate as the product comes out of preview!
Windows Virtual Desktop – Step # 5: Session Host Pool
Next, we will create the juiciest part – a session host pool! Navigate to the resource addition section of Azure and look up “Windows Virtual Desktop - Provision a host pool”.
The setup is a simple ClickOps exercise with a couple of gotchas. I won’t dive too deep here, as the portal is self-explanatory.
The basics are as follows:
Configure a host pool and your initial testing users. Jot down the host pool name, as you will need this later.
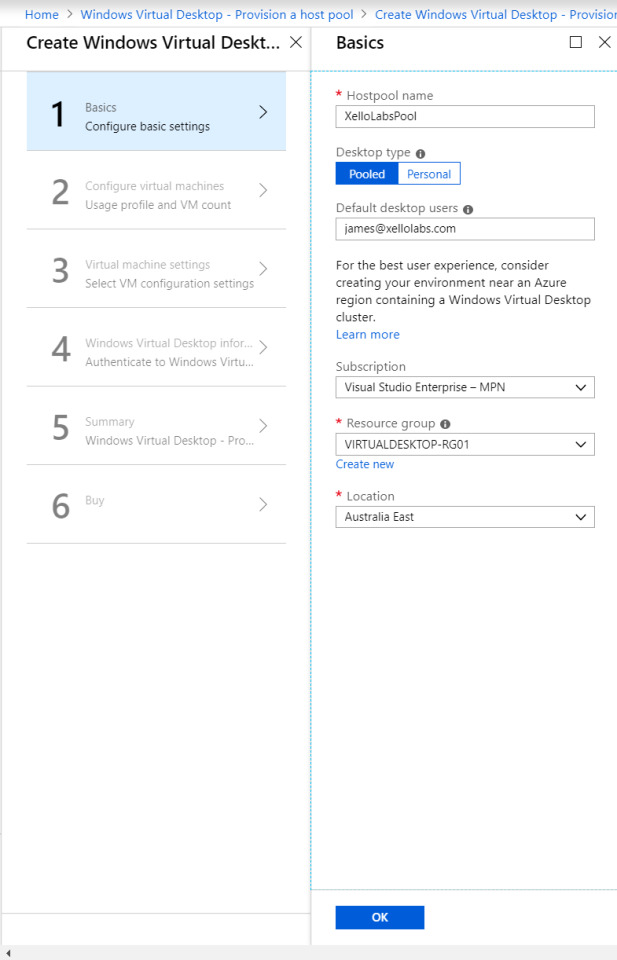
The VM configuration: Select how many users you expect, how much usage you expect, and a VM name prefix. Azure only allows 15 characters for VM names, so don’t make this one too long.
If you’re labbing the solution, it’s probably good to change the VM size and make sure it’s a single VM – 100 D8S virtual machines really hammers the credit card!

More VM configuration: This time its domain joining and the VNet configuration. Important to call out here, the web portal does not appear to recognize subdomains. Should you utilize a subdomain, you will need to select the “specify domain” option and type it in. I had corp.contoso.com (Original I know) as my domain, so this got me scratching my head for a bit!
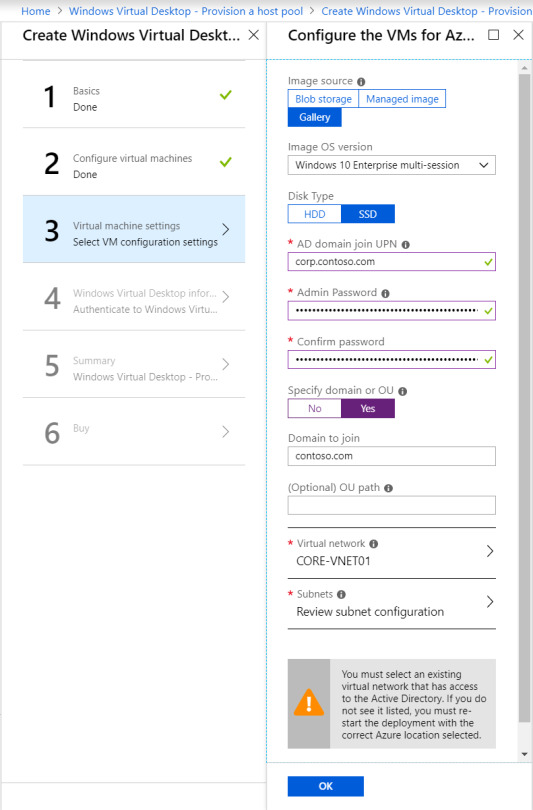
Tenant Configuration: This is where you will utilize the Tenant name from those initial PowerShell commands. If you didn’t keep record of it, get-rdstenant is your friend!
Use the credentials for the user you specified as “TenantCreator” earlier.

Final steps: Validate everything is correct and click deploy! (10 points to anyone who spots the error in the below validation!)

I’ve downloaded the template here, because if you’re not using templates and automation – you’re living in the past. Something for a future blog post! The deployment can take a while depending on your VM sizing, so patience is key.

Windows Virtual Desktop – Step # 6: Test users
If you have followed along with me for this long, well done! Once the deployment is completed, you should be able to log into this page with a test user.

Note: If you need to add extra test users, the doc for that is simple and can be located here.
Windows Virtual Desktop – The Xello Verdict
My initial thoughts on the Windows Virtual Desktop product are super positive.
For starters, it’s a huge upgrade from Remote Desktop Services 2016. My key comments and advice when evaluating or troubleshooting are:
Pay attention. While most of the deployment is a “next next” click through exercise there is a lot of room for error. The product is in preview and will have undocumented issues. Following on from this, be careful with your deployment size. While Microsoft takes care of the underlying connection brokering and session management, the default 100 VM deployment is expensive.
Don’t test this with an Azure AD account late at night. The solution uses on premise AD and you will be confused.
The product currently only supports Central US & East US 2. This will change as the product comes out of preview but expect some latency in the short term.
Do you have application configuration or performance requirements? You may need to test them a bit more than normal. Considering that Microsoft acquired FSLogix for this reason, I’m yet to evaluate how Microsoft worked through performance challenges and non-persistent settings. OneDrive immediately comes to mind in this space.
The Microsoft Doc and the event logs are your friends. I had to be patient and use the diagnostic commands at different stages when getting used to the product. Don’t be afraid to log into each desktop directly either. Under the hood it is still Windows 10!
If you want to learn more about Windows Virtual Desktop, or even just grab some advice on deployment, please feel free to reach out to myself and the Xello team!
Like the walkthrough? Stay tuned for the next part in my technical blog series, where I’ll be covering the Azure Sentinel and putting its security benefits to the test. Originally posted on: Xello.com.au
1 note
·
View note