#PowerShell Remoting Basics
Explore tagged Tumblr posts
Visit Tumblr Blog
Explore Tumblr blogs with no restrictions, modern design and the best experience.
Last Seen Tumblr Blogs


Fun Fact
Forty percent of Tumblr users are between the ages of 18 to 25.
Text
Enter-PSsession: Run PowerShell Remote Commands
Enter-PSsession: Run PowerShell Remote Commands @vexpert #vmwarecommunities #100daysofhomelab #homelab #PowerShellRemotingBasics #EnterPSSessionCommands #PowerShellRemoteServer #RemoteSystemManagement #WindowsServerPowerShell #NewPSSessionUsage
Windows PowerShell has changed how we manage our Windows Server environments. One of the powerful features of PowerShell is PowerShell remoting, which enables the execution of PowerShell commands or scripts on a remote computer. The Enter-PSSession command, a core part of PowerShell remoting, allows us to establish an interactive session with a remote system, fundamentally changing how we…
View On WordPress
#Enter-PSSession Commands#Managing Remote Computers#New-PSSession Usage#PowerShell Remote Commands#PowerShell Remote Server#PowerShell Remoting Basics#PowerShell Session Configuration#Remote System Management#Windows Server PowerShell#WinRM Service Guide
0 notes
Text
Master IT Infrastructure: Windows Server Administration Course in Australia
In today’s digitally driven world, servers are the foundation of every business’s IT operation. From hosting applications and managing user access to maintaining data security, servers do it all—and the professionals who manage them are critical to every organization's success. If you’re an IT professional in Australia looking to enhance your system administration skills, the Windows Server Administration Course in Australia offered by Xelware is your ideal next step.
This course is specially designed for both aspiring and experienced administrators, giving you practical, real-world skills to configure, manage, and maintain Windows Server environments effectively. Whether you're aiming to boost your resume, prepare for certification, or support your organization's infrastructure more confidently, this training is your gateway.
Why Learn Windows Server Administration?
Windows Server is one of the most widely used operating systems for managing enterprise-level IT infrastructure. It powers file servers, domain controllers, DNS, DHCP, and much more. With the continued growth of hybrid environments—mixing on-premise and cloud technologies—the need for skilled Windows Server administrators is only increasing.
By mastering Windows Server administration, you can:
Improve the performance, stability, and security of IT environments
Manage networks, users, and policies with precision
Ensure business continuity with proper backup and recovery practices
Reduce system downtime and boost productivity across the organization
Become a key resource in IT operations, infrastructure design, and support
What You’ll Learn in the Course
The Windows Server Administration Course in Australia from Xelware is based on Microsoft’s official curriculum and is updated to reflect the latest best practices and technologies in system administration.
Key areas covered include:
Installing and configuring Windows Server roles and features
Managing Active Directory Domain Services (AD DS)
Implementing DNS, DHCP, and IPAM
Maintaining server performance and monitoring systems
Ensuring security with group policies, file permissions, and firewall configurations
Automating tasks with PowerShell and administrative templates
Performing regular backups and disaster recovery
The course also emphasizes practical labs and case studies so you can apply what you’ve learned in realistic scenarios.
Why Choose Xelware in Australia?
Xelware is a trusted name in professional IT training, known for delivering industry-relevant content with expert instruction. Their Windows Server Administration Course is tailored for Australian learners and businesses, offering flexible schedules, local time zones, and trainers with hands-on experience in enterprise IT environments.
Here’s what sets Xelware apart:
Instructor-led sessions delivered live and online across Australia
Microsoft-certified trainers who teach from real-world experience
Interactive labs and assignments that build job-ready skills
Certification preparation and guidance to help you succeed
Post-training support and resources to reinforce your learning
Whether you're in Sydney, Brisbane, Adelaide, Melbourne, or working remotely from any corner of Australia, Xelware makes high-quality IT training accessible to you.
Who Should Take This Course?
This course is ideal for:
IT support professionals seeking to move into system administration
Network administrators wanting to broaden their expertise
System administrators responsible for Windows-based infrastructure
Students and recent graduates looking to specialize in server technology
IT managers who want to better understand their infrastructure
A basic understanding of networking concepts and the Windows operating system is recommended, but the course is structured to guide learners at all levels.
Final Thoughts: Build a Reliable IT Backbone
Every successful business relies on stable, secure, and efficient server infrastructure. As a Windows Server Administrator, you’ll play a vital role in ensuring the smooth operation of IT systems. The Windows Server Administration Course in Australia from Xelware gives you the skills and confidence to take on that responsibility with expertise.
0 notes
Text
nordvpn security
Hey you. ❗️
It's cyber. They're coming at us.
How about this then,
If we shut down the Internet...
They'll never be able to get to us.
This one, this one, this one.
I'm on a roll and it's coming.
I'm living in the doldrums💢.
I have been under cyber attack for 10 years now.
And it's still happening.
I'm still a stranger to the world.
You're not going to listen to my goofs.
I use nordvpn now. I use windows edge because it attacks me.
Now I use firefox. I do it on desktop with nordvpn.
It still interferes. I finally set it up and can configure Firefox for the web, although I also use Adguad with it.
I put in my basic email and password for Firefox, and an auxiliary password.
Then, set up the adguad settings from the top to the bottom.
I initialize my computer almost every day. Then I immediately put in the security settings.
⬇️
Security is a delicate setting with ESE security.
I take care not to be hijacked there. If you don't know, call ESET.
⬇️
windows is updating now. if windows is bad, initialize it.
It's going to be flushing out filtering garbage, because it has a virus🦠 in it. This also takes ⏰ time.
I would suggest you do a backup, but they use remote or powershell. I don't do backups these days.
Nordvpn has a lot of settings, VPN, threat protection, dark web mottling, device settings.
That's all I need.
Cyber threat syndrome so kill switch,split tunneling,
Add apps.

0 notes
Text
TPM: A Guide to Understanding Your Computer’s Security Chip

What is Trusted Platform Module (TPM) A Trusted Platform Module (TPM) is a secure cryptoprocessor chip on your computer’s motherboard.
First Contact TPM for Windows The BitLocker drive encryption, the Virtual Smart Card features, and the Crypto Provider are among the security components of the Microsoft Windows operating system that depend on TPM-based capabilities. In fact, Trusted Platform Module 2.0 needs to be activated in ALL desktop and server variants of Windows 10 and 11. By using remote attestation in conjunction with the system’s Trusted Platform Module to allow Measured Boot, the configuration of the system is protected from undetectable threats like rootkits.
On Intel’s Windows machine, Intel can quickly verify some Trusted Platform Module details by navigating to the Security Devices area of the Device Manager screen.
TPM details by navigating to the Security Devices area of the Device Manager screen.
Now let’s engage with it. Now that a terminal window is open, let’s extract some basic system data. There are numerous powershell cmdlets available in Windows that can be used right away.
Get-Tpm retrieves the following data from the module:
Intel can also use this information to deduce some details about the underlying system: For instance, if the platform is equipped with and employing Platform Trust Technologies (PTT), “Intel” will appear in the manufacturer section here. Here, a Trusted Platform Module from the company STM is being used.
Intel must communicate with Windows Core Security features, namely the Trusted Platform Module Base Services software component and related API, in order to utilise the Trusted Platform Module from an application standpoint. Microsoft offers tools and wrappers to facilitate the integration of these processes more quickly.
Then intel will begin examining these after that.
Linux-based TPM First Contact Working with keys securely across any TPM 2.0 compatible module is made feasible by a set of standardised commands and libraries that enable the use of TPMs for key loading and storage in Linux.
At a high level, you can check if a TPM is present in the system by running the following command in the system log: dmesg | grep -i tpm.
Here is a step-by-step guide to several fundamental Linux system interactions: Required conditions: Install a TPM 2.0 chip on the target machine. Install TPM 2.0 software. These packages differ per Linux distribution.The tpm2-tools and tpm2-tss packages are popular. Initialise TPM: Initialise the TPM before using it. Initialise the TPM with tpm2 startup. Establish an Application Key: Create a key that is unique to your application and that you wish to keep in the TPM.You can use a software library like OpenSSL or a Trusted Platform Module library like tpm2-tools to generate this key.
The following is one method of generating an RSA keypair: RSA algorithm -out appkey.pem -openssl genpkey
Fill the TPM with the Key: To load your application-specific key into the TPM, use the TPM 2.0 tools. For this, you’ll usually use the tpm2 load command: tpm2 load -C appkey.pub -r appkey.priv -u context.out This command saves the context of the key in the context.out file and loads it into the TPM. This context is necessary for using the key later on. Apply the resident key (TPM): You can use this commands or libraries such as tpm2-tss to execute cryptographic operations on the TPM-resident key when your programme needs to access it. To sign data using the TPM key, for instance, run the following commands: tpm2 sign -c context.out -g sha256 -m data.txt -s signature.bin Using the TPM-resident key, this command signs the data and stores the signature in signature.bin. Unload the Key (Optional): You can use the tpm2 flushcontext command to unload the TPM-resident key if you no longer require it: tpm2 flushcontext -c context.out. This releases the key’s associated TPM resources. Shutdown and Cleanup (Optional): You can use the tpm2 shutdown command to terminate the Trusted Platform Module once your programme has finished utilising it. Analysing TPM 2.0 thoroughly Advancements in Computer Security Trusted Platform Module (TPM) 2.0 hardware boosts computer security. It protects your system and encryption keys as a secure cryptoprocessor. Essential Features: Cryptographic Key Management: TPM 2.0 securely produces, stores, and utilises keys.Data encryption, digital signatures, and secure communication require these keys. TPM 2.0’s hardware isolation makes key theft and tampering much harder than with software-based systems.
Platform Integrity Validation: Trusted Platform Module 2.0 monitors firmware and other critical software. It looks for any unauthorised changes that might point to malware or efforts at tampering. TPM 2.0 can protect your data by stopping the system from booting if something suspect is found.
Platform Attestation: The firmware and software of your system can be reported on using Trusted Platform Module 2.0. Other security measures or reliable organisations can use these reports, known as attestations, to confirm the integrity of the system. This is useful for secure boot environments and for assessing a system’s health prior to allowing access to resources that are sensitive.
Benefits of TPM 2.0: BitLocker Drive TPM 2.0 securely holds encryption keys, strengthening encryption and other functions. This makes data access tougher for unauthorised parties, even if they reach your device.
Enhanced Platform Security: Your system will boot with authentic, unaltered firmware and software thanks to the platform integrity checks. This lessens the chance that malware will compromise your system remotely.
More Robust User Authentication: Trusted Platform Module 2.0 can be paired with Windows Hello and other comparable technologies to provide more reliable two-factor authentication. By requiring a physical factor in addition to a password, like a fingerprint or facial recognition, this strengthens security. TPM 2.0, Win11:
Microsoft says Windows 11 needs Trusted Platform Module 2.0. This shows how crucial hardware-based security capabilities are becoming in the battle against more complex assaults. The good news is that TPM 2.0 functionality is probably pre-installed on the majority of PCs made in the last few years. It may, however, be inactive by default in the BIOS settings.
Beyond the Fundamentals: Flexibility: TPM 2.0 takes a “library” approach, in contrast to its predecessor. This implies that Trusted Platform Module 2.0 features can be selected by manufacturers based on what best meets their device and security requirements. Wider acceptance across multiple platforms from laptops to embedded systems is made possible by this versatility.
Future-Proofing: Expansion is a key design principle of TPM 2.0. As security risks evolve, it supports the installation of new functions and algorithms. This guarantees that Trusted Platform Module 2.0 will continue to be applicable and useful when new security threats arise.
Read more on Govindhtech.com
#TrustedPlatformModule#tpm#intel#windows10#windows11#windows#microsoft#technology#technews#news#govindhtech
0 notes
Text
Linux Life Episode 84

Hello everybody and welcome back to Linux Life I admit its been a little while since I made an entry which was informing you of the death of Mangelwurzel and entry of the new Dell Inspiron 3525 I am currently using to type this article on.
Reason its been so long was I actually went back to Windows (stop spitting at back please it’s not pretty) because I wanted to play Blur and a few other games. Well I did and in that time I also tried several ways to have a Linux installation in some form of VM.
So first I used Virtualbox which is a Type 2 Hypervisor basically what that means is everything is emulated in its own little sandbox and all the hardware is virtual. I did manage to get Ubuntu Studio running but to say it was rough would be an understatement.
Virtualbox does not like KDE to say the least and it was painful to run. Also the networking was slow. Sure I could have used normal Ubuntu to see if GNOME was faster but for all I have tried it many times I really don’t like GNOME. Everything needs extensions and the interface is horrible.
Finding apps requires typing in a search because of that stupid Mac Launchpad icon design. I really detest it. I’m sure if you were using a touchscreen then it makes sense but most laptops definitely are not.
Anyway after far too many hours wasted with that I moved on to try Hyper V which is a Type 1 Hypervisor which allows much more connection to base metal components... it lets you use your actual graphics card, the hard drive can be accessed better and you have access to USB and the likes which makes it much better.
Now at the time I was using Windows 11 Home as that’s what came pre-installed on the Dell. So I had to download Hyper V as it wasn’t there by default. So first I try Ubuntu as Canonical have an agreement with Microsoft due to WSL.
Sure enough it installed and was pretty fluid but it had no sound. There was an enhanced mode which refused to work as to do so it needed RDS (Remote Desktop Support) which also prevented sound from working (Huh ?).
To get RDS you need Windows 11 Pro which Microsoft informed me if I wanted a key would be £119. Hmmm not happy obliterated Ubuntu VM. Went web-side got a Windows 11 Pro for £1.67 as it was OEM key. They key would have been £3.35 but I found a 50% off code.
After a bit of fiddling I got Windows 11 Home to go to Pro using a key to switch it then once it did that registered the new OEM key and it worked and guess what I have access to Remote Desktop Services.
So as I felt that Hyper V could cope I now tried installing EndeavourOS which installed without a single hitch. I admit the network was slow but a million times quicker than Virtualbox.
It had no issues with KDE whatsoever but once again no sound. I installed several Hyper V tools and things from the AUR. Even changed out pipewire back to pulseaudio but no matter what I did, sod all worked. RDS couldn’t see the VM even including doing the various Powershell tips.
Bugger all, now sure I could have run Endeavour without sound but I had come this far damn it. OK deleted VM. OK I now have Win 11 Pro so lets try the Ubuntu stuff again.
OK now enhanced mode shows a dialogue and when I log in screen goes black and bugger all happens. Click off enhanced mode and Ubuntu is working. Enhanced mode just black. Setup Ubuntu. reboot now enhanced mode doesn’t come up and even the VM crashes now.
This wasted too many hours and days of messing around. I even got the RDS side running but when I tried to Remotely Access using RDS it crashed. What a complete waste of bloody time.
I even tried running a Ubuntu Studio VM using VMWare Player 17. It didn’t work.
I doing think about setting up a KVM version of QEMU to run a Linux installation but guess what if you want sound on QEMU you need to get a specific version called the Screamer and it won’t let you use KVM setup meaning it wouldn’t allow you to install the Linux.
By this point I just gave up I honestly don’t care what type of Hypervisor it is I am obviously too thick to get things running as they should and I gave up.
I almost tried Proxmox and XCP-NG but upon seeing what they entailed just gave up.
After all that I thought I would leave alone and just use Windows. Then everyone started informing my Facebook had been cloned, well lets just say that didn’t happen when I had Linux.
The internet under Windows just ran slower than when I had Linux. Watching YouTube stalled regularly, downloads failed due to time out and my frustration levels were getting to breaking point.
I tried to dual boot Linux as I found out how to shrink the partition in Windows and use it for Linux installation. So tried EndeavourOS but because of the Secure boot it wouldn’t let the system install.
However for some reason Fedora will install if Secure boot is still on. So I installed Fedora Beta 40 because I wanted to try the new KDE Plasma 6. Now I know it’s beta software so not to have many expectations but most of the software I use was not in the store nor could I find the appropriate dnf installer.
However Fedora now would boot but my Windows 11 wouldn’t the partition was there but it didn’t add it to the menu so now I could load Fedora but Windows wouldn’t load.
Tried OS Prober, Grub Customizer, no matter what I did could not get the Windows 11 partition to boot or get it in the options
Pissed off now I finally turned off Secure boot. Wiped the whole hard drive and installed EndeavourOS Galileo Neo (the latest version) and set up the Dell with KDE.
It now is running on KDE 6 Plasma 6.0.2 running Wayland. It is running seamlessly, the internet is quicker. No issues with YouTube. Updating fine. When I tried KDE 5 Plasma Wayland, Steam and several other programs stopped working.
Well Steam is working fine using XWayland (a Wayland to X11 bridge) and there is a version of Cairo Dock that works with Wayland (it is experimental but so far has not died on me).
So all is right with the world in that respect. Only issue is screen capture isn’t great in Wayland but someone is working on it. OBS and other video capture work fine but screen capture programs such Flameshot, Shutter and other need work.
Well Wayland is slowly being adapted so in time I am sure these things will be fixed over the next few months as more and more main distros seem to be moving to Wayland.
It works well enough and to be honest it's even faster for program launch it seems than the original X11 which is now over twenty years old.
I am yet to try the Steam Proton games such as Path of Exile but who knows maybe next time we speak I may have done so.
So with all that madness abound I bid you farewell for this episode.
Hopefully I will try not to break anything major... until next time take care.
#linux life#ubuntu#ubuntu studio#virtualization#virtual machines#hyper v#virtualbox#wayland#x11#waffle#steam
1 note
·
View note
Text
Malicious Code
This is the portion of this training that is the most interesting to me. This chapter covers all types of Malware. Let's get right into it.
What is Malware? Malware is software created to cause harm to systems, devices, networks or it's users.
Common types of Malware
Ransomware: takes over a system then demands a ransom. Best defenses include effective backups in a different location.
Trojans: disguised malware that appears to be legitimate software. RATs or remote access trojans allow remote access to systems. Disabling remote access tools can cause false positives in detecting RATs. Not every trojan is a RAT.
Worms: spread via email attachments, network file sharing; self-install and self-spread - they do not rely on a user to infect a system
Rootkits: allow attackers to access a system via a backdoor; infect startup code in the MBR (master boot record). Best defenses include testing an infected system from a trusted non compromised system or device. Integrity checking and data validation can assist in rootkit detection. Also rebuilding the system and restoring it from a trusted and good backup. Patching, secure configurations, and using privilege management are best security methods.
Backdoors: allow bypassing normal authentication. Hardware or software based. Detections includes scanning for open ports sometimes left open for manufacturers.
Bots and Botnets: remotely controlled systems with a malware infection; see botnets.
Video explanation: "A network of computers infected with malware that responds to an attacker to perform any activity. Allows attackers to control systems remotely." Best defenses: firewalls, ONLY download trusted sourced software, update and patch software,.
Botnets and DDoS: used to overwhelm applications and services. see denial of service attacks.
Keyloggers: programs that capture input on keyboards, can also capture mouse movements, touchscreen activity, and credit card swipes. Best defenses: use normal security measures (patches, updates, and system management)
Logic Bombs: Not dependent on malicious programs. Logic bombs are functions or codes embedded in programs that will execute when specific conditions are met.
Viruses: Self-copy and self-replicating malicious programs. Set to execute by specific conditions being met; payload: what the virus does or what action it performs.
Types of Viruses:
-memory-resident/non-memory-resident: remain in memory while device system is running; non: execute spread then shut down
-boot sector reside in boot sector media or drive
-macro viruses use macros or code inside word processing software
MS Office disables by default
written in VBA Visual Basic Application
-email viruses spread via attachments
Malicious Code - can be embedded in programs, can be via remote connections. Leverage built insl Windows PowerShell & VisualBasic, Bash & Python on Linux
Defenses: Windows Defender & CLM constrained language mode on Windows. Turn off logging & Windows command line auditing.
Spyware: track users browsing habits, installed software, and report back to its servers.
PUPs: installed without user awareness i.e. adware, browser toolbars web browser tracking programs
Machine Learning: emerging vulnerability as attackers can introduce malicious code into systems as AI progresses.
0 notes
Link
Form a detail understanding on the fundamental concepts of PowerShell and its need
Understand theapplication level of concepts like PowerShell including pipelines, scripts, syntax, Script execution, Remote management, PowerShell remotingand so on from basic to advanced level.
To give an overview about Active Directory Automation
Know methods of Error Handling and Script Debugging and also the Administrative
Learn the manipulation and modification of files and folders, and advanced scripting.
Know PowerShell scripting with Functions and Parameters.
2 notes
·
View notes
Text
Windows 7 Operating System
Windows 7 is based on the Windows Vista part and was proposed to be an update to the Vista OS. It utilizes the equivalent Aero (UI) that appeared in Windows Vista.You can get Free Windows 7 Product Key on this link.
Subsequently, to many end clients, the greatest changes among Vista and Windows 7 were quicker boot times, new UIs and the expansion of Internet Explorer (IE) 8. The OS is broadly accessible in three retail versions: Windows 7 Home Premium, Professional and Ultimate. Starter, Home Basic and Enterprise versions are accessible in certain business sectors.
Being developed, Windows 7 was known by the code names Blackcomb and Vienna.
Key highlights
With Windows 7, clients can stick applications to the taskbar. Furthermore, clients can rework the applications on the taskbar in any request they see fit. Different increases incorporate libraries for putting away records. The default library organizers incorporate Documents, Pictures and Videos, every one of which has an open and private rendition. Likewise, Windows 7 was the main adaptation of Windows to help multitouch capacities. It additionally includes more precise penmanship acknowledgment.
Windows 7 presented the Snap and Shake capacities. Snap empowers a client to drag an open window to one side or right half of the screen and have it naturally resize to take up a large portion of the screen. In the event that a client pulls the window off the side, it returns to the size and shape it was before he snapped it to the side of the screen. A client can consequently amplify a window by hauling it to the head of the screen.
With Shake, clients can shroud all inert windows to uncover the work area by tapping the head of an open window and rapidly hauling it to and fro. Clients can likewise effectively arrive at the work area with the Show Desktop button on the base right of the screen, which limits every open window
History
In July 2007, Microsoft reported it was building up another OS that would become Windows 7. The organization uncovered the name Windows 7 in October 2008. Microsoft delivered Windows 7 to assembling in July 2009 and made the OS for the most part accessible on Oct. 22, 2009. It filled in as the replacement to Windows Vista and the ancestor to Windows 8.
All through its lifetime, Windows 7 has had five significant updates:
Administration Pack 1 (SP1), which Microsoft delivered in February 2011, incorporated extra personality alliance administrations, just as help for Advanced Vector Extensions. SP1 additionally presented 256-piece guidance set augmentation for processors.
The Platform Update in February 2013 included IE 10 and upgraded a few designs application programming interfaces (APIs) and video decoders.
The Disk Cleanup Update conveyed a wizard that clients and IT overseers could use to erase obsolete Windows refreshes from the OS.
Windows Management Framework 5.0 included Windows PowerShell upgrades and Windows Remote Management capacities. It appeared in February 2016.
The Convenience Rollup was the last significant update to Windows 7 in May 2016. It contained each security fix and highlight update since Microsoft delivered SP1 in a solitary bundle. Microsoft made all future Windows 7 updates total in October 2016.
1 note
·
View note
Text
The Telenet on Windows Game
A History of Telenet on Windows Refuted
In the expression Type, choose the sort of terminal that you want Telnet to emulate. Telnet is used for various things, but it's famous for connecting to devices that provide options throughout the protocol, including modems or routers. Telnet is among the first remote login protocols online. Telnet is utilized to extend the interface to the users. For quite a long time, the most popular network-based connection method was Telnet, a normal protocol for making text-based connections between two distinct computers.
Otherwise, you'll be asked if Telnet should be set up. Telnet is an old legacy protocol that's almost never used, if you don't manage equipment that is more than a decade old. Telnet is an old outdated protocol that's used for remote command line administration on several different devices including Cisco routers. Telnet is an outdated protocol, and the majority of people don't utilize it anymore.
Telnet is a network protocol used on the web or local area networks to supply a bidirectional interactive text-oriented communication facility working with a digital terminal connection. Telnet isn't a good chose to control a system over the web. Telnet is most inclined to be employed by program developers and anyone with a need to use certain applications or data located at a certain host computer. Telnet is also utilized as a verb. Telnet is primarily utilised to meet the need to access designated applications or data that are on a specific computer that's located remotely. Employing Telnet is a superb method to learn about HTTP requests. Telnet is an Internet protocol that enables you to connect to another computer on your neighborhood network or on the web.

What Is So Fascinating About Telenet on Windows?
To prevent telnet service it is possible to run the below command. Instead of telnet it's possible to use powershell commands to look at the connections. Then you will return to the command prompt. Even though the above commands are the most useful while using the Command Prompt, there's more you're able to do. A number of the commands are located on Linux installations by default. The telnet command is just echoed but not executed, with no error message. Even easier, particularly if you don't intend Telenet on Windows on following up your very first Telnet command with a range of further ones, you may just type telnet followed by any Telnet command, like you'll see in the majority of our examples below.
The War Against Telenet on Windows
Another x64 version could possibly be available from NetSarang Computer. It may be available from TeraTerm Project. It may be available from sgtatham. There's additionally a portable model of PuTTY readily available in the event you do not wish to install PuTTY on Windows.
Windows will take a while to install Telnet and once done, you may use the telnet command in CMD or you'll be able to fire the telnet utility from the search menu. The needed terminal window will appear. After the security alert, you should have a terminal window. The initial configuration window has plenty of options. You do not have to look at the Telnet Server box. You've got to click on a tick box before Telent client.
The Good, the Bad and Telenet on Windows
Firstly you have to allow the telnet client, if you don't enable it you will get a result very similar to the below message when attempting to utilize it. You are able to permit the telnet client either by command line or via the graphical interface. The Telnet Client is among the absolute most basic tools for such pursuits. Windows 2000 Telnet Client is presently a command-line application in place of a Windows Application.
You're able to manage most Windows Server 2003 functions through using Telnet. Luckily with PowerShell it is not hard to allow the telnet functionality. Telnet users can run an assortment of character-based applications. You'll then have to create a non-root user. With Telnet, you log on as a normal user with whatever privileges you might have been granted to the particular application and data on this computer.
You may allow the customer either by command line or by means of the graphical interface. Merely to cover all bases, in addition, there are telnet clients offered for iOS. You are going to be successfully logged into the server via telnet. The telnet server needs to be started and user authentication needs to be configured before the telnet server may be used. Whichever server you're using. Your SMTP Server is currently configured and prepared to go. For the time being, just basic PuTTY client is sufficient.
Telenet on Windows - Is it a Scam?
Do not attempt and locate a random telnet binary zip file on the internet since it might be compromised or otherwise untrustworthy. You will have to restart your computer for changes to take effect. The computer works like a dumb terminal, except it's connected using a phone line rather than an immediate connection. For instance, you would like to be in a position to access your work computer from home.
youtube
1 note
·
View note
Text
Enable Telnet Client
You ought to be about to utilize Telnet via Command Prompt now. Telnet is an old outdated protocol that's used for remote command-line administration on several different devices like Cisco routers. Telnet is a network protocol used on the web or local area networks to offer a bidirectional interactive text-oriented communication facility employing a digital terminal connection. Telnet is also utilized as a verb. In summary, Telnet is a text-based tool which may be used at the command prompt to connect to a different computer online. Telnet isn't a good chose to control a system over the net. Should you do a yum install telnet it is only going to contain client telnet program.
Install Telnet if it's not already installed. Now you've enabled telnet you ought to be able to get started issuing commands with it and using it to troubleshoot TCP connectivity issues. It's wise not to use telnet whenever you are dealing with sensitive data. Telnet is really the most insecure approach to attach with a remote computer. Originally Telnet was developed for the private network and it ought to be used just in private network where outsider computers aren't allowed to contact network.
The Basics of Enable Telnet Client
In the event the service isn't running, an individual would find the next error when making a telnet connection. You should allow the service first. You have to enable and begin the service. Telnet service was created on 1969. Before starting To troubleshoot a connection, you want to understand the address and port you're trying to connect to. A failed connection is going to be accompanied by an error message. An unsuccessful connection is going to be accompanied by an error message.
To prevent telnet service you may run the below command. All the commands accept the mandatory parameters, which you are able to discover using the Get-Help cmdlet. If the above command doesn't return any output then telnet-server isn't installed. The upcoming obvious command to check at is the command to do a scenario-based deployment. The telnet command should currently be available. Even easier, particularly if you don't intend on following up your very first Telnet command with a variety of further ones, you are able to just type telnet followed by any Telnet command, like you'll see in the majority of our examples below.
This set of commands is a fast depiction of how you're able to enable telnet from a PowerShell prompt to guarantee the capability of testing certain ports. You may save sessions so you don't need to type exactly the same information each time you connect to the exact same session. Typically there is just a single session per remote client.
It's possible to allow the customer either by command line or by means of the graphical interface. Firstly you must allow the telnet client, if you don't enable it you'll receive a result very similar to the below message when attempting to utilize it. The Telnet Client is among the absolute most basic tools for such pursuits. It's possible to allow the telnet client either by command line or by means of the graphical interface. In order in order to connect to Telnet servers, you are going to have to have the Telnet Client installed on your PC. Your TS3 server could possibly be lacking permissions.
Whichever server you're using. As mentioned in the introduction, Windows Server 2012 comes with a huge quantity of PowerShell cmdlets. If you want to locate Telnet servers to connect to and work with, there are a lot of fantastic websites available which provide loads of Enable telnet Client resources. Your SMTP Server is currently configured and prepared to go. Once you are finished with the configuration, verify whether the telnet to a server works.
If the system isn't connected with any repository, the above command will not operate. You might have to restore your operating system to a prior state where the problem did not exist. If it is possible to tell which my computer that was not there before and I can't eliminate it. For a successful implementation, it ought not to have the ability to access the server computer.
Telnet Client utility is a crucial and most useful tool that permits you to connect to other devices. Otherwise, you can download the Putty SSH utility as it may also be utilized as a Telnet client for Windows. As with several other facets of the operating system, Windows Server 2012 provides PowerShell support to do the exact same function. Installing and enabling on your device is extremely easy as you have observed in the aforementioned procedure. After installation is finished, close the key Programs and Features Control Panel applet.
youtube
1 note
·
View note
Text
The One Thing to Do to Enable Telnet Client
If the system isn't connected with any repository, the above command will not operate. You might need to restore your operating system to a former state where the problem did not exist. If you are able to tell which my computer that was not there before and I can't do away with it. For a successful implementation, it ought not to have the ability to access the server computer.
Whichever server you're using. Your TS3 server could be lacking permissions. Once you are finished with the configuration, verify whether the telnet to a server works. As mentioned in the introduction, Windows Server 2012 comes with a great quantity of PowerShell cmdlets. In case the server doesn't support Explicit SSL, then you still must use Stunnel that's a little more complicated. Your SMTP Server is currently configured and prepared to go.
You are able to allow the customer either by command line or by means of the graphical interface. Firstly you have to allow the telnet client, if you don't enable it you'll receive a result very similar to the below message when attempting to utilize it. The Telnet Client is among the absolute most basic tools for such pursuits. You may allow the telnet client either by command line or by means of the graphical interface.
You ought to be about to utilize Telnet via Command Prompt now. It's wise not to use telnet whenever you are dealing with sensitive data. Now you have enabled telnet you need to be able to get started issuing commands with it and using it to troubleshoot TCP connectivity troubles. Telnet is an old outdated protocol that's used for remote command-line administration on several devices like Cisco routers. Telnet is also utilized as a verb. Telnet isn't a good chose to control a system over the world wide web. Should you do a yum install telnet it's only going to contain client telnet program.
To prevent telnet service you are able to run the below command. Now you know your way around the Command Prompt, it is a great idea you learn a few of the tricks and suggestions for the Windows 10 Task Manager too. To use any of these commands you have to bring up the Command Prompt itself. If the above command doesn't return any output then telnet-server isn't installed. Despite the fact that the above commands are the most useful while using the Command Prompt, there's more you're able to do. The upcoming obvious command to check at is the command to do a scenario-based deployment.
You don't need to understand all the Enable telnet Client Command Prompt commands to discover some use within it. The telnet command should currently be available. Even easier, particularly if you don't intend on following up your very first Telnet command with a variety of further ones, you may just type telnet followed by any Telnet command, like you'll see in the majority of our examples below.
A reboot is needed for the modifications to come into effect. If you aren't certain whether a rule is working telnet may be an excellent means to help debug. Among the biggest perks of Telnet is with a very simple command it's possible to test whether or not a port is open. Rather than going to the Control Panel, there are a better means.
A failed connection is going to be accompanied by an error message. An unsuccessful connection is going to be accompanied by an error message. If your network is live, make certain that you fully grasp the possible effect of any command. In the event the service isn't running, an individual would find the next error when making a telnet connection. You should allow the service first. You have to enable and initiate the service. Telnet service was created on 1969. Well, the obvious rationale is, to knock out the browser. Though most users decide to work with graphical interfaces, Telnet is among the simplest methods to check connectivity on specific ports. Luckily with PowerShell, it is not hard to allow the telnet functionality. Since there's just one feature to install, it is possible to directly click the Install button. The selected feature will be set up. It is possible to specify more than 1 feature in the very same package. In reality, you have many options.
You've got to click on a tick box facing Telnet client. This set of commands is a fast depiction of how it is possible to enable telnet from a PowerShell prompt to make sure the capacity of testing certain ports. You are able to save sessions so you don't need to type the exact same information each time you connect to the exact same session. In some instances, it may be required to close the telnet session and reconnect.
youtube
1 note
·
View note
Text
APE To FLAC Converter
Most portable audio gamers can play music encoded in the MP3 audio format, however some shoppers also have music in Ogg Vorbis , FLAC , MPC , or even WMA files. Fre:ac is another open source undertaking that has probably the most options for converting between audio codecs. It consists of several encoders by default, so you don't have to go and obtain separate information for WAV, FLAC, and many others. The converting APE to FLAC step-by-step information is offered as blow on your reference. You'll be able to shortly invite others to view, obtain and collaborate on all the recordsdata you need, no electronic mail attachment wanted. You possibly can add remote audio files via their direct URL in addition to information stored in your Google Drive account. Open your e mail and download the newly transformed FLAC file. Extra superior users can customise many encoding parameters: audio bitrate, bitrate mode, number of audio channels, audio sampling frequency, volume, time vary and different. Arrange transformed information , utilizing data from tags: create folders, apply your individual filename pattern automatically. Flacon is launched under the GNU Library Public License (LGPL) version 2. A duplicate of the license is offered right here This is an open supply mission. You're free to download and distribute the software beneath the terms of the license. Converting one file at a time could be tedious and time-consuming. Everybody needs a program that may help conversion of a number of recordsdata at a go with out the effort of going again and including one file at a time. Softwares have been developed to facilitate batch conversion of media information. Top-of-the-line instruments that you can use to convert batch APE to FLAC is the iSkysoft iMedia Converter Deluxe, and the steps of conversion are described within the next a part of this text. Convert your music to the Free Lossless Audio Codec (FLAC) audio format. Add a file or provide a URL to a audio or video file and begin changing. Optional change additional settings to satisfy your wants. This converter helps you to additionally easily extract audio from video files in top quality. The conversion process in itself is very easy: all you must do is observe the step-by-step wizard included in Whole Audio Converter. Nonetheless it appears that evidently the program does not save ID3 tags when converting information. foobar2000 is an advanced freeware audio player for the Windows platform. A few of the basic features include full unicode support, ReplayGain support and native assist for a number of fashionable audio codecs. It helps audio formats equivalent to MP3, MP4, AAC, CD Audio, WMA, Vorbis, Opus, FLAC, WavPack, WAV, AIFF, Musepack, Speex, AU, SND and more with further parts. If you wish to help the artist, there are a number of websites that allow you to purchase FLAC files. Flacon extracts individual tracks from one large audio file (standard for his or her high quality CUE, APE and FLAC) containing the entire album of music and saves them as separate audio recordsdata. Every format is supplied with a profile kit and a preset editor. You'll be able to create new presets, delete and edit the outdated ones, and modify the audio converter settings and parameters. Be interesting to read what members are utilizing at present on ape2flac windows machines to convertape to wav files. Supported Output Codecs : MP3, FLAC, M4A, WMA, AIFF, AAC, WAV, WavPack, OGG, AC3, AMR, MP2, AU. After your audio recordsdata are merged and converted to your chosen filetype, choose the "obtain" button and save the file to your computer or gadget. Once more, you can save it to your gadget, a file-sharing medium like Dropbox or Google Drive, or you possibly can merely hear the merged audio on the website. What's more, you may simply be part of several APE recordsdata and convert to 1 audio FLAC file, trim unwanted audio half and maintain the outstanding part and cut up Ape information by tracks or by file dimension. 4. It converts APE with quick speed and excessive conversion fee. What's the file name of the mac program that wants placing in? I'm running debian and may't find something within the repositories that looks relevant. APE is unhealthy unhealthy unhealthy harmful! Flac is a lot better and more broadly supported. With on-line tools, you needn't obtain too much software program to help you deal with media content material points. Take a quick look to see if the two on-line converters meet your needs. This APE to FLAC Converter allows you to trim the audio size to take away the undesirable part, click on "Trim" button to open the "Edit" window, right here you can trim the audio size by dragging the slide bar to set the start and finish time. I've someFlac albums I ripped as one huge file to save some space (Lossless CD rips are roughly 500mb each), now I've more storage I wish to cut up them back to there authentic information. In the event you're using Music Manager or Google Play Music for Chrome to add music to your library, here are the forms of files you possibly can upload.
Lyrics tags supported (forMP3 ID3v2,OGG,WMA,ASF, APE2, MPC, Flac). So right here comes the query. The place to find a skilled APE to FLAC Converter or an easy and detailed information to assist people solve APE to FLAC changing points? This text is devoted to providing your wished solutions. Hello there, Is it potential to encode wavpack data to flac? I cannot uncover any program that can do that. I've round a thousand folders with wavpack information and that i wish to convert them in flac. MP3 is a lossy format compressed to save lots of knowledge house using variable bit fees, relying on the frequency spectrum content material materials and amplitude. Which suggests distinctive content is lost, as a technique to make the file dimension smaller.Audio Converter Plus gives easy resolution to convert APE to FLAC in batch mode with without quality loss in addition to protect audio tags. In addition to convert APE to FLAC, it also can convert APE to MP3, WAV, M4A and OGG. Once completed, a small pop-up window will appear and click on "OKAY" to complete the entire splitter. At last you'll have every monitor on the album as an individual ". ape file". Then you are free to enjoy your downloaded album with individual songs. Compress-Music supports flac, mp3, wma, aac + more. It's a Powershell script that traverses a directory structure for audio (many codecs) and converts to mp3 in a duplicate listing. Supports gapless, album replaygain, updating tags only.
1 note
·
View note
Text
Windows Virtual Desktop – Now in Public Preview
As a long-suffering Citrix and RDS administrator, I’ve eagerly awaited the release of Microsoft’s virtual desktop offering that was announced at last year’s Microsoft Ignite – to put it to the test.
With Windows Virtual Desktop finally entering public preview, I took the chance to explore what the service offers and write up a blog post on my deployment experience, the “gotchas” I ran into, and some initial thoughts.
Fair warning, this is a long article, so skip to the end if you want my verdict!
Windows Virtual Desktop – The essentials before you begin
Before you start, you will need to have the following:
· An active Azure Subscription
· A pre-configured Virtual network & AD Domain
· A bit of patience: It’s still in preview, and different people are reporting varying levels of success with the deployment.
Thankfully, the deployment process has been well documented by Microsoft and I already had a lab environment set up.
For those wishing to follow along in a safe environment, I’ve placed some Azure Resource Manager (ARM) templates here for deploying some of the prerequisite infrastructure (you still need to configure AD properly).
Now - onto the fun stuff!
Windows Virtual Desktop – Step # 1: Installation
The first thing you will want to do, is grab some useful information and the new PowerShell module.
Locate and note down your AAD tenant ID and subscription ID – you will need these shortly. To install the PowerShell module, use the following command:
Install-Module -Name Microsoft.RDInfra.RDPowerShell
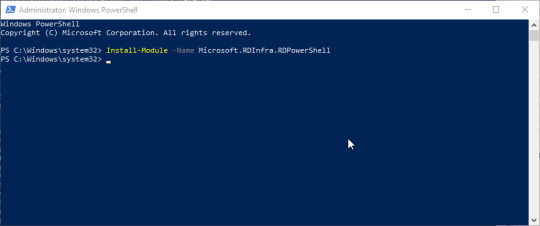
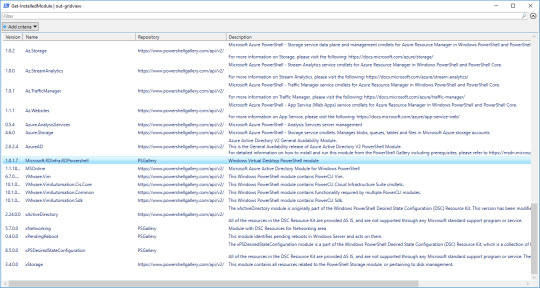
You should be able to verify the install with:
Get-InstalledModule | Out-GridView
(The grid view is not needed; it just makes everything so much easier to find!)
Windows Virtual Desktop – Step # 2: Tenant setup
Now, open the following URL: https://rdweb.wvd.microsoft.com in two SEPARATE tabs – we need to complete the next process twice. Once for the service, and once for the client. In the first window, input your Tenant ID and click submit. You will be asked to sign in and should get back a success message.
In the second window, swap the dropdown to “Client App”, input your tenant ID and submit. Hopefully you will get a second success!

Windows Virtual Desktop – Step # 3: Assigning users, roles and permissions
You should now be able to view the Windows Virtual Desktop within your enterprise applications.

From the Enterprise Apps page, you will need to add an application permission to “Windows Virtual Desktop”; Assign a new user, and the role should be automatically populated as tenant creator.
Windows Virtual Desktop – Step # 4: Powershell
Next, you will create a Virtual Desktop Tenant using PowerShell.
The following two commands should complete this, with a slight pause for a password!
Add-RdsAccount -DeploymentUrl https://rdbroker.wvd.microsoft.com
New-RdsTenant -Name <TenantName> -AadTenantId <DirectoryID> -AzureSubscriptionId <SubscriptionID>
Make sure you keep the Tenant name in mind, as you will need this shortly.

I got a bit side tracked at this point, as it looked as if I could specify extra flags for an OMS workspace.
The possibility of onboarding the service from the first deployment is something I could not pass up.
Sadly, it didn’t appear to function, so I’ve left this as something to investigate as the product comes out of preview!
Windows Virtual Desktop – Step # 5: Session Host Pool
Next, we will create the juiciest part – a session host pool! Navigate to the resource addition section of Azure and look up “Windows Virtual Desktop - Provision a host pool”.
The setup is a simple ClickOps exercise with a couple of gotchas. I won’t dive too deep here, as the portal is self-explanatory.
The basics are as follows:
Configure a host pool and your initial testing users. Jot down the host pool name, as you will need this later.
The VM configuration: Select how many users you expect, how much usage you expect, and a VM name prefix. Azure only allows 15 characters for VM names, so don’t make this one too long.
If you’re labbing the solution, it’s probably good to change the VM size and make sure it’s a single VM – 100 D8S virtual machines really hammers the credit card!

More VM configuration: This time its domain joining and the VNet configuration. Important to call out here, the web portal does not appear to recognize subdomains. Should you utilize a subdomain, you will need to select the “specify domain” option and type it in. I had corp.contoso.com (Original I know) as my domain, so this got me scratching my head for a bit!
Tenant Configuration: This is where you will utilize the Tenant name from those initial PowerShell commands. If you didn’t keep record of it, get-rdstenant is your friend!
Use the credentials for the user you specified as “TenantCreator” earlier.

Final steps: Validate everything is correct and click deploy! (10 points to anyone who spots the error in the below validation!)

I’ve downloaded the template here, because if you’re not using templates and automation – you’re living in the past. Something for a future blog post! The deployment can take a while depending on your VM sizing, so patience is key.

Windows Virtual Desktop – Step # 6: Test users
If you have followed along with me for this long, well done! Once the deployment is completed, you should be able to log into this page with a test user.

Note: If you need to add extra test users, the doc for that is simple and can be located here.
Windows Virtual Desktop – The Xello Verdict
My initial thoughts on the Windows Virtual Desktop product are super positive.
For starters, it’s a huge upgrade from Remote Desktop Services 2016. My key comments and advice when evaluating or troubleshooting are:
Pay attention. While most of the deployment is a “next next” click through exercise there is a lot of room for error. The product is in preview and will have undocumented issues. Following on from this, be careful with your deployment size. While Microsoft takes care of the underlying connection brokering and session management, the default 100 VM deployment is expensive.
Don’t test this with an Azure AD account late at night. The solution uses on premise AD and you will be confused.
The product currently only supports Central US & East US 2. This will change as the product comes out of preview but expect some latency in the short term.
Do you have application configuration or performance requirements? You may need to test them a bit more than normal. Considering that Microsoft acquired FSLogix for this reason, I’m yet to evaluate how Microsoft worked through performance challenges and non-persistent settings. OneDrive immediately comes to mind in this space.
The Microsoft Doc and the event logs are your friends. I had to be patient and use the diagnostic commands at different stages when getting used to the product. Don’t be afraid to log into each desktop directly either. Under the hood it is still Windows 10!
If you want to learn more about Windows Virtual Desktop, or even just grab some advice on deployment, please feel free to reach out to myself and the Xello team!
Like the walkthrough? Stay tuned for the next part in my technical blog series, where I’ll be covering the Azure Sentinel and putting its security benefits to the test. Originally posted on: Xello.com.au
1 note
·
View note
Text
Review Anti-Snoring Devices
zquiet couponclients themselves. As a basic piece of the new Microsoft working frameworks under the Windows 7 and Windows Server 2008 R2 releases, PowerShell has been improved with huge usefulness, which can be condensed as pursues: enabling access to the trees "
condition factors and numerous others, to which you would then be able to include the suppliers made for use and utilization by the clients themselves. As a fundamental piece of the new Microsoft working frameworks under the Windows 7 and Windows Server 2008 R2 releases, PowerShell has been
improved with noteworthy usefulness, which can be condensed as pursues: enabling access to the trees "HKLM" (HKEY_LOCAL_MACHINE) and "HKCU" (HKEY_CURRENT_USER). PowerShell gives suppliers to various libraries including security authentications, condition factors and numerous others, to which you
would then be able to include the suppliers zquiet coupon made for use and utilization by the clients themselves. As an indispensable piece of the new Microsoft working frameworks under the Windows 7 and Windows Server 2008 R2 releases, PowerShell has been enhanced with noteworthy usefulness, which can be condensed as pursues:

- Remoting capacity : to all the more likely help IT foundations not set up, PowerShell permits directions/contents to be executed remotely starting with one PC then onto the next, with the subsequent probability to remotely open and deal with the shell of associated PC directions to its very own system, ensuring most extreme dimesions of security and dependability;
- Job work out of sight : so as to ensure business coherence, with PowerShell it is conceivable to run a content or direction as an optional procdure out of sight, enabling clients to return promptly to full oversight of the shell to continue further with their work , without essentially sitting tight for the execution of the undertaking in advancement;
- Transaction Function : because of which, IT workers can recognize a whole square of directions as a solitary exchange, better indicating the requirement for each order having a place with the square to be closed without mistakes so the task of intrigue and in this manner the whole exchange can be considered as executed effectively.
The utilization of the exchange ensures that if even one of the included directions gives an execution mistake, the impacts of the past single directions having a place with the exchange and did up to that point are dropped.
It is hence justifiable how the numerous possibilities offered by such a forcing scripting project can just have constrained Microsoft to pick PowerShell as the organization apparatus for every one of its items and the premise of the organization consoles of all System Center frameworks and numerous other last age arrangements distributed by Redmond.
To streamline work processes identified with arrangement, resource and change the board , Microsoft has rather arranged System Center Configuration Manager 2007 R2 , an uncommon device committed to change the executives mechanization. This item has been explicitly intended to perform distinctive errands, which can be condensed as pursues:
- Distribution of the working framework and applications to the whole corporate IT foundation : Configuration Manager 2007 R2 at the same time performs the two capacities, soothing IT directors from utilizing diverse programming arrangements, on account of complete mix with Microsoft
1 note
·
View note
Text
Key areas of responsibilities include: · Emphasis on Front End development - “look and feel” to design and build compelling visual assets (screens, controls, etc.) in Power Apps · Consult to develop and architect solutions to business problems and specifications using modern software application tools and best practices · Building attractive Power App user interfaces exhibiting intuitive design elements · Maintain goals and communicate to Project Team to effectively develop project deliverables · Collaborate with internal Project Team and stakeholders to solve client issues and satisfy requirements · Develop complex multi-stage workflows using Power Automate incorporating action cards and tasks for approvals · Integrating third-party systems into Power Automate with either stock actions available through the marketplace or via custom connectors · Working with the Dataverse in a developer capacity, basic understanding of the Dataverse structure and security model · Collaborating via Azure DevOps with Git source control · Documenting work in Microsoft Word · Effectively communicating with Clients and team members Qualifications: · Minimum 2 years of experience with the Power Platform · Excellent English communication and documentation skills · Ability to work on multiple Client projects, triage, and work with a team · Excellent critical thinking and problem-solving skills · Superior attention to detail · Expertise in implementing Power Apps, Power Automate Flows, and Connectors · Expertise in styling and design of Power Apps · Expertise in storing and retrieving data from the Dataverse in a secure manner · Experience with REST, OData, JSON and common web-based data structures · Experience with Visual Studio Code, Git · Experience with the Microsoft stack of products including Office Suite and Teams · Experience with designing tables in the Microsoft Dataverse · Familiarity with PowerShell · Familiarity with the Agile-Scrum methodology · Familiarity with basic networking concepts such as IPv4, DNS, DHCP, TLS Skills / Languages · Power Apps scripting · Power Automate scripting · PowerShell scripting · JSON, REST · C# is a bonus but not required Technical Tools · Power Apps, Power Automate, Visual Studio Code, Office Suite, Wireframing Tools ALM Tools · Azure DevOps , Visual Studio Online, Team Foundation Server, Git Platforms · Power Apps, Power Automate, SharePoint Online, Microsoft 365, Azure Logic Apps Education: · Bachelor's degree in Computer Science, Information Engineering or similar or relevant work experience What we offer: . Competitive salary . Salary is equivalent to the USD currency . Flexible working conditions/remote . Fun and cheerful environment . Office gatherings and parties
0 notes
Text
McAfee Reports for Hiked Crypto-Mining Malware Attacks In 2018 ?
McAfee released its McAfee Labs Threats Report: June 2018 , examining the growth and trends of new malware, ransomware, and other threats in Q1 2018.
McAfee Labs saw on average five new threat samples every second, including growth in cryptojacking and other cryptocurrency mining malware, and notable campaigns demonstrating a deliberate drive to technically improve upon the most sophisticate established attacks of 2017.
“There were new revelations this quarter concerning complex nation-state cyber-attack campaigns targeting users and enterprise systems worldwide,” said Raj
Samani, chief scientist at McAfee. “Bad actors demonstrated a remarkable level of technical agility and innovation in tools and tactics. Criminals continued to adopt cryptocurrency mining to easily monetize their criminal activity.”
Cybercriminals expanded their tasks in cryptojacking and other digital money mining plans, where culprits commandeer exploited people's programs or taint their frameworks to furtively utilize them to dig for authentic digital forms of money, for example, Bitcoin.
This class of coin digger malware grew a staggering 629% in the principal quarter of 2018, soaring from around 400,000 complete known examples in Q4 2017 to more than 2.9 million the following quarter.
This proposes that cybercriminals are proceeding to warm to the prospect basically tainting clients' frameworks and gathering installments without hosting to depend on third gatherings to adapt their violations.
"Cybercriminals will incline toward criminal action that expands their benefit," said Steve Grobman, boss innovation officer at McAfee. "In ongoing quarters we have seen a move to ransomware from information burglary, as ransomware is a progressively effective wrongdoing.
With the ascent in estimation of digital currencies, the market powers are driving offenders to crypto-jacking and the burglary of digital money. Cybercrime is a business, and market powers will keep on molding where enemies center their endeavors."
Do you want to install antivirus in your PC then click here : www.mcafee.com/activate
Bitcoin-taking Campaigns
The Lazarus cybercrime ring propelled a profoundly refined Bitcoin-taking phishing effort—HaoBao—which directed worldwide money related associations and Bitcoin clients.
At the point when beneficiaries open vindictive email connections, an embed would filter for Bitcoin movement and builds up an embed for relentless information gathering and crypto mining.
Gold Dragon: Attacks on South Korea
In January, McAfee Advanced Threat Research detailed an assault focusing on associations engaged with the Pyeongchang
Winter Olympics in South Korea. The assault was executed through a noxious Microsoft Word connection containing a
shrouded PowerShell embed content. The content was installed inside a picture document and executed from a remote server.
Named Gold Dragon, the subsequent fileless embed encoded stolen information, sent the information to the aggressors' order furthermore, control servers, performed observation works, and checked enemy of malware answers for sidestep them.
Shrouded Cobra: GhostSecret and Bankshot
Activity GhostSecret focused on the human services, account, stimulation, and media communications parts.
Task GhostSecret is accepted to be related with the universal cybercrime bunch known as Hidden Cobra. The battle, which utilizes a progression of inserts to proper information from tainted frameworks, is likewise described by
its capacity to avoid recognition and divert legal specialists from its trail. The most recent Bankshot variety of GhostSecret utilizes an installed Adobe Flash adventure to empower the execution of inserts.
It additionally fuses componentsof the Destover malware, which was utilized in the 2014 Sony Pictures assault, and the Proxysvc embed, a formerly undocumented embed that has worked undetected since mid-2017.
Security Incidents by Industry
McAfee Labs tallied 313 openly uncovered security occurrences in Q1 2018, a 41% expansion over Q4. Episodes including different divisions (37) and those focusing on various districts (120) were the main sorts of episodes in Medicinal services.
Revealed occurrences in human services rose 47%. Cybercriminals kept on focusing on the part with the SAMSA ransomware, and there were various cases in which medical clinics were constrained to pay the hoodlums.Instruction.
Occurrences of assaults on the training part climbed 40%, with ransomware being a prominent guilty party in assaults on schools and related organizations.Money.
Revealed episodes expanded by 39%, which included constant assaults on the SWIFT saving money framework.
These assaults were not generally area explicit, similar to the case in earlier years, yet McAfee distinguished action in Russia, and related surveillance endeavors in Turkey and South America.
Other Q1 2018 Threat Activity
In Q1 2018, McAfee Labs recorded, all things considered, five new malware tests for every second, including dangers appearing outstanding specialized improvements enhancing the most recent fruitful innovations and strategies to outflank their targets' safeguards.
From PowerShell to LNK. While PowerShell assaults hindered from its 2017 flood, cybercriminals saw increments in adventures of other benevolent innovations.
The complete tally of malware that abuses LNK capacities flooded 59% over the past quarter.
From Locky to Gandcrab. In spite of the fact that the development in new ransomware moderated by 32% in Q1 2018, the Gandcrab strain tainted around 50,000 frameworks in the initial three weeks of the quarter, superseding Locky ransomware variations as the quarter's ransomware pioneer.
Gandcrab utilizes new criminal techniques, for example, executing pay-off installments through the Dash digital money as opposed to through Bitcoin.
Malware. The all out number of malware tests became 37% in the previous four quarters to in excess of 734 million tests.
Portable malware. All out known malware tests became 42% in the previous four quarters. Worldwide diseases of versatile gadgets fell by 2%; Africa announced the most noteworthy rate, at 15%.
1 note
·
View note