#about.jed
Text
ꕀ ᐝ 𖠳 pete wentz, cis male, he/him 𖠳 ᐝ ꕀ ‷ heads up ; if you hear bishop's knife trick by fall out boy blaring, it’s most likely jedidiah (jed) owens making their way down the shore ! they’re 43 years old and celebrate their birthday on 10/9- i knew they were a libra ! especially since they’re very intelligent and indecisive. they are from dillon, texas staying in the cove and are currently working as a house band bassist at aretha's corner, here at the cape. they always did remind me of the buzzing glow of a neon sign in the dark, the feeling when you get off a rollercoaster and had the time off your life, and the desert wind in your hair as you speed down the open highway.‷

full name: jedidiah ezekiel lewis owens
nickname(s): jed, jj (taluluah/sibs only)
date of birth: 10-9-1980
gender: cis man (he/him)
sexual orientation: pansexual
spoken languages: english, conversational in patois (Jamaican secondary language)
neighbourhood: the cove
occupation: house bassist @ aretha's
physical.
hair colour / eye colour: naturally black/bleached blonde / hazel
height: 5 ft 6in
body and built: slim, atheletic
tattoos: (will provide a second post but all of the FCs tattoos)
piercings: tongue, left nostril
personality.
positive trait(s): intelligent, creative
negative trait(s): indecisive, stubborn
background.
his dad, a jamaican man named leroy, disappeared the day his mother told him she was pregnant with jed.
jed is tallulah (he calls her loulou) owens' oldest (half) brother.
he acted out growing up, getting into trouble, tattoos and drugs way too young.
at the age of 15, he got into some trouble with a local gang. he asked his step dad for help and he threw a bottle at his head.
jed stole what cash his step-dad had left and settled with the gang.
when the dust settled from that, he realized he didn't want his younger sibs to feel the way he felt when he asked for help and was refused, so he took on the role of man of the house and quit everything (but weed) cold turkey and got a job the day he turned 16.
jed never graduated high school, but he provided a steady source of support and income for his siblings.
he stayed till the youngest brother left home and then he himself traveled (read: couch surfed and hitchhiked across the country, but when tallulah moved here, he came to visit and never left.
currently lives in the small guest house on her property.
headcanons.
jed loves all kinds of music with the exception of country. it grates his nerves like nothing else.
he only ended up playing bass because he won a bass when he was 17 off a poker game with friends. he taught himself and played in a few shitty bands here and there, but never made it big.
he writes (dark) poetry daily.
he DIYs 99% of his clothes. he'll buy a plain shirt, jeans, or hoodie and create something sweet. he started in high school with sharpies and it expanded into cricuts and a screenprinting set up in his little guest house.
6 notes
·
View notes
Text
Setting up Gatsby
This week I decided to dip my toe into learning Gatsby. So far it’s wonderful. If you’re someone who enjoys React, Gatsby is absolutely a tool I recommend adding to your belt
What is Gatsby?
Gatsby is an open source static website generator that is based on React. From what I understand to simplify it is really just a simple way to build sides using React without a lot of the business of setting things up.
Many of the features you may have to add to a React project are built in when using Gatsby. For example, routing in Gatsby is mind-blowingly simple. A Gatsby project will have a directory located at /src/pages. Any React component defined in src/pages/*.js will become a page. Meaning src/pages/about.js will automatically be available at localhost:8000/about.
Gatsby uses GraphQL to get data meaning it can get data from just about anywhere, from a database, common CMS’s like WordPress, or even a simple CSV.
How to get started Using Gatsby
The Gatsby docs are very clear and helpful for getting up and running. They even have a whole section devoted to helping you set up a development environment if you need to.
Personally I have completed the first section of the docs to learn some of the basics. Generally its a simple as running gatsby new [project name] from the command line to create a new repo with the default Gatsby setup files.
From there most of the set up for a basic project is done. You’ll need to import react to each component like always and then create your components as always.
Next Steps
I have a bit more learning to do but I’m excited do dive deeper. I want to understand if some of the modern react hooks would be available here, and if they’d even be useful for the type of projects Gatsby is suited for. Similarly for things like state management. I’m also curious about the various plugins available; is that library particularly robust?
I plan to use Gatsby to build my personal portfolio site. I’ve been digging around for a tool that will help me quickly build a beautiful frontend without a whole bunch of extra that. I won’t need since primarily the site will be presentational and have no real need of a full backend. I also wanted to write in React rather than using basic HTML/CSS/Javascript. Gatsby seems like the perfect solution so far.
0 notes
Text
Этап 2.Создание react-проекта по шагам
После создания адаптивного меню переходим к Link и роутингу. Роутинг это маршрутизация, пользователь должен видеть где он находится в данный момент времени в приложении т.е. разговор идет про браузерную строку и навигацию по истории. Сам React маршрутизацию не поддерживает но есть библиотеки.
Установим модуль >npm install react-router-dom содержит все необходимое для работы с маршрутизацией на Реакте. В системе маршрутизации каждый маршрут сопоставляется с определенным компонентом. Для примера определили три однотипных компонента: Home, Users, About.
Cоздадим их сейчас в папке src создадим файлы users.js, about.js,home.js
Переходим в файл App.js создаем. Здесь необходимо прописать саму маршрутизацию, для этого понадобится модуль switch- понадобится для выбора маршрута- выбирает первый попавшийся маршрут и использует его для обработки. Без этого объекта роутер может использовать для обработки одного запроса теоретически нескольким м��ршрутам и если они соответствуют строке запроса. Далее каждый маршрут представляет собой объект Route. Он имеет ряд атрибутов. В частности, для маршрута устанавливается 2 атрибута. Первый это path(путь) то что прописываем в адресной строке и компонент, в нашем случае Home; путь -это url, который вводим в адресную строку;компонент -это компонент, который отвечает за обработку запроса по данному маршруту.
Выглядит это так:

Теперь создадим что-то в файлах users.js и т.д.
Сначала следует импортировать react и далее создать компонент. Вводим следующее

Далее Link импортируем из react-router-dom в файле NaviBar.js
import {Link} from 'react-router-dom';
Еще импортируем switch, Router, Link в файле App.js :
import {
BrowserRouter as Router,
Switch,
Route,
Link
} from "react-router-dom";
Конечный результат работы: страницы Home,users, about отрабатываются при нажатии

0 notes
Text
Building a Blog with Next.js
In this article, we will use Next.js to build a static blog framework with the design and structure inspired by Jekyll. I’ve always been a big fan of how Jekyll makes it easier for beginners to setup a blog and at the same time also provides a great degree of control over every aspect of the blog for the advanced users.
With the introduction of Next.js in recent years, combined with the popularity of React, there is a new avenue to explore for static blogs. Next.js makes it super easy to build static websites based on the file system itself with little to no configuration required.
The directory structure of a typical bare-bones Jekyll blog looks like this:
. ├─── _posts/ ...blog posts in markdown ├─── _layouts/ ...layouts for different pages ├─── _includes/ ...re-usable components ├─── index.md ...homepage └─── config.yml ...blog config
The idea is to design our framework around this directory structure as much as possible so that it becomes easier to migrate a blog from Jekyll by simply reusing the posts and configs defined in the blog.
For those unfamiliar with Jekyll, it is a static site generator that can transform your plain text into static websites and blogs. Refer the quick start guide to get up and running with Jekyll.
This article also assumes that you have a basic knowledge of React. If not, React’s getting started page is a good place to start.
Installation
Next.js is powered by React and written in Node.js. So we need to install npm first, before adding next, react and react-dom to the project.
mkdir nextjs-blog && cd $_ npm init -y npm install next react react-dom --save
To run Next.js scripts on the command line, we have to add the next command to the scripts section of our package.json.
"scripts": { "dev": "next" }
We can now run npm run dev on the command line for the first time. Let’s see what happens.
$ npm run dev > [email protected] dev /~user/nextjs-blog > next ready - started server on http://localhost:3000 Error: > Couldn't find a `pages` directory. Please create one under the project root
The compiler is complaining about a missing pages directory in the root of the project. We’ll learn about the concept of pages in the next section.
Concept of pages
Next.js is built around the concept of pages. Each page is a React component that can be of type .js or .jsx which is mapped to a route based on the filename. For example:
File Route ---- ----- /pages/about.js /about /pages/projects/work1.js /projects/work1 /pages/index.js /
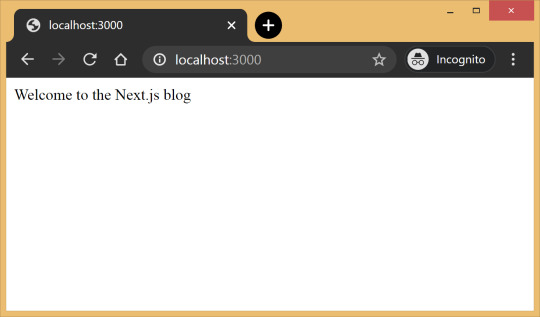
Let’s create the pages directory in the root of the project and populate our first page, index.js, with a basic React component.
// pages/index.js export default function Blog() { return <div>Welcome to the Next.js blog</div> }
Run npm run dev once again to start the server and navigate to http://localhost:3000 in the browser to view your blog for the first time.

Out of the box, we get:
Hot reloading so we don’t have to refresh the browser for every code change.
Static generation of all pages inside the /pages/** directory.
Static file serving for assets living in the/public/** directory.
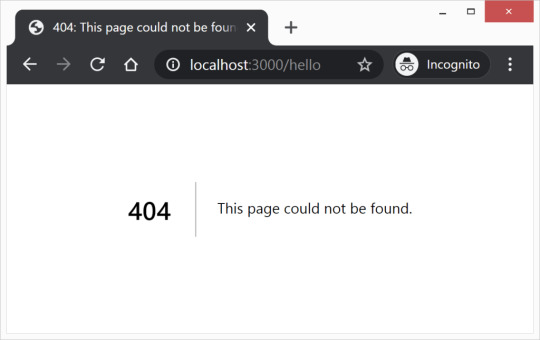
404 error page.
Navigate to a random path on localhost to see the 404 page in action. If you need a custom 404 page, the Next.js docs have great information.

Dynamic pages
Pages with static routes are useful to build the homepage, about page, etc. However, to dynamically build all our posts, we will use the dynamic route capability of Next.js. For example:
File Route ---- ----- /pages/posts/[slug].js /posts/1 /posts/abc /posts/hello-world
Any route, like /posts/1, /posts/abc, etc., will be matched by /posts/[slug].js and the slug parameter will be sent as a query parameter to the page. This is especially useful for our blog posts because we don’t want to create one file per post; instead we could dynamically pass the slug to render the corresponding post.
Anatomy of a blog
Now, since we understand the basic building blocks of Next.js, let’s define the anatomy of our blog.
. ├─ api │ └─ index.js # fetch posts, load configs, parse .md files etc ├─ _includes │ ├─ footer.js # footer component │ └─ header.js # header component ├─ _layouts │ ├─ default.js # default layout for static pages like index, about │ └─ post.js # post layout inherts from the default layout ├─ pages │ ├─ index.js # homepage | └─ posts # posts will be available on the route /posts/ | └─ [slug].js # dynamic page to build posts └─ _posts ├─ welcome-to-nextjs.md └─ style-guide-101.md
Blog API
A basic blog framework needs two API functions:
A function to fetch the metadata of all the posts in _posts directory
A function to fetch a single post for a given slug with the complete HTML and metadata
Optionally, we would also like all the site’s configuration defined in config.yml to be available across all the components. So we need a function that will parse the YAML config into a native object.
Since, we would be dealing with a lot of non-JavaScript files, like Markdown (.md), YAML (.yml), etc, we’ll use the raw-loader library to load such files as strings to make it easier to process them.
npm install raw-loader --save-dev
Next we need to tell Next.js to use raw-loader when we import .md and .yml file formats by creating a next.config.js file in the root of the project (more info on that).
module.exports = { target: 'serverless', webpack: function (config) { config.module.rules.push({test: /\.md$/, use: 'raw-loader'}) config.module.rules.push({test: /\.yml$/, use: 'raw-loader'}) return config } }
Next.js 9.4 introduced aliases for relative imports which helps clean up the import statement spaghetti caused by relative paths. To use aliases, create a jsconfig.json file in the project’s root directory specifying the base path and all the module aliases needed for the project.
{ "compilerOptions": { "baseUrl": "./", "paths": { "@includes/*": ["_includes/*"], "@layouts/*": ["_layouts/*"], "@posts/*": ["_posts/*"], "@api": ["api/index"], } } }
For example, this allows us to import our layouts by just using:
import DefaultLayout from '@layouts/default'
Fetch all the posts
This function will read all the Markdown files in the _posts directory, parse the front matter defined at the beginning of the post using gray-matter and return the array of metadata for all the posts.
// api/index.js import matter from 'gray-matter'
export async function getAllPosts() { const context = require.context('../_posts', false, /\.md$/) const posts = [] for(const key of context.keys()){ const post = key.slice(2); const content = await import(`../_posts/${post}`); const meta = matter(content.default) posts.push({ slug: post.replace('.md',''), title: meta.data.title }) } return posts; }
A typical Markdown post looks like this:
--- title: "Welcome to Next.js blog!" --- **Hello world**, this is my first Next.js blog post and it is written in Markdown. I hope you like it!
The section outlined by --- is called the front matter which holds the metadata of the post like, title, permalink, tags, etc. Here’s the output:
[ { slug: 'style-guide-101', title: 'Style Guide 101' }, { slug: 'welcome-to-nextjs', title: 'Welcome to Next.js blog!' } ]
Make sure you install the gray-matter library from npm first using the command npm install gray-matter --save-dev.
Fetch a single post
For a given slug, this function will locate the file in the _posts directory, parse the Markdown with the marked library and return the output HTML with metadata.
// api/index.js import matter from 'gray-matter' import marked from 'marked'
export async function getPostBySlug(slug) { const fileContent = await import(`../_posts/${slug}.md`) const meta = matter(fileContent.default) const content = marked(meta.content) return { title: meta.data.title, content: content } }
Sample output:
{ title: 'Style Guide 101', content: '<p>Incididunt cupidatat eiusmod ...</p>' }
Make sure you install the marked library from npm first using the command npm install marked --save-dev.
Config
In order to re-use the Jekyll config for our Next.js blog, we’ll parse the YAML file using the js-yaml library and export this config so that it can be used across components.
// config.yml title: "Next.js blog" description: "This blog is powered by Next.js"
// api/index.js import yaml from 'js-yaml' export async function getConfig() { const config = await import(`../config.yml`) return yaml.safeLoad(config.default) }
Make sure you install js-yaml from npm first using the command npm install js-yaml --save-dev.
Includes
Our _includes directory contains two basic React components, <Header> and <Footer>, which will be used in the different layout components defined in the _layouts directory.
// _includes/header.js export default function Header() { return <header><p>Blog | Powered by Next.js</p></header> }
// _includes/footer.js export default function Footer() { return <footer><p>©2020 | Footer</p></footer> }
Layouts
We have two layout components in the _layouts directory. One is the <DefaultLayout> which is the base layout on top of which every other layout component will be built.
// _layouts/default.js import Head from 'next/head' import Header from '@includes/header' import Footer from '@includes/footer'
export default function DefaultLayout(props) { return ( <main> <Head> <title>{props.title}</title> <meta name='description' content={props.description}/> </Head> <Header/> {props.children} <Footer/> </main> ) }
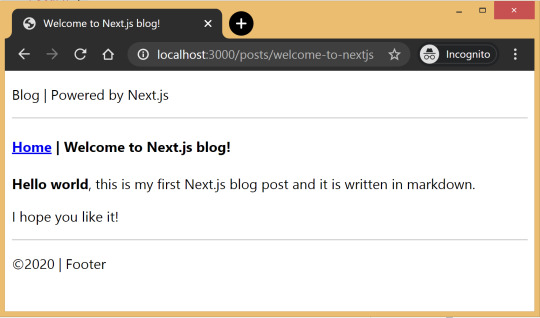
The second layout is the <PostLayout> component that will override the title defined in the <DefaultLayout> with the post title and render the HTML of the post. It also includes a link back to the homepage.
// _layouts/post.js import DefaultLayout from '@layouts/default' import Head from 'next/head' import Link from 'next/link'
export default function PostLayout(props) { return ( <DefaultLayout> <Head> �� <title>{props.title}</title> </Head> <article> <h1>{props.title}</h1> <div dangerouslySetInnerHTML=/> <div><Link href='/'><a>Home</a></Link></div> </article> </DefaultLayout> ) }
next/head is a built-in component to append elements to the <head> of the page. next/link is a built-in component that handles client-side transitions between the routes defined in the pages directory.
Homepage
As part of the index page, aka homepage, we will list all the posts inside the _posts directory. The list will contain the post title and the permalink to the individual post page. The index page will use the <DefaultLayout> and we’ll import the config in the homepage to pass the title and description to the layout.
// pages/index.js import DefaultLayout from '@layouts/default' import Link from 'next/link' import { getConfig, getAllPosts } from '@api'
export default function Blog(props) { return ( <DefaultLayout title={props.title} description={props.description}> <p>List of posts:</p> <ul> {props.posts.map(function(post, idx) { return ( <li key={idx}> <Link href={'/posts/'+post.slug}> <a>{post.title}</a> </Link> </li> ) })} </ul> </DefaultLayout> ) }
export async function getStaticProps() { const config = await getConfig() const allPosts = await getAllPosts() return { props: { posts: allPosts, title: config.title, description: config.description } } }
getStaticProps is called at the build time to pre-render pages by passing props to the default component of the page. We use this function to fetch the list of all posts at build time and render the posts archive on the homepage.

Post page
This page will render the title and contents of the post for the slug supplied as part of the context. The post page will use the <PostLayout> component.
// pages/posts/[slug].js import PostLayout from '@layouts/post' import { getPostBySlug, getAllPosts } from "@api"
export default function Post(props) { return <PostLayout title={props.title} content={props.content}/> }
export async function getStaticProps(context) { return { props: await getPostBySlug(context.params.slug) } }
export async function getStaticPaths() { let paths = await getAllPosts() paths = paths.map(post => ({ params: { slug:post.slug } })); return { paths: paths, fallback: false } }
If a page has dynamic routes, Next.js needs to know all the possible paths at build time. getStaticPaths supplies the list of paths that has to be rendered to HTML at build time. The fallback property ensures that if you visit a route that does not exist in the list of paths, it will return a 404 page.
Production ready
Add the following commands for build and start in package.json, under the scripts section and then run npm run build followed by npm run start to build the static blog and start the production server.
// package.json "scripts": { "dev": "next", "build": "next build", "start": "next start" }
The entire source code in this article is available on this GitHub repository. Feel free to clone it locally and play around with it. The repository also includes some basic placeholders to apply CSS to your blog.
Improvements
The blog, although functional, is perhaps too basic for most average cases. It would be nice to extend the framework or submit a patch to include some more features like:
Pagination
Syntax highlighting
Categories and Tags for posts
Styling
Overall, Next.js seems really very promising to build static websites, like a blog. Combined with its ability to export static HTML, we can built a truly standalone app without the need of a server!
The post Building a Blog with Next.js appeared first on CSS-Tricks.
You can support CSS-Tricks by being an MVP Supporter.
Building a Blog with Next.js published first on https://deskbysnafu.tumblr.com/
0 notes
Text
Building a Blog with Next.js
In this article, we will use Next.js to build a static blog framework with the design and structure inspired by Jekyll. I’ve always been a big fan of how Jekyll makes it easier for beginners to setup a blog and at the same time also provides a great degree of control over every aspect of the blog for the advanced users.
With the introduction of Next.js in recent years, combined with the popularity of React, there is a new avenue to explore for static blogs. Next.js makes it super easy to build static websites based on the file system itself with little to no configuration required.
The directory structure of a typical bare-bones Jekyll blog looks like this:
. ├─── _posts/ ...blog posts in markdown ├─── _layouts/ ...layouts for different pages ├─── _includes/ ...re-usable components ├─── index.md ...homepage └─── config.yml ...blog config
The idea is to design our framework around this directory structure as much as possible so that it becomes easier to migrate a blog from Jekyll by simply reusing the posts and configs defined in the blog.
For those unfamiliar with Jekyll, it is a static site generator that can transform your plain text into static websites and blogs. Refer the quick start guide to get up and running with Jekyll.
This article also assumes that you have a basic knowledge of React. If not, React’s getting started page is a good place to start.
Installation
Next.js is powered by React and written in Node.js. So we need to install npm first, before adding next, react and react-dom to the project.
mkdir nextjs-blog && cd $_ npm init -y npm install next react react-dom --save
To run Next.js scripts on the command line, we have to add the next command to the scripts section of our package.json.
"scripts": { "dev": "next" }
We can now run npm run dev on the command line for the first time. Let’s see what happens.
$ npm run dev > [email protected] dev /~user/nextjs-blog > next ready - started server on http://localhost:3000 Error: > Couldn't find a `pages` directory. Please create one under the project root
The compiler is complaining about a missing pages directory in the root of the project. We’ll learn about the concept of pages in the next section.
Concept of pages
Next.js is built around the concept of pages. Each page is a React component that can be of type .js or .jsx which is mapped to a route based on the filename. For example:
File Route ---- ----- /pages/about.js /about /pages/projects/work1.js /projects/work1 /pages/index.js /
Let’s create the pages directory in the root of the project and populate our first page, index.js, with a basic React component.
// pages/index.js export default function Blog() { return <div>Welcome to the Next.js blog</div> }
Run npm run dev once again to start the server and navigate to http://localhost:3000 in the browser to view your blog for the first time.

Out of the box, we get:
Hot reloading so we don’t have to refresh the browser for every code change.
Static generation of all pages inside the /pages/** directory.
Static file serving for assets living in the/public/** directory.
404 error page.
Navigate to a random path on localhost to see the 404 page in action. If you need a custom 404 page, the Next.js docs have great information.

Dynamic pages
Pages with static routes are useful to build the homepage, about page, etc. However, to dynamically build all our posts, we will use the dynamic route capability of Next.js. For example:
File Route ---- ----- /pages/posts/[slug].js /posts/1 /posts/abc /posts/hello-world
Any route, like /posts/1, /posts/abc, etc., will be matched by /posts/[slug].js and the slug parameter will be sent as a query parameter to the page. This is especially useful for our blog posts because we don’t want to create one file per post; instead we could dynamically pass the slug to render the corresponding post.
Anatomy of a blog
Now, since we understand the basic building blocks of Next.js, let’s define the anatomy of our blog.
. ├─ api │ └─ index.js # fetch posts, load configs, parse .md files etc ├─ _includes │ ├─ footer.js # footer component │ └─ header.js # header component ├─ _layouts │ ├─ default.js # default layout for static pages like index, about │ └─ post.js # post layout inherts from the default layout ├─ pages │ ├─ index.js # homepage | └─ posts # posts will be available on the route /posts/ | └─ [slug].js # dynamic page to build posts └─ _posts ├─ welcome-to-nextjs.md └─ style-guide-101.md
Blog API
A basic blog framework needs two API functions:
A function to fetch the metadata of all the posts in _posts directory
A function to fetch a single post for a given slug with the complete HTML and metadata
Optionally, we would also like all the site’s configuration defined in config.yml to be available across all the components. So we need a function that will parse the YAML config into a native object.
Since, we would be dealing with a lot of non-JavaScript files, like Markdown (.md), YAML (.yml), etc, we’ll use the raw-loader library to load such files as strings to make it easier to process them.
npm install raw-loader --save-dev
Next we need to tell Next.js to use raw-loader when we import .md and .yml file formats by creating a next.config.js file in the root of the project (more info on that).
module.exports = { target: 'serverless', webpack: function (config) { config.module.rules.push({test: /\.md$/, use: 'raw-loader'}) config.module.rules.push({test: /\.yml$/, use: 'raw-loader'}) return config } }
Next.js 9.4 introduced aliases for relative imports which helps clean up the import statement spaghetti caused by relative paths. To use aliases, create a jsconfig.json file in the project’s root directory specifying the base path and all the module aliases needed for the project.
{ "compilerOptions": { "baseUrl": "./", "paths": { "@includes/*": ["_includes/*"], "@layouts/*": ["_layouts/*"], "@posts/*": ["_posts/*"], "@api": ["api/index"], } } }
For example, this allows us to import our layouts by just using:
import DefaultLayout from '@layouts/default'
Fetch all the posts
This function will read all the Markdown files in the _posts directory, parse the front matter defined at the beginning of the post using gray-matter and return the array of metadata for all the posts.
// api/index.js import matter from 'gray-matter'
export async function getAllPosts() { const context = require.context('../_posts', false, /\.md$/) const posts = [] for(const key of context.keys()){ const post = key.slice(2); const content = await import(`../_posts/${post}`); const meta = matter(content.default) posts.push({ slug: post.replace('.md',''), title: meta.data.title }) } return posts; }
A typical Markdown post looks like this:
--- title: "Welcome to Next.js blog!" --- **Hello world**, this is my first Next.js blog post and it is written in Markdown. I hope you like it!
The section outlined by --- is called the front matter which holds the metadata of the post like, title, permalink, tags, etc. Here’s the output:
[ { slug: 'style-guide-101', title: 'Style Guide 101' }, { slug: 'welcome-to-nextjs', title: 'Welcome to Next.js blog!' } ]
Make sure you install the gray-matter library from npm first using the command npm install gray-matter --save-dev.
Fetch a single post
For a given slug, this function will locate the file in the _posts directory, parse the Markdown with the marked library and return the output HTML with metadata.
// api/index.js import matter from 'gray-matter' import marked from 'marked'
export async function getPostBySlug(slug) { const fileContent = await import(`../_posts/${slug}.md`) const meta = matter(fileContent.default) const content = marked(meta.content) return { title: meta.data.title, content: content } }
Sample output:
{ title: 'Style Guide 101', content: '<p>Incididunt cupidatat eiusmod ...</p>' }
Make sure you install the marked library from npm first using the command npm install marked --save-dev.
Config
In order to re-use the Jekyll config for our Next.js blog, we’ll parse the YAML file using the js-yaml library and export this config so that it can be used across components.
// config.yml title: "Next.js blog" description: "This blog is powered by Next.js"
// api/index.js import yaml from 'js-yaml' export async function getConfig() { const config = await import(`../config.yml`) return yaml.safeLoad(config.default) }
Make sure you install js-yaml from npm first using the command npm install js-yaml --save-dev.
Includes
Our _includes directory contains two basic React components, <Header> and <Footer>, which will be used in the different layout components defined in the _layouts directory.
// _includes/header.js export default function Header() { return <header><p>Blog | Powered by Next.js</p></header> }
// _includes/footer.js export default function Footer() { return <footer><p>©2020 | Footer</p></footer> }
Layouts
We have two layout components in the _layouts directory. One is the <DefaultLayout> which is the base layout on top of which every other layout component will be built.
// _layouts/default.js import Head from 'next/head' import Header from '@includes/header' import Footer from '@includes/footer'
export default function DefaultLayout(props) { return ( <main> <Head> <title>{props.title}</title> <meta name='description' content={props.description}/> </Head> <Header/> {props.children} <Footer/> </main> ) }
The second layout is the <PostLayout> component that will override the title defined in the <DefaultLayout> with the post title and render the HTML of the post. It also includes a link back to the homepage.
// _layouts/post.js import DefaultLayout from '@layouts/default' import Head from 'next/head' import Link from 'next/link'
export default function PostLayout(props) { return ( <DefaultLayout> <Head> <title>{props.title}</title> </Head> <article> <h1>{props.title}</h1> <div dangerouslySetInnerHTML=/> <div><Link href='/'><a>Home</a></Link></div> </article> </DefaultLayout> ) }
next/head is a built-in component to append elements to the <head> of the page. next/link is a built-in component that handles client-side transitions between the routes defined in the pages directory.
Homepage
As part of the index page, aka homepage, we will list all the posts inside the _posts directory. The list will contain the post title and the permalink to the individual post page. The index page will use the <DefaultLayout> and we’ll import the config in the homepage to pass the title and description to the layout.
// pages/index.js import DefaultLayout from '@layouts/default' import Link from 'next/link' import { getConfig, getAllPosts } from '@api'
export default function Blog(props) { return ( <DefaultLayout title={props.title} description={props.description}> <p>List of posts:</p> <ul> {props.posts.map(function(post, idx) { return ( <li key={idx}> <Link href={'/posts/'+post.slug}> <a>{post.title}</a> </Link> </li> ) })} </ul> </DefaultLayout> ) }
export async function getStaticProps() { const config = await getConfig() const allPosts = await getAllPosts() return { props: { posts: allPosts, title: config.title, description: config.description } } }
getStaticProps is called at the build time to pre-render pages by passing props to the default component of the page. We use this function to fetch the list of all posts at build time and render the posts archive on the homepage.

Post page
This page will render the title and contents of the post for the slug supplied as part of the context. The post page will use the <PostLayout> component.
// pages/posts/[slug].js import PostLayout from '@layouts/post' import { getPostBySlug, getAllPosts } from "@api"
export default function Post(props) { return <PostLayout title={props.title} content={props.content}/> }
export async function getStaticProps(context) { return { props: await getPostBySlug(context.params.slug) } }
export async function getStaticPaths() { let paths = await getAllPosts() paths = paths.map(post => ({ params: { slug:post.slug } })); return { paths: paths, fallback: false } }
If a page has dynamic routes, Next.js needs to know all the possible paths at build time. getStaticPaths supplies the list of paths that has to be rendered to HTML at build time. The fallback property ensures that if you visit a route that does not exist in the list of paths, it will return a 404 page.

Production ready
Add the following commands for build and start in package.json, under the scripts section and then run npm run build followed by npm run start to build the static blog and start the production server.
// package.json "scripts": { "dev": "next", "build": "next build", "start": "next start" }
The entire source code in this article is available on this GitHub repository. Feel free to clone it locally and play around with it. The repository also includes some basic placeholders to apply CSS to your blog.
Improvements
The blog, although functional, is perhaps too basic for most average cases. It would be nice to extend the framework or submit a patch to include some more features like:
Pagination
Syntax highlighting
Categories and Tags for posts
Styling
Overall, Next.js seems really very promising to build static websites, like a blog. Combined with its ability to export static HTML, we can built a truly standalone app without the need of a server!
The post Building a Blog with Next.js appeared first on CSS-Tricks.
via CSS-Tricks https://ift.tt/38RTO6t
0 notes
Text
Building a Blog with Next.js
In this article, we will use Next.js to build a static blog framework with the design and structure inspired by Jekyll. I’ve always been a big fan of how Jekyll makes it easier for beginners to setup a blog and at the same time also provides a great degree of control over every aspect of the blog for the advanced users.
With the introduction of Next.js in recent years, combined with the popularity of React, there is a new avenue to explore for static blogs. Next.js makes it super easy to build static websites based on the file system itself with little to no configuration required.
The directory structure of a typical bare-bones Jekyll blog looks like this:
. ├─── _posts/ ...blog posts in markdown ├─── _layouts/ ...layouts for different pages ├─── _includes/ ...re-usable components ├─── index.md ...homepage └─── config.yml ...blog config
The idea is to design our framework around this directory structure as much as possible so that it becomes easier to migrate a blog from Jekyll by simply reusing the posts and configs defined in the blog.
For those unfamiliar with Jekyll, it is a static site generator that can transform your plain text into static websites and blogs. Refer the quick start guide to get up and running with Jekyll.
This article also assumes that you have a basic knowledge of React. If not, React’s getting started page is a good place to start.
Installation
Next.js is powered by React and written in Node.js. So we need to install npm first, before adding next, react and react-dom to the project.
mkdir nextjs-blog && cd $_ npm init -y npm install next react react-dom --save
To run Next.js scripts on the command line, we have to add the next command to the scripts section of our package.json.
"scripts": { "dev": "next" }
We can now run npm run dev on the command line for the first time. Let’s see what happens.
$ npm run dev > [email protected] dev /~user/nextjs-blog > next ready - started server on http://localhost:3000 Error: > Couldn't find a `pages` directory. Please create one under the project root
The compiler is complaining about a missing pages directory in the root of the project. We’ll learn about the concept of pages in the next section.
Concept of pages
Next.js is built around the concept of pages. Each page is a React component that can be of type .js or .jsx which is mapped to a route based on the filename. For example:
File Route ---- ----- /pages/about.js /about /pages/projects/work1.js /projects/work1 /pages/index.js /
Let’s create the pages directory in the root of the project and populate our first page, index.js, with a basic React component.
// pages/index.js export default function Blog() { return <div>Welcome to the Next.js blog</div> }
Run npm run dev once again to start the server and navigate to http://localhost:3000 in the browser to view your blog for the first time.
Out of the box, we get:
Hot reloading so we don’t have to refresh the browser for every code change.
Static generation of all pages inside the /pages/** directory.
Static file serving for assets living in the/public/** directory.
404 error page.
Navigate to a random path on localhost to see the 404 page in action. If you need a custom 404 page, the Next.js docs have great information.
Dynamic pages
Pages with static routes are useful to build the homepage, about page, etc. However, to dynamically build all our posts, we will use the dynamic route capability of Next.js. For example:
File Route ---- ----- /pages/posts/[slug].js /posts/1 /posts/abc /posts/hello-world
Any route, like /posts/1, /posts/abc, etc., will be matched by /posts/[slug].js and the slug parameter will be sent as a query parameter to the page. This is especially useful for our blog posts because we don’t want to create one file per post; instead we could dynamically pass the slug to render the corresponding post.
Anatomy of a blog
Now, since we understand the basic building blocks of Next.js, let’s define the anatomy of our blog.
. ├─ api │ └─ index.js # fetch posts, load configs, parse .md files etc ├─ _includes │ ├─ footer.js # footer component │ └─ header.js # header component ├─ _layouts │ ├─ default.js # default layout for static pages like index, about │ └─ post.js # post layout inherts from the default layout ├─ pages │ ├─ index.js # homepage | └─ posts # posts will be available on the route /posts/ | └─ [slug].js # dynamic page to build posts └─ _posts ├─ welcome-to-nextjs.md └─ style-guide-101.md
Blog API
A basic blog framework needs two API functions:
A function to fetch the metadata of all the posts in _posts directory
A function to fetch a single post for a given slug with the complete HTML and metadata
Optionally, we would also like all the site’s configuration defined in config.yml to be available across all the components. So we need a function that will parse the YAML config into a native object.
Since, we would be dealing with a lot of non-JavaScript files, like Markdown (.md), YAML (.yml), etc, we’ll use the raw-loader library to load such files as strings to make it easier to process them.
npm install raw-loader --save-dev
Next we need to tell Next.js to use raw-loader when we import .md and .yml file formats by creating a next.config.js file in the root of the project (more info on that).
module.exports = { target: 'serverless', webpack: function (config) { config.module.rules.push({test: /\.md$/, use: 'raw-loader'}) config.module.rules.push({test: /\.yml$/, use: 'raw-loader'}) return config } }
Next.js 9.4 introduced aliases for relative imports which helps clean up the import statement spaghetti caused by relative paths. To use aliases, create a jsconfig.json file in the project’s root directory specifying the base path and all the module aliases needed for the project.
{ "compilerOptions": { "baseUrl": "./", "paths": { "@includes/*": ["_includes/*"], "@layouts/*": ["_layouts/*"], "@posts/*": ["_posts/*"], "@api": ["api/index"], } } }
For example, this allows us to import our layouts by just using:
import DefaultLayout from '@layouts/default'
Fetch all the posts
This function will read all the Markdown files in the _posts directory, parse the front matter defined at the beginning of the post using gray-matter and return the array of metadata for all the posts.
// api/index.js import matter from 'gray-matter'
export async function getAllPosts() { const context = require.context('../_posts', false, /\.md$/) const posts = [] for(const key of context.keys()){ const post = key.slice(2); const content = await import(`../_posts/${post}`); const meta = matter(content.default) posts.push({ slug: post.replace('.md',''), title: meta.data.title }) } return posts; }
A typical Markdown post looks like this:
--- title: "Welcome to Next.js blog!" --- **Hello world**, this is my first Next.js blog post and it is written in Markdown. I hope you like it!
The section outlined by --- is called the front matter which holds the metadata of the post like, title, permalink, tags, etc. Here’s the output:
[ { slug: 'style-guide-101', title: 'Style Guide 101' }, { slug: 'welcome-to-nextjs', title: 'Welcome to Next.js blog!' } ]
Make sure you install the gray-matter library from npm first using the command npm install gray-matter --save-dev.
Fetch a single post
For a given slug, this function will locate the file in the _posts directory, parse the Markdown with the marked library and return the output HTML with metadata.
// api/index.js import matter from 'gray-matter' import marked from 'marked'
export async function getPostBySlug(slug) { const fileContent = await import(`../_posts/${slug}.md`) const meta = matter(fileContent.default) const content = marked(meta.content) return { title: meta.data.title, content: content } }
Sample output:
{ title: 'Style Guide 101', content: '<p>Incididunt cupidatat eiusmod ...</p>' }
Make sure you install the marked library from npm first using the command npm install marked --save-dev.
Config
In order to re-use the Jekyll config for our Next.js blog, we’ll parse the YAML file using the js-yaml library and export this config so that it can be used across components.
// config.yml title: "Next.js blog" description: "This blog is powered by Next.js"
// api/index.js import yaml from 'js-yaml' export async function getConfig() { const config = await import(`../config.yml`) return yaml.safeLoad(config.default) }
Make sure you install js-yaml from npm first using the command npm install js-yaml --save-dev.
Includes
Our _includes directory contains two basic React components, <Header> and <Footer>, which will be used in the different layout components defined in the _layouts directory.
// _includes/header.js export default function Header() { return <header><p>Blog | Powered by Next.js</p></header> }
// _includes/footer.js export default function Footer() { return <footer><p>©2020 | Footer</p></footer> }
Layouts
We have two layout components in the _layouts directory. One is the <DefaultLayout> which is the base layout on top of which every other layout component will be built.
// _layouts/default.js import Head from 'next/head' import Header from '@includes/header' import Footer from '@includes/footer'
export default function DefaultLayout(props) { return ( <main> <Head> <title>{props.title}</title> <meta name='description' content={props.description}/> </Head> <Header/> {props.children} <Footer/> </main> ) }
The second layout is the <PostLayout> component that will override the title defined in the <DefaultLayout> with the post title and render the HTML of the post. It also includes a link back to the homepage.
// _layouts/post.js import DefaultLayout from '@layouts/default' import Head from 'next/head' import Link from 'next/link'
export default function PostLayout(props) { return ( <DefaultLayout> <Head> <title>{props.title}</title> </Head> <article> <h1>{props.title}</h1> <div dangerouslySetInnerHTML=/> <div><Link href='/'><a>Home</a></Link></div> </article> </DefaultLayout> ) }
next/head is a built-in component to append elements to the <head> of the page. next/link is a built-in component that handles client-side transitions between the routes defined in the pages directory.
Homepage
As part of the index page, aka homepage, we will list all the posts inside the _posts directory. The list will contain the post title and the permalink to the individual post page. The index page will use the <DefaultLayout> and we’ll import the config in the homepage to pass the title and description to the layout.
// pages/index.js import DefaultLayout from '@layouts/default' import Link from 'next/link' import { getConfig, getAllPosts } from '@api'
export default function Blog(props) { return ( <DefaultLayout title={props.title} description={props.description}> <p>List of posts:</p> <ul> {props.posts.map(function(post, idx) { return ( <li key={idx}> <Link href={'/posts/'+post.slug}> <a>{post.title}</a> </Link> </li> ) })} </ul> </DefaultLayout> ) }
export async function getStaticProps() { const config = await getConfig() const allPosts = await getAllPosts() return { props: { posts: allPosts, title: config.title, description: config.description } } }
getStaticProps is called at the build time to pre-render pages by passing props to the default component of the page. We use this function to fetch the list of all posts at build time and render the posts archive on the homepage.

Post page
This page will render the title and contents of the post for the slug supplied as part of the context. The post page will use the <PostLayout> component.
// pages/posts/[slug].js import PostLayout from '@layouts/post' import { getPostBySlug, getAllPosts } from "@api"
export default function Post(props) { return <PostLayout title={props.title} content={props.content}/> }
export async function getStaticProps(context) { return { props: await getPostBySlug(context.params.slug) } }
export async function getStaticPaths() { let paths = await getAllPosts() paths = paths.map(post => ({ params: { slug:post.slug } })); return { paths: paths, fallback: false } }
If a page has dynamic routes, Next.js needs to know all the possible paths at build time. getStaticPaths supplies the list of paths that has to be rendered to HTML at build time. The fallback property ensures that if you visit a route that does not exist in the list of paths, it will return a 404 page.

Production ready
Add the following commands for build and start in package.json, under the scripts section and then run npm run build followed by npm run start to build the static blog and start the production server.
// package.json "scripts": { "dev": "next", "build": "next build", "start": "next start" }
The entire source code in this article is available on this GitHub repository. Feel free to clone it locally and play around with it. The repository also includes some basic placeholders to apply CSS to your blog.
Improvements
The blog, although functional, is perhaps too basic for most average cases. It would be nice to extend the framework or submit a patch to include some more features like:
Pagination
Syntax highlighting
Categories and Tags for posts
Styling
Overall, Next.js seems really very promising to build static websites, like a blog. Combined with its ability to export static HTML, we can built a truly standalone app without the need of a server!
The post Building a Blog with Next.js appeared first on CSS-Tricks.
Building a Blog with Next.js published first on https://deskbysnafu.tumblr.com/
0 notes
Text
Building a Blog with Next.js
In this article, we will use Next.js to build a static blog framework with the design and structure inspired by Jekyll. I’ve always been a big fan of how Jekyll makes it easier for beginners to setup a blog and at the same time also provides a great degree of control over every aspect of the blog for the advanced users.
With the introduction of Next.js in recent years, combined with the popularity of React, there is a new avenue to explore for static blogs. Next.js makes it super easy to build static websites based on the file system itself with little to no configuration required.
The directory structure of a typical bare-bones Jekyll blog looks like this:
. ├─── _posts/ ...blog posts in markdown ├─── _layouts/ ...layouts for different pages ├─── _includes/ ...re-usable components ├─── index.md ...homepage └─── config.yml ...blog config
The idea is to design our framework around this directory structure as much as possible so that it becomes easier to migrate a blog from Jekyll by simply reusing the posts and configs defined in the blog.
For those unfamiliar with Jekyll, it is a static site generator that can transform your plain text into static websites and blogs. Refer the quick start guide to get up and running with Jekyll.
This article also assumes that you have a basic knowledge of React. If not, React’s getting started page is a good place to start.
Installation
Next.js is powered by React and written in Node.js. So we need to install npm first, before adding next, react and react-dom to the project.
mkdir nextjs-blog && cd $_ npm init -y npm install next react react-dom --save
To run Next.js scripts on the command line, we have to add the next command to the scripts section of our package.json.
"scripts": { "dev": "next" }
We can now run npm run dev on the command line for the first time. Let’s see what happens.
$ npm run dev > [email protected] dev /~user/nextjs-blog > next ready - started server on http://localhost:3000 Error: > Couldn't find a `pages` directory. Please create one under the project root
The compiler is complaining about a missing pages directory in the root of the project. We’ll learn about the concept of pages in the next section.
Concept of pages
Next.js is built around the concept of pages. Each page is a React component that can be of type .js or .jsx which is mapped to a route based on the filename. For example:
File Route ---- ----- /pages/about.js /about /pages/projects/work1.js /projects/work1 /pages/index.js /
Let’s create the pages directory in the root of the project and populate our first page, index.js, with a basic React component.
// pages/index.js export default function Blog() { return <div>Welcome to the Next.js blog</div> }
Run npm run dev once again to start the server and navigate to http://localhost:3000 in the browser to view your blog for the first time.

Out of the box, we get:
Hot reloading so we don’t have to refresh the browser for every code change.
Static generation of all pages inside the /pages/** directory.
Static file serving for assets living in the/public/** directory.
404 error page.
Navigate to a random path on localhost to see the 404 page in action. If you need a custom 404 page, the Next.js docs have great information.

Dynamic pages
Pages with static routes are useful to build the homepage, about page, etc. However, to dynamically build all our posts, we will use the dynamic route capability of Next.js. For example:
File Route ---- ----- /pages/posts/[slug].js /posts/1 /posts/abc /posts/hello-world
Any route, like /posts/1, /posts/abc, etc., will be matched by /posts/[slug].js and the slug parameter will be sent as a query parameter to the page. This is especially useful for our blog posts because we don’t want to create one file per post; instead we could dynamically pass the slug to render the corresponding post.
Anatomy of a blog
Now, since we understand the basic building blocks of Next.js, let’s define the anatomy of our blog.
. ├─ api │ └─ index.js # fetch posts, load configs, parse .md files etc ├─ _includes │ ├─ footer.js # footer component │ └─ header.js # header component ├─ _layouts │ ├─ default.js # default layout for static pages like index, about │ └─ post.js # post layout inherts from the default layout ├─ pages │ ├─ index.js # homepage | └─ posts # posts will be available on the route /posts/ | └─ [slug].js # dynamic page to build posts └─ _posts ├─ welcome-to-nextjs.md └─ style-guide-101.md
Blog API
A basic blog framework needs two API functions:
A function to fetch the metadata of all the posts in _posts directory
A function to fetch a single post for a given slug with the complete HTML and metadata
Optionally, we would also like all the site’s configuration defined in config.yml to be available across all the components. So we need a function that will parse the YAML config into a native object.
Since, we would be dealing with a lot of non-JavaScript files, like Markdown (.md), YAML (.yml), etc, we’ll use the raw-loader library to load such files as strings to make it easier to process them.
npm install raw-loader --save-dev
Next we need to tell Next.js to use raw-loader when we import .md and .yml file formats by creating a next.config.js file in the root of the project (more info on that).
module.exports = { target: 'serverless', webpack: function (config) { config.module.rules.push({test: /\.md$/, use: 'raw-loader'}) config.module.rules.push({test: /\.yml$/, use: 'raw-loader'}) return config } }
Next.js 9.4 introduced aliases for relative imports which helps clean up the import statement spaghetti caused by relative paths. To use aliases, create a jsconfig.json file in the project’s root directory specifying the base path and all the module aliases needed for the project.
{ "compilerOptions": { "baseUrl": "./", "paths": { "@includes/*": ["_includes/*"], "@layouts/*": ["_layouts/*"], "@posts/*": ["_posts/*"], "@api": ["api/index"], } } }
For example, this allows us to import our layouts by just using:
import DefaultLayout from '@layouts/default'
Fetch all the posts
This function will read all the Markdown files in the _posts directory, parse the front matter defined at the beginning of the post using gray-matter and return the array of metadata for all the posts.
// api/index.js import matter from 'gray-matter'
export async function getAllPosts() { const context = require.context('../_posts', false, /\.md$/) const posts = [] for(const key of context.keys()){ const post = key.slice(2); const content = await import(`../_posts/${post}`); const meta = matter(content.default) posts.push({ slug: post.replace('.md',''), title: meta.data.title }) } return posts; }
A typical Markdown post looks like this:
--- title: "Welcome to Next.js blog!" --- **Hello world**, this is my first Next.js blog post and it is written in Markdown. I hope you like it!
The section outlined by --- is called the front matter which holds the metadata of the post like, title, permalink, tags, etc. Here’s the output:
[ { slug: 'style-guide-101', title: 'Style Guide 101' }, { slug: 'welcome-to-nextjs', title: 'Welcome to Next.js blog!' } ]
Make sure you install the gray-matter library from npm first using the command npm install gray-matter --save-dev.
Fetch a single post
For a given slug, this function will locate the file in the _posts directory, parse the Markdown with the marked library and return the output HTML with metadata.
// api/index.js import matter from 'gray-matter' import marked from 'marked'
export async function getPostBySlug(slug) { const fileContent = await import(`../_posts/${slug}.md`) const meta = matter(fileContent.default) const content = marked(meta.content) return { title: meta.data.title, content: content } }
Sample output:
{ title: 'Style Guide 101', content: '<p>Incididunt cupidatat eiusmod ...</p>' }
Make sure you install the marked library from npm first using the command npm install marked --save-dev.
Config
In order to re-use the Jekyll config for our Next.js blog, we’ll parse the YAML file using the js-yaml library and export this config so that it can be used across components.
// config.yml title: "Next.js blog" description: "This blog is powered by Next.js"
// api/index.js import yaml from 'js-yaml' export async function getConfig() { const config = await import(`../config.yml`) return yaml.safeLoad(config.default) }
Make sure you install js-yaml from npm first using the command npm install js-yaml --save-dev.
Includes
Our _includes directory contains two basic React components, <Header> and <Footer>, which will be used in the different layout components defined in the _layouts directory.
// _includes/header.js export default function Header() { return <header><p>Blog | Powered by Next.js</p></header> }
// _includes/footer.js export default function Footer() { return <footer><p>©2020 | Footer</p></footer> }
Layouts
We have two layout components in the _layouts directory. One is the <DefaultLayout> which is the base layout on top of which every other layout component will be built.
// _layouts/default.js import Head from 'next/head' import Header from '@includes/header' import Footer from '@includes/footer'
export default function DefaultLayout(props) { return ( <main> <Head> <title>{props.title}</title> <meta name='description' content={props.description}/> </Head> <Header/> �� {props.children} <Footer/> </main> ) }
The second layout is the <PostLayout> component that will override the title defined in the <DefaultLayout> with the post title and render the HTML of the post. It also includes a link back to the homepage.
// _layouts/post.js import DefaultLayout from '@layouts/default' import Head from 'next/head' import Link from 'next/link'
export default function PostLayout(props) { return ( <DefaultLayout> <Head> <title>{props.title}</title> </Head> <article> <h1>{props.title}</h1> <div dangerouslySetInnerHTML=/> <div><Link href='/'><a>Home</a></Link></div> </article> </DefaultLayout> ) }
next/head is a built-in component to append elements to the <head> of the page. next/link is a built-in component that handles client-side transitions between the routes defined in the pages directory.
Homepage
As part of the index page, aka homepage, we will list all the posts inside the _posts directory. The list will contain the post title and the permalink to the individual post page. The index page will use the <DefaultLayout> and we’ll import the config in the homepage to pass the title and description to the layout.
// pages/index.js import DefaultLayout from '@layouts/default' import Link from 'next/link' import { getConfig, getAllPosts } from '@api'
export default function Blog(props) { return ( <DefaultLayout title={props.title} description={props.description}> <p>List of posts:</p> <ul> {props.posts.map(function(post, idx) { return ( <li key={idx}> <Link href={'/posts/'+post.slug}> <a>{post.title}</a> </Link> </li> ) })} </ul> </DefaultLayout> ) }
export async function getStaticProps() { const config = await getConfig() const allPosts = await getAllPosts() return { props: { posts: allPosts, title: config.title, description: config.description } } }
getStaticProps is called at the build time to pre-render pages by passing props to the default component of the page. We use this function to fetch the list of all posts at build time and render the posts archive on the homepage.

Post page
This page will render the title and contents of the post for the slug supplied as part of the context. The post page will use the <PostLayout> component.
// pages/posts/[slug].js import PostLayout from '@layouts/post' import { getPostBySlug, getAllPosts } from "@api"
export default function Post(props) { return <PostLayout title={props.title} content={props.content}/> }
export async function getStaticProps(context) { return { props: await getPostBySlug(context.params.slug) } }
export async function getStaticPaths() { let paths = await getAllPosts() paths = paths.map(post => ({ params: { slug:post.slug } })); return { paths: paths, fallback: false } }
If a page has dynamic routes, Next.js needs to know all the possible paths at build time. getStaticPaths supplies the list of paths that has to be rendered to HTML at build time. The fallback property ensures that if you visit a route that does not exist in the list of paths, it will return a 404 page.

Production ready
Add the following commands for build and start in package.json, under the scripts section and then run npm run build followed by npm run start to build the static blog and start the production server.
// package.json "scripts": { "dev": "next", "build": "next build", "start": "next start" }
The entire source code in this article is available on this GitHub repository. Feel free to clone it locally and play around with it. The repository also includes some basic placeholders to apply CSS to your blog.
Improvements
The blog, although functional, is perhaps too basic for most average cases. It would be nice to extend the framework or submit a patch to include some more features like:
Pagination
Syntax highlighting
Categories and Tags for posts
Styling
Overall, Next.js seems really very promising to build static websites, like a blog. Combined with its ability to export static HTML, we can built a truly standalone app without the need of a server!
The post Building a Blog with Next.js appeared first on CSS-Tricks.
Building a Blog with Next.js published first on https://deskbysnafu.tumblr.com/
0 notes
Text
Create New Express.js Apps in Minutes with Express Generator
Express.js is a Node.js web framework that has gained immense popularity due to its simplicity. It has easy-to-use routing and simple support for view engines, putting it far ahead of the basic Node HTTP server.
However, starting a new Express application requires a certain amount of boilerplate code: starting a new server instance, configuring a view engine, setting up error handling.
Although there are various starter projects and boilerplates available, Express has its own command-line tool that makes it easy to start new apps, called the express-generator.
What is Express?
Express has a lot of features built in, and a lot more features you can get from other packages that integrate seamlessly, but there are three main things it does for you out of the box:
Routing. This is how /home /blog and /about all give you different pages. Express makes it easy for you to modularize this code by allowing you to put different routes in different files.
Middleware. If you’re new to the term, basically middleware is “software glue”. It accesses requests before your routes get them, allowing them to handle hard-to-do stuff like cookie parsing, file uploads, errors, and more.
Views. Views are how HTML pages are rendered with custom content. You pass in the data you want to be rendered and Express will render it with your given view engine.
Getting Started
Starting a new project with the Express generator is as simple as running a few commands:
npm install express-generator -g
This installs the Express generator as a global package, allowing you to run the express command in your terminal:
express myapp
This creates a new Express project called myapp which is then placed inside of the myapp directory.
cd myapp
If you’re unfamiliar with terminal commands, this one puts you inside of the myapp directory.
npm install
npm is the default Node.js package manager. Running npm install installs all dependencies for the project. By default, the express-generator includes several packages that are commonly used with an Express server.
Options
The generator CLI takes half a dozen arguments, but the two most useful ones are the following:
-v . This lets you select a view engine to install. The default is jade. Although this still works, it has been deprecated in favor of pug.
-c . By default, the generator creates a very basic CSS file for you, but selecting a CSS engine will configure your new app with middleware to compile any of the above options.
Now that we’ve got our project set up and dependencies installed, we can start the new server by running the following:
npm start
Then browse to http://localhost:3000 in your browser.
Application Structure
The generated Express application starts off with four folders.
bin
The bin folder contains the executable file that starts your app. It starts the server (on port 3000, if no alternative is supplied) and sets up some basic error handling. You don’t really need to worry about this file because npm start will run it for you.
public
The public folder is one of the important ones: everything in this folder is accessible to people connecting to your application. In this folder, you’ll put JavaScript, CSS, images, and other assets that people need when they connect to your website.
routes
The routes folder is where you'll put your router files. The generator creates two files, index.js and users.js, which serve as examples of how to separate out your application's route configuration.
Usually, here you’ll have a different file for each major route on your website. So you might have files called blog.js, home.js, and/or about.js in this folder.
views
The views folder is where you have the files used by your templating engine. The generator will configure Express to look in here for a matching view when you call the render method.
Outside of these folders, there’s one file that you should know well.
Continue reading %Create New Express.js Apps in Minutes with Express Generator%
via SitePoint https://ift.tt/2sf41oq
0 notes
Last Seen Blogs

greggodreg
Gray

ronniemarkellpodcast
Ronnie & Markell Podcast

kar-tive-blog
Positive,Creative,Active Exploring new things

flamencaviajera
Flamenca y Viajera

robbedgraves
THIIEVESANDBEGGARS