#add-apt-repository
Explore tagged Tumblr posts
Visit Tumblr Blog
Explore Tumblr blogs with no restrictions, modern design and the best experience.
Last Seen Tumblr Blogs


Fun Fact
Tumblr Inc. is using 66 technologies for its website.
Text
Linux update! (And a few Nvidia tips)
After a dreadful day of trying to make this work, I'm reporting that The Sims 2 finally works on my new Linux system! 😭❤️ Admittedly I have made my own life harder setting this up, but the most important thing I've learned from this experience and thought it might worth sharing:
Before you try to install TS2 on your Linux, make sure that you have your graphics card's driver updated!
When I first installed The Sims 2 on Linux it was incredibly laggy and choppy, because the default Nouveau driver didn't work well enough with my Nvidia card. After I installed the Nvidia driver from the built in driver manager, the game just straightup crashed.
Then I had to find out that Mint's driver manager couldn't install the newest driver for my card (RTX 3070), and even when installed, it didn't work. 😂
So if you have an Nvidia card and struggling or planning to install Linux in the future, below the cut are a few useful tips that I've discovered in the depths of the Internet:
Check what driver the official Nvidia site recommends for your GPU. - I did this and it showed driver version 570.
2. I think this is optional, but open your terminal and type the cmd: sudo apt update - this will trigger Linux to update its driver list.
3. Open Driver Manager, and see if the recommended driver (570 in my case is available). For me it was not available, only the 550, this was my issue.
3.1. If you can see your required driver, awesome, install it from the driver manager and skip to step 5. 3.2. If not, you have to use this PPA. -> Meaning you have to open your terminal and enter the following commands (when I list multiple commands to run, first type the first one, press enter, then type the next one, press enter etc.): sudo add-apt-repository ppa:graphics-drivers/ ppa sudo apt update You can also find installation guide on the link above, but it's basically this. 4. Now you have to restart your system, and repeat Step 3. of this list. The newest driver should show up in your Driver Manager now, install it.
5. After installing, open your terminal and type the following command: inxi -G -> this will allow us to check if the driver works properly. Shock, it did not for me :D When working properly, it should look like this:
Display: x11 server: X.Org v: 21.1.11 with: Xwayland v: 23.2.6 driver: X: loaded: nvidia gpu: nvidia,nvidia-nvswitch resolution: 1:1920x1080~60Hz 2: 1920x1080~60Hz When not working, it looks like this: Example 1: Display: x11 server: X.Org v: 21.1.11 with: Xwayland v: 23.2.6 driver: X: loaded: nouveau unloaded: fbdev,modesetting,vesa failed: nvidia
6. This is the thread that helped me fix this problem. You have to scroll down to the Nvidia Graphics troubleshooting tips.
7. I had to add this "kernel boot parameter": nvidia_drm.fbdev=1 into the system. On this link you can see how to add it either temporarily or "permanently" (meaning you don't have to add it every time you start your system, but it is removable).
To add it permanently, you have to type the following commands into your terminal:
sudo nano /etc/default/grub GRUB_CMDLINE_LINUX_DEFAULT="quiet splash nvidia_drm.fbdev=1" sudo update-grub
8. After you added it, reboot your system, and when it starts again, check if the parameter is there with the command: cat /proc/cmdline
9. If it's there, run the inxi -G command again, and see if it looks like it should.
10. If not, you might have to update the Kernel version of your Linux, which you can do in the Update Manager/View/Linux Kernels menu. I had to update mine from 6.8 to 6.11.
After all this you should be good to install the game, I made my life so much harder than it was necessarily so I hope my research on how to deal with an Nvidia Graphics card with Sims 2 on Linux is helpful to some of you. 😂
38 notes
·
View notes
Text
DeadBeef на Linux Mint
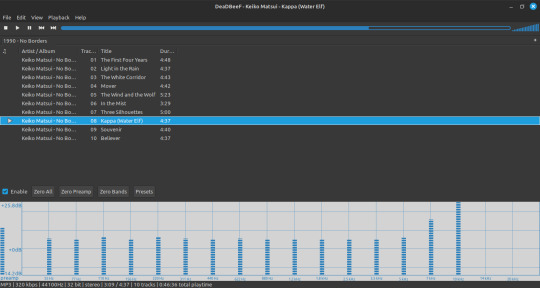
$ sudo add-apt-repository ppa:starws-box/deadbeef-player $ sudo apt update
Next, install DeadBeef:
$ sudo apt install deadbeef
#русский текст#русские посты#русский пост#русский tumblr#русский блог#русский тамблер#линукс#аудиофилия#deadbeef#плеер
4 notes
·
View notes
Text
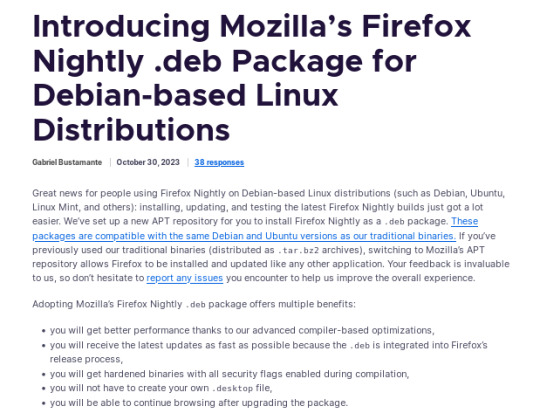
official instructions to add the Mozilla .deb repository for everyone on Ubuntu, Mint, or Debian, etc., who would like to install Firefox Nightly (most bleeding edge unstable version and users are likely to encounter bugs!). link attached to screenshot above.
it should be noted, however, that this repository provides both the main version of Firefox (non snap version) as well as Firefox Nightly and others so installing this repository may conflict with default Ubuntu apt version of Firefox (dummy package that installs the Snap version). although, I am not familiar with the Snap version so it might not be an issue (sorry)
as for other repositories, it appears the "mozilla teams" PPA version of the regular Firefox package takes precedence so there should be no conflict with the PPA installed alongside the official Mozilla repo.
alternatively however: if you wish to remove the PPA, you will need to explicitly install the Mozilla repo version number in order to receive future updates. for example:
sudo apt install firefox=134.0.2~build1
to find the latest version number:
apt-cache show firefox | grep Version | grep -v ubuntu | head -n 1
(the grep -v ubuntu should exclude other repository versions and hopefully the formatting holds up here I tried to avoid quotes)
and then if the PPA is not already removed at this point, just make sure to remove the PPA before the next update
2 notes
·
View notes
Text
Audacity for Debian-based Linux
So, some time around 2020/2021, Audacity for Linux from the repositories of Debian-based distros (including Ubuntu, Mint, etc.) no longer had access to high quality stretch (change tempo, change pitch, shifting slider). This appears to be due to a combination of Debian no longer updating Audacity at all past 2.4.2 (as Audacity's new owners from 3.0.0 on have had...issues, to put it lightly), but also the fact that 2.4.2 specifically was requiring a version of the SBSMS library past what Debian had. It's still the case that the apt version of Audacity on Linux Mint still lacks the high quality stretch functions.
The workaround for this is to compile from source. HOWEVER. Be apprised that if you specifically go for version 2.4.2, there is still a bug around SBSMS, which causes Audacity to crash when attempting high quality stretching. Apparently, if you go for versions afterwards (3.0+, new Audacity owners), or the version before (2.3.3), you will not run into this issue.
I am stubborn, so I have verified that I can now open Audacity 2.4.2 and do a high quality pitch change without crashing. Here are the solution options. Know that both are still compiling from source.
Option 1: Do it manually command by command on the terminal
You will, however, notice that the important download link for the patch is broken. You must get it from here.
Note that you should preface all of the commands listed in that post with "sudo", or they will likely throw an error. (Or do whatever you need to for terminal to continuously recognize root access.) In addition, note that the "pre-installation test" section is not optional. Audacity will not run if the "Portable Settings" folder is not created, and furthermore, the "Portable Settings" folder and all containing files need to have write permissions enabled to the relevant non-root group/owner.
Whether you installed manually or used the script, you will need to go to "/usr/local/share/audacity/audacity-minsrc-2.4.2/build/bin/Release" to launch Audacity. In the file explorer window, you can click the button to the left of the magnifying glass to switch to text input where you can copy and paste the above path. Or, from /home, go up one level, and then navigate through manually.
Change the launcher's icon and add it to the start menu/desktop, per your specific distro and desktop environment.
Option 2: Modify and run a bash script
I found a helpful Youtube video stepping through the process, before they link to a bash script automating the whole thing. However, the script does not include the 2.4.2 patch. There are also a few modifications that need to be done to the script.
Modifications to make (right click the .sh file, open with, pick some text editor):
Line 35: change the dl_directory to match your own system. (Specifically, you probably need to replace "piuser" with your own account name.)
This change also needs be done on lines 115, 116, and 120 (or replace the hard coded parts with "${DL_DIRECTORY}").
Line 77 (optional): add "patch" as a dependent package to check. Like Python, it's mostly likely already installed, so you could leave this commented out.
Lines 139-142: Not a modification, but a note that I didn't end up using this (left it commented out), so I did have to download the 2.4.2 source code from fosshub manually and put it in the location specified by dl_directory. I also put the patch there. If you do want to try to automate the download, you'll not only have to add another line to also download the patch file, but both the source code for 2.4.2 and the patch have hyphens in their urls, so you need to either add backslashes to escape them, or enclose the entire url in quotation marks. But I also can't guarantee that either of those things will work, since I ended up doing the downloads manually.
Line 150: Per the manual installation above, the patch needs to be applied before the build. Add this code block at line 150 (after the script checks to see if the "Build" folder exists):
#SBSMS patch required for 2.4.2 if [ -f "${DL_DIRECTORY}/changepitch.patch" ]; then sudo cp "${DL_DIRECTORY}/changepitch.patch" "${DIRECTORY}/${VERSION}" fi sudo patch -p 1 < changepitch.patch
That's it for changing the script. Save it, close out of the text editor. (If you decided not to try letting the script do the downloads, then make sure you download the source code and the patch and put them in the dl_directory location at this point.)
Enable the script to be executable. (Right click the .sh file, Properties. On the Permissions tab, check that "Allow executing file as a program" is checked.)
Double click the .sh file. I suggest doing the "Run In Terminal" option so you can see the progress. (And if it's really short, probably something went wrong. The build section takes 20 minutes.)
This script does not include installing the offline manual for Audacity. That is covered in the guide posted in Option 1. Sorry, you'll have to do some terminal typing after all.
Whether you installed manually or used the script, you will need to go to "/usr/local/share/audacity/audacity-minsrc-2.4.2/build/bin/Release" to launch Audacity. In the file explorer window, you can click the button to the left of the magnifying glass to switch to text input where you can copy and paste the above path. Or, from /home, go up one level, and then navigate through manually.
Change the launcher's icon and add it to the start menu/desktop, per your specific distro and desktop environment.
#linux#linux mint#ubuntu#debian#audacity#category: other#vibrating at the mashups now once again at my fingertips
9 notes
·
View notes
Text


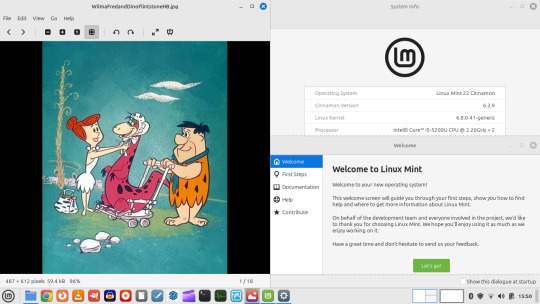


24.08.24
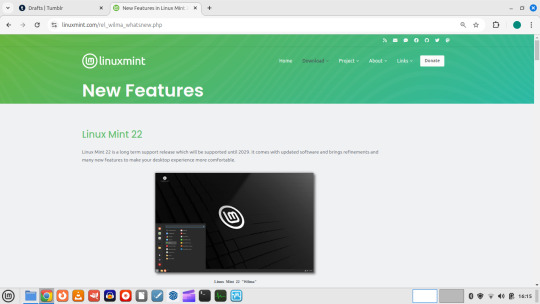
I upgraded my Linux laptop from Linux Mint 21.3 to 22 today. Linux Mint 22 codenamed ''Wilma'' is the latest version of the Linux Mint operating system based on Ubuntu 24.04 LTS (Noble Numbat).
I am using the 'Cinnamon' desktop edition.
https://linuxmint.com/rel_wilma_whatsnew.php
More about Ubuntu's Noble Numbat release:
https://ubuntu.com/blog/the-coronation-of-a-new-mascot-noble-numbat
Before starting the upgrade, I updated all my installed applications with the update manager.
The sequence is as follows:
- apt update - updates the cache of all the app packages.
- apt install mintupgrade
- sudo mintupgrade - this automatically downloads the upgraded version of Mint with the libraries in the correct locations. It also runs the 'Timeshift' tool to create a system snapshot of the previous Linux Mint 21.3 installation, so that I could roll back in case there's a problem.
The upgrade tool points software repositories to the new release and adds new software repos and removes old software repos. Next it prompts you to upgrade the Update Manager which installs all the latest versions of all the packages for Linux Mint 22 (Wilma).
After rebooting, the upgrade was complete and everything looked good! I am now running the latest Mint version with the latest updates.
Here is the Linux Mint 22 system upgrade guide:
https://linuxmint-user-guide.readthedocs.io/en/latest/upgrade-to-mint-22.html
I decided to change my desktop background to one of the new 'Wilma' selections. I launched and played with some of the software.
I had to reinstall the GIMP image editing tool. Evolus Pencil was removed as it is an Orphan package. An Orphan package on Linux is an unofficial repository package downloaded from online.
I also had a look at my Need for Madness game, which I installed onto the laptop last year.
See game project links below:
https://www.tumblr.com/bjsmall/722403851251089408/040723-need-for-madness-game-linux-install-1?source=share
https://www.tumblr.com/bjsmall/722403845778636800/040723-need-for-madness-game-linux-installation?source=share
The operating systems name is also the name of the character Wilma, Fred Flintstones wife from the Flintstones!
Below is a comparison of Linux Mint Cinnamon 22 and Ubuntu 24.04 with its default GNOME desktop with the Ubuntu mascot wallpapers.
4 notes
·
View notes
Note
I hope you know you've earned the title Linux pro my friend. Installing linux on apple hardware is a challenge, installing a linux OS without support for the architecture/arm on apple hardware is truly triumph. Even if you don't believe it i bestow upon you an honorary title of Linux pro. Be well, and be free friend!
Well, to be fair, I didn't install Zorin OS onto an M1 Mac. It's running under a UTM (QEmu) Virtual Machine. I am, however, surprised that I got Zorin OS Core running on an ARM Machine, at all. I'm even more surprised that I've done it before anyone has documented it online. There are plenty of questions about an ARM version and M1 Virtualization on Zorin's official forum, but they usually go unanswered. From the initial forum posts I used to get my leverage, most people seemed to conclude that Zorin OS Lite would work just fine, but attempting to install Zorin OS Core over top of Ubuntu Server ARM resulted in dependency issues. I got this issues at first too, but after trying and trying again, I realize that Ubuntu Server 20.04's own repositories didn't contain the app versions that Zorin OS was looking for when attempting to install. I realized that Zorin's devs probably had to implement these in repositories of their own, and I was right. I found the list of official Zorin OS repos and "sudo add-apt-repository"ed about 3-4 of them into Ubuntu Server. After that, "sudo aptitude install zorin-os-desktop" ran without errors, and one reboot later, I was running Zorin OS 16.3 Core on an ARM Virtual Machine.
It's still not perfect. Strange oddities, glitches, and freezes occur here and there. For example, this is the second version of this post I'm writing. During the first draft, the VM froze, and I had to restart it. It just does that randomly, for seemingly no reason. I've added an app to the macOS host to see if it's the external SSD sleeping that's causing this issue, but I don't know, as of right now.
The Software Store (aka package manager) also doesn't seem to work properly. Nothing installs, and I always have to use "sudo aptitude install" to get stuff. I'm assuming, despite being the ARM64 version of Gnome Software, something under the hood is still attempting to install the AMD64 version of apps, causing the weird failures and indefinite stalls.
The main LibreOffice app, for some reason, also didn't appear in the Zorin Menu, and had to be added manually.
Only one of UTM's sound card drivers allowed the audio settings to appear as normal. Everything else eliminated a bunch of sliders in the "Sound" settings and muted the VM on startup. That was pretty annoying because I wanted to hear the Zorin OS login chime. Luckily, the one sound card option fixed all this, but for some reason, the VM occasionally starts up with zero audio. It always does this when I restart, so I always have to shut down and then turn back on to fix it.
I'm sure there's plenty more, but so far that's all I've found. I'm sure a more power user would find other stuff, but I'm really only looked to use Zorin OS as a productivity OS, so I'm not likely to run into much more.
To be fair, though, even with all the weird stuff, it still runs smoother than the native install on my 2011 MacBook Pro, so I'm not complaining. In fact, I'm just happy to be using Zorin OS on my desktop, at all.
#Netscape Results#rambles#linux#linux arm#arm linux#apple silicon#virtual machine#virtualization#m1#m1 mac#mac#imac#m1 imac#zorin#zorin os#zorin os core#arm#arm64
2 notes
·
View notes
Text
How to Install MySQL 8 – Step-by-Step Guide
How to Install MySQL 8 – Step-by-Step GuideMySQL 8 brings improved performance, security, and features. Below are the installation steps for different operating systems. For Ubuntu / Debian-based LinuxStep 1: Update your system sudo apt updatesudo apt upgradeStep 2: Add the MySQL APT repository wget https://dev.mysql.com/get/mysql-apt-config_0.8.29-1_all.debsudo dpkg -i…
0 notes
Text
Postal SMTP install and setup on a virtual server

Postal is a full suite for mail delivery with robust features suited for running a bulk email sending SMTP server. Postal is open source and free. Some of its features are: - UI for maintaining different aspects of your mail server - Runs on containers, hence allows for up and down horizontal scaling - Email security features such as spam and antivirus - IP pools to help you maintain a good sending reputation by sending via multiple IPs - Multitenant support - multiple users, domains and organizations - Monitoring queue for outgoing and incoming mail - Built in DNS setup and monitoring to ensure mail domains are set up correctly List of full postal features
Possible cloud providers to use with Postal
You can use Postal with any VPS or Linux server providers of your choice, however here are some we recommend: Vultr Cloud (Get free $300 credit) - In case your SMTP port is blocked, you can contact Vultr support, and they will open it for you after providing a personal identification method. DigitalOcean (Get free $200 Credit) - You will also need to contact DigitalOcean support for SMTP port to be open for you. Hetzner ( Get free €20) - SMTP port is open for most accounts, if yours isn't, contact the Hetzner support and request for it to be unblocked for you Contabo (Cheapest VPS) - Contabo doesn't block SMTP ports. In case you are unable to send mail, contact support. Interserver
Postal Minimum requirements
- At least 4GB of RAM - At least 2 CPU cores - At least 25GB disk space - You can use docker or any Container runtime app. Ensure Docker Compose plugin is also installed. - Port 25 outbound should be open (A lot of cloud providers block it)
Postal Installation
Should be installed on its own server, meaning, no other items should be running on the server. A fresh server install is recommended. Broad overview of the installation procedure - Install Docker and the other needed apps - Configuration of postal and add DNS entries - Start Postal - Make your first user - Login to the web interface to create virtual mail servers Step by step install Postal Step 1 : Install docker and additional system utilities In this guide, I will use Debian 12 . Feel free to follow along with Ubuntu. The OS to be used does not matter, provided you can install docker or any docker alternative for running container images. Commands for installing Docker on Debian 12 (Read the comments to understand what each command does): #Uninstall any previously installed conflicting software . If you have none of them installed it's ok for pkg in docker.io docker-doc docker-compose podman-docker containerd runc; do sudo apt-get remove $pkg; done #Add Docker's official GPG key: sudo apt-get update sudo apt-get install ca-certificates curl -y sudo install -m 0755 -d /etc/apt/keyrings sudo curl -fsSL https://download.docker.com/linux/debian/gpg -o /etc/apt/keyrings/docker.asc sudo chmod a+r /etc/apt/keyrings/docker.asc #Add the Docker repository to Apt sources: echo "deb https://download.docker.com/linux/debian $(. /etc/os-release && echo "$VERSION_CODENAME") stable" | sudo tee /etc/apt/sources.list.d/docker.list > /dev/null sudo apt-get update #Install the docker packages sudo apt-get install docker-ce docker-ce-cli containerd.io docker-buildx-plugin docker-compose-plugin -y #You can verify that the installation is successful by running the hello-world image sudo docker run hello-world Add the current user to the docker group so that you don't have to use sudo when not logged in as the root user. ##Add your current user to the docker group. sudo usermod -aG docker $USER #Reboot the server sudo reboot Finally test if you can run docker without sudo ##Test that you don't need sudo to run docker docker run hello-world Step 2 : Get the postal installation helper repository The Postal installation helper has all the docker compose files and the important bootstrapping tools needed for generating configuration files. Install various needed tools #Install additional system utlities apt install git vim htop curl jq -y Then clone the helper repository. sudo git clone https://github.com/postalserver/install /opt/postal/install sudo ln -s /opt/postal/install/bin/postal /usr/bin/postal Step 3 : Install MariaDB database Here is a sample MariaDB container from the postal docs. But you can use the docker compose file below it. docker run -d --name postal-mariadb -p 127.0.0.1:3306:3306 --restart always -e MARIADB_DATABASE=postal -e MARIADB_ROOT_PASSWORD=postal mariadb Here is a tested mariadb compose file to run a secure MariaDB 11.4 container. You can change the version to any image you prefer. vi docker-compose.yaml services: mariadb: image: mariadb:11.4 container_name: postal-mariadb restart: unless-stopped environment: MYSQL_ROOT_PASSWORD: ${DB_ROOT_PASSWORD} volumes: - mariadb_data:/var/lib/mysql network_mode: host # Set to use the host's network mode security_opt: - no-new-privileges:true read_only: true tmpfs: - /tmp - /run/mysqld healthcheck: test: interval: 30s timeout: 10s retries: 5 volumes: mariadb_data: You need to create an environment file with the Database password . To simplify things, postal will use the root user to access the Database.env file example is below. Place it in the same location as the compose file. DB_ROOT_PASSWORD=ExtremelyStrongPasswordHere Run docker compose up -d and ensure the database is healthy. Step 4 : Bootstrap the domain for your Postal web interface & Database configs First add DNS records for your postal domain. The most significant records at this stage are the A and/or AAAA records. This is the domain where you'll be accessing the postal UI and for simplicity will also act as the SMTP server. If using Cloudflare, turn off the Cloudflare proxy. sudo postal bootstrap postal.yourdomain.com The above will generate three files in /opt/postal/config. - postal.yml is the main postal configuration file - signing.key is the private key used to sign various things in Postal - Caddyfile is the configuration for the Caddy web server Open /opt/postal/config/postal.yml and add all the values for DB and other settings. Go through the file and see what else you can edit. At the very least, enter the correct DB details for postal message_db and main_db. Step 5 : Initialize the Postal database and create an admin user postal initialize postal make-user If everything goes well with postal initialize, then celebrate. This is the part where you may face some issues due to DB connection failures. Step 6 : Start running postal # run postal postal start #checking postal status postal status # If you make any config changes in future you can restart postal like so # postal restart Step 7 : Proxy for web traffic To handle web traffic and ensure TLS termination you can use any proxy server of your choice, nginx, traefik , caddy etc. Based on Postal documentation, the following will start up caddy. You can use the compose file below it. Caddy is easy to use and does a lot for you out of the box. Ensure your A records are pointing to your server before running Caddy. docker run -d --name postal-caddy --restart always --network host -v /opt/postal/config/Caddyfile:/etc/caddy/Caddyfile -v /opt/postal/caddy-data:/data caddy Here is a compose file you can use instead of the above docker run command. Name it something like caddy-compose.yaml services: postal-caddy: image: caddy container_name: postal-caddy restart: always network_mode: host volumes: - /opt/postal/config/Caddyfile:/etc/caddy/Caddyfile - /opt/postal/caddy-data:/data You can run it by doing docker compose -f caddy-compose.yaml up -d Now it's time to go to the browser and login. Use the domain, bootstrapped earlier. Add an organization, create server and add a domain. This is done via the UI and it is very straight forward. For every domain you add, ensure to add the DNS records you are provided.
Enable IP Pools
One of the reasons why Postal is great for bulk email sending, is because it allows for sending emails using multiple IPs in a round-robin fashion. Pre-requisites - Ensure the IPs you want to add as part of the pool, are already added to your VPS/server. Every cloud provider has a documentation for adding additional IPs, make sure you follow their guide to add all the IPs to the network. When you run ip a , you should see the IP addresses you intend to use in the pool. Enabling IP pools in the Postal config First step is to enable IP pools settings in the postal configuration, then restart postal. Add the following configuration in the postal.yaml (/opt/postal/config/postal.yml) file to enable pools. If the section postal: , exists, then just add use_ip_pools: true under it. postal: use_ip_pools: true Then restart postal. postal stop && postal start The next step is to go to the postal interface on your browser. A new IP pools link is now visible at the top right corner of your postal dashboard. You can use the IP pools link to add a pool, then assign IP addresses in the pools. A pool could be something like marketing, transactions, billing, general etc. Once the pools are created and IPs assigned to them, you can attach a pool to an organization. This organization can now use the provided IP addresses to send emails. Open up an organization and assign a pool to it. Organizations → choose IPs → choose pools . You can then assign the IP pool to servers from the server's Settings page. You can also use the IP pool to configure IP rules for the organization or server. At any point, if you are lost, look at the Postal documentation. Read the full article
0 notes
Text
CI/CD Pipeline Automation Using Ansible and Jenkins
Introduction
In today’s fast-paced DevOps environment, automation is essential for streamlining software development and deployment. Jenkins, a widely used CI/CD tool, helps automate building, testing, and deployment, while Ansible simplifies infrastructure automation and configuration management. By integrating Ansible with Jenkins, teams can create a fully automated CI/CD pipeline that ensures smooth software delivery with minimal manual intervention.
In this article, we will explore how to automate a CI/CD pipeline using Jenkins and Ansible, from setup to execution.
Why Use Jenkins and Ansible Together?
✅ Jenkins for CI/CD:
Automates code integration, testing, and deployment
Supports plugins for various DevOps tools
Manages complex pipelines with Jenkinsfile
✅ Ansible for Automation:
Agentless configuration management
Simplifies deployment across multiple environments
Uses YAML-based playbooks for easy automation
By integrating Jenkins with Ansible, we can achieve automated deployments, infrastructure provisioning, and configuration management in one streamlined workflow.
Step-by-Step Guide: Integrating Ansible with Jenkins
Step 1: Install Jenkins and Ansible
📌 Install Jenkins on a Linux Server
wget -O /usr/share/keyrings/jenkins-keyring.asc \
echo "deb [signed-by=/usr/share/keyrings/jenkins-keyring.asc] \
https://pkg.jenkins.io/debian binary/" | sudo tee /etc/apt/sources.list.d/jenkins.list > /dev/null
sudo apt update
sudo apt install jenkins -y
sudo systemctl start jenkins
sudo systemctl enable jenkins
Access Jenkins UI at http://<your-server-ip>:8080
📌 Install Ansible
sudo apt update
sudo apt install ansible -y
ansible --version
Ensure that Ansible is installed and accessible from Jenkins.
Step 2: Configure Jenkins for Ansible
📌 Install Required Jenkins Plugins
Navigate to Jenkins Dashboard → Manage Jenkins → Manage Plugins
Install:
Ansible Plugin
Pipeline Plugin
Git Plugin
📌 Add Ansible to Jenkins Global Tool Configuration
Go to Manage Jenkins → Global Tool Configuration
Under Ansible, define the installation path (/usr/bin/ansible)
Step 3: Create an Ansible Playbook for Deployment
Example Playbook: Deploying a Web Application
📄 deploy.yml
---
- name: Deploy Web Application
hosts: web_servers
become: yes
tasks:
- name: Install Apache
apt:
name: apache2
state: present
- name: Start Apache
service:
name: apache2
state: started
enabled: yes
- name: Deploy Application Code
copy:
src: /var/lib/jenkins/workspace/app/
dest: /var/www/html/
This playbook: ✅ Installs Apache ✅ Starts the web server ✅ Deploys the application code
Step 4: Create a Jenkins Pipeline for CI/CD
📄 Jenkinsfile (Declarative Pipeline)
pipeline {
agent any
stages {
stage('Clone Repository') {
steps {
git 'https://github.com/your-repo/app.git'
}
}
stage('Build') {
steps {
sh 'echo "Building Application..."'
}
}
stage('Deploy with Ansible') {
steps {
ansiblePlaybook credentialsId: 'ansible-ssh-key',
inventory: 'inventory.ini',
playbook: 'deploy.yml'
}
}
}
}
This Jenkins pipeline: ✅ Clones the repository ✅ Builds the application ✅ Deploys using Ansible
Step 5: Trigger the CI/CD Pipeline
Go to Jenkins Dashboard → New Item → Pipeline
Add your Jenkinsfile
Click Build Now
Jenkins will execute the CI/CD pipeline, deploying the application using Ansible! 🚀
Benefits of Automating CI/CD with Ansible & Jenkins
🔹 Faster deployments with minimal manual intervention 🔹 Consistent and repeatable infrastructure automation 🔹 Improved security by managing configurations with Ansible 🔹 Scalability for handling multi-server deployments
Conclusion
By integrating Ansible with Jenkins, DevOps teams can fully automate CI/CD pipelines, ensuring faster, reliable, and consistent deployments. Whether deploying a simple web app or a complex microservices architecture, this approach enhances efficiency and reduces deployment risks.
Ready to implement Ansible and Jenkins for your DevOps automation? Start today and streamline your CI/CD workflow!
💡 Need help setting up your automation? Contact HawkStack Technologies for expert DevOps solutions!
For more details click www.hawkstack.com
0 notes
Text
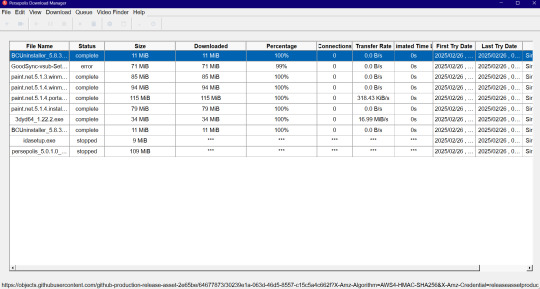
Download Manager - Persepolis Download Manager
A Comprehensive Guide to Persepolis Download Manager
In the world of internet downloads, having a reliable and efficient download manager can make a huge difference. Persepolis Download Manager is a powerful tool that stands out among various download managers for its simplicity, speed, and open-source nature. Whether you’re downloading a large file or multiple files at once, Persepolis can help you manage, pause, resume, and schedule your downloads with ease.
Here’s everything you need to know about Persepolis Download Manager:
What is Persepolis Download Manager?
Persepolis is an open-source download manager that allows you to accelerate your downloads and manage them with ease. It is compatible with both Linux and Windows operating systems. Persepolis acts as a graphical user interface (GUI) for Aria2, which is a command-line download utility, known for its high-speed downloading capabilities and support for multiple protocols like HTTP(S), FTP, and BitTorrent.
The software was designed to offer a simple, user-friendly experience while maintaining the power of Aria2 behind the scenes. As an open-source project, Persepolis provides users with full control over its functionality and allows for transparency and community contributions.
Key Features of Persepolis Download Manager
Download Acceleration Persepolis helps speed up your downloads by splitting files into multiple segments and downloading them simultaneously, resulting in faster download speeds. This is especially useful when downloading large files or multiple files at once.
Pause and Resume Downloads One of the most useful features of Persepolis is the ability to pause and resume downloads. Whether you’re dealing with an unstable internet connection or need to shut down your system, you can pick up right where you left off, saving you time and bandwidth.
Scheduling Downloads Persepolis allows you to schedule downloads for later. This feature is perfect for those who want to download large files overnight or when network congestion is minimal.
Batch Downloading You can queue up multiple files for downloading at once. Persepolis will manage them in the background, ensuring that each download starts and finishes without requiring manual intervention.
Browser Integration Persepolis integrates seamlessly with popular browsers like Firefox and Chrome. Once the plugin is installed, you can easily add downloads to Persepolis directly from the browser with a single click, bypassing the browser’s built-in download manager.
Support for Multiple Protocols Persepolis supports several protocols, including HTTP(S), FTP, and BitTorrent. This makes it versatile for all kinds of downloads, whether from standard websites or peer-to-peer networks.
User-Friendly Interface Persepolis’s interface is clean and intuitive, making it easy for both beginners and advanced users to navigate. Its simple design ensures that users can start using it right away without needing to read lengthy manuals.
Cross-Platform Being available on both Linux and Windows ensures that a wide range of users can benefit from Persepolis Download Manager. You can use it on your desktop or laptop without worrying about compatibility issues.
Notifications and Alerts Persepolis keeps you updated with progress notifications. When your download completes, you will receive an alert, so you’re always in the loop without needing to constantly monitor the app.
How to Install Persepolis Download Manager?
For Linux:
Using APT (Ubuntu/Debian): Open a terminal and run the following command:bashCopysudo apt install persepolis
From Source: You can also download the source code from the official Persepolis GitHub repository and build it manually if you prefer to customize the installation.
For Windows:
Download the Installer: Visit the official Persepolis website or its GitHub page to download the Windows installer. Simply follow the prompts to complete the installation process.
Install via Windows Package Manager (Winget): You can also install Persepolis using Windows Package Manager by running:bashCopywinget install Persepolis
Why Choose Persepolis?
Open-Source and Free Persepolis is completely free and open-source, meaning that anyone can contribute to its development or use it without any cost. There are no hidden fees or premium features locked behind a paywall.
Lightweight Unlike some other download managers, Persepolis is lightweight, meaning it doesn’t take up much system space or resources, even during active downloads.
Community Support Persepolis has a dedicated community of users and developers who contribute to its improvement. If you encounter any issues, you can easily find help or file a bug report.
Completely Customizable Being open-source, Persepolis is customizable to fit your needs. You can adjust its settings to maximize download performance, adjust the number of segments, or tweak it to work with your preferred browser.
Privacy-Focused Persepolis respects user privacy. Unlike some proprietary download managers, it does not track your downloads or impose unwanted ads.
Troubleshooting Common Issues
While Persepolis is generally reliable, users may encounter some common issues such as:
Slow Downloads If you’re experiencing slow download speeds, ensure that the number of download segments is set to a higher value, as this can help accelerate the process. Additionally, check your internet connection for any interruptions.
Browser Integration Issues If the browser integration isn’t working, ensure that the Persepolis browser extension is installed and properly configured in your browser settings.
Connection Timeouts Sometimes, Persepolis may fail to connect to a server due to connection timeouts. This issue can be solved by adjusting the connection timeout settings or retrying the download.
Conclusion
Persepolis Download Manager is an exceptional tool for managing and accelerating your downloads. Its open-source nature, ease of use, and powerful features make it a top choice for anyone looking to download files more efficiently. Whether you’re a casual user or a power downloader, Persepolis offers all the features you need to streamline your download experience.
So, if you haven’t already, give Persepolis a try and experience how it can improve your downloading workflow. Happy downloading!
Persepolis for Windows > https://github.com/persepolisdm/persepolis/releases
Persepolis for Chromium based Browsers > https://chrome.google.com/webstore/detail/persepolis-download-manag/legimlagjjoghkoedakdjhocbeomojao?hl=en
Persepolis for Mozilla based Browsers > https://addons.mozilla.org/en-US/firefox/addon/persepolis-dlm-integration/
Screenshot: (Multiple themes available)
0 notes
Text
Ansible Là Gì? Cách Cài Đặt Ansible trên Ubuntu 22.04
Ansible là một công cụ tự động hóa mã nguồn mở mạnh mẽ, đơn giản và dễ học. Nó được sử dụng để tự động hóa việc cấu hình và quản lý hệ thống, triển khai ứng dụng và nhiều tác vụ khác. Ansible giúp giảm thiểu công sức và thời gian cần thiết để quản lý một số lượng lớn máy chủ, từ vài máy đến hàng nghìn máy.

Tại sao Ansible lại phổ biến?
Ansible có nhiều ưu điểm khiến nó trở thành một lựa chọn phổ biến trong giới DevOps:
Đơn giản: Ansible sử dụng cú pháp YAML đơn giản và dễ đọc, giúp người dùng dễ dàng viết các playbook (tập lệnh của Ansible).
Không cần cài đặt tác nhân: Ansible không yêu cầu cài đặt bất kỳ tác nhân nào trên các máy chủ được quản lý, giúp đơn giản hóa quá trình cài đặt và bảo trì.
Mạnh mẽ: Ansible có khả năng tự động hóa nhiều tác vụ phức tạp, từ cấu hình hệ thống đến triển khai ứng dụng.
Linh hoạt: Ansible có thể được sử dụng để quản lý nhiều loại hệ điều hành và nền tảng khác nhau.
Cộng đồng lớn: Ansible có một cộng đồng người dùng lớn và tích cực, cung cấp nhiều tài liệu, hướng dẫn và module (thành phần mở rộng của Ansible) hữu ích.
Cách Ansible hoạt động
Ansible hoạt động dựa trên nguyên tắc "push-based", nghĩa là nó kết nối đến các máy chủ được quản lý và thực hiện các tác vụ được chỉ định trong playbook. Ansible sử dụng SSH để kết nối đến các máy chủ, do đó yêu cầu duy nhất là máy chủ quản lý (nơi cài đặt Ansible) có thể kết nối SSH đến các máy chủ được quản lý.
Cài đặt Ansible trên Ubuntu 22.04
Để cài đặt Ansible trên Ubuntu 22.04, bạn có thể thực hiện theo các bước sau:
Cập nhật danh sách gói:Bash sudo apt update
Cài đặt các gói phụ thuộc:Bash sudo apt install software-properties-common
Thêm kho lưu trữ Ansible PPA:Bash sudo add-apt-repository ppa:ansible/ansible
Cập nhật lại danh sách gói:Bash sudo apt update
Cài đặt Ansible:Bash sudo apt install ansible
Kiểm tra cài đặt:Bash ansible --version Nếu bạn thấy thông tin về phiên bản Ansible, nghĩa là bạn đã cài đặt thành công.
Cấu hình Ansible
Sau khi cài đặt Ansible, bạn cần cấu hình nó để có thể quản lý các máy chủ. Hai thành phần quan trọng cần cấu hình là:
Inventory: File chứa danh sách các máy chủ được quản lý.
Playbook: File chứa các tập lệnh tự động hóa.
1. Inventory
File inventory mặc định của Ansible nằm tại /etc/ansible/hosts. Bạn có thể tạo một file inventory mới hoặc sử dụng file mặc định.
Ví dụ, để quản lý hai máy chủ có địa chỉ IP là 192.168.1.10 và 192.168.1.20, bạn có thể thêm chúng vào file inventory như sau:
Ini, TOML[webservers] 192.168.1.10 192.168.1.20
Bạn cũng có thể nhóm các máy chủ lại với nhau:
Ini, TOML[webservers] 192.168.1.10 192.168.1.20 [databases] 192.168.1.30
2. Playbook
Playbook là một file YAML chứa các tập lệnh tự động hóa. Ví dụ, để cài đặt Apache trên hai máy chủ webservers, bạn có thể tạo một playbook có tên install_apache.yml như sau:
YAML--- - hosts: webservers become: true tasks: - name: Cài đặt Apache apt: name: apache2 state: present
Để chạy playbook này, bạn sử dụng lệnh sau:
Bashansible-playbook install_apache.yml
Kết luận
Ansible là một công cụ tự động hóa mạnh mẽ và dễ sử dụng, giúp đơn giản hóa việc quản lý và cấu hình hệ thống. Hy vọng bài viết này đã giúp bạn hiểu rõ hơn về Ansible và cách cài đặt nó trên Ubuntu 22.04.
Nguồn tham khảo: https://thuegpu.vn/ansible-la-gi-cach-cai-dat-ansible-tren-ubuntu-22-04/
1 note
·
View note
Text
Simply about Linux Security
Linux is often praised as one of the best operating systems in terms of security due to several key factors that make it inherently secure and resilient against many types of attacks. Here's why:
1. Open-Source Nature
Transparency: Linux is open-source, meaning its source code is publicly available for review. This transparency allows anyone (including security experts) to examine the code for vulnerabilities, report bugs, and contribute fixes. This collaborative approach leads to faster identification and patching of security issues compared to proprietary systems.
Community and Auditing: Since many users and organizations contribute to Linux's development, any vulnerabilities discovered are often addressed quickly.
2. User Privileges and Access Control
Least Privilege Principle: In Linux, by default, users do not have administrative (root) access to the system. Administrative rights are required to make significant system changes, reducing the risk of malware or attackers exploiting a compromised user account to take control of the system.
Sudo Command: Administrative tasks are typically carried out using sudo (superuser do), which provides controlled, time-limited access to root privileges. This limits potential damage by preventing unnecessary exposure of administrative rights.
3. Strong File Permissions and Ownership
Linux enforces strict file permissions for users and groups, ensuring that only authorized users can access, modify, or execute files. This is a fundamental aspect of Linux's security model, making it difficult for unauthorized users or malware to alter important system files.
Each file has an owner, a group, and a set of permissions (read, write, execute), allowing for detailed control over who can do what with each file.
4. Security Modules and Features
SELinux (Security-Enhanced Linux): This is a set of kernel-level security enhancements that implement mandatory access control (MAC). It adds an additional layer of security by enforcing strict access policies that restrict how processes interact with the system and each other.
AppArmor: Similar to SELinux, AppArmor is a security module that restricts programs to a set of predefined security profiles, preventing them from performing unauthorized actions.
Chroot and Namespaces: These tools allow isolation of processes, limiting the damage they can do even if compromised.
5. Frequent Security Patches
The Linux community is very active in identifying and fixing vulnerabilities. Most Linux distributions offer regular updates, including security patches, making it quick and easy to keep the system secure.
Security advisories and patches for distributions (like Debian, Ubuntu, or Red Hat) are generally well-documented and quickly available.
6. Minimal Attack Surface
Linux distributions can be customized to include only the necessary components, reducing the attack surface. Users can install a minimal version of Linux with only the essential software, which reduces the number of potential vulnerabilities.
Many server-focused Linux distributions, such as CentOS or Ubuntu Server, come with fewer default applications, reducing the chances of exploitable vulnerabilities.
7. Robust Package Management
Package managers like apt, yum, and dnf ensure that software installed on Linux is vetted and comes from trusted repositories. This reduces the risk of installing malicious or untrusted software.
Additionally, Linux distributions often come with tools to verify the integrity of installed packages and update software automatically.
8. Lower Target for Malware
Popularity in Specific Use Cases: While Linux is widely used for servers, many personal users still prefer other operating systems (like Windows). This makes Linux less of a target for mass-market malware.
Open-Source Security Tools: Many Linux distributions have strong built-in security tools, and the OS itself is often the platform for security professionals and penetration testers, further boosting its reputation as a secure platform.
9. Security by Design
Linux has security mechanisms built into its design, such as:
Stack Protection: Linux uses techniques like stack canaries and non-executable memory to prevent stack-based buffer overflow attacks.
Data Execution Prevention (DEP): This feature prevents code from executing in areas of memory that should contain only data.
Address Space Layout Randomization (ASLR): Randomizing memory addresses for processes makes it harder for attackers to predict the location of critical system functions.
10. Regular Security Audits and Penetration Testing
Since many security professionals and ethical hackers use Linux, the system is often subjected to rigorous security testing. This helps find vulnerabilities before they are exploited in real-world attacks.
Conclusion
Linux's security is driven by its open-source nature, strong access controls, and a thriving community that quickly identifies and fixes vulnerabilities. Combined with its robust security tools, regular updates, and user-centric design, it offers a highly secure environment, making it a popular choice for critical applications like web servers, networking, and cloud computing. However, like any system, its security ultimately depends on how it's configured and maintained.
for more details please visit
www.qcsdclabs.com,
www.hawkstack.com
0 notes
Link
jbredir simplifies adding repositories to multiple package managers
0 notes
Text
Logi Bolt-Adapter unter Ubuntu koppeln
Bluetooth ist eine universelle Lösung zur kabellosen Verbindung von Mäusen und Tastaturen. Ein wesentlicher Vorteil ist, dass keine USB-Ports belegt werden.
Die Kopplung per Bluetooth ist jedoch nicht immer eine Option. In solchen Fällen kommen proprietäre Adapter der Hardwarehersteller ins Spiel.
Logitech Unify und Bolt
Logitech verwendet die älteren Unify- sowie die neuen Bolt-Adapter. Diese Adapter werden nicht immer im Paket mit den Mäusen und Tastaturen verkauft. Zumindest bei separat erworbenen Adaptern ist es notwendig, diese mit der Maus und/oder der Tastatur zu koppeln.
Solaar
Das Pairing von Logitech Peripheriegeräten mit dem Bolt- und Unify-Adapter erfolgt auf proprietärem Weg. Während hierfür unter macOS und Windows die Anwendung Logi Options+ zur Verfügung steht, ist diese nicht für Linux verfügbar.
Unter Linux kann die Open-Source-Software Solaar verwendet werden.
Sofern die aktuelle Version im Repository der verwendeten Ubuntu-Version nicht verfügbar ist, kann diese aus dem PPA des Projektes bezogen werden.
Das PPA wird wie folgt eingebunden:
sudo add-apt-repository ppa:solaar-unifying/stable
sudo apt update
Die Installation erfolgt ohne Besonderheiten:
sudo apt install solaar
Paring
Solaar ist grafisches Werkzeug. Nach dem Start wird eine Liste der angeschlossenen, kompatiblen USB-Adapter angezeigt. Für den Kopplungsvorgang ist der Adapter auszuwählen. War beim Start von Solaar der USB-Adapter bereits eingesteckt, kann es notwendig sein, den Adapter abzuziehen und erneut einzustecken.
Die Peripheriegerät ist dann in den Kopplungsmodus zu versetzen.
Zur Authentifizierung ist eine Sequenz von Tastendrücken vorzunehmen. Danach ist das Peripheriegerät mit dem Adapter gekoppelt.
Verwendung an anderen Rechnern
Anders als bei einem Pairing per Bluetooth ist die Maus bzw, die Tastatur nicht mit dem Rechner (präziser der Instanz des Betriebssystem auf dem Rechner), sondern mit dem Adapter gekoppelt.
Der Adapter mit den gekoppelten Geräten lässt sich daher auch an Rechnern, an denen die Kopplung nicht erfolgt, verwenden.
Das Posting Logi Bolt-Adapter unter Ubuntu koppeln wurde ursprünglich auf thosch.micro.blog veröffentlicht.
0 notes
Text
Новый Sayonara player - рабочий поиск станций, как по жанрам, так и по названиям.
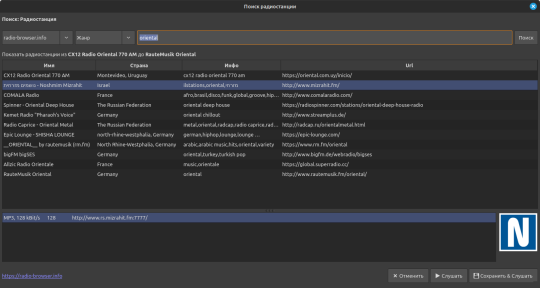

По жанру Oriental нашёл потоки Израильской, Арабской и Турецкой музыки.
По жанру Psychedelic нашёл кучу потоков разных течений этого стиля.
По названию нашёл Payam как из Тегерана, так из Швеции, из Швеции рабочий.
Чтобы установить новую версию удалите обычную через менеджер приложений.
Затем откройте терминал и скопируйте туда, по очереди, эти три строки: (Минт\Убунту\Дебиан):
sudo apt-add-repository ppa:lucioc/sayonara
sudo apt-get update
sudo apt-get install sayonara
#sayonara#софт#линукс#линукс минт#русский блог#русский тамблер#русский tumblr#русский текст#русский пост#русские посты#аудиофилия#меломания#плеер
8 notes
·
View notes
Text
Introduction
Git and GitHub are at the heart of modern software development, enabling developers to track changes, collaborate on projects, and manage code versions with ease. Whether you're new to version control or looking to refine your skills, this masterclass will guide you through the essentials of Git and GitHub, from basic commands to advanced workflows. By the end, you'll have the knowledge and confidence to use these powerful tools in your projects.
What is Git?
Definition and Core Functions
Git is a distributed version control system designed to handle everything from small to very large projects with speed and efficiency. It allows developers to track changes to files, collaborate with others, and revert back to previous versions of the code if necessary. Unlike other version control systems, Git stores snapshots of the entire project at each commit, rather than tracking changes line by line.
How Git Works: Snapshots vs. Deltas
Git’s unique approach to version control is based on snapshots. Every time you commit changes in Git, it takes a snapshot of the current state of your project and stores a reference to that snapshot. If files haven’t changed, Git doesn’t store the file again—just a link to the previous identical file. This makes Git extremely efficient in terms of storage and speed.
Benefits of Using Git
Using Git offers several benefits, including:
Version Control: Track every change made to the codebase and revert to earlier versions if needed.
Collaboration: Multiple developers can work on the same project simultaneously without overwriting each other’s work.
Branching: Easily create branches for new features, fixes, or experiments without affecting the main codebase.
Understanding GitHub
What is GitHub?
GitHub is a cloud-based hosting service that lets you manage Git repositories. It provides a web-based interface that makes it easy to share your repositories with others, collaborate on projects, and manage issues and pull requests. GitHub is widely used for open-source projects, but it’s also popular in enterprise environments.
GitHub vs. Git: Key Differences
While Git is a version control system, GitHub is a platform for hosting and collaborating on Git repositories. GitHub provides additional features like issue tracking, project management tools, and integrations with other services, making it an essential tool for modern development.
Why GitHub is Essential for Collaboration
GitHub’s collaborative features, such as pull requests, code reviews, and team management, make it an indispensable tool for any team working on software projects. It also fosters a strong community around open-source software, allowing developers to contribute to projects they’re passionate about.
Setting Up Git
Installing Git on Different Operating Systems
Installing Git is straightforward and can be done on various operating systems:
Windows: Download the Git installer from the official Git website and follow the installation prompts.
macOS: Install Git using Homebrew with the command brew install git.
Linux: Use your distribution’s package manager, such as apt-get for Debian-based systems or yum for Red Hat-based systems, to install Git.
Git Workflow Explained
The Basic Git Workflow
The basic Git workflow consists of three main stages:
Working Directory: Where you modify files.
Staging Area: Where you prepare changes to be committed.
Repository: Where committed changes are stored.
A typical workflow involves modifying files, staging the changes with git add, and then committing them to the repository with git commit.
Advanced Git Commands and Techniques
Stashing Changes with git stash
Sometimes you need to switch branches but have uncommitted changes. git stash temporarily saves those changes so you can return to them later.
Undoing Changes with git reset and git revert
git reset: Reverts changes in your working directory and staging area to a previous commit.
git revert: Creates a new commit that undoes the changes introduced by a previous commit.
Cherry-picking Commits with git cherry-pick
git cherry-pick allows you to apply specific commits from one branch onto another. This is useful for applying bug fixes or features without merging entire branches.
Tagging Releases with git tag
Tags are used to mark specific points in your project’s history, such as releases. Use git tag <tag-name> to create a new tag.
Working with GitHub
Creating and Managing GitHub Repositories
To create a new repository on GitHub, click the "New" button on your GitHub dashboard and follow the prompts. You can then push your local repository to GitHub using:
bash
Copy code
git remote add origin <repository-url> git push -u origin main
Forking and Pull Requests Explained
Forking: Creating your own copy of someone else’s repository on GitHub. This is often the first step in contributing to open-source projects.
Pull Requests: Allow you to propose changes to a repository. After reviewing your changes, the repository owner can merge them into the main codebase.
Collaborating with Teams on GitHub
GitHub’s collaborative features, such as issues, projects, and pull requests, make it easy for teams to manage tasks, track progress, and review code.
Git Branching Strategies
The Feature Branch Workflow
In the feature branch workflow, each new feature or fix is developed in its own branch. This keeps the main branch stable and free from incomplete code.
Git Flow vs. GitHub Flow
Git Flow: A robust branching model that uses long-lived branches for development, release, and hotfixes.
GitHub Flow: A simpler model that uses short-lived feature branches and continuous integration.
Best Practices for Managing Branches
Keep branch names descriptive and consistent.
Regularly merge or rebase feature branches with the main branch to avoid conflicts.
Delete branches after they have been merged to keep the repository clean.
Handling Merge Conflicts
What Causes Merge Conflicts?
Merge conflicts occur when two branches have changes in the same part of a file. Git can’t automatically determine which changes to keep, so it flags the conflict for you to resolve manually.
Steps to Resolve Merge Conflicts
Open the conflicted file in your text editor.
Look for conflict markers (e.g., <<<<<<< HEAD).
Decide which changes to keep and remove the conflict markers.
Stage and commit the resolved file.
Tips to Avoid Merge Conflicts
Regularly merge changes from the main branch into your feature branch.
Communicate with your team to avoid working on the same files simultaneously.
Collaborating with Git and GitHub
Forking Repositories and Contributing to Open Source
Fork a repository to create your own copy, make your changes, and submit a pull request to contribute to the original project. This is how most open-source contributions are made.
Reviewing and Merging Pull Requests
Pull requests should be reviewed carefully to ensure code quality and consistency. Use GitHub’s built-in review tools to discuss changes, request modifications, and approve the final version.
Best Practices for Team Collaboration
Use meaningful commit messages to communicate changes.
Review code in pull requests before merging.
Maintain a clear and organized branching strategy.
GitHub Actions and Automation
Introduction to GitHub Actions
GitHub Actions allow you to automate tasks within your GitHub repository, such as running tests, deploying code, or sending notifications. Actions are defined in YAML files stored in your repository.
Setting Up CI/CD Pipelines
Continuous Integration/Continuous Deployment (CI/CD) pipelines can be set up using GitHub Actions to automatically build, test, and deploy your code whenever changes are pushed to the repository.
Automating Workflows with GitHub Actions
GitHub Actions can be used to automate repetitive tasks, such as merging dependabot updates, generating release notes, or tagging versions.
Git Security Best Practices
Managing SSH Keys and Credentials
Use SSH keys for secure access to your GitHub repositories. Never share your keys or credentials publicly, and consider using a credential manager to store them securely.
Keeping Your Repositories Secure
Use .gitignore to prevent sensitive files from being tracked by Git.
Regularly audit your repository for sensitive information.
Enable two-factor authentication on your GitHub account.
Using GitHub's Security Features
GitHub provides several security features, including Dependabot for automatic dependency updates and security alerts for vulnerable dependencies.
Common Git and GitHub Mistakes
Forgetting to Pull Before Pushing
Always pull the latest changes from the remote repository before pushing your own changes. This helps avoid merge conflicts and ensures you’re working with the most up-to-date code.
Overcomplicating the Branch Structure
Keep your branch structure simple and avoid creating unnecessary branches. This makes it easier to manage and reduces the risk of merge conflicts.
Ignoring Documentation and Commit Messages
Clear documentation and meaningful commit messages are crucial for maintaining a project’s history and making it easier for others to understand your changes.
0 notes