#allow_url_include
Explore tagged Tumblr posts
Visit Tumblr Blog
Explore Tumblr blogs with no restrictions, modern design and the best experience.
Last Seen Tumblr Blogs


Fun Fact
Tumblr has been providing a Korean-language service since 2013.
Text
How to Prevent File Inclusion Vulnerabilities in Laravel (2025)
File Inclusion Vulnerabilities in Laravel: What You Need to Know
Laravel is one of the most popular PHP frameworks for building web applications, known for its elegant syntax and rich set of features. However, like any other web framework, Laravel is susceptible to security vulnerabilities. One such vulnerability is File Inclusion (specifically Local File Inclusion, or LFI), which can allow attackers to include files that can lead to code execution, information disclosure, or remote code inclusion.

In this post, we'll dive into what File Inclusion vulnerabilities are, how they affect Laravel applications, and how you can fix them using best practices. Moreover, we'll guide you on how our free Website Security Checker can help you identify and protect your site from these vulnerabilities.
What is File Inclusion?
File Inclusion vulnerabilities occur when an application includes a file without properly validating the file path. This could allow malicious users to include arbitrary files from the server, which could lead to serious security breaches.
In Laravel, this typically happens when user input is passed directly to a file inclusion function like include(), require(), or file_get_contents() without proper sanitization.
How File Inclusion Vulnerabilities Work in Laravel
Laravel’s architecture is designed to be secure out of the box. However, improper use of dynamic file inclusion can introduce risks. Here’s a simple example where File Inclusion vulnerabilities could occur:
<?php // Vulnerable to LFI $file = $_GET['page']; // User input directly from the URL include($file . '.php'); ?>
In this code, the value passed through the $_GET['page'] parameter is directly included as a PHP file. Without validation, an attacker could potentially manipulate this input to include malicious files, such as:
http://yourwebsite.com/?page=../../etc/passwd
This would allow an attacker to read sensitive files on the server.
How to Fix File Inclusion Vulnerabilities in Laravel
To protect your Laravel application from File Inclusion vulnerabilities, follow these best practices:
Avoid User Input in File Inclusion: Never allow user input to determine the file path. Always validate and sanitize any user input before using it in file inclusion functions.
<?php $validPages = ['home', 'about', 'contact']; // Whitelist valid page names $page = $_GET['page']; if (in_array($page, $validPages)) { include($page . '.php'); } else { echo "Invalid page request!"; } ?>
Use Laravel’s Built-in Routing: Instead of relying on dynamic file inclusion, use Laravel’s routing system to map requests to controllers or views. This eliminates the need for file inclusion altogether.
Disable allow_url_include in PHP: Make sure the allow_url_include directive is disabled in your PHP configuration to prevent Remote File Inclusion (RFI) attacks.
How Our Free Website Security Checker Can Help
Our Free Website Security Scanner tool can scan your Laravel site for File Inclusion vulnerabilities and other security issues. By using the tool to test website security free, you can get a detailed vulnerability report that will help you protect your Laravel application.
Here’s a screenshot of our tool in action:

Vulnerability Assessment Report Example
Once you run the security check, our tool generates a vulnerability report that shows potential issues with your site. Here’s an example of a vulnerability assessment report:

By reviewing these reports, you can identify weak points in your site and take immediate steps to fix any File Inclusion vulnerabilities or other security threats.
Conclusion
File Inclusion vulnerabilities can be a major threat to Laravel applications if not properly handled. By following best practices like input sanitization, using Laravel’s routing system, and utilizing our free Website Security Checker, you can ensure your application is secure against these threats.
Start using our free tool today and take proactive steps to protect your Laravel site from file inclusion and other security risks!
#cyber security#cybersecurity#data security#pentesting#security#the security breach show#laravel#inclusion
1 note
·
View note
Text
Instalar DVWA en KALI Linux 2021

Instalar DVWA en KALI Linux 2021.2, para verificar la seguridad de tus aplicaciones. Rompiendo se aprende y la práctica hace al maestro, pero tenemos una duda, ¿dónde podemos practicar nuestras habilidades de hacking ético?. La respuesta es sencilla, en DVWA (Damn Vulnerable Web Application). Hablamos de una aplicación web vulnerable desarrollada en PHP/MySQL, cuyo principal objetivo es permitir a los profesionales de la seguridad evaluar sus conocimientos, en un entorno completamente legal. Estas prácticas ayudan a los desarrolladores web a comprender mejor el proceso de segurización de sus aplicaciones. También resulta extremadamente útil para estudiantes, profesores y aficionados, en el proceso de aprendizaje en temas de seguridad sobre aplicaciones web. Cualquier usuario que quiera empezar con la piratería ética, debe realizar sus pruebas, pero no olvides que cualquier experimento con intentos de penetración en sistemas ajenos sin permiso, es ilegal y puede acarrearte graves problemas, incluyendo cuantiosas multas o hasta prisión. Mejor no te la juegues y por ello, en el artículo de hoy vemos como instalar esta aplicación como base de pruebas, en tu instalación de KALI Linux en español.

DVWA - Instalar DVWA en KALI Linux 2021
Instalar DVWA en KALI Linux 2021
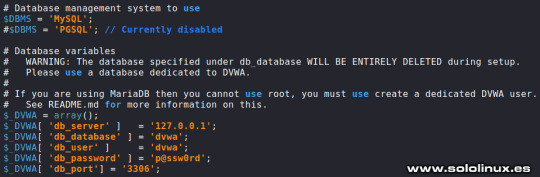
KALI Linux ya viene con su servidor local instalado, accedemos directamente a la carpeta html. cd /var/www/html Ahora descargamos DVWA. sudo git clone https://github.com/ethicalhack3r/DVWA Ejemplo. ┌──(kali㉿kali)- └─$ cd /var/www/html ┌──(kali㉿kali)- └─$ sudo git clone https://github.com/ethicalhack3r/DVWA password for kali: Clonando en 'DVWA'... remote: Enumerating objects: 3398, done. remote: Counting objects: 100% (49/49), done. remote: Compressing objects: 100% (32/32), done. remote: Total 3398 (delta 20), reused 35 (delta 16), pack-reused 3349 Recibiendo objetos: 100% (3398/3398), 1.65 MiB | 4.46 MiB/s, listo. Resolviendo deltas: 100% (1510/1510), listo. ┌──(kali㉿kali)- └─$ Sin salir de /var/www/html, listamos el contenido descargado. ls Vemos el contenido de /html.

Contenido de /var/www/html - Instalar DVWA en KALI Linux 2021 En la imagen anterior, puedes observar que se encuentran dos archivos y un directorio llamado DVWA. Le concedemos los permisos necesarios. sudo chmod -R 777 DVWA DVWA contiene una carpeta llamada config, accedemos a ella. cd DVWA/config En config nos encontramos con el archivo de configuración predeterminado, es mejor dejarlo como copia de seguridad y generar otro. sudo cp config.inc.php.dist config.inc.php Abrimos el archivo con el editor nano. sudo nano config.inc.php Si quieres puedes modificar el usuario y la contraseña, pero no te olvides de los datos porque los vas a necesitar después. Una vez editado el archivo (si es tu caso), lo guardas y cierras el editor. No cambies el nombre de la base de datos.
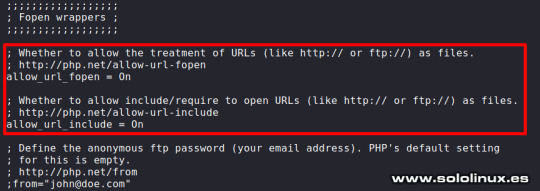
Configurar la base de datos - Instalar DVWA en KALI Linux 2021 Instalar DVWA en KALI Linux 2021.2 KALI ya viene con el motor de base de datos instalado, lo iniciamos. sudo systemctl start mysql Verificamos que todo es correcto. systemctl status mysql Ejemplo del status de la base de datos. ┌──(kali㉿kali)- └─$ sudo systemctl start mysql ┌──(kali㉿kali)- └─$ systemctl status mysql ● mariadb.service - MariaDB 10.5.11 database server Loaded: loaded (/lib/systemd/system/mariadb.service; disabled; vendor preset: disabled) Active: active (running) since Sun 2021-08-08 11:08:35 CEST; 21s ago Docs: man:mariadbd(8) https://mariadb.com/kb/en/library/systemd/ Process: 2885 ExecStartPre=/usr/bin/install -m 755 -o mysql -g root -d /var/run/mysqld (code=exited, status=0/SUCCESS) Process: 2886 ExecStartPre=/bin/sh -c systemctl unset-environment _WSREP_START_POSITION (code=exited, status=0/SUCCESS) Process: 2888 ExecStartPre=/bin/sh -c && VAR= || VAR=`cd /usr/bin/..; /usr/bin/galera_recove> Process: 2949 ExecStartPost=/bin/sh -c systemctl unset-environment _WSREP_START_POSITION (code=exited, status=0/SUCCESS) Process: 2951 ExecStartPost=/etc/mysql/debian-start (code=exited, status=0/SUCCESS) Main PID: 2935 (mariadbd) Status: "Taking your SQL requests now..." Tasks: 14 (limit: 2295) Memory: 111.2M CPU: 3.388s CGroup: /system.slice/mariadb.service └─2935 /usr/sbin/mariadbd Accedemos a la consola de MariaDB y creamos el usuario con su password. Recuerda que estos datos los proporcionamos anteriormente, en el archivo config.inc.php; en nuestro caso utilizamos los que venían por defecto, porque al ser un entorno de pruebas local, no existe ningún riesgo. Sigue los pasos que te indico a continuación. sudo mysql -u root -p create user 'userDVWA'@'127.0.0.1' identified by "dvwa"; grant all privileges on dvwa.* to 'userDVWA'@'127.0.0.1' identified by 'dvwa'; exit Ejemplo completo del proceso con respuestas incluidas. ┌──(kali㉿kali)- └─$ sudo mysql -u root -p Enter password: Welcome to the MariaDB monitor. Commands end with ; or g. Your MariaDB connection id is 44 Server version: 10.5.11-MariaDB-1 Debian 11 Copyright (c) 2000, 2018, Oracle, MariaDB Corporation Ab and others. Type 'help;' or 'h' for help. Type 'c' to clear the current input statement. MariaDB > create user 'userDVWA'@'127.0.0.1' identified by "dvwa"; Query OK, 0 rows affected (0.008 sec) MariaDB > grant all privileges on dvwa.* to 'userDVWA'@'127.0.0.1' identified by 'dvwa'; Query OK, 0 rows affected (0.008 sec) MariaDB > exit Bye Para instalar DVWA en KALI Linux 2021 correctamente, debemos hacer unas modificaciones en el archivo php.ini. La versión actual de php en KALI es la 7.4, si cambia la versión abres el archivo que corresponda. sudo nano /etc/php/7.4/apache2/php.ini Busca las líneas "allow_url_fopen" y "allow_url_include". Asegúrate que las dos están en "On". ;;;;;;;;;;;;;;;;;; ; Fopen wrappers ; ;;;;;;;;;;;;;;;;;; ; Whether to allow the treatment of URLs (like http:// or ftp://) as files. ; http://php.net/allow-url-fopen allow_url_fopen = On ; Whether to allow include/require to open URLs (like http:// or ftp://) as files. ; http://php.net/allow-url-include allow_url_include = Off Una vez tengas las dos en "On", guarda el archivo y cierra el editor.
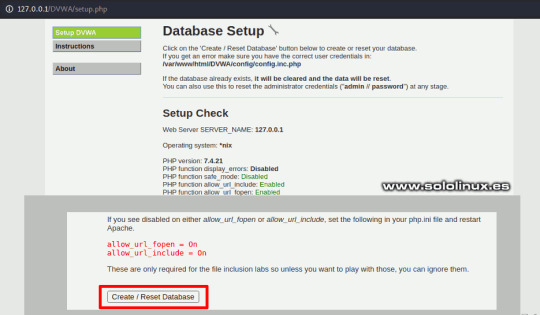
Configurar el archivo php.ini - Instalar DVWA en KALI Linux 2021 Para dejar la herramienta lista para su uso, solo falta iniciar Apache. sudo systemctl start apache2 Verificamos que el servicio está corriendo. systemctl status apache2 Ejemplo. ┌──(kali㉿kali)- └─$ sudo systemctl start apache2 ┌──(kali㉿kali)- └─$ systemctl status apache2 ● apache2.service - The Apache HTTP Server Loaded: loaded (/lib/systemd/system/apache2.service; disabled; vendor preset: disabled) Active: active (running) since Sun 2021-08-08 11:23:34 CEST; 40s ago Docs: https://httpd.apache.org/docs/2.4/ Process: 3176 ExecStart=/usr/sbin/apachectl start (code=exited, status=0/SUCCESS) Main PID: 3187 (apache2) Tasks: 6 (limit: 2295) Memory: 18.5M CPU: 292ms CGroup: /system.slice/apache2.service ├─3187 /usr/sbin/apache2 -k start ├─3189 /usr/sbin/apache2 -k start ├─3190 /usr/sbin/apache2 -k start ├─3191 /usr/sbin/apache2 -k start ├─3192 /usr/sbin/apache2 -k start └─3193 /usr/sbin/apache2 -k start Instalar DVWA en KALI Linux 2021 Una vez hemos terminado de instalar DVWA en KALI Linux 2021, iniciamos la herramienta insertando esta URL en tu navegador web preferido. - http://127.0.0.1/DVWA/setup.php Verás una pantalla con diversos errores, no te preocupes es algo normal, ya que falta generar la base de datos. Lo único que nos falta es pulsar en "Crear database", para que se genere y nos redirija a la página de inicio de sesión.
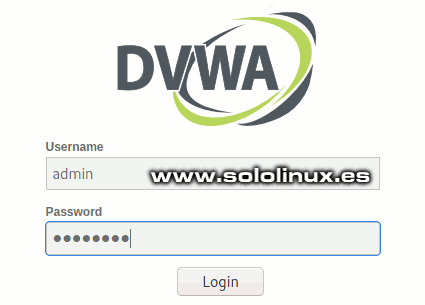
Crear la base de datos en DVWA - Instalar DVWA en KALI Linux 2021 Puedes iniciar sesión con los datos de acceso predeterminados, que son... - Username: admin - Password: password
Iniciar sesión en DVWA Canales de Telegram: Canal SoloLinux – Canal SoloWordpress Espero que este artículo te sea de utilidad, puedes ayudarnos a mantener el servidor con una donación (paypal), o también colaborar con el simple gesto de compartir nuestros artículos en tu sitio web, blog, foro o redes sociales. Instalar DVWA en KALI Linux 2021.2. Chat de SoloLinux en Telegram Read the full article
#.config#allow_url_fopen#allow_url_include#aplicaciónwebvulnerable#basededatos#carpetahtml#config.inc.php#consoladeMariaDB#DamnVulnerableWebApplication#DVWA#editornano#hacking#Hackingetico#iniciarapache#InstalarDVWA#InstalarDVWAenKALI#KALILinux2021#KALILinuxenespañol#mariadb#nano#php.ini
0 notes
Text
Fanlistings and php7
If your hosting is upgrading to php7, Enthusiast won’t work unless you update to this version https://github.com/Lysianthus/enthusiast or downgrade your version of php using cpanel’s multiphp manager
It’s a bit of a pain if you only have the one fanlisting and were using a far simpler script but works OK so long as you make sure to:
1/ make sure that force lowercase is NOT ticked when uploading files via FTP because Mail.php and PEAR.php require capitals
2/ come up with a new name for the fanslisting table (not database, just the table) when installing and then drop it using Cpanel’s PhpMyadmin and rename your old fanlisting table to the new name.
3/ If it still doesn’t work use CPanel’s MultiPHP INI Editor to enable allow_url_fopen and allow_url_include
4/ I also collated the database to utf8_general_ci just for good measure.
I’m still getting errors in the dashboard when trying to search members “MySQL said: SQLSTATE[HY000] [1045] Access denied for user ''@'localhost' (using password: NO)” but otherwise it seems to working ok, i’ll need to do a test sign up to see if any more errors crop up.
Also I am well cuffed that I switched a couple of things to flatfiles a few years back, mysql or whatever the current database thingamajig is when a small txt file will suffice is overkill.
#fanlistings#php#php7#a bunch of pages on my website are borked from deprecated functions#fanlisting#mysql#saf
1 note
·
View note
Photo

Where is php.ini? The PHP Configuration File
In this tutorial, we’re going to discuss php.ini—the main configuration file in PHP. From the beginner’s perspective, we’ll discuss what it’s meant for, where to locate it and a couple of important configuration settings it provides.
What is php.ini?
Whether you’re a beginner in PHP or a seasoned PHP developer, I’m sure that you’ve heard of php.ini: the most important PHP configuration file.
When PHP is run, it looks for the php.ini file in some specific locations and loads it. This file allows you to configure a few important settings that you should be aware of. Quite often, you’ll find you need to tweak settings in the php.ini file.
On the other hand, it’s certainly possible that you've never had a need to modify php.ini. PHP can run happily with the settings provided in the default php.ini file, since PHP ships with these default recommended settings. In fact, there are no critical configuration parameters that you must set in order to run PHP.
However, the php.ini file provides a couple of important settings that you want to make yourself familiar with. In fact, as a PHP developer, it’s inevitable and you’ll encounter it sooner than later.
Where is php.ini?
In this section, we’ll see how to find the php.ini file which is loaded when you run the PHP script. This can be tricky—the location of the php.ini file vastly varies by the environment you’re running PHP with. If you’re running the Windows, you'll likely find the php.ini file within the directory of your PHP installation in the system drive. On the other hand, if you’re running another operating system, then it’s difficult to guess the exact location of the php.ini file—there are several possibilities.
This is where the phpinfo() function comes to the rescue. It will tell you where php.ini is located and it will also output all the important PHP configuration information.
You can run phpinfo() by creating a .php file and calling that function. Go ahead and create the phpinfo.php file with the following contents and place it in your document root:
<?php phpinfo(); ?>
Load this file in your browser and you should see the output of phpinfo(). Look for the following section.
As you can see, there are two sections. The first one, Configuration File (php.ini) Path, indicates the default path of the php.ini file in your system. And the second one, Loaded Configuration File, is the path from where the php.ini file is being loaded when PHP is run.
So you can edit the php.ini file indicated in the Loaded Configuration File section, and that should work in most cases. Of course, if you’re running PHP as an Apache module, you need to restart the Apache server to make sure that the changes you’ve made in the php.ini file are reflected.
On the other hand, if you’re using software like WAMP or XAMPP to run your web development stack, it’s even easier to modify the php.ini file—you can directly access it via the WAMP or XAMPP UI.
In the next section, we’ll explore a couple of important settings in the php.ini file.
Important Settings in php.ini
The php.ini file provides a lot of configuration directives that allow you to modify various behaviors of PHP. In fact, when you open the php.ini file, you may get overwhelmed by the number of directives it provides. I'll try to group them based on their behavior, and I hope it’ll be easy for you to understand.
Of course, we won’t go through each and every directive, but I’ll try to cover the most important ones. Let’s have a look at the list of categories of directives that we’re going to discuss.
error handling directives
file upload directives
security related directives
session directives
miscellaneous directives
Error Handling Directives
In this section, we’ll go through directives that are related to error handling and useful for debugging during development.
display_errors
The display_errors directive allows you to control displaying errors to the screen during script execution. You can set it to On if you want to enable displaying errors to the screen and Off in case you want to disable it. It’s important that you don’t ever enable this on a production site—it will slow your site down and could give hackers valuable clues to your site's security vulnerabilities.
error_reporting
This directive allows you to set the error reporting level. Mostly, this directive works in conjunction with the display_errors directive. This directive can accept E_ALL, E_NOTICE, E_STRICT and E_DEPRECATED constants.
You can set it to E_ALL if you want to display all types of errors like fatal errors, warnings, deprecated functions etc. You can also combine the different values if you want to filter out specific errors. For example, if you want to display all errors but notices, you can set it to E_ALL & ~E_NOTICE.
error_log
On a production website, you need to make sure that PHP it doesn’t display any errors to the client browser. Instead you can log errors somewhere so that later on you can refer to them in case something goes wrong with your site. The error_log directive allows you to set the name of the file where errors will be logged. You need to make sure that this file is writable by the web server user.
File Upload Directives
In this section, we’ll see a couple of important directives that allow you to enable file uploading capabilities in your PHP forms.
file_uploads
This is a boolean directive which allows you to enable HTTP file uploads. If you set it to On, you can use the file field in your forms and users will be able to upload files from their computer. On the other hand, if you set it to Off, file uploading is disabled altogether.
upload_max_filesize
If you have enabled the file upload feature on your website, and you’re facing difficulties in uploading files, this is the directive you should check first. It allows you to set the maximum size of a file that can be uploaded.
By default, it’s set to 2MB, and thus users can’t upload files larger than 2MB. You can fine tune this value as per your requirements—often you'll want to increase this limit to allow larger file uploads.
post_max_size
This setting allows you to set the maximum size of the POST data in your forms. When user submits a form with the POST method, the total POST data size should not exceed the value you’ve set to this directive.
This should be larger than the value you’ve set in upload_max_filesize directive, since file uploads are handled with POST requests.
Security Directives
In this section, we’ll see a few important directives that are related to security.
allow_url_fopen
The allow_url_fopen directive is disabled by default. But when it’s enabled, it allows remote file inclusion in PHP file functions. This means that your PHP files can include code from other servers. Be wary about enabling this—if your code is subject to an injection attack, remote file inclusion will make it much easier for a malicious user to hijack your server.
allow_url_include
The allow_url_include directive is similar to the allow_url_fopen directive, but it enables remote file inclusion in include functions. It allows you to include remote files in include, include_once, require and require_once functions.
If you want to enable this directive, you also need to make sure that you’ve enabled the allow_url_fopen directive as well.
Session Directives
Session management is one of the most important aspects when you’re working with PHP. In this section, we’ll go through a couple of important session directives.
session.name
The session.name directive allows you to set a name of the session cookie. By default, it is set to PHPSESSID, but you can change it to something else by using this directive.
session.auto_start
If you set the value of the session.auto_start directive to 1, the session module in PHP starts a session automatically on every request and thus you don’t have to use the session_start function in your scripts.
session.cookie_lifetime
The session.cookie_lifetime directive allows you to set lifetime of a session cookie. By default, it is set to 0 seconds, and it means that the session cookie is deleted when the browser is closed. This is a really useful setting which allows you to set up "remember me" kind of functionality, allowing your users to pick up where they left off on your site.
Miscellaneous Directives
In this last section, we’ll see a couple of other directives that are important in the context of PHP script execution.
memory_limit
The memory_limit directive allows you to limit the maximum amount of memory a script is allowed to use.
You want to fine tune this directive as per your requirements, and you should not set this too high to avoid memory outages on your server—poorly written or buggy scripts can eat up all the memory on your server if you let them!
max_execution_time
The max_execution_time directive sets the maximum amount of time a script is allowed to run before it is terminated. The default is 30 seconds, and you can increase it to some reasonable limit as per your requirements if it’s needed.
Similar to the memory_limit directive, you should not set this too high to avoid issues on your server.
max_input_time
The max_input_time directive allows you to set the maximum amount of time a script is allowed to parse incoming form data from a GET or POST.
If you have forms on your website that submit a large amount of data, you might like to increase the value of this directive.
Conclusion
It's impossible to cover each and every directive within a single article, but I’ve tried to cover the important ones. Feel free to post your queries if you want to know about any specific directives, and I’ll be happy to help!
As a PHP developer, it’s important that you understand the different directives in the php.ini file, and that should help you to fine tune your PHP configuration to your requirements.
The Best PHP Scripts on CodeCanyon
Explore thousands of the best and most useful PHP scripts ever created on CodeCanyon. With a low-cost one time payment, you can purchase these high-quality WordPress themes and improve your website experience for you and your visitors.
Here are a few of the best-selling and up-and-coming PHP scripts available on CodeCanyon for 2020.
PHP
14 Best PHP Event Calendar and Booking Scripts
Kyle Sloka-Frey
PHP
8 Best PHP URL Shortener Scripts
Eric Dye
PHP
12 Best Contact Form PHP Scripts
Nona Blackman
PHP
Comparing the 5 Best PHP Form Builders
Nona Blackman
PHP
Create Beautiful Forms With PHP Form Builder
Ashraff Hathibelagal
by Sajal Soni via Envato Tuts+ Code https://ift.tt/35wcGo1
0 notes
Text
Most Common Weakness In PHP Security.
Secure By Design is a basic idea of any e-commerce website developer Bangalore in the security world where software is planned starting from the earliest stage to be as secure as possible regardless of whether or not it forces an disadvantage to the end user. The reason for this rule is to guarantee that users who are not security specialists can utilize the software without essentially being obliged to go through the motions to figure out how to secure their use or, much worse, being tempted into overlooking security concerns which uncover unaddressed security vulnerabilities because of inexperience or laziness. The core of the guideline therefore is to promote trust in the software while, somewhat paradoxically, maintaining a strategic distance from much complexity for the end client by web designer Bangalore.

Odd however it might appear, this rule clarifies a portion of PHP's most prominent security weaknesses. PHP does not expressly utilize Secure By Design as a guiding principle when executing features. I'm sure it's in the back of website developer in India minds just as I'm sure it has influenced numerous if their design choices, anyway there are issues when you think about how PHP has affected the security practices of PHP web portal development companies in Bangalore.
How about we inspect the four most prominent examples I am aware of where PHP falls short of where I trust it should be and how they have affected on how website development company in Bangalore practice security. There's another undercurrent here in that I strongly accept website developer Bangalore are affected by how PHP handles a specific security issue. It's not bizarre to see developers request to PHP's authority in justifying programming practices.
· SSL/TLS Misconfiguration
· XML Injection Attacks
· Cross-Site Scripting (Limited Escaping Features)
· Stream Injection Attacks (incl. Local/Remote File Inclusion)
SSL/TLS Misconfiguration
SSL/TLS are benchmarks for small website company in Bangalore who take it as consideration secure correspondence between two parties by offering two key features. Right off the bat, communications are encrypted so that eavesdroppers on the connection between the two parties can't disentangle the information being exchanged. Furthermore, one or the two parties can have their identity verified utilizing, for example, SSL Certificates to guarantee that the parties consistently connect with the intended party and not to potential Man-In-The-Middle (MITM) attackers. Most Important point for web designing company Bangalore is that encryption, by itself, does not prevent Man-In-The-Middle attacks. In the event that a MITM is associated with, the encryption mechanism is negotiated with the attacker which means they can decrypt all messages received.
PHP isn't exceptional. It's not special. It's simply taking a moronic stance. On the off chance that it were not moronic, and security was a genuine concern for ecommerce developer in Bangalore, this would be fixed. Likewise, the documentation would be fixed to clearly state how PHP's position is sustainable followed by lots of examples of how to make secure connections properly. Indeed, even that doesn't exist which seems suspicious since php web development company Bangalore realize it was featured previously.
XML Injection Attacks
Across mid-2012 another security vulnerability began doing the rounds of different PHP apps/libs/frameworks including Symfony 2 and Zend Framework. It was "new" in light of the fact that in mid 2012 a bit of research by web designing company in Bangalore highlighted that PHP was itself vulnerable to all XML Injection Attacks by default. XML Injection refers to different attacks however the two of most interest are XML External Entity Injection (XXE) and XML Entity Expansion (XEE).
Do we blame web designer in Bangalore for not moderating a vulnerability inherited from PHP or blame PHP for enabling that vulnerability to exist by default? On the off chance that it looks, quacks and swims like a duck, perhaps it is a security vulnerability in PHP all things considered.
Cross-Site Scripting
Outside of SQL Injection attacks, it's likely that Cross-Site Scripting (XSS) is the most widely recognized security vulnerability by website designing company in Bangalore which afflicting PHP applications and libraries. The vulnerability emerges essentially from key failures in:
· Input Validation
· Output Escaping
Stream URI Injection Attack
This one turns up last since it's neither a default vulnerability as such or an omission of security features Or maybe it clearly emerges because of insanity. For reasons unknown, include(), include_once(), require() and require_once() functions are equipped for accepting remote URLs when allow_url_include is enabled. This choice shouldn't exist not to mention be capable for web designing services Bangalore being set to On by.
This stream stuff is where the need a conventional I/O interface seems to have been realized at the expense of security. Fortunately the solutions are fairly simple - don't let untrusted input enter file and include function parameters. On the off chance that ecommerce website designer in Bangalore see a variable enter any incorporate or file system function set Red Alert and charge phasers to most extreme. Exercise due caution to validate the variable.
Conclusion
At the end of the day, all security vulnerabilities must be accused on somebody - either PHP is at fault and it should be fixed or website designer Bangalore are at fault for not monitoring these issues. Personally, I think that it's hard to accuse developers. They expect that their programming language should be secure and it’s not an unreasonable demand. Truly, fixing security may make a website developers Bangalore life more difficult however this misses a significant point - by not fixing security, their lives are as of now increasingly difficult with user land fixes being required, configuration options that need careful checking, and documentation omissions, misinformation and poor examples leading them off track.
#php web development company Bangalore#web solution provider Bangalore#website designing Bangalore#ecommerce in Bangalore
0 notes
Link
0 notes