#php.ini
Explore tagged Tumblr posts
Visit Tumblr Blog
Explore Tumblr blogs with no restrictions, modern design and the best experience.
Last Seen Tumblr Blogs


Fun Fact
Tumblr has been banned in Indonesia for providing people with access to pornographic content.
Text
Discover the power of .ini files to fine-tune your website's settings within cPanel. This comprehensive guide will walk you through the process of creating, editing, and managing these configuration files. Learn how to optimize PHP directives, control error reporting, and tailor your website's behavior to your specific needs. Whether you're a developer or a website owner, this tutorial will empower you to take full control of your website's configuration by leaarning how to create php.ini file in cPanel..
0 notes
Text
使用MultiPHP INI Editor修改 php.ini 即時生效【BlueHost cPanel示範】
你的網站使用類似BlueHost虛擬主機並且是多人共用方案,當你在使用一些外掛時會需要調整到php.ini檔案內的參數(例:max_input_vars)才能讓正常執行,但共用虛擬主機不會任意讓你修改並重新啟動機器,可以透過cPanel的MultiPHP INI Editor來達成修改php.ini並即時生效的需求… Continue reading 使用MultiPHP INI Editor修改 php.ini 即時生效【BlueHost cPanel示範】
0 notes
Text
Decoding Data in PHP: The Ultimate Guide to Reading File Stream Data to String in 2025 Reading file content into a string is one of the most common tasks in PHP development. Whether you're parsing configuration files like JSON or INI, processing uploaded documents, or consuming data from streams and APIs, being able to efficiently and correctly read file data into a string is essential. With PHP 8.x, developers have access to mature, robust file handling functions, but choosing the right one—and understanding how to handle character encoding, memory efficiency, and errors—is key to writing performant and reliable code. In this comprehensive guide, we’ll walk through the best ways to read file stream data into a string in PHP as of 2025, complete with modern practices, working code, and real-world insights. Why Read File Stream Data to String in PHP? There are many scenarios in PHP applications where you need to convert a file's contents into a string: Parsing Configuration Files: Formats like JSON, INI, and YAML are typically read as strings before being parsed into arrays or objects. Reading Text Documents: Applications often need to display or analyze user-uploaded documents. Processing Network Streams: APIs or socket streams may provide data that needs to be read and handled as strings. General File Processing: Logging, data import/export, and command-line tools often require reading file data as text. Methods for Reading and Converting File Stream Data to String in PHP 1. Using file_get_contents() This is the simplest and most widely used method to read an entire file into a string. ✅ How it works: It takes a filename (or URL) and returns the file content as a string. 📄 Code Example: phpCopyEdit 📌 Pros: Very concise. Ideal for small to medium-sized files. ⚠️ Cons: Loads the entire file into memory—can be problematic with large files. Error handling must be explicitly added (@ or try/catch via wrappers). 2. Using fread() with fopen() This method provides more control, allowing you to read file contents in chunks or all at once. 📄 Code Example: phpCopyEdit 📌 Pros: Greater control over how much data is read. Better for handling large files in chunks. ⚠️ Cons: Requires manual file handling. filesize() may not be reliable for network streams or special files. 3. Reading Line-by-Line Using fgets() Useful when you want to process large files without loading them entirely into memory. 📄 Code Example: phpCopyEdit 📌 Pros: Memory-efficient. Great for log processing or large data files. ⚠️ Cons: Slower than reading in one go. More code required to build the final string. 4. Using stream_get_contents() Works well with generic stream resources (e.g., file streams, network connections). 📄 Code Example: phpCopyEdit 📌 Pros: Works with open file or network streams. Less verbose than fread() in some contexts. ⚠️ Cons: Still reads entire file into memory. Not ideal for very large data sets. 5. Reading Binary Data as a String To read raw binary data, use binary mode 'rb' and understand the data's encoding. 📄 Code Example: phpCopyEdit 📌 Pros: Necessary for binary/text hybrids. Ensures data integrity with explicit encoding. ⚠️ Cons: You must know the original encoding. Risk of misinterpreting binary data as text. Handling Character Encoding in PHP Handling character encoding properly is crucial when working with file data, especially in multilingual or international applications. 🔧 Best Practices: Use UTF-8 wherever possible—it is the most compatible encoding. Check the encoding of files before reading using tools like file or mb_detect_encoding(). Use mb_convert_encoding() to convert encodings explicitly: phpCopyEdit$content = mb_convert_encoding($content, 'UTF-8', 'ISO-8859-1'); Set default encoding in php.ini:
iniCopyEditdefault_charset = "UTF-8" Be cautious when outputting string data to browsers or databases—set correct headers (Content-Type: text/html; charset=UTF-8). Error Handling in PHP File Operations Proper error handling ensures your application fails gracefully. ✅ Tips: Always check return values (fopen(), fread(), file_get_contents()). Use try...catch blocks if using stream wrappers that support exceptions. Log or report errors clearly for debugging. 📄 Basic Error Check Example: phpCopyEdit Best Practices for Reading File Stream Data to String in PHP ✅ Use file_get_contents() for small files and quick reads. ✅ Use fread()/fgets() for large files or when you need precise control. ✅ Close file handles with fclose() to free system resources. ✅ Check and convert character encoding as needed. ✅ Implement error handling using conditionals or exceptions. ✅ Avoid reading huge files all at once—use chunked or line-by-line methods. ✅ Use streams for remote sources (e.g., php://input, php://memory). Conclusion Reading file stream data into a string is a foundational PHP skill that underpins many applications—from file processing to configuration management and beyond. PHP 8.x offers a robust set of functions to handle this task with flexibility and precision. Whether you’re using file_get_contents() for quick reads, fgets() for memory-efficient processing, or stream_get_contents() for stream-based applications, the key is understanding the trade-offs and ensuring proper character encoding and error handling. Mastering these techniques will help you write cleaner, safer, and more efficient PHP code—an essential skill for every modern PHP developer. 📘 External Resources: PHP: file_get_contents() - Manual PHP: fread() - Manual PHP: stream_get_contents() - Manual
0 notes
Text
Prevent Session Fixation in Symfony Securely
Symfony is a powerful PHP framework for building secure and scalable web applications. However, if not configured correctly, it can be vulnerable to various security risks — one of them being Session Fixation.

In this post, we’ll explore what Session Fixation is, how it impacts Symfony applications, show practical examples, and most importantly, how to prevent it. We’ll also introduce a free Website Security Scanner that helps you identify vulnerabilities like session fixation instantly.
📬 Subscribe to our cybersecurity newsletter on LinkedIn: Subscribe on LinkedIn
🔍 What is Session Fixation?
Session Fixation is a type of attack where a malicious actor sets or predicts a user's session ID in advance and forces the victim to use that session. Once the victim logs in, the attacker hijacks the session.
This happens when session IDs are not regenerated after authentication, allowing attackers to take control of the user’s authenticated session.
⚠️ Why Symfony Apps May Be Vulnerable
Symfony uses PHP sessions under the hood. If you don’t explicitly regenerate session IDs after login or use secure cookie attributes, your application might be exposed to fixation attacks.
🧪 Exploiting Session Fixation (Example)
Let’s see how an attacker might perform session fixation in a Symfony app.
Attacker sends a link with a predefined session ID:
http://example.com/login?PHPSESSID=attackerSession123
2. Victim clicks the link and logs in. If the session ID is not regenerated after authentication, the attacker now has access to the logged-in session.
🛡️ Preventing Session Fixation in Symfony
Symfony provides a way to regenerate session IDs using its Security component. Here’s how you can secure your login process.
✅ 1. Regenerate Session on Login
In your custom authenticator or login controller, ensure you regenerate the session:
use Symfony\Component\HttpFoundation\Request; use Symfony\Component\HttpFoundation\Session\SessionInterface; public function onAuthenticationSuccess(Request $request, TokenInterface $token, string $firewallName): ?Response { $session = $request->getSession(); if ($session instanceof SessionInterface) { $session->migrate(true); // This regenerates session ID } return new RedirectResponse($this->urlGenerator- >generate('dashboard')); }
This prevents the attacker’s session from persisting post-authentication.
✅ 2. Use Secure Cookie Settings
Set session cookie parameters in your php.ini or Symfony framework.yaml:
# config/packages/framework.yaml framework: session: cookie_secure: auto # Use 'true' for HTTPS-only cookie_httponly: true # Prevent JavaScript access cookie_samesite: 'lax' # Prevent CSRF + Session Fixation
Or if using PHP directly:
session.cookie_secure = 1 session.cookie_httponly = 1 session.cookie_samesite = Lax
💡 Bonus Tip: Add Session Expiry and Idle Timeout
Configure session timeout in Symfony:
# config/packages/framework.yaml framework: session: gc_maxlifetime: 1800 # Session expires after 30 minutes
🛠️ Scan Your Site for Session Fixation & More
📸 Screenshot of our website vulnerability scanner homepage:

Screenshot of the free tools webpage where you can access security assessment tools.
To confirm your Symfony app isn’t vulnerable to session fixation, run a free vulnerability scan with our tool. It automatically checks for insecure session handling, missing cookie flags, and more.
📸 Screenshot of a sample vulnerability report showing a session fixation risk detected by the scanner to check Website Vulnerability.

An Example of a vulnerability assessment report generated with our free tool, providing insights into possible vulnerabilities.
📚 Learn More from Pentest Testing Corp.
We publish weekly insights on web application security. Check out more topics like session hijacking, CSRF, and XSS:
📖 Visit our blog: Pentest Testing Blog
🧩 Need Help? Hire Experts for Full Web App Security Testing
If you’re building or maintaining Symfony or PHP-based apps, you can’t afford to leave security to chance. Our team offers in-depth manual and automated Web App Penetration Testing services.
✅ Detailed reports ✅ Business logic testing ✅ OWASP Top 10 compliance
🔗 Learn more: Web App Penetration Testing Services
📬 Stay Updated
Subscribe to our LinkedIn newsletter for tips, threat intelligence, and exclusive vulnerability write-ups.
🔗 Subscribe on LinkedIn: Click here
🌐 Share this post to protect your network, or scan your website today for free: https://free.pentesttesting.com/
💬 Drop your thoughts or questions in the comments — let’s build secure apps together.
1 note
·
View note
Text
What Steps Should I Take for OpenEMR Installation Issues?
Introduction
The installation process of OpenEMR presents difficulties due to its power as an open-source Electronic Medical Records (EMR) system. The following section presents known OpenEMR installation issues with corresponding step-by-step solutions.
Common Installation Errors and Solutions
1.PHP Compatibility Issues
Error: OpenEMR installation fails due to compatibility issues with PHP version.
Solution: The installation process requires using PHP version 7.4 or newer versions. The php.ini file requires PHP configuration updates that match OpenEMR settings. Proper error prevention involves enabling Off for short_open_tag while setting the memory_limit to 512M in your php.ini file.
2.Database Connection Failure
Error: “Cannot connect to the MySQL database.”
Cause: This error arises when the OpenEMR installer cannot establish a connection to the MySQL database.
Solution:
· Ensure the MySQL service is running: sudo service mysql start.
· Verify that the credentials in the sqlconf.php file are correct:
Php: $host = 'localhost'; $port = '3306'; $login = 'your_username'; $pass = 'your_password'; $dbase = 'openemr';
3. Blank Page After Installation
Error: A blank screen is displayed after installing OpenEMR.
Cause: Typically caused by a missing PHP module or a permissions issue.
Solution:
· Check for missing PHP modules using php -m | grep -i <missing_module>.
· Install missing modules with sudo apt-get install php-<module_name>.
· Ensure correct file permissions: sudo chmod -R 755 /var/www/openemr.
4. Locale Errors
Error: “PHP Warning: Failed to setlocale…”
Cause: The locale settings on the server are not configured correctly.
Solution:
· Install the appropriate locales: sudo locale-gen en_US.UTF-8.
· Reconfigure locales: sudo dpkg-reconfigure locales.
5. SQL Error in OpenEMR Usage
Error: A fatal error occurred that showed “Uncaught Error: SQLSTATE[42S02]: Base table or view not found…”
Cause: The missing database table or improper database table creation process causes this error to appear.
Solution:
· Re-execute the SQL upgrade script through the command: mysql -u root -p openemr < sql/upgrade.sql.
· All database tables need to be imported correctly.
6. PDF Generation Failure
Error: The error message reads, “FPDF error: Unable to create output file.”
Cause: The file system write permissions create a cause that prevents OpenEMR from generating output files.
Solution:
· Users need write permissions in the sites/default/documents directory because of this command: sudo chmod -R777/var/www/openemr/sites/default/documents.
Common Mistakes During Setup
1.Inadequate System Requirements Assessment
· Performance problems emerge because organizations underestimate their hardware requirements along with their software needs.
· System requirements assessment needs to become a complete process done before any installation begins.
2.Neglecting Data Backup and Recovery Planning
· Failing to plan backup procedures and recovery strategies remains one of the main setup challenges.
· Planning for data backup becomes essential since the absence of planning may cause complete loss of information.
· Regular backups should be conducted either through OpenEMR’s tools or third-party scripting solutions.
3.Improper Configuration
· Incorrectly implemented settings result in both performance issues and system errors.
· Users should verify that both database and PHP settings align correctly with OpenEMR’s necessary requirements.
Real-World Examples and Case Studies
Cloud Success Story: Through OpenEMR Cloud on AWS, this Vermont clinic cut their server maintenance expenses by 70% and also gained better peak-season system capabilities.
On-Premises Example: A large Texas hospital chose on-premises deployment of OpenEMR to sustain whole authority over security standards while maintaining easy integration with current hospital information infrastructure.
Troubleshooting Tips for Windows Installation
· Check PHP settings because you must enable all required PHP extensions while following the correct settings in the php.ini configuration file.
· Check MySQL Connection by verifying the correct running of MySQL and sqlconf.php credentials.
· During installation, use a temporary disable of antivirus software to prevent interruptions.
· You should check OpenEMR directory permissions to stop unauthorized access to its files.
Future Trends in OpenEMR
OpenEMR will continue integrating modern features into its system as healthcare technology advances forward.
AI and Machine Learning
· OpenEMR will incorporate artificial intelligence-based clinical decision support systems and predictive analytics technology for patient care in future updates.
Telehealth Enhancements
· The telehealth system will receive updated modules that enable remote consultation access while offering better healthcare access to patients.
Interoperability Standards
· Additional FHIR technology support in the system will help different healthcare systems communicate their data more efficiently.
Conclusion
The resolution of OpenEMR installation problems requires a careful approach together with expertise in frequent installation barriers. Healthcare providers who focus on PHP compatibility along with database connections and permissions will establish a successful OpenEMR setup while maximizing its functionality. Continuous updates about the latest OpenEMR advancements enable healthcare professionals to achieve maximum performance and efficiency for their management tasks.
FAQs
What are the most common installation errors in OpenEMR?
During OpenEMR installation, you might encounter three major issues that include PHP version conflicts as well as database connection problems and unexplained blank pages showing up because of either missing components or access permission problems.
How do I troubleshoot a blank page error after OpenEMR installation?
Review both PHP module's presence and verify correct permissions for the OpenEMR directory files.
What are some common mistakes during OpenEMR setup?
The integration of insufficient system assessment with poor data backup and recovery planning along with unsuitable configuration represents the main mistakes that cause performance degradation and data loss.
0 notes
Text
Hướng dẫn hiển thị lỗi PHP (giúp debug dễ dàng hơn),
💡 Để hiển thị lỗi PHP (giúp debug dễ dàng hơn), bạn cần chỉnh lại các dòng cấu hình trong file php.ini hoặc override qua .htaccess hoặc ini_set() tùy theo môi trường. Dưới đây là hướng dẫn chi tiết 🌿💻 ✅ Cách 1: Chỉnh trực tiếp trong php.ini File đang dùng: /opt/alt/php74/etc/php.ini Mở file này và tìm/cập nhật các dòng sau: display_errors = On display_startup_errors = On error_reporting =…
0 notes
Text
🔰 Thay đổi giới hạn kích thước tệp tải lên wordpress trong CyberPanel
Bạn đang sử dụng CyberPanel để quản lý website và từng gặp tình trạng tải lên Plugin hoặc Theme và nhận được thông báo: The uploaded file exceeds the upload_max_filesize directive in php.ini. Có nghĩa tệp bạn tải lên vượt quá kích thước tệp cho phép
Bài viết này sẽ giúp các bạn khắc phục vấn đề trên
0 notes
Text
0 notes
Text

How to Create php.ini file in cPanel?
Creating a php.ini file is one way to do this. This file allows you to alter many PHP configurations to better suit the demands of your website.
0 notes
Text
How to Easily Upload Large Files to Your WordPress Site
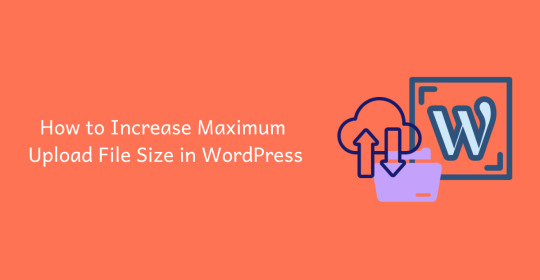
If you’ve ever tried to upload a large file to WordPress, you know how frustrating it can be when you hit size limits. Understanding how to handle these restrictions can make the process much simpler. A key step is to learn how to Increase WordPress Max Upload Size, which is essential for a smoother uploading experience.
The Importance of Upload Limits
WordPress imposes upload limits to optimize server performance and maintain security. These limits can vary based on your hosting provider, typically ranging from 2MB to over 128MB. Knowing your current upload capacity will help you manage your uploads more effectively.
How to Check Your Current Upload Limit
To find out your upload limit, log into your WordPress dashboard and go to the Media section. The maximum upload file size will be displayed there, allowing you to determine if you need to make any adjustments.
Method 1: Adjusting the php.ini File
One way to increase your upload limit is by modifying the php.ini file, assuming you have access. This file contains settings that can be changed to allow for larger file uploads, providing a straightforward solution.
Method 2: Editing the .htaccess File
If you can’t access the php.ini file, editing the .htaccess file is another option. This file can also be modified to increase your upload limits without requiring extensive technical expertise.
Method 3: Using a Plugin for Convenience
For a user-friendly option, consider installing a plugin designed to help increase your upload size. These plugins make it easy to adjust your settings without needing to navigate through complex code.
Method 4: Reach Out to Your Hosting Provider
If you’re still having trouble, reaching out to your hosting provider is a great option. They can assist you in increasing your upload limits directly, ensuring that you can upload large files without any hassle.
Conclusion
Uploading large files to WordPress doesn’t have to be a complicated process. By following the methods outlined above, you can effectively manage your upload limits and enhance your overall experience. For more details on adjusting these settings, be sure to check out how to Increase WordPress Max Upload Size. With the right strategies, you’ll improve your content management and get the most out of your WordPress site.
0 notes
Text
WHAT ARE SOME TIPS FOR UPLOADING AND MANAGING LARGE FILES IN WORDPRESS?
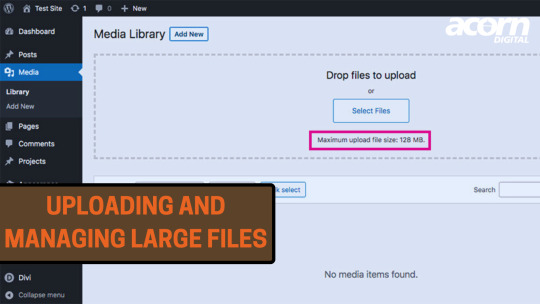
Uploading and managing large files in WordPress can be challenging due to server limitations and file size restrictions. Optimize images, use a CDN for faster loading, consider a file management plugin, increase PHP upload limit, and manage large files by breaking them into smaller chunks.
1. Increase the Maximum Upload File Size:
Edit php.ini file: Increase upload_max_filesize, post_max_size, and memory_limit.
Edit .htaccess file: Add php_value upload_max_filesize and php_value post_max_size.
WordPress Plugin: Use a plugin like Increase Maximum Upload File Size to adjust these settings without code changes.
0 notes
Text
Hướng dẫn fix bật display_errors trong php.ini nhưng vẫn không hiển thị lỗi LiteSpeed + CageFS
🌿💥 Ok bạn! Nếu đã bật display_errors trong php.ini nhưng vẫn không hiển thị lỗi khi dùng LiteSpeed + CageFS trên hệ thống CloudLinux thì khả năng cao là do: 😲 Nguyên nhân phổ biến: CageFS không cập nhật file php.ini mới sửa display_errors bị override bởi alt_php.ini, clos_ssa.ini Trang lỗi được LiteSpeed xử lý riêng (friendly error page) Trang đang bị lỗi 500 nội bộ và không hiển thị ra trình…
0 notes
Text
How to Fix input var and max execution time issue
Fix input var and max execution time issue To solve issues related to input variables and maximum execution time in PHP, you’ll need to adjust some settings in your PHP configuration files (php.ini) or through your application code. Here are the steps for addressing these issues: 1. Increasing Input Variables Limit Modifying php.ini: Locate your php.ini file. The location varies depending on…
0 notes