#config.inc.php
Explore tagged Tumblr posts
Visit Tumblr Blog
Explore Tumblr blogs with no restrictions, modern design and the best experience.
Last Seen Tumblr Blogs


Fun Fact
In 2020, 44% of users from Denmark used Tumblr daily.
Text
Instalar DVWA en KALI Linux 2021

Instalar DVWA en KALI Linux 2021.2, para verificar la seguridad de tus aplicaciones. Rompiendo se aprende y la práctica hace al maestro, pero tenemos una duda, ¿dónde podemos practicar nuestras habilidades de hacking ético?. La respuesta es sencilla, en DVWA (Damn Vulnerable Web Application). Hablamos de una aplicación web vulnerable desarrollada en PHP/MySQL, cuyo principal objetivo es permitir a los profesionales de la seguridad evaluar sus conocimientos, en un entorno completamente legal. Estas prácticas ayudan a los desarrolladores web a comprender mejor el proceso de segurización de sus aplicaciones. También resulta extremadamente útil para estudiantes, profesores y aficionados, en el proceso de aprendizaje en temas de seguridad sobre aplicaciones web. Cualquier usuario que quiera empezar con la piratería ética, debe realizar sus pruebas, pero no olvides que cualquier experimento con intentos de penetración en sistemas ajenos sin permiso, es ilegal y puede acarrearte graves problemas, incluyendo cuantiosas multas o hasta prisión. Mejor no te la juegues y por ello, en el artículo de hoy vemos como instalar esta aplicación como base de pruebas, en tu instalación de KALI Linux en español.

DVWA - Instalar DVWA en KALI Linux 2021
Instalar DVWA en KALI Linux 2021
KALI Linux ya viene con su servidor local instalado, accedemos directamente a la carpeta html. cd /var/www/html Ahora descargamos DVWA. sudo git clone https://github.com/ethicalhack3r/DVWA Ejemplo. ┌──(kali㉿kali)- └─$ cd /var/www/html ┌──(kali㉿kali)- └─$ sudo git clone https://github.com/ethicalhack3r/DVWA password for kali: Clonando en 'DVWA'... remote: Enumerating objects: 3398, done. remote: Counting objects: 100% (49/49), done. remote: Compressing objects: 100% (32/32), done. remote: Total 3398 (delta 20), reused 35 (delta 16), pack-reused 3349 Recibiendo objetos: 100% (3398/3398), 1.65 MiB | 4.46 MiB/s, listo. Resolviendo deltas: 100% (1510/1510), listo. ┌──(kali㉿kali)- └─$ Sin salir de /var/www/html, listamos el contenido descargado. ls Vemos el contenido de /html.

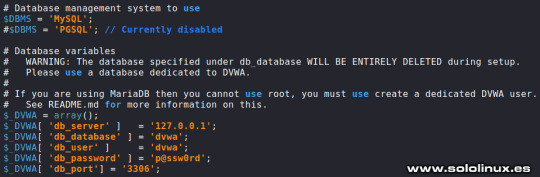
Contenido de /var/www/html - Instalar DVWA en KALI Linux 2021 En la imagen anterior, puedes observar que se encuentran dos archivos y un directorio llamado DVWA. Le concedemos los permisos necesarios. sudo chmod -R 777 DVWA DVWA contiene una carpeta llamada config, accedemos a ella. cd DVWA/config En config nos encontramos con el archivo de configuración predeterminado, es mejor dejarlo como copia de seguridad y generar otro. sudo cp config.inc.php.dist config.inc.php Abrimos el archivo con el editor nano. sudo nano config.inc.php Si quieres puedes modificar el usuario y la contraseña, pero no te olvides de los datos porque los vas a necesitar después. Una vez editado el archivo (si es tu caso), lo guardas y cierras el editor. No cambies el nombre de la base de datos.
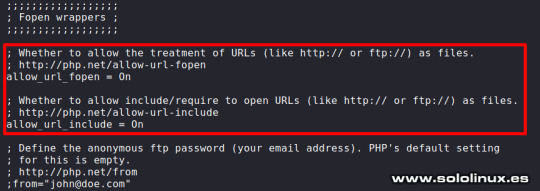
Configurar la base de datos - Instalar DVWA en KALI Linux 2021 Instalar DVWA en KALI Linux 2021.2 KALI ya viene con el motor de base de datos instalado, lo iniciamos. sudo systemctl start mysql Verificamos que todo es correcto. systemctl status mysql Ejemplo del status de la base de datos. ┌──(kali㉿kali)- └─$ sudo systemctl start mysql ┌──(kali㉿kali)- └─$ systemctl status mysql ● mariadb.service - MariaDB 10.5.11 database server Loaded: loaded (/lib/systemd/system/mariadb.service; disabled; vendor preset: disabled) Active: active (running) since Sun 2021-08-08 11:08:35 CEST; 21s ago Docs: man:mariadbd(8) https://mariadb.com/kb/en/library/systemd/ Process: 2885 ExecStartPre=/usr/bin/install -m 755 -o mysql -g root -d /var/run/mysqld (code=exited, status=0/SUCCESS) Process: 2886 ExecStartPre=/bin/sh -c systemctl unset-environment _WSREP_START_POSITION (code=exited, status=0/SUCCESS) Process: 2888 ExecStartPre=/bin/sh -c && VAR= || VAR=`cd /usr/bin/..; /usr/bin/galera_recove> Process: 2949 ExecStartPost=/bin/sh -c systemctl unset-environment _WSREP_START_POSITION (code=exited, status=0/SUCCESS) Process: 2951 ExecStartPost=/etc/mysql/debian-start (code=exited, status=0/SUCCESS) Main PID: 2935 (mariadbd) Status: "Taking your SQL requests now..." Tasks: 14 (limit: 2295) Memory: 111.2M CPU: 3.388s CGroup: /system.slice/mariadb.service └─2935 /usr/sbin/mariadbd Accedemos a la consola de MariaDB y creamos el usuario con su password. Recuerda que estos datos los proporcionamos anteriormente, en el archivo config.inc.php; en nuestro caso utilizamos los que venían por defecto, porque al ser un entorno de pruebas local, no existe ningún riesgo. Sigue los pasos que te indico a continuación. sudo mysql -u root -p create user 'userDVWA'@'127.0.0.1' identified by "dvwa"; grant all privileges on dvwa.* to 'userDVWA'@'127.0.0.1' identified by 'dvwa'; exit Ejemplo completo del proceso con respuestas incluidas. ┌──(kali㉿kali)- └─$ sudo mysql -u root -p Enter password: Welcome to the MariaDB monitor. Commands end with ; or g. Your MariaDB connection id is 44 Server version: 10.5.11-MariaDB-1 Debian 11 Copyright (c) 2000, 2018, Oracle, MariaDB Corporation Ab and others. Type 'help;' or 'h' for help. Type 'c' to clear the current input statement. MariaDB > create user 'userDVWA'@'127.0.0.1' identified by "dvwa"; Query OK, 0 rows affected (0.008 sec) MariaDB > grant all privileges on dvwa.* to 'userDVWA'@'127.0.0.1' identified by 'dvwa'; Query OK, 0 rows affected (0.008 sec) MariaDB > exit Bye Para instalar DVWA en KALI Linux 2021 correctamente, debemos hacer unas modificaciones en el archivo php.ini. La versión actual de php en KALI es la 7.4, si cambia la versión abres el archivo que corresponda. sudo nano /etc/php/7.4/apache2/php.ini Busca las líneas "allow_url_fopen" y "allow_url_include". Asegúrate que las dos están en "On". ;;;;;;;;;;;;;;;;;; ; Fopen wrappers ; ;;;;;;;;;;;;;;;;;; ; Whether to allow the treatment of URLs (like http:// or ftp://) as files. ; http://php.net/allow-url-fopen allow_url_fopen = On ; Whether to allow include/require to open URLs (like http:// or ftp://) as files. ; http://php.net/allow-url-include allow_url_include = Off Una vez tengas las dos en "On", guarda el archivo y cierra el editor.
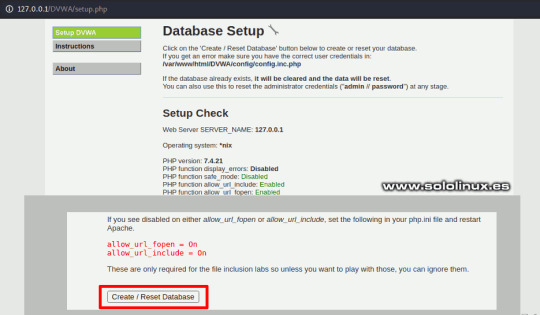
Configurar el archivo php.ini - Instalar DVWA en KALI Linux 2021 Para dejar la herramienta lista para su uso, solo falta iniciar Apache. sudo systemctl start apache2 Verificamos que el servicio está corriendo. systemctl status apache2 Ejemplo. ┌──(kali㉿kali)- └─$ sudo systemctl start apache2 ┌──(kali㉿kali)- └─$ systemctl status apache2 ● apache2.service - The Apache HTTP Server Loaded: loaded (/lib/systemd/system/apache2.service; disabled; vendor preset: disabled) Active: active (running) since Sun 2021-08-08 11:23:34 CEST; 40s ago Docs: https://httpd.apache.org/docs/2.4/ Process: 3176 ExecStart=/usr/sbin/apachectl start (code=exited, status=0/SUCCESS) Main PID: 3187 (apache2) Tasks: 6 (limit: 2295) Memory: 18.5M CPU: 292ms CGroup: /system.slice/apache2.service ├─3187 /usr/sbin/apache2 -k start ├─3189 /usr/sbin/apache2 -k start ├─3190 /usr/sbin/apache2 -k start ├─3191 /usr/sbin/apache2 -k start ├─3192 /usr/sbin/apache2 -k start └─3193 /usr/sbin/apache2 -k start Instalar DVWA en KALI Linux 2021 Una vez hemos terminado de instalar DVWA en KALI Linux 2021, iniciamos la herramienta insertando esta URL en tu navegador web preferido. - http://127.0.0.1/DVWA/setup.php Verás una pantalla con diversos errores, no te preocupes es algo normal, ya que falta generar la base de datos. Lo único que nos falta es pulsar en "Crear database", para que se genere y nos redirija a la página de inicio de sesión.
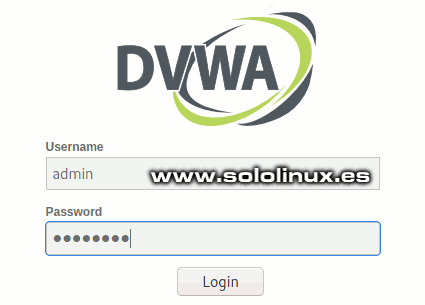
Crear la base de datos en DVWA - Instalar DVWA en KALI Linux 2021 Puedes iniciar sesión con los datos de acceso predeterminados, que son... - Username: admin - Password: password
Iniciar sesión en DVWA Canales de Telegram: Canal SoloLinux – Canal SoloWordpress Espero que este artículo te sea de utilidad, puedes ayudarnos a mantener el servidor con una donación (paypal), o también colaborar con el simple gesto de compartir nuestros artículos en tu sitio web, blog, foro o redes sociales. Instalar DVWA en KALI Linux 2021.2. Chat de SoloLinux en Telegram Read the full article
#.config#allow_url_fopen#allow_url_include#aplicaciónwebvulnerable#basededatos#carpetahtml#config.inc.php#consoladeMariaDB#DamnVulnerableWebApplication#DVWA#editornano#hacking#Hackingetico#iniciarapache#InstalarDVWA#InstalarDVWAenKALI#KALILinux2021#KALILinuxenespañol#mariadb#nano#php.ini
0 notes
Text
mamp phpMyAdmin インポートのタイムアウトまでの時間を伸ばす
/Applications/MAMP/bin/phpMyAdmin/config.inc.php
↓ 300の数値を大きくする。→4000とかデカめに設定。 $cfg['ExecTimeLimit'] = 300;
2 notes
·
View notes
Text
Homebrew(ed) Apache, MySQL, phpMyAdmin
At the time of this writing, I'm relatively new to the world of homebrew package management. Chances are good that if you are reading this, you are too. Have no fear these things are easier to install than you think, even if you hit a few bumps in the road.
Once you get the hang of homebrew you want to start installing all kinds of awesomeness. I had already fired up the native install of Apache that comes with Mac OS 10.7 and was well on my way to serving up websites that didn't need databases. Then I ran into one that needed it.
I tried the usual suspect:
brew install mysql
to my delight, mysql was installed (pretty sweet right?). Next up I installed phpMyAdmin (you gotta have a way to manage that database right). This too magically installed, however once I made the required modification to the apache httpd.conf file and fired up phpMyAdmin through my browser I kept getting the "The mcrypt extension is missing" error.
If you are using Homebrew as your OSX package manager, chances are that you are using the default PHP that comes with Lion. This PHP installation does not have the mcrypt extension, so if you are trying to use something like PHPMyAdmin, you’ll get an error message saying that mcrypt is not enabled in php.ini. I stumbled on a few articles on this topic, which I list here in case you want to read them too. Skip down for the solution:
PHP mcrypt in Snow Leopard with Homebrew - this method didn't work for me
(Re)installing PHP 5.3 on Mac OS X - this method worked
Even though the re-install of PHP solved the lacking mcrypt issue, I still had an issue accessing phpMyAdmin. I didn't change any of the defaults, so I could connect fine with:
mysql -uroot -p
However, phpMyAdmin by default has a flag set in the config that prevents you from logging in with an empty password. A good security measure to be sure, but to get in you 'll need to make the following change to the config.inc.php file
36 $cfg['Servers'][$i]['AllowNoPassword'] = true;
Now you should be able to fire up mysql
msyql.server start
Login to phpMyAdmin
http://localhost/phpmyadmin
0 notes
Text
PHPMyAdmin is a free software tool written in PHP, intended to handle the administration of MySQL over the Web interface. phpMyAdmin supports a wide range of operations on MySQL and MariaDB. In this article we look at how you install PHPMyAdmin on Kali Linux & Debian Linux system. Most frequent database operations – (managing databases, tables, columns, relations, indexes, users, permissions, etc) can be performed via the web console, while you still have the ability to directly execute any SQL statement. Core Features of phpMyAdmin An intuitive cool web interface Support for most MySQL features Import data from CSV and SQL Export data to various formats: CSV, SQL, XML, PDF, ISO/IEC 26300 – OpenDocument Text and Spreadsheet, Word, LATEX, and others Administering multiple servers Creating PDF graphics of your database layout Creating complex queries using Query-by-example (QBE) Searching globally in a database or a subset of it Transforming stored data into any format using a set of predefined functions, like displaying BLOB-data as image or download-link The following is the procedure to follow while installing PHPMyAdmin on Kali Linux or any other Debian based system. Step 1: Update System Start by ensuring the system is updated. sudo apt update sudo apt upgrade Because of kernel updates a reboot may be required. sudo reboot Step 2: Install PHP and Apache on Kali Linux The next step is the installation of PHP, required modules and Apache Web Server. sudo apt -y update sudo apt -y install wget php php-cgi php-mysqli php-pear php-mbstring libapache2-mod-php php-common php-phpseclib php-mysql Confirm installation of PHP by checking the version: $ php --version PHP 7.4.11 (cli) (built: Oct 6 2020 10:34:39) ( NTS ) Copyright (c) The PHP Group Zend Engine v3.4.0, Copyright (c) Zend Technologies with Zend OPcache v7.4.11, Copyright (c), by Zend Technologies Step 3: Install MariaDB / MySQL database Server Since you’re using phpMyAdmin to administer MySQL or MariaDB database server you should have database server already installed. You can also reference our guides below. How To Install MariaDB on Kali Linux How To Install MySQL 8.0 on Kali Linux Once the database server is installed and running you can then proceed to install phpMyAdmin on Kali Linux and Debian system. Step 4: Install PHPMyAdmin on Kali Linux From the phpMyAdmin downloads page you should be able to check the latest release. Use wget command line tool to download the latest version of phpMyAdmin: wget https://www.phpmyadmin.net/downloads/phpMyAdmin-latest-all-languages.tar.gz Extract downloaded archive file using tar: tar xvf phpMyAdmin-latest-all-languages.tar.gz Move the folder created from extraction to /usr/share/phpmyadmin directory. rm -f phpMyAdmin-latest-all-languages.tar.gz sudo mv phpMyAdmin-*/ /usr/share/phpmyadmin Create directory for phpMyAdmin temp files. sudo mkdir -p /var/lib/phpmyadmin/tmp sudo chown -R www-data:www-data /var/lib/phpmyadmin We also need to create a directory where phpMyAdmin configuration files will be stored. sudo mkdir /etc/phpmyadmin/ Copy configuration template to the directory we just created. sudo cp /usr/share/phpmyadmin/config.sample.inc.php /usr/share/phpmyadmin/config.inc.php Edit the file /usr/share/phpmyadmin/config.inc.php and set secret passphrase: $ sudo vim /usr/share/phpmyadmin/config.inc.php $cfg['blowfish_secret'] = 'H2TxcGXxflSd8JwrXVlh6KW4s2rER63i'; Configure Temp directory by adding this line in the file. $cfg['TempDir'] = '/var/lib/phpmyadmin/tmp'; Step 5: Configure Apache web Server Create a new Apache configuration file for phpMyAdmin. sudo vim /etc/apache2/conf-enabled/phpmyadmin.conf Paste below contents to the file. Alias /phpmyadmin /usr/share/phpmyadmin Options SymLinksIfOwnerMatch DirectoryIndex index.php AddType application/x-httpd-php .php
SetHandler application/x-httpd-php php_value include_path . php_admin_value upload_tmp_dir /var/lib/phpmyadmin/tmp php_admin_value open_basedir /usr/share/phpmyadmin/:/etc/phpmyadmin/:/var/lib/phpmyadmin/:/usr/share/php/php-gettext/:/usr/share/php/php-php-gettext/:/usr/share/javascript/:/usr/share/php/tcpdf/:/usr/share/doc/phpmyadmin/:/usr/share/php/phpseclib/ php_admin_value mbstring.func_overload 0 AddType application/x-httpd-php .php SetHandler application/x-httpd-php php_value include_path . php_admin_value upload_tmp_dir /var/lib/phpmyadmin/tmp php_admin_value open_basedir /usr/share/phpmyadmin/:/etc/phpmyadmin/:/var/lib/phpmyadmin/:/usr/share/php/php-gettext/:/usr/share/php/php-php-gettext/:/usr/share/javascript/:/usr/share/php/tcpdf/:/usr/share/doc/phpmyadmin/:/usr/share/php/phpseclib/ php_admin_value mbstring.func_overload 0 # Authorize for setup AuthType Basic AuthName "phpMyAdmin Setup" AuthUserFile /etc/phpmyadmin/htpasswd.setup Require valid-user # Disallow web access to directories that don't need it Require all denied Require all denied Require all denied Restriction to specific IP addresses or network address block can be set with a configuration which looks similar to below. Require ip 127.0.0.1 192.168.10.0/24 Finally restart Apache web server to read the changes. sudo systemctl restart apache2 Confirm Apache service has been started without any error: $ systemctl status apache2 ● apache2.service - The Apache HTTP Server Loaded: loaded (/lib/systemd/system/apache2.service; disabled; vendor preset: disabled) Active: active (running) since Fri 2022-01-22 14:49:54 EST; 11min ago Docs: https://httpd.apache.org/docs/2.4/ Process: 7502 ExecStart=/usr/sbin/apachectl start (code=exited, status=0/SUCCESS) Main PID: 7513 (apache2) Tasks: 11 (limit: 2274) Memory: 57.8M CPU: 656ms CGroup: /system.slice/apache2.service ├─7513 /usr/sbin/apache2 -k start ├─7515 /usr/sbin/apache2 -k start ├─7516 /usr/sbin/apache2 -k start ├─7517 /usr/sbin/apache2 -k start ├─7518 /usr/sbin/apache2 -k start ├─7519 /usr/sbin/apache2 -k start ├─7751 /usr/sbin/apache2 -k start ├─7757 /usr/sbin/apache2 -k start ├─7758 /usr/sbin/apache2 -k start ├─7759 /usr/sbin/apache2 -k start └─7760 /usr/sbin/apache2 -k start Step 6: Open phpMyAdmin Web interface Access phpMyAdmin Web interface on http://[ServerIP|Hostname]/phpmyadmin Use your database credentials – username & password to login. The root user credentials can also be used to authenticate. phpMyAdmin dashboard is displayed upon a successful login. You can now use phpMyAdmin for all database management tasks in your software development cycle. Below are more guides we have on Kali Linux.
0 notes
Text
Fix PhpMyAdmin secret passphrase (blowfish_secret) Issue
In this blog I w,ill explain you how we can fix PhpMyAdmin secret passphrase error in simple steps. Fix PhpMyAdmin secret passphrase (blowfish_secret) Issue If you manually install PhpMyAdmin on your server then go to the PHPMyAdmin directory. You can rename config.sample.inc.php to config.inc.php. Open this file in your editor. Now you need to add 32 char in $cfg['blowfish_secret'] Save…

View On WordPress
0 notes
Link
0 notes
Text
Install phpMyAdmin Centos 7
Hướng dẫn install phpMyAdmin Centos 7 là bài viết chia sẻ của chúng tôi trong hướng dẫn sử dụng vps linux của chúng tôi. Mời các bạn cùng tham khảo bài viết của chúng tôi.
Xem chi tiết tại https://doc.vsis.net/install-phpmyadmin-centos/
phpMyAdmin là gì? Tại sao nên cài phpMyAdmin
MySQL là cơ sở dữ liệu phổ biến với tất cả các nhà phát triển! Nó là mã nguồn mở và giúp duy trì sự cân bằng hoàn hảo giữa tốc độ và tính năng. Khi install phpMyAdmin CentOS 7, bạn sẽ sử dụng được giao diện người dùng trực quan mới thông qua trình duyệt thay vì dùng dòng lệnh.

Một số tính năng khác của phpMyAdmin:
Tạo, duyệt, chỉnh sửa và thả cơ sở dữ liệu, bảng, lượt xem, cột và chỉ mục
Hiển thị nhiều bộ kết quả thông qua procedures hoặc truy vấn được lưu trước
Tạo, sao chép, xóa, đổi tên và thay đổi cơ sở dữ liệu, bảng, cột và chỉ mục
Bảo trì máy chủ, cơ sở dữ liệu và bảng, với các đề xuất về cấu hình máy chủ
Tải tập tin văn bản vào bảng
Hướng dẫn install phpMyAdmin Centos 7
Đăng nhập vào VPS
Bạn hãy đăng nhập vào VPS thông qua giao thức ssh. Nếu bạn chưa biết về ssh thì hãy đọc bài viết này nhé SSH là gì? Cách đăng nhập vào VPS linux bằng SSH
Nếu bạn chưa có VPS thì hãy truy cập link này để đăng ký 1 vps giá rẻ hoặc liên hệ điện thoại / zalo số 0968675675 nhé
Cài đặt / Install máy chủ Web Apache
Trước tiên bạn phải cài đặt máy chủ web apache để cho phpmyadmin hoặt động nhé. Hãy thực hiện câu lệnh sau:
yum install httpd -y
Sau đó hãy trạng thái của apache bằng lệnh dưới đây xem nó hoạt động chưa nhé
systemctl status httpd
Sau đó hãy kiểm tra bằng trực quan là gõ ip lên trình duyệt xem nó đã thực sự chạy chưa nhé. Nếu xuất hiện như hình dưới đây tưc là nó đã hoạt động nhé bạn.
Install Repository EPEL
phpMyAdmin có trong repository EPEL (Gói bổ sung cho Enterprise Linux). Để truy cập EPEL, bạn cần install gói đặc biệt – epel-release. Sử dụng lệnh sau để install epel-release CentOS:
sudo yum install epel-release
Install phpMyAdmin CentOS 7
Hãy chạy lệnh sau để cài Install phpMyAdmin CentOS 7 nhé
sudo yum install phpmyadmin
Sau khi cài đặt hoàn tất, bạn phải chỉnh sửa tệp cấu hình phpMyAdmin.
Cấu hình tệp phpMyAdmin.conf
Việc chỉnh sửa sẽ đảm bảo rằng bạn có thể truy cập client phpMyAdmin từ xa. Chúng tôi sẽ mở tệp phpMyAdmin.conf trong thư mục /etc/httpd/conf.d/ bằng vim editor:
vim /etc/httpd/conf.d/phpMyAdmin.conf
Ở đây bạn sẽ thấy 4 chuỗi ip yêu cầu khác nhau, khớp với chuỗi IP dài. Giá trị mặc định là 127.0.0.1. Thay thế giá trị đó bằng IP máy bạn sẽ sử dụng để truy cập phpMyAdmin. Bạn có thể sử dụng công cụ như WhatsMyIP để kiểm tra IP. Lưu và thoát tệp bằng cách nhấn escape và gõ vào :wq.
Bạn có thể xem ví dụ về tệp phpMyAdmin.conf bên dưới:
Khởi động lại máy chủ Web Apache
Tiếp theo, chúng ta sẽ khởi động lại máy chủ Web Apache bằng cách nhập lệnh sau vào dòng lệnh:
systemctl restart httpd
Xác định tên người dùng và mật khẩu phpMyAdmin
Tên người dùng và mật khẩu sẽ nằm trong tệp config.inc.php. Tệp sẽ nằm trong thư mục phpMyAdmin installation. Với chúng tôi thì đó là /etc/phpMyAdmin.
Mở tệp bằng vim editor:
vim config.inc.php
Bên trong, bạn có thể đặt tên người dùng và mật khẩu, như trong ảnh chụp màn hình bên dưới:
Lưu và thoát tệp bằng cách nhấn esc và :wq như trước.
Khởi động lại máy chủ Web Apache
Tiếp theo, chúng ta sẽ khởi động lại máy chủ Web Apache bằng cách nhập lệnh sau vào dòng lệnh:
systemctl restart httpd
Như vậy bạn đã hoàn thành install phpMyAdmin CentOS 7. Ngoài ra các bạn có thể sử dụng các scripts quản lý vps có cài sẵn phpMyAdmin bạn có thể tham khảo tại bài viết https://doc.vsis.net/phan-mem-quan-ly-vps/
Nếu bạn có nhu cầu về VPS giá rẻ vui lòng liên hệ với chúng tôi theo các thông tin sau:
Thuê VPS giá rẻ: https://vsis.net/vps-gia-re/
Tạo 1 ticket hỗ trợ tại >>> https://my.vsis.net/submitticket.php
Điện thoại: 0968675675
Zalo/Viber/Telegram: 0968675675
Facebook Messenger: https://www.messenger.com/t/vsisnetidc/
Group hỗ trợ khách hàng và chia sẻ các kiến thức mới nhất: https://www.facebook.com/groups/congcumarketing9999/
Fanpage: https://www.facebook.com/vsisnetidc/
Zalo Page: zalo.me/3864761206090439486
0 notes
Text
Phpmyadmin root şifresi oluşturma
Phpmyadmin root şifresi oluşturma
Phpmyadmin sql kısmından aşağıdaki kodu girdiğiniz zaman şifreniz mysql olacaktır. SET PASSWORD FOR 'root'@'localhost' = PASSWORD('mypass'); FLUSH PRIVILEGES; Daha sonra phpmyadmin dosyalarının kurulu olduğu dizinden config.inc.php dosyasında bu satırı şifreniz ile değiştiriniz. $cfg['Servers'][$i]['password'] = 'mysql';

View On WordPress
0 notes
Text
CVE-2020-23150
A SQL injection vulnerability in config.inc.php of rConfig 3.9.5 allows attackers to access sensitive database information via a crafted GET request to install/lib/ajaxHandlers/ajaxDbInstall.php. source https://cve.report/CVE-2020-23150
0 notes
Text
Xampp Mysql Phpmyadmin

How to Create table in MySQL db using phpmyadmin xampp server. Start xampp control panel and run Apache, MySQL server. Open your web browser and type localhost/phpmyadmin into your address bar. Now first you have to create MySQL database so read my tutorial for How to create MySQL database in phpmyadmin. I've since uninstalled WAMP and tried XAMPP, and the problem still exists. Even just browsing the databases with PHPMyAdmin takes a long time between page loads. I am guessing it's a problem with MySQL. Any suggestions would be helpful.
Intro
Heroku offers a generous free tier for hosting up to five full-stack projects. But documentation for getting a PHP with MySQL site up and running with Heroku is poor - it took me way to much Googling. Yet the process isn't difficult, so I created this blog post to help others and myself in future deployments.
I also made a video tutorial which you can follow along to.
1. Create an account on Heroku and download Heroku CLI tools
Sign up to Heroku here.
Then download the Heroku CLI tools to allow you to write Heroku commands from your command line.
2. Open up your project folder in CLI
I’m using VS code’s integrated terminal and like to store my files in /c/xampp/htdocs/project-name but you can choose whatever you prefer.
3. Login to Heroku from the terminal
We next issue the command “heroku login”, then press any key. A login page will be opened in the browser where you can login.
4. Create an initial PHP file
We will deploy this test file.
5. Create a composer.json file
Every PHP project is required to have one when deploying to Heroku.
6. Initialise a git repository, add everything then commit
git init
git add .
git commit -m 'Added index file and composer.json'
Now for the Heroku stuff!
7. Create an Heroku project
This can easily be done through the command line but I prefer to use the Heroku website.
Login to Heroku and go to your apps dashboard.
Then click “create new app”.
Choose any available app name you want, choose your region, then click create app.
8. Push the app to Heroku
Tell git the remote Heroku repository we want to push to:
heroku git:remote -a dannys-tutorial-app
Replace “dannys-tutorial-app” with your app name from the previous step.
Then deploy to Heroku! Make sure to state the correct branch, here I am using the main branch:
git push heroku main
Heroku will then provide you with the URL to your app.
And here we have it, our app has been deployed!
9. Now to add a MySQL database

During development of your app, your app wouldv’e been connected to a local database on your machine which Heroku has no access to. So we need to set up a new MySQL database within Heroku. To do this we need to add the “ClearDB” add-on to our app.
Go to your app dashboard (https://dashboard.heroku.com/apps) and select your app.
Click Resources then add the ClearDB Add-on:
Be sure to select the free option then submit the order. You will probably be prompted to add your credit card details. Unfortunately this is required in order to add add-ons such as this to your project. But as long as you select the free option, Heroku won’t charge you.
Xampp Phpmyadmin Mysql Password
10. Get your database URL
Got to “settings” then scroll down to “config vars”. Copy your database URL into a text editor or word document for later use.
Here’s mine: mysql://b0cc1049d026d1:[email protected]/heroku_3b61f10a737bcca?reconnect=true
The URL contains the information you need to connect to your new Heroku MySQL database via PHPMyAdmin:
Username: b0cc1049d026d1
Password: da2394e8
Host: eu-cdbr-west-03.cleardb.net
Xampp Mysql Setup
11. Configure PHPMyAdmin to connect to the database
We now need to tell PHPMyAdmin our Heroku database information so that it can connect to it.
You need find your config.inc.php file which stores configuration information. My PHPMyAdmin came with XAMPP and so my config file is located here:
C:xamppphpMyAdminconfig.inc.php
Open Phpmyadmin Xampp
Open up this file in any text editor, I’m using VS code but you could use something like notepad as well.
Copy the code below to the bottom of the file (but still within the PHP tags). Change the host, username and password to the one’s you obtained from the URL before.
12. Configure your Heroku MySQL database
Open up PHPMyAdmin. If using XAMPP it can be done as below:
Open up the server side-panel and select your newly added Heroku server:
Go over to databases and select your Heroku database.
You can now create the tables you need in your database.
13. Connect to the Heroku database from PHP
Copy in the code below to load in your Heroku database configuration variables to your app. This will connect your app to the database.
And that’s it! We have deployed a PHP project to Heroku, made a remote MySQL database, configured the database using PHPMyAdmin, and finally connected our app to the database.
If that was helpful, you can say thanks by subscribing to my YouTube channel. Leave a comment if you have any questions or feedback (positive or negative) :)
Error resolving of PhpMyAdmin access denied.
For most first time install, accessing http://localhost/PhpMyAdmin will directly take us to the PhpMyAdmin web interface without asking for password or anything because by default there is no password set. But when you install it second time you can face an error like this while accessing PhpMyAdmin.Due to that previous default loaclhost port number is not valid now.
What should be done! Let’s see in below with some easy steps.
1. So , you have to open XAMPP Control Panel ->Click MySql Config->Click my.ini
It will open in notepad as shown in figure.
2. You have to write this line skip-grant-tables after (mysqld).
3.Open xamp folder ->PhpMyAdmin .You will see config.inc.php file in phpMyAdmin folder, just open it with notepad++
$cfg(‘Servers’)($i)(‘host’) = ‘127.0.0.1’; This is default port number.
4. Resolve this issue by manually editing in the file “config.inc.php” located at “C:xamppphpMyAdmin”. Write “localhost:3307” within $cfg(‘Servers’)($i)(‘host’) = ‘localhost:3307′; as shown given picture.
Localhost Phpmyadmin Mysql Localhost Xampp
5. Save this changes. You can find port number as follows: Open XAMP->config->service port setting->mySql.
Now , you can access MyPhpAdmin.
Xampp Mysql Phpmyadmin Error
Thanks.
How to install WordPress on Windows using XAMPP? Part-1 - April 8, 2021
How to merge two or multiple tables to each other in the Laravel PHP Framework? (Part-1) - September 7, 2020
How to merge two or multiple tables to each other in the Laravel PHP Framework? (Part-3) - September 7, 2020
0 notes
Photo

(via Driver = mysqli NOT working (OJS 3.2.1-1) - Software Support - PKP Community Forum)
Installing OJS with error 500? Maybe you have to change MySQL to MySQLi directly in admin, not in config.inc.php .
0 notes
Text
Instalar phpMyAdmin en CentOS 8 con Lamp
Instalar phpMyAdmin en CentOS 8 con Lamp. Aprovechando que en artículo anterior explicamos como instalar LAMP en CentOS 8, ahora vemos como instalar la herramienta gráfica por excelencia, muy útil si quieres administrar bases de datos. Es evidente que hablamos de phpMyAdmin. La aplicación phpMyAdmin no está incluida de forma predeterminada en los repositorios CentOS 8, así que vemos como instalarla manualmente. Instalar phpMyAdmin en CentOS 8 con Lamp Descargamos la última versión estable de phpMyAdmin, nuestro caso la 5.0.2. Puedes revisar las versiones en su página oficial. cd /var/www/html wget https://files.phpmyadmin.net/phpMyAdmin/5.0.2/phpMyAdmin-5.0.2-all-languages.zip Extraemos el zip. unzip phpMyAdmin-5.0.2-all-languages.zip Movemos el contenido a la carpeta phpmyadmin. mv phpMyAdmin-5.0.2-all-languages phpmyadmin Cambiamos el propietario al usuario Apache. chown -R apache:apache /var/www/html/phpmyadmin Es necesario modificar el nombre del archivo de configuración. cd /var/www/html/phpmyadmin mv config.sample.inc.php config.inc.php Lo editamos... nano config.inc.php Donde "blowfish_secret", introduces una contraseña segura. Guarda el archivo y cierra el editor nano. Creamos las tablas de phpMyAdmin en la base de datos. mysql Configurar phpMyAdmin con Apache Creamos el archivo de configuración. sudo nano /etc/httpd/conf.d/phpmyadmin.conf Copia y pega lo siguiente. Alias Read the full article
#CentOS8conLamp#comoinstalarLAMPenCentOS8#ConfigurarphpMyAdmin#IniciarphpMyAdmin#InstalarphpMyAdmin#phpMyAdmin#phpMyAdminenCentOS8
0 notes
Text
In today’s guide, we will discuss how you can Install phpMyAdmin on Debian 10 / Debian 11 Linux. phpMyAdmin is a free and Open source Web application written in PHP for administering MySQL and MariaDB database servers. It is mostly used by Developers and DBAs to interact with a database server because of its ease of use. phpMyAdmin provides an advanced SQL editor which makes it easy to build and test complex SQL queries. It also allows you to manage Databases, Users, Data import and export, stored procedures and triggers, execute and edit queries, search database globally and much more. This tutorial explains the steps for installing phpMyAdmin with Apache on Debian 11 / Debian 10 Linux system. Let’s get started. Step 1: Install PHP on Debian 11 / Debian 10 PHP is the main software requirement for running phpMyAdmin. Install it using our guide below. How To Install PHP on Debian System For simplicity, the commands below can be executed to install PHP and extensions required. sudo apt -y update sudo apt -y install wget php php-cgi php-mysqli php-pear php-mbstring libapache2-mod-php php-common php-phpseclib php-mysql Step 2: Install MariaDB Database Server If you don’t have existing Database server to manage, you can use our guide to install MariaDB database server on Debian. How to Install MariaDB on Debian Step 3: Install Apache Web Server For this installation setup, we chose Apache as a web server to use with phpMyAdmin. You are free to choose whichever web server you prefer though, e.g Nginx. Install Apache Web Server on Debian system by running the following commands sudo apt-get -y install wget apache2 Step 4: Install phpMyAdmin on Debian 10 / Debian 11 You can check the released of phpMyAdmin from the downloads page. Thanks William Desportes for the hint on how to pull the latest release of phpMyAdmin. Download latest version of phpMyAdmin with wget command. DATA="$(wget https://www.phpmyadmin.net/home_page/version.txt -q -O-)" URL="$(echo $DATA | cut -d ' ' -f 3)" VERSION="$(echo $DATA | cut -d ' ' -f 1)" wget https://files.phpmyadmin.net/phpMyAdmin/$VERSION/phpMyAdmin-$VERSION-all-languages.tar.gz For English language only package, use: wget https://files.phpmyadmin.net/phpMyAdmin/$VERSION/phpMyAdmin-$VERSION-english.tar.gz Extract downloaded Archive: tar xvf phpMyAdmin-$VERSION-all-languages.tar.gz Move the resulting folder to /usr/share/phpmyadmin folder. sudo mv phpMyAdmin-*/ /usr/share/phpmyadmin Create directory for phpMyAdmin temp files. sudo mkdir -p /var/lib/phpmyadmin/tmp sudo chown -R www-data:www-data /var/lib/phpmyadmin Create directory for phpMyAdmin configuration files such as htpass file. sudo mkdir /etc/phpmyadmin/ Create phpMyAdmin configuration file. sudo cp /usr/share/phpmyadmin/config.sample.inc.php /usr/share/phpmyadmin/config.inc.php Edit the file /usr/share/phpmyadmin/config.inc.php and set secret passphrase: $ sudo vim /usr/share/phpmyadmin/config.inc.php $cfg['blowfish_secret'] = 'H2OxcGXxflSd8JwrwVlh6KW6s2rER63i'; Configure Temp directory: $cfg['TempDir'] = '/var/lib/phpmyadmin/tmp'; Step 5: Configure Apache web Server Create phpMyAdmin Apache configuration file: sudo vim /etc/apache2/conf-enabled/phpmyadmin.conf And paste below contents to the file: Alias /phpmyadmin /usr/share/phpmyadmin Options SymLinksIfOwnerMatch DirectoryIndex index.php AddType application/x-httpd-php .php SetHandler application/x-httpd-php php_value include_path . php_admin_value upload_tmp_dir /var/lib/phpmyadmin/tmp php_admin_value open_basedir /usr/share/phpmyadmin/:/etc/phpmyadmin/:/var/lib/phpmyadmin/:/usr/share/php/php-gettext/:/usr/share/php/php-php-gettext/:/usr/share/javascript/:/usr/share/php/tcpdf/:/usr/share/doc/phpmyadmin/:/usr/share/php/phpseclib/ php_admin_value mbstring.func_overload 0 AddType application/x-httpd-php .php
SetHandler application/x-httpd-php php_value include_path . php_admin_value upload_tmp_dir /var/lib/phpmyadmin/tmp php_admin_value open_basedir /usr/share/phpmyadmin/:/etc/phpmyadmin/:/var/lib/phpmyadmin/:/usr/share/php/php-gettext/:/usr/share/php/php-php-gettext/:/usr/share/javascript/:/usr/share/php/tcpdf/:/usr/share/doc/phpmyadmin/:/usr/share/php/phpseclib/ php_admin_value mbstring.func_overload 0 # Authorize for setup AuthType Basic AuthName "phpMyAdmin Setup" AuthUserFile /etc/phpmyadmin/htpasswd.setup Require valid-user # Disallow web access to directories that don't need it Require all denied Require all denied Require all denied You can restrict access from specific IP by adding line like below: Require ip 127.0.0.1 192.168.18.0/24 Restart apache web server. sudo systemctl restart apache2 Step 6: Visit phpMyAdmin Web interface Access phpMyAdmin Web interface on http://[ServerIP|Hostname]/phpmyadmin. Use your database credentials – username & password to login. phpMyAdmin dashboard is displayed upon a successful login. It looks something like this:
0 notes
Text
phpMyAdmin Unlimited Session
Open /etc/phpmyadmin/config.inc.php
Add the following:
$newTimeout = 1190804011908; $cfg['LoginCookieValidity'] = $newTimeout; ini_set('session.gc_maxlifetime', $newTimeout);
0 notes
Text
Mac OS X: REMUS Datentechnik GmbH, Authorized Apple Premium Service Provider
Is this return text in German? If so then you have to insert the text in German in line 9 of the takePic.php script. Camera is an ancient Canon ixus 400. With the command gphoto2 etc. I can control the camera in the terminal and the images are loaded. The software has strong scanning technology and all the new features that can be easily solved Photo Booth Video Recovery and Photo and Video Recovery. It scans your storage device deeply and detects any missing files. After that it is possible to preview the recoverable items and restore them wherever you want for quick access. Today it has numerous satisfied users around the world who have tried to fix it for Photo Booth Video Recovery issue. Not only does it also have some amazing features that make it popular in photo recovery segment. Of course, adaptable and switchable. If the iPhone is connected to its own computer, applications that support the file sharing function can be filled with files. However, both the interface and the sluggish management function of the previous Apple solution should give every user the desire for far-reaching improvements. Maybe the Apple developers see it similarly.
macOS Mojave - Camera transfer
Google times "set up print server with CUPS and AirPrint on the Raspberry Pi" and do it exactly as described. In the guide odnoklassniki download video reference is made to HP Linux drivers. If you don't have an HP printer, you may have to search for a suitable Linux driver first.
In config.inc.php I have behind print "fit-to-page" deleted.
This saves you the WLAN router and you have a solution that connects itself.
Hello Marvin, you can At gphoto, set whether the pictures should stay on the camera.
I just posted the solution in Manuel's commentary.
Look in the gphoto issues on GitHub, otherwise open an issue accordingly.
I'll add that right in the tutorial above. When clicking on the QR image, only a white window appeared. Hello Michael, there are several problems with the QR code. here we are still looking for a solution.
50% discount on Skylum Luminar 4 plus 2 Premium Sky collections
Photo Booth makes it easy to access video and other media files. If you have deleted a video with the “X�� symbol in Photo Booth, you can restore videos from photo booth with the following command. And to do this data recovery experts recommend you to go for Remo Recover as it is integrated with effective data recovery modules. This software also developed with Smart Scan Engines and has the caliber to find lost and deleted files based on unique style. Try to select the 1200. Most of the time it runs with a different driver. A small change in print.php was necessary to print without a QR code. I would like to print the photos in full size without a QR code. It actually went best for me in the Edge. After a certain timeout, the page loads again (like pressing the Home button), but the Surface has problems with it. Where can I set the timeout?
0 notes
Text
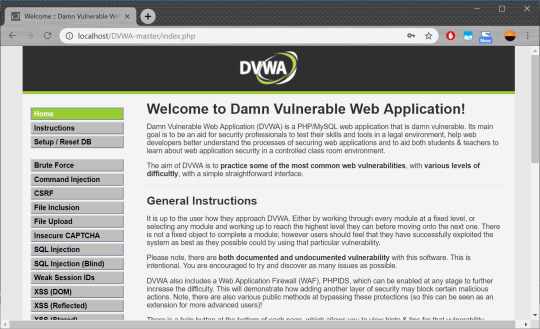
The Damn Vulnerable Web Application (DMVA) - Tuturial #1 - Intro + Installation
DSo I’m finally starting on my Something Awesome Project, with only 26 hours before I have to submit something yay :D. Shoutout to my tutor, Adam Smallhorn, whose advice gave me a clearer goal than before and guided me to this whole DVWA idea. Now onto the meaty stuff:
What is DMVA?
I think there is no better explanation for DMVA than their description on their website:
Damn Vulnerable Web App (DVWA) is a PHP/MySQL web application that is damn vulnerable. Its main goals are to be an aid for security professionals to test their skills and tools in a legal environment, help web developers better understand the processes of securing web applications and aid teachers/students to teach/learn web application security in a class room environment.
The DVWA is an ideal environment to legally test a whole wide range of attacks due to its numerous vulnerabilities. Additionally, you can change the security level to low, medium, high, or impossible, with each level offering a different level of difficulty.
Now since I am a simple student with almost zero practical experience in the field of security, I will be attempting the lowest/easiest difficulty. I will also try to post tutorial-like blogs for other students in the same boat as me, who might be trying these things for fun. I think the aim for these next couple of blogs will just be to see how far I can get trying through this DMVA.
Installation
This following section will cover the installation of DMVA on a Windows 10 PC using XAMPP web server
1. Download DMVA from their website http://www.dvwa.co.uk/
2. Download XAMPP here: https://www.apachefriends.org/download.html
3. Install XAMPP by running xampp-windows-xx-xx -installer.exe
4. Run the XAMPP Control Panel and Start the Apache and MySQL server. You can check that your server is running by typing \localhost into your web browser url.

5. (Optional) Delete everything inside the C:\xampp\htdocs folder. You dont need those for DVWA
6. Extract or Copy the files from the DVWA.zip file into the C:\xampp\htdocs folder.

7. Go back to your browser and refresh \localhost. You should now see something like this:

8. Now go C:\xampp\htdocs\DVWA-master\config and change the filename to “config.inc.php”
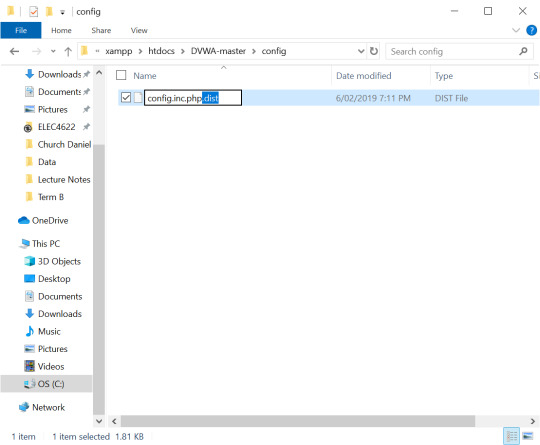
9. Your webpage should now look like this:

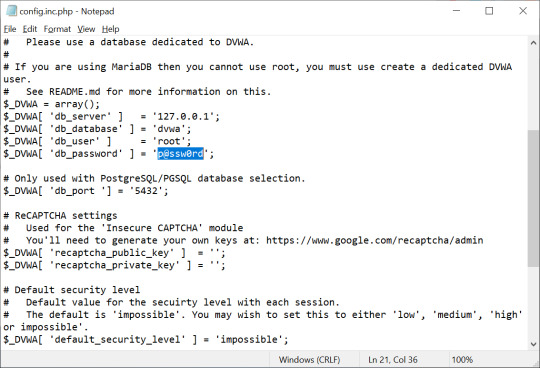
However, when you try to create a database at the bottom of the setup page, you will be faced with an error. Now you have to go back to your config.inc.php file, and open it with a text editor like notepad:
10. Find the password line and simply delete it so the line reads:
$_DVWA[ 'db_password' ] = '';
11. You should now be able to create a database. Simply login with
Username: admin
Password: password
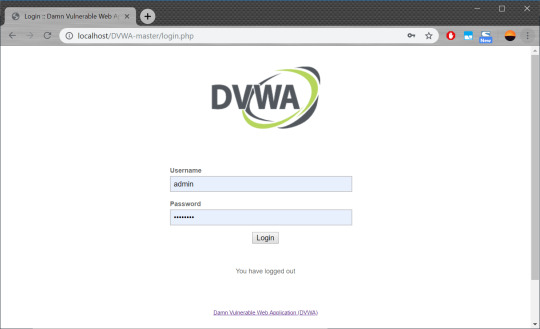
12. Voila! You’re in!
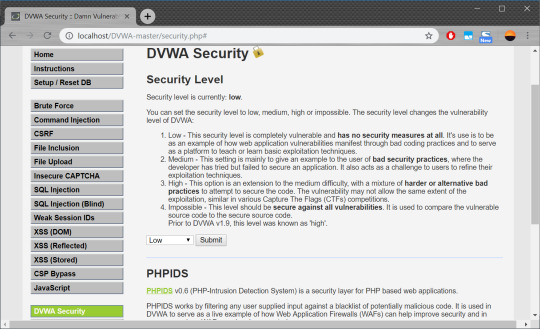
Optional: Change the Security Level
Do this by navigating to the DVWA Security Page, change the drop down box to ‘Low’ and press submit.
0 notes