#and i FINALLY figured out how to not make my pictures so small huzzah
Text


the dark divinity rides once again...
#... yea i had to try it. andi as odin rules so hard#no she hasn't been tempered by odin she IS odin. like ysayle transforming into shiva#i really wanna try and make this a major plot point for her and paris so i may rework her entire bio#i intentionally made things dark to draw attention to the cape and eyes#holminster switch has an Extremely different vibe if you change the skybox from 'everlasting light' to 'tension' btw#and i FINALLY figured out how to not make my pictures so small huzzah#this is a test run so it may look squished/blurry on other screens orz. i'll get better at proper vertical and landscape cropping eventuall#blood cw#q.#mygposes.#ffxivsnaps#gposers#ffxiv gpose#ffxiv oc#hyur
33 notes
·
View notes
Text


"I do it because I want to protect him from the world, and sometimes from myself. I want to tell him every secret I ever had, and yet I never want to make him choose, to see the hurt in his eyes, to put this, too, on him. I want-I want so many things. Sometimes, I just want."
Turning The Page by @queerofthedagger / art by @schweetheart
I started this fanARTifact in July 2021 and finally, finally finished it in September 2024. Click below to see so many more pictures and read probably too much about the project.
This project was a LABOR OF LOVE because y'all...I failed so, so many times during the making of it. I had grand dreams of all the things that I was going to do and learn and every single time I tried something it was like the universe telling me to go ahead and go fuck myself, we're not doing that. But it's done and I'm pleased with it. I hope Mona and Schweets are. Let's talk about the process.
I read this story back in July 2021 when it came out and immediately wrote @schweetheart on July 23, 2021 to ask if I could use her art for the back because it was such a crucial part of the story.

She graciously allowed me to use it, and even sent me a high res file so I could have the portrait of Arthur printed on art paper.

THEN. My brilliantly stupid self decided that just making the book wasn't enough. I mean, I had already done that for Arthur's journal back in 2020 and I am nothing if not a nutter about learning to do new things, especially for my fanARTifact series.
SO. I'm going to learn to make paper. Yeah. Totally a reasonable escalation in terms of new skills, right?? ......... Nope. I bought a small 5x7 mould and deckle to practice with and some cotton linters to make the pulp. Twas. A. Failure. I didn't have a press or the felts or the sizing needed to make the paper actually, ya know, usable. This was the first time I put the project down for a while.
Moving on to another new skill in late 2021, I decided that I wanted to make the walnut ink myself. Luckily, I was part of a pigment subscription in 2020 (that is a hell of a nerdy statement, even for me) and had all the supplies in my art studio to attempt this endeavor.


I didn't fail this part! Fucking huzzah for small miracles. Now I had two small bottles of black walnut ink to use for the calligraphy that I wanted to do for some of the excerpts. Except now I was stuck again on the paper making part so I put it back down again for an eternity.
Picking it back up in late 2022, I asked Mr. Highlynerdy to make a custom size mould and deckle for me so I could have long pieces to fold for my signatures. It was his first time doing anything like this but he's a buddy and a pal and gave it a try. Surprising no one if you've read this far, we both failed this part. Even now, I'm still not sure we succeeded but eventually we did get something workable. And considering professional mould and deckles cost in the hundreds of dollars...yeah, it'll do.
It took a hot ass minute for me to feel ready to attempt the paper making again but once I was ready, I ordered wet, pre-beaten pulp from Twinrocker. A very curt man on the phone helped me figure out what I needed and added internal sizing to the pulp I ordered. I didn't take pictures of any of the paper stuff because it was very messy and annoying. Once again, Mr. Highlynerdy helped me rig up a drying box with tri-wall cardboard and ratchet straps and a box fan. Once the paper was dry, I used a gelatin mixture to paint on external sizing. Since I'm primarily a painter, I needed the paper to be able to handle ink, paint, pencil. Sizing paper is the only way to do this, but no worries, I won't go further into the nerdy details about this.
Once the paper was ready, I decided to sew the text block. Here's another part where I failed YET A-FUCKING-GAIN. I talked before on Arthur's Journal post about how books were very, very rare in the 6th century (Arthurian period), but BBC Merlin is soooooo anachronistic that it's fiiiiiine to just do what I wanted. HOWEVER. I did want to try to do visible spine binding. But. Unfortunately I had gone ahead and used all of my paper to bind the text block as if I was going to case it in. FUUUUUUUCCCCCK. It's fine. We're fine. Come on, brain. What can we do.
Well, what we CAN'T do is use a piece of leather from my large remnant that I bought for my first journal because someone - FUCKING ME - measured and cut the last piece NOT TAKING INTO ACCOUNT THE WIDTH of the text block. So now it doesn't fit. And refusing to buy a new piece of leather I'm forced to pivot once again.


I decided to cut the leather spine even shorter, buy some wood pieces and sand them, paint them a matte black, and then glue the leather to those pieces. Cool cool cool. We're moving on. I tested a lot of different glues for this and good ol' super glue ended up being the clear winner. Cue putting this project away again for a whiiiillle.
In October 2023, I decided to pull it out again and do the calligraphy and drawings I wanted. This story has so many gorgeous parts but I finally decided on the first page, the last page, and the page about Gaius.
I mixed my handmade walnut ink with my beloved Finetec gold and used the quills I bought from John Neal Booksellers to practice my Uncial. I shouldn't have been rusty after lettering an entire fic for this fanARTifact, but I was.

The little dragon was inspired by medieval manuscript dragons I found.


Narratively, I loved the idea that Merlin's writing would start off soft and delicate and become stronger by the end of the journal. Also, I loved that the end word "WANT" would be just gold because the ink blend changes throughout. Something magical or whatever.

This part needed tears. They might have been real ones...
Annnnnnnnd, the project was put down again until a few days ago when I decided, after getting back into Merlin fic, I needed to buck up and finish it.

I did so many tests for the cover. I tried embossing, carving, and debossing and hated all of them. I settled on painting it with acrylic paints in the shape of a Celtic knot sort of pattern. I originally wanted to do a triskelion but after reading a bit about how some asshole groups have co-opted the symbol for shitty purposes, I decided against it. It's a mix of black and gold and it's hard to capture the depth of it through photos...eh, I did what I could.

Still. Something wasn't quite working with the brown leather and the black covers with the new symbol so I broke out my matte black leather paint and decided to go all black.

All I had left to do was glue in the text block and it would be done! And that still took me a few days to work up the courage. The book opens nice and flat, which will be good for me as I will use it as a sketchbook.
Sitting here, on September 1st, I have completed a project that taught me many new skills and also taught me a lot about humility and perseverance. There was no way I was going to abandon this project, and maybe I should have started over many of the times, but I am quite in love with the final result and I just hope that it does it's inspiration proud. Thank you @queerofthedagger Mona for all you create and share with the Merlin fandom, and thank you @schweetheart for allowing me to use your gorgeous art.

Also, you may see quite a few other fanARTifacts in this photoshoot because I will use any opportunity to show them off lol.

If you read to the end of this, you deserve a cocktail and a cookie. Thank you. 💛✨✨
#fanARTifact#fanARTifacts#merlin#bbc merlin#bookbinding#merlin fan art#handmade books#ficbinding#fanbinding#calligraphy#uncial#hand lettering#arthur pendragon#i really need to proofread this one more time...#but i have been on the computer for over three hours editing photos and writing this#i hope you love it mona#queerofthedagger#schweetheart#i have now made a book for arthur and merlin#and a scarf for arthur and merlin lol
124 notes
·
View notes
Text
RANDOM - Banana Fish Review, Vol. 1, Part Four

(This was one of my fav gifs looking for gifs of Shorter.)
*There will be pictures/gifs included tomorrow, because this is already late & loading them is taking forever, for some reason.
Haha, no, I actually prettied it up 1/5/21. Yes, I’m glorious.

No I’m actually Dio DIO in this situation, who am I kidding.
(This transition from Caesar to Dio fascinates me, by the way.) (The GIF.)
The JOJO reference is because I’ve finally finished Diamond is Unbreakable! It was fun! I enjoyed it a lot! Ready for the next part!
But back to Banana Fish.
Hope you enjoy this!
So my plans failed again. Who is surprised? (Not me.)

I apologize profusely for the gaping void of Banana Fish-ness left since last I posted.

No really. I now have an alarm set for every Wednesday.
Let’s see how this goes. News Update: Maybe next time.
Also, my internet is still blitzy & rotten, otherwise I would’ve posted this yesterday (the 15th).
Now on to the in-depth, delighted gushing - er, review, of Banana Fish!
*Also, this is part 4, and 4 is a special number for me. Because of this guy:

And I can spell his name correctly!!! (It’s Ulquiorra, from Bleach, my 1st anime fan gushing love.)
Yes, I’m strange. Moving on.
So, brief recap, since I’m not sure anyone has read Part 3, given how terrifyingly long it is. If you missed it, here’s the link:
https://imagine-fight-write.tumblr.com/post/632014616404344832/random-banana-fish-review-vol-1-part-3-my
Please love & like it & repost to the rest of the Web. I worked tremendously hard on it.
Yes it’s long, but oh, it was delightful! There was snark! Delicious food! Wine! Fabulous mustaches! Mysteries! I gushed so much!

(And snarled at the wonton waste of good breakfast food, which I will not forget & always condemn.)

*I mean, I know people who will throw up if they have breakfast in the morning. But it’s important to eat so you have energy to do things & feel good.

And Dino took a perfectly beautiful breakfast & essentially wasted it for no good reason. I was so mad.
We meet Dino Golzine, a.k.a., Ash’s worst nemesis /enemy (note, I can’t spell nemesis) and major reason for why his life sucks.

(Although society doesn’t help either. Though the police try. They really do. Except what’s his face who’s complete scum & thoughtless, but we won’t meet him til Vol. 2. Plus I don’t think he has a name?)
But yes, Dino Golzine. All around awful person, and not safe around children (or anyone, really.) He’s low-key in this scene, mostly using verbal assaults (to great effect) but just you wait. There’s a reason he’s a mob boss.
Ash snarks, to great effect, but he’s no match. Dino has all the cards and all the dice (cards & dice being metaphors for power, & how he involves awful, painful memories of Ash’s past & tries to manipulate & order him around. Brrr.)
But Ash rallies, and ultimately refuses returning to be Dino’s heir / toy.
We meet Shorter! Huzzah!
(End of recap.)

It’s clear right away Shorter & Ash are old friends. They exchange quips about Marvin. We learn Marvin holds a mean grudge, so savvy readers can guess it’ll come to play later (it does.)
Shorter’s last line is strange.
“Just don’t put me in the position of having to kill you.”

Which is kinda out of the blue. I don’t know what to make of it. It doesn’t spoil or fore-shadow anything (unless in a very confused, round-about way) because that never happens later. So I’m confused.
Ash laughs it off and goes zooming off on his motor-bike / motorcycle (not sure which).

Note, from this short scene we already learn Shorter has his own sources of information - he knows Ash went to Dino’s, fast enough to be there before their conversation ended (unless he was just lucky to be there already - why was he there?). He already knows about Ash’s talk with Marvin, with enough detail to warn Ash about Marvin’s temper & that Marvin likes him, which is a bad combination.
Shorter is smart & cares about his friends, warning Ash about Marvin.
Aren’t friends great?
Especially after meeting such a dominating if soft spoken monster like Dino?
The answer is yes.

Next, we get this hilariously great shot of Ash running up the steps to his dingy apartment (pg. 47.)
It’s reminiscent for me of a scene in JoJo’s Bizarre Adventure, Part 1, when Jonathan & Dino have their epic fight in the Joestar mansion.

There’s a part where Jonathan does this epic flip up to a second floor via sword (it’s epic) & it ends with this a few-seconds-longer-than it-needs-to-be shot of his butt. You can’t miss it. I’m usually oblivious to such things & I noticed it. I laugh every single time.

Anyway, back to Banana Fish.
(The atmosphere of grunginess (it’s not a word, I meant dirty, ugly, rough) & spartan furniture is great. Just look at those walls. I adore it.

(But would never want to live there.) Ash is clearly not rich & after Dino’s rich mansion, this is a stark contrast.

Also, there are no pictures or posters on the walls (which are festooned with dirt and cracks instead.) In fact, there’s almost nothing in terms of personal effects at all.
This baffles me. I mean yes, I assume they’re all dirt poor, living in a gang & working for the mafia on the side isn’t something you do for the luxuries. But surely they’d have something.

Or maybe it has something to do with Japanese decorating aesthetics? Meaning, Japanese appear to be more spartan than Americans in terms of decor (see the book, In Praise of Shadows, for example.)
* I can’t spell aesthetics. Why do I even use that word?
The apartment just looks extremely bare compared to others I’ve seen in movies depicting this era. Is what I’m saying.

Look at those bare walls. (It hurts me.)
Thoughts? Comments on how Japanese, Americans, and Europeans differ in basic decorating styles? Comment below!
Also remember as always, Banana Fish is both set & was written in the 1980’s, well before the “modern” style we have now.
Unless - wait. There is something very important to Ash which he’s clearly hiding in the apartment he goes to, which I assume only Skip & select members know about.
So maybe this isn’t actually Ash’s main base, where he sleeps & hangs out?
Yes, that must be it.
If you’re confused, I’ll explain once we get done with this section.
Moving on.
We meet Skip!!!! (Pg.47)

Black characters (and Latino) are still, alas, extremely rare in manga, anime, & other media, so all the cheers for including Skip so early & as such an important character.
Because Skip is very important. For multiple reasons. More on that later. Also note, 1 of the gang members Ash busts earlier is also black.
Again, the dialogue is great here between Ash & Skip, establishing Ash’s trust in him. Which is no small thing.
Skip is like Shorter, (agh, both their names start with S) sweet, but also has a nose for news.
Arthur’s going to get it, hah!
There’s yet another reference to it being early.

Though there’s no specific time mentioned . . . Nope, not since Ash found the poor, dying banana fish dude.
Does Ash usually sleep in? Is he a night owl? He was wandering around at 1 in the morning last night, after all.
*Yes, technically it was early morning, but it was still dark, so bite me.
But then, he was also suspicious & keeping tabs on his 2 gang members. So, who knows.
But I’m going to guess he’s a night owl.

Ash sits on the bed, and after Skip mentions everything is good, “him, too”.
Ash gives his 1st real, genuine smile. Gentle, relieved, no hard edges. Just pure happiness & relief. It’s sweet.
(Also, I just realized the “him, too” is supposed to be a surprise / shock for the reader & I spoiled it earlier. I do apologize.)

Skip offers to get coffee but Ash declines, deciding to nap, which reminds me:
Actually, drinking coffee before you take a nap can, for some people, actually make you sleep better.
Also, short cat naps (15-30mins) can boost your energy and mood.
Naps are good for you!

I almost wondered if the comics Skip had on the table might’ve been manga, but remembered it was the 1980’s and, far as I know, manga wasn’t big the U.S. yet. Alas!
Which is funny if you think about this being in a manga.

Skip goes to leave. Ash puts his hand in his pocket and gets this intense, almost fierce expression on his face (middle panel, pg. 48).
I was absolutely baffled by this reaction for a long time, but finally figured it out. Ash’s reaction is supposed to be baffling, because what he realizes right here will be revealed in the next few pages.
Skip, concerned, asks what’s up, but Ash brushes him off and sends him off to buy coffee. (After which I sincerely hope he takes a nap, because he needs one, he’s been up all night.) Sleep is good for you!
Skip is able to buy coffee with a single coin. A single coin.

(Sorry, I couldn’t resist.)
All my tears, and curses on inflation and overpriced coffee! And Starbucks!

Anyway, we learn Arthur’s going to get it (and Skip is the best spy ever) and the scene cuts to:
Our favorite person (not) Dino Golzine, tending his orchids.

I like this. It’s a rather unique hobby for a villian. I assume to give him a refined, elegant, and exact air.
He’s interrupted by Angie & his fabulous mustache (snickers) and this delightfully comic scientist person (who might be important later? The face sameness makes it difficult to judge, & I’m too lazy to consult my other volumes, which are not close by.)
But his entrance is priceless (pg. 50). I mean seriously, please go find it if you haven’t already. It’s dramatic, with a big WHAM! & he looks so cartoonish.
I love it.
Dino tells him, essentially, “don’t disturb my orchids” and me being an non-gardner person, I wonder: is it actually true loud noises can disturb flowers?

Comment below!
Anyway, Dino quickly establishes yes, he did send Ash’s gang members to kill the poor banana fish guy who started this whole mystery, and yes, it was important.
There’s a great panel (pg. 51) of scientist dude, drawn much less comedic, the whole panel black except for a white aura around him sweating and clearly in distress.
He whispers, “It - it’s gone.”
Dino snaps to attention with a leonine look, exactly like a cat who has just spotted another cat. It’s easily my favorite picture of Dino so far, very striking.

The dialogue is brilliant and snappy, short and direct.
“What is gone? . . . You’re positive? . . . Just a small amount.”
And we get the grand reveal:
Ash, taking out a bullet shaped capsule (was the shape intentional by Yoshida?). A capsule he’d clearly taken from the dying banana fish guy. There’s a great panel on the bottom of pg. 52 of Ash’s questioning expression and a ?
He unscrews the capsule and pulls out a tiny vial.
Thinks of the address the dying banana fish guy gave him.
Ash goes into the next room, where we see the silhouette of someone sitting with a plaid blanket draped across their knees.
He expresses his first real look of vulnerability, and gives a wonderful line:
“Go see . . . Banana fish . . . He said it and died. And you say it and you might as well be dead. Who did this to you? Griff . . . Please tell me, big brother.”
Everything clicks together (almost.)
Griff /Griffin is the soldier shown way back in the very beginning. The one who left for a few minutes and came back insane and shot up his squad.
Who’s now a human vegetable.
Banana fish is clearly responsible. Somehow.
And Dino is mixed in with it (of course). Pieces are coming together, but questions still remain.
Until next time!
#random#banana fish#banana fish review#manga#ash lynx#skip#banana fish shorter#friendship#xena warrior princess#JoJo's Bizarre Adventure
7 notes
·
View notes
Text
~ISEB in Japan: A Photo Journal~
If you’ve been following me on Twitter lately, you’ll know that I’ve been traveling through parts of Japan the last couple of weeks with my Ignis Play Arts Kai figure in tow. I posted a few pictures over there during the duration of my trip, but those barely scratched the surface of everything I got to do while in Japan. So I thought I’d put together a blog post of my journey while it was still fresh in my mind, featuring everyone’s favorite strategist in what I’ve been dubbing my Great Final Fantasy XV Adventure of 2019!

[Image-heavy content + commentary under the cut]
A brief backstory: I’ve wanted to go to Japan my entire adult life. For years, I’ve watched friends make the trek while I’ve been stuck at home with a severe case of FOMO. The only thing that ever stopped me from going was money (or a lack thereof), so I made the decision last summer to buckle down and sock away every dime I made to make it happen. My only concern before hopping on the plane was that I had missed the wave of FFXV popularity by about a year, but I would quickly learn that—other than not getting to eat any of Ignis’ recipes at the Square Enix Cafe—I had little to worry about.

Literally the only reason I brought my Play Arts Kai figure was so I could take this picture of Ignis at the Citadel (a.k.a. the Tokyo Metropolitan Government Building), which was the very first place I stopped at on my first full day in Tokyo. The building + the surrounding plaza, while not 100% accurate, is a fairly impressive facsimile of the one in the game. It’s located in Shinjuku, which also boasts a lot of similarities to Insomnia. Having finished Episode Ardyn mere hours before jetting off on my trip, it felt like I had stepped off the plane and right into the game!


There just so happened to be an Animate right near the Tokyo Metropolitan Government Building, so I popped in to get a feel for what kind of FFXV merch I’d be able to find two years after the game’s release and a year after its height of popularity. Turns out, there was quite a lot of swag to be found! Truth be told, I’ve never been one to chase down official merchandise (unfortunately my job doesn’t really afford that luxury), but I gave myself special permission while on vacation to buy anything I wanted. So I did! Including everything you see above. ^^;;

The next thing I did was take the train to Ginza to meet Lyle/@landscape-gonna (@landscape_gonna on Twitter), and I simply cannot say enough nice things about her. If you don’t know who she is, there’s a 99.9% chance you’ve seen at least one of her Ignis costumes, and they are A. M. A. Z. I. N. G. We had chatted a bit previously on Twitter before I went full-on stan mode, asking her if she'd be willing to meet up with me (a total stranger) to have lunch and talk Ignis and Final Fantasy. Not only did she say yes, but she gifted me with copies of her incredible cosplay zines and was not the least embarrassed when I busted out my Play Kai Arts figure in the middle of a busy Japanese dessert restaurant haha.

See? Zero embarrassment here.

We even did Noct’s ultimate pose! In public!
I can’t begin to articulate how special meeting Lyle was for me—being brought together from opposite sides of the world to share in our love for Ignis/FFXV is a memory I will cherish my entire life. So Lyle, if you are reading this: どうもありがとうございます ! ٩( ᐛ )( ᐖ )۶
Lyle wasn't the only friend I had in Japan. Another friend of mine, Asuka (who happens to be well-versed in anime/video game culture), volunteered to be my guide through Ikebukuro/Otome Road the next day. Quick otaku lesson: Kbooks is a chain of stores that specializes in the resale of licensed merchandise. For example, if you missed out on some of the limited availability items from the Movic and the Square Enix Cafe collaborations, you might be able to find them at a Kbooks. Otome Road in particular has something like seven different Kbook shops in a 3-block radius, each one specializing in different products (sports anime, idols, cosplay, etc). I, of course, beelined for the video game shop...
...which is where I found this fucking thing:

I’m not gonna lie, I almost bought it. I just didn’t know what I would do with it besides scare the living daylights out of people when they least expected it lol.

Yoooo Adam I found ya boi in Ikebukuro

We popped into the cosplay Kbooks shop since it was right across the street and I found an Ignis costume for sale! Please enjoy this picture of me pretending to come up with a new recipeh (since this is likely the closest I’ll ever come to cosplaying as Ignis).

One of the things Asuka introduced me to was Hanami (picnic under the cherry blossoms, basically). I had timed my trip to coincide with the blooming of the sakura, and the experience of being in Japan during that time was indescribable. I took a bajillion pictures of the sakura while I was there and unfortunately none of my photos ever quite captured the beauty and magic of them in person, but here’s a lil’ pic of a tree in bloom at Yoyogi Park (with the Movic Ignis charm I bought at Kbooks earlier that day).
Another item on my Japan checklist was to stay at a ryokan (traditional Japanese inn) in Hakone, a town famous for its onsen/hot springs. Nothing in Hakone is cheap (at least, not during peak sakura season), and I had spent an absurd amount of money on a night at one particular ryokan with a private bath (shy husband haha). The private bath could only be reserved in 30-minute increments, and by the time we finally rolled into Hakone the bath we wanted only had one slot available for the rest of the night. So what did I do?
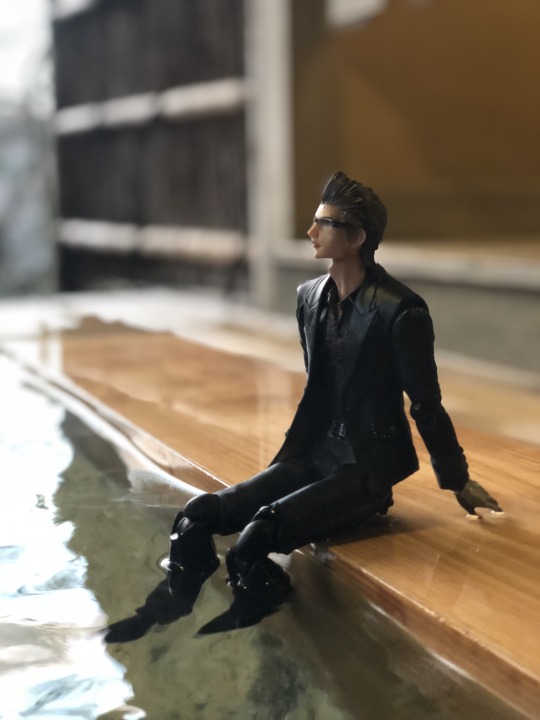
If you said, “Waste the first 15 minutes of your 30-minute, super-expensive onsen experience taking the perfect Ignis-in-a-hot-springs photo” then you would be absolutely correct lol.

I actually wasn’t planning on taking a bunch of photos of my Ignis figure on this trip, but after my husband tucked Ignis into my futon while I was in the bathroom, documenting my trip vicariously through Ignis ended up taking on a life of its own. ¯\_(ツ)_/¯

I popped back over to Tokyo after my stay in Hakone, which is when I finally got to make the Great Nerd Pilgrimage™ to the Square Enix Cafe! Had the FFXV collab been going on while I was there, I might’ve forked over the cash to eat at the cafe, but I opted to skip out on lunch so I could spend more money in their shop. They still had a small collection of FFXV merch...

...including this acrylic Ignis stand that I wanted but thought I would never own after failing to find it at Kbooks earlier in the week. Huzzah!

Also, I just feel the need to let everyone know that this is what the outside of the Square Enix Cafe in Tokyo looks like lmao.

Our next stop was Kyoto, which we arrived in on Gladio’s birthday (April 2nd). Unfortunately I didn’t have time to draw anything for his b-day, but we did stop for a Nissin Cup Noodle in honor of Gladio!


One of the most memorable moments of my trip was when this boating incident happened, and it requires a little bit of backstory. On my first full day in Kyoto, I attempted to field two of the most popular tourist destinations in Kyoto: the bamboo forest in Arashiyama, and the Fushimi Inari Shrine. Both places have their beauty and historical significance, and I suspect during the off-season are inspiring sites to behold. In my case, both places were absolutely swarming with tourists, which really put a damper on my enjoyment of them. Defeated, I followed a local canal back toward my hotel, which is where I spotted a miniature boat enthusiast controlling a boat that looked eerily similar to the Royal Vessel. I pulled my Ignis figure out with the intention of simply taking a photo of the boat in the background; when the man saw me holding my figure and fumbling with my phone, he flagged me over and gestured for me to put Ignis in the boat. I wish I had documented how it all went down a little better, but as I was literally wheezing with laughter, the above was the best I could capture.
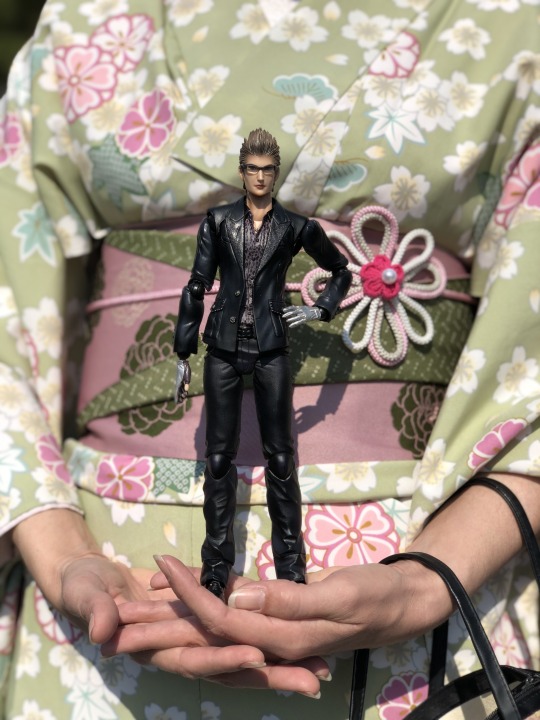
One of the more off-the-cuff decision I made was to dress in kimono for a day while in Gion (Kyoto). As the cherry blossoms were at their height during my stay there, you couldn’t sneeze without hitting someone who was dressed traditionally for the numerous festivals that were taking place throughout the city. As a white foreigner, I initially had reservations about wearing a kimono (for fear of cultural appropriation), but I did everything I could to be as respectful and reverent whilst wearing the garb (and the rental shop was certainly happy for the patronage). It was an amazing experience and I would definitely do it again!
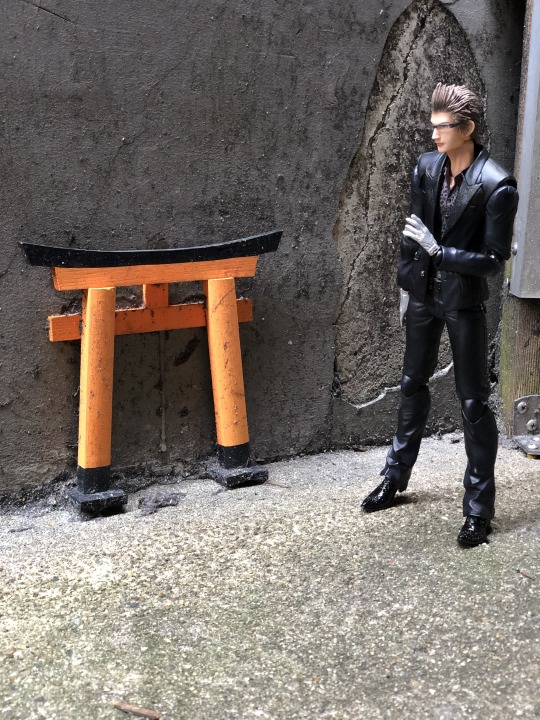
Speaking of being respectful, I made it a point not to take pictures of Ignis while visiting any shrines (because nothing screams ‘douchey American’ quite like whipping out an action figure on sacred grounds), hence why I don’t have pictures of any of the major shrines we visited in this post. I did, however, spot this miniature shrine arch in an alleyway, and thought it would be okay for my equally miniature strategist to pay his respects.
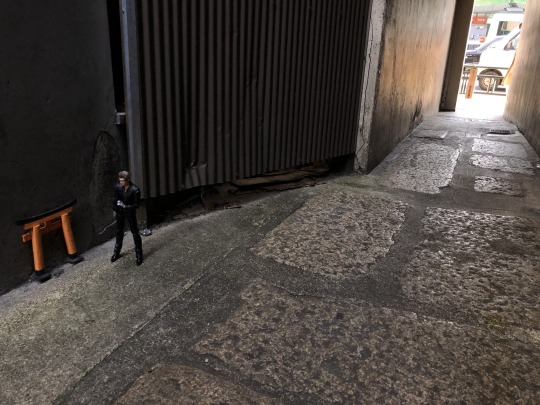
Literally, a tiny shrine in an alleyway. I suppose even alleys have their deities!

Osaka is about 20 minutes away from Kyoto by train, and since I had already traveled all the way out to Kyoto, I went the extra few miles to stop by the Square Enix Cafe in Osaka. They actually had a smaller selection of FFXV merch than the one in Tokyo and I didn’t end up buying anything, but I would’ve never stopped wondering if I had missed out on something if I hadn’t gone and seen it for myself!

My last day in Kyoto was a week into my trip, and I still had five days left to go. After walking ~10 miles every day (no joke, I have the GPS screenshots to prove it!), I was really starting to feel the grind. I’m sure Ignis was also desperate for an Ebony after being lugged around in the bottom of my purse for a week lol.

Back on the Shinkansen (bullet train) to Tokyo!

Weeeeeee (ノ^ヮ^)ノ*:・゚✧

Said hi to Fuji-san!

Stopped for a delicious matcha parfait! (Shout-out to my husband who never once got annoyed with me whenever I busted out my figure in public spaces lol)

This was without a doubt the craziest and most unexpected find of any of my merch runs. I had gone to the video game Kbooks in Ikebukuro earlier in the week and had sifted through all their Ignis merch with a fine-toothed comb. This particular Movic charm was one I had been on the lookout for, but it was a rare pull even when they were readily available a year ago, and the only Ignis charm I came across in my first trip to Kbooks was the normal Ignis one (see my Hanami pic). I had no real reason to return to Ikebukuro after I got back from Kyoto, but on a whim I went one last time and BAM—this guy was hanging out there in his lil’ baggie, just waiting for me to get my grubby little hands on him. Jackpot!

All in all, I spent way too much money and I couldn’t be happier for it. The only thing I couldn’t find for the life of me was the Ignis cologne by Movic, but after searching through several Animates and Kbooks, I began to suspect it might be an online-exclusive item that wasn’t available in stores. (Which was probably a good thing for me cause I was already stretching my budget to the limit by this point haha.)

On my last night in Japan, I went back to the Tokyo Metropolitan Government Building—only this time I went at night when it was all lit up! I also went up to the observation deck on the 45th floor (something I didn’t know you could do the first time I was there) and enjoyed a fantastic view of nighttime Insomnia Tokyo. It was the perfect bookend to a perfect trip, and my heart is absolutely overflowing right now with love for both Japan and Final Fantasy XV!
147 notes
·
View notes
Text
Finding Neverland: (9/?)
Summary: History has a funny way of repeating itself. Juliet Jones learns this the hard way as she finds herself thrown decades into the past, and tasked with ensuring that her parents fall in love. (CS movie redux)
Notes: My muse is back and so is this story! Huzzah! In this chapter, someone discovers the secret! But who?
Read on AO3.
Previous Chapters: [1] [2] [3] [4] [5] [6] [7] [8]
Chapter 9
Gideon doesn't sleep.
He can't, far too anxious about missing Juliet and derailing the timeline to calm himself. Normally when he can't sleep, he's read, but he doesn't have a book here. Besides, he thinks he might be too worried to even do that.
This is all my fault, he thinks, guilt coursing through his veins.
If he hadn't been stabbed during their fight with the Lost Boys, David might have been hit with an arrow. If he hadn't have disappeared after his fight with Juliet, she would still be here, safe and cuddled to his side, and they'd figure out how to fix this mess together.
Some hero.
Maybe that was why his grandmother had taken him all those years ago. Maybe he was destined to destroy things. So what if he didn't kill Emma all of those years ago? He'd completely altered the course of her life now.
He can't think like that. He can't. Drowning in self-pity will not bring Juliet back. It won't fix the timeline. Gideon presses the heels of his hands to his eyes, trying to force himself to think or not think. He'd take either at this point.
His hope for Hook's rum to dull his senses appears to have been in vain. He now wishes he had drank more. He'd be useless while drunk, but he's already fairly useless now that buzz is quickly disappearing.
He needs a plan. If he cannot sleep, he might as well plan. He tries to wrack his mind to recall just what had happened while everyone had been in Neverland. He'd relied on Juliet's knowledge of the events, and though he knows the big moments from this story, he does know the small, but also important, ones. As such, he finds himself wishing for a photographic memory and that he'd paid more attention to Henry's books in which he'd recounted the events.
Not that it would matter anyway. With the timeline already a disaster, Gideon isn't sure the even if he knew everything that events would play out as meant to.
Maybe it's a good thing Juliet doesn't know what has happened, Gideon thinks darkly. She'd be a nervous wreck knowing just how much her existence was a stake. An overly optimistic side of him hopes that by the time he's reunited with her, that maybe he will have fixed things. That way, the issue would have already been resolved by the time he tells her what happened.
"Hey, sweetheart, so your parents almost didn't get together, but no worries, I fixed it!"
Yeah. Right.
Fixing the timeline is something that they're going to have to do together. But how? He keeps circling back to that. Of course, Gideon knows this isn't the first time the timeline has been broken. There's a certain irony in the fact that Emma altered the course of her parents' romance, and now her own is being altered by her daughter and himself.
Fate. Destiny. Full circle.
He wants to scream. He wonders if this is how Emma felt when she learned she put her own existence at stake. If -- when -- they fix this, maybe he'll have to ask her. Gideon hopes that she will find humor in the situation. Maybe they all can start a club -- Juliet, her parents, and himself. Call it Time Traveller's Anonymous. They can compare notes for their adventures. He wonders if he and Juliet will get their pictures immortalized in Henry’s other book like Juliet’s parents had been. If they do, it won’t be nearly as romantic. It’s Neverland, and Gideon is certain that there isn’t a ball for his father–
His father.
His father helped Juliet’s parents find their way back home to where they belonged.
Maybe, just maybe, he can help them.
If Gideon can convince him to help. Would his father believe him if he showed up announcing that he was his son? Perhaps, but there is also a chance that the Rumplestiltskin here might believe him to be a trick by Pan. Leaving the group might also create problems in the future, should they think he deserted them.
But then Gideon thinks of Juliet, unsure of where she might be and what the future – if it still exists, might hold for her, for them.
His fathers has already saved the timeline one.
Gideon makes his decision.
-/-
"You have got to be kidding me."
The words come out without thought, and had she been considering the situation more carefully, Juliet might have said something different. She should have played her reaction cool, instead of sitting slack-jawed at the circumstances that have led to her being trapped with Neal fucking Cassidy. But instead, she says the first thing that comes out of her mouth.
"I'm really not," he tells her, and Juliet can tell by his tone that he's confused. Her response is not what he expected, not that she can blame him. With her eyes finally beginning to adjust to the dark, she can begin to make him out.
He's still a shadow, mostly, but then again he's always been. Henry's dad. Gideon's brother. Her mother's first love. Juliet barely knows what he looks like. She's seen him in old pictures – framed photos in her brother's and Gideon's parents' home, in her mother's box of memories –but she doubts she would recognize him on the street were he to suddenly appear.
But here he is, Neal Cassidy in the flesh.
One of the “good guys.”
But is he? He's the one who bailed on her mom because he was told to and the reason she had to set through many, many, many lectures on safe sex growing up. Her parents say he was a hero, but she doubts her father would have walked away if told to do so.
But it's Neal who is here, not her father. And right now she's supposed to be Juliet Of Verona, not Juliet Jones who knows about the man locked up beside her.
"Where are we?" she inquires, because that's something both Juliet of Verona and Juliet Jones would ask. Because, truthfully, she has no idea where she is, even if she has a sinking feeling for just how she got here.
"Not sure, actually."
"Well, you're helpful." Not. She tries tugging on whatever is binding her hands. If she can get them free, maybe can get herself out of here and find her family and Gideon. "Wait. Do you know if they brought a man to camp?"
Gideon had been missing before her blackout. If they had him...well, she's not sure what she could do. But being separated in the past isn't a good.
"I don't know."
"For one of the good guys, you're kind of useless."
"I don't know because they moved us," Neal huffs out. He's annoyed with her, and Juliet's annoyed with him...but also herself. Because how could she have been taken? She's not a damsel in distress. She refuses to be. But now she's trapped with her brother's dead dad in some dark place that she's apparently been moved to and--
"They moved us?"
"I just said that."
"To here? They moved you and me to here?"
"To this cave, yeah."
Juliet's stomach drops. She knows exactly where they are.
Echo Cave.
-/-
Gideon slinks through the forest. He keeps his footsteps light, hoping not to draw much attention from both the camp or any Lost Boys lurking in the forest.
Hook had been on watch when Gideon decided to leave. Getting around him had been a daunting prospect. Juliet’s father, both the past and future versions really, is far more discerning of a man than either of her grandparents. Gideon’s excuse of needing to relieve himself can only buy himself so much time before Hook alerts someone to go looking. At the very least, he finds some comfort in the fact that Emma hadn’t been on watch. Gideon is certain he would have tripped her lie detector somehow.
Gideon wonders if he possibly should have left a note, one explaining that he had gone searching for a way to find Juliet. That would have been the proper, heroic thing to do. But, he doubts that anyone would have let him go, whether out of distrust or concern for his own safety. Regardless of the might-have-beens or what-ifs, Gideon knows that nothing can stand between him and finding his father. As such, he needs to put as much distance between himself and the camp as possible. And then, quite possibly most importantly, figure out a way to find his father.
He fingers at the cuff around his wrist.
Not that he knows any tracker spells. He has the power, but not the skill. Besides, even if he did know how to use magic, he would still be breaking his personal vow. But if breaking his vow meant saving the life of the woman he loves and the future as he knows it, would it really be such a bad thing?
Is becoming the Dark One to save your son bad?
He jerks his hand away from his cuff as if it had scalded him.
He can, of course, attempt the method of just shouting his father’s name over and over again. Others have tried it, and succeeded. But his father might not answer, too concerned with saving his grandson to answer the call of a stranger. A stranger who is his son, but he doesn’t know that. Not yet, at least. To make matter worse, Gideon still needs to strategize a way to convince his father. He knows his father well enough to know that he can’t summon him without a plan, and he rakes his hair in frustration.
Then, he hears a snap of magic, and Gideon’s blood runs cold.
“Well, well, well, look who is far away from camp.”
Gideon turns to the voice behind him. He sees Pan leaning casually against a tree, his arms crossed in front of his chest. Gideon has never particularly wanted to meet his grandfather. Their encounter earlier, the one which nearly killed him, had been enough for enough lifetimes. This had not been the family reunion he had been hoping for, but the only upside to encountering his demon grandfather is that he at the very least had answers.
“Where’s Juliet?” Gideon asks, knowing he is in not position to make demands. He is weaponless, and Pan has his own magic and tricks.
“Not even a hello? Are there manners wherever it is that you come from?”
“Generally, it’s considered impolite to kidnap people, so pardon if I’m not the best example of conduct,” Gideon replies. He steels himself, standing taller in an attempt to look more imposing. “Now tell me where she is.”
“Locked up,” Pan replies with a smirk. “She’s quite pretty when she’s passed out.”
Gideon’s blood boils, and he balls his hands into fists. He’s tempted to reach for his cuff. His magic, though unrefined, might be able to distract Pan and give him a chance to escape. “Why’d you take her?”
“Why not?” Pan laughs. “Do you want her back?”
Gideon schools his features to keep from showing his surprise. He knows the stories. Pan lies. Pan tricks. He isn’t called a demon for nothing. “What’s the catch?”
“Catch? You don’t trust me?”
“You kidnapped my girlfriend,” Gideon replies in deadpan. “So tell me the catch.”
“You would think someone whose girlfriend who has been kidnapped wouldn’t be in position to be making demands,” Pan comments, pushing himself away from the tree and walking closer to Gideon. “It’s impressive, but stupid. Just want I need.”
“And what’s that?”
“I need you to kill Emma and her family, of course,” Pan answers as if it’s the most obvious answer in the world. “You see, they’re becoming rather insistent thorns in my side, and I very much would like them to go away. That’s where you come in, and in return, I will return your beloved Juliet.”
“And how would I kill them? I’m outnumbered,” Gideon says, playing along. Perhaps leading Pan to believe that he would actually agree to such a plan might buy him some time. At the very least, it might prevent Pan from trying to kill him. “And how would I know that you won’t hurt Juliet?”
“What sort of person would I be if I broke my deals?” Pan asks. Gideon suppresses an eye roll. What is it with his family and fucked up deals? “As for how you kill the Charmings, no worries, I have that taken care of.” With a wave of his hand, he produces a waterskin. “In here, is some of most potent poison in Neverland. It’s your job to ensure they ingest it.”
“You want me to spike their drinks?”
“Something like that,” Pan answers with a shrug. “Now, if you don’t feel comfortable doing this, I can make sure it ends up somewhere else. Perhaps in your beloved Juliet’s drink?”
“I’ll take it.” Gideon reaches out is hand, bristling at his grandfather’s – his fucking grandfather – threat. He hopes he is playing his role believably. He doesn’t have a plan for how to proceed next, just that he has to get his grandfather off his case now while also ensuring Juliet’s safety.
“Maybe you aren’t as stupid as I thought,” Pan comments, handing over the poison. “Now, best get on. If they aren’t dead in twelve hours, your lady love will be.”
And then, he disappears.
Gideon stares at the skin of poisoned water in his hand, feeling at a loss. He has no intention to carry out Pan’s request, but where does he go from here? To his father? Back to the camp to confess everything? A sense of dread befalls him, knowing that Pan will likely be keeping eyes on him. If he fails to do what was asked, Juliet might be even more in danger.
God, by trying to be a hero, he might have fucked it up even more.
Gideon closes his eyes, and hoping for a sign of what he should do. He stays like that, standing with his eyes screwed shut, for a long while, breathing and thinking and getting absolutely nowhere.
He needs to find Juliet. He needs to restore the timeline. He needs to find a way for them to return home.
He just feels at a lost for how to accomplish any of that. Even worse, when he opens his eyes, he finds himself staring down the pointed end of a blade, Captain Hook on the other side.
He doesn’t look happy or friendly. Instead, Juliet’s father looks out for blood – Gideon’s.
-/-
"We can't be here."
Juliet tugs at the constraints around her wrists. She has know way of knowing just what sort of knots were used or which enchantments Pan placed on the bindings. Years ago, her father trained her on the various ways to release herself from various traps – "You'll find out, Cygnet, that our family has a terrible penchant for being tied up." – but the lessons have faded in time and relied mostly on her being awake at the time she was bound.
But that's the least of her worries, at least for right now. Right now, her biggest priority is figuring out how to escape the cave before the rest of her family arrives, and either she or Gideon is forced to reveal the nature of their temporal displacement to the group at large. That many people knowing surely wouldn't be a good thing. Only Gideon's father knew about her parent's adventure at the time. Too many people knowing would surely increase the likelihood of something going wrong with the timeline. Besides, how would she and Gideon even begin to make them all forget them without wiping out memories from the entire Neverland mission.
"We really, really can't be here."
"You still haven't told me where here is," Henry's father replies. His voice remains annoyed, no longer holding the assuring tone he'd used when Juliet first woke.
Knowing that she has to provide an answer, she sighs. "Echo Cave."
"Shit." Right on, buddy, Juliet thinks. "Pan's trying to fuck with us."
"Looks like it." No wonder her father's always called Pan a demon.
Juliet can feel Neal's gaze as he studies her in the dark. She tries to shrink away from it, knowing no good could come from his scrutiny.
"So what did you do to have his sights set on you?"
"Come here," Juliet responds. It's close enough to the truth, at the very least. Though he doesn't have her mother's lie detector, Juliet knows by now it's better to weave a web of as few lies as possible. "My boyfriend and I fell through a portal, and ended up in Neverland. I don't think Pan liked that very much.”
"He doesn't like a lot of things. Trust me, I know," Neal replies, and he's back to sound reassuring again. "So you're boyfriend's the man you were asking about earlier?"
"Yeah." An image of Gideon hurt and sprawled on the ground flashes through her mind. She feel the familiar sting of tears at the thought, and wills them away. "He was hurt earlier, and I healed him. Pan saw, and I think he wanted to move me off the chessboard.”
"My son and the woman I love are both here," Neal tells her in an attempt to find common ground, Juliet is sure. She tries not to cringe at the way her refers to her mother, but it's a difficult thing. Despite objectively knowing her mother had precious loves like everyone else, Juliet's always perceived her father the one and only. Neal's words feel false, even if she knows deep down he means them. "The woman I love, Emma, she has magic like you."
"I know." The words come out before Juliet can think them through, and she wants to smack herself.
"You know?" She can hear the newfound suspicion in Neal's voice, because, of course, he would be suspicious. She has responded as Juliet Jones, the woman thinking fondly of her mother, and not Juliet of Verona, a stranger more or less. Juliet grapples for the right words, trying to explain her choice.
"I know her. She's here. I was with her. She's trying to find Henry." The words tumble out quickly. "We joined them. Strength in numbers, you know? We thought they could get us home."
Neal is quite for a long while. Juliet bites her lip, hoping she proved to be convincing. She's not sure how she would handle him seeing her enemy, especially once they reunite with the group. Of course, if they reunite with everyone, it likely means some time travel secrets have already been revealed.
"Pan's using us to distract them from rescuing Henry," Neal says suddenly, breaking his silence, "and he's hoping whatever secrets they have to reveal to save us messes with group dynamics long enough to delays us."
"You figured all of that out?" He's right, of course, but Juliet hadn't expected him to cotton on to Pan's plan so quickly. She's not sure why, other than picturing him as the antithesis to her father, but she's always envisioned him as being less than intelligent.
"It makes the most sense," Neal answers by way of explanation, "but what doesn't make sense is that you already figured that out."
"What do you mean?" Juliet asks. She does her best to keep her voice neutral, and hopes that he can't see her shake out of nervousness.
"You already knew what Echo Cave was, despite coming here fairly recently," Neal says slowly. She can see him ticking off his fingers, and Juliet feels a surge of annoyance that his hands aren't bound. It dissipates quickly as he continues on. "In fact, once you figured out where we were, you freaked out."
"Hook told me," she answers. Again, not a lie. Her father did explain the mechanics of Echo Cave to her years ago. "And revealing secrets isn't fun, so who would want that?"
"That's the point, though. You're freaked out about them revealing their deepest darkest secrets. Emma, her family, Hook, they're all strangers to you. Their secrets shouldn't matter."
"There's my boyfriend. Did you ever think I might be afraid about what he could be hiding from me?"
"You're too worried about his safety right now to be worried about his secrets."
"Multi-tasking is a thing, you know. A person can feel more than one emotion."
"Yeah, they can, but that's not it," Neal replies. "You're worried about them finding out something about you and your boyfriend. Which makes me wonder what it is."
"You're crazy."
"And right," Neal says. Juliet tugs tighter at her bindings. She's unsuccessful. "So my guess is that you've been lying to them about something. Your names. Where you came from. Who you're allied with."
"I am not lying about my allegiances."
"You didn't deny the other two."
Juliet narrows her eyes. Her heart is beating wildly in her chest, and she feels like vomiting. She's been caught, Neal knows it too. Juliet also knows that any further denials will likely lead him to believe that she's working for Pan, and a threat to Henry, which would be a very bad thing.
Well, once everyone gets here, they will all figure out the truth anyway, Juliet thinks. Assuming they don't think she and Gideon are villains from the future. Terminators or whatever her mother's mind would jump to.
What a terrible time traveler she is.
But that's when it hits her, the realization that everyone will know her secret eventually. Her parents. Her grandparents.
Neal.
And, well, he’s going to die soon anyway.
"Okay, Buddy, you want to know my secret?" she asks. She does her best to sound tough, formidable. "I'm a time traveler, and I'm from your future."
21 notes
·
View notes
Text
Birthday Message
Wow, this has got to be the shortest thing I’ve written in a long time. I said I’d write something short, and I did! Huzzah!
I got the idea from @otp-fanfic-ideas, so check out their blog if you want some cool ideas! I’ll reblog the one I used, shall I?
UsUk fanfic, 2,398 words.
It’s Alfred’s birthday today! Send him a birthday wish to let him know you’re thinking of him!
Yes, Arthur knew it was Alfred’s birthday. He didn’t need a Facebook notification to tell him that it was his crush’s birthday.
Furthermore, Arthur was always thinking of Alfred. Well, not always. That would be creepy and obsessive. Just enough times during the day to confirm that he did indeed have a crush on Alfred.
If he let Alfred know he was thinking of him, Alfred would know he had a huge-ass crush on him.
But Arthur needed to send him a birthday wish. Alfred was the type of guy who regularly updated his Facebook status, tagged people (mostly Arthur and Matthew) in stuff, posted pictures, the like. He’d consider the lack of a Facebook birthday message an insult.
So Arthur had to send him a birthday message.
The only thing was, he didn’t know how. Not literally; he knew what he had to do to post it, he just didn’t know what to write. Usually he just wrote a quick ‘Happy birthday, Alfred!’ and accompanied it with a picture of his favourite superhero or something, but he couldn’t do that on Alfred’s sixteenth! The sixteenth was special, and so the message had to be special!
Plus, there was the fact that Alfred had sent that birthday message that made his heart flutter and made him fall deeper in love.
Happy birthday, Artie! Sixteen now, bro! Just wanted to say that you’re a hella awesome friend and if I didn’t have you in my life it would be duller ‘cause I wouldn’t have your shining sarcasm to brighten it up! Not to mention your intelligence and sharp wit and all that stuff. Also, your writing abilities are mega-awesome and you’ve got the best imagination I’ve ever seen! So, y’know. Have a hella awesome birthday, and I’m really glad you’re my friend!!
Arthur could not send a simple ‘Happy birthday!’.
His fingers hovered over the keyboard, itching to type what he really wanted to say. He really wanted to tell Alfred what a brilliant person he was; tell him just how seeing his dazzling smile made Arthur’s day better; tell him how his laugh was wonderfully infectious, if loud and obnoxious; tell him about how addictive his shining optimism and hyperactivity were; tell him how his outrageous ideas were simply testament to how much of a genius he was; tell him that he was amazing in every sense of the word.
But that would be the same as typing ‘HAPPY BIRTHDAY ALFRED DID YOU KNOW I HAVE A MASSIVE CRUSH ON YOU?’.
So, no.
Sighing in frustration, he procrastinated by finding a good picture of Captain America that he could edit into a Happy Birthday e-card, and then once he found one he procrastinated even more by editing it. And this involved finding a suitable background, painstakingly cutting out the image of Steve Rogers, choosing the right colours and the right font, laying it out correctly, all of which took him an hour to do in total.
An hour later he had a perfect e-card, but no message.
Look, just write something which sounds like something you’d say!
Yeah, but do I use real me or hiding-a-crush me?
Use hiding-a-crush you, for God’s sake! Unless you want to tell him how you feel, which I REALLY don’t recommend. He’s gay, but not gay for you.
Shut up, I don’t need you to remind me!
Scowling, Arthur went back onto Facebook. Conversations with himself surrounding his crush always ended like that, with himself reminding him that he had no chance with Alfred. The boy was cheery, optimistic, sunny, dazzling. Why on Earth would he ever want to burden himself down with Arthur’s cynicism, pessimism, sarcasm, and bluntness? Being Alfred’s love was only a fantasy. A shining, brilliant fantasy.
After debating for about five minutes on what to write, he finally typed in something, uploaded his e-card, and hit send.
Arthur Kirkland > Alfred Foster Jones
Happy birthday, wanker. Now you’re sixteen years closer to death.
Satisfied, he switched off his laptop and began messing around on his phone, listening to music and scrolling through Tumblr and whatnot, his mind on other things. In a few hours he’d be going to Alfred’s and the two would be going to the ice-skating rink for his party, along with a few of their other friends who they’d meet there. He couldn’t wait to go to Alfred’s house, to sit with him on the bus, to skate with him, to have Alfred hold his hands as he taught Arthur how to skate, to fall into Alfred’s arms when he would end up tripping...
His notification tone rang out, effectively snapping him out of his wonderful daydream. Irritated, he checked his messages, and scoffed. Turned out it was Francis who’d texted him. Francis was his best friend, but he still didn’t approve of being texted by him when he was in the middle of imagining how Alfred’s strong arms would feel around him.
-Arthur what kind of birthday message was THAT
Arthur stared in confusion before he remembered that everyone could see his birthday message, not just Alfred.
-A fine one. Why do you ask?
-Arthur that was anything but fine you have a CRUSH on this boy why are you like this
Arthur scowled. A few months ago (on Arthur’s birthday, incidentally), Francis had figured out the object of Arthur’s affections when he’d caught sight of Arthur smiling and blushing uncontrollably in response to Alfred’s birthday message, and now he’d taken it upon himself to be his Romantic Advisor. His ‘advice’, however, always seemed to be along the lines of ‘hint until he figures it out’.
-Well, I’m not exactly going to give him a sappy message, am I? He’ll KNOW I like him if I do that!
-Mon DIEU Arthur! You’ll scare him off at this rate!
-Pfft, Alfred knows I wish him well. If he didn’t, he wouldn’t have stayed my friend all these years, would he? Honestly, I think sending a heartfelt message would scare him more.
-You are hopeless
Another notification tone rang out, and Arthur pulled down the drop-down menu to read it.
Alfred Foster Jones commented on your picture.
His birthday message popped up, and Arthur felt a little nervous as he scrolled to see what Alfred had said. Despite his words to Francis, there was still the small chance Alfred might take offence, especially considering the sweet birthday message he’d given Arthur.
Alfred Foster Jones
Haha love ya too british bastard 😂
Arthur let out a breath he didn’t know he’d been holding, and grinned like an idiot. Alfred hadn’t taken offence, and had even realised that he held him close to his heart.
He’d even said ‘love ya too’.
Arthur hid his face in his hands and did his best to refrain from gleefully jumping up and down, knowing he’d get all four of his brothers coming into his room and being nosy if he did so. So he contented himself with reading the comment over and over again (concentrating especially on the ‘love ya too’ part).
About five minutes later, Arthur’s notification tone rang out again, alerting him to a text that turned out to be from Alfred.
-Dude?
-You there?
Arthur hastened to respond. He didn’t much mind texts from Alfred.
-Yes, why?
The next text made his breath hitch and eyes go wide.
-Francis kinda told me you like me
Arthur felt himself burn with both anger and embarrassment. On the first day Francis had brought up his knowledge of Arthur’s crush Arthur had very explicitly told him not to tell Alfred. And what had the fucker done? God, Alfred probably thought him some sort of weirdo freak now. He wouldn’t want Arthur round at his house anymore, he would probably act awkward and uncomfortable around him now, they’d grow apart instead of closer –
-Wait wait wait dont go and chew francis out!!
Arthur scowled – that was exactly what he’d been planning on doing.
-Why ever should I not? The bastard frog’s embarrassed me.
-Cause youre gonna thank him!
He blinked, and furrowed his eyebrows. Was Alfred saying... What Arthur thought he was saying? Or was Arthur reading too far into it?
-What a ludicrous notion.
-Nah nah nah, its not ludicrous at all!
-Cause, er...
Arthur waited, his heart in his mouth. There was no way – Alfred couldn’t –
-I kinda like you too, Artie.
Alfred could.
Arthur’s eyes widened and a giddy, deliriously happy feeling took hold of him, making his heart beat a million times a minute and making him feel like he was soaring high above the world. He stared at the message until it was ingrained into his memory, not quite believing his luck.
Alfred liked him back.
Alfred liked him back.
These two years of desperately wanting Alfred to be his wasn’t for nothing, because Alfred liked him back.
-Artie?? You stil there??
-Yes.
The amount of restraint it took to not keyboard-smash an excited response was quite frankly astounding.
-So?
-Whaddaya say?
-*’What do [I] say’ to what?
-Pfft, grammar nerd 😝
-Anyway, WHADDAYA say to me asking you out?
Oh God.
Was Alfred trying to make him spontaneously combust with joy?
If he’d needed self-restraint before, he needed ten times the amount now. For God’s sake, Alfred had just asked Arthur out! Day after day Arthur had constructed scenarios in which they confessed to each other, but not once had it crossed his mind that it may actually have ended up happening.
Act cool, Arthur. Don’t freak him out.
-I say that’s a wonderful idea, and I’m inclined to respond with a ‘yes’.
Not two seconds later Alfred called him, and Arthur pressed ‘Accept’ only to be met with Alfred’s loud American voice screaming down the phone.
“OHMIGOD WE’RE DATING ARTIE WE’RE DATING HOLY SHIT YOU’RE MY BOYFRIEND OHMIGOD OHMIGOD OHMIGOD!”
Arthur could practically hear the wide smile stretched across Alfred’s face. What he wouldn’t give to see it...
“How long have you liked me?” Alfred asked excitedly. “It’s been ten months for me, ever since we went to Alton Towers together.”
“Tch, amateur,” Arthur said, although Alfred’s words made his heart go aflutter. Ten months. For ten months Alfred had liked him. However small a time that was compared to how long Arthur had been yearning for Alfred, it still made him smile uncontrollably. “Try two years.”
“Two years?!” He exclaimed. “How the heck did you survive?! I was going crazy with ten months!”
“You learn a few tricks, I guess. Namely, just act how you acted before developing the attraction.” God, Arthur didn’t know how he was keeping himself so calm when all he wanted to do was jump around with joy.
“I think it’s a good thing that I couldn’t hide it well, though,” Alfred mused.
“How come?”
“Well, Francis found me out. That’s why he told me that you like me, ‘cause he knew about five months ago that I like you. Oh, he also told me to tell you that the only reason he told me that you like me is because – er, what was it – oh, because you weren’t ever going to get the ball rolling, so he had to... Or something.”
It was surprising that Arthur even understood that.
He laughed, not having the will to be irritated at Francis anymore. The bloke had literally just gotten Arthur and Alfred to date – being annoyed at him would be criminal.
“Thank God you wear your heart on your sleeve, hm? I didn’t know how much longer I could take it,” Arthur said. Then, a thought suddenly struck him. “Oh, and I actually do wish you a happy birthday, by the way! I just... I wanted to give you a special message like you did for me, but I didn’t know how to go about it without revealing anything.”
“Oh yeah, that!” Alfred laughed in his wonderful way on the other side of the phone. “I knew you meant well, dude! And it was kinda cute.”
Arthur knew his face was beet red by this point, and he muttered, “Sh-shut up, it wasn’t cute.”
“Pfft, yeah it was! Anyway,” he said before Arthur could protest, “seeing as how we’re now boyfriend and boyfriend, do – d’ya wanna come round to mine now instead of later? If you’ve got other things to do that’s totally fine of course, I just wondered if-“
“Alfred,” Arthur interrupted, grinning. Alfred was a confident bloke, but it seemed that romantic stuff could turn him into a nervous wreck. Now that’s cute.
“I’d love to, Alfred.”
“C-cool!” He could sense that Alfred was relieved. “So, heh, I guess I’ll see you soon?”
“See you,” Arthur said, then hung up, grinning like a lovesick dork at his phone. And then he finally let it all out – all the excitement and euphoria and giddiness just burst out of him as he rolled off his bed and jumped and squealed all over his room, not caring when his brothers came barging in and saw him bouncing up and down like a hyperactive jack-in-the-box.
Alfred was his boyfriend.
His BOYFRIEND.
“What the hell’s gotten into you?” one of his brothers asked, looking truly confused.
“Alfred’s my boyfriend and I’m off to his house so if you don’t mind please get out I need to change, thanks!” Arthur shoved them out and began getting himself ready to go to Alfred’s, the ecstatic feeling not lessening in the slightest.
Ten minutes later he was zipping up his boots when his phone buzzed with a text from Francis.
-So are you going to change your Facebook relationship status yet?
-Alfie has
Arthur couldn’t scowl at Francis meddling in his love life, not after what he’d done.
-I suppose I’ll do it, then.
...Thanks, by the way.
-Always happy to help the romantically-inept 😘
He just knew that Francis was chuckling behind his phone, and so was Arthur. But Francis was right – he should update his relationship status. Alfred was a social media addict, even if Arthur wasn’t.
Arthur Kirkland went from being single to being in a relationship with Alfred Foster Jones.
Less than a minute later his phone buzzed again, this time with a Facebook notification.
Alfred Foster Jones
And I couldn't be happier!! 😆
Arthur smiled.
#aph usuk#UsUk#Fluff#Oneshot#My fanfic#gakuen hetalia#I guess#what else do i tag#i honestly have no idea#Cute#Fanfiction
79 notes
·
View notes
Text
Denver County Fair: Post-Morteum
So.
The Denver County Fair.
What. A. Bomb.
I don’t mean The Bomb. I mean a bomb. More on that in a minute. This was our first sales event. So unlike our initial soft “open” at Creative Mornings, here we offered the Instax for rent throughout each day of the Fair.
This event presented an opportunity to experiement with our presentation before we get ourselves into a kiosk on the Mall. Experimenting included both our table layout and the verbage of the sales pitch. Over the three days, we tweaked and tested the layout of materials, promos and stock changed. We also tried different ways of sharing about the camera and it’s price points. All of it was in an attempt to connect the right message with the right customer: SnapShotz is an instant camera rental company and you can rent a camera for today at the Fair.
Going into the event, we had a few of challenges:
CHALLENGES AT THE COUNTY FAIR
Venue: First off, the Denver County Fair is held at the Western Stock Show complex. The complex is design as both a convention center and a stock show performance arena. There are multiple buildings that house the elements of the fair. The only part outside is the carnival rides out in the large parking lot adjacent to the main hall. As a result, all the vendors, exhibitors and the exhibts are inside the concrete convention center.
Booth Location: Our inside location was on at the end of an aisle, right next to a couple of vendors promoting some local history museums. Across from us was the kids stage where they held the watermelon eating contest (among other things). Moving in, our booth location seemed promising.
Weather: As with all things Colorado, weather was a big issue. The County Fair took place over one of the hottest weekends this summer. Friday’s outside temperature exceeded 95 degrees F. On Saturday, we had back to back thunderstorms. And the swamp coolers blew out. Whelp. The humidity inside was as bad as outside. Sunday was the only remotely decent weather day of the whole weekend.
EXECUTION
Day One’s Set-Up:

This layout was pretty straight forward. Two banner signs--one with price information and the other explaining how it works--a small assortment of display merchandise, a groovy light-up sign that said “Rent Instax Here,” and rack cards and stickers placed across the table top.
To show people what was possible with the camera, we put out a bunch of photos that we took at the Fair. We also offered to take people’s picture for free, wrapping it in a cute little PhotoFlyer sticker I had printed up. That was a big hit...almost too big. Most people asked for the photo, had it taken, then walked away while it developed. And to make matters worse, kids would walk up, get their photo, then bring back a sibiling who wanted a photo too. Grr...not exactly what I had in mind for the freebie.
However, the biggest issue is that people thought we were just advertising the fact that we do event rentals. We can do event rentals, but the point is to get you to rent a camera for your adventure TODAY. Frustratingly, we didn’t get our first one until sometime around 4:30pm. Our second one of Friday came exactly five minutes later. Whoohoo! Those were our only sales for Friday. But it was Day One so I was happy we sold anything at all.
Day Two’s Set-Up:

This time, we went with one sign explaining how instant photography works, the same promo materials and light up sign and a whole big row of cameras out. Five of each color totatling 20 cameras on the table. Whoo! We changed the sign to say, “Get a free photo!” And we kept out the photos to display what was possible. And we also put a paper star that said, “rent me” on the table in front of the cameras.
This time, there was definitely interest in the cameras. But there was still a disconnect that we were renting cameras for the day. A number of people thought we were selling them (nope, sorry). But we did make a couple of good connections with other local businesses that want to bring instant photography to their venues. Thumbs up!
Because we didn’t use the sign saying how much it cost, folks had to ask us the rental price. This ended up being a good thing because only the folks truly interested asked us what it cost, meaning they had a higher likelihood of actually renting a camera. It weeded out folks who didn’t have any intention of buying so we didn’t have to try to sell them as hard. But, we didn’t have that many bites. Over all, we had two sales for the whole day. Ugh.
The lack of sales may have been influenced by the fact that we had two back to back thunderstorms on Saturday and the swamp cooler went out in the convention hall. Talk about muggy. And unhappy people. The carnival outside was shut down due to rain, so most people just walked around the stuffy and humid convention center trying to find fans. And the convention center is not exactly the most photogenic location in Denver.
The “Get a free photo” worked good. I think a lot of folks thought we were giving away the photos that we took, but the reality is that we wanted to give them a photo of themselves. The one’s that got it enjoyed their picture, but again, they just walked away with it after saying “thank you.”
Day Three’s Set-Up:

I flew solo on Sunday, meaning it was just me trying to make sales. I put cameras on both sides of the table with the banner in the middle. This sort of made me feel like I was hiding behind a shield, but having the cameras on both corners definitely brought interest. Everybody wanted to know if I was selling the cameras (again, no). I also limited the number of example photos on the table so folks didn’t think those were the freebies. And I changed the light up sign to say, “Take a free photo!”
That seemed to work better than “Get a free photo.” It encouraged others to interact with the camera and piqued curiosity to use the camera. That then opened the door to show how the camera worked which further gave me the opportunity to sell the camera.
Oh yeah. And I had a nice big “rent me!” star on my tabletop banner.
Again, I tried the trick of not posting the price anywhere. That strategy worked again as only the people truly interested in buying asked me how much it cost. But everyone snubbed their noses when I told them price. EVERYBODY. I had absolutely no sales on Sunday. That sucked. BIG TIME.
So...four sales in three days.
Yeah. A bomb.
Other Stuff That Happened At The Fair:
Apparently my bad sales were not an anomaly for the weekend. Every vendor that I talked to also had a dismal result of being at the Fair. Even the anchor vendors at the convention all, like the pizza and hamburger kiosks, were down 50% in revenue. That’s a really terrible return on the weekend for everybody.
Our location on the end cap ended up being a bad spot too. When folks passed us by, most of them were on their way out of the fair instead of coming in. The traffic route put us at the end of the road for most vendors, meaning that when people finally passed us, they all said, “Oh man! I wish I saw you earlier in the day!”
The Fair is a relatively new event in Denver. It’s only five or six years old and still trying to get it’s legs under it. So there’s hiccups and goof-ups that happen when an event is still trying to figure itself out. And I’m sure some of that played into the way things went over the whole weekend.
The Fair is also not very photogenic. Drab concrete interiors combined with fluorescent lights do not make for nice pictures. It doesn’t matter if it’s a picture of your kid with a face filled with food during the pie eating contest or if it’s the best of show prize turkey. Pictures like these suck, whether on your phone or on an instant photo. If the only photogenic area of your event is the carnival rides, who wants to rent a camera anyway?
RESULTS:
The Good:
First off, there was a LOT of interest for Take Your SnapShotz! The people that stopped by liked the idea and those that went through our entire sales process were definitely interested. And those that did rent a camera loved the experience. Hooray! Happy customers. Plus, I know I can sell cameras at retail if I want to in the future.
I also connected with a few other businesses in Denver that want to work with me and bring in Take Your SnapShotz for their events. Two are music related, one being a karaoke event and the other a DJ for a number of music venues. The third is a businessman hustling on a number of different projects. I sent them all follow up emails today. :)
And we had four sales. Sales verified that the idea is good! It means people WANT to rent cameras. One of my customers rented even though they owned a camera--but they had left it at home. That says something.
Also, the people that rented cameras are our target customers. Everything about the customer profile I identified was there. That means my targeting is correct. Huzzah.
The Ugly:
Throughout the weekend, we dealt with software issues between our rental database and our payment processor. Our barcode scanner occasionally decided to input numbers one by one, rather than reading the whole string at once. Somehow a kid pulled a camera off the table and on to the floor...despite the cameras being well away from the edge of the table. Thankfully it didn’t break (that dad was so relieved) so I’m not out a camera. But two of my other ones decided to have a shutter issue so I have to send those back to the manufacturer. Fantastic.
We had only four sales. Four sales is not even half of what we paid to be at the fair. Ouch. Also, four sales doesn’t boost your confidence that you have a good idea. The first day of the fair I wondered if the whole thing might be a bomb. A failure. Four sales feels like a failure.
TAKEAWAYS
Based on the consistent “nevermind,” response we got when concluding our sales pitch, is it possible that our price point is too high. The sell is easier when we mention the fact that the cameras retail at $70 at local camera stores and that the film is often $10 a pack of 10 pictures. From there, we say that the $25 rental includes a free pack of film.
There’s two ways we can change this. Either offer the rental as a “$15 camera rental with a $10 purchase of film,” or just drop the price down to $20 per rental. I’m not a fan of the latter. It makes the camera rental itself the equivalent of a $10 rental with a $10 pack of film. To me, that cheapens the camera too far.
When we do other events and festivals, we also need to do a better job at vetting the venue for pretty pictures, thinking for things like interior space and environment. My expectations of the fair were based on my childhood experiences at country fairs in rural parts of the United States. County fairs in a big city look very very different.
We definitely need a different rental database manager and payment processor. Our current process is far too cumbesome, requiring round trip from web browser to app to other app back to web browser. Combine this with a futzed up scanner and the margin for error is too wide. At the moment, a checkout process takes 5 minutes and sometimes even longer if the system goofs. This is just far too long for something that should be a scan and swipe.
And figuring out the retail side of things needs to happen sooner rather than later. I was expecting to add this kind of inventory further down the road, but based on all the interest we had this past weekend I think we can add this into our revenue stream much earlier. Yeah!
FOR OUR NEXT EVENT...
Crazy enough, our next event is this weekend. As in this Saturday. This time we’re going to the Colorado Dragon Boat Festival.
To tell you the truth, I was thinking that this past weekend at the Fair was borderline disaster, but after recapping all of this, I think I’m in a much better spot for Dragon Boat than I thought I was.
First off, we have a working pitch. I know how I want to arrange the table (for the most part) and I know how to entice folks to come and try the camera. My “schpeal” for how to sell the camera is comfortable. And I have a good idea of who’s going to buy my camera.
Also, I know that the Dragon Boat Festival is going to be much more interesting to photograph. Not only are we outside (yeah!) there’s all kinds of stuff to see. There’s three stages at the event, plus the boats races in the lake. It’s a colorful celebration of not just Chinese culture, but all Asia-Pacific cultures. Just from looking at the website I know there will be a lot more photo opportunities than at the County Fair.
And fun fact: this is The Year of the Pig in the Chinese Zodiac. Every vendor is encouraged to have something “pig themed” so that will lend itself to photos too. I want to get some pig-related items for a photobooth set at our tent. Because why not? And apparently, Pig Years are great to start businesses in.
We’re still going to go with our current rental payment processing software. I’m not happy about that, but I don’t have the time to find another resource. I spent far too much time last week trying to find an alternative and I’m just not doing that again.
And I intend to test the price point. If by the end of day Saturday things seem to be a sour puss, I can adapt the price to $20 on Sunday.
Something I have to remember is that all of this tweaking, testing and learning is essential to us launching a successful kiosk downtown. As frustrating as last weekend was, we learned valuable stuff. This weekend I can iterate on those lessons. Despite the disappointment, I’m glad we’re learning this stuff now before we have to do all this stuff full time downtown. It would be awful to have a grand opening and discover our payment processor has a fatal glitch. Or have our price point be too high.
0 notes
Text
The Beach House Has A Kitchen! Well, Kinda, Sorta…
Dude. We got things DONE this weekend at the beach house. And by that I mean, we showed up with a giant to-do list and only got about half of it checked off, but it really felt awesome after four days there (thanks to the kids having no school on Monday & Tuesday) to lock the door knowing that we’d knocked out a huge portion of the kitchen.
We still have to get a fridge and a dishwasher, add floating shelves around the stove, add a backsplash, do the toe kicks & quarter round down at the cabinet bases, and the island will have a larger counter with a sink in it and a 12″ overhang for the stools… but we are getting there! We actually have perimeter counters! I mean, they need to be screwed in and sealed, but they’re there! And we have working drawers (still need hardware) and a hood that’s hung up (that white part is just a protective cover, it’ll all be stainless once we peel that off). I love how everything I say is countered by a “but we still need to do blank!” But seriously, this kitchen progress feels pretty freaking exciting for us. Especially because just a little while ago it was looking more like this:
And back when we bought it last fall we were staring at a room that looked like this:
So…. progress!
And without further ado, here’s a video walk-through that we took right before we locked the door behind us yesterday. It’s full of all the what’s next & what’s changing info along with a bunch of explanations about the whole house as it has progressed since our last tour back in October. Note: If you’re viewing this post through a reader, you might have to click through to the actual post to see the video. And if for any reason you’re having an issue with the video loading here on our site, you can also view it here on YouTube.
Once again I’ll mention that I can fit a whole lot more words and info (and pictures!) into a video. Heck, a video is worth a million pictures! So that’s the best way to get all caught up and see/hear about what’s going on these days. But if you’re at work or somewhere that you can’t watch the video, here are some photos to tide you over.
The front bedroom is moving right along. We couldn’t fit the headboard in the packed car on the way out, so that’s coming (and we’ll also hang curtains to make that bed feel a lot more balanced and grounded in front of the window) but it’s really feeling super cozy in there now. Something magical happened when we moved the side tables from the back bedroom in and rolled out our new 8 x 10 rug. It’s 20% off on Serena & Lily right now – not sure how long that’ll last, but it’s so soft and it’s also indoor/outdoor so we love that we can hose it down outside and it’ll hopefully be super durable for the beach house.
As for the other sources in the room, there’s a mood board with links at the bottom of this post, so there you can find the bedding & lamp info, etc. And picture me cupping my hands around my mouth and shouting a resounding “yes, we’d love to!” to everyone asking us to build a “Shop Our Beach House” page like the one we have for our current house. We’re hoping to do that as things come together more – maybe within the next month or two.
We also got this 5 x 8′ rug (also on sale for just $258 right now) for the guest room, which is a pretty sandy color and is a hemp/cotton blend for a nice durable and beachy feeling. We’re realizing we’re drawn to a lot of blue things (hello, beach house… and also, hello, we love blue) so it’s nice to have some warm tones in the refinished wood doors & floors, the pink stove, and also in this warm textured rug. Gotta keep the balance so it doesn’t turn into the “I’m Blue Abadee Abadaaa” house (does anyone else remember that crazy song?! They were just taking nonsense right?!).
Speaking of blue, downstairs we also got this 8 x 10′ rug, which is a nice silvery gray-blue, especially on sunnier days (so sorry the video was filmed on the grayest of gray days – BOO!). We’re actually debating bringing this rug up to the back bedroom and perhaps getting something slightly warmer and less blue since the sofa sometimes reads like a deep denim blue, and again… there’s lots of blue here, so we want to make sure it doesn’t get overwhelming.
It’s a really nice plush rug though! Super soft feeling and the little X detail around the border is so cool. Looks way more expensive than it was for that large size in all wool. And yes, we still need a top for that coffee table and to paint and reupholster those crazy green chairs. Soon I hope!
And now let’s talk about the rug that didn’t work. As soon as we rolled this one out we were like “Uhhhhh, it’s really dark. And kinda crazy looking in here.” In the photo on the site it looked a lot more subtle and subdued, but in person it felt more chaotic than this picture even conveys. In person you couldn’t really pick up on the diagonal lines of the pattern, it just sort of looked like a rag rug with lots of randomly placed bumps in dark blue, and with the blue doors and the blue tub in the master… it was A LOT of blue (and not all the same tone of blue – the rug sort of clashed in person).
So although we gave ourselves a few days to live with it to see if it grew on us, the verdict was “we’re sending it back.” Again, this picture makes it look less busy. In person, it just didn’t work for us. Which is sad, because packaging and mailing back a rug is akin to running a triathlon for a 5’2″ gal like me.
So the little X-border rug from downstairs might come up here (it reads a lot more like a light silvery-gray) and then we have to find a good rug for the living room, but it helps that the three big rugs that we need for this house are all 8 x 10’s, which is nice for flexibility & swapping (you know I love to switch things around – a little too much probably).
The hall bathroom is still my favorite bathroom, and we actually found the perfect mirror for it, but alas, we couldn’t fit that in the car either, so we’ll have to hang it next time. We did manage to hang a shower curtain in there and caulk the tile edges (we finished caulking all the showers!). So pretty much all we need to complete this room is a toilet paper holder, a few towel hooks, and the easy small stuff. HUZZAH! Also need to hang the art and add window treatments so we can stop blocking the windows with cardboard while we’re there because that just doesn’t feel very classy you guys.
This is a terrible picture taken with the lights on during a super rainy day, but the master bathroom shower finally got glass! WAHOO! We worried that shower might feel tight, but thanks to getting this glass panel instead of a big bulky wall, it feel so bright and open in there! It actually feels just as big as the bigger hall shower which is around 6″ wider – so it’s funny how much your eyes play tricks on you when it comes to the actual perceived size of something. Still need a lot of stuff in here (I want a wooden stool by the tub, a few other hits of wood to add warmth, window treatments of course, towel hooks, etc). Slowly but surely…
But now let’s get back to the kitchen that we assembled from approximately 4,567 small parts with a single allen wrench.
Just kidding, it was slightly fewer parts and it actually didn’t involve a single allen wrench (go figure!), but it was sort of like a DIY marathon of snapping, drilling, hinging, hooking, and leveling things over a four day period.
As for why we opted for Ikea cabinets at the beach house, we’ve been really happy with the ones we put in our laundry room and our bonus room – and the budget called for something affordable since we’re also adding beds and furnishing a lot of other rooms at the same time. We even got to take advantage of Ikea’s spring kitchen event (yes we ordered all of this waaaay back then) to save some extra money. This entire kitchen – including the counters and sink! – came in around $3K, which is pretty dang amazing to me.
We’re lucky because some Ikea kitchens consist of 25+ cabinets and we only had 8 in here to assemble (and it helped that we had an extra long weekend thanks to those two additional days off of school for the kids). It also helped that we went pretty simple with the layout and the cabinet fronts since we want the pink stove and the pretty old architectural details in here (like the back staircase and the old glass-paned doors) to be the stars.
Speaking of that back door, yes we’re going to eventually paint it. We love the blue chippy door to the mudroom, which you can see in the video, but the back door just seems to look dirtier as the kitchen comes together more. And yes, we have to weatherstrip it because there’s a small gap. The light bounces off the floor and creates what looks like a much wider gap than the actual sliver of space under there, so we get “OMG CAN AN ANIMAL GET IN THERE?!” comments surprisingly often, but in reality it’s definitely not animal-sized. If it was, the whole weatherstripping thing would have been waaaay higher on the to-do list. Ha!
Getting back to the topic of kitchen assembly time, the fastest part was the counters by far. We measured ten times before we cut each one, and we taped them off to lessen the likelihood of splintering from the circular saw (which worked!). Lo and behold, we didn’t mess up a single cut! Each of the four counters we sliced and diced fit like a glove. We still have to screw them into place and seal them (and figure out the entire island – so there’s THAT) but we’re super relieved that our first go at cutting our own counters wasn’t too much trouble. Note: For more info about how we planned this kitchen, what exact items we ordered, and why the heck we chose butcher block, this post has all of those details for ya!
And as for the color of our butcher block, we got so lucky! It’s really close to the heart pine floor color, and we think when we seal them we’ll be even closer (they look a bit drier and less shiny than the floors right now, but only slightly).
So that, my friends, is what we’ve been up to at the beach house. Oh and the kitchen table came with those chairs from craigslist (the whole thing was $65 and the table has super cool legs that you can’t really see here) but we’re going to be switching the free chairs out for white ones since that feels like a super dark spot in the kitchen right now. And those chandeliers will be lowered around 10″ (they were installed higher so people wouldn’t run into them and break them while the house was being put back together & the floors were getting refinished). And we need a dishwasher. And a drawer for that space below the microwave. And a much bigger island counter with a sink in it. And art. And lots of stuff. But look, we have a half-functional kitchen!!!
A few other things we checked off the list were that I got to run around scraping stickers off all of the windows with a razor and then I cleaned them all (so SHINNNNY! – please sing that like the crab in Moana). I also got crazy with the spackle and basically filled every single ding and dent I could find (if you look super closely in the video you might see some of my patches that I have to sand and paint the next time we’re there). When the hood went up there was a little ding in the ceiling, so I wasted no time hopping up on the counter to fill that baby. PARKOUR!
I’ll leave you guys with this shot of the kitchen from the door, which is such a welcome change! No more pile of Ikea boxes sitting on the floor, mocking us and making us question our sanity/ability/time management skills.
And since we promised a big ol’ mood board full of sources, here’s the one we shared a couple of weeks ago along with with our new additions added below:
1. Living Room Art / 2. Kitchen Stool (similar) / 3. Chair Version of Kitchen Stools / 4. Front Bedroom Art / 5. Walls (SW White Heron) / 6. Downstairs Trim (SW Stone Isle) / 7. Upstairs Trim (SW Pure White) / 8. Tub & Pocket Doors (SW Riverway) / 9. Foyer Mirror / 10. Hall Bath Tile / 11. Hall Bath Vanity / 12. Downstairs Bath Mirror / 13. Downstairs Bath Vanity / 14. Master Bath Mirror / 15. Master Bedding / 16. Master Bedside Lamps / 17. Master Bedroom Art / 18. Master Bath Tile / 19. Master Bath Accent Tile / 20. Master Nightstands / 21. Hall Bedding
22. Leather Ottomans / 23. Hall Bedroom Art / 24. Extra-Long Waffle Shower Curtain / 25. Downstairs Bath Art / 26. Glass Shower Pane / 27. Pink Downstairs Lamps / 28. Hall Bedroom Blanket / 29. Front Bedroom Blanket / 30. Blue Front Bedroom Lamps / 31. Kitchen Counters / 32. Wood Benches / 33. Front Bedroom Pillow / 34. Kitchen Cabinets / 35. Front Bedroom Rug / 36. Living Room Rug / 37. Middle Bedroom Rug
And for anyone looking for lighting sources, here’s our mood board with that info:
1. Front Porch / 2. Downstairs Bath / 3. Kitchen Island / 4. Porch Numbers 5. Foyer (similar) / 6. Bedrooms / 7. Kitchen Sconces / 8. Living & Master Bath 9. Mudroom / 10. Clear, Soft White LED Bulbs / 11. Dining / 12. Master Bath 13. Hall Bath / 14. Hallway & Small Upstairs Rooms / 15. Under Stairs
And in perhaps the craziest news of all, on November 5th we got a completely unseasonably warm 70-degree day, so we actually all went to the beach and went swimming!
It was so crazy. The water felt perfectly refreshing! Of course now we’re back at home and this morning it was 40 degrees so bah humbug.
Psst – You can see more of our beach house adventure here (it’s a category full of posts about the entire process, which started over a year ago).
*This post contains affiliate links*
The post The Beach House Has A Kitchen! Well, Kinda, Sorta… appeared first on Young House Love.
The Beach House Has A Kitchen! Well, Kinda, Sorta… published first on http://ift.tt/2qxZz2j
0 notes
Text
The Beach House Has A Kitchen! Well, Kinda, Sorta…
Dude. We got things DONE this weekend at the beach house. And by that I mean, we showed up with a giant to-do list and only got about half of it checked off, but it really felt awesome after four days there (thanks to the kids having no school on Monday & Tuesday) to lock the door knowing that we’d knocked out a huge portion of the kitchen.
We still have to get a fridge and a dishwasher, add floating shelves around the stove, add a backsplash, do the toe kicks & quarter round down at the cabinet bases, and the island will have a larger counter with a sink in it and a 12″ overhang for the stools… but we are getting there! We actually have perimeter counters! I mean, they need to be screwed in and sealed, but they’re there! And we have working drawers (still need hardware) and a hood that’s hung up (that white part is just a protective cover, it’ll all be stainless once we peel that off). I love how everything I say is countered by a “but we still need to do blank!” But seriously, this kitchen progress feels pretty freaking exciting for us. Especially because just a little while ago it was looking more like this:
And back when we bought it last fall we were staring at a room that looked like this:
So…. progress!
And without further ado, here’s a video walk-through that we took right before we locked the door behind us yesterday. It’s full of all the what’s next & what’s changing info along with a bunch of explanations about the whole house as it has progressed since our last tour back in October. Note: If you’re viewing this post through a reader, you might have to click through to the actual post to see the video. And if for any reason you’re having an issue with the video loading here on our site, you can also view it here on YouTube.
Once again I’ll mention that I can fit a whole lot more words and info (and pictures!) into a video. Heck, a video is worth a million pictures! So that’s the best way to get all caught up and see/hear about what’s going on these days. But if you’re at work or somewhere that you can’t watch the video, here are some photos to tide you over.
The front bedroom is moving right along. We couldn’t fit the headboard in the packed car on the way out, so that’s coming (and we’ll also hang curtains to make that bed feel a lot more balanced and grounded in front of the window) but it’s really feeling super cozy in there now. Something magical happened when we moved the side tables from the back bedroom in and rolled out our new 8 x 10 rug. It’s 20% off on Serena & Lily right now – not sure how long that’ll last, but it’s so soft and it’s also indoor/outdoor so we love that we can hose it down outside and it’ll hopefully be super durable for the beach house.
As for the other sources in the room, there’s a mood board with links at the bottom of this post, so there you can find the bedding & lamp info, etc. And picture me cupping my hands around my mouth and shouting a resounding “yes, we’d love to!” to everyone asking us to build a “Shop Our Beach House” page like the one we have for our current house. We’re hoping to do that as things come together more – maybe within the next month or two.
We also got this 5 x 8′ rug (also on sale for just $258 right now) for the guest room, which is a pretty sandy color and is a hemp/cotton blend for a nice durable and beachy feeling. We’re realizing we’re drawn to a lot of blue things (hello, beach house… and also, hello, we love blue) so it’s nice to have some warm tones in the refinished wood doors & floors, the pink stove, and also in this warm textured rug. Gotta keep the balance so it doesn’t turn into the “I’m Blue Abadee Abadaaa” house (does anyone else remember that crazy song?! They were just taking nonsense right?!).
Speaking of blue, downstairs we also got this 8 x 10′ rug, which is a nice silvery gray-blue, especially on sunnier days (so sorry the video was filmed on the grayest of gray days – BOO!). We’re actually debating bringing this rug up to the back bedroom and perhaps getting something slightly warmer and less blue since the sofa sometimes reads like a deep denim blue, and again… there’s lots of blue here, so we want to make sure it doesn’t get overwhelming.
It’s a really nice plush rug though! Super soft feeling and the little X detail around the border is so cool. Looks way more expensive than it was for that large size in all wool. And yes, we still need a top for that coffee table and to paint and reupholster those crazy green chairs. Soon I hope!
And now let’s talk about the rug that didn’t work. As soon as we rolled this one out we were like “Uhhhhh, it’s really dark. And kinda crazy looking in here.” In the photo on the site it looked a lot more subtle and subdued, but in person it felt more chaotic than this picture even conveys. In person you couldn’t really pick up on the diagonal lines of the pattern, it just sort of looked like a rag rug with lots of randomly placed bumps in dark blue, and with the blue doors and the blue tub in the master… it was A LOT of blue (and not all the same tone of blue – the rug sort of clashed in person).
So although we gave ourselves a few days to live with it to see if it grew on us, the verdict was “we’re sending it back.” Again, this picture makes it look less busy. In person, it just didn’t work for us. Which is sad, because packaging and mailing back a rug is akin to running a triathlon for a 5’2″ gal like me.
So the little X-border rug from downstairs might come up here (it reads a lot more like a light silvery-gray) and then we have to find a good rug for the living room, but it helps that the three big rugs that we need for this house are all 8 x 10’s, which is nice for flexibility & swapping (you know I love to switch things around – a little too much probably).
The hall bathroom is still my favorite bathroom, and we actually found the perfect mirror for it, but alas, we couldn’t fit that in the car either, so we’ll have to hang it next time. We did manage to hang a shower curtain in there and caulk the tile edges (we finished caulking all the showers!). So pretty much all we need to complete this room is a toilet paper holder, a few towel hooks, and the easy small stuff. HUZZAH! Also need to hang the art and add window treatments so we can stop blocking the windows with cardboard while we’re there because that just doesn’t feel very classy you guys.
This is a terrible picture taken with the lights on during a super rainy day, but the master bathroom shower finally got glass! WAHOO! We worried that shower might feel tight, but thanks to getting this glass panel instead of a big bulky wall, it feel so bright and open in there! It actually feels just as big as the bigger hall shower which is around 6″ wider – so it’s funny how much your eyes play tricks on you when it comes to the actual perceived size of something. Still need a lot of stuff in here (I want a wooden stool by the tub, a few other hits of wood to add warmth, window treatments of course, towel hooks, etc). Slowly but surely…
But now let’s get back to the kitchen that we assembled from approximately 4,567 small parts with a single allen wrench.
Just kidding, it was slightly fewer parts and it actually didn’t involve a single allen wrench (go figure!), but it was sort of like a DIY marathon of snapping, drilling, hinging, hooking, and leveling things over a four day period.
As for why we opted for Ikea cabinets at the beach house, we’ve been really happy with the ones we put in our laundry room and our bonus room – and the budget called for something affordable since we’re also adding beds and furnishing a lot of other rooms at the same time. We even got to take advantage of Ikea’s spring kitchen event (yes we ordered all of this waaaay back then) to save some extra money. This entire kitchen – including the counters and sink! – came in around $3K, which is pretty dang amazing to me.
We’re lucky because some Ikea kitchens consist of 25+ cabinets and we only had 8 in here to assemble (and it helped that we had an extra long weekend thanks to those two additional days off of school for the kids). It also helped that we went pretty simple with the layout and the cabinet fronts since we want the pink stove and the pretty old architectural details in here (like the back staircase and the old glass-paned doors) to be the stars.
Speaking of that back door, yes we’re going to eventually paint it. We love the blue chippy door to the mudroom, which you can see in the video, but the back door just seems to look dirtier as the kitchen comes together more. And yes, we have to weatherstrip it because there’s a small gap. The light bounces off the floor and creates what looks like a much wider gap than the actual sliver of space under there, so we get “OMG CAN AN ANIMAL GET IN THERE?!” comments surprisingly often, but in reality it’s definitely not animal-sized. If it was, the whole weatherstripping thing would have been waaaay higher on the to-do list. Ha!
Getting back to the topic of kitchen assembly time, the fastest part was the counters by far. We measured ten times before we cut each one, and we taped them off to lessen the likelihood of splintering from the circular saw (which worked!). Lo and behold, we didn’t mess up a single cut! Each of the four counters we sliced and diced fit like a glove. We still have to screw them into place and seal them (and figure out the entire island – so there’s THAT) but we’re super relieved that our first go at cutting our own counters wasn’t too much trouble. Note: For more info about how we planned this kitchen, what exact items we ordered, and why the heck we chose butcher block, this post has all of those details for ya!
And as for the color of our butcher block, we got so lucky! It’s really close to the heart pine floor color, and we think when we seal them we’ll be even closer (they look a bit drier and less shiny than the floors right now, but only slightly).
So that, my friends, is what we’ve been up to at the beach house. Oh and the kitchen table came with those chairs from craigslist (the whole thing was $65 and the table has super cool legs that you can’t really see here) but we’re going to be switching the free chairs out for white ones since that feels like a super dark spot in the kitchen right now. And those chandeliers will be lowered around 10″ (they were installed higher so people wouldn’t run into them and break them while the house was being put back together & the floors were getting refinished). And we need a dishwasher. And a drawer for that space below the microwave. And a much bigger island counter with a sink in it. And art. And lots of stuff. But look, we have a half-functional kitchen!!!
A few other things we checked off the list were that I got to run around scraping stickers off all of the windows with a razor and then I cleaned them all (so SHINNNNY! – please sing that like the crab in Moana). I also got crazy with the spackle and basically filled every single ding and dent I could find (if you look super closely in the video you might see some of my patches that I have to sand and paint the next time we’re there). When the hood went up there was a little ding in the ceiling, so I wasted no time hopping up on the counter to fill that baby. PARKOUR!
I’ll leave you guys with this shot of the kitchen from the door, which is such a welcome change! No more pile of Ikea boxes sitting on the floor, mocking us and making us question our sanity/ability/time management skills.
And since we promised a big ol’ mood board full of sources, here’s the one we shared a couple of weeks ago along with with our new additions added below:
1. Living Room Art / 2. Kitchen Stool (similar) / 3. Chair Version of Kitchen Stools / 4. Front Bedroom Art / 5. Walls (SW White Heron) / 6. Downstairs Trim (SW Stone Isle) / 7. Upstairs Trim (SW Pure White) / 8. Tub & Pocket Doors (SW Riverway) / 9. Foyer Mirror / 10. Hall Bath Tile / 11. Hall Bath Vanity / 12. Downstairs Bath Mirror / 13. Downstairs Bath Vanity / 14. Master Bath Mirror / 15. Master Bedding / 16. Master Bedside Lamps / 17. Master Bedroom Art / 18. Master Bath Tile / 19. Master Bath Accent Tile / 20. Master Nightstands / 21. Hall Bedding
22. Leather Ottomans / 23. Hall Bedroom Art / 24. Extra-Long Waffle Shower Curtain / 25. Downstairs Bath Art / 26. Glass Shower Pane / 27. Pink Downstairs Lamps / 28. Hall Bedroom Blanket / 29. Front Bedroom Blanket / 30. Blue Front Bedroom Lamps / 31. Kitchen Counters / 32. Wood Benches / 33. Front Bedroom Pillow / 34. Kitchen Cabinets / 35. Front Bedroom Rug / 36. Living Room Rug / 37. Middle Bedroom Rug
And for anyone looking for lighting sources, here’s our mood board with that info:
1. Front Porch / 2. Downstairs Bath / 3. Kitchen Island / 4. Porch Numbers 5. Foyer (similar) / 6. Bedrooms / 7. Kitchen Sconces / 8. Living & Master Bath 9. Mudroom / 10. Clear, Soft White LED Bulbs / 11. Dining / 12. Master Bath 13. Hall Bath / 14. Hallway & Small Upstairs Rooms / 15. Under Stairs
And in perhaps the craziest news of all, on November 5th we got a completely unseasonably warm 70-degree day, so we actually all went to the beach and went swimming!
It was so crazy. The water felt perfectly refreshing! Of course now we’re back at home and this morning it was 40 degrees so bah humbug.
Psst – You can see more of our beach house adventure here (it’s a category full of posts about the entire process, which started over a year ago).
*This post contains affiliate links*
The post The Beach House Has A Kitchen! Well, Kinda, Sorta… appeared first on Young House Love.
The Beach House Has A Kitchen! Well, Kinda, Sorta… published first on http://ift.tt/2qCHnUt
0 notes
Text
The Beach House Has A Kitchen! Well, Kinda, Sorta…
Dude. We got things DONE this weekend at the beach house. And by that I mean, we showed up with a giant to-do list and only got about half of it checked off, but it really felt awesome after four days there (thanks to the kids having no school on Monday & Tuesday) to lock the door knowing that we’d knocked out a huge portion of the kitchen.
We still have to get a fridge and a dishwasher, add floating shelves around the stove, add a backsplash, do the toe kicks & quarter round down at the cabinet bases, and the island will have a larger counter with a sink in it and a 12″ overhang for the stools… but we are getting there! We actually have perimeter counters! I mean, they need to be screwed in and sealed, but they’re there! And we have working drawers (still need hardware) and a hood that’s hung up (that white part is just a protective cover, it’ll all be stainless once we peel that off). I love how everything I say is countered by a “but we still need to do blank!” But seriously, this kitchen progress feels pretty freaking exciting for us. Especially because just a little while ago it was looking more like this:
And back when we bought it last fall we were staring at a room that looked like this:
So…. progress!
And without further ado, here’s a video walk-through that we took right before we locked the door behind us yesterday. It’s full of all the what’s next & what’s changing info along with a bunch of explanations about the whole house as it has progressed since our last tour back in October. Note: If you’re viewing this post through a reader, you might have to click through to the actual post to see the video. And if for any reason you’re having an issue with the video loading here on our site, you can also view it here on YouTube.
Once again I’ll mention that I can fit a whole lot more words and info (and pictures!) into a video. Heck, a video is worth a million pictures! So that’s the best way to get all caught up and see/hear about what’s going on these days. But if you’re at work or somewhere that you can’t watch the video, here are some photos to tide you over.
The front bedroom is moving right along. We couldn’t fit the headboard in the packed car on the way out, so that’s coming (and we’ll also hang curtains to make that bed feel a lot more balanced and grounded in front of the window) but it’s really feeling super cozy in there now. Something magical happened when we moved the side tables from the back bedroom in and rolled out our new 8 x 10 rug. It’s 20% off on Serena & Lily right now – not sure how long that’ll last, but it’s so soft and it’s also indoor/outdoor so we love that we can hose it down outside and it’ll hopefully be super durable for the beach house.
As for the other sources in the room, there’s a mood board with links at the bottom of this post, so there you can find the bedding & lamp info, etc. And picture me cupping my hands around my mouth and shouting a resounding “yes, we’d love to!” to everyone asking us to build a “Shop Our Beach House” page like the one we have for our current house. We’re hoping to do that as things come together more – maybe within the next month or two.
We also got this 5 x 8′ rug (also on sale for just $258 right now) for the guest room, which is a pretty sandy color and is a hemp/cotton blend for a nice durable and beachy feeling. We’re realizing we’re drawn to a lot of blue things (hello, beach house… and also, hello, we love blue) so it’s nice to have some warm tones in the refinished wood doors & floors, the pink stove, and also in this warm textured rug. Gotta keep the balance so it doesn’t turn into the “I’m Blue Abadee Abadaaa” house (does anyone else remember that crazy song?! They were just taking nonsense right?!).
Speaking of blue, downstairs we also got this 8 x 10′ rug, which is a nice silvery gray-blue, especially on sunnier days (so sorry the video was filmed on the grayest of gray days – BOO!). We’re actually debating bringing this rug up to the back bedroom and perhaps getting something slightly warmer and less blue since the sofa sometimes reads like a deep denim blue, and again… there’s lots of blue here, so we want to make sure it doesn’t get overwhelming.
It’s a really nice plush rug though! Super soft feeling and the little X detail around the border is so cool. Looks way more expensive than it was for that large size in all wool. And yes, we still need a top for that coffee table and to paint and reupholster those crazy green chairs. Soon I hope!
And now let’s talk about the rug that didn’t work. As soon as we rolled this one out we were like “Uhhhhh, it’s really dark. And kinda crazy looking in here.” In the photo on the site it looked a lot more subtle and subdued, but in person it felt more chaotic than this picture even conveys. In person you couldn’t really pick up on the diagonal lines of the pattern, it just sort of looked like a rag rug with lots of randomly placed bumps in dark blue, and with the blue doors and the blue tub in the master… it was A LOT of blue (and not all the same tone of blue – the rug sort of clashed in person).
So although we gave ourselves a few days to live with it to see if it grew on us, the verdict was “we’re sending it back.” Again, this picture makes it look less busy. In person, it just didn’t work for us. Which is sad, because packaging and mailing back a rug is akin to running a triathlon for a 5’2″ gal like me.
So the little X-border rug from downstairs might come up here (it reads a lot more like a light silvery-gray) and then we have to find a good rug for the living room, but it helps that the three big rugs that we need for this house are all 8 x 10’s, which is nice for flexibility & swapping (you know I love to switch things around – a little too much probably).
The hall bathroom is still my favorite bathroom, and we actually found the perfect mirror for it, but alas, we couldn’t fit that in the car either, so we’ll have to hang it next time. We did manage to hang a shower curtain in there and caulk the tile edges (we finished caulking all the showers!). So pretty much all we need to complete this room is a toilet paper holder, a few towel hooks, and the easy small stuff. HUZZAH! Also need to hang the art and add window treatments so we can stop blocking the windows with cardboard while we’re there because that just doesn’t feel very classy you guys.
This is a terrible picture taken with the lights on during a super rainy day, but the master bathroom shower finally got glass! WAHOO! We worried that shower might feel tight, but thanks to getting this glass panel instead of a big bulky wall, it feel so bright and open in there! It actually feels just as big as the bigger hall shower which is around 6″ wider – so it’s funny how much your eyes play tricks on you when it comes to the actual perceived size of something. Still need a lot of stuff in here (I want a wooden stool by the tub, a few other hits of wood to add warmth, window treatments of course, towel hooks, etc). Slowly but surely…
But now let’s get back to the kitchen that we assembled from approximately 4,567 small parts with a single allen wrench.
Just kidding, it was slightly fewer parts and it actually didn’t involve a single allen wrench (go figure!), but it was sort of like a DIY marathon of snapping, drilling, hinging, hooking, and leveling things over a four day period.
As for why we opted for Ikea cabinets at the beach house, we’ve been really happy with the ones we put in our laundry room and our bonus room – and the budget called for something affordable since we’re also adding beds and furnishing a lot of other rooms at the same time. We even got to take advantage of Ikea’s spring kitchen event (yes we ordered all of this waaaay back then) to save some extra money. This entire kitchen – including the counters and sink! – came in around $3K, which is pretty dang amazing to me.
We’re lucky because some Ikea kitchens consist of 25+ cabinets and we only had 8 in here to assemble (and it helped that we had an extra long weekend thanks to those two additional days off of school for the kids). It also helped that we went pretty simple with the layout and the cabinet fronts since we want the pink stove and the pretty old architectural details in here (like the back staircase and the old glass-paned doors) to be the stars.
Speaking of that back door, yes we’re going to eventually paint it. We love the blue chippy door to the mudroom, which you can see in the video, but the back door just seems to look dirtier as the kitchen comes together more. And yes, we have to weatherstrip it because there’s a small gap. The light bounces off the floor and creates what looks like a much wider gap than the actual sliver of space under there, so we get “OMG CAN AN ANIMAL GET IN THERE?!” comments surprisingly often, but in reality it’s definitely not animal-sized. If it was, the whole weatherstripping thing would have been waaaay higher on the to-do list. Ha!
Getting back to the topic of kitchen assembly time, the fastest part was the counters by far. We measured ten times before we cut each one, and we taped them off to lessen the likelihood of splintering from the circular saw (which worked!). Lo and behold, we didn’t mess up a single cut! Each of the four counters we sliced and diced fit like a glove. We still have to screw them into place and seal them (and figure out the entire island – so there’s THAT) but we’re super relieved that our first go at cutting our own counters wasn’t too much trouble. Note: For more info about how we planned this kitchen, what exact items we ordered, and why the heck we chose butcher block, this post has all of those details for ya!
And as for the color of our butcher block, we got so lucky! It’s really close to the heart pine floor color, and we think when we seal them we’ll be even closer (they look a bit drier and less shiny than the floors right now, but only slightly).
So that, my friends, is what we’ve been up to at the beach house. Oh and the kitchen table came with those chairs from craigslist (the whole thing was $65 and the table has super cool legs that you can’t really see here) but we’re going to be switching the free chairs out for white ones since that feels like a super dark spot in the kitchen right now. And those chandeliers will be lowered around 10″ (they were installed higher so people wouldn’t run into them and break them while the house was being put back together & the floors were getting refinished). And we need a dishwasher. And a drawer for that space below the microwave. And a much bigger island counter with a sink in it. And art. And lots of stuff. But look, we have a half-functional kitchen!!!
A few other things we checked off the list were that I got to run around scraping stickers off all of the windows with a razor and then I cleaned them all (so SHINNNNY! – please sing that like the crab in Moana). I also got crazy with the spackle and basically filled every single ding and dent I could find (if you look super closely in the video you might see some of my patches that I have to sand and paint the next time we’re there). When the hood went up there was a little ding in the ceiling, so I wasted no time hopping up on the counter to fill that baby. PARKOUR!
I’ll leave you guys with this shot of the kitchen from the door, which is such a welcome change! No more pile of Ikea boxes sitting on the floor, mocking us and making us question our sanity/ability/time management skills.
And since we promised a big ol’ mood board full of sources, here’s the one we shared a couple of weeks ago along with with our new additions added below:
1. Living Room Art / 2. Kitchen Stool (similar) / 3. Chair Version of Kitchen Stools / 4. Front Bedroom Art / 5. Walls (SW White Heron) / 6. Downstairs Trim (SW Stone Isle) / 7. Upstairs Trim (SW Pure White) / 8. Tub & Pocket Doors (SW Riverway) / 9. Foyer Mirror / 10. Hall Bath Tile / 11. Hall Bath Vanity / 12. Downstairs Bath Mirror / 13. Downstairs Bath Vanity / 14. Master Bath Mirror / 15. Master Bedding / 16. Master Bedside Lamps / 17. Master Bedroom Art / 18. Master Bath Tile / 19. Master Bath Accent Tile / 20. Master Nightstands / 21. Hall Bedding
22. Leather Ottomans / 23. Hall Bedroom Art / 24. Extra-Long Waffle Shower Curtain / 25. Downstairs Bath Art / 26. Glass Shower Pane / 27. Pink Downstairs Lamps / 28. Hall Bedroom Blanket / 29. Front Bedroom Blanket / 30. Blue Front Bedroom Lamps / 31. Kitchen Counters / 32. Wood Benches / 33. Front Bedroom Pillow / 34. Kitchen Cabinets / 35. Front Bedroom Rug / 36. Living Room Rug / 37. Middle Bedroom Rug
And for anyone looking for lighting sources, here’s our mood board with that info:
1. Front Porch / 2. Downstairs Bath / 3. Kitchen Island / 4. Porch Numbers 5. Foyer (similar) / 6. Bedrooms / 7. Kitchen Sconces / 8. Living & Master Bath 9. Mudroom / 10. Clear, Soft White LED Bulbs / 11. Dining / 12. Master Bath 13. Hall Bath / 14. Hallway & Small Upstairs Rooms / 15. Under Stairs
And in perhaps the craziest news of all, on November 5th we got a completely unseasonably warm 70-degree day, so we actually all went to the beach and went swimming!
It was so crazy. The water felt perfectly refreshing! Of course now we’re back at home and this morning it was 40 degrees so bah humbug.
Psst – You can see more of our beach house adventure here (it’s a category full of posts about the entire process, which started over a year ago).
*This post contains affiliate links*
The post The Beach House Has A Kitchen! Well, Kinda, Sorta… appeared first on Young House Love.
The Beach House Has A Kitchen! Well, Kinda, Sorta… published first on http://ift.tt/2uiWrIt
0 notes
Text
The Beach House Has A Kitchen! Well, Kinda, Sorta…
Dude. We got things DONE this weekend at the beach house. And by that I mean, we showed up with a giant to-do list and only got about half of it checked off, but it really felt awesome after four days there (thanks to the kids having no school on Monday & Tuesday) to lock the door knowing that we’d knocked out a huge portion of the kitchen.
We still have to get a fridge and a dishwasher, add floating shelves around the stove, add a backsplash, do the toe kicks & quarter round down at the cabinet bases, and the island will have a larger counter with a sink in it and a 12″ overhang for the stools… but we are getting there! We actually have perimeter counters! I mean, they need to be screwed in and sealed, but they’re there! And we have working drawers (still need hardware) and a hood that’s hung up (that white part is just a protective cover, it’ll all be stainless once we peel that off). I love how everything I say is countered by a “but we still need to do blank!” But seriously, this kitchen progress feels pretty freaking exciting for us. Especially because just a little while ago it was looking more like this:
And back when we bought it last fall we were staring at a room that looked like this:
So…. progress!
And without further ado, here’s a video walk-through that we took right before we locked the door behind us yesterday. It’s full of all the what’s next & what’s changing info along with a bunch of explanations about the whole house as it has progressed since our last tour back in October. Note: If you’re viewing this post through a reader, you might have to click through to the actual post to see the video. And if for any reason you’re having an issue with the video loading here on our site, you can also view it here on YouTube.
Once again I’ll mention that I can fit a whole lot more words and info (and pictures!) into a video. Heck, a video is worth a million pictures! So that’s the best way to get all caught up and see/hear about what’s going on these days. But if you’re at work or somewhere that you can’t watch the video, here are some photos to tide you over.
The front bedroom is moving right along. We couldn’t fit the headboard in the packed car on the way out, so that’s coming (and we’ll also hang curtains to make that bed feel a lot more balanced and grounded in front of the window) but it’s really feeling super cozy in there now. Something magical happened when we moved the side tables from the back bedroom in and rolled out our new 8 x 10 rug. It’s 20% off on Serena & Lily right now – not sure how long that’ll last, but it’s so soft and it’s also indoor/outdoor so we love that we can hose it down outside and it’ll hopefully be super durable for the beach house.
As for the other sources in the room, there’s a mood board with links at the bottom of this post, so there you can find the bedding & lamp info, etc. And picture me cupping my hands around my mouth and shouting a resounding “yes, we’d love to!” to everyone asking us to build a “Shop Our Beach House” page like the one we have for our current house. We’re hoping to do that as things come together more – maybe within the next month or two.
We also got this 5 x 8′ rug (also on sale for just $258 right now) for the guest room, which is a pretty sandy color and is a hemp/cotton blend for a nice durable and beachy feeling. We’re realizing we’re drawn to a lot of blue things (hello, beach house… and also, hello, we love blue) so it’s nice to have some warm tones in the refinished wood doors & floors, the pink stove, and also in this warm textured rug. Gotta keep the balance so it doesn’t turn into the “I’m Blue Abadee Abadaaa” house (does anyone else remember that crazy song?! They were just taking nonsense right?!).
Speaking of blue, downstairs we also got this 8 x 10′ rug, which is a nice silvery gray-blue, especially on sunnier days (so sorry the video was filmed on the grayest of gray days – BOO!). We’re actually debating bringing this rug up to the back bedroom and perhaps getting something slightly warmer and less blue since the sofa sometimes reads like a deep denim blue, and again… there’s lots of blue here, so we want to make sure it doesn’t get overwhelming.
It’s a really nice plush rug though! Super soft feeling and the little X detail around the border is so cool. Looks way more expensive than it was for that large size in all wool. And yes, we still need a top for that coffee table and to paint and reupholster those crazy green chairs. Soon I hope!
And now let’s talk about the rug that didn’t work. As soon as we rolled this one out we were like “Uhhhhh, it’s really dark. And kinda crazy looking in here.” In the photo on the site it looked a lot more subtle and subdued, but in person it felt more chaotic than this picture even conveys. In person you couldn’t really pick up on the diagonal lines of the pattern, it just sort of looked like a rag rug with lots of randomly placed bumps in dark blue, and with the blue doors and the blue tub in the master… it was A LOT of blue (and not all the same tone of blue – the rug sort of clashed in person).
So although we gave ourselves a few days to live with it to see if it grew on us, the verdict was “we’re sending it back.” Again, this picture makes it look less busy. In person, it just didn’t work for us. Which is sad, because packaging and mailing back a rug is akin to running a triathlon for a 5’2″ gal like me.
So the little X-border rug from downstairs might come up here (it reads a lot more like a light silvery-gray) and then we have to find a good rug for the living room, but it helps that the three big rugs that we need for this house are all 8 x 10’s, which is nice for flexibility & swapping (you know I love to switch things around – a little too much probably).
The hall bathroom is still my favorite bathroom, and we actually found the perfect mirror for it, but alas, we couldn’t fit that in the car either, so we’ll have to hang it next time. We did manage to hang a shower curtain in there and caulk the tile edges (we finished caulking all the showers!). So pretty much all we need to complete this room is a toilet paper holder, a few towel hooks, and the easy small stuff. HUZZAH! Also need to hang the art and add window treatments so we can stop blocking the windows with cardboard while we’re there because that just doesn’t feel very classy you guys.
This is a terrible picture taken with the lights on during a super rainy day, but the master bathroom shower finally got glass! WAHOO! We worried that shower might feel tight, but thanks to getting this glass panel instead of a big bulky wall, it feel so bright and open in there! It actually feels just as big as the bigger hall shower which is around 6″ wider – so it’s funny how much your eyes play tricks on you when it comes to the actual perceived size of something. Still need a lot of stuff in here (I want a wooden stool by the tub, a few other hits of wood to add warmth, window treatments of course, towel hooks, etc). Slowly but surely…
But now let’s get back to the kitchen that we assembled from approximately 4,567 small parts with a single allen wrench.
Just kidding, it was slightly fewer parts and it actually didn’t involve a single allen wrench (go figure!), but it was sort of like a DIY marathon of snapping, drilling, hinging, hooking, and leveling things over a four day period.
As for why we opted for Ikea cabinets at the beach house, we’ve been really happy with the ones we put in our laundry room and our bonus room – and the budget called for something affordable since we’re also adding beds and furnishing a lot of other rooms at the same time. We even got to take advantage of Ikea’s spring kitchen event (yes we ordered all of this waaaay back then) to save some extra money. This entire kitchen – including the counters and sink! – came in around $3K, which is pretty dang amazing to me.
We’re lucky because some Ikea kitchens consist of 25+ cabinets and we only had 8 in here to assemble (and it helped that we had an extra long weekend thanks to those two additional days off of school for the kids). It also helped that we went pretty simple with the layout and the cabinet fronts since we want the pink stove and the pretty old architectural details in here (like the back staircase and the old glass-paned doors) to be the stars.
Speaking of that back door, yes we’re going to eventually paint it. We love the blue chippy door to the mudroom, which you can see in the video, but the back door just seems to look dirtier as the kitchen comes together more. And yes, we have to weatherstrip it because there’s a small gap. The light bounces off the floor and creates what looks like a much wider gap than the actual sliver of space under there, so we get “OMG CAN AN ANIMAL GET IN THERE?!” comments surprisingly often, but in reality it’s definitely not animal-sized. If it was, the whole weatherstripping thing would have been waaaay higher on the to-do list. Ha!
Getting back to the topic of kitchen assembly time, the fastest part was the counters by far. We measured ten times before we cut each one, and we taped them off to lessen the likelihood of splintering from the circular saw (which worked!). Lo and behold, we didn’t mess up a single cut! Each of the four counters we sliced and diced fit like a glove. We still have to screw them into place and seal them (and figure out the entire island – so there’s THAT) but we’re super relieved that our first go at cutting our own counters wasn’t too much trouble. Note: For more info about how we planned this kitchen, what exact items we ordered, and why the heck we chose butcher block, this post has all of those details for ya!
And as for the color of our butcher block, we got so lucky! It’s really close to the heart pine floor color, and we think when we seal them we’ll be even closer (they look a bit drier and less shiny than the floors right now, but only slightly).
So that, my friends, is what we’ve been up to at the beach house. Oh and the kitchen table came with those chairs from craigslist (the whole thing was $65 and the table has super cool legs that you can’t really see here) but we’re going to be switching the free chairs out for white ones since that feels like a super dark spot in the kitchen right now. And those chandeliers will be lowered around 10″ (they were installed higher so people wouldn’t run into them and break them while the house was being put back together & the floors were getting refinished). And we need a dishwasher. And a drawer for that space below the microwave. And a much bigger island counter with a sink in it. And art. And lots of stuff. But look, we have a half-functional kitchen!!!
A few other things we checked off the list were that I got to run around scraping stickers off all of the windows with a razor and then I cleaned them all (so SHINNNNY! – please sing that like the crab in Moana). I also got crazy with the spackle and basically filled every single ding and dent I could find (if you look super closely in the video you might see some of my patches that I have to sand and paint the next time we’re there). When the hood went up there was a little ding in the ceiling, so I wasted no time hopping up on the counter to fill that baby. PARKOUR!
I’ll leave you guys with this shot of the kitchen from the door, which is such a welcome change! No more pile of Ikea boxes sitting on the floor, mocking us and making us question our sanity/ability/time management skills.
And since we promised a big ol’ mood board full of sources, here’s the one we shared a couple of weeks ago along with with our new additions added below:
1. Living Room Art / 2. Kitchen Stool (similar) / 3. Chair Version of Kitchen Stools / 4. Front Bedroom Art / 5. Walls (SW White Heron) / 6. Downstairs Trim (SW Stone Isle) / 7. Upstairs Trim (SW Pure White) / 8. Tub & Pocket Doors (SW Riverway) / 9. Foyer Mirror / 10. Hall Bath Tile / 11. Hall Bath Vanity / 12. Downstairs Bath Mirror / 13. Downstairs Bath Vanity / 14. Master Bath Mirror / 15. Master Bedding / 16. Master Bedside Lamps / 17. Master Bedroom Art / 18. Master Bath Tile / 19. Master Bath Accent Tile / 20. Master Nightstands / 21. Hall Bedding
22. Leather Ottomans / 23. Hall Bedroom Art / 24. Extra-Long Waffle Shower Curtain / 25. Downstairs Bath Art / 26. Glass Shower Pane / 27. Pink Downstairs Lamps / 28. Hall Bedroom Blanket / 29. Front Bedroom Blanket / 30. Blue Front Bedroom Lamps / 31. Kitchen Counters / 32. Wood Benches / 33. Front Bedroom Pillow / 34. Kitchen Cabinets / 35. Front Bedroom Rug / 36. Living Room Rug / 37. Middle Bedroom Rug
And for anyone looking for lighting sources, here’s our mood board with that info:
1. Front Porch / 2. Downstairs Bath / 3. Kitchen Island / 4. Porch Numbers 5. Foyer (similar) / 6. Bedrooms / 7. Kitchen Sconces / 8. Living & Master Bath 9. Mudroom / 10. Clear, Soft White LED Bulbs / 11. Dining / 12. Master Bath 13. Hall Bath / 14. Hallway & Small Upstairs Rooms / 15. Under Stairs
And in perhaps the craziest news of all, on November 5th we got a completely unseasonably warm 70-degree day, so we actually all went to the beach and went swimming!
It was so crazy. The water felt perfectly refreshing! Of course now we’re back at home and this morning it was 40 degrees so bah humbug.
Psst – You can see more of our beach house adventure here (it’s a category full of posts about the entire process, which started over a year ago).
*This post contains affiliate links*
The post The Beach House Has A Kitchen! Well, Kinda, Sorta… appeared first on Young House Love.
0 notes
Photo

The Beach House Has A Kitchen! Well, Kinda, Sorta… http://ift.tt/2yIqDUr
Dude. We got things DONE this weekend at the beach house. And by that I mean, we showed up with a giant to-do list and only got about half of it checked off, but it really felt awesome after four days there (thanks to the kids having no school on Monday & Tuesday) to lock the door knowing that we’d knocked out a huge portion of the kitchen.
We still have to get a fridge and a dishwasher, add floating shelves around the stove, add a backsplash, do the toe kicks & quarter round down at the cabinet bases, and the island will have a larger counter with a sink in it and a 12″ overhang for the stools… but we are getting there! We actually have perimeter counters! I mean, they need to be screwed in and sealed, but they’re there! And we have working drawers (still need hardware) and a hood that’s hung up (that white part is just a protective cover, it’ll all be stainless once we peel that off). I love how everything I say is countered by a “but we still need to do blank!” But seriously, this kitchen progress feels pretty freaking exciting for us. Especially because just a little while ago it was looking more like this:
And back when we bought it last fall we were staring at a room that looked like this:
So…. progress!
And without further ado, here’s a video walk-through that we took right before we locked the door behind us yesterday. It’s full of all the what’s next & what’s changing info along with a bunch of explanations about the whole house as it has progressed since our last tour back in October. Note: If you’re viewing this post through a reader, you might have to click through to the actual post to see the video. And if for any reason you’re having an issue with the video loading here on our site, you can also view it here on YouTube.
Once again I’ll mention that I can fit a whole lot more words and info (and pictures!) into a video. Heck, a video is worth a million pictures! So that’s the best way to get all caught up and see/hear about what’s going on these days. But if you’re at work or somewhere that you can’t watch the video, here are some photos to tide you over.
The front bedroom is moving right along. We couldn’t fit the headboard in the packed car on the way out, so that’s coming (and we’ll also hang curtains to make that bed feel a lot more balanced and grounded in front of the window) but it’s really feeling super cozy in there now. Something magical happened when we moved the side tables from the back bedroom in and rolled out our new 8 x 10 rug. It’s 20% off on Serena & Lily right now – not sure how long that’ll last, but it’s so soft and it’s also indoor/outdoor so we love that we can hose it down outside and it’ll hopefully be super durable for the beach house.
As for the other sources in the room, there’s a mood board with links at the bottom of this post, so there you can find the bedding & lamp info, etc. And picture me cupping my hands around my mouth and shouting a resounding “yes, we’d love to!” to everyone asking us to build a “Shop Our Beach House” page like the one we have for our current house. We’re hoping to do that as things come together more – maybe within the next month or two.
We also got this 5 x 8′ rug (also on sale for just $258 right now) for the guest room, which is a pretty sandy color and is a hemp/cotton blend for a nice durable and beachy feeling. We’re realizing we’re drawn to a lot of blue things (hello, beach house… and also, hello, we love blue) so it’s nice to have some warm tones in the refinished wood doors & floors, the pink stove, and also in this warm textured rug. Gotta keep the balance so it doesn’t turn into the “I’m Blue Abadee Abadaaa” house (does anyone else remember that crazy song?! They were just taking nonsense right?!).
Speaking of blue, downstairs we also got this 8 x 10′ rug, which is a nice silvery gray-blue, especially on sunnier days (so sorry the video was filmed on the grayest of gray days – BOO!). We’re actually debating bringing this rug up to the back bedroom and perhaps getting something slightly warmer and less blue since the sofa sometimes reads like a deep denim blue, and again… there’s lots of blue here, so we want to make sure it doesn’t get overwhelming.
It’s a really nice plush rug though! Super soft feeling and the little X detail around the border is so cool. Looks way more expensive than it was for that large size in all wool. And yes, we still need a top for that coffee table and to paint and reupholster those crazy green chairs. Soon I hope!
And now let’s talk about the rug that didn’t work. As soon as we rolled this one out we were like “Uhhhhh, it’s really dark. And kinda crazy looking in here.” In the photo on the site it looked a lot more subtle and subdued, but in person it felt more chaotic than this picture even conveys. In person you couldn’t really pick up on the diagonal lines of the pattern, it just sort of looked like a rag rug with lots of randomly placed bumps in dark blue, and with the blue doors and the blue tub in the master… it was A LOT of blue (and not all the same tone of blue – the rug sort of clashed in person).
So although we gave ourselves a few days to live with it to see if it grew on us, the verdict was “we’re sending it back.” Again, this picture makes it look less busy. In person, it just didn’t work for us. Which is sad, because packaging and mailing back a rug is akin to running a triathlon for a 5’2″ gal like me.
So the little X-border rug from downstairs might come up here (it reads a lot more like a light silvery-gray) and then we have to find a good rug for the living room, but it helps that the three big rugs that we need for this house are all 8 x 10’s, which is nice for flexibility & swapping (you know I love to switch things around – a little too much probably).
The hall bathroom is still my favorite bathroom, and we actually found the perfect mirror for it, but alas, we couldn’t fit that in the car either, so we’ll have to hang it next time. We did manage to hang a shower curtain in there and caulk the tile edges (we finished caulking all the showers!). So pretty much all we need to complete this room is a toilet paper holder, a few towel hooks, and the easy small stuff. HUZZAH! Also need to hang the art and add window treatments so we can stop blocking the windows with cardboard while we’re there because that just doesn’t feel very classy you guys.
This is a terrible picture taken with the lights on during a super rainy day, but the master bathroom shower finally got glass! WAHOO! We worried that shower might feel tight, but thanks to getting this glass panel instead of a big bulky wall, it feel so bright and open in there! It actually feels just as big as the bigger hall shower which is around 6″ wider – so it’s funny how much your eyes play tricks on you when it comes to the actual perceived size of something. Still need a lot of stuff in here (I want a wooden stool by the tub, a few other hits of wood to add warmth, window treatments of course, towel hooks, etc). Slowly but surely…
But now let’s get back to the kitchen that we assembled from approximately 4,567 small parts with a single allen wrench.
Just kidding, it was slightly fewer parts and it actually didn’t involve a single allen wrench (go figure!), but it was sort of like a DIY marathon of snapping, drilling, hinging, hooking, and leveling things over a four day period.
As for why we opted for Ikea cabinets at the beach house, we’ve been really happy with the ones we put in our laundry room and our bonus room – and the budget called for something affordable since we’re also adding beds and furnishing a lot of other rooms at the same time. We even got to take advantage of Ikea’s spring kitchen event (yes we ordered all of this waaaay back then) to save some extra money. This entire kitchen – including the counters and sink! – came in around $3K, which is pretty dang amazing to me.
We’re lucky because some Ikea kitchens consist of 25+ cabinets and we only had 8 in here to assemble (and it helped that we had an extra long weekend thanks to those two additional days off of school for the kids). It also helped that we went pretty simple with the layout and the cabinet fronts since we want the pink stove and the pretty old architectural details in here (like the back staircase and the old glass-paned doors) to be the stars.
Speaking of that back door, yes we’re going to eventually paint it. We love the blue chippy door to the mudroom, which you can see in the video, but the back door just seems to look dirtier as the kitchen comes together more. And yes, we have to weatherstrip it because there’s a small gap. The light bounces off the floor and creates what looks like a much wider gap than the actual sliver of space under there, so we get “OMG CAN AN ANIMAL GET IN THERE?!” comments surprisingly often, but in reality it’s definitely not animal-sized. If it was, the whole weatherstripping thing would have been waaaay higher on the to-do list. Ha!
Getting back to the topic of kitchen assembly time, the fastest part was the counters by far. We measured ten times before we cut each one, and we taped them off to lessen the likelihood of splintering from the circular saw (which worked!). Lo and behold, we didn’t mess up a single cut! Each of the four counters we sliced and diced fit like a glove. We still have to screw them into place and seal them (and figure out the entire island – so there’s THAT) but we’re super relieved that our first go at cutting our own counters wasn’t too much trouble. Note: For more info about how we planned this kitchen, what exact items we ordered, and why the heck we chose butcher block, this post has all of those details for ya!
And as for the color of our butcher block, we got so lucky! It’s really close to the heart pine floor color, and we think when we seal them we’ll be even closer (they look a bit drier and less shiny than the floors right now, but only slightly).
So that, my friends, is what we’ve been up to at the beach house. Oh and the kitchen table came with those chairs from craigslist (the whole thing was $65 and the table has super cool legs that you can’t really see here) but we’re going to be switching the free chairs out for white ones since that feels like a super dark spot in the kitchen right now. And those chandeliers will be lowered around 10″ (they were installed higher so people wouldn’t run into them and break them while the house was being put back together & the floors were getting refinished). And we need a dishwasher. And a drawer for that space below the microwave. And a much bigger island counter with a sink in it. And art. And lots of stuff. But look, we have a half-functional kitchen!!!
A few other things we checked off the list were that I got to run around scraping stickers off all of the windows with a razor and then I cleaned them all (so SHINNNNY! – please sing that like the crab in Moana). I also got crazy with the spackle and basically filled every single ding and dent I could find (if you look super closely in the video you might see some of my patches that I have to sand and paint the next time we’re there). When the hood went up there was a little ding in the ceiling, so I wasted no time hopping up on the counter to fill that baby. PARKOUR!
I’ll leave you guys with this shot of the kitchen from the door, which is such a welcome change! No more pile of Ikea boxes sitting on the floor, mocking us and making us question our sanity/ability/time management skills.
And since we promised a big ol’ mood board full of sources, here’s an updated version of the one we shared a couple of weeks ago with our new additions added:
1. Living Room Art / 2. Kitchen Stool (similar) / 3. Chair Version of Kitchen Stools / 4. Front Bedroom Art / 5. Walls (SW White Heron) / 6. Downstairs Trim (SW Stone Isle) / 7. Upstairs Trim (SW Pure White) / 8. Tub & Pocket Doors (SW Riverway) / 9. Foyer Mirror / 10. Hall Bath Tile / 11. Hall Bath Vanity / 12. Downstairs Bath Mirror / 13. Downstairs Bath Vanity / 14. Master Bath Mirror / 15. Hall Bedding / 16. Master Bedside Lamps / 17. Master Bedroom Art / 18. Master Bath Tile / 19. Master Bath Accent Tile / 20. Master Nightstands / 21. Master Bedding / 22. Kitchen Counters / 23. Pink Downstairs Lamps / 24. Blue Front Bedroom Lamps / 25. Kitchen Cabinets / 26. Front Bedroom Rug / 27. Living Room Rug / 28. Middle Bedroom Rug
And for anyone looking for lighting sources, here’s our mood board with that info:
1. Front Porch / 2. Downstairs Bath / 3. Kitchen Island / 4. Porch Numbers 5. Foyer (similar) / 6. Bedrooms / 7. Kitchen Sconces / 8. Living & Master Bath 9. Mudroom / 10. Clear, Soft White LED Bulbs / 11. Dining / 12. Master Bath 13. Hall Bath / 14. Hallway & Small Upstairs Rooms / 15. Under Stairs
And in perhaps the craziest news of all, on November 5th we got a completely unseasonably warm 70-degree day, so we actually all went to the beach and went swimming!
It was so crazy. The water felt perfectly refreshing! Of course now we’re back at home and this morning it was 40 degrees so bah humbug.
Psst – You can see more of our beach house adventure here (it’s a category full of posts about the entire process, which started over a year ago).
*This post contains affiliate links*
The post The Beach House Has A Kitchen! Well, Kinda, Sorta… appeared first on Young House Love.
0 notes
Text
The Beach House Has A Kitchen! Well, Kinda, Sorta…
Dude. We got things DONE this weekend at the beach house. And by that I mean, we showed up with a giant to-do list and only got about half of it checked off, but it really felt awesome after four days there (thanks to the kids having no school on Monday & Tuesday) to lock the door knowing that we’d knocked out a huge portion of the kitchen.
We still have to get a fridge and a dishwasher, add floating shelves around the stove, add a backsplash, do the toe kicks & quarter round down at the cabinet bases, and the island will have a larger counter with a sink in it and a 12″ overhang for the stools… but we are getting there! We actually have perimeter counters! I mean, they need to be screwed in and sealed, but they’re there! And we have working drawers (still need hardware) and a hood that’s hung up (that white part is just a protective cover, it’ll all be stainless once we peel that off). I love how everything I say is countered by a “but we still need to do blank!” But seriously, this kitchen progress feels pretty freaking exciting for us. Especially because just a little while ago it was looking more like this:
And back when we bought it last fall we were staring at a room that looked like this:
So…. progress!
And without further ado, here’s a video walk-through that we took right before we locked the door behind us yesterday. It’s full of all the what’s next & what’s changing info along with a bunch of explanations about the whole house as it has progressed since our last tour back in October. Note: If you’re viewing this post through a reader, you might have to click through to the actual post to see the video. And if for any reason you’re having an issue with the video loading here on our site, you can also view it here on YouTube.
Once again I’ll mention that I can fit a whole lot more words and info (and pictures!) into a video. Heck, a video is worth a million pictures! So that’s the best way to get all caught up and see/hear about what’s going on these days. But if you’re at work or somewhere that you can’t watch the video, here are some photos to tide you over.
The front bedroom is moving right along. We couldn’t fit the headboard in the packed car on the way out, so that’s coming (and we’ll also hang curtains to make that bed feel a lot more balanced and grounded in front of the window) but it’s really feeling super cozy in there now. Something magical happened when we moved the side tables from the back bedroom in and rolled out our new 8 x 10 rug. It’s 20% off on Serena & Lily right now – not sure how long that’ll last, but it’s so soft and it’s also indoor/outdoor so we love that we can hose it down outside and it’ll hopefully be super durable for the beach house.
As for the other sources in the room, there’s a mood board with links at the bottom of this post, so there you can find the bedding & lamp info, etc. And picture me cupping my hands around my mouth and shouting a resounding “yes, we’d love to!” to everyone asking us to build a “Shop Our Beach House” page like the one we have for our current house. We’re hoping to do that as things come together more – maybe within the next month or two.
We also got this 5 x 8′ rug (also on sale for just $258 right now) for the guest room, which is a pretty sandy color and is a hemp/cotton blend for a nice durable and beachy feeling. We’re realizing we’re drawn to a lot of blue things (hello, beach house… and also, hello, we love blue) so it’s nice to have some warm tones in the refinished wood doors & floors, the pink stove, and also in this warm textured rug. Gotta keep the balance so it doesn’t turn into the “I’m Blue Abadee Abadaaa” house (does anyone else remember that crazy song?! They were just taking nonsense right?!).
Speaking of blue, downstairs we also got this 8 x 10′ rug, which is a nice silvery gray-blue, especially on sunnier days (so sorry the video was filmed on the grayest of gray days – BOO!). We’re actually debating bringing this rug up to the back bedroom and perhaps getting something slightly warmer and less blue since the sofa sometimes reads like a deep denim blue, and again… there’s lots of blue here, so we want to make sure it doesn’t get overwhelming.
It’s a really nice plush rug though! Super soft feeling and the little X detail around the border is so cool. Looks way more expensive than it was for that large size in all wool. And yes, we still need a top for that coffee table and to paint and reupholster those crazy green chairs. Soon I hope!
And now let’s talk about the rug that didn’t work. As soon as we rolled this one out we were like “Uhhhhh, it’s really dark. And kinda crazy looking in here.” In the photo on the site it looked a lot more subtle and subdued, but in person it felt more chaotic than this picture even conveys. In person you couldn’t really pick up on the diagonal lines of the pattern, it just sort of looked like a rag rug with lots of randomly placed bumps in dark blue, and with the blue doors and the blue tub in the master… it was A LOT of blue (and not all the same tone of blue – the rug sort of clashed in person).
So although we gave ourselves a few days to live with it to see if it grew on us, the verdict was “we’re sending it back.” Again, this picture makes it look less busy. In person, it just didn’t work for us. Which is sad, because packaging and mailing back a rug is akin to running a triathlon for a 5’2″ gal like me.
So the little X-border rug from downstairs might come up here (it reads a lot more like a light silvery-gray) and then we have to find a good rug for the living room, but it helps that the three big rugs that we need for this house are all 8 x 10’s, which is nice for flexibility & swapping (you know I love to switch things around – a little too much probably).
The hall bathroom is still my favorite bathroom, and we actually found the perfect mirror for it, but alas, we couldn’t fit that in the car either, so we’ll have to hang it next time. We did manage to hang a shower curtain in there and caulk the tile edges (we finished caulking all the showers!). So pretty much all we need to complete this room is a toilet paper holder, a few towel hooks, and the easy small stuff. HUZZAH! Also need to hang the art and add window treatments so we can stop blocking the windows with cardboard while we’re there because that just doesn’t feel very classy you guys.
This is a terrible picture taken with the lights on during a super rainy day, but the master bathroom shower finally got glass! WAHOO! We worried that shower might feel tight, but thanks to getting this glass panel instead of a big bulky wall, it feel so bright and open in there! It actually feels just as big as the bigger hall shower which is around 6″ wider – so it’s funny how much your eyes play tricks on you when it comes to the actual perceived size of something. Still need a lot of stuff in here (I want a wooden stool by the tub, a few other hits of wood to add warmth, window treatments of course, towel hooks, etc). Slowly but surely…
But now let’s get back to the kitchen that we assembled from approximately 4,567 small parts with a single allen wrench.
Just kidding, it was slightly fewer parts and it actually didn’t involve a single allen wrench (go figure!), but it was sort of like a DIY marathon of snapping, drilling, hinging, hooking, and leveling things over a four day period.
As for why we opted for Ikea cabinets at the beach house, we’ve been really happy with the ones we put in our laundry room and our bonus room – and the budget called for something affordable since we’re also adding beds and furnishing a lot of other rooms at the same time. We even got to take advantage of Ikea’s spring kitchen event (yes we ordered all of this waaaay back then) to save some extra money. This entire kitchen – including the counters and sink! – came in around $3K, which is pretty dang amazing to me.
We’re lucky because some Ikea kitchens consist of 25+ cabinets and we only had 8 in here to assemble (and it helped that we had an extra long weekend thanks to those two additional days off of school for the kids). It also helped that we went pretty simple with the layout and the cabinet fronts since we want the pink stove and the pretty old architectural details in here (like the back staircase and the old glass-paned doors) to be the stars.
Speaking of that back door, yes we’re going to eventually paint it. We love the blue chippy door to the mudroom, which you can see in the video, but the back door just seems to look dirtier as the kitchen comes together more. And yes, we have to weatherstrip it because there’s a small gap. The light bounces off the floor and creates what looks like a much wider gap than the actual sliver of space under there, so we get “OMG CAN AN ANIMAL GET IN THERE?!” comments surprisingly often, but in reality it’s definitely not animal-sized. If it was, the whole weatherstripping thing would have been waaaay higher on the to-do list. Ha!
Getting back to the topic of kitchen assembly time, the fastest part was the counters by far. We measured ten times before we cut each one, and we taped them off to lessen the likelihood of splintering from the circular saw (which worked!). Lo and behold, we didn’t mess up a single cut! Each of the four counters we sliced and diced fit like a glove. We still have to screw them into place and seal them (and figure out the entire island – so there’s THAT) but we’re super relieved that our first go at cutting our own counters wasn’t too much trouble. Note: For more info about how we planned this kitchen, what exact items we ordered, and why the heck we chose butcher block, this post has all of those details for ya!
And as for the color of our butcher block, we got so lucky! It’s really close to the heart pine floor color, and we think when we seal them we’ll be even closer (they look a bit drier and less shiny than the floors right now, but only slightly).
So that, my friends, is what we’ve been up to at the beach house. Oh and the kitchen table came with those chairs from craigslist (the whole thing was $65 and the table has super cool legs that you can’t really see here) but we’re going to be switching the free chairs out for white ones since that feels like a super dark spot in the kitchen right now. And those chandeliers will be lowered around 10″ (they were installed higher so people wouldn’t run into them and break them while the house was being put back together & the floors were getting refinished). And we need a dishwasher. And a drawer for that space below the microwave. And a much bigger island counter with a sink in it. And art. And lots of stuff. But look, we have a half-functional kitchen!!!
A few other things we checked off the list were that I got to run around scraping stickers off all of the windows with a razor and then I cleaned them all (so SHINNNNY! – please sing that like the crab in Moana). I also got crazy with the spackle and basically filled every single ding and dent I could find (if you look super closely in the video you might see some of my patches that I have to sand and paint the next time we’re there). When the hood went up there was a little ding in the ceiling, so I wasted no time hopping up on the counter to fill that baby. PARKOUR!
I’ll leave you guys with this shot of the kitchen from the door, which is such a welcome change! No more pile of Ikea boxes sitting on the floor, mocking us and making us question our sanity/ability/time management skills.
And since we promised a big ol’ mood board full of sources, here’s an updated version of the one we shared a couple of weeks ago with our new additions added:
1. Living Room Art / 2. Kitchen Stool (similar) / 3. Chair Version of Kitchen Stools / 4. Front Bedroom Art / 5. Walls (SW White Heron) / 6. Downstairs Trim (SW Stone Isle) / 7. Upstairs Trim (SW Pure White) / 8. Tub & Pocket Doors (SW Riverway) / 9. Foyer Mirror / 10. Hall Bath Tile / 11. Hall Bath Vanity / 12. Downstairs Bath Mirror / 13. Downstairs Bath Vanity / 14. Master Bath Mirror / 15. Hall Bedding / 16. Master Bedside Lamps / 17. Master Bedroom Art / 18. Master Bath Tile / 19. Master Bath Accent Tile / 20. Master Nightstands / 21. Master Bedding / 22. Kitchen Counters / 23. Pink Downstairs Lamps / 24. Blue Front Bedroom Lamps / 25. Kitchen Cabinets / 26. Front Bedroom Rug / 27. Living Room Rug / 28. Middle Bedroom Rug
And for anyone looking for lighting sources, here’s our mood board with that info:
1. Front Porch / 2. Downstairs Bath / 3. Kitchen Island / 4. Porch Numbers 5. Foyer (similar) / 6. Bedrooms / 7. Kitchen Sconces / 8. Living & Master Bath 9. Mudroom / 10. Clear, Soft White LED Bulbs / 11. Dining / 12. Master Bath 13. Hall Bath / 14. Hallway & Small Upstairs Rooms / 15. Under Stairs
And in perhaps the craziest news of all, on November 5th we got a completely unseasonably warm 70-degree day, so we actually all went to the beach and went swimming!
It was so crazy. The water felt perfectly refreshing! Of course now we’re back at home and this morning it was 40 degrees so bah humbug.
Psst – You can see more of our beach house adventure here (it’s a category full of posts about the entire process, which started over a year ago).
*This post contains affiliate links*
The post The Beach House Has A Kitchen! Well, Kinda, Sorta… appeared first on Young House Love.
The Beach House Has A Kitchen! Well, Kinda, Sorta… published first on http://ift.tt/2r6hzQy
0 notes
Text
The Beach House Has A Kitchen! Well, Kinda, Sorta…
Dude. We got things DONE this weekend at the beach house. And by that I mean, we showed up with a giant to-do list and only got about half of it checked off, but it really felt awesome after four days there (thanks to the kids having no school on Monday & Tuesday) to lock the door knowing that we’d knocked out a huge portion of the kitchen.
We still have to get a fridge and a dishwasher, add floating shelves around the stove, add a backsplash, do the toe kicks & quarter round down at the cabinet bases, and the island will have a larger counter with a sink in it and a 12″ overhang for the stools… but we are getting there! We actually have perimeter counters! I mean, they need to be screwed in and sealed, but they’re there! And we have working drawers (still need hardware) and a hood that’s hung up (that white part is just a protective cover, it’ll all be stainless once we peel that off). I love how everything I say is countered by a “but we still need to do blank!” But seriously, this kitchen progress feels pretty freaking exciting for us. Especially because just a little while ago it was looking more like this:
And back when we bought it last fall we were staring at a room that looked like this:
So…. progress!
And without further ado, here’s a video walk-through that we took right before we locked the door behind us yesterday. It’s full of all the what’s next & what’s changing info along with a bunch of explanations about the whole house as it has progressed since our last tour back in October. Note: If you’re viewing this post through a reader, you might have to click through to the actual post to see the video. And if for any reason you’re having an issue with the video loading here on our site, you can also view it here on YouTube.
Once again I’ll mention that I can fit a whole lot more words and info (and pictures!) into a video. Heck, a video is worth a million pictures! So that’s the best way to get all caught up and see/hear about what’s going on these days. But if you’re at work or somewhere that you can’t watch the video, here are some photos to tide you over.
The front bedroom is moving right along. We couldn’t fit the headboard in the packed car on the way out, so that’s coming (and we’ll also hang curtains to make that bed feel a lot more balanced and grounded in front of the window) but it’s really feeling super cozy in there now. Something magical happened when we moved the side tables from the back bedroom in and rolled out our new 8 x 10 rug. It’s 20% off on Serena & Lily right now – not sure how long that’ll last, but it’s so soft and it’s also indoor/outdoor so we love that we can hose it down outside and it’ll hopefully be super durable for the beach house.
As for the other sources in the room, there’s a mood board with links at the bottom of this post, so there you can find the bedding & lamp info, etc. And picture me cupping my hands around my mouth and shouting a resounding “yes, we’d love to!” to everyone asking us to build a “Shop Our Beach House” page like the one we have for our current house. We’re hoping to do that as things come together more – maybe within the next month or two.
We also got this 5 x 8′ rug (also on sale for just $258 right now) for the guest room, which is a pretty sandy color and is a hemp/cotton blend for a nice durable and beachy feeling. We’re realizing we’re drawn to a lot of blue things (hello, beach house… and also, hello, we love blue) so it’s nice to have some warm tones in the refinished wood doors & floors, the pink stove, and also in this warm textured rug. Gotta keep the balance so it doesn’t turn into the “I’m Blue Abadee Abadaaa” house (does anyone else remember that crazy song?! They were just taking nonsense right?!).
Speaking of blue, downstairs we also got this 8 x 10′ rug, which is a nice silvery gray-blue, especially on sunnier days (so sorry the video was filmed on the grayest of gray days – BOO!). We’re actually debating bringing this rug up to the back bedroom and perhaps getting something slightly warmer and less blue since the sofa sometimes reads like a deep denim blue, and again… there’s lots of blue here, so we want to make sure it doesn’t get overwhelming.
It’s a really nice plush rug though! Super soft feeling and the little X detail around the border is so cool. Looks way more expensive than it was for that large size in all wool. And yes, we still need a top for that coffee table and to paint and reupholster those crazy green chairs. Soon I hope!
And now let’s talk about the rug that didn’t work. As soon as we rolled this one out we were like “Uhhhhh, it’s really dark. And kinda crazy looking in here.” In the photo on the site it looked a lot more subtle and subdued, but in person it felt more chaotic than this picture even conveys. In person you couldn’t really pick up on the diagonal lines of the pattern, it just sort of looked like a rag rug with lots of randomly placed bumps in dark blue, and with the blue doors and the blue tub in the master… it was A LOT of blue (and not all the same tone of blue – the rug sort of clashed in person).
So although we gave ourselves a few days to live with it to see if it grew on us, the verdict was “we’re sending it back.” Again, this picture makes it look less busy. In person, it just didn’t work for us. Which is sad, because packaging and mailing back a rug is akin to running a triathlon for a 5’2″ gal like me.
So the little X-border rug from downstairs might come up here (it reads a lot more like a light silvery-gray) and then we have to find a good rug for the living room, but it helps that the three big rugs that we need for this house are all 8 x 10’s, which is nice for flexibility & swapping (you know I love to switch things around – a little too much probably).
The hall bathroom is still my favorite bathroom, and we actually found the perfect mirror for it, but alas, we couldn’t fit that in the car either, so we’ll have to hang it next time. We did manage to hang a shower curtain in there and caulk the tile edges (we finished caulking all the showers!). So pretty much all we need to complete this room is a toilet paper holder, a few towel hooks, and the easy small stuff. HUZZAH! Also need to hang the art and add window treatments so we can stop blocking the windows with cardboard while we’re there because that just doesn’t feel very classy you guys.
This is a terrible picture taken with the lights on during a super rainy day, but the master bathroom shower finally got glass! WAHOO! We worried that shower might feel tight, but thanks to getting this glass panel instead of a big bulky wall, it feel so bright and open in there! It actually feels just as big as the bigger hall shower which is around 6″ wider – so it’s funny how much your eyes play tricks on you when it comes to the actual perceived size of something. Still need a lot of stuff in here (I want a wooden stool by the tub, a few other hits of wood to add warmth, window treatments of course, towel hooks, etc). Slowly but surely…
But now let’s get back to the kitchen that we assembled from approximately 4,567 small parts with a single allen wrench.
Just kidding, it was slightly fewer parts and it actually didn’t involve a single allen wrench (go figure!), but it was sort of like a DIY marathon of snapping, drilling, hinging, hooking, and leveling things over a four day period.
As for why we opted for Ikea cabinets at the beach house, we’ve been really happy with the ones we put in our laundry room and our bonus room – and the budget called for something affordable since we’re also adding beds and furnishing a lot of other rooms at the same time. We even got to take advantage of Ikea’s spring kitchen event (yes we ordered all of this waaaay back then) to save some extra money. This entire kitchen – including the counters and sink! – came in around $3K, which is pretty dang amazing to me.
We’re lucky because some Ikea kitchens consist of 25+ cabinets and we only had 8 in here to assemble (and it helped that we had an extra long weekend thanks to those two additional days off of school for the kids). It also helped that we went pretty simple with the layout and the cabinet fronts since we want the pink stove and the pretty old architectural details in here (like the back staircase and the old glass-paned doors) to be the stars.
Speaking of that back door, yes we’re going to eventually paint it. We love the blue chippy door to the mudroom, which you can see in the video, but the back door just seems to look dirtier as the kitchen comes together more. And yes, we have to weatherstrip it because there’s a small gap. The light bounces off the floor and creates what looks like a much wider gap than the actual sliver of space under there, so we get “OMG CAN AN ANIMAL GET IN THERE?!” comments surprisingly often, but in reality it’s definitely not animal-sized. If it was, the whole weatherstripping thing would have been waaaay higher on the to-do list. Ha!
Getting back to the topic of kitchen assembly time, the fastest part was the counters by far. We measured ten times before we cut each one, and we taped them off to lessen the likelihood of splintering from the circular saw (which worked!). Lo and behold, we didn’t mess up a single cut! Each of the four counters we sliced and diced fit like a glove. We still have to screw them into place and seal them (and figure out the entire island – so there’s THAT) but we’re super relieved that our first go at cutting our own counters wasn’t too much trouble. Note: For more info about how we planned this kitchen, what exact items we ordered, and why the heck we chose butcher block, this post has all of those details for ya!
And as for the color of our butcher block, we got so lucky! It’s really close to the heart pine floor color, and we think when we seal them we’ll be even closer (they look a bit drier and less shiny than the floors right now, but only slightly).
So that, my friends, is what we’ve been up to at the beach house. Oh and the kitchen table came with those chairs from craigslist (the whole thing was $65 and the table has super cool legs that you can’t really see here) but we’re going to be switching the free chairs out for white ones since that feels like a super dark spot in the kitchen right now. And those chandeliers will be lowered around 10″ (they were installed higher so people wouldn’t run into them and break them while the house was being put back together & the floors were getting refinished). And we need a dishwasher. And a drawer for that space below the microwave. And a much bigger island counter with a sink in it. And art. And lots of stuff. But look, we have a half-functional kitchen!!!
A few other things we checked off the list were that I got to run around scraping stickers off all of the windows with a razor and then I cleaned them all (so SHINNNNY! – please sing that like the crab in Moana). I also got crazy with the spackle and basically filled every single ding and dent I could find (if you look super closely in the video you might see some of my patches that I have to sand and paint the next time we’re there). When the hood went up there was a little ding in the ceiling, so I wasted no time hopping up on the counter to fill that baby. PARKOUR!
I’ll leave you guys with this shot of the kitchen from the door, which is such a welcome change! No more pile of Ikea boxes sitting on the floor, mocking us and making us question our sanity/ability/time management skills.
And since we promised a big ol’ mood board full of sources, here’s the one we shared a couple of weeks ago along with with our new additions added below:
1. Living Room Art / 2. Kitchen Stool (similar) / 3. Chair Version of Kitchen Stools / 4. Front Bedroom Art / 5. Walls (SW White Heron) / 6. Downstairs Trim (SW Stone Isle) / 7. Upstairs Trim (SW Pure White) / 8. Tub & Pocket Doors (SW Riverway) / 9. Foyer Mirror / 10. Hall Bath Tile / 11. Hall Bath Vanity / 12. Downstairs Bath Mirror / 13. Downstairs Bath Vanity / 14. Master Bath Mirror / 15. Master Bedding / 16. Master Bedside Lamps / 17. Master Bedroom Art / 18. Master Bath Tile / 19. Master Bath Accent Tile / 20. Master Nightstands / 21. Hall Bedding
22. Leather Ottomans / 23. Hall Bedroom Art / 24. Extra-Long Waffle Shower Curtain / 25. Downstairs Bath Art / 26. Glass Shower Pane / 27. Pink Downstairs Lamps / 28. Hall Bedroom Blanket / 29. Front Bedroom Blanket / 30. Blue Front Bedroom Lamps / 31. Kitchen Counters / 32. Wood Benches / 33. Front Bedroom Pillow / 34. Kitchen Cabinets / 35. Front Bedroom Rug / 36. Living Room Rug / 37. Middle Bedroom Rug
And for anyone looking for lighting sources, here’s our mood board with that info:
1. Front Porch / 2. Downstairs Bath / 3. Kitchen Island / 4. Porch Numbers 5. Foyer (similar) / 6. Bedrooms / 7. Kitchen Sconces / 8. Living & Master Bath 9. Mudroom / 10. Clear, Soft White LED Bulbs / 11. Dining / 12. Master Bath 13. Hall Bath / 14. Hallway & Small Upstairs Rooms / 15. Under Stairs
And in perhaps the craziest news of all, on November 5th we got a completely unseasonably warm 70-degree day, so we actually all went to the beach and went swimming!
It was so crazy. The water felt perfectly refreshing! Of course now we’re back at home and this morning it was 40 degrees so bah humbug.
Psst – You can see more of our beach house adventure here (it’s a category full of posts about the entire process, which started over a year ago).
*This post contains affiliate links*
The post The Beach House Has A Kitchen! Well, Kinda, Sorta… appeared first on Young House Love.
The Beach House Has A Kitchen! Well, Kinda, Sorta… published first on http://ift.tt/2qxZz2j
0 notes
Text
The Beach House Has A Kitchen! Well, Kinda, Sorta…
Dude. We got things DONE this weekend at the beach house. And by that I mean, we showed up with a giant to-do list and only got about half of it checked off, but it really felt awesome after four days there (thanks to the kids having no school on Monday & Tuesday) to lock the door knowing that we’d knocked out a huge portion of the kitchen.
We still have to get a fridge and a dishwasher, add floating shelves around the stove, add a backsplash, do the toe kicks & quarter round down at the cabinet bases, and the island will have a larger counter with a sink in it and a 12″ overhang for the stools… but we are getting there! We actually have perimeter counters! I mean, they need to be screwed in and sealed, but they’re there! And we have working drawers (still need hardware) and a hood that’s hung up (that white part is just a protective cover, it’ll all be stainless once we peel that off). I love how everything I say is countered by a “but we still need to do blank!” But seriously, this kitchen progress feels pretty freaking exciting for us. Especially because just a little while ago it was looking more like this:
And back when we bought it last fall we were staring at a room that looked like this:
So…. progress!
And without further ado, here’s a video walk-through that we took right before we locked the door behind us yesterday. It’s full of all the what’s next & what’s changing info along with a bunch of explanations about the whole house as it has progressed since our last tour back in October. Note: If you’re viewing this post through a reader, you might have to click through to the actual post to see the video. And if for any reason you’re having an issue with the video loading here on our site, you can also view it here on YouTube.
Once again I’ll mention that I can fit a whole lot more words and info (and pictures!) into a video. Heck, a video is worth a million pictures! So that’s the best way to get all caught up and see/hear about what’s going on these days. But if you’re at work or somewhere that you can’t watch the video, here are some photos to tide you over.
The front bedroom is moving right along. We couldn’t fit the headboard in the packed car on the way out, so that’s coming (and we’ll also hang curtains to make that bed feel a lot more balanced and grounded in front of the window) but it’s really feeling super cozy in there now. Something magical happened when we moved the side tables from the back bedroom in and rolled out our new 8 x 10 rug. It’s 20% off on Serena & Lily right now – not sure how long that’ll last, but it’s so soft and it’s also indoor/outdoor so we love that we can hose it down outside and it’ll hopefully be super durable for the beach house.
As for the other sources in the room, there’s a mood board with links at the bottom of this post, so there you can find the bedding & lamp info, etc. And picture me cupping my hands around my mouth and shouting a resounding “yes, we’d love to!” to everyone asking us to build a “Shop Our Beach House” page like the one we have for our current house. We’re hoping to do that as things come together more – maybe within the next month or two.
We also got this 5 x 8′ rug (also on sale for just $258 right now) for the guest room, which is a pretty sandy color and is a hemp/cotton blend for a nice durable and beachy feeling. We’re realizing we’re drawn to a lot of blue things (hello, beach house… and also, hello, we love blue) so it’s nice to have some warm tones in the refinished wood doors & floors, the pink stove, and also in this warm textured rug. Gotta keep the balance so it doesn’t turn into the “I’m Blue Abadee Abadaaa” house (does anyone else remember that crazy song?! They were just taking nonsense right?!).
Speaking of blue, downstairs we also got this 8 x 10′ rug, which is a nice silvery gray-blue, especially on sunnier days (so sorry the video was filmed on the grayest of gray days – BOO!). We’re actually debating bringing this rug up to the back bedroom and perhaps getting something slightly warmer and less blue since the sofa sometimes reads like a deep denim blue, and again… there’s lots of blue here, so we want to make sure it doesn’t get overwhelming.
It’s a really nice plush rug though! Super soft feeling and the little X detail around the border is so cool. Looks way more expensive than it was for that large size in all wool. And yes, we still need a top for that coffee table and to paint and reupholster those crazy green chairs. Soon I hope!
And now let’s talk about the rug that didn’t work. As soon as we rolled this one out we were like “Uhhhhh, it’s really dark. And kinda crazy looking in here.” In the photo on the site it looked a lot more subtle and subdued, but in person it felt more chaotic than this picture even conveys. In person you couldn’t really pick up on the diagonal lines of the pattern, it just sort of looked like a rag rug with lots of randomly placed bumps in dark blue, and with the blue doors and the blue tub in the master… it was A LOT of blue (and not all the same tone of blue – the rug sort of clashed in person).
So although we gave ourselves a few days to live with it to see if it grew on us, the verdict was “we’re sending it back.” Again, this picture makes it look less busy. In person, it just didn’t work for us. Which is sad, because packaging and mailing back a rug is akin to running a triathlon for a 5’2″ gal like me.
So the little X-border rug from downstairs might come up here (it reads a lot more like a light silvery-gray) and then we have to find a good rug for the living room, but it helps that the three big rugs that we need for this house are all 8 x 10’s, which is nice for flexibility & swapping (you know I love to switch things around – a little too much probably).
The hall bathroom is still my favorite bathroom, and we actually found the perfect mirror for it, but alas, we couldn’t fit that in the car either, so we’ll have to hang it next time. We did manage to hang a shower curtain in there and caulk the tile edges (we finished caulking all the showers!). So pretty much all we need to complete this room is a toilet paper holder, a few towel hooks, and the easy small stuff. HUZZAH! Also need to hang the art and add window treatments so we can stop blocking the windows with cardboard while we’re there because that just doesn’t feel very classy you guys.
This is a terrible picture taken with the lights on during a super rainy day, but the master bathroom shower finally got glass! WAHOO! We worried that shower might feel tight, but thanks to getting this glass panel instead of a big bulky wall, it feel so bright and open in there! It actually feels just as big as the bigger hall shower which is around 6″ wider – so it’s funny how much your eyes play tricks on you when it comes to the actual perceived size of something. Still need a lot of stuff in here (I want a wooden stool by the tub, a few other hits of wood to add warmth, window treatments of course, towel hooks, etc). Slowly but surely…
But now let’s get back to the kitchen that we assembled from approximately 4,567 small parts with a single allen wrench.
Just kidding, it was slightly fewer parts and it actually didn’t involve a single allen wrench (go figure!), but it was sort of like a DIY marathon of snapping, drilling, hinging, hooking, and leveling things over a four day period.
As for why we opted for Ikea cabinets at the beach house, we’ve been really happy with the ones we put in our laundry room and our bonus room – and the budget called for something affordable since we’re also adding beds and furnishing a lot of other rooms at the same time. We even got to take advantage of Ikea’s spring kitchen event (yes we ordered all of this waaaay back then) to save some extra money. This entire kitchen – including the counters and sink! – came in around $3K, which is pretty dang amazing to me.
We’re lucky because some Ikea kitchens consist of 25+ cabinets and we only had 8 in here to assemble (and it helped that we had an extra long weekend thanks to those two additional days off of school for the kids). It also helped that we went pretty simple with the layout and the cabinet fronts since we want the pink stove and the pretty old architectural details in here (like the back staircase and the old glass-paned doors) to be the stars.
Speaking of that back door, yes we’re going to eventually paint it. We love the blue chippy door to the mudroom, which you can see in the video, but the back door just seems to look dirtier as the kitchen comes together more. And yes, we have to weatherstrip it because there’s a small gap. The light bounces off the floor and creates what looks like a much wider gap than the actual sliver of space under there, so we get “OMG CAN AN ANIMAL GET IN THERE?!” comments surprisingly often, but in reality it’s definitely not animal-sized. If it was, the whole weatherstripping thing would have been waaaay higher on the to-do list. Ha!
Getting back to the topic of kitchen assembly time, the fastest part was the counters by far. We measured ten times before we cut each one, and we taped them off to lessen the likelihood of splintering from the circular saw (which worked!). Lo and behold, we didn’t mess up a single cut! Each of the four counters we sliced and diced fit like a glove. We still have to screw them into place and seal them (and figure out the entire island – so there’s THAT) but we’re super relieved that our first go at cutting our own counters wasn’t too much trouble. Note: For more info about how we planned this kitchen, what exact items we ordered, and why the heck we chose butcher block, this post has all of those details for ya!
And as for the color of our butcher block, we got so lucky! It’s really close to the heart pine floor color, and we think when we seal them we’ll be even closer (they look a bit drier and less shiny than the floors right now, but only slightly).
So that, my friends, is what we’ve been up to at the beach house. Oh and the kitchen table came with those chairs from craigslist (the whole thing was $65 and the table has super cool legs that you can’t really see here) but we’re going to be switching the free chairs out for white ones since that feels like a super dark spot in the kitchen right now. And those chandeliers will be lowered around 10″ (they were installed higher so people wouldn’t run into them and break them while the house was being put back together & the floors were getting refinished). And we need a dishwasher. And a drawer for that space below the microwave. And a much bigger island counter with a sink in it. And art. And lots of stuff. But look, we have a half-functional kitchen!!!
A few other things we checked off the list were that I got to run around scraping stickers off all of the windows with a razor and then I cleaned them all (so SHINNNNY! – please sing that like the crab in Moana). I also got crazy with the spackle and basically filled every single ding and dent I could find (if you look super closely in the video you might see some of my patches that I have to sand and paint the next time we’re there). When the hood went up there was a little ding in the ceiling, so I wasted no time hopping up on the counter to fill that baby. PARKOUR!
I’ll leave you guys with this shot of the kitchen from the door, which is such a welcome change! No more pile of Ikea boxes sitting on the floor, mocking us and making us question our sanity/ability/time management skills.
And since we promised a big ol’ mood board full of sources, here’s the one we shared a couple of weeks ago along with with our new additions added below:
1. Living Room Art / 2. Kitchen Stool (similar) / 3. Chair Version of Kitchen Stools / 4. Front Bedroom Art / 5. Walls (SW White Heron) / 6. Downstairs Trim (SW Stone Isle) / 7. Upstairs Trim (SW Pure White) / 8. Tub & Pocket Doors (SW Riverway) / 9. Foyer Mirror / 10. Hall Bath Tile / 11. Hall Bath Vanity / 12. Downstairs Bath Mirror / 13. Downstairs Bath Vanity / 14. Master Bath Mirror / 15. Master Bedding / 16. Master Bedside Lamps / 17. Master Bedroom Art / 18. Master Bath Tile / 19. Master Bath Accent Tile / 20. Master Nightstands / 21. Hall Bedding
22. Leather Ottomans / 23. Hall Bedroom Art / 24. Extra-Long Waffle Shower Curtain / 25. Downstairs Bath Art / 26. Glass Shower Pane / 27. Pink Downstairs Lamps / 28. Hall Bedroom Blanket / 29. Front Bedroom Blanket / 30. Blue Front Bedroom Lamps / 31. Kitchen Counters / 32. Wood Benches / 33. Front Bedroom Pillow / 34. Kitchen Cabinets / 35. Front Bedroom Rug / 36. Living Room Rug / 37. Middle Bedroom Rug
And for anyone looking for lighting sources, here’s our mood board with that info:
1. Front Porch / 2. Downstairs Bath / 3. Kitchen Island / 4. Porch Numbers 5. Foyer (similar) / 6. Bedrooms / 7. Kitchen Sconces / 8. Living & Master Bath 9. Mudroom / 10. Clear, Soft White LED Bulbs / 11. Dining / 12. Master Bath 13. Hall Bath / 14. Hallway & Small Upstairs Rooms / 15. Under Stairs
And in perhaps the craziest news of all, on November 5th we got a completely unseasonably warm 70-degree day, so we actually all went to the beach and went swimming!
It was so crazy. The water felt perfectly refreshing! Of course now we’re back at home and this morning it was 40 degrees so bah humbug.
Psst – You can see more of our beach house adventure here (it’s a category full of posts about the entire process, which started over a year ago).
*This post contains affiliate links*
The post The Beach House Has A Kitchen! Well, Kinda, Sorta… appeared first on Young House Love.
The Beach House Has A Kitchen! Well, Kinda, Sorta… published first on http://ift.tt/2qCHnUt
0 notes
Last Seen Blogs

yesbellame-blog1
quiero escapar.

laydnixmusic
LayDNix Music


saccharine-snake
saccharine_snake

herbatahleb
Herbata❤|Commissions open|