#and it's also 100% fine to delete swatches
Text
just a reminder that i do look at my activity and see the tags yall use when u rb my stuff
#someone reblogged my jellybean hoodie with the tags 'i love simlish kpop cc but those s*z swatches are getting deleted'#which is like#it's fine to dislike a kpop group#(although i think this person is an anti which is just embarazzing to me)#and it's also 100% fine to delete swatches#i do it for every single piece of cc i download in order to keep my mods folder as small as possible#but saying that in the tags feels very weird and unnecessary to me#i know it's not directed at ME but it feels like it because i'm the one who spent time making those swatches lol#not to mention my friend who spent time making the simlish album covers which is way more work#AND my other friend who made the simlish maniac logo#maybe i'm overreacting and being too sensitive - given that this comment was not directed at me in any way#but it just annoyed me#that being said -- i do also see the positive comments and they make me super happy#so thank you to all the nice people and fuck you to this weirdo
15 notes
·
View notes
Text
How to sort your non-default eyes cc by style not by colors in CAS
If you are using 2+ non default eyes like me and you are borthered by the swatches are mixing up or hard to find the eyes you want without having a headache. Then do this. EDIT: Sorry to any people follow this tutorial before I edit this, you should follow this tutorial instead for faster method, both works fine but the other tutorial is much faster and easier. I really apologize for my lack of knowledge when writing this tutorial.
Required: Sims4Studio

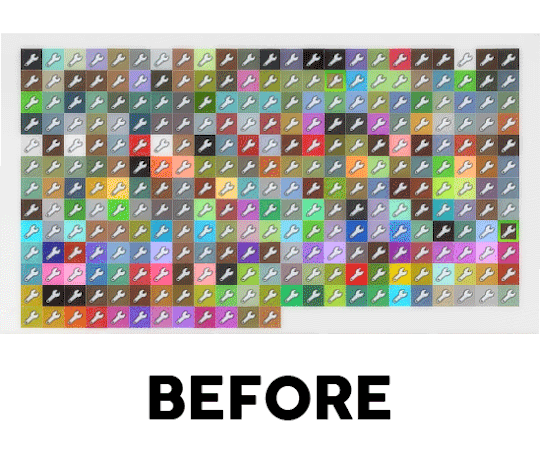
So originally, most nondefault eyes are made with the sorting order from 0 to 100+, which gonna make 10 different styles of green eyes in around same spot of EA green eyes, for so they mostly sort by colors. And if the palette goes beyond the EA colors and/or more swatches and/or sort differently by cc eyes creators, it will be like picture above.

Step 1: Open Sims4Studio, click on My Projects, locate the NON-DEFAULT eyes package you want to re-sort, and open it.
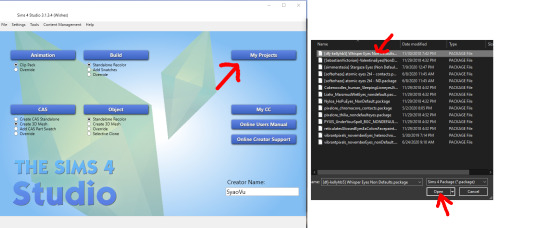
Step 2: When the package is opened, (1) click on Warehouse Tab, you can see the list of CAS Parts on the left which control how the swatch behave, (2) click on the first CAS Part, (3) on the right side, type sec into the search bar, (4) SecondaryDisplayIndex will appear, you want to change the number next to it.

Step 3: The strategy is go for big number, I recommend go for 1000, then go the next CAS Part on the list on the left side, change number up by the unit of 5, so it will be 1005
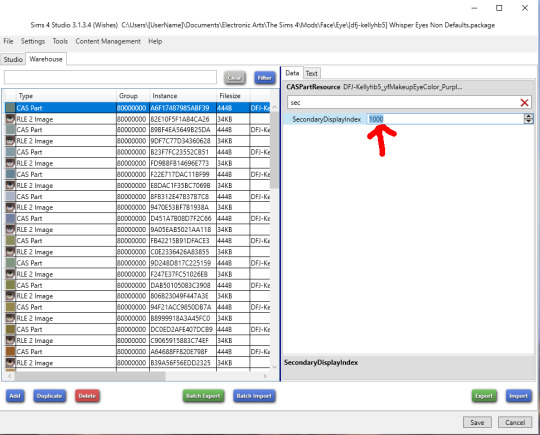
Step 4: Continue going down the list for each CAS Part, change the number increase by 5 than previous CAS Part, 1010, 1015, 1020, 1025 and so for until you reach the end.

Step 5: When you’re done, hit Save at the bottom and then Cancel to exit the file.
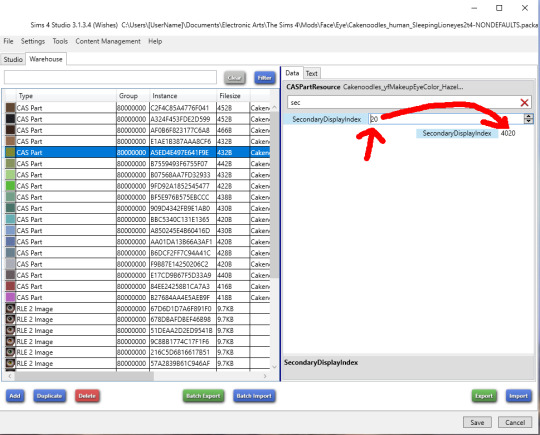
Step 6: Do the same thing from Step 1 to Step 5 again for each new non default eyes that you have. The new eyes to re-sort now start with 2000 like pic below, then the next following set of eyes start with 3000 and so for, the reason to do this is to keep them far away from each other to avoid mixing up.

One tip: Sometimes when you go down the CAS Part list, the color swatch is not arranged correctly(top to bottom) to how they appear in Studio Tab, so instead of go from top to bottom and add 5 to the new one, you can just add the number before the existing number like pic below to make it thounsands unit.
Now, open the game and tada you have pretty organized non-defaults eyes in CAS (also great that you can delete the eyes you had in your folder that you don’t want to use anymore in the process)
#syaovu#sims4#ts4#ts4 tutorial#s4 tutorial#s4cas tutorial#tutorial#resources#sort non-default eyes by style in CAS
1K notes
·
View notes
Photo

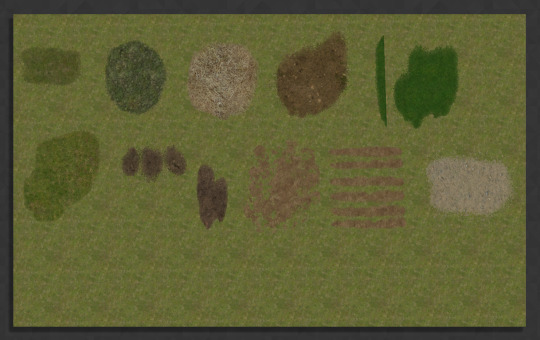

Hood Deco Flat Grass
So i was able to finish this yesterday after all, but got headache in the end so no way i’d upload it then :D For those who hadn’t seen my wip post about it you can check it out for additional pics in the desert terrain.
They use road deco mesh from Crqtt and I’ve cloned them from Gwenke’s seasonal tree, so they are seasonal, but in a way that they’ll only get snow covered in winter, on all other stages they’ll stay the same, don’t worry though, all 3 stages use the same texture, so there’s only 2 txtrs per package the other one being snow stage. Also textures are 512x512, at least smaller than 1024 the roads use. Most of the textures are from CuriousB’s hood defaults set, with the exeption of the last 3 txtrs on the swatch and the snow txtrs which i found on Google. I’m not sure if i’m happy with how the snow stage turned out, mb it’s just a bad angle and empty space unflattering them, but originally i thought they’ll look nice enough to straight up decorate snow hoods with, like less floodfill, more snowy terrain detail... Also thanks to whoever made free PS brushes i used to make most of those shapes.
Find them in “Flora” section. There’s 193 packages, but they are all properly named both the files and in game descriptions, so it should be easy enough to delete the ones you don’t want, i kind of got carried away with some of those and idk it might be good to pick and choose which ones work for you, i’m not sure myself if i’m gonna keep them all, though it doesn’t actually look as such a big number when you see them in catalogue. On the pic is just an example of some shapes, there’s many unique shapes which may or may not be even better. Another thing to note is that i lowered them even more than Maxis alleys are, cos they looked too high for me the way they were originally. They look like they go under the road when you place them in hood, but if you see from the lot they’ll be above the road, so place them close to the road without intersecting it, unless you want some dirt or grass on your road ofc. Do i need to mention that those will work best/mostly on flat terrains?
Download (compressed)
Also since there’s many packages i want to point out that you can bundle hood deco, same thing as with objects with fixing instances on XMLs, the only caveat is having descriptions, if you wish to preserve them you should manually edit each XML to point out to correct instance of Text List (they are all 7B by default, so you’ll need to fix instances for text lists as well. the line in xml is “stringsetid”). In this particular case however i’d recommend deleting all but one text lists and editing remaning one to give general description. Idk if it was said anywhere, but thought it might be the right time to point that out, since having that many packages might be a dealbreaker for the bundling people :D
I'm pretty sure i’ll need a bigger version of this though, i was correct in thinking that those are mostly useful on small scale decorating, on one had it’s more versatile, on another more tedious to place and i don’t have patience for it. Like on the first pic i’ve used like 10-15 things, and it’s what, to cover the ground under 6 trees? In this case it might be fine and manageable, but if i have a forest with 100 trees i’ll def won’t care that much to put shitton of lil grasses by hand in there, like to make small touches to the big shape is ok, but make main ground with small things - not so much. But gotta try make less packages for that one...
#s2cc#sims2cc#sims2 cc#sims 2 cc#ts2cc#ts2 cc#sims2 download#sims 2 download#ts2 download#ts2 custom content#sims 2 custom content#sims 2 hood deco
486 notes
·
View notes
Photo

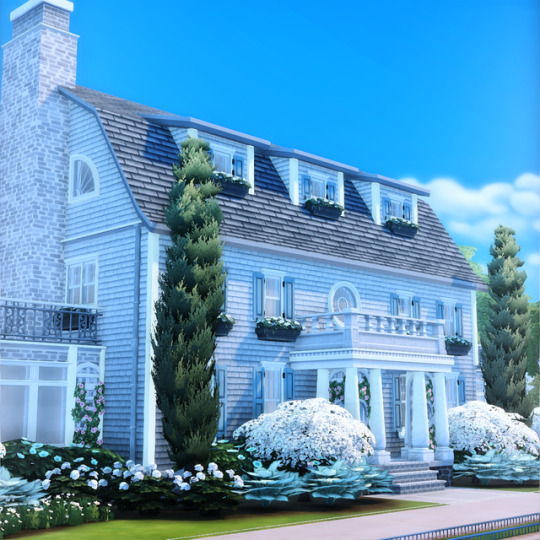


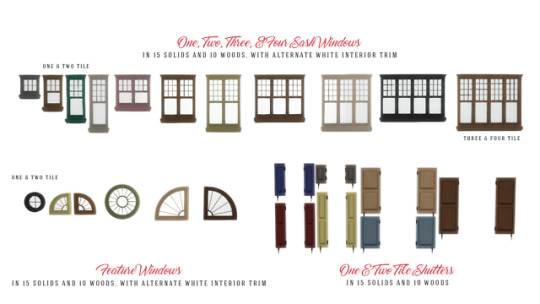


Graciously Georgian Version 2.0 - Classic Style Build Set with 60 New and Improved Items
I have been working on this for too long. Way too long. I loved the original set; I use it a lot and we just don't really have anything similar ingame to replicate it. However, the original had issues. It was my first original buildmode set so that was expected. However I kept seeing other issues besides the ones reported that I just had to fix because they bugged me. So it is finally done and I am even happier. Why so long? I have made it so this replaces the original items almost perfectly. Along with fixing existing meshes removing unnecessary polys and fitting better into the game sizing (no clipping through ceilings) I also added a few new items as well.
What you need to know:
This replaces the original set. Well almost. 2 swatches from the single sash loft windows don't replace and I couldn't figure out why. Everything else is fine. That is 99.6% of window styles replace the originals
I will repeat: THIS REPLACES THE ORIGINAL SET. Delete the original package files before putting in this set.
Added new styles. You now get the solids and woods in alternate white trim (rather then just woods being available in both)
12 new items (windows and doors)
Some colour styles have changed, mainly the wood white trim doors
DO NOT delete the files with TEXTURE in the package names. The cc will not work without them. Read this because so many of you don't.
Updates:
20/4/2019 - Fixed shadow issue with 4 sash standard window
28/10/2020: Now compatible with patch 1.66 new cutout system
The Build/Buy items feature:
basegame compatibility
non-default
60 meshes in total with between 25 and 50 colour/style options:
find items easily using phrase "Graciously" or "Georgian" in search bar (try this tutorial to easily find my sets)
custom thumbnails
Pricing and polycount as follows:
1 Sash attic window 1 & 2 Tile ($43/44, 314 polys)
1 Sash loft window 1 & 2 Tile ($53/54, 350 polys)
1 Sash counter window 1 & 2 Tile ($103/104, 362 polys)
1 Sash standard window 1 & 2 Tile ($153/154, 374 polys)
2 Sash loft window ($94, 470 polys)
2 Sash counter window ($144, 494 polys)
2 Sash standard window ($194, 518 polys)
3 Sash counter window ($184, 626 polys)
3 Sash standard window ($234, 662 polys)
4 Sash counter window 3 & 4 Tile ($228/229, 758 polys)
4 Sash standard window 3 & 4 Tile ($278/279, 806 polys)
Small round window 1 & 2 Tile ($40/41, 800 polys)*
Small quarter windows left & right ($45, 524 polys)
Large round window ($105, 1468 polys)
Large quarter windows left & right ($115, 654 polys)
Single interior door 1 & 2 Tile ($329/329, 910 polys)
Single glass interior door 1 & 2 Tile ($348/349, 1134 polys)*
Double interior door ($360, 1630 polys)
Double glass interior door ($380, 2078 polys)*
1, 2, 3, &4 tile short Square Arches ($80/120/160/200, 340 polys)
1, 2, 3, &4 tile medium Square Arches ($100/140/180/220, 412 polys)
1, 2, 3, &4 tile short Curved Arches ($90/130/170/210, 496/576/664/736 polys)
1, 2, 3, &4 tile medium Curved Arches ($110/150/190/230, 568/648/736/808 polys)
Narrow Single Entrance Doorway 1 & 2 Tile ($390/391, 1248 polys)*
Square Single Entrance Doorway ($460, 1516 polys)
Arched Single Entrance Doorway ($470, 1708 polys)
Square Double Entrance Doorway ($580, 2200 polys)*
Arched Double Entrance Doorway ($610, 2852 polys)*
French Double Doorway ($500, 1564 polys)
1 Tile shutters in attic, loft, counter, & standard sizes ($32/62/92/102, 660/756 polys)
2 Tile shutters in loft, counter, & standard sizes ($84/114/144,660/759 polys)
*This content is considered high poly so use in moderation, or if you don't think your computer can handle it, best to take these items out.
CC credits:
All custom content is mine, so feel free to browse through my downloads to find it.
This is a pick and choose download so I am not providing a merged file. Simply choose your preferred download site and grab the ZIP file. To install, extract the archive using WINZip/WinRAR/7Zip/Unarchiver and place the folder or package files in your mods folder, then look for them in your game. If you are having issues check out my Installing Content help page.
Download:
SimFileShare | Google Drive
My content will always be free, but if you are so inclined and able, you can show your support and buy me a coffee
5K notes
·
View notes
Photo
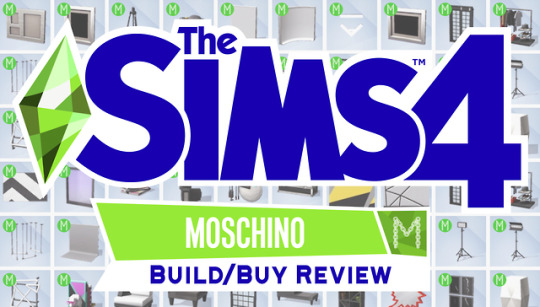
The Sims 4 Moschino Stuff - Early Access Build/Buy Review
Huge thank you to the EA Game Changer Program for providing me with the opportunity to play Moschino Stuff early!
Ever since I saw the trailer for Moschino Stuff, I knew the Build/Buy content was going to be the part of this pack that I was the most excited for and interested in and for the most part I absolutely love a lot of it. But, like CAS, Build/Buy is not without it’s issues.
As always, if you have any questions about the pack, feel free to send me an ask!
See a preview of all the new Build/Buy items here
👗The Buy
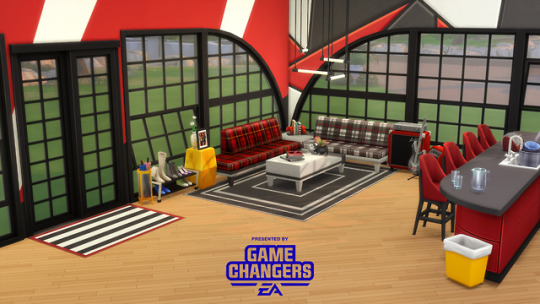
I pretty much love all of the Buy Mode objects. The couches come in some very cool patterns as well as solids, the funky pop art mirror is fun, and I love that the end table is much lower than most end tables we have so it sits nice and flush at the same height as the couches and coffee table.
But my favourite things are probably, as always, the decorative stuff. More specifically the LiBEARian (the books with the bear book ends, get it!), the Simsational Style Stack (the magazine pile) and the Amp Stack (they’re all in the pics above). Even though the Amp Stack is purely decorative, it looks very cool sitting next to a guitar and adds a lot of character to any musician’s house!
I also really like the Repurposed Gear Chest (the trunk with stickers on it) that’s essentially a coffee table and looks very cool and retro, and the Tastefully Empty Bookcase which... is not empty at all? lol I do wish the bookcase came in different heights and widths as well, but at least this time it’s a short one, unlike the bookcases that came with Seasons and StrangerVille that I love but never get to use because they’re too tall for short walls.
Something that’s bothered me pretty much since base game released is that there’s no consistent colour palette for all build/buy objects. I get that each pack has specific themes and there might be colours that fit that theme better than others but I would love to see a consistent palette used throughout every pack — say like black and white obviously, 5 different wood tones, 5 solid neutrals and 5 solid “standard” colours (blue, red, yellow etc) — and have every single item that gets added to the game made in those colours, then if a new pack has specific colours for it’s theme they can be added on top of the standard palette. I like the colour palette that was chosen for the items in this pack but I found it really hard to find anything from other packs that matched it. It bothers me so much that nothing ever matches from pack to pack, half the time objects in the same pack don’t even match! And even now that the 350 new swatches were added to base game doors... they still don’t match anything else!
Sorry, I know I’m ranting and this has very little to do with Moschino Stuff but it just really bothers me that nothing ever matches because whenever I build I spend hours trying to find a floor to match the trim around the bottom of the wall I’ve chosen, then none of the doors match the floor and trim so I have to change it all, then none of the windows match the doors, floor and trim, and on and on until I’ve completely forgotten what I originally wanted the build to look like!
I really like the new frames we got for photos too, and the fact that they can now be placed on tables BUT I’ve had a couple of issues with them. First of all, it’s not possible to turn the frames placed on tables using the alt key, so you can only turn them in 45 degree increments and I hate that. I like to have all my photo frames slightly askew at different angles and it bothers me that these ones can only be places either facing straight forwards or angled by 45 degrees.
The second issue I have with the frames is actually more of a technical one but I’m not entirely sure if it’s the frames themselves, the photos, or the photography skill; I haven’t been able to work that out yet. When I have a sim take photos using the new tripod and camera everything is fine, but the second I exit out of the photography UI my FPS drops drastically.
I thought it was just my computer being stupid at first, until other Game Changers started reporting the same issue. I suspect it might be the photos and frames — specifically the new collage frame — because as soon as I remove the frames from the lot, the FPS goes back to normal. My game normally runs at a steady 60 FPS at all times but as you can see here, it drops down to 8-12 whenever there are framed photos on the lot and shoots back up when I delete them.
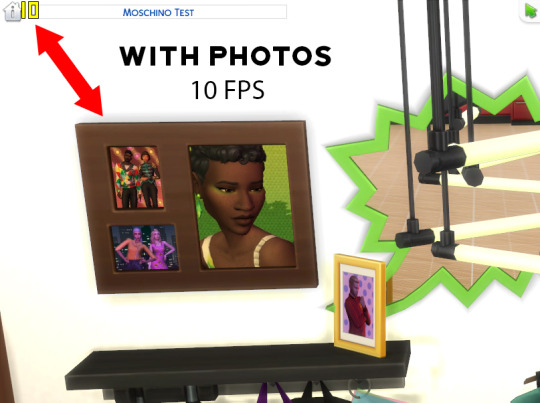

NOTE: This was with my game 100% CC and Mod free.
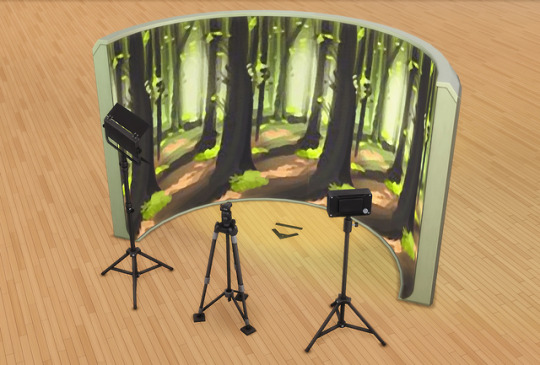
All of the new photography gear is so cool too! The fact that most of the items (like the tripod, camera, and tape markers) can be picked up in your sims inventory is so handy; your sim can just grab their equipment and head out into the world to take photos of other sims, landscapes, pets, and themselves literally anywhere they can plop the tripod down! And the backdrops have some really cool backgrounds for you to take photos in front of... or maybe... some other... uses 😈
👗The Build
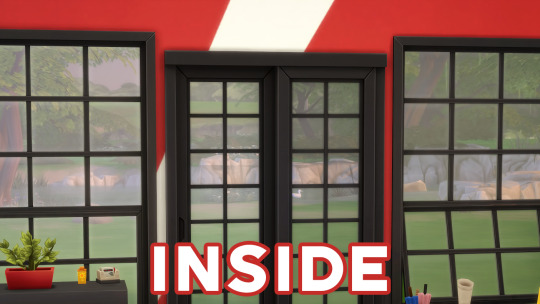
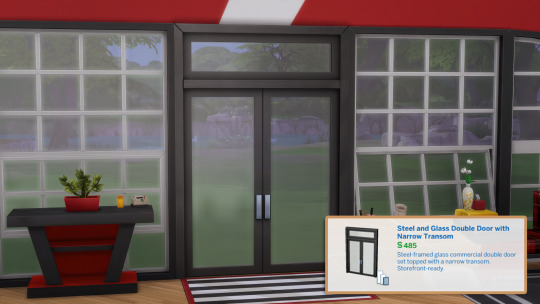
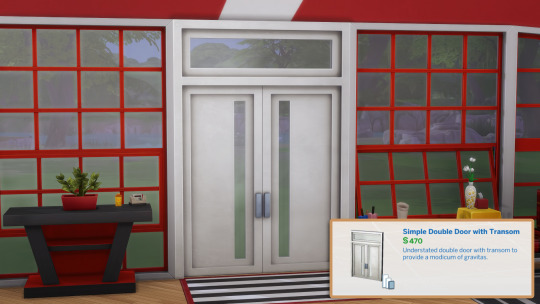
I think the thing most people were looking forward to in this pack were the beautiful windows and doors; I’m definitely one of those people lol They are definitely gorgeous but as seems to happen every single time we get new windows and doors, the selection is limit in many different ways.
Every single colourway for both the windows and the doors is either white, black, red, or some combination of those colours. There are no colourways that match any of the other colours used on the furniture for the set (like blue, pink and yellow) and absolutely zero wood or neutral tones.
There are also no other heights for both the door and window other than for the shortest wall height, which absolutely baffles me because they’re clearly a set made to be used in lofts and converted warehouse type builds... builds that are generally made with either the medium or tallest wall height. They also didn’t bother to make single tile versions of any of the windows and doors, or even a closed version for the smaller window!
But what’s even more baffling (at least to me) is the way the door was made. I literally spent a full 30 minutes just sitting here in front of my computer, staring at this door, trying to figure out what could possibly have been going through the head of whoever made it when they decided that not only would it be shorter on one side, therefore also shorter than the windows, but also that it wouldn’t take up the full two tiles it was allocated and therefore wouldn’t sit flush up against the windows it was made to go with!
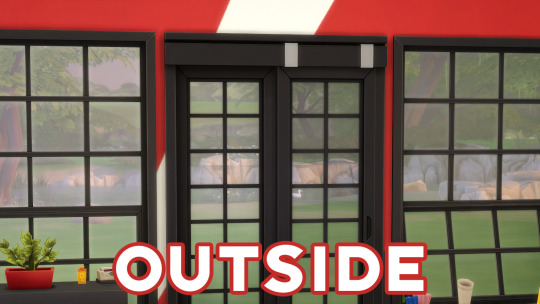
I saw a tweet by one of the Gurus that basically said “It’s the right height on the outside, just flip it around” but... that still leaves you with one side shorter than the windows, it’s just now on the other side, and there’s still gaps at the side! Why you would go to all the trouble to make the windows fit beautifully together like that and then not make the door exactly the same height and width! It bothers me way more than it probably should but I just don’t understand!
On the plus side, there are some base game doors that fit in with the windows (kind of) that I will probably use instead of the Moschino door... at least until someone makes a build add-on for them anyway lol
👗The Verdict
Overall, while I have issues with some of the build/buy stuff, this is where this pack makes up for the lack of CAS stuff in my opinion and what would make me want to fork over the $10 for the pack. To be completely honest, I’d pay $10 just for the LiBEARian though 🤣
All thoughts and opinions expressed in this review are my own. I am not paid by EA to “hype” their games; I am given the opportunity to review their games early in exchange for an honest review.
Click here for my Create-A-Sim Review
Gameplay Review coming soon
185 notes
·
View notes
Text
ashlee’s gif making tutorial
@amysperalta has requested a gif making tutorial from me and i’m happy to oblige! everyone has a different way to gif and some ways don’t work for some people, so this is just how i personally make them. i’ve also never made a tutorial before, so let’s hope this doesn’t end badly.
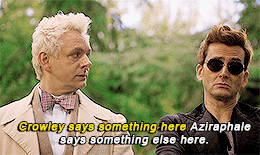
this is the gif i’ll be making for the purposes of this tutorial:

things you’ll need:
a version of photoshop
some way to get frames from a video file (i’ll give some options)
patience
step 1: getting your frames
there are many, many ways to do this. there are multiple different programs to do this with (kmplayer, uplayer, gom player) but i personally use mpv (via @kylos lovely tutorial here; which i also highly recommend as a gif tutorial since it gives a different way to create a gif file) because my mac doesn’t accept any other type of program.
note: BE SURE THAT WITH ANY PROGRAM YOU USE, IT IS SET TO SAVE EVERY FRAME. some people may lie to you and say a program grabbing every other or every third frame is fine, but it’s 2019 and we don’t do that any more. the tumblr gif limit is 3mb, which means we can have smooth, non-choppy gifs by gathering every frame from a scene.
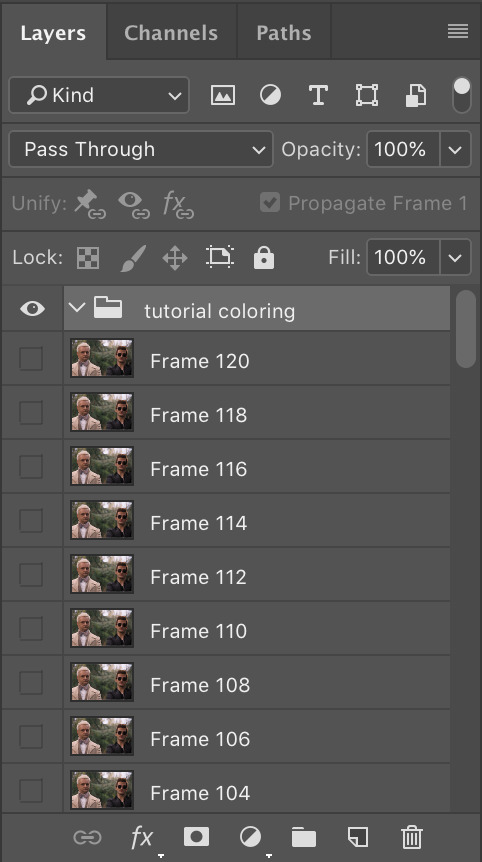
okay, so i gather my frames, and typically keep them in a folder, separating scenes cut-by-cut so it’s easier to handle. for example:
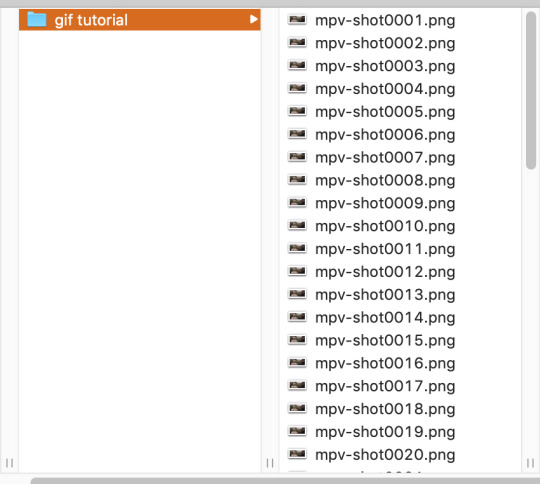
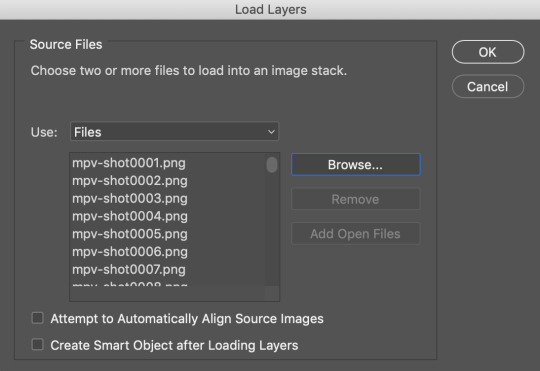
from there, i import them into photoshop using: File --> Scripts --> Load Files into Stack; this screen pops up, in which you browse for your frames hit OK. this will automatically upload all the frames into the same file for you. be patient! depending on how many frames you choose, it can take a few minutes to upload all of the frames.
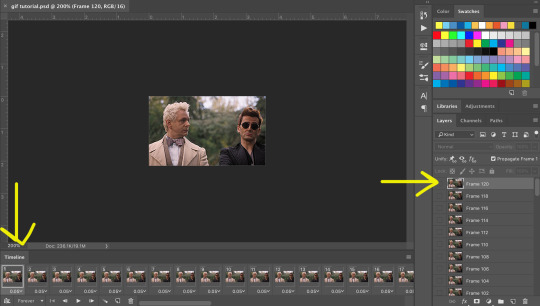
i always save my work after every step. so once frames are uploaded i save the file. be sure to have “timeline” (or “animation” on some versions of photoshop) opened in your view. my photoshop looks like this when i open the file:

now, i’m going to click “Create Frame Animation” at the bottom. This will give me a timeline to work with at the bottom. Next step, go to the three little lines on the right side of the thingy that says “Timeline” and go through these steps:

and then

now, you have a working gif! you can hit the little play button at the bottom left of the screen and it should play for you.
step two: cropping and sharpening
there is plenty you can do for sizes on tumblr. the general widths are 540px (big), 268px (normal) and 177/178px (small). it’s all a matter of the type of set you’re making. also be aware that the gif limit is 3mb. the bigger the gif, the fewer frames you can have. most of my 540px gifs have between 20-35 frames, while some of my 268px frames can have 75-90 depending on the coloring of the scene.
but for the purpose of this tutorial, i’m making one 268x160. i go to the crop key at the left side, and set my ration up top to 268 and 160.

then i crop the gif! (note: sometimes, files will have a black line on one side of a video file; typically the bottom or on one side. the black line will be no more than 2px big and sometimes hard to see until you’ve cropped it. be sure to drag the cropped area away from the edge of the files that have this dark line, as it when appears on the final gif and looks bad. one of my more recent sanditon gifsets fell to this and i didn’t realize until i had posted it. 😖)
now we have to size it. you do do this by going to Image --> Image Size or using the keyboard shortcut. it should automatically keep the aspect ratio, thus when you change width to 268, the height should change to 160 automatically.

hit OK and now you have your base gif!

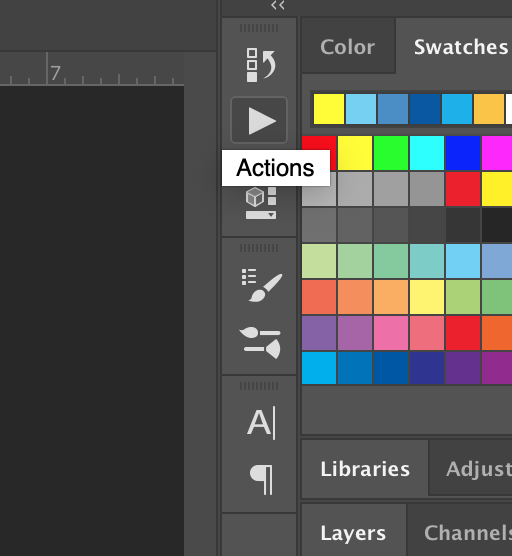
next, we’ll be sharpening and setting the frame rate, two very important things. to sharpen a gif, there is no way you want to go do it frame by frame, so you can use an action! these are really helpful. i have one i use for most gifs, and one i use for lesser quality. the one i use for this gif is this one here. to use this, you’ll have your photoshop open, you can go to your actions in your barthingy on the right by color swatches which should look like this:
click that and find the three grey lines at the top right. click them and this will pop up. you’ll go to “load actions” and then browse for the action you downloaded.

once loaded, it will show up like this and have a nifty play button!
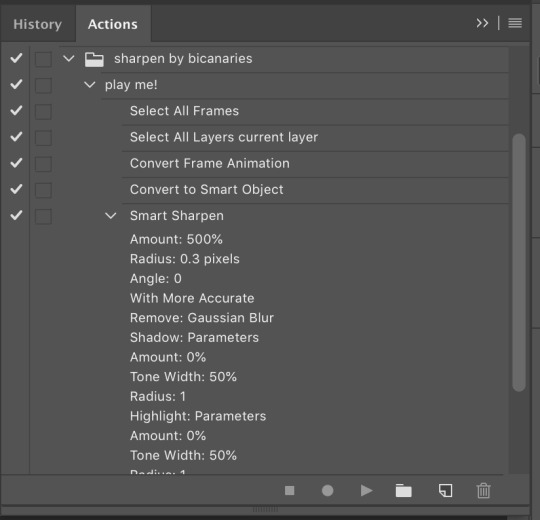
make sure you click on/highlight the “play me!” line and then hit the play button on the bottom of the box. it will go through the motions for you and sharpen your gif. once that’s done, you can hit the big action button to close this box to get it out of the way. now, to set a frame rate, you’ll go down to the timeline and highlight all of the frames and then click while holding shift and this will pop up.
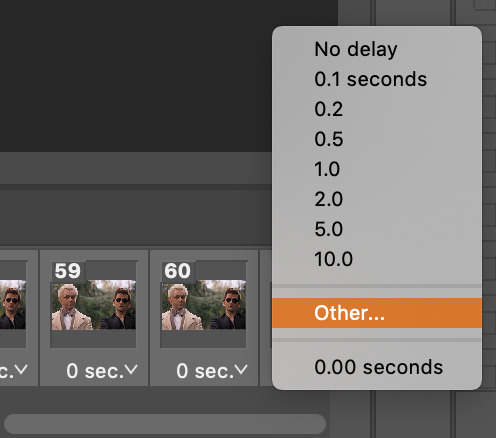
you’ll select “other” and type in “.05″. this is the most commonly used frame rate. most movies and tv shows will look fine using this for scenes, especially ones with subtitles, etc. for more artistic scenes, sometimes i’ll use “.06″ to slow it down just a hair. also make sure that your gifs are set the loop “forever”.
and there you go! a gif fully sharpened and moving at the proper speed:

this is also the time you can choose your frames. meaning if you uploaded like 200 frames and only wanted to use 50 of them, you can go through and delete them in the timeline. there’s a little trashcan button there.
note: once you’ve sharpened and set your frame ratio, be sure to go into your levels box and click the top frame. it is also useful to have the first frame in the timeline always highlighted as you’re editing the rest of the gif.
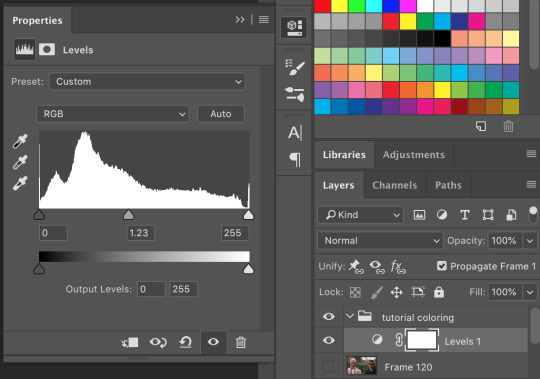
step three: coloring
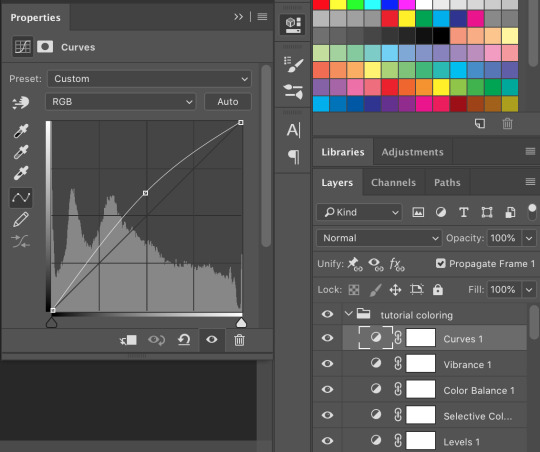
there are endless ways to color. there’s loads of people offering psd colorings. (psd means an editable photoshop file btw) you can also make your own. i have a whole slew of psds i’ve made for certain scenes that i’ve kept and reuse, tweaking each time. this isn’t a coloring tutorial, but i’ll show you a quick way to make a simple coloring. (i purposely chose a well lit scene for this gif tutorial for this reason. making dark scenes look good, or scenes with bad color balance is a whole other tutorial lol)
first off, make a folder above your frames. you can name it whatever you want; it will automatically call itself “group 1″. this is where you’ll be putting all of your coloring layers so they stay together and you can also save it to use again.
from here on out, we’ll be adding layers, using the half black/half white circle down at the bottom; just click on it and it’ll pull up a list of things you can use. note that when you add coloring layers, you start at the bottom and add other layers on top of it.
always start with “levels”. i lighten up almost every scene i gif, since it gives me the chance to play with contrast on my own terms.
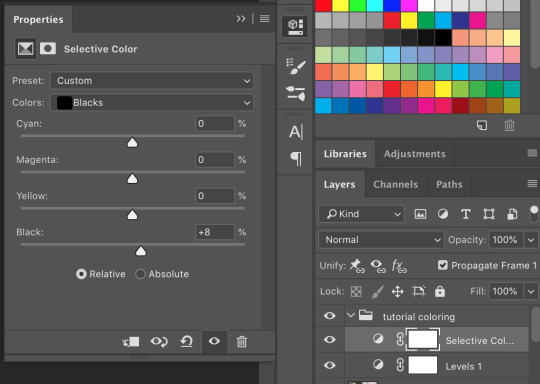
then we’ll do a “selective color”; this one is just to set some blacks while giving contrast. be sure to select “blacks” at the top and change just what’s below:
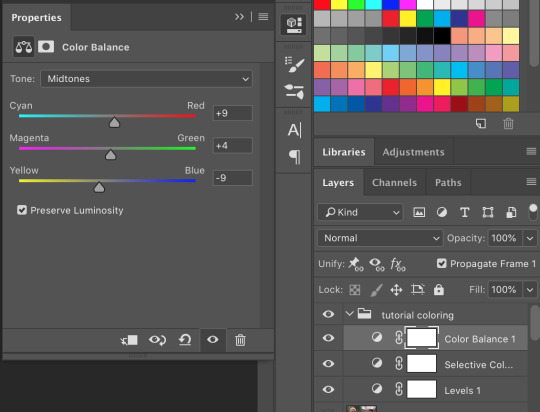
most gifs also need some “color correction” at this point. (this is a layer you’ll keep coming back to to tweak as you add more above it fyi.) for this one, i’ll make it a bit more green and red.
the gif right now looks like this....which isn’t perfect, but i can see where it will get to from here:

now we’ll add a layer of 100% “vibrance”

not every gif needs 100% vibrance, but i tend to like how colors look when i use it and we can fix any weird colored skin in later steps. and now some curves for contrast:
the gif now looks like this:

which is much too yellow certainly, but gifs always look worse before they look better when it comes to coloring! next, we’ll make another layer of “selective colors”. this is when you’ll play with each color within the same selective color layer. i’m guessing i’ll utilize more blues and less yellows under “yellow” and “red” but let’s see what happens:


now it looks like this!

which is a lot better. i’ll probably up the blacks +10 (using the same selective color layer) just a bit so crowley can be his angsty self entirely. i also want to up the greens because i love bright gifs.

the great thing about selective colors is that they’re easy to manipulate. and you can even have multiple of them over one another to really zero in on one color. and if you find that you can’t get the gif to look right at all, you can also return to your color balance layer and tweak it until it looks better and is easier to manage.
so now, my finished gif looks like this:
(this is not the most exciting gif ever, but it works to show how to play with colors in a well lit scene).
there is a number of other things i do/can be done in making gifs, but these are the basics.
be sure to go to File --> Export --> Save for Web and follow my settings to save your gif. (there are many ways to save a gif, and each gif tutorial will give you different settings. i recommend trying them out and see which works best for you.) pay attention to the “bicubic” quality at the bottom. and when your gif is small enough (under 3mb), be sure to click on the “original” tab at the top and save it while on that screen.


and, because i’m feeling nice, let’s have a quick subtitles moment:
bonus step 4: subtitles
i know there are easier ways to make subtitles but this is how i do mine. using the ruler around your photoshop space, drag one vertical line over your gif. the program should automatically “snap” them to the middle of the gif to create your perfect center.

then take the text tool and write something in it, no matter where or what size, just so you have something to manipulate. you’ll find that it too will snap to the center to match the ruler line, giving you a centered text box! you can have it whatever distance you want from the bottom (don’t go too close or tumblr will cut it off) and then you can edit the text color/font/etc. these are my settings.

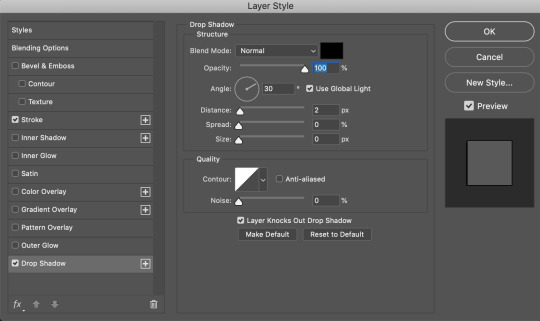
and i also have an added stroke and drop shadow to it which you can get to from Layer --> Layer Style:

and so it looks like this:
it is important to add your text layer ABOVE your coloring folder, otherwise the coloring will affect the text. and it’s good to have different colors for different people talking.
i hope that all made sense! feel free to send me any questions (i’m sure i must have made you confused or missed a step or something), or if you have any other tutorials you’d like to request.
#gif tutorial#photoshop tutorial#photoshop#itsphotoshop#tutorial#my tutorial#thanks for requesting this!#it's very long but i hope it helps
67 notes
·
View notes
Note
Hey littlelittlesimmies! I love what you do with maxis meshes and Im a really big fan! Can I ask a quick question? I know you like to keep your download folder as thin as possible, about large is yours? do you have any special tips or tricks to save space? Thank you so much, you are my sim-spiration!
You sim-spiration ? Really ? Wow, let me thank you sooo much !!! You’ve just put a smile on my face
I will try to reply but I have to admit I’m not an expert about saving space. I’ve read so many different tricks but still did not tried them all. But, my way to do so is more or less this :
I only download new meshes when I really love them. It’s basic, but belive me, sometimes it’s hard to look at wonderful CC and not downloading them. Or, sometimes I download them just to keep the textures somewhere and maybe reuse it later. But in the end, I admit I have a lot of new meshes in my game anyway. I just try to have only meshes that really look different from the Maxis ones.
About BodyShop files :
I only townify low poly meshes. I have a few “high” poly hair meshes but as they are not townified, I can only use them if I think a particular Sim really need this one, so they don’t show up everywhere. I also try to use texture replacements for defaults than defaults with new meshes (but I started to use defaults only two month ago so I don’t have a lot of experience with defaults…).
Also, if any clothe miss a morph, I don’t download/keep it, even if the clothe is wonderfully looking.
And I only keep the recolors I really do love. If I’m not sure I will use something, I don’t keep it.
About hairs, I always use the Hair Binner to have all 5 natural colors in one package. This way, if I delete a hair from the game, It deletes all the naturals at once (but not the mesh itself : useful if I have custom colors, but a pain if not). Also, if I plan to share a Sim with CC hair, the people that will download it will have all the naturals at once too. I’ve heard that merging files makes the game run faster so it could be a positive point too, but I’m not 100% positive it’s true.
About clothes : if it can be slaved/repositoried, then it HAS to be. For exemple @deedee-sims let their followers to choose betwen a slaved or a standalone versions of other age groups than adult. I always take the slaved one. @rented-space has a lots of wonderful swim/underwear but they are all standalone, so I slave them myself before I add them to my game. @whattheskell has a lot of repositoried clothes for their repository project so this is also a very good place to download clothes and keep your Downloads folder as thin as possible. In general for clothes : AF&TF usually can share the same texture. EM,AM&TM can too. So if you learn how to repository things, you can 99% of the time slave one or two age groups to the second or third one. It doesn’t save a lot of space if you have few CC, but as your Downloads folder grows, it becomes useful.
In general :
I compressorize everything. Always. Sometimes I forget to compress things I do before I upload them (sorry…), but before I place something in my Downloads folder, The Compressorizer is used anyway.
I also use Delphy’s Downloads Organizer to check once a month if I have orphans or duplicates and then delete them (warning : defaults, omsps, face templates and a few other things are often considered as orphans by the program but they’re not : if you never used that program, always keep a copy of your entire Downloads folder before you delete anything, just in case).
It’s rare I have orphans or duplicates because I mostly delete things from my Download folder directly, and not from the game itself.
Also, about slaved/repository stuff : paintings ! I try to only keep meshes that takes their textures from Maxis paintings. This way, I only need a few recolors of Maxis paintings to have a very large choice of paintings in game. If you have all Ep/Sp or almost all of them, I think there is really enough shapes and sizes for paintings with the game, so I really don’t understand the need of new meshes, unless they really have something unique (but still : they can be slaved to Maxis, right ?)
Anyway : two or three times a year, it’s cleaning time in my Downloads folder. There are a lot of tutorials on how to do so in the internet. Usually I place on an empty lot everything I realize I don’t use or don’t like anymore, then package the lot, open it with Clean Installer to see the names of the files, and then delete them from my Download folder. As I keep all recolors sets inside the subfolder where the mesh is (no matter who did the recolors), it’s easy to delete everything at once.
To be clear, it’s heartbreaking sometimes, but if I don’t use something, even if I LOVE that something, I don’t keep it. Because there are things I really do LOVE but after a few months, I realize I don’t even use them in game, so let’s save space for something I WILL use.
Oh, and I also rename everything I download. Any special caracters are deleted or replaced with an underscore. My file names only can be letters, numbers, and underscore. Any other caracter is deleted. I’ve read somewhere it helps the game to load the files faster and a lot of people shared their experience to say it works (but I don’t remember if I’ve seen the difference the first time I did it because it was a long time ago).
About the size of my own Downloads folder :
I checked its size and it was 2,66Go ! But my game is running fine so I did’nt believed it… and then your ask made me realized I kept all preview/swatches/PSD inside my Downloads folder :D. Now that I’ve deleted them all (I hope), it’s exactly 1,84Go. Well I had almost 1Go of unecessary files in my folder, let’s facepalm together ! I think they were not loaded by the game but it’s still idiot to keep them here as I often move or copy/paste this folder at different places of my computer when I need to tests things or just backup my CC… so now copy/paste is faster.
Hope you have the answers you were looking for ! If not, please don’t hesitate to tell me :-) Also, if you need me to link at some tutorials, don’t hesitate to tell me. Most of the time they are easy to find with Google but if not, I can take a look for you (I don’t have them close anymore as I’ve learned them and don’t need them for my personal use, but I think i’m gonna add a page on my tumblr with links to tutorials one day). Have a nice day !
5 notes
·
View notes
Last Seen Blogs

pebble-ink
Alice :]
ask-blooky-and-shyren-blog
Ask us!

emo-chicken-nugger
Nothing That Is Human Is Alien To Me

cant-decide-the-name
queen of bad puns and jokes

mattsxbaegel-blog
Lil Mimi from the 5838th