#s4 tutorial
Explore tagged Tumblr posts
Visit Tumblr Blog
Explore Tumblr blogs with no restrictions, modern design and the best experience.
Last Seen Tumblr Blogs


Fun Fact
If you dial 1-866-584-6757, you can leave an audio post for your followers.
Text
L&D Trans Sim Tagging: EA Made an Oopsie
Xan here. Remember how I never got into Fullbody outfits, in the original Trans Sim tutorial? Well, I am honor-bound to get into it a little. Why? Because I made a discovery, and it's...not great.
TL;DR: The Part Flags for most of Life & Death are messed up. Trans Sims are wearing the wrong meshes and it cannot be avoided; EA has to fix it.
If this concerns you, please upvote the report, and spread the word. They have ignored the Sims community about gender-related glitches in the past. Help us make them fix this, so we don't have to.
In-depth explanation about the problem below.
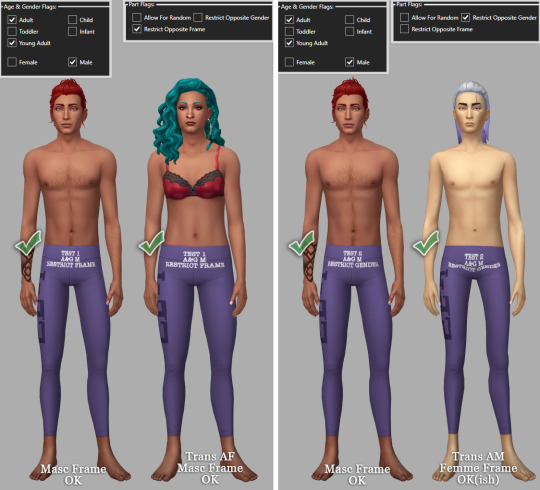
I was stoked to see we got clothes for both frames in the newer packs. Finally, Sims can wear whatever gender clothing they want! That's the goal, right? But, recent testing made me wonder how they handle opposite-frames. I thought I could learn something to help with inclusive tagging. So, I stuck Carmen in a dress from L&D, and:

It passes from the front, but...her chest. That's the opposite gender distortion. The one caused by putting a AM (masc frame) mesh on any AF (female) Sim, trans or not. I've definitely talked about this.

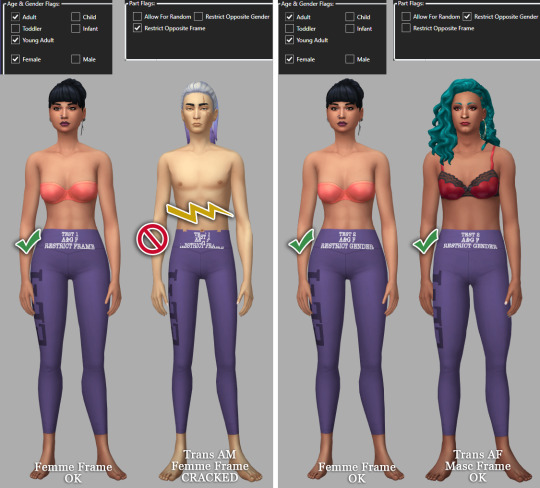
I went and cloned both meshes to check the tags, and sure enough:

Quick tagging lesson: toggling Restrict Opposite Frame means Carmen can't wear the AF one. She has to wear the AM frame dress, because as a trans Sim, her frame is AM. (Literally, the Opposite Frame of her gender.) But because she has breasts, she inherits the chest distortion all female Sims get wearing a man's top. The same applies for Erik, her counterpart (AM w/AF frame).
With a sinking feeling, I went back to the game and tried...everything.

I ran out of space, there are more. Trans-men are the same. I got halfway through the AM catalog and ran out of willpower. I'm betting almost every item made for both frames in this pack is tagged wrong. It's locked by frame, instead of gender. With pants, that's not a problem--but tops, dresses and suits will all be swapped.
So, now we know Fullbody meshes work similarly to tops. They need to be locked by Gender. And it's really just that tag. To test, I went back to my cloned dresses, and fixed it with two clicks:

This means all women regardless of frame can use the AF, and all men can use the AM. And here's the result: AF dress on AF Sim, AM dress on AM Sim. They literally swapped dresses.


So, easily fixed! That's 2 files out of...all of them. (sigh) I filed a Bug Report, linked above. Hopefully the amount of evidence I provided will get an actual response. That, or they'll think I'm an arrogant prat for telling them how their game works. But, I didn't break it.
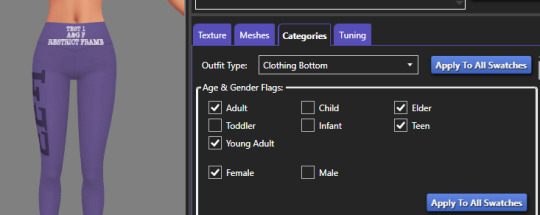
Moral of the Story: this is a great example of what not to do if you make cc, or if you retag what you download. Remember, if you want to limit who can wear a mesh:
"Restrict Opposite Gender" for Tops and Fullbody; this makes sure all AF and AM Sims wear their meshes, and don't end up with chest lumps.
"Restrict Opposite Gender" for AF Bottoms; Trans-AM Sims break in half. Don't Restrict AM Bottoms at all. They fit everyone.
Or, Don't Restrict Anything, if you want all options. Note: distortions will happen. Mark your gender filters. They help a lot.
Earrings, Hats, Makeup, Gloves, Socks, Tights work for everyone
Necklaces and Nails are "Restrict Opposite Frame"; Trans Sims can't wear these from their own gender. They don't fit.
If you got this far, thank you for sticking it out. My innocent question turned into a tagging lesson (again). But, if it helps anyone in the future, I'll be glad. At least now we know there's a problem.
Please boost the Bug Report, share if you found it useful, and thanks for reading. I'm on the soap box again re: trans inclusion, but it's still Pride and I can't not stand up for my people. The more we know, the better we can do on our side.
Finally, tagging some folks who might want to know, if they don't already (feel free to ignore): @sejianismodding @the-crypt-o-club @yooniesim @whyhellosims @thefoxburyinstitute @sims4tutorials @mmfinds @gncc
#sims 4 bugs#ts4 bugs#s4 tutorial#ts4 tutorial#sims 4 studio#lgbt sims#ts4 trans#carmilla#phantom#realizing I never actually explained how tagging works#might be time soon#in my defense I didn't know when I wrote the first guide#but I'd rather not annoy everyone banging on about this
136 notes
·
View notes
Text
*Tutorial* How to make outfits for "👻Invisibles and Skeletons💀"
I finished posting all of the tutorials!
Hi! I'm so happy that you are enjoying my CC "👻Invisibles and Skeletons💀." Thank you for your interest!
*CC
👻Invisibles👻
💀Skeletons💀
💀Skeletons Hair Useable Body Version💀
👻Outfits for Invisibles and Skeletons💀
*Tutorial
📝Easy Way
📝Step-by-step. 1
📝Step-by-step. 2 and EP01Detective Outfit CC
FOLLOW ME on X Twitter / Patreon / Curseforge Thank you for your support. If you like my CC pls like and reblogging💝
@sssvitlanz @maxismatchccworld @mmfinds @maxismatch4sims @gncc @mmoutfitters @love4sims4 @sims-4-maxis-match @sims4downloads @alwaysfreecc
#the sims 4#sims 4#ts4cc#s4cc download#ts4#s4 download#maxis match#ts4 download#ts4 custom content#ts4cc tutorial#ts4 tutorial#s4 tutorial#tutorial#s4acc female#ts4 cc female#s4cc female#s4acc male#s4cc maleo#s4 cas#s4mm#s4cc#s4ccfinds#s4 custom content#ts4 cas#ts4 simblr#ts4 screenshots#ts4 occult#ts4 outfits#sims 4 skeleton#ts4 mm
51 notes
·
View notes
Video
youtube
Hello simmers! If you want to see my process and the final result of the 3d model I posted yesterday, please watch this video! The dress turned out amazing! I am so proud of myself! Hope you like it!!
131 notes
·
View notes
Text
Tutorial for Simplifying Changing Warehouse Info For Multiple Swatches Simplified: Sims 4 Studio
Hi everyone!
I have some exciting news - to me anyway, and I hope for you 😁
I recently had my tutorial approved on the Sims 4 Studio website!
This is for creators who use Sims 4 Studio, and anyone else who may wish to alter existing .package files.
Changing Warehouse Info For Multiple Swatches Simplified | Sims 4 Studio
Intro:
WHY I MADE THIS TUTORIAL
The purpose of this tutorial is to help creators and simmers alike simplify and speed up how to change information in the Warehouse tab in Sims 4 Studio for multiple swatches, especially if you have more than one section that needs adjusting, like Composition Method and Sort Layer for CAS items.
So, let’s say you’ve created an entire package with 15 swatches and have saved your package. Then you realize, OMG I forgot to change something in Warehouse mode and now have to go in and change each swatch separately. (cue dramatic music)
I don’t recommend this for only a few swatches, though, because, while helpful, this is not a one shot process, but it will save time for those packages with several swatches that require fixing/changing in the Warehouse tab.
Changing Warehouse Info For Multiple Swatches Simplified | Sims 4 Studio
6 notes
·
View notes
Text
how to pose sims for photoshoots - tutorial
MODS & CC USED:
teleport any sims
pose player
mc command center
iso love photos – full control camera (optional)
photographic memory (optional)
wicked whims | wonderful whims (optional)
backdrops 1 & 2
@ts4-poses
some of my favorite pose creators: ssiat | acha | dearkim
530 notes
·
View notes
Text
Move Deco Cars to the Transportation Category
Hello! When I was looking for the answer on how to make this happen, I couldn't find a straight forward tutorial. Instead, I found a couple bits and fucked around in S4S and pieced it together so, I wanted to put out a quick straightforward tutorial so others don't have to do the same.
You'll just need S4S for this. On the main screen, click "My Projects" and then select your deco car file.

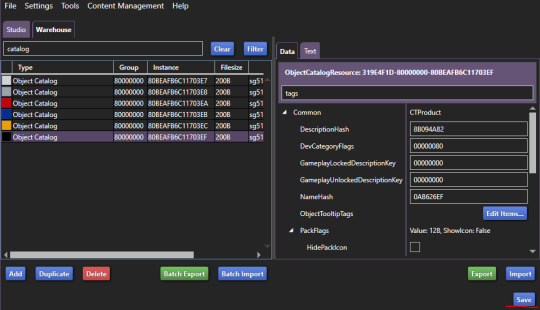
Now, go to the "Warehouse" tab. This is in the top left next to the Studio tab.

In the filter search bar type in "catalog" and then click "Filter." Then, click on the first one. On the right hand side, type "Tags" in the filter.

Scroll down on the right side and click the "Edit Items" button next to "Tags."

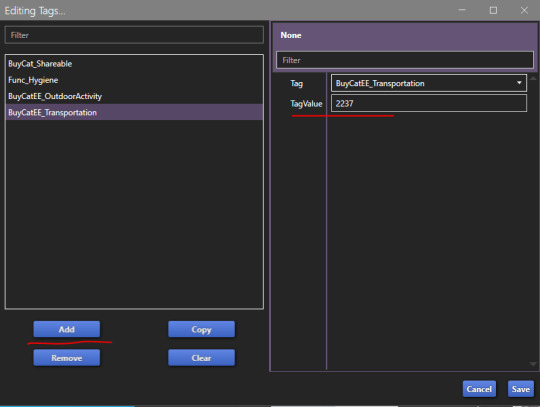
In the window that opens, click "Add" on the left hand side. Then, in the "TagValue" box on the right hand side, type in 2237, and then hit tab on your keyboard. Once you tab away, it will automatically update the "Tag" box directly above that to say "BuyCatEE_Transportation" Click the save button.
Now, you just need to repeat these steps for every "Object Catalog" entry your item has. There's one for each swatch. Make sure to save your package file when you're done!
Congrats, your deco car is in the transportation category in the build mode catalog now!

If they're currently showing in a category like Decor>Sculptures or Activites and Skills>Outdoors and you'd no longer like them to appear there now that they'll be in the transportation category, you can fix that quickly on the "Studio" tab.
While on the "Studio" tab, click the "Tags" tab on the right hand side. Uncheck any categories you no longer want the item to be in, and then click the "Apply To All Swatches" button. Again, don't forget to save when you're done.

That's it! It's actually really easy, it just gets a bit time consuming depending on how many swatches your deco car has, and how many deco cars you have. The build mode categories being nice and clean and not seeing items repeated across multiple sections is so nice though. 10 out of 10 Highly Recommend

74 notes
·
View notes
Text
Tutorial: Converting all types of CAS CC to work with color sliders (+ how to disable it)
This enables CAS CC to work with Color Sliders for Hair, Clothes, & Accessories by thepancake1 and @mizoreyukii.
Since S4 Studio only let's you batch convert hairs and update makeup for compatibility, I present to you: TS4AlphaConverter_2_2_0_0 by CmarNYC.

Keep in mind that enabling CAS CC for color sliders will increase the file sizes of your .package files!
Sliders will also always affect all the texture, i.e. you can't exclude accessories like buttons or zippers, so some textures might not work well.
Also check out this tutorial: Fixing slider compatible CAS CC with broken textures

💜 Requirements:
Color Slider mod
TS4AlphaConverter_2_2_0_0
CAS CC you want to enable
Featured CC by @trillyke @daylifesims @jius-sims @magic-bot
💜How to enable CC for color sliders
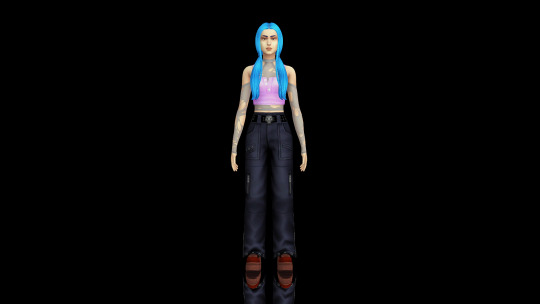
1. Download the required program, mod and CC you want. This is my outfit before sliders:

2. Open up Alpha Converter
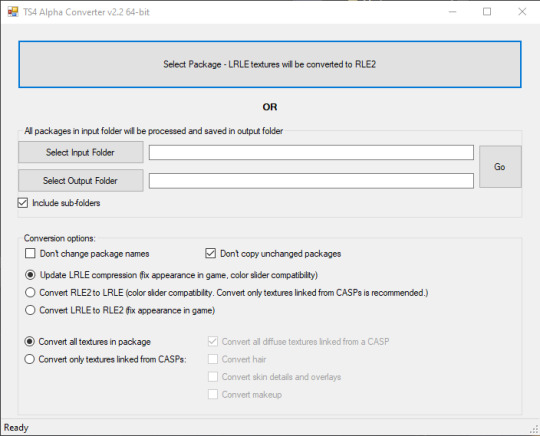
3. For enabling sliders, you can only use the folder option and not single files: Select your input folder which contains the .packages you want to enable. Then select your output folder where you want to save the new files. "Include subfolders" is handy if your CC goes into more folders inside your input folder. It will reproduce the same file structure.
4. I would recommend enabling "Don't change package names" so you can just replace your input files directly, otherwise it adds "_Fixed" at the end of the filename. I will also leave "Don't copy unchanged packages" checked.
5. Next we will select "Convert RLE2 to LRLE" to enable color sliders. I will explain the others later. It then enables "Convert only textures linked from CASPs" which is good, e.g. it will only target actual CAS CC textures then and no Build & Buy for example. Leave "Convert all diffuse textures linked from CASP" checked if you want to convert all types of CAS CC.
6. These are my finished settings:
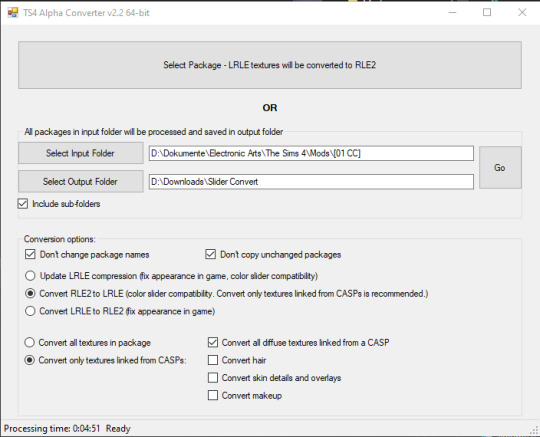
7. Press "Go". It will then take a while depending on file amount and swatches, as it will have to go through textures one by one.
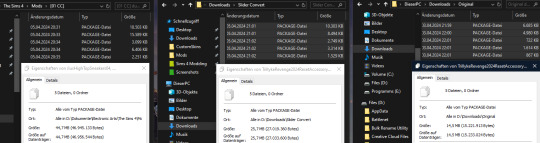
8. Check your finished files. The file size should be bigger, in this case it went up by 30 MB for only 5 files.
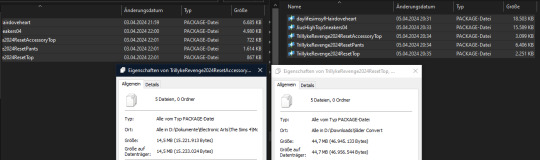
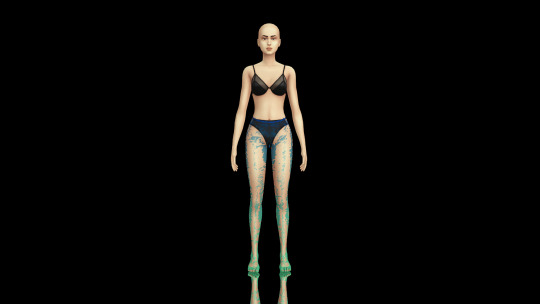
This is how the outfit looks after applying sliders to all pieces:
💜 How to disable CAS CC for color sliders
This time select "Convert LRLE to RLE2". You can leave "Convert only textures linked from CASPs".

2. Press "Go" and let it do it's thing.
3. As you can see, the file size went down again (middle), but it is not the same size as from the original file (right).
You will no longer be able to use sliders on the CAS CC piece, except transparency, which always works.
💜 Fixing slider compatible CAS CC with broken textures
If some of your CAS CC displays huge areas of missing, pixelated textures there is an issue with compression.
I don't know how and why this happens, but check out * this tutorial * on how to fix it.
@thefoxburyinstitute @maxismatchccworld @emilyccfinds @sssvitlanz
#ts4 tutorial#ts4 resources#tutorial#Sims 4 tutorial#s4 guide#ts4 guide#Sims 4 studio#Sims 4 cas#ts4 cas#color slider#cmarnyc#thepancake1#mizoreyukii#yorututorials
109 notes
·
View notes
Text
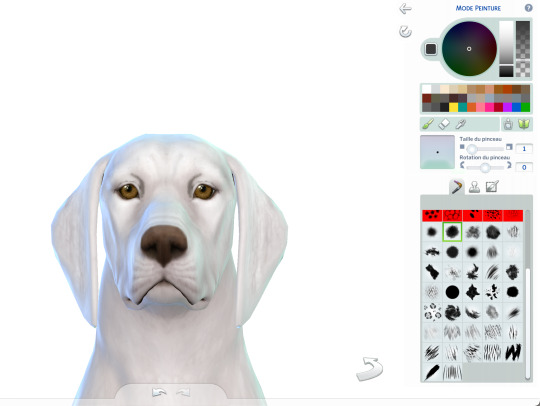
Some tricks to paint your animals in CAS
I won't make a tutorial because I wouldn't know where to start and honestly, it's mostly through practice that you'll improve yourself at painting. But here are a few tricks that might help you. 1. Enter the cheat code "cas. clockspeed 2" to almost pause the time in CAS. When the animal is breathing too fast it really makes it more difficult to paint details. 2. When you want to paint small details on your pet's face, click on "edit details", then double click anywhere else to exit the details painting mode without zooming out. You'll have a closer look of what you're doing. 3. Be aware that you can have a much darker black paint by pulling down the slider lower than it is set.

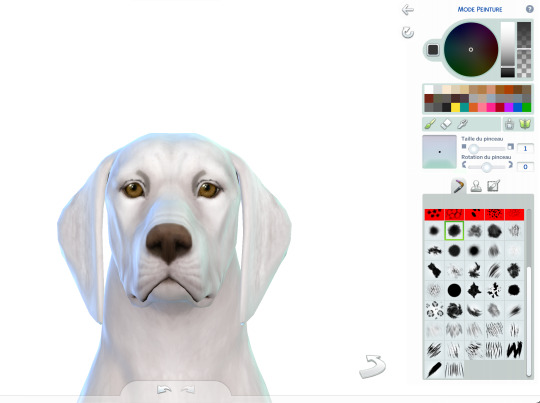
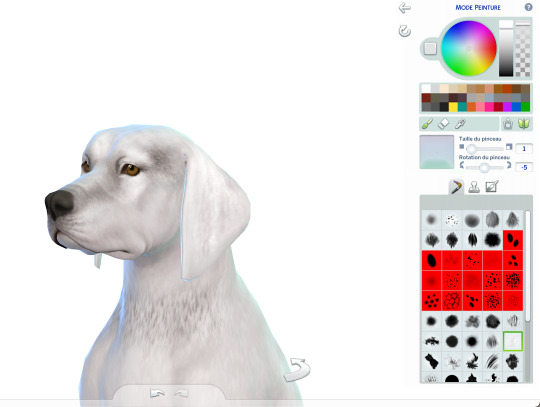
4. Use pictures as references. Can sound silly, but it isn't just for inspiration, it will really help you to see better where you are supposed to paint the lights. Aaand they are really important since they will give much more landforms, and therefore, realism to your animals. 5. Paint the eyelids and the nose of your pets. Trust me, they will look much more expressive and realistic. 6. You can paint thinner traits with a simple technique. First, you make the trait you want using the colour you want, usually darker than your pet's colour.
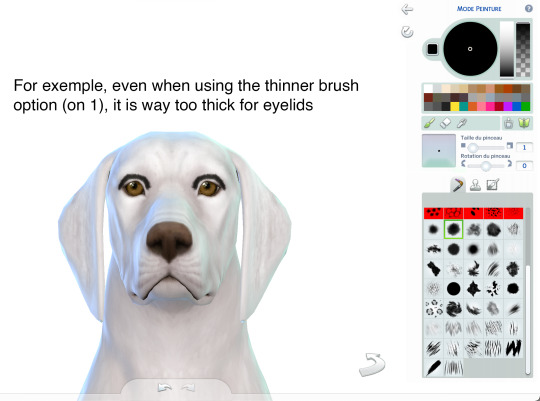
Once you've done your trait the way you want it, select the pet's base colour (white in this exemple) and draw an other trait just next to the first one. It has to be very close to erase some of it but not all.

Same here:
7. Make a hairy effect using the fur brushes. Use different ones, set them to to smallest option on the face and more or less bigger on the body, depending on the hair length. Also, you can start with a dark colour and draw lighter above. Pay attention of the orientation of your brushes; respect the hair's direction. 8. Don't hesitate to mess around with different colours and opacity. 9. Use fur brushes with a darker colour to give some shadows and landforms to your animals.
That's it, I'll update this post if I can think of anything else. I hope some of you will find it useful. Have fun ! ᵔᴥᵔ
#sims 4#ts4#s4#sims 4 pets#sims 4 cc finds#sims 4 cats and dogs#sims 4 dog#sims 4 tutorial#sims 4 tricks#sims 4 painting tricks#sims 4 help#sims 4 realistic pets
311 notes
·
View notes
Note
Hi Xan hope your week is well !! I've been heavily referencing your guide to making clothes for trans sims and it's really helpful ! But I'm having issues with the pants specifically T_T I made my leggings for both fem and masc frames and followed your recommended flags and I'm having gaps on the waistband for both FTM and MTF sims :pensive: unsure if it's a mesh issue or a flag issue for me honestly :( thank u in advance !!
Hey there @suzukipc! Pants are tricky. Accessory leggings/tights don't have a mesh, so they shouldn't have any gender-issues--they're just smacked on the body--but leggings as pants do. I'd have to see your files to be sure, but if you mean Skin Tight Pants (Leggings in S4S), that might be a mesh issue, due to the way they're made--but tagging can factor in? Let me put something together...
(4 hours later) ...Okay. In trying to figure out how to help, my answer turned into...a tutorial. Sorry about that! So, here we go:
Troubleshooting: Tagging Trans Sim Bottoms
So. These leggings are from Discover University, made for AF Frame. (Note the Age & Gender flag, set to Female. That's the base they were built on, not who can use them. I'll get back to what this does.)
I've made 3 copies, and tagged them all different ways to show what would happen. Dragging Carmen and Erik back into this, guest-starring Roxie as cis control:
Roxie's fine either way, because her frame and gender match. Carmen is okay-ish, but Erik is...not. AF-Frame meshes break on trans-masc Sims, essentially shoving their hip-bones into their ribs. We saw that in the tutorial, so no surprise there.
For science, let's do the same thing with the AM version of this same mesh, with Henry as control this time.
Generally okay? Carmen's hips are in AM position, which looks fine. Erik really never win with pants, but that's the best we get most times. At least his torso is intact! (This is why I recommend using AM Frame if there aren't meshes for each Frame. It works well enough.)
I've gone over all this before--but there is one thing I didn't cover. Remember the Age & Gender tags I mentioned earlier? Some creators check both genders here, and the results are...not great if the mesh is based on the body, which is the case with leggings. The game (best as I can tell) tries to enforce the mesh's original Frame, with weird results for everyone. Here's what happens when you toggle both genders under A&G: AF Mesh, and AM Mesh.
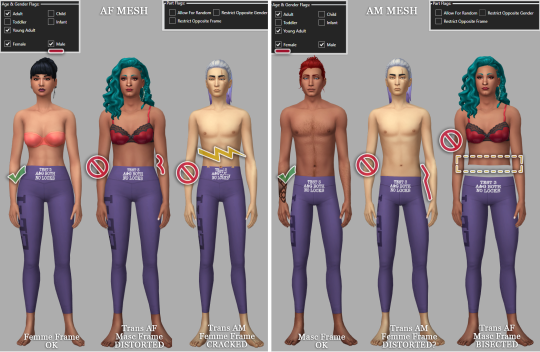
So, AF mesh: Carmen now has a bubble butt, love-handles, and weirdly skinny AF-Frame legs. Erik's waist is cracked, again. (Sorry, Erik.) AM Mesh: Erik has AM-Frame legs and hips--and Carmen has become a magician's assistant. (Sorry, Carmen.) Note that Roxie and Henry are fine, because their gender and frame match the meshes. Can't break something made for them.
But if it's not for them? It'll break them too.
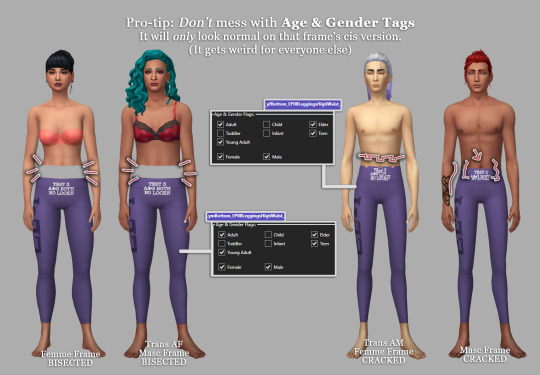
It's even worse on fullbody meshes...but that's an aside, and I'll post about it another time. I feel compelled.
If you see your problem here, hopefully you have your answer! If not, that's okay. Just send us another message and I'll have a look at the files for you, if you like. (I promise not to send you another tutorial. ;B)
To everyone else: if this helped you, remember to share. Never know who might need the info. Thanks for reading, and Happy Simming. :3
#asks#inclusive asks#suzukipc#sims 4 studio#s4 tutorial#ts4 tutorial#s4 cas tutorial#ts4#simblr#the sims 4#curse you thorough testing#this did take 4 hours#and 6 meshes and 5 game loads#so hopefully it helps someone
17 notes
·
View notes
Text

*Tutorial* How to make outfits for "👻Invisibles and Skeletons💀"
Hi! I'm so happy that you are enjoying my CC "👻Invisibles and Skeletons💀." I got a request about how to make outfits for 💀👻. Thank you for your interest! So I'm making the tutorial. If you are interested, please check the tutorials on my Patreon.
*CC
👻Invisibles👻
💀Skeletons💀
💀Skeletons Hair Useable Body Version💀
👻Outfits for Invisibles and Skeletons💀
*Tutorial
📝Easy Way
📝Step-by-step. 1
FOLLOW ME on X Twitter / Patreon / Curseforge Thank you for your support. If you like my CC pls like and reblogging💝
@sssvitlanz @maxismatchccworld @mmfinds @maxismatch4sims @gncc @mmoutfitters @love4sims4 @sims-4-maxis-match @sims4downloads @alwaysfreecc
46 notes
·
View notes
Text
I'll be posting the next chapter of Pedal to the Metal (go to my pinned post to read!) Later today, so here's some art for chapter three! It's one of the pamphlets Steve makes. I'm not much of an artist so excuse the lack of skill but this was so fun-

And here is a link on how to fold it and turn it into your own Steve from yoga class approved pamphlet!!
https://www.readbrightly.com/how-to-make-zine/
#steddie#steve harrington#eddie munson#steve x eddie#stranger things#eddie x steve#steveddie#stranger things s4#ao3#fanfic#fanart#zine#art#tutorial
15 notes
·
View notes
Text
I've reworked this tutorial. It's more in depth and has a few pictures now 💕
0 notes
Text
youtube
Speed Mesh #10 - Mya Hair:
Haven't uploaded a speed mesh in years, but when I saw a lot of interest in them I decided to give it another go! This hair is not currently available for download, it's part of a collection coming in September. Hope you find the speed mesh helpful - I included timestamps in the description so you can see what I'm doing in each part!
#r#youtube#ts4#s4#ts4cc#ts4mm#s4cc#s4mm#ts4 youtube#s4 youtube#ts4 speedmesh#ts4 mesh#ts4 tutorial#sims tutorial#maxismatch#sims4#thesims#Youtube
106 notes
·
View notes
Text

𝑻𝒉𝒆 𝑼𝒍𝒕𝒊𝒎𝒂𝒕𝒆 𝑮𝒖𝒊𝒅𝒆 𝒕𝒐 𝑭𝒊𝒏𝒅𝒊𝒏𝒈 𝑹𝒆𝒄𝒐𝒎𝒎𝒆𝒏𝒅𝒆𝒅 "𝑻𝒉𝒆 𝑺𝒊𝒎𝒔 𝟒" 𝑪𝑪 𝑾𝒆𝒃𝒔𝒊𝒕𝒆𝒔 [𝟐𝟎𝟐𝟑]
Are you a dedicated "The Sims 4" player searching for top-notch custom content (CC) to enhance your gameplay? You're in the right place! This guide will lead you through the most popular platforms for quick access to a wealth of CC. From staying current with trends to pinpoint searches, I've got you covered.
♡𝙒𝙖𝙩𝙘𝙝 𝙑𝙞𝙙𝙚𝙤 觀看完整影片 𝙃𝙀𝙍𝙀 .ᐟ.ᐟ.ᐟ
𝒅𝒐𝒘𝒏𝒍𝒐𝒂𝒅 𝒍𝒊𝒏𝒌𝒔 ↴
⎚ ᴛᴜᴍʙʟʀ|ᴄᴄ ғɪɴᴅs Maxis Match CC World / MM Finds / MM Outfitters / Warmsol's CC Finds / Maysie Moon / Boey's CC finds / Llama CC finds / SimsTrouble CC Finds / Plumbie's CC Finds / HazelMine's CC Finds / Angel TS4 CC Finds / Oshin CC Finds / SimBys CC Finds / Mandy CC Finds / Nolan Sims CC Finds
⎚ ᴘᴀᴛʀᴇᴏɴ|ᴘɪɴɴᴇʀ The Sims Resource / Simmerthings / Kataraesimmer
⎚ ᴘᴀᴛʀᴇᴏɴ|ᴄᴄ ᴄʀᴇᴀᴛᴏʀs|我私心愛的12位創作者(◍3◍) HuiEn / Joliebean / Serenity / Miiko / TwistedCat / Northern Siberia Winds / PoyoPoyo / Obscurus-Sims / Caio / Madlen / Simstrouble / Jius-Sims
⎚ ᴄᴄ ᴄᴏᴍᴘɪʟᴀᴛɪᴏɴ sɪᴛᴇs SnootySims / The Mods Babe / We Want Mods
⎚ ᴄᴜ��sᴇғᴏʀɢᴇ|ɪᴛs ᴛᴜᴍʙʟʀ The Official Mod Hub
⎚ ᴛʜᴇ sɪᴍs ʀᴇsᴏᴜʀᴄᴇ|ᴄᴄ ᴄʀᴇᴀᴛᴏʀs ANGISSI / asan333 / cosimetic / David_Mtv / S-Club / Nords / OranosTR / Anonimux Simmer
✧˚. Exploring Patreon's Most Popular Creators and Their 50 Outstanding CC Collections 我最愛的50位CC創作者推薦&必備50款衣服套件包 - 𝘾𝙝𝙚𝙘𝙠 𝙃𝙀𝙍𝙀 & 𝙃𝙀𝙍𝙀 ♡

✴︎ sɪᴍᴛᴜʙᴇ|sɪᴍʙʟʀ|sɪᴍᴛᴇʀᴇsᴛ|sɪᴍᴛʀᴇᴏɴ ✴︎
#featured#ts4cc#CC Finds#ts4ccmm#ts4#sims4#the sims 4#s4cc#s4mmcc#sims 4 cc#the sims 4 custom content#sims 4 custom content#sims cc#s4ccmm#s4ccfinds#ts4ccfinds#s4 custom content#ts4 tutorial#sims 4#ts4 tutorials
73 notes
·
View notes
Text

Well, I tried at least.
#my coloring#gif coloring#photoshop coloring#i saw a gif coloring tutorial for this scene of nancy a while ago and i wanted to try it#it ended up not looking good for my gif because they were using a different source. i think 4k when mine's *only* 1080p#so ofc it's gonna end up looking different and all#so i did this coloring from scratch and well. i guess it's okay#a little too soft for my tastes perhaps. but then again had i sharpened it more. it wouldn't have looked good either#because this scene is so dark and all#anyway fuck s4. and i don't mean just plot-wise#they made their scenes so dark at times that it's not even funny man#color comparison#coloring comparison#gifs
35 notes
·
View notes
Text
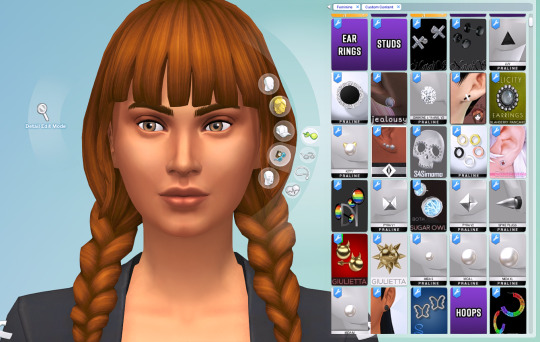
How to create visual "custom categories" with the new Sims 4 Studio Batch-Edit
As discovered by @vyxated Sims 4 Studio now supports batch-changing the Display Index number which allows you to easily sort your CC (see post here)
Using that, you can create visual "custom categories" for any existing category to sort your CC into smaller groups that share a thematic.
━━━━━━ ・❪ ☾ ❫ ・ ━━━━━━
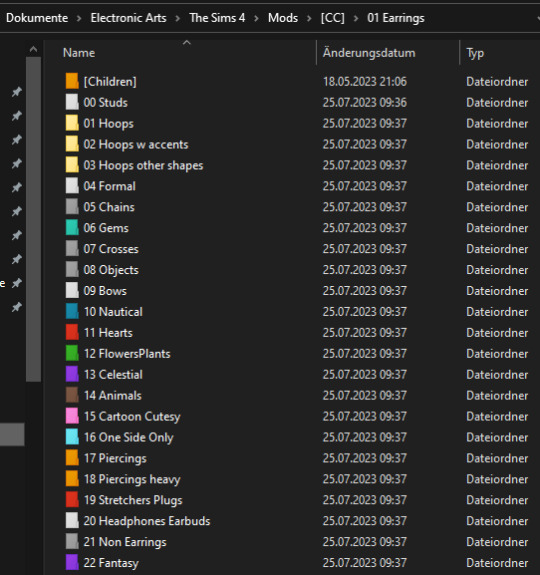
Step 1: Creating folders
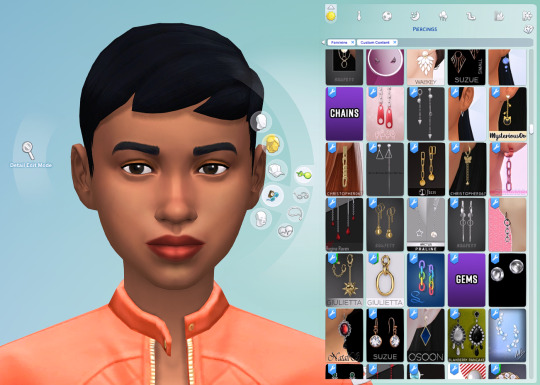
First you need to sort your CC into whatever categories you want. I am sorting my earrings.
( I use Folder Painter to get colored folders)
━━━━━━ ・❪ ☾ ❫ ・ ━━━━━━
Step 2 (Optional): Creating dividers
I highly recommend you to make some sort of divider for your categories (basically like my TidyCAS).
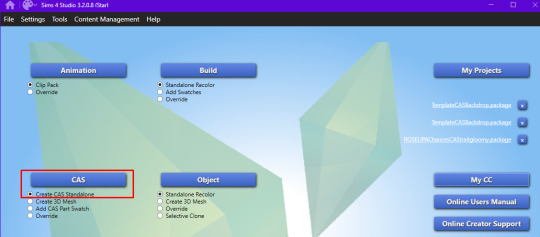
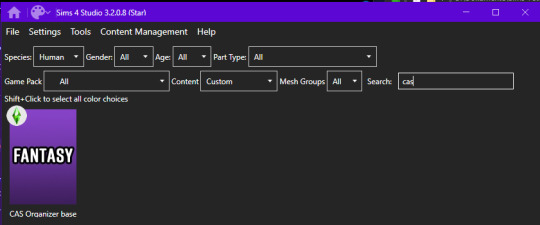
For that, in S4Studio start out by cloning any basegame CAS item.
I usually always use the sunscreen facepaint, but it doesn't really matter, you shouldnt use smth with a mesh.
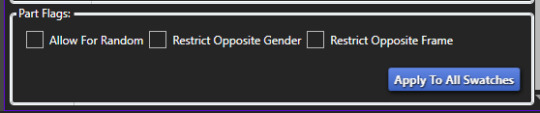
Or you can download this file and place it in Documents\Sims 4 Studio\Mods. It has no texture, is enabled for a lot of things and disabled for random.
IMPORTANT: For every new divider you want to create, you have to clone the CAS item from S4Studio again. You cannot simply duplicate your divider CC and simply change it.
Save it as the number and name of your category. For me it would start with "00 Studs".
In that file, first import any type of custom thumbnail you want to use to display the category name.
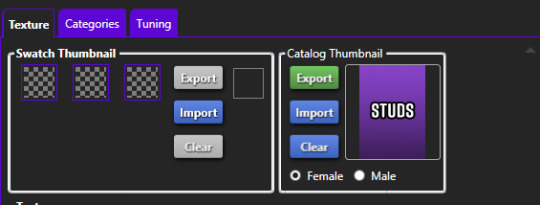
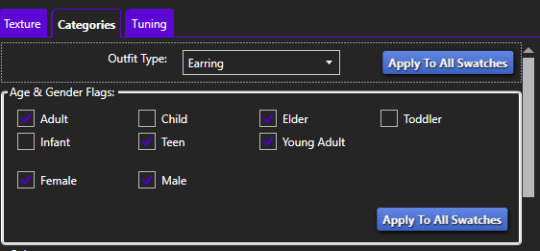
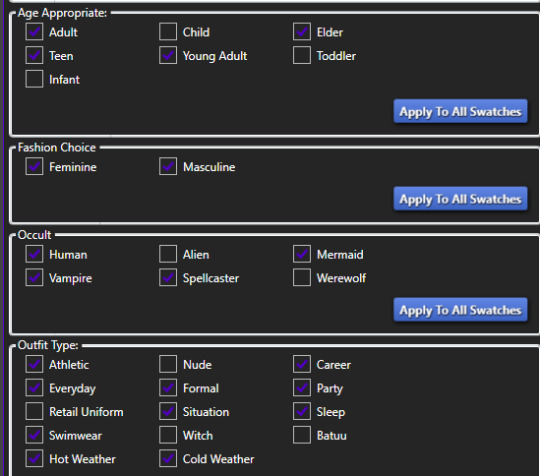
Then, change the category to whatever category you are working on and enable it for all ages, genders, fashion choices & outfit types you want and disable it for random.
Now if you want, import an empty texture to get rid off the sunscreen, but since you won't apply that CC, it won't matter.
Download the empty texture here
Make sure to place the dividers OUTSIDE your sorted folders.
━━━━━━ ・❪ ☾ ❫ ・ ━━━━━━
Step 3: Batch processing in S4Studio
Now you want to batch process your folders in S4Studio.
First click on "My CC" and let it load.

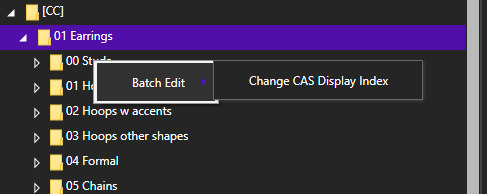
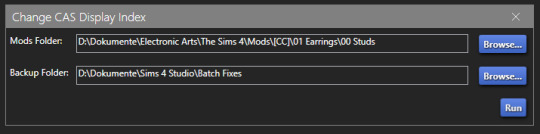
Now right click your first folder and select "Batch Edit - Change CAS Display Index"
In the next window, press "Run".
Then, enter whatever number you want to start with. The smaller the number, the higher up the content is. You can go into negatives and the limit is a veeeeeeeeeery high number.
If you just want to sort some normal CC, I recommend starting with 0 simply.
For the next folder I then always go up by 10, so 0-10-20-30-etc.

Then press "OK".
You will then get a popup with all your changed files (I sorted mine before so it's non lol)
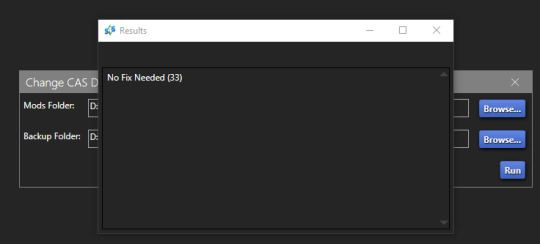
Note: Keep in mind that it does not sort your CC alphabetically. Apparently it's by last modified date.
━━━━━━ ・❪ ☾ ❫ ・ ━━━━━━
If you have done step 2:
Step 4: Sorting your dividers
Lastly you want to make sure that your dividers show up at the beginning of the custom categories.
Open up your divider in S4Studio again if you closed it.
Click on "Warehouse", select the "CAS Part" and on the right in the "Filter" field search for "display".
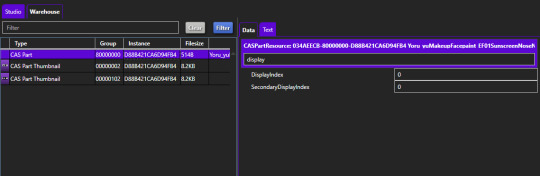
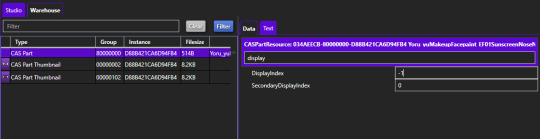
Under "DisplayIndex" you now want to input a number that's before your category.
My category starts at 0, so I will change it to -1. If the category starts with 10, I input 9 and so on.
"SecondaryDisplayIndex" is swatch order, so it doesn't matter here.
Then just save it.
━━━━━━ ・❪ ☾ ❫ ・ ━━━━━━
And that's it!
@thefoxburyinstitute
#ts4 tutorial#ts4 resources#tutorial#sims 4 studio#sims 4 tutorial#s4 guide#ts4 guide#sims 4 cas#sims 4 organazation#ts4 cas#yorututorials
371 notes
·
View notes