#applecomputerinc
Text
El capitan vmware fusion

#El capitan vmware fusion install#
#El capitan vmware fusion pro#
#El capitan vmware fusion mac#
This is a simple guide of installing macOS X into VmWare on macOS without a recovery partition or creating external bootable media.
#El capitan vmware fusion install#
However it is surprisingly unintuitive if you don’t have a recovery partition (in which case you can just to Add > New > Install OS X from the recovery partition) or a media, that you can convert into bootable media and use in a new custom VmWare machine.
#El capitan vmware fusion mac#
If you own a Mac and a VmWare Fusion, then you can legally create macOS virtual machines. Now you should be able to boot up the VM and have it run properly on the Linux host.How to create a macOS virtual machine in VmWare Fusion on Mac without a CD, USB drive or recovery partition VBoxManage setextradata "$VM_NAME" "VBoxInternal/Devices/smc/0/Config/GetKeyFromRealSMC" 1 VBoxManage setextradata "$VM_NAME" "VBoxInternal/Devices/smc/0/Config/DeviceKey" "ourhardworkbythesewordsguardedpleasedontsteal(c)AppleComputerInc" VBoxManage setextradata "$VM_NAME" "VBoxInternal/Devices/efi/0/Config/DmiBoardProduct" "Iloveapple" VBoxManage setextradata "$VM_NAME" "VBoxInternal/Devices/efi/0/Config/DmiSystemVersion" "1.0" VBoxManage setextradata "$VM_NAME" "VBoxInternal/Devices/efi/0/Config/DmiSystemProduct" "MacBookPro11,3" VBoxManage modifyvm "$VM_NAME" -keyboard usb Next, open up a terminal and run the following VBoxManage commands: VBoxManage modifyvm "$VM_NAME" -cpuidset 00000001 000306a9 04100800 7fbae3ff bfebfbff You'll need to set the VM OS Type to "Mac OS X" and the OS Version to "Mac OS X 10.11 El-capitan (64-bit)". Open up virtualbox on the Linux host, and import the OVF. Step Three: Import OVF into Linux host VirtualBox mf with this result.Ĭopy the OVF folder with all three files over to the Linux Machine. Take the resulting hash and replace the hash after SHA1(.ovf)= in. Since we have modified the OVF file, its SHA1 checksum will have changed. Next we need to take care of a few inconsistencies between VMWare's OVF format and VirtualBox's OVF format. This will create a folder with three files in it: In the VMWare "Virtual Machine Library" menu, select the OSX VM you just created, and then select File -> Export To OVF. Go through the OSX installation process until the point where OSX asks you to setup the installation (IE: create users, etc). Follow the instructions and soon OSX will start installing in a VMWare VM. On the "Select the Installation Method" menu, choose "Install OSX from the recovery partition".
#El capitan vmware fusion pro#
Install VMWare Fusion Pro on your OSX Host ( ).
A Linux computer to transfer the VM over to.
This tutorial will go over one possible way to accomplish this task. VirtualBox only officially supports OS X guests on an OS X host, but it is possible to create one on an OS X host and transfer it over to a Linux host. How to create an OS X El Capitan VM that will run on Linux
0 notes
Link
Apple is now providing refurbished iPad Air 4 versions
#adobe#appstore#apple#applecomputer#applecomputerinc#appleinc#appletv#google#imac#ibook#ibookstore#intel#ios#ios9#ipad#iphone#iphone6s#ipodclassic#ipodnano#ipodshuffle
0 notes
Photo
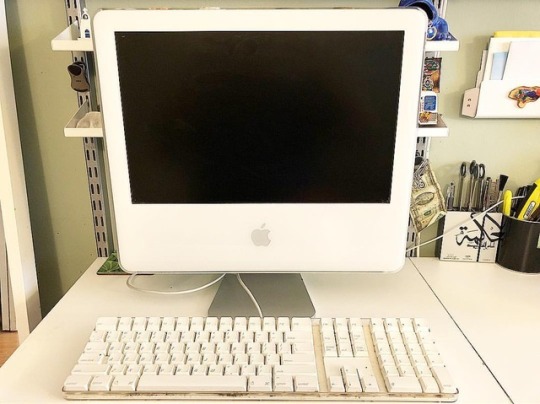
Cleaning my apartment yesterday made me resurface some old stuff that was catching dust. It brought me a lot of good memories. It came to life 14 years ago. It’s cool to see the Apple products evolution in a few years and be part of it all ❤️ • This 2004 G5 was my first and only iMac until I retired it in 2012; it surpassed its life expectations. • The iMac G5 is an all-in-one personal computer that was designed, manufactured and sold by Apple Computer, Inc. from August 2004 to March 2006. It is the final iMac to use a PowerPC processor, making it the last model that could natively run Mac OS 9 (Classic) applications. It was replaced in January 2006 by the Intel-based iMac, which retained the features, price, and case design of the iMac G5. • #imac #imacg5 #theg5 #imacclassic #oldimac #memorylane #myfirstimac #apple #applecomputers #applecomputerinc #g5technology #backinthedays #applefan #appleproducts #bestcomputersintheworld #applefifthavenue #applestore #applefifthavenueteam #14yearsago #myappletreasure #teenagecomputer #appleeverything #applebrand #2004imacg5 #whiteimac #appleproductsevolution #whitecomputer #appleimac #ripimac #g5memories (at New York, New York)
#applecomputerinc#myfirstimac#backinthedays#theg5#appleproductsevolution#applefifthavenue#imacclassic#applecomputers#2004imacg5#appleproducts#appleeverything#apple#applefifthavenueteam#whitecomputer#imacg5#14yearsago#teenagecomputer#applebrand#ripimac#g5memories#appleimac#oldimac#g5technology#imac#bestcomputersintheworld#applestore#whiteimac#myappletreasure#applefan#memorylane
3 notes
·
View notes
Photo

36years ago, Personal computer from apple, it cames with keyboard and mouse 🖥️ . . . . . . . . . . . . #personalcomputer #personalcomputers #apple80 #applecomputerinc #retrô #retrogamecollector #oldcomputer #vintagevector #vintageobject #vintageartdesign #adobeillustration #pinkitems #pinkfeed https://www.instagram.com/p/B-E-Ne4A7UK/?igshid=1b8rsobc5z7t1
#personalcomputer#personalcomputers#apple80#applecomputerinc#retrô#retrogamecollector#oldcomputer#vintagevector#vintageobject#vintageartdesign#adobeillustration#pinkitems#pinkfeed
0 notes
Photo

Inside the Macintosh.
1 note
·
View note
Photo

pizzabox #apple #macintosh #performa #applehardware #applecomputerinc #applecollection #vintageapple #vintagecomputer #retroapple #retromac #vintage #vintagemac #retrocomputer #90s #atticfinds
#vintagecomputer#vintagemac#performa#macintosh#90s#atticfinds#retroapple#applehardware#vintageapple#apple#applecollection#retromac#applecomputerinc#retrocomputer#vintage
2 notes
·
View notes
Photo

Blizzard and Backbone partner for better 'Diablo Immortal' experience on mobile | AppleInsider Read More 👉 https://www.candourmag.com/blizzard-and-backbone-partner-for-better-diablo-immortal-experience-on-mobile-appleinsider/?feed_id=2213&_unique_id=6299d8e161f1b UK’s Leading British Asian Magazine. Focusing on Fashion, Beauty, Parties, Celebrities, Music, Entertainment, Tech & More. Be ahead of all the biggest trends! 👍 up 👉 www.candourmag.com #apple #Google #Adobe #AppStore #AppleComputer #AppleComputerInc. #AppleInc #AppleTV #imac #iBook #iBookStore #iMac #Intel #ios9 #ios9 #iPad #iPhone #iphone6 #iphone6s #iPodclassic #iPodnano #iPodshuffle #iPodtouch #iTunes #iTunesStore #macbook #macosx #macosx #MacPro #MacBookPro #MagicMouse #MagicPad #Microsoft #Nokia #Nvidia #ResearchinMotion #RIM #Samsung #BritishCandour
#Tech#apple#Google#Adobe#AppStore#AppleComputer#AppleComputerInc.#AppleInc#AppleTV#imac#iBook#iBookStore#iMac#Intel#ios9#iPad#iPhone#iphone6#iphone6s#iPodclassic#iPodnano#iPodshuffle#iPodtouch#iTunes#iTunesStore#macbook#macosx#MacPro
0 notes
Photo
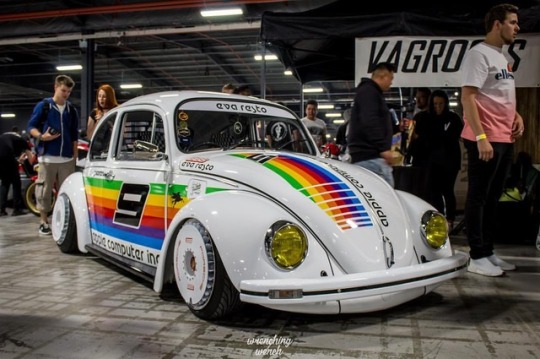
Throwing it back to @fitteduk with this retro af Beetle. Old school Apple liveries work on pretty much everything. Oh, and turbofans. #tbt #fitteduk . Owner: @maxisadogsname . #volkswagen #beetle #vw #vwbeetle #classicbeetle #volkswagenbeetle #oldbeetle #oldschool #classic #classiccar #retro #retrocar #apple #applecomputerinc #turbofans #carshow #vagroots #classicvw #bug #vwbug #fitteduk2017 #throwbackthursday (at EventCity (Official Page))
#retro#tbt#classic#vagroots#retrocar#turbofans#applecomputerinc#vwbug#classicvw#classicbeetle#carshow#vw#fitteduk#fitteduk2017#apple#beetle#oldbeetle#classiccar#oldschool#throwbackthursday#vwbeetle#volkswagen#bug#volkswagenbeetle
0 notes
Link
Apple touts gains of privateness-preserving ad tech in pitch to advertisers
#adobe#appstore#apple#applecomputer#applecomputerinc#appleinc#appletv#google#imac#ibook#ibookstore#intel#ios#ios9#ipad#iphone#iphone6s#ipodclassic#ipodnano#ipodshuffle
0 notes
Text
Mac Os X Iso Download 64 Bit For Virtualbox

Mac Os High Sierra Iso For Virtualbox
How To Install Mac Os On Virtualbox
Mac Os Iso For Vmware
Mac Os Vm Iso
Mac Os X Download Iso
Mac Os 64 Bit Download
If you have 64 bit Operating system then you can download Virtualbox 6.0. 1) Just again visit this Link 2) Now under Virtualbox 6.0.0 click on your OS. 3) Now the download will start automatically, it will 200mb in size. The 'System Type' of your copy of Windows needs to be 64-bit, because OS X Mountain Lion is a 64-bit operating system. If you have a 32-bit copy of Windows, you can only install Mac OS X Snow Leopard on Virtualbox.
Downloading process of macOS Catalina Image file for VirtualBox and VMware. Mac OS 10.15 Catalina is named because of a special kind of update for Apple and for its operating system which is known as Mac. It has some outstanding features, applications, and a voice record facility which we already discussed earlier.
Mac Os High Sierra Iso For Virtualbox
VirtualBox is a general-purpose full virtualizer for x86 hardware, targeted at server, desktop and embedded use.For a thorough introduction to virtualization and VirtualBox.
For VMware or VirtualBox virtual machines, click the button below to download the image file to your computer via google drive. Download ISO File. Update (June 8, 2018): Mac OS 10.13.5 Released! Update: (July 26, 2018): Mac OS 10.13.6 Released! Update: (July 26, 2018): Mac OS Mojave 10.14 Released!
Want to install macOS on Virtualbox?
If yes, then this post is definitely for you.
In the previous posts, I have already talked about installing linux ubuntu on Virtualbox & other operating systems also.
Everyone knows Mac OS is one of the most premium Operating systems.
And everyone wants to use it but it’s a little expensive.
And that’s why people try to find out different ways to install Mac OS on their PC.
Two years back I also installed Mac OS High Sierra Hackintosh on my PC.
And now I am installing the Mojave version.
So in this post, I will show you how to install macOS Mojave on Virtualbox on Windows PC.
Let’s see How it works.
Also Read: Chromebook ChromeOS on Virtual machines.
How to Install macOS on Virtualbox in Windows 10 PC [ Mojave ]
But before we begin.
Please make sure that you have downloaded the Oracle Virtualbox and the macOS Mojave ISO file from the given link.
Virtualbox: Download link
macOS Mojave Virtualbox image: Download link
I know you might be thinking of creating your own iso file but it’s a little time-consuming.
And that’s why I have already given the link for the Mojave image file.
Now I hope you have already downloaded all the given files & installed Virtualbox successfully.
Note:- Please check the VT-x or AMD-V virtualization feature must be enabled in your BIOS settings.
So Let’s get started & follow this step by step guide.
How To Install Mac Os On Virtualbox
1. Open & Install Virtualbox Extension Pack
Now Open Virtualbox and install the Extension Pack from the given link. Download link
Now that you have installed the extension pack, it’s time to create a virtual machine.
2. Create a macOS Mojave Virtual Machine
Open Virtualbox and Click on the “New” button to create a macOS virtual machine.
Now type the name as “macOS Mojave“, type of OS as Mac OS X and the version of OS as Mac OS X (64-bit). And then Click on Next.
3. Memory Size (RAM)
Now select the amount of RAM to be allocated to the virtual machine. And to run macOS on Virtualbox, the minimum recommended RAM size is 2048Mb.
4. Setup a Virtual Hard Disk
Now the next step is to create a virtual disk for this machine. But here instead of creating a new virtual hard disk, we will import the macOS Mojave 10.14 disk image file which we have downloaded earlier. So Click on Use an existing virtual hard disk file.
And then click on the Folder icon and browse to the image file.
Now select the image file and Click Open.
And you can see that you have successfully created the macOS virtual machine and here comes the configuration part.
5. Configuring macOS Virtual Machine
Note:- All these settings are mandatory to run and install macOS Mojave on Virtualbox on Windows PC properly.
Now Click on Settings.
Now in the Next screen Go to System, then Click on Motherboard Tab and Select the Boot Order as Optical and Hard disk. And in the Extended Features Enable I/O APIC, Enable EFI (Special OSes only) and Hardware Clock in UTC Time. Click OK.
Next Go to Processor Tab. And select the minimum processor as 2 and Enable PAE/NX in the extended features. Click OK.
Further, Go to Display Settings and change the Video Memory to 128 MB or the maximum you can have.
Next, Go to the Storage tab and Enable the Use Host I/O Cache and Click OK.
Now, Go to the USB tab and Enable the USB 3.0 (xHCI) Controller and Click OK.
6. Modify Virtualbox Virtual Machine using Command Prompt
Note:- Before running the Command Prompt, please make sure that you have Closed the Virtualbox & it is not in the running state.
Also, I would recommend you to Restart or Reboot your pc before using these command-line codes.
Now add the following commands to Virtualbox Virtual Machine using Command Prompt (CMD). And to Open Command Prompt, click on Search and type “CMD” and Right Click on it and select Run as Administrator.
Now run each command one by one in the command prompt. And before running each command, please make sure to change the “Your VM Name” part with the name of the virtual machine that you have created earlier.
cd “C:Program FilesOracleVirtualBox”
VBoxManage.exe modifyvm “Your VM Name” –cpuidset 00000001 000106e5 00100800 0098e3fd bfebfbff
VBoxManage setextradata “Your VM Name” “VBoxInternal/Devices/efi/0/Config/DmiSystemProduct” “iMac11,3”
VBoxManage setextradata “Your VM Name” “VBoxInternal/Devices/efi/0/Config/DmiSystemVersion” “1.0”
VBoxManage setextradata “Your VM Name” “VBoxInternal/Devices/efi/0/Config/DmiBoardProduct” “Iloveapple”
VBoxManage setextradata “Your VM Name” “VBoxInternal/Devices/smc/0/Config/DeviceKey” “ourhardworkbythesewordsguardedpleasedontsteal(c)AppleComputerInc”
VBoxManage setextradata “Your VM Name” “VBoxInternal/Devices/smc/0/Config/GetKeyFromRealSMC” 1
Like I will replace “Your VM Name” with “macOS Mojave” in all the codes.
It will be easier if you first copy all the codes to a notepad file & edit them and then paste them in the CMD.
And you are done with the configuration part. Now comes the major part to install the macOS Mojave on Virtualbox Virtual machine.
Install macOS Mojave on Virtualbox PC
Note:- All this installation process of mac on Virtualbox works the same as on the original MacBook. This means that this process is also applicable to Mac Users installing the Mac operating system.
So Let’s get started & install it properly.
1. Start & Run macOS Mojave
Now Open Virtualbox & select the virtual machine and then Click on Start.
Now, wait for a few minutes while the virtual machine boots up and start loading the installer or the installation files.
2. Select Country & Keyboard Layout
Now select the United States as a country & Click on Continue.
And Keyboard layout as the US and Click on Continue.
Mac Os Iso For Vmware
3. Data and Privacy
Now in the next screen, it will ask for the Data and Privacy settings which are by default. So Click on Continue.
4. Transfer information to this Mac
On this screen, it will ask if you want to transfer any sort of information from any Mac or Windows PC. So, select Don’t transfer any information now and Click on Continue.
5. Sign in with Your Apple ID
Now it will ask to sign in with your Apple ID. If you already have the apple ID then you can enter or you can simply on Set up Later. And Continue.
6. Term and Conditions
Now the Term and conditions part, So simply Click on Agree.
7. Create a Computer Account
Its time to create a computer account that is similar to the user account created in Windows PC. So, fill out all the details like Full name, Account name and Password. And Click on Continue.
8. Express Set-Up
Next is Express Set Up where you can also customize settings or you can simply click on Continue.
9. Choose your MacOS Look
Since macOS Mojave comes in two different looks, one is the Light look which is similar to normal and the other one is the Dark look. You may choose according to your Preference & Click on Continue.
10. Installed Mac OS Mojave on Virtualbox
And Done! You have successfully installed the macOS Mojave 10.14 on Virtualbox virtual machine in Windows 10 PC.
That’s it for now…
Conclusion

So that’s how you can easily install a Mac OS on Windows 10 PC using Virtual Box Virtual Machine. And you can also follow the same method for other different OSes like Catalina & High Sierra.
Stay tuned for the next post on install mac os on VMware.
Feel free to share your thoughts and also tell us if you know any better way to Install macOS on Virtualbox in Windows 10 PC [ Mojave ].
If you liked this post, Don’t forget to share this awesome post with your friends.
Table Of Content
1- Download Mac OS
2- Create Mac OS Virtual Machine
3- Configure VBoxManage
4- Start the Mac OS virtual machine
View more Tutorials:
1- Download Mac OS
2- Create Mac OS Virtual Machine
3- Configure VBoxManage
4- Start the Mac OS virtual machine
1- Download Mac OS
Mac OS is a computer operating system developed by Apple. This is a operating system with beautiful interface, however, to own a the computer of Apple with this operating system, you need to use a lot of money, normally with the double price than that of common computers using Windows operating system. Fortunately, you can experience the Mac OS right on your computer by installing a Mac OS virtual machine on VirtualBox.
Mac Os Vm Iso
Below is the list of Mac OS versions released in recent years:
Mac OS VersionNameRelease Date10.10YosemiteJune 201410.11El CapitanSeptember 30, 201510.12SierraJune 12, 201610.13High SierraJune 5, 2017
Mac Os X Download Iso
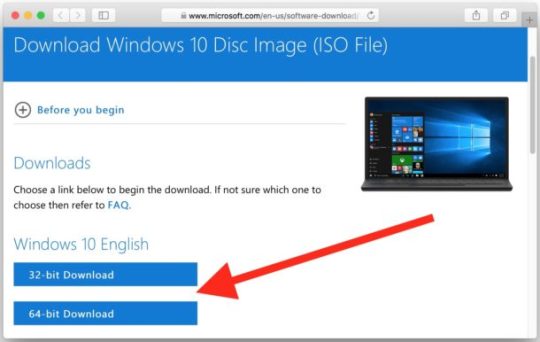
In this post, I will show you how to install the Mac OS on VirtualBox. First of all, please download an installer.
Mac Os 64 Bit Download
After finishing downloading, there is one file:
Extract the file that you have just downloaded in a folder.
2- Create Mac OS Virtual Machine
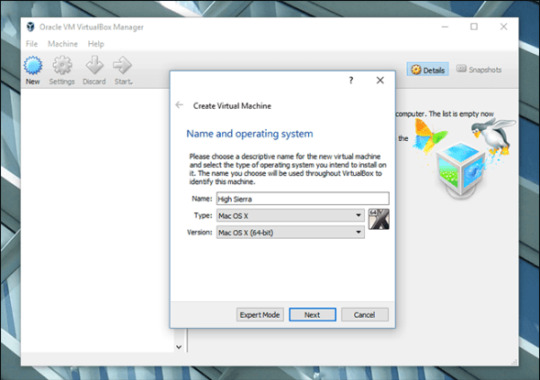
On the VirtualBox, create a new virtual machine.
Enter a name for the virtual machine and select a Mac OS version suitable for the Mac OS version that you have downloaded..
Mac OS operating systems need a large amount of RAM to work, You should provide it with about 4GB RAM.
The Mac OS file downloaded by you in the above step is a complete operating system and you can be willing to use without installation. Therefore, on the VirtualBox, you only need to point to this postion of this file.
OK, your Mac OS virtual machine has been created.
You can carry out other configurations for Mac OS, for example, Network configuration, specifying the quantity of Processors,..
3- Configure VBoxManage
After you create VirtualBox virtual machine, the Meta information of this virtual machine will be found in the folder (Depending on your operating system):
LINUX (Ubuntu,..):/home/{user}/VirtualBox VMs
WINDOWS:C:/Users/{user}/VirtualBox VMs
There are some advanced configurations that you can perform via the interface of VirtualBox, and you must carry out it via a command:
Replace 'Your-VM-Name' by your virtual machine name. Your virtual machine name can be found in the 'Setting > General > Basic' (Like the following illustration).
On the Linux (Ubuntu,..), open Terminal windows and CD to go to your Mac OS virtual machine directory. If you use the Windows operating system, open the CMD windows with Administrator privilege and CD to go to the Mac OS virtual machine directory.
Perform the above commands respectively (after having replaced 'Your-VM-Name'):
OK, all the commands have been performed successfully.
4- Start the Mac OS virtual machine
Press on 'Start' button to start your Mac OS virtual machine:
Enter username/password (to be used to enter your Mac OS virtual machine).
OK, at this moment, you have installed Mac OS Virtual Machine on VirtualBox successfully .
View more Tutorials:
0 notes
Text
Mac OS XをVirtualBoxにインストールする方法【インストール不可の時の回避法】
※注意:この記事中のコマンドはLinuxでFirefoxからターミナルにコピー・ペーストで貼り付けて実行しようとすると、貼り付け時のバグに依る入力間違いの文字を修正したとしてもあるいは当然そのままでも正常に実行できないようです。その場合は出典を辿ってそのページの該当するコマンドをコピーして実行してみてください。
Mac OS XはVirtualBoxにインストールしようとすると「Mac OS Xはこのコンピュータにはインストール出来ません」のような警告表示が出てインストールが不可になるようになっているが、これはMac OS Xの低レベルなレイヤーにハードウェアを認証する手法が組み込まれているからである。以下のコマンドを端末で実行すれば認証を偽装してVirtualBoxにMac OS Xをインストールすることが出来るはず。しかし厳格にはこれは違法な手法だと思われる。この手法の実行は自身の意志で自己責任で行なって欲しい。
※この記事のコマンドは基本的にLinuxで動作し及びMac OS Xでも動作するコマンドだと思われる。下記のコマンドのうち「VBoxManage」の部分はWindowsでは「ディレクトリ\VBoxManage.exe」に置き換えればコマンドプロンプトで正しく実行できると思われる。
VBoxManage modifyvm "仮想マシンの名前" --cpuidset 00000001 000106e5 00100800 0098e3fd bfebfbff
VBoxManage setextradata "仮想マシンの名前" "VBoxInternal/Devices/efi/0/Config/DmiSystemProduct" "iMac11,3"
VBoxManage setextradata "仮想マシンの名前" "VBoxInternal/Devices/efi/0/Config/DmiSystemVersion" "1.0"
VBoxManage setextradata "仮想マシンの名前" "VBoxInternal/Devices/efi/0/Config/DmiBoardProduct" "Iloveapple"
VBoxManage setextradata "仮想マシンの名前" "VBoxInternal/Devices/smc/0/Config/DeviceKey" "ourhardworkbythesewordsguardedpleasedontsteal(c)AppleComputerInc"
VBoxManage setextradata "仮想マシンの名前" "VBoxInternal/Devices/smc/0/Config/GetKeyFromRealSMC" 1
[仮想マシンの名前]は作成した時の仮想マシンの名前であるため自身が設定した仮想マシンの名前に置き換えて正確に入力すること
出典:UbuntuなVirtualBoxにmacOS High Sierraをインストールしてみる
上記のコマンドは仮想マシンのハードウェアを偽装する設定とアップルが組み込んだ認証回避手法への脅しの文字列を素知らぬ顔で設定して認証を偽装するものである。
以下のコマンドを入力すれば、画面の解像度を調節できる。二種類あるが、上のコマンドを実行すると下のコマンドが無効化されるようなので間違って実行したら削除するコマンドを見つけなければいけないのかもしれない。私の経験では削除方法がわからなかったため、先に下のコマンドを実行したが上記の方のコマンドが有効であった。上記のコマンドが設定されていなければ下のコマンドが有効になるものかもしれないが、仕組みがわからないこともあって正確なことはわからない。上のコマンドはディスプレイの大きさの規格に沿って解像度を設定するコマンドであり、下のコマンドは解像度を数値で指定するコマンドである。
VBoxManage setextradata "VM name" VBoxInternal2/EfiGopMode N
VM nameは作成した時の仮想マシンの名前であるため自身が設定した仮想マシンの名前に置き換えて正確に入力すること
Nは解像度を表す番号(0 = 640x480、1 = 800x600、2 = 1024x768、3 = 1280x1024、4 = 1440x900、5 = 1920x1200)
VBoxManage setextradata "Mountain Lion" VBoxInternal2/EfiGraphicsResolution 1440x900
Mountain Lionは作成した時の仮想マシンの名前であるため自身が設定した仮想マシンの名前に置き換えて正確に入力すること
出典: VirtualBoxにインストールしたMacの解像度を変更
以下のソフトウェアをクライアントのMac OS Xにインストールして仮想マシンのオーディオコントローラーの設定をICH AC97に変更すると(正常に?とりあえず?)音が鳴るようになる。追記の項のほうからリンクが張られているパッケージを取得すれば良し。上記のほうのリンクはダミーみたいだが。私自身はフォーラムのページの方のパッケージをダウンロードして実際に使ったと記憶しているが、直接パッケージをダウンロードするリンクのほうでも良いはず。普通はマニュアルインストールのパッケージではなくインストーラーのパッケージの方を使えば良いだろう。
--> Mac OS X on Virtualbox 3.2 beta3 and AC97 Audio Driver
Mac OS Xのインストールディスクはインストールを終了しようとしてもスタートアップシステムを選択して再起動出来るだけで電源を切るという意味でシステム終了する機能がないため、途中でインストールを中断するなら仮想マシンの電源を強制的に落とすしかありません。これはもともとプリインストールされているシステムが有るMacにインストールすることが前提で設計されているからだと思います。でもはっきり言ってこの仕様はいただけない。インストール用にインストールディスクから起動するだけなら即時的に強制的に電源を落としても仮想マシンは壊れたりしないようです。
インストールディスクはディスクイメージに吸い��してから仮想マシンのストレージの設定で仮想マシンにマウントさせたほうが断然使いやすく速度も速いです(ホストコンピュータのストレージの容量は食います)。Mac OS Xではディスクユーティリティ、Ubuntu LinuxでもDisk Utility(だっけ?)などでディスクイメージ化して(ISOイメージだと思います。Mac OS X専用のDMGイメージでは無い)用意すれば良いです。ただなるべく簡単にインストール可能かどうか測りたいなら物理ドライブからインストールディスクを起動してインストール可能かどうか調べてから、ディスクイメージに吸い出したほうがより段階的で安心だと思います。
上記は基本的にSnowLeopardあたりのケースについて書いている。SnowLeopardのインストールディスクはAmazonあたりで購入できるだろうか。仮想マシンは重いため、普通のスペックのマシンではほとんど実用的には動作しないだろう。システムのリソース負荷を軽くしたいならLinux上で動かす場合はWindowMaker【シングルユーザーモードでログインしないこと、デスクトップ環境を切り替えられなくなる】やLXDEなど軽量なデスクトップ環境の上でVirtualBoxの仮想マシンを動作させることが考えられる。ちなみに私が実行した限りではMac OS X内のプレビューアプリは原因は分からないが正常に画像が表示されなかった。ちなみに実際にVirtualBoxにMac OS Xをインストールする場合は、仮想マシンとして適切なプリセットを選ぶこと。
#ourhardworkbythesewordsguardedpleasedontsteal<--NotFalseOnStevesApplePleaseTakeThemThanks#ourlazyworkbythesewordsguardedpleaseshutdownbyforce<--FaultOnStevesApplePleaseDontForgiveButDontExclusionUs
0 notes
Photo

Macintosh IIci #apple #macintosh #applecomputerinc #retromac #retroapple #vintagemac #vintageapple #vintagecomputer #applehardware #applecollection #1990s #90s #atticfinds
#macintosh#vintagemac#vintageapple#90s#1990s#atticfinds#applecomputerinc#vintagecomputer#applecollection#applehardware#retromac#retroapple#apple
1 note
·
View note
Text
How to Use Mac-only Apps on Windows 10
Wondering how to install and use Mac-only apps on a Windows 10 PC? You have come to the right place to know the answer. There are barely any ways to use Mac apps on Windows, but there is a method which will enable you to run Mac apps.

This method is not a very easy and straightforward but will work once you understand the whole procedure. So without wasting any time, let’s get started.
Step 1: Install and Setup Virtual Machine
This is the best way to use Mac apps on a Windows computer. It requires a bit of technical knowledge, but we’ll help you in that regard.
Files required to create a MacOS Virtual Machine in Windows 10:
Download the “VirtualBox”(latest version).
A copy of “macOS”(Download most recent version)
After successfully downloading required files, extract them in different folders. In the Mojave Image folder, you will find a VMDK file, which means Virtual Machine Disk Format. This file is containing macOS operating system.
How to Make macOS Virtual Machine in Windows 10?
Open the VirtualBox folder and then locate and launch the VirtualBox file.
Select “New” and then type macOS. The software will detect the OS when you type and then select the macOS 10.13 High Sierra.
Set the RAM to 4GB (Your Computer must have at least 6 GB of RAM to run the Mac OS).
Set hard drive (use existing virtual hard disk file).
Then select the folder icon to browse and then select the VMDK file.
Hit the Create button.
Setting up the macOS Virtual Machine
Before you start using macOS on the Windows 10, you need to tweak the settings of Virtual Machine. To begin editing the settings, see the guide below.
Right click on macOS Virtual Machine and select settings.
On the left-hand side menu, hit the system tab.
Then uncheck the Floppy located under Boot Order.
In the Chipset, select the ICH9 option.
Now click on a processor located at the top menu.
In the processor, slider, assign two units.
Check the Enable PAE/NX box.
Under “Display” settings, set the Video Memory slider to 128MB.
Now under “Storage” settings, make sure that box labeled with Use Host I/O Cache is checked.
Hit ok, and your settings will be saved.
Open Command Prompt and To Tweak Your PC
Your PC isn’t ready to run Virtual Box due to lack in the configuration. We will use the Command Prompt to configure your PC. macOS VMDK requires patching of the Virtual Box to function flawlessly. To do this, you need to enter some codes in Command Prompt. It is pretty easy, follow the below steps carefully:
Close all applications and programs on your PC (It is important to close all program on your PC otherwise this action can be futile).
Hit the Start key and type CMD.
Right click on the CMD and choose Run as administrator.
Now type “C:\Programs files\Oracle\VirtualBox\” and hit enter.
Below are some commands that you need to type in CMD. Replace the “macos” with the name of your virtual machine, which is located in the quotes. After every command hit enter:
VBoxManage.exe modifyvm “macos” – -cpuidset 00000001 000106e5 00100800 0098e3fd bfebfbff
VBoxManage setextradata “macos” “VBoxInternal/Devices/efi/0/Config/DmiSystemProduct” “iMac11,3”
VBoxManage setextradata “macos” “VBoxInternal/Devices/efi/0/Config/DmiSysteVersion” “1.0”
VBoxManage setextradata “macos” “vBoxInternal/Devices/efi/0/Config/DmiBoardProduct” “Iloveapple”
VBoxManage setextradata “macos” “VBoxInternal/Devices?smc/0/Config/DeviceKey “”ourhardworkbythesewordsguardedpleasedontsteal(c)AppleComputerinc”
VBoxManage setextradata “macos” “VBoxInternal/Devices/smc/0/Config/GetKeyFromRealSMC” 1
If any command fails, then enter it again and make sure you type accurately. When you have done every command successfully, then close the command prompt.
Start Your macOS Mojave Virtual Machine
Now open the VirtualBox and then double click the macOS virtual machine to start your macOS on Windows 10. You can now see a long stream of random text, and then a grey screen will appear after that. This grey screen can take on up to two minutes go away, so don’t panic and don’t press any key. After two minutes later you will finally see a “Welcome” screen. Now you can set your macOS Mojave virtual machine to the full screen.
Now the macOS is successfully installed and is working perfectly. Move ahead and install the Mac apps on windows.
Step 2: Sign into Your Apple Account
Now you can see that every process and experience is similar to a real Mac. To access the App Store, you first need to log into the Apple account. Apple requires an account to install an app from the Apple App Store.
Step 3: Download First Mac App on Windows 10
As now you have the authority to install and use any Mac app on your Windows PC. You can download any apps from the App Store. Open the App Store from the bottom icons. If the system asks for the Apple account information, then enter again.
Now browse for the app which you want to download. Click on the Get button then Install.
Open your macOS app on your Windows 10 PC and enjoy the Mac app on Windows.
How To Save MacOS Virtual Machine Session and shut down safely?
Randomly closing the virtual machine can cause your virtual disk to get corrupted and your Mac apps and other work can also be affected. Follow the below guide to save the Virtual machine session safely:
Click on the Apple logo in the top-right corner.
Click on shutdown.
Now you can see operating system will shut down the macOS correctly.
How to save your current state in Virtual machine?
Any activity you do inside your macOS will not be saved automatically. You will need to do that manually every time before closing it.
You will need to take a snapshot which will save your current progress on the virtual macOS.
A snapshot will allow you to restore the progress of your work that you left before quitting it. After taking a snapshot, you can shut the macOS as well as your PC.
Wrapping It Up
A small mistake in the whole process can fail the entire process. Now we know how to use the Mac apps on your Windows 10. You can save a lot of money by using this method. You are not limited to using only apps. You can almost do everything possible in a macOS.
Lucia Mandela is a Microsoft Office expert and has been working in the technical industry since 2002. As a technical expert, Lucia has written technical blogs, manuals, white papers, and reviews for many websites such as office.com/setup.
Source:Windows 10
0 notes
Photo

Square's payment app will support Tap to Pay on iPhone later in 2022 | AppleInsider Read More 👉 https://www.candourmag.com/squares-payment-app-will-support-tap-to-pay-on-iphone-later-in-2022-appleinsider/?feed_id=2108&_unique_id=6299c7bd17a04 UK’s Leading British Asian Magazine. Focusing on Fashion, Beauty, Parties, Celebrities, Music, Entertainment, Tech & More. Be ahead of all the biggest trends! 👍 up 👉 www.candourmag.com #apple #Google #Adobe #AppStore #AppleComputer #AppleComputerInc. #AppleInc #AppleTV #imac #iBook #iBookStore #iMac #Intel #ios9 #ios9 #iPad #iPhone #iphone6 #iphone6s #iPodclassic #iPodnano #iPodshuffle #iPodtouch #iTunes #iTunesStore #macbook #macosx #macosx #MacPro #MacBookPro #MagicMouse #MagicPad #Microsoft #Nokia #Nvidia #ResearchinMotion #RIM #Samsung #BritishCandour
#Tech#apple#Google#Adobe#AppStore#AppleComputer#AppleComputerInc.#AppleInc#AppleTV#imac#iBook#iBookStore#iMac#Intel#ios9#iPad#iPhone#iphone6#iphone6s#iPodclassic#iPodnano#iPodshuffle#iPodtouch#iTunes#iTunesStore#macbook#macosx#MacPro
0 notes
Photo

MW65 review: Master & Dynamic's first ANC headphones were worth the wait http://bit.ly/2J6lsm8 #Adobe #app #AppStore #Apple #AppleComputer #AppleComputerInc. #AppleInc #AppleTV #gadgets #Google #imac #iBook #iBookStore #iMac #Intel #ios #ios9 #ios9 #iPad #iPhone #iphone6 #iphone6s #iPodclassic #iPodnano #iPodshuffle #iPodtouch #iTunes #iTunesStore #mac #macbook #macosx #macosx #MacPro #macapp #macbook #MacBookPro #macbookpro #macintosh #macos #macpro #MagicMouse #MagicPad #Microsoft #Nokia #Nvidia #ResearchinMotion #RIM #Samsung
0 notes
Text
How to Run macOS on Windows 10 in a Virtual Machine
Windows 10 is an extraordinary working framework. It has its idiosyncrasies and irritations, yet what working framework doesn't? Regardless of whether you're under obligation to Microsoft and Windows 10, you can at present shop around. What preferable approach to do that over from the protected bounds of your current working framework and a virtual machine? Thusly, you can run macOS on Windows.
In this instructional exercise, you will figure out how to introduce macOS in a virtual machine, making a virtual Hackintosh. "Hackintosh" is the name of any unsupported equipment running a Mac working framework. Uncertain in the event that you will coexist with a Mac? Out this instructional exercise an attempt!
What Files Do You Need to Create a macOS Virtual Machine on Windows 10?
Before digging into the "how to," you have to download and introduce the fundamental devices. The instructional exercise subtleties how to make macOS virtual machines utilizing both Oracle VirtualBox Manager (VirtualBox) and VMware Workstation Player (VMware Player). Not certain which to utilize? Study the contrasts among VirtualBox and VMware.)
Download the most recent variant of VirtualBox. The instructional exercise utilizes VirtualBox 6.0.6.
Download the most recent variant of VMware Player. The instructional exercise utilizes VMware Player 15.0.4.
You additionally need a duplicate of macOS, as well. Mojave is the most recent macOS variant. Be that as it may, at the season of composing, there is no AMD macOS Mojave construct accessible to those without a current AMD-based macOS establishment.
That doesn't mean AMD clients are totally stuck between a rock and a hard place however. You can at present introduce macOS High Sierra in a virtual machine. Also, in time, an AMD-based macOS Mojave virtual machine construct will end up accessible.
This instructional exercise will concentrate on introducing macOS in a virtual machine running on Intel equipment. Shockingly, I don't approach any AMD equipment so can't give an instructional exercise. Be that as it may, in the event that you keep understanding, you will discover connections to a few AMD macOS High Sierra and Mojave instructional exercises towards the finish of the article.
Download the macOS Virtual Image
Download the macOS virtual picture for your CPU, virtual machine type, and the adaptation of macOS you need:
Intel Mojave
VirtualBox Intel HFS Mojave 10.14.3
Google Drive
Mediafire
Code for VirtualBox (Required)
Virtualbox Intel APFS Mojave 10.14.3
Google Drive
Media Fire
Code for VirtualBox (Required)
VMware Player Intel APFS Mojave 10.14.3
Google Drive
Media Fire
VMware Player Patch Tool (Both Files Required)
After the document completing the process of downloading, right-snap, and concentrate utilizing your preferred file instrument. For example, I would right-click, at that point select 7-Zip > Extract to "Mojave Image." In the organizer, you will discover a .VMDK record, which represents Virtual Machine Disk Format. The VMDK record contains the working framework you will use in the following area.
Step by step instructions to Create a macOS Mojave Virtual Machine with VirtualBox
Open VirtualBox. Select New. Type macOS. VirtualBox will identify the OS as you type and will default to Mac OS X. In any case, you have to change this. Under Version, select macOS 10.13 High Sierra.
Next, set the measure of RAM the virtual machine and macOS can utilize. I would propose at least 4GB, however the more you can give from the host framework, the better your experience will be. Keep in mind, you can't dole out more RAM than your framework has accessible, and you have to abandon some memory accessible for the host working framework. (The amount RAM does a framework need?)
At last, you have to allot a hard circle. Select Use a current virtual hard plate record.
Select the organizer symbol and peruse to the VMDK document, at that point hit Create.
Alter the macOS Mojave Virtual Machine Settings
Before starting up the virtual machine and utilizing macOS Mojave, you have to make a couple of changes to the settings. Right-click you macOS virtual machine and select Settings.
Under System, expel Floppy from the boot request. Guarantee the Chipset is set to ICH9.
Select the Processor tab. Dole out two processors. On the off chance that you have an i7 CPU with capacity to save (or an i9 with different additional centers), think about relegating more. Be that as it may, this isn't imperative. Ensure the Enable PAE/NX box is checked.
Under Display, set Video Memory to 128MB.
Presently, under Storage, check the case nearby Use Host I/O Cache.
Use Command Prompt to Add Custom Code to VirtualBox
Shockingly, in its flow design, VirtualBox doesn't work with your macOS VMDK. To get it ready for action, you need to basically fix VirtualBox before the macOS virtual machine will work. TO do this, you have to enter some code utilizing the Command Prompt. Every one of the subtleties are beneath.
Begin by shutting VirtualBox. The directions won't execute appropriately if VirtualBox or any of its related procedures are running. When shut, press Windows Key + X, at that point select Command Prompt (Admin) from the menu. On the off chance that your menu just demonstrates the PowerShell choice, type order into your Start menu seek bar. At that point right-click the Best Match, and select Run as Administrator.
The accompanying code works for VirtualBox 5.x and 6.x.
Utilize the accompanying order to find the Oracle VirtualBox registry:
cd "C:\Program Files\Oracle\VirtualBox\"
Presently, enter the accompanying directions, one by one. Alter the direction to coordinate the name of your virtual machine. For example, my virtual machine name is "macos." Here are the directions:
VBoxManage.exe modifyvm "macos" - cpuidset 00000001 000106e5 00100800 0098e3fd bfebfbff
VBoxManage setextradata "macos" "VBoxInternal/Devices/efi/0/Config/DmiSystemProduct" "iMac11,3"
VBoxManage setextradata "macos" "VBoxInternal/Devices/efi/0/Config/DmiSystemVersion" "1.0"
VBoxManage setextradata "macos" "VBoxInternal/Devices/efi/0/Config/DmiBoardProduct" "Iloveapple"
VBoxManage setextradata "macos" "VBoxInternal/Devices/smc/0/Config/DeviceKey" "ourhardworkbythesewordsguardedpleasedontsteal(c)AppleComputerInc"
VBoxManage setextradata "macos" "VBoxInternal/Devices/smc/0/Config/GetKeyFromRealSMC" 1
After the finishing of the directions, and assuming you experienced no blunders, close the Command Prompt.
macos virtual machine order brief virtualbox
Boot Your macOS Mojave Virtual Machine
Revive VirtualBox. Double tap your macOS virtual machine to begin it. You will see a long stream of content, trailed by a dim screen. The dark screen can pause for a minute or two to clear, however don't freeze. When it settle, you will land at the macOS "Welcome" screen.
macos virtual machine virtualbox welcome screen
From here, you can set your macOS Mojave virtual machine up as you see fit.
Professional Tip: Take a depiction of your virtual machine once it passes the dim screen. In the event that anything turns out badly down the line, you can come back to the Welcome screen setup and begin the procedure once more. When you complete the macOS setup, take another so you can hop straight into your macOS establishment. Head to Machine > Take Snapshot, give your depiction a name, and sit tight for it to process.
Mouse and Keyboard Not Working?
Turn your macOS Mojave virtual machine off. Presently, download and introduce the VirtualBox Extension Pack.
Once introduced, right-click your macOS virtual machine and select Settings. Open the USB tab and select USB 3.0 (xHCI) Controller, at that point press OK.
Begin your macOS Mojave virtual machine once more, and you are a great idea to go.
0 notes
Last Seen Blogs

sukilane
MR MOON WHAT HAVE YOU DONE

twrkk
It's only a dream

before-interesting
Untitled

bluesfreakingart
Blues art.

napyofastar
stargaze