#arduino data types
Explore tagged Tumblr posts
Visit Tumblr Blog
Explore Tumblr blogs with no restrictions, modern design and the best experience.
Last Seen Tumblr Blogs


Fun Fact
China blocked Tumblr because of pornography and censorship problems in 2013.
Text
⚡️🔍 Power up your projects with smart USB-C tools! Switch cables on/off with ease, power with precision, and monitor every milliamp with useful & compact analyzers @ Adafruit.
Check them out:
5 notes
·
View notes
Text
Progress Update 11/10/2024
Haven't made a progress update in a bit, but want to keep documenting changes and interations even if they are small. So here we go.
The majority of the focus recently has been on developing the Viewfinder for the Interpreter. One of the major pieces of design I want to incorporate into this is a 3D viewing space, akin to a hologram/projection/Pepper's Ghost. My original plan for this was to modify this design. I saw this concept about a decade ago on Instructables I think and thought it was really cool.
My modifications were going to be using four separate OLED displays each running either the original or a mirrored or rotated version of the original gif/movie/image, rather than a single screen with the four images on it together. There were some pros and cons of this I had convinced myself of, but one of my barriers on progress in this method was related to having the Arduino I am working with not having enough breakout pins for the type of data pins I need for four screens. My soldering skills aren't amazing, so getting four of them hooked into one set of pins was daunting.
However, I found this video a few days ago, and was reintroduced to Retroreflectors. Video goes over the basics of the tech, and even takes it a step further by introducing ways to make it into a "touch screen". However, that's extra complexity and not what I want for this Viewfinder anyway, so it's possible I can just snag the reflector part of their build and significantly reduce the complexity in my own design.
This now leaves potential for a much larger image size, as before I was limited to 128 x 64 pixels, as I wanted to keep the footprint small, which majorly limited screen size to fit with needing to cram four into the space. So bigger canvas size is great! Fewer electrical components is also great! Now is just getting in some sample materials for testing the holographic display part itself.
Another part of the project I've been working on is the music. Less progress here, but I have started to tinker with a program to add in drums which I think will add a much-needed layer to the music I have been working on.
That's all for this one, I am hoping to have materials in a couple weeks, and I am clearing out some sidejobs that also will help fund this endeavor.
4 notes
·
View notes
Text
youtube
An amazing documentary on an older bit of computer technology that uses punchcards. What makes this more amazing too, is that this is a VERY old form of programming that dates back to the 1700s. Before we had these types of electric punchcard computers, Paper punchcards were used to make weaving patterns for things like dobbies when making jacquard fabric and lace patterns for big looms, automatons, and in a lot of ways works like the drum on a music box. It's a way to have mechanical programming instead of coding electronics. Electronics are smaller, load faster, and can hold much much more data, but Punch card equipment has it's own benefits as well. I'm actually old enough and fortunate enough to have handled old punch card and mag striped equipment when helping my mom in her classroom, it was a very outdated tech then. But it's not just charming, fun to use, and fairly simple to pickup, it's practical, and at least for me I can understand it better than I can with coding now due to my issues with losing my memory. Honestly it's a fascinating rabbithole to go down, because it leads you to analog technology and how simple it really is. From the fact that a speaker is just something that can vibrate a pattern like a piece of cardboard or rubber attached to a needle being cranked over a record like this:
youtube
You'd be surprised what you can do mechanically. And a solid mechanical build combined with simple electronics like an arduino if you're able to learn can make amazing things.
#mechanics#punch card computers#punch cards#old technology#amazing things#learn something new#gramophone#Youtube
5 notes
·
View notes
Text
AH I REMEMBERED WHAT I WAS GONNA SAY EARLIER but it's kind of stupid, lmao.
So my partner is getting into brewing beer and I got them a Tilt, which is a Bluetooth hydrometer. It measures specific gravity and temperature, which are things you want to know so that you don't kill your yeast or whatever. Except the sensor's Bluetooth range is super short, and it basically runs via a phone app, and the temperature we're logging currently is the crawlspace, accessible via the staircase closet. So they were like, wait, what do we do about this, because I can't leave my phone in the closet, that's my alarm clock.
In a kind of ridiculous turn of life imitating art, I was like, hold up, I got just the thing right at my desk. Bam. Old phone. We just needed to scrounge up a charger because the battery is so dead that after charging just enough to power on it claimed it was at 53% (to be fair to it, there is a very real chance that it's correct, and it just holds no charge at this point so the capacity is just THAT low) and now it lives in the closet logging sensor data.
And I was like, you know...didn't I just solve a major story detail with a much larger version of this...yeah, no, this is all vaguely familiar somehow, power supply issues and all. Kind of cool that the concept works though. Kind of weird that it came up at all?
We are not gonna talk about the fact that I still have at least two more ancient-ass phones in a drawer where that came from because look, man, sometimes you just need a camera/mic/mini computer with Bluetooth and wifi that fits in a pocket, and people just get rid of these things, but not me. I actually could build a shitty security system out of them if I was reaaaally inclined. I mean. I'm not. But it's technically possible.
For real though, If I pick up any stupid maker projects I still high-key am thinking about slapping Bluetooth into a necomimi headset and running that through an Arduino and learning to code just enough to let me skip songs/change the volume on Spotify with my brain, because it's entirely doable, and I mean yeah I could do that on my phone remotely too, but that's not funny, now, is it. I'm just not sure it's $350+ of parts funny. Kind of a big investment just to prove the point that haha look I am the extremely ADHD type of lazy where I would rather solve a problem via the most convoluted and complicated Rube-Goldberg type ass machine way possible rather than just perform a single simple action.
YEAH I'VE BEEN THIS SCATTERED ALL DAY AND I REALLY SHOULD GO TO BED SHOULDN'T I. I started playing Satisfactory. Mistakes were made. I'm going to dream about conveyor belts again and I did it to myself...
#you know I used to mostly blog about witchcraft and paganism#and now I'm like. you know what I want to do? chain an EEG sensor to the Spotify API and skip songs with my brain.#it's kind of like magic when you put it like that. maybe things haven't actually changed that much after all#the headset idea actually came about bc I'd gotten so far into the writing zone that I literally just. tried to skip a song with my brain.#because I had so much reploid characters on my mind that it just sounded like a normal course of action I should be able to take#obviously it didn't work and cue me sitting there for a full 3 seconds going 'why didn't it. wait. why did I think it would?'#followed immediately after by 'YEAH BUT I PROBABLY COULD DO THAT ACTUALLY'#because you just Cannot write a character like Glitch without it rubbing off on you a little bit and WWGD kicked in real hard lmao#well obviously he'd [ridiculous chain of ideas ending in 'anyway I installed some shit and now I can control Spotify with my mind']#and I gotta say I do not like the idea of sticking a sensor on the *inside* of my skull. sounds very bad.#but it doesn't have to be on the inside to work soooo there's that!#I have a friend who for quite a long time had a rare earth magnet in one finger so he could find live wires by touch#he ended up removing it for work eventually but when I say I was jelly. man. but also kinda squeamish about it.#I do not like sharp things and I am Very funny about my fingers as an artist/writer/used to be musician.#but man that sounds cool. I want the magnet senses. I don't think I want them enough to have a magnet under my skin though#I think I wouldn't use them enough for that to be helpful actually lmao#anyway do I even need more senses? probably not. mine are already unfiltered and loud as shit.#'boy I wish I could sense magnetic fields' says idiot guy who can hear the mains hum even with no electronics currently turned on#like when the power goes out I can FEEL the fucking difference in the air and it's unnaturally quiet and kinda spooky#I do not think I need help on this front actually. I think I got it handled pretty okay lol
3 notes
·
View notes
Text
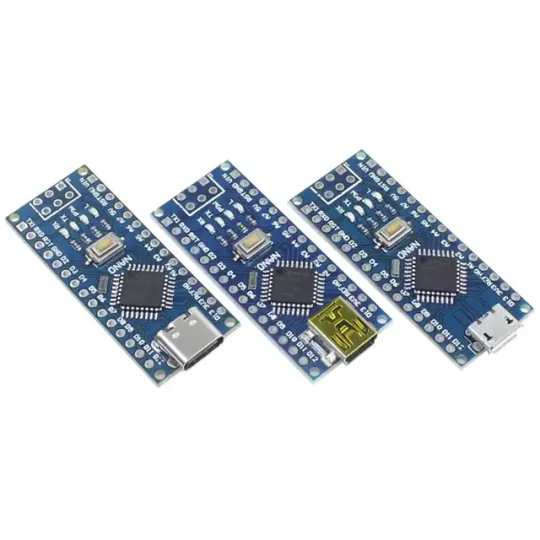
Introduction to Mini Development Board Based on Arduino Nano CH340 The Mini development board is a highly versatile microcontroller board that has gained significant popularity among makers and electronics enthusiasts. Its compact design, measuring just 45mm x 18mm, makes it particularly suitable for projects where space is at a premium. Powered by the ATmega328P microcontroller, the Nano CH340 supports various applications, from basic prototyping to complex automation tasks, thereby catering to a wide range of user needs. One of the standout features of the Mini development board is the CH340 USB-to-serial converter. This chip facilitates seamless communication between the microcontroller and a computer, allowing users to easily upload sketches and monitor serial data. Compared to its predecessors, which often utilized the FTDI chip, the CH340 offers a more cost-effective solution without compromising performance, making it a preferred choice for many hobbyists and professionals alike. Applications and Projects Using Mini Development Board for Arduino Nano CH340 The Arduino Nano CH340 is a compact yet powerful microcontroller board, making it an ideal choice for a wide array of projects. Its versatility and ease of use allow both beginners and experienced programmers to create innovative solutions across multiple domains. One common application is in robotics, where the Nano CH340 can be utilized to control motors and sensors, enabling the development of robots that can navigate environments autonomously. For those interested in home automation, the Arduino Nano CH340 serves as a reliable central unit that can manage various household devices. By integrating this board with smart sensors and relays, users can create systems that automate lighting, climate controls, and security measures. Projects can range from simple automated lighting systems to sophisticated home monitoring setups, showcasing the broad capabilities of the Nano CH340. PCB Size:43*18mm About Interface: Default shipment is type-c,if you need micro usb or mini usb interface,they are same price,just leave us message to claim the specified interface. Interested with much more quantity or other development board,contact us to talk details.View our company site to know more about our product category. Read the full article
0 notes
Text
Elmalo, let's commit to that direction. We'll start with a robust Sensor Fusion Layer Prototype that forms the nervous system of Iron Spine, enabling tangible, live data connectivity from the field into the AI's processing core. Below is a detailed technical blueprint that outlines the approach, components, and future integrability with your Empathic AI Core.
1. Hardware Selection
Edge Devices:
Primary Platform: NVIDIA Jetson AGX Xavier or Nano for on-site processing. Their GPU acceleration is perfect for real-time preprocessing and running early fusion algorithms.
Supplementary Controllers: Raspberry Pi Compute Modules or Arduino-based microcontrollers to gather data from specific sensors when cost or miniaturization is critical.
Sensor Modalities:
Environmental Sensors: Radiation detectors, pressure sensors, temperature/humidity sensors—critical for extreme environments (space, deep sea, underground).
Motion & Optical Sensors: Insect-inspired motion sensors, high-resolution cameras, and inertial measurement units (IMUs) to capture detailed movement and orientation.
Acoustic & RF Sensors: Microphones, sonar, and RF sensors for detecting vibrational, audio, or electromagnetic signals.
2. Software Stack and Data Flow Pipeline
Data Ingestion:
Frameworks: Utilize Apache Kafka or Apache NiFi to build a robust, scalable data pipeline that can handle streaming sensor data in real time.
Protocol: MQTT or LoRaWAN can serve as the communication backbone in environments where connectivity is intermittent or bandwidth-constrained.
Data Preprocessing & Filtering:
Edge Analytics: Develop tailored algorithms that run on your edge devices—leveraging NVIDIA’s TensorRT for accelerated inference—to filter raw inputs and perform preliminary sensor fusion.
Fusion Algorithms: Employ Kalman or Particle Filters to synthesize multiple sensor streams into actionable readings.
Data Abstraction Layer:
API Endpoints: Create modular interfaces that transform fused sensor data into abstracted, standardized feeds for higher-level consumption by the AI core later.
Middleware: Consider microservices that handle data routing, error correction, and redundancy mechanisms to ensure data integrity under harsh conditions.
3. Infrastructure Deployment Map
4. Future Hooks for Empathic AI Core Integration
API-Driven Design: The sensor fusion module will produce standardized, real-time data feeds. These endpoints will act as the bridge to plug in your Empathic AI Core whenever you’re ready to evolve the “soul” of Iron Spine.
Modular Data Abstraction: Build abstraction layers that allow easy mapping of raw sensor data into higher-level representations—ideal for feeding into predictive, decision-making models later.
Feedback Mechanisms: Implement logging and event-based triggers from the sensor fusion system to continuously improve both hardware and AI components based on real-world performance and environmental nuance.
5. Roadmap and Next Steps
Design & Prototype:
Define the hardware specifications for edge devices and sensor modules.
Develop a small-scale sensor hub integrating a few key sensor types (e.g., motion + environmental).
Data Pipeline Setup:
Set up your data ingestion framework (e.g., Apache Kafka cluster).
Prototype and evaluate basic preprocessing and fusion algorithms on your chosen edge device.
Field Testing:
Deploy the prototype in a controlled environment similar to your target extremes (e.g., a pressure chamber, simulated low-gravity environment).
Refine data accuracy and real-time performance based on initial feedback.
Integration Preparation:
Build standardized API interfaces for future connection with the Empathic AI Core.
Document system architecture to ensure a smooth handoff between the hardware-first and AI-core teams.
Elmalo, this blueprint establishes a tangible, modular system that grounds Iron Spine in reality. It not only demonstrates your vision but also builds the foundational “nervous system” that your emergent, empathic AI will later use to perceive and interact with its environment.
Does this detailed roadmap align with your vision? Would you like to dive further into any individual section—perhaps starting with hardware specifications, software configuration, or the integration strategy for the future AI core?
0 notes
Text
one of the biggest shocks to me about the ham radio world has been how out of step it is with the consumer electronics world (at the cheap end, at least).
like, you'd think that with the flood of cheap handheld software-based transceivers now from brands like Baofeng, that they'd throw a standard consumer audio-type headphone jack on the thing and let you get audio out to any set of headphones or headsets. but uhhhh. no. you can't do that. this is equipment that came out of spaces adjacent to/ovelapping with professional audio/RF engineering. so the mics on big kid radios are using like. XLR hookups. Maybe some of them have some more basic consumer outputs, but that seems to be reserved for the projects that also come from hobbyist computing directions, stuff like Arduino/raspi-based projects.
there ARE audiocable-type interfaces for the handheld type radios, but they are not compatible with headphones unless you do some soldering or chain together adapters. one of the de facto standards these days seems to be the "Kenwood" type connector, which is a set of adjacent 2.5mm and a 3.5mm TRS jacks. If I want to program my Yaesu handheld I need a special cable with an integrated circuit that converts USB to this two-prong serial interface thing.
the beater radio i just picked up does bluetooth programming AND USB-C programming, but it still has no simple audio out! (the BT is program-only, no audio) It was easier and more attractive for them to put a bluetooth module in there hooked up to serial port than it was to add a headphone jack. and it's like. the only one I know of on the market with a USB-C port for charging and programming.
it's a weird bit of culture shock for me coming from the gaming/PC enthusiast side, where my feature-language is "mic jack for audio, some USB format for data and power, bluetooth audio if you're fancy". I consider PCs and gaming to be my "primary" hobby, and everything else is an extension of that. My interest in radio is partially driven by having all this compute power literally next to my feet, knowing there's all this information going through the air around me, and getting frustrated that I can't interact with it. I want to add new capability to my battlestation! and i'm running into barriers on things that in my usual world were solved problems long ago
0 notes
Text
Which Are the Most Advanced Electronic Laboratory Equipment for Education in India?

Electronic laboratory equipment is an integral part of educational institutions, where it allows the student to gain some practical experience regarding electrical and electronic concepts. Since technology is always under innovation, modern laboratories require good quality and innovative implements to enhance the learning experience in laboratories. Finding the right electronic laboratory equipment manufacturer and supplier in India is the right degree of precision, reliability, and durability. With advanced Electronic laboratory equipment, students learn technical skills along with a practical understanding of circuits, microcontrollers, and communication systems. In this blog, we mentioned some of the most advanced electronic laboratory equipment for education in India.
8 Most Advanced Electronic Laboratory Equipment for Education in India
Digital Oscilloscope
A digital oscilloscope is an essential measuring and analyzing device for electrical signals in real time. It has become a crucial teaching tool for students in many educational labs teaching waveforms, voltage levels, and signal analysis. Modern oscilloscopes are high bandwidth, touch screen, and with advanced triggering, making them quite efficient for the student to learn.
Function Generator
A function generator is an essential device used to generate different kinds of electrical waveforms, like sine, square, and triangular waves. The function generator is mainly used for circuit testing in educational laboratories or for research projects. Advanced models have frequency modulation, phase-locking capabilities, and digital control for precision.
According to Wikipedia, In electrical engineering, a function generator is usually a piece of electronic test equipment or software used to generate different types of electrical waveforms over a wide range of frequencies. Some of the most common waveforms produced by the function generator are the sine wave, square wave, triangular wave and sawtooth shapes.
Spectrum Analyzer
Spectrum analyzers measure the electric signal frequency spectrum. They teach students about signal strength, bandwidth, and distortion from communication systems. Modern spectrum analyzers include high-speed digital processing, a touchscreen interface, and wireless connectivity for remote monitoring.
Digital Multimeter
It is an essential tool used in measurements of voltage, current, and resistance. The modern Digital Multimeter offers high resolution, data logging, Bluetooth connectivity, and more, so it is a good educational tool.
Microcontroller Development Board
Embedded microcontroller development boards such as Arduino and Raspberry Pi are used in educational institutions to teach students the fundamentals of an embedded system. With this board, students will be able to develop real-time applications, offering a practical platform in terms of programming and integration of hardware into software.
Power Supply Unit
Testing and powering electronic circuits require a regulated power supply. In a modern power supply, digital displays along with programmable voltage settings and overcurrent protection safeguard the integrity of experiments in the laboratory.
Soldering and Desoldering Station
Soldering stations are the stations used to assemble and repair electronic circuits. A high-class soldering station, with highly sensitive temperature regulation and ESD-protected working features, includes high-speed heating for student learning through PCB designing and repairing techniques.
Wireless Communication Trainer Kit
A wireless communication trainer kit is intended to help the student understand a number of different wireless technologies such as Bluetooth, Wi-Fi, and RF communication. These kits make it possible to demonstrate complex wireless concepts with practical demonstrations and experiments.
Enhancing Engineering Education in India through Advanced Electronic Laboratory Equipment
In accordance with a research study done by Smart Learning Environments, adding high-technology Electronic laboratory equipment, including augmented reality (AR) systems in the educational process of engineering improves the level of practical skills and students' understanding of complex contents. The analysis showed that students trained by using AR tools improved their skills for working with laboratory instruments like an oscilloscope and a function generator and obtained better practice-based assessment results. This helped build not only confidence but also relieved the cognitive load of having their familiarization with equipment through virtual devices before the real experiment was undertaken. Such advanced tools in engineering curricula at Indian colleges help close that gap between the knowledge acquired and the moment of practical application, hence setting up an effective learning environment.
Why Choose Eduscope India?
Eduscope India is the leading electronic laboratory equipment manufacturer and supplier in India, that offers high-quality innovative and educational solutions for laboratories. Steady on precision and durability, products from Eduscope India address the latest industry standard.
This equipment helps in learner practice and real-time experiments to boost students' learning abilities. In addition, Eduscope India offers extended support by providing proper installation, training, and maintaining all its products.
Conclusion
Electronics Laboratory Equipment for students is something that needs to be chosen right to provide the students with practical experience and technical know-how. The advanced laboratory equipment mentioned above increases the efficiency of learning by providing the student with problem-solving skills and innovation. For any institution looking for the best electronic laboratory equipment manufacturer and supplier in India, Eduscope India is one of the finest, with its commitment to quality, reliability, and customer support. A laboratory investment in quality helps to prepare future-ready learning environments in electronics preparation for real-world applications.
#electronic laboratory equipment manufacturer and supplier in india#electronic laboratory equipment manufacturer and supplier#electronic laboratory equipment manufacturer
0 notes
Text

Top 10 Skills You’ll Learn in an Embedded System Development Course in India
Today, with advanced technology in every field, the world has taken a big step toward creating new industries and innovations. It is one of the most challenging and exciting fields, and it's worth investing in by enrolling in an embedded system development course in India. The knowledge and skills gained are useful for outstanding performance in various domains such as IoT, robotics, and automotive technology. Here, we look at the top 10 skills you would learn in an embedded system development course, including a fascinating project initiative, TechnosCOE.
1. Familiarity with Microcontrollers and Microprocessors
Microcontrollers and microprocessors are the foundation base for embedded systems. Courses include architecture, functioning, and programming, with hands-on experience in popular controllers such as Arduino, PIC, and ARM, which form the backbone of most embedded applications.
2. Programming Languages
One of the main emphases of an embedded system development course in India is acquiring skills in programming languages such as C and C++. These skills are essential to writing firmware and developing applications for embedded systems. It also makes some courses introduce Python for scripting and debugging purposes to improve a student's versatility.
3. Real-Time Operating Systems (RTOS)
The creation of efficient and reliable systems is based on the understanding of how RTOS works. These courses cover the principles of multitasking, scheduling, and inter-process communication. By mastering RTOS concepts, students can develop systems for industries such as telecommunications and healthcare.
4. Circuit Design and PCB Development
These contain custom circuitry designs and a printed circuit board (PCB). The knowledge gained from developing circuitry robust and efficient within Eagle and Altium Designer gives immense value toward the prototyping and product development phase.
5. Sensor integration and data acquisition
Modern embedded systems interact with the physical world through sensors. Courses teach students how to integrate sensors, process their data, and use it in meaningful ways. Applications include temperature monitoring, motion detection, and environmental sensing, among others.
6. IoT (Internet of Things) Development
IoT has changed the face of industries, and at the center of this change is the concept of embedded systems. Students are taught to design devices that are internet-enabled, which can talk to other devices, and perform analytics in real-time data. The same skill can be applied to smart home automation and industrial applications.
7. Embedded Linux
Training on Embedded Linux is generally a part of an embedded system development course in India. It is a highly versatile and widely used open-source software in the world of embedded systems. A student learns how to develop applications, configure the kernel, and build custom distributions for different types of devices.
8. Debugging and Testing Techniques
Debugging is a key tool in embedded system development. Students become experts in using tools like JTAG debuggers and oscilloscopes to identify and debug those issues. Techniques on testing address all the requirements for the performance and safety of the system.
9. Communication Protocols
Understanding communication protocols is very important to the embedded engineers. The curriculum covers some popular protocols such as I2C, SPI, UART, CAN, and Ethernet, which are usually used in applications such as car systems and automation in industrial places.
10. Project Management and Documentation
Beyond technical skills, students also learn project management techniques and documentation practices. These soft skills ensure that they can efficiently collaborate with teams, manage timelines, and maintain accurate records of their work.
Role of TechnosCOE in Embedded Learning
Most embedded system courses include real-world projects that allow students to apply their skills practically. TechnosCOE is one such project, an initiative designed to bridge the gap between theoretical knowledge and practical application. TechnosCOE offers students opportunities to work on cutting-edge projects involving IoT, robotics, and smart devices.
This initiative focuses on teamwork, innovation, and problem-solving, ensuring learners are industry-ready. Through the TechnosCOE, students are exposed to real-world challenges and learn how to apply embedded system principles to develop effective solutions.
Why Choose an Embedded System Development Course in India?
India is turning out to be a fast-growing hub for embedded technology. Industries like automotive, healthcare, and consumer electronics will have a vast number of opportunities. Embedded system development courses offered in India will ensure expert faculty members, state-of-the-art labs, and industrial collaborations. They also offer internship and placement support, which proves to be perfect for career growth.
Conclusion
The course on embedded system development course in India not only gives the students technical expertise but also prepares them for dynamic and rewarding careers. Mastering microcontrollers to developing IoT solutions, these skills are invaluable in today's technology-driven world. Initiatives like TechnosCOE further enhance the learning experience, making these courses a worthwhile investment for aspiring engineers.
0 notes
Text
UHF Reader Based on Pico W & ESP32 with 50 Tags/Second Reading within 1.5 Meter Range

A UHF Reader (Ultra High Frequency Reader) is a device that is used to read and write data from UHF RFID tags within the 860MHz-960MHz frequency range. It is a multi tags 50 tags/second reading/writing device within 1-1.5 meter range designed with cutting edge UHF technology. It is a compact, portable and easy to use device.
The UHF reader has 2 variants: one is UHF Reader by Pico W and another is UHF Reader by ESP32. The Pico W variant comes with RP2040 microcontroller with Wi-Fi and BLE support. It is compatible with MicroPython, CircuitPython and Arduino for programming. ESP32 variant comes with ESP32 S3 series microcontroller and has 2.4GHz & Bluetooth 5 (LE) support. It is compatible with Arduino and Espressif IDE for programming.
Key Features and Specifications:
UHF Reader Pico Variant:

Powered by Raspberry Pi Pico W
RP2040 microcontroller dual-core Arm Cortex M0+ microprocessor with 264kB RAM
Supports Wi-Fi and BLE
1.14” TFT display for better visualization
Multi-tone buzzer for audio alerts
Micro USB Support for programming & Type C support for power
3 programmable buttons and Reset button
SD card slot for data storage/transfer
LED Status for power and battery charging
Multipurpose GPIOs breakout for interfacing external peripherals
SWD pins breakout for serial debugging
Supports MicroPython, CircuitPython, and Arduino for programming
UHF Reader ESP32 Variant:

Powered by ESP32 S3 WROOM-1
Dual-core 32 bit LX7 microprocessor with Up to 8 MB PSRAM and up to 16 MB flash memory
Supports 2.4GHz (802.11b/g/n) Wi-Fi and Bluetooth 5 (LE)
1.14” TFT display with ST7789 display driver
Comes with a Read and Write UHF module.
Frequency range of 865.1MHz-867.9MHz (for EU/UK) and 902.25MHz-927.75MHz (for US)
Can Identify 50 tags/second up to the 1.5-meter range.
TTL UART communication interface and communication baud rates 115200bps-38400bps
output power 18-26dBm and output power accuracy +/- 1dB
operation current 180mA at 3.5V (26 dBm Output), 110mA at 3.5V (18 dBm Output)
Multi-tone buzzer for audio alerts
2 user programmable buttons, Boot and Reset buttons
For power and programming support, the Type C Interface
SD Card slot for data transfer/storage
LED status for power and charging
Multipurpose GPIOs breakout for interfacing external peripherals
Supports Arduino and Espressif IDE for programming
By using ESP32 and RP2040, you can build a UHF RFID reader for scan tags and data tracking. This UHF Reader with ESP32 and Pico by SB Components is suitable for applications like warehouses, retail stores, and many other applications where you want to track your inventory data accurately.
#technology#innovation#tech#iot#rfid#uhf#uhf reader#arduino#espressif#iot applications#raspberry pi#rp2040#esp32#projects#programming#ultra high frequency reader#rfid tags#data tracking#electronics
1 note
·
View note
Text
Price: [price_with_discount] (as of [price_update_date] - Details) [ad_1] Plug and Play, No Driver Required. Ideal USB Printer Cable: type A to Type B printer cable is a versatile solution for connecting both USB-A enabled devices to your printer. This USB hp printer cord is the perfect choice for desktops and laptops, providing an efficient way to reduce clutter and save money. Additionally, the added benefit of compatibility offers even greater flexibility in how you connect and use your printer, embracing the convenience of Printer Cable. 480Mbps High-speed Transfer: High speed Lexmark printer cord transfers data fast speed up to 480 Mbps for USB 2.0 devices, this USB A to B canon printer cable is backward compliant with low-speed USB 1.0 (1.5 Mbps) and full-speed USB 1.1 (12 Mbps). Compared to a WIFI connection, a printer USB type b cable provides a more stable connection and offers a more efficient work way for you. Easy to Plug & Durable Dell Printer Cord: Simply connect to your printer, no driver is required. Tangle-free printer cable USB B with TPE jacket eliminates bunching, tangles, and knots, photo scanner cable makes the USB 2.0 printer cord more flexible and offers a long lifespan. ▶WIDE COMPATIBILITY - ideal for connecting your Printer, Scanner, Fax, Hard Drive Disk, Server, Keyboard, Midi, DAC, Snowball mic, Development board, UPS, Digital Camera and more to a Laptop, Computer (Mac and PC) and other legacy devices with a USB-B port. Also is a good USB Type B replacement cord for devices like Arduino, Blue, Brother, Canon, CyberPower, Dell, Epson, Fujitsu, HP, IOGEAR, Lexmark, M-Audio, and Panasonic, Plug and play, no need to install any plug-in, No drive required. HP Deskjet, HP Officejet, HP Envy, HP Photosmart, Epson Stylus, Canon Pixma, Brother MFC, Brother DCP, Lexmark, Samsung, Oki, Yamaha digital piano, sound bar, DAC etc.HP Deskjet, HP Officejet, HP Envy, HP Photosmart, Epson Stylus, Canon Pixma, Brother MFC, Brother DCP, Lexmark, Samsung, Oki, Yamaha digital piano, sound bar, DAC etc. ✅ [Universal Printer Cable]: Sweguard USB 2.0 Printer Cable is ideal for connecting your scanner, printer, server, camera such as HP, Canon, Lexmark, Epson, Dell, Xerox , Samsung and other usb b devices to a laptop, computer (Mac/PC) or other USB-enabled device. 【Ideal Printer Cable】Printer Cable can easily can connect usb type b scanners, printers, all-in-one machines, fax machines and other usb-b devices to your laptop. It can help you solve the problem of file transfer errors and improve office efficiency. Note: This USB Printer Cable is suitable for most printer devices, printing is related to software, please make sure that your device has downloaded the driver, select the corresponding model when printing. ▶UPGRADED VERSION-SHIELDING RING - The normal printer cable will receive all kinds of messy high-frequency signals in the surrounding environment, and these signals are superimposed on the originally transmitted signal, and even change the original transmission of useful signals. Shielding Ring Connector make the normal useful signal Stable Transmission better, and a good suppression of high-frequency interference signal, this is why FEDUS improve the cable with Layer Shielding Structure. ▶REINFORCED & MORE DURABLE - 10X DURABLE CABLE: In order to enhance the durability of the printer cable and ensure that customers can achieve the purpose of "NEVER CHANGE THE CABLE", we strive to perfection in both material selection and wire structure. High quality PVC and machine moulded connector provides strong protection for the printer cord. At the same time, the special SR design makes the internal core not to be damaged no matter how many times the customer bends. ▶2 YEAR REPLACEMENT WARRANTY - 1 Year manufacturer warranty and product support provide peace of mind when purchasing, Each Printer Cord goes through rigorous testing to ensure a secure wired connection If for any reason you are not satisfied with the item, you will get a replacement
0 notes
Text
Getting Started with Embedded Programming: Tools and Techniques
Embedded programming is an exciting field that combines hardware and software to create systems that control various devices and processes. From simple microcontrollers in household appliances to complex systems in automobiles and medical devices, embedded programming plays a vital role in modern technology. If you’re looking to dive into embedded programming, this guide will outline essential tools and techniques to help you get started.

Understanding Embedded Programming
At its core, embedded programming involves writing software that runs on embedded systems—computers designed to perform dedicated functions within larger systems. Unlike traditional programming, which often runs on general-purpose computers, embedded programming requires a deep understanding of hardware constraints, real-time performance requirements, and low-level programming.
Essential Tools for Embedded Programming
Microcontrollers and Development Boards
Arduino: A popular platform for beginners, Arduino boards come with an integrated development environment (IDE) and a user-friendly programming language based on C/C++. The vast community support and numerous libraries make it easy to get started.
Raspberry Pi: Although primarily a single-board computer, Raspberry Pi can be used for embedded programming projects, especially those requiring more computational power. It supports various programming languages and operating systems.
ESP8266/ESP32: These Wi-Fi-enabled microcontrollers are ideal for IoT projects. They are programmable using the Arduino IDE or the Espressif IDF and offer great features for wireless applications.
Development Environments and IDEs
Arduino IDE: Specifically designed for Arduino programming, this IDE simplifies the process of writing and uploading code to the board.
PlatformIO: An open-source ecosystem for IoT development, PlatformIO supports multiple boards and frameworks, providing advanced features like libraries and debugging tools.
Keil uVision: A popular IDE for ARM microcontrollers, offering a comprehensive development environment, including simulation and debugging capabilities.
Eclipse with Embedded Plugins: Eclipse can be customized with plugins for embedded development, supporting various toolchains and microcontrollers.
Compilers and Toolchains
GCC (GNU Compiler Collection): Widely used for compiling C and C++ code for embedded systems. It supports various microcontroller architectures and is essential for low-level programming.
ARM Toolchain: A collection of tools used to develop applications for ARM-based microcontrollers. It includes a compiler, assembler, and linker, providing everything needed for embedded development.
Debugging Tools
JTAG/SWD Debuggers: Hardware debuggers like J-Link or ST-Link provide a means to debug embedded systems at the hardware level, allowing for real-time code execution and monitoring.
Serial Monitors: Tools that enable communication between your computer and the microcontroller via serial ports. They are useful for debugging and monitoring output during development.
Techniques for Embedded Programming
Start with a Simple Project Begin with a basic project that interests you, such as blinking an LED or reading a sensor. This hands-on experience will help you understand the fundamentals of embedded programming and familiarize you with the tools.
Learn C/C++ Basics Most embedded systems are programmed in C or C++, so having a strong grasp of these languages is essential. Focus on key concepts such as data types, control structures, and pointers, as these are frequently used in embedded programming.
Understand Hardware Basics Familiarize yourself with the hardware you are working with, including pin configurations, voltage levels, and peripheral interfaces (like I2C, SPI, UART). Knowing how to interact with the hardware is crucial for successful embedded programming.
Utilize Libraries and Frameworks Take advantage of existing libraries and frameworks to simplify your development process. Libraries can provide pre-written code for common functions, such as controlling motors or reading sensors, allowing you to focus on the logic of your application.
Implement Real-Time Operating Systems (RTOS) For more complex projects, consider using an RTOS to manage multitasking and timing constraints. An RTOS helps in scheduling tasks, ensuring that your application meets real-time requirements.
Practice Debugging and Testing Develop good debugging habits by regularly testing your code and using debugging tools. Learn to analyze errors, use breakpoints, and monitor variables during execution. Rigorous testing will ensure that your embedded application functions as intended.
Expanding Your Knowledge
Online Courses and Tutorials: Platforms like Coursera, Udacity, and edX offer various courses in embedded systems and programming. These courses can provide structured learning and hands-on projects.
Books and Resources: Consider reading books like "Programming Embedded Systems in C and C++" by Michael Barr or "The Definitive Guide to ARM Cortex-M3 and Cortex-M4 Processors" by Joseph Yiu for deeper insights.
Join Communities and Forums: Engaging with online communities such as Arduino forums, Raspberry Pi forums, or Stack Overflow can provide support and inspiration. These platforms are valuable for asking questions and sharing your projects.
Conclusion
Getting started with embedded programming can be both challenging and rewarding. By leveraging the right tools and techniques, you can develop your skills and create innovative projects that bridge the gap between hardware and software. Whether you aim to build IoT devices, control robotics, or develop smart applications, the world of embedded programming offers endless possibilities. So, gather your tools, start coding, and unleash your creativity in this fascinating field!
0 notes
Text
youtube
Micro screws are tiny screws with a diameter typically less than 1.6 millimeters. They are commonly used in electronics, eyeglasses, watches, and other small devices. They are also used in some medical devices.
Micro screws are available in a variety of materials, including steel, brass, and stainless steel. The type of material used will depend on the application. For example, screws used in medical devices will need to be made of a biocompatible material.
There are also a variety of head styles available for micro screws, including Phillips, flat head, and hex head. The head style will be chosen based on the application and the tools that will be used to tighten the screw.
The LGT8F328P is an 8-bit microcontroller manufactured by Logic Green. It's a functional clone of the more popular ATmega328P, commonly used in Arduino Uno, Nano, and Mini boards. This means the LGT8F328P has the same:
Instruction set: Can run the same code written for the ATmega328P. Registers: Same internal memory for storing data during program execution. Pin layout: Can be used on development boards designed for the ATmega328P.
0 notes
Text
IoT Starter Kits Market Analysis 2023 Dynamics, Players, Type, Applications, Trends, Regional Segmented, Outlook & Forecast till 2033
The IoT Starter Kits Market Size highlights the market's growth potential, projecting a value of around USD 98.29 Billion by 2033, up from USD 59 Billion in 2023. This trajectory suggests a promising compound annual growth rate (CAGR) of 6.6% from 2024 to 2033.
The competitive analysis of the IoT Starter Kits Market offers a comprehensive examination of key market players. It encompasses detailed company profiles, insights into revenue distribution, innovations within their product portfolios, regional market presence, strategic development plans, pricing strategies, identified target markets, and immediate future initiatives of industry leaders. This section serves as a valuable resource for readers to understand the driving forces behind competition and what strategies can set them apart in capturing new target markets.
Market projections and forecasts are underpinned by extensive primary research, further validated through precise secondary research specific to the IoT Starter Kits Market. Our research analysts have dedicated substantial time and effort to curate essential industry insights from key industry participants, including Original Equipment Manufacturers (OEMs), top-tier suppliers, distributors, and relevant government entities.
IoT Starter Kits Market Benefits
IoT Starter Kits research reports provide critical insights for strategic decision-making. They help businesses understand market trends, customer preferences, and competitive landscapes. By analyzing data on market size, growth potential, and consumer behavior, companies can identify new opportunities and mitigate risks. These reports also guide product development, pricing strategies, and marketing campaigns, ensuring alignment with current market demands. Furthermore, market research reports enhance forecasting accuracy and help in benchmarking performance against competitors. Ultimately, they inform investment decisions, optimize resource allocation, and foster innovation, contributing to sustained business growth and a competitive edge.
Key Report Highlights:
Key Market Participants: The report delves into the major stakeholders in the market, encompassing market players, suppliers of raw materials and equipment, end-users, traders, distributors, and more.
Comprehensive Company Profiles: Detailed company profiles are provided, offering insights into various aspects including production capacity, pricing, revenue, costs, gross margin, sales volume, sales revenue, consumption patterns, growth rates, import-export dynamics, supply chains, future strategic plans, and technological advancements. This comprehensive analysis draws from a dataset spanning 12 years and includes forecasts.
Market Growth Drivers: The report extensively examines the factors contributing to market growth, with a specific focus on elucidating the diverse categories of end-users within the market.
Data Segmentation: The data and information are presented in a structured manner, allowing for easy access by market player, geographical region, product type, application, and more. Furthermore, the report can be tailored to accommodate specific research requirements.
SWOT Analysis: A SWOT analysis of the market is included, offering an insightful evaluation of its Strengths, Weaknesses, Opportunities, and Threats.
Expert Insights: Concluding the report, it features insights and opinions from industry experts, providing valuable perspectives on the market landscape.
Receive the FREE Sample Report of IoT Starter Kits Market Research Insights @ https://stringentdatalytics.com/sample-request/iot-starter-kits-market/9499/
Market Segmentations:
Global IoT Starter Kits Market: By Company • Laird Connectivity • Sensative • DAOKI • ThingPulse • Osoyoo • Arduino • Particle • NXP • Harting • Softing • Synox • Telit • EnOcean • Soracom • AAEON Technology Global IoT Starter Kits Market: By Type • Cellular • Wi-Fi • Others Global IoT Starter Kits Market: By Application • Supply Chain • Smart City • Agriculture • Industry • Transportation • Others
Regional Analysis of Global IoT Starter Kits Market
All the regional segmentation has been studied based on recent and future trends, and the market is forecasted throughout the prediction period. The countries covered in the regional analysis of the Global IoT Starter Kits market report are U.S., Canada, and Mexico in North America, Germany, France, U.K., Russia, Italy, Spain, Turkey, Netherlands, Switzerland, Belgium, and Rest of Europe in Europe, Singapore, Malaysia, Australia, Thailand, Indonesia, Philippines, China, Japan, India, South Korea, Rest of Asia-Pacific (APAC) in the Asia-Pacific (APAC), Saudi Arabia, U.A.E, South Africa, Egypt, Israel, Rest of Middle East and Africa (MEA) as a part of Middle East and Africa (MEA), and Argentina, Brazil, and Rest of South America as part of South America.
Click to Purchase IoT Starter Kits Market Research Report @ https://stringentdatalytics.com/purchase/iot-starter-kits-market/9499/
Report includes Competitor's Landscape:
➊ Major trends and growth projections by region and country ➋ Key winning strategies followed by the competitors ➌ Who are the key competitors in this industry? ➍ What shall be the potential of this industry over the forecast tenure? ➎ What are the factors propelling the demand for the IoT Starter Kits? ➏ What are the opportunities that shall aid in significant proliferation of the market growth? ➐ What are the regional and country wise regulations that shall either hamper or boost the demand for IoT Starter Kits? ➑ How has the covid-19 impacted the growth of the market? ➒ Has the supply chain disruption caused changes in the entire value chain?
Why to Purchase IoT Starter Kits Market Report?
Purchasing a market research report provides valuable, reliable insights that are often beyond a company's in-house capabilities. These reports deliver comprehensive data on market trends, customer behaviors, competitive analysis, and industry forecasts, saving time and resources on extensive data collection and analysis. They offer expert perspectives and methodologies, ensuring credible, up-to-date information. By accessing tailored, actionable intelligence, businesses can make informed decisions, reduce uncertainty, and identify opportunities for growth. Additionally, these reports enhance strategic planning, risk management, and competitive positioning, making them a crucial investment for companies seeking to stay ahead in their industry and drive innovation. Customization of the Report:
This report can be customized to meet the client’s requirements. Please connect with our sales team ([email protected] ), who will ensure that you get a report that suits your needs. You can also get in touch with our executives on +1 346 666 6655 to share your research requirements.
About Stringent Datalytics
Stringent Datalytics offers both custom and syndicated market research reports. Custom market research reports are tailored to a specific client's needs and requirements. These reports provide unique insights into a particular industry or market segment and can help businesses make informed decisions about their strategies and operations.
Syndicated market research reports, on the other hand, are pre-existing reports that are available for purchase by multiple clients. These reports are often produced on a regular basis, such as annually or quarterly, and cover a broad range of industries and market segments. Syndicated reports provide clients with insights into industry trends, market sizes, and competitive landscapes. By offering both custom and syndicated reports, Stringent Datalytics can provide clients with a range of market research solutions that can be customized to their specific needs.
Reach US
Stringent Datalytics
+1 346 666 6655
Social Channels:
Linkedin | Facebook | Twitter | YouTube
0 notes

Text
QT Py USB Host BFF Tests a Trinkey
our popular USB Host FeatherWing (https://www.adafruit.com/product/5858) lets anyone with a Feather board add USB Host support via the MAX3421E (https://www.digikey.com/en/products/detail/analog-devices-inc-maxim-integrated/MAX3421EETJ-T/1455883) chip - a tried and true SPI-to-USB converter. here's a tinified version, that fits on the back of any QT Py or Xiao board. use SPI plus a CS and IRQ pin and you're ready to rock. theres tinyUSB support for me MAX3421 chip (https://github.com/hathach/tinyusb/issues/2001) for Arduino which means its trivial to connect to a USB keyboard, mouse, storage key, or a USB serial device like this Trinkey! We're using our SHT45 Trinkey (https://www.adafruit.com/product/5896) as a demo board since its an easy way to quickly verify enumeration and data transfer. since the BFF/QTPy form-factor is too small for a proper USB Type A, we're going with a micro B, you can just an OTG adapter to turn it into a full size A (https://www.adafruit.com/product/1099)
0 notes