#arduino uno online
Explore tagged Tumblr posts
Visit Tumblr Blog
Explore Tumblr blogs with no restrictions, modern design and the best experience.
Last Seen Tumblr Blogs


Fun Fact
Users from the US are the majority of Tumblr visitors.
Text
youtube
HX711 Tare Calibration Scaling - Simple basic usage Arduino UNO digital weighing scale simulate 5Kg load cells digital weighing scale hx711 hx710 datasheet programming reference on wokwi arduino uno online simulator. how to calibrate a hx711 load cell for 5kg load?
#HX711#programming#wokwi#hx710#Arduino UNO#load cells#online simulator#digital weighing scale#youtube#arduino#tutorials#how to#simulator#datasheet#Youtube
0 notes
Text
Robotics | Admissions Open 2025–26 | best engineering colleges in bangalore for placements
Master the Future of Automation with Robotics at RRCE! Join the advanced Robotics course with Microcontroller & Arduino Uno at Rajarajeswari College of Engineering (RRCE) and kickstart your journey into the world of intelligent automation. Gain hands-on experience, build real-world projects, and become the innovator the tech industry needs. Explore Robotics Programs at RRCE | Admissions Open for 2025–26 – Apply Now!

#“Placement Engineering Colleges in bangalore”#“best private engineering colleges in bangalore”#“top engineering colleges in bangalore vtu affiliated”#“best engineering colleges in bangalore for placements”#“NAAC A grade engineering colleges in bangalore”
0 notes
Text
How I Built My First Robot with Arduino and Scratch
When I first heard about robotics, I imagined it required a lab full of expensive tools and years of experience. But then I discovered the magic of Arduino and Scratch—two beginner-friendly tools that helped me bring my first robot to life right from my desk at home. In this blog, I’ll walk you through my journey, from clueless beginner to proud robot builder.
Step 1: Getting the Right Tools
I started by gathering a few essential components:
Arduino Uno board
USB cable for connection
Breadboard and jumper wires
DC motors and wheels
Motor driver (L298N)
Battery pack
Ultrasonic sensor for obstacle detection
I also downloaded mBlock (based on Scratch), which lets you drag-and-drop code blocks to control Arduino. No typing complex code? Perfect for a newbie like me!
Step 2: Assembling the Robot
I followed a few online tutorials to:
Connect the motors to the motor driver.
Attach the wheels.
Mount the ultrasonic sensor like a pair of robot "eyes."
Wire everything up to the Arduino using the breadboard.
It was confusing at first, but after a couple of YouTube rewatches and trial-and-error moments, I finally got all the connections right.
Step 3: Programming with Scratch (mBlock)
Here’s where things got exciting. Using mBlock:
I wrote a simple block-based program to make the robot move forward.
Then added logic to make it stop and turn when the ultrasonic sensor detected an obstacle.
I uploaded the code to Arduino directly from mBlock.
Watching the robot respond to my code was like witnessing magic. I didn’t need to write a single line of text-based code—just drag, drop, and connect blocks like a puzzle.
Step 4: Debugging and Improving
The first version of my robot turned randomly or stopped too soon. But instead of getting frustrated, I learned to:
Tweak sensor distance values
Slow down motor speed for better control
Add an LED light that turns red when an obstacle is near (just for flair!)
Each little fix taught me more about how code and hardware interact.
What I Learned
Arduino makes robotics affordable and accessible.
Scratch (via mBlock) removes the fear of coding.
Making mistakes is part of the fun. Every issue I solved made me more confident.
0 notes
Text
Stem Education for Arduino Mega Kit Atmega2560 MCU with Sensor Modules The Arduino Mega Kit electronic components packing list below: - 1 x KY-006 passive buzzer module - 1 x two colors module - 1 x Hit sensor module - 1 x Vibration switch module - 1 x Photo Resistance Module - 1 x Key switch module - 1 x Tilt switch module - 1 x 3-color full-color LED SMD modules - 1 x Infrared emission sensor module - 1 x 3-color LED module - 1 x Mercury open optical module - 1 x Yin Yi 2-color LED module 3 MM - 1 x active zoomer module - 1 x temperature sensor module - 1 x Automatic flashing colorful module - 1 x Mini reed magnetic modules - 1 x Hall magnetic sensor module - 1 x Infrared receiver sensor module - 1 x Class sensor magnetic Bihor - 1 x Magic Cup Light Module - 1 x encoder module - 1 x Broken Optical Module - 1 x Heartbeat Detection Module - 1 x Reed module - 1 x Obstacle avoidance sensor module - 1 x sensor module - 1 x Microphone sound sensor module - 1 x Laser sensor module - 1x5 V relay module - 1 x temperature sensor module - 1 x temperature sensor module - 1 x Linear Magnetic Salon Sensors - 1 x Flame sensor module - 1 x Sensitive Microphone Sensor Module - 1 x Temperature and humidity sensor module - 1 x XY-like joystick module - 1 x Metal Touch Sensor Module - 1x Development Board for Arduino Mega 2560 R3 - 1 x SR04 - 1 x MB-102 - 1x9v battery buckle - 1 x Bread plate electric source - 6x1 K - 6x10 K - 6x100 K - 6 x 220R - 5 x keys - 4 x LED yellow 5mm - 4 x LED Red 5mm - 4 x LED Green 5mm The atmega2560 mcu development board for arduino mega kit comes with exact parts list as piture show online. Note:We only provide hardware.Turtial or lesson is not provided,they are universal use everywhere from the internet. Other development kits,view here. If you are STEM education user,welcome contact us to talk the customzied hardware list. About Us: Shenzhen Chengsuchuang Technology Co.,Ltd. provide one stop supply solution to Arduino development board kits,including arduino uno,mega,nano etc.All of our products warranty is 1 year warranty default.We are in the electronics hardware since 2014. Read the full article
0 notes
Text
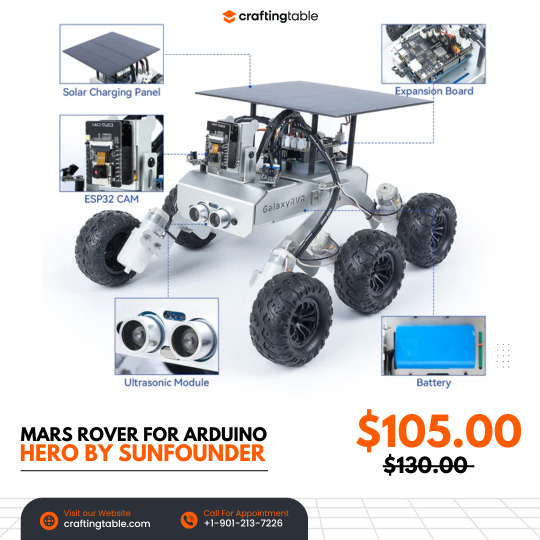
GalaxyRVR is an easy-to-use robot that works with Arduino Uno R3 and lets you experience what it’s like to explore Mars. It’s built strong with metal parts and has a smart wheel system to move smoothly over sand, rocks, grass, and even mud. It uses solar power to charge and has a camera (ESP32-CAM) that shows you what it sees in real time through an app. You can drive it from anywhere! It also has sensors to avoid obstacles and bright lights so it can explore in the dark too. The kit comes with helpful videos and guides, and there's an online community ready to help, making it perfect for beginners who want to build and explore. Buy Now
0 notes
Text
Arduino Projects
The open-source electronics platform Arduino is built on user-friendly hardware and software. Using the Arduino Integrated Development Environment (IDE), microcontroller boards can be programmed. Users can connect with a variety of sensors, actuators, and other electrical components thanks to the digital and analog input/output (I/O) pins on these boards.
Popular Arduino boards include:
Arduino Uno
Arduino Nano
Arduino Mega
Arduino Leonardo
Arduino MKR series
Why Choose Arduino for Your Projects?
User-Friendly: Arduino is a great option for novices due to its simplicity.
Reasonably priced: The hardware is readily accessible and reasonably priced.
Community Support: A sizable user base offers a wealth of information, forums, and tutorials.
Versatile: Works with many different types of sensors, modules, and parts.
Cross-Platform: Linux, macOS, and Windows can all use the Arduino IDE.
Tips for Successful Arduino Projects
Start Small: Take on easier tasks at first, then work your way up to more difficult ones.
Record Your Work: Make notes about your code, wiring, and troubleshooting procedures.
Learn from the Community: Seek advice and inspiration by participating in forums and online tutorials.
Try new things: Don't be scared to adjust and change projects to fit your demands.
Arduino projects are a great way to learn about programming and electronics. Your creativity is the only restriction on the range of options available, from basic LED blinkers to complex home automation systems. Arduino enables creators to realize their ideas through its user-friendly platform and extensive community support. Get an Arduino board, look through the available information, and begin creating your next fascinating project right now!
To know more, click here.
0 notes
Text
Components for a DIY BCI
EEG (Electroencephalography) Hardware:
The most basic BCIs rely on EEG sensors to capture brainwaves.
OpenBCI is a popular, relatively affordable option for DIY BCI projects. While it costs a few hundred dollars, it is one of the most versatile kits available.
NeuroSky MindWave or Muse Headband are other cheaper alternatives, ranging from $100-$200. These are commercially available EEG devices for consumer-grade BCIs.
OpenEEG is another open-source project that allows you to build your own EEG hardware from scratch, though it requires more technical skill.
Electrodes:
You’ll need wet or dry electrodes to attach to your scalp. Wet electrodes give more accurate readings but are messier, while dry electrodes are more convenient.
You can order pre-gelled electrodes online or even repurpose ECG/EMG electrodes.
Amplifier:
The signal from the brain is very weak and needs to be amplified. Most consumer-grade EEG headsets already include built-in amplifiers.
If you're building your own, you’ll need to add an instrumentation amplifier like the INA114 to your circuit.
Microcontroller (optional but recommended):
You can use a microcontroller (e.g., Arduino or Raspberry Pi) to process and transmit the EEG signals.
This allows you to handle signal conditioning (filtering noise, extracting frequency bands like alpha or beta waves) before passing the data to a computer.
Signal Processing Software:
To interpret the brainwave data, you’ll need software to process the EEG signals.
OpenBCI GUI or BrainBay (open-source software for EEG processing) are good choices.
If using a commercial device like the Muse headband, you can use their respective apps or SDKs.
Python libraries like MNE-Python or OpenBCI_Python can be used for more advanced data processing and visualizations.
Steps to Build a Basic DIY BCI
Choose Your EEG Hardware:
If you're starting from scratch, something like OpenBCI Cyton board is a good start. It’s open-source, has good community support, and includes everything from the signal acquisition to the interface.
Set Up Your Electrodes:
Attach electrodes to specific parts of the scalp. The 10-20 system is commonly used in EEG to position electrodes. For basic experiments, placing electrodes on the frontal or occipital lobes is common for reading alpha and beta waves.
Amplify the Signal:
If you're using raw hardware, you need to amplify the EEG signal to make it usable. Most DIY kits or premade EEG headsets have built-in amplifiers. If you're building one from scratch, the INA114 or a similar instrumentation amplifier can be used.
Capture the Data:
Use a microcontroller or a computer interface to collect and transmit the amplified EEG data. For example, with an Arduino or Raspberry Pi, you can read analog signals from the amplifier and stream them to your PC via serial communication.
Process the Data:
Use software like OpenBCI GUI, BrainBay, or MNE-Python to filter and visualize the brainwave data. You’ll want to filter out noise and focus on frequency bands like alpha waves (8–12 Hz) for meditation or relaxation signals.
Analyze and Create Control Mechanisms:
Once you have the processed data, you can start building applications around it. For instance:
Detecting Alpha waves: You can trigger certain actions (e.g., turning on a light or moving a cursor) when you detect increased alpha activity (indicating relaxation).
Training with Neurofeedback: Users can learn to modulate their brain activity by receiving real-time feedback based on their brainwave patterns.
DIY EEG Project Example: Arduino-based EEG
Here’s a simplified example of how you could set up a basic EEG using an Arduino:
Materials:
Arduino Uno
EEG electrodes (you can buy inexpensive ECG electrodes online)
Instrumentation amplifier (e.g., INA114 or an open-source EEG shield for Arduino)
Resistors, capacitors for noise filtering
Cables to connect electrodes to the amplifier
Steps:
Assemble the amplifier circuit:
Build a simple differential amplifier circuit to pick up the small EEG signals from the electrodes.
Use the INA114 instrumentation amplifier to boost the signal.
Connect to Arduino:
The amplified signal can be connected to one of the Arduino’s analog inputs.
Write an Arduino script to read the analog value and send it to the PC via serial communication.
Filter and Process the Signal:
On your PC, use Python (or Processing) to capture the signal data.
Apply digital filters to isolate the EEG frequency bands you’re interested in (e.g., alpha, beta, theta waves).
Visualize or Control:
Create a simple application that shows brainwave activity or controls something based on EEG input (like blinking an LED when alpha waves are detected).
Further Ideas:
Neurofeedback: Train your brain by playing a game where the user must relax (increase alpha waves) to score points.
Control Mechanisms: Use the brainwave data to control devices, such as turning on lights or moving a robotic arm.
Estimated Cost:
EEG Kit: If using pre-made kits like Muse or NeuroSky: $100–$200.
DIY EEG Build: OpenBCI costs around $300–$400 for more advanced setups, while OpenEEG might be built for less, but requires more technical expertise.
Challenges:
Noise Filtering: EEG signals are weak and can easily be corrupted by muscle movements, electrical interference, etc. Filtering noise effectively is key to a successful BCI.
Precision: DIY BCIs are generally not as accurate as commercial-grade devices, so expect some limitations.
Building a homebrew BCI can be fun and educational, with a wide variety of applications for controlling electronics, games, or even providing neurofeedback for meditation
0 notes
Text
Electronic Component UAE

Next Power Groups of company, established in 2012 is a leading high service provider Electronics, Electronic Components & Industrial Automation Spare Parts in Dubai-UAE, OMAN and establishing their branches around the GCC.
They are the Manufacturer / Exporters / Service Providers / Suppliers Of IGBT Modules, Stud Thyristors, Diode Modules, Electronic Component Tester, IC Programming System, AC to DC Converter, DC To DC Converter, Limit switch, Electronic Transformer, Power Supply, Ultra cell Battery, Voltage Potentiometer, Stepper Motor, DC Motor, Arduino Starter Kit, Servo Motor, Arduino Uno, Ultrasonic Sensor, Humidity Sensor Module, IR Sensor set, Switches and indicators, Relay, Timer, Relay Sockets, IGBT, Fuse, Fan, Contactors, Breakers etc.
Distributor of electronic, electrical, components, industrial and maintenance, repair & operations (MRO) products – with fast, easy access to over 40,000 stocked products, 24 hours a day, 365 days a year,
Products : Switches, Power Supply, Modules, IC, Diodes, Capacitors, Resistors, indicators, Sensors, Cables, Connectors, SSR, Arduino, Potentiometer, Motors, Relays, Timers, Relay Sockets, IGBT, Fuse, Fan, Contactors, Breakers, Transformers etc.
We supply these electric products to more suppliers in UAE, We have a wide variety of branded products. MEANWELL, AUTONICS, FOTEK, AURDUINO, BOURNS, BUSSMANN, SCHNEIDER ELECTRIC, SIBA, ABB, LONG BATTERY, SUNON FAN, EBM PAPST FAN, CRYDOM, FLUKE, FUJI ELECTRIC, IDEC, EATON, FOTEK, INFINEON, INTERNATIONAL RECTIFIERS, LONG BATTERY, POWER PLUS, SIEMENS, LS ELECTRIC, GENERAL ELECTRIC, FINDER, IXYS, MITSUBISHI, OMRON, PEAK ELECTRONIC, POWEREX, SANREX, SCHRACK, SEMIKRON, XELTEK Etc.
Please send your inquiry to this email
Website : Oncomponents Online electronicstore
[email protected] | For Order +971-567131624
#electronic components#electronics#power supplies#arduino#modules#capacitors#relays#resistor#mean well
1 note
·
View note
Photo
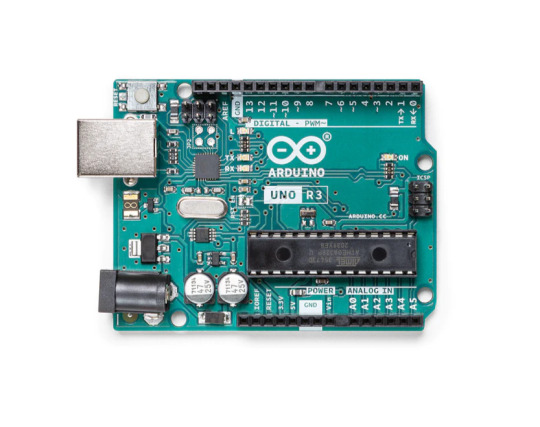
Exploring the Arduino UNO: A Beginner's Guide to DIY Electronics - Robu.in | Indian Online Store | RC Hobby
0 notes
Text
youtube
Push Button Multi LEDs Controller - Switch Case Vs Array Arduino Programming for Beginners Online Arduino Simulator Virtual Breadboard basic sketch examples: Programming and write Arduino UNO sketch with ezButton Arduino library for controlling LEDs toggle switch ON/OFF with a push button.
#programming#how to#simulator#wokwi#arduino#tutorials#Push Button#LEDs Controller#Virtual Breadboard#Youtube
0 notes
Video
youtube
IOT Based Industrial Air Pollution Monitoring System using Arduino with LabVIEW and Zigbee on Thingspeak | iot based air pollution monitoring system using arduino | IoT Projects using ESP32 | IoT Projects Arduino | WSN Based Real Time Air Pollution Monitoring System Using Zigbee and LabVIEW | Industrial Monitoring System using LabVIEW and GSM.***********************************************************If You Want To Purchase the Full Working Project KITMail Us: [email protected] Name Along With You-Tube Video LinkWe are Located at Telangana, Hyderabad, Boduppal. Project Changes also Made according to Student Requirementshttp://svsembedded.com/ https://www.svskits.in/ http://svsembedded.in/ http://www.svskit.com/M1: 91 9491535690 M2: 91 7842358459 We Will Send Working Model Project KIT through DTDC / DHL / Blue Dart / First Flight Courier ServiceWe Will Provide Project Soft Data through Google Drive1. Project Abstract / Synopsis 2. Project Related Datasheets of Each Component3. Project Sample Report / Documentation4. Project Kit Circuit / Schematic Diagram 5. Project Kit Working Software Code6. Project Related Software Compilers7. Project Related Sample PPT’s8. Project Kit Photos9. Project Kit Working Video linksLatest Projects with Year Wise YouTube video Links157 Projects https://svsembedded.com/ieee_2022.php135 Projects https://svsembedded.com/ieee_2021.php 151 Projects https://svsembedded.com/ieee_2020.php103 Projects https://svsembedded.com/ieee_2019.php61 Projects https://svsembedded.com/ieee_2018.php171 Projects https://svsembedded.com/ieee_2017.php170 Projects https://svsembedded.com/ieee_2016.php67 Projects https://svsembedded.com/ieee_2015.php55 Projects https://svsembedded.com/ieee_2014.php43 Projects https://svsembedded.com/ieee_2013.php1100 Projects https://www.svskit.com/2022/02/900-pr...***********************************************************Creating an IoT-based Industrial Air Pollution Monitoring System using Arduino with LabVIEW and Zigbee on ThingSpeak involves integrating various components and technologies. Here's a step-by-step guide to help you get started:Components Needed:1. Arduino Board (e.g., Arduino Uno):• Used for sensor interfacing and data processing.2. Air Quality Sensors (e.g., MQ series sensors):• Measure air pollution parameters like CO, CO2, particulate matter, etc.3. Zigbee Module:• Enables wireless communication between Arduino and the central system.4. LabVIEW Software:• Used for creating a graphical user interface (GUI) and processing data.5. ThingSpeak Account:• Online platform for storing and analyzing sensor data.Hardware Setup:1. Connect Air Quality Sensors to Arduino:• Wire the sensors to the analog or digital pins on the Arduino.2. Connect Zigbee Module to Arduino:• Use UART communication to connect the Zigbee module to the Arduino.3. Power Supply:• Ensure that all components have a stable power supply.4. Configure Zigbee Communication:• Set up Zigbee communication between the Arduino and the central system.Software Implementation:1. Arduino Programming:• Write a program to read sensor data and send it to the Zigbee module.• Implement error handling and data formatting.2. LabVIEW GUI Design:• Create a LabVIEW VI (Virtual Instrument) for the user interface.• Add indicators to display real-time sensor data.• Implement controls for system configuration.3. LabVIEW Serial Communication:• Use LabVIEW to establish serial communication with the Arduino through the Zigbee module.• Implement data parsing to extract sensor values.4. ThingSpeak Integration:• Create a ThingSpeak channel to store the sensor data.• Use the ThingSpeak API in LabVIEW to send data to ThingSpeak.Data Visualization:1. LabVIEW Visualization:• Use LabVIEW to create charts, graphs, or other visual representations of air pollution data.2. ThingSpeak Dashboard:• Explore ThingSpeak's built-in tools for data visualization and analysis.Testing and Debugging:1. Test the System:• Ensure that the hardware connections are secure.• Check data transmission between Arduino and LabVIEW.• Verify data upload to ThingSpeak.2. Debugging:• Use serial monitoring tools for Arduino to debug communication issues.• Check LabVIEW code for any errors or unexpected behavior.Finalization:1. Optimization:• Optimize the code for efficiency and reliability.• Consider implementing features like data logging or notifications.2. Documentation:• Document the system architecture, hardware connections, and software implementation.3. Deployment:• Install the system in the industrial environment.• Monitor and maintain the system as needed.By following these steps, you can create a robust IoT-based Industrial Air Pollution Monitoring System using Arduino, LabVIEW, Zigbee, and ThingSpeak.
0 notes
Text
Introduction Model rocketry is an exciting hobby that combines both technology and creativity. Model rocketry enthusiasts are always looking for new and innovative ways to improve their rockets, and one such way is by using an Arduino-based altimeter. An altimeter is a device used to measure altitude or height above sea level. The Arduino-based altimeter is an electronic device that utilizes the power of Arduino microcontrollers to record and store the altitude data of your model rocket's flight. The Arduino-based altimeter can be used for a range of things, such as measuring the maximum altitude of your rocket and ensuring that it deploys its parachute at the correct time. In this article, we’ll provide you with an in-depth guide on how you can build a model rocket altimeter using Arduino. How to Build a Model Rocket Altimeter using Arduino To build an Arduino-based altimeter for your model rocket, you will need the following components: - Arduino Uno R3 board - BMP280 digital pressure sensor - Lipo battery - PCB board - Resistors - Jumper wires - LEDs Once you have all these components, follow these steps to construct your model rocket altimeter: Step 1: Assemble the circuit Using the PCB board, assemble the circuit according to the schematics provided. Start by connecting the BMP280 pressure sensor to the Arduino Uno board. You can do this by connecting the SDA and SCL pins of the sensor to the A4 and A5 pins of the board. Additionally, connect the VIN and GND pins of the sensor to the 5V and GND pins of the board, respectively. Step 2: Add a switch To power the altimeter on and off, add a switch. The switch should be connected to the VIN and GND of the Lipo battery. Step 3: Connect the LEDs Connect the LEDs to the digital pins of the board, ensuring that the resistors are used to limit the current that flows through them. Step 4: Upload the code Once you have assembled the circuit, upload the code to the Arduino Uno board. The code is readily available online, and you can find it on the Arduino IDE or in various online forums. Step 5: Power the altimeter The altimeter should now be powered on, and you can test it by connecting it to the Lipo battery. You can then place the altimeter into your model rocket, and it will record and store the altitude data during the rocket's flight. FAQs About Model Rocket Altimeter Arduino 1. What is the maximum altitude the Arduino-based altimeter can measure? The BMP280 pressure sensor used in this altimeter has a range of 300-1100 hPa, equivalent to an altitude range of approximately 9,000 meters above sea level. However, the maximum altitude that can be measured by the altimeter is dependent on factors such as the quality and accuracy of the sensor, the barometric pressure of the location of the rocket launch, and the sensitivity of the pressure sensor. 2. How can I calibrate my altimeter? To calibrate your altimeter, you will need to use a known elevation location such as a mountain or hilltop. Once you get to this location, insert a battery and turn on the altimeter, then wait for it to stabilize before writing down the altitude data. Repeat this process a few times, and then calculate the average deviation between the readings. You can then adjust the calibration constants in the code to ensure that the altitude measurement is accurate. 3. Can the altimeter record temperature? The BMP280 pressure sensor used in this altimeter can measure temperature in addition to pressure, meaning that the altimeter can record both altitude and temperature data. You can even customize the code to record and store temperature data, in addition to the altitude data. Conclusion An Arduino-based altimeter for model rockets is an innovative way to record and store the altitude data of your rocket's flight. By using this altimeter, you can ensure that your model rocket deploys its parachute at the correct time, and you can also record its maximum altitude. Building an Arduino-based altimeter for model rockets is straightforward and requires only a few components.
With the right skills and knowledge, you can also customize the code to record other data such as temperature. If you have any questions or comments Please contact us on our contact page or via our Facebook page. #model #rocket #altimeter #arduino
0 notes
Text
Effizientes Prototyping: Arduino-Simulation mit TinkerCAD

In diesem Beitrag möchte ich dir TinkerCAD von Autodesk vorstellen und zeigen, wie du damit dein Prototyping am Arduino effizienter machen kannst. Mit dem bereits veröffentlichten Beitrag Arduino & Raspberry Pi – Online Simulator für Schaltungen wo ich dir Wokwi vorgestellt habe, habe ich dir bereits eine gute Lösung gezeigt, hier soll es nun um eine Alternative zu diesem gehen.

Warum sollte man eine Schaltung simulieren?
Der Vorteil einer Simulation am Computer ist, dass du alle Bauteile vorhanden hast und dir nichts kaputtgehen kann, wenn du mal etwas falsch verdrahtest. Des Weiteren bist du mit einem Tool wie TinkerCAD (oder ähnlichen) viel schneller und effizienter. Zusätzlich kannst du hier auch mal etwas ausprobieren, ohne gleich tief in die Tasche greifen zu müssen und so deine Schaltung im vorn hineinplanen.
Anmelden an TinkerCAD
Damit du TinkerCAD verwenden kannst, musst du dir zunächst ein Konto anlegen. Dieses kannst du ein bestehendes Google oder Apple Konto machen. Oder du erstellst dir mit deiner E-Mail-Adresse ein eigenes Konto.


Wenn du angemeldet bist, dann kannst du über die Schaltfläche "Erstellen" (1) aus dem Untermenü den Eintrag "Schaltkreis" (2) wählen.

Erstellen einer einfachen Arduino-Simulation mit TinkerCAD
Im ersten Schritt wählen wir einen Mikrocontroller aus, hier kannst du zwischen einem BBC micro:bit, Arduino UNO R3 und ATtiny wählen.

Dieser Beitrag soll sich zunächst um die Simulation von Schaltkreisen am Arduino handeln, daher wähle ich diesen aus und platziere diesen per Drag'n Drop auf die Arbeitsfläche. Der einfachste Schaltkreis am Arduino UNO ist wie immer eine blinkende Leuchtdiode. Eigentlich benötigt diese keine Simulation, denn, wenn du eine LED falsch in den Schaltkreis einbaust, dann leuchtet diese einfach nur nicht. Jedoch benötigst du dafür lediglich wenige Komponenten und Code, und daher ist es der ideale Einstieg. Die interne LED ist am digitalen Pin D13 angeschlossen und an diesen verbinden wir nun eine LED mit einem 220 Ohm Vorwiderstand.

Der Beispielcode, welcher bereits existiert macht, hier genau das, was wir benötigen und daher ist unser kleines Programm und die damit verbundene Simulation schon fertig.

Programmieren
Den Code erstellen wir ähnlich wie in MakeCode oder Scratch mit vorgefertigten Blöcken. Hier findest du zu jeder verfügbaren Komponente einen Codeblock und somit kannst du sehr einfach und schnell dein Programm erstellen. Nachfolgend ein kleiner Codeblock zum Drehen eines Servomotors von 1° bis 180° und zurück. (siehe obiges YouTube-Video)

Fazit zur Arduino-Simulation mit TinkerCAD
Als Fazit zu TinkerCAD als Tool zur Arduino-Simulation ziehe, ich, dass dieses für kleine Projekte gut brauchbar ist. Was ich besonders cool finde ist, dass dieses bereits mit einer Vielzahl von Komponenten bestückt ist und somit schon einige Projekte simuliert werden können. Jedoch fehlt hier eine Möglichkeit diesen Code, als INO-Datei für die Arduino IDE zu exportieren, was ich leider als deutlichen Minuspunkt werten muss. Read the full article
0 notes
Text
Top 5 Home Automation Electronics Kits for Beginners in 2025
Home automation is changing the way we live, making everyday tasks easier and more efficient. From controlling lights to setting up security systems, smart technology is transforming our homes. If you're just starting to explore this exciting field, one of the best ways to dive in is with a home automation electronics kit. These kits give you the chance to learn and create your own smart home solutions.
In this article, we will explore the top 5 home automation electronics kits for beginners in 2025. Whether you’re new to electronics or just starting to get into home automation, these kits offer a great introduction to the world of DIY smart homes.
1. Arduino Starter Kit for Home Automation
What It Is:
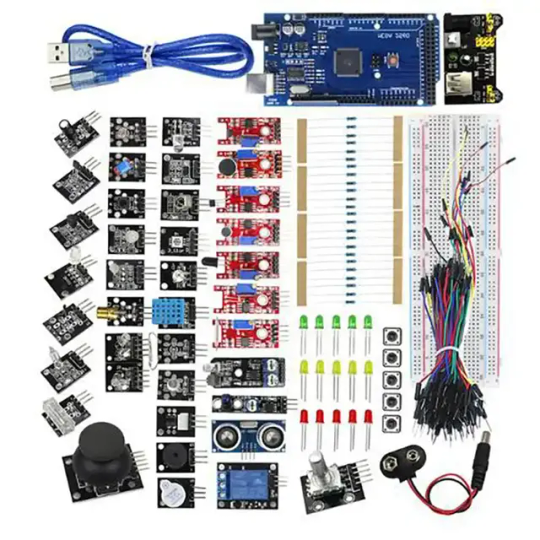
Arduino is one of the most popular platforms for creating home automation projects. The Arduino Starter Kit includes an Arduino board, a variety of sensors, and all the necessary components to start building your first smart home devices.
Features:
Complete Kit: Includes the Arduino Uno board, wires, LEDs, temperature sensors, and more.
Easy Tutorials: Many beginner-friendly guides and projects are available online.
Open-Source: You can freely modify and improve your projects as you gain more experience.
Large Community: Lots of support and advice from other users.
Why It’s Great for Beginners:
Affordable: It’s one of the cheaper options for home automation kits.
Simple Programming: The programming language (C++) is beginner-friendly and well-documented.
Expandable: As you learn, you can add more sensors and devices to your projects.
Example Projects:
Automate lights with motion sensors.
Control a fan based on temperature.
Build a smart lock system using an RFID sensor.
2. Raspberry Pi 4 Home Automation Kit
What It Is:
The Raspberry Pi 4 is a small but powerful computer that can be used to control and manage your home automation system. With this kit, you’ll have the tools to run automation software and integrate smart devices.
Features:
Powerful Processor: The Raspberry Pi 4 has strong performance for handling complex tasks.
Versatile Software: It runs Raspberry Pi OS, which supports different home automation programs.
Connectivity: It includes Wi-Fi, Bluetooth, and Ethernet options to connect to your devices.
Complete Kit: Comes with a Raspberry Pi 4, power supply, pre-loaded SD card, and cooling accessories.
Why It’s Great for Beginners:
User-Friendly: Despite its power, the Raspberry Pi is beginner-friendly with lots of helpful tutorials.
Affordable: A powerful option that doesn’t cost a lot.
Expandable: You can add extra sensors, cameras, and devices as you go.
Example Projects:
Build a smart home dashboard to control all your devices.
Create a home security system using cameras and motion sensors.
Design a smart thermostat that adjusts the temperature based on the weather.
3. Sonoff DIY Smart Home Kit
What It Is:
Sonoff is known for offering simple and affordable home automation solutions. The Sonoff DIY Smart Home Kit includes smart plugs, switches, and a hub that can be easily controlled using a smartphone app.
Features:
Smart Plugs & Switches: Control your home appliances remotely through the eWeLink app.
Voice Control: Works with Alexa and Google Assistant for voice commands.
Cloud Control: Control devices from anywhere using the internet.
Wide Compatibility: It works with most home appliances.
Why It’s Great for Beginners:
Simple Setup: You don’t need to deal with complicated wiring—just plug in your devices and start using them.
No Programming Required: The app makes it easy to control devices without any technical skills.
Affordable: The kit is budget-friendly, making it an excellent entry point for beginners.
Example Projects:
Set up a lighting system that turns on based on motion or time.
Automate appliances like coffee makers and fans.
Use a motion sensor to trigger a lamp to turn on when someone enters the room.
4. Makeblock mBot Ultimate 2.0 Robotics Kit (with Home Automation Projects)
What It Is:
The Makeblock mBot Ultimate 2.0 is primarily a robotics kit but can also be used to create home automation projects. It’s a great option for beginners who want to learn both robotics and automation.
Features:
Includes Sensors: Comes with motion, temperature, and light sensors.
Visual Programming: Uses mBlock, a drag-and-drop programming tool based on Scratch, making it easy to learn coding.
Modular Design: You can add different parts to customize your projects.
App Control: The mBot can be controlled using a mobile app, allowing you to set up automated routines.
Why It’s Great for Beginners:
Educational: Combines fun robotics with practical home automation skills.
Easy to Program: The visual programming interface is beginner-friendly.
Customizable: You can build different types of projects, including home automation systems.
Example Projects:
Set up a security system with motion detection and video.
Build a smart pet feeder that can be controlled from your phone.
Create a lighting system that turns on or off based on occupancy.
5. Tinkr Home Automation Kit
What It Is:
The Tinkr Home Automation Kit is a beginner-friendly kit designed for easy setup and control of smart home devices. It comes with various sensors, smart plugs, and a user-friendly app.
Features:
Complete Kit: Includes motion, light, and temperature sensors, as well as smart plugs and switches.
Easy-to-Use App: The Tinkr app makes it simple to control your devices and set up automation routines.
Cloud Control: Allows you to control your devices from anywhere using the internet.
Wireless: Uses Wi-Fi or Zigbee for easy connections with smart devices.
Why It’s Great for Beginners:
Plug-and-Play: No complex wiring—just follow the instructions in the app.
Simple Interface: The app’s interface is designed to be easy for beginners.
Affordable: It’s a great value for those just getting into home automation.
Example Projects:
Set up smart lighting that adjusts based on room occupancy.
Automate your air conditioning system to turn on when the temperature reaches a certain level.
Build a smart garden irrigation system that activates when the soil is dry.
Conclusion
As home automation becomes more popular, there are plenty of options for beginners to explore. The kits listed here offer an accessible and hands-on way to learn about smart technology and electronics. Whether you choose a simple option like the Sonoff DIY Smart Home Kit or a more powerful solution like the Raspberry Pi 4, each of these home automation electronics kits provides a great starting point for your smart home projects.
By diving into home automation, you’ll not only be able to make your home smarter and more efficient, but you’ll also gain valuable skills in electronics, programming, and problem-solving. So, pick your favorite kit, get started, and enjoy the process of creating your own smart home!
0 notes
Text
Smart Robot car kit for Arduino UNO R3, 4WD, omnidirectional motion, FPV, ESP32 camera, battery included SunFounder
About SunFounder: SunFounder is an 11 year old STEAM and Maker education company that helps beginners learn Raspberry Pi, Arduino, ESP32 from zero to hero. About the Zeus car: This kit includes easy-to-follow instructions for assembling and coding the robot car. Beginners can complete projects without problems using Online step-by-step tutorials and videos. Using the 6cm Mecanum wheel, easy…

View On WordPress
0 notes
Text

Buy Quality Arduino Boards Online
The best collection high quality Arduino board including Arduino UNO, Mega, Micro, Pro mini, Leonardo, Due, and LilyPad. These boards are available at Tomson Electronics at the best price. Pan India delivery within 7 working days. Hyper delivery is available in Kochi, Ernakulam. Fast shipping to all places in Kerala and South India.
#wholesale electronics distributor tamilnadu#Top Electronics Components Distributors#Buy IT & Electronic Items Online at Best Price in India#Buy IT & Electronic Items Online at Best Price#LED lights bulk purchase India#Consumer electronics distributor India#Wholesale electronics marketplace
0 notes