#arduino variable types
Explore tagged Tumblr posts
Visit Tumblr Blog
Explore Tumblr blogs with no restrictions, modern design and the best experience.
Last Seen Tumblr Blogs


Fun Fact
Tumblr Inc. has $15.1M in annual revenue.
Text
I am being aggressively reminded on why I don’t work on projects late at night and that is because last night I was loosing my goddamn mind because I learned that python doesn’t require you to declare variable types.
What do you MEAN I can just do n=4 in one line and then n=“cat” the next line???? My AP CSA Java brain DOES NOT like that.
I haven’t done python in like 3 years and I’m only frantically relearning it because I got an adafruit trinket board to run some LED. You can theoretically use it with the Arduino IDE and program it with C++. Which would be REALLY NICE because that’s where I have completed code written. But despite my best efforts it refuses to get programmed. So now I get to rewrite all my code in python.
Good times good times.
At least now I can include different blade modes on the same file and just only uncomment one so that my sister can swap between modes easier.
3 notes
·
View notes
Text
I had to run by a Radio Shack on a few occasions for electronics components right up til their eventual closure. They had the “electronics components” as a category, but they were largely supplying them from a small stack of cabinets, and not even all of that was populated, alongside maybe two or three types of ‘general starter electronics kit’. Forget “building a radio”: the local place didn’t even have a full E6 resistors or magnet wire. And their staff would be better trained to sell RC cars or cell phones (the latter of which was nearly half the store by 2012) than to answer even simple electronics questions.
((Note the lack of transformers even listed on those cabinets; at best they’d have a couple variable-voltage wall warts.))
Their online catalog was better in variety -- I got a lot of copper-plated boards during their going-out-of-business sale -- but it was nowhere near competitive with online sellers even before dropshipping ate the world. In many cases you’d be looking at three- to five-fold markup over McMaster-Carr or DigiKey prices, even including shipping.
Which... kinda points to the issue with foone’s alternate proposal. A RadioShack trying to sell to hobbyist enthusiasts would have still had to compete with the internet, and hobbyists ended up being pretty fickle about large purchases, too, no matter how much brand loyalty they might have had at a day-to-day basis.
With good reason: those electronics components cabinets often had a 10-fold markup over buying the same from local used electronics shops or 20-fold from online vendors, but if you needed a D-25 or a stack of LEDs in a hurry you’d be willing to pay a couple bucks for the convenience. And those really weren’t enough to keep the lights on or doors open at the scale -- even small family used electronics shops have to operate at a drastically different format. Meanwhile, if you wanted to make even a moderately-complicated electronics circuit, you’d be looking at tens if not hundred of dollars in price differences between RadioShack’s local options and online sellers.
((And, separately, the modern education system had absolutely slaughtered any interest in low-level electronics pre-Arduino, and not just as primary or secondary school levels. I’ve talked with post-grad EEs who hadn’t touched a component smaller than a NAND gate. The internet has done amazing things for connectivity and community among hardware enthuisiasts, but we’re still a dying breed.))
But RadioShack’s pre-00s business model sold the small stuff like transformers and capacitors so that it could also sell the big stuff: sound systems, full radio kits, so on. Even back in the 1980s, they were far more . The point of selling mechanical keyboards, had they made it to today, wouldn’t be to sell a handful of 50-cent cherry switches for $3 each, but that they could sell a 50-buck mechanical keyboard kit for $200. I think that would have been a more successful approach in retrospect... but it’d also be the sort of thing that would have been ‘successful’ on the scale of a few hundred stores at most, rather than the thousands that RadioShack was operating (and often locked into).
((They did sell Arduino and RaspberryPi-style kits, mostly MAKE magazine or Seeed-variant stuff, just around 2012-2013. But they were very much marketed at Young Children Educational Gifts rather than viable projects.))
Microcenter and some hardware stores have taken that approach, and they do exist -- though it’s still not their core focus so much as a way to drive other sales -- but they’re the sort of business that can only support a location or two per city, rather than the convenient strip-mall front that RadioShack aimed for.
Does anyone remember what happened to Radio Shack?
They started out selling niche electronics supplies. Capacitors and transformers and shit. This was never the most popular thing, but they had an audience, one that they had a real lock on. No one else was doing that, so all the electronics geeks had to go to them, back in the days before online ordering. They branched out into other electronics too, but kept doing the electronic components.
Eventually they realize that they are making more money selling cell phones and remote control cars than they were with those electronic components. After all, everyone needs a cellphone and some electronic toys, but how many people need a multimeter and some resistors?
So they pivoted, and started only selling that stuff. All cellphones, all remote control cars, stop wasting store space on this niche shit.
And then Walmart and Target and Circuit City and Best Buy ate their lunch. Those companies were already running big stores that sold cellphones and remote control cars, and they had more leverage to get lower prices and selling more stuff meant they had more reasons to go in there, and they couldn't compete. Without the niche electronics stuff that had been their core brand, there was no reason to go to their stores. Everything they sold, you could get elsewhere, and almost always for cheaper, and probably you could buy 5 other things you needed while you were there, stuff Radio Shack didn't sell.
And Radio Shack is gone now. They had a small but loyal customer base that they were never going to lose, but they decided to switch to a bigger but more fickle customer base, one that would go somewhere else for convenience or a bargain. Rather than stick with what they were great at (and only they could do), they switched to something they were only okay at... putting them in a bigger pond with a lot of bigger fish who promptly out-competed them.
If Radio Shack had stayed with their core audience, who knows what would have happened? Maybe they wouldn't have made a billion dollars, but maybe they would still be around, still serving that community, still getting by. They may have had a small audience, but they had basically no competition for that audience. But yeah, we only know for sure what would happen if they decided to attempt to go more mainstream: They fail and die. We know for sure because that's what they did.
I don't know why I keep thinking about the story of what happened to Radio Shack. It just keeps feeling relevant for some reason.
34K notes
·
View notes
Text
Price: [price_with_discount] (as of [price_update_date] - Details) [ad_1] Unleash your programming potential and master coding with this incredible 7-book bundle! Are you looking for the PERFECT introduction into the world of coding? Want to uncover the secrets of Python, SQL, C++ and so much more? Are you looking for the ultimate guide to getting started with programming? Then this bundle is for you. ★ NEW UPDATE 2022! The NEW EDITION addresses ALL the reader feedback we have received. The Books have been professionally reformatted, revised and edited with professional proofreading editor ★ Written with the beginner in mind, this incredible 7-in-1 book bundle brings you everything you need to know about programming. Packed with a ton of advice and step-by-step instructions on all the most popular and useful languages, you’ll explore how even a complete beginner can get started with ease! Covering data science, Arduino, and even Raspberry pi, you’ll learn the fundamentals of object-oriented programming, operators, variables, loops, classes, arrays, strings and so much more! Here’s just a little of what you’ll discover inside: Uncovering The Secrets of C++, C#, Python, SQL and More Breaking Down The Fundamentals of Data Science Understanding The Different Classes, Operations, and Data Types Fundamental Programming Skills That YOU Need To Know Tips and Tricks For Getting The Most out of Each Language The Best Strategies For Using Arduino and Raspberry Pi Common Errors and How To Troubleshoot Them And Much More! No matter your level of programming experience, this bundle uses step-by-step instructions and easy-to-follow advice so you can get the most out of programming. Explore these amazing languages, master the fundamentals of programming, and unleash your programming potential today! Scroll up and buy now to begin your programming journey! ASIN : B087D1CTCQ Language : English File size : 2893 KB Text-to-Speech : Enabled Screen Reader : Supported Enhanced typesetting : Enabled X-Ray : Not Enabled Word Wise : Not Enabled Print length : 822 pages Page numbers source ISBN : 1801875367 [ad_2]
0 notes
Text
5 Arduino Courses for beginners
Everyone can learn programming and electronics with Arduino, an open-source, flexible electronics platform. Taking an introductory course can put you on the proper path, whether you're interested in making projects with Arduino as a hobby, aspiration engineer, or just interested. Here are the top five Arduino courses for beginners, which will help you progress from learning the fundamentals to working on real-world projects.
Arduino Step by Step: Getting Started by Udemy
Course Overview: Complete beginners are the target audience for this course. It provides a thorough introduction to the Arduino ecosystem, covering topics such as installing your first Arduino board, creating your first sketch (software), and understanding basic electrical principles. Additionally, you'll discover how to link your Arduino to a variety of parts, including sensors, motors, and LEDs.
Why Choose This Course?
Covers both hardware and software aspects of Arduino.
Hands-on projects with step-by-step guidance.
Lifetime access to course material, including future updates.
Practical assignments and quizzes to test your knowledge.
Introduction to Arduino by Coursera
Course Overview: This Coursera course, provided by the University of California, Irvine, offers an academic approach to studying Arduino. It focuses on fundamental programming abilities, knowledge of coding conventions unique to Arduino, and easy projects. You'll start creating your projects and gain a deeper understanding of microcontroller ideas under the direction of an expert.
Why Choose This Course?
Taught by a university professor with real-world experience.
Mix of theory and practical exercises.
Includes peer-reviewed projects and quizzes.
Offers a certificate upon completion for those who upgrade.
Arduino for Absolute Beginners by Skillshare
Course Overview: For people who want to start with no prior expertise, Skillshare's Arduino for Absolute Beginners course is ideal. It covers all the fundamentals of Arduino, such as how to set up your first project, how to use the Arduino IDE, and how to deal with simple parts like buttons and LEDs. There are several practical tasks throughout the course that allow you to put what you've learned into practice.
Why Choose This Course?
Short, easy-to-follow video lessons.
Project-based approach to learning.
Skillshare’s platform allows for a flexible learning schedule.
Community discussions to share progress and ask questions.
Arduino Programming and Hardware Fundamentals with Hackster by EdX
Course Overview: This course delves further into the principles of hardware and programming. You will investigate different types of sensors and actuators, gain knowledge of breadboarding methods, and have practical experience constructing interactive projects. Additionally, the curriculum covers fundamental concepts in coding, such as variables, loops, and functions, all demonstrated with examples specific to Arduino.
Why Choose This Course?
Detailed coverage of hardware and software concepts.
Interactive hands-on exercises and simulations.
Offers verified certificates for completion.
Partnership with Hackster ensures industry relevance.
Arduino Bootcamp: Learning Through Projects by Udemy
Course Overview: The Arduino Bootcamp course follows a project-based methodology in which you work on a number of beginner to intermediate level projects. Working with various communication protocols, managing outputs, and utilizing sensors are just a few of the principles that have been strengthened and practical skills gained through these projects. You'll be confident enough to start working on your original projects by the end of the course.
Why Choose This Course?
15 hands-on projects that gradually increase in complexity.
Step-by-step instructions suitable for all skill levels.
Lifetime access and downloadable resources.
Great for building a project portfolio.
How to Choose the Right Arduino Course for You
Your Learning Style
Course Duration
Budget
Instructor Support
Beginner's Arduino classes are an excellent way to get started learning about electronics and coding. These five classes offer a great way to get started with Arduino, regardless of your goals: building interactive projects, developing skills for a job, or simply taking up a new pastime. Select one that appeals to you and explore the world of do-it-yourself electronics!
To know more click here:- Fortune Robotics
0 notes
Text
Arduino Programmierung: Effiziente Datenverwaltung mit struct

In der Welt der Arduino Programmierung bietet das Schlüsselwort "struct" eine kraftvolle Möglichkeit zur effizienten Datenverwaltung. Anders als Arrays erlaubt ein struct die Gruppierung verschiedener Datentypen unter einem Dach – und das mit variablen, aussagekräftigen Namen. Bevor wir jedoch tiefer in die Vorteile von struct eintauchen, werfen wir einen Blick auf das Problem, dem viele Entwickler gegenüberstehen: Arrays. Diese, obwohl leistungsstark, sind auf einen Datentyp beschränkt und verlangen eine festgelegte Größe. Das Finden spezifischer Daten wird so zu einer Herausforderung.
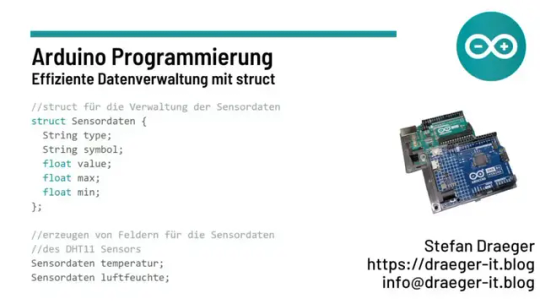
Arduino Programmierung: Effiziente Datenverwaltung mit struct Verkürzt kann man quasi sagen: Ein struct (Abkürzung für "structure") ist in der Welt der Arduino Programmierung, die auf C++ basiert, eine Datenstruktur, die es ermöglicht, verschiedene Datentypen unter einem gemeinsamen Namen zu organisieren und zu gruppieren.
Wie ist ein struct aufgebaut?
Ein struct ist eine Datenstruktur, die es erlaubt, verschiedene Datentypen unter einem gemeinsamen Namen zu gruppieren. Technisch gesehen wird ein struct als benutzerdefiniertes Datentyp betrachtet, der aus einer Sammlung von Datenmitgliedern besteht. Im Gegensatz zu Klassen, haben structs standardmäßig öffentlichen Zugriff auf ihre Datenmitglieder, während Klassen standardmäßig private Zugriffsbereiche haben. struct Sensordaten{ // Datentyp1 variablenname1; // Datentyp2 variablenname2; // ... }; Wir können also für einen Sensor folgendes struct erzeugen. struct Sensordaten{ String typ; float value; };
Wie wird ein struct erzeugt?
Das struct wird behandelt wie eine Variable, d.h. zunächst nennen wir den Datentypen, was in unserem Fall der Name des struct ist und danach einen Namen. Du kannst dann entweder gleich Werte zuweisen oder dieses später in einer Funktion erledigen. Sensordaten temperatur = { "Temperatur", 12.64 }; Wenn du die Initialisierung der Daten des struct später erledigst, dann solltest du sicherstellen, dass dieses vor dem Lesen / verwenden der Daten erfolgt. Es würde dir kein Fehler geworfen werden, sondern du erhältst einfach irgendwelche Daten aus dem Speicher. Sensordaten temperatur; void setup(){ temperatur.type = "Temperatur"; temperatur.value = 12.56; }
Ein Beispiel für den Einsatz eines struct am Arduino
Steigen wir nun mit einem Beispiel ein, ich möchte gerne die Sensordaten eines DHT11 Sensors verwalten. Dieser Sensor liefert die Temperatur, sowie die relative Luftfeuchtigkeit.

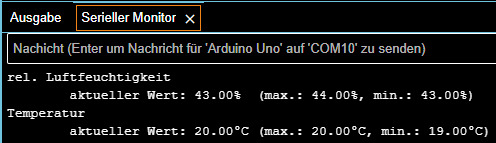
Arduino UNO R3 mit DHT11 Sensor Diese Daten wollen wir jetzt in einem struct speichern. Dazu legen wir uns zunächst erstmal die Struktur an. struct Sensordaten { String type; //der Typ (Temperatur, rel. Luftfeuchtigkeit, Luftdruck etc.) String symbol; //das Zeichen/Symbol für die Maßeinheit (°C, %, hPa) float value; //der aktuelle Wert float max; //der maximal gemessene Wert float min; //der minimal gemessene Wert }; Hier der komplette Code zum Auslesen der Temperatur und rel. Luftfeuchtigkeit eines DHT11 Sensors am Arduino UNO R3. //Bibliothek zum kommunizieren mit dem DHT Sensor #include //der Sensor ist am digitalen Pin D5 angeschlossen DHTNEW dht11Sensor(5); //struct für die Verwaltung der Sensordaten struct Sensordaten { String type; String symbol; float value; float max; float min; }; //erzeugen von Feldern für die Sensordaten //des DHT11 Sensors Sensordaten temperatur; Sensordaten luftfeuchte; void setup() { //begin der kommunikation mit 9600 Baud //auf der seriellen Schnittstelle Serial.begin(9600); //definieren der Daten für den Temperaturwert temperatur.type = "Temperatur"; temperatur.symbol = "°C"; temperatur.value = 0; //maximale und minimale Grenze setzen temperatur.max = -999; temperatur.min = 999; //definieren der Daten für //die relative Luftfeuchtigkeit luftfeuchte.type = "rel. Luftfeuchtigkeit"; luftfeuchte.symbol = "%"; luftfeuchte.value = 0; luftfeuchte.max = -999; luftfeuchte.min = 999; } //Funktion zum ausgeben von Sensordaten //auf der seriellen Schnittstelle //Als Parameter wird das struct übergeben. void printValues(Sensordaten data) { Serial.println(data.type); Serial.print("taktueller Wert: "); Serial.print(data.value); Serial.print(data.symbol); Serial.print("t"); Serial.print("(max.: "); Serial.print(data.max); Serial.print(data.symbol); Serial.print(", min.: "); Serial.print(data.min); Serial.print(data.symbol); Serial.print(")"); Serial.println(); } void loop() { //anfordern der Sensordaten dht11Sensor.read(); //behandeln der Werte für die rel. Luftfeuchtigkeit float luftfeuchteValue = dht11Sensor.getHumidity(); luftfeuchte.value = luftfeuchteValue; luftfeuchte.max = max(luftfeuchteValue, luftfeuchte.max); luftfeuchte.min = min(luftfeuchteValue, luftfeuchte.min); //behandeln der Werte für die Temperatur float temperatureValue = dht11Sensor.getTemperature(); temperatur.value = temperatureValue; temperatur.max = max(temperatureValue, temperatur.max); temperatur.min = min(temperatureValue, temperatur.min); //ausgeben der Daten auf der seriellen Schnittstelle printValues(luftfeuchte); printValues(temperatur); //eine kleine Pause von 1,5 Sekunden delay(1500); } Der Code erzeugt eine Ausgabe auf der seriellen Schnittstelle aus welcher wir die aktuellen sowie der maximale und minimale Wert ablesen können.
Beispiel - struct zum speichern von Sensordaten eines DHT11 Sensors am ArduinoHerunterladen
Erkannte Vorteile eines struct
Wenn wir nun auf den Code blicken, erkennen wir zunächst vier eindeutige Vorteile eines struct. Datenorganisation: structs ermöglichen die Gruppierung verschiedener Datentypen unter einem gemeinsamen Namen. Dies fördert die organisierte Strukturierung von Daten, was besonders nützlich ist, wenn verschiedene Informationen zu einem einzigen Konzept gehören. Verbesserte Lesbarkeit: Durch die Verwendung von structs können Daten mit aussagekräftigen Namen versehen werden. Dies verbessert die Lesbarkeit des Codes, da Entwickler auf einen Blick erkennen können, welche Daten ein bestimmtes struct repräsentiert. Einfacher Zugriff: Der Zugriff auf die Mitglieder eines structs erfolgt über die Punkt-Notation, was den Code einfacher und intuitiver macht. Dies erleichtert das Lesen, Schreiben und Verstehen von Daten, insbesondere im Vergleich zu komplexen Indizierungsmechanismen bei Arrays. Flexibilität und Erweiterbarkeit: structs bieten Flexibilität, da sie verschiedene Datentypen enthalten können. Dies ermöglicht die Definition komplexer Datenstrukturen, die leicht erweitert oder angepasst werden können, ohne den gesamten Code umzuschreiben. Dies ist besonders nützlich, wenn neue Daten hinzugefügt werden müssen.
Nachteile eines struct durch die öffentliche, einfache Struktur
Wo Vorteile sind, sind auch Nachteile. Daher ergeben sich aus dem sehr geöffneten Aufbau des struct folgende Nachteile. Keine Methoden: Im Gegensatz zu Klassen in einigen Programmiersprachen können structs keine Methoden enthalten. Das bedeutet, dass du keine Funktionen direkt an ein struct binden kannst. Begrenzte Vererbung: Im Vergleich zu Klassen bieten structs eine begrenzte Vererbungsfähigkeit. Du kannst nur öffentliche Datenmitglieder erben, und es gibt keine Möglichkeit, den Zugriff zu steuern oder Funktionen zu überschreiben. Keine Kontrollmechanismen: structs bieten standardmäßig keinen Schutzmechanismus für ihre Datenmitglieder. Alle Daten sind standardmäßig öffentlich zugänglich, was potenzielle Probleme in Bezug auf Datenintegrität und -sicherheit verursachen kann. Keine Zugriffsmodifikatoren: Anders als bei Klassen, bei denen du private, geschützte und öffentliche Zugriffsmodifikatoren verwenden kannst, haben structs standardmäßig nur öffentlichen Zugriff. Das kann die Kontrolle über den Zugriff auf die Daten beeinträchtigen. Read the full article
0 notes
Text

Data Types in Arduino programming
In Arduino programming, data types are used to define the type of data that a variable can hold. The data types are essential for declaring variables in Arduino sketches, helping to optimize memory usage and ensure that the variables can hold the appropriate values for a given application. Checkout this article to learn more.
0 notes
Text
Sensor Digital de presión para medir la hermeticidad en cañerías de Gas con el celular
En Argentina, cuando el Gasista matriculado realiza una instalación nueva, la debe someter a una prueba de hermeticidad antes de aprobar la obra, para realizar esa prueba el gasista conecta un manómetro, con escala de 1 kg/cm² luego infla la cañería hasta llegar a una presión de 0,2 kg/cm², en una primera etapa las llaves de paso de los artefactos deben estar cerradas, se debe comprobar que la aguja del manómetro quede inmóvil durante 15 minutos, luego se repite la prueba pero con las llaves de paso de los artefactos abiertas, y los robinetes del artefacto cerrados.
La cañería se infla con aire, con un compresor o un inflador de bicicleta.
Un dato importante, la presión nominal del gas natural es de 20 gr/cm² y 28gr/cm² para el gas envasado, y la prueba de hermeticidad se haría a 200 gr/cm² que sería lo mismo que 0,2 kg/cm²
Esta es una foto del d1 mini con el sensor bmp280

//Código para quemar con el arduino ide:
#include <ESP8266WiFi.h>
#include <WiFiClient.h>
#include <Adafruit_BMP280.h>
// Cambia estos valores para conectarte a tu red Wi-Fi
const char* ssid = "cursodegas";
const char* password = "12345678";
// Crea un objeto BMP280
Adafruit_BMP280 bmp;
// Crea un objeto servidor
WiFiServer server(80);
// Variable para almacenar el tiempo de la última actualización
unsigned long lastUpdate = 0;
// Variable para almacenar la presión atmosférica local (en hPa)
float localPressure = 0.0;
void setup() {
// Inicializa el monitor serial
Serial.begin(115200);
// Conéctate a la red Wi-Fi
WiFi.begin(ssid, password);
while (WiFi.status() != WL_CONNECTED) {
delay(1000);
Serial.println("Conectándose a la red Wi-Fi...");
}
Serial.println("Conexión WiFi establecida.");
Serial.println("Dirección IP: ");
Serial.println(WiFi.localIP());
// Inicializa el sensor BMP280
if (!bmp.begin()) {
Serial.println("No se pudo encontrar el sensor BMP280, revisa las conexiones.");
while (1);
}
// Lee la presión atmosférica local para la calibración
localPressure = bmp.readPressure() / 100.0F; // Lectura de presión en hPa
// Inicializa el servidor
server.begin();
Serial.println("Servidor iniciado.");
}
void loop() {
// Declarar variables
float temperature;
float pressure;
// Espera a que se conecte un cliente
WiFiClient client = server.available();
if (!client) {
return;
}
// Lee la petición HTTP
String request = client.readStringUntil('\r');
Serial.println(request);
client.flush();
// Actualiza los valores del sensor si han pasado al menos 2 segundos desde la última actualización
unsigned long now = millis();
if (now - lastUpdate >= 2000) {
temperature = bmp.readTemperature();
pressure = (bmp.readPressure() / 100.0F) - localPressure; // Lectura de presión calibrada en hPa
lastUpdate = now;
}
// Construye la respuesta HTTP
String html = "<html><head><meta http-equiv=\"refresh\" content=\"2\"></head><body>";
html += "<h1>PRESION </h1>";
html += "<p>Temperatura: " + String(temperature) + " °C</p>";
html += "<p>Presion: " + String(pressure,2) + " g/cm2</p>";
html += "</body></html>";
// Envía la respuesta HTTP
client.println("HTTP/1.1 200 OK");
client.println("Content-Type: text/html");
client.println("Connection: close");
client.println("");
client.println(html);
}
// copiar hasta acá
Así se ve en el teléfono, muestra la temperatura tambien

Les cuento que el sensor es muy preciso, si tocan la cañería el calor de sus manos va a aumentar la presión y lo van a poder ver instantáneamente, al igual que si la cañería pierde, esto va a poner a prueba sus instalaciones
Vamos a usar:
sensor de presión barométrica bmp280
un esp8266 d1 mini
una pila 18650
un cargador de batería de litio
opcional, si arman la capsula con termo-fusión, o accesorios de pvc, pero no quieren desarmar para cargar la batería van a necesitar un módulo emisor y receptor cargador de celular inalámbrico
Conexiones: del bmp280 solamente vamos a usar 4 pines
vcc lo conectamos a la salida de 3.3 voltios del d1 mini
gnd a gnd
SCL va al pin D1
SDA va al pin D2
Por ultimo hay que alimentar al d1 mini, primero usaba un módulo dc-dc y lo calibraba a 3.3 voltios, pero en los otros modelos directamente conecté una batería de litio 18650 al pin de 5 voltios del d1 mini
Le pueden colocar un interruptor así queda mas práctico
Funcionamiento del dispositivo, el esp8266 D1 mini se va a conectar por wifi al celular, previamente, hay que configurar el hot-spot del celular, se debe colocar la misma ssid y contraseña del código, entonces una vez que el esp8266 se conectó, nos fijamos que dirección ip le asignó el teléfono, luego pegamos esa dirección ip en el navegador y podremos ver los valores del sensor de presión en el teléfono, la pagina se va a actualizar cada 2 segundos
Un dato importante es que el sensor bmp 280 entrega el resultado de la presión en pascales, en el código se cambia ese valor a hecto pascales y para que tengan una idea 200 hectopascales es igual a 0,204 kg/m² que serían 204 gr/cm².
Recuerde que si requiere una precisión mas exacta, por mas que la pagina diga el valor en gramos sobre centímetro cuadrado, en realidad son hecto pascales, puede usar una página web que haga la conversión, como no es una diferencia significativa para mi lo deje así.
Entonces si leemos 200 g/cm² en realidad son 204 gr/cm²
o si tenemos una lectura de 28 hectopascales en realidad es 28,55 gramos/cm²
para mi es lo mismo, no es un error muy grande, probé con otras ecuaciones en la parte que hace la conversión y divide por 100F pero me daba errores de medición
Para que sea mas fácil tomar la lectura de la presión, lo primero que hace el código es tomar una lectura y luego restarla a las siguientes lecturas, de ese modo se calibra el sensor a cero, para que entiendan, por ejemplo, antes de hacer esa modificación, el sensor media mas o menos desde los 946 hecto pascales, que es la altura a nivel del mar a donde estoy, entonces tenía que inflar la cañería a 1146 hecto pascales, obviamente el valor de cero se va a ir corriendo a medida que pasa el tiempo, entonces si dejan pasar mucho tiempo entre lectura y lectura van a tener que resetear el d1 mini, habría que ver si se puede colocar un botón de reset en la página así no hay que desarmar el instrumento
Acá se ven las cápsulas de pvc

La librería del bmp280 la pueden descargar de:
Deben recordar cambiar un valo, sino da error, tienen que entrar al directorio donde esta instalado el arduino ide, luego van a librerías, entran a (Adafruit_BMP280_Library), y al archivo (Adafruit_BMP280.h) lo tienen que abrir como archivo de texto y en la linea 37 cambian (0x77) por (0x76) guardan y cierran, y reinicien el arduino ide
La cápsula que vincula el aparato este a la cañería debe ser de pvc, probé con cañería epoxi pero cuando cerraba la tapa se cortaba la conexión wifi entre el d1 mini y el teléfono
habría que probar de colocar un módulo emisor y receptor cargador de celular inalámbrico y el módulo de carga para baterías de litio, el que trae protección y hacer la capsula totalmente sellada, con termo-fusión
Al principio usaba un arduino nano y el sensor bmp 280. Sacaba 4 cables desde dentro de la cañería para visualizar los datos en una pantalla oled, pero por mas sellador que colocaba, siempre, el aire se escapaba por los cables, así que opté por usar el esp8266 d1 mini que es uno de los módulos mas chicos, e introducir el sensor dentro de la cañería.
El código lo pueden quemar con el ide de arduino, antes tienen que instalar las librerías del esp8266, en este tutorial explican como es el procedimiento:
youtube
En esta parte del código pueden cambiar las credenciales del wifi que liberan desde el teléfono, obviamente tienen que coincidir así el d1 mini se conecta al wifi que libera el teléfono
const char* ssid = "cursodegas";
const char* password = "12345678";
Bueno eso es todo por ahora, esto es un prototipo, y lo comparto por si quieren probarlo o hacerle alguna modificación, muchas gracias a la gente del CEDER de Villa Carlos Paz, a mi primer profesor, que le gustaban mis proyectos y me alentaba a seguir adelante, se llama Roberto Muñoz y también al profesor actual, Andrés Bustos, me brindaron muchos consejos
Si alguien quiere que le venda un prototipo listo, la parte electrónica, la envío por correo, puede contactarme al 351-3854282
0 notes
Text
UYPP: Ben Ruel's Garage Garden

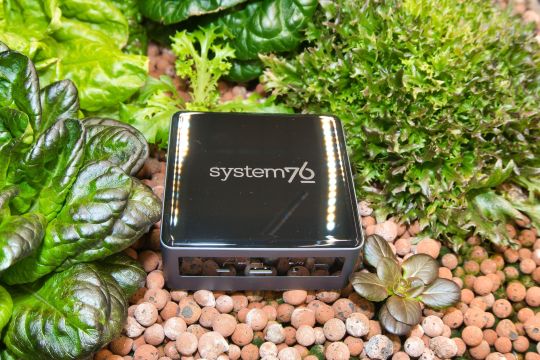
Back in March, we announced the winners for our Unleash Your Potential Program, in which six participants got to configure their own System76 computer to use for their awesome projects. This first awesome project is the Garage Garden, helmed by awesome project-er, engineer, and mighty green thumb Ben Ruel. We sat down with Ben to see how his project has been growing on the Meerkat.
Can you tell us about the Garage Garden project? What's it all about?
I spent a career with the Coast Guard and came up here—my final tour with the Coast Guard was in Juneau. Being in southeast Alaska, we’re constrained with what they call off-the-road systems, and the only way in or out of town is by boat or by plane. So all of our food comes up here by barge for a small nominal fee, or by aircraft for an incredibly large fee.
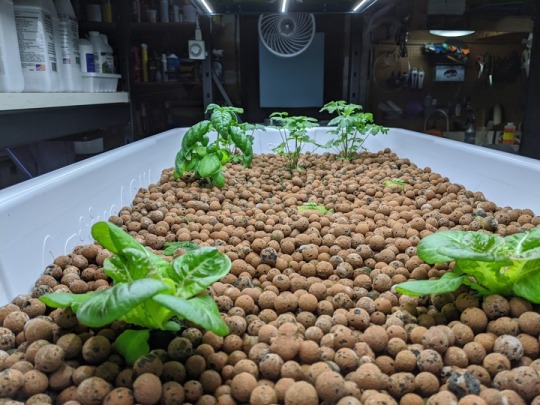
When I came up to Juneau with my wife and kids 11 years ago, we noticed that by the time our produce gets up here, it’s lived on a barge a week, two weeks out of Seattle, and you have no shelf life left on them. We started trying to grow food within the first year of getting here, and we came to the conclusion pretty quickly that with 300 days plus of rain every year, outdoor growing wasn’t really a viable option. That’s when we started a hobby farm in a garage growing some stuff in soil under fluorescent lights, as odd as that sounds.
Since then, we’ve progressed into hydroponics, but we’ve done it very manually. We go out every other day and take readings by hand, so I’ve been doing some research about building IOT devices that will talk back and automate some of the readings. My dream would be using it to actually control the concentration of nutrient solutions that we use. The overall goal is we’re going to build the hydroponic monitoring network of IOT devices, and use the Meerkat as a control center for the devices and a repository for all the data. We’ve also been doing some investigating behind the scenes into whether or not it could grow enough legs to become a business.
Is there a specific type of produce that you’re starting with?
We’ve been all over the road. Right now we’ve got lettuce. We’ve always got some kind of green leafy vegetables whether it’s any variety of lettuce that will grow hydro, some bok choy and tatsoi, and we’re growing kale like it’s going out of style. We’ve grown cucumbers to the point where I think I’ve harvested 65 pounds of cucumbers off of 4 plants over the last couple of months, but we’re really constrained by our size.
I live in a relatively small 3-bedroom house, and we’re just using a one-and-a-half car garage as our grow area. Right now I’ve got two tents. As funny as it sounds, cannabis is legal in Alaska and has been forever—my wife and I don’t touch the stuff, but because it’s been legalized, the infrastructure and the supplies that we need are freely available. We’re growing tomatoes in a tent that’s designed for marijuana growth. It works really well. It helps to maintain efficient temperature control; you can maintain temperature and humidity, block out extraneous light if you don’t want it, and cycle the lights on and off.
Depending on whether it’s too hot in the summer we’ll run the lights at night, and in the wintertime we’re looking for extra warmth, we can shift the cycle and run the lights during the day. Our big benefit up here is that, because Juneau’s all on hydroelectric power, electricity is really cheap.
What variables are being monitored?
With hydroponics, there’s a good number of parameters that you’ve got to try and keep track of. You’re basically diluting nutrients in a solution of as pure water as you can get. You want to keep track of things—your pH can’t be too acidic or too alkaline, for example.
The other big parameter is the electrical conductivity, or total dissolved solids. You want to make sure you’ve got the right concentration of nutrients, and that your nutrient solution isn’t salting up. As you’re adjusting pH back and forth, it’ll start demineralizing salt, so tracking that data gives you a good indication for when it’s time to dump the reservoir and start over.
We’re doing it manually now. I go out every couple of days and we take samples, and sit down and log it into a spreadsheet. The Meerkat acts as a control center for programming devices, keeping a repository of the programming for the IOT devices that we’re using (Arduinos with the esp8266 chips) as well as running different database programs as Docker containers, so that they can be spun up and knocked down fast enough as we try and figure out what the best way to move forward is. We’ve got a couple of database servers that I’ve been playing around with, trying to break from traditional SQL and looking at NoSQL type of databases.
I’m not an IT guy by trade. I’m more of an electronics guy, so I’m kind of doing it as a study-by-night type of project.
What has your experience been like with the Meerkat so far?
I’m actually completely blown away by the Meerkat’s performance. It’s astounding what that small form factor and footprint is able to do. I’ve used Linux for a number of years, and basically everybody’s heard of System76. I’ve seen Pop!_OS before and never really played with it all that much, but I’ve actually grown to love it. The feel, the ergonomics, the interface, and even down to the color schemes that come bone-stock right out of the box. They just make more sense to me. I’m looking forward to the COSMIC update after researching that to see how the differences in the workflow will affect things.

What software are you using for this project?
Right now we’re writing in Docker containers and running the Tick Stack from Influx. We’re also running Telegraf, Protograph, Capacitor, playing around with the Time Series Database, I’ve got a container running MongoDB I run with SQLite, and there’s a couple different IDEs I’ve got loaded on there as well for programming Arduinos or esp8266 chip flashing.
How was the setup process for the machine?
It was up and running within 10–15 minutes of pulling it out of the box. I actually took it to work, too. We do a lot of work with government agencies, and I’ve been doing a lot of microwave radio repair. I’ve got a pretty small workbench at our shop here in Juneau, so using the Meerkat to drive all of our test equipment to control the radio while logging data coming out of the radio, it was perfect. It had enough horsepower to remotely control the test equipment. I wasn’t pushing it all that hard, but setting it up and going back and forth between having it at home or at work, it was negligible to get it up and running.
Stay tuned for further updates from Ben Ruel’s Garage Garden and cool projects from our other UYPP winners!
#system76#meerkat#desktop#mini#minicomputer#computers#desktops#laptops#servers#keyboards#NoSQL#Pop!_OS#Ubuntu#Linux#Alaska#Juneau#hydroponics#farming#vegetables#produce#cucumbers#totsui#bok choy#Arduino#Mongodb#IOT#iot solutions#automation#harvest#garage
19 notes
·
View notes
Text
Direct RAM Access
All programs operate on RAM regardless of its programming language, operating system or hardware, be it a smartphone, cloud, desktop, laptop or a machine as tiny as Arduino.
Nowadays, RAM is used as a synonym for main computer memory. In reality, it is an abbreviation for "Random-Access Memory". Here, random means not as in something random; the last thing you expect from a RAM is randomness. The connection between words "random" and "access" with the hyphen means any data in memory is accessed arbitrarily by the programs.
In this context, the opposite of random is sequential, which means the memory is accessed one-by-one as we can still see in SQL result-sets. In old times, memory hardware like "tape" was sequential; to access an arbitrary location, all previous locations on the band should be visited. The access types of memory hardware may seem outdated today as tapes are obsoleted as storage devices; almost all memory are "random" for the last 20 years.
Memory types like hard disks and CD/DVDs are randomly-accessed, but one thing separates RAM from the former is the fixed access time for each location. For disks, a device called "head" should be rotated so that access times may vary depending on the location. Nowadays, hard disks are rapidly replaced by SSDs (Solid State Drive) that can store as much data as disks and provide fixed access time as RAMs.
From now on, let's assume a RAM is a sea of bytes that is addressed by a number which is represented by the data type int.
In C, you can directly access RAM via its address. Let's start with an example:
#include <stdio.h> int main(int argc, char* argv[]) { char* p = 0; printf("%c\n", *p); return 0; }
Here, we start introducing the infamous "pointers" in C. Pointers are used like "references" in modern languages, but they really are memory addresses in C.
The term "char" (character) in the variable definition is the main mental block for understanding pointers while learning C. In reality, any type of variable definition with an asterisk (*) is always an int. The preceding type specifier is used to represent data in that address later.
The variable p is assigned the address 0, or in other words, the location of the very first byte in memory to p.
char *p = 0;
Here, *p represents the data in address p as char. We'll try to write it on the standard out (stdout) with printf():
printf("%c\n", *p);
When you run this program in a PC, it crashes with the following message:
Segmentation fault (core dumped)
In Windows, it pops a message box that says "Access Violation". This fault is similar to NullPointerException, NullReferenceException etc. in modern languages.
The above program crashes because the ability to reach an address doesn't mean the memory location it refers really exists. Because modern operating systems like Linux, Windows run many programs (or processes as they are called in that context) simultaneously, they should manage precious RAM resources carefully by a mechanism called "virtual memory" that often abbreviated as VM.
Modern systems would block writing to address 0 because it almost always means a programming fault like the exceptions mentioned above. But C is also used for embedded programming, which means writing programs for very tiny CPUs which helps electronic controller hardware. Those machines have constrained hardware resources so they may not have the luxury for controlling memory access. In this instance, reading the memory at 0 or an arbitrary location may not crash.
Now let's try to assign an arbitrary address to the p:
char *p = 5500;
The compiler would give a warning for that number.
warning: initialization makes pointer from integer without a cast
This error won't halt the compilation process. But as a wise programmer, we should not accumulate warnings. Thanks to "casting", it is possible to convince the compiler that we know what we are doing with a cast:
char *p = (char *)5500;
When you run the program, the result is again the segmentation fault. As you can see, C makes it possible to shoot yourself in the foot. But you are still lucky if you shoot yourself in the foot because at least you can go to a hospital. However, if that kind of error results in reading or writing from a legal memory, then your data integrity breaks and god knows where this error pops in the future.
Playing with Valid Memory Locations
Enough of crashes. Let's use some valid memory addresses, starting with the following example program:
#include <stdio.h> int main(int argc, char* argv[]) { char c = 'A'; printf("%u\n", &c); return 0; }
Here we define a variable of 1 byte (or 1 ASCII character) as c. It represents a location in RAM which stores a byte of data. The & operator takes the address of a variable, so the output is something like this:
1868946151
Let's play a little bit more and add any variable we've encountered throughout our little program:
printf("argc %u\n", &argc); printf("argv %u\n", &argv); printf("c %u\n", &c); printf("main %u\n", main);
It outputs something like this:
argc 1527215996 argv 1527215984 c 1527216007 main 448100010
As you can see, our main function's assembly code is located somewhere in our RAM.
Now let's play with them via a pointer:
char c = 'A'; char* p = &c; printf("c %c\n", c); printf("*p %c\n", *p); *p = 'B'; printf("c %c\n", c);
Here we define a pointer p and assign it to the address of c. So p becomes a reference to the c. The output is:
c A *p A c B
Now let's do something dangerous:
char* p = main; printf("%c\n", *p); *p = 'A';
This program has the ability to read and print the first character of the main() function but crashes when trying to write into it. Modern CPUs can distinguish between code and data and prevents overwriting the code.
U Segmentation fault (core dumped)
If you try the example above, you probably get warnings but, it doesn't stop compiling anyway.
To get even more dangerous, we will use a technique called the "pointer arithmetic".
char c1 = 'A'; char c2 = 'B'; char *p = &c1; printf("C1 %u %c\n", &c1, c1); printf("C2 %u %c\n", &c2, c2); p++; *p = 'Z'; printf("C2 %u %c\n", &c2, c2);
When you run this program, the output will be:
C1 69358686 A C2 69358687 B C2 69358687 Z
As you can see, the value of c2 is changed magically by a series of manipulations.
char *p = &c1;
We first assign pointer p to the address of c1.
p++; *p = 'Z'; printf("C2 %u %c\n", &c2, c2);
Remember, a pointer is actually an int that represents a memory address. Since it is an int, it is perfectly legal to increment it. By that, we can magically change the value of c2 without mentioning it.
Control is costly. Programs written in C are very fast because allowing direct manipulation of RAM avoids that cost.
Other Languages' Perspective on Accessing RAM
Most modern languages other than C and C++ prevent direct access to RAM. Instead, they control accessing it through carefully defined interfaces called "references". First, there is no notion of taking the address of a variable for basic types like char, int, double etc.
Second, object instances are stored in a variable of reference type. The reference is an opaque type; you can't take the address of it. They are used as-is. Of course, you can change the object which the reference points to, but you can't make it pointing an invalid arbitrary address like 5500 as we have given above.
Of course, object instances do live somewhere in RAM and in the 1990s references may leak that info when you convert them into a string. Today garbage collectors (GC) may move objects around the RAM for efficiency and heap defragmentation, so that info should contain something more independent than a mere memory address.
The following Java program creates two instances of class Object and converts them into a string:
public class Xyz { public static void main(String[] args) { Object o1 = new Object(); Object o2 = new Object(); System.out.println("O1 " + o1); System.out.println("O2 " + o2); } }
The outputs are some random hash values that uniquely identify the instance that is managed by the GC. As you can see, the hexadecimal numbers are unrelated.
O1 java.lang.Object@3af49f1c O2 java.lang.Object@19469ea2
One of the main design principles of modern languages is preventing pointer errors as you can see in the preceding paragraphs. As we said before, direct RAM manipulation is what makes C programming language very fast. However, most modern software doesn't need to be fast as much. Correctness is more valued since programmers are forced to deploy programs fast in this Internet era.
Zero, Null, Nil, Undefined
References can have a special value called null or nil or undefined when they do not point to any object instance. Let's make them fail by abusing them:
String s = null; System.out.println("Length " + s.length());
The result is the Java-style "Segmentation Fault".
Exception in thread "main" java.lang.NullPointerException at Xyz.main(Xyz.java:6)
Let me stress again. In a modern programing language, the reference may be null or something real, not in-between like in C/C++.
Some more modern languages like Kotlin (a Java dialect) go even further and prevent null value assignment if you don't specifically mark the reference with a question mark:
val String s = null; // Incorrect, don't compile var String? s = null; // Correct ```` ## Leaky Abstraction Operating Systems like Linux and Windows provide C APIs for their services. A modern programming language runtime should call that APIs at some point to do meaningful things like I/O and creating windows. Each of those languages provides some means of accessing C libraries and interacting with C so you can taste the pleasure of direct memory manipulation. For example, C# programming language and its associated runtime .NET provides "Interop" library to interface with the operating system. Interop library contains a big class called Marshal, which has many dirty and dangerous static methods against all OOP principles. For example, the following methods are available to read and write a byte to/from the RAM directly:
public static byte ReadByte(IntPtr ptr); public static void WriteByte(IntPtr ptr, byte val);
IntPtr type represents a C pointer. These methods are ready to throw an "AccessViolationException" when you do the same experiments as in the above paragraphs. But when you access some valid C memory by some means outside the scope of this topic, you can use them conveniently. Read/Write methods have other variants which allow accessing different basic types like int and blocks of byte arrays at once. Now, as always, let's do some naughty things:
using System; using System.Runtime.InteropServices;
namespace savas { class Program { static void Main(string[] args) { byte b = 33; GCHandle h = GCHandle.Alloc(b, GCHandleType.Pinned); IntPtr p = h.AddrOfPinnedObject(); byte b2 = Marshal.ReadByte(p); Console.WriteLine("b2 = " + b2);
} }
} ```
After defining the variable b, we "pinned" it so the GC won't move its place in memory. Then we get its address via AddrOfPinnedObject() method just like the & operator in C, read its value and print it. The output is "b2 = 33" as expected.
But if you call Marshal.WriteByte() to manipulate p, it doesn't write into b because once you pin the object, the connection between b and p is lost. This allows C# to stay pure because the Marshal class' memory methods are designed to manipulate buffers provided by the C libraries, not the other way around.
Python programming language has been written in C. At the same time, it provides a C interface that allows built-in classes and libraries be written in C. If that kind of classes supports a "buffer protocol", its raw bytes can be manipulated by memoryview class of Python. By default, Python's standard byte and bytearray objects support that protocol.
Without memoryview, Python-way of manipulating buffers is inefficient since any operation on arrays and slices requires creating a copy of the object. Using memoryview allows C-style direct control of memory in a controlled way; "best of both worlds" in certain scenarios.
1 note
·
View note
Photo

Best Guidance of Arduino for Newbie
Every techy person familiar with the word “Arduino”. But they don’t have idea about its board, software, programming and etc. So watch this infographic of best guidance of Arduino for newbie. Must watch.
0 notes
Text
Project 1 - Programmable NeoPixels
Project Requirements
For this project we needed to use 2 or more Arduino inputs to control some LEDs. For my project, I decided to create a programmable NeoPixel strip, which uses a potentiometer and two push buttons to change the color of a specified pixel in the strip. Using these inputs, you can program the strip to be any color, or combination of colors, that you want. (In my example video I only set the strip to one color, but in this image you can see you can create any combination of colors you’d like.)

youtube
Implementation
The pixel strip starts with all the pixels set to the color white. You begin with the with the first pixel in the strip being the one that is currently selected. Using the push button on the left you can move up the strip by one pixel at the time, looping back to the first pixel once the end is reached. The currently selected pixel is indicated by whichever one is flashing on and off. The RGB LED starts as red, indicating that the color you are manipulating for the current pixel is red. To change the color you want to manipulate, press the push button on the right. You can cycle through red, green, and blue, and the RGB LED will be lit up with the color that is currently selected. To change the value of whatever color is selected for the current pixel, you can adjust the potentiometer. The POT value is mapped between 0-255 to correspond with the color value of the selected color for the current pixel. To save the color you have set for the current pixel, just switch the pixel with the left button, and you will now be able to change the color of the next pixel. The current RGB values are saved from whatever the color was set on the last pixel, allowing you to quickly update the whole strip with your custom color by just cycling through all the pixels once you have adjusted one to the desired color.
Challenges
The first challenge was getting the buttons to cycle through the current pixel and color smoothly, without being able to hold the button down and quickly loop through them. I created a variable for each button that controls whether the buttons can accept input, and they are set to false as soon as a button is pressed, and back to true once the button is released. I then stored state variables for the current color and pixel to track which color and pixel is currently selected. Another problem was storing the color values for the pixels as they blink or as you switch between them. I had to use bitwise operators to extract the RGB values from the current pixel’s color, and save them in uint8_t variables to be manipulated or set for different pixels down the line. Besides those two problems, most of the other code was easy to implement, and just required me to create state machines to process input and output separately. I also had to create a state machine when storing the user’s custom color based on the currently selected color by taking the POT’s value for only a certain color channel depending on the currently selected color.
Future Improvements
One thing I can do to improve on this project is have the user manipulate the currently selected color using a different type of input. As of now, the potentiometer can’t reset each time the currently selected color is changed, and this makes it annoying to create a custom color as each time you switch the current color channel, the value of that color will be what the potentiometer was set at for the previous one. In the future, I can potentially find an input that is also in a resting state, and moving it up or down will lower or raise the value of the current color channel. This way, as you switch color channels, the value of the color for that channel stays at what it was previously set at, and doesn’t overwrite with the current value of the POT.
1 note
·
View note
Text
Ubidots + ESP32- Predictive Machine Monitoring
Predictive analysis of machine vibration and temp by creating mail events and a record of vibration in google sheet using Ubidots.

Story
Predictive Maintenance and Machine Health Monitoring
The rising of new technology i.e, the Internet of Things, heavy industry has started adopting sensor-based data collection to solve its biggest challenges, principal among them process downtime in the form of shutdowns and process delays. Machine monitoring also called predictive maintenance or condition monitoring is the practice of monitoring electrical equipment through sensors in order to accumulate diagnostic data. To achieve this, data acquisition systems and data loggers are used to monitor all kinds of equipment, such as boilers, motors, and engines. Following condition are measured:
Temperature and Humidity Data Monitoring
Current and Voltage Monitoring
Vibration Monitoring: In this article, we will read Temperature, vibration and publish the data in Ubidots. Ubidots supports graphs, UI, notifications, and emails. These features make it ideal for predictive maintenance analysis. We will also get the data in google sheets which will make predictive maintenance analysis more easier.
Hardware:
ESP-32
IoT Long Range Wireless Vibration And Temperature Sensor
Long-Range Wireless Mesh Modem with USB Interface
Software Used:
Arduino IDE
Ubidots
LabView Utility
Library Used:
PubSubClient Library
Wire.h
Arduino Client for MQTT
This library provides a client for doing simple publish/subscribe messaging with a server that supports MQTT
For more information about MQTT, visit mqtt.org.
Download
The latest version of the library can be downloaded from GitHub
Documentation
The library comes with a number of example sketches. See File > Examples > PubSubClient within the Arduino application.Full API Documentation.
Compatible Hardware
The library uses the Arduino Ethernet Client api for interacting with the underlying network hardware. This means it Just Works with a growing number of boards and shields, including:
Arduino Ethernet
Arduino Ethernet Shield
Arduino YUN – use the included YunClient in place of EthernetClient, and be sure to do a Bridge.begin() first
Arduino WiFi Shield - if you want to send packets greater than 90 bytes with this shield, enable the MQTT_MAX_TRANSFER_SIZE () option in PubSubClient.h.
Sparkfun WiFly Shield – when used with this library
Intel Galileo/Edison
ESP8266
ESP32The library cannot currently be used with hardware based on the ENC28J60 chip – such as the Nanode or the Nuelectronics Ethernet Shield. For those, there is an alternative library available.
Wire Library
The Wire library allows you to communicate with I2C devices, often also called "2 wire" or "TWI" (Two Wire Interface), can download from Wire.h
Basic Usage
Wire.begin()Begin using Wire in master mode, where you will initiate and control data transfers. This is the most common use when interfacing with most I2C peripheral chips.
Wire.begin(address)Begin using Wire in slave mode, where you will respond at "address" when other I2C masters chips initiate communication.
Transmitting
Wire.beginTransmission(address)Start a new transmission to a device at "address". Master mode is used.
Wire.write(data)Send data. In master mode, beginTransmission must be called first.
Wire.endTransmission()In master mode, this ends the transmission and causes all buffered data to be sent.
Receiving
Wire.requestFrom(address, count)Read "count" bytes from a device at "address". Master mode is used.
Wire.available()Returns the number of bytes available by calling receive.
Wire.read()Receive 1 byte.
Steps to send data to Labview vibration and temperature platform using IoT long-range wireless vibration, temperature sensor and long-range wireless mesh modem with USB interface:
First, we need a Labview utility application which is ncd.io Wireless Vibration and Temperature Sensor.exe file on which data can be viewed.
This Labview software will work with ncd.io wireless Vibration Temperature sensor only
To use this UI, you will need to install following drivers Install run time engine from here 64bit
32 bit
Install NI Visa Driver
Install LabVIEW Run-Time Engine and NI-Serial Runtime
Getting started guide for this product.
Uploading the code to ESP32 using Arduino IDE:
Download and include the PubSubClient Library and Wire.h Library.
You must assign your unique Ubidots TOKEN, MQTTCLIENTNAME, SSID (WiFi Name) and Password of the available network.
Compile and upload the Ncd__vibration_and_temperature.ino code.
To verify the connectivity of the device and the data sent, open the serial monitor. If no response is seen, try unplugging your ESP32 and then plugging it again. Make sure the baud rate of the Serial monitor is set to the same one specified in your code 115200.
Serial Monitor Output:

Data on serial monitor of Arduino IDE.
Making the Ubidot Work:
Create the account on Ubidot.
Go to my profile and note down the token key which is a unique key for every account and paste it to your ESP32 code before uploading.
Add a new device to your Ubidot dashboard name ESP32.


Now you should see the published data in your Ubidots account, inside the device called "ESP32".
Inside the device create a new variable name sensor in which your temperature reading will be shown.


Now you are able to view the Temperature and other sensors data which was previously viewed in the serial monitor. This happened because the value of different sensor readings is passed as a string and store in a variable and publish to a variable inside device esp32.
Create a dashboard in ubidots.

Go to data select dashboard and inside dashboard create different widgets and add a new widget to your dashboard screen.
OUTPUT
Now as the temperature/vibration increases and decreases new data available inside the various variable.

Creating Events in Ubidots

1) Select Events (from the Data dropdown).

2) To create a new event, click the yellow plus icon in the upper right corner of the screen.
Types of Events: Ubidots support already integrated events to allow you to send Events, Alerts, and Notifications to those who need to know when they need to know. Ubidots' prebuilt integrations include:
Email notifications
SMS notifications
Webhook events - learn more
Telegram notifications
Slack notifications - learn more
Voice Call notifications - learn more
Back to Normal notification - learn more
Geofence notifications - learn more
3) Then choose a device and associating variable that indicates the devices' "values".

4) Now select a threshold value for your event to trigger and compare it to device values and also select time to trigger your event.
5) Establish and configure which actions are to be executed and the message to the receiver: Send SMS, Email, Webhooks, Telegrams, Phone Calls, SLACK, and webhooks to those who need to know.

6) Configure the Event notice.

7) Determine the activity window the events may/may not be executed.

8) Confirm your Events.
The output of Event in Your Mail:

Export Your Ubidots Data to Google Sheets:
In this, we can extract the data stored in the Ubidots cloud for further analysis. The possibilities are enormous; for instance, you could create an automatic report generator and send them to your customers every week.
Another application would be device provisioning; if you have thousands of devices to deploy, and their information is in a Google Sheet, you could create a script to read the sheet and create a Ubidots data source for every line on the file. Steps to do this-
Create a Google Sheet and add two sheets to it with these names:
Variables
Values
From your Google Sheet, click on "Tools" then "Script Editor...", then "Blank Project".
Open the Script Editor.

Add the code below (in the code section) to the script Script.
Done! now open your Google Sheet again and you'll see a new menu to trigger the functions.

Result:

1 note
·
View note
Text
Halfway through
Our first week and a half of class flew by, and we're officially halfway through our program! I haven't mentioned a single word about our curriculum, so I'll get right on that.
For this particular program, INNOV@INSA, we have two different "tracks" -- one that focuses on project management, and another that focuses on building IoT devices (read as: arduinos with a bunch of sensors and bluetooth communication devices slapped onto it.) I was really torn between the two tracks, but I eventually chose the IoT one.
We've mostly had our IoT class every morning from 9am-12pm, which has usually been just a lecture. In the 8 days of class we've had so far, we've had 7 different professors, which has made for an interesting classroom experience. Some of the lectures we've had so far have resembled the entirety of 370 squished into a 3-hour lecture--we blazed through all of the components of a CPU, calculated the power consumption of a given sensor in various states of activity, and we've learned about different properties of networks and network signals.

We were recently given an Arduino Uno to toy around with, and we were encouraged to travel around campus and Lyon to collect data with the various sensors that were soldered onto it.

A couple of our lectures have been in this room, which is already decked out in a bunch of sensors, but I don't think we're allowed to use any of this data for our own project :(
...
In addition to our technical class, we're all enrolled in a French language class, a cross-cultural awareness class, and then a class that focuses on the industry and society in and around Lyon.
I've really enjoyed our French class so far, I was initially worried as it is our only class taught in French (which makes sense, as the best way to really learn a language is to hear and speak it), but our professor has taken a very creative approach to some of our lessons. Some of us were more novice speakers while one student has French-speaking family members and is almost fluent. During our first class, our professor roughly gauged our vocabulary by asking us to pretend we were parents trying to pacify our imaginary toddler's never-ending curiosity.
So a dialogue would go like:
"Hey papa, why are bridges suspended over rivers?' "To let boats pass underneath them." "Hey mama, why do old people lose their hair?" "Because being bald is fashionable"
and so on and so forth.
...
Our cross-cultural class also had a really interesting first day, the professor presented a generic stock photo that I'm having a lot of trouble finding, so imagine this:
A person is sitting in what looks like a chair with an attached desk inside a room with other similar types of chairs. No one else is in the frame, and on the desk are a pile of papers, a pair of eyeglasses, and the person's gaze is directed downward, presumably at a phone in their hands.
Our professor asked us to describe the scene. Some students stated more objective facts ("she is sitting in a chair", "she's looking at her phone", "she's inside a building", etc.) while others stated more subjective interpretations ("she's not paying attention to class", "she's cheating on her homework assignment", etc.) It was an interesting conversation that highlighted how easily people can infer intent behind behavior, some of us have mentioned that French people have come off as rude because they stand "too close" (a relatively subjective term) or they don't say "excuse me" when squeezing by (also a more subjective and/or culturally-influenced behavior).
...
I'm excited to see what the rest of the program has in store, but we're just beginning a 4-day weekend and school is, for now, the last thing on my mind.
a+, Christina Computer Science Entrepreneurship with INNOV@INSA Lyon, France
...
P.S. For those who have done a little bit of coding, and are familiar with the increment operator (e.g. “++”), there have been a couple French programmers who took it upon themselves to try and write the expression “a++” (e.g. incrementing a variable named “a”) in the most ridiculous ways possible. The site is read from bottom to top, and it starts off relatively tame, with “a++”, “a += 1”, and “a = a + 1”, but then quickly devolves into code that looks like an ASCII camel.

1 note
·
View note
Text
Gardening as Nature Intended, with an Arduino
We’re not exactly what you’d call naturalists here at Hackaday, so to us, the idea that hot pepper seeds need to germinate in hot conditions sounds suspiciously like a joke. The sort of thing somebody might tell you right before they try to sell you an elevator pass, or cram you into a locker. But we don’t think [Dean] would have gone through so much trouble if it wasn’t true. You’re still not going to sell us an elevator pass, though. Not again.
According to [Dean], the Carolina Reaper pepper seeds he bought from Puckerbutt Pepper Company (truly a name you can trust) recommend that they be germinated at a temperature between 80 and 85 degrees Fahrenheit for up to eight weeks. To make sure they were maintained at the optimal temperature for as long as possible, he decided to get a heating pad he could place under the seeds to keep them warm. He just needed some way to make sure the heat only kicked on once the soil temperature fell out of the sweet spot.
To get an accurate reading, [Dean] ended up going with a waterproof K-type thermocouple connected to a SainSmart MAX6675 module that could be buried amongst the seeds. When the soil temperature drops below 82.5 F, it kicks on the heating mat through an IoT Relay by Digital Loggers. He even added in a capacitive soil moisture sensor and a couple of LEDs so he could tell from across the room if he needed to water what he loving refers to as his “Hell Berries”
Looking back through the archives, we see a considerable overlap between hacking and gardening. Since success demands the careful control and monitoring of a myriad of variables, it seems the sort of thing that’s ripe for gloriously over-engineered automation. Especially if you’re trying to get the things to sprout off-world.
Gardening as Nature Intended, with an Arduino was originally published on PlanetArduino
1 note
·
View note
Text
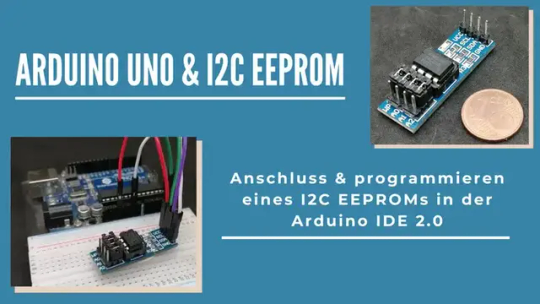
Arduino UNO - I2C EEPROM beschreiben & lesen

In diesem Beitrag möchte ich dir zeigen, wie du einen EEPROM Baustein per I2C Schnittstelle am Arduino UNO beschreiben und lesen kannst.
Der hier verwendete EEPROM Baustein hat eine Speicherkapazität von 256K, dieses ist für die meisten Daten am Arduino ausreichend. Wenn du mehr Daten speichern möchtest, dann empfehle ich dir eine SD-Karte mit entsprechendem Modul.


Benötigte Ressourcen für den Anschluss des EEPROM an den Arduino UNO
In den nachfolgenden Abschnitten möchte ich dir zeigen wie du den EEPROM anschließt und programmierst, dafür benötigst du: - einen Arduino UNO, - ein USB-Datenkabel, - ein EEPROM mit I2C Schnittstelle, - vier Breadboardkabel, männlich-weiblich, 10 cm

Technische Daten des EEPROM mit 256 K
Es gibt die EEPROMs in diversen Ausführungen, allgemein unterscheiden sich diese jedoch in der Speicherkapazität. Wie erwähnt verwende ich ein Modul mit 256 K Speicher. Varianten24C16 - 16 K 24C64 - 64 K 24C128 - 128 K 24C256 - 256 KBetriebsspannung2.7 V bis 5.5 VSchnittstelleI2C Auswahl der Adresse per Jumpermaximale Schreib-/Lese Zyklenüber 1 Million malDatensicherheitspeichern der Daten bis zu 40 Jahre
Aufbau des I2C EEPROM Moduls
Kommen wir zunächst zum Aufbau des EEPROM Moduls.
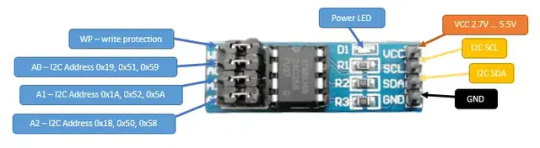
Mit den Jumpern A0 bis A2 können wir verschiedene I2C Adressen setzen und somit entweder mehrere dieser Module einsetzen oder bei Adressenkonflikt diesen lösen. A0 I2C device found at address 0x19 ! I2C device found at address 0x51 ! I2C device found at address 0x59 ! A1 I2C device found at address 0x1A ! I2C device found at address 0x52 ! I2C device found at address 0x5A ! A2 & ohne Jumper I2C device found at address 0x18 ! I2C device found at address 0x50 ! I2C device found at address 0x58 ! Die I2C Adressen habe ich mit dem I2C Scanner von Arduino Playground ermittelt. Die Adressen wechselst du, indem du EINEN der Jumper auf die vordere Position setzt. In dem Bild ist der Jumper A0 aktiv und können die I2C Adressen 0x19, 0x51 & 0x59 verwendet werden.

256K EEPROM Jumper A0 aktiv
Anschluss des EEPROM an den Arduino
Durch die I2C Schnittstelle ist zumindest der Anschluss sehr einfach. Du findest am Arduino die I2C Schnittstelle an den Pins analog A4 = SDA & analog A5 = SCL.

Arduino UNO SCL & SDA Pins Die Schaltung ist dann wirklich recht einfach, denn wir müssen lediglich die nachfolgenden Pins verbinden: I2C EEPROMArduino UNOVCC3.3VGNDGNDSDAanalog A4SCLanalog A5 -
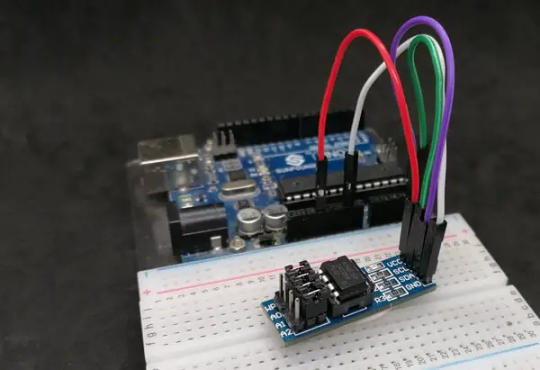
Arduino UNO mit I2C 256K EEPROM
Programmieren des EEPROMs in der Arduino IDE 2.0
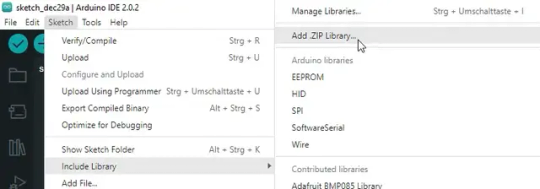
Auf der offiziellen Seite von Arduino.cc findest du ein Beispiel, wo du lediglich deine I2C Adresse anpassen musst. Ich habe dieses einmal genommen und zu einer kleinen Bibliothek umgeschrieben / exportiert. Der Code wurde von mir nicht wesentlich verändert. Ich habe lediglich die Funktionen so aufbereitet, dass diese über eine Klasse geladen werden. Du kannst dir diese von meinem GitHub Repository StefanDraeger/AT24C256EEPROM_lib als ZIP-Datei herunterladen. Diese ZIP-Datei kannst du dann über Sketch > Include Library > Add ZIP. Library... in deine IDE integrieren.
Beispiel - schreiben & lesen von Daten eines EEPROMs Das nachfolgende Beispiel findest du ebenfalls in der Bibliothek. #include #include //create object of type AT24C //with I2C Address 0x51 AT24C at24c256 = AT24C(0x51); void setup() { //content to write char data = "Hello World!"; //begin OneWire communication Wire.begin(); //begin serial communication Serial.begin(9600); //write content from field data to eeprom at24c256.write_page(0, (byte *)data, sizeof(data)); //tiny break for 100 ms. delay(100); //write message to serial interface Serial.println("Write data successfull."); } void loop() { //start with address 0 int addr = 0; //read the first byte byte b = at24c256.read_byte(0); //as long as the value in the variable b //is not equal to 0 makes.. while (b != 0) { //print character to serial interface Serial.print((char)b); //increment address addr++; //read content from new address b = at24c256.read_byte(addr); } //send linebreak to serial interface Serial.println(" "); //tiny break for 2 seconds delay(2000); } Wenn man das Beispiel auf den Arduino überspielt hat, wird nachfolgende Ausgabe erzeugt.

Wir können nun die nachfolgenden Zeilen aus dem Beispiel entfernen oder auskommentieren und erneut das Beispiel hochladen, um zu verifizieren, dass wirklich die Daten aus dem EEPROM geladen werden.
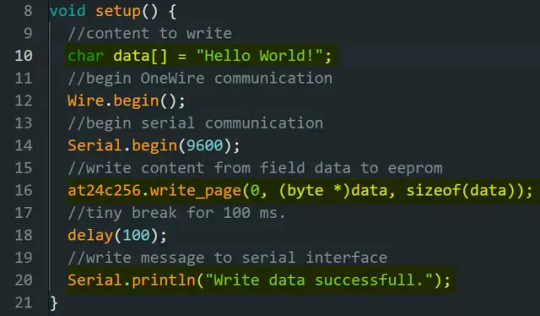
Zeilen entfernen/auskommentieren zum verifizieren Read the full article
0 notes
Text
In Arduino programming, arrays are used to store sets of data efficiently. An array is a collection of variables of the same type, referenced by a common name and an index or position number. For instance, an array of integers might be used to store sensor readings, and an array of characters could represent a string. Arrays simplify code by allowing the programmer to access and manipulate multiple values using a single variable name. Checkout this blog to learn more about arrays.
0 notes