#arduino vs raspberry pi for beginners
Explore tagged Tumblr posts
Visit Tumblr Blog
Explore Tumblr blogs with no restrictions, modern design and the best experience.
Last Seen Tumblr Blogs


Fun Fact
Women make up for the other 50% of Tumblr’s audience.
Text
What STEAM lab solutions are most effective for elementary vs. high School?
https://makersmuse.in/wp-content/uploads/2024/11/DSC_0866.NEF_-scaled.jpg
In a rapidly evolving world, the importance of STEAM (Science, Technology, Engineering, Arts, and Mathematics) education is undeniable. But when it comes to setting up a STEAM lab, one size doesn’t fit all elementary and high school students have different needs and learning styles. Let’s dive into the most effective STEAM lab solutions for both levels to maximize student engagement and success.
STEAM Lab Solutions for Elementary School
At the elementary level, children are naturally curious and eager to explore. The focus here should be on cultivating this curiosity through play and hands-on activities. Here are some effective solutions:
1. Interactive Learning Stations
Why It Works: Young students thrive in environments that offer variety and allow them to explore at their own pace. Setting up stations with different themes like robotics, simple circuits, or basic chemistry experiments keeps learning fun and engaging.
Example: A station where students can build simple machines using LEGO kits helps them understand basic engineering concepts through play.explore now
2. Art Integration with Science Kits
Why It Works: At this age, combining art with science makes learning more tangible. Kids can create art projects using concepts from science, like building models of volcanoes or creating chemical reactions with baking soda and vinegar.
Example: STEAM kits that include both artistic and scientific components, such as creating solar system models with clay and learning about planets, can be highly engaging.
3. Coding for Beginners
Why It Works: Introducing kids to coding through visual, block-based programming languages like Scratch helps develop logical thinking and problem-solving skills.
Example: Students can create their own animated stories or games using Scratch, which is an accessible way to introduce programming concepts.
STEAM Lab Solutions for High School
High school students require more advanced and in-depth STEAM activities to prepare them for potential future careers in tech, engineering, and science. Here’s what works best for this age group:
1. Advanced Robotics and Engineering Projects
Why It Works: High school students are ready to tackle complex projects that challenge their critical thinking and technical skills. Robotics clubs or competitions offer great opportunities for students to collaborate and solve real-world problems.
Example: Building robots using Arduino or Raspberry Pi kits can help students learn about programming, electronics, and mechanical engineering.
2. 3D Printing and Digital Fabrication
Why It Works: 3D printing and digital fabrication allow students to bring their ideas to life, offering a hands-on approach to design and prototyping. It fosters creativity and helps students understand the engineering design process.
Example: Students can design and print custom objects, such as phone holders or mechanical parts, applying concepts from geometry and physics.learn now
3. Data Science and Artificial Intelligence
Why It Works: With the increasing importance of data in every industry, introducing data science and AI at the high school level can give students a head start. Working with data sets or building simple AI models can spark interest in computer science and analytics.
Example: High schoolers can analyze datasets using Python or R to learn about trends and make predictions, or even experiment with creating basic chatbots.
Tailoring STEAM Labs to Student Needs
While elementary students benefit from exploratory and creative activities, high schoolers thrive on challenges that allow them to apply advanced skills. Understanding these differences helps educators design effective STEAM labs that cater to the developmental stages of their students.
For elementary students, a successful STEAM lab focuses on play-based, interactive learning with an emphasis on exploration and creativity. Simple, visual tools and kits are effective in engaging young minds.
For high school students, a more structured, project-based approach works well. Providing access to advanced tools like 3D printers, robotics kits, and coding platforms allows them to engage deeply with the material, preparing them for future academic and career opportunities.
Ready to set up a dynamic STEAM lab for your school!
Whether you’re aiming to inspire young learners or challenge high school students, finding the right solutions is key. Start exploring our range of STEAM kits and resources today to transform your classroom into a hub of creativity and innovation!
This blog outlines tailored approaches for setting up STEAM labs based on the educational level, ensuring both elementary and high school students can benefit from an enriched learning experience.
0 notes
Text
Raspberry Pi for Beginners (Mac+PC)
Raspberry Pi for Beginners (Mac+PC)
WoW, I wasn’t expecting that. I just wanted to buy a Respberry Pi for my living room. But now I know what this little computer can do and I will probably get another one as a workplace – replacement. https://vimeo.com/335365626 Watch 4 of 25 lessons for free now! VIDEO #1 What can I do with a Raspberry Pi after the first start? See the true potential. VIDEO #2 Software Projects –…

View On WordPress
#arduino vs raspberry pi for beginners#arduino vs raspberry pi for robotics#getting started with raspberry pi#iot tutorial for beginners#raspberry#raspberry pi#raspberry pi (computer)#raspberry pi 3#raspberry pi 4#raspberry pi 4 projects#raspberry pi 4 setup#raspberry pi 4 tutorial for beginners#raspberry pi for beginners#raspberry pi projects#raspberry pi projects for beginners#raspberry pi tutorial#raspberry pi tutorial for beginners
0 notes
Text
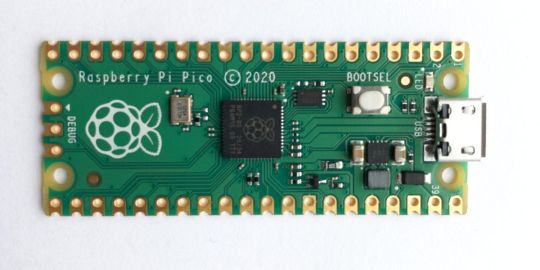
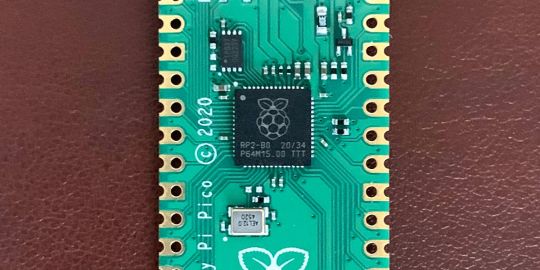
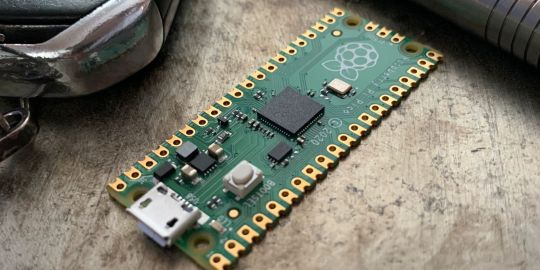
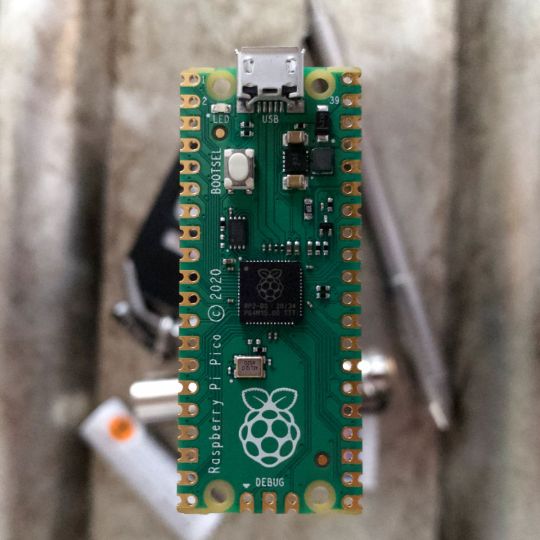
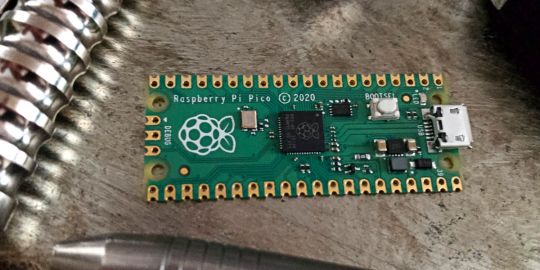
A Peek at the Pico, Raspberry Pi's Newest Petite Powerhouse
Raspberry Pi Pico
8.80 / 10
Read Reviews
Read More Reviews
Read More Reviews
Read More Reviews
Read More Reviews
Read More Reviews


Shop Now
Meet the new Raspberry Pi Pico; a tiny microcontroller filled with big possibilities.
Specifications
Brand: Raspberry Pi
CPU: Dual-core 133Mhz ARM
Memory: 264Kb
Ports: microUSB
Pros
Powerful ARM Processor
Micro-USB Connectivity
Breadboard Mountable
Easy-To-Use Interface
Absolutely Adorable
Inexpensive
Cons
No Wi-Fi or Bluetooth connectivity
No Header Pins
I/O Port Labelling on One Side Only
No USB-C Connectivity
Buy This Product
Raspberry Pi Pico other
Shop
// Bottom var galleryThumbs1 = new Swiper('.gallery-thumbs-1', { spaceBetween: 10, slidesPerView: 10, freeMode: true, watchSlidesVisibility: true, watchSlidesProgress: true, centerInsufficientSlides: true, allowTouchMove: false, preventClicks: false, breakpoints: { 1024: { slidesPerView: 6, } }, }); // Top var galleryTop1 = new Swiper('.gallery-top-1', { spaceBetween: 10, allowTouchMove: false, loop: true, preventClicks: false, breakpoints: { 1024: { allowTouchMove: true, } }, navigation: { nextEl: '.swiper-button-next', prevEl: '.swiper-button-prev', }, thumbs: { swiper: galleryThumbs1 } });
We’ve managed to get our hands on the coveted Raspberry Pi Pico. Today, we’re going to be looking at some of the most important features and putting it toe-to-toe with some of the biggest names in small electronics.
We’ll be showing you what the Pico can do, and we’ll get you started with MicroPython, one of Pico’s supported programming languages. We’ll even offer up some code to try in case you decide to buy a Pico of your own.
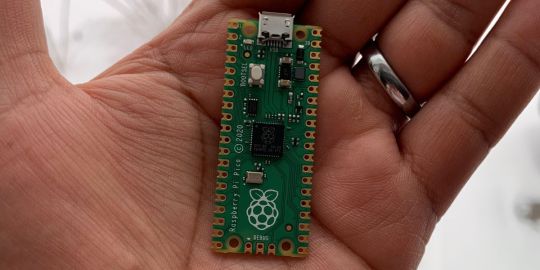
What Is a Raspberry Pi Pico?
Raspberry Pi Pico is a new budget microcontroller designed by Raspberry Pi. It’s a tiny computer built around a single chip, with onboard memory, and programmable in/out ports. Historically, microcontrollers are used in a variety of devices from medical implants to power tools. If you have an electronic device sitting in your vicinity, there’s a good chance that there’s a microcontroller inside of it.
Key Features of the Pico

The Pico is built around the RP2040 microcontroller chip, which was designed by Raspberry Pi UK. It’s a Dual-Core ARM processor with a flexible clock that can run up to 133 MHz. The Pico also supports 1.8-5.5 DC input voltage, has a micro-USB input port, and an onboard temperature sensor.
Flanking the chip on all sides are a series of castellations that allow easy soldering to a Veroboard or breadboard. This dual in-line package (DIP) style form factor is stackable, and can also be used in carrier board applications.
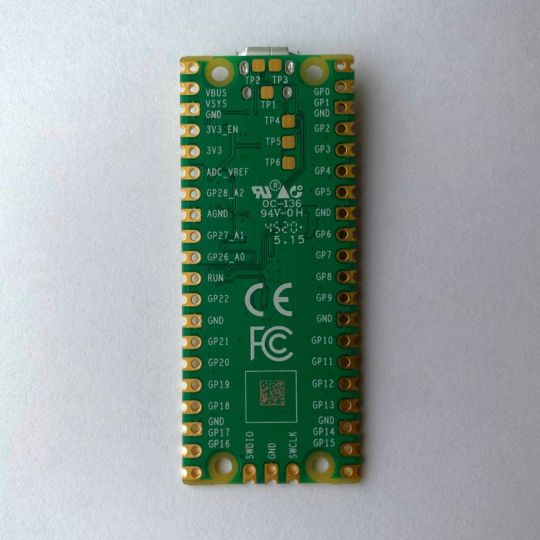
Technical Specifications
21 mm x 51 mm
264kb on-chip RAM
2 MB on-board QSPI flash
2 UART
26 GPIO
2 SPI controllers
2 ISC controllers
16 PWM channels
Accelerated integer and floating-point libraries
3-pin ARM Serial Wire Debug (SWD) port
What’s So Special About the Pi Pico?
The Pi Pico is a different kind of microcontroller. It’s Raspberry Pi’s first, and it features ARM technology in its RP2040 silicon chip. Many technology companies are embracing silicon ARM chips, with major manufacturers like Apple leading the charge.
The punchy little Pico packs a staggering 26 multifunction general purpose input/output (GPIO) ports, including 3 that are analog. Alongside these ports are 8 programmable input/output (PIO) ports. Compare this to other microcontrollers like the Arduino Nano, and the Pico packs roughly 18% more GPIO capability.
The most considerable difference between the Pico and its competitors, however, is the $4 price tag. Low cost is the main selling point of this unique offering.
At launch, many online retailers sold out of the device due to the interest and Raspberry Pi’s favorable reputation. By setting the price so low, the Pico opens the door for a new class of high-powered, budget microcontrollers.
There are many potential applications for the new Pico. With its onboard temperature sensor, the device is an obvious choice for IoT projects.
One talented retro gaming enthusiast even used a Pico to build a gaming console with full VGA video support.
youtube
This means that makers who have been curious about Raspberry Pi, or microcontrollers in general, now have the ability to experiment for less than the price of a fancy cup of coffee.
Related: The Raspberry Pi Comes of Age With the Pi 400 Desktop
The Raspberry Pi Pico Processor
The RP2040 ARM chip is an interesting choice for the Pico. At 133MHz, the chip is capable of leaving more expensive boards, like the Arduino Uno, in the dust.
Using ARM processors seems to be an emerging trend in the world of microcontrollers. In addition to Raspberry Pi, both Sparkfun and Adafruit also offer boards with similar ARM technology.
The industry-wide switch was made for a single reason—speed. ARM processors give a considerable boost over standard Atmel chips. In a board this size, using an ARM processor is like dropping a fully kitted Porsche engine into a Volkswagen. On the other hand, many microcontrollers don’t require that much processing speed. Yet.
Ramping up performance means that makers who want to push the limits of the Pico will have an abundance of power to do so.
The I/O Ports
The GPIO ports on the Pi Pico feature several interesting functions for common uses such as operating a screen, running lighting, or incorporating servos/relays. Some functions of the GPIO are available on all ports, and some only work for specific uses. GPIO 25, for example, controls the Pico’s onboard LED, and GPIO 23 controls the onboard SMPS Power Save feature.
The Pico also has both VSYS (1.8V — 5.5V) and VBUS (5V when connected to USB) ports, which are designed to deliver current to the RP2040 and its GPIO. This means that powering the Pico can be done with or without the use of the onboard micro-USB.
A full list of the I/O ports is available on Raspberry Pi’s website in its complete Pico documentation.
Pico vs. Arduino vs. Others
One question on the minds of many makers is whether or not the Raspberry Pi Pico is better than Arduino?
That depends. Pound-for-pound, higher-end Arduino boards like the Portenta H7 make the Pico look like a toy. However, the steep cost for a board of that caliber might be a tough pill for the microcontroller hobbyist to swallow. That's why the smaller price tag on the Pico makes it a win for makers who enjoy low-risk experimentation.
Along with minimal cost, the Raspberry Pi jams an extensive feature set into the Pico, comparable to boards like the Teensy LC, and the ESP32. But neither of these competitors manage to challenge the budget-friendly Pico on price.
That's what makes the Pico such a fantastic value, and a great choice for hobbyists and power users alike.
The Pi Pico: What’s Not To Love?
Unfortunately, to drive the price of the Pico down, Raspberry Pi had to make a few compromises. The most notable of which is the lack of an onboard radio module. Neither Bluetooth nor Wi-Fi is supported without add-ons.
The Wi-Fi limitation can be eliminated by adding a module like the ESP-01. Bluetooth support may prove a bit more challenging. If you need an all-in-one solution for your products, you’re better off skipping the Pico, and spending a little extra for something like the Pi Zero W, or ESP32.
Additionally, many early adopters are complaining about the lack of GPIO labeling on the top of the board. Raspberry Pi provides an extensive amount of documentation on its website to address this, but pointing-and-clicking, or thumbing through paperwork when you have a hot soldering iron in your hands isn’t often desirable.
Lastly, the lack of I/O pin headers is something of an issue for some, as it means less convenience when swapping I/O components. This minor annoyance can be solved via the use of leads, soldering the component wiring directly to the Pico, or using a breadboard.
If you’ve been using microcontrollers or small electronics for any period of time, then an unpopulated board is most likely a non-issue. Of course, you could also add your own pin headers if you plan on regular experimentation with different external components.
The final rub with the Pico is the micro-USB port. With many other microcontrollers like the Portenta H7 moving toward USB-C, Raspberry Pi's micro-USB port seems dated.
Logically however, the decision to use micro-USB makes sense. It was done by Raspberry Pi to keep costs as low as possible, and to keep interface capability almost universal. Everyone we know has at least a few micro-USB cables tucked away somewhere in their homes.
However, with future versions, a USB-C interface would be a nice addition to an already spectacular package.
Related: A Beginners Guide To Breadboarding With Raspberry Pi
Programming the Raspberry Pi Pico
Interfacing with the Pi Pico can be done via C/C++, or via MicroPython in the Read-Eval-Print-Loop or REPL (pronounced “Reh-pul”). The REPL is essentially a command line interface that runs line-by-line code in a loop.
In order to access the REPL, you’ll need to install MicroPython onto the Pico. This process is simple and only involves four steps.
Installing MicroPython
Download MicroPython for Raspberry Pi Pico from the Raspberry Pi Website
Connect the Pico to your computer via micro-USB while holding the BOOTSEL button
Wait for the Pico to appear as an external drive
Copy the MicroPython file to the Pi Pico, and it will automatically reboot
You can access the REPL in a number of ways. We used the screen command in a macOS terminal window to access the serial bus connected to the Pico. To accomplish this with Terminal, you’ll first open a new terminal window, then type ls /dev/tty*
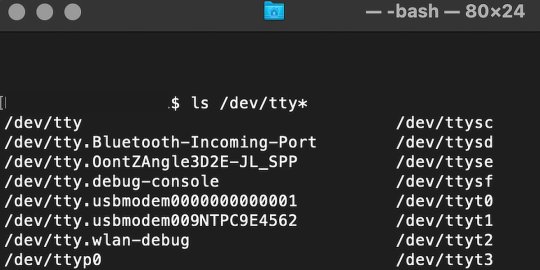
From there, find the port where the Pico is connected. It should be labeled something like /dev/tty.usbmodem0000000000001. Then run the command:
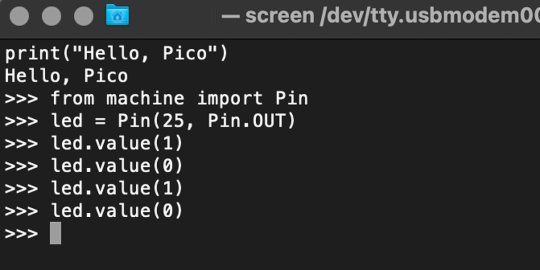
screen /dev/tty.usbmodem0000000000001
Your cursor should change. Hit Return and the cursor will change again to >>>.
In the image below we've included the classic Hello World (Hello, Pico) command-line program in the REPL, along with a few lines of code that will turn the Pico's LED on and off. Feel free to try them yourself.
For more information, we recommend you invest in the official starter guide to MicroPython that Raspberry Pi has published on their website.
Download: MicroPython for Raspberry Pi Pico (free)
Using the Raspberry Pi Pico With Thonny
If you’re looking for a more proper coding environment, the Raspberry Pi Pico will also allow access to the REPL with Thonny. To enable this feature, first download and install Thonny. Once installed, connect your Pi Pico. Open Thonny and you'll see information indicating your Pico is connected in the Shell.
At the bottom right of the screen, you should see a version of Python. Click this version and select MicroPython (Raspberry Pi Pico) from the drop-down menu.
Now you can type commands into the Shell, or you can use Thonny’s editor to write or import multiple lines of code.
The abundance of interface possibilities make the Raspberry Pi Pico easy to program. For those who are familiar with MicroPython, this should be nothing new. For beginners, however, Thonny provides a powerful interface and debugger to get started with programming.
Download: Thonny (Free) Windows | Mac
Should I Buy the Raspberry Pi Pico?
The Raspberry Pi Pico is a powerful budget board that is perfect for hobbyists, or makers just starting out with microcontrollers. The documentation, low cost, and wide range of possibilities for the Pico also make it a great choice for seasoned small electronics wizards. If you’re a DIYer who loves to tinker, or you just want to challenge yourself to a weekend project, then you’ll love playing with the Pico.
On the other hand, if you don't have one or more projects in mind that need a microcontroller, then this board is probably not for you. Also, if your project needs Wi-Fi connectivity or Bluetooth, then the Pico won’t scratch that itch. And finally, for users who aren’t comfortable learning MicroPython, or exploring C/C++, the Pico isn't ideal. And remember: this Raspberry Pi is not like the others. It will not run a full Linux operating system.
But, if you dream in Python, or if you love the smell of solder, then you won't regret grabbing this tiny powerhouse. Most of all, if the sight of the sports-car-sleek RP2040 gets your creative gears turning, then we think you’ll really benefit from picking up the Pico.
Serving up Several Sweet Possibilities
While it isn’t perfect, the Raspberry Pi Pico is a strong entry into the world of microcontrollers. The reputation that Raspberry Pi has built for quality electronic components at a relatively low price extends to the Pico.
It’s everything a Raspberry Pi should be: small, sweet, and superb. It’s beautifully designed, and extremely inexpensive. But the best part isn’t the looks or the low cost.
The best part about this small wonder is picking it up, and holding it in your hands. It's feeling the tug of electronic inspiration. It's realizing just how powerful the Pico is, and what it means for microcontrollers going forward.
And truthfully, we think it's amazing that something as small as the Pico can offer so many unique possibilities.
A Peek at the Pico, Raspberry Pi's Newest Petite Powerhouse published first on http://droneseco.tumblr.com/
0 notes
Text
How to Transfer Data From One USB Hard Drive to Another USB
youtube
How to Transfer Data From One USB Hard Drive to Another USB |USB to USB data transfer cable (Unboxing + Review) | Transfer Files From USB Flash To Any Smartphone Without PC, ****************************************************************** If You Want To Purchase the Full Project or Software Code Mail Us: [email protected] Title Name Along With You-Tube Video Link Project Changes also Made according to Student Requirements http://svsembedded.com/ è https://www.svskits.in/ M1: +91 9491535690 è M2: +91 7842358459 ****************************************************************** 1. PEN DRIVE TO PEN DRIVE DATA TRANSFER USING RASPBERRY PI, 2. USB TO USB Data Transfer using Raspberry Pi, 3. Pendrive to pendrive data transfer without pc, 4. How to Transfer Data From One USB Hard Drive to Another, 5. How to Replace the Redmi Note 3/Redmi Note 3 Pro Screen, 6. USB TO USB Data Transfer using Raspberry Pi, 7. Micro USB Hub - Simultaneous Charging & OTG - works only on some Windows/Android devices, 8. DIY Very Easy and Simple to Make diy USB Speaker | Powerful Ultra Amplifier Circuit, 9. Portable Raspberry Pi 3 Project - Raspberry Pi Portable Computer, 10. Pen Drive Life Hack - How to Turn Usb Pendrive into OTG Pendrive, 11. USB to USB data transfer cable (Unboxing + Review), 12. Easy Transfer 3 in 1 OTG USB Flash Drive for Android, iPhone & Computer, 13. Water Cooled Raspberry Pi 3, 14. How to Replace the Xiaomi Mi Max Screen, 15. Creating rawprogram.xml and patch for flashing LG Qualacomm mobiles, 16. Transfer Files From USB Flash To Any Smartphone Without PC, 17. Arduino based women safety security system using gsm and gps modem, 18. Raspberry Pi Mount a USB Drive, 19. Mobile to Pen Drive Data Transfer in 5 Seconds, 20. Simple Basic audio Amplifier Circuit using 1 MOSFET Transistor, 21. How to Copy Data from Laptop to Pen drive, Computer to Pen Drive to Laptop, Computer, 22. Smart Garbage Collecting Truck Using Arduino, GSM, GPS and Internet of Things (IOT), 23. How to Assemble or Build a Computer - easy way, 24. program arduino with android smartphone, 25. Android Phone to Pen Drive Directly Transfer Images, Video, Music & All Date, 26. How to transfer files to Pendrive using OTG cable in Moto G4 Plus December 2020, 27. RJ45 Crimping Tutorial - Straight Cable Crimping - Network Cable Color Code, 28. HOW TO SEND FILES COMPUTER TO PENDRIVE, 29. How to Copy or Transfer Data from a USB Flash Drive to a Computer, 30. How to use a pen drive with android to transfer DSLR pics without a computer, 31. WiFi Home Door Lock| Blynk | iot project, 32. Don't buy a GSM module, use your old phone, 33. Computer Basics: Hardware, 34. Basic concept of Arduino in Hindi | Arduino tutorials for beginners part, 35. Control Your Room Lights With Your Mobile | Make Your Home "Smart" | Arduino Uno FULL Setup, 36. Raspberry Pi Reading Car Diagnostics – Data, 37. Hand Gesture Controlled Robot using Arduino | How to Make a Gesture Control Robot, 38. Top 10 IoT(Internet Of Things) Projects Of All Time | 2020, 39. What is Arduino? Arduino Projects? Arduino Vs Raspberry Pi3, 40. DHCP Explained - Dynamic Host Configuration Protocol, 41. Network Troubleshooting using PING, TRACERT, IPCONFIG, NSLOOKUP COMMANDS, 42. How to Format a Drive using Command Prompt, 43. How to configure a Shared Network Printer in Windows, 44. Four Distributed Systems Architectural Patterns by Tim Berglund, 45. LET`S BUILD - my first Raspberry Pi SMART MIRROR, 46. Arduino RFID Sensor (MFRC522) Tutorial, 47. Android Studio For Beginners Part
1 note
·
View note
Link
Frequently asked questions of programming.
• Should I learn Python or JavaScript? • Data Science vs Web Development vs App Development, which one should I choose? • Why should I learn Web Development when there are popular Web Developing tools like Wix & WordPress? • All these points made me confused 😕 about what should I do?
So before starting with the questions Here's something about who I am and What makes me qualified to answer such questions? I'm a gradiot (an idiot who did his graduation and who has wasted money and time getting zero skills from college while there's an actual opportunity to learn everything online for free). Yes, I am a CS graduate. I have a great desire to make things, you might know the feeling of IT'S ALIVE if you have developed anything. During my college years I came across multiple technologies from Arduino to Raspberry pi, from PHP to JavaScript, Python, flutter you name it. I tried to learn and understand various technologies not due to college curriculum, but due to my desire to learn more and google 😎. Throughout my journey I encountered many questions and here are some of the questions I think will help you guys. Hope You'll like it.
Should I learn Python or JavaScript?
Before I start with why Python🐍 or JavaScript⚡. Let's talk about programming in general. Programming is a way of thinking and implementing the logic you create in a language that machines understand. Now there are styles or you can say structures of programming aka programming paradigms like Object-oriented programming (OOPs), Functional programming, procedural programming, etc. As a developer, you should at least know one of these paradigms. The more paradigms you know the broader choices you'll have for creating efficient and flexible code.

Back to the topic, Python and JavaScript both support OOPs and functional programming along with other paradigms. JavaScript is considered as the king of web programming that is used to create highly functional and dynamic websites. It has a vast ecosystem of libraries and frameworks to choose from like ReactJS, Angular, and Vue for front-end and NodeJS for the backend. You can also create native Apps for phones using React Native in JavaScript. So, with JavaScript, you can develop full-fledged websites as well as mobile applications. Whereas, Python is Best-suited programming language for Machine learning and data science. It has multiple Libraries like Keras, TensorFlow, Scikit-learn, etc. Along with that, Python is easy to use and has large community support. You can also create websites in python using frameworks like Django and Flask. You can also create apps in python as well using Tkinter, kiwi, etc. Both languages have powerful rounding development.
TL;DR Here is my perspective on this topic. As a developer, everyone must know basic web development since Machine learning and Data Science is a service-based skill While Web and App Development is a product-based skill. Hence, Data Science and Machine learning people are called engineers and not developers. Notice the very subtle difference between an engineer and a developer. Also, you know Mark Zuckerberg, Elon Musk, well they started with web dev and created their products. Ask yourself what you want, define your goals, and then choose wisely and always bet on JavaScript.
Data Science vs Web Development vs App Development Which one should I choose?
If you are reading this, you might be knowing very well the pay of a Data Science and ML engineers as compared to a Web Developer or an App Developer. All this huge burst about AI is the future and might very well draw you towards thinking that even I should learn Data Science for a huge package and a job opportunity. Here's the ugly truth, it's hard to get a job in Data Science since companies will prefer a person having the Domain knowledge and usually majoring in Mathematics and statistics, you should at least have Masters or Ph.D. for getting a job in this field. For Example- A fintech company will choose a CFA or Finance major rather than a CS engineer and teach them Data Science since python is easy and it's the efficiency that counts. So, the person with finance knowledge is well suited for the job. However, As I said It's hard to get a job, not impossible. Some CS grads have got into data science and are earning handful. All you need to learn is python and some libraries and mathematics. Now, As I said before, data science is a service-based skill you are not technically a developer you're an engineer who is figuring out solutions for a given problem. On the other hand, being a web or app developer means developing products. You can create applications and websites and release them to earn using ad revenue, selling them, or even creating and maintain them for companies that way you don't have to rely on companies to give your services. I suggest you to first, learn web development and then Data Science while earning through your web dev skills. That way you will have a decent skill set, portfolio, and a budget to start experimenting into the world of machine learning where processing power is everything.

Why should I learn Web Development when there is a popular Web Developing tool like Wix & WordPress?
WordPress and Wix are popular content management systems. They are best for creating small websites and blogs. Yes, they made it easy for anyone to create websites but that doesn't mean web developers' jobs are gone. You can't create Amazon, Netflix, Twitter, and large fully functional websites using them. So, if you are trying to be a low-level web developer, you can pretty much say goodbye to developing websites. You can google top trending tech skills in demand and you will find AngularJS, ReactJS, NodeJS developers in demand. Not only websites but you can also create native applications for android and iOS using React-native and games using ThreeJS a JavaScript library. Possibilities are endless, all you have to do is START. I'll suggest you start with MERN stack just my personal opinion but you can research and pick whichever stack you like.
Is NodeJS better than Django?
Before comparing let's talk about what is NodeJS and Django. Node JS is a JavaScript runtime taken out of the client-side browser environment which uses OS binding for I/O, and Django is a Python framework. So comparing both is like comparing apples with oranges. Though let's have these points clear. When It comes to performance, Yes. NodeJS is faster than Django or in general python since it's written in C++ and is a JS runtime. You ask why? because JavaScript is faster than python because it works on an asynchronous non-blocking object model. When It comes to scalability, No. Django or python, in general, is highly scalable as the caching of applications is quite easy. Django is a high-level Python Web framework that encourages rapid development and clean, pragmatic design. With the introduction of npm which stands for the Node Package Management system, the open-source community has been boomed towards NodeJS since managing packages and dependencies has never been that easy. Also, npm is far better than pip when it comes to package management, you can research about it. Here are some of the big fishes and the backend tech they preferred for their development. Uber, Twitter, eBay, Netflix, Duckduckgo, PayPal, LinkedIn, Trello, Mozilla, GoDaddy are some big names using Node JS as their backend technology. Pinterest, Instagram, Eventbrite, Sentry, Zapier, Dropbox, Spotify, YouTube are also some big names using Django as their backend technology. Notice the trend here, Uber, Twitter, and Netflix are some of the applications that priorities performance whereas Pinterest, Instagram, YouTube requires a lot of space and thus scalability is their priority. So, the choice is upon you what you want scalability or performance.
All these points made me confused 😕 about what should I do?
First, ask yourself what do you enjoy doing. Do you like to create games, apps, websites? What intrigues you? What sparks your curiosity? I have listed some of the questions depending upon the choices you make.
• GAME Development – If you want to get into the game development industry, you will have to learn C# or C++ for hardcore game development. You can create web games using ThreeJS or any other library but you won't be exactly a game developer.
• App Development – You can create an application using JAVA for android or Swift for iOS. Further, you can use React-native or Flutter for creating apps that would run on both android and iOS. If you want web apps, you can use Ionic as well.
• Web Development – There are many stacks (a set of technologies that suits well with each other) you could choose to learn like MEAN stack, MERN stack, LAMP stack, etc. You can create a website from WordPress or Wix as well. Develop an interactive portfolio for yourself with the stack you find interesting.
• Data Science, ML, AI – Start with python and take courses on data science, mathematics, machine learning, from popular websites like Udemy or LinkedIn. Start competing on Kaggle and maintain your Kaggle profile. Second, do yourself a favor and start learning algorithms and data structures in the language that fits your answer to the above question. Third, Start applying for internships with some projects and try to make an exemplary portfolio. Maintain your GitHub, LeetCode or HackerRank or any other profiles which you can include on your resume.
I hope this might help you; I tried my best to answer some of the questions that I've faced throughout my journey as a gradiot. If you feel that I'm missing something or something is wrong please feel free to correct me in the comment section. Thank you for your valuable time.
0 notes
Text
Choose best coding Robots for Kids
Programmable robot kits for kids are a great way to introduce your children to Science, Technology, Engineering, and Math (STEM). Programmable robot kits can be a fun and educational experience for just about anyone, regardless of age.
Working with these robotic kits can foster a sense of accomplishment, and inspire the mind as kids work out new ways to program the robots to perform a task. Programmable robot kits teach many skills besides the obvious ones, such as learning basic programming. They also help hone skills used to assemble the robot from a collection of parts into a working device waiting for the builder's command. Assembling a robot helps show that patience and fortitude outweigh the instant gratification of a pre-assembled gadget. The skills learned in assembly come in very handy when it's time to customize the robot to meet a new challenge.
5 Programmable Robots You Should Consider
Our list of programmable robots concentrates on kits, so some assembly is going to be required. Robotic kits are a great way to learn about multiple aspects of robotics, including design, assembly, and programming, and modifying a robot to meet new goals.
Ozobot Evo vs Bit
The kits are appropriate for just about any age, though there are some considerations for the very young. Some robot kits require soldering a few electronic components, and while soldering is a good skill to learn, all but one of the robots in our list can be assembled without pulling out a soldering iron.
Other considerations are the type of programming language that is used. Graphics-based languages can be easier for those just starting out, while text-based languages can provide more opportunity to expand on the robot's capabilities.
LEGO MINDSTORMS EV3
Lego Group
What We Like • Especially engaging for kids who are familiar with LEGOs. • Programming is easy and visually oriented, offering a good intro to coding. What We Don't Like • No DC charger included. • Lack of items such as differential drive makes building anything more than the featured robots difficult. LEGO MINDSTORMS has been the leader in programmable robot kits for quite a while. As you might imagine, combining all of the available LEGO brick types with the EV3 brick, which contains an ARM9 processor and input and output ports, along with a sufficiently large collection of sensors, motors, and other components, allows you to build 17 LEGO-designed robotic creatures, as well as all the additional creations you can come up with from your imagination. No soldering is required, and programming your creations is performed with a drag-and-drop programming language that allows you to assemble programming blocks and palettes on the screen to bring your robots to life.
robot toys online
Recommended age: 10 and up. Makeblock mBot Ranger
What We Like • Users can advance programming knowledge with Arduino. • Solidly constructed with metal components. What We Don't Like • Plotter needs to be secured to prevent unwanted motion. • Doesn’t include battery for remote. The mBot Ranger is a STEM educational robot designed to help children explore and learn about robotics; it's also just plain fun. The mBot Ranger makes use of precision metal components and a pre-assembled Arduino controller board to build three different robots; Land Raider, a tank-like rover; Nervous Bird; a two-wheeled self-balancing robot; and Dashing Raptor, a three-wheeled racer.
The mBot Ranger can be programmed using Scratch, a graphical programming language that allows you to build up complex programs by dragging programming blocks into place. You can also delve into more advanced C language-based programming using the Arduino controller. Makeblock includes all the necessary tools in the box, so you won’t find yourself running to the hardware store just to complete the assembly. Recommended age: 8 and up.
Boe-Bot Robot Kit
Parallax What We Like • Encourages creativity and problem-solving with lots of modification possibilities. • No soldering required. What We Don't Like • Younger kids will require help, ideally from an adult who has some robotics experience. • No batteries included. • Not Mac-compatible. The Boe-Bot robot kits are simple in concept; it’s a basic three-wheeled, roll-about robot. But in actuality, it's an advanced robotics platform that allows for 50 modifications to the robot, including building new sensors using the included breadboard, a method of wiring up circuit elements that doesn't require soldering. The Boe-Bots are available in different configurations based on the control board included, either an Arduino or a BASIC Stamp. Both include the ability to be controlled using multiple programming languages. The Boe-Bot robots are well designed and well documented, with detailed explanations of each major component as well as each sensor. The electronic breadboard lets you easily design and wire up new components, and there's a large collection of add-on products that work with Boe-Bot. Recommended age: Boe-Bot is an advanced robotics kit targeted at those 13 and up. Rokit Smart
programmable robot kits for beginners
Robolink What We Like • Challenging addition to home-schooling curriculum. • No soldering required. What We Don't Like • No instructions included (users must find them online). • Programmer cable not included. Rokit Smart is an 11-in-1 robotics kit that includes motors, circuit boards, frame components, and microcontrollers, as well as the tools you'll need to assemble any of the 11 robots that can be created. Although the number of components and the amount of assembly may seem daunting, the online guides, tutorials, and videos that walk you through creating any of the 11 robots make the process easy enough for most grade school kids, with a touch of adult help. Rokit Smart is a good choice for those just starting out, with a desire to learn about all aspects of robotics, including mechanical design and assembly, electronics, and programming. Recommended age: 9 and up. iRobot Create 2 Programmable Robot
iRobot What We Like • Drive system comes preassembled. • User can create storage bin with included 3D-printable file. What We Don't Like • A bit noisy. • Requires assistance from experienced adult. If the iRobot name is familiar, it may be because the same company makes the popular Roomba vacuum cleaner. The Create 2 robots are remanufactured Roombas sans the vacuum. An iRobot Create 2 can use either an Arduino controller board or a Raspberry Pi-based controller for advanced robotics projects. Even without the controller boards, the Create 2 has all of the built-in sensors and basic programmable controls found in a basic Roomba vac. It can even make use of most Roomba 600 series accessories.
robot toys for adults
The Create 2's real robotic strength is as a platform for building on and customizing. iRobot provides online projects that can be completed, as well as a gallery where you can submit your creations to share with others. Create 2 is an advanced robotics kit; it comes with just the bare essentials, requiring you to design and build your projects from scratch.

0 notes
Text
[Udemy] From 0 to 1: Raspberry Pi and the Internet of Things
Have a blast using the Raspberry Pi to do some home automation and understand the Internet of Things What Will I Learn? Understand what the internet of things and physical computing are Know their way around a Raspberry Pi Use the Raspberry Pi in Home Automation projects Think of different IoT applications and visualize the components needed to build them Do cool things like control switches in their home with their smartphone Requirements No real prerequisites. Beginner level understanding of electric circuits and programming might help but its not mandatory If you intend to do the physical computing projects, go ahead and purchase a Raspberry Pi - but the course does give you advice on things you might need to get for your automation projects so you can wait to decide as well. Description Taught by a team of electrical engineers from Stanford and IIT Madras. An Internet-Of-Things course for everyone - accessible yet serious, to take you from absolute beginner to a solid intermediate level - built around Home Automation using Raspberry Pi. This is a course is for everyone. You need not be an electrical engineer, or an engineer at all. We explain all engineering or automation concepts from absolute scratch. This is an Internet-of-Things course, not merely a Raspberry Pi course. This is important because we think too many courses end up becoming like manuals for the Raspberry Pi, or the Arduino, or some specific hardware device. This course is careful to generalize The course takes you to a solid intermediate level. The objective is to get you to a point where if you imagine a really cool IoT application, you will be able to independently figure out how to implement it. We focus on Home Automation using Raspberry Pi for our use-cases. This is so that you can immediately put it to use around the home (turn that music down without getting off the couch!) As with all our courses, this one too is quirky. The examples are irreverent. Lots of little touches: repetition, zooming out so we remember the big picture, active learning with plenty of quizzes. There’s also a peppy soundtrack, and art - all shown by studies to improve cognition and recall. What’s Covered: Internet of Things : Sensors, Actuators, Microcontrollers, Arduino, Raspberry Pi, Physical Computing, Smart homes Raspberry Pi 2 Model B Components, System on a Chip (SOC) , Input Output Interfaces, SD Card / Secondary Storage, Choice of Operating Systems, RISC/CISC Architectures, x86 vs ARM, Raspbian OS installation, Raspbian tour, Linux Shell commands overview, Installing softwares, Connecting to the Internet Physical Computing: Sensors (Photoresistors, Ultrasonic sensors, motion sensors, temperature and humidity sensors), Relays, LEDs, Push buttons, Basics of circuit design, Ohm’s law, RC circuit, GPIO pins, Serial and Parallel interfaces, UART, SPI, I2C, Pulse Width Modulation (PWM), Python (RPi DOT GPIO), WiringPi, Node js (RPi-GPIO) Home Automation projects:��Measuring Distance, Measuring Light Intensity, Controlling switches with sensors, Controlling switches over local and external networks Who is the target audience? Yep! Anyone who is interested in Internet of Things, Physical computing, hardware hacking and wants to get their hands dirty with real projects Yep! Non-engineers / Non-tech persons who are interested in home automation projects or Raspberry Pi Yep! People who are looking to understand the details of IoT and want to think of new startup ideas in the IoT space or work in this space Yep! Engineers who have book knowledge but want some help with practical application of electronics concepts source https://ttorial.com/from-0-1-raspberry-pi-internet-things
source https://ttorialcom.tumblr.com/post/177813006428
0 notes
Photo

Know Amazing Aspects Of Arduino vs Raspberry Pi
Arduino and Raspberry Pi is most known boards in the techy world. Professional people know every facts and feature about both boards. But students and beginners get confused b/w them, now don’t take any worries. Here is, you see Amazing Aspects Of Arduino vs. Raspberry Pi.
0 notes
Text
A Peek at the Pico, Raspberry Pi's Newest Petite Powerhouse
Raspberry Pi Pico
8.80 / 10
Read Reviews
Read More Reviews
Read More Reviews
Read More Reviews
Read More Reviews
Read More Reviews

Shop Now
Meet the new Raspberry Pi Pico; a tiny microcontroller filled with big possibilities.
Specifications
Brand: Raspberry Pi
CPU: Dual-core 133Mhz ARM
Memory: 264Kb
Ports: microUSB
Pros
Powerful ARM Processor
Micro-USB Connectivity
Breadboard Mountable
Easy-To-Use Interface
Absolutely Adorable
Inexpensive
Cons
No Wi-Fi or Bluetooth connectivity
No Header Pins
I/O Port Labelling on One Side Only
No USB-C Connectivity
Buy This Product
Raspberry Pi Pico other
Shop
// Bottom var galleryThumbs1 = new Swiper('.gallery-thumbs-1', { spaceBetween: 10, slidesPerView: 10, freeMode: true, watchSlidesVisibility: true, watchSlidesProgress: true, centerInsufficientSlides: true, allowTouchMove: false, preventClicks: false, breakpoints: { 1024: { slidesPerView: 6, } }, }); // Top var galleryTop1 = new Swiper('.gallery-top-1', { spaceBetween: 10, allowTouchMove: false, loop: true, preventClicks: false, breakpoints: { 1024: { allowTouchMove: true, } }, navigation: { nextEl: '.swiper-button-next', prevEl: '.swiper-button-prev', }, thumbs: { swiper: galleryThumbs1 } });
We’ve managed to get our hands on the coveted Raspberry Pi Pico. Today, we’re going to be looking at some of the most important features and putting it toe-to-toe with some of the biggest names in small electronics.
We’ll be showing you what the Pico can do, and we’ll get you started with MicroPython, one of Pico’s supported programming languages. We’ll even offer up some code to try in case you decide to buy a Pico of your own.
What Is a Raspberry Pi Pico?
Raspberry Pi Pico is a new budget microcontroller designed by Raspberry Pi. It’s a tiny computer built around a single chip, with onboard memory, and programmable in/out ports. Historically, microcontrollers are used in a variety of devices from medical implants to power tools. If you have an electronic device sitting in your vicinity, there’s a good chance that there’s a microcontroller inside of it.
Key Features of the Pico
The Pico is built around the RP2040 microcontroller chip, which was designed by Raspberry Pi UK. It’s a Dual-Core ARM processor with a flexible clock that can run up to 133 MHz. The Pico also supports 1.8-5.5 DC input voltage, has a micro-USB input port, and an onboard temperature sensor.
Flanking the chip on all sides are a series of castellations that allow easy soldering to a Veroboard or breadboard. This dual in-line package (DIP) style form factor is stackable, and can also be used in carrier board applications.
Technical Specifications
21 mm x 51 mm
264kb on-chip RAM
2 MB on-board QSPI flash
2 UART
26 GPIO
2 SPI controllers
2 ISC controllers
16 PWM channels
Accelerated integer and floating-point libraries
3-pin ARM Serial Wire Debug (SWD) port
What’s So Special About the Pi Pico?
The Pi Pico is a different kind of microcontroller. It’s Raspberry Pi’s first, and it features ARM technology in its RP2040 silicon chip. Many technology companies are embracing silicon ARM chips, with major manufacturers like Apple leading the charge.
The punchy little Pico packs a staggering 26 multifunction general purpose input/output (GPIO) ports, including 3 that are analog. Alongside these ports are 8 programmable input/output (PIO) ports. Compare this to other microcontrollers like the Arduino Nano, and the Pico packs roughly 18% more GPIO capability.
The most considerable difference between the Pico and its competitors, however, is the $4 price tag. Low cost is the main selling point of this unique offering.
At launch, many online retailers sold out of the device due to the interest and Raspberry Pi’s favorable reputation. By setting the price so low, the Pico opens the door for a new class of high-powered, budget microcontrollers.
There are many potential applications for the new Pico. With its onboard temperature sensor, the device is an obvious choice for IoT projects.
One talented retro gaming enthusiast even used a Pico to build a gaming console with full VGA video support.
youtube
This means that makers who have been curious about Raspberry Pi, or microcontrollers in general, now have the ability to experiment for less than the price of a fancy cup of coffee.
Related: The Raspberry Pi Comes of Age With the Pi 400 Desktop
The Raspberry Pi Pico Processor
The RP2040 ARM chip is an interesting choice for the Pico. At 133MHz, the chip is capable of leaving more expensive boards, like the Arduino Uno, in the dust.
Using ARM processors seems to be an emerging trend in the world of microcontrollers. In addition to Raspberry Pi, both Sparkfun and Adafruit also offer boards with similar ARM technology.
The industry-wide switch was made for a single reason—speed. ARM processors give a considerable boost over standard Atmel chips. In a board this size, using an ARM processor is like dropping a fully kitted Porsche engine into a Volkswagen. On the other hand, many microcontrollers don’t require that much processing speed. Yet.
Ramping up performance means that makers who want to push the limits of the Pico will have an abundance of power to do so.
The I/O Ports
The GPIO ports on the Pi Pico feature several interesting functions for common uses such as operating a screen, running lighting, or incorporating servos/relays. Some functions of the GPIO are available on all ports, and some only work for specific uses. GPIO 25, for example, controls the Pico’s onboard LED, and GPIO 23 controls the onboard SMPS Power Save feature.
The Pico also has both VSYS (1.8V — 5.5V) and VBUS (5V when connected to USB) ports, which are designed to deliver current to the RP2040 and its GPIO. This means that powering the Pico can be done with or without the use of the onboard micro-USB.
A full list of the I/O ports is available on Raspberry Pi’s website in its complete Pico documentation.
Pico vs. Arduino vs. Others

One question on the minds of many makers is whether or not the Raspberry Pi Pico is better than Arduino?
That depends. Pound-for-pound, higher-end Arduino boards like the Portenta H7 make the Pico look like a toy. However, the steep cost for a board of that caliber might be a tough pill for the microcontroller hobbyist to swallow. That's why the smaller price tag on the Pico makes it a win for makers who enjoy low-risk experimentation.
Along with minimal cost, the Raspberry Pi jams an extensive feature set into the Pico, comparable to boards like the Teensy LC, and the ESP32. But neither of these competitors manage to challenge the budget-friendly Pico on price.
That's what makes the Pico such a fantastic value, and a great choice for hobbyists and power users alike.
The Pi Pico: What’s Not To Love?
Unfortunately, to drive the price of the Pico down, Raspberry Pi had to make a few compromises. The most notable of which is the lack of an onboard radio module. Neither Bluetooth nor Wi-Fi is supported without add-ons.
The Wi-Fi limitation can be eliminated by adding a module like the ESP-01. Bluetooth support may prove a bit more challenging. If you need an all-in-one solution for your products, you’re better off skipping the Pico, and spending a little extra for something like the Pi Zero W, or ESP32.
Additionally, many early adopters are complaining about the lack of GPIO labeling on the top of the board. Raspberry Pi provides an extensive amount of documentation on its website to address this, but pointing-and-clicking, or thumbing through paperwork when you have a hot soldering iron in your hands isn’t often desirable.
Lastly, the lack of I/O pin headers is something of an issue for some, as it means less convenience when swapping I/O components. This minor annoyance can be solved via the use of leads, soldering the component wiring directly to the Pico, or using a breadboard.
If you’ve been using microcontrollers or small electronics for any period of time, then an unpopulated board is most likely a non-issue. Of course, you could also add your own pin headers if you plan on regular experimentation with different external components.
The final rub with the Pico is the micro-USB port. With many other microcontrollers like the Portenta H7 moving toward USB-C, Raspberry Pi's micro-USB port seems dated.
Logically however, the decision to use micro-USB makes sense. It was done by Raspberry Pi to keep costs as low as possible, and to keep interface capability almost universal. Everyone we know has at least a few micro-USB cables tucked away somewhere in their homes.
However, with future versions, a USB-C interface would be a nice addition to an already spectacular package.
Related: A Beginners Guide To Breadboarding With Raspberry Pi
Programming the Raspberry Pi Pico
Interfacing with the Pi Pico can be done via C/C++, or via MicroPython in the Read-Eval-Print-Loop or REPL (pronounced “Reh-pul”). The REPL is essentially a command line interface that runs line-by-line code in a loop.
In order to access the REPL, you’ll need to install MicroPython onto the Pico. This process is simple and only involves four steps.
Installing MicroPython
Download MicroPython for Raspberry Pi Pico from the Raspberry Pi Website
Connect the Pico to your computer via micro-USB while holding the BOOTSEL button
Wait for the Pico to appear as an external drive
Copy the MicroPython file to the Pi Pico, and it will automatically reboot
You can access the REPL in a number of ways. We used the screen command in a macOS terminal window to access the serial bus connected to the Pico. To accomplish this with Terminal, you’ll first open a new terminal window, then type ls /dev/tty*

From there, find the port where the Pico is connected. It should be labeled something like /dev/tty.usbmodem0000000000001. Then run the command:
screen /dev/tty.usbmodem0000000000001
Your cursor should change. Hit Return and the cursor will change again to >>>.
In the image below we've included the classic Hello World (Hello, Pico) command-line program in the REPL, along with a few lines of code that will turn the Pico's LED on and off. Feel free to try them yourself.

For more information, we recommend you invest in the official starter guide to MicroPython that Raspberry Pi has published on their website.
Download: MicroPython for Raspberry Pi Pico (free)
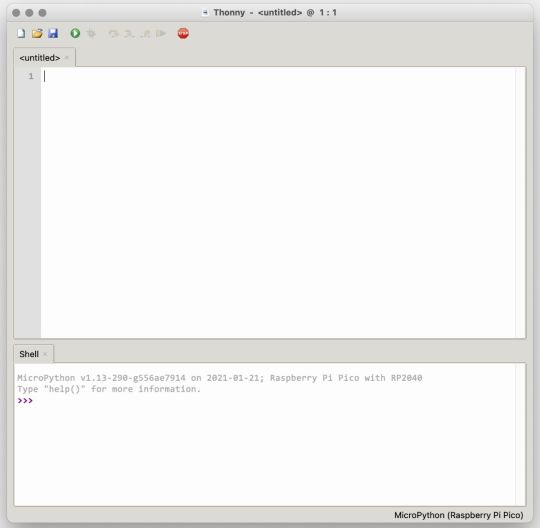
Using the Raspberry Pi Pico With Thonny

If you’re looking for a more proper coding environment, the Raspberry Pi Pico will also allow access to the REPL with Thonny. To enable this feature, first download and install Thonny. Once installed, connect your Pi Pico. Open Thonny and you'll see information indicating your Pico is connected in the Shell.
At the bottom right of the screen, you should see a version of Python. Click this version and select MicroPython (Raspberry Pi Pico) from the drop-down menu.
Now you can type commands into the Shell, or you can use Thonny’s editor to write or import multiple lines of code.
The abundance of interface possibilities make the Raspberry Pi Pico easy to program. For those who are familiar with MicroPython, this should be nothing new. For beginners, however, Thonny provides a powerful interface and debugger to get started with programming.
Download: Thonny (Free) Windows | Mac
Should I Buy the Raspberry Pi Pico?
The Raspberry Pi Pico is a powerful budget board that is perfect for hobbyists, or makers just starting out with microcontrollers. The documentation, low cost, and wide range of possibilities for the Pico also make it a great choice for seasoned small electronics wizards. If you’re a DIYer who loves to tinker, or you just want to challenge yourself to a weekend project, then you’ll love playing with the Pico.
On the other hand, if you don't have one or more projects in mind that need a microcontroller, then this board is probably not for you. Also, if your project needs Wi-Fi connectivity or Bluetooth, then the Pico won’t scratch that itch. And finally, for users who aren’t comfortable learning MicroPython, or exploring C/C++, the Pico isn't ideal. And remember: this Raspberry Pi is not like the others. It will not run a full Linux operating system.
But, if you dream in Python, or if you love the smell of solder, then you won't regret grabbing this tiny powerhouse. Most of all, if the sight of the sports-car-sleek RP2040 gets your creative gears turning, then we think you’ll really benefit from picking up the Pico.
Serving up Several Sweet Possibilities
While it isn’t perfect, the Raspberry Pi Pico is a strong entry into the world of microcontrollers. The reputation that Raspberry Pi has built for quality electronic components at a relatively low price extends to the Pico.
It’s everything a Raspberry Pi should be: small, sweet, and superb. It’s beautifully designed, and extremely inexpensive. But the best part isn’t the looks or the low cost.
The best part about this small wonder is picking it up, and holding it in your hands. It's feeling the tug of electronic inspiration. It's realizing just how powerful the Pico is, and what it means for microcontrollers going forward.
And truthfully, we think it's amazing that something as small as the Pico can offer so many unique possibilities.
A Peek at the Pico, Raspberry Pi's Newest Petite Powerhouse published first on http://droneseco.tumblr.com/
0 notes
Text
How to Make A Simple WiFi Controlled Robot Car (NodeMCU) | Wifi RC Car ESP8266 App - NodeMCU (ESP12E)
youtube
Smart Robot: NodeMCU ESP8266 WiFi Robot Car + L293N + Wifi RC Car ESP8266 (NodeMCU) | How To Make A Simple WIFI Car (NodeMCU) | Wifi RC Car ESP8266 - NodeMCU (ESP12E). ****************************************************************** If You Want To Purchase the Full Project or Software Code Mail Us: [email protected] Title Name Along With You-Tube Video Link Project Changes also Made according to Student Requirements http://svsembedded.com/ è https://www.svskits.in/ M1: +91 9491535690 è M2: +91 7842358459 ****************************************************************** 1. How To Make A Simple WIFI Controlled Car (NodeMCU), 2. How to Make Arduino ESP8266 WiFi Robot Car | Controlled with Application, 3. ESP8266 NodeMCU RC car control over WiFi using RoboRemo app, 4. Smartphone controlled NodeMCU (ESP8266) 4WD WiFi Robot Car & DIY Android application, 5. How to Make Mobile Remote Controlled Car with Nodemcu | Indian LifeHacker, 6. Esp8266 NodeMcu wifi bot tutorial, 7. Arduino Project: IOT Car Parking System using Nodemcu esp8266 wifi + Blynk (Tabs + led widgets), 8. WIFI Controlled Robot | NodeMcu ESP8266, 9. How To Make A Wi-Fi Car Using NodeMCU esp8266 | Mobile Phone Controlled Car, 10. ESP8266 - WiFi Car, 11. Robot Wifi con ESP32 y Arduino Tutorial, 12. How to make Internet Controlled Car | IoT | Blynk | NodeMCU | esp8266, 13. Smartphone Controlled Arduino&NodeMCU 4WD Robot Car | WiFi Arduino&NodeMCU Robot, 14. IOT NodeMCU ESP8266 - Control de Foco Relay WebSocket WebServer, 15. How To Make A Mobile Phone Control WiFi Car Using Node MCU ESP8266 | DIY , 16. Creating a Nodemcu (Esp8266) Android phone controlled rover, 17. Arduino IOT Project: Nodemcu ESP8266 wifi Robot Car “L298N motor driver + Blynk + Joystick”, 18. Diy Amazing WiFi car mobile controlled | WiFi car V/S RC car challenge, 19. Adding WiFi controls to a RC car using Arduino, 20. NodeMcu(ESP12E) Android Wifi Controlled Rc Car Full Tutorial, 21. Arduino Project: Safe distance maintaining Car to Avoid accident” L298N and Ultrasonic Sensor”, 22. Doit.am WiFi Car and Tank Based on ESP8266 Dev Kit, 23. Arduino WİFİ Kontrollü Araba | Nodemcu Kontrollü Robot, 24. Wifi | ESP8266 NodeMCU | robot car WIFI | carrito robot con ARDUINO, 25. Wifi Robot Car/RC Car NodeMCU ESP8266 -Blynk App, 26. How to make Internet Controlled Car | IoT | Blynk | NodeMCU | esp8266, 27. V380 WiFi Camera Setup & Installation , 28. Control FAN Speed and LIGHT using TV Remote, 29. Build a surveillance robot that video streams with Arduino - Skype Shield Tutorial, 30. IoT based Smart Parking System using ESP8266 NodeMCU, 31. Smart Crop Protection From Wild Animals With Alert Using Arduino | Field Sensor Monitoring with WiFi, 32. Industrial Inspection Robot The Front Tilt Minibot, 33. How to Make Arduino ESP8266 WiFi Robot Car | Controlled with Application, 34. IOT BASED SMART BLOOD BANK SYSTEM, 35. CameraIP+ESP8266(MCU E-12), 36. Arduino DS WiFi Camera Robot - Assembly and Presentation, 37. V380 wifi Camera software installation & Setup & remote viewing on Laptop or PC Over Wifi / Local, 38. Make wireless CCTV camera using Action cam | Arduino project, 39. Make your own GPS SMS Security Tracking System, 40. WiFi Home Door Lock| Blynk | iot project, 41. How to Make a Gesture Control Robot at Home, 42. TOP 5 ESP8266 (NodeMCU) PROJECTS, 43. program arduino with android smartphone, 44. How to Make Water Overflow Alarm at Home, 45. How To Make A Simple WIFI Controlled Car (NodeMCU), 46. Arduino UNO & ESP8266 and control using smartphone, 47. How to make a | SPY Camera with | esp 8266 | Node MCU | wifi | IoT projects, 48. How To Make A DIY Arduino Obstacle Avoiding Car At Home, 49. Google Assistant | Home Automation IOT | NodeMCU ESP8266, 50. Arduino Powered Automated Security Camera, 51. Arduino RFID Solenoid Lock, 52. Arduino infrared thermometer with case MDF, 53. Bluetooth 8-Channel relay control ( Fan and Light ) board (with Android App), 54. 360° Fisheye Panoramic Wifi LED Bulb Light with Spy Camera, 55. esp8266, internet camera position control, 56. DIY | Easy IOT controlled robot With wifi camera for live streaming, 57. Top 10 IoT(Internet Of Things) Projects Of All Time | 2020, 58. Basic concept of Arduino in Hindi | Arduino tutorials for beginners, 59. how to make a ttp223 touch based Light Mirror Touch Switch Controller, 60. What is Arduino- Arduino Projects-Arduino Vs Raspberry Pi., 61. Top 7 Most Innovative Electronics DIY Projects For 2020, 62. Sonoff WiFi Smart Switch Tutorial, 63. Arduino RFID Sensor (MFRC522) Tutorial,
1 note
·
View note