#assignment_2
Explore tagged Tumblr posts


Text
CS6601 - Assignment 2 - Skid Isolation Solved
This assignment will cover some of the concepts discussed in the Adversarial Search lectures. You will be implementing game playing agents for a variant of the game Isolation. Table of Contents Get repository Setup Jupyter Jupyter Tips IDE Get repository Pull this repository to your local machine: git clone https://github.gatech.edu/omscs6601/assignment_2.git Setup Activate the environment: conda…
0 notes
Text
Assignment 2: Mechanical Computer
How can people have an impact on the spaces which they inhabit? This is the question that I wanted to ask with this assignment. By creating a means of interaction with the people in the space, my project intends to essentially count the amount of people in a space, which could then be translated into a change in the environment. That change could be physical or ephemeral, or maybe even emotional. In this case, I wanted this change to be auditory.
Step 1: Switch and Relay
What do people do in a space and how can we use this as an input? I was working with the assumption that people will want to sit when they’re in this space, I think that’s a pretty safe bet, I know that I like to sit sometimes, The question then becomes, how do we record this input? The switch and relay that i designed would utilize the pressure created by the action of sitting, basically the seat would compress as a result of sitting, this compression would be translated via a plunger which would attach to a lever. When the input moves down the output will move up.


Step 2: Logic Gates
Now that we have an output, we need a way to combine a multitude of these outputs to produce specific results, this is where the gates come in. The first gate on the chopping block is the AND gate, a gate where and output is only created when both the inputs are 1. My and gate uses a similar system to the relay, utilizing a lever, this lever can rotate based on the inputs, but if both are 1 then the lever will move upwards on a track which would then create the desired result.


The next gate on deck is the OR gate, wherein an output of 1 is created if any or both of the inputs are 1. My OR gate uses a bar on tracks with inputs on both sides. As one input moves upward, the bar moves along with it, this works for either side and it will also function with both sides activated.


The final gate I designed was the XOR gate, where the output is 1 if any of the inputs are 1 but the output is 0 when both inputs are one. The XOR gate is an essential piece in a binary adder which is why I decided to design one, in hindsight this may have been a fruitless endeavor seeing that an adder isn't specifically necessary for what I was trying to see, nevertheless I designed one. The concept works as a combination of the two previous gates, the two inputs are attached to a bar with rotating joints, this means that one positive input would result in the bar rotating, but with two positive inputs the bar moves upward rather than rotating. This bar is designed to interact with another bar situated above it which controls the output, So by having the input bar rotate, the ends will start to push the output bar upward. The space between the bars is specified so that if the bar moves upward without rotation it will not interact with the output bar, instead stopping just below therefore not activating the output.


Step 3: Changing the Space
My intention with this project is to use the amount of people to effect a change in the auditory condition of the space The way I imagined this happening was that the inputs of people would interact with a wind organ by opening and closing valves to allow or prohibit air flow. In all honesty this ended up being rather weak and unresolved, the mechanisms I designed did not effectively interact with this system. If I were to move forward with this project I would definitely try and dive deeper into how these systems can interact and what they can interact with in order to achieve my goal.
0 notes
Text
Making the Axles
In the first prototype we made, the axles were made of circular spacers put through two rectangular acrylic pieces slotted together. There was a lot of friction between the spacers and the body, so we opted to use rectangular steel bars as the axles.
The steel bar has rounded edges so it can rotate easily. Cutting and sanding the axles was a tedious process because of the precision required.

We were able to get the axles to the accurate dimensions by using a caliper and sanding down a little bit at a time until it was correct. There were several issues that we encountered with the steel bars. The main issue was that the bars were not as precise as we assumed them to be; they were not completely square and it had a different thickness depending on where you measured. This caused a big problem when we were trying to put on the spacers and gears. Some would go on easily and others would break because of the varying thickness.
Another challenge we ran into while assembling the car was that the bevels we put onto the ends of the steel made the entire axle slightly shorter than it was in the design. Therefore, some of the spacers could not go on the end of the axle because there was no surface area for the spacer to go onto.
Overall, because the steel reduced a lot of friction, it ended up being a better alternative to the acrylic axles.
0 notes
Text
Loads of Potential

It was our team’s goal to store as much potential energy as possible to help our car fly across the table. We began the process of exploring how to store energy with torsion springs cut from delrin but we quickly made the jump to cast concrete (Rockite).
The torsion springs seemed to break no matter how we designed them to bend (plastic is inherently brittle). We focused our attention on flywheels which we decide to cast with Rockite to allow for the greatest amount of customization. Our first flywheels only measured 2.5″ in diameter. The image shown above was 6″ across because we calculated that the mass is important, but the larger diameter is more important.

We concluded that the two 6″ flywheels were massive but they put a lot of strain on the car’s axles. There was also too much friction at all of the joints were the gears, flywheels, and wheels met the axles. No matter how much potential energy is stored, the car’s mechanics have to be efficient or else the car simple will not move. The wheels should be able to spin for multiple seconds with a simple flick of a finger, and if they don't, your car will only move with a big push.
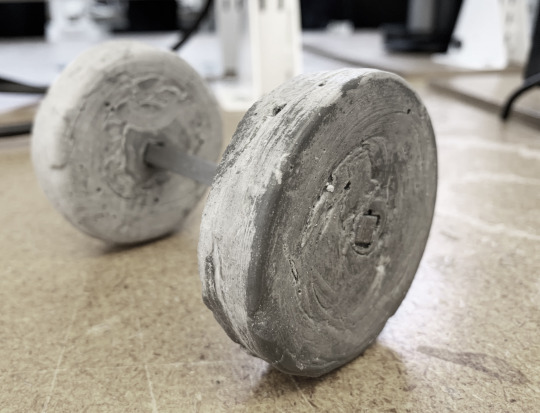
One final idea that was proposed that I wish we could have explored was the idea of rolling the car multiple times across the table to build up potential energy in the flywheel and then setting it on the table top to let the flywheel spin freely for multiple seconds and propel the car forward.
1 note
·
View note

Text
Welcome
Welcome to the Connective-Environments Fall 2020 blog. We will be using this blog in addition to the Instagram accounts as the main repository to document the awesome things you will be designing and to document your progress.
In order to post in this blog, you will need to join the group through the invitation you received, and create your account if you don’t have one yet. Couple rules of good practice:
1. Keep the blog’s wall neat.
To keep the wall neat, it is a good practice to add a “Read More” break in your text after the first few sentences that will direct a reader to the full extended post. If you don’t do that, the blog’s wall will soon be crowded with lengthy posts. You can add a “read more” break either in Rich Text format or in HTML format.
To add a “read more” break in Rich Text format, press Enter so that you create a new line and the following four icons will appear:

Click on the last of the four (the one with the three dots).
You can read more about this here.
Keep in mind that the “read more” breaks work only in text-based posts (like this one); they do not work in photo-based posts. Use a concise descriptive sentence before you add the “read more” break so that readers can understand the topic of the post.
2. Use consistent tags.
Use the following tags when you write:
#assignments, #assignment_1, #assignment_2, #assignment_3, #assignment_4, #final_paper, #links, #your_current_team_name, etc., and generally any other tag that others can use too.
Since you will be switching teams throughout the semester, use a tag with your current team’s name in order to group posts according to each team.
3. Document your work for others
Post photos documenting in detail your work and your process. Others should be reading your posts and learn from you. Focus on what works and what does not work. Explain why. Don’t just post a photo with a one-liner. I will show more examples of what it means to document work. Until then, you can have a look at my own class webpage when I took How to Make (Almost) Anything class (not necessarily the best example) at MIT. Also make sure you have a look and explore the websites of other students, in more recent years, in that class, in how they document their work here, or more specifically:2018, 2017, 2016, 2015, 2014, 2013, 2012, 2011, 2010, …..Web documentation is graded.
0 notes
Photo


De Eendracht
Johannes Van Den Broek
“Design enables inhabitants to transform the dwelling between a layout for the day”
Issuu. “Dwelling Typologies.” Accessed April 23, 2020. https://issuu.com/aad_lund/docs/assignment_2.
0 notes


Text
The Good, The Bad & The Ugly: Assignment 2 Recap

Im going to start this blog by saying: YOU WILL FAIL! But with enough dedication, commitment and a ton of trial and error, YOU WILL SUCCEED and it will feel amazinggg!!!
youtube
Choose one LaserCutter and Stick to it!
Each machine will have its own tolerances, and it is unsafe to assume that testing results for one machine applies to the rest. The best recommendation for perfecting your craft is selecting one laser cutter and testing different material settings until you arrive at the best possible outcomes that result in the best possible fitting of pieces. I made the mistake of moving from one machine to another too many times which caused me to have to spend valuable time figuring out the best settings for that new machine instead of spending that time on improving the design.

Prototype early!
The absolute best advise anyone could ever give is to start testing models and gear ratios EARLY in the process (As early as the day you are handed the assignment). Our team went through three iterations of the design before we were able to arrive at a design that was elegant and (somewhat) functional.

Figure out your snap joints early!
Snap joints is what you are most likely to use to hold the car together. Because dealing with these kinds of connections is detrimental for the sturdiness and stability of your project, we recommend testing the snap joints simultaneously while testing laser cutter settings and material properties.

Casting Rockite: Fly-Wheel Designs Only
Casting the flywheels out of Rockite was no easy task. The goal with the flywheel design is to get the most inertia possible with the least weight necessary. To achieve such desired outcome, I recommend casting the heavy rockite the furthest distance possible form the axis of rotation. Bulky material closer to the axis of rotation of the flywheel will add to the overall weight of the car without adding significant inertia i.e. energy storage to the system. All this extra weight will cause your car to move slower and for a shorter distance, as well as increase the friction between its moving parts.

Make it the lightest possible!
After arriving at a design that seems to functions, I recommend taking one last pass at the design but this time carving out any material that is not serving a purpose. You can achieve that by hollowing out parts of the chassis that exist between joints as long as it does not interfere with the structural integrity of the car. As mentioned before, Flywheels can be reduced in weight by adding material close to the circumference of the circle and away from the axis of rotation.

Make your Drive Axle hefty!
This is something we realized after the fact; since speed in the flywheel is being transferred through the gears and transformed into torque in the drive axle, it is important for the drive axel to the consist of material that can tolerate such high torque. Because of that, it is recommended that you beef-up the drive axel in order to increase sturdiness and stability.

Final Remarks!
This assignment was a great challenge and an awesome learning experience all at the same time. In architecture, we are used to dealing with tolerances down to the 1/32″, which you may think is small but it is actually not. this Architectural-Engineering exercise made us think about functionality as a variable depended on tolerances that went down to the 10th of a millimeter. This exercise was extremely eyeopening in that regard, and resulted in products we were all proud of.
0 notes
Text
Assignment 2: Designing a Switch + Relay
I’ve set the goal of this piece as counting the people existing in a space. The intention being that the people would provide the input of the device simply by sitting or standing in the space. The device would then take these inputs into account and add them all together, which would subsequently produce a result specific to the amount. This result may have a visual representation or an auditory representation.
Switch
The fist step in the design process is to create the switch which will respond to the presence of a human. The switch I designed responds to pressure exerted by the weight of the person. A plate would that can either be sat upon or stood upon would be connected to a spring and plunger system which would move in the vertical direction. The system at rest would be in the up position, this would qualify as the 0, the system, when acted upon, would be in the down position, this would qualify as the 1.


Relay
The next step would be to incorporate the switch into a relay. The relay I designed would use a lever. The switch would provide the input to one side, while the other side would be connected to another plunger. Each would incorporate a spring, which would allow it to move back to the rest position when the person stops providing the input. In simple terms, as one side goes down the other side goes up. When the output plunger goes up it could then interact with another lever which provides opportunity for compounding

0 notes
Text
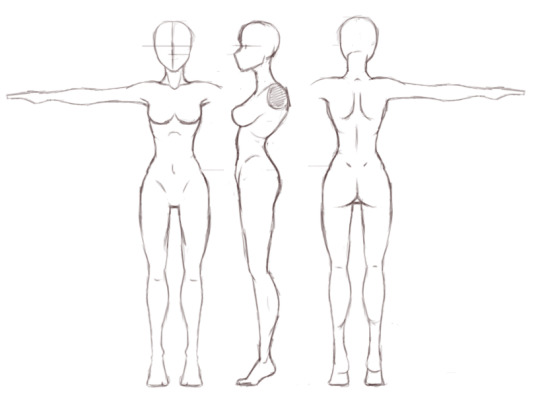
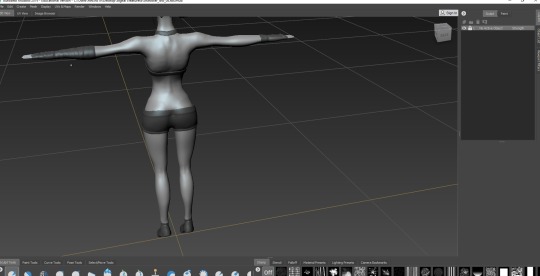
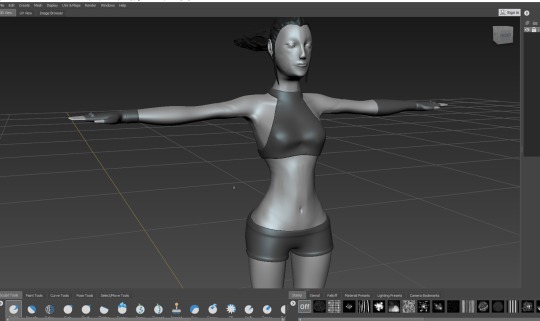
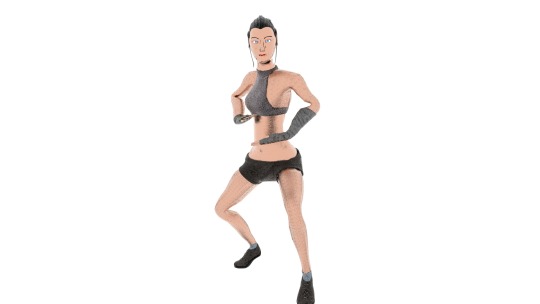
KNB217_DigitalCreatures
Assignment_2
Vergil Lin (N9634819)
In this assignment, we are required to create a human base creature and rig for it. The whole process of this assignment was attracted me very much because I am pretty interested in character design. On the one hand, this assessment is a test which is not only for our technology skills but also for our design abilities. During this process, this blog is working on recording to help me find out the problems and reflection.
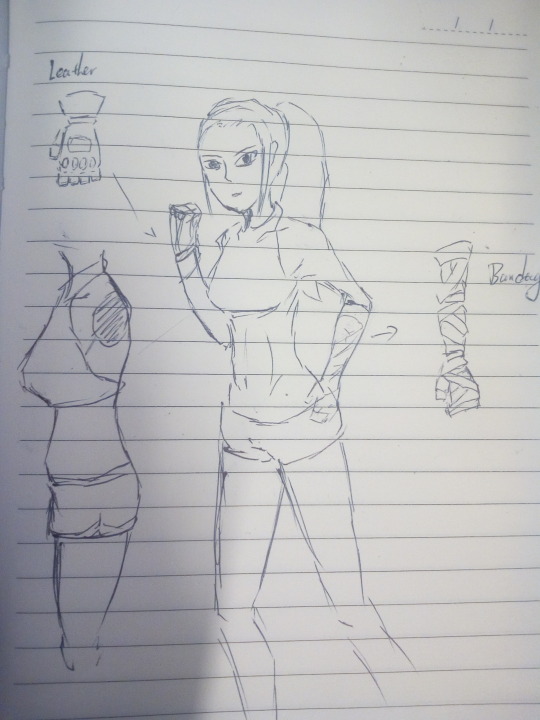
1.Design
For this assignment, we need to design a simple human base creature, and then draw textures and rigging for it. I was planing to design a woman who is just back from boxing gym. So that she wearing a vest, a short pants, a pair of gloves and sport shoes. I designed a ponytail haircut for her to make the design as real as possible. Although I don’t want this character looks too boring, I still not skilful enough to put some very difficult design. Based on that, I only draw two different gloves that won’t be too monotonous.
2.Base Mesh
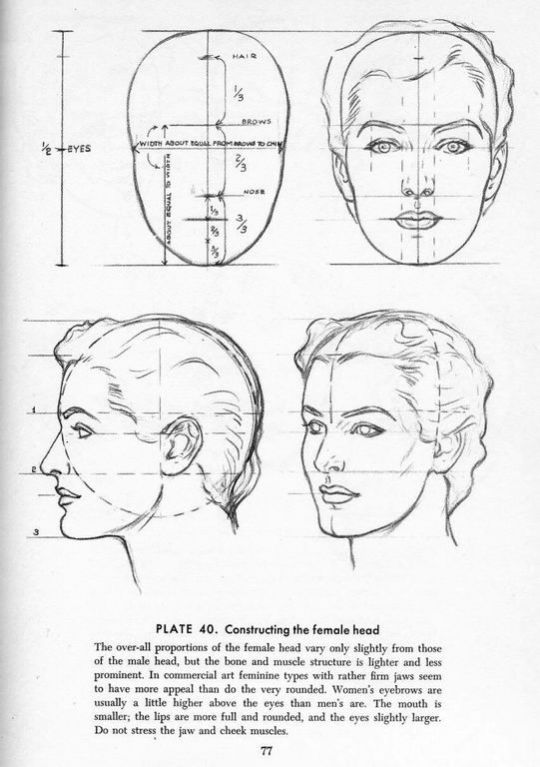
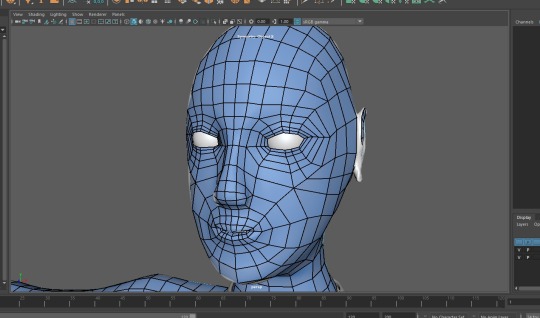
This step should be my favourite part of the whole process. I already have some experience about base mesh modelling and the structure of human. during this process, I rewarmed my knowledge about human structure and find out some very interesting things such like I realise that the waist is the most beautiful part of woman body...
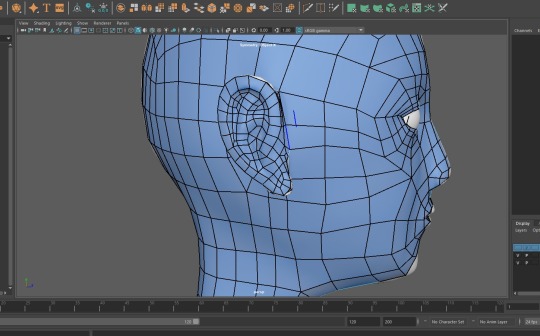
Any how, there still few challenge for me. For example, I still remember the shame about last assignment that I draw a face to my create. This time, I spend lots of time and find some tutorial about how to create human head. After a series of practice, I think I got a not bad human head. Meanwhile, I also learned a lot about the structure of human’s ears. I can’t imagine how many work I will get when I retopo the mesh of ear.
3.Craving
High poly mesh craving is a meticulous work that testing the understanding of the muscles and bones. I spend lot time on researching the structure of the boxing athletes and really pay pretty much attention on the firm abs. maybe the result is not satisfactory enough, but I really enjoyed in it. In this step, I learned some new knowledge about how to use Mudbox better. I believe that the interest and skill can be the hardest base stone of my career in the future.
4. Retopologize
The retopologize part is the hardest ordeal about the patient. On the one hand, you have to make sure that the distribution of faces must be logical and connect with the details from high poly mesh. But overall, this part is not very difficult if keep be careful and patient. Another important thing is that I got a good point about the mesh. I knew the low poly mesh can be smooth after a communication with classmate. After I learned how to use the “soften edge”, I have never worried about the clear and sharp edge of low poly meshes.
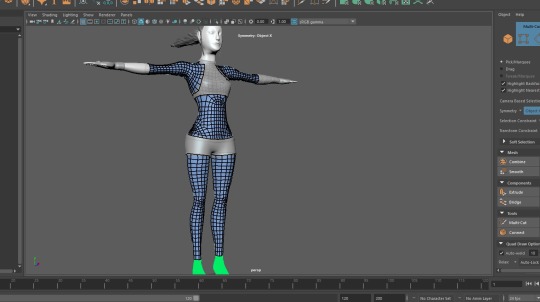
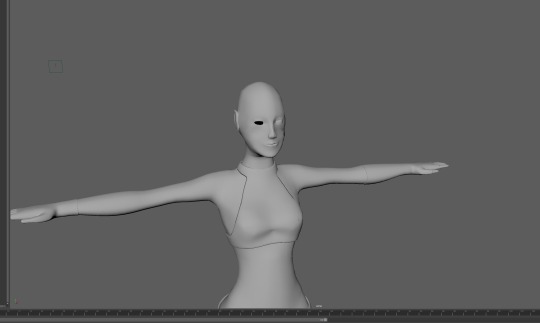
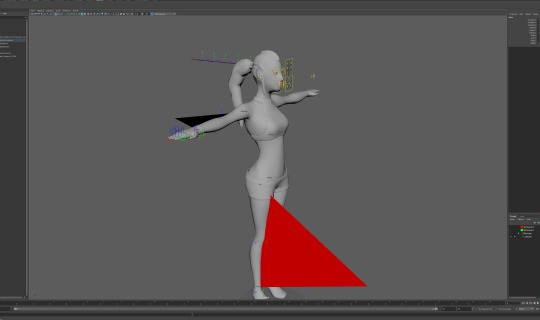
5.Rigging
I have np experience about rigging before. B ut Rigging is so important that all the 3D animation and video game characters needs be rig. Basic rigging is not vert difficult. Tutorial and workshop gave lots of detail about how to rig. Although the rigging is finished, I still need many practice because I think my character skinning have a huge space to improve. In the rigging part, the worst problem I met is the orientation of the knee and elbow. At the begining I found out that my shoulder controllers were not in the correct position. After asking tutor I knew that the orientation of the knee and elbow were wrong. I spend two days to find a balance in rotations and found out that every time I correct the position of joint, the rotation will change. It was really makes me disappointment. One day I was struggling in the rigging, I discovered that the orientation is depends on the orientation of curves. After that, I solved this problem very soon.
movement testing:
youtube
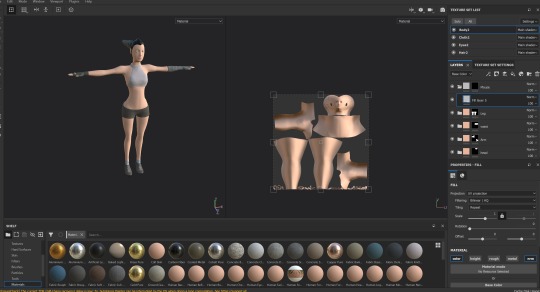
6.Texture
Texture part is a familiar part for me because the time I draw textures for modelling has been not very short. A clean UV map is really helpful for this step. Of course I knew there are many details are presented by texture, but I still have no good idea about those details in textures. I think I need to get a deeper understanding about colours.
7.Emotion design
To make characters more realistic, their behaviour must be logical. Their emotions are same. I made some emotion design and analysed that how should present the. Unfortunately, my drawing skills and rigging skills limited my present.
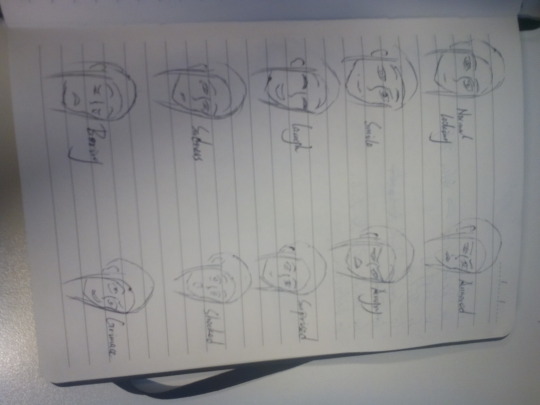
(I don’t know why the position is not correct....)
youtube
8. Render the Pose
9. Reflection
At the end of this whole process, I think I still need more practice to improve. The most important problem I have is not doing well in the detail. Next step I am going to do is read some book which talking about the drawing and color. I think it can be helpful for me to understand them. Also, I will practice my basic skills.
This is the Model of my character:
https://skfb.ly/6L8sB
0 notes
Photo

“I need my penchant, dammit!”
1 note
·
View note
Text
Week 2
https://github.com/drogova/ml-da_wesleyan_university/blob/master/assignment_2.ipynb
0 notes
Link
0 notes