#c ide centos linux
Explore tagged Tumblr posts
Visit Tumblr Blog
Explore Tumblr blogs with no restrictions, modern design and the best experience.
Last Seen Tumblr Blogs


Fun Fact
China blocked Tumblr because of pornography and censorship problems in 2013.
Text
Why do professionals prefer Linux?
Experts choose Linux for several reasons, primarily due to its flexibility, security, and performance. Here are some of the main reasons why professionals across various fields prefer Linux:
1. Open Source Nature
Freedom and Transparency: Linux is open-source, meaning its source code is available for anyone to modify, inspect, and distribute. This allows experts to tweak the system to suit their specific needs, ensure privacy, and fix any issues that might arise.
Cost-Effective: Since Linux is free, organizations and individuals do not have to pay for licenses or subscriptions, making it a cost-effective choice for businesses and hobbyists alike.
2. Customization
Linux can be highly customized to fit a wide range of use cases, from small embedded systems to large-scale enterprise servers. Experts can choose from various distributions (Ubuntu, CentOS, Arch, Debian, etc.), each with different features that cater to specific needs.
Users can modify almost every aspect of the operating system, from the graphical interface to the kernel itself, enabling them to create highly optimized and tailored environments.
3. Security
Strong Security Model: Linux has a reputation for being more secure than other operating systems. Its permission-based structure (with fine-grained control over who can access files and resources) makes it less prone to attacks.
Regular Updates: The Linux community is very active, and security patches are rolled out quickly to address vulnerabilities.
Open Security: Since the source code is available for review, any security flaws can be found and fixed quickly by both the community and independent security researchers.
4. Stability and Reliability
Linux is known for its stability and reliability, particularly in server environments. It can run for long periods without requiring a reboot, which is why it is commonly used for critical infrastructure, such as web servers, databases, and cloud services.
It is less prone to crashes and slowdowns compared to other operating systems, making it an excellent choice for both personal and professional use.
5. Performance
Lightweight: Linux is highly efficient and can run on older or less powerful hardware. There are lightweight distributions designed to run on minimal resources, making it ideal for systems with limited hardware capabilities.
Optimized for Power Users: With Linux, experts have complete control over the processes and services running on their systems, allowing them to fine-tune performance for specific workloads.
6. Flexibility for Development
Linux is often the go-to operating system for software development, especially for server-side applications. It supports a wide range of programming languages (Python, C, C++, Java, Ruby, etc.) and development tools (IDEs, debuggers, and compilers).
It also provides powerful command-line tools and scripting languages (bash, zsh), which are preferred by developers for automating tasks, system administration, and working with various tools and utilities.
7. Support for Programming and Open-Source Tools
Linux natively supports a wide array of open-source software, making it the perfect environment for software developers, system administrators, and IT professionals.
The OS supports popular development frameworks, version control systems (like Git), and programming languages without the need for complex installations or additional tools.
8. Community Support
Vibrant Community: Linux has a vast and active user base, which contributes to an extensive ecosystem of documentation, forums, and tutorials. This means that experts can often find solutions to their problems through community support, whether it’s via official documentation, Stack Overflow, or dedicated forums.
Collaboration: The Linux community encourages collaboration and sharing knowledge, which helps professionals stay up-to-date with the latest trends and best practices.
9. Server and Cloud Dominance
Preferred for Servers: Linux dominates in the server space, particularly for web servers (Apache, Nginx) and cloud services. Popular cloud platforms, including AWS, Google Cloud, and Azure, offer native support for Linux, and many cloud services are optimized for Linux-based environments.
Containerization: Linux is also widely used for containers (like Docker), which have become a standard for deploying and managing applications across different environments.
10. Minimal Resource Usage
Unlike Windows, Linux distributions are highly efficient in terms of system resources. This makes it an excellent choice for running on servers or devices with limited memory or processing power.
11. Privacy and Data Control
Linux gives users complete control over their data, unlike proprietary systems like Windows or macOS, which often have more aggressive data collection policies. For privacy-conscious users, Linux offers an environment where they can limit what data is shared.
12. Compatibility with Modern Technologies
Linux is widely compatible with modern technologies, including Docker containers, Kubernetes, and the Internet of Things (IoT) devices. Many experts in these fields choose Linux due to its flexibility and adaptability to new tech trends.
Conclusion
Linux is favored by experts for its versatility, security, performance, and the control it offers users over their systems. Whether it's software development, system administration, cybersecurity, or running enterprise-grade servers, Linux is the go-to choice for professionals who value efficiency, customizability, and the open-source nature of the platform.
for more details visit www.qcsdclabs.com
0 notes
Text
Code Blocks Mac Os Download

Code::Blocks is a free, open source cross-platform IDE (Integrated Development Environment) which works alongside compilers such as GCC, Visual C++, and Clang. It is currently oriented towards just a few fundamental programming languages: C, C++, and Fortran.
CodeBlocks is supported by Windows, Mac OS X, and Linux. Its latest version, as of this writing, was released on Dec 27, 2013.
These are instructions on how to build Code::Blocks under Apple Mac OS X. They have been tested under Mac OS X version 10.4 (PowerPC and Intel), and should work similarly on the newer Mac OS X 10.5 and 10.6 as well. Code Blocks Review. Code Blocks is an excellent option for programming in C. It is an open-source, integrated, cross-platform development environment that supports the use of multiple compilers, such as: GCC (MingW/GNU GCC), MSVC, Digital Mars, Borland C 5.5, and Open Watcom. The default compiler that this Code Blocks packet comes with is. Sep 05, 2017 The latest Code blocks v16.01 is not available for Mac OS because, as the team behind the IDE put it, they don’t have developers to make one. So head on to codeblocks.org and download the version that is already available.
Now, introduction aside, I guess you already know what CodeBlocks is. You might have used it easily on Windows to write C/C++ programs; there it wasn’t much of a problem to use the IDE on Windows.

If you’re trying to get CodeBlocks up and running on Mac OS X, then there are few extra things you need to do besides downloading the CodeBlocks file. In this post, I’ll guide you through a step-by-step procedure to install CodeBlocks on Mac.
The Mac version of CodeBlocks relies on Xcode distribution from Apple for its compiler. So, the installation requires setting up of 3 different parts:
1. Installing Xcode:
The first thing you need to do is download Xcode from App Store. Just go to App Store, sign up if you need to, and search for Xcode. The file you’re looking for is this shown below; it is the first item in the search result.
The Xcode file is large – around 2.5GB. Here it says “open” because I’ve already installed it on my Mac. On your Mac, it may say “get” or “free” underneath the icon.
Just click on it, and install it, accepting all the defaults and entering your system password when required. The downloading and installation procedure may take some time. (The version I’ve installed is Xcode 6.1.1.)

2. Installing CodeBlocks:
Download Code Blocks
In the second part, you need to download and setup CodeBlocks for Mac. Go to this page. Click on Download the binary release, and select Mac OS X. Then, download CodeBlocks from any of these two mirror links.
This is a zip file of around 30MB. Once you’ve downloaded it, upzip it and you’ll get a CodeBlocks app file. Now to install this, simply “drag and drop” that file into Applications folder.
If you’ve never installed an application on your Mac from a third-party site before, you will need to make a change to allow your system for such installations. For this go to System Preferences > Security & Privacy.
Click the lock to make changes, and click on Allow apps downloaded from: Anywhere as shown below. (You can revert to your original settings once you’ve installed CodeBlocks.)
3. Installing Command Line Tools:
After you’ve installed Xcode and CodeBlocks, there’s one more thing to do – installing the command line tools. If you just do the above two steps, you can write as much code as you want, but they won’t compile!
This is because you still don’t have a working GCC compiler on your Mac. Command Line Tools allow you to call the compilers from the command line.
Now, go to the Apple Developer download page. First, you may need to log in using your Apple ID, and then you may also be asked to sign up for Apple Developer ID which is free.
You’ll come across a page like this. Click on Command Line Tools for Xcode, and download the dmg file. (This file is 170MB as of now.)
Once you’ve downloaded it, you’ll get a package file (.pkg) as shown above. Just double-click it and it will install the Command Line Tools. Accept all defaults.
Code Blocks For Mac
Then, everything’s set; you’re ready to write your first program using CodeBlocks on Mac. Open CodeBlocks, copy-paste this sample C++ code and click on Build and Run.
Sample C++ Code
2
4
6
usingnamespacestd;
{
return0;
This will open the Terminal and print “I’m using CodeBlocks on Mac!” as shown below.

Well, that’s it – making CodeBlocks run on Mac OS X requires just downloading and installing of Xcode, CodeBlocks itself, and Command Line Tools. If you encounter any problems, or have any questions, bring them up from the comments.
Mac Os Download
Please select a setup package depending on your platform:
NOTE: For older OS'es use older releases. There are releases for many OS version and platforms on the Sourceforge.net page.
Code Blocks Mac Os Download 64-bit
NOTE: There are also more recent nightly builds available in the forums or (for Ubuntu users) in the Ubuntu PPA repository. Please note that we consider nightly builds to be stable, usually.
NOTE: We have a Changelog for 20.03, that gives you an overview over the enhancements and fixes we have put in the new release.
NOTE: The default builds are 64 bit (starting with release 20.03). We also provide 32bit builds for convenience.
Windows XP / Vista / 7 / 8.x / 10:
FileDateDownload from
codeblocks-20.03-setup.exe
codeblocks-20.03-setup-nonadmin.exe
codeblocks-20.03-nosetup.zip
codeblocks-20.03mingw-setup.exe
codeblocks-20.03mingw-nosetup.zip
codeblocks-20.03-32bit-setup.exe
codeblocks-20.03-32bit-setup-nonadmin.exe
codeblocks-20.03-32bit-nosetup.zip
codeblocks-20.03mingw-32bit-setup.exe
codeblocks-20.03mingw-32bit-nosetup.zip
29 Mar 2020
29 Mar 2020
29 Mar 2020
29 Mar 2020
29 Mar 2020
02 Apr 2020
02 Apr 2020
02 Apr 2020
02 Apr 2020
02 Apr 2020
FossHUB or Sourceforge.net
FossHUB or Sourceforge.net
FossHUB or Sourceforge.net
FossHUB or Sourceforge.net
FossHUB or Sourceforge.net
FossHUB or Sourceforge.net
FossHUB or Sourceforge.net
FossHUB or Sourceforge.net
FossHUB or Sourceforge.net
FossHUB or Sourceforge.net

NOTE: The codeblocks-20.03-setup.exe file includes Code::Blocks with all plugins. The codeblocks-20.03-setup-nonadmin.exe file is provided for convenience to users that do not have administrator rights on their machine(s).

NOTE: The codeblocks-20.03mingw-setup.exe file includes additionally the GCC/G++/GFortran compiler and GDB debugger from MinGW-W64 project (version 8.1.0, 32/64 bit, SEH).
NOTE: The codeblocks-20.03(mingw)-nosetup.zip files are provided for convenience to users that are allergic against installers. However, it will not allow to select plugins / features to install (it includes everything) and not create any menu shortcuts. For the 'installation' you are on your own.
If unsure, please use codeblocks-20.03mingw-setup.exe!
Linux 32 and 64-bit:
DistroFileDate Download from
codeblocks_20.03_amd64_oldstable.tar.xz
codeblocks_20.03_i386_oldstable.tar.xz
codeblocks_20.03_amd64_stable.tar.xz
codeblocks_20.03_i386_stable.tar.xz
29 Mar 2020
29 Mar 2020
29 Mar 2020
29 Mar 2020
FossHUB or Sourceforge.net
FossHUB or Sourceforge.net
FossHUB or Sourceforge.net
FossHUB or Sourceforge.net
codeblocks-20.03-1.el6.rmps.tar
codeblocks-20.03-1.el7.rmps.tar
29 Mar 2020
29 Mar 2020
FossHUB or Sourceforge.net
FossHUB or Sourceforge.net
For Ubuntu, use this PPA:
29 Mar 2020
Note: The Linux packages above are compressed archives (tar, tar.xz or tar.bz2). When you decompress the package you downloaded on your system, you will find all the .rpm or .deb packages required to install Code::Blocks.
Note: On RedHat/CentOS older revisions of 6 (up to 6.2 as far as we know) you need to add repoforge (former rpmforge) to your repolist, to be able to install the needed wxGTK-package. See http://repoforge.org/use for an instruction.
Note: Redhat/CentOS probably also needs an installed hunspell-package, if you want to install the contrib-plugins.
Mac OS X:
FileDateDownload from
CodeBlocks-13.12-mac.zip
26 Dec 2013
FossHUB or Sourceforge.net
NOTES:
Code::Blocks 20.03 for Mac is currently not available due to issues caused by Apple hardening their install packages and lack of Mac developers. We could use an extra Mac developer to work on these issues.
The provided download contains an Application Bundle (for the i386 architecture) built for Mac OS X 10.6 (and later), bundling most Code::Blocks plugins.
For older release versions please check here.
0 notes
Text
Hướng dẫn cài đặt Visual Studio Code trên Linux
Được phát triển bởi Microsoft, Visual Studio Code là một IDE hay trình soạn thảo mã nguồn mở miễn phí – cho phép các nhà phát triển ứng dụng có thể viết code sử dụng vô số các ngôn ngữ khác nhau như: C/C++, Go, Pỵhon, Java,…
Trong bài viết này, mình sẽ hướng dẫn bạn cách cài đặt phần mềm Visual Studio Code trên Linux. Cụ thể hơn chút, là bạn sẽ biết cách cài đặt Visual Studio Code trên cả bản phân phối dựa trên Debian lẫn RedHAT.
Hướng dẫn cách cài đặt Visual Studio Code trên Debian, Ubuntu và Linux Mint
Phương pháp cài đặt Visual Studio Code trên các hệ thống dựa trên Debian thường được thực hiện bằng cách kích hoạt repository package Visual Studio Code sử dụng công cụ quản lý package apt.
$ sudo apt update
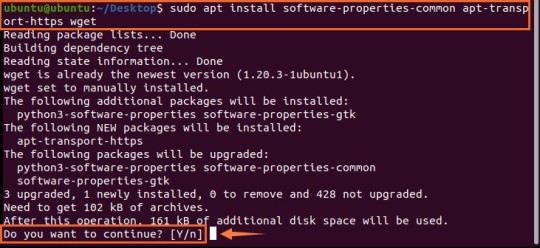
Một khi đã update xong hệ thống, tiến hành cài đặt các dependencies được yêu cầu thực hiện.
$ sudo apt install software-properties-common apt-transport-https
Tiếp theo, sử dụng lệnh wget để iport GPG key của Microsoft như dòng lệnh bên dưới đây:
$ sudo wget -q https://packages.microsoft.com/keys/microsoft.asc -O- | sudo apt-key add -
Với việc bổ sung GPG key của Microsoft, khi đó bật repository của Visual Studio Code bằng cách chạy câu lệnh sau:
$ sudo add-apt-repository "deb [arch=amd64] https://packages.microsoft.com/repos/vscode stable main"
Một khi đã bật repository, cập nhật hệ thống và tiến hành cài đặt Visual Studio Code bằng cách chạy lệnh sau:
$ sudo apt update $ sudo apt install code
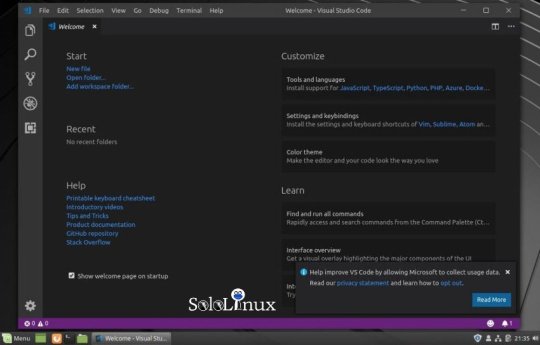
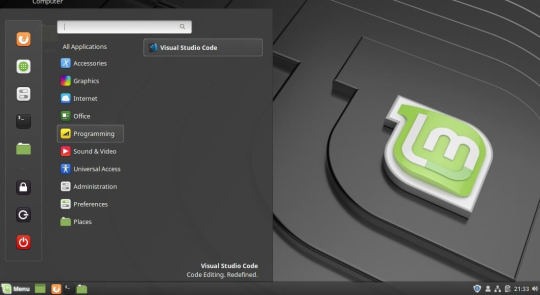
Do kích thước phần mềm này khá nặng, nên việc cài đặt phần mềm sẽ mất khoảng 5 phút đồng hồ. Khi đã cài đặt thành công, hãy sử dụng trình quản lý ứng dụng để tìm kiếm công cụ Visual Studio Code và bấm vào icon để khởi chạy hoặc bạn có thể sử dụng lệnh “code“.

Hướng dẫn cài đặt Visual Code Studio trên CentOS, RHEL và Fedora
Quá trình cài đặt Visual Studiode Code dựa trên các bản phân phối RedHAT tương tự như cách cài đặt trên Ubuntu. Ngay lập tức, tiến hành cập nhật hệ thống bằng cách sử dụng câu lệnh sau:
$ sudo dnf update
Tiếp đó import GPG key của Microsoft bằng cách sử dụng câu lệnh rpm như bên dưới:
$ sudo rpm --import https://packages.microsoft.com/keys/microsoft.asc
Với GPG key của Microsft đã được cài đặt, tiến hành tạo file repository cho Visual Code Studio.
$ sudo vim /etc/yum.repos.d/vstudio_code.repo
Tiếp theo, chèn đoạn code sau vào file.
[code] name=Visual Studio Code baseurl=https://packages.microsoft.com/yumrepos/vscode enabled=1 gpgcheck=1 gpgkey=https://packages.microsoft.com/keys/microsoft.asc
Để cài đặt công cụ Visual Studio Code, chạy câu lệnh sau:
$ sudo dnf install code
Để sử dụng ứng dụng này, tương tự như trên cách cài đặt trên Ubuntu, chỉ cần vào phần quản lý ứng dụng và tìm kiếm Visual Studio Code rồi mở ra là thấy thôi.
Kết luận
Visual Studio Code là công cụ soạn thảo code giàu tính năng và mạnh mẽ – cho phép bạn phát triển ứng dụng trong một loạt các ngôn ngữ lập trình phổ biến. Đặc biệt đối với các nhà lập trình viên ngôn ngữ như C và python cực kỳ thích công cụ này.
The post Hướng dẫn cài đặt Visual Studio Code trên Linux appeared first on Quang Vũ Blog.
source https://blog.vu-review.com/visual-studio-code-linux.html
1 note
·
View note
Link
0 notes
Text
This guide will help new users with the installation of MariaDB 10.7 on Amazon Linux 2. MariaDB is a free to use and open source relational database management system originally forked from MySQL. The latest stable release of MariaBD database server as of this article update is version 10.7 with cool new features that can be read from the release notes page. Install MariaDB 10.7 on Amazon Linux 2 The version of MariaDB server available on the OS default repositories is not the latest as per the upstream project. $ sudo amazon-linux-extras | grep mariadb 17 lamp-mariadb10.2-php7.2 available \ 54 mariadb10.5 available [ =stable ] To be able to install the latest MariaDB 10.7 on Amazon Linux 2 we’ll have to add MariaDB official RPM repository. The one that works for Amazon Linux 2 is CentOS 7 repository. Let’s first update and reboot the system sudo yum -y update sudo reboot Step 1: Add MariaDB repository to Amazon Linux 2 Add MariaDB repository to Amazon Linux 2 machine by running the commands below as root or user with sudo privileges. curl -LsS -O https://downloads.mariadb.com/MariaDB/mariadb_repo_setup sudo bash mariadb_repo_setup --os-type=rhel --os-version=7 --mariadb-server-version=10.7 Repository addition output: # [info] Skipping OS detection and using OS type 'rhel' and version '7' as given on the command line # [info] Checking for script prerequisites. # [info] MariaDB Server version 10.7 is valid # [info] Repository file successfully written to /etc/yum.repos.d/mariadb.repo # [info] Adding trusted package signing keys... /etc/pki/rpm-gpg ~ ~ # [info] Successfully added trusted package signing keys # [info] Cleaning package cache... Failed to set locale, defaulting to C Loaded plugins: langpacks, priorities, update-motd Cleaning repos: amzn2-core amzn2extra-docker mariadb-main mariadb-maxscale mariadb-tools Cleaning up everything Before you begin installaton update OS package cache index: sudo rm -rf /var/cache/yum sudo yum makecache Confirm available repositories on your Amazon Linux instance. $ sudo yum repolist repo id repo name status amzn2-core/2/x86_64 Amazon Linux 2 core repository 27317 amzn2extra-docker/2/x86_64 Amazon Extras repo for docker 56 mariadb-main MariaDB Server 80+3 mariadb-maxscale MariaDB MaxScale 4 mariadb-tools MariaDB Tools 14+1 repolist: 27471 Step 2: Install MariaDB 10.7 on Amazon Linux 2 Once you have the repository added and working you can then begin the installation of MariaDB on Amazon Linux 2 machine. sudo yum install MariaDB-server MariaDB-client Make sure there are no dependency issues and agree to installation. .... Dependencies Resolved ====================================================================================================================================================================================================== Package Arch Version Repository Size
====================================================================================================================================================================================================== Installing: MariaDB-client x86_64 10.7.3-1.el7.centos mariadb-main 15 M MariaDB-compat x86_64 10.7.3-1.el7.centos mariadb-main 2.2 M replacing mariadb-libs.x86_64 1:5.5.68-1.amzn2 MariaDB-server x86_64 10.7.3-1.el7.centos mariadb-main 25 M Installing for dependencies: MariaDB-common x86_64 10.7.3-1.el7.centos mariadb-main 81 k boost-program-options x86_64 1.53.0-27.amzn2.0.5 amzn2-core 161 k galera-4 x86_64 26.4.11-1.el7.centos mariadb-main 9.9 M libpmem x86_64 1.3-3.amzn2 amzn2-core 36 k ncurses-compat-libs x86_64 6.0-8.20170212.amzn2.1.3 amzn2-core 308 k perl-Compress-Raw-Bzip2 x86_64 2.061-3.amzn2.0.2 amzn2-core 32 k perl-Compress-Raw-Zlib x86_64 1:2.061-4.amzn2.0.2 amzn2-core 58 k perl-DBI x86_64 1.627-4.amzn2.0.2 amzn2-core 804 k perl-Data-Dumper x86_64 2.145-3.amzn2.0.2 amzn2-core 48 k perl-IO-Compress noarch 2.061-2.amzn2 amzn2-core 260 k perl-Net-Daemon noarch 0.48-5.amzn2 amzn2-core 51 k perl-PlRPC noarch 0.2020-14.amzn2 amzn2-core 36 k socat x86_64 1.7.3.2-2.amzn2.0.1 amzn2-core 291 k Transaction Summary ====================================================================================================================================================================================================== Install 3 Packages (+13 Dependent packages) Total download size: 54 M Is this ok [y/d/N]: y Start and enable the database service. sudo systemctl enable --now mariadb MariaDB service should show as running. $ systemctl status mariadb ● mariadb.service - MariaDB 10.7.3 database server
Loaded: loaded (/usr/lib/systemd/system/mariadb.service; enabled; vendor preset: disabled) Drop-In: /etc/systemd/system/mariadb.service.d └─migrated-from-my.cnf-settings.conf Active: active (running) since Thu 2022-03-03 00:03:20 UTC; 3s ago Docs: man:mariadbd(8) https://mariadb.com/kb/en/library/systemd/ Process: 3222 ExecStartPost=/bin/sh -c systemctl unset-environment _WSREP_START_POSITION (code=exited, status=0/SUCCESS) Process: 3197 ExecStartPre=/bin/sh -c [ ! -e /usr/bin/galera_recovery ] && VAR= || VAR=`cd /usr/bin/..; /usr/bin/galera_recovery`; [ $? -eq 0 ] && systemctl set-environment _WSREP_START_POSITION=$VAR || exit 1 (code=exited, status=0/SUCCESS) Process: 3194 ExecStartPre=/bin/sh -c systemctl unset-environment _WSREP_START_POSITION (code=exited, status=0/SUCCESS) Main PID: 3208 (mariadbd) Status: "Taking your SQL requests now..." CGroup: /system.slice/mariadb.service └─3208 /usr/sbin/mariadbd Step 3: Secure and Test database connection Run the database hardening script provided by the installer. $ sudo mariadb-secure-installation NOTE: RUNNING ALL PARTS OF THIS SCRIPT IS RECOMMENDED FOR ALL MariaDB SERVERS IN PRODUCTION USE! PLEASE READ EACH STEP CAREFULLY! In order to log into MariaDB to secure it, we'll need the current password for the root user. If you've just installed MariaDB, and haven't set the root password yet, you should just press enter here. Enter current password for root (enter for none): OK, successfully used password, moving on... Setting the root password or using the unix_socket ensures that nobodycan log into the MariaDB root user without the proper authorisation. You already have your root account protected, so you can safely answer 'n'. Switch to unix_socket authentication [Y/n] n ... skipping. You already have your root account protected, so you can safely answer 'n'. Change the root password? [Y/n] y New password: Re-enter new password: Password updated successfully! Reloading privilege tables.. ... Success! By default, a MariaDB installation has an anonymous user, allowing anyone to log into MariaDB without having to have a user account created for them. This is intended only for testing, and to make the installation go a bit smoother. You should remove them before moving into a production environment. Remove anonymous users? [Y/n] y ... Success! Normally, root should only be allowed to connect from 'localhost'. This ensures that someone cannot guess at the root password from the network. Disallow root login remotely? [Y/n] y ... Success! By default, MariaDB comes with a database named 'test' that anyone can access. This is also intended only for testing, and should be removed before moving into a production environment. Remove test database and access to it? [Y/n] y - Dropping test database... ... Success! - Removing privileges on test database... ... Success! Reloading the privilege tables will ensure that all changes made so far will take effect immediately. Reload privilege tables now? [Y/n] y ... Success! Cleaning up... All done! If you've completed all of the above steps, your MariaDB installation should now be secure. Thanks for using MariaDB! Confirm you can login as root user with the password set. $ mysql -u root -p Enter password: Welcome to the MariaDB monitor. Commands end with ; or \g. Your MariaDB connection id is 14 Server version: 10.7.3-MariaDB MariaDB Server Copyright (c) 2000, 2018, Oracle, MariaDB Corporation Ab and others. Type 'help;' or '\h' for help. Type '\c' to clear the current input statement. MariaDB [(none)]> SELECT VERSION(); +----------------+ | VERSION() | +----------------+ | 10.7.3-MariaDB | +----------------+ 1 row in set (0.000 sec) MariaDB [(none)]> QUIT Bye The marks the end of our guide on the installation of MariaDB 10.7 on Amazon Linux 2 server.
0 notes
Text
Night owl discovery pro

#Night owl discovery pro license key#
#Night owl discovery pro 720p#
#Night owl discovery pro 1080p#
#Night owl discovery pro drivers#
#Night owl discovery pro update#
#Night owl discovery pro license key#
This multi-threaded application ran on a dual dual-core Xeon server.ĭeveloped compatibility libraries to run some code originally written for Windows under Linux.Ĭreated licensing manager for a telecom product in C for OSE operating system to enableĬall limits, trial licenses, leased licenses, backup licenses, and application restrictions.ĭeveloped license key generation program for Windows using Microsoft Visual C++.NETĭeveloped an integrated IEEE 1149.1 JTAG architecture allowing boundary scan test, CPU and DSP debuggers, With Multi IDE to CENTOS (Red Hat Enterprise Linux) environment using Eclipse IDE, GCC, GDB. Setup new development environment and ported C/C++ code from Enea OSE RTOS using Green Hills compiler Integrated with clients Visual SourceSafe version control system. The product is a high end SACD audio disc player.ĭeveloped code in C using IAR Embedded Workbench tools for STR750 ARM7 microcontroller.Ĭreated bootloader, in-system updates for all firmware including Microchip PIC18, Xilinx FPGA and CPLD.
#Night owl discovery pro drivers#
The device transmits camera images of the pillbox over ethernet or a POTS line and uses Voice-over-Internet-Protocol (VOIP) to communicate with caregivers or a call center.Įnhanced bootloader to add diagnostic tests to support manufacturing and verify proper operation in the field.Įnhanced stepper motor drivers for direct control using a scripting language. Monitor dispensing of medication to elderly clients. The product is an advanced home medical device designed to GPS drivers, storage driver, power monitoring,Ģ.4GHz 802.15.4 radios using Synapse SNAP modules, Python, XML-RPC, low power sleep modes, antenna measurements. Software and firmware for vehicle GPS tracking.
#Night owl discovery pro update#
Implemented complex monitoring and control algorithms.ĭesigned a custom bootloader and robust OTA firmware update process. Temperature and humidity sensors and relays. Wifi performance testing.ĭeveloped the firmware to control an animated custom display, OTA firmware update over Wifi.ĮMMC performance tuning. Implemented fast wakeup and wifi connection. NOTE: You can add up to a MAX of 4 wire free cameras to our WNIP2 Series Wi-Fi NVR.Developed the FreeRTOS firmware for wireless battery-powered remote control with LCD touchscreen.It must be used with a compatible Night Owl® WNIP2 Series Wi-Fi NVR - sold separately. Add-On Camera: This camera is not for stand-alone use.Engineered in the USA: All our products are designed and engineered in the United States.No Monthly Fees: The compatible Wi-Fi NVR required to use this add-on battery-powered security camera includes free remote viewing, with no need for monthly service or offsite storage fees.Enjoy detailed video, bright playback, crisp photos, and real-time footage.
#Night owl discovery pro 1080p#
High-Quality 1080p Resolution: Monitor your property with sharp 1080p video resolution.
This camera records in full-color during the day and black and white at night for 24/7 monitoring.
Night Vision: Keep an eye on your property at all hours with up to 40 ft.
You are notified immediately with a real-time alert to your Smart Device when human motion occurs.
Motion-Activated Spotlight: The bright spotlight in this indoor/outdoor security camera automatically switches on when the camera detects human motion.
2-Way Audio Communication: Speak and listen remotely through your camera with the Night Owl® app.
Hassle-Free Charging Options: The camera includes 2 rechargeable batteries and can hold up to 4 that can be conveniently charged while the camera remains mounted.
Battery-Powered Security Camera for Wire Free Flexibility: This camera is battery operated, so there’s no need for rewiring or disguising a conspicuous cord.
With resolutions up to 4K, advanced features like motion detection, and vandal-proof mounting, Night Owl Add On Cameras keep you connected to your world. Both Wired and Wireless add on cameras use the latest technology to fulfill your surveillance needs. Ready to expand your video security system? Maybe it is time to replace older cameras? Our Add On Cameras are designed for use with compatible Night Owl DVR’s (Digital Video Recorders) and NVR’s (Network Video Recorders). Whether you are searching for a compatible Wired or Wireless camera, you will find them here. Some systems are backward compatible, while others will only work with a specific camera model. It is important to note that Add On Cameras are not compatible with all systems.
#Night owl discovery pro 720p#
Resolutions between 720p and 4K (8 Megapixels) are sure to fit your existing Analog or HD system. Our Add On Cameras are sold in packs of 1, 2, and 4. Welcome to Night Owl’s world of Add On Cameras! Ready to expand your Wired or Wireless video security system? Maybe it is time to replace older cameras? Night Owl has a wide selection of indoor and indoor/outdoor Add On Cameras.
0 notes
Text
Ubuntu notepad++ download command

UBUNTU NOTEPAD++ DOWNLOAD COMMAND INSTALL
UBUNTU NOTEPAD++ DOWNLOAD COMMAND UPDATE
UBUNTU NOTEPAD++ DOWNLOAD COMMAND CODE
It possess in build UI designer, support for version control, it has multiple platform support and simulator of Mobile UI designing. The must have IDE for C++ and QML developers.
UBUNTU NOTEPAD++ DOWNLOAD COMMAND INSTALL
Install gedit in CentOS Linux # yum install gedit Install package in Ubuntu # apt-get install gedit Gedit is already installed application in Ubuntu and CentOS Linux, but if it is removed then can be installed. The official text editor from Genome, an ideal tool for general purpose text editing, advantage of using gedit is that it gives you feel of using office suite, i has features print preview, text wrapping auto indentation, bracket matching, fonts and color configuration and it provides a rich and complete online documentation. Install package with CentOS 7, download package # wget Įxtract Package # tar -xvf /Komodo/releases/9.3.2/Komodo-Edit-9.3.2-16460-linux-x86_64.tar.gz
UBUNTU NOTEPAD++ DOWNLOAD COMMAND UPDATE
Update and install package # apt-get update & apt-get install komodo-edit Install komodo edit with Ubuntu/Mint Linux LinuxĪdd repo # sudo add-apt-repository -y ppa:mystic-mirage/komodo-edit Komodo-edit package it available as open source and free but user can also purchase commercial and advanced version of Komodo IDE.
UBUNTU NOTEPAD++ DOWNLOAD COMMAND CODE
It provides syntax coloring, code folding and it include CSS code formetter. It support several language including Google go language. Komodo Edit was founded in 2007, this text editor is written in C++, python, pearl and java script. Update System and install package # apt-get update & apt-get install brackets Use following commands # sudo add-apt-repository ppa:webupd8team/brackets Officially brackets editor is provided in. As per official statement of Brackets it is “A Modern text editor that understand web design”. Install package # yum install atom.x86_64.rpmīrackets is developed and maintained by Adobe, an ideal IDE for web developments which supports HTML5, CSS and java script. Ideal for PHP and python development.Īdd repo and install package # sudo add-apt-repository ppa:webupd8team/atom It comes with auto completion, search/replace, multiple file support and display line numbers. Install package in CentOS 7. Download package # wget Įxtract package # tar -vxjf sublime_text_3_build_3065_圆4.tar.bz2 -C /optĬreate a soft Link # sudo ln -s /opt/sublime_text_3/sublime_text /usr/bin/sublime3Ī light and fast editor which support multiple os platforms, ideal for code development and customizable text editor. Install package # dpkg -i sublime-text_build-3114_b Installation with Ubuntu/Mint Linux, Download Package # wget Developer can improve performance by freely available plugins, “go to anything navigation” navigate to symbols, files, lines etc, more then 20 themes are available which make t looking good. it is a cross platform source code editor with a python programming application interface or API. Sublime text editor is written in c++ and python, it is an ideal text editor for programming in python, HTML, php etc.
0 notes
Text
Visual Studio Code Apt

Visit the VS Code install page and select the 32 or 64 bit installer. Install Visual Studio Code on Windows (not in your WSL file system). When prompted to Select Additional Tasks during installation, be sure to check the Add to PATH option so you can easily open a folder in WSL using the code command. Visual Studio Code is a free and open-source, cross-platform IDE or code editor that enables developers to develop applications and write code using a myriad of programming languages such as C, C, Python, Go and Java to mention a few. To Install Visual Studio Code on Debian, Ubuntu and Linux Mint: 1. Update your system by running the command. Introduction to Visual Studio Code. Introduction to Visual Studio Code. Skip to Content Current Page: Blog About Contact FAQs. Now, to install the Visual Studio Code DEB package file, run the APT command as follows. $ sudo apt install. / code.deb The APT package manager should start installing the DEB package file. At this point, Visual Studio Code should be installed.
Visual Studio Code Apt
Visual Studio Code Apt Install
Apt Remove Visual Studio Code
Installation
See the Download Visual Studio Code page for a complete list of available installation options.
By downloading and using Visual Studio Code, you agree to the license terms and privacy statement.
Snap
Visual Studio Code is officially distributed as a Snap package in the Snap Store:
You can install it by running:
Once installed, the Snap daemon will take care of automatically updating VS Code in the background. You will get an in-product update notification whenever a new update is available.
Note: If snap isn't available in your Linux distribution, please check the following Installing snapd guide, which can help you get that set up.
Learn more about snaps from the official Snap Documentation.
Debian and Ubuntu based distributions
The easiest way to install Visual Studio Code for Debian/Ubuntu based distributions is to download and install the .deb package (64-bit), either through the graphical software center if it's available, or through the command line with:
Note that other binaries are also available on the VS Code download page.
Installing the .deb package will automatically install the apt repository and signing key to enable auto-updating using the system's package manager. Alternatively, the repository and key can also be installed manually with the following script:
Then update the package cache and install the package using:
RHEL, Fedora, and CentOS based distributions
We currently ship the stable 64-bit VS Code in a yum repository, the following script will install the key and repository:
Then update the package cache and install the package using dnf (Fedora 22 and above):
Or on older versions using yum:
Due to the manual signing process and the system we use to publish, the yum repo may lag behind and not get the latest version of VS Code immediately.
openSUSE and SLE-based distributions
The yum repository above also works for openSUSE and SLE-based systems, the following script will install the key and repository:
Then update the package cache and install the package using:
AUR package for Arch Linux
There is a community-maintained Arch User Repository package for VS Code.
To get more information about the installation from the AUR, please consult the following wiki entry: Install AUR Packages.
Nix package for NixOS (or any Linux distribution using Nix package manager)
There is a community maintained VS Code Nix package in the nixpkgs repository. In order to install it using Nix, set allowUnfree option to true in your config.nix and execute:
Installing .rpm package manually
The VS Code .rpm package (64-bit) can also be manually downloaded and installed, however, auto-updating won't work unless the repository above is installed. Once downloaded it can be installed using your package manager, for example with dnf:
Note that other binaries are also available on the VS Code download page.
Updates
VS Code ships monthly and you can see when a new release is available by checking the release notes. If the VS Code repository was installed correctly, then your system package manager should handle auto-updating in the same way as other packages on the system.
Note: Updates are automatic and run in the background for the Snap package.
Node.js
Node.js is a popular platform and runtime for easily building and running JavaScript applications. It also includes npm, a Package Manager for Node.js modules. You'll see Node.js and npm mentioned frequently in our documentation and some optional VS Code tooling requires Node.js (for example, the VS Code extension generator).
If you'd like to install Node.js on Linux, see Installing Node.js via package manager to find the Node.js package and installation instructions tailored to your Linux distribution. You can also install and support multiple versions of Node.js by using the Node Version Manager.
To learn more about JavaScript and Node.js, see our Node.js tutorial, where you'll learn about running and debugging Node.js applications with VS Code.
Setting VS Code as the default text editor
xdg-open
You can set the default text editor for text files (text/plain) that is used by xdg-open with the following command:
Debian alternatives system
Debian-based distributions allow setting a default editor using the Debian alternatives system, without concern for the MIME type. You can set this by running the following and selecting code:
If Visual Studio Code doesn't show up as an alternative to editor, you need to register it:
Windows as a Linux developer machine
Another option for Linux development with VS Code is to use a Windows machine with the Windows Subsystem for Linux (WSL).
Windows Subsystem for Linux
Visual Studio Code Apt
With WSL, you can install and run Linux distributions on Windows. This enables you to develop and test your source code on Linux while still working locally on a Windows machine. WSL supports Linux distributions such as Ubuntu, Debian, SUSE, and Alpine available from the Microsoft Store.
When coupled with the Remote - WSL extension, you get full VS Code editing and debugging support while running in the context of a Linux distro on WSL.
See the Developing in WSL documentation to learn more or try the Working in WSL introductory tutorial.
Next steps
Once you have installed VS Code, these topics will help you learn more about it:
Additional Components - Learn how to install Git, Node.js, TypeScript, and tools like Yeoman.
User Interface - A quick orientation to VS Code.
User/Workspace Settings - Learn how to configure VS Code to your preferences through settings.
Common questions
Azure VM Issues
I'm getting a 'Running without the SUID sandbox' error?
You can safely ignore this error.
Debian and moving files to trash
If you see an error when deleting files from the VS Code Explorer on the Debian operating system, it might be because the trash implementation that VS Code is using is not there.
Run these commands to solve this issue:
Conflicts with VS Code packages from other repositories
Some distributions, for example Pop!_OS provide their own code package. To ensure the official VS Code repository is used, create a file named /etc/apt/preferences.d/code with the following content:
'Visual Studio Code is unable to watch for file changes in this large workspace' (error ENOSPC)
When you see this notification, it indicates that the VS Code file watcher is running out of handles because the workspace is large and contains many files. Before adjusting platform limits, make sure that potentially large folders, such as Python .venv, are added to the files.watcherExclude setting (more details below). The current limit can be viewed by running:
The limit can be increased to its maximum by editing /etc/sysctl.conf (except on Arch Linux, read below) and adding this line to the end of the file:
The new value can then be loaded in by running sudo sysctl -p.
While 524,288 is the maximum number of files that can be watched, if you're in an environment that is particularly memory constrained, you may wish to lower the number. Each file watch takes up 1080 bytes, so assuming that all 524,288 watches are consumed, that results in an upper bound of around 540 MiB.
Arch-based distros (including Manjaro) require you to change a different file; follow these steps instead.
Another option is to exclude specific workspace directories from the VS Code file watcher with the files.watcherExcludesetting. The default for files.watcherExclude excludes node_modules and some folders under .git, but you can add other directories that you don't want VS Code to track.
I can't see Chinese characters in Ubuntu
We're working on a fix. In the meantime, open the application menu, then choose File > Preferences > Settings. In the Text Editor > Font section, set 'Font Family' to Droid Sans Mono, Droid Sans Fallback. If you'd rather edit the settings.json file directly, set editor.fontFamily as shown:
Package git is not installed
This error can appear during installation and is typically caused by the package manager's lists being out of date. Try updating them and installing again:
The code bin command does not bring the window to the foreground on Ubuntu
Running code . on Ubuntu when VS Code is already open in the current directory will not bring VS Code into the foreground. This is a feature of the OS which can be disabled using ccsm.
Under General > General Options > Focus & Raise Behaviour, set 'Focus Prevention Level' to 'Off'. Remember this is an OS-level setting that will apply to all applications, not just VS Code.
Visual Studio Code Apt Install
Cannot install .deb package due to '/etc/apt/sources.list.d/vscode.list: No such file or directory'

This can happen when sources.list.d doesn't exist or you don't have access to create the file. To fix this, try manually creating the folder and an empty vscode.list file:
Cannot move or resize the window while X forwarding a remote window
If you are using X forwarding to use VS Code remotely, you will need to use the native title bar to ensure you can properly manipulate the window. You can switch to using it by setting window.titleBarStyle to native.
Using the custom title bar
The custom title bar and menus were enabled by default on Linux for several months. The custom title bar has been a success on Windows, but the customer response on Linux suggests otherwise. Based on feedback, we have decided to make this setting opt-in on Linux and leave the native title bar as the default.
Apt Remove Visual Studio Code
The custom title bar provides many benefits including great theming support and better accessibility through keyboard navigation and screen readers. Unfortunately, these benefits do not translate as well to the Linux platform. Linux has a variety of desktop environments and window managers that can make the VS Code theming look foreign to users. For users needing the accessibility improvements, we recommend enabling the custom title bar when running in accessibility mode using a screen reader. You can still manually set the title bar with the Window: Title Bar Style (window.titleBarStyle) setting.
Broken cursor in editor with display scaling enabled
Due to an upstream issue #14787 with Electron, the mouse cursor may render incorrectly with scaling enabled. If you notice that the usual text cursor is not being rendered inside the editor as you would expect, try falling back to the native menu bar by configuring the setting window.titleBarStyle to native.
Repository changed its origin value
If you receive an error similar to the following:
Use apt instead of apt-get and you will be prompted to accept the origin change:
0 notes
Text
Streaming MySQL Backups with Percona XtraBackup – Another Alternative
Today we are going to present you with another way to make a database copy between servers using our Percona XtraBackup utility. What is the difference with many others existing on the web? Not many, but they are interesting in terms of performance and availability. We will combine the xbstream utility with the power of pigz and socat, to take advantage of the multi-processing in the case of having multiple processors, and at the same time, reduce the use of network bandwidth in cases where this component is a bottleneck. So let’s explain each component: socat: This stands for SOcket CAT. It is a utility for data transfer between two addresses. What makes socat so versatile is the fact that an address can represent a network socket, any file descriptor, a Unix domain datagram or stream socket, TCP and UDP (over both IPv4 and IPv6), SOCKS 4/4a over IPv4/IPv6, SCTP, PTY, datagram, and stream sockets, named and unnamed pipes, raw IP sockets, OpenSSL, or on Linux even any arbitrary network device pigz: This stands for parallel implementation of gzip, and it is a fully functional replacement for gzip that exploits multiple processors and multiple cores to the hilt when compressing data. xbstream: (with parallelism) to process several files in parallel. Packages required: pigz, socat, and, of course, Percona XtraBackup Servers Involved in the Task Source: the source database where the backup will be taken (MySQL 5.7 installed on CentOS 7.8) Target: the destination where the backup will be send (MySQL 5.7 installed on CentOS 7.8) Steps 1. Install the required packages in the Source and Target nodes: Source # yum install -y pigz socat Target # yum install -y pigz socat If you haven’t installed Percona XtraBackup (in both servers), please follow the instructions explained in https://www.percona.com/doc/percona-xtrabackup/2.4/index.html#installation Make sure you have a user with proper privileges to do the backup on Source db: +---------------------------------------------------------------------------+ | Grants for bkpuser@localhost | +---------------------------------------------------------------------------+ | GRANT RELOAD, PROCESS, REPLICATION CLIENT ON *.* TO 'bkpuser'@'localhost' | +---------------------------------------------------------------------------+ 2. On Target, execute: Stop current database service (if any): Target # systemctl stop mysqld Delete datadir contents (assuming it was installed with default settings) and make sure you’re logged in to the Target server!! Target # rm -rf /var/lib/mysql/* Finally, we’re going to execute the command to receive the backup from the source (Source): Target # socat -u TCP-LISTEN:4444,reuseaddr stdio | pigz -dc -p 4 - | xbstream —p 4 -x -C /var/lib/mysql 3. On Source, execute the command to send the backup to target (Target). Source # xtrabackup --defaults-file=/etc/my.cnf --backup --user=bkpuser --password=Bkpuser123! --stream=xbstream --parallel 4 --no-timestamp --target-dir=/tmp | pigz -k -1 -p4 - | socat -u stdio TCP:Target:4444 You will see an output like this: xtrabackup: recognized server arguments: --datadir=/var/lib/mysql --server-id=1 --log_bin=/var/lib/mysql/mysql-bin --innodb_log_file_size=200M --innodb_log_files_in_group=2 --open_files_limit=65535 --parallel=4 xtrabackup: recognized client arguments: --backup=1 --user=bkpuser --password=* --stream=xbstream --target-dir=/tmp 200822 11:10:16 version_check Connecting to MySQL server with DSN 'dbi:mysql:;mysql_read_default_group=xtrabackup' as 'bkpuser' (using password: YES). 200822 11:10:16 version_check Connected to MySQL server 200822 11:10:16 version_check Executing a version check against the server... 200822 11:10:16 version_check Done. 200822 11:10:16 Connecting to MySQL server host: localhost, user: bkpuser, password: set, port: not set, socket: not set Using server version 5.7.30-log xtrabackup version 2.4.20 based on MySQL server 5.7.26 Linux (x86_64) (revision id: c8b4056) xtrabackup: uses posix_fadvise(). xtrabackup: cd to /var/lib/mysql xtrabackup: open files limit requested 65535, set to 65535 xtrabackup: using the following InnoDB configuration: xtrabackup: innodb_data_home_dir = . xtrabackup: innodb_data_file_path = ibdata1:12M:autoextend xtrabackup: innodb_log_group_home_dir = ./ xtrabackup: innodb_log_files_in_group = 2 xtrabackup: innodb_log_file_size = 209715200 InnoDB: Number of pools: 1 200822 11:10:16 >> log scanned up to (6724690490) xtrabackup: Generating a list of tablespaces InnoDB: Allocated tablespace ID 2 for mysql/plugin, old maximum was 0 xtrabackup: Starting 4 threads for parallel data files transfer 200822 11:10:16 [01] Streaming ./ibdata1 ...etc 4. Once finished with step 3, you will see an output like this on the Target node: ... MySQL binlog position: filename 'mysql-bin.000091', position '102205647' 200822 11:10:21 [00] Streaming 200822 11:10:21 [00] ...done 200822 11:10:21 [00] Streaming 200822 11:10:21 [00] ...done xtrabackup: Transaction log of lsn (4308505553) to (4308505562) was copied. 200822 11:10:21 completed OK! And step 2 will be finished too, so you must execute the following commands in Target node: Target # xtrabackup --prepare --use-memory=1G --target-dir=/var/lib/mysql/ From the documentation: After you made a backup with the xtrabackup –backup option, you’ll first need to prepare it in order to restore it. Data files are not point-in-time consistent until they’ve been prepared, because they were copied at different times as the program ran, and they might have been changed while this was happening. If you try to start InnoDB with these data files, it will detect corruption and crash itself to prevent you from running on damaged data. The xtrabackup –prepare step makes the files perfectly consistent at a single instant in time, so you can run InnoDB on them. Target # chown -R mysql:mysql /var/lib/mysql/* Target # systemctl start mysqld And you have cloned a new database! You can, of course, set up this new database as a replica with these additional steps executed in the Target node: Look at the content of the file xtrabackup_binlog_info, it will be something like: Target # cat /var/lib/mysql/xtrabackup_binlog_info mysql-bin.000091 102205647 (We’re assuming they have created the following user/grants in the Source db, if not, create it) mysql> show grants for replicator; +----------------------------------------------------+ | Grants for replicator@% | +----------------------------------------------------+ | GRANT REPLICATION SLAVE ON *.* TO 'replicator'@'%' | +----------------------------------------------------+ Connect to the database, and run: Target # mysql -u root -p mysql> change master to master_host='Source',master_port=3306,master_user='replicator',master_password='R3pl1c4t10n!',master_log_file='mysql-bin.000091',master_log_pos=102205647; Query OK, 0 rows affected (0.00 sec) mysql> start slave; Query OK, 0 rows affected (0.00 sec) mysql> pager egrep -i "Master_Host|Master_User|Master_Port|file|behind" mysql> show slave statusG Master_Host: master Master_User: replicator Master_Port: 3306 Master_Log_File: mysql-bin.000091 Relay_Log_File: relay.000001 Relay_Master_Log_File: mysql-bin.000091 Until_Log_File: Master_SSL_CA_File: Seconds_Behind_Master: 0 Master_Info_File: mysql.slave_master_info 1 row in set (0.00 sec) And that’s all. Happy streaming! https://www.percona.com/blog/2021/01/08/streaming-mysql-backups-with-percona-xtrabackup-another-alternative/
0 notes
Text
Cacti is a great monitoring and Graphing tool that runs on many Unix and Linux Operating systems. We recently wrote guides on Cacti installation, check them out using the following links: Install Cacti Monitoring Server on Debian How To Install Cacti on RHEL 8 / CentOS 8 Install and Configure Cacti on Ubuntu This guide on How to Import templates on Cacti is based on that article. What are Cacti Templates: You can unleash the real strength of Cacti is by using templates. There are three different types of templates with the basic Cacti installation: Data Templates – A data template provides a skeleton for an actual data source Graph Templates – A graph template provides a skeleton for an actual graph Host Templates – Instead of abstracting the fields of a host, a host template allows you to associate graph templates and data queries with a given host type. How to Import templates on Cacti Templates on Cacti are imported using import_package.php script. You can locate this script by using the command below: $ sudo find / -name import_package.php /var/www/html/cacti/cli/import_package.php From the output we can confirm its location is /var/www/html/cacti/cli/import_package.php. This may vary depending on how your installation was done. Check script usage guide: $ sudo /var/www/html/cacti/cli/import_package.php --help Cacti Import Template Utility, Version 1.2.19 (DB: 1.2.19), Copyright (C) 2004-2022 The Cacti Group usage: import_package.php --filename=[filename] [--only-info] [--remove-orphans] [--with-profile] [--profile-id=N A utility to allow signed Cacti Packages to be imported from the command line. Required: --filename The name of the gziped package file to import Optional: --only-info Output the info section of the package, do not import --preview Preview the Template Import, do not import --with-profile Use the default system Data Source Profile --profile-id=N Use the specific profile id when importing --remove-orphans If importing a new version of the template, old elements will be removed, if they do not exist in the new version of the template. The usage syntax is: sudo /var/www/html/cacti/cli/import_package.php --filename=[filename] Where: [filename] is the name of the gziped package file to import Downloading Cacti Templates Cacti Templates for Host, Graph, and Data are available on https://docs.cacti.net/templates. You can download a template you want from the link to the local system where Cacti server runs. Let’s consider an example to install SNMP Generic device template wget https://docs.cacti.net/_media/template:package:generic_snmp_device.xml.gz Once the package is downloaded, install it like below: sudo /var/www/html/cacti/cli/import_package.php --filename=./generic_snmp_device.xml.gz Sample output: Cacti has imported the following items for the Package: Package Files /var/www/html/cacti/site/resource/snmp_queries/interface.xml [written] CDEF [success] Turn Bytes into Bits [unchanged] GPRINT Preset [success] Normal [unchanged] Data Input Method [success] Unix - Ping Host [updated] Table: data_input, Column: input_string, New Value: 'perl /scripts/ping.pl ', Old Value: 'perl /scripts/ping.pl ' Table: data_input_fields, Column: data_name, New Value: 'hostname', Old Value: 'ip' [success] Get SNMP Data [unchanged] [success] Get SNMP Data (Indexed) [updated] Table: data_input_fields, Column: allow_nulls, New Value: 'on', Old Value: '' Data Template [success] Unix - Ping Host [new] [success] SNMP - Generic OID Template [new] [success] Interface - Traffic [new] [success] Interface - Errors/Discards [new] [success] Interface - Unicast Packets [new] [success] Interface - Non-Unicast Packets [new] Graph Template [success] Unix - Ping Latency [new] [success] SNMP - Generic OID Template [new] [success] Interface - Traffic (bits/sec) [new]
[success] Interface - Errors/Discards [new] [success] Interface - Unicast Packets [new] [success] Interface - Non-Unicast Packets [new] [success] Interface - Traffic (bytes/sec) [new] [success] Interface - Traffic (bits/sec, 95th Percentile) [new] [success] Interface - Traffic (bits/sec, Total Bandwidth) [new] [success] Interface - Traffic (bytes/sec, Total Bandwidth) [new] [success] Interface - Multicast Packets (Legacy) [new] [success] Interface - Broadcast Packets (Legacy) [new] Data Query After the installation, Data Query XML files are copied into Cacti snmp_queries directory: $ ls -1 /var/www/html/cacti/resource/snmp_queries/ host_disk.xml index.php interface.xml net-snmp_devio.xml net-snmp_disk.xml Let’s also add Local Linux system wget https://docs.cacti.net/_media/template:package:local_linux_machine.xml.gz -O local_linux_machine.xml.gz Then import it using the command: sudo /var/www/html/cacti/cli/import_package.php --filename=./local_linux_machine.xml.gz This last package comes with the following templates – linux, UNIX, net-snmp, load, cpu, memory, context switches, interrupts, interface, errors, disk, logins, processes, iops wget https://docs.cacti.net/_media/template:package:netsnmp_device.xml.gz -O netsnmp_device.xml.gz sudo /var/www/html/cacti/cli/import_package.php --filename=./netsnmp_device.xml.gz Confirm that the templates have been imported on Cacti Admin interface. Login using admin user account, then go to: Console > Templates
0 notes
Link
こんにちは、サイオステクノロジー武井です。いよいよ佳境に入ってきた連載「世界一わかりみが深いコンテナ & Docker入門 」ですが、今回はDockerのファイルシステムです。 全7回シリーズでお届けする予定で、今回は第6回目となります。 その1:コンテナってなに? その2:Dockerってなに? その3:Dockerfileってなに? その4:docker-composeってなに? その5:Dockerのネットワークってどうなってるの? 今回はこちら → その6:Dockerのファイルシステムってどうなってるの? その7:実践!!Dockerでアプリケーション開発!!(執筆中) Dockerのファイルシステム Dockerは、その1:コンテナってなに?で紹介したDockerリポジトリにたくさんのDockerイメージを格納しています。その容量を節約するために、ちょっと特殊なファイルシステムを採用しています。それは、「OverlayFS(Overlay Filesystem)」というもので、ちょうど画像や写真を編集するソフト「Photoshop」のレイヤーのようなイメージです。OverlayFSのおかげで劇的に容量を効率化出来ているDockerリポジトリですが、まず、そのOverlayFSの仕組みからご説明したいと思います。(他にも色々なファイルシステムがありますが、本ブログでは一番メジャーと思われるOverlayFSについてのみ説明します) OverlayFSとは? OverlayFSについてお話します。 OverlayFSのイメージ OverlayFSとは、端的にいうと、レイヤーを重ね合わせて結合してできるファイルシステムです。ナンノコッチャという感じですが、まず以下の図を見てください。 layer01〜layer03までの3つのディレクトリがあります。OverlayFSではこれら3つのレイヤーを結合してmergeディレクトリのような見せ方をすることが出来ます。 では、それぞれのレイヤーに同じファイル名のファイルがあった場合はどうなるでしょうか? 上図のようにlayer02とlayer03のディレクトリに同じファイル名のファイルBがあった場合、上のレイヤーのほうが見えることとなります。 これはOverlayFSの超簡単なイメージであり、実際はもうちょっと複雑な動きをします。次にそれを説明したいと思います。 OverlayFSの実際の動き ここではOverlayFSの実際の動きをご説明するとともに、実際にコマンド叩いて実践したいと思います。 まず、その前にちょっと説明させてください。OverlayFSには以下の4つのレイヤーの概念があります。 lowerdir 重ね合わせるレイヤーのベースとなるディレクトリです。先程のイメージ図で記載した「layer01〜layer03ディレクトリ」に相当します。OverlayFSの仕組み上、このディレクトリのファイルに対して変更がされることはないので、基本的にこのディレクトリは読み込み専用でOKです。 upperdir mergeddirに対して変更をかけたファイルが保存されるディレクトリです。 workdir 内部的に利用される作業用ディレクトリです。 mergeddir lowerdirとupperdirを結合したディレクトリです。ファイルに対して追加・変更・削除などの操作を行うディレクトリでもあります。 説明だけではわかりにくいと思いますし、私も最初この説明だけでは全くわかりませんでした。なので、実践してみたいと思います。以下のような構成をもとに、実際にOverlayFSを構築します。upperdirはここでは使いませんし、一旦その存在を忘れてもらってOKです。OverlayFSはややこしいので、順を追って説明していきます。 lowerdirに相当する2つのディレクトリ「lower01」「lower02」、upperdirに相当するディレクトリ「upper」、mergeddirに相当するディレクトリ「merged」 を作成します。 期待する動きとしては、lower01ディレクトリにあるhoge.txt(中身はhogeと書いてある)と、lower02ディレクトリにあるfuga.txt(中身はfugaと書いてある)の両方のファイルがmergedディレクトリに表示されるというものです。upperは、今回の説明では使いませんし、ややこしいので気にしないでください。 では早速実践してみましょう!!OverlayFSを使うためには、毎度おなじみmountコマンドを使います。書式は以下のとおりです。 mount -t overlay [一意の識別名] -o lowerdir=[lowerdirに指定するディレクトリ],upperdir=[upperdirに指定するディレクトリ],workdir=[workdirに指定するディレクトリ] [mergeddirに指定するディレクトリ] 上図の構成を実現するためのコマンドは以下のとおりです。 # mkdir merged # mkdir upper # mkdir lower01 lower02 lower01/hoge.txt lower02/fuga.txt # mkdir work # mount -t overlay overlay -o lowerdir=lower02:lower01,upperdir=upper,workdir=work merged lowerdirに複数のディレクトリを指定する場合は、コロンで区切り、左側に指定するほうが上になります。なので今回の場合は、lower02:lower01と指定します。 では、本当に期待通りの動作になっているか見てみましょう。 # ls merged fuga.txt hoge.txt # cat merged/hoge.txt hoge # cat merged/fuga.txt fuga キタ━━━━(゚∀゚)━━━━!! 期待通りですね。 では、次にlower02ディレクトリにhoge2という内容のhoge.txtを追加してみます。lower02のほうがlower01より上のレイヤーなので、mergedディレクトリのhoge.txtの中身はhoge2になるはずです。図にすると以下のような構成ですね。 では試してみませう(๑•̀ㅂ•́)و✧ lowerdirは基本読み取り専用を前提としているので、lowerdir内のファイルを変更する場合、再マウントが必要になります。 # umount overlay lower02/hoge.txt # mount -t overlay overlay -o lowerdir=lower02:lower01,upperdir=upper,workdir=work merged # ls merged fuga.txt hoge.txt # cat merged/hoge.txt hoge2 キタ━━━━(゚∀゚)━━━━!! 期待通りですね。 ファイルを追加するときの動き ここからは、ファイルの追加・削除・更新のときのそれぞれのユースケースにて、OverlayFSがどのような動きをするのか解説したいと思います。 では、先程ご説明した以下の構成のOverlayFSによって作られたファイルシステムにファイルを追加したいと思います。追加するファイル名「piyo.txt」、その中身はpiyoという文字列のファイルになります。 ここで初めてupperdirの出番なのです。OverlayFSにファイルを追加・更新・削除などの変更処理を加える場合、OverlayFSの仕様により、それらは必ずupperdirに反映されます。 ユーザーに見えるのはmergeddirであり、ユーザーはこのmergedディレクトリにファイルを追加するオペレーションをするわけですが、OverlayFS的にはpiyo.txtはupperディレクトリに追加されます。そして、upperディレクトリに書き込まれたファイルはlower01ディレクトリやlower02ディレクトリに書き込まれたファイルと同じように、mergedディレクトリに見えるようになります。図にすると以下のような感じです。 つまり、OverlayFSはlowerdirとupperdirを重ね合わせたもの(mergrddir)が、ユーザーに見えるディレクトリになるわけです。 では、実際にやってみたいと思います。 最初はlower01ディレクトリにhoge.txt、lower02ディレクトリにfuga.txtがある状態です。まず、この状態を以下のように作ります。「OverlayFSの実際の動き」でご紹介したことと同じことをしているだけですが。 # mkdir merged # mkdir upper # mkdir lower01 lower02 lower01/hoge.txt lower02/fuga.txt # mkdir work # mount -t overlay overlay -o lowerdir=lower02:lower01,upperdir=upper,workdir=work merged ここでmergeddirにpiyo.txtを追加してみましょう。確かにmergeddirディレクトリにファイルが追加されていることがわかります。 merged/piyo.txt # ls merged fuga.txt hoge.txt piyo.txt でも、実際に追加したファイルはuperdirディレクトリにあります。 ということで、追加したファイルはすべてupperdirの方に反映されることがわかりました。 ファイルを更新するときの動き 次にファイルを更新するときの動きを説明します。「ファイルを追加するときの動き」でご紹介した以下の構成のfuga.txtというファイルの内容をfugaからfuga2に変更してみます。 ユーザーがmergedディレクトリ内のfuga.txtをhogeからhoge2に変更するオペレーションをすると、ファイルシステム内部の動きは、まずlower02のfuga.txtがupperディレクトリにコピーされます。 次に、uperディレクトリ内のfuga.txtの内容がfugaからfuga2に変更されます。 そして、このfuga.txtというファイル名のファイルは、lower02ディレクトリとupperディレクトリの両方に存在してます。OverlayFSの仕様では、より上位の層のレイヤーのファイルがユーザーに見えることとなるので、mergedディレクトリには、upperディレクトリにあるファイルが見えることとなります。つまり以下のような状態です。 では実践してみましょう。「ファイルを追加するときの動き」の状態で、mergedディレクトリ内のhoge.txtの内容をhogeからhoge2に変更してみます。 merged/fuga.txt # cat merged/fuga.txt fuga2 mergedディレクトリ内のhoge.txtの内容はhoge2になっているわけですが、upperディレクトリのhoge.txtも合わせてhoge2になっていることがわかります。 # cat upper/fuga.txt fuga2 つまり、mergedディレクトリに加えた変更は、一旦lower01ディレクトリもしくはlower02ディレクトリのファイルをupperディレクトリにコピーし、それからその内容を変更します。この仕組をコピー・オン・ライトといいます。 ファイルを削除するときの動き 次にファイルを削除するときの動きを見てみます。「ファイルを更新するときの動き」でご紹介した以下の構成から、hoge.txtを削除してみます。 hoge.txtを削除すると下図のようになります。upperディレクトリに何やら新しいファイルが出来て、mergeddirディレクトリにはhoge.txtは見えなくなりました。 upperディレクトリに出来たファイルは「ホワイトアウトファイル」と呼ばれるもので、ファイルが削除されたことを表すものです。OverlayFSでは、lowerdirの層にあるディレクトリには変更を加えることはしません。そういう仕様だからです(この仕様のありがたみは、このあとの説明でご説明します)。では、「ファイルが削除された」ということを表現する方法が難しいわけですが、そこでOverlayFSでは、先程のホワイトアウトファイルと呼ばれるものを、削除対象と同名のファイル名でupperディレクトリに置くことで、ファイルシステム的に削除されたことにしてしまうわけです。つまりmergeddirからは見えなくなるということになります。 では、この「ホワイトアウトファイル」というファイルの実態についてですが、これは「キャラクタデバイスファイル」と呼ばれるものです。ここでは、本筋から離れるので多くを語りませんが、Linuxのファイルの種類には「ファイル」「ディレクトリ」「シンボリックリンク」などのほかに「デバイスファイル」というものがあります。Linuxはハードディスクなどの物理的なデバイスや画面への出力など何でもファイルとして表現する特徴があります。ハードディスクなら/dev/sdaみたいなのがありますし、画面になにか文字を出力したい場合は、/dev/stdoutに書き出したりします。ホワイトアウトファイルもこのデバイスファイルの一種です。デバイスファイルには「キャラクタデバイスファイル」と「ブロックデバイスファイル」があり、前者は1文字単位で、後者はある程度まとまった単位で通信します。ここでは、それほどキャラクタデバイスファイルやブロックデバイスファイルについては、知らなくてもいいかもしれません。とにかくキャラクタデバイスファイルは、OverlayFSではファイルが削除されたことを表すマーカーみたいなものなのです。 では実践してみましょう。 # rm merged/hoge.txt # ls merged fuga.txt piyo.txt 確かに削除されてますね。 では、upperディレクトリを見てみましょう。 # ls upper fuga.txt hoge.txt piyo.txt [root@localhost test]# ls -la upper/hoge.txt c---------. 1 root root 0, 0 Aug 11 09:16 upper/hoge.txt あれ?何やら新しいhoge.txtという新しいファイルが出来ていますね。しかも、先頭の一文字が「c」となっています。これがキャラクタデバイスファイルです(ディレクトリだとd、シンボリックリンクだとlとかになっています)。 もちろん下位のレイヤー(lower01ディレクトリ、lower02ディレクトリ)には何ら変化はありません。 # ls lower01 hoge.txt # ls lower02 fuga.txt OverlayFSでのファイルの追加・更新・削除を実施してみました。いかがでしたでしょうか?なんとなく雰囲気は掴んで頂けたかと思います。次は、OverlayFSがどのようにDockerに応用されているかを見てみます。 DockerでOverlayFSを試してみよう!! では、このOverlayFSをDockerでどのように使われているか体感してみましょう!! コンテナを作ってOverlayFSの動きを確認する そのために、以下のDockerイメージを作成します。 ベースイメージはCentOS7 hogeと書かれたテキストファイルを/root/hoge.txtに配置 fugaと書かれたテキストファイルを/root/fuga.txtに配置 以下のDockerfileを作成します。 FROM centos:centos7 ADD hoge.txt /root/hoge.txt ADD fuga.txt /root/fuga.txt そして以下のコマンドを実行してDockerのイメージを作成します。 /root/hoge.txt /root/fuga.txt # docker build -t testapp01 . 先ほど作成したイメージでコンテナを起動します。 # docker run -d -it testapp01 /bin/bash mountコマンドでファイルシステムのマウント状況を確認します。 # mount | grep overlay overlay on /var/lib/docker/overlay2/1ed14519861b8d785d3265512917f70274b3f11192f184e0f025728cad34317d/merged type overlay (rw,relatime,seclabel,lowerdir=/var/lib/docker/overlay2/l/677WTGQVA7IBOMGXUH7Z4DEXLS:/var/lib/docker/overlay2/l/NBS6NXIEXE65SYVIZ7D3HSREZY:/var/lib/docker/overlay2/l/BFQS6YGZG6YK5HU5PPE3SLJ4NE:/var/lib/docker/overlay2/l/5CXN3KDXZ4VBENORX7ZLOHUAQU,upperdir=/var/lib/dockeroverlay2/1ed14519861b8d785d3265512917f70274b3f11192f184e0f025728cad34317d/diff,workdir=/var/lib/docker/overlay2/1ed14519861b8d785d3265512917f70274b3f11192f184e0f025728cad34317d/work) lowdir、upperdirなどに色々何やら指定されていますね。これを先程の図に置き換えると以下のようになります。(図が小さいのでクリックして拡大してみてください) 先程のmountコマンドの結果にて、lowerdirオプションでコロン(:)区切りで指定した部分が、OverlayFSのlowerdirの層に該当します。upperdirオプションはOverlayFSのupperdir層に該当します。でもまだ、このコンテナには何も変更を加えていないので何もありません。「overlya on…」の直後に指定されているディレクトリは、OverlayFSのmergeddir層に該当します。 そして、上図から見てわかるように、Dockerfileに記載した1行が、lowerdirの1層に該当します。そしてその順番はmountコマンドのlowerdirオプションで指定されている順番の前にある方がより新しい物となっています。 lowerdirの一番下の層はCentOSのバイナリやライブラリが格納されています。真ん中の層はhoge.txtがある層、一番上はfuga.txtがある層ですね。 つまりDockerfileに記載されている一行ごとが、OverlayFSの1層に該当するのです。ただし、LBAELコマンドなどファイルシステムに影響のないコマンドは、OverlayFSの層は作成されません。 新しくファイルを作ってみる ここでさらにOverlayFSのコンテナでの動きを確認するために、先程作成したコンテナに新しいファイルを作成してみましょう。 # docker exec -it trusting_lalande /bin/bash /root/piyo.txt # exit # cat /var/lib/docker/overlay2/1ed14519861b8d785d3265512917f70274b3f11192f184e0f025728cad34317d/diff/root/piyo.txt piyo upperdirの層に新しくpiyo.txtというファイルが追加されていました。つまり以下のようになっています。 先程、「OverlayFSとは?」の「ファイルを追加するときの動き」で説明した動きと全く同じものとなっていることがわかると思います。 【補足】必ず追加されるレイヤー 先程の図では触れていませんでしたが、lowerdirオプションで指定されている一番最初のレイヤー(つまりlowerdirの一番上のレイヤー)には、どのコンテナも必ず以下のようなディレクトリ・ファイル構成を含みます。 dev ├── console ├── pts └── shm .dockerenv etc ├── hostname ├── hosts ├── mtab └── resolv.conf どうやらこれは、Dockerが必ず勝手に追加するレイヤーのようです。例えば、.dockerenvがあることによって、これがコンテナかどうかを識別したりなど、そういうシステム的な用途に使うレイヤーのようです。 Dockerリポジトリにイメージをpushしてみよう!! ここからいよいよ核心に迫ってきます。「なぜOverlayFSを用いると、Dockerイメージの容量を劇的に効率化できるのか?」がわかるまで、あともうちょっとです。そのためには、Dockerリポジトリにイメージをpushして、その仕組を説明する必要があります。 まずは簡単なイメージをpushしてみる Docker Hubの中身を見ることはできませんので、Dockerのプライベートリポジトリを作ってみます。これは、その名の通り、自分の好きな環境に自分だけのマイDockerリポジトリを作成できるものです。このプライベートリポジトリはDocker Hubと同じ動きをします。 では、プライベートリポジトリを作成します。 # docker run -d -p 5000:5000 registry:2.7.1 これだけです。Docker Hubからregistryという名前のイメージがDockerのプライベートリポジトリで、これpullして、localhostの5000番のポートでアクセスできるようにしています。 では、先程作成したイメージをpushしてみましょう。その前にまず準備があります。まず以下の書式のコマンドでDockerイメージにタグ打ちします。 docker tag [イメージ名] [Dockerリポジトリのホスト名]:[Dockerリポジトリのポート番号]/[Dockerリポジトリ内でのイメージ名]:[Dockerリポジトリ内でのタグ名] この書式に準じて、以下のコマンドを発行します。 # docker tag testapp01 localhost:5000/testapp01:1.0.0 ホスト名localhost、ポート番号5000のDockerリポジトリに対して、ホストPC内のtestapp01というDockerイメージをイメージ名tespapp01、タグ1.0.0でpushするための準備になります。 docker imagesコマンドを発行すると、このタグうちされたイメージが確認できます。 # docker images REPOSITORY TAG IMAGE ID CREATED SIZE testapp01 latest 2a676d1a10be 3 hours ago 203MB localhost:5000/testapp01 1.0.0 2a676d1a10be 3 hours ago 203MB centos centos7 7e6257c9f8d8 2 weeks ago 203MB registry 2.7.1 2d4f4b5309b1 2 months ago 26.2MB これでpushする準備は整いました。ではpushします。 # docker push localhost:5000/testapp01 The push refers to repository [localhost:5000/testapp01] 7795a963c7fd: Pushed 293e2fda7682: Pushed 613be09ab3c0: Pushed 1.0.0: digest: sha256:cae2b6d2048363477707e2efeebb392cf77769e2fc4aab15e4692c76f9c2b399 size: 943 これでpushは完了しました。これらの情報はプライベートリポジトリ内の/var/lib/registry/docker/registry/v2ディレクトリ内に格納されています。しかし、結構複雑な構成になっています。 大きく分けますと、pushした各イメージのメタ情報が格納されているrepositoriesというディレクトリ、メタ情報から参照され実際のコンテンツが格納されるblobsというディレクトリから構成されます。 では、先程pushしたイメージがどのように格納されているか紐解いていきます。 まず、メタ情報を見てみます。先の程の図の通り、pushしたtespapp01というイメージ名で、タグが1.0.0のイメージは、/var/lib/registry/docker/registry/v2/repositories/testapp01/_manifests/tags/1.0.0/current/link というファイルに保存されています。この中身を見てみましょう。 # cat /var/lib/registry/docker/registry/v2/repositories/testapp01/_manifests/tags/1.0.0/current/link sha256:cae2b6d2048363477707e2efeebb392cf77769e2fc4aab15e4692c76f9c2b399 この��はblobsディレクトリにあるコンテンツを指しています。blobsの下には、コンテンツを一定の規則でsha256でハッシュ化したディレクトリの下に保存されています。この例では、/var/lib/registry/docker/registry/v2/blobs/sha256/ca/cae2b6d2048363477707e2efeebb392cf77769e2fc4aab15e4692c76f9c2b399/dataに保存されていることとなります。 では、このメタ情報の中身を見てみましょう。 1 2 3 4 5 6 7 8 9 10 11 12 13 14 15 16 17 18 19 20 21 22 23 24 25 26 { "schemaVersion": 2, "mediaType": "application/vnd.docker.distribution.manifest.v2+json", "config": { "mediaType": "application/vnd.docker.container.image.v1+json", "size": 3264, "digest": "sha256:2a676d1a10be3f73ba4c869690c70dd362e8fc59910827e82e801f50c9444cd0" }, "layers": [ { "mediaType": "application/vnd.docker.image.rootfs.diff.tar.gzip", "size": 75863188, "digest": "sha256:75f829a71a1c5277a7abf55495ac8d16759691d980bf1d931795e5eb68a294c0" }, { "mediaType": "application/vnd.docker.image.rootfs.diff.tar.gzip", "size": 141, "digest": "sha256:e1d238d7466d5d8ee1c493d55edfd05b793f2f5e24694eaa427bfab49c1e3fe1" }, { "mediaType": "application/vnd.docker.image.rootfs.diff.tar.gzip", "size": 142, "digest": "sha256:ecd34d62868de6dd6bbf39056edd8d2aa5b5b2ec75d8e16e8de3e0e603a2385e" } ] } メタ情報がJOSN形式で色々書かれていますが、大事なのはlayersというフィールドです。ここには、配列の形式で、このイメージを構成するレイヤーの情報が格納されています。3つのレイヤーから成り立っていることがわかります。 そして、この順番も重要で、layersフィールドの中に定義されている配列は、上にある方が一番下のレイヤーということになります。このあたりは、後ほどもっと詳細にご説明します。 digestの値は、コンテンツを一定の規則でハッシュ化したもので、blobsディレクトリのディレクトリ名のもととなっています。 では、このメタ情報をもとにblobsディレクトリの中身を実際に見てみることにしましょう。 まず、digestが「75f829a71a1c5277a7abf…」のコンテンツを見てみましょう。これは、先程ご説明したようにblobsディレクトリ配下のディレクトリ名と同じなので、このレイヤーのコンテンツは、/var/lib/registry/docker/registry/v2/blobs/sha256/75/75f829a71a1c5277a7abf55495ac8d16759691d980bf1d931795e5eb68a294c0/dataであることがわかります。 レイヤーのコンテンツは、tarで丸められgunzipで圧縮されていますので、解凍しますと以下のようなファイルが出てきます。 # tar xzvf data # ls anaconda-post.log bin data dev etc home lib lib64 media mnt opt proc root run sbin srv sys tmp usr var これはCentOS7のイメージですね。今度は、その一つ下の配列にあり、digestが「e1d238d7466d5d8ee1c493d…」のコンテンツを見てみましょう。このコンテンツは、/var/lib/registry/docker/registry/v2/blobs/sha256/e1/e1d238d7466d5d8ee1c493d55edfd05b793f2f5e24694eaa427bfab49c1e3fe1/dataに格納されています。こちらも同様にtarで丸められgunzipで圧縮されていますので、解凍します。 # tar xzvf data # ls root hoge.txt おお!!これは、hoge.txtを追加したレイヤーですね。ここまでやるとわかるかとは思いますが、blobs配下の各ディレクトリは、Dockerfile内で定義した各コマンドが生成したレイヤーは以下の図のように格納されています。 先程のイメージをちょっと変更したものをpushしてみる さて、ここで先程のイメージをちょっと変更したイメージを作って、プライベートリポジトリにpushしてみます。以下のDockerfileを作成してtesapp02というイメージを作ります。testapp01との差分は、hello.txtが追加されたということだけです。 FROM centos:centos7 ADD hoge.txt /root/hoge.txt ADD fuga.txt /root/fuga.txt ADD hello.txt /root/hello.txt ビルドしてtestapp02というイメージを作ります。 hello.txt # docker build -t testapp02 . 先ほどと同じ要領でタグ打ちして、プライベートリポジトリにpushします。 # docker tag testapp02 localhost:5000/testapp02:1.0.0 # docker push localhost:5000/testapp02 さて、プライベートリポジトリの中のファイルを見てみると以下のようになっています。メタ情報が格納されているrepositoriesディレクトリの中に、testapp02というディレクトリが増えています。これは先程pushしたイメージ名のメタ情報になります。 では、先程と同じ要領でtestapp02というイメージのメタ情報を見てみましょう。 1 2 3 4 5 6 7 8 9 10 11 12 13 14 15 16 17 18 19 20 21 22 23 24 25 26 27 28 29 30 31 { "schemaVersion": 2, "mediaType": "application/vnd.docker.distribution.manifest.v2+json", "config": { "mediaType": "application/vnd.docker.container.image.v1+json", "size": 3511, "digest": "sha256:f6c5ea1064e5aa2f48127eb493a3b76d1dccf86fffbdeb4f62d1dbca68abc463" }, "layers": [ { "mediaType": "application/vnd.docker.image.rootfs.diff.tar.gzip", "size": 75863188, "digest": "sha256:75f829a71a1c5277a7abf55495ac8d16759691d980bf1d931795e5eb68a294c0" }, { "mediaType": "application/vnd.docker.image.rootfs.diff.tar.gzip", "size": 141, "digest": "sha256:e1d238d7466d5d8ee1c493d55edfd05b793f2f5e24694eaa427bfab49c1e3fe1" }, { "mediaType": "application/vnd.docker.image.rootfs.diff.tar.gzip", "size": 142, "digest": "sha256:ecd34d62868de6dd6bbf39056edd8d2aa5b5b2ec75d8e16e8de3e0e603a2385e" }, { "mediaType": "application/vnd.docker.image.rootfs.diff.tar.gzip", "size": 143, "digest": "sha256:b5795aa121e492cac028390d379cc9fdeb654d414a671b9a94674f6d293ffa0f" } ] } よーく目を凝らしてみ見ます。layersのフィールドの配列には4つのレイヤーが含まれます。ただしtestapp01のものと比べると、一番最後の配列にあるレイヤー(digestが「b5795aa121e49…」のもの)が増えているのみです。だいたい想像は付きますが、きっとこれは、hello.txtを追加したレイヤーかなと。実際見てみたいと思います。blobsディレクトリを見てみます。 # cd /var/lib/registry/docker/registry/v2/blobs/sha256/b5/b5795aa121e492cac028390d379cc9fdeb654d414a671b9a94674f6d293ffa0f/ # ls data # tar xzvf data root/ root/hello.txt やっぱりそうでしたね。 では次にblobsディレクトリを確認してみますと、以下のような構成になっています。 つまり、全く異なるイメージであるはずのtestapp01とtestapp02は、同じレイヤーはプライベートリポジトリ上で共有しているのです。 つまり、Dockerは、OverlayFSを利用して、Dockerfile内で発行された各コマンドによって生成されたファイルを「レイヤー」という単位で分けて管理して、同じレイヤーは重複してリポジトリにはアップせず、リポジトリ上で共有することで、容量を節約しているのです。 もしこれが、OverlayFSを利用しないでtestapp01、testapp02をまるごと違うものとして全てリポジトリにpushしたらどうなるでしょうか?CentOSのイメージも含まれるので、その容量はかなり大きくなることが想像できます。 まとめ いかがでしたでしょうか?DockerのファイルシステムであるOverlayFS、そしてDockerがなぜOverlayFSを使うメリットを説明してみました。随分複雑なことをしているんですね、Docker。泣かせてくれます。でも、苦労してまとめたので、ぜひ見てくれたら幸いです。 ご覧いただきありがとうございます。 ブログの最新情報はSNSでも発信しております。 ぜひTwitterのフォロー&Facebookページにいいねをお願い致します! >> 雑誌等の執筆依頼を受付しております。 ご希望の方はお気軽にお問い合わせください!
0 notes
Text
300+ TOP LINUX Objective Questions and Answers
LINUX Multiple Choice Questions :-
1. Maximum how long can a Linux filename be? A. 128 bytes B. 255 bytes C. 32 bytes D. 64 bytes Ans: B 2. Which combination of keys is used to exit from terminal? A. Ctrl + t B. Ctrl + z C. Ctrl + d D. Ctrl + e Ans: C 3. Which command(s) is/are used to get help about a command in Linux? A. info B. man C. None of these D. Both a and b Ans: A&B 4. Which of the following OS is not based on Linux? A. Ubuntu B. Redhat C. CentOs D. BSD Ans: D 5. Which command is used to get the kernel version in Linux? A. uname -r B. kernel C. uname -n D. uname -s Ans: A 6. Which command is used to list all the files in your current directory(including hidden)? A. ls -l B. ls -t C. ls -a D. ls -i Ans: C 7. Which command is/are used to remove directory in Linux? A. rmdir B. rm -r C. only b D. Both a and b Ans: D 8. Which key combination is used to see all the hidden files in Nautilus file manager? A. Ctrl + Shift + h B. Ctrl + h C. Ctrl + Alt + h D. None of the above Ans: B 9. Which of the following command is used to create file in Linux? A. touch B. cat C. echo D. All of the above Ans: D 10. In Linux everything stored as a A. file B. directory C. executables D. None of the above Ans: A

LINUX MCQs 11. Which of the following is not a valid login shell in Linux? A. C shell B. Net Shell C. Bash Shell D. Z shell Ans: B 12. Which command is used to record session in Linux? A. script B. session C. both a and b D. none of these Ans: A 13. Which of the following command can be used as an alternative to echo command? A. print B. printr C. printf D. none of these Ans: C 14. Which command is used to change password of your Linux system? A. password B. pass C. change -p D. passwd Ans: D 15. Which command is used see the list of users who are currently logged-in? A. login B. users C. who D. which Ans: C 16. Which directory in Linux contains all the config file of the system? A. /etc B. /var C. /lib D. /bin Ans: A 17. Which of the following command is used to know last shutdown/reboot date and time? A. last B. lastlogin C. lastreboot D. lastshutdown Ans: A 18. Which of the following command is used to count number of lines in a file? A. wc -l B. wc -c C. wc -w D. None of these Ans: A 19. Which of the following statement is incorrect about /bin and /sbin directory? A. /sbin contain only binaries essential for booting, restoring, Recovering, and/or repairing the system in addition to the binaries in /bin. B. There is no difference between /bin and /sbin, they are just two directories C. /bin contains commands that may be used by both the system administrator and by users, but which are required when no other filesystems are mounted. D. Utilities used for system administration are stored in /sbin. Ans: B 20. Which of the following command(s) is/are used to reboot a Linux system? A. shutdown -h B. reboot C. init 6 D. All of the above Ans: D 21. Total no of run levels in a Linux system? A. 6 B. 7 C. 5 D. 8 Ans: B 22. Which command is used to copy entire directory? A. cp -r B. cp -i C. cp D. none of these Ans: A 23. Suppose I am in /etc directory and I want to go to my home directory which command should I use? A. cd B. cd ~ C. Both A and B D. none of these Ans: C 24. Which special character should be avoided during naming a file? A. .(dot) B. $ C. _(underscore) D. -(Hyphen) Ans: D 25. Which of the following is relative path to /home/sandeep directory? A. $ cd Desktop/abc B. $ cd Downloads/abc C. Both a and b D. $ cd /etc Ans: C LINUX Objective type Questions with Answers 26. Suppose currently I am in /home/sandeep/Downloads/abc. After executing cd ../.., where am I now? A. /home/sandeep B. /home/sandeep/Downloads C. /home D. None of these Ans: A 27. Suppose I am in /etc directoy, after executing cd .(single dot), where am I now? A. /etc B. /(root) C. /home D. None of these Ans: A 28. what is the purpose of -i in rm -i command? A. It will ask for confirmation before every deletion. B. It just an extra option Ans: A 29. mv command can be used to ? A. Move the file to different directory. B. Renaming a file C. Both a and b. D. Only a. Ans: C 30. Which of the following command is used to display content of a file in octal format? A. octal B. cat C. oct D. od Ans: D 31. In Linux which of following command do you use to know the purpose of a command? A. which B. whatis C. what D. purpose Ans: B 32. What is the process id of init process? A. 2 B. 6 C. 4 D. 1 Ans: D 33. Suppose I have made some changes in my Php.ini file and I want to restart my Apache server, which of following command should I use? A. sudo service apache2 restart B. sudo /etc/init.d/apache2 restart C. Both A and B D. Only A Ans: C 34. Which command is used to show process hierarchy in tree format? A. ps -tree B. pstree C. ps -t D. none of these Ans: B 35. Which of the following command is used to see the content of tar(backup.tar) file without extracting it? A. tar -xvf backup.tar B. tar -svf backup.tar C. tar -tvf backup.tar D. none of these Ans: C 36. Which command is used to execute the last command you have executed? A. !! B. !-1 C. Both A and B D. Only A Ans: C 37. What is the purpose of id command? A. Print effective and real UID B. Print effective and real GID C. Print effective and real UID and GID D. None of these Ans: C 38. Which command is used to print the login shell of an user? A. echo $SHELL B. echo $LOGIN C. echo $LSHELL D. None of the Above Ans: A 39. Which of the following command return the exit status of last command? A. $! B. $$ C. $? D. $# Ans: C 40. which command is used to print the current working direcotry? A. pwd B. echo $PWD C. Both A and B D. Only A Ans: C 41. What is ppid(parent process id) of daemon process in Linux ? A. any arbitrary number B. 1 Ans: B 42. What is context switch? A. Process switches from user mode to kernel mode B. Process switches from kernel mode to user mode C. Kernel switches from one process to another process D. None of these Ans: C 43. Maximum number of processes exist in Linux system ? A. 32768 B. 1024 C. 2048 D. 16384 Ans: A 44. Which of the following command keep a process running even after you logout from your shell? A. & B. nohup C. bg D. hup Ans: B 45. What is the range of nice number in linux system ? A. 0 to 19 B. -20 to 19 C. -20 to 0 D. -10 to 10 Ans: B 46. On success fork return ______ to parent process ? A. 0 B. 1 C. parent process id D. child process Id Ans: D 47. Which of the following command kill all the process including shell ? A. kill kill 0 B. kill -9 kill 0 C. kill -s kill 0 D. Both B and C Ans: D 48. Which of the following statement is true ? A. echo $$ return PID of login shell and echo $? return status of last command B. echo $$ return status of last command and echo $? return PID of login shell C. echo $$ and echo $? return some integer value of no significance D. All of the statements are false Ans: A 49. Priority of the process can be changed using which of the following command ? A. nice B. chpriority C. renice D. Not allowed to change process priority Ans: C 50. In _______ state of a process, the process will be terminated and the information will still be available in the process table. A. Interruptible B. Uninterruptible C. Zombie D. Running Ans: C LINUX Questions and Answers pdf Download Read the full article
0 notes
Text
Inxi: Identificar el hardware del sistema
Inxi: Identificar el hardware del sistema. Inxi es un potente script bash, con la capacidad de identificar el hardware del sistema e imprimir los datos de una forma limpia y clara. Muestra información sobre el hardware del sistema (disco duro, tarjeta gráfica, de audio, de red, CPU, RAM, etc...), así como otros detalles del sistema como los drivers, Xorg, distribución linux, entorno de escritorio, kernel, procesos, tiempo de actividad, y muchos más. Su uso no está muy extendido por desconocimiento, pero seguro que si lo pruebas una vez se convertirá en tu herramienta perfecta. En este articulo tratamos de acercar al usuario la herramienta inxi, así como sacar el máximo provecho de la misma.
Inxi: Identificar el hardware del sistema
Inxi suele venir preinstalado en la mayoría de sistemas linux, si no es tu caso vemos como hacerlo. Debian, Ubuntu, Linux Mint, y derivados: sudo apt install inxi Centos, RHEL, Fedora, y derivados: #CentOS-RHEL sudo yum install inix #Fedora sudo dnf install inix Arch Linux, Manjaro, y derivados: sudo pacman -S inxi Open Suse, Suse, y derivados: sudo zypper install inxi Una vez instalada, puedes ejecutar la herramienta inxi en su forma básica. inxi Podrás ver una salida similar a: # inxi CPU: Quad Core Intel Xeon E3-1245 v5 (-MT MCP-) speed/min/max: 3681/800/3900 MHz Kernel: 3.10.0-1062.12.1.el7.x86_64 x86_64 Up: 7d 14h 40m Mem: 14477.7/64049.9 MiB (22.6%) Storage: 1.40 TiB (9.8% used) Procs: 195 Shell: bash 4.2.46 inxi: 3.0.37 Inxi también nos permite ampliar la información de forma detallada con su opción -F. inxi -F ejemplo de salida real...

Comando inxi -F Podemos ejecutar otras opciones para especificar lo que queremos identificar realmente. Vemos algunos ejemplos. Para identificar el sistema ejecutamos el siguiente comando. inxi -S ejemplo... System: Host: xxxx.xxxx.xxxx Kernel: 3.10.0-1062.12.1.el7.x86_64 x86_64 bits: 64 Console: tty 0 Distro: CentOS Linux release 7.7.1908 (Core) Saber que placa base, bios, y más. inxi -M ejemplo... Machine: Type: Kvm System: Supermicro product: SYS-5039MS-H12TRF-ON002 v: 0123456789 serial: S225408X6330575 Mobo: Supermicro model: X11SSE-F v: 1.01 serial: ZM163S009973 UEFI : American Megatrends v: 2.2 date: 05/16/2018 Quieres saber que cpu tienes? inxi -C ejemplo... CPU: Topology: Quad Core model: Intel Xeon E3-1245 v5 bits: 64 type: MT MCP L2 cache: 8192 KiB Speed: 2013 MHz min/max: 800/3900 MHz Core speeds (MHz): 1: 893 2: 879 3: 826 4: 821 5: 1765 6: 848 7: 851 8: 1508 Ahora identificamos la tarjeta gráfica... inxi -G ejemplo... Graphics: Card: Intel Mobile 945GM/GMS 943/940GML Express Integrated Graphics Controller Display Server: X.Org 1.18.4 drivers: intel (unloaded: fbdev,vesa) Resolution: [email protected] GLX Renderer: Mesa DRI Intel 945GM GLX Version: 1.4 Mesa 18.0.5 Detalles del hardware de audio. inxi -A ejemplo... Audio: Card Intel NM10/ICH7 Family High Definition Audio Controller driver: snd_hda_intel Sound: Advanced Linux Sound Architecture v: k4.15.0-74-generic Los dispositivos de red. inxi -N ejemplo... Network: Card-1: Marvell 88E8038 PCI-E Fast Ethernet Controller driver: sky2 Card-2: Intel PRO/Wireless 4965 AG or AGN Network Connection driver: iwl4965 Dispositivos de almacenamiento. inxi -D ejemplo... Drives: Local Storage: total: 1.40 TiB used: 139.99 GiB (9.8%) ID-1: /dev/sda vendor: Samsung model: MZ7LN512HMJP-00000 size: 476.94 GiB ID-2: /dev/sdb vendor: Samsung model: MZ7LN512HMJP-00000 size: 476.94 GiB ID-3: /dev/sdc vendor: Samsung model: MZ7LN512HMJP-00000 size: 476.94 GiB Identificamos el raid (si existe). inxi -R ejemplo... RAID: Device-1: md1 type: mdraid status: active raid: raid-5 report: 3/3 UUU Components: online: sda2~c0 sdb2~c1 sdc2~c3 Device-2: md0 type: mdraid status: active raid: raid-5 report: 3/3 UUU Components: online: sda3~c0 sdc3~c3 sdb3~c1 Las particiones del sistema. info -P ejemplo... Partition: ID-1: / size: 924.97 GiB used: 139.83 GiB (15.1%) fs: ext4 dev: /dev/md1 ID-2: /boot size: 1.93 GiB used: 168.6 MiB (8.5%) fs: ext4 dev: /dev/md0 ID-3: swap-1 size: 1024.0 MiB used: 0 KiB (0.0%) fs: swap dev: /dev/sda1 ID-4: swap-2 size: 1024.0 MiB used: 0 KiB (0.0%) fs: swap dev: /dev/sdb1 ID-5: swap-3 size: 1024.0 MiB used: 0 KiB (0.0%) fs: swap dev: /dev/sdc1 Los sensores. inxi -S ejemplo... Sensors: System Temperatures: ipmi cpu: 41 C mobo: 38 C Fan Speeds (RPM): ipmi cpu: 7700 fan-1: System Temperatures: lm-sensors cpu: 29.8 C mobo: 27.8 C Fan Speeds (RPM): lm-sensors N/A Información de uso. inxi -I ejemplo... Info: Processes: 193 Uptime: 7d 14h 50m Memory: 62.55 GiB used: 14.23 GiB (22.8%) Init: systemd runlevel: 3 Shell: bash inxi: 3.0.37 Canales de Telegram: Canal SoloLinux – Canal SoloWordpress Espero que este articulo te sea de utilidad, puedes ayudarnos a mantener el servidor con una donación (paypal), o también colaborar con el simple gesto de compartir nuestros artículos en tu sitio web, blog, foro o redes sociales. Read the full article
0 notes
Text
The Best IDE Software
The work of a developer is complex and time-consuming, but arming yourself with the most sophisticated tools makes the job both quicker and easier. That’s why many developers turn to integrated development environments (IDEs) to manage workflows, access a suite of development tools within a single dashboard, and reduce errors that can have catastrophic consequences if deployed unchecked.
IDEs run the gamut from the simple to the incredibly sophisticated, with some aiming for a clutter-free UI in a lightweight tool to maximize speed for smaller-scale tasks and others offering cross-platform, multi-language support in robust environments capable of handling the most complicated development projects.
Read Best IDEs for Web Development

1. Microsoft Visual Studio
Microsoft Visual Studio is a premium IDE ranging in price from$699 - $2,900 depending on the edition and licensing. The many editions of this IDE are capable of creating all types of programs ranging from web applications to mobile apps to video games. This series of software includes tons of tools for compatibility testing so that you can see how your apps run on more than 300 devices and browsers. Thanks to its flexibility, Visual Studio is a great tool for both students and professionals.
Features:
A massive library of extensions that is always growing
IntelliSense
Customizable dashboard and dockable windows
Straightforward workflow and file hierarchy
Insights for monitoring performance in real-time
Automation tools
Easy refactoring and code snippet insertion
Split-screen support
Error list that allows debugging while building
Approval checks when deploying apps via ClickOnce, Windows Installer or Publish Wizard
Drawbacks:
Because the Visual Studio is a heavyweight IDE, it takes considerable resources to open and run, so making simple edits may be time-consuming on some devices. For a simpler task, it may be easier to use a lightweight editor.
2. NetBeans
A free, open-source Integrated Development Environment for software developers. You get all the tools you need to create professional desktop, enterprise, web, and mobile applications with the Java language, C/C++, and even dynamic languages such as PHP, JavaScript, Groovy, and Ruby. Apache NetBeans is easy to install and use straight out of the box and runs on many platforms including Windows, Linux, Mac OS X, and Solaris.

Features:
Intuitive drag-and-drop interface
Dynamic and static libraries
Multi-session GNU debugger integration with code assistance
Allows for remote development
Compatible with Windows, Linux, OS X, and Solaris platforms
Supports Qt Toolkit
Supports Fortran and Assembler files
Supports a number of compilers including CLang/LLVM, Cygwin, GNU, MinGW, and Oracle Solaris Studio
Drawbacks:
This free IDE consumes a lot of memory, so it may perform sluggishly on some machines.
3. PyCharm
PyCharm Community for PC is a free Python IDE with the complete set of tools for productive development with the Python programming language. In addition, the IDE provides high-class capabilities for professional Web development with the Django framework. Intelligent PC Python IDE with refactorings, debugger, code completion, on-the-fly code analysis, and coding productivity orientation.
Notable Features:
Compatible with Windows, Linux, and Mac OS
Comes with Django IDE
Easy to integrate with Git, Mercurial, and SVN
Customizable interface with VIM emulation
JavaScript, Python and Django debuggers
Supports Google App Engine
Drawbacks:
Users complain that PyCharm has some bugs, such as the autocomplete feature occasionally not working, which can be a minor inconvenience.
4.IntelliJ IDEA
IntelliJ IDEA is a powerful Java integrated development environment(IDE) for developing computer software for Windows PC. Every aspect of IntelliJ IDEA is specifically designed to maximize developer productivity. Together, powerful static code analysis and ergonomic design make development not only productive but also an enjoyable experience.
Features:
Extensive database editor and UML designer
Supports multiple build systems
Test runner UI
Code coverage
Git integration
Supports Google App Engine, Grails, GWT, Hibernate, Java EE, OSGi, Play, Spring, Struts and more
Deployment and debugging tools for most application servers
Intelligent text editors for HTML, CSS, and Java
Integrated version control
AIR Mobile supports Android and iOS devices
Drawbacks:
This IDE comes with a learning curve, so it may not the best for beginners. There are many shortcuts to remember, and some users complain about the clunky UI
5. RStudio
RStudio is an integrated development environment (IDE) for R. It includes a console, syntax-highlighting editor that supports direct code execution, as well as tools for plotting, history, debugging and workspace management. RStudio is available in open source and commercial editions and runs on the desktop (Windows, Mac, and Linux) or in a browser connected to RStudio Server or RStudio Server Pro (Debian/Ubuntu, RedHat/CentOS, and SUSE Linux).

Features:
Syntax highlighting, code completion, and smart indentation
Execute R code directly from the source editor
Quickly jump to function definitions
Integrated R help and documentation
Easily manage multiple working directories using projects
Workspace browser and data viewer
Interactive debugger to diagnose and fix errors quickly
Extensive package development tools
Authoring with Sweave and R Markdown
Drawbacks:
Most Git operations have to get handled via the command line.
Read: Which are better for developers, IDEs or text editors?
0 notes
Text
Installing C/ C++ Development Environment in Linux
How To Set Up C, C++ Development Environment in #Linux
In this tutorial, we are going to set up C and C++ development environment in Operating Systems like Arch Linux, Ubuntu, CentOS/ Red Hat, Fedora and OpenSUSE.
It includes following components:
Compiler (gcc, g++, etc)
IDE (Code::Blocks, Geany and Eclipse)
For a successful installation type/ paste following commands in your favourite terminal application.
1. Perform Full System Update.
Arch Linux:
View On WordPress
#arch linux#c#C++ IDE#cedeblocks#centos#code::blocks#compiler#debian#Developement Enviorment#eclipse#fedora#g++#gcc#geany#gnu/linux#install#linux#linux blog#one click install#opensource#opensuse#opensuse 42#programming#red hat#SUSE#tanmay chandane#tanmayslinuxblog#ubuntu
0 notes
Text
In this guide, we’re going to cover the steps of Installing OpenNebula Front-end on CentOS 7 / CentOS 8. OpenNebula is a simple but feature-rich and flexible solution that helps you build and manage enterprise clouds and Virtualized Data Centers. For Ubuntu use: How to Install OpenNebula Front-end on Ubuntu Why OpenNebula OpenNebula combines existing virtualization technologies like KVM and VMware with advanced features for multi-tenancy, automatic provision, and elasticity. Its aim is to make management of cloud simple. It can be compared with other Cloud Management platforms like Openstack and Cloudstack. OpenNebula Components OpenNebula has two main components: OpenNebula Front-end – This is the management engine that executes the OpenNebula services. OpenNebula Hypervisor Nodes – These are the hypervisors which provide the resources needed by the VMs. The minimum recommended specs for the OpenNebula front-end are: Resources Minimum Recommended configuration Memory 2 GB CPU 1 CPU (2 cores) Disk Size 100 GB Network 2 NICS The OpenNebula Front-end machine needs network connectivity to all the hosts, and possibly access to the storage Datastores (either by direct mount or network). The base installation of OpenNebula takes less than 150MB. Install OpenNebula Front-end on CentOS 7 / CentOS 8 Here we’ll walk through all steps to get OpenNebula Front-end engine up and running on a CentOS 7 server. I assume you already have a running instance of CentOS 7, this can be a virtual machine or a physical server. Step 1: Add OpenNebula and epel repositories Run the following commands to add OpenNebula repositories on CentOS 7/8. Run the following commands as a user with sudo privileges: CentOS 8: sudo tee /etc/yum.repos.d/opennebula.repo ~/.one/one_auth This will set the oneadmin password on the first boot. From that point, you must use the command below to change oneadmin’s password. $ oneuser passwd Step 7: Configure Firewall We’re close to the final step. We need to configure the firewall to allow specific ports required by OpenNebula. Check if you have firewalld service active. $ sudo firewall-cmd --state running If running, open the port required to access Sunstone web interface. sudo firewall-cmd --add-port=9869/tcp --permanent sudo firewall-cmd --reload Step 8: Start OpenNebula daemons. Used systemd service management command to start OpenNebula services. sudo systemctl start opennebula opennebula-sunstone sudo systemctl enable opennebula opennebula-sunstone Step 9: Verifying the Installation and Accessing Sunstone UI After OpenNebula is started for the first time, you should check that the commands can connect to the OpenNebula daemon. You can do this in the Linux CLI or in the graphical user interface: Sunstone. From CLI in the Front-end, run the following command as oneadmin: $ sudo su - oneadmin -c "oneuser show" USER 0 INFORMATION ID : 0 NAME : oneadmin GROUP : oneadmin PASSWORD : e6a7ce61b035faf07f4d98319dd99b19912b1bed AUTH_DRIVER : core ENABLED : Yes TOKENS USER TEMPLATE TOKEN_PASSWORD="58bb386f7b00453481b40e88cda4fea99b9390e0" RESOURCE USAGE & QUOTAS If you get an error message, then the OpenNebula daemon could not be started properly. The OpenNebula logs are located in /var/log/one, namely: oned.log – Core logs. Error messages will be located here. prefixed with [E] sched.log – Scheduler logs are located here. Accessing Sunstone UI Now you can try to log in to Sunstone web interface. To do this point your browser to: http://:9869 If everything is OK you will be greeted with a login page. The user is oneadmin and the password is the one in the file /var/lib/one/.one/one_auth in your Front-end. On logging in, you should get a dashboard like below. OpenNebula Front-end Directory structure The following table lists some notable paths that are available in your Front-end after the installation:
Path Description /etc/one/ Configuration Files /var/log/one/ Log files, notably: oned.log, sched.log, sunstone.log and .log /var/lib/one/ oneadmin home directory /var/lib/one/datastores// Storage for the datastores /var/lib/one/vms// Action files for VMs (deployment file, transfer manager scripts, etc…) /var/lib/one/.one/one_auth oneadmin credentials /var/lib/one/remotes/ Probes and scripts that will be synced to the Hosts /var/lib/one/remotes/hooks/ Hook scripts /var/lib/one/remotes/vmm/ Virtual Machine Manager Driver scripts /var/lib/one/remotes/auth/ Authentication Driver scripts /var/lib/one/remotes/im/ Information Manager (monitoring) Driver scripts /var/lib/one/remotes/market/ MarketPlace Driver scripts /var/lib/one/remotes/datastore/ Datastore Driver scripts /var/lib/one/remotes/vnm/ Networking Driver scripts /var/lib/one/remotes/tm/ Transfer Manager Driver scripts Now that we have covered Installing OpenNebula Front-end on CentOS 7.
0 notes