#caption and tags and alt text all filled and everything
Explore tagged Tumblr posts
Visit Tumblr Blog
Explore Tumblr blogs with no restrictions, modern design and the best experience.
Last Seen Tumblr Blogs


Fun Fact
Women make up for the other 50% of Tumblr’s audience.
Text

Bringer of Darkness: Arc 1, Page 28.
That can't be good....
<PREVIOUS | FIRST | NEXT>
#oh sweet baby corn i was so blinding sure i had this one scheduled?#but apparently that’s not what happened!!!! like at all!!!!! which is so totally great and not annoying at all!!!!! :DDDDDDDDDD#i think the one i had scheduled got eaten or something because i did set it all up. i am so mad about that. like dude.#caption and tags and alt text all filled and everything#so not seeing it being posted is weird and i’d apologize if that was my fault. except it’s not so i’m apologizing out of politeness#another weird thing: did not intentionally make font bigger.#procreate just kinda does that sometimes ive noticed.#so that was not on purpose and i apologize for the sudden inconsistency in font size#also if anyone is reading these tags: this is the 99th post on the blog.#if i play my cards right then the next page will become the 100th post. which is my current game plan#so basically i am not reblogging anything to this blog or answering any asks until next friday.#ergo any questions will remain unanswered and any fanart will be scheduled to reblog until after page 29 is posted.#bringer of darkness fancomic#bringer of darkness au#sonic.exe#sonicexe#sonic exe#sonic.exe au#sonic exe fancomic#sonic the hedgehog#sth au#sth amy#amy rose#sth tails#tails the fox#BoD arc 1
84 notes
·
View notes
Text
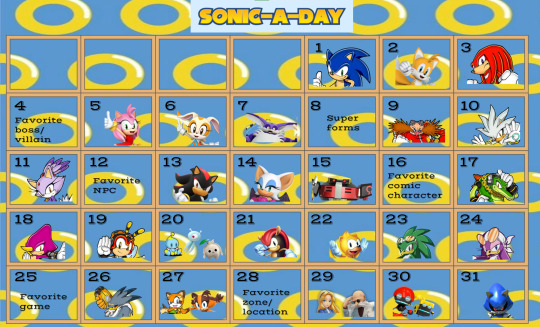
WELCOME TO SONIC-A-DAY MAY WHERE FOR EVERY DAY ON THE MONTH OF MAY, WE CREATE FOR OUR MAGNIFICENT SONIC CAST!
Many were interested in participating to an event like this. So, here we are, the Sonic-A-Day May Event, inspired by @hermitadaymay.
Important rules to note
1. Any type of fanwork is welcome so long as it features, or is otherwise inspired by, the Sonic character of the day.
2. Tag #sonicfriendsaday to have your fanwork reblogged (keep in mind that while every fanwork has its own merit and value, even those involved in more mature themes, this blog will only feature PG-13 works for everyone to enjoy)
3. Fanworks for one Sonic character posted after the day rolls over to another character's day (per the Eastern Day Time) will be reblogged in one big queue in June. I will try my best to reblog everything tagged, please be patient if I haven't reblogged your fanwork.
4. No traced or stolen work allowed. AI-generated/assisted pieces are also not allowed and will not be featured on the blog.
5. Be kind to yourselves. I will not be reblogging posts that talks negatively about your art/skills, whether it is in the caption or the tags. Everyone is always improving.
6. Technically not a rule, but it is strongly recommend adding alt text or description to all images. Click here to learn more about writing alt text.
Small intro on the person running this
Hello there! My name is Bloop! You can use she/her and/or they/them pronouns for me. My main blog is @bloop-im-a-frog-now.
Prompts explained and name of the character for each day
May 1st - Sonic the Hedgehog
May 2nd - Miles "Tails" Prower
May 3rd - Knuckles the Echidna
May 5th - Amy Rose
May 4th - Favorite boss/villain
The Sonic games have many beloved bosses and villains. If you want to create something for Black Doom or Mephiles or the Egg Dragoon, that is the perfect day for them! Metal Overlord and its variations can be for the Metal Sonic day or for this day, it is for you to decide.
May 6th - Cream the Rabbit (and Cheese too!)
May 7th - Big the Cat
May 9th - Dr. Ivo Robotnik/Dr. Eggman
May 8th - Super forms
Since Sonic the Hedgehog 2, super forms have been a staple of this franchise. If you don't have at least one super form per game, then you're probably playing a racing game. Which super form is your favorite? Who would you like to see have a super form? How would super forms affect the body? If super forms come from the Chaos Emeralds, does that mean every living being is familiar with Chaos Energy? Some questions to ponder upon for this day. You can also just do Super Sonic, game, TV show or movie counterpart, and it would fill this prompt!
May 10th - Silver the Hedgehog
May 11th - Blaze the Cat
May 13th - Shadow the Hedgehog
May 12th - Favorite NPC
Sonic games have had many NPC throughout the years. From Chip to Vanilla, some that affect the plot more, others that don't (I see you, Sonic Man (i think that's his name)), it can be anyone that was not playable in a Sonic game! It can also include characters from TV shows or the movies! They can technically be NPCs. They weren't playable in the games. Truly, if you love a character and you wish they were playable, here's your chance to make them shine!
May 14th - Rouge the Bat
May 15th - E-123 OMEGA
May 17th - Vector the Crocodile
May 16th - Favorite comic character
Sonic has many comics! From the Archie's, the manga to the IDW publishing. Do you have a favorite comic character that is not a main member of the Sonic cast? They get a spotlight during that day!
May 18th - Espio the Chameleon
May 19th - Charmy Bee
May 21st - Mighty the Armadillo
May 20th - Chao/Wisp/Koco
Somehow, Sonic games have adorable creatures. Some prefer the Chao, others love the powers the Wisps give you. The Kocos were plot important in Sonic Frontiers, and even have Lore you didn't expect these little creatures would have. Which one do you like? Which type of Chao/Wisp do you like? Now's the time to make your preference known!
May 22nd - Ray the Flying Squirrel
May 23rd - Jet the Hawk
May 24th - Wave the Swallow
May 26th - Storm the Albatross
May 25th - Favorite game
Do you have a favorite Sonic game? Which one is it? It's time to show it some love! You can show your favorite part of that game, you can write about its story, you can talk about a mechanic you thought was really cool. Anything goes, as long as it ties in with your favorite Sonic game.
May 27th - Marine the Raccoon/Sticks the Badger
May 29th - Maria/Gerald Robotnik
May 28th - Favorite zone/location
We all know SEGA loves Green Hill Zone. What about you? Do you like City Escape? Or Final Haunt? Maybe you like Babylon Garden or Planet Wisp! Show some love to your favorite zone/location.
May 30th - Orbot/Cubot
May 31st - Metal Sonic
#sth#sonic fandom#sth fandom#sonicaday#sonic the hedgehog#miles tails prower#miles prower#tails the fox#knuckles the echidna#sonic movie universe#amy rose#amy the hedgehog#cream the rabbit#big the cat#super sonic#eggman#dr robotnik#ivo robotnik#dr eggman#silver the hedgehog#blaze the cat#shadow the hedgehog#rouge the bat#e 123 omega#omega e123#vector the crocodile#espio the chameleon#charmy bee#chao#wisp
49 notes
·
View notes
Text
Editing tips, I guess?
Hey uhhhhh, so I've gotten lots of new followers over the past few weeks and wanted to do some kind of thank you?? Also, I have seen a fair share of "omg HOW" in the tags on my edits (which??? always make my day?? my week??? my life????)
Anyway, I thought I'd share some of my ~techniques with y'all? So here goes:
(lmao this got really fuckin long so cuuuuuut)
1. Make EVERYTHING a Smart Object
Okay, maybe not EVERYTHING, but seriously. Do it. It will save ur editing life. You ever shrink something down and then an hour later change your mind and decide you want it bigger? If you're not using a smart object, it’ll get blurry when you scale it back up and you’ll be fuCKED!
To make a layer/group a smart object, just right click on it in the layers panel and select "convert to smart object". This makes Photoshop store the layer's original data in a separate space for safe keeping (an embedded .psb file, to be exact) -- so you can shrink it and enlarge it as many times as you want without any lossiness.
As soon as I paste/place a screencap, texture, or whatever into my document, the first thing I always, ALWAYS do is convert it to a smart object!!
Why, you might ask?? Continue to item No.2 :)))
2. Harness the POWER of Smart Objects!!
The reason I am obsessed with Smart Objects is because I am obsessed with making any edits as non-destructive as possible. If you use “Image > Adjustments > Levels/Selective Color/etc” on a regular layer, that’s a destructive edit. Same goes for any Filters (such as blur/sharpen) and transforms (Warp, distort, perspective). You lose the original data that was there and the only way it can be undone is with ctrl+z. Might not seem like a huge deal at first, but if you keep chugging along for an hour and decide, “hmm, maybe i went too hard on that levels adjustment after all...” your only options are deleting the layer and starting over, or uh... hoping it’s still in your history panel.
However, it's really easy to avoid destructive edits when you use smart objects!! Because all those adjustments, filters, and transforms become “Smart Filters”. Smart Filters have all the non-destructive advantages of performing these adjustments via adjustment layers, but have the added bonus of ONLY effecting the layer they’ve been applied to, instead of cascading down and effecting all the layers beneath. (Which can be a good thing sometimes, but that’s a whole other topic)
Smart filters are attached to their ‘parent layers’, and can be hidden, deleted, or modified (by double-clicking their names) at any time:

Can I hear a wahoo???
Other cool things about Smart Objects:
You can copy a Smart Filter with all its settings to another layer by alt+click+dragging it over
You can change the order in which Smart Filters are applied by clicking and dragging them around
You can edit a smart object independently/in a sort of 'isolated' mode by double-clicking on its thumbnail!! I like to use this for edits that are specific to a given screencap-- like cutting out the background and any initial adjustments, like levels and selective coloring. Once you’re done editing the contents of the smart object, hit ctrl+s and it will automatically update in the main document!
But really, the biggest thing for me here is psychological. I know I’m much more willing to try things and experiment when I know that I can easily go back and tweaks things at any time. Otherwise, I’d stick with adjustments I don’t really like all that much simply because it would take too much time/effort to redo them.
3. Don't even THINK ABOUT using the eraser tool or I will STOMP YOU to death with my hooves!!
Use a layer mask instead. Please I am begging you. It all comes back to making your edits as non-destructive as possible. If you erase something, it's gone forever. When you mask something, you can make changes to which parts are visible/not visible as often as you want.
For the newbies or the otherwise unacquainted, a mask is a greyscale ‘map’ attached to a layer (or layer group) that controls its opacity. Black areas give the layer 0% opacity, white areas will give it 100% opacity, and you can use shades of grey to achieve partial transparency. You ‘draw’ on these layers with the your trusty brush and paint bucket tools.
You can create a mask by selecting a layer and then clicking the little mask icon at the bottom of the layers panel (it’s the one with the little circle inside the box). Draw black on the parts you want to hide, and if you erase too much on accident? Just paint back over it with white!
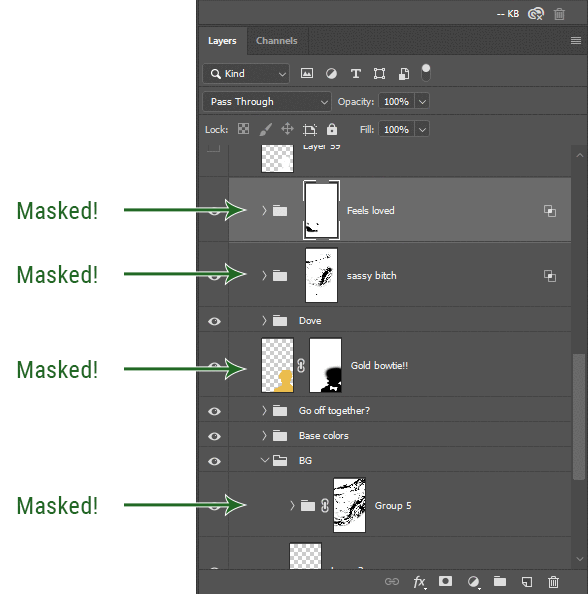
I love masks, and sometimes i will throw an already masked layer inside a layer group and apply a second mask to said group. This way I have two masks that can be edited independently from each other. Like layer mask-ception.
So anyway, yes. Eraser tool? Don’t know her.
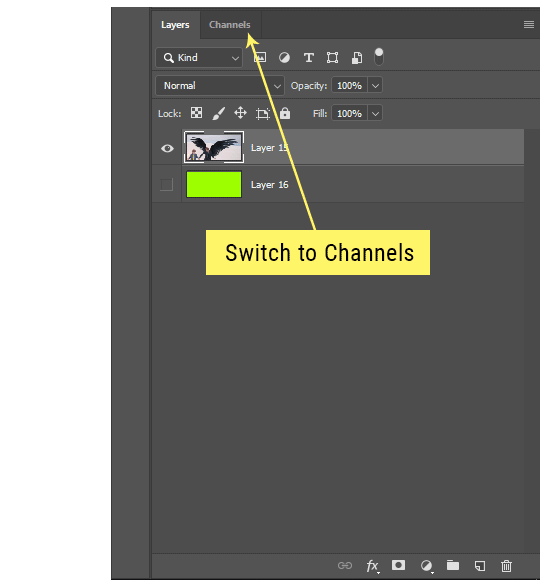
4. Try using channels to create masks!
This is a technique that works REALLY well for cutting out complex shapes, such as wispy hair (or feathers!) -- provided there's strong contrast between the subject and the background, and the background isn't too busy.
This is also a fantastic method for capturing alpha transparency. For example: If you have a neato paint stroke/splatter/watercolor texture you want to use as a mask, but has a solid background that’s getting in the way of things. This method will capture all the semi-opaque areas flawlessly!!
While editing your image (which you had better have made into a Smart Object!!!) do the following:
Switch from the "layers" panel to the "Channels" panel.
Toggle through the R, G, and B channels, and decide which one has the most contrast for the areas you are trying to mask.
Ctrl+Click that channel's thumbnail. This will create a selection marquee.
Switch back to the layers panel
Click on the target layer/group (the one you are trying to mask)
Click the mask icon at the bottom of the panel (the one with the circle inside a box)
Release the selection and invert the mask if necessary
If you're using this method to cut out a subject from its background, you probably won't want alpha transparency. In this case, select the mask thumbnail and use a levels adjustment on the mask itself to bump the contrast until you have more of a cutout effect!
It sounds like a lot of steps, but it’s really simple! So I made this handy GIF: (click to view from beginning)
Sometimes you won’t want to use this method for the entire image, but just a specific part. For example, if you’ve cut out a character with some other method (magic wand, manual brushwork), but are having a hard time with their hair in particular. Use this method to create the selection, but instead of converting the whole selection into a mask, use the brush tool to apply the mask only where you need it! You can invert the selection itself with shift+ctrl+i.
5. Outlining text

The font I used here is Salomé, which is actually a solid typeface with no outlined version. But you can make virtually any font into an outlined version if you so desire!
There's two possible methods here, actually:
The Easy Way:
Add a stroke layer effect to the text layer (by selecting the layer, clicking the little “fx” button at the bottom of the layers panel, and choosing “Stroke...”)
As far as settings go, aligning the stroke to the inside usually yields the best result/maintains the integrity of the letterforms.
Make the color of the text itself match the background.
If necessary, use the lighten/darken blend modes to create the illusion of transparency.
If you need true transparency (which I didn't until I decided I wanted to apply a gradient over the text), you'll have to try something else-- The Also Easy But Less Than Ideal Way:
Right click the text layer in the layers panel and select "convert to shape".
Now you can edit the fill/stroke the same way you would any other vector shape.
Again, you’ll want to set the stroke alignment to ‘inside’. For vector shapes, those settings are a little hidden. You’ll wanna open up that little dropdown in the toolbar with the line in it, and click “More Options”.
This is semi-destructive, so if you're working with a lot of text you might have to edit later, consider duplicating and hiding those text layers first so you'll have a 'backup' of it.
And while I’m on the topic of text...
6. Try breaking up your text layers!
I know a lot of people like to draw a neat little text box to put their text in, and then they center it all nice and neat and probably use a small font size to make it subtle and stuff... and that’s cool. Everyone’s got their different styles and things they like to emphasize in their edits and there’s absolutely merit to that sort of thing (case and point: the bulk of my dear @herzdieb’s work), but. Listen.
I love typography. I love a good typeface. The stroke widths, the letterforms, the ligatures, the serifs... I get like, horny on main for a good typeface. I like to make the text on my edits BIG, so that those details can shine. I also like doing interesting things with the text. Jumbling words/letters around, distorting them, deconstructing them and just... letting the text really ~interact with the rest of the composition instead of just kinda politely floating on top of it.
I’m not saying you have to do that kinda stuff. Or that I think neat little floaty text boxes are boring, or lazy, or whatever. It’s just... personally, I get really inspired by type. Fun type treatments are one of those things I LIVE FOR, something of a ~signature of mine, and I encourage everyone to just... try it? To use text as more of an integral Design Element and less of a... idk. A caption?
So if you have a quote, or even just a word... put each word (or letter) on its own text layer. And then: make ‘em different sizes. Make the words so big they don’t fit on the canvas. Rotate each one at a fun angle. Scatter them around. Go nuts. Use masks to chop parts of the letterforms off. Make ‘em overlap. Just have at it. Or, as the kids these days are saying: go absolutely fuckin feral.
If that really just isn’t your style, or doesn’t work/make sense for the edit you’re doing, fine. Delete all the layers and just do a text box or whatever. But. I’m tellin u.
Give it a try.
At least once.
Just... a lil taste.
7. Understand the difference between lighten/darken vs screen/multiply
For a while in my photoshoppin' youth, my understanding of these blend modes basically amounted to "darken makes things darker, and multiply makes things really darker", and vice versa for lighten/screen. But there's an important difference between how these blend modes work, and if you understand them, you can use them more... strategically? I guess?
Darken and Lighten are kinda misnomers tbh, because they technically don't really darken or lighten anything. What they actually do is make it so that only the areas of the layer that are darker or lighter than the content of the layers beneath them are visible. This produces some pretty nifty layering effects that you can't achieve with screen and multiply.
Here’s an example: (if you’re reading this on a phone with the brightness dimmed down you probably won’t be able to see the differences)
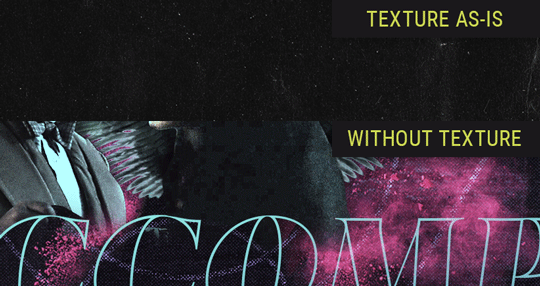
Without any the texture applied, you can really see the noise/graininess of Crowley’s jacket in the screencap. You can also see the ‘seam’ where Crowley fades into the background-- the jacket is a green-ish black, while the background it’s fading into is more of a purple-black.
With the texture set to ‘Screen’, the whole image becomes lighter across the board. Crowley’s jacket gets lighter, and so does Aziraphale’s jacket and the pink cloud thing. This does little to nothing to obscure the poor image quality and disguise that ‘seam’.
But with the ‘Lighten’ blend mode, ONLY the dark parts of the image appear lightened, and not only do they appear lightened, but they get kinda equalized. Notice how the patchy jpeg artifacts on Crowley’s jacket disappear, how that color seam smooths out, and how the brightness of Aziraphale’s jacket and the pink cloud doesn’t change at all.
This isn’t to say that lighten/darken are better and that you shouldn’t use screen/multiply. They each have their uses. But most often, I find myself using lighten/darken because the way they work is honestly really helpful? And just cool af?
8. Masking individual frames on gifs
If you ever feel like torturing yourself by making a gif that has frame-by-frame masking, my advice is don't try to mask each frame from scratch. You'll get patchy/wobbly results from the masks being slightly different on each frame.
Instead, mask the first frame, then alt+click and drag that mask onto the next frame. Make any minor adjustments to the new mask as needed, and repeat for each frame. This saves time and more importantly, keeps the masking consistent on areas with little to no movement, which makes a HUGE difference in how smooth the final product will be.

If you look at the edges of the animation, they’re nice and steady and consistent. It’s only the parts that have a lot of movement (like the back of his neck) where you can see any ‘ghosting’/wobbly-ness happening.
Sometimes the mask will move when I copy it to the next frame. Like, for the whole document. It gets nudged 20 pixels down or to the left or s/t every time. I have yet to figure out why, but I’m betting it has something to do with shooting myself in the foot with the frame 1 propagation settings at some point during editing?? ANYWAY, when this happens, just unlock the mask from its layer (click the little chain icon between their thumbnails) and move it back into place.
In these cases, I also like to pick a spot with a hard edge (such as the shoulder in the above gif) as a reference point of where it needs to be moved to. It kinda sucks having to do this for every frame, but you already signed up for some suckage when u decided to mask every frame of a gif, so I mean... 👀
9. Don't be afraid/too intimidated to do manips as needed!
Manips can be tricky if you're really striving for realism. There's light sources and color grading and perspectives to reconcile!! But when you're doing an artsy Edit with a capital E, odds are those kinds of discrepancies will be thoroughly camouflaged by all the levels, black and white, etc adjustments you're doing!
Something I run into often is, "I like this screencap, but the top of their head/hair is chopped off :(" But if I go back through all the screencaps from the scene, there's usually another frame where the camera is planned/zoomed out enough that I can steal the rest of their head/limb from it! And since it's from the same scene/shot, the lighting and color grading should already be a perfect match!
A super simple example:
So I wanted to use this picture of David and Michael for this edit, but 1) They’re standing on the wrong sides for their characters, and 2) part of David’s arm is covered up by Michael’s.
Of course, the easiest course of action would be to just mirror the photo so they’re on the correct sides, but 1) mirroring faces tends to yield wonky results, and 2) that still wouldn’t give me a perfect, free-standing cutout of Crowley to place wherever I want in my composition (as opposed to being forced to awkwardly position him off the edge of the canvas to hide the fact that the other arm is missing)
Fortunately, it only took all of like, two (2) minutes to draw a crude selection around his good arm, copy and paste it into a new layer, flip it around, and add any necessary masking to get the shape right.
My point here isn’t to teach y’all how to do manips, or to pass this off as an impressive example of one. Because it’s really, REALLY not. My point here is to demonstrate that even something as tiny and simple as this can really open up your options for what you can actually do with an edit/composition.
So next time you’re feeling limited/inconvenienced by the crop of a screencap, just... you know. Consider whether or not it’s worth attempting a quick and dirty manip to fix it.
Another Example:

Sometimes you’re torn between two screencaps. You like one element from Screencap A but also want some other element from Screencap B. What to do? Just frankenstein ‘em together. Layer one on top of the other, get them lined up, and mask out the necessary parts.
It’s easy to get hung up on stuff like “Uh... should Crowley’s shoulder be doing that?” but let me assure you that like... the people looking at the final product are none the wiser to your butcherwork and will not notice. Especially if you’re going to add a bunch of contrast and color adjustments later on. (in fact, sometimes I’ll apply those adjustments first so I’m not distracted by any discrepancies that are going to come out in the wash anyway)

“I dunno... 🤔🤔 doesn’t seem anatomically correct... 🤔🤔🤔🤔” thought no one.
Point is... point is... dolphins you can get away with a LOT more than you think you can. Don’t let the desire to make these kinds of manips perfect get in the way of just... making them good enough. The bar isn’t that high, I promise.
10. Know what inspires you
What types of edits get you EXCITED? What kind of work do you see on your dash and go, "oh, I'm reblobbin' THAT!!1!"
I know for herzdieb, she's all about emotional pieces. She likes matching words/lyrics/poetry to on-screen moments and punching you in the feels with both. She hears a song, or reads a poem, and the lightbulbs go off for her, and she does her thing.
As for myself, I just live for the aesthetics of an edit. The colors, the fonts, the composition. I almost never know what text/screencaps I'm going to use when I start an edit. I just see a font I like, or a color palette, or a texture, and think, "I wanna use that!"
And once you know what inspires you, collect that inspo! I hoard textures and fonts. I have them organized into neat lil folders. When I wanna make an edit, that’s where I start. I just browse through them all until one or two start calling my name. Herzdieb collects songs and quotes and poems. Maybe your thing is color palettes, or aesthetic-y photos. Or whatever.
The point here is make the kinda stuff you like/want to see. Not the kinda stuff everyone else is making or the kinda stuff you notice gets the most notes.
11. Be able to let go of things that aren't working
I often begin an edit with a rough idea of the style, colors, or layout I'm going for. And I almost always end up doing... something totally different.
So don't get too fixated on what your initial ideas are. Be open to experimenting and just let the edit be what it wants to be. If something looks nice, do it. If it doesn't, don't try to force it just because, "well, I was inspired by this piece that did xyz and I wanna try it too".
When you see a certain effect that inspires you, just keep it in mind as a possible solution for the next time you make something-- don't make it into a benchmark, or some imaginary 'goal' you have to meet for This Edit You Are Working On Right This Moment. In fact, sometimes the elements I end up ditching are the very ones I started with, that initially sparked my inspiration. And that's okay. Inspiration can be a moving target, and if your vision for something changes, let it.
You wanna know what inspo reference I was looking at when I started that “Temptation Accomplished” edit?
Fucking this: https://search.muz.li/YTdiNjkwN2Rh
You might be thinking, “how the fUCK was that the inspiration??!! Your edit looks nothing like that at all!” ...and you would be 100% correct, and that is 100% my point. I spent a good hour or two trying to incorporate that cutout text layering effect before finally accepting the fact that it just wasn’t working for the edit I was making. And it wasn’t until then that it actually started to come together.
12. Be patient, and take the time to explore all your options!
I’m not gonna lie, y’all. I spend hours on my edits. I usually complete them over the course of 2-3 days/sittings. I rarely have a plan. 99% of the time I'm just throwing things at the wall and seeing what sticks. When I get stuck (when, not if), it helps to step away from it and come back later with a fresh perspective/set of eyes.
Every single edit I've posted, I have at some point felt like giving up on because I thought it looked like garbage (and not just because I was being self-deprecating/doubting myself, but because at those points, they simply weren't finished/something about the composition just wasn't working for me)
Work through those moments, and if necessary, take a break/sleep on it. It's always after I've exhausted my early ideas that the really good ones start to come to mind!
Here’s how the character poster edits I did progressed:

In Classic Me™ Fashion, I literally started off with just... textures I liked, and a font that I liked. Now, there were obviously a lot more ‘steps’ involved in both designs, but hopefully at the very least this gives a sense of how things get from point A to point B.
So uh... thanks 4 comin 2 my TED talk. I hope u learned at least one (1) cool new thing or maybe just feel vaguely inspired by this rambling mess?
157 notes
·
View notes
Photo


LIVEJOURNAL FOR SCOOBIES #5: HOW TO POST AN ENTRY (TO SEASONAL_SPUFFY)
Join me on a new voyage of the mind as I make 2 mock posts for the LiveJournal community seasonal-spuffy, taking screenshots all the way.
This post might be of use to people who want to know how to make LiveJournal posts in general, but most of the specifics will be Seasonal Spuffy guidelines. If you’re only interested in Seasonal Spuffy guidelines, try the community profile.
Note: the LiveJournal version of this post might be easier to read. https://seasonal-spuffy.livejournal.com/631381.html
STEP 0: Things to do before posting to Seasonal Spuffy
Create a LiveJournal account (sometimes, we’ve allowed participation elsewhere, but the Fall 2018 round only happens on LiveJournal);
join the community (currently optional, but makes posting easier);
(optional!) sign up for a posting day;
or wait for the free-for-all days: Nov. 22&25, Dec. 1&2 for Fall 2018;
create a new Spuffy work of almost any kind (detailed guidelines here).
STEP 1: Open the post editor
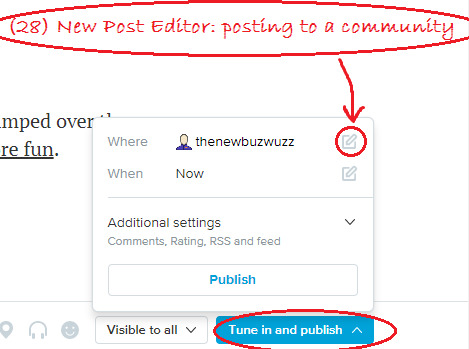
Click “Post to Community” or a pencil icon at the top of the recent entries page of the comm, or click “Post New Entry” in the top right corner of any LJ page.
There are currently 2 post editors.
The new post editor may look like home if you’re used to tumblr. It looks like in screenshots 27-28, and it produces posts that are formatted like this. If you start in the new post editor and change your mind, click "Switch to old version" at the bottom of the page. Your post-in-progress will open in the legacy editor. You cannot switch back with the same post.
The legacy editor has 2 modes - visual editor and HTML. You can switch between them freely, using tabs at the top of the area where you write your post. In the mobile version of the site, you only get the HTML editor. Compared to the new post editor, the legacy editor gives you much more control over formatting, and it lets you preview the entry before you post.
Most of the screenshots in this tutorial post are from the legacy editor.
STEP 2: Select the community
See screenshot 18. If the community isn’t set, click “To Community” above the subject line of your entry-in-progress and select seasonal_spuffy.
STEP 3: Write a title (”subject”)
Ideally, the title describes your entry. Here are three good examples:
Four Banners
Icons: Night & Day
Fic: Buffy and the Bloodmobile (2 of 4)
However, any entry title you like is fine as long as the entry has a header.
STEP 4: Fill in the header (the version for fic)
If you're posting fic, please fill out this header at the top of your post: Title: Author: Era/season/setting: Rating: See screenshot 20. For "title" and "author", please give us the info that you’d like us to use when we link to your entry.
You might need to add another header line for warnings:
if your entry includes Spike/Other or Buffy/Other pairings;
if your entry is explicit/ not safe for work.
You can continue the header if you want, e.g. add a line for "Author's Note".
STEP 4: Fill in the header (the version for art etc.)
If you’re posting art or other work, the basic header is only 2 lines: Title: Creator:
We will use this title and name when we link to your entry.
You might need to add another header line for warnings:
if your entry includes Spike/Other or Buffy/Other pairings;
if your post is explicit/ not safe for work.
You can continue the header with other info if you want.
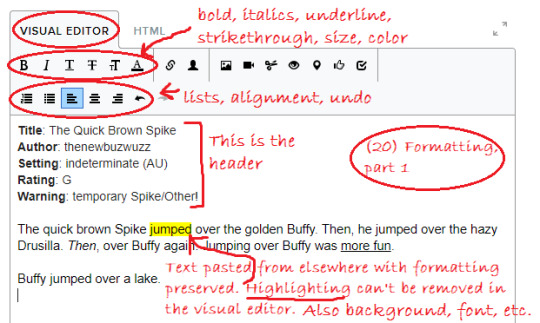
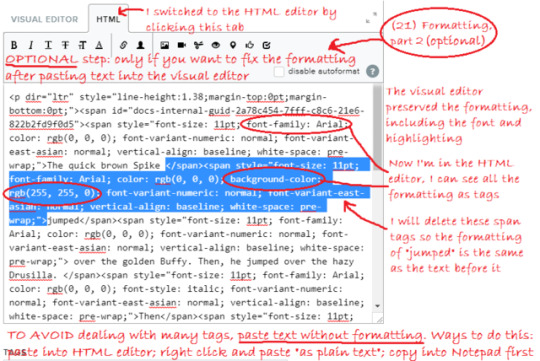
STEP 5: Insert your work (the version for fic)
The visual editor preserves formatting if you paste text into it. Sometimes, it keeps too much, like the font or the background color. If you want to find out whether this happened, scroll to the bottom of the page and PREVIEW. If there’s too much formatting and you feel like cleaning the post up, you have 2 options:
paste text without formatting instead (paste in the HTML editor, or right-click in the visual editor and Paste as Plain Text, or copy from Notepad),
or, after pasting into the visual editor, switch to the HTML editor and remove the formatting tags that you don’t want.
See screenshot 20 and 21 for an example.
STEP 5: Insert your work (the version for artwork)
See screenshot 22. After clicking the image icon in the toolbar, I dragged and dropped the image from my computer, set image size to 600 pixels, and put a checkmark in “Add a link to fullsize picture” so that people can click my image to view it in full size. I left the other settings as they are. Then, I clicked “Insert Pictures”.
The visual editor now shows an image in the entry, while the HTML editor shows some link code where I can insert descriptive alt text and hover text for the image if I like.
As an alternative to uploading, you can insert an image from various hosting sites by selecting “Paste URL” or one of the other options.
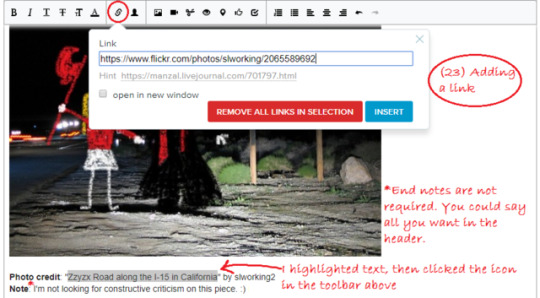
STEP 6 (optional): Add some end notes
If you like, you can add some notes below your work, like credit for images used. Screenshot 23 shows how to add a link.
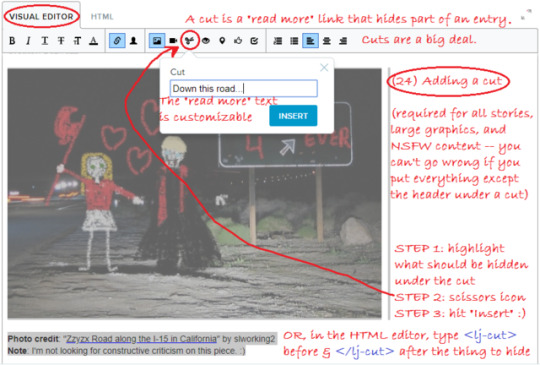
STEP 7: Add a cut
Cuts are “read more” links that will hide parts of the entry when people see the entry in a feed. Cuts are a big deal on LiveJournal, and you should use them.
For Seasonal Spuffy, cuts are required for all stories, large graphics, and NSFW content. You can’t go wrong if you just “cut” everything except the header.
Unlike tumblr, where a “read more” link hides everything from that point onwards, LiveJournal cuts have both a beginning and an end.
To add a cut in the visual editor:
Highlight the part you want to hide.
Click the scissors icon "Insert Cut" in the toolbar (screenshot 24).
Change the "Read more" text if you like or just click Insert.
See if there are cut lines now: dotted lines with little scissor images (screenshot 25).
To add a cut in the HTML editor:
Add before the part you need to cut and after it,
OR highlight text and click the Insert Cut icon. This will add the cut code.
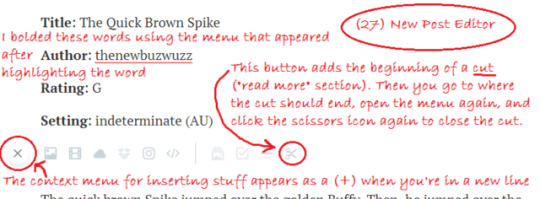
To add a cut in the new post editor:
Go to an empty new line at the start of the section you want to hide.
A toolbar should open (see screenshot 27). Click the scissors icon to add the start of the cut.
Then go to an empty line where the cut should end.
In the toolbar, click the scissors icon again to add the end of the cut.
STEP 8: Add tags
Please add these kinds of tags to your Seasonal Spuffy entry:
creator (creator: yourusername with your username)
form (form: banner/wallpaper/manip, form: fanmix, form: fic, form: icons, form: meta/recs, form: other art, form: poetry, form: vid)
era (era: ats s5, era: btvs s1,..., era: btvs s7, era: comics canon, era: indeterminate, era: post-series, era: pre-series)
rating (rating: nc-17, rating: other)
(optional) genre - for fic if applicable (genre: alternate reality, genre: amnesia, genre: baby/kid/parent fic, genre: crossover, genre: holiday, genre: post-apocalyptic, genre: shanshu!Spike, genre: time travel, genre: vamped character, genre: wishverse)
You don’t have to memorize these tags. If you type the first part of the tag, like “era”, the available options will show in a dropdown. See screenshot 25. You can also click “select” and see all the available tags for the community.
If you're posting for the first time, your creator tag might not be available yet. That's okay - we will add it later.
If tags bewilder you, it's okay to skip this step or skip some kinds of tags. The mods can clean the tags up for you. If there’s enough time, it’s also okay to ask for help. :) You can contact one of the mods, like thenewbuzwuzz or Rebcake, or email [email protected], send us an ask here, etcetera.
STEP 9 (optional): Preview
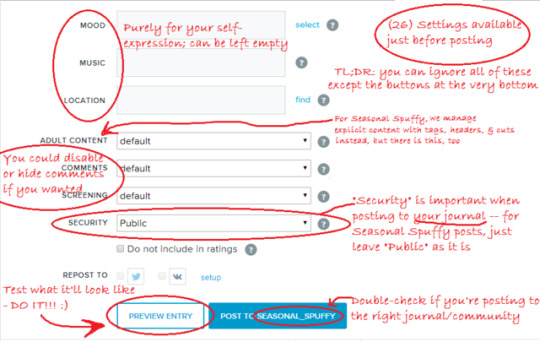
Once you're done, it's a good idea to click the white button "Preview Entry" at the bottom of the post editor (see screenshot 26). This option is only available in the legacy editor. The preview will open in a new window, and you'll have to close it and return to the editor to finish posting your entry.
You can't see cuts when you preview a post, because they won’t be visible when your post is open. This is normal.
If you have time and you want to make absolutely sure everything is fine before making the real post, you could make a private test post on your journal. The option to make the entry private is under Security near the bottom of the window, and you’d have to edit the “Post” settings at the top to post to your journal. After that, if you see everything *is* fine, you can open that post for editing, go into the HTML editor, and copy everything for posting to the community.
STEP 10: Post
Double-check the text on the blue “post” button right before you post. The button caption should say “POST TO SEASONAL_SPUFFY”.
For Seasonal Spuffy entries, we don’t require you to do anything with the various settings that are available directly before posting. See screenshot 26 for an explanation of what some of them would do if you did use them.
If your entry is finished but it’s not yet your posting day/ not a free-for-all day, you can schedule the entry to be posted on the right day.
To schedule, use the setting "Date" at the top of the post editor.
Right after you schedule, LiveJournal will offer to view the post, and it will kind of look like it's already posted. If you go to the main page of the community, you should be able to see it's not there yet.
If we're between rounds and we've turned entry moderation on, you won't be able to schedule an entry. You can contact us (message a mod, e.g. thenewbuzwuzz, email [email protected], or get in touch with us elsewhere), and we can change the setting. Currently, in November 2018, you can schedule.
STEP 11 (optional): Check and fix as needed
It’s a good idea to look at your entry in the recent entries page of the community, so that you can see if the cut worked.
To edit your entry if necessary, hover over its title in the recent entries page and select the pencil icon on the right, or click the title to open the entry, then select the pencil icon in the row of icons above the title. After editing, click the blue button "Save Entry" at the bottom of the page.
In case of urgent problems posting, message one of the mods, for example, thenewbuzwuzz or teragramm; or email [email protected], or comment on one of the latest mod posts on LiveJournal.
If you have time and you prefer to figure things out on your own, try the LiveJournal FAQ.
See the community profile for more information on how the community works.
If you have other questions about the event or posting, please feel free to ask!
#sorry about that optimistic promise on Sunday. ''a day or two''#long post#seasonal spuffy#mod post#livejournal#tutorials#btvs
14 notes
·
View notes
Text
What Are Meta Tags?
Let’s talk about meta tags — what they are, why they matter, and how to do them better.
First things first — what made you click on this article to read it?
Maybe the title caught your eye, or perhaps it was the short blurb you saw.
You might have clicked simply because this article comes from a source you trust.
If you found this article via a search engine, though, there’s a good chance you found and clicked this article because of meta tags.
Meta tags are the foundation of SEO, and the first thing you’ll find yourself setting up when building a web page.
Without meta tags, you can’t reach readers organically.
It doesn’t take much time to generate meta tags, but it’s more important than you might think.
That’s because 93% of all online experiences begin with a search engine.
This is why so many online marketers are so focused on getting SEO right.
Organic search traffic is the holy grail of SEO, so it can’t be ignored.
Your content needs to be readable and appealing to users on search engines.
There’s a very specific syntax needed.
It’s similar to how bookstores and libraries organize their archives of books — and that’s what meta tags are, essentially.
What are Meta Tags?
Meta tags are a type of HTML tag that provides search engines with information about a website page.
Let’s take a look at the basic elements.
The title and description tags make up almost the entire entry.
If not for these meta tags, all you’d see in Google SERPs would be my URL.
Title and description tags are the two most-used tags for SEO purposes, but SEO isn’t the only part of digital marketing.
Advanced digital marketing requires the use of even more tags that improve page rank and overall user experience.
Just like this search result, you’ll soon find out that these tags control how your entire digital presence is viewed and navigated.
Machines can read URLs just fine. If I wrote for machines, my website would look like this:
Google prioritizes certain tags because they provide context for people.
I built my website for people as well, so it looks like this:
This polish is what marketing is all about.
In this blog post, we will explore meta tags and see how they affect your overall digital marketing efforts.
While simple, the devil is in the details, and every detail counts.
How Meta Tags Affect Brand Image and Click-Through Rates
You absolutely can judge a book by its cover. It’s what covers are designed for.
Your title and meta description tag create the cover for your web page. They’re your first impression on most visitors.
It’s not just about search engines, but how we view the Internet.
Reddit is a basic link-aggregation site that takes away all the bells and whistles.
Reddit depends on the title and image to entice conversations and clicks.
Using meta tags correctly is like using the correct format for a business email.
Sure, you can put whatever you like out there, but there’s a level of professionalism that’s expected at some point.
Even Amazon will only give you a picture, title, and short description to make your point.
Think of these tags as your elevator pitch.
You’re given about as much space as a Tweet to sell your entire brand and product.
Which means you need to nail it.
You can’t just call in this detail and polish everything else. If you do, nobody will ever see the rest of what you polished.
We already know how meta tags affect SEO, but that’s not the only element.
Meta tags will make your email marketing and marketing automation efforts easier by providing information for emailed links.
Tags are a crucial element that determines what my automated social media posts look like.
When other bloggers, YouTubers, and social media influencers (and micro-influencers) share your content, tags make it easier.
Think of meta tags as the packaging for your product.
If your packaging isn’t spot-on, nobody will ever buy your product, no matter how great it is!
So what are some best practices to implement for tags?
Meta Tag Best Practices
There are a TON of different HTML tags that can be used on a web page. We’re only going to focus on a handful of significant tags.
We’ll start with the one that might have brought you here today.
1. Title Tags
It’s not technically a meta tag, but it shows up in the header and is used as one.
As of July 2017, the character limits for title tags in Google search results are 78 on mobile devices and 70 on a desktop.
However, that doesn’t necessarily mean you should use all those characters, and 60 is the generally recommended limit.
Long-tail keywords make a difference.
Here are the top meta titles in the SERPs for “How to make content marketing effective.”
By adding the year, we get an entirely new set of results for “how to make content marketing effective 2017.”
Some users will want basic information, while others will want the most current.
By adjusting our title tag, we can affect which of these searches we rank for.
Ultimately, the goal is to hit both, but that’s not always feasible.
Make sure your keyword is in your title, or you’ll find your articles buried in search results.
For example, when I search for the “best tacos in Tucson,” some restaurants are on page 10 below, even Del Taco.
That’s a wasted opportunity for that taco capital of the country!
These small businesses could greatly improve their search results, sales, and ROI by simply adding “best tacos in Tucson” to their title tags.
Here’s a sample of the HTML required for a title tag located in your header.
<head>
<title>The Best Title Example I Could Come Up With</title>
</head>
In WordPress, it’s as easy as giving your page a title.
You really can’t miss it.
That’s all there is to it!
2. Image Tags
Like title tags, Image tags aren’t labeled “meta.”
But they’re clearly used by search engines, link aggregators, and other sites to identify your site.
There are two image descriptions actually crammed into one tag.
Here’s what the HTML code looks like.
<img src=“image.jpg” alt=“image description” title=“image tooltip”>
Both the alt and title tags should be defined for the best experience.
The title displays on your screen when you hover your cursor over it.
The alt text displays when the image can’t be rendered (or is spoken to the blind and visually impaired).
When uploading an image to WordPress, you’ll be prompted to enter the title, caption, alt text, and description.
The more fields you fill out (even if you use the same information), the more searchable your images become.
Anywhere from 20-60% of all Google traffic goes to sites with well-optimized graphics.
Why wouldn’t you want to be included?
It’s also a matter of ADA website compliance.
There are approximately 58,200 people with some level of visual impairment per million in the U.S. alone.
That’s a huge segment of the population that wouldn’t have a great user experience without alt image tags.
Optimize your images for search engines and users.
3. Description Meta Tags
A meta description tag gives you a chance to provide an overview of the page’s content.
They’re limited to around 160 characters and aren’t directly tied to Google’s search algorithms at all!
Once again, the reason you need description tags is to improve the user experience.
Description tags encourage click-throughs.
Here’s what the HTML looks like:
<head> <meta name=”description” content=”This is an example of the text that will show up in search results. Read on to learn more about description tags.”> </head>
Without a meta description, Google will default to whatever preview sentence it feels best encompasses the content.
This isn’t necessarily a bad thing.
This post doesn’t have a meta description (I rarely use them), and it ranks well.
Of course, my blogs are filled with relevant content in short, sweet sentences. Most of them would work as descriptions on their own.
Still, there’s no harm in adding additional information to make your content more searchable.
4. Robots Noindex and Nofollow Meta Tags
Robot meta tags aren’t always necessary.
By default, all of the pages and links you create on your website are indexed as ‘follow’ by search bots and web crawlers.
Whenever you want to redirect them, you’ll need a robot meta tag.
Here’s the noindex HTML code:
<html><head> <meta name=”robots” content=”noindex” /> (…) </head>
This would be within the header and indicate this page doesn’t need to be indexed.
It’s useful for syndicated and duplicate content that your customers/readers could use, but you don’t want credit in search indexes.
Here’s the HTML for a robot nofollow.
<meta name=”robots” content=”nofollow”>
This is used for links you don’t necessarily want to endorse.
For example, readers leaving links in my comments aren’t exactly endorsed by me, so a nofollow tag above the comments section keeps my site clean for bots.
Here’s a great infographic on when and how to use nofollow tags.
Now we get to one of the most controversial meta tags.
5. Keyword Meta Tags
Keyword tags aren’t used by search algorithms to determine search ranking.
Here’s what the HTML looks like:
<meta name=”keywords” content=”HTML, CSS, XML, JavaScript”>
I coach my SEO clients to ignore keyword tags because they don’t affect SEO.
That doesn’t necessarily make them useless, however. They’re especially useful in WordPress.
Keyword tags and categories can help Google determine which page on your site should rank for a search.
They also create a page in WordPress that provides one more indexed page.
This means that, while your blog posts are focused on long-tail keywords, your tag and category pages have feeds covering the shorter keywords.
Categories can be used for the URL format, providing one more keyword to the page address.
This is accomplished under Settings – Permalinks in WordPress.
Adding this format provides context to your content.
Google loves context for search results!
Keywords also provide a big-picture overview of how many pages you have for each keyword.
You can use them to help plan your editorial calendar.
6. Viewport tags
You don’t spend much time thinking about viewports, but they’re especially important in today’s mobile-first world of search.
On mobile devices, pages are shown in a popup window called a viewport that extends past the device’s border.
Here’s an illustration of what I’m talking about.
Developers can set the viewport size to increase mobile usability.
WordPress users can check this tag to learn this information for their templates.
But you probably didn’t know that unless you’re already a web developer.
Since Google increasingly focuses on mobile-friendly websites, this meta tag could mean the difference between success and mobile failure.
Now that you have a basic understanding of meta tags and why they’re important, I’ll show you some of my favorite tools for manipulating them.
Free Tools to Add and Check Your Meta Tags
Don’t worry if this all sounds overwhelming — there are tons of tools to make it easy to get meta tags right. Here are two of my favorites.
Yoast SEO Plugin for WordPress
Yoast is a powerful SEO plugin for WordPress and one of the most-downloaded SEO and meta tags tools.
With Yoast, all of the pages and posts you publish have back-end options to increase social sharing, optimize SEO, update tags, and other metadata.
With Yoast installed on your WordPress site, a few clicks and a few seconds of your time are all it takes to add meta-tagging to your process.
Yoast also allows you to enter a focus keyword that doesn’t get added to the meta tags, allowing the back-end program to analyze your post.
BuzzStream Meta Tag Extractor
If you need a quick chart of the metadata that’s being used by your competition, BuzzStream’s Meta Tag Extractor is a sleek and simple solution.
Copy and paste a list of URLs, and you’ll be presented with the meta tag information.
There’s even an option to download as a CSV file so that you can scrape large lists quickly.
It’s a quick and easy way to organize this data when you need it.
This free online tool does its job without all the bells and whistles.
Less Popular (But Still Useful!) Meta Tags
So to be fully transparent, here’s a chart of HTML meta tags.
An author meta tag can be used to tell search engines who wrote a piece of content.
Authors have been used in the past for search results, but it’s not a factor anymore. However, you might use author tags if you run a multi-author blog.
WordPress does add this information to blogs when multiple users are contributing content.
It’s more a badge of honor for bloggers than anything else.
Most of the rest define parameters that should already be controlled on a server level.
While I ignored these meta tags, it doesn’t mean you have to. Feel free to add whatever information you’d like.
It doesn’t help search rankings, but it doesn’t hurt them, either.
Conclusion
Meta tags are a basic part of HTML — and can impact SEO.
Back in the early days of the internet, they were a signaling factor for search engines to understand what content is on a page.
The internet (and our relationship with it) has evolved exponentially since then.
Contextual search, AI digital assistants, and mobile devices are changing the way we view content.
Search engines are incentivized to provide the best search results possible, so meta tags are less important.
However, some, such as the titles and meta descriptions, are more important than ever before.
While less metadata is used, it’s still the first impression you’ll make on both robots and people.
What do your website’s meta tags say about you?
The post What Are Meta Tags? appeared first on Neil Patel.
Original content source: https://neilpatel.com/blog/why-meta-tags-are-so-important/ via https://neilpatel.com
See the original post, What Are Meta Tags? that is shared from https://imtrainingparadise.weebly.com/home/what-are-meta-tags via https://imtrainingparadise.weebly.com/home
0 notes
Text
What Are Meta Tags?
Let’s talk about meta tags — what they are, why they matter, and how to do them better.
First things first — what made you click on this article to read it?
Maybe the title caught your eye, or perhaps it was the short blurb you saw.
You might have clicked simply because this article comes from a source you trust.
If you found this article via a search engine, though, there’s a good chance you found and clicked this article because of meta tags.
youtube
Meta tags are the foundation of SEO, and the first thing you’ll find yourself setting up when building a web page.
Without meta tags, you can’t reach readers organically.
It doesn’t take much time to generate meta tags, but it’s more important than you might think.
That’s because 93% of all online experiences begin with a search engine.
This is why so many online marketers are so focused on getting SEO right.
Organic search traffic is the holy grail of SEO, so it can’t be ignored.
Your content needs to be readable and appealing to users on search engines.
There’s a very specific syntax needed.
It’s similar to how bookstores and libraries organize their archives of books — and that’s what meta tags are, essentially.
What are Meta Tags?
Meta tags are a type of HTML tag that provides search engines with information about a website page.
Let’s take a look at the basic elements.
The title and description tags make up almost the entire entry.
If not for these meta tags, all you’d see in Google SERPs would be my URL.
Title and description tags are the two most-used tags for SEO purposes, but SEO isn’t the only part of digital marketing.
Advanced digital marketing requires the use of even more tags that improve page rank and overall user experience.
Just like this search result, you’ll soon find out that these tags control how your entire digital presence is viewed and navigated.
Machines can read URLs just fine. If I wrote for machines, my website would look like this:
Google prioritizes certain tags because they provide context for people.
I built my website for people as well, so it looks like this:
This polish is what marketing is all about.
In this blog post, we will explore meta tags and see how they affect your overall digital marketing efforts.
While simple, the devil is in the details, and every detail counts.
How Meta Tags Affect Brand Image and Click-Through Rates
You absolutely can judge a book by its cover. It’s what covers are designed for.
Your title and meta description tag create the cover for your web page. They’re your first impression on most visitors.
It’s not just about search engines, but how we view the Internet.
Reddit is a basic link-aggregation site that takes away all the bells and whistles.
Reddit depends on the title and image to entice conversations and clicks.
Using meta tags correctly is like using the correct format for a business email.
Sure, you can put whatever you like out there, but there’s a level of professionalism that’s expected at some point.
Even Amazon will only give you a picture, title, and short description to make your point.
Think of these tags as your elevator pitch.
You’re given about as much space as a Tweet to sell your entire brand and product.
Which means you need to nail it.
You can’t just call in this detail and polish everything else. If you do, nobody will ever see the rest of what you polished.
We already know how meta tags affect SEO, but that’s not the only element.
Meta tags will make your email marketing and marketing automation efforts easier by providing information for emailed links.
Tags are a crucial element that determines what my automated social media posts look like.
When other bloggers, YouTubers, and social media influencers (and micro-influencers) share your content, tags make it easier.
Think of meta tags as the packaging for your product.
If your packaging isn’t spot-on, nobody will ever buy your product, no matter how great it is!
So what are some best practices to implement for tags?
Meta Tag Best Practices
There are a TON of different HTML tags that can be used on a web page. We’re only going to focus on a handful of significant tags.
We’ll start with the one that might have brought you here today.
1. Title Tags
It’s not technically a meta tag, but it shows up in the header and is used as one.
As of July 2017, the character limits for title tags in Google search results are 78 on mobile devices and 70 on a desktop.
However, that doesn’t necessarily mean you should use all those characters, and 60 is the generally recommended limit.
Long-tail keywords make a difference.
Here are the top meta titles in the SERPs for “How to make content marketing effective.”
By adding the year, we get an entirely new set of results for “how to make content marketing effective 2017.”
Some users will want basic information, while others will want the most current.
By adjusting our title tag, we can affect which of these searches we rank for.
Ultimately, the goal is to hit both, but that’s not always feasible.
Make sure your keyword is in your title, or you’ll find your articles buried in search results.
For example, when I search for the “best tacos in Tucson,” some restaurants are on page 10 below, even Del Taco.
That’s a wasted opportunity for that taco capital of the country!
These small businesses could greatly improve their search results, sales, and ROI by simply adding “best tacos in Tucson” to their title tags.
Here’s a sample of the HTML required for a title tag located in your header.
<head>
<title>The Best Title Example I Could Come Up With</title>
</head>
In WordPress, it’s as easy as giving your page a title.
You really can’t miss it.
That’s all there is to it!
2. Image Tags
Like title tags, Image tags aren’t labeled “meta.”
But they’re clearly used by search engines, link aggregators, and other sites to identify your site.
There are two image descriptions actually crammed into one tag.
Here’s what the HTML code looks like.
<img src=“image.jpg” alt=“image description” title=“image tooltip”>
Both the alt and title tags should be defined for the best experience.
The title displays on your screen when you hover your cursor over it.
The alt text displays when the image can’t be rendered (or is spoken to the blind and visually impaired).
When uploading an image to WordPress, you’ll be prompted to enter the title, caption, alt text, and description.
The more fields you fill out (even if you use the same information), the more searchable your images become.
Anywhere from 20-60% of all Google traffic goes to sites with well-optimized graphics.
Why wouldn’t you want to be included?
It’s also a matter of ADA website compliance.
There are approximately 58,200 people with some level of visual impairment per million in the U.S. alone.
That’s a huge segment of the population that wouldn’t have a great user experience without alt image tags.
Optimize your images for search engines and users.
3. Description Meta Tags
A meta description tag gives you a chance to provide an overview of the page’s content.
They’re limited to around 160 characters and aren’t directly tied to Google’s search algorithms at all!
Once again, the reason you need description tags is to improve the user experience.
Description tags encourage click-throughs.
Here’s what the HTML looks like:
<head> <meta name=”description” content=”This is an example of the text that will show up in search results. Read on to learn more about description tags.”> </head>
Without a meta description, Google will default to whatever preview sentence it feels best encompasses the content.
This isn’t necessarily a bad thing.
This post doesn’t have a meta description (I rarely use them), and it ranks well.
Of course, my blogs are filled with relevant content in short, sweet sentences. Most of them would work as descriptions on their own.
Still, there’s no harm in adding additional information to make your content more searchable.
4. Robots Noindex and Nofollow Meta Tags
Robot meta tags aren’t always necessary.
By default, all of the pages and links you create on your website are indexed as ‘follow’ by search bots and web crawlers.
Whenever you want to redirect them, you’ll need a robot meta tag.
Here’s the noindex HTML code:
<html><head> <meta name=”robots” content=”noindex” /> (…) </head>
This would be within the header and indicate this page doesn’t need to be indexed.
It’s useful for syndicated and duplicate content that your customers/readers could use, but you don’t want credit in search indexes.
Here’s the HTML for a robot nofollow.
<meta name=”robots” content=”nofollow”>
This is used for links you don’t necessarily want to endorse.
For example, readers leaving links in my comments aren’t exactly endorsed by me, so a nofollow tag above the comments section keeps my site clean for bots.
Here’s a great infographic on when and how to use nofollow tags.
Now we get to one of the most controversial meta tags.
5. Keyword Meta Tags
Keyword tags aren’t used by search algorithms to determine search ranking.
Here’s what the HTML looks like:
<meta name=”keywords” content=”HTML, CSS, XML, JavaScript”>
I coach my SEO clients to ignore keyword tags because they don’t affect SEO.
That doesn’t necessarily make them useless, however. They’re especially useful in WordPress.
Keyword tags and categories can help Google determine which page on your site should rank for a search.
They also create a page in WordPress that provides one more indexed page.
This means that, while your blog posts are focused on long-tail keywords, your tag and category pages have feeds covering the shorter keywords.
Categories can be used for the URL format, providing one more keyword to the page address.
This is accomplished under Settings – Permalinks in WordPress.
Adding this format provides context to your content.
Google loves context for search results!
Keywords also provide a big-picture overview of how many pages you have for each keyword.
You can use them to help plan your editorial calendar.
6. Viewport tags
You don’t spend much time thinking about viewports, but they’re especially important in today’s mobile-first world of search.
On mobile devices, pages are shown in a popup window called a viewport that extends past the device’s border.
Here’s an illustration of what I’m talking about.
Developers can set the viewport size to increase mobile usability.
WordPress users can check this tag to learn this information for their templates.
But you probably didn’t know that unless you’re already a web developer.
Since Google increasingly focuses on mobile-friendly websites, this meta tag could mean the difference between success and mobile failure.
Now that you have a basic understanding of meta tags and why they’re important, I’ll show you some of my favorite tools for manipulating them.
Free Tools to Add and Check Your Meta Tags
Don’t worry if this all sounds overwhelming — there are tons of tools to make it easy to get meta tags right. Here are two of my favorites.
Yoast SEO Plugin for WordPress
Yoast is a powerful SEO plugin for WordPress and one of the most-downloaded SEO and meta tags tools.
With Yoast, all of the pages and posts you publish have back-end options to increase social sharing, optimize SEO, update tags, and other metadata.
With Yoast installed on your WordPress site, a few clicks and a few seconds of your time are all it takes to add meta-tagging to your process.
Yoast also allows you to enter a focus keyword that doesn’t get added to the meta tags, allowing the back-end program to analyze your post.
BuzzStream Meta Tag Extractor
If you need a quick chart of the metadata that’s being used by your competition, BuzzStream’s Meta Tag Extractor is a sleek and simple solution.
Copy and paste a list of URLs, and you’ll be presented with the meta tag information.
There’s even an option to download as a CSV file so that you can scrape large lists quickly.
It’s a quick and easy way to organize this data when you need it.
This free online tool does its job without all the bells and whistles.
Less Popular (But Still Useful!) Meta Tags
So to be fully transparent, here’s a chart of HTML meta tags.
An author meta tag can be used to tell search engines who wrote a piece of content.
Authors have been used in the past for search results, but it’s not a factor anymore. However, you might use author tags if you run a multi-author blog.
WordPress does add this information to blogs when multiple users are contributing content.
It’s more a badge of honor for bloggers than anything else.
Most of the rest define parameters that should already be controlled on a server level.
While I ignored these meta tags, it doesn’t mean you have to. Feel free to add whatever information you’d like.
It doesn’t help search rankings, but it doesn’t hurt them, either.
Conclusion
Meta tags are a basic part of HTML — and can impact SEO.
Back in the early days of the internet, they were a signaling factor for search engines to understand what content is on a page.
The internet (and our relationship with it) has evolved exponentially since then.
Contextual search, AI digital assistants, and mobile devices are changing the way we view content.
Search engines are incentivized to provide the best search results possible, so meta tags are less important.
However, some, such as the titles and meta descriptions, are more important than ever before.
While less metadata is used, it’s still the first impression you’ll make on both robots and people.
What do your website’s meta tags say about you?
The post What Are Meta Tags? appeared first on Neil Patel.
Original content source: https://neilpatel.com/blog/why-meta-tags-are-so-important/ via https://neilpatel.com
The original post, What Are Meta Tags?, has been shared from https://imtrainingparadise.wordpress.com/2020/11/12/what-are-meta-tags/ via https://imtrainingparadise.wordpress.com
0 notes
Text
SEO Analysis In Harrison Township PA
How is your SEO doing on your website? If you have made an effort your hand at SEO or you have called someone to work on your SEO for you, you may ponder how everything is going. If you haven’t seen an improvement in your SEO Analysis In Harrison Township PA, or you aren’t moving up the Google rankings as quickly as you would like, SEO analysis may be in order.
Our company undertakes a full scale SEO analysis including not merely the content you produce, but the performance of your website as well. SEO analysis is key to promoting your website and making it something that will work for you.
As an SEO analysis in Harrison Township PA, we target to improve your website’s performance and learn how to continue your development.
Our SEO analysis tools allow you to measure and analyze the ranking potential of your website. It doesn’t just analyze your content, it looks at the meta tags, the captions, the speed, the download speed, the performance, the mobilization, and so much more. Our tools employ the same technology to crawl your website that Google and other search engines will use.
What We Analyze?
There are so many things that go into making SEO and Google ranking what it is. The Google algorithm is difficult and no one really knows what goes into it. Some of the things we will look at when performing an SEO analysis include:
Strength of your HTTP headers
Length and relevancy of the title tags you use
Figure out the heading and phrase elements
Determine a proper length and relevancy for the description tags
Look at the keywords and significance of the keywords that you are choosing;
Figure out how often to use keywords to help your page rank
Check for keywords in the Alt text of the images
Check for keywords in the anchor tags and links
Examine any keywords in the meta tag or add them if you have not
Analyze the robots meta tag to see if search engines can find them
Find out how your website shows up to other people
Find out how the website appears on a search engine
Review the relevancy of your information
Ensure all linkage is correct
This is just a small part of what our tools and team as able to do as part of an SEO analysis. There are many, many parts to this process, which is why handing it over to a team and not to a piece of software is such a great idea. Even though technology crawls these sites, actual humans will make use of them, so you have to find a middle ground.
After SEO Analysis In Harrison Township PA
Once our analysis has been completed, we will then get the information and use it to come up with a new and improved website for you. We may use pieces of your old website or we may rewrite your website completely to suit with what we believe will help you to rank in Harrison Township PA. Members of our competent team will work with you to load your website with content that we expect will continue to rank remarkably well. We will utilize what we learn in that SEO analysis and push even further, enabling more people to see your work, bringing in more eyes to see your website, and actually bringing you more conversion.
Call Our SEO Analysis In Harrison Township PA Company Today
Our company can take care of all of the aspects of your SEO needs. We’ll start by figuring out your content and enabling you comprehend what works and what isn’t working for you. However, we don’t cease there. We can then help you to achieve what your website needs, whether it is technical or in filling your content needs.
We have a team of people willing to work for you, assisting your business to flourish in the Harrison Township area, in PA, and even all over the country. This business grew out of a need for businesses of all sizes to rank higher on the Google platform. Since Google regulates so much of what we see on a daily basis, our SEO analysis takes into consideration what Google looks for, though much of what we do will also allow you to rank on other platforms as well.
Give us a call today to get started. There is no time like the present to at least have an SEO analysis done so that you can see whether or not you need some specialist help or whether you are performing a good job on your own.
The post SEO Analysis In Harrison Township PA appeared first on .
from http://harrisburgseo.org/seo-analysis-in-harrison-township-pa/ via IFTTT
from Blog https://harrisburgseo.wordpress.com/2018/02/22/seo-analysis-in-harrison-township-pa/ via IFTTT
1 note
·
View note
Text
Ambiance - Restaurant WordPress Theme
https://opix.pk/blog/ambiance-restaurant-wordpress-theme/ Ambiance - Restaurant WordPress Theme https://opix.pk/blog/ambiance-restaurant-wordpress-theme/ Opix.pk LIVE PREVIEWBUY FOR $49 L’ambiance is a unique and refreshing WordPress experience for Restaurants, Bars and Cafes Industries. This smooth theme focusses on versatility and ease-of-use instead of 1001 features. You will notice this while setting up your surprisingly easy-to-configure new Theme for your Restaurant, Bar, Sushi lounge, Bistro, Bakery, Pub, coffee shop, pizzeria or any other form of retail experience. L’ambiance is suitable for users without programming skills and offers much flexibility for the ones who do. Packed with everything you need to get started. Creating your own menu’s was never easier with our menu manager you can create, update, delete and reorder your price-list as you see fit. Full screen slideshow, image or video background Setting the mood is what L’ambiance is all about. Seduce, fascinate and convince your visitors with your new mobile first website that is simply stunning to look at and a breeze to work with. Easy to manage and use masonry gallery Simplicity is at L’ambiance it’s core. We’ve implemented a gallery which is easy to use and works flawlessly with photoswipe. It behaves perfectly on all your devices. Notice: We’ve removed the PHP 5.6 and higher requirement. L’ambiance will now work from PHP 5.3.29 and up. Five star support Whenever you have an issue with our theme or WordPress in general, we are here to assist you. Post a comment or open a ticket here Update log v1.0 - release v1.1 Updated menu manager, fixed linking v1.1.1 Updated menu manager: Prevent deletion of menu items if plugin deactivates. v1.1.2 Updated background slideshow, fixed issue with touch laptops Fixed contact page maps link General improvements v1.1.3 Improved support for touchscreens and laptops with touchscreens Added option to turn of ajax and page-transitions Added show logo on mobile device option Improved contact page code Fixed translations bug v1.1.4 Fixed bug in always show header option Added the option to choose the background color of the logo Added option to add footer text Added option to give footer a background color Improved frontpage code v1.1.5 Made written by footer optional Added option to add you own footer to pages Removed obtrusive footer Improved javascript check on ajax v1.1.6 Updated footer implementation Menu's are now sortable Updated menu navigation styling Added currency position option v1.2 Removed PHP 5.6 and higher requirement Improved compatibility with PHP 5.3.29 and up. Added functionality to add your own fallback icon (knife & fork) Css improvements Added posiblity to add a menu to a page via shortcode Improved support for polylang Removed requirement to call menu "frontpage" General style fixes General improvements v1.1.6 Updated footer implementation Menu's are now sortable Updated menu navigation styling Added currency position option v1.2.1 Added option to upload custom icons per page and navigation item Improved back button functionality Added back to top functionality Added support for submenu's in content pages Fixed contact page styling bug Fixed toolbar navigation issue v1.2.2 Added image gallery Dramatically improved non-ajax version Styling fixes and code improvements v1.2.3 Updated password protected pages styling Basic form styling update Javascript improvements v1.2.4 Added option to show categories and / or tags in blog Fixed single post header Updated styling v1.2.5 Updated gallery plugin to support php 5.3 Fixed issue with logo in header v1.2.6 Added option to display styling in excerpt Fixed issue where icon wouldn't display in blog v1.2.7 Added sorting of categories in menu plugin Fixed price bug Correct fonts inclusion v1.2.8 Updated header logo styling, now grows with image size Improved CSS Improved Javascript Removed shorthand array notation v1.2.9 Fixed that page got stuck in loading mode if there were no images Added one click importer Added option to add description to menu (dishes) Fixed styling issue override of buttons Added option to add labels to social links Added option to change language / labels of weekdays v2.0 Added Visual Composer Added support for custom shortcodes in Visual composer Added native support for Polylang Improved assets loading Added long-term caching support Restructuring Javascript improvements CSS improvements Added child theme to zip v2.1 Fixed reference issue for importer Updated visual composer Added option to show flags in language selector Added option to show the language selector on the left Improved css for menu items on mobile screens V2.2 Added the possibility to include custom fonts Code cleanup Improved animation handler Fixed country flags Fixed header icon for blog Fixed icon display in page meta data Added option to change stroke header color Added option to change the form border color Fixed deleting of page metadata Fixed modal on CF7 message Added several styling / color options Improved VC support Improved VC Ajax support Improved non-ajax version V2.3 Fixed non ajax version links issue V2.4 Fixed non loading issue Updated visual composer V2.5 Always hide splash Updated Visual Composer Added logo placeholders Themecheck compliance V2.6 Updated visual composer Prevent logo from blocking navigation Don't show contact page items when not filled in Support newlines & html in menu items Support alt-text captions in image gallery Source
0 notes
Text
Web Design & SEO: Everything Designers Should Know
UX design and a solid SEO strategy go hand in hand.
Design is here to boost user experiences, inspire users to spend more time on your pages, and ensure they don’t leave your site frustrated. This way, it minimizes bounce rates and turns your visitors into leads and, ultimately, sales.
However, designing a spotless website is pointless if it’s not visible on Google. This is where SEO shines. It increases your site’s exposure in the SERPs, drives greater traffic to it, and gives you the opportunity to delight a visitor with your gorgeous website design and quality content.
When merged together, web design and SEO are indicators of your credibility and professionalism.
So, let’s see how to combine them for a better online performance.
The Basics of Implementing SEO and Web Design
In the world of digital marketing, building your online presence on strong foundations is critical. If some basic aspects of your site are poorly managed, you cannot expect your web design or SEO to deliver exceptional results.
Here are key elements of any strong web design:
Choosing a Domain Name
Stuffing your domain with a bunch of keywords won’t help. They look spammy and may hurt both your rankings and user experience.
Remember that there are millions of domain names out there. So, your goal is to make your domain name catchy and memorable. It needs to be relevant to your business’ focus and be easy to spell and pronounce. To make your site easier to find, it’s always good to use your brand name as your domain name, too.
Investing in the Right Hosting Provider
Choosing the right hosting plan directly impacts your website speed, server performance, and uptime/downtime. These are all important UX factors Google considers while indexing and ranking your site.
Building Your Website Using a Reliable CMS
A solid CMS is one that is easy to use and manage. You should be able to design your site however you want, without taking additional courses in web design. It should also help you make your site mobile-friendly, add social media integrations effortlessly, and use various content management tools. The most popular CMS option is definitely WordPress, followed by Joomla, Drupal, TYPO3, and Squarespace.
When choosing the right CMS for your business, ask yourself how it will impact your online performance. For example, does it allow you to customize your URLs? Can you make on-page changes without changing the URL? Some systems create meta tags (meta descriptions and title tags) automatically, so you should check whether you can modify them.
The Link Between Web Design and Indexability
Did you now that Google crawls each page of your site individually when indexing it? That’s why you need to add internal links to make these pages findable by search engines. Most importantly, you need to check whether all your interlinks work.
Start with the simple Google search. For example, the site: operator will help you see all your pages that are indexed. You could also check robots.txt files (https//https://ift.tt/2OySwmk) to identify your site’s disallows. Sure, you can speed this process up using web crawlers like Screaming Frog or Google Search Console’s Index Status that will do the job for you.
Keyword Research and Meta Tags
On-page SEO can be viewed as a process of optimizing individual pages on a site to rank higher. In short, you need to do detailed keywords research and optimize your key page elements for them.
A title is the first element a visitor sees in the SERPs. It should be creative, intriguing, and authentic to stand out from other results in the SERPs. Above all watch your title length (it should be up to 60 characters) and add your major keywords to it naturally.
Meta descriptions tell a searcher what the page is about. It’s pretty limited- you need to use these 160 characters wisely to grab people’s attention and entice them to click on your link.
Headings increase the readability of your textual content, making it more user-friendly. Use them to separate your content into smaller chunks and help visitors find the information they’re looking for easily.
Google still cannot understand your visual content. When optimizing your images, infographics, and image captioning for visibility, make sure you have a clear alt text that describes what the image is about. Brief descriptions including your main keywords will be enough.
Information Architecture and URLs
Which URL seems more logical to you?
https://ift.tt/2FJigcZ
https://ift.tt/2OySmLK
The first one, I hope.
Well-optimized URLs tell users what the page is about and help them find the desired information or products faster. Just like title tags and meta descriptions, they provide a wider context around your keywords for both users and search engines. Precisely because of that, your URLs need to be descriptive, short, understandable, and optimized for your major keywords.
Simplifying Website Navigation
Navigation goes beyond a simple menu bar at the top of your site. When used properly, it inspires people to stay more on your site and browse through it.
When building website navigation, it’s critical to understand the needs and expectations of your potential customers. Just like at any physical store, website navigation should help a potential customer find a product or content faster and guide them through their buyer journey towards finalizing a purchase. If a customer needs to waste their time thinking where to click, that’s a clear sign you need to improve your navigation.
The Impact of Page Load Speed on Rankings
Page speed is one of the most significant ranking factors. And, with the 2018 Speed Update, it has become a notable ranking signal for mobile devices, too.
Page load times are important for a good reason- they impact user experiences and can result in either higher conversions or bounce rates. Stats back me up on that. For example, did you know that your visitors expect your site to load in less than 2 seconds? And, if it fails to do so, almost half of them would leave it. Apart from losing potential leads and conversions, high bounce rates have a negative impact on your online performance and ranking in the long run.
For starters, use Google’s Page Speed Insights to find out how fast your pages are. Here are a few steps to take to boost your site speed, such as:
Choosing the right hosting plan
Compressing your high-quality images
Using browser caching
Removing auto-play content
Reducing the number of plugins and popups
Investing in a reliable content delivery network (CDN)
Website Responsiveness is the Mobile-First Era
With the number of mobile users, mobile searches have also grown. For example, did you know that 57% of all US online traffic is generated through mobile devices?
And, for your mobile visitors, their browsing experience determines whether they will buy from you. Stats say that 52% of your potential customers would not to make a purchase after a negative mobile experience.
Given these figures, it’s not surprising that Google is constantly striving to improve mobile users’ satisfaction and provide them with relevant results. This year, they finally rolled out the Mobile-First Index, meaning that they’re now indexing a mobile version of your site.
And, to meets these standards, you need to make your site design highly responsive.
What does this mean?
Use Google’s Mobile-Friendly Test to check how friendly your pages are to mobile users. When optimizing your site, pay attention to the overall site’s usability, such as its speed and page layout. How appealing is your site to mobile users? Can they read your content and see your videos without having to zoom and pinch continually? What about your CTA’s and links- are they easy to tap? Does your content fit the screen size, irrespective of its size? Are your forms easy to fill out from mobile devices?
Putting it All Together
Even if you believed that SEO and web design have nothing in common, I hope this article proves you wrong. Your website design impacts visitors’ perceptions of your brand, making it feel professional and authoritative. Above all, it impacts user experiences and impacts their engagement and purchase decisions. These are all factors Google takes into account when ranking you.
Featured image via DepositPhotos
Add Realistic Chalk and Sketch Lettering Effects with Sketch’it – only $5!
Source p img {display:inline-block; margin-right:10px;} .alignleft {float:left;} p.showcase {clear:both;} body#browserfriendly p, body#podcast p, div#emailbody p{margin:0;} Web Design & SEO: Everything Designers Should Know published first on https://medium.com/@koresol
0 notes
Text
Web Design & SEO: Everything Designers Should Know
UX design and a solid SEO strategy go hand in hand.
Design is here to boost user experiences, inspire users to spend more time on your pages, and ensure they don’t leave your site frustrated. This way, it minimizes bounce rates and turns your visitors into leads and, ultimately, sales.
However, designing a spotless website is pointless if it’s not visible on Google. This is where SEO shines. It increases your site’s exposure in the SERPs, drives greater traffic to it, and gives you the opportunity to delight a visitor with your gorgeous website design and quality content.
When merged together, web design and SEO are indicators of your credibility and professionalism.
So, let’s see how to combine them for a better online performance.
The Basics of Implementing SEO and Web Design
In the world of digital marketing, building your online presence on strong foundations is critical. If some basic aspects of your site are poorly managed, you cannot expect your web design or SEO to deliver exceptional results.
Here are key elements of any strong web design:
Choosing a Domain Name
Stuffing your domain with a bunch of keywords won’t help. They look spammy and may hurt both your rankings and user experience.
Remember that there are millions of domain names out there. So, your goal is to make your domain name catchy and memorable. It needs to be relevant to your business’ focus and be easy to spell and pronounce. To make your site easier to find, it’s always good to use your brand name as your domain name, too.
Investing in the Right Hosting Provider
Choosing the right hosting plan directly impacts your website speed, server performance, and uptime/downtime. These are all important UX factors Google considers while indexing and ranking your site.
Building Your Website Using a Reliable CMS
A solid CMS is one that is easy to use and manage. You should be able to design your site however you want, without taking additional courses in web design. It should also help you make your site mobile-friendly, add social media integrations effortlessly, and use various content management tools. The most popular CMS option is definitely WordPress, followed by Joomla, Drupal, TYPO3, and Squarespace.
When choosing the right CMS for your business, ask yourself how it will impact your online performance. For example, does it allow you to customize your URLs? Can you make on-page changes without changing the URL? Some systems create meta tags (meta descriptions and title tags) automatically, so you should check whether you can modify them.
The Link Between Web Design and Indexability
Did you now that Google crawls each page of your site individually when indexing it? That’s why you need to add internal links to make these pages findable by search engines. Most importantly, you need to check whether all your interlinks work.
Start with the simple Google search. For example, the site: operator will help you see all your pages that are indexed. You could also check robots.txt files (https//https://ift.tt/2OySwmk) to identify your site’s disallows. Sure, you can speed this process up using web crawlers like Screaming Frog or Google Search Console’s Index Status that will do the job for you.
Keyword Research and Meta Tags
On-page SEO can be viewed as a process of optimizing individual pages on a site to rank higher. In short, you need to do detailed keywords research and optimize your key page elements for them.
A title is the first element a visitor sees in the SERPs. It should be creative, intriguing, and authentic to stand out from other results in the SERPs. Above all watch your title length (it should be up to 60 characters) and add your major keywords to it naturally.
Meta descriptions tell a searcher what the page is about. It’s pretty limited- you need to use these 160 characters wisely to grab people’s attention and entice them to click on your link.
Headings increase the readability of your textual content, making it more user-friendly. Use them to separate your content into smaller chunks and help visitors find the information they’re looking for easily.
Google still cannot understand your visual content. When optimizing your images, infographics, and image captioning for visibility, make sure you have a clear alt text that describes what the image is about. Brief descriptions including your main keywords will be enough.
Information Architecture and URLs
Which URL seems more logical to you?
https://ift.tt/2FJigcZ
https://ift.tt/2OySmLK
The first one, I hope.
Well-optimized URLs tell users what the page is about and help them find the desired information or products faster. Just like title tags and meta descriptions, they provide a wider context around your keywords for both users and search engines. Precisely because of that, your URLs need to be descriptive, short, understandable, and optimized for your major keywords.
Simplifying Website Navigation
Navigation goes beyond a simple menu bar at the top of your site. When used properly, it inspires people to stay more on your site and browse through it.
When building website navigation, it’s critical to understand the needs and expectations of your potential customers. Just like at any physical store, website navigation should help a potential customer find a product or content faster and guide them through their buyer journey towards finalizing a purchase. If a customer needs to waste their time thinking where to click, that’s a clear sign you need to improve your navigation.
The Impact of Page Load Speed on Rankings
Page speed is one of the most significant ranking factors. And, with the 2018 Speed Update, it has become a notable ranking signal for mobile devices, too.
Page load times are important for a good reason- they impact user experiences and can result in either higher conversions or bounce rates. Stats back me up on that. For example, did you know that your visitors expect your site to load in less than 2 seconds? And, if it fails to do so, almost half of them would leave it. Apart from losing potential leads and conversions, high bounce rates have a negative impact on your online performance and ranking in the long run.
For starters, use Google’s Page Speed Insights to find out how fast your pages are. Here are a few steps to take to boost your site speed, such as:
Choosing the right hosting plan
Compressing your high-quality images
Using browser caching
Removing auto-play content
Reducing the number of plugins and popups
Investing in a reliable content delivery network (CDN)
Website Responsiveness is the Mobile-First Era
With the number of mobile users, mobile searches have also grown. For example, did you know that 57% of all US online traffic is generated through mobile devices?
And, for your mobile visitors, their browsing experience determines whether they will buy from you. Stats say that 52% of your potential customers would not to make a purchase after a negative mobile experience.
Given these figures, it’s not surprising that Google is constantly striving to improve mobile users’ satisfaction and provide them with relevant results. This year, they finally rolled out the Mobile-First Index, meaning that they’re now indexing a mobile version of your site.
And, to meets these standards, you need to make your site design highly responsive.
What does this mean?
Use Google’s Mobile-Friendly Test to check how friendly your pages are to mobile users. When optimizing your site, pay attention to the overall site’s usability, such as its speed and page layout. How appealing is your site to mobile users? Can they read your content and see your videos without having to zoom and pinch continually? What about your CTA’s and links- are they easy to tap? Does your content fit the screen size, irrespective of its size? Are your forms easy to fill out from mobile devices?
Putting it All Together
Even if you believed that SEO and web design have nothing in common, I hope this article proves you wrong. Your website design impacts visitors’ perceptions of your brand, making it feel professional and authoritative. Above all, it impacts user experiences and impacts their engagement and purchase decisions. These are all factors Google takes into account when ranking you.
Featured image via DepositPhotos
Add Realistic Chalk and Sketch Lettering Effects with Sketch’it – only $5!
Source from Webdesigner Depot https://ift.tt/2FFwt9N from Blogger https://ift.tt/2HZI46e
0 notes
Text
2018 Year In Review
It was an exciting year for me with a lot of new opportunities opened up and working with amazing people! I started 2018 seeing just how hard I can push ETDPhotography, and I wanted give a quick rundown on some highlights for the year, some management and productivity tips, and what exciting things are coming in 2019!
First, A Thank You
Thank you, by reading this blog or being a customer of ETDPhotography you are literally making someone’s dream job a reality. So thank you, and I appreciate you all making this my best and most exciting year yet.
Blogs and Photoshoots and Analytics, Oh My!
I had two personal challenges related to photography this year. One was to have 52 photoshoots during 2019, and the other was a 30-day blogging challenge in January. 2018 will be ending with 49 Photoshoots, and January had a blog post on all but 2 days. While it's tempting to sit around disappointed about getting so close but not reaching my goals, I’m more just impressed that I managed these numbers to begin with, and it means I can retry the challenges next year!
I also wanted to grow the audience of ETDPhotography as well, which largely thanks you and the 30 day blog challenge more than doubled this year! I certainly hope to try and continue the trend in growth in 2019.
I learned that making useful, local-focused posts can really help with website SEO(search engine optimization). ETDPhotography is now the top google search result when searching for photo locations in Erie PA! Metadata is really essential to this as well. Always caption your photos, use tags and keywords, and always fill in the “alt text” on <img> tags. (If you need to learn how to do this, check out w3schools or here if you’re on Squarespace.)
New Looks, New Edits, New Style
I had a major shift in my personal style this year. The website has received a major overhaul with a new dark theme intended for ease of use on mobile and while scrolling through articles late at night. I’ve also changed how I approach photo editing as well. I used to be all about the vintage and styled looks, but that has changed for a greater appreciation for crisp, bold colors. I still flip between the two occasionally, and I think the variety keeps things interesting. If you are curious about how to create either of these looks in lightroom, key an eye out for guides coming in January 2019!
Bigger, Better, Moving Pictures
I previously talked about my style switch in one of my videos, which is also a new focus in 2018! I haven’t just been getting into video for kicks though, in 2019 a very exciting project will be starting which isn’t ready for announcement quite yet!
However, you may have seen articles for The Creative Process of Photography, which will be an in-depth how-to about everything photography! My hope is to eventually compile this series into a book. If there are any particular topics you would like covered, please let me know in the comments! This series is the first in a trend of longer-form articles I wish to have on ETDPhotography.
My first mini-documentary (and first public short film!) was released this year as well. Snowing In June is a short film about the Eastern Cottonwood tree on Presque Isle and the important effects it has on the Peninsula. This film was also entered into the My RØDE Reel Short film competition, which with your votes did well enough to win film equipment I can use to create even more documentaries!
New Places, People, and Things
One of the more exciting things about photography is the places it ends up taking you. In 2018 I’ve traveled to cool cities and photographed amazing people along the way. D.C., St. Petersburg, Annapolis, and even some cool places in my home state of PA.
I particularly enjoyed making short photo-stories about locations. Some of these I detailed on the photo-walks blog like in Washington D.C. and others were more traditional single-location stories like these work portraits at a salon. What do you think would make a cool photo-story? I would love to hear your ideas!
Old-growth New Podcast
2018 debuted a new podcast co hosted by myself and Julia Guerrein talking about the environment! The Old-growth Podcast reviews current events in environmental science and policy and goes in-depth on environmental educational subjects. Although our release schedule has been scattered a bit by busy schedule, we do have more episodes in the pipeline and responses so far have been excellent!
Favorite Photos 2018
While I took a plethora of photos this year, there always some particular ones that catch my eye. I’ll leave 2018 with a gallery of my personal favorite photos that I took this year. See you in 2019!
[GALLERY]
0 notes
Text
Image SEO: Optimizing images for search engines
Whether you’re a blogger or you write articles for an online magazine or newspaper, chances are you’ll find yourself asking whether your article needs an image or not. The answer is always “Yes”. Images bring an article to life and can also contribute to your website’s SEO. This post explains how to fully optimize an image for SEO and provides some pointers on using images for the best user experience.
Always use images
Finding the right image
Alternatives
Preparing images for use in your article
Choose the right file name
Scale for image SEO
Use responsive images
Reduce file size
Adding the image to your article
Captions
Alt text and title text
Add image structured data
OpenGraph and Twitter Cards
Alignment
XML image sitemaps
Image SEO: summary
Always use images
Images, when used with care, will help readers better understand your article. The old saying “A picture is worth a thousand words” probably doesn’t apply to Google, but it’s certainly true when you need to spice up 1,000 dull words, illustrate what you mean in a chart or data flow diagram, or just make your social media posts more enticing.
It’s a simple recommendation: you should add images to every article you write online to make them more appealing. What’s more, since visual search is getting increasingly important — as seen in Google’s vision for the future of search — it could turn out to provide you with a nice bit of traffic. If you have visual content it might make sense to put image SEO a bit higher on your to-do list.
Google Images was recently revamped with a brand-new interface. You’ll also find new filters, meta data and even attribution. The cool new filters show that Google increasingly knows what’s in an image and how that image fits into the larger context.
Google’s new interface for Image Search was released at the end of September 2018
Finding the right image
It’s always better to use original images – those you have taken yourself – than stock photos. Your team page needs pictures of your actual team, not this dude on the right or one of his stock photo friends. Off topic: never mind that dude needs a haircut.
Your article needs an image relevant to its subject. If you’re choosing a random photo just to get a green bullet in our SEO plugin’s content analysis, then you’re doing it wrong. The image should reflect the topic of the post or have illustrative purposes within the article of course. Try to place the image near the relevant text. If you have a main image or an image that you’re trying to rank, try to keep that near the top of the page, if it makes sense.
Master the basics of SEO with our Basic SEO training
Spice up your rankings with quick wins
Make sure you’re getting the basics right
Covers all important aspects of SEO
On-demand SEO training by Yoast
$199 - Buy now ▸
More info
There is a simple image SEO reason for all of this: an image with related text ranks better for the keyword it is optimized for. There’s more about image SEO later.
Alternatives
If you don’t have any images of your own that you can use, there are other ways to find unique images and still avoid stock photos. Flickr.com is a nice image source for instance, as you can use Creative Commons images. Don’t forget to attribute the original photographer. I also like the images provided by sites like Unsplash. Our blogger Caroline wrote an awesome overview of where to get great images. Steer clear of the obvious stock photos, picking the ones that look (ok, just a bit) more genuine. But whatever you use, it seems like images with people in them always look like stock photos, unless you took them yourself. In the end, that’s always the best idea.
Obvious alternatives for photos could be illustrations, which is what we use, or graphs. An honorable mention should go to animated GIFs, as they are incredibly popular these days.
But even though animated GIFs are popular, don’t go overboard. It’ll make your post harder to read, as the movement of the image distracts your readers’ attention. They can also slow down your page.
Preparing images for use in your article
Once you have found the right image – whether an illustration, chart or photo – the next step is to optimize it for use on your website. There are a number of things you need to think about:
Choose the right file name
Image SEO starts with the file name. You want Google to know what the image is about without even looking at it, so use your focus keyphrase in the image file name. It’s simple: if your image shows a sunrise in Paris over Notre Dame Cathedral, the file name shouldn’t be DSC4536.jpg, but notre-dame-paris-sunrise.jpg. The main keyphrase would be Notre Dame, as that is the main subject of the photo, which is why it’s at the beginning of the file name.
Scale for image SEO
Loading times are important for UX and SEO. The faster the site, the easier it is to visit and index a page. Images can have a big impact on loading times, especially when you upload a huge image then display it really small – for example a 2500×1500 pixels image displayed at 250×150 pixels size – as the entire image still has to be loaded. So resize the image to how you want it displayed. WordPress helps by automatically providing the image in multiple sizes after upload. Unfortunately, that doesn’t mean the file size is optimized as well, that’s just the image display size.
Use responsive images
This one is essential for SEO as well, and if you’re using WordPress it’s done for you since it was added by default from version 4.4. Images should have the srcset attribute, which makes it possible to serve a different image per screen width — especially useful for mobile devices.
Reduce file size
The next step in image SEO should be to make sure that scaled image is compressed so it is served in the smallest file size possible.
Of course, you could just export the image and experiment with quality percentages, but I prefer to use 100% quality images, especially given the popularity of retina and similar screens.
Tools like JPEGmini can drastically reduce image file sizes without artifacts
You can still reduce the file size of these images by removing the EXIF data, for example. We recommend using tools like ImageOptim or websites like JPEGmini, jpeg.io or Kraken.io.
When you’ve optimized your images, test your site with tools like Google PageSpeed Insights, Lighthouse, WebPageTest.org or Pingdom.
Adding the image to your article
While Google is getting better at recognizing what’s in an image, you shouldn’t rely on their abilities just yet. It all comes down to you providing the context for that image — so fill in as much as you can!
Now your image is ready to use, but don’t just throw it into your article anywhere. As mentioned earlier, adding it close to related textual content helps a lot. It makes sure the text is as relevant to the image as the image is to the text.
Captions
Find out everything about SEO now!
From keyword research to technical SEO
New courses will be added automatically & free of charge
Earn 9 official Yoast certificates
Save 60% by bundling all courses!
$499 - Buy now ▸
More info
The image caption is the text that accompanies the image on the page — if you look at the images in this article, it’s the text in the gray box below each one. Why are captions important for image SEO? Because people use them when scanning an article. People tend to scan headings, images and captions as they scan a web page. Back in 1997, Nielsen wrote:
“Elements that enhance scanning include headings, large type, bold text, highlighted text, bulleted lists, graphics, captions, topic sentences, and tables of contents.”
In 2012, KissMetrics went even further, stating that:
“Captions under images are read on average 300% more than the body copy itself, so not using them, or not using them correctly, means missing out on an opportunity to engage a huge number of potential readers.”
Do you need to add captions to every image? No, because sometimes images serve other purposes. Decide whether you want to use yours for SEO as well or not. Bearing in mind the need to avoid over-optimization, I’d say you should only add captions where it would make sense to the visitor for one to be there. Think about the visitor first, and don’t add a caption just for image SEO.
Alt text and title text
The alt text (or alt tag) is added to an image so there will be descriptive text in place if the image can’t be displayed to the visitor for any reason. I can’t put it any better than Wikipedia:
“In situations where the image is not available to the reader, perhaps because they have turned off images in their web browser or are using a screen reader due to a visual impairment, the alternative text ensures that no information or functionality is lost.”
Be sure to add alt text to every image you use, and make sure the alt text includes the SEO keyword for that page (if appropriate). Most importantly, describe what’s in the image so both search engines and people can make sense of it. The more relevant information surrounding an image has, the more search engines deem this image important.
When hovering over an image, some browsers show the alt text as a ‘tooltip’. Chrome shows the title text as was intended. Title text for images is similar and a lot of people who use titles simply copy the alt text, but more and more people leave them out altogether. Why is that? Here’s Mozilla’s take:
“title has a number of accessibility problems, mainly based around the fact that screen reader support is very unpredictable and most browsers won’t show it unless you are hovering with a mouse (so e.g. no access to keyboard users).”
It is better to include such supporting information in the main article text, rather than attached to the image.
Read more: Read more about alt tag and title tag optimization »
Add image structured data
Adding structured data to your pages can help search engines display your images as rich results. While Google says structured data doesn’t help you rank better, it does help to achieve a more fleshed out listing in Image Search. There’s more, though. For instance, if you have recipes on your site and you add structured data to your images Google can also add a badge to your images showing that this image belongs to a recipe. Google Images supports structured data for the following types:
Product
Video
Recipe
Google has a number of guidlines you need to follow if you want your images to appear rich in image search. Main takeaway is that the image attribute is mandatory and that your images should be crawlable and indexable. You can find them all Google’s Structured Data General Guidelines. Try out Structured data training if you want to learn how to add structured data to your pages!
OpenGraph and Twitter Cards
Earlier on, I mentioned using images for social sharing. If you add the following image tag to the <head> section in your page HTML like this:
<meta property="og:image" content="http://example.com/link-to-image.jpg" />
That will make sure the image is included in your share on Facebook (and OpenGraph is also used for Pinterest, for instance).
Our Yoast SEO plugin has a Social section where you can set and even – in the Premium version – preview your Facebook and Twitter posts. Make sure you use a high-quality image, like the original image you used in the post, as the social platforms use higher quality/larger images more often than not. If you have set this up correctly, and it doesn’t work, try to flush Facebook’s cache in the URL Debugger. Twitter Cards do the same for Twitter and are also generated by our plugin.
Alignment
This is one of my pet peeves: Images should never break the left reading line. I’m sure there are studies backing this up, but for me it’s personal. I just really don’t like it when text starts to the right of an image, only to jump to the left the next image down:
Maintain the left reading line; don’t align images to the left
If you use an image at the same width as your text column, that’s fine and it will even help emphasize the image more.
I’ll be honest: this has absolutely nothing to do with image SEO, but I saw the chance to express my opinion and used it! I think it’s bad for user experience. So, just to please me: don’t do this. Thanks, I appreciate it.
XML image sitemaps
If you are a web developer, you might wonder about XML image sitemaps. I’d prefer to describe this as images in XML sitemaps. Google is clear about this:
Additionally, you can use Google image extensions for sitemaps to give Google more information about the images available on your pages. Image sitemap information helps Google discover images that we might not otherwise find (such as images your site reaches with JavaScript code), and allows you to indicate images on your site that you want Google to crawl and index.
Every now and then, people ask us about XML image sitemaps. We don’t generate these in our plugin, but follow Google’s advice and include them in the page or post sitemaps. Just scroll down in our post sitemap and you’ll see we have added images to all our latest posts (there is a column just for that). Adding images to your XML sitemaps helps Google index your images, so be sure to do so for better image SEO.
Image SEO: summary
Image SEO is the sum of a number of elements. With Google getting better at recognizing elements in images every day, it makes sense to make sure the image and all its elements contribute to a good user experience as well as SEO. It would be foolish to try to kid Google.
Keep these things in mind when adding an image to an article:
Use a relevant image that matches your text
Pick a good file name for your image
Make sure image dimensions match the image size as displayed
Use srcset if possible
Reduce file size for faster loading
Add a caption, if appropriate, for easier scanning of the page
Use image alt text. Title text is optional
Add structured data to your images
Add OpenGraph and Twitter Card tags for the image
Don’t break the left reading line with an image – align images right or center
Use images in your XML sitemaps
Provide all the context you can!
Besides contributing to SEO and user experience, images can also play an important role in conversion!
The post Image SEO: Optimizing images for search engines appeared first on Yoast.
from Yoast • SEO for everyone https://yoast.com/image-seo/
0 notes
Text
Promote Your Business And Your Website Thanks To Search Engine Optimization.
With so many online businesses competing for the consumers time and money, failure to properly utilize search engine optimization (SEO) in online efforts can easily spell doom for a company’s online operations. This selection of handpicked SEO tips and tricks will offer guidance on using SEO to drive traffic, sales volume and increase exposure.
When using SEO on a page that has images, be sure to make ample use of the tag. Search engines cannot view images and so cannot index them. However, if you include relevant text in the tag, the search engine can base it’s guess about the image on that text and improve your site’s ranking.
As you begin to build your site, you will find out various ways to help customers and search engines navigate your site. One such way is to use breadcrumb navigation. This is a method of secondary navigation which makes it easier for users to navigate around your website once there. The idea is that each page is accurately described so people always know their way around.
The most important thing to do is learn about what search engine optimization does and why it works. There are several forms of media that can assist you with learning about search engine optimization. Spend a few days learning about it and taking notes, and you will understand why it is important. Then make the necessary changes to your blog or site.
For the highest search engine optimization, have a code ratio that is known as the high signal-to-noise code or also known as the high content-to code. This means that the source code is lower than the written text. In other words, article should contain more text than HTML code.
Add descriptive text to all hyperlinks that explains what the linked content is about. This makes it easier for visitors and search engines to understand where the link takes them. The link should include keywords that describe the content on the page so that search engines will associate that page with those keywords.
Get to the point with keywords. Most searches are only two or three words, and if your keywords are longer than that, you may be more difficult to spot. Shorter is better. So, if you can eliminate unnecessary words, do it! Your goal is to be seen by as many people as you can, not describe everything you do in the keywords.
Be satisfied with your own site. If you are not, you may be constantly changing the content, which can confuse both search engines and readers. Find your niche and stick to it. Providing yourself with the confidence and security of your well-established website can help you find what else you may need to do to optimize it.
Use the alt tag (html code) to add keywords to your images. Search engines (as of yet) can not actively search images and create keywords for them. They rely on you to create keywords for their engine searches. More keywords mean more hits for your site, and more search visibility.
Part of a wide-reaching search engine optimization strategy is to use the same keywords in your advertisements that you do on your site. Not only does this keep your efforts focused, it provides you with valuable feedback. The volume of traffic you get from different ads will tell you which keywords are most enticing to potential visitors.
Once you think you’re finished optimizing your website, think again. Go back through your research and check off what has been done, and then get to doing the items you’ve forgotten or overlooked. There are also new ideas and tools for SEO popping up daily, so make sure you keep up with the latest news in the field.
An important way to ensure that search engines have easy, efficient access to the entirety of your website is a site map. A site map – which lists each component of your site and provides individual links to all of them – allows the automated searchers to reach every page of your site in no more than two clicks.
When working on your search engine optimization, make sure that the titles and captions of any images you use on your website are filled with as many relevant keywords as possible. Search engines don’t pick up text within pictures, only the words surrounding images, so it is vital that you make the most possible use of your image filenames and labels.
Increasing the amount of back links you have to your website, the more it can pop up in search engine results. This will be beneficial to your overall goals of optimizing your website and the amount of attention that it receives from search engines. Increasing the amount of back links can help you to succeed.
Rather than lose out to more tech-savvy competitors, take this opportunity to consider implementing SEO efforts to enhance your company’s online presence. Follow the advice in this article and you will be enabling your business to gain better standings on the major search engine results pages, which will ultimately drive traffic and sales.
The post Promote Your Business And Your Website Thanks To Search Engine Optimization. appeared first on Kari Hallock.
from Kari Hallock https://ift.tt/2mBNvfI via Article Source
0 notes
Text
Google’s updated SERP snippet length: What should be your SEO strategy now?
Source: First appeared at
On December 1st, 2017, Barry Schwartz reported on Search Engine Land that Google had officially confirmed a change to how it displays text snippets in Google’s Search Engine Results Pages (SERPs).
Barry wrote,
“A Google spokesperson told us: ‘We recently made a change to provide more descriptive and useful snippets, to help people better understand how pages are relevant to their searches. This resulted in snippets becoming slightly longer, on average.’”
These snippets are the blurbs of text displayed in Google’s SERPs along with the clickable blue text and the page URL.
A quick Google search corroborates this – let’s use the query “how were the pyramids built” as an example:
In the screenshot above, you can see that where Google would previously display a snippet approximately 150-165 characters long including spaces (give or take, you can see it varies now and it varied before Google made the change too), but now they’re much longer.
The text snippet Google shows in the SERP is *supposed* to be (more on this later) the contents of the meta description tag in the HTML of the page – let’s check each of these page’s actual meta descriptions and their lengths.
Here they are, in the same order as above:
There are no photographs of the pyramid being built, and the engineers didn’t leave detailed blueprints. [Length:109]
The ancient Egyptians who built the pyramids may have been able to move massive stones by transporting them over wet sand. [Length:122]
No meta description specified in the HTML
No meta description specified in the HTML
Here’s everything you need to know about the incredible Egyptian pyramids. [Length:74]
Two things jump out right away.
Google is not displaying the page’s actual meta description as the SERP snippet for these specific listings for this specific query, even when the meta description is specified in the HTML, but instead is being pulled directly from the text that appears at or near the top of the page.
The length of the snippets is longer than the length that Google previously displayed, congruent with Google’s confirmation that they’re showing longer SERP snippets.
Here’s how that breaks down for the above query, again in the same order as the SERP listing screenshot above:
The first sentence of the text is used as the SERP snippet
The first sentence of the text is used as the SERP snippet
The H1 page headline, followed by ellipses ( … ), followed by the second, third, and fourth sentences on the page in the first paragraph (skipping the first sentence in the first paragraph) are used as the SERP snippet.
The first and second sentences, and part of the third, are used as the SERP snippet
The first and second sentences, the image ALT attribute (or the image caption, they’re both the same text), plus text via HTML code associated with the image, “Getty – Contributor” (<div class=”article__credit”>Getty – Contributor</div>)
Checking a number of other queries returned similar observations about what Google is using as the SERP snippet, but note that some SERP snippets were indeed taken from the actual meta description.
For example, in the SERP for a query for musician “Todd Rundgren”, this SERP snippet is obviously taken directly from the meta description:
For many other queries I performed, both commercial and non-commercial in query intent, it turned up a mix of SERP snippet sources – primarily either text on the page or the actual meta description specified in the HTML, and in some cases via image ALT attribute, and occasionally from some other bit of code in the HTML.
On mobile devices, the SERP snippets were very similar, in many cases the same as on desktop.
The SERP orders were slightly different, so yes, there’s going to be ranking variations based on various factors (it’s well known that Google can and will alter the SERPs you see based on your search history, geo-location, query type, your previous interaction with SERPs, etc.).
However, the overall scheme of the SERP snippets remained constant – text was taken mostly from either the first paragraph of the page, or the meta description, and in some cases the image ALT attribute, and occasionally from other text in the HTML code.
Dr. Pete Meyers over at Moz conducted research late last year on 89,909 page-one organic results.
Pete noted that the average SERP snippet was 215 characters long with the median length at 186, and he was quick to point out that, “big numbers are potentially skewing the average. On the other hand, some snippets are very short because their Meta Descriptions are very short”.
Pete also noted no significant differences between desktop and mobile snippet lengths, sometimes seeing mobile snippets longer than desktop snippets.
For sure the actual SERP snippet you see, and the length, will vary by query type.
What is going on here?
Google is trying to satisfy searchers.
Yes, traditionally the idea was that Google would pull the SERP snippet from the meta description, but for years now Google has been using whatever text its algorithms determine makes the most sense based on the user’s query.
Not all sites – for example, Wikipedia and another we saw above – don’t even make use of the meta description tag in the HTML of their pages, so what’s a poor search engine to do in that case?
Similarly, what if the meta description is badly written, or spammy-sounding with lots of keyword stuffing, or doesn’t well-reflect the page’s theme and topic(s)?
So that’s what’s going on here – Google evolved over time to use whatever it deems makes the most sense to a user performing a certain query.
Wait: What the heck is a meta description, anyway?
Meta descriptions are HTML code that Google understands, and that is meant to provide a synopsis of the page.
Here’s an example:
<meta name=”description” content=”A description of the page” />
This code goes between the <head></head> tags of the HTML and is not displayed on the visible content that a user would see.
Do meta descriptions impact SEO?
Meta descriptions will not impact rankings.
But, if Google does use a page’s meta description as the SERP snippet, that can impact click-through from the SERP.
That’s because a well-written meta description that is compelling, relevant to the page, and relevant to the query or queries for which the page is ranking, can impact organic traffic.
And that can have a downstream impact on conversions (the desired actions you want website visitors to take – fill out a form, buy something, and so on).
Poorly written meta descriptions, if used as the SERP snippet, can have the opposite effect and discourage the user to click through to your page, and instead go to your competitors.
So, what should be your strategy now that Google has increased the SERP snippet length?
In summary, you could do any of the following:
Do nothing at all
Rewrite longer meta descriptions for all your pages
Rewrite longer meta descriptions for some of your pages (e.g. your top ten or twenty organic landing pages, or some pages you determine have low click-thru rates)
Delete all your meta descriptions
Audit your site’s content to ensure that the first text on your page is compelling, uses keywords congruent with how someone would search for your content, ensure the first paragraph contains at least 300-350 characters of text including spaces, and front-load the first 150 characters in case google changes back to shorter snippets in the future.
What you decide to do (or not do) will at least in part hinge upon resources you have available to make changes.
Don’t take a “set it and forget it” attitude with your website’s content and your meta descriptions. It’s common for businesses to put in a fair amount of work into their website, then just let it go stale.
A good recommendation here would be to cycle through this stuff on a regular basis – think quarterly or a couple times per year. Once per year at a minimum.
Here’s what I recommend
First, it should be obvious that your page’s textual content is for humans to consume, and that should always be your primary consideration.
You’ve heard the phrase “dance like no one’s watching” – well, write like Google doesn’t exist. But Google does exist, and their mission is satisfied users (so that people continue to use their service and click on ads) – Google is chasing satisfied users and so should you.
The refrain of “write great content” has been used ad nauseum. The only reason I’m mentioning the whole “write for your users” thing is simply because often people focus primarily on “how do I SEO my pages?” instead of “what’s good for my users?”.
Okay, with that out of the way and forefront in your mind, here’s what I recommend. Adjust this according to your specific needs – your industry, your users – don’t just take this as a cookie-cutter approach.
And, do this on the time frame that makes the most sense and works for you and the resources you have available to you to make changes to your site. If you haven’t looked at your page content and meta descriptions in a year or more, then this is a higher priority for you than if you refreshed all that 60 days ago.
Meta descriptions
Make them about 300-320 characters long, including spaces
Make the meta description super-relevant to the page text
Front-load the first 150-165 characters with your most-compelling text – compelling to your users who might see the text as a SERP snippet (just in case Google decides to shorten them again)
Use a call to action if applicable, but don’t be a used car salesman about it – and as appropriate, use action-oriented language
Remember WIIFM – what’s in it for me – as applicable, focus on benefits, not features
Don’t be deceptive or make promises your page content can’t keep
Keep in mind that Google may not use your meta description as the SERP snippet and may instead use content from your page, likely from the first paragraph.
With that in mind:
Review & refresh your content
Make sure the H1 page headline is super-relevant to the page’s topic
Include an image (as applicable) that is super-relevant to the page (not one of those dumb, tangentially-related stock images) and craft an excellent and page-relevant image ALT attribute
Ensure that your opening paragraph is enticing and practically forces the reader to keep reading – that way if it’s the text used as the SERP snippet, that will capture people’s attention.
Summary
My summary is that if you if you haven’t already, please go back and read the whole article – I promise you it’ll be worth it. But I will add one more piece here and that is that ostensibly the type of content you’re creating is going to dictate how you configure your meta descriptions, H1 page headlines, and especially the opening text on the page.
In some cases, it makes sense to use the “how to feed a (Google) hummingbird” technique where you pose the topic’s question and answer it concisely at the top of the page, then defend that position, journalism style, in the rest of the text under that.
Similarly, you may be shooting for a SERP featured snippet and voice-assistant-device answer using bullet points or a numbered list at the top of your content page.
The point is, the guidelines and recommendations I’ve provided for you here are not a one-size-fits-all, cookie-cutter approach to your meta descriptions and your content. SEO experience, switching your brain into the on position, and a willingness to test, observe, and adjust are all mandatory to achieve the best results.
Google’s updated SERP snippet length: What should be your SEO strategy now?
0 notes
Text
SEO Analysis In Uniontown PA
How is your SEO performing on your website? If you have made an effort your hand at SEO or you have asked someone to work on your SEO for you, you may ask yourself how everything is going. If you haven’t seen an improvement in your SEO Analysis In Uniontown PA, or you aren’t moving up the Google rankings as rapidly as you would like, SEO analysis may be in order.
Our company handles a full scale SEO analysis including not merely the content you produce, but the performance of your website as well. SEO analysis is key to improving your website and making it something that will work for you.
As an SEO analysis in Uniontown PA, we aim to enhance your website’s performance and learn how to continue your growth.
Our SEO analysis tools make it possible for you to measure and analyze the ranking capacity of your website. It doesn’t solely analyze your content, it looks at the meta tags, the captions, the speed, the download speed, the performance, the mobilization, and so much more. Our tools employ the same technology to crawl your website that Google and other search engines will use.
What We Analyze?
There are so many things that go into making SEO and Google ranking what it is. The Google algorithm is complicated and no one really knows what goes into it. Some of the things we will look at when performing an SEO analysis include:
Strength of your HTTP headers
Length and relevancy of the title tags you use
Examine the heading and phrase elements
Determine a suitable length and relevancy for the description tags
Look at the keywords and significance of the keywords that you are choosing;
Figure out how often to use keywords to help your page rank
Check for keywords in the Alt text of the images
Check for keywords in the anchor tags and links
Examine any keywords in the meta tag or add them if you have not
Analyze the robots meta tag to see if search engines can view them
Figure out how your website shows up to other people
Understand how the website appears on a search engine
Examine the relevancy of your information
Ensure all linkage is correct
This is just a small part of what our methods and team as able to do as part of an SEO analysis. There are many, many parts to this process, which is why handing it over to a team and not to a piece of software is such a great idea. Even though technology crawls these sites, actual humans will make use of them, so you have to find a middle ground.
After SEO Analysis In Uniontown PA
Once our analysis has been finished, we will then get the information and use it to come up with a new and improved website for you. We may use pieces of your old website or we may rewrite your website entirely to suit with what we believe will help you to rank in Uniontown PA. Members of our competent team will work with you to load your website with content that we believe will continue to rank incredibly well. We will apply what we learn in that SEO analysis and push even further, letting more people to see your work, bringing in more eyes to see your website, and actually bringing you more conversion.
Call Our SEO Analysis In Uniontown PA Company Today
Our company can manage all of the aspects of your SEO needs. We’ll start by examining your content and helping you understand what works and what isn’t working for you. However, we don’t halt there. We can then enable you to fulfill what your website needs, whether it is technical or in filling your content needs.
We have a team of people willing to work for you, allowing your business to flourish in the Uniontown area, in PA, and even all over the country. This business grew out of a need for businesses of all sizes to rank higher on the Google platform. Since Google supervises so much of what we see on a daily basis, our SEO analysis takes into consideration what Google looks for, though much of what we do will also allow you to rank on other platforms as well.
Give us a call today to get started. There is no time like the present to at least have an SEO analysis done so that you can see whether or not you need some professional help or whether you are performing a good job on your own.
The post SEO Analysis In Uniontown PA appeared first on .
from http://harrisburgseo.org/seo-analysis-in-uniontown-pa/ via IFTTT
from Blog https://harrisburgseo.wordpress.com/2018/02/21/seo-analysis-in-uniontown-pa/ via IFTTT
1 note
·
View note