#circuit builder kit
Explore tagged Tumblr posts
Visit Tumblr Blog
Explore Tumblr blogs with no restrictions, modern design and the best experience.
Last Seen Tumblr Blogs


Fun Fact
The most popular pages on Tumblr are about Minecraft, GIFs, and David J. Peterson.
Text
🧪 Science Toys 2025: Fun Experiments Every Age Group Loves
🔬 Why Science Toys Are Everywhere in 2025 In 2025, science toys are not just for science fairs. From toddlers to seniors, everyone is enjoying hands-on experiments that mix fun with learning. Parents prefer toys that teach real-world concepts. Schools, hobby clubs, and even retirement homes are using science kits for engagement and education. Benefits of science toys: Build curiosity and…
#best science toys for kids#brain toys for seniors#buy science toys online#CBSE science learning#chemistry kits for school kids#circuit builder kit#crystal growing kits India#DIY science kits India#eco-science toys#educational toys India#hands-on science learning#Indian science toy brands#kids science subscription box#magnetic science toys#microscope for kids#NEP science education#robot science kit India#science gifts for children#science kits for all ages#science toys 2025#smartivity science toys#solar science toy#STEM toys India#toddler science toys
0 notes
Text
How the Right Supplier Can Improve Your Panel Assembly Workflow

In the competitive world of electrical panel manufacturing, time, consistency, and precision are everything. A well-organized panel assembly workflow can be the difference between hitting deadlines and losing contracts. But one often-overlooked factor in achieving operational efficiency is this:
The right supplier isn’t just a vendor — they’re a strategic partner. In this blog, we’ll break down how the right supplier can directly enhance your panel assembly workflow, reduce friction in operations, and elevate your entire production process.
1. Ensuring Reliable Component Availability
Panel assembly often stalls because of component shortages. When you’re missing critical parts — like circuit breakers, contactors, or terminal blocks — your line goes idle.
A dependable supplier:
· Maintains ready stock of high-demand components
· Offers real-time inventory updates
· Provides just-in-time (JIT) delivery
This ensures your team always has what it needs, minimizing production downtime and keeping your project timelines on track.
Impact: Faster production starts, fewer delays, better throughput.
2. Simplifying the Procurement Process
Juggling multiple vendors for various panel parts creates complexity — multiple orders, invoices, and deliveries. It eats up time your team could spend on value-added tasks.
A smart supplier partner:
· Consolidates a wide range of panel components
· Offers bundled BOM support
· Provides a single point of contact for all orders
This streamlined approach reduces your procurement overhead, lowers admin costs, and frees up your internal resources.
Impact: Faster ordering, reduced paperwork, smoother coordination.
3. Improving Product Selection and Compatibility
Choosing the wrong component — even slightly incompatible — can lead to rework, panel redesign, or even failures in the field. That’s a major risk to quality and your brand.
A technically capable supplier:
· Understands your electrical panel design and specs
· Guides you on compatible, compliant components
· Helps you select cost-effective alternatives when needed
With expert support, your team avoids costly errors and gets it right the first time.
Impact: Better accuracy, fewer mistakes, higher quality output.
4. Reducing Lead Times Through Local Sourcing
Global supply chains can be unreliable — delays at ports, shipping bottlenecks, and customs hold-ups all hurt your workflow.
A locally positioned supplier:
· Sources and stocks components closer to your facility
· Offers same-day or next-day delivery
· Bypasses import-related delays
This leads to shorter lead times, more predictable schedules, and the ability to react quickly to urgent needs.
Impact: Agile production schedules, improved customer responsiveness.
5. Supporting Scalable Growth
As your panel-building business grows, your workflow complexity increases. You’ll need a supplier that can scale with you.
A growth-ready supplier:
· Keeps track of your recurring BOM patterns
· Prepares for larger, scheduled orders
· Offers credit terms or inventory reserves for long-term customers
Instead of being reactive, you can plan your production proactively — without worrying about supply issues.
Impact: Smooth scaling, reduced bottlenecks, confident expansion.
6. Providing Value-Added Services
Beyond just selling products, great suppliers offer services that make your workflow leaner:
· Pre-kitting: All components bundled per job
· Labeling and part tagging
· Custom panel parts or DIN rail assemblies
· Training on new product integration
These extras can shave hours off assembly time and improve jobsite or factory efficiency.
Impact: Leaner processes, faster panel builds, lower labor costs.
Conclusion: Suppliers Are Part of Your Workflow Strategy
Your workflow is only as strong as its weakest link — and for many panel builders, that weak link is a slow or unreliable supplier.
At Daleel Trading, we go beyond supplying components. We
Stock what you need
Deliver when you need it
Support you with technical know-how
And grow with your business
The right supplier doesn’t just deliver products — they deliver productivity.
Ready to streamline your panel assembly workflow?
Contact Daleel Trading today to discover how we can simplify your sourcing, boost your efficiency, and help you build better panels — faster.
8 notes
·
View notes
Text


Montreal Assembly - Worng Side Of Uranus
"If you’re a regular Cabinet peruser, you’ve joined me as I waxed nostalgic for time periods I’ve never lived in, you’ve noticed me orating some company and component history, and you’ve almost certainly seen me talk about the best effects in their respective classes. And while there are plenty of classes and there is certainly enough love to go around, today I present you with my favorite pedal of all time: the Montreal Assembly Wrong Side of Uranus.
While many of you know Scott Monk and his amazing company for the Count to 5, he’s been in business for much longer than you think, and he’s made more things than most people know about. I first found out about him in 2009 while chasing wares by one of pedal history’s most sought-after builders, Etienne Blythe of Sonic Crayon.
If you were as into pedals as I was in the late-aughts… well, there’s a chance you still may never have heard of Sonic Crayon. However, at one time, Sonic Crayon’s wares were in extreme demand, with resellers ransacking the limited inventory and flipping the pedals for four times the price. His most famous may have been the Hollow Earth. His most unobtainable may have been the Anti-Nautilus. The one I wanted was the Moth.
The Moth was Sonic Crayon’s bitcrusher, and back in 2008 and 2009, that wasn’t an effect you could get just anywhere. However, Sonic Crayon had an old-school way of doing things: When he felt like making a batch, he did. Then he put 10 or so up for sale on his blog, and by word of mouth they’d sell out in minutes. One time, when checking his blog for a potential drop, I saw a new post where he said that if you’re tired of waiting for a Moth, there’s another Canadian guy making bitcrushers and that his were admittedly better. Who am I to argue? Let’s go.
That company was Montreal Assembly. At that time, Scott had only released two pedals, the Uranus and another insane device called Probability of a Fax Machine. When I heard the crude “basement demos,” I was sold. The problem: the sales tactics were exactly the same as Sonic Crayon—made and sold whenever. I never caught one. But my friend did.
My friend had gone off to college and left a present for me. I took a train and met their dad at a station in the suburbs, retrieved the box and opened it right there on the train. The Uranus was inside. When I got home I plugged everything I could into it. I messaged its creator, Scott, on Gmail Chat and geeked out when he answered.
I asked him if it was possible to add a mix circuit to the Uranus and Scott took time out of studying for signal processing exams to draw me up a somewhat complicated add-on schematic. Being somewhat intermediate with prototyping board, I hadn’t done a whole lot of my own stripboard layouts. Be that as it may, I cobbled it together. It worked. Now, I could blend the clean signal in with the bitcrushed one.
Despite being housed in a spray painted computer project box and featuring a barren aesthetic landscape, the Uranus is an impeccably engineered piece of sonic kit. Like most bitcrushers, there are knobs for bit rate and sample rate reduction. The third is volume. However, the bit rate knob is a pushbutton rotary encoder; as you turn it, it displays the bitrate in the seven-segment display. When the pedal is in bypass, the display flashes “bypass,” one letter at a time. Pressing down on the rotary encoder cycles through a slew of modes—ten to be exact—called things like “Dialup,” “Hostile” and more, including an incredible bitcrushed trem called “Blipo'' and a modulated sample rate mode called “Plunger.” It’s total labor-of-love stuff and I am here for it.
Mine is labeled 2010 and is one of a handful known to exist, and the only one with this mix knob. You may have seen one in a promotional photo that Strymon posted of its El Capistan being used in the studio by Godspeed! You Black Emperor, with the Uranus riding sidesaddle. Many, many people have never heard of it, and some of you may have never heard of Montreal Assembly before now. I urge you to change that.
At NAMM 2020, I actually saw Scott walking by our booth and I recognized him from some old demos. I ran down the aisle and tapped him on the shoulder. He looked right at me, then read my name badge, looked back up and said “Heyyy, Kula, how’s that bitcrusher treating you?” What a legend."
cred: catalinbread.com/blogs/kulas-cabinet/montreal-assembly-wrong-side-of-uranus
22 notes
·
View notes
Text
Top Tips for Fast and Safe Panel Assembly

Panel assembly is a critical process in the electrical industry that directly impacts safety, performance, and efficiency. Whether you’re building distribution panels, control boards, or switchgear systems, the goal is to assemble panels quickly without compromising safety or quality. In this post, we’ll explore proven tips to help electricians, technicians, and panel builders streamline their workflow while ensuring compliance with safety standards.
1. Plan Thoroughly Before Assembly
Efficiency starts with preparation. Before you begin, study the layout drawings and electrical schematics carefully. Make a checklist of all the required components — circuit breakers, relays, terminal blocks, wire ducts, and enclosures.
· Pre-arrange tools and materials
· Verify component compatibility with design
· Identify high-priority tasks and dependencies
A well-organized plan saves time and avoids costly errors during installation.
2. Use Modular and Pre-Fabricated Components
Using modular devices like DIN-rail mountable circuit breakers or pre-assembled terminal blocks can reduce build time significantly.
Benefits:
· Faster mounting and wiring
· Easier upgrades and replacements
· Reduced wiring complexity
Where possible, opt for plug-and-play components or pre-terminated wiring kits.
3. Maintain a Clean and Organized Work Area
A tidy workstation boosts productivity and prevents mistakes. Use labeled bins, trays, and tool organizers to keep everything accessible.
· Segregate power, control, and signal cables
· Keep fasteners and tools sorted by size/type
· Remove scrap materials and wire offcuts regularly
A clean work area also improves safety and reduces trip hazards.
4. Label Components and Wiring Clearly
Proper labeling speeds up installation and future maintenance. Use heat-resistant wire markers or automated labeling machines for consistency.
Label:
· All wires at both ends
· Control devices (relays, contactors, timers)
· Terminal blocks and busbars
Clear identification is essential for testing, fault isolation, and panel certification.
5. Use the Right Torque Tools
Over- or under-tightened terminals can cause failures or fire risks. Always use torque screwdrivers or wrenches calibrated to the manufacturer’s specifications.
· Ensure solid mechanical and electrical contact
· Reduce the risk of arcing or overheating
· Document torque settings for quality records
Following torque guidelines is a best practice for long-term reliability.
6. Apply Effective Cable Management
Good cable routing isn’t just about aesthetics — it enhances performance and safety.
· Use wire ducts, cable ties, and strain reliefs
· Maintain minimum bend radii, especially for data cables
· Separate AC power and control wiring to avoid interference
Neatly routed cables simplify inspections and future modifications.
7. Conduct Final Visual and Electrical Inspection
Before energizing the panel:
· Inspect all terminations and mounting
· Check for exposed conductors or loose parts
· Test insulation resistance and continuity
· Verify grounding and bonding paths
A comprehensive inspection reduces commissioning delays and ensures compliance with safety standards.
8. Document As-Built Changes
If any field modifications were made during assembly, update the panel drawings and documentation to reflect those changes.
Include:
· Wiring diagrams
· Component serial numbers
· Torque test records
· Electrical test results
Accurate documentation is essential for maintenance, certification, and future upgrades.
9. Train Your Assembly Team
Skilled workers build faster and safer panels. Provide regular training on:
· Electrical safety and lockout/tagout
· Schematic interpretation
· Safe use of hand and power tools
· Latest panel-building standards (e.g., IEC, UL, NEC)
An informed and competent team minimizes rework and enhances build quality.
Final Thoughts
Fast panel assembly doesn’t mean cutting corners. By following structured processes, using the right tools, and prioritizing safety, you can consistently deliver high-quality panels — on time and within budget.
Looking for top-tier switchgear accessories and panel-building solutions? Contact us today to explore how we can support your projects with reliable, efficient, and cost-effective products.
5 notes
·
View notes
Text
Building Your Own Mechanical Dog: A Beginner’s Guide
In the ever-evolving world of robotics, creating your own mechanical dog is a fascinating and rewarding challenge. Whether you're a hobbyist, a student, or simply curious about robotic engineering, building a mechanical dog can be a fun way to learn about coding, mechanics, and artificial intelligence. It’s more than just assembling wires and parts—it's about bringing movement and purpose to a machine that mimics a beloved companion. At mechanical dog, we believe that anyone passionate about robotics can take the first step in developing a robotic pet with personality. This guide will walk you through the essentials—from selecting the right components to programming basic functions—to help you build your first functional and interactive mechanical dog.
Understand the Core Functionality of a Mechanical Dog
Before jumping into assembly, it's crucial to understand what makes a mechanical dog function. These robotic companions typically involve servos or motors to mimic the movements of legs, a microcontroller as the brain, and a power source for mobility. Sensors such as ultrasonic detectors help the mechanical dog navigate its environment. Grasping the roles of each component ensures a more efficient build process and sets the foundation for future customization. It also helps in troubleshooting and upgrading the design later. Learning this early provides a technical roadmap and gives you clarity on what parts to prioritize as a beginner in robotics.
Choosing the Right Materials and Parts to Begin
Starting with the right components makes a big difference in your mechanical dog’s performance. You'll need a sturdy yet lightweight frame, preferably 3D-printed plastic or aluminum. Essential parts include servo motors for leg movement, a rechargeable battery pack, a microcontroller like Arduino or Raspberry Pi, and wiring kits. Buying beginner-friendly kits from reputable robotics stores is highly recommended. Mechanical dog recommends selecting components based on simplicity and expandability. Focus on acquiring parts that allow trial and error without breaking your budget. This stage sets the groundwork for building something durable and modifiable over time.
Assembling the Frame and Installing Motors
Once you have the necessary parts, it’s time to bring your mechanical dog to life. Begin by assembling the body and legs, using screws and brackets to fix the frame. Install the motors at the joints to replicate knee and hip motion. Precision in alignment is key—improper placement may result in unbalanced movement. Make sure each motor is securely fastened and capable of smooth rotation. During this stage, mechanical dog builders often test the range of motion manually before connecting to the control board. Taking your time here helps prevent mechanical issues down the line.
Wiring and Connecting Your Microcontroller System
With the frame and motors in place, the next step is wiring. Connect each motor to the microcontroller using jumper wires or a motor shield. Labeling wires helps reduce confusion later, especially when debugging. Your microcontroller acts as the brain of the mechanical dog and sends commands that control movement. Power connections must be secure and insulated to prevent short-circuiting. This phase requires patience and organization, particularly for first-timers. Once everything is in place, running a basic movement script is a great way to ensure your connections work and to see your mechanical dog come alive.
Programming Basic Movement and Direction Controls
Programming is where your mechanical dog learns to walk. Start with simple scripts that control forward and backward movement using timed signals to motors. As you progress, introduce directional turns and stop-start commands. Platforms like Arduino IDE or Python make this easy for beginners, especially with online resources and libraries. At mechanical dog, we encourage experimenting with code to understand how speed and timing affect performance. Getting these basics down sets the stage for more advanced behaviors, like obstacle avoidance and voice command integration. Programming breathes life into your build and gives it functionality.
Integrating Sensors for Navigation and Interaction
Sensors make your mechanical dog interactive and responsive to its environment. Ultrasonic sensors help it detect walls, infrared sensors track lines or paths, and gyros assist in balance. Proper sensor placement is essential—usually on the head or front body of the robot. Once installed, they are connected to the microcontroller and incorporated into your code. This enables your mechanical dog to avoid obstacles or follow predefined routes. These intelligent behaviors enhance the experience and demonstrate real-world robotics applications. Adding sensors is a significant upgrade and a fun learning curve for every builder.
Testing, Troubleshooting, and Future Enhancements
Once all systems are connected and programmed, it’s time to test your mechanical dog. Watch for issues like jerky movement, sensor misreads, or battery drainage. Take notes and go step-by-step to troubleshoot. This is where hands-on learning is most valuable. Mechanical dog builders often revisit earlier steps for fine-tuning. After successful testing, consider adding voice control, facial recognition, or remote operation via Wi-Fi. With every enhancement, you’ll grow your skills and make your mechanical dog smarter. Remember, every successful robotics project involves problem-solving and persistence.
Conclusion
Building a mechanical dog from scratch is a fulfilling journey that combines creativity, logic, and hands-on learning. Whether you’re doing it as a personal challenge or stepping into the field of robotics professionally, the experience offers a deep understanding of engineering and artificial intelligence. With patience and curiosity, your mechanical dog will not only move and interact but also reflect the effort you’ve invested in learning. At mechanical dog, we support all levels of builders and believe that even a beginner can create something incredible. Start small, think big, and bring your robotic companion to life.
0 notes
Text
Why WD Electronics Is the Ultimate Upgrade for Your Off-Road Ride
Every off-road enthusiast knows that power, performance, and dependability are crucial when it comes to pushing the boundaries of adventure. The electronic systems in your car must be able to survive the most difficult situations, whether you're driving over muddy roads, rough trails, or sand dunes. This is where Dig Rig Powersports' WD Electronics comes in, providing an excellent answer to all of your off-road electronics requirements.
Built for Rugged Terrain
Off-road vehicles such as ATVs, UTVs, and side-by-sides need electrical systems that are sophisticated, robust, and efficient in addition to having a lot of horsepower. This is precisely why WD Electronics was designed from the ground up. Battle-tested and trail-approved, WD Electronics devices are made to withstand mud, water, vibration, and extremely high or low temperatures. Everything you need to precisely manage your power distribution is available from WD Electronics, including reliable wiring harnesses, intelligent switch panels, and relay systems. Whether you're racing, hunting, carrying, or just having fun, this translates to fewer breakdowns, safer rides, and increased confidence.
Plug-and-Play Simplicity
The simplicity of installation is one of the main benefits of selecting WD Electronics. Dig Rig Powersports has created a plug-and-play system that is easy to set up and doesn't require much technological knowledge. This keeps professional-level outcomes while making upgrades more affordable for regular riders. To help you spend more time on the trail and less time in the garage, each kit includes waterproof components, premium terminals, connectors with clear labels, and comprehensive instructions.
Precision Power Management
For contemporary off-road vehicles, power management is essential. Your electrical load can easily overwhelm a stock setup with extra lighting, sound systems, GPS units, winches, and more. Intelligent relay panels and fuse blocks from WD Electronics guarantee the safe and effective supply of power to all of your accessories. You can now operate high-draw components without worrying about overload or failure thanks to this. Your car is safe thanks to clever layouts and circuit protection, and even in poor visibility situations, the user-friendly switch systems allow for smooth operation.
Customization at Its Best
Dig Rig Powersports is aware that every ride is unique. For this reason, WD Electronics designs its products to be flexible. There is a solution that may be customized to meet your demands, whether you need a basic switch panel replacement or a full car wiring overhaul.
You can construct your own unique system or select from pre-configured packages. Modular components make it simple to expand your setup and provide easy access to replacement parts. Your vehicle will be prepared for everything you throw at it thanks to this level of personalization.
Trusted by the Off-Road Community
Within the off-road scene, WD Electronics has rapidly established a reputation for dependability and creativity. Because the brand continuously performs well under duress, riders, racers, and builders have come to trust it.
Real riders who are aware of the difficulties in off-road settings make up their staff. Products that truly address issues in the real world are the result of this practical experience.
Built to Last
WD Electronics is an investment in longevity. To stop corrosion and failure, these systems are constructed with weatherproof connectors, marine-grade wire, and durable housings. WD Electronics will keep your equipment operating whether you're driving through a dust storm or stuck in a deluge.
For anyone who is serious about off-road performance, their components are a wise investment because they are also covered by robust warranties and the outstanding customer service of Dig Rig Powersports.
Why Choose Dig Rig Powersports?
Dig Rig Powersports is enthusiastic about the off-road lifestyle and is more than just a seller of parts. They have established themselves as a go-to resource for enthusiasts wishing to upgrade their vehicles thanks to their proficiency in off-road electronics.
Dig Rig Powersports makes it simple for anyone to update with confidence by providing comprehensive instructions, installation videos, and quick tech support. When you purchase from them, you're getting equipment that has been tried and tested by experts and is regarded as reliable by the community because of their dedication to quality and innovation.
Conclusion
Dig Rig Powersports' WD Electronics is the finest upgrade for people who expect the best from their machines. These off-road electronics systems raise the bar for dependability and performance thanks to their innovative design, robust construction, and unparalleled user-friendliness. Don't accept mediocrity. Use WD Electronics' strength, accuracy, and performance to upgrade your vehicle. Find out why so many riders rely on Dig Rig Powersports to fuel their journeys by visiting them today.
0 notes
Text
G.SKILL Ripjaws M5 RGB: DDR5 Memory with Flexible Lighting

The world’s top brand of performance overclock memory and PC parts, G.SKILL International Enterprise, is pleased to announce the launch of Ripjaws M5 RGB, a high-performance RGB DDR5 memory series made for the newest DDR5-capable Intel systems. Initial specifications up to DDR5-6400 CL32-39-39-102 96GB (2x48GB) will be available at launch. With its customizable RGB lighting and matte black or white aluminum heatspreaders, the Ripjaws M5 RGB memory kit is perfect for a range of PC setups and designs.
In this blog we will explain the standout features of G.SKILL Ripjaws M5 RGB DDR5 Memory, including its flexible lighting options and how it enhances your PC’s performance.
Designed to Perform Stylishly
The 41mm-tall Ripjaws M5 RGB series, which comes with matte white or matte black aluminum heat spreaders, is minimalistic in style and has RGB lighting that can be adjusted to fit a wide range of PC build themes.
Take Advantage of High Performance DDR5
The Ripjaws M5 RGB is a great option for performance PC builds because it is made using high-screened integrated circuits (ICs) and is designed for high-speed DDR5 performance. It offers overclocked specifications in a range of speeds, timings, and kit capacity options, up to DDR5-6400 CL32-39-39-102 96GB (2x48GB). Please refer to the table below for a list of launch specifications.Image credit to G.SKILL
Support and Availability for Intel XMP 3.0 Profiles
Because the Ripjaws M5 RGB has compatibility for Intel XMP 3.0 memory overclock profiles, users can overclock the memory kit by simply turning on XMP in the BIOS and using a motherboard and processor that are compatible. In 2024, authorized distribution partners of G.SKILL will receive this new memory series.
G.SKILL’s Ripjaws M5 RGB DDR5 memory range is its latest high-performance memory. This series serves to PC aficionados seeking high performance, elegant design, and Intel platform compatibility.
Speed and Style Designed
The DDR5-pushing Ripjaws M5 RGB has excellent specs. Key features are listed below:
High Speed Performance: The memory kits can reach DDR5-6400 CL32-39-39-102 speeds. This allows for fast data transfer rates for video editing, 3D rendering, and high-end gaming.
Massive Memory: G.Skill’s Ripjaws M5 RGB can hold up to 96GB (2 x 48GB) for memory-intensive programmes and massive datasets.
Custom RGB Lighting: Memory modules have matte black or white aluminium heatspreaders. RGB lights on these heatspreaders let you customise your PC’s look and fit your build’s theme.
Compatible-optimized
Ripjaws M5 RGB is optimized for Intel DDR5 systems. When used with an Intel motherboard and processor, this provides seamless integration and excellent performance. Memory kits support Intel XMP 3.0 profiles. Allowing the XMP profile in your BIOS makes overclocking easier and helps you reach the rated speeds without manual tweaking.
Availability, Pricing
In Q1 2024, G.Skill released Ripjaws M5 RGB. This depends on the merchant and memory kit configuration (speed, capacity). Due to their high-performance requirements and RGB lights, they will cost more than DDR5 memory.
Conclusion
PC builders seeking high performance and visual flair may consider the G.SKILL Ripjaws M5 RGB DDR5 series. Featuring fast speeds, huge capacities, and customizable RGB illumination, it caters to memory fans who want the best while looking good. Before buying, check motherboard compatibility and price premium.
Read more on Govindhtech.com
#RipjawsM5RGB#DDR5memory#PCbuild#DDR5performance#motherboard#GSKILL#news#technews#technology#technologynews#technologytrends#govindha @govindhtech
0 notes
Text
Saturday Movie Night: Railscale 2
youtube
Seeing as I started this feature with the first issue of the Railscale trilogy, it only seemed fair to share the second issue next. See above to watch the programme, and see below for more details about the contents.
MIKE SHARMAN'S VICTORIAN RAILWAY (4mm/EM)
Once a classic sight on the exhibition circuit, Mike Sharman had built his early-Victorian layout into his loft by the time Railscale came to film it. Mike himself talks us through the layout, which is packed to the gills with models of pre-1870 prototypes, and includes, standard, broad, narrow, and even mixed gauge sections!
BOYTON CROSSING - PART 2 (4mm/OO)
Having assembled the basic structure of his crossing keeper's cottage, Mike Jolly describes how he added all the details that bring life to the model.
PENDON MUSEUM (4mm/EM)
Probably the most famous of all model railways, that at Pendon, Oxfordshire has been in development since the 1930s. The museum houses several displays, but this feature focuses on the Dartmoor Scene - the isolated junction station of Pen Tor Road, located somewhere on that wild moorland.
PROJECT N - PART 2 (2mm/N)
Mike Jolly finishes building the baseboard for his N gauge layout. He then shows how he laid the track and prepared the basic scenery - with all the triumphs and tragedies that that entails. Finally, we are rewarded with a glimpse of "the first train"!
WAGON KIT CONSTRUCTION (7mm/O)
We continue to watch Mike Jolly at work, as he assembles, modifies, paints, letters and weathers a basic private owner wagon kit.
OXFORD REWLEY ROAD (4mm/OO)
As well as the GWR station, Oxford was also served by the LNWR, and this model represents their station as it was under LMS ownership. The builders have put together a sequence faithfully reproducing the 1938 timetable, and Railscale 2 ends with the first section of that sequence.
1 note
·
View note
Text

ICYMI: BUKI Junior Electric Circuit Builder Kit - 14 Models & 110 Pieces, Age 8+ | eBay https://rover.ebay.com/rover/1/711-53200-19255-0/l?mpre=https%3A%2F%2Fwww.ebay.com%2Fitm%2F204747321037&utm_source=dlvr.it&utm_medium=tumblr
0 notes
Text
What Could Go Wrong?
Day No: 12
Prompt: Cave In
Fandom: Murdoch Mysteries
Medium: Fic
Trigger warnings: none
SFW

The hole that had been forcibly opened up by persons unknown was a treasure trove for Pendrick and Murdoch. Watts refused to come with them in exploring, instead focused on a new project for the local school. Re-certifying himself to be a builder, he had been taking on small projects to keep himself occupied and draw in a small amount of money. He didn’t need much, just enough for a meal at the Round Table here and there.
Here and there being every single day.
Brackenreid sent them with Torva, third generation Corp that watched them and the surroundings carefully as they tested and searched everything they could get their hands on. The two of them had found quite a few chips, circuits, other gadgetry that they were still working on figuring out. Even a full thing called a computer. Murdoch managed to secure it in his pack, thanking himself for only packing some bread and basic tools that could be hung from his belt. James had more things, including two first aid kits that Llewellyn had ‘sneaked’ in when he was gathering a few spare ropes.
Torva quirked xir’s head at something. “We should leave,” they said.
“Why?” Murdoch asked, looking over a book. It was a mystery novel. There were a few more on the shelf and he wanted to bring them along as well. Maybe I’ll come back with a bag to safely secure them in. They are quite old. Protecting them should be thorough.
“I hear something in the distance of the system,” xe informed, “And it’s not natural.”
Pendrick glanced up from the cabinet he was working on. “Human?”
They shook their head. “Definitely not. It’s probably Old World Security, same as the bot in Nora’s Mine.” That wasn’t good. The history of the Sandrock tunnel was a chilling reminder about how some of the Old World wasn’t just old toys and statues. It could kill, and people were willing to kill for it. The two looked at each other and nodded in agreement. They would have to come back with weaponry and reinforcements if they wanted to continue.
Moving back to the hallway that connected to the hole from the Abandoned Ruins and the freestanding elevator that they constructed, the sounds got louder and louder. “I think we should run,” Murdoch muttered, already trying to shift himself into going faster.
“That might attract it,” Pendrick warned.
A few more steps and Torva was shining xir’s light at something. “I don’t think that really matters.”
Seven to eight foot tall, it was a bot that put the one that William saw in Atara to shame. Gleaming orange and green pained along its body, it was a mockery of the human body with thin arms and legs, but an oversized chest and tiny head. The head had a glimmer that made him think there was a system held within to allow it to see and hear. The rest must have been in the body. Getting into that would be a huge scientific redevelopment.
“State your purpose,” the bot said.
That was not something they expected. Most of the bots that had been encountered earlier were nothing more than attackers. None of those ones talked, either. Only Ack and Ally back in the town, but Ack was a cook and Ally was a special case. “Exploration?” Pendrick tried.
Ten seconds went by. “Exploration does not require the theft of computers.” It apparently figured out what was on William’s back.
“We can’t turn them on here,” Murdoch explained, “There’s no power source active here. There hasn’t been for close to three hundred to four hundred years. We have to take it back to our work to figure out a way to power it.”
The bot processed this as well. “I cannot allow that. There is sensitive material on the computer. Please hand it over.”
Pendrick and Murdoch glanced at each other. There was something on the computer that could be useful in figuring out more of the history surrounding the city and the Old World. They didn’t want to give it up. Torva walked forward. “Portia Civil Corp. These men are consultants for the current law enforcement agency,” xe said, bringing the bots attention. “We need to see what’s on here, for information on a long ago event.
That caught the bot. “Law enforcement.” It almost seemed to be working on allowing the three to leave, but it instead attacked Torva instead. Both of the builders were thrown aside.
“William, please tell me you bought-”
“No gun! Brought the staff!”
Struggling to get the pack off his back, he placed it along the wall before pulling out a steel rod. Twisting it, the thing elongated into a bo staff that was a few inches taller than himself. Pendrick had placed down his things and pulled out a sword.
“Perhaps it’s a good thing that we didn’t persuade Llewellyn to come out with us,” Pendrick quipped, aiming for the bot’s legs. Murdoch used the sharper edge of his staff to try and get into the cranium on top, figuring on wrecking the camera to make it blind.
Torva went for the chest, a set of chromium and steel daggers working on cutting through the ventilation covers that he saw along the side. Something cracked when Murdoch hit the dome, but he didn’t get another chance to break it. The bot wrapped around both of them. He and James were thrown in opposite directions deeper into the ruin. The bot then extended its arms up and latched onto wood and steel before forcibly bringing everything down.
The dust and dirt flying into their faces made it hard to breathe for a few minutes. The two coughed for minutes until the air didn’t bother their lungs. “Murdoch!” Pendrick yelled.
“I’m alive,” he called back, “Nothing broke.”
“Good,” he said, “Julia would have killed me if you went back with another broken bone.” Forcing himself up, he looked and saw that the main way of getting back to the outside was blocked. “I don’t hear anything.”
“Nor I.” Murdoch had struggled up as well and grabbed his pack again, holding it when trying to put it on pained him. He knew that his pack was mostly the computer, along with some small things. “We may be stuck for a while. I don’t have anything to get through this.”
Pendrick lamented that he didn’t bring his pickhammer from a Sandrock build. “Neither do I.” He looked at the other man. “If Torva stops the bot, xe can get the last builder in Portia that might be able to get us out.” Looking over the man, he saw that there was a dangerous gash along his back. Bless Llewellyn for being smart about the kits. “Hold still.”
William didn’t know why until something flared along his back. Cleaning alcohol. “Ahh,” he hissed. “James?”
“A nice, large gash, likely from some broken metal. You’re lucky Llewellyn thinks he’s sneaky. Put two aid kits into my pack before we went.” He held still while the wound was cleaned, treated, and covered expertly by the other man. Rumbling from the other side of the rubble caused more stuff to rain down on their head. “I think it may be apt to continue inward. You did say there were air currents. Perhaps another exit?” Murdoch nodded and followed the other man.
#whumptober2022#fic#murdoch mysteries#cave in#james pendrick#william murdoch#original character#IT'S AN AU!!!#ANOTHER FREAKING AU!!!!#my time at portia au#after the game thou#i wrote 13 before 12#so my tags and things are going to be out of order
1 note
·
View note
Photo

Gundam Build Divers Re:Rise
So, if you’ve been here a while, you’ll know I’m a big fan of the Build Series. I even like Try, which has actually offended people. No joke. And Re:Rise is no exception, having the best story and characters in the lineup, not to mention some of the more innovative Gunpla. It’s pretty obvious it’s the most beloved of the Build Series by the general public as well as hard-core Gundam fans, and I feel that’s because it leaned more heavily into the Gundam side of things than the Build side, for both its ups and downs.
The Good: The story is very strong, and is able to get away with things that hampered GBF slightly and GBD a lot. It presents it mystical elements forefront and prominently.
In almost every collectibles based series, there is almost always some form of mystical element (a trend made prominent by Yu-Gi-Oh!), and both GBF and GBD lean into this to different degrees. (Actually, one of the reasons I like GBFT is because it’s the only series like this I’ve ever seen that doesn’t have a mystical element.) GBF’s was pretty subtle, being presented early on and only really being used as a motivator for the Chairman and a sad goodbye. GBD leans into it a little harder with Sarah being the main focus of the entire final arc.

GBDR is able to get around this by having the entire focus of the show be about the mystical element, so there’s no conflict between the grounded story and the abnormal additions. Also, it was just, like, really good? And I think part of that is the naivety of the characters. I was able to pick up almost immediately that everything was real, but I read a lot of the YouTube comments after each episode, and a lot of people were convinced it was just a story mission at first, with more and more people catching on as the series progressed. (For me what sealed the deal was Maiya being able to describe Kazami’s character. A supposed NPC being able to nail the personality of a player.) Since they thought it was a game, the stakes seemed low even though we as the audience knew otherwise. And when everything came to light, not only did the stakes immediately skyrocket, but they did so believably. And wanting to help people is always a good motivation.
The animation was very good. It dove at a few points, as is not uncommon, but the overall quality stayed high. There was almost no stock footage apart from the Core Changes. And the number of cameos throughout this season, especially in the last three episodes, were staggering, but were just balanced enough to not overshadow the main cast.
Except for Kyoya’s Cardass Finisher. Like, ok, reference, but it was, like, three minutes long.

All the characters were very good, and I feel part of that was both establishing a detailed past for everyone to help with their motivation and character growth as people, rather than fighters, and not having the main character be the newbie. Reiji, Sekai, and Riku were all new players and had to have plenty of things explained to them, whereas here all of BUILD DiVERS were either experienced fighters or builders, and Freddie, the non-combatant would only require an occasional explanation while he, in turn, explained his world to the players (a very important give-and-take). I also liked how they didn’t need to spell out every detail of Par and Kazami’s pasts. Par never has to explain how he became disabled to the rest of the team, and Kazami never vocalizes about the death of his dad. Sometimes that’s the better way to handle things.
And finally, the Gunpla are FANTASTIC! Look, I know I complain, but there’s a reason I’ve bought 12 Core Gundams, and will probably buy more. Each design in this series is so lovingly crafted. There’s a good balance of series, motif, and gimmick. And Re:Rising Gundam is such a cherry on all of it. Like, I pointed out all those oddities in my Wodom Pod review, but never did I even consider it was part of a combination. And it so encapsulates the themes of coming together this series oozes. I love it.

The Bad: But, of course, nothing is perfect. While I do enjoy the story, what sets the Build Series apart from other Gundams is its levity and light-heartedness, and that’s something that was lacking from this season. It’s not absent. The Space-Crossing Festival, for instance, was a great example of this, but those moments were few and far between. I think Jed dying was the moment I realized I’d have to look at this as a Gundam series and not a Build one. Being afraid for the show’s characters isn’t something I’ve had to worry about with Build. Even when Sarah’s life was on the line at the end of GBD, I knew everything was going to turn out alright. Here, though? Up until the training mission I was worried someone was going to sacrifice themselves. And it’s good that didn’t happen, but that one moment put me on edge for the entire rest of the series.
And it’s not necessarily a bad thing, but it’s something I expect from 00 or Thunderbolt. Not Build.
Already mentioned the animation had its dips. I think I watched the entire show in 720p. Would have preferred 1080. Moving on.
While I don’t have any real issues with the main cast of characters, I do have a few issues with Eve. I’m not the biggest fan of how she retcons a lot of the events of the first season, having this apparent noble sacrifice that completely doesn’t affect the story of GBD at all. And while I don’t mind May being constructed from some of Eve’s data, I wish it was built up at least a bit? I can think of some moments in retrospect where I can suss out that maybe that’s what they were going for, but it still felt very sudden. That could have been handled better.

And while I love this season’s Gunpla, there are simultaneously a lot and not a lot compared to other seasons. Like there’s a lot of releases, but a ton of them are remolds. Twelve Cores, remember? Almost every suit got a remold. The Justice Knight and Infinite Justice, all the Eldoran and non-Eldoran counterpart units, the Valkylander and Ex are the same mold, and all the Core Armors. That’s probably because they used a lot of suits that are more original and are just homages rather than straight remolds, like the Build Strike or 00 Diver, but it’s definitely noticeable.

Where do we go from here: We have an official announcement of a Divers Battlogue, just like with Fighters, and we may get OVAs like the previous seasons did, too, eventually, but I’m talking about beyond that.
After Fighters Battlogue ended, Fighters did, too. We moved on to Build Divers, and from what I can tell it’s been successful, especially this season. My worry is that with the announcement of a Battlogue, we’re also announcing the end of Divers.
Now, I don’t think Build is going away, because it has its own fanbase, and it’s just good from a marketing perspective. Take some old kits, make a few new parts for them, and resell them. What I’m worried is we’re heading to a new subtitle and a new continuity, which would be our FIFTH (Builders, Fighters, Divers, and GBGW). It made sense to end Fighters because they created a seven year time skip to explain how we got to the point of using original Gunpla, they didn’t go over well, and from a writing perspective it put them in a corner. Divers was a good reboot, returning to modified kits, and giving us a protagonist who actually pilots a Gunpla he built himself (three season in). Divers also has a very large mythos at this point, with AIs, and multiple confirmed species of aliens. If you jumped ahead just one more year, you could write a great story where it’s just exploring this inter-species cultural hub that is GBN. That’s what I’d like to see, anyway. If you skipped ahead just a little farther, you could have Asha, Towana, or Hulun return as our Yuma or Par for that season to connect it to the past one. There’s a lot of potential still there. Like, even the ending suggests they might have some more ideas for Eldora yet (whether that will be tackled in a new season, the Battlogue, or an OVA, I don’t know).
You could also return to Build Fighters. Make it take place in that seven-year gap, which would allow you to have Gunpla more on the level of what we saw in GBD (more advanced than GBF, but not at original yet). Or show us the pro circuit at the same time as GBFT and how insane that’s become. (What we see in GBFT is just the Japan’s U-19, and they apparently can’t hold a candle to actual pro players. Can you imagine what Worlds would be like O_O)
There’s just so many new stories they could tell with what already exists. I don’t want them to reboot the series again needlessly.

Also, we’re running out of headliner Gundams. The only obvious choices I don’t think we’ve touched yet are Barbatos, Unicorn, Victory, and Zeta.
As for my hopes for the Battlogue, I’d like to see Maiya and Kazami go on a date, because that would be adorable. I’d like to see Freddie pilot his first Gunpla, because that would be adorable. And I’d like to see the gang teach the village kids how to build Gunpla, because that would be adorable. What can I say? This series got kinda dark; I’d like some cute to balance it out.
Overall, this series was great. Favorite of the Build Series, even if it is a little more Gundam than Build. There’s a lot of potential still left in this universe, so I hope they’ll continue to explore it, rather than reboot the series again.
23 notes
·
View notes
Text
The Ten Best STEM Toys to Give as Gifts in 2020
https://sciencespies.com/nature/the-ten-best-stem-toys-to-give-as-gifts-in-2020/
The Ten Best STEM Toys to Give as Gifts in 2020

In recent years, STEM-themed toys for all ages have flooded the market, making it a little overwhelming for people to choose the most skill-based gifts for the kids in their lives. But a team of engineers has come to the rescue with a recommendation of the most thoughtfully designed STEM-oriented products on the market.
Each year, Purdue University’s INSPIRE Research Institute for Pre-College Engineering turns into a toy testing laboratory as faculty and students run mounds of toys, books and games through their paces. The highest rated products earn a coveted spot on the institute’s annual Engineering Gift Guide, which is now in its seventh year.
“Play is one of the places where we can capture a kid’s imagination,” says Tamara Moore, a professor of engineering education and the executive director of INSPIRE. “For a child to get interested in potentially having a STEM career, you want [to] capture their imagination. Being able to have that freedom to play is really one incredibly important way for this to happen.”
The gifts usually go through a strenuous review process, which includes input from parents and kids that test out the toys. But because of the Covid-19 pandemic, the process looked different this year. It was spearheaded by a team of four undergraduate students that thoroughly inspected, played with and reviewed nearly 100 toys released in the last couple of years, Moore says.
The team looked for toys that embodied the hallmarks of engineering and fostered meaningful skills, like spatial reasoning, computational thinking, innovation and creativity. “And those skills start early,” Moore says. Well-designed toys can expand young learners’ minds and foster these skills throughout childhood development.
For Smithsonian readers, Moore and her team selected their ten favorite STEM gifts for 2020 spanning three different age groups.
0-4 Years
Weights Balance Game
This game comes with a wooden balance beam and a variety of blocks in different colors and sizes. The goal is to add blocks to the opposite sides of the scale without tipping it. The set also comes with a variety of cards that show the various ways the blocks can be positioned, helping kids learn how to follow a basic blueprint. By repositioning the blocks on different parts of the board, kids can develop spatial reasoning skills in an engaging, intuitive way. (Janod, $27.99)

Sweet Cocoon Stacking Stones
The 20 light, colorful wooden stones in this set come in a of number of sizes and odd shapes. Children are able to freely play with the stacking stones and build a variety of structures, from a simple tower to a more complex bridge. Moore says that the “stones are a perfect introductory toy for young children to explore engineering thinking and design,” while also improving their spatial reasoning and building skills. (Janod, $29.99)

My First Rush Hour
My First Rush Hour is a one-player maze game in which a child is tasked with navigating a little red car through traffic. Pick a challenge card out of the 30-card deck and then arrange the cars and trucks on the board to match the card. Then, the player has to drive the car around the other vehicles on the board and escape from rush hour. This game encourages spatial reasoning and problem-solving skills while fostering perseverance. (ThinkFun, $23.99)
5-7 Years

Addy-matic and the Toasterrific
This picture book by Curtis Mark Williams stars Addy, who is not a morning person. To avoid waking up early to make breakfast, she hatches a plan to toast her bread without having to get out of bed. To do so, Addy designs her very own Rube Goldberg machine—a complicated series of steps that accomplish a simple task—with items from around her house. It’s a captivating and fun story that centers around a hallmark of engineering: identifying a problem and solving it creatively. “It expresses the entire engineering process in a way young children can understand and relate to,” Moore says. (CreateSpace Independent Publishing Platform, $9.99)

Gears! Gears! Gears! Robots in Motion
This 116-piece kit comes with gears, wheels, claws and axles for kids to build their own moving robots. The set comes with instructions to build three different robot models complete with working treads and spinning eyes, but kids can also get creative and build their own. Since this toy has lots of moving parts, they’ll have to figure out how to get the robot’s gears and wheels rotating, which introduces kids to basic physics concepts while improving their spatial reasoning skills. (Learning Resources, $39.99)

Design & Drill Space Circuits
Good circuit toys are hard to find, especially for young kids, but this one is a winner, Moore says. This kit comes with an instructional storybook that walks builders through assembling various circuits using a board, a battery pack, an electric screwdriver and other tools and explains the basics of electricity flow. By following the instructions and employing problem-solving skills, kids can complete 20 space-themed missions—from lighting up a rocket to throwing a party on the moon—outlined in the book. (Educational Insights, $49.99)
Ages 8+

(Potato Pirates)
Enter the Spudnet is a potato-themed board game that introduces kids to the world of cybersecurity and networking without even having them touch a computer. Players receive tasks that they must complete by moving their ships from warehouse to warehouse on the board while protecting their privacy and preventing opponents from attacking them. Cybersecurity is more important than ever, so it’s a socially relevant game, Moore says. It also builds skills in critical thinking, problem solving and design. Plus, it’s just good family fun. (Potato Pirates, $57)

Code Rocket
Code Rocket comes with a small, green microcontroller in the shape of a rocket that connects to a computer via a USB port. When users run the accompanying software, they’ll be coached through the basics of coding through fun tasks, like lighting up certain parts of the rocket, which start easy and get progressively more challenging as young coders develop their skills. Code Rocket uses C++, a common coding language in the engineering world, so it’s a great introductory tool, Moore says. (Let’s Start Coding, $44.99)

(WordStruct)
WordStruct is an engineer’s version of Scrabble. This word-building game comes with 100 letter tiles that players can arrange together to spell out words, but in a 3-D structure. The goal is for players to score the highest number of points by building the most complex crosswords they possibly can. Words can be arranged horizontally, vertically and diagonally, creating an extra level of complexity. This game promotes innovative thinking, spatial reasoning skills and perseverance as players are challenged to think both critically and creatively. (WordStruct, $24.99)
Best Overall STEM Toy
youtube
Gravitrax takes the beloved marble run to a new level. It comes with more than 150 pieces that include obstacles like trampolines, bridges, tiles and ziplines, allowing players to build elaborate routes for their marbles to roll down. Kids have the option to follow the layouts that come with the game or design their own. Players will engage spatial reasoning, trouble-shooting, and critical and creative thinking skills in a game that’s fun for adults too. Plus, Moore says this game encompasses several of the engineering skills that she looks for in a good toy, in that “it allows children to explore both through creating their own designs and following maps that have been made [to follow].” (Ravensburger, $129.99)
Having trouble seeing our list of STEM toys? Turn off your ad blocker and you’ll be all set.
By buying a product through these links, Smithsonian magazine may earn a commission. 100 percent of our proceeds go to supporting the Smithsonian Institution.
#Nature
5 notes
·
View notes
Text
Introduction to the Railbike Blog
Welcome and thank you for visiting the Railbike Blog, a place that I intend to develop as the premier resource for railbiking in North America. Over the coming months, not only will I write reviews of each of the excursions currently on offer, I’ll also explore the people, politics and technology that have shaped modern railbiking.
What is railbiking? While I offer a more specific definition below, it is exactly as it sounds: pedal-powered vehicles used on railroad tracks.

In the past two years, I’ve pedalled 8 routes and count another 8 across the continent to pedal this year. Please let me know if there are any excursions I’ve missed and should add. Also, if anyone knows of a legal opportunity to ride a bicycle fit with an outrigger for rail travel (photo above right), please let me know. Here is the list of North American routes to the best of my knowledge.
Previously Pedalled:
Rail Explorers Rhode Island Division: The Northern Ramble and the Southern Circuit
Rail Explorers Las Vegas Division: The Southwest Ramble
Rail Explorers Catskills Division (NY): The River Run
Rail Explorers Adirondack Division (NY): Saranac Lake to Lake Clear and “Into the Wild” from Tupper Lake to Lake Clear (neither currently on offer)
Rail Explorers Delaware Division: Brandywine Valley (not currently on offer)
Revolution Rail Co: North Creek, NY
Planned to Pedal:
Railriders (WA): North Pend Oreille Valley Lions Club
Railriders Joseph Branch (OR): Joseph to Enterprise and Minam to Wallowa
Oregon Coast Railriders (OR): Bay City to Tillamook and Wheeler
Vance Creek Railriders (WA): Camp 1 to Shelton
Adirondack Scenic Railbike Adventures (NY): Round trip Thendara to Carter Station
Belfast and Moosehead Lake RailCyclers (ME)
Please read below for my working definition of modern railbikes, along with a brief history of the concept. In coming posts, I’ll offer more detail on how the current vehicles and routes came to be. I look forward to sharing this with you.
Definition
For the purposes of this blog, a Railbike is a non-motorized, pedal-powered rail vehicle used for inspection and maintenance-of-way or for recreation on railroad lines. Railbikes are distinguished from motorized draisines in that they are pedal-powered in the manner of bicycles. For the same reason, they are further distinguished from handcars, velocipede handcars, and hand-powered draisines (NB, European systems tend not to use this distinction and use the generic term draisine universally). While initially used for track inspection and light transport of rail materials, typical modern examples are for recreational tourist excursions. Most modern railbikes run on disused railroads or on shared track with tourist railroads, although this does not preclude railbikes from operating on purpose-built tracks.

(The author on a Rail Explorers tandem railbike during the “Into the Wild” excursion in October of 2016, Tupper Lake - Lake Clear, Adirondacks, NY)
A Brief History
Unsurprisingly, the evolution of the railbike is tied closely to the evolution of both the railroad and the bicycle. Given the need for a lightweight rail inspection vehicle, light enough to be easily removed from tracks to clear the way for oncoming trains or to reverse direction of travel, the inventors Perry and Aspinwall patented the original three-wheeled velocipede hand-car, which was later improved and mass-produced by the George S. Sheffield Company of Three Rivers, Michigan, US in 1883 [1] [2].

(Advert for Geo S. Sheffield's early three-wheeled handcar, 1883 [4])
Following the introduction of the chain-driven bicycle in the late 1860s, which was mass-produced starting in 1885 by British inventor John Kemp Starley as the Rover Safety Bicycle, Charles N. Teetor of Hagerstown, Indiana, US, patented a four-wheeled pedal-powered railbike called the Railway Velocipede, one of the earliest examples of a pedal-powered railway vehicle [3]. A side-by-side tandem version with passenger seating was produced by Orenstein & Koppel of Berlin, Germany six years earlier [4].
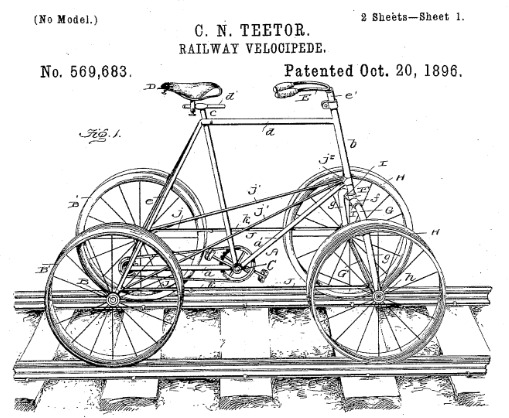
(Sketch of Teetor's pedal-powered, chain-driven Railway Velocipede from the original 1895 patent [3])
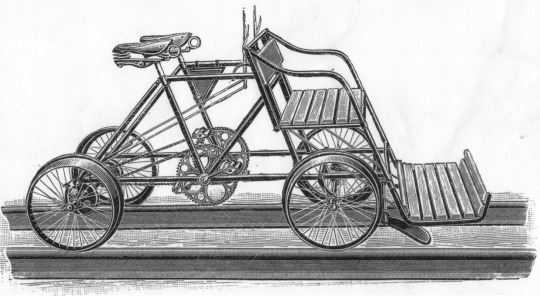
(Orenstein & Koppel side-by-side tandem with passenger seating, c.1890 [4])
Following Dunlop's 1887 invention of the pneumatic bicycle tyre and subsequent mounting improvements by Michelin in 1891, the Sears and Roebucks Catalog offered the "Harris 20th Century Railroad Attachment" in 1908. The catalog described the attachment as transforming "the ordinary bicycle into the most practical and durable device obtaining high speed on railroad tracks, making a regular railroad velocipede out of an ordinary bicycle...this attachment has become very popular with railroad and telegraph employees, both male and female" [1] [4]

(Harris 20th Century Railroad Attachment as seen in the Sears and Roebuck catalog, 1905 [1])
Abandonment Creates Room for Recreational Railbikes
The 20th-century trend toward the use of private automobiles, buses and airplanes decreased the use of trains in many countries [5]. Large-scale abandonment of railroads followed the Beeching cuts in the UK in 1963 and the Railroad Revitalization and Regulatory Reform Act in the US 1976, the latter leaving almost 35,000 miles (56,000 km) of disused track [1]. By the mid-1970s, the magazine Popular Mechanics advertised conversion kits for using standard bicycles on abandoned railroads available from the American Railbike Association [6]. Thus, the abandoned railroads created a space for a new form of leisure.

(Advert for conversion kit, Popular Mechanics, February, 1976)
References
Melin, B., Railbike: Cycling on Abandoned Railroads, Balboa Publishing, San Anselmo, CA, 1996
US Patent RE10303 E, Handcar, https://www.google.com/patents/USRE10303
US Patent 569683 A, Railway Velocipede, https://patents.google.com/patent/US569683A/
Thomas, J., Historic Builders of Velocipedes and Other Hand Powered Vehicles, http://velocipedes.blazerweb.co.uk/newsletters/Newsletter19b.pdf
Gallamore, Robert E. and Meyer, John R., American Railroads: Decline and Renaissance in the Twentieth Century, Harvard University Press, 2014
Popular Mechanics, It's New Now: Riding the Rails-Bicycle Style, February, 1976, p 87, https://books.google.com/books?id=B-IDAAAAMBAJ&printsec=frontcover&source=gbs_ge_summary_r&cad=0#v=onepage&q&f=false
#railbike#railbikes#railbikeblog#railexplorers#revolutionrail#railriders#adirondackscenicrailbikeadventures#railcyclers
8 notes
·
View notes
Text
Ampkit setups

#Ampkit setups install#
With hundreds of full-color photographs and illustrations, these instructions make this an easy, fun and rewarding project-even for first-time builders.
We created easy step-by-step instructions for each amp kit, breaking down every task into clear, bite-sized pieces.
12" Jensen speaker – just like the ones used in the originals.
Authentic fiber eyelet boards just like the ones used in the original vintage amps.
High-quality period-authentic resistors, CTS pots, Orange Drop caps, and Switchcraft jacks for their authentic tone and a lifetime of trouble-free use.
Top-shelf 6V6, 12AX7, 12AY7, 5Y3 tubes and vintage spec transformers to give your amp the perfect vintage tone.
Superior craftsmanship on the tweed covered exteriors with perfectly aligned seams.
The cabinet interiors are genuine 3/4" North American Pine ( not plywood), just like the ones made in the Fullerton factory in the 1950s.
It comes with all the parts you need to complete this project in just a few evenings. The '59 Tweed is a perfect place to start. We've gone to great lengths to make this kit something a complete beginner can tackle. If building such an iconic classic sounds hard, don't worry. This is one of our Icon Kits: loving reproductions of vintage classics. StewMac has lovingly recreated this timeless amplifier in our '59 Tweed 15W Amp Kit. From the hint of crunch you hear on the opening note of "My My, Hey Hey", to the warm overdrive in "Powderfinger" and finally the gritty dirt in "Hey Hey, My My" you will see exactly what this little tweed amp is capable of … goosebumps. Just listen to Neil Young's Rust Never Sleeps. but at the end of the day whether it was a happy accident or pure genius, this amp is one of the finest examples of vintage tone available anywhere, at any price. Why do the controls on the channel you're NOT using make your tone so great? Some say it's caused by defects in the circuit design, others dive deep into the nuances of the engineering. AmpKit Power Pack 9.99 D-Delay Pedal 2.99 AmpKit Unlock All Gear 19.99 AmpKit Unlock All Gear 49.99 American Acoustic Amp 2.99 Ensembly Pedal 2.99 AmpKit Clean & Classic Pack 19.99 American Bass King Amp 2.99 Peavey 6505+ Amp 3. With mysteriously fat saturated tone, this little monster makes it easy to achieve seismic distortion. The dirty little devil that shaped guitar history
View All WOODSTAX - Shop Tonewood by the Piece.
Posted in Amp Modeling, iPhone, Music Software, Web Sites. Besides the setup file you can also attach sound samples uploaded to SoundCloud and register you profile. Setups are really easy to share, you can export them right out of the app and send them by email or just copy the file.
View All All Hardware + Parts by Instrument There’s a site devoted to AmpKit setups.
Failure Diagnosis (no output, no power LED, etc.
First and Last Name with complete Shipping Address.
Please call us during normal business hours at 1-80 (option #1) and be prepared with the following information: Use our RFTECH:Knowledge Base for troubleshooting assistance. Many products we receive are sent back with No Trouble Found, usually due to incorrect installation. Prior to requesting an RA, try to diagnose the failure. Boom!™ is a Trademark of Harley-Davidson USA, Inc. AmpKit+ transforms your iPad, iPhone, or iPod touch into a powerful guitar amp & effects studio The paid AmpKit+ app includes 4 amps and matching cabinets, 10 pedals and 8 mics at less than half price. Harley-Davidson®, Road King®, Road Glide®, Street Glide®, Tri Glide®, and Freewheeler® are Registered Trademark of Harley-Davidson USA, Inc. Factory equipped with "Harley-Davidson Audio Powered by Rockford Fosgate" 3-way speakers and saddlebag amplifier. Factory equipped with "Harley-Davidson Audio Powered by Rockford Fosgate" 2-way speakers and saddlebag amplifier. Motorcycle has storage pocket in lieu of infotainment unit.
#Ampkit setups install#
Contact technical support for suggested harness brace.ĥ Tour-Pak® must be detached in order to install and remove subwoofer enclosures. Indicates nomenclature used on some early models and later inherited.ġ Factory Radio from Harley-Davidson® must be flashed.Ģ H-D® Power Lock for touring luggage not compatible with 6x9" bag-lid kit.ģ Saddlebags must be factory Harley-Davidson® ABS plastic to insure proper fitment with bag-lid and subwoofer kits.įiberglass saddlebags and bag-lids not compatible.Ĥ Stretched Saddlebags not optimized for kits with subwoofers. MODELĮlectra Glide® Ultra Classic® Twin-CooledĮlectra Glide® Ultra Classic® Low Twin-Cooled The HD14U-STG2 is better equipped for these models. The HD14-STG2, HD14-STG3 or HD14-STG5 are better equipped for these models. NOT AVAILABLE Model not produced this year If your motorcycle is not listed below, it is not compatible. Kit only compatible with standard sized Harley-Davidson® ABS plastic saddlebags and lids.
0 notes
Text

BUKI Junior Electric Circuit Builder Kit - 14 Models & 110 Pieces, Age 8+ | eBay https://rover.ebay.com/rover/1/711-53200-19255-0/l?mpre=https%3A%2F%2Fwww.ebay.com%2Fitm%2F204747321037&utm_source=dlvr.it&utm_medium=tumblr
0 notes
Text
Circuit Scribe Drone Builder Kit for Kids | Build Your Own Drone with Camera | With Conductive Ink Pen, Motors, Propellers, Free iOS/Android Controller App, Battery-Operated Drone Hub
Circuit Scribe Drone Builder Kit for Kids | Build Your Own Drone with Camera | With Conductive Ink Pen, Motors, Propellers, Free iOS/Android Controller App, Battery-Operated Drone Hub
Price: (as of – Details) Product Description Build and fly your own drone with easy assembly and clear instructions. No soldering required. 1) Sketch – Draw your circuits onto the arms using Circuit Scribe pens 2) Snap – Easily snap the drone hub and motors into place 3) Soar – Download free mobile app and soar! Power your cardboard arms with conductive silver Ink, and connect your drone’s hub…

View On WordPress
0 notes