#cleangeeks
Explore tagged Tumblr posts
Visit Tumblr Blog
Explore Tumblr blogs with no restrictions, modern design and the best experience.
Last Seen Tumblr Blogs


Fun Fact
Tumblr Inc. has $15.1M in annual revenue.
Photo

We're selling our excess Gameboy cases. Kira heard that models help products sell and volunteered. I think it will work.
3 notes
·
View notes
Text
Maccleanse software

#MACCLEANSE SOFTWARE SOFTWARE#
In fact the entire clean up is done in mere 3 steps which is hardly to be found with any other tools available on internet. You can uninstall apps and at the same time optimize or manage the system add-ons and extensions along with performance and CPU usage, etc. It uses RAW algorithm which helps in deep scanning. There are many features built in it, such as remove duplicate files, junk files, large files, etc. Unlike every other Mac cleaning apps, it has got a stronghold of perfection which makes it more preferable than any everything else. When it comes to cleaning up the junk files, removing duplicated files, and optimizing the Mac to deliver speedy performance, " CleanGeeker" can be a pretty good bet in optimizing macOS. So if you wish to explore a best free Mac cleaner app, then you have to continue with your reading down the lane.īest Free Mac Cleaner #1: TunesBro CleanGeeker
#MACCLEANSE SOFTWARE SOFTWARE#
However, the Mac cleaner software can do the same job in an instant without much hassle. Searching for large sized files, faulty files, app cache, duplicated items manually one after another would take all your day, thus this attempt is of no use when you want the result in a minute. And this is exactly where Mac cleaning software is required at their utmost. Now deciding as to what to discard from your storage to avail some space for necessary components is quite a challenging task. Now riveting the locus of discussion to Mac computers, you would face the same consequential aspects here also. No matter which operating system you are using currently, but if you use it recklessly without taking into note of the storage capacity, at one point of time you are bound to run of your space.
0 notes
Text
CleanGeeker for Mac
CleanGeeker for Mac can clean up junk files on Mac and act as the best Mac uninstaller while removing the corresponding files. Get your computer’s speed and performance improved with CleanGeeker for Mac.
https://bestmacuninstaller.com/cleangeeker-for-mac/
1 note
·
View note
Text
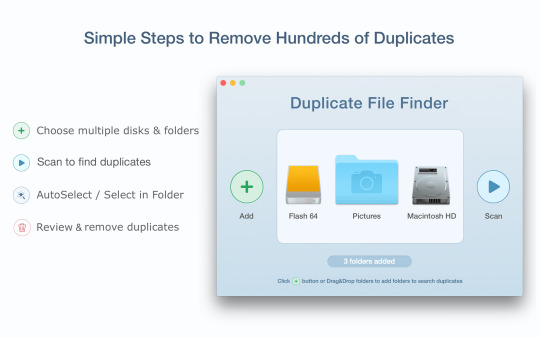
Find Duplicate For Mac

Many are free, including Duplicate File Finder Remover and Duplicates Cleaner. You could also try the Find Duplicates feature of Parallels Toolbox, which offers a free trial. Using Smart Folders to Find and Delete Duplicate Files on Mac. Finding all duplicate files that are occupying your space is rather simple. If you want the process to be easy, then follow the steps outlined: Go to your Mac’s desktop and under the menu bar, click on File. A drop-down menu will appear. Select New Smart Folder from the list of. Finding duplicate files on your Mac can be tedious without great apps. That's likely why your memory is filled with duplicate files. It's also why most of us don't bother finding the duplicates to delete! Gemini and Disk Drill making finding duplicate files really simple. Both have awesome features, and make finding and deleting duplicate files. Fortunately, for MAC users, iMyMac Mac Cleaner’s Duplicate Finder can be the best duplicate photo finder Mac 2020 that be used to find duplicate or similar images on your Mac and free up your much-needed storage space. This best duplicate file finder for Mac only takes a few clicks to go through the entire process. Easy Duplicate Finder (Mac & Windows) Another great duplicate finder for Mac and Windows could be considered is Easy Duplicate Finder. Easy Duplicate Finder is a powerful duplicate file finder that can help you find specified types of duplicate files by using different scan modes, and with very easy steps.
How to get rid of duplicate photos on a Mac? Duplicate photos have a way of creeping into your Mac without being aware of. It could happen because of multiple downloads of the same photos, while importing from an external storageor even when syncing iPhone to your Mac computer. Regardless of how these duplicates were created in the first place, they can take up a lot of space over time. There are several ways to remove duplicates on a Mac, such as doing it manually, using command line executions or installing special software for the purpose. Here, we outline three different ways in which you can delete duplicate photos on your Mac.
Part 1. How to Manually Find and Delete Duplicate Photos on Mac
The manual deletion method is obviously the most time-consuming, but it will allow you to go through your photos and visually check whether or not they're actually duplicates or simply two different images of the same object taken one after the other. How do you manually check for and delete duplicate photos? Here's the process to follow:
Step 1. Open a Finder window and navigate to Users >(Username) >Pictures or Photos Library. This is your first stop because images will be stored here by default.
Step 2. Sort the files by 'Name', and select the viewing option that allows you to preview the file.
Step 3. Select all duplicate photos, and then right-click and 'Move to Trash'. You will also need to go to the 'Recently Deleted Files' section in Finder and empty everything after you've deleted the photos you need to.
Step 4. Repeat Steps 1 to 3 in other folders where images may be saved, such as the Downloads folder or your Desktop.
This is obviously labor-intensive, so you may want to set aside a few hours over the weekend for this task. That's one reason most Mac users don't bother with deleting duplicates, because it can easily consume an entire day if you've got tons of images and you haven't done any housekeeping on them in a while. The second option is much faster and more user friendly.
Part 2: How to Find and Remove Duplicate Photos on Mac in a Minute
TunesBro is a highly respected app development company with several device management products to its credit. The CleanGeeker app contains powerful algorithms to help you instantly scan and identify duplicate photos as wellas other redundant copies. It even quarantines potentially harmful files, while keeping your system files intact, unlike other optimization software for Mac computers.
True to its name, CleanGeeker comes with a clean interface and can help you clean up your computer in minutes. The built-in AI searching algorithms can quickly find duplicates no matter where in your computer they're hiding. The best part is that, once deleted, these files are no longer recoverable because they no longer reside in the memory. That means a lot of space can be freed by using this robust application.

Highlights of TunesBro CleanGeeker
Locate all duplicate files on Mac in a minute.
Save GBs of free storage by cleaning up the junks and caches.
Unarchive compressed files from various formats, such as ZIP, RAR, GZIP, TAR.
Destroy sensive data on Mac without zero possibility for recovery.
Step 1Prepareation
Please first d ownload TunesBro CleanGeeker DMG file and install it on your Mac. Then open the app and you will find several options on the lefe sidebar.
Step 2Scan Duplicate Photos on Mac
From the home page, click on the 'Duplicate Clean' tab on the left-side panel. Once your computer has been deeply scanned, the software will display all duplicate content, nearly organized by type. Selecting a particular folder will cause all the duplicates in that location to be automatically selected, with the original one being unchecked. If you're only deleting duplicate image files, select the appropriate folder.
Step 3Start to Delete Duplciate Photos on Mac
Once you review all the duplicates and check or uncheck the boxes as required, you may click on 'Delete', which will remove all selected files. These files are deleted for good, meaning they can't be recovered even with a powerful data recovery software.
As you can see, CleanGeeker has remove all duplicate photos and other files you need in just one click. It's the best time to start an in-depth cleanup on your Mac with ultra ease.
Part 3. How to Get Rid of Duplicate Photos on My Mac via Commands
In Mac, the command line interface is called Terminal. You can access the app by going into Applications >Utilities. This method is a little faster because the command helps make a list of potential duplicates, but you have to go into those specific locations to delete the files. Here's how you can do it:
Step 1. Open a Terminal window using the process mentioned in the previous paragraph. You can also search for it by opening Spotlight (Command + Spacebar), searching there and clicking on the appropriate result.
Step 2. In the Terminal interface, use the cd command to navigate to a specific location. For example, cd ~/Pictures will take you to the Pictures folder.
Step 3. Here, type in the command below, followed by the Enter key: Find . -size 20 ! -type d -exec cksum () ; | sort | tee /tmp/f.tmp | cut -f 1,2 -d ‘ ‘ | uniq -d | grep -hif – /tmp/f.tmp > duplicates.txt
Step 3. The purpose of this command is to find all duplicate files (including photos) and create a .txt file containing a list of these files.
Step 4. Now, go to Finder and search for these specific files mentioned in the .txt file, and move them to trash. You can then empty the trash once you've finished the clean-up job.

Although this removes the step of manually finding duplicate photos and other files, it doesn't automate the deletion process. In addition, it requires a double-deletion sequence to first move to trash and then empty the trash.
Wrapping up
If you want to save time and avoid the hassle of command line work, or if you are unfamiliar with using Terminal commands, then what you need is a purpose-built software such as CleanGeeker that can easily remove the duplicates for you.
The best part about CleanGeeker is the convenience that it offers the user. No fussing with complex settings or potentially risky command line work, no confusing interface, visually appealing layout and convenient selection/deselection of files to be deleted - all these features make it one of the top Mac optimization software utilities you can find.

Oct 12, 2018 15:31:43 / Posted by Candie Kates to Mac Solution
Related Articles & Tips
While most Macs have a decent amount of storage space, it’s not unlimited. So, you have to be smart about what you’re saving. And duplicate files are only a waste of space. But finding and deleting those duplicates requires an extreme amount of patience or an app that will find those duplicates for you.
Keep reading and you’ll learn how to clean your Mac of duplicates both with an app and manually. The methods you’ll be reading about include:
Duplicate file finder app
Terminal commands
Smart folders in Finder
Why is my Mac duplicating files?
There are a ton of reasons your Mac could be loaded with duplicate files. Maybe you’ve imported the same photos from your camera multiple times and didn’t realize it. Or you couldn’t find a file you were sent, so you just re-downloaded it. Duplicates are a normal part of using a computer, which is why you should regularly check and clean your Mac for duplicate files.
How to find duplicate files on Mac
Over time your Mac is going to fill up and run out of storage space. And most likely, duplicates that take up a good amount of your valuable space. Sure, you can try to sort through all of your files, searching for those duplicate documents, photos, and music files. But if your hard drive is already full, that means you’ve got a lot of files to sift through. And it’s going to take you a very long time to go through them one-by-one.
1. Delete duplicate files with Gemini 2
There are a ton of duplicate finder tools out there, but we’ll take Gemini 2 as an example, because we’re 100% sure it works. Once you have Gemini 2 downloaded and installed, just follow these steps to scan all of the folders on your Mac:
Download, install and open Gemini 2.
Click the + > Choose Customer Folder...
Then, select your hard drive. Unless you’ve renamed it, it’s called Macintosh HD.
Click Scan for Duplicates.
When the scan is over (which doesn’t take long), you get two options: Review Results and Smart Cleanup.
Smart Cleanup means you’ll automatically delete all of the files Gemini 2 thinks are duplicates, leaving the originals in place. While Review Results will allow you to do exactly what it suggests. You’ll be able to see all of your files and select which ones you want to delete.
That’s pretty much all there is to it. Gemini 2 will delete duplicate files in your Photos, Downloads, Mail Downloads, iTunes, and all the other locations on your disk. It’s by far, the easiest and fastest way to find and delete all of the duplicates on your Mac.
2. Find duplicate files with a Terminal
Before you jump into Terminal headfirst, you should only do it if you're comfortable and know your way around Terminal. It’s a powerful tool that can mess up a lot if you don’t know what you’re doing. We’ve tested the steps below and nothing bad happened, but you should still be careful and double check everything you type into the command line.
So, here’s how you search for duplicate files with Terminal:
In Finder, go to Applications > Utilities > Terminal to open it.
Navigate to the folder you want to scan with the cd command. For example, if you want to scan Downloads, type in cd ~/Downloads and hit Enter.
Copy and paste this command:
find . -size 20 ! -type d -exec cksum () ; | sort | tee /tmp/f.tmp | cut -f 1,2 -d ‘ ‘ | uniq -d | grep -hif – /tmp/f.tmp > duplicates.txt and hit Enter.
This will create a text file in the folder you’ve specified, with a list of your duplicates inside. But, there are two things you should keep in mind:
This terminal command overlooks a lot of duplicates.
You’ll still need to locate those duplicate files and sift through them to separate the copies from the originals.
So, this command is more like a crystal ball: it gives you hints, but you still have to go and do the sorting and deleting manually. Which brings us to another option, that will do a little more of the work for you.
Sometimes files won’t be flagged as duplicates because they have slightly different file names. But every file has what’s called an md5 hash, which is a unique identifier that stays with the file. So even if you move or rename a file, it’s md5 hash will remain the same.
Similar to the Terminal command above, you can generate a list that shows the md5 tag to verify all of the duplicates in a particular folder. Follow the steps below to create that list.
Open Terminal from the Utilities folder.
For this example, we’ll scan the Documents folder. Type into the Terminal window: ~/Documents.
Copy and paste this code: find ./ -type f -exec md5 () ; | awk -F '=' '(print $2 't' $1)' | sort | tee duplicates.txt and then hit enter.
Then, open a Finder window and navigate to your Documents folder.
Open the Documents.txt file.
This generates a list of all of the files in the folder you’ve specified, but you’ll at least be able to see the md5 tags to know which files are copies of each other.
3. Find duplicate files on Mac using Smart folders
The truth is duplicate files can live anywhere on your hard drive, which makes finding them that much trickier. But thanks to a feature in Finder called Smart Folders, you can narrow your search down based on specific criteria. Say you want to search all of the documents on your Mac, then you’d follow these steps:
In a new Finder window, click File > New Smart Folder and make sure This Mac is selected.
In the top-right corner, click +.
From the first drop-down menu, select Kind and in the second drop-down, choose Documents. Then, click Save.
A pop-up window will come up, letting you name the folder and choose where to save the Smart Folder.
From there, you can see all of your documents. Click to order the files by either name, size, or date created to help you quickly spot duplicates.
Select the files you want to delete.
Right-click (or hold down Command and click) and then click Move to Trash.
How to locate duplicate files using Smart Folders
While using Smart Folders is a lot faster than hunting through your entire hard drive for duplicate files, it still requires a bit of patience. Manually going through each of your files one-by-one can take some time, even after you’ve narrowed them down.
4. Find duplicate pictures in your Photos library
You move a bunch of new photos onto your Mac, import them into Photos, and start sorting them out. What you probably don’t know is that all of those pics now exist in two copies: one in the initial folder (say, Documents), and one in Home > Pictures > Photos Library. So, the best thing to do is to use the import features in either iPhoto or Photos.
Now, how do you find these duplicate photos and get rid of them? Depends on how much you rely on Photos for viewing and organizing your pics. If you never liked the app anyway and have backups of all pics in other folders, just go ahead and empty the Photos library. Remember two things here, though:
Delete your pics in Photos only when you’re 100% sure you have copies of them in another folder.
When you delete duplicate files in Photos, they are not removed — just moved to a Recently Deleted folder. Meaning they’re still taking up storage space. So, don’t forget to empty your Recently Deleted folder too.
Find similar photos in Photos
If you are using Photos to store and organize your pictures, keep in mind that it only displays files stored in Home > Pictures > Photos Library. So, if your pics are duplicated, you’ll have to remove the copies that are stored elsewhere. Here’s how you can find them:
In Photos, open the Photos tab to see all your pics sorted by date.
In Finder, open All My Files to view all your pics in bulk, not in a dozen individual folders.
Sort the files by Date Created, so that your pics in Finder are listed more or less in the order they’re listed in Photos.
Now comes the tedious part. Take a group of pics in Photos, created within the same day — say, April 17, 2015. Go to Finder, spot the 2015 section, and find that identical group of pics (they will be located together, so you just need to look carefully).
Repeat step 4 for all the pictures you have in your Photos library. That way, you’ll find and remove the duplicate photos that are stored in other locations, and keep only the pics in your Photos library.
You’ll quickly see how long it will take you to find and delete your photos manually. But if you used an app like Gemini 2, it can do most of the heavy lifting for you. Plus, you’re able to review all of the duplicates Gemini finds or just delete them all with one click. The best part is you can download Gemini 2 for free and see how it works.
5. How to find duplicates in Mail Downloads
Here’s a common scenario: a colleague emails you a document, and you open the attachment in Mail to take a look at it. You’re going to need this file, so you download it onto your Mac for safe keeping. No duplicates, nothing to talk about here. Right?
Not exactly. See, the Mail app has quietly downloaded this attachment the moment you opened it, and stashed it in its very own downloads folder. So, now you have two copies of the same file on your Mac.
The Mail Downloads folder is not particularly easy to find. You really have to know where to look to get to it. Follow these steps to access it:
Open Finder.
In the Menu bar, click Go > Go to Folder��
Type this address:
~/Library/Containers/com.apple.mail/Data/Library/Mail Downloads and hit Go.
This will open a new Finder window where all of your Mail attachments live. The good news here is that there’s nothing to compare or sort. These files are automatically downloaded to make it faster to open the next time you need them. But all the attachments still live on your email server and can be re-downloaded at any time. Meaning, if there’s nothing you would miss, you could empty this entire folder.
How to find duplicate files in specific folders
You can also use Smart Folders to look for duplicates within specific folders. This is particularly helpful in instances when you have multiple folders in a folder. To set up a Smart Folder that searches a specific folder:
Go to the folder you want to search in Finder and click File > New Smart Folder.
In the Search bar at the top of the window, click the folder name.
Click + in the top-right corner.
Set your other search criteria and click Save.
Then, name your Smart Folder and choose where to save it.
Organize your files by name, size, or date created to help you see the duplicates.
Select the files you want to delete and drag them to your Trash.
Find Duplicate Mac Photos
How to find duplicates of specific file types
Because you set the search criteria with each Smart Folder, that means you can search for specific types of files or files of a certain size. To create a Smart Folder for a certain type of file, like pictures, you can open a new Finder window and follow these steps:
Click File > New Smart Folder.
Then, in the top-right corner, click +.
From the first drop-down menu, select Kind.
Choose Image from the second drop-down.
Click Save.
Then, give your Smart Folder a name and choose where you want to save it.
After it’s saved, you can select the duplicate files, right-click or command-click, and click Move to Trash.
How to find duplicates by file sizes
If you want to only search for files by their size, which is particularly helpful to get rid of larger duplicates, do the following:
Open a Finder window.
In the top right, click +.
Click on the first drop-down to choose File Size. If you don’t see it, click Other… and then search for size, to add it to the menu.
Set your file size criteria.
Then you can click Save, name your folder and choose where it’s saved.
Once your Smart Folder is created, you can select the duplicates, right-click or command-click, and then click Move to Trash.
While Smart Folders are extremely helpful in finding and deleting duplicates on your Mac, it still requires you do a lot of it manually. Which leaves room for error and not to mention how much time it will take you to remove files one at a time.
The alternative to deleting duplicates manually is to use an app Gemini 2. It quickly scans your entire hard drive or individual folders, presenting you with the duplicate files to review. Or you can even choose to use the Smart Cleanup feature, which will automatically delete duplicates and leave the original files in their place.
Mac Duplicates Finder
Hopefully, this article helps you clean up your Mac and remove those sneaky duplicate files that are eating up all of your storage space.
0 notes
Text
How To Force Kill An App In Mac

To quit (close) a Mac app normally, choose Quit from the app's menu in the menu bar, or press Command (⌘)-Q. If the app doesn't quit, follow these steps to force the app to quit.
Force Kill App On Mac
How To Force Kill An App In Mac Catalina
Occasionally in Mac OS X, it may be necessary to force a program or process to quit. For example, if a particular program fails to respond or unexpectedly hangs. Every application on a Mac comprises of one or more processes. It’s usually possible to use the Force Quit command (⌘⌥ esc) in the Apple Menu, but. Aug 26, 2020 All you have to do is press Command+Option+Escape+Shift to force quite all the apps running on the Mac. You have to hold the keys for few seconds and all the apps that are not responding on your Mac will be closed. Be careful: Please take a note that all the apps which are running might get closed.
Step 3: Select the app which you want to close and click on the force quit option. 5) Using Kill Command. You can also close any app through the command line; it is a complicated method compared to others. To close the app, you should know the process id then only you can close the app. Find the app that you want to force close in the Dock on your Mac. Once you’ve found the app, hold down the Option key on your keyboard, right-click on the app in the Dock, and click on the option that says Force Quit. The Dock will force close the selected app on your Mac. Apr 25, 2020 How to Force Quit Apps on Mac Force Quit Apps From the Activity Monitor. Similar to a task manager on Windows, macOS has Activity Monitor to let you. Close Apps from the Force Quit Window. This is a must-have for every Mac user. From any screen, you can simply use. Force Quit Apps from the. When an application hangs on your Mac, sometimes the quickest fix is to force the application to quit. In most cases, this will free the system and allow you to re-launch the program to get on with your work. There are three main ways to force-quit a program in OS X.
How to force an app to quit
Press these three keys together: Option, Command, and Esc (Escape). Or choose Force Quit from the Apple menu in the upper-left corner of your screen. (This is similar to pressing Control-Alt-Delete on a PC.)
Then select the app in the Force Quit window and click Force Quit.
You can even force the Finder to quit, if it stops responding: Select Finder in the Force Quit window, then click Relaunch.
Learn more
How to force an app to close on your iPhone, iPad, or iPod touch.
Installing a software or app is extremely easy and so does uninstalling the software when you don't need them anymore? Many times, for some unknown reason, a Mac system denies to remove some data. If this is happening with you then the first thing you could try is to restart the computer and then try to remove it again, but still failed! Then what should you do?
On the other hand, there are many stubborn software that won't get uninstalled whatsoever. You will continuously get errors, warning and unknown issues when uninstalling them. These are usually infected with viruses or the developers don't intend to let you uninstall them. This could be really very intimidating especially when they are slowing down your computer. In this article, we will show you few simple tricks to remove unwanted apps or softwares that won't delete on Mac.
Part 1. How to Delete Apps in the Finder on Mac Manually (the Hard Way)
Unlike Windows computers, Mac works a little distinctly. All the programs and apps are stored in the Application directory. The app and software configuration settings are saved in the Library/Preferences folder and any other additional supporting data are saved in the /Library/Application_Support folder. In order to remove the Apps in Mac, you only have to open the application folder and drag the app to the Bin or Trash Can. This is rather easy if the program is uninstalled simply.
However, if the application still denies to uninstall and stays on the Mac then we need to get another solution below.
Force Kill App On Mac
Delete the Preferences
If you can't delete the app by using the above method then the reason could be that the preferences folder of that app still exists. Let's go and delete that first.
Step 1. Open Finder then click on the Go option from the dropdown menu.
Step 2. When the menu pops down, simple press the Option key and keep holding it.
Step 3. You will now see the Library option right between the Computer and Home options. Click on it and the folder should open.
NOTE The final necessary thing to do after uninstalling a program is to empty the trash can or Bin. Dragging and dropping a software shortcut icon to the Bin will actually do nothing. It is only erasing the shortcut, this won't uninstall the program. It is still laying somewhere in your computer however, if you empty the trash then the application is truly removed.
However, there's also a chance that the software files must have stored in the computer somehow, which happens quite often. So, if you are not able to remove Apps by yourself then it's better to take help from an automatic Mac program remover like CleanGeeker in Part 2..

Part 2: Completely Remove Unwanted Apps that Won't Delete on Mac (Easy Way)
When any app is fishy enough not to get deleted from a Launchpad or Finder then you will have to use some sort of force to delete that. TunesBro CleanGeeker is one of the most powerful Mac app remover that helps to remove any app or software as well as the trace from the Mac without destroying your system. Unlike other App removers, CleanGeeker can deeply scan and remove multiple apps at once, including corresponding files and preferences. It also has other miscellaneous functions as well like cleaning junk files, clearing app caches and finding + deleting duplicate items from the computer like music, documents, pictures, videos, etc. To summarize, CleanGeeker is used to optimize and organize your Mac so that it remains clean and fast as a thunder.
CleanGeeker - Force to Delete Apps on Mac, Easy and Safe!
Locate all the installed apps on your Mac and shows them in a list.
Deeply scan and remove apps along with its remaining files like caches, or junk files.
Force to remove unwanted app that won’t uninstalled, easy and safe! Never destroy your system.
Optimize and improve your Mac’s space and performance.
Step 1Download and Install App Remover Tool on Your Mac
Download the App remover and install it normally on your Mac. Launch the program and enter the license code to activate the software. On the main user interface, you will be able to see multiple options on the screen. Just click on 'Uninstaller' from the mid left sidebar.
How To Force Kill An App In Mac Catalina
Step 2Scan All Apps that Installed On Your Mac
Let the program search all the apps installed in your computer. It may take few minutes.
Step 2 Found and Remove Unwanted Applications on Mac
Once the scanning is done, you should be able to look on all the apps that has been installed in the system. Choose the app that you want to remove and select the 'Delete' button once.
There's no software or apps that cannot be removed with CleanGeeker and that's why it's now a must have tool for everyone. Moreover, it helps to speed up your computer unbelievably fast and run it like it used to when you first bought it.
Part 3: Delete Apps Downloaded from Mac App Store
One of the best alternative to delete any app is by simply deleting it from the sales page from the App Store. Once you have done that, you will no longer be able to download it form there anymore. But, the app will remain active in the iTunes account which is associated with that. So, if you wish to download or update it later from the iTunes then you will be able to do that. But the important thing is: Once you delete any app which you have downloaded from Apple App Store, you won’t be able to recover that app or find the SKU to install it again.
So, if you want to delete any app from App Store without actually removing it then follow these steps –
Step 1. Open the Launchpad from the Dock section. At this point you should be familiar with it if not then just find the Rocket icon.
Step 2. After the Launchpad is opened, it will replace the existing Windows with the apps that are provided by default in alphabetic order. You can obviously do many things using this tool but at this moment we are just erasing the unwanted apps.
Step 3. Just like any iPhone or Android phone, click and hold on the app that you want to delete until it starts dancing. Next, click on the 'X' mark with your mouse or touchscreen.
Step 4. Now, confirm that you want to delete by clicking on the 'Delete' button once and the system will get rid of it instantly.
Done! Keep in mind, that you should not worry about accidentally delete the apps that you want to keep in Mac. You’re allowed to obviously re-install any app that you have deleted before without paying any extra. Simply go to the app store and it’s done.
Oct 15, 2018 15:31:43 / Posted by Candie Kates to Mac Solution
Related Articles & Tips
0 notes
Text
Optimize Mac For Gaming

That’s because game developers optimize their creations for PCs first. Older Mac ports also relied on Wine wrappers, which dramatically limit game performance. So long as you have the disk space to handle the partition, BootCamp is a must-have for Mac gamers. How to Optimize Mac for Gaming. Macs don’t provide the ideal gaming setup.
Optimize Mac For Gaming Laptops
Gaming On A Mac
When you think of a Mac, gaming is not always the first thing that comes to mind. That used to be the realm of PCs, but today's Macs are more powerful and tailed to the needs of gamers. Nonetheless, even if you own an old Mac desktop or laptop, there are ways to optimize it for gaming. This article shows you what you need to do in order to prepare your Mac to handle the heavy graphics and processing power that most new games require.
How to Optimize a Mac for Gaming: Use These Tips! Mac’s are capable of so much. The number one thing on how to optimize a Mac for gaming is to clear space and maintain that storage “wiggle room”. Remember, the less your Mac has to worry about as you play your games, the faster that it will run. Check The Status Of Disk Usage. This is one of the best ways to keep your Mac in good shape as. Upgrade your Graphics Drivers for an immediate FPS boost. Your graphics card is the centerpiece of. Activate the Game Mode. Sometimes, all you need to do is activate the game mode on your device.
Before we describe the three method keep in mind that finding duplicate files is a tricky thing because of different file names, different versions of the same file, different download times and so many more variables. The first method shown below will make your manual search a little easier and a little more fruitful.
Tips 1. Boost Performance by Closing Others App during Gaming
Freeing up RAM is a little trickier because it's a dynamic resource. However, there are a couple of things that can be done.
First, one of the biggest memory drains in your system is the web browser. Some are more insatiable than others, but they're all resource-hungry applications. So are Java and Flash, so make sure that all browsers and their plugins are closed when it's game time.
Also make sure that apps that start at startup aren't running in the background. Essentially, any background non-essential process should go. This can be done: Apple icon (upper left corner) -> Force Quit... Choose the apps to be closed at gaming time.
If you want to stretch it even more, you can also consider disabling some Mac OS X (macOS) features, such as Siri or animation. If you're an amateur gamer the difference will barely be noticeable, but if you have a low-RAM system, it could yield positive results. If you have an older 4GB RAM Mac computer, we would recommend doing a full housekeeping run before you opt to upgrade your hardware for gaming.
Tips 2 : Optimize Mac Running Memory for Gaming
If you have a Mac that's a year old or more, then the first thing to do is cleaning out all the junk that's been collecting over that period of time. A utility like TunesBro CleanGeeker can help with this. CleanGeeker's deep scan capabilities will help you find and remove junk, duplicates, large files you don't use and even apps that aren't relevant to you any more. In addition, it can help optimize your startup items so you have an optimized booting time.
Highlights of TunesBro CleanGeeker
Remove invisible junk anc app caches.
Find and remove duplicates files for making more room.
Clean real-time memory used by other apps.
Turn off apps being opened at the login.
Step 1Download TunesBro CleanGeeker
First, download and install TunesBro CleanGeeker on your Mac. When you launch the app, you'll see several options on the left panel, such as junk, duplicates and large files. You will also see several other utilities that you will need for this Mac optimization exercise. Just follow the steps shown below:
Step 2 Clean up Memory and Uninstall Unwanted Apps
Find 'Memory' option and click 'Deep Scan' at the bottom. You will get the memory boosted in a few seconds. The app shows up how much memory it saved this time.
In the Utilities section, click on 'Uninstaller' and remove any app that you don't use anymore. Most users will have lots of these, and some of them may be utilizing more resources and occupying more memory space than you realize. TunesBro CleanGeeker's Uninstaller will remove every remnant of the apps that are removed, freeing up significant space.
You can also use the 'Optimization' tool to prevent certain apps from launching on startup. It will make your Mac more responsive and boot faster.
Step 3Scan and Delete (Junk/Cache/Large File)
In the main 'Junk' section and click on the Quick Scan button to allow the software to get into your system and identify all the unnecessary files like temp, cache, language files and so on. Review and then delete all the files you don't need.
Tips 3. Upgrade Hardware for Mac (10X Booster)
And this is the next stop. Upgrading your RAM increases compute power by that much more. In the example just shown, upgrading your hardware to 8GB of RAM will increase your Mac's processing to handle all but the most resource-intensive games. You'll still be limited by the graphics card, but shouldn't have problems rendering game content at the required frame rate. If you're going to be doing a lot of gaming, you can even consider an upgrade to 16GB.
You might also consider putting in a SSD because it can handle system tasks and load times better than older hard drives. Of course, there's always overclocking, but that's inadvisable on a MacBook Pro or MacBook Air because of overheating problems. You could probably do it on an iMac, but that might mean replacing the stock fan for one that can cool a lot better. Nonetheless, overclocking will most likely void your warranty, and just not worth doing on a Mac.
Summary
Overall, upgrading RAM, optimizing RAM usage and keeping your Mac clean are probably the three most effective things you can do to prepare your Mac for a life of gaming. Get a tool like CleanGeeker, upgrade your RAM and keep resource-hungry processes closed during your gaming sessions. That's your best bet.
Nov 9, 2018 16:29:07 / Posted by Candie Kates to Mac Solution
Related Articles & Tips
Despite the complexities and limitations, gaming on Mac is fun. Well, you must know that Mac is quite a robust and secure system to handle your gaming speed, configurations and settings provided you know a few tricks.
From making enough space to download and run games to purging inactive memory, running terminal commands to closing all the unnecessary apps, there are various methods by which you optimize Mac for gaming. Moreover, after making all the required software updates, hardcore gamers can also think of upgrading to new hardware such as eGPU or new SSD, but that is optional. So gamers, are you ready to set up your Mac for gaming? Let’s do it!
How To Optimize Mac For Gaming
1. Check The Status Of Disk Usage
This is one of the best ways to keep your Mac in good shape as well as optimize it for gaming. If you go through the details of Mac, you can find startup apps, resource-hogging or unwanted apps or other utilities that keep running in the background without our knowledge.
Status Of Disk Usage:
For this, Disk Inventory X is a free and potential tool that has been running for years and quickly displays the status of disk usage in a textual and visual manner. This step is essential as it will help you understand how much space on your Mac is occupied. So, you will know precisely how much space you need to retrieve to play games seamlessly and get optimum performance.
Although you can also find the disk space of your Mac by clicking Apple icon > About this Mac > Storage, yet the minute details are easily covered by Disk Inventory X and hence recommended.
Clean The Clutter& Optimize Mac For Gaming:
Smart Mac Careis our favorite tool, and we highly recommend this optimization suite to all the gamers. As it keeps Mac healthy by retrieving chunks of space, improving boot time and deleting redundant data like duplicate files, unwanted apps, etc. Its automatic scanning and cleaning not just improves the overall performance of Mac but also can be helpful for Mac games.
You might also be aware of the fact that games may require a lot of gigabytes whether you play it from Steam or download them on your Mac. That’s why it is recommended that atleast 15% of free space or 18GB space is available on your Mac, even after a game is downloaded, for it to function seamlessly. Maintaining it manually can be cumbersome. For it, you must rely on a third-party tool like Smart Mac Care, which can clean your junk files, duplicate, uninstall unwanted apps, which in turn, recovers space and maintains the system health.
2. Disable OS X Features (Notification Center & Dashboard)
The native features are hardly used for everyday purposes, yet they take up the processing power and RAM, hindering the good gaming experience. Thankfully, they can be easily disabled or enabled using Terminal as and when required.
2.1 Disable/Enable Dashboard:
Optimize Mac For Gaming Laptops
To disable, click on Spotlight icon from the menu bar and type ‘terminal’ or go through Applications > Utilities > Terminal.
Enter the command: defaults write com.apple.dashboard mcx-disabled -boolean YES
Next enter: killall Dock
These two commands above will restart the Finder with the dashboard being disabled.
In case you want to enable it again, follow these steps:
To enable; defaults write com.apple.dashboard mcx-disabled -boolean NO
Next enter: killall Dock
2.2 Disable/Enable Notification Center:
To disable: Open terminal once again and enter command: launchctl load -w /System/Library/LaunchAgents/com.apple.notificationcenterui.plist
Next enter: killall NotificationCenter
To enable: Open terminal once again and enter command: launchctl load -w /System/Library/LaunchAgents/com.apple.notificationcenterui.plist
Next open Finder, press Command + Shift + G and copy-paste /System/Library/CoreServices/
Restart your Mac, and you will be able to get back your Notification Center.
As both processes keep running in the background, it is better to keep them disabled and utilize it to get better gaming experience than ever.
3. Stop The Apps From Starting Automatically
Does this happen to you as well that when you log in to the system, various apps start automatically and hog the system resources? Well, if it is happening, you can disable login items and optimize your Mac for gaming.
For this;
Go to click on Apple icon > System Preferences > Users and Groups > Login items. Here, you can select the app that you do not want to pop-up or rather select all of them and click on the ‘-’ sign below.
4. Close All Applications & Menu Bar Apps
Your Mac will inevitably run at a slow speed, and your performance of your games would not be as expected when multiple applications are running behind. Hence, this step is another necessity of the list.
Check your dock and quit all the running applications by right-clicking on them and selecting Quit. Looks like a small process but believe me it’s an effective one!
5. Configure Game Settings
Your games’ in-built settings can be tweaked side by side while you optimize Mac for gaming and learning how to make the gaming experience better. These settings can be different, depending on the game. Hence we will tell you some generalized tips here that will help you with most of them.
Go to Graphics settings from the options and select in between Low, Medium and High to suit your graphics card.
Go to Game settings or Options within and make the screen resolution settings appropriate as per the game requires.
Play the game, and you will be able to decide which settings ideally suit your game.
6. Play In Different Viewed/Windowed Mode
Not many people believe this, but playing games in different modes do help in recognizing the speed and graphics variation of the game. You can always try for both the options, including Windowed mode or full-screen mode one by one.
You can switch between modes by visiting Video or Graphics settings of the game itself. Switch the options and find the most suitable mode as per speed, texts display and transient graphics.
7. Keep Checking Activity Monitor
Activity Monitor is an in-built tool of Mac, which is capable of explaining where and how Mac is using memory, CPU usage, Energy consumption, etc. It can also show you which application is running behind when you are enjoying your favorite games on Mac.
Other than this, you can also keep track of RAM and CPU usage, especially when you hear the fans running at speed while playing games on Mac. If any of the tasks is taking a toll on resources, you can simply choose to end it right from here.
8. Keep Software Up To Date
Now, this seems obvious, but the step helps in maintaining the process of the system as well as optimizing Mac for gaming. Keep visiting the App Store to find any new update on the game as any kind of bug might be slowing down the gaming speed. You can even let Mac update all the gaming or other applications to stay up to date with a simple tweak.

Just go to System Preferences > Applications > Tick mark the ‘Automatically check for updates’.
Also, make sure that you update all software, including OS for the smooth performance of Mac, which, in turn, helps in removing any bugs or glitches as well.
And you are good to go!
9. Run Windows To Play Window-Specific Games
We know that your Windows users’ friends might be telling you the story of cool games that they enjoyed last week, but it is still not available for Mac. Even in this case, you are at luck as Mac lets you install Windows on your system and let you enjoy the same way your friends are.
There are various methods by which you can install Windows on Mac. So, check out how to run Windows on Mac?
EXTRA TIPS
We are sure that you have got all the tips and tricks on how to optimize Mac for gaming. But we have something else for you. All these methods were focused more or less on the internal settings. Yet if you are someone who wants more to enhance your gaming experience on Mac, we have some quick suggestions for you.
Upgrade HDD / SSD
While learning how to optimize Mac for gaming, this trick is good to try! Do not limit yourself to graphics or processors as hard drives play an essential role in letting your game load in no time, boots the system quickly and improves the system tasks.
It is best if you upgrade to SSD if your Mac doesn’t come with one. Learn the working mechanism of SSD and make sure you go for those SSDs which can upgrade in future and optimize Mac for gaming.
Upgrade Your RAM
RAM plays a crucial role for smooth gaming on any system and so on Mac. Explore your Mac with Activity Monitor, and if your system needs better memory, better upgrade it.
Some gamers are comfortable with 4GB of RAM, but some of them require more and upgrade their RAM to 8GB or even 16GB. Which gamer are you? Define and upgrade!
Try External Graphics Processor or eGPU
For this trick and before investing, you need to find if your Mac is compatible with Thunderbolt 3 standard by identifying the port. In addition to the internal video processor, eGPU provides additional performance for professional apps, 3D gaming, VR content and more for the enhanced gaming experience.
A good eGPU is capable of accelerating apps, allows VR headsets to connect and let you charge the MacBook Pro. It surely is a costly affair to invest in a good eGPU, but those gamers who have afforded it already are pretty content with their Mac for gaming sessions.
Additional Tip: Feeling generous, if yes, then check out the new Mac Pro, which comes with robust Xeon processors up to 28 cores, Apple Afterburner, a revolutionary Accelerator Card and more.
We Are Listening!
What do you have to say about all the tips and tricks for optimizing Mac for gaming? Let us know in the comment section below. Also, follow us on Facebook and YouTube for cool tech-updates every day.
Gaming On A Mac
What Do You Think? 6 Responses
0 notes
Photo

Do you have your lucky dice yet!?⠀ Grab one from our lime and cherry scented D20 bath bombs!⠀ #📷 @halkyone9⠀ -⠀ -⠀ -⠀ -⠀ -⠀ ⠀ #bathbomb#bath#soap#soaping#dungeonsanddragons #soapmaking#vegetarian#vegan#crueltyfree#nottestedonanimals#bathandbody#bathtime#relax#bubbles#glitter#sparkles#bathbombaddict#geekyclean#cleangeeks#bathbombs##bathtime#bath#bubblebath#bathbomb#bubbles #relaxing#enjoy#rest (at GeekyClean)
#bathbomb#soap#bathandbody#bathbombs#vegetarian#sparkles#📷#crueltyfree#dungeonsanddragons#geekyclean#soaping#nottestedonanimals#rest#glitter#relax#soapmaking#bubblebath#bubbles#enjoy#bathbombaddict#cleangeeks#vegan#bathtime#bath#relaxing
1 note
·
View note
Text
Mojave Patcher Update

Mojave Patcher Update 10.14.6
Mojave Patcher Software Update
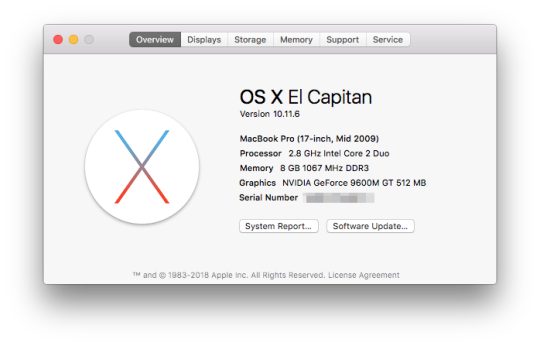
Mojave Patcher Update 10.14.6
This is not a review per se, it is a discussion of the class of software to which this program belongs. As a public service to the MacUpdate community, I've found as many of these 'cleaner' apps on this website as I could and listed them them below. Before you even *think* of installing any of them, PLEASE read this: https://discussions.apple.com/docs/DOC-8841. There are now 74 (that's SEVENTY FOUR) programs in the list, and it seems like new entries in the 'Mac cleaner' market space pop up every day, metastasizing like a cancer. Unfortunately, more is not better. They are all of dubious value. Many have no reviews here. Many have what look to be essentially fake 5-star reviews with no useful commentary. Many -- probably the most accurate and honest -- have negative reviews, by users who have been burned by them. Most of the developers' descriptions boast about what a great job they do, but the truth is, there are no good, comprehensive, head-to-head reviews of these programs by impartial 3rd parties. True experts in macOS maintenance advise against using any of them, because in general they serve little useful purpose and they can easily do more harm than good. Macs simply do not need 'cleaning.' (See for example: https://www.thesafemac.com/the-myth-of-the-dirty-mac/) Some of these programs are notorious for being little more than malware. Many have 'disk' in their name, although disks, especially internal ones, are now a thing of the past. (Although macOS still comes with the storage drive initialized as 'Macintosh HD,' a quaint relic of a bygone era.) You are well-advised to read any program documentation and make a RELIABLE BACKUP before attempting any changes. If I have missed any programs that should be on the list, please leave a comment and let me know. I will rate all these programs with one star, probably one more than they deserve. And I would appreciate comments. If you disagree, please speak up. But if all you can come up with is 5 stars and a sentence or two saying that program X is great and I don't know what I'm talking about, please save your breath. No one here will take you seriously. And I apologize for the almost unreadable formatting, a severe limitation of MacUpdate itself, which compresses maximum text into minimum space, leaving no whitespace for readability. :: BEGIN LIST:: Aooro : AppCleaner & Uninstaller : AutoTrash : Avast Cleanup : AweCleaner : Broom : BuhoCleaner : CCleaner : Clean Disk : CleanGeeker : CleanGenius : Clean Me : CleanMyDrive : CleanMyMac X : Cleaner One Pro : Cocktail : Combo Cleaner : Disk Aid : Disk Analyzer Pro : Disk BoostUp : Disk Clean Pro : Disk Cleaner : Disk Cleaner Pro : Disk Diet : Disk Doctor : Disk Expert : Disk Health : Disk Janitor : DiskKeeper Advanced Cleaner : DiskKeeper Cleaner - Modern : DiskKeeper Pro : Disk Manager: Disk Sensei : Disk Xray : Disk Xray Lite : Doctor Disk Cleaner : FastScanner Pro : Hard Disk Manager : HD Cleaner : iBooster : iCare : iMac Cleaner : MacBooster : Mac Cleaner : MacClean : MacClean360 : MacCleaner Pro : MacCleanse : MacEnizer : MacMaintenance : MacMaster : MacOptimizer : MacTuneUp : Mechanism8 : Mojave Cleaner : More Disk Space : Omni Remover : Power Booster : PowerMyMac : Precious Disk : Pro Disk Cleaner : Quick Cleaner : SubRosaSoft Drive Cleaner : Sensei : Startup Manager : Stellar SpeedUpMac : TrashMe 3 : Washing Machine : WeCleanse : WinZip Mac Optimizer : Wise Mac Care : Wise mCleaner : XustoDisk : Xustomite :: END LIST :: The only system maintenance tools I recommend are 1) TinkerTool System, a true bargain priced at only $14 for a single license. TTS is a an exceptional piece of quality engineering, safe when used properly, and superbly documented, with in-depth tutorials for every option. 2) OnyX, from Titanium Software, has a loyal following and gets good reviews here. 3) I have used Northern Softworks' 'Cache Cleaners' in the past (the latest being 'Big Sur Cache Cleaner,' which I have not used) and their products were always first rate. Still, the same warnings apply. As for the rest, listed above, it is safe to say that nobody who really knows what they're doing with Macs and macOS will touch them. Don't get sucked in by a pretty interface. You may very well regret it. -SB
Avast Cleanup is an optimization tool that detects unnecessary items and performance issues on your Mac, optimizes disk space, and improves the speed of your system. Avast Cleanup Premium is a paid product that requires a subscription to use.
Mojave Patcher Software Update
Nov 02, 2019 Adobe Zii Patcher 4.5.0 has worked excellent without issues with below version. Os x boot. If i update my mac from Mojave to Catalina, will everything work as it is working. Check our recent post for new update zii patcher. Stan says: November 13, 2019 at 6:04 pm. Thanks for the quick fix — 5.0.7 works 🙂. Adobe Zii Patcher 4.5.0 has worked excellent without issues with below version. If i update my mac from Mojave to Catalina, will everything work as it is working. Bootable hackintosh usb high sierra.
0 notes
Text
The Best Way to Remove Malware from Mac Is Here
New Post has been published on https://worldhackernews.com/the-best-way-to-remove-malware-from-mac-is-here-2/
The Best Way to Remove Malware from Mac Is Here
Certain Mac apps being so persistent that they are it is anything but a simple task to remove them via the traditional methods. Regardless of whether done as such, there will dependably be some app remnants that will later stop up the system’s memory and assets regardless of whether one gets rid of the primary program, a few documents are probably going to be conveyed around the hard drives that are almost difficult to track and expel.
Thus, this piece particularly stresses on the means associated with the removal of such applications and their different classifications, why they hold on the user’s system and what ought to be done with the end goal to uninstall them totally.
A well-known participant from the rundown of the undesirable Mac apps is Advanced Mac Cleaner, appropriated through a fake Adobe Flash Player installer which is a variant of Crossrider/OSX Shlayer, basically an adware program. The Advanced Mac Cleaner uses Siri to inform the user in regards to some wrong doing with their Mac along with a configuration profile that the malware installs itself in the user’s Mac.
The expulsion of malware and other undesirable programs from the user’s Mac frequently requires root access, which represents the peril of changing system documents and impairing their computer by and large. Then again, a non-intrusive yet to a great degree complete Mac cleaner app like TunesBro CleanGeeker will get rid of anything related with an application that is being uninstalled.
The user should simply install the software and given it a chance to carry out the activity for them. The other option is simply to do it physically – go into every one of their registries one by one and search for stranded documents and organizers downloaded by the application that the user will probably never again require. Then again, CleanGeeker will give the user a chance to do a similar thing in just a few minutes. Here’s the ticket:
Step 1: For the user to download TunesBro CleanGeeker from the official TunesBro website and install it on their Mac.
Step 2: Once they launch the application, they will see an Uninstaller option on the left menu panel. They have to click on that.
Step 3: The software will scan and list out all the apps currently residing in the user’s Mac. They simply pick out the ones to uninstall and hit the button to proceed.
Step 4: Once the process is complete, they can go in manually and check for themselves – all app remnants will have been deleted.
As CleanGeeker offers all the correct alternatives to do so, the user’s next target ought to be to expel the remainders of applications that were uninstalled prior. To do this, the means given ought to be pursued painstakingly:
Step 1: Remove Junk Files – Using apps, browsing and interacting with people online generates a lot of digital junk that ends up clogging your memory. Click on Quick Scan in the CleanGeeker interface and delete all the junk found by the program.
Step 2: Remove Duplicates – Though not related to malware or unwanted apps, this is a useful step. Click the Remove Duplicates tab and then scan the system. CleanGeeker will list out all duplicates and similar. Review, select/deselect and delete them forever. You’ll be surprised by how much space is taken up by duplicate files.
Step 3: Remove Large Files – Most of the time, we don’t need those massive media files to sit around our system. The best thing for these is to back them up to the cloud and clear your local memory. To remove them, click on the corresponding tab in CleanGeeker to see all your large files. If you don’t need them, just select and delete them in bulk.
Furthermore, this is the way by which one efficiently expels the undesirable apps on Mac or anything so far that can possibly influence the user’s framework by backing it off or cutting it down totally.
Source link
0 notes
Text
TunesBro CleanGeeker – Meet The World No. 1 Mac Cleaner Software
https://goo.gl/HfetDR
0 notes
Photo

The new d20 soaps exclusive to DigitalSoaps are going to be amazing! D8s and d10s are incoming!
3 notes
·
View notes
Text
Savings with online coupon codes Wednesday, February 28, 2018
R. Cooper Coupon Codes & Discount
Post memorial day sale: 70% discount everything. R. Cooper Coupon Code: CLEARANCE
Cleangeeks Coupon Codes & Discount
In celebration of our new site, get 20% discount first billing with code . used to march 31. Cleangeeks Coupon Code: CLEANGEEKS
In celebration of our new site, get 20% discount initial invoice with code . used to march 31.
Cymax Baby Coupon Codes & Discount
Discount up to 10% discount select magnussen items. Cymax Baby Coupon Code: MAG10
Special offer 10% discount select magnussen items.
1800 Postcards Coupon Codes & Discount
Extra 25% discount all products. 1800 Postcards Coupon Code: 25OFF326
Up to 25% discount normal price products.
0 notes
Text
CleanGeeker for Mac
CleanGeeker for Mac can clean up junk files on Mac and act as the best Mac uninstaller while removing the corresponding files. Get your computer’s speed and performance improved with CleanGeeker for Mac.
https://bestmacuninstaller.com/cleangeeker-for-mac/
1 note
·
View note
Text
Great coupons Wednesday, February 28, 2018
Ajff Coupon Codes & Discount
With 50% off. Ajff Coupon Code: FB03
Take an extra 50% discount screenings of the rescuers on 2/18 and 2/18 tickets.
Cleangeeks Coupon Codes & Discount
In celebration of our new site, get 20% discount first billing with code . used to march 31. Cleangeeks Coupon Code: CLEANGEEKS
In celebration of our new site, get 20% discount initial invoice with code . used to march 31.
Coleman's Military Surplus Coupon Codes & Discount
Take up to 15% discount almost everything. Coleman's Military Surplus Coupon Code: FALL15
Get an extra 15% discount almost everything.
Edenorganix Coupon Codes & Discount
Receive an extra 20% discount payment of stript items. Edenorganix Coupon Code: STRIPT09
Discount 20% discount invoice of stript items.
0 notes
Text
How to buy online with coupon codes? Wednesday, February 28, 2018
1800 Postcards Coupon Codes & Discount
Extra 25% discount all products. 1800 Postcards Coupon Code: 25OFF326
Up to 25% discount normal price products.
Barkingrainpress Coupon Codes & Discount
Now to the expire of sept use code at checkout to get the revenge ebook for $2.99. Barkingrainpress Coupon Code: BRP1YEAR
Now expire on the expire of sept use code at checkout to get the revenge ebook for $2.99.
Cleangeeks Coupon Codes & Discount
In celebration of our new site, get 20% discount first billing with code . used to march 31. Cleangeeks Coupon Code: CLEANGEEKS
In celebration of our new site, get 20% discount initial invoice with code . used to march 31.
1800 Postcards Coupon Codes & Discount
Extra 25% discount all products. 1800 Postcards Coupon Code: 25OFF326
Up to 25% discount normal price products.
0 notes