#clearwax
Text
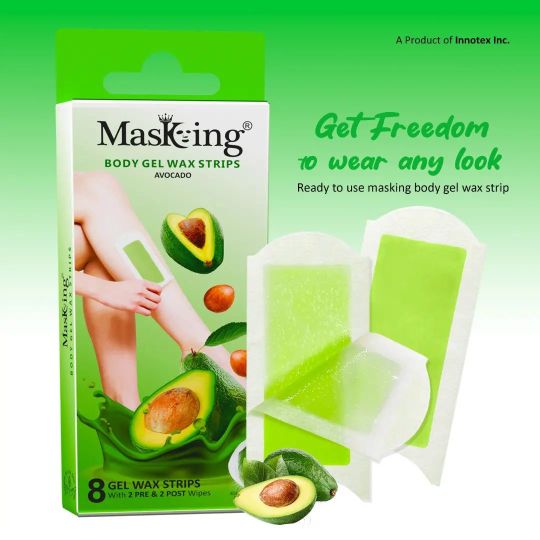
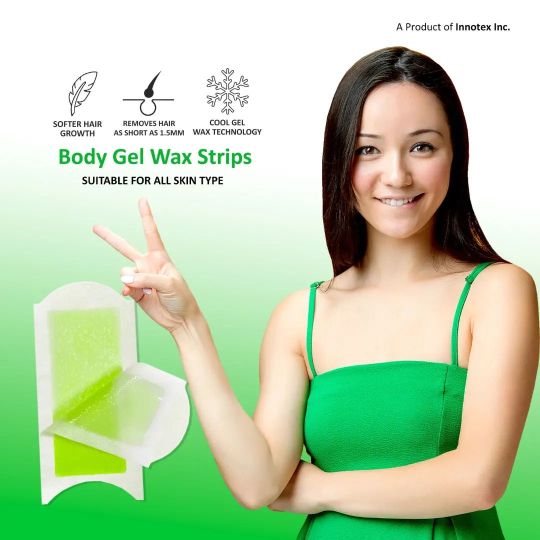
Keep your day go strong with MasKing Avocado Body gel Wax Strip and slay your day! 📢
Avocados🥑moisturizes and gives instantly exfoliated skin.
You are just a step away to free yourself from your body hair woes!
So, why wait now...Hurry up! 🌟
Shop Now🔗: https://www.themasking.com/
#wax #waxing #bodywax #exfoliates #waxstrips #facialwaxstrips #beautytips #beautyblogger #skincareroutine #skincareproducts #skinmoisturizing #facewax #facewaxing #waxaddict #waxobsessed #waxlife #waxlover #hair #bodywaxing #hairremoval #smoothskin #radiantskincare #skinsmoothing #steam #honeywax #clearwax #antiaging #glowingskin #natural #beautiful #healthyskin #healthlifestyle #masking #letsmasking #maskingsheetmask #maskingcosmetic
#wax#waxing#bodywax#exfoliates#waxstrips#facialwaxstrips#beautytips#beautyblogger#skincareroutine#skincareproducts#skinmoisturizing#facewax#facewaxing#waxaddict#waxobsessed#waxlife#waxlover#hair#bodywaxing#hairremoval#smoothskin#radiantskincare#skinsmoothing#steam#honeywax#clearwax#antiaging#glowingskin#natural#beautiful
0 notes
Photo

No edit here bc perfect timing🙂🤓 Beni cookies Ft. Guy Sensei😋😄 #wax #concentrates #michiganconcentrate #clearwax #terps #dabstagram (at Stoned in Michigan) https://www.instagram.com/p/CEMd5P1Hgg_/?igshid=1iw0x9s0mkwmh
1 note
·
View note
Photo

Floral frame and hand holding flowers. #clearwax #waxsealcollection #waxsealing #frames #hands #papercrafts #vintagestyle #vintagejournal #happyjournal #memorykeeping #thegingerbreadprints #lizzyizzydesigns #journalkit #papercrafts #printable #journaling #thebulletjournal #vintageephemera #stickers #printables #journaltheme #myvisionboard #journal #artjournal #printables #journalpages #journalideas #journalspread #download #junkjournal #junkjournals #weeklyspread https://www.instagram.com/p/CV9aL6dNBma/?utm_medium=tumblr
#clearwax#waxsealcollection#waxsealing#frames#hands#papercrafts#vintagestyle#vintagejournal#happyjournal#memorykeeping#thegingerbreadprints#lizzyizzydesigns#journalkit#printable#journaling#thebulletjournal#vintageephemera#stickers#printables#journaltheme#myvisionboard#journal#artjournal#journalpages#journalideas#journalspread#download#junkjournal#junkjournals#weeklyspread
1 note
·
View note
Photo

Marbled, Base & Backdrop Display Boards. White with Gold veining. 🤍💛#displayboard #fauxmarble #frenchicpaint #frensheen #gorgeousgold #clearwax (at Vintage Verrico Nerve Centre.) https://www.instagram.com/p/CRGRFJBM3qo/?utm_medium=tumblr
0 notes
Photo

Just finished up this gorgeous 1930's chest of drawers. I decided to keep lots of it's natural beauty but with highlights of #anniesloan #frenchlinen. French Linen with natural wood goes together for me just like #peasandcarrots The grooved details were done by using French Linen as a wash, with the side panels being solid. The entire piece was refreshed by using Annie Sloan #clearwax The result is something that by design is very #feminine now has a nice #masculine feel. . This beauty is marked at $350 Dimensions: 32in wide x 18in deep x 46in tall #swipeformore . . . . . #junqtique #diy #painteddresser #paintedfurniture #home #interiors #decor #newmexico #clovisnm #cannonafb #fresh (at Prairie Roads JunQtique) https://www.instagram.com/p/B04qUYqp6w0/?igshid=f3gvymzepi95
#anniesloan#frenchlinen#peasandcarrots#clearwax#feminine#masculine#swipeformore#junqtique#diy#painteddresser#paintedfurniture#home#interiors#decor#newmexico#clovisnm#cannonafb#fresh
0 notes
Text
Get Online Clearwax Ear Drop 10ml in India | TabletShablet
Clearwax Ear Drop 10ml is a combination of four medicines: Benzocaine, Chlorbutol, Paradichlorobenzene and Turpentine Oil. Benzocaine is a local anesthetic. It works by blocking pain signals from the nerves to the brain which decreases sensation of pain. Chlorbutol is a preservative. Paradichlorobenzene is an ear wax softener which dissolves the ear wax while exerting antibacterial and antifungal actions. Turpentine Oil is a lubricant. If You want the most valuable product you can visit Us medicines online.
0 notes
Video
Clear wax brings Out depth and color instantly in milk paint 🎨 ... #creativemoments1 #milkpaint #clearwax (at Strathmore, Alberta) https://www.instagram.com/p/BrkyxtslPYV/?utm_source=ig_tumblr_share&igshid=l016k5cprtmn
0 notes
Photo

Wilmington. Today. #talkingheads #vinyl #vinyljunkie #vinyladdict #vinyligclub #JupiterDE #JupiterWilmington #clearwax (at Jupiter Records)
0 notes
Photo

Do you like the look? Stay tuned for a step by step instructional blog by Clay. Chalk Paint® by Annie Sloan and some Salt Wash. #chalkpaint #anniesloan #coco #parisgrey #purewhite #oldwhite #clearwax #saltwash #diy #paintedfurniture #furnituremakeover (at Sophie's Fine Gifts & Collectibles)
#parisgrey#saltwash#clearwax#oldwhite#chalkpaint#diy#anniesloan#coco#furnituremakeover#purewhite#paintedfurniture
0 notes
Photo

Lamp love 💚💙 #anniesloan #chalkpaint #amsterdamgreen #florence #clearwax (at The Turquoise Hen)
0 notes
Photo

Introducing Jewel This gorgeous buffet was done using a mix of #anniesloan in #giverny & #amsterdamgreen The top was done in a #faux wood finish using layers of #honfleur & #graphite then stained darker by using straight #darkwax The entire piece was sealed with #clearwax, then shaded with dark wax for #depth and #dimension #Jewel would be perfect as an entry piece, a sofa table, a buffet or even an entertainment center. Dimensions: 67in wide x 22in deep x 38in tall Priced at $589 . . . #shanegrahinteriors #chalkpaintisanniesloan #diy #PaintedFurniture #paint #home #homedecor #furniture #newmexico #clovisnm #cannonafb #lubbocktx #amarillo #myamarillo #flippedfurniture #shanegrah #staged #vintage #antique (at Prairie Roads JunQtique) https://www.instagram.com/p/B0b8gDKpKf8/?igshid=3h3j27ms98op
#anniesloan#giverny#amsterdamgreen#faux#honfleur#graphite#darkwax#clearwax#depth#dimension#jewel#shanegrahinteriors#chalkpaintisanniesloan#diy#paintedfurniture#paint#home#homedecor#furniture#newmexico#clovisnm#cannonafb#lubbocktx#amarillo#myamarillo#flippedfurniture#shanegrah#staged#vintage#antique
0 notes
Photo

Delicious antique gilding by Gillian @yatpottery What was a very unremarkable pine mirror is becoming something quite spectacular. Emperor’s Silk #anniesloanchalkpaint . Full reveal when it goes up on the feature wall soon. @anniesloan_ukcoordinator @visit_herefordshire @yourherefordshire1 @eatsleepliveherefordshire @visitdeanwye @visit_rossonwye @visitmonmouthshire #photooftheday #anniesloan #chalkpaint #anniesloanchalkpaint #anniesloanhome #vintage #paintedfurniture #homedecor #furnituremakeover #vintagefurniture #diy #chalkpaintedfurniture #shoplocal #painteverything #anniesloanstockist #furnitureartist #darkwax #upcylefurniture #upcycledfurniture #furniture #refurbishedfurniture #upcycle #interiordesign #shabbychic #vintagedecorating #clearwax #shopsmall #handpaintedfurniture #furniturepainter #handpainted (at Yat Pottery Studio) https://www.instagram.com/p/CKwdx2ZH-Da/?igshid=1m97iau7jziqj
#anniesloanchalkpaint#photooftheday#anniesloan#chalkpaint#anniesloanhome#vintage#paintedfurniture#homedecor#furnituremakeover#vintagefurniture#diy#chalkpaintedfurniture#shoplocal#painteverything#anniesloanstockist#furnitureartist#darkwax#upcylefurniture#upcycledfurniture#furniture#refurbishedfurniture#upcycle#interiordesign#shabbychic#vintagedecorating#clearwax#shopsmall#handpaintedfurniture#furniturepainter#handpainted
0 notes
Audio
Get Online Clearwax Ear Drop 10ml in India | TabletShablet
Clearwax Ear Drop 10ml is a combination of four medicines: Benzocaine, Chlorbutol, Paradichlorobenzene and Turpentine Oil. Benzocaine is a local anesthetic. It works by blocking pain signals from the nerves to the brain which decreases sensation of pain. Chlorbutol is a preservative. Paradichlorobenzene is an ear wax softener which dissolves the ear wax while exerting antibacterial and antifungal actions. Turpentine Oil is a lubricant. If You want the most valuable product you can visit Us medicines online.

0 notes
Video
instagram
When you need another shade of silver wax. Mix up a batch ☺️ ... #silverwax #micapowder #clearwax #pewterwax #creativemoments1 (at Strathmore, Alberta)
0 notes
Photo

Dropping @ Jersey. Saturday. #toriamos #clearwax #vinyl #vinylingclub #JupiterNJ (at Jupiter Records)
0 notes
Text
A Simple Guide To Cleaning And Sealing A Small Slate Floor

If you are wondering how to clean and seal a slate floor, you have landed at the right place.
My minimum daily charge for slate cleaning makes cleaning small slate floors quite costly. Over the years, I have helped a number of people to do small floors themselves. So, I decided to publish the advice on my blog as a reference for anyone who wants to try cleaning and sealing slate themselves.
There are many cleaners and sealers available. I have decided to use LTP products for this guide because they are good quality products and available throughout the country from Tile Giant stores, or online from LTP themselves or other suppliers.
If you have the desire, your knees and arms are OK, you can do the work yourself. I reckon 5 square metres is as much as a normal person will want to attempt. However, if you are particularly motivated, enjoy kneeling a lot, hard work and aching shoulders, then you can go as large as you want. So here we go.
I have added links to the cleaners, sealers and some equipment that is not readily available in the home.
If there is anything in this guide that you don’t understand, please feel free to use my simple contact form
How To Clean And Seal A Slate Floor
Slate Cleaning Chemicals
LTP Solvex – est. £23.00 for 1 litre
LTP Grimex – est. £14.00 for 1 litre
Slate Impregnating Sealers
LTP H20 – natural – est. £38.00 for 1 liter
LTP H20 – Colour Enhancing Impregnating Sealer – est. £30.00 for 1 lire
Slate Surface Sealers
LTP Ironwax Satin – est.£18.00 for 1 litre
LTP Ironwax Gloss – est. £17.00 for 1 litre
Slate Floor Wax
LTP Clearwax – est £21.00 for 1 litre
Materials
3m Masking Tape
2-inch paint brush
small Artist paint brush for grout
Black Scrubbing Pads – Tile Giant –
Grout Scrubbing brush – est. £15.00
Mop and Bucket
Sponge
Clean Water bucket
Wet Vacuum
Black Bag
Personal Protection Equipment
Knee Pads
Protective Gloves – Ansell Sol-Vex 37-675 Chemical-Resistant Gloves Blue Large – est. £3.00
Protective goggles – est. £1.50
Safety Equipment and Precautions
Clear out area
Remove all furniture, free-standing items and removable kitchen kick boards from the room.
Tape skirting boards
Use the 75mm masking tape to protect your skirting boards and the base of door architrave and static furniture
Assemble equipment
Get your equipment and chemicals together in a safe area as close to your room as possible
Put on PPE
Put on your gloves, goggles and knee pads.
Dilute LTP Grimex into mop bucket – add chemical to water
Always add chemicals to the water. Never add water to the chemicals, because the water can splash the chemicals out o the bucket onto your skin.
Fill rinse bucket with water
Shake Solvex
LTP Solvex settles and separates after it has stood for only a few hours. So, before you open the container, give it a good shake to fully mix the components into a creamy consistency.
Apply Solvex with the brush
Apply the Solvex to 1 or 2 square metres maximum of the floor. As a rule of thumb, only apply the Solvex as far as you can reach on your knees.
Leave Solvex for 15 minutes
The Solvex needs tome to be absorbed into the old sealer and make it soft.
Wet the Solvex With Some Grimex
Use a sponge to wet out the Solvex.
Agitate Solvex
Hand Pad
Use a black scrubbing pad to scrub the surface and remove the old sealer from the tile.
Grout Brush
Use the grout brush to scrub the grout to remove the old sealer.
Remove Slurry
Ideally, use a wet vac to vacuum away the slurry. If you don’t have a wet vacuum, then use a mop and bucket, or sponge and cloth.
Repeat from 4 until got as clean as possible
If there are layers of old sealer on your floor, you may need to repeat the process a number of times to remove all traces of the old sealer.
Remove Tape
Once you have removed all of the old Sealer from the tiles and grout, you can remove the masking tape and put it straight into a black bag for disposal.
Remove Cleaning Materials
Clean and remove all cleaning materials and equipment to a safe place.
Leave overnight to Dry
Some grout can be very porous, so it is better to leave your floor overnight, or even a couple of nights to dry ready for sealing.
Applying Slate Impregnating Sealer
If you are going to leave the floor with an Impregnating Sealer finish or you are going to apply a wax finish, you need to apply two or three coats of impregnating sealer.
Get Sealing Materials and PPE
Gather your sealing chemicals and equipment to a safe place, as close to the work area as possible.
Put on PPE
Put on your gloves and knee pads
If Applying Colour Enhancing Impregnating Sealer
Test the sealer to ensure it does not make the tiles too dark
Use an inconspicuous area, e.g. under a kitchen unit and apply a small amount of sealer
If the sealer makes the stone too dark, hiding the natural colours, then strip it off with some Solvex and rinse with some LTP Grimex and use the Standard Impregnating sealer. If the results are acceptable continue to apply the Impregnating sealer
Apply The Impregnating Sealer
Start at the far end of the room away from the door.
Pour around a tablespoon of sealer onto the floor and massage it into the surface of the tiles and grout with a microfiber cloth, working on 1 square metre at a time.
Work backwards to the door until the floor has been sealed.
Do not allow the sealer to pool in the crevices.
If there is any wet sealer remaining on the floor after 20 minutes, wipe it off with a clean dry cloth.
Wait for the Sealer to dry for 30 minutes to an hour.
Applying Slate Surface Sealer
Apply Four To Six Coats Of Surface Sealer
Start at the far end of the room away from the door.
Pour around a tablespoon of Surface Sealer onto the floor and massage it into the surface of the tiles and grout with a microfiber cloth, working on 1 square metre at a time.
If the wet sealer looks milky, it is too thick, so spread it out more.
Work backwards to the door until the floor has been sealed.
Leave the floor overnight to dry
Applying Slate Surface Wax
Get Finishing Materials and PPE
Put on gloves and knee pads
Start at the far end of the room at the farthest point from the door
Working in approximately half a square metre squares, apply a thin coat of wax with the applicator cloth. Immediately buff to a low sheen with a clean buffing cloth. Continue until the floor has been waxed.
If after studying this guide, you prefer to call in Professional help, please don’t hesitate to use my simple contact form, I will be happy to help.
0 notes
Last Seen Blogs
onmyyan
Yandere Tingz

capuchinn0
Capuchinn0

casifier
cas' blog

bonod
Sans titre

maybedraws-things
Maybe_Draws!