#combine multiple next.js apps
Explore tagged Tumblr posts
Visit Tumblr Blog
Explore Tumblr blogs with no restrictions, modern design and the best experience.
Last Seen Tumblr Blogs


Fun Fact
China blocked Tumblr because of pornography and censorship problems in 2013.
Text
Headless CMS Development: What It Is and Why It Matters in 2025

In today’s digital-first landscape, businesses must deliver content seamlessly across websites, apps, smart devices, and more. The rise of headless CMS development is a direct response to this demand — providing the flexibility to create engaging, high-performance digital experiences on any platform.
At the heart of this evolution is not just the CMS itself, but the custom web development services that power it. Together, they allow brands to go beyond templates and plugins to build tailored solutions that stand out and scale.
Whether you’re a content-driven brand, a fast-growing startup, or an enterprise with complex digital needs, understanding headless CMS — and the role of custom development — is key to staying competitive.
What Is a Headless CMS?
A headless CMS is a content management system that separates the backend (where content is created and stored) from the frontend (where the content is displayed). In a traditional CMS like WordPress, both the content and its presentation are managed in one platform. With a headless CMS, the content is stored in a backend system and delivered via API to any frontend — a website, app, smartwatch, or even voice assistant.
This approach gives developers the freedom to build the front-end using any technology they prefer while allowing content creators to manage content through a central interface.
Why Use a Headless CMS?
Headless CMS development brings several key advantages:
1. Omnichannel Content Delivery One of the biggest strengths of a headless CMS is the ability to deliver the same content across multiple platforms. You can push updates to your website, mobile app, and digital signage at the same time, without having to duplicate efforts.
2. Front-End Flexibility With no presentation layer baked in, developers can choose modern front-end frameworks like React, Vue.js, or Next.js. This leads to faster development cycles and the ability to build richer, more interactive user experiences.
3. Faster Performance Because the frontend and backend are decoupled, websites and apps can load faster — especially when using static site generators or front-end caching. This speed not only improves user experience but can also boost SEO rankings.
4. Easier Scaling As your business grows, a headless CMS can easily scale with you. It’s built for managing and distributing large volumes of content to a wide range of platforms without requiring multiple CMS installations.
5. Enhanced Security Since the CMS is not directly exposed to the public web, the risk of attacks like cross-site scripting or plugin vulnerabilities is significantly reduced. The backend stays protected, while the frontend can be tightly controlled.
Common Use Cases
Headless CMS development is ideal for businesses that need to publish content across multiple touchpoints. Some examples include:
eCommerce platforms that display product content on web stores, mobile apps, and physical kiosks.
Media and publishing companies looking to push stories across websites, newsletters, apps, and social platforms.
Corporate websites supporting multilingual content across regional front-ends.
Mobile-first brands that want to update in-app content dynamically without going through app store resubmissions.
IoT products like smart displays or voice interfaces that need real-time content delivery.
Popular Headless CMS Platforms
Several tools have emerged as leaders in the headless CMS space, offering different features for different needs. Here are a few worth knowing:
Contentful is known for its strong APIs and enterprise-ready tools.
Strapi is open-source, developer-friendly, and supports both REST and GraphQL.
Sanity offers real-time collaboration and flexible content schemas.
Storyblok combines visual editing with headless capabilities, which appeals to marketers and developers alike.
Ghost, while originally a blogging tool, has embraced headless functionality for publishers.
Challenges and Considerations
Despite its many advantages, headless CMS development also comes with a few challenges that you should be aware of:
More Technical Setup: Unlike traditional CMS platforms where themes and plugins are ready out of the box, a headless CMS requires developers to build the front-end from scratch.
Greater Dependence on Developers: While content managers can still work in the CMS, changes to how content is displayed often require a developer’s help.
Choosing the Right Stack: You’ll need to decide on front-end frameworks, hosting, deployment workflows, and APIs — making planning and coordination essential.
If your team lacks the technical resources or prefers a plug-and-play approach, a traditional CMS might be easier to work with, at least in the short term.
Is Headless CMS Right for You?
Ask yourself the following:
Do you need to manage content across more than just a website?
Do your developers prefer using modern frameworks like React or Vue?
Is performance, security, or scalability a key concern?
Do you plan to grow your digital presence across multiple channels in the future?
If the answer to most of these is yes, headless CMS development is likely a good fit. On the other hand, if you just need a simple blog or brochure website, a traditional CMS could still serve your needs well.
Final Thoughts
Headless CMS development is shaping the future of digital content management. It offers the freedom to build with the best tools, the ability to deliver content anywhere, and the scalability to grow without limits.
As businesses evolve to meet user expectations across an ever-growing range of digital platforms, headless CMS is more than a trend — it’s a strategic choice. Whether you're launching a new app, scaling your eCommerce operations, or creating a unified content strategy, going headless can help you move faster and smarter in a multichannel world.
0 notes
Text

Edge Computing for Web Developers: How to Speed Up Your Apps
In today’s digital race, milliseconds matter.
Whether you’re building a real-time dashboard, an e-commerce platform, or a SaaS product, users expect one thing — speed. But traditional cloud setups, while powerful, aren’t always fast enough when data has to travel halfway across the globe.
Enter: Edge Computing — a game-changing strategy that moves computing closer to users and supercharges web performance.
What Is Edge Computing (And Why Should You Care)?
Imagine you’re ordering pizza. Would you rather get it from a kitchen next door or one 500 miles away?
That’s the difference between centralized cloud and edge computing.
Edge computing is about processing data as close to the user as possible — often on local servers or network nodes instead of a distant data center. For web developers, this means fewer delays, faster responses, and smoother user experiences.
And in an age where a one-second delay can drop conversions by 7%, that’s a big deal.
How Does It Actually Work?
Here’s the simple version:
You deploy some parts of your app (like APIs, static files, and authentication logic) to a central server and across multiple edge locations worldwide.
When a user in New York accesses your app, it loads from a nearby edge server, not from a main server in Singapore.
Result? Lower latency, less server load, and faster load times.
What Can Web Developers Use Edge Computing For?
Edge computing isn’t just for heavy tech infrastructure — it’s now developer-friendly and API-driven. Here’s how you can use it:
1. Deliver Static Assets Faster
CDNs (Content Delivery Networks) like Cloudflare, Vercel, or Netlify already do this — they serve your HTML, CSS, JS, and images from edge locations.
Bonus Tip: Combine with image optimization at the edge to slash load times.
2. Run Serverless Functions at the Edge
Think dynamic actions like form submissions, authentication, or geolocation-based content. Platforms like Cloudflare Workers, Vercel Edge Functions, and AWS Lambda@Edge let you run logic closer to your users.
Example: Show region-specific content without needing the user to wait for a central server to decide.
3. Improve API Response Times
You can cache API responses or compute lightweight operations at the edge to reduce back-and-forth trips to the origin server.
Imagine: A travel app loading nearby attractions instantly by computing distance at the edge, not centrally.
4. Secure Your App Better
Edge networks can block threats before they ever reach your main server, including bots, DDoS attacks, and suspicious traffic.
It’s like having a security guard posted on every street corner, not just your front door.
But… Does Every App Need Edge Computing?
Not necessarily. If your app is local, low-traffic, or non-latency-sensitive, traditional cloud might be enough.
But if you’re scaling globally, working with real-time data, or want lightning-fast load speeds, edge computing is your secret weapon.
Real-World Impact: Numbers Don’t Lie
Vercel reported a 50% performance boost for apps deployed with edge functions.
Retailers using edge caching see a 20–30% decrease in bounce rates.
Streaming platforms improved video start times by up to 60% with edge delivery.
These aren’t just nice-to-haves — they’re competitive advantages.
Getting Started: Tools You Should Know
Here are a few platforms and tools that make edge computing accessible for developers:
Cloudflare Workers — Write JavaScript functions that run at the edge.
Vercel — Perfect for Next.js and frontend teams, with edge function support.
Netlify Edge Functions — Simplified edge logic built into your CI/CD.
AWS Lambda@Edge — Enterprise-grade, with tight AWS integration.
Pro tip: If you’re already using frameworks like Next.js, Nuxt, or SvelteKit, edge-ready deployments are often just one setting away.
Final Thoughts: Why This Matters to You
For developers: Edge computing lets you build faster, more responsive apps without reinventing your stack.
For business owners: It means happier users, lower customer loss, and more conversions.
In a world where speed = success, edge computing isn’t the future — it’s the edge you need today.
0 notes
Text
Debugging Common State Management Issues in Next.js Apps
Next.js has revolutionized web development, offering a powerful blend of React's component-based architecture and server-side rendering. However, as applications grow in complexity, managing state effectively becomes crucial. State management issues can lead to frustrating bugs, performance bottlenecks, and a poor user experience. This blog post explores common state management challenges in Next.js and provides practical debugging tips.
The Challenges of State in Next.js:
Next.js applications often combine client-side and server-side rendering. This hybrid approach, while powerful, introduces unique state management complexities.
Server-Side vs. Client-Side State: Understanding the distinction between state managed on the server during initial rendering and state managed on the client after hydration is essential. Mismatched state between these two environments can lead to hydration errors and unexpected behavior.
Data Fetching and Caching: Efficiently fetching and caching data, especially when dealing with APIs, is critical for performance. Inefficient data fetching can result in slow loading times and excessive network requests.
Component Communication: As applications scale, managing state across multiple components becomes challenging. Prop drilling and complex event handling can make code difficult to maintain and debug.
Global State Management: When dealing with shared state across the entire application, choosing the right global state management solution (e.g., Context API, Redux, Zustand) is crucial. Incorrect implementation can lead to performance issues and unpredictable state changes.
Debugging Strategies:
Here are some effective debugging techniques to tackle common state management issues in Next.js applications:
Leverage Browser Developer Tools:
Utilize the React Developer Tools extension to inspect component state and props.
Use the Network tab to monitor API requests and identify data fetching issues.
Employ the Console tab to track errors and warnings related to state updates.
Implement Logging and Debugging Statements:
Strategically place console.log() statements to track state changes and identify unexpected behavior.
Use conditional logging to narrow down specific issues.
Bugasura can help to organize and track these logs, and connect them to specific bugs.
Isolate Components:
Break down complex components into smaller, manageable pieces.
Test individual components in isolation to identify state-related issues.
This can be done using tools like Storybook.
Utilize React's Strict Mode:
Enable Strict Mode to identify potential issues during development, such as unsafe lifecycle methods and unexpected side effects.
This can catch many state related errors early in the development cycle.
Pay Attention to Hydration Errors:
Carefully examine hydration errors, as they often indicate discrepancies between server-side and client-side state.
Ensure that initial state values are consistent across both environments.
Test Thoroughly:
Write unit and integration tests to verify state behavior and prevent regressions.
Use testing libraries like Jest and React Testing Library to create comprehensive test suites.
Testing is a core part of confirming state management is working correctly.
Bugasura and State Management Debugging:
Bugasura can be an invaluable tool for debugging state management issues. By integrating Bugasura into your Next.js workflow, you can:
Capture detailed bug reports, including console logs, network requests, and component state.
Collaborate with team members to track and resolve state-related bugs efficiently.
Gain insights into recurring state management issues and improve your application's overall stability.
By understanding the common state management challenges in Next.js and employing effective debugging techniques, you can build robust and maintainable applications.
0 notes
Text
Reasons to Choose a TypeScript Development Company for Your Next Project
In the ever-evolving world of web development, businesses are continually searching for technologies that can deliver robust, scalable, and maintainable applications. TypeScript and Next.js are two of the most powerful technologies in today’s development landscape, offering enhanced functionality, better performance, and improved developer productivity. To harness the full potential of these technologies, partnering with a TypeScript development company and hiring dedicated Next.js developers can be a game-changer for your project.

Why Choose TypeScript for Your Development Project?
TypeScript, a superset of JavaScript, introduces static typing, which helps catch errors early, improves code quality, and provides better tooling support for developers. With these advantages, it’s easy to see why so many developers and companies are shifting towards TypeScript for building dynamic, complex applications.
Key Benefits of TypeScript Development Services:
Error PreventionTypeScript’s static type system allows developers to identify potential issues during the development phase, reducing the chances of runtime errors in production. This is especially valuable when working on large-scale applications that require high levels of accuracy.
Scalability and MaintainabilityTypeScript's features such as interfaces, classes, and modules make the code more maintainable and scalable. This is essential when your application grows, as it allows developers to manage complex codebases more effectively.
Better CollaborationThe explicit type system improves communication between developers. As TypeScript enforces type safety, it makes it easier for multiple developers to work on the same project without introducing errors.
Harness the Power of Next.js for Web Development
Next.js is one of the most popular frameworks for building React-based web applications. It offers several out-of-the-box features such as server-side rendering (SSR), static site generation (SSG), and an easy setup for building scalable web apps. When paired with TypeScript, Next.js becomes an even more powerful tool for creating dynamic web applications.
By hiring dedicated Next.js developers, you can take full advantage of its capabilities to enhance performance, optimize SEO, and create a seamless user experience. Whether you are building a large-scale eCommerce platform or a dynamic content website, Next.js and TypeScript are the perfect combination.
Benefits of Hiring Dedicated Next.js Developers:
Custom SolutionsDedicated Next.js developers can create customized web applications tailored to your business needs. They can leverage the framework’s capabilities to deliver a high-performance, SEO-friendly, and user-centric solution.
Expertise in Server-Side Rendering and Static GenerationNext.js developers have extensive experience with server-side rendering (SSR) and static site generation (SSG), which enhances the speed and performance of your web application.
Faster Time to MarketBy working with experienced Next.js developers, your application can be built and deployed quickly. Their familiarity with the framework allows for faster development cycles, getting your product to market in less time.
Hire Remote Developers in India: A Smart Choice for Global Projects
When you hire remote developers India, you gain access to a highly skilled talent pool at competitive rates. Many TypeScript development companies and Next.js development services are based in India, where you can find top-tier developers specializing in these technologies. Indian developers are known for their technical expertise, strong work ethic, and adaptability to international project requirements.
By hiring remote developers in India, you can scale your development team quickly and efficiently, ensuring that your project moves forward without delays. Moreover, with developers working across time zones, your project can see continuous development, speeding up the overall progress.
LAMP Application Development Services: A Robust Solution for Web Applications
The LAMP stack—comprising Linux, Apache, MySQL, and PHP—is a well-established platform for building dynamic web applications. Many businesses choose LAMP application development services because of their reliability, security, and scalability. While TypeScript and Next.js are ideal for front-end development, LAMP is perfect for backend solutions, especially for projects requiring a solid database-driven structure.
When integrated with modern technologies like TypeScript and Next.js, the LAMP stack becomes even more powerful, offering a full-stack solution for scalable and high-performance applications. Whether you need a content management system, an eCommerce platform, or a custom enterprise solution, LAMP can meet your needs.
Why Choose a TypeScript Development Company?
Working with a TypeScript development company offers several advantages, particularly when you’re looking to leverage both TypeScript and Next.js for your project. A professional development team with expertise in these technologies can create solutions that are not only functional but also optimized for performance, scalability, and maintainability.
By hiring dedicated developers with expertise in TypeScript, Next.js, and the LAMP stack, you ensure your application is built on a solid foundation. Whether you’re looking to hire remote developers in India or find experts in a specific technology, the right team can make all the difference in achieving your business goals.
Conclusion
The combination of TypeScript, Next.js, and LAMP application development services provides a comprehensive, powerful stack for building modern, scalable, and high-performance web applications. By hiring dedicated Next.js developers and leveraging TypeScript development services, you can ensure that your project is in good hands. Additionally, hiring remote developers in India allows you to tap into a global talent pool while optimizing your development costs.
Partnering with the right TypeScript development company will help you unlock the true potential of these technologies and deliver exceptional results for your business.
Contact us for more information .
0 notes
Text
Exploring the Latest Innovations in Web Development Technology
In recent years, web development technology has witnessed rapid advancements, driven by the ever-evolving needs of businesses and users alike. Developers are constantly exploring novel ways to create faster, more secure, and more interactive web experiences, from new programming languages and frameworks to innovative tools and techniques. In this article, we delve into the latest innovations in web development technology, highlighting key trends, emerging technologies, and their impact on the future of web development.

Progressive Web Apps (PWAs): Progressive Web Apps (PWAs) continue to gain traction as a transformative approach to web development. PWAs combine the best of web and mobile applications, offering features such as offline access, push notifications, and app-like interactions. With advancements in service workers and web APIs, PWAs are becoming increasingly powerful, providing users with fast, reliable experiences across devices and network conditions.
Serverless Architecture: Serverless architecture has emerged as a game-changer in web development, allowing developers to build and deploy applications without managing traditional server infrastructure. With serverless platforms like AWS Lambda, Google Cloud Functions, and Azure Functions, developers can focus on writing code while the cloud provider handles scaling, provisioning, and maintenance. Serverless architecture offers scalability, cost-effectiveness, and agility, enabling rapid development and deployment of web applications.
Jamstack (JavaScript, APIs, and Markup): Jamstack architecture is revolutionizing the way web applications are built and deployed. By decoupling the front end and back end, Jamstack enables developers to leverage pre-built markup, APIs, and JavaScript frameworks to create fast, secure, and highly performant websites and web applications. With the rise of static site generators like Gatsby, Next.js, and Nuxt.js, Jamstack has gained popularity for its simplicity, scalability, and flexibility.
Headless CMS: Headless Content Management Systems (CMS) are gaining momentum as a modern approach to content management. Unlike traditional monolithic CMS platforms, headless CMS solutions like Contentful, Strapi, and Sanity.io separate content management from the presentation layer, allowing developers to deliver content seamlessly across multiple channels and devices. Headless CMS enables greater flexibility, scalability, and agility in content delivery, empowering developers to create dynamic and personalized web experiences.
WebAssembly (Wasm): WebAssembly (Wasm) is revolutionizing web development by enabling high-performance, low-level code execution in web browsers. With WebAssembly, developers can run code written in languages like C, C++, and Rust directly in the browser, unlocking new possibilities for web applications, games, multimedia processing, and more. As browser support for WebAssembly continues to expand, developers are exploring its potential to enhance performance, security, and functionality in web applications.
GraphQL: GraphQL has emerged as a powerful alternative to traditional RESTful APIs for client-server communication. With its flexible query language and hierarchical data structure, GraphQL enables clients to request only the data they need, minimizing over-fetching and under-fetching of data. GraphQL offers improved performance, efficiency, and flexibility in data fetching, making it an attractive choice for modern web applications and microservices architectures.
Artificial Intelligence and Machine Learning: Artificial Intelligence (AI) and Machine Learning (ML) are increasingly being integrated into web development services to create smarter, more personalized user experiences. From chatbots and virtual assistants to recommendation engines and predictive analytics, AI and ML technologies transform how users interact with web applications. With advancements in natural language processing, image recognition, and data analysis, developers can harness the power of AI to automate tasks, optimize content, and improve user engagement.
Cybersecurity: Cybersecurity remains a top priority in web development, with the increasing frequency of cyber-attacks and data breaches. Developers are focusing on implementing security best practices, such as using HTTPS, securing APIs, and preventing common vulnerabilities like cross-site scripting (XSS) and SQL injection. With the rise of privacy regulations like GDPR and CCPA, cybersecurity is becoming increasingly important for protecting user data and maintaining trust in web applications.
The latest innovations in top web development companies in Bangalore are driving significant technology and advancements in the way web applications are built, deployed, and experienced. From Progressive Web Apps and serverless architecture to Jamstack and WebAssembly, developers have access to a wide range of tools and techniques to create faster, more secure, and more interactive web experiences. By embracing emerging technologies such as GraphQL, AI, and cybersecurity, developers can stay ahead of the curve and deliver cutting-edge web applications that meet the evolving needs of businesses and users in the digital age.
#best website company in bangalore#web design development company in bangalore#website development services in bangalore#top website development company in bangalore#top web design company in bangalore#top web development companies in bangalore#best website designers in bangalore
0 notes
Text
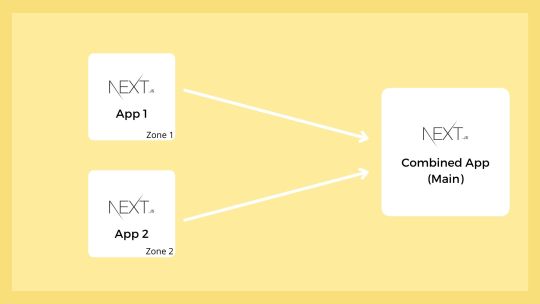
Multi Zones: Combine Multiple Next.js Apps
Multi Zones: Combine Multiple Next.js Apps
When developing a big web project, we need a team. But when it’s a huge one, we can split the project into many and assign it to multiple teams. We can run each project separately and even host them on different servers. This gives teams more control over a huge project. Here we will discuss the Multi Zones, the Next.js way to combine multiple apps. Prerequisites Before continuing this article,…
View On WordPress
0 notes
Text
Full Stack Development with Next.js and Supabase – The Complete Guide
Supabase is an open source Firebase alternative that lets you create a real-time backend in less than two minutes.
Supabase has continued to gain hype and adoption with developers in my network over the past few months. And a lot of the people I've talked to about it prefer the fact that it leverages a SQL-style database, and they like that it's open source, too.
When you create a project Supabase automatically gives you a Postgres SQL database, user authentication, and API. From there you can easily implement additional features like realtime subscriptions and file storage.
In this guide, you will learn how to build a full stack app that implements the core features that most apps require – like routing, a database, API, authentication, authorization, realtime data, and fine grained access control. We'll be using a modern stack including React, Next.js, and TailwindCSS.
I've tried to distill everything I've learned while myself getting up to speed with Supabase in as short of a guide as possible so you too can begin building full stack apps with the framework.
The app that we will be building is a multi-user blogging app that incorporates all of the types of features you see in many modern apps. This will take us beyond basic CRUD by enabling things like file storage as well as authorization and fine grained access control.
You can find the code for the app we will be building here.
By learning how to incorporate all of these features together you should be able to take what you learn here and build out your own ideas. Understanding the basic building blocks themselves allows you to then take this knowledge with you in the future to put it to use in any way you see fit.
Supabase Overview
How to Build Full Stack Apps
I'm fascinated by full stack Serverless frameworks because of the amount of power and agility they give to developers looking to build complete applications.
Supabase brings to the table the important combination of powerful back end services and easy to use client-side libraries and SDKs for an end to end solution.
This combination lets you not only build out the individual features and services necessary on the back end, but easily integrate them together on the front end by leveraging client libraries maintained by the same team.
Because Supabase is open source, you have the option to self-host or deploy your backend as a managed service. And as you can see, this will be easy for us to do on a free tier that does not require a credit card to get started with.
Why Use Supabase?
I've led the Front End Web and Mobile Developer Advocacy team at AWS, and written a book on building these types of apps. So I've had quite a bit of experience building in this space.
And I think that Supabase brings to the table some really powerful features that immediately stood out to me when I started to build with it.
Data access patterns
One of the biggest limitations of some of the tools and frameworks I've used in the past is the lack of querying capabilities. What I like a lot about Supabase is that, since it's built on top of Postgres, it enables an extremely rich set of performant querying capabilities out of the box without having to write any additional back end code.
The client-side SDKs provide easy to use filters and modifiers to enable an almost infinite combination of data access patterns.
Because the database is SQL, relational data is easy to configure and query, and the client libraries take it into account as a first class citizen.
Permissions
When you get past "hello world" many types of frameworks and services fall over very quickly. This is because most real-world use cases extend far beyond the basic CRUD functionality you often see made available by these tools.
The problem with some frameworks and managed services is that the abstractions they create are not extensible enough to enable easy to modify configurations or custom business logic. These restrictions often make it difficult to take into account the many one-off use cases that come up with building an app in the real-world.
In addition to enabling a wide array of data access patterns, Supabase makes it easy to configure authorization and fine grained access controls. This is because it is simply Postgres, enabling you implement whatever row-level security policies you would like directly from the built-in SQL editor (something we will cover here).
UI components
In addition to the client-side libraries maintained by the same team building the other Supabase tooling, they also maintain a UI component library (beta) that allows you to get up and running with various UI elements.
The most powerful is Auth which integrates with your Supabase project to quickly spin up a user authentication flow (which I'll be using in this tutorial).
Multiple authentication providers
Supabase enables all of the following types of authentication mechanisms:
Username & password
Magic email link
Google
Facebook
Apple
GitHub
Twitter
Azure
GitLab
Bitbucket
Open Source
One of the biggest things it has going for it is that it is completely open source (yes the back end too). This means that you can choose either the Serverless hosted approach or to host it yourself.
That means that if you wanted to, you could run Supabase with Docker and host your app on AWS, GCP, or Azure. This would eliminate the vendor lock-in issue you may run into with Supabase alternatives.
How to Get Started with Supabase
Project setup
To get started, let's first create the Next.js app.
npx create-next-app next-supabase
Next, change into the directory and install the dependencies we'll be needing for the app using either NPM or Yarn:
npm install @supabase/supabase-js @supabase/ui react-simplemde-editor easymde react-markdown uuid npm install tailwindcss@latest @tailwindcss/typography postcss@latest autoprefixer@latest
Next, create the necessary Tailwind configuration files:
npx tailwindcss init -p
Now update tailwind.config.js to add the Tailwind typography plugin to the array of plugins. We'll be using this plugin to style the markdown for our blog:
plugins: [ require('@tailwindcss/typography') ]
Finally, replace the styles in styles/globals.css with the following:
@tailwind base; @tailwind components; @tailwind utilities;
Supabase project initialization
Now that the project is created locally, let's create the Supabase project.
To do so, head over to Supabase.io and click on Start Your Project. Authenticate with GitHub and then create a new project under the organization that is provided to you in your account.

Give the project a Name and Password and click Create new project.
It will take approximately 2 minutes for your project to be created.
How to create a database table in Supabase
Once you've created your project, let's go ahead and create the table for our app along with all of the permissions we'll need. To do so, click on the SQL link in the left hand menu.

In this view, click on Query-1 under Open queries and paste in the following SQL query and click RUN:
CREATE TABLE posts ( id bigint generated by default as identity primary key, user_id uuid references auth.users not null, user_email text, title text, content text, inserted_at timestamp with time zone default timezone('utc'::text, now()) not null ); alter table posts enable row level security; create policy "Individuals can create posts." on posts for insert with check (auth.uid() = user_id); create policy "Individuals can update their own posts." on posts for update using (auth.uid() = user_id); create policy "Individuals can delete their own posts." on posts for delete using (auth.uid() = user_id); create policy "Posts are public." on posts for select using (true);
This will create the posts table that we'll be using for the app. It also enabled some row level permissions:
All users can query for posts
Only signed in users can create posts, and their user ID must match the user ID passed into the arguments
Only the owner of the post can update or delete it
Now, if we click on the Table editor link, we should see our new table created with the proper schema.

That's it! Our back end is ready to go now and we can start building out the UI. Username + password authentication is already enabled by default, so all we need to do now is wire everything up on the front end.
Next.js Supabase configuration
Now that the project has been created, we need a way for our Next.js app to know about the back end services we just created for it.
The best way for us to configure this is using environment variables. Next.js allows environment variables to be set by creating a file called .env.local in the root of the project and storing them there.
In order to expose a variable to the browser you have to prefix the variable with NEXT_PUBLIC_.
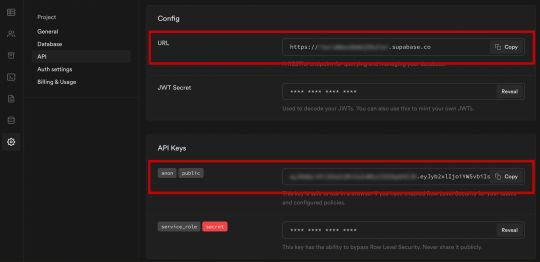
Create a file called .env.local at the root of the project, and add the following configuration:
NEXT_PUBLIC_SUPABASE_URL=https://app-id.supabase.co NEXT_PUBLIC_SUPABASE_ANON_KEY=your-public-api-key
You can find the values of your API URL and API Key in the Supabase dashboard settings:
Next, create a file called api.js in the root of the project and add the following code:
// api.js import { createClient } from '@supabase/supabase-js' export const supabase = createClient( process.env.NEXT_PUBLIC_SUPABASE_URL, process.env.NEXT_PUBLIC_SUPABASE_ANON_KEY )
Now we will be able to import the supabase instance and use it anywhere in our app.
Here's an overview of what it looks like to interact with the API using the Supabase JavaScript client.
Querying for data:
import { supabase } from '../path/to/api' const { data, error } = await supabase .from('posts') .select()
Creating new items in the database:
const { data, error } = await supabase .from('posts') .insert([ { title: "Hello World", content: "My first post", user_id: "some-user-id", user_email: "[email protected]" } ])
As I mentioned earlier, the filters and modifiers make it really easy to implement various data access patterns and selection sets of your data.
Authentication – signing up:
const { user, session, error } = await supabase.auth.signUp({ email: '[email protected]', password: 'example-password', })
Authentication – signing in:
const { user, session, error } = await supabase.auth.signIn({ email: '[email protected]', password: 'example-password', })
In our case we won't be writing the main authentication logic by hand, we'll be using the Auth component from Supabase UI.
How to Build the App
Now let's start building out the UI!
To get started, let's first update the app to implement some basic navigation and layout styling.
We will also configure some logic to check if the user is signed in, and show a link for creating new posts if they are.
Finally we'll implement a listener for any auth events. And when a new auth event occurs, we'll check to make sure there is currently a signed in user in order to show or hide the Create Post link.
Open _app.js and add the following code:
// pages/_app.js import Link from 'next/link' import { useState, useEffect } from 'react' import { supabase } from '../api' import '../styles/globals.css' function MyApp({ Component, pageProps }) { const [user, setUser] = useState(null); useEffect(() => { const { data: authListener } = supabase.auth.onAuthStateChange( async () => checkUser() ) checkUser() return () => { authListener?.unsubscribe() }; }, []) async function checkUser() { const user = supabase.auth.user() setUser(user) } return ( <div> <nav className="p-6 border-b border-gray-300"> <Link href="/"> <span className="mr-6 cursor-pointer">Home</span> </Link> { user && ( <Link href="/create-post"> <span className="mr-6 cursor-pointer">Create Post</span> </Link> ) } <Link href="/profile"> <span className="mr-6 cursor-pointer">Profile</span> </Link> </nav> <div className="py-8 px-16"> <Component {...pageProps} /> </div> </div> ) } export default MyApp
How to make a user profile page
Next, let's create the profile page. In the pages directory, create a new file named profile.js and add the following code:
// pages/profile.js import { Auth, Typography, Button } from "@supabase/ui"; const { Text } = Typography import { supabase } from '../api' function Profile(props) { const { user } = Auth.useUser(); if (user) return ( <> <Text>Signed in: {user.email}</Text> <Button block onClick={() => props.supabaseClient.auth.signOut()}> Sign out </Button> </> ); return props.children } export default function AuthProfile() { return ( <Auth.UserContextProvider supabaseClient={supabase}> <Profile supabaseClient={supabase}> <Auth supabaseClient={supabase} /> </Profile> </Auth.UserContextProvider> ) }
The profile page uses the Auth component from the Supabase UI library. This component will render a "sign up" and "sign in" form for unauthenticated users, and a basic user profile with a "sign out" button for authenticated users. It will also enable a magic sign in link.
How to create new posts
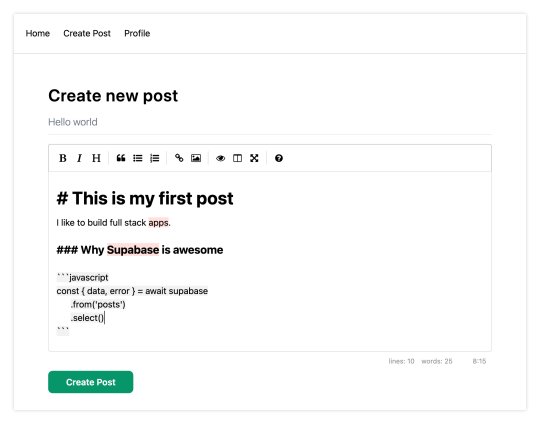
Next, let's create the create-post page. In the pages directory, create a page named create-post.js with the following code:
// pages/create-post.js import { useState } from 'react' import { v4 as uuid } from 'uuid' import { useRouter } from 'next/router' import dynamic from 'next/dynamic' import "easymde/dist/easymde.min.css" import { supabase } from '../api' const SimpleMDE = dynamic(() => import('react-simplemde-editor'), { ssr: false }) const initialState = { title: '', content: '' } function CreatePost() { const [post, setPost] = useState(initialState) const { title, content } = post const router = useRouter() function onChange(e) { setPost(() => ({ ...post, [e.target.name]: e.target.value })) } async function createNewPost() { if (!title || !content) return const user = supabase.auth.user() const id = uuid() post.id = id const { data } = await supabase .from('posts') .insert([ { title, content, user_id: user.id, user_email: user.email } ]) .single() router.push(`/posts/${data.id}`) } return ( <div> <h1 className="text-3xl font-semibold tracking-wide mt-6">Create new post</h1> <input onChange={onChange} name="title" placeholder="Title" value={post.title} className="border-b pb-2 text-lg my-4 focus:outline-none w-full font-light text-gray-500 placeholder-gray-500 y-2" /> <SimpleMDE value={post.content} onChange={value => setPost({ ...post, content: value })} /> <button type="button" className="mb-4 bg-green-600 text-white font-semibold px-8 py-2 rounded-lg" onClick={createNewPost} >Create Post</button> </div> ) } export default CreatePost
This component renders a Markdown editor, allowing users to create new posts.
The createNewPost function will use the supabase instance to create new posts using the local form state.
You may notice that we are not passing in any headers. This is because if a user is signed in, the Supabase client libraries automatically include the access token in the headers for a signed in user.
How to view a single post
We need to configure a page to view a single post.
This page uses getStaticPaths to dynamically create pages at build time based on the posts coming back from the API.
We also use the fallback flag to enable fallback routes for dynamic SSG page generation.
We use getStaticProps to enable the Post data to be fetched and then passed into the page as props at build time.
Create a new folder in the pages directory called posts and a file called [id].js within that folder. In pages/posts/[id].js, add the following code:
// pages/posts/[id].js import { useRouter } from 'next/router' import ReactMarkdown from 'react-markdown' import { supabase } from '../../api' export default function Post({ post }) { const router = useRouter() if (router.isFallback) { return <div>Loading...</div> } return ( <div> <h1 className="text-5xl mt-4 font-semibold tracking-wide">{post.title}</h1> <p className="text-sm font-light my-4">by {post.user_email}</p> <div className="mt-8"> <ReactMarkdown className='prose' children={post.content} /> </div> </div> ) } export async function getStaticPaths() { const { data, error } = await supabase .from('posts') .select('id') const paths = data.map(post => ({ params: { id: JSON.stringify(post.id) }})) return { paths, fallback: true } } export async function getStaticProps ({ params }) { const { id } = params const { data } = await supabase .from('posts') .select() .filter('id', 'eq', id) .single() return { props: { post: data } } }
How to query for and render the list of posts
Next, let's update index.js to fetch and render a list of posts:
// pages/index.js import { useState, useEffect } from 'react' import Link from 'next/link' import { supabase } from '../api' export default function Home() { const [posts, setPosts] = useState([]) const [loading, setLoading] = useState(true) useEffect(() => { fetchPosts() }, []) async function fetchPosts() { const { data, error } = await supabase .from('posts') .select() setPosts(data) setLoading(false) } if (loading) return <p className="text-2xl">Loading ...</p> if (!posts.length) return <p className="text-2xl">No posts.</p> return ( <div> <h1 className="text-3xl font-semibold tracking-wide mt-6 mb-2">Posts</h1> { posts.map(post => ( <Link key={post.id} href={`/posts/${post.id}`}> <div className="cursor-pointer border-b border-gray-300 mt-8 pb-4"> <h2 className="text-xl font-semibold">{post.title}</h2> <p className="text-gray-500 mt-2">Author: {post.user_email}</p> </div> </Link>) ) } </div> ) }
Let's test it out
We now have all of the pieces of our app ready to go, so let's try it out.
To run the local server, run the dev command from your terminal:
npm run dev
When the app loads, you should see the following screen:

To sign up, click on Profile and create a new account. You should receive an email link to confirm your account after signing up.
You can also create a new account by using the magic link.
Once you're signed in, you should be able to create new posts:
Navigating back to the home page, you should be able to see a list of the posts that you've created and be able to click on a link to the post to view it:

How to Edit Posts
Now that we have the app up and running, let's learn how to edit posts. To get started with this, let's create a new view that will fetch only the posts that the signed in user has created.
To do so, create a new file named my-posts.js in the root of the project with the following code:
// pages/my-posts.js import { useState, useEffect } from 'react' import Link from 'next/link' import { supabase } from '../api' export default function MyPosts() { const [posts, setPosts] = useState([]) useEffect(() => { fetchPosts() }, []) async function fetchPosts() { const user = supabase.auth.user() const { data } = await supabase .from('posts') .select('*') .filter('user_id', 'eq', user.id) setPosts(data) } async function deletePost(id) { await supabase .from('posts') .delete() .match({ id }) fetchPosts() } return ( <div> <h1 className="text-3xl font-semibold tracking-wide mt-6 mb-2">My Posts</h1> { posts.map((post, index) => ( <div key={index} className="border-b border-gray-300 mt-8 pb-4"> <h2 className="text-xl font-semibold">{post.title}</h2> <p className="text-gray-500 mt-2 mb-2">Author: {post.user_email}</p> <Link href={`/edit-post/${post.id}`}><a className="text-sm mr-4 text-blue-500">Edit Post</a></Link> <Link href={`/posts/${post.id}`}><a className="text-sm mr-4 text-blue-500">View Post</a></Link> <button className="text-sm mr-4 text-red-500" onClick={() => deletePost(post.id)} >Delete Post</button> </div> )) } </div> ) }
In the query for the posts, we use the user id to select only the posts created by the signed in user.
Next, create a new folder named edit-post in the pages directory. Then, create a file named [id].js in this folder.
In this file, we'll be accessing the id of the post from a route parameter. When the component loads, we will then use the post id from the route to fetch the post data and make it available for editing.
In this file, add the following code:
// pages/edit-post/[id].js import { useEffect, useState } from 'react' import { useRouter } from 'next/router' import dynamic from 'next/dynamic' import "easymde/dist/easymde.min.css" import { supabase } from '../../api' const SimpleMDE = dynamic(() => import('react-simplemde-editor'), { ssr: false }) function EditPost() { const [post, setPost] = useState(null) const router = useRouter() const { id } = router.query useEffect(() => { fetchPost() async function fetchPost() { if (!id) return const { data } = await supabase .from('posts') .select() .filter('id', 'eq', id) .single() setPost(data) } }, [id]) if (!post) return null function onChange(e) { setPost(() => ({ ...post, [e.target.name]: e.target.value })) } const { title, content } = post async function updateCurrentPost() { if (!title || !content) return await supabase .from('posts') .update([ { title, content } ]) router.push('/my-posts') } return ( <div> <h1 className="text-3xl font-semibold tracking-wide mt-6 mb-2">Edit post</h1> <input onChange={onChange} name="title" placeholder="Title" value={post.title} className="border-b pb-2 text-lg my-4 focus:outline-none w-full font-light text-gray-500 placeholder-gray-500 y-2" /> <SimpleMDE value={post.content} onChange={value => setPost({ ...post, content: value })} /> <button className="mb-4 bg-blue-600 text-white font-semibold px-8 py-2 rounded-lg" onClick={updateCurrentPost}>Update Post</button> </div> ) } export default EditPost
Now, add a new link to our navigation located in pages/_app.js:
// pages/_app.js { user && ( <Link href="/my-posts"> <span className="mr-6 cursor-pointer">My Posts</span> </Link> ) }
When running the app, you should be able to view your own posts, edit them, and delete them from the updated UI.
How to enable real-time updates
Now that we have the app running it's trivial to add real-time updates.
By default, Realtime is disabled on your database. Let's turn on Realtime for the posts table.
To do so, open the app dashboard and click on Databases -> Replication -> 0 Tables (under Source). Toggle on Realtime functionality for the posts table. Here is a video walkthrough of how you can do this for clarity.
Next, open src/index.js and update the useEffect hook with the following code:
useEffect(() => { fetchPosts() const mySubscription = supabase .from('posts') .on('*', () => fetchPosts()) .subscribe() return () => supabase.removeSubscription(mySubscription) }, [])
Now, we will be subscribed to realtime changes in the posts table.
The code for the app is located here.
Next Steps
By now you should have a good understanding of how to build full stack apps with Supabase and Next.js.
If you'd like to learn more about building full stack apps with Supabase, I'd check out the following resources.
If you read this far, tweet to the author to show them you care.
0 notes
Link
Mathias (Matt) Biilmann is CEO of Netlify, a company he co-founded in 2014 and today is one of the fastest growing web development platforms. He has been … More about Mathias ↬ Web-oriented databases, frameworks like Nuxt and Next.js, and even frameworkless approaches are evolving the Jamstack, but the core principles are more powerful than ever.It’s been five years since I first presented the idea of the Jamstack architecture at SmashingConf in San Francisco 2016, a talk inspired by many conversations with colleagues and friends in the industry. At that point, the idea of fundamentally decoupling the front-end web layer from the back-end business logic layer was only an early trend, and not yet a named architectural approach. The New Front-end Stack. Javascript, APIs and Markup. A presentation from 2016 by Matt Biilmann. Watch on VimeoStatic site generators were emerging as a real option for building larger content-driven sites, but the whole ecosystem around them was nascent, and the main generators were pure open-source tools with no commercial presence. Single Page Applications were the basis of some large-scale web apps, like Gmail, but the typical approach to building them was still backend-centric. Fast forward to 2020, Jamstack hit the mainstream, and we saw millions of developers and major brands like Unilever, Nike, and PayPal embrace the architecture. Vital initiatives like the Covid Tracking Project were able to scale from 0 to 2 million API requests on the Jamstack. Frameworks like Nuxt became commercial businesses, and we celebrated large public companies like Microsoft and Cloudflare as they launched early Jamstack offerings. As the commercial space has heated up and the developer community has grown, there’s also been more noise, and we’re even starting to test the boundaries of Jamstack’s best practices. It feels like the right time to both revisit the original vision some of us had five years ago, and look ahead at what the changes in the technological landscape will mean for the future of the Jamstack architecture and the web. Let’s start out by quickly revisiting the core principles that have made the architecture prove popular. Compiling The UIIn the Jamstack architecture, the UI is compiled. The goal is to do the right work at the right times — with a preference for doing as much work as possible ahead of time. Many times, the entire site can be prerendered, perhaps not even requiring a backend once deployed. Decoupled FrontendsDecoupling the frontend from back-end services and platforms enforces a clear contract for how your UI communicates with the rest of the system. This defaults to simplicity: your frontend has a limited contact surface with anything outside itself, making it less complicated to understand how external changes will affect its operation. Pulling Data As NeededOf course, not everything can be prerendered, and the Jamstack architecture is capable of delivering dynamic, personalized web apps as well as more globally consistent content. Requesting data from the frontend can power some rich and dynamic applications. A good example is the frontend of our own Netlify UI, which is itself a Jamstack application built and run on Netlify. We pre-compile an app shell, then use asynchronous requests to hit our API to load data about our users and their sites. Whether you’re using REST, GraphQL, or WebSockets, if you’re precompiling as much of the UI as possible and loading data to give your users a dynamic, customized experience, then you’re shipping the Jamstack architecture. Jamstack In 2021 And BeyondThere’s more innovation happening across the Jamstack ecosystem than ever before. You can see a rapid evolution of the back-end services, developer tooling, and client-side technologies that are combining to enable development teams to build experiences for the web that would have seemed out of reach only a couple of years ago. I want to point to three trends I see shaping up for Jamstack developers in the near future: 1. Distributed Persistent Rendering (DPR)More than anything, Jamstack’s inherent simplicity has made the process of building and deploying web applications much easier to reason about. Code and content updates can be pre-rendered as clean, atomic deployments and pushed right to the edge, creating strong guarantees around reliability and performance without the need to manage complex infrastructure. But pre-rendering a larger website may also mean waiting several minutes each time there’s a new deployment. That’s why I think we are seeing so much innovation happening to make builds smarter and faster — especially for larger sites and web apps. Take for example the raw speed of esbuild, the new “extremely fast JavaScript compiler.” A production bundle that may take Parcel or Webpack over a minute to compile can be completed by esbuild in under a second. And build tools like Vite and Snowpack lean on native ES modules to make local development feel nearly instantaneous. Like the assets generated during a build, those rendered by DPR at request time would remain in the CDN cache until invalidated by the successful completion of a new deploy. This would allow developers to consider the assets rendered during a deploy, and those rendered on demand from requests to DPR functions contained in that deploy, as all belonging to the same logical atomic deploy. (Large preview)In the React ecosystem, some newer frameworks like Remix or Blitz are starting to lean more on the “run everything on a server” approach we’ve all known in the past. There’s a risk of bringing back much of the complexity we’ve worked to escape. Layers of caching can help make server-side apps more performant, but developers lose the guarantees of atomic deployments that make Jamstack apps easy to reason about. Blitz seems to be moving the monolith into the frontend. This can make full-stack apps runnable on typical Jamstack platforms, but without any clear decoupling between the web experience layer and the back-end business logic layer. I think decoupling the frontend from the backend is fundamental to the Jamstack approach and responsible for unlocking so many of its benefits. What I see gaining real momentum are the “hybrid” frameworks like Next.js, Nuxt.js, and SvelteKit that allow developers to seamlessly mix pages pre-rendered at build time with other routes that are rendered via serverless functions. The challenge is that serverless functions (while certainly scalable) have their own set of performance implications. Ultimately, I see the community moving towards an extremely powerful trio that provides Jamstack developers request-level control over the performance profile of any site or application: Delivering pages entirely pre-rendered at build time,Delivering pages dynamically via serverless functions, orBuilding pages on-demand that then persist as static CDN assets.Next.js has done quite a bit of work on a concept of Incremental Static Regeneration. The idea is to ensure high-performance pages by paring serverless functions with different caching strategies like Stale While Revalidate. While the idea of distributing some of the builds to an on-demand approach that still includes strong caching guarantees is a powerful technique, unless developers explicitly opt-out of the stale-while-revalidate approach, the atomic deploy guarantee will be violated by serving a mix of stale and fresh assets from different deploys. Currently the benefits of ISR are also exclusive to a singular framework and only deeply integrated into the offerings of a single provider. At Netlify, we see a lot of promise in the idea of allowing developers to render critical pages at build time, while deferring other pages (like older blog posts, for example) to be built only when and if they are requested. We’re calling the approach Distributed Persistent Rendering or DPR. It’s an architecture for incremental builds that can be compatible across almost every framework and Jamstack site generator, from 11ty to Nuxt to Next.js. DPR will dramatically reduce upfront build times for larger sites, solving a core criticism of static site generation. On Jamstack.org, we’ve opened a Request For Comments to involve the entire community in our efforts to give developers more options for how pages are rendered while adhering closely to the principles that have made Jamstack so popular. By giving this architecture a name and refining it with community input, we can help Jamstack developers build patterns around it — regardless of the framework. 2. Streaming Updates From The Data LayerIf you develop web applications, you’ve likely followed the evolution of state management libraries as developers have built more and more complex web interfaces using tools like React, Vue, and Svelte. But state management has largely been an in-browser and in-memory concern. Each browser tab essentially has its own state, but can be quite complex to connect that local browser state of your application back to the data services that power it. Luckily, this is improving as more and more services now support real-time data subscriptions. Hasura, OneGraph, and Supabase all offer this capability and I only expect to see wider adoption across all providers as the underlying data stores are cached and distributed to the edge for fast global performance. Take Twillio’s expanding APIs: they now not only offer streaming video but also streaming “data tracks,” which can be used to create complex collaboration apps that stay continually synchronized across participants. Finally, new providers are emerging that aggregate data across back-end services. Whether or not you use GraphQL as a query language, it’s really compelling to imagine the power of connecting your UI to a single, standard stream of updates from multiple underlying APIs. 3. Developer Collaboration Goes MainstreamThe Jamstack is built on a Git workflow — an approach that scales really well to larger development teams. But going forward, we’ll start to see how these traditionally developer-focused tools will expand to involve everyone across the company: developers, sure, but also writers, editors, designers, and SEO experts. When you think of collaboration, you tend to think of synchronous edits—the multiple cursors that fly around a Google Doc, for example. We are seeing that style of live collaboration come to CMS tools like Sanity and design tools like Figma. But so much work often happens asynchronously, and non-developers traditionally haven’t enjoyed the powerful tools that developers use to seamlessly branch, stage, and merge changes with collaborative discussion attached to each pull request. Early on in the Jamstack, some clever git-based CMS tools emerged to help non-developers manage content like code — perhaps without even knowing that each change they made was being git-committed just like a developer working from the terminal. We’re now starting to see new tools tackle visual page edits in a way that remains compatible with popular Jamstack site generators like Gatsby and Next.js. All of this lowers the bar to collaboration for non-developers and we’ll only see that trend accelerate. And it’s not just non-developers joining in on the collaboration: deep integrations between tools are bringing more automated contributions into our dev, build, and deploy workflows. Just browse the comment history on a GitHub pull request to see how many tools are now integrated to run automated tests and catch errors before they are deployed. Updates to Netlify’s docs, for example, aren’t just linted against our code standards, they are also linted against our content standards, ensuring we stay consistent with our style guide for vocabulary, language, and phrasing. Teams can also now easily tie performance budgets and SEO standards to each deployment, again with alerts and logs tied directly to GitHub issues. I would expect to see those sorts of integrations explode in the coming year, allowing a git-based workflow to underpin not just code changes, but also content, data, design assets — you name it. Friendly interfaces into these Git workflows will allow more contributors to comment, commit, and collaborate and bring developer productivity tooling further into the mainstream. Enabling Scale And Dynamic Use CasesWhile Jamstack stays true to the core concepts of decoupling the frontend from the backend and maintaining immutable and atomic deploys, new build strategies and compute primitives have the potential to unlock extremely large-scale sites and dynamic, real-time web applications. Jamstack developers — and now entire web teams, marketers, and product managers — have much to look forward to in this space. Further Reading And References“How The COVID Tracking Project Scaled From 0 To 2M API Requests In 3 Months,” Netlify, Netlify Blog“Incremental Static Regeneration: Its Benefits And Its Flaws,” Cassidy Williams, Netlify Blog“Distributed Persistent Rendering: A New Jamstack Approach For Faster Builds,” Matt Biilmann, Netlify BlogGlossary, Jamstack.org (vf, il)
0 notes
Text
Consistent Backends and UX: Why Should You Care?
Article Series
Why should you care?
What can go wrong? (Coming soon)
What are the barriers to adoption? (Coming soon)
How do new algorithms help? (Coming soon)
More than ever, new products aim to make an impact on a global scale, and user experience is rapidly becoming the determining factor for whether they are successful or not. These properties of your application can significantly influence the user experience:
Performance & low latency
The application does what you expect
Security
Features and UI
Let's begin our quest toward the perfect user experience!
1) Performance & Low Latency
Others have said it before; performance is user experience (1, 2). When you have caught the attention of potential visitors, a slight increase in latency can make you lose that attention again.
2) The application does what you expect
What does ‘does what you expect’ even mean? It means that if I change my name in my application to ‘Robert’ and reload the application, my name will be Robert and not Brecht. It seems important that an application delivers these guarantees, right?
Whether the application can deliver on these guarantees depends on the database. When pursuing low latency and performance, we end up in the realm of distributed databases where only a few of the more recent databases deliver these guarantees. In the realm of distributed databases, there might be dragons, unless we choose a strongly (vs. eventually) consistent database. In this series, we’ll go into detail on what this means, which databases provide this feature called strong consistency, and how it can help you build awesomely fast apps with minimal effort.
3) Security
Security does not always seem to impact user experience at first. However, as soon as users notice security flaws, relationships can be damaged beyond repair.
4) Features and UI
Impressive features and great UI have a great impact on the conscious and unconscious mind. Often, people only desire a specific product after they have experienced how it looks and feels.
If a database saves time in setup and configuration, then the rest of our efforts can be focused on delivering impressive features and a great UI. There is good news for you; nowadays, there are databases that deliver on all of the above, do not require configuration or server provisioning, and provide easy to use APIs such as GraphQL out-of-the-box.
What is so different about this new breed of databases? Let’s take a step back and show how the constant search for lower latency and better UX, in combination with advances in database research, eventually led to a new breed of databases that are the ideal building blocks for modern applications.
The Quest for distribution
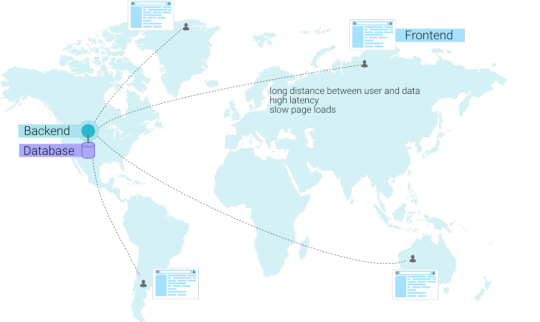
I. Content delivery networks
As we mentioned before, performance has a significant impact on UX. There are several ways to improve latency, where the most obvious is to optimize your application code. Once your application code is quite optimal, network latency and write/read performance of the database often remain the bottleneck. To achieve our low latency requirement, we need to make sure that our data is as close to the client as possible by distributing the data globally. We can deliver the second requirement (write/read performance) by making multiple machines work together, or in other words, replicating data.
Distribution leads to better performance and consequently to good user experience. We’ve already seen extensive use of a distribution solution that speeds up the delivery of static data; it’s called a Content Delivery Network (CDN). CDNs are highly valued by the Jamstack community to reduce the latency of their applications. They typically use frameworks and tools such as Next.js/Now, Gatsby, and Netlify to preassemble front end React/Angular/Vue code into static websites so that they can serve them from a CDN.

Unfortunately, CDNs aren't sufficient for every use case, because we can’t rely on statically generated HTML pages for all applications. There are many types of highly dynamic applications where you can’t statically generate everything. For example:
Applications that require real-time updates for instantaneous communication between users (e.g., chat applications, collaborative drawing or writing, games).
Applications that present data in many different forms by filtering, aggregating, sorting, and otherwise manipulating data in so many ways that you can’t generate everything in advance.
II. Distributed databases
In general, a highly dynamic application will require a distributed database to improve performance. Just like a CDN, a distributed database also aims to become a global network instead of a single node. In essence, we want to go from a scenario with a single database node...
...to a scenario where the database becomes a network. When a user connects from a specific continent, he will automatically be redirected to the closest database. This results in lower latencies and happier end users.

If databases were employees waiting by a phone, the database employee would inform you that there is an employee closer by, and forward the call. Luckily, distributed databases automatically route us to the closest database employee, so we never have to bother the database employee on the other continent.

Distributed databases are multi-region, and you always get redirected to the closest node.
Besides latency, distributed databases also provide a second and a third advantage. The second is redundancy, which means that if one of the database locations in the network were completely obliterated by a Godzilla attack, your data would not be lost since other nodes still have duplicates of your data.

Distributed databases provide redundancy which can save your application when things go wrong.

Distributed databases divide the load by scaling up automatically when the workload increases.
Last but not least, the third advantage of using a distributed database is scaling. A database that runs on one server can quickly become the bottleneck of your application. In contrast, distributed databases replicate data over multiple servers and can scale up and down automatically according to the demands of the applications. In some advanced distributed databases, this aspect is completely taken care of for you. These databases are known as "serverless", meaning you don’t even have to configure when the database should scale up and down, and you only pay for the usage of your application, nothing more.
Distributing dynamic data brings us to the realm of distributed databases. As mentioned before, there might be dragons. In contrast to CDNs, the data is highly dynamic; the data can change rapidly and can be filtered and sorted, which brings additional complexities. The database world examined different approaches to achieve this. Early approaches had to make sacrifices to achieve the desired performance and scalability. Let’s see how the quest for distribution evolved.

Traditional databases' approach to distribution
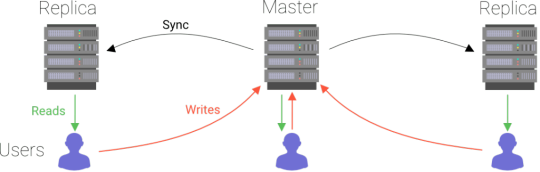
One logical choice was to build upon traditional databases (MySQL, PostgreSQL, SQL Server) since so much effort has already been invested in them. However, traditional databases were not built to be distributed and therefore took a rather simple approach to distribution. The typical approach to scale reads was to use read replicas. A read replica is just a copy of your data from which you can read but not write. Such a copy (or replica) offloads queries from the node that contains the original data. This mechanism is very simple in that the data is incrementally copied over to the replicas as it comes in.
Due to this relatively simple approach, a replica’s data is always older than the original data. If you read the data from a replica node at a specific point in time, you might get an older value than if you read from the primary node. This is called a "stale read". Programmers using traditional databases have to be aware of this possibility and program with this limitation in mind. Remember the example we gave at the beginning where we write a value and reread it? When working with traditional database replicas, you can’t expect to read what you write.
You could improve the user experience slightly by optimistically applying the results of writes on the front end before all replicas are aware of the writes. However, a reload of the webpage might return the UI to a previous state if the update did not reach the replica yet. The user would then think that his changes were never saved.
The first generation of distributed databases
In the replication approach of traditional databases, the obvious bottleneck is that writes all go to the same node. The machine can be scaled up, but will inevitably bump into a ceiling. As your app gains popularity and writes increase, the database will no longer be fast enough to accept new data. To scale horizontally for both reads and writes, distributed databases were invented. A distributed database also holds multiple copies of the data, but you can write to each of these copies. Since you update data via each node, all nodes have to communicate with each other and inform others about new data. In other words, it is no longer a one-way direction such as in the traditional system.

However, these kinds of databases can still suffer from the aforementioned stale reads and introduce many other potential issues related to writes. Whether they suffer from these issues depends on what decision they took in terms of availability and consistency.
This first generation of distributed databases was often called the "NoSQL movement", a name influenced by databases such as MongoDB and Neo4j, which also provided alternative languages to SQL and different modeling strategies (documents or graphs instead of tables). NoSQL databases often did not have typical traditional database features such as constraints and joins. As time passed, this name appeared to be a terrible name since many databases that were considered NoSQL did provide a form of SQL. Multiple interpretations arose that claimed that NoSQL databases:
do not provide SQL as a query language.
do not only provide SQL (NoSQL = Not Only SQL)
do not provide typical traditional features such as joins, constraints, ACID guarantees.
model their data differently (graph, document, or temporal model)
Some of the newer databases that were non-relational yet offered SQL were then called "NewSQL" to avoid confusion.
Wrong interpretations of the CAP theorem
The first generation of databases was strongly inspired by the CAP theorem, which dictates that you can't have both Consistency and Availability during a network Partition. A network partition is essentially when something happens so that two nodes can no longer talk to each other about new data, and can arise for many reasons (e.g., apparently sharks sometimes munch on Google's cables). Consistency means that the data in your database is always correct, but not necessarily available to your application. Availability means that your database is always online and that your application is always able to access that data, but does not guarantee that the data is correct or the same in multiple nodes. We generally speak of high availability since there is no such thing as 100% availability. Availability is mentioned in digits of 9 (e.g. 99.9999% availability) since there is always a possibility that a series of events cause downtime.

Visualization of the CAP theorem, a balance between consistency and availability in the event of a network partition. We generally speak of high availability since there is no such thing as 100% availability.
But what happens if there is no network partition? Database vendors took the CAP theorem a bit too generally and either chose to accept potential data loss or to be available, whether there is a network partition or not. While the CAP theorem was a good start, it did not emphasize that it is possible to be highly available and consistent when there is no network partition. Most of the time, there are no network partitions, so it made sense to describe this case by expanding the CAP theorem into the PACELC theorem. The key difference is the three last letters (ELC) which stand for Else Latency Consistency. This theorem dictates that if there is no network partition, the database has to balance Latency and Consistency.
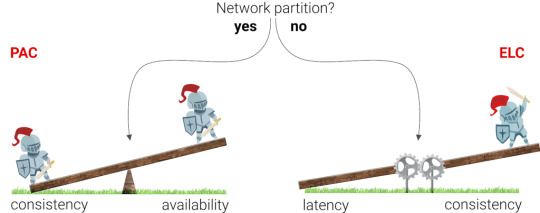
According to the PACELC theorem, increased consistency results in higher latencies (during normal operation).
In simple terms: when there is no network partition, latency goes up when the consistency guarantees go up. However, we’ll see that reality is still even more subtle than this.
How is this related to User Experience?
Let’s look at an example of how giving up consistency can impact user experience. Consider an application that provides you with a friendly interface to compose teams of people; you drag and drop people into different teams.

Once you drag a person into a team, an update is triggered to update that team. If the database does not guarantee that your application can read the result of this update immediately, then the UI has to apply those changes optimistically. In that case, bad things can happen:
The user refreshes the page and does not see his update anymore and thinks that his update is gone. When he refreshes again, it is suddenly back.
The database did not store the update successfully due to a conflict with another update. In this case, the update might be canceled, and the user will never know. He might only notice that his changes are gone the next time he reloads.
This trade-off between consistency and latency has sparked many heated discussions between front-end and back-end developers. The first group wanted a great UX where users receive feedback when they perform actions and can be 100% sure that once they receive this feedback and respond to it, the results of their actions are consistently saved. The second group wanted to build a scalable and performant back end and saw no other way than to sacrifice the aforementioned UX requirements to deliver that.
Both groups had valid points, but there was no golden bullet to satisfy both. When the transactions increased and the database became the bottleneck, their only option was to go for either traditional database replication or a distributed database that sacrificed strong consistency for something called "eventual consistency". In eventual consistency, an update to the database will eventually be applied on all machines, but there is no guarantee that the next transaction will be able to read the updated value. In other words, if I update my name to "Robert", there is no guarantee that I will actually receive "Robert" if I query my name immediately after the update.
Consistency Tax
To deal with eventual consistency, developers need to be aware of the limitations of such a database and do a lot of extra work. Programmers often resort to user experience hacks to hide the database limitations, and back ends have to write lots of additional layers of code to accommodate for various failure scenarios. Finding and building creative solutions around these limitations has profoundly impacted the way both front- and back-end developers have done their jobs, significantly increasing technical complexity while still not delivering an ideal user experience.
We can think of this extra work required to ensure data correctness as a “tax” an application developer must pay to deliver good user experiences. That is the tax of using a software system that doesn’t offer consistency guarantees that hold up in todays webscale concurrent environments. We call this the Consistency Tax.
Thankfully, a new generation of databases has evolved that does not require you to pay the Consistency Tax and can scale without sacrificing consistency!
The second generation of distributed databases
A second generation of distributed databases has emerged to provide strong (rather than eventual) consistency. These databases scale well, won't lose data, and won't return stale data. In other words, they do what you expect, and it's no longer required to learn about the limitations or pay the Consistency Tax. If you update a value, the next time you read that value, it always reflects the updated value, and different updates are applied in the same temporal order as they were written. FaunaDB, Spanner, and FoundationDB are the only databases at the time of writing that offer strong consistency without limitations (also called Strict serializability).
The PACELC theorem revisited
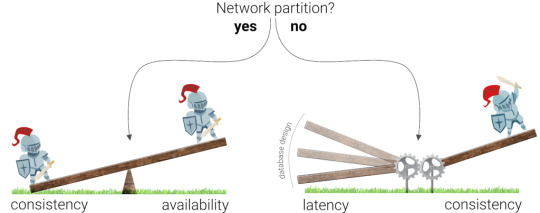
The second generation of distributed databases has achieved something that was previously considered impossible; they favor consistency and still deliver low latencies. This became possible due to intelligent synchronization mechanisms such as Calvin, Spanner, and Percolator, which we will discuss in detail in article 4 of this series. While older databases still struggle to deliver high consistency guarantees at lower latencies, databases built on these new intelligent algorithms suffer no such limitations.
Database designs influence the attainable latency at high consistency greatly.
Since these new algorithms allow databases to provide both strong consistency and low latencies, there is usually no good reason to give up consistency (at least in the absence of a network partition). The only time you would do this is if extremely low write latency is the only thing that truly matters, and you are willing to lose data to achieve it.

intelligent algorithms result in strong consistency and relatively low latencies
Are these databases still NoSQL?
It's no longer trivial to categorize this new generation of distributed databases. Many efforts are still made (1, 2) to explain what NoSQL means, but none of them still make perfect sense since NoSQL and SQL databases are growing towards each other. New distributed databases borrow from different data models (Document, Graph, Relational, Temporal), and some of them provide ACID guarantees or even support SQL. They still have one thing in common with NoSQL: they are built to solve the limitations of traditional databases. One word will never be able to describe how a database behaves. In the future, it would make more sense to describe distributed databases by answering these questions:
Is it strongly consistent?
Does the distribution rely on read-replicas, or is it truly distributed?
What data models does it borrow from?
How expressive is the query language, and what are its limitations?
Conclusion
We explained how applications can now benefit from a new generation of globally distributed databases that can serve dynamic data from the closest location in a CDN-like fashion. We briefly went over the history of distributed databases and saw that it was not a smooth ride. Many first-generation databases were developed, and their consistency choices--which were mainly driven by the CAP theorem--required us to write more code while still diminishing the user experience. Only recently has the database community developed algorithms that allow distributed databases to combine low latency with strong consistency. A new era is upon us, a time when we no longer have to make trade-offs between data access and consistency!
At this point, you probably want to see concrete examples of the potential pitfalls of eventually consistent databases. In the next article of this series, we will cover exactly that. Stay tuned for these upcoming articles:
Article Series
Why should you care?
What can go wrong? (Coming soon)
What are the barriers to adoption? (Coming soon)
How do new algorithms help? (Coming soon)
The post Consistent Backends and UX: Why Should You Care? appeared first on CSS-Tricks.
Consistent Backends and UX: Why Should You Care? published first on https://deskbysnafu.tumblr.com/
0 notes
Text
STAR Apps: A New Generation of Front-End Tooling for Development Workflows
Product teams from AirBnb and New York Times to Shopify and Artsy (among many others) are converging on a new set of best practices and technologies for building the web apps that their businesses depend on. This trend reflects core principles and solve underlying problems that we may share, so it is worth digging deeper.
Some of that includes:
Visual consistency: Presented as a design system (not to be confused with a pattern library or style guide) often built with libraries like styled-components and tools like Storybook.
Internal consistency: Created with static typing tools like TypeScript.
Data manipulation: These work with GraphQL-speaking clients like Apollo.
Data representation: Displayed with a library for reusable components and behaviors, like React.
Naming things is hard, and our industry has struggled to name this new generation of tooling for web apps. The inimitable Orta Theroux calls it an Omakase; I slimmed it down and opted for a simpler backronym pulled from letters in the tooling outlined above: STAR (Design Systems, TypeScript, Apollo, and React).
STAR apps are not "yet another front-end stack." They involve additional opinions and constraints. As such, STAR apps aren’t necessarily easy, either. They have a learning curve. A solo developer may find STAR apps unnecessarily verbose because they front-load communication overhead. STAR apps are more about product team workflow than they are about any specific technology.
However, we find that companies upon companies are finding this stack to be a worthwhile investment. We should ask why.
Context: From LAMP to MEAN
The LAMP stack was identified in 1998 by Michael Kunze to describe the combination of Linux, Apache, MySQL, and PHP as predominant open source technologies to write a full web server. In this model, all rendering and logic was done on the server side, and the role of JavaScript was extremely limited. To this day, this is the most common website architecture due to the popularity of long established frameworks like WordPress, which powers 30% of the Internet.
In the ensuing 20 years, the growth of the web platform (JavaScript in particular), led to a evolution of the "front end" discipline, as a complement to "back end" server-side concerns. Through a combination of Atwood’s Law and Metcalfe’s predictions on the triumph of the web over native platforms, these efforts culminated in a re-imagining of the monolithic architecture to straddle both front and back ends. One prominent encapsulation of this was the MEAN stack, coined by Val Karpov in 2013, to offer "full-stack" JavaScript alternatives, including MongoDB (for NoSQL data storage), Express and Node (to write web servers), and Angular (for writing reactive user interfaces).
What’s changed
However, in the last five years, multiple trends have chipped away at the MEAN stack and the ideal of the full-stack JavaScript monolith:
Instead of every developer writing bespoke endpoints, APIs have become an economy of their own with companies like Stripe, Twilio and Zapier growing purely through the strength of their APIs.
The acquisition of Firebase and launch of AWS Lambda in 2014 — and the subsequent serverless revolution — has made the concept of doing your own undifferentiated server management and reliability engineering far less appealing.
As for proprietary backends, it was clear that not all backend environments were going to be written in JavaScript, particularly with the continuing strength other language frameworks, including Rails, Laravel and .NET, and emerging languages like Go. Even the creators of Express.js and Node.js wound up abandoning JavaScript development altogether.
This has meant that the product engineer’s stack and primary work has shifted even more toward the front end over what was envisioned by the MEAN stack. Chris has described this as a phenomenon that gives extraordinary powers to front-end developers because of the trend toward front-end tooling for what's traditionally been considered back-end territory. Front-end engineering has also evolved, mostly by incrementally adding a constraint layer on top of what we already use — adding a design philosophy, types, schemas, and component structure to how we make our apps.
Why all this change? Stop changing things!
The truth is that we now live in a world where product and business needs now have requirements to bring web app (including mobile web) engineering on par with Android, iOS, and desktop native app development, while our disparate web development tools are still woefully inadequate in comparison to those tightly scoped ecosystems. It’s not that there’s anything inherently wrong with older toolsets or that the new ones are perfect. Instead, the changes can be seen as responses to the underlying needs of product teams:
Stronger types: Type-checking isn’t a panacea, nor does it replace the need for tests, but it does enable better tooling and increase code confidence. TypeScript and GraphQL do this for clients and APIs, as Chris Toomey of thoughtbot has shown. Lauren Tan of Netflix has taken this idea even further to propose a full end-to-end Strongly Typed Graph.
Integrated designer/developer workflows: A reliance on manual code tests and design reviews doesn’t scale. Design systems now are comprehensive documentation on the how and why of reusable components across an organization. Brad Frost has shown how to set up "workshop" and "storefront" environments for a style guide and design system workflow using Gatsby. Design tools, like Sketch and Framer, have even begun to tightly integrate React and design into streamlined workflows. TypeScript and GraphQL both also offer tightly coupled self-documenting features with TSDoc, GraphiQL, and related IDE integrations.
Optimized for change: As product teams embrace iterative agile sprints and split testing, it is increasingly important to use flexible paradigms that embrace incremental adjustments. Dan Abramov of the React team calls this "second order" API design — robustness to changing requirements. Design Systems and React make it easy to compose reusable components at breakneck pace, with TypeScript dramatically shortening feedback loops. Adam Neary of Airbnb shows a wonderful example of refactoring and iterating with React and Apollo GraphQL in production.
Note that "product teams" in this article primarily refer to product engineering teams, though it is often the case that product design and product management are co-located or have heavy, frequent input. Engineering workflows must explicitly take them into account as a result.
Remaining frontiers
Believe it or not, I am being descriptive, rather than prescriptive; I’m not recommending that everybody throw out their code and start writing STAR apps. Rather, I am observing and calling out what I see as a trend where great product teams are all converging on this new pattern. And they just may be on to something.
However, I don’t believe the evolution has reached its conclusion. There are still too many important aspects of modern web app development that need broader consensus, which has resulted in a hodgepodge of custom or one-off solutions and checklists. A big one is performance. The average amount of JavaScript shipped on desktop and mobile has doubled in the last five years. All the wonderful web app engineering in the world will be for nothing if the user navigates away before it loads. The traditional solution has been (often hand-rolled) server-side rendering that's later managed by frameworks like Next.js and After.js. However, this does still require running and managing a server, so static rendering solutions like Gatsby and React-Static have become popular to render apps straight to static markup to be lazily rehydrated later (the last piece of the JAMstack). Progressive Web App technology and patterns help make subsequent loads even faster and serve as a viable alternative to native experiences.
To be continued...
As this story continues to unfold, I believe that a lot more exploration and experimentation needs to happen to smooth the learning curve for more teams to adopt STAR app workflows. In fact, I am learning about it myself in the open at STAR Labs and invite you to tag along. If you have experiences to share or questions to ask, I am all ears.
The post STAR Apps: A New Generation of Front-End Tooling for Development Workflows appeared first on CSS-Tricks.
😉SiliconWebX | 🌐CSS-Tricks
0 notes
Text
Build a dynamic JAMstack app with GatsbyJS and FaunaDB
In this article, we explain the difference between single-page apps (SPAs) and static sites, and how we can bring the advantages of both worlds together in a dynamic JAMstack app using GatsbyJS and FaunaDB. We will build an application that pulls in some data from FaunaDB during build time, prerenders the HTML for speedy delivery to the client, and then loads additional data at run time as the user interacts with the page. This combination of technologies gives us the best attributes of statically-generated sites and SPAs.
In short…<deep breath>...auto-scaling distributed websites with low latency, snappy user interfaces, no reloads, and dynamic data for everyone!
Heavy backends, single-page apps, static sites
In the old days, when JavaScript was new, it was mainly only used to provide effects and improved interactions. Some animations here, a drop-down there, and that was it. The grunt work was performed on the backend by Perl, Java, or PHP.
This changed as time went on: client code became heavier, and JavaScript took over more and more of the frontend until we finally shipped mostly empty HTML and rendered the whole UI in the browser, leaving the backend to supply us with JSON data.
This led to a neat separation of concerns and allowed us to build whole applications with JavaScript, called Single Page Applications (SPAs). The most important advantage of SPAs was the absence of reloads. You could click on a link to change what's displayed, without triggering a complete reload of the page. This in itself provided a superior user experience. However, SPAs increased the size of the client code significantly; a client now had to wait for the sum of several latencies:
Serving latency: retrieving the HTML and JavaScript from the server where the JavaScript was bigger than it used to be
Data loading latency: loading additional data requested by the client
Frontend framework rendering latency: once the data is received, a frontend framework like React, Vue, or Angular still has to do a lot of work to construct the final HTML
A royal metaphor

We can analogize the loading a SPA with the building and delivery of a toy castle. The client needs to retrieve the HTML and JavaScript, then retrieve the data, and then still has to assemble the page. The building blocks are delivered, but they still need to be put together after they're delivered.
If only there were a way to build the castle beforehand...
Enter the JAMstack
JAMstack applications consist of JavaScript, APIs and Markup. With today's static site generators like Next.js and GatsbyJS, the JavaScript and Markup parts can be bundled up into a static package and deployed via a Content Delivery Network (CDN) that delivers files to a browser. A CDN geographically distributes the bundles, and other assets, to multiple locations. When a user’s browser fetches the bundle and assets, it can receive them from the closest location on the network, which reduces the serving latency.
Continuing our toy castle analogy, JAMstack apps are different from SPAs in the sense that the page (or castle) is delivered pre-assembled. We have a lower latency since we receive the castle in one piece and no longer have to build it.

Making static JAMstack apps dynamic with hydration
In the JAMstack approach, we start with a dynamic application and prerender static HTML pages to be delivered via a speedy CDN. But what if a fully static site is not sufficient and we need to support some dynamic content as the user interacts with individual components, without reloading the entire page? That's where client-side hydration comes in.
Hydration is the client-side process by which the server-side rendered HTML (DOM) is "watered" by our frontend framework with event handlers and/or dynamic components to make it more interactive. This can be tricky because it depends on reconciling the original DOM with a new virtual DOM (VDOM) that's kept in memory as the user interacts with the page. If the DOM and VDOM trees do not match, bugs can arise that cause elements to be displayed out of order, or necessitate rebuilding the page.
Luckily, libraries like GatsbyJS and NextJS have been designed so as to minimize the possibility of such hydration-related bugs, handling everything for you out-of-the-box with only a few lines of code. The result is a dynamic JAMstack web application that is simultaneously both faster and more dynamic than the equivalent SPA.
One technical detail remains: where will the dynamic data come from?
Distributed frontend-friendly databases!
JAMstack apps typically rely on APIs (ergo the "A" in JAM), but if we need to load any kind of custom data, we need a database. And traditional databases are still a performance bottleneck for globally distributed sites that are otherwise delivered via CDN, because traditional databases are only located in one region. Instead of using a traditional database, we’d like our database to be on a distributed network, just like the CDN, that serves the data from a location as close as possible to wherever our clients are. This type of database is called a distributed database.
In this example, we’ll choose FaunaDB since it is also strongly consistent, which means that our data will be the same wherever my clients access it from and data won’t be lost. Other features that work particularly well with JAMstack applications are that (a) the database is accessed as an API (GraphQL or FQL) and does not require you to open a connection, and (b) the database has a security layer that makes it possible to access both public and private data in a secure way from the frontend. The implications of that are we can keep the low latencies of JAMstack without having to scale a backend, all with zero configuration.
Let's compare the process of loading a hydrated static site with the building of the toy castle. We still have lower latencies thanks to the CDN, but also less data since most the site is statically generated and therefore requires less rendering. Only a small part of the castle (or, the dynamic part of the page) needs to be assembled after it has been delivered:

Example app with GatsbyJS & FaunaDB
Let’s build an example application that loads data from FaunaDB at build time and renders it to static HTML, then loads additional dynamic data inside the client browser at run time. For this example, we use GatsbyJS, a JAMstack framework based on React that prerenders static HTML. Since we use GatsbyJS, we can code our website completely in React, generate and deliver the static pages, and then load additional data dynamically at run time. We’ll use FaunaDB as our fully managed serverless database solution. We will build an application where we can list products and reviews.
Let’s look at an outline of what we have to do to get our example app up and running and then go through every step in detail.
Set up a new database
Add a GraphQL schema to the database
Seed the database with mock-up data
Create a new GatsbyJS project
Install NPM packages
Create the server key for the database
Update GatsbyJS config files with server key and new read-only key
Load the pre-rendered product data at build time
Load the reviews at run time
1. Set up a new database
Before you start, create an account on dashboard.fauna.com. Once you have an account, let’s set up a new database. It should hold products and their reviews, so we can load the products at build-time and the reviews in the browser.
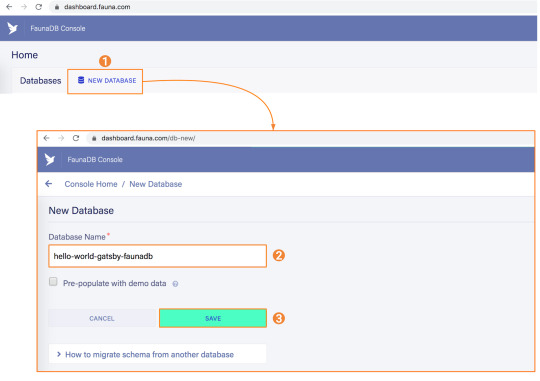
2. Add a GraphQL schema to the database
Next, we use the server key to upload a GraphQL schema to our database. For this, we create a new file called schema.gql that has the following content:
type Product { title: String! description: String reviews: [Review] @relation } type Review { username: String! text: String! product: Product! } type Query { allProducts: [Product] }
You can upload your schema.gql file via the FaunaDB Console by clicking "GraphQL" on the left sidebar, and then click the "Import Schema" button.
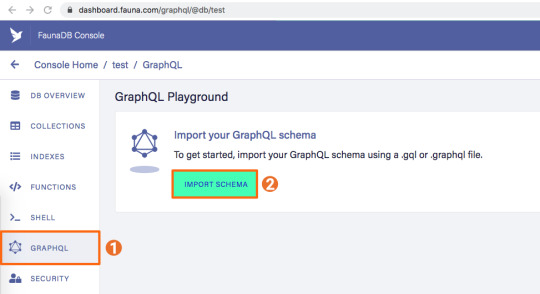
Upon providing FaunaDB with a GraphQL schema, it automatically creates the required collections for the entities in our schema (products and reviews). Besides that, it also creates the indexes that are needed to interact with those collections in a meaningful and efficient manner. You should now be presented with a GraphQL playground where you can test out
3. Seed the database with mock-up data
To seed our database with products and reviews, we can use the Shell at dashboard.fauna.com:
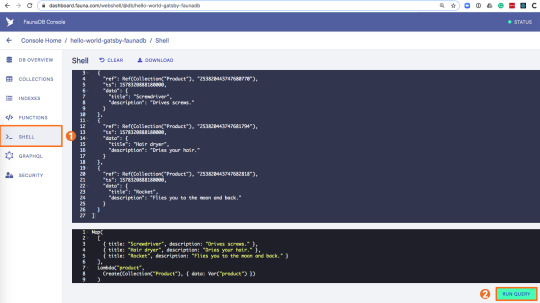
To create some data, we’ll use the Fauna Query Language (FQL), after that we’ll continue with GraphQL to build are example application. Paste the following FQL query into the Shell to create three product documents:
Map( Paginate(Match(Index("allProducts"))), Lambda("ref", Create(Collection("Review"), { data: { username: "Tina", text: "Good product!", product: Var("ref") } })) );
We can then write a query that retrieves the products we just made and creates a review document for every product document:
Map( Paginate(Match(Index("allProducts"))), Lambda("ref", Create(Collection("Review"), { data: { username: "Tina", text: "Good product!", product: Var("ref") } })) );
Both types of documents will be loaded via GraphQL. However, there is a significant difference between products and reviews. The former will not change a lot and is relatively static, while the second is user-driven. GatsbyJS allows us to load data in two ways:
data that is loaded at build time which will be used to generate the static site.
data that is loaded live at request time as a client visits and interacts with your website.
In this example, we chose to let the products be loaded at build time, and the reviews to be loaded on-demand in the browser. Therefore, we get static HTML product pages served by a CDN that the user immediately sees. Then, as our user interacts with the product page, we load the data for the reviews.
4. Create a new GatsbyJS project
The following command creates a GatsbyJS project based on the starter template:
$ npx gatsby-cli new hello-world-gatsby-faunadb $ cd hello-world-gatsby-faunadb
5. Install npm packages
In order to build our new project with Gatsby and Apollo, we need a few additional packages. We can install the packages with the following command:
$ npm i gatsby-source-graphql apollo-boost react-apollo
We will use gatsby-source-graphql as a way to link GraphQL APIs into the build process. Using this library, you can make a GraphQL call from which the results will be automagically provided as the properties for your react component. That way, you can use dynamic data to statically generate your application. The apollo-boost package is an easily configurable GraphQL library that will be used to fetch data on the client. Finally, the link between Apollo and React will be taken care of by the react-apollo library.
6. Create the server key for the database
We will create a Server key which will be used by Gatsby to prerender the page. Remember to copy the secret somewhere since we will use it later on. Protect server keys carefully, they can be used to create, destroy, or manage the database to which they are assigned. To create the key we can go to the fauna dashboard and create the key in the security tab.

7. Update GatsbyJS config files with server and new read-only keys
To add the GraphQL support to our build process, we need to add the following code into our graphql-config.js inside the plugins section where we will insert the FaunaDB server key which we generated a few moments ago.
{ resolve: "gatsby-source-graphql", options: { typeName: "Fauna", fieldName: "fauna", url: "https://graphql.fauna.com/graphql", headers: { Authorization: "Bearer <SERVER KEY>", }, }, }
For the GraphQL access to work in the browser, we have to create a key that only has permissions to read data from the collections. FaunaDB has an extensive security layer in which you can define that. The easiest way is to go to the FaunaDB Console at dashboard.fauna.com and create a new role for your database by clicking "Security" in the left sidebar, then "Manage Roles," then "New Custom Role":

Call the new custom role ‘ClientRead’ and make sure to add all collections and indexes (these are the collections that were created by importing the GraphQL schema). Then, select Read for each for them. Your screen should look like this:
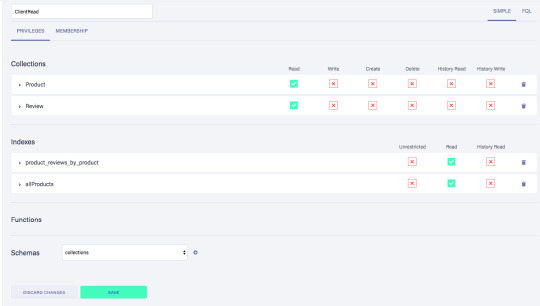
You have probably noticed the Membership tab on this page. Although we are not using it in this tutorial, it is interesting enough to explain it since it's an alternative way to get security tokens. In the Membership tab can specify that entities of a collection (let's say we have a 'Users' collection) in FaunaDb are members of a particular role. That means that if you impersonate one of these entities in that collection, the role privileges apply. You impersonate a database entity (e.g. a User) by associating credentials with the entity and using the Login function, which will return a token. That way you can also implement password-based authentication in FaunaDb. We won't use it in this tutorial, but if that interests you, check the FaunaDB authentication tutorial.
Let’s ignore Membership for now, once you have created the role, we can create a new key with the new role. As before, click "Security", then "New Key," but this time select "ClientRead" from the Role dropdown:
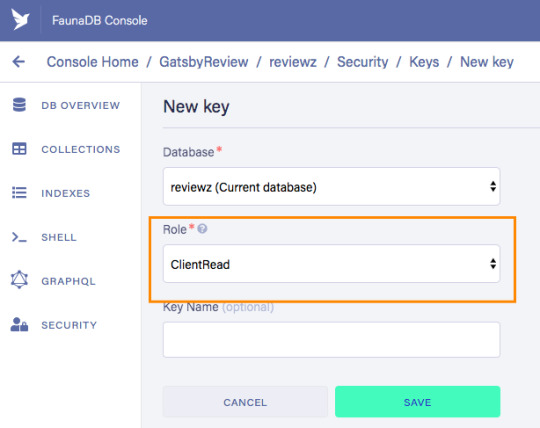
Now, let's insert this read-only key in the gatsby-browser.js configuration file to be able to call the GraphQL API from the browser:
import React from "react" import ApolloClient from "apollo-boost" import { ApolloProvider } from "react-apollo" const client = new ApolloClient({ uri: "https://graphql.fauna.com/graphql", request: operation => { operation.setContext({ headers: { Authorization: "Bearer <CLIENT_KEY>", }, }) }, }) export const wrapRootElement = ({ element }) => ( <ApolloProvider client={client}>{element}</ApolloProvider> )
GatsbyJS will render its Router component as a root element. If we want to use the ApolloClient everywhere in the application on the client, we need to wrap this root element with the ApolloProvider component.
8. Load the pre-rendered product data at build time
Now that everything is set up, we can finally write the actual code to load our data. Let’s start with the products we will load at build time.
For this we need to modify src/pages/index.js file to look like this:
import React from "react" import { graphql } from "gatsby" Import Layout from "../components/Layout" const IndexPage = ({ data }) => ( <Layout> <ul> {data.fauna.allProducts.data.map(product => ( <li>{product.title} - {product.description}</li> ))} </ul> </Layout> ) export const query = graphql` { fauna { allProducts { data { _id title description } } } } ` export default IndexPage
The exported query will automatically get picked up by GatsbyJS and executed before rendering the IndexPage component. The result of that query will be passed as data prop into the IndexPage component.If we now run the develop script, we can see the pre-rendered documents on the development server on http://localhost:8000/.
$ npm run develop
9. Load the reviews at run time
To load the reviews of a product on the client, we have to make some changes to the src/pages/index.js:
import { gql } from "apollo-boost" import { useQuery } from "@apollo/react-hooks" import { graphql } from "gatsby" import React, { useState } from "react" import Layout from "../components/layout" // Query for fetching at build-time export const query = graphql ` { fauna { allProducts { data { _id title description } } } } ` // Query for fetching on the client const GET_REVIEWS = gql ` query GetReviews($productId: ID!) { findProductByID(id: $productId) { reviews { data { _id username text } } } } ` const IndexPage = props => { const [productId, setProductId] = useState(null) const { loading, data } = useQuery(GET_REVIEWS, { variables: { productId }, skip: !productId, }) } export default IndexPage
Let’s go through this step by step.
First, we need to import parts of the apollo-boost and apollo-react packages so we can use the GraphQL client we previously set up in the gatsby-browser.js file.
Then, we need to implement our GET_REVIEWS query. It tries to find a product by its ID and then loads the associated reviews of that product. The query takes one variable, which is the productId.
In the component function, we use two hooks: useState and useQuery
The useState hook keeps track of the productId for which we want to load reviews. If a user clicks a button, the state will be set to the productId corresponding to that button.
The useQuery hook then applies this productId to load reviews for that product from FaunaDB. The skip parameter of the hook prevents the execution of the query when the page is rendered for the first time because productId will be null.
If we now run the development server again and click on the buttons, our application should execute the query with different productIds as expected.
$ npm run develop
Conclusion
A combination of server-side data fetching and client-side hydration make JAMstack applications pretty powerful. These methods enable flexible interaction with our data so we can adhere to different business needs.
It’s usually a good idea to load as much data at build time as possible to improve page performance. But if the data isn’t needed by all clients, or too big to be sent to the client all at once, we can split things up and switch to on-demand loading on the client. This is the case for user-specific data, pagination, or any data that changes rather frequently and might be outdated by the time it reaches the user.
In this article, we implemented an approach that loads part of the data at build time, and then loads the rest of the data in the frontend as the user interacts with the page.
Of course, we have not implemented a login or forms yet to create new reviews. How would we tackle that? That is material for another tutorial where we can use FaunaDB’s attribute-based access control to specify what a client key can read and write from the frontend.
The code of this tutorial can be found in this repo.
The post Build a dynamic JAMstack app with GatsbyJS and FaunaDB appeared first on CSS-Tricks.
via CSS-Tricks https://ift.tt/2RjR7mI
0 notes
Text
Build a dynamic JAMstack app with GatsbyJS and FaunaDB
In this article, we explain the difference between single-page apps (SPAs) and static sites, and how we can bring the advantages of both worlds together in a dynamic JAMstack app using GatsbyJS and FaunaDB. We will build an application that pulls in some data from FaunaDB during build time, prerenders the HTML for speedy delivery to the client, and then loads additional data at run time as the user interacts with the page. This combination of technologies gives us the best attributes of statically-generated sites and SPAs.
In short…<deep breath>...auto-scaling distributed websites with low latency, snappy user interfaces, no reloads, and dynamic data for everyone!
Heavy backends, single-page apps, static sites
In the old days, when JavaScript was new, it was mainly only used to provide effects and improved interactions. Some animations here, a drop-down there, and that was it. The grunt work was performed on the backend by Perl, Java, or PHP.
This changed as time went on: client code became heavier, and JavaScript took over more and more of the frontend until we finally shipped mostly empty HTML and rendered the whole UI in the browser, leaving the backend to supply us with JSON data.
This led to a neat separation of concerns and allowed us to build whole applications with JavaScript, called Single Page Applications (SPAs). The most important advantage of SPAs was the absence of reloads. You could click on a link to change what's displayed, without triggering a complete reload of the page. This in itself provided a superior user experience. However, SPAs increased the size of the client code significantly; a client now had to wait for the sum of several latencies:
Serving latency: retrieving the HTML and JavaScript from the server where the JavaScript was bigger than it used to be
Data loading latency: loading additional data requested by the client
Frontend framework rendering latency: once the data is received, a frontend framework like React, Vue, or Angular still has to do a lot of work to construct the final HTML
A royal metaphor

We can analogize the loading a SPA with the building and delivery of a toy castle. The client needs to retrieve the HTML and JavaScript, then retrieve the data, and then still has to assemble the page. The building blocks are delivered, but they still need to be put together after they're delivered.
If only there were a way to build the castle beforehand...
Enter the JAMstack
JAMstack applications consist of JavaScript, APIs and Markup. With today's static site generators like Next.js and GatsbyJS, the JavaScript and Markup parts can be bundled up into a static package and deployed via a Content Delivery Network (CDN) that delivers files to a browser. A CDN geographically distributes the bundles, and other assets, to multiple locations. When a user’s browser fetches the bundle and assets, it can receive them from the closest location on the network, which reduces the serving latency.
Continuing our toy castle analogy, JAMstack apps are different from SPAs in the sense that the page (or castle) is delivered pre-assembled. We have a lower latency since we receive the castle in one piece and no longer have to build it.
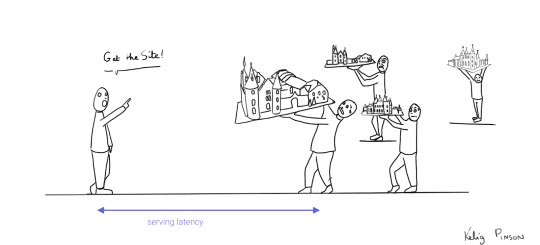
Making static JAMstack apps dynamic with hydration
In the JAMstack approach, we start with a dynamic application and prerender static HTML pages to be delivered via a speedy CDN. But what if a fully static site is not sufficient and we need to support some dynamic content as the user interacts with individual components, without reloading the entire page? That's where client-side hydration comes in.
Hydration is the client-side process by which the server-side rendered HTML (DOM) is "watered" by our frontend framework with event handlers and/or dynamic components to make it more interactive. This can be tricky because it depends on reconciling the original DOM with a new virtual DOM (VDOM) that's kept in memory as the user interacts with the page. If the DOM and VDOM trees do not match, bugs can arise that cause elements to be displayed out of order, or necessitate rebuilding the page.
Luckily, libraries like GatsbyJS and NextJS have been designed so as to minimize the possibility of such hydration-related bugs, handling everything for you out-of-the-box with only a few lines of code. The result is a dynamic JAMstack web application that is simultaneously both faster and more dynamic than the equivalent SPA.
One technical detail remains: where will the dynamic data come from?
Distributed frontend-friendly databases!
JAMstack apps typically rely on APIs (ergo the "A" in JAM), but if we need to load any kind of custom data, we need a database. And traditional databases are still a performance bottleneck for globally distributed sites that are otherwise delivered via CDN, because traditional databases are only located in one region. Instead of using a traditional database, we’d like our database to be on a distributed network, just like the CDN, that serves the data from a location as close as possible to wherever our clients are. This type of database is called a distributed database.
In this example, we’ll choose FaunaDB since it is also strongly consistent, which means that our data will be the same wherever my clients access it from and data won’t be lost. Other features that work particularly well with JAMstack applications are that (a) the database is accessed as an API (GraphQL or FQL) and does not require you to open a connection, and (b) the database has a security layer that makes it possible to access both public and private data in a secure way from the frontend. The implications of that are we can keep the low latencies of JAMstack without having to scale a backend, all with zero configuration.
Let's compare the process of loading a hydrated static site with the building of the toy castle. We still have lower latencies thanks to the CDN, but also less data since most the site is statically generated and therefore requires less rendering. Only a small part of the castle (or, the dynamic part of the page) needs to be assembled after it has been delivered:
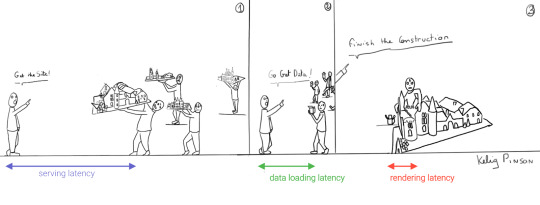
Example app with GatsbyJS & FaunaDB
Let’s build an example application that loads data from FaunaDB at build time and renders it to static HTML, then loads additional dynamic data inside the client browser at run time. For this example, we use GatsbyJS, a JAMstack framework based on React that prerenders static HTML. Since we use GatsbyJS, we can code our website completely in React, generate and deliver the static pages, and then load additional data dynamically at run time. We’ll use FaunaDB as our fully managed serverless database solution. We will build an application where we can list products and reviews.

Let’s look at an outline of what we have to do to get our example app up and running and then go through every step in detail.
Set up a new database
Add a GraphQL schema to the database
Seed the database with mock-up data
Create a new GatsbyJS project
Install NPM packages
Create the server key for the database
Update GatsbyJS config files with server key and new read-only key
Load the pre-rendered product data at build time
Load the reviews at run time
1. Set up a new database
Before you start, create an account on dashboard.fauna.com. Once you have an account, let’s set up a new database. It should hold products and their reviews, so we can load the products at build-time and the reviews in the browser.

2. Add a GraphQL schema to the database
Next, we use the server key to upload a GraphQL schema to our database. For this, we create a new file called schema.gql that has the following content:
type Product { title: String! description: String reviews: [Review] @relation } type Review { username: String! text: String! product: Product! } type Query { allProducts: [Product] }
You can upload your schema.gql file via the FaunaDB Console by clicking "GraphQL" on the left sidebar, and then click the "Import Schema" button.

Upon providing FaunaDB with a GraphQL schema, it automatically creates the required collections for the entities in our schema (products and reviews). Besides that, it also creates the indexes that are needed to interact with those collections in a meaningful and efficient manner. You should now be presented with a GraphQL playground where you can test out
3. Seed the database with mock-up data
To seed our database with products and reviews, we can use the Shell at dashboard.fauna.com:

To create some data, we’ll use the Fauna Query Language (FQL), after that we’ll continue with GraphQL to build are example application. Paste the following FQL query into the Shell to create three product documents:
Map( Paginate(Match(Index("allProducts"))), Lambda("ref", Create(Collection("Review"), { data: { username: "Tina", text: "Good product!", product: Var("ref") } })) );
We can then write a query that retrieves the products we just made and creates a review document for every product document:
Map( Paginate(Match(Index("allProducts"))), Lambda("ref", Create(Collection("Review"), { data: { username: "Tina", text: "Good product!", product: Var("ref") } })) );
Both types of documents will be loaded via GraphQL. However, there is a significant difference between products and reviews. The former will not change a lot and is relatively static, while the second is user-driven. GatsbyJS allows us to load data in two ways:
data that is loaded at build time which will be used to generate the static site.
data that is loaded live at request time as a client visits and interacts with your website.
In this example, we chose to let the products be loaded at build time, and the reviews to be loaded on-demand in the browser. Therefore, we get static HTML product pages served by a CDN that the user immediately sees. Then, as our user interacts with the product page, we load the data for the reviews.
4. Create a new GatsbyJS project
The following command creates a GatsbyJS project based on the starter template:
$ npx gatsby-cli new hello-world-gatsby-faunadb $ cd hello-world-gatsby-faunadb
5. Install npm packages
In order to build our new project with Gatsby and Apollo, we need a few additional packages. We can install the packages with the following command:
$ npm i gatsby-source-graphql apollo-boost react-apollo
We will use gatsby-source-graphql as a way to link GraphQL APIs into the build process. Using this library, you can make a GraphQL call from which the results will be automagically provided as the properties for your react component. That way, you can use dynamic data to statically generate your application. The apollo-boost package is an easily configurable GraphQL library that will be used to fetch data on the client. Finally, the link between Apollo and React will be taken care of by the react-apollo library.
6. Create the server key for the database
We will create a Server key which will be used by Gatsby to prerender the page. Remember to copy the secret somewhere since we will use it later on. Protect server keys carefully, they can be used to create, destroy, or manage the database to which they are assigned. To create the key we can go to the fauna dashboard and create the key in the security tab.

7. Update GatsbyJS config files with server and new read-only keys
To add the GraphQL support to our build process, we need to add the following code into our graphql-config.js inside the plugins section where we will insert the FaunaDB server key which we generated a few moments ago.
{ resolve: "gatsby-source-graphql", options: { typeName: "Fauna", fieldName: "fauna", url: "https://graphql.fauna.com/graphql", headers: { Authorization: "Bearer <SERVER KEY>", }, }, }
For the GraphQL access to work in the browser, we have to create a key that only has permissions to read data from the collections. FaunaDB has an extensive security layer in which you can define that. The easiest way is to go to the FaunaDB Console at dashboard.fauna.com and create a new role for your database by clicking "Security" in the left sidebar, then "Manage Roles," then "New Custom Role":
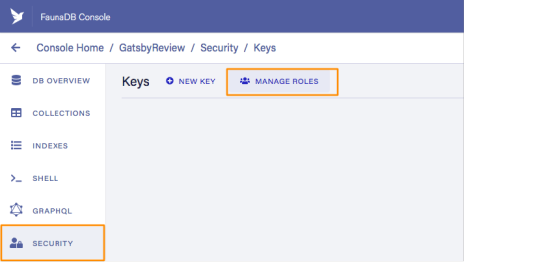
Call the new custom role ‘ClientRead’ and make sure to add all collections and indexes (these are the collections that were created by importing the GraphQL schema). Then, select Read for each for them. Your screen should look like this:

You have probably noticed the Membership tab on this page. Although we are not using it in this tutorial, it is interesting enough to explain it since it's an alternative way to get security tokens. In the Membership tab can specify that entities of a collection (let's say we have a 'Users' collection) in FaunaDb are members of a particular role. That means that if you impersonate one of these entities in that collection, the role privileges apply. You impersonate a database entity (e.g. a User) by associating credentials with the entity and using the Login function, which will return a token. That way you can also implement password-based authentication in FaunaDb. We won't use it in this tutorial, but if that interests you, check the FaunaDB authentication tutorial.
Let’s ignore Membership for now, once you have created the role, we can create a new key with the new role. As before, click "Security", then "New Key," but this time select "ClientRead" from the Role dropdown:

Now, let's insert this read-only key in the gatsby-browser.js configuration file to be able to call the GraphQL API from the browser:
import React from "react" import ApolloClient from "apollo-boost" import { ApolloProvider } from "react-apollo" const client = new ApolloClient({ uri: "https://graphql.fauna.com/graphql", request: operation => { operation.setContext({ headers: { Authorization: "Bearer <CLIENT_KEY>", }, }) }, }) export const wrapRootElement = ({ element }) => ( <ApolloProvider client={client}>{element}</ApolloProvider> )
GatsbyJS will render its Router component as a root element. If we want to use the ApolloClient everywhere in the application on the client, we need to wrap this root element with the ApolloProvider component.
8. Load the pre-rendered product data at build time
Now that everything is set up, we can finally write the actual code to load our data. Let’s start with the products we will load at build time.
For this we need to modify src/pages/index.js file to look like this:
import React from "react" import { graphql } from "gatsby" Import Layout from "../components/Layout" const IndexPage = ({ data }) => ( <Layout> <ul> {data.fauna.allProducts.data.map(product => ( <li>{product.title} - {product.description}</li> ))} </ul> </Layout> ) export const query = graphql` { fauna { allProducts { data { _id title description } } } } ` export default IndexPage
The exported query will automatically get picked up by GatsbyJS and executed before rendering the IndexPage component. The result of that query will be passed as data prop into the IndexPage component.If we now run the develop script, we can see the pre-rendered documents on the development server on http://localhost:8000/.
$ npm run develop
9. Load the reviews at run time
To load the reviews of a product on the client, we have to make some changes to the src/pages/index.js:
import { gql } from "apollo-boost" import { useQuery } from "@apollo/react-hooks" import { graphql } from "gatsby" import React, { useState } from "react" import Layout from "../components/layout" // Query for fetching at build-time export const query = graphql ` { fauna { allProducts { data { _id title description } } } } ` // Query for fetching on the client const GET_REVIEWS = gql ` query GetReviews($productId: ID!) { findProductByID(id: $productId) { reviews { data { _id username text } } } } ` const IndexPage = props => { const [productId, setProductId] = useState(null) const { loading, data } = useQuery(GET_REVIEWS, { variables: { productId }, skip: !productId, }) } export default IndexPage
Let’s go through this step by step.
First, we need to import parts of the apollo-boost and apollo-react packages so we can use the GraphQL client we previously set up in the gatsby-browser.js file.
Then, we need to implement our GET_REVIEWS query. It tries to find a product by its ID and then loads the associated reviews of that product. The query takes one variable, which is the productId.
In the component function, we use two hooks: useState and useQuery
The useState hook keeps track of the productId for which we want to load reviews. If a user clicks a button, the state will be set to the productId corresponding to that button.
The useQuery hook then applies this productId to load reviews for that product from FaunaDB. The skip parameter of the hook prevents the execution of the query when the page is rendered for the first time because productId will be null.
If we now run the development server again and click on the buttons, our application should execute the query with different productIds as expected.
$ npm run develop
Conclusion
A combination of server-side data fetching and client-side hydration make JAMstack applications pretty powerful. These methods enable flexible interaction with our data so we can adhere to different business needs.
It’s usually a good idea to load as much data at build time as possible to improve page performance. But if the data isn’t needed by all clients, or too big to be sent to the client all at once, we can split things up and switch to on-demand loading on the client. This is the case for user-specific data, pagination, or any data that changes rather frequently and might be outdated by the time it reaches the user.
In this article, we implemented an approach that loads part of the data at build time, and then loads the rest of the data in the frontend as the user interacts with the page.
Of course, we have not implemented a login or forms yet to create new reviews. How would we tackle that? That is material for another tutorial where we can use FaunaDB’s attribute-based access control to specify what a client key can read and write from the frontend.
The code of this tutorial can be found in this repo.
The post Build a dynamic JAMstack app with GatsbyJS and FaunaDB appeared first on CSS-Tricks.
Build a dynamic JAMstack app with GatsbyJS and FaunaDB published first on https://deskbysnafu.tumblr.com/
0 notes
Text
STAR Apps: A New Generation of Front-End Tooling for Development Workflows
Product teams from AirBnb and New York Times to Shopify and Artsy (among many others) are converging on a new set of best practices and technologies for building the web apps that their businesses depend on. This trend reflects core principles and solve underlying problems that we may share, so it is worth digging deeper.
Some of that includes:
Visual consistency: Presented as a design system (not to be confused with a pattern library or style guide) often built with libraries like styled-components and tools like Storybook.
Internal consistency: Created with static typing tools like TypeScript.
Data manipulation: These work with GraphQL-speaking clients like Apollo.
Data representation: Displayed with a library for reusable components and behaviors, like React.
Naming things is hard, and our industry has struggled to name this new generation of tooling for web apps. The inimitable Orta Theroux calls it an Omakase; I slimmed it down and opted for a simpler backronym pulled from letters in the tooling outlined above: STAR (Design Systems, TypeScript, Apollo, and React).
STAR apps are not "yet another front-end stack." They involve additional opinions and constraints. As such, STAR apps aren’t necessarily easy, either. They have a learning curve. A solo developer may find STAR apps unnecessarily verbose because they front-load communication overhead. STAR apps are more about product team workflow than they are about any specific technology.
However, we find that companies upon companies are finding this stack to be a worthwhile investment. We should ask why.
Context: From LAMP to MEAN
The LAMP stack was identified in 1998 by Michael Kunze to describe the combination of Linux, Apache, MySQL, and PHP as predominant open source technologies to write a full web server. In this model, all rendering and logic was done on the server side, and the role of JavaScript was extremely limited. To this day, this is the most common website architecture due to the popularity of long established frameworks like WordPress, which powers 30% of the Internet.
In the ensuing 20 years, the growth of the web platform (JavaScript in particular), led to a evolution of the "front end" discipline, as a complement to "back end" server-side concerns. Through a combination of Atwood’s Law and Metcalfe’s predictions on the triumph of the web over native platforms, these efforts culminated in a re-imagining of the monolithic architecture to straddle both front and back ends. One prominent encapsulation of this was the MEAN stack, coined by Val Karpov in 2013, to offer "full-stack" JavaScript alternatives, including MongoDB (for NoSQL data storage), Express and Node (to write web servers), and Angular (for writing reactive user interfaces).
What’s changed
However, in the last five years, multiple trends have chipped away at the MEAN stack and the ideal of the full-stack JavaScript monolith:
Instead of every developer writing bespoke endpoints, APIs have become an economy of their own with companies like Stripe, Twilio and Zapier growing purely through the strength of their APIs.
The acquisition of Firebase and launch of AWS Lambda in 2014 — and the subsequent serverless revolution — has made the concept of doing your own undifferentiated server management and reliability engineering far less appealing.
As for proprietary backends, it was clear that not all backend environments were going to be written in JavaScript, particularly with the continuing strength other language frameworks, including Rails, Laravel and .NET, and emerging languages like Go. Even the creators of Express.js and Node.js wound up abandoning JavaScript development altogether.
This has meant that the product engineer’s stack and primary work has shifted even more toward the front end over what was envisioned by the MEAN stack. Chris has described this as a phenomenon that gives extraordinary powers to front-end developers because of the trend toward front-end tooling for what's traditionally been considered back-end territory. Front-end engineering has also evolved, mostly by incrementally adding a constraint layer on top of what we already use — adding a design philosophy, types, schemas, and component structure to how we make our apps.
Why all this change? Stop changing things!
The truth is that we now live in a world where product and business needs now have requirements to bring web app (including mobile web) engineering on par with Android, iOS, and desktop native app development, while our disparate web development tools are still woefully inadequate in comparison to those tightly scoped ecosystems. It’s not that there’s anything inherently wrong with older toolsets or that the new ones are perfect. Instead, the changes can be seen as responses to the underlying needs of product teams:
Stronger types: Type-checking isn’t a panacea, nor does it replace the need for tests, but it does enable better tooling and increase code confidence. TypeScript and GraphQL do this for clients and APIs, as Chris Toomey of thoughtbot has shown. Lauren Tan of Netflix has taken this idea even further to propose a full end-to-end Strongly Typed Graph.
Integrated designer/developer workflows: A reliance on manual code tests and design reviews doesn’t scale. Design systems now are comprehensive documentation on the how and why of reusable components across an organization. Brad Frost has shown how to set up "workshop" and "storefront" environments for a style guide and design system workflow using Gatsby. Design tools, like Sketch and Framer, have even begun to tightly integrate React and design into streamlined workflows. TypeScript and GraphQL both also offer tightly coupled self-documenting features with TSDoc, GraphiQL, and related IDE integrations.
Optimized for change: As product teams embrace iterative agile sprints and split testing, it is increasingly important to use flexible paradigms that embrace incremental adjustments. Dan Abramov of the React team calls this "second order" API design — robustness to changing requirements. Design Systems and React make it easy to compose reusable components at breakneck pace, with TypeScript dramatically shortening feedback loops. Adam Neary of Airbnb shows a wonderful example of refactoring and iterating with React and Apollo GraphQL in production.
Note that "product teams" in this article primarily refer to product engineering teams, though it is often the case that product design and product management are co-located or have heavy, frequent input. Engineering workflows must explicitly take them into account as a result.
Remaining frontiers
Believe it or not, I am being descriptive, rather than prescriptive; I’m not recommending that everybody throw out their code and start writing STAR apps. Rather, I am observing and calling out what I see as a trend where great product teams are all converging on this new pattern. And they just may be on to something.
However, I don’t believe the evolution has reached its conclusion. There are still too many important aspects of modern web app development that need broader consensus, which has resulted in a hodgepodge of custom or one-off solutions and checklists. A big one is performance. The average amount of JavaScript shipped on desktop and mobile has doubled in the last five years. All the wonderful web app engineering in the world will be for nothing if the user navigates away before it loads. The traditional solution has been (often hand-rolled) server-side rendering that's later managed by frameworks like Next.js and After.js. However, this does still require running and managing a server, so static rendering solutions like Gatsby and React-Static have become popular to render apps straight to static markup to be lazily rehydrated later (the last piece of the JAMstack). Progressive Web App technology and patterns help make subsequent loads even faster and serve as a viable alternative to native experiences.
To be continued...
As this story continues to unfold, I believe that a lot more exploration and experimentation needs to happen to smooth the learning curve for more teams to adopt STAR app workflows. In fact, I am learning about it myself in the open at STAR Labs and invite you to tag along. If you have experiences to share or questions to ask, I am all ears.
The post STAR Apps: A New Generation of Front-End Tooling for Development Workflows appeared first on CSS-Tricks.
STAR Apps: A New Generation of Front-End Tooling for Development Workflows published first on https://deskbysnafu.tumblr.com/
0 notes